Leaderboard


Popular Content
Showing content with the highest reputation since 08/26/2011 in all areas
-

Version 1.0
105,297 downloads
This is the same manual that is already available here on VFRD. I have been using this so much lately that I went ahead and made it a little more useful for myself. I assumed that some other members might like to have it as well. Combined both files into one. Optimized the file size so that it is only 60 MB. Ran OCR text recognition to enable text searches on the entire book. Rotated pages that had landscape page diagram for ease of viewing. Created bookmarks for each chapter & sub-chapters. I figured this was the least I could do to contribute since I am getting so much help from this forum.35 points -
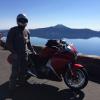
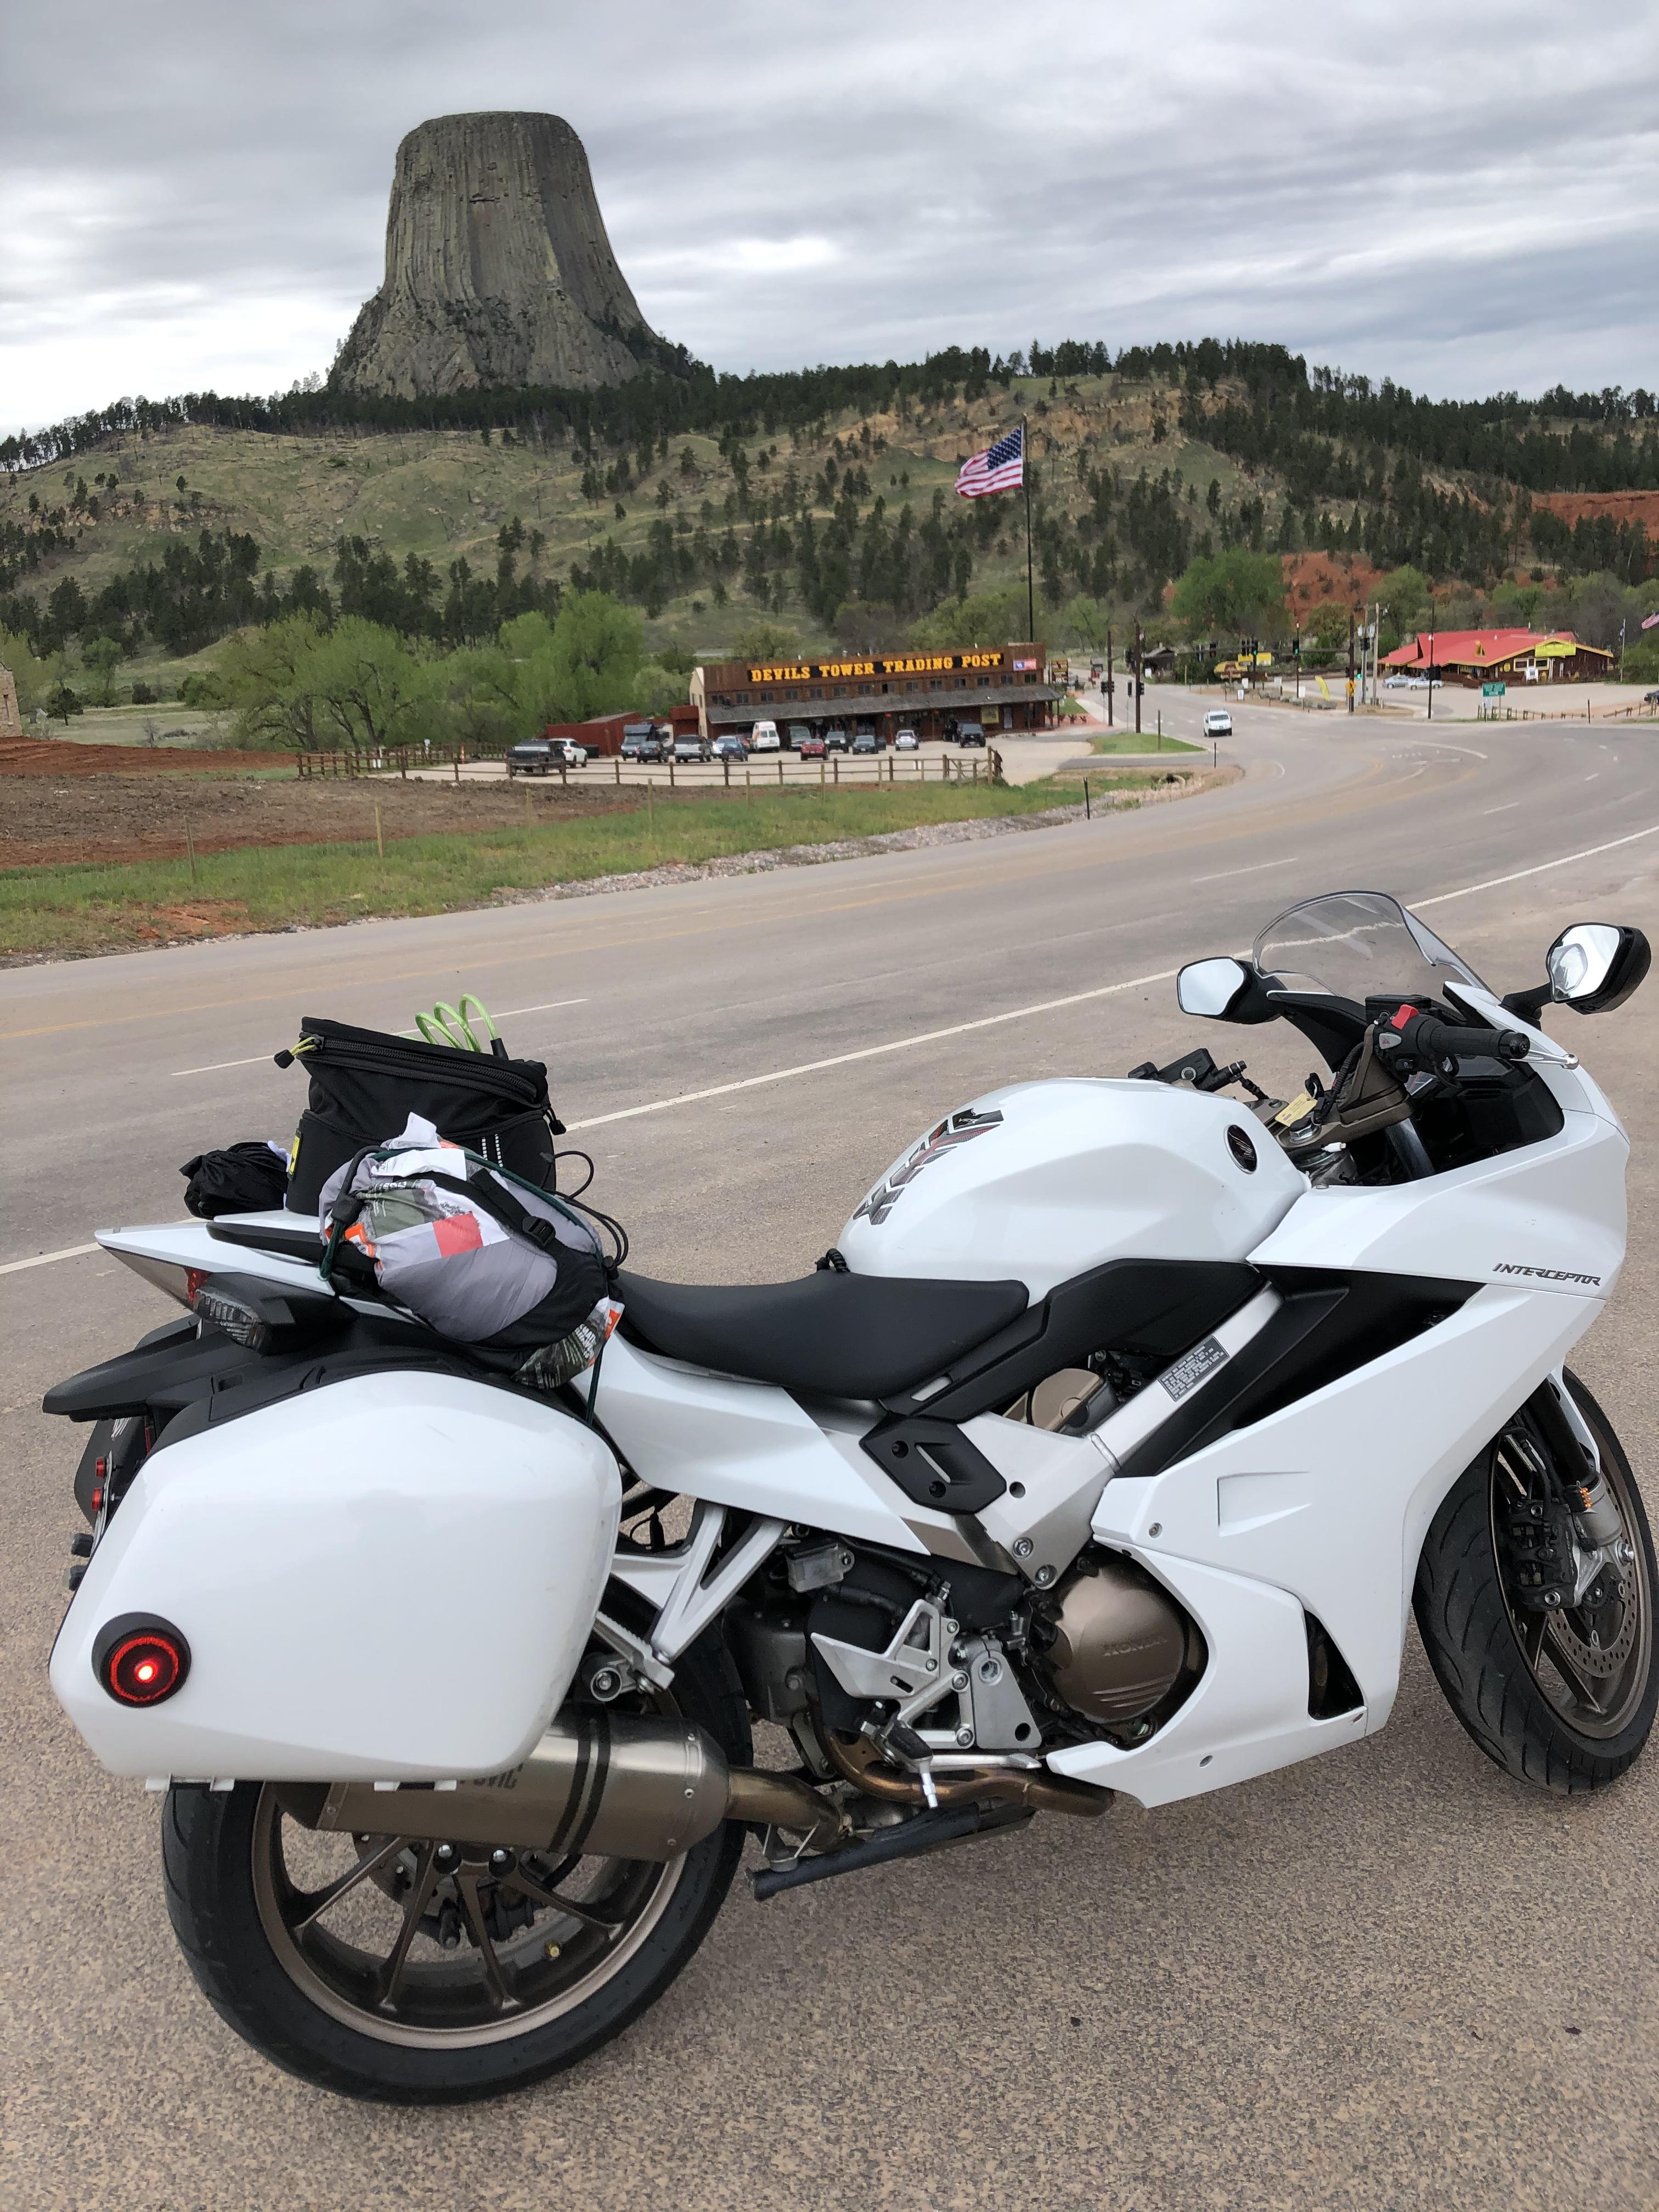
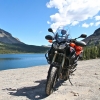
From the album: my trips
In 1998 I jumped back to the VFR fold with this brand new VFR800. Resprayed wheels improve visual and a Yoshimura RS3 helps unleash the aural. Unfortunately this bike met an untimely end when it was stolen less than a year, and 25K km later.© Lorne Black
24 points -
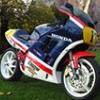
From the album: Kelly's VF1000R and VF1000F
21 points -
From the album: my VFRs
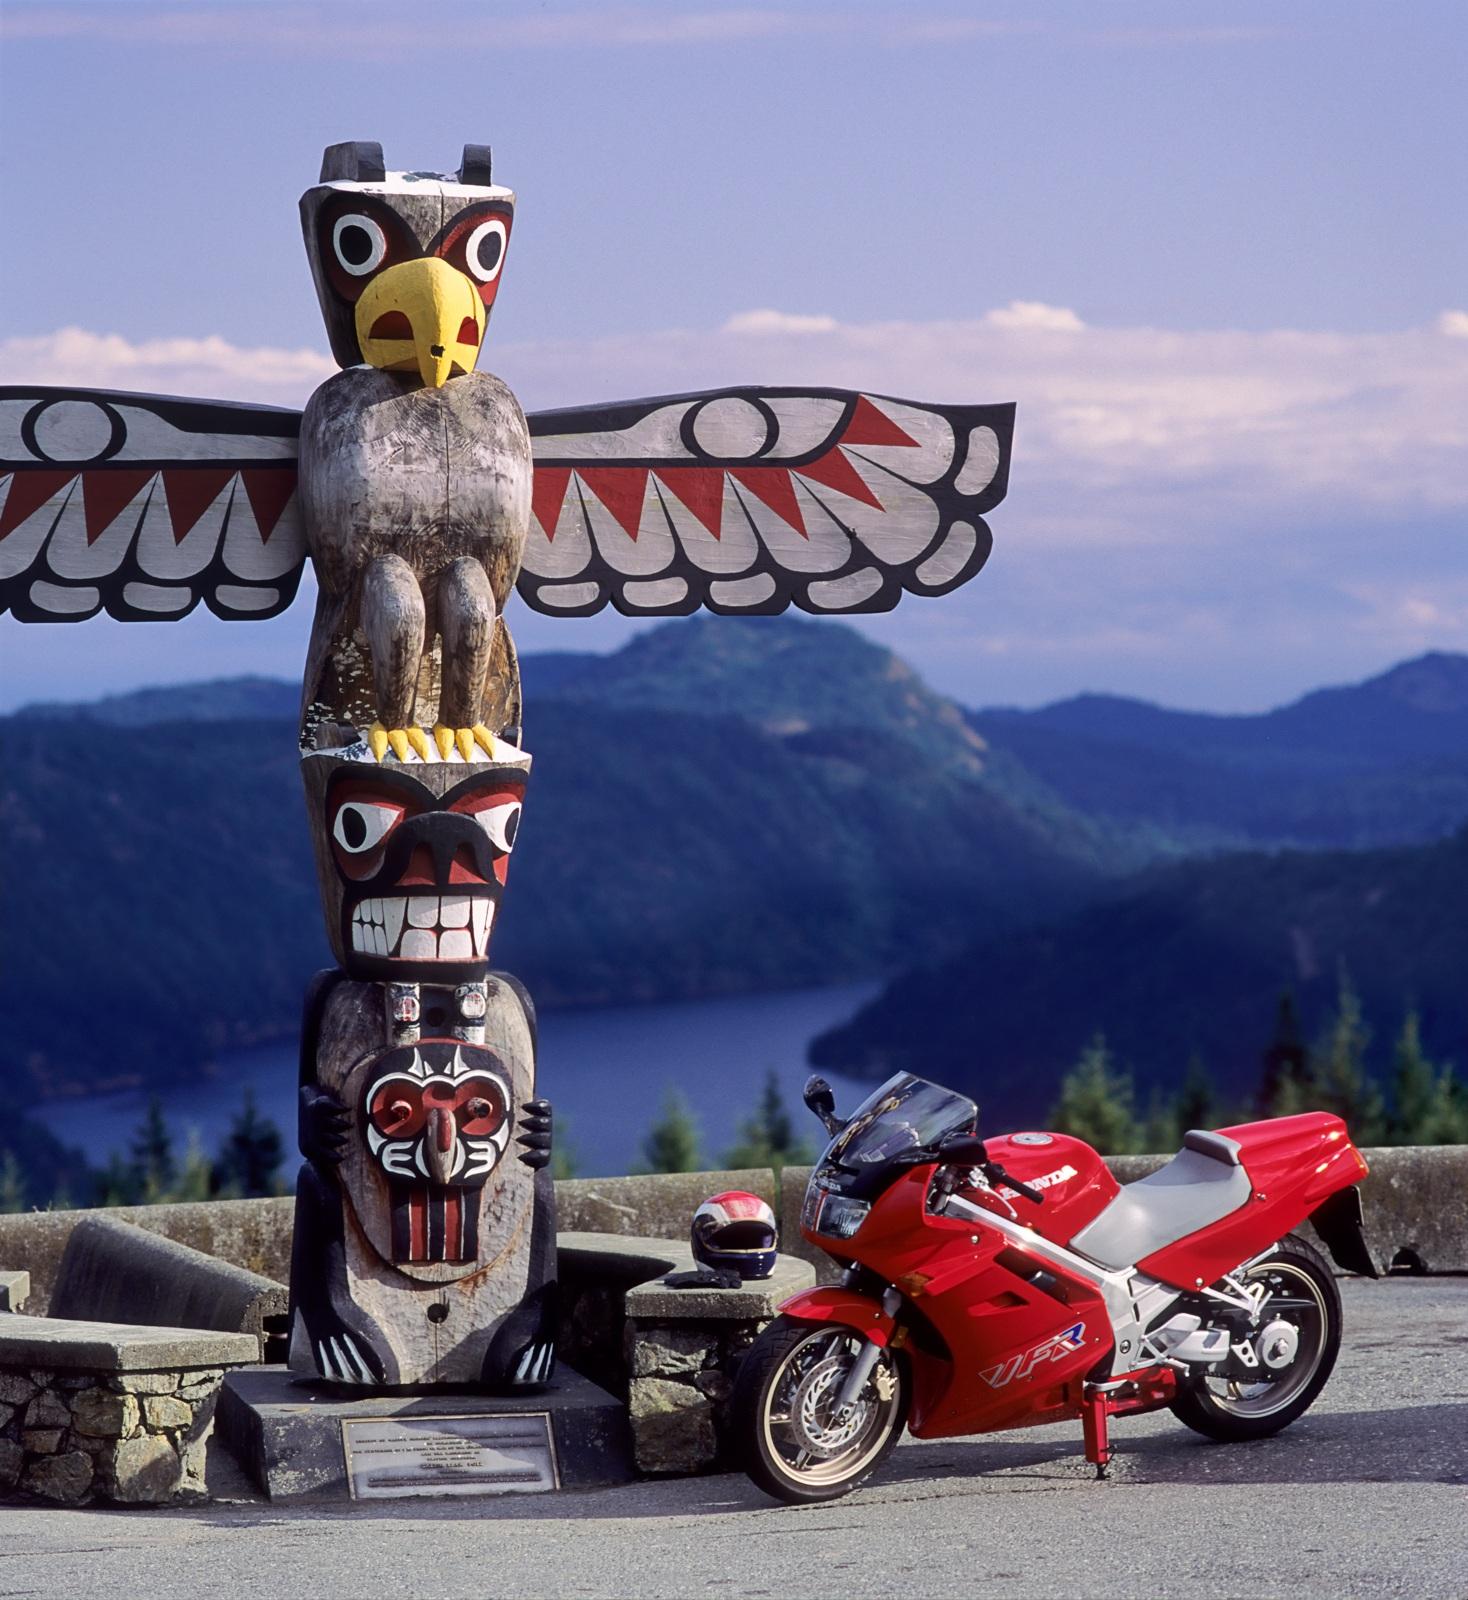
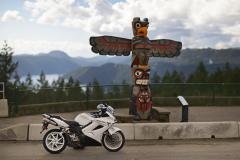
This totem is the Salish Bear pole at the summit of the Malahat highway near Victoria BC. It was carved in celebration of the 1966 centennary of the merger of colonies of Vancouver Island and British Columbia. The elevation is a modest 356 metres, or 1157 feet, above Saanich Inlet which can just be spied in the background.© Lorne Black
21 points -
From the album: HONDA VFRCLUB HUNGARY
21 points -
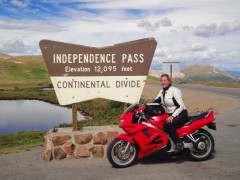
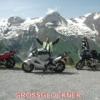
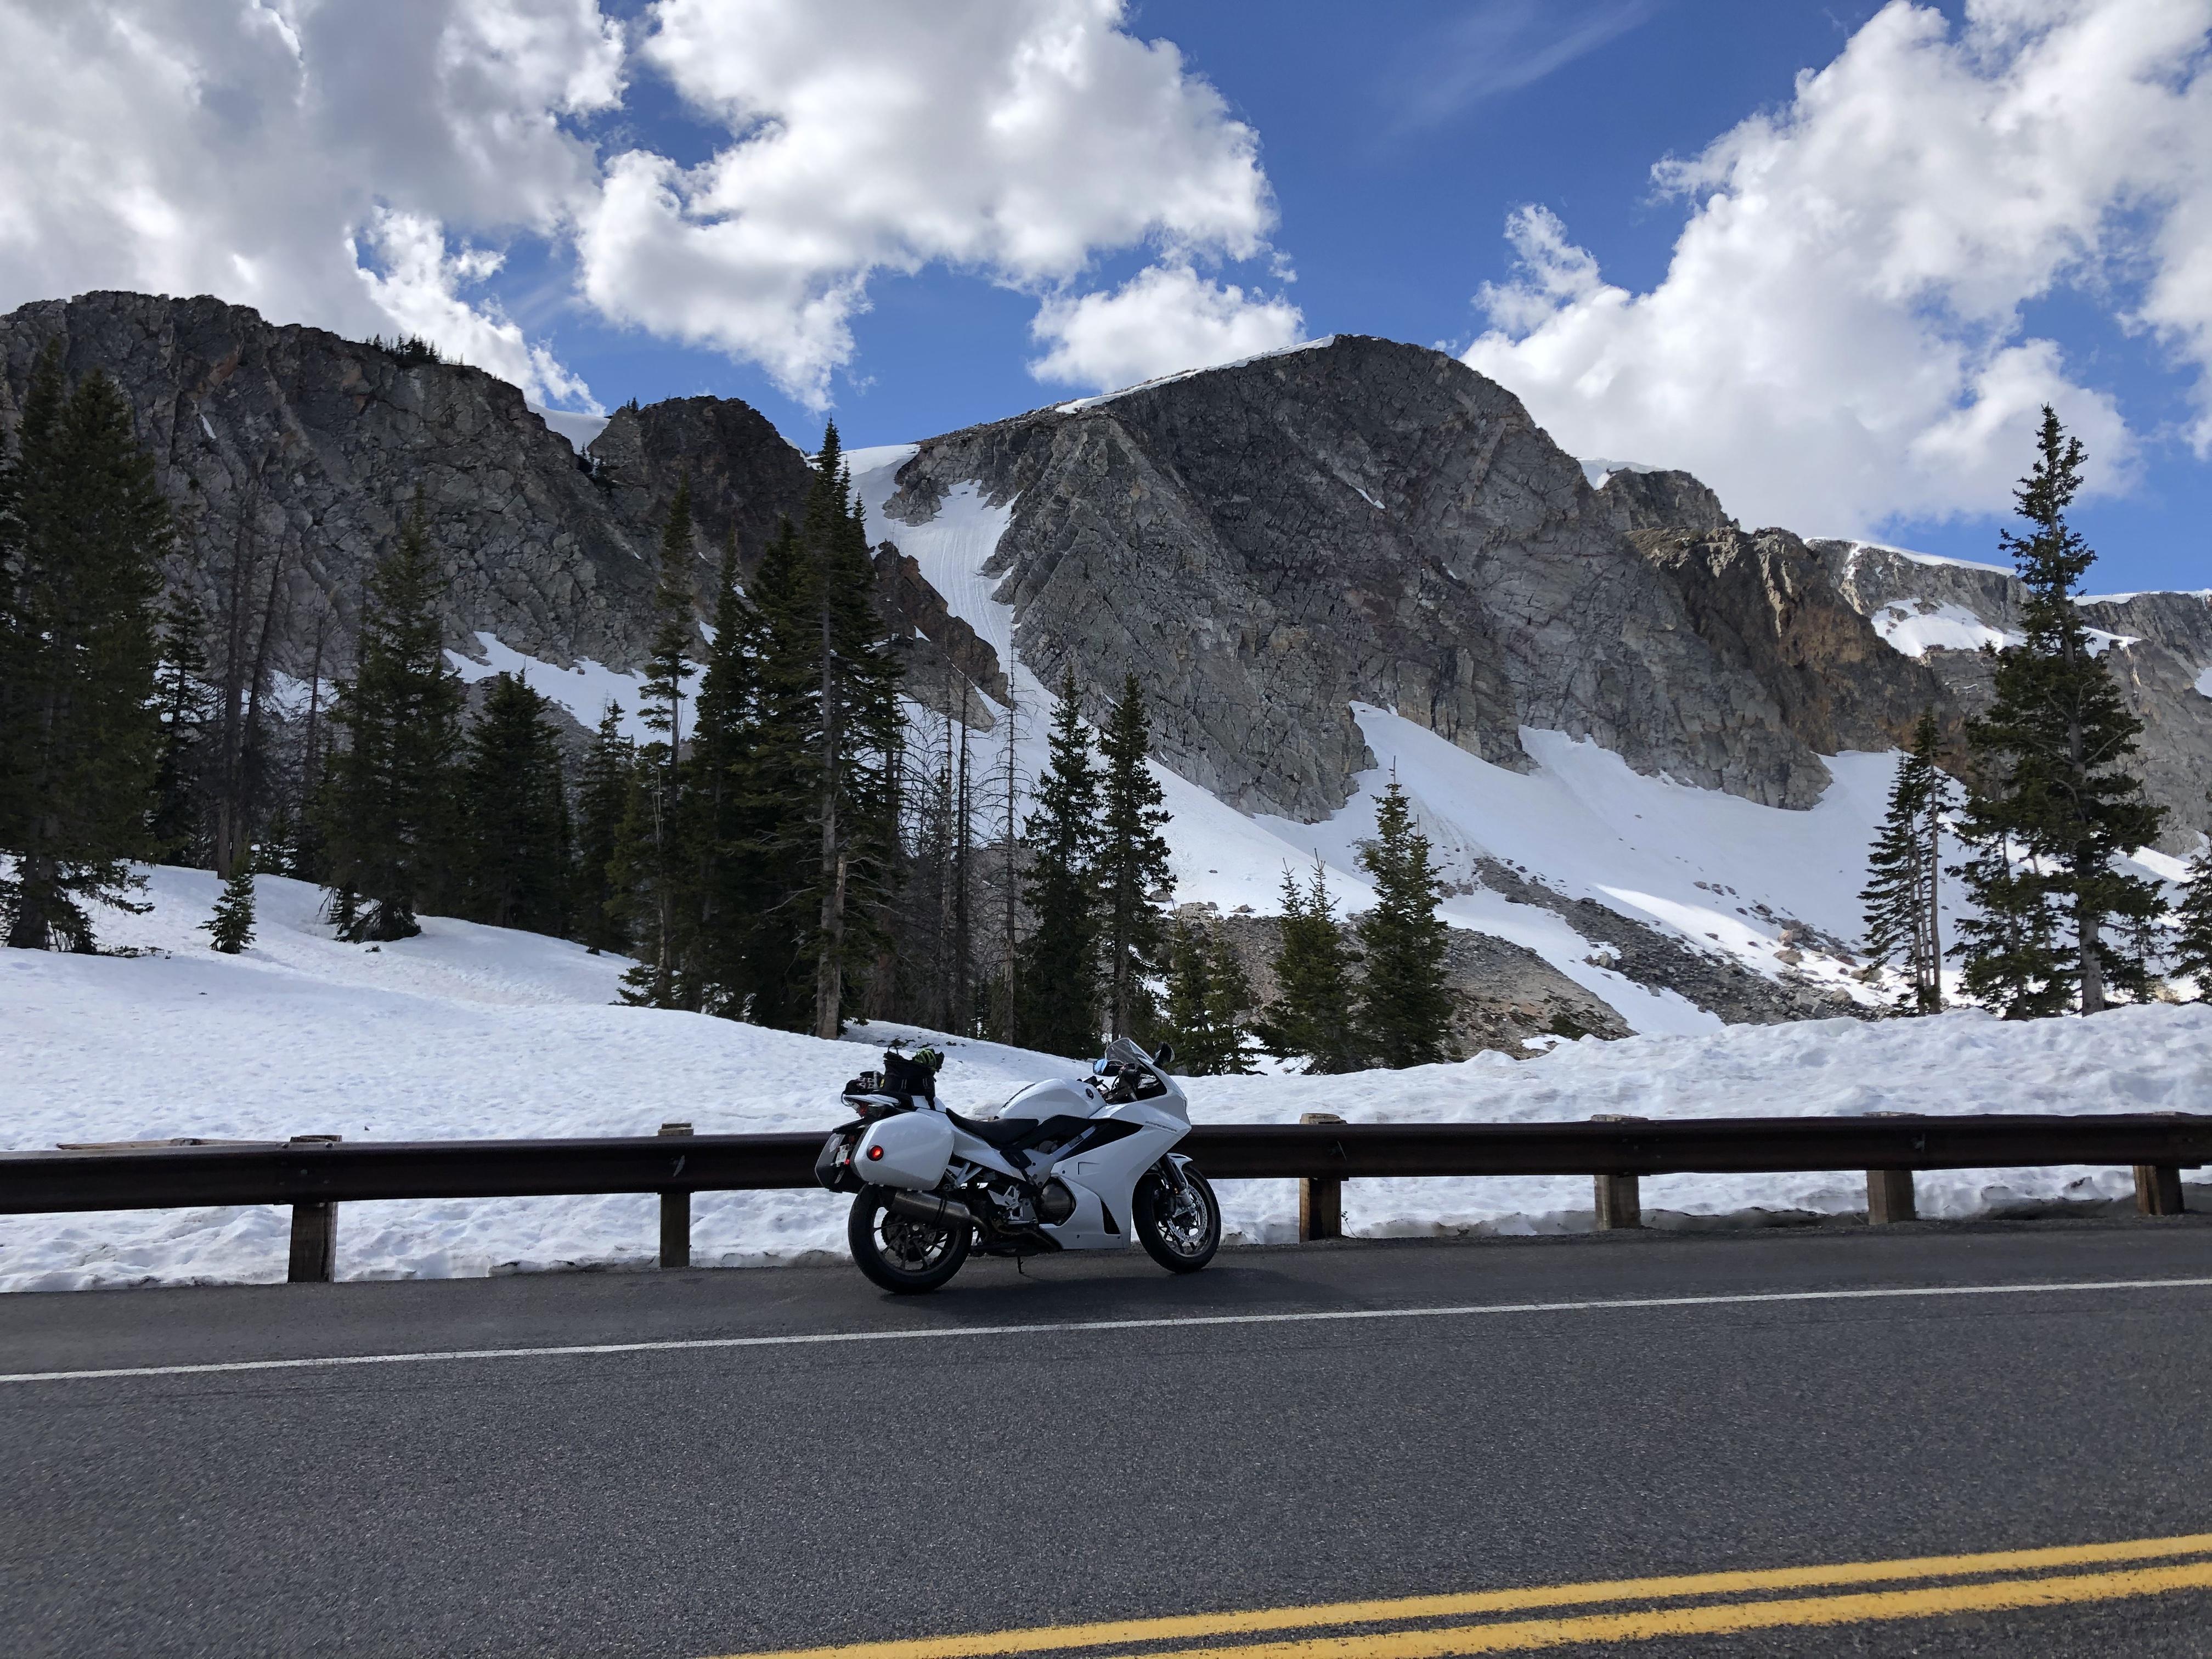
From the album: Michigan to Colorado 2012
At Independence Pass, CO on the way to Aspen during a day ride while at the MSTA's 2012 STAR event in Avon, CO. From MI, we took a northern route from via 95% secondary roads. Saw "real" America and met unique Americans.© ©2012 AnnieR
20 points -
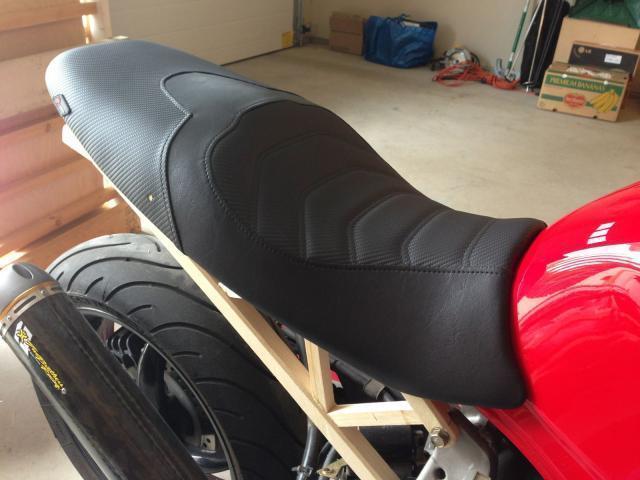
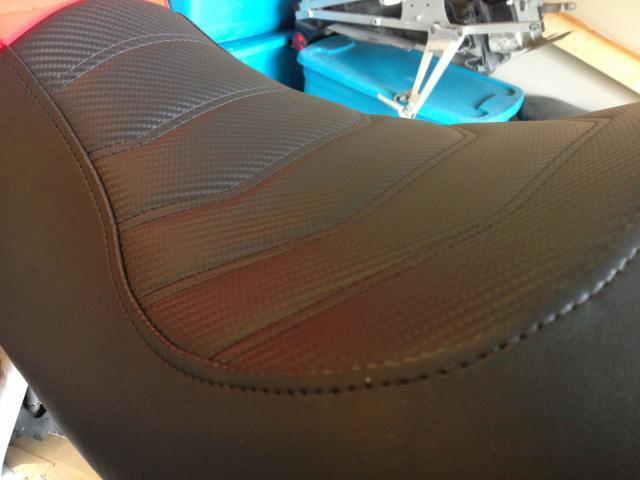
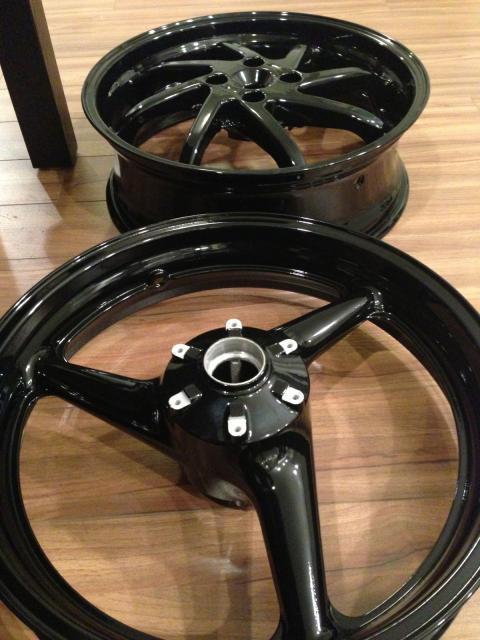
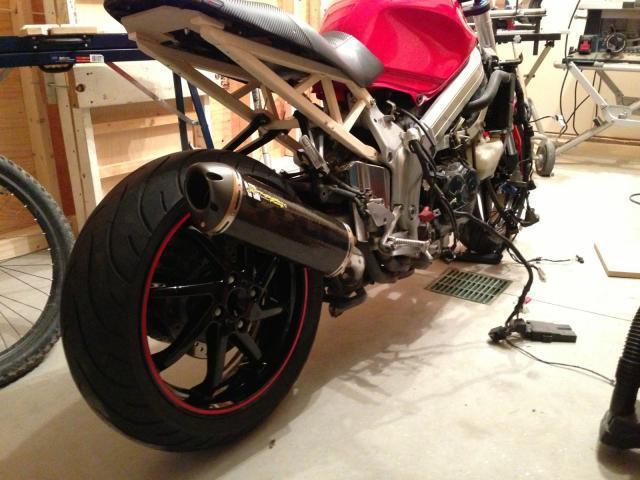
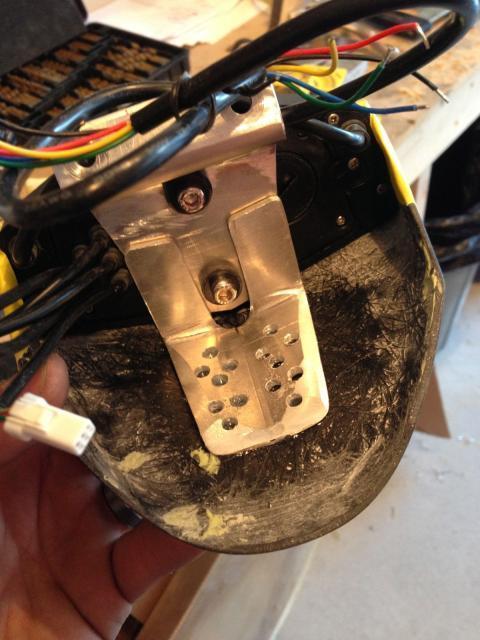
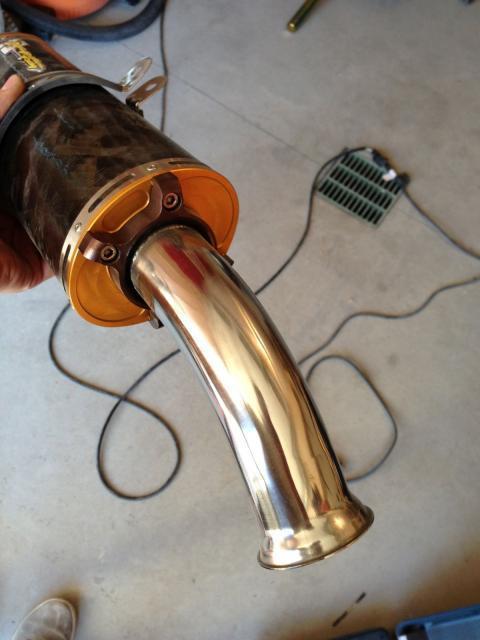
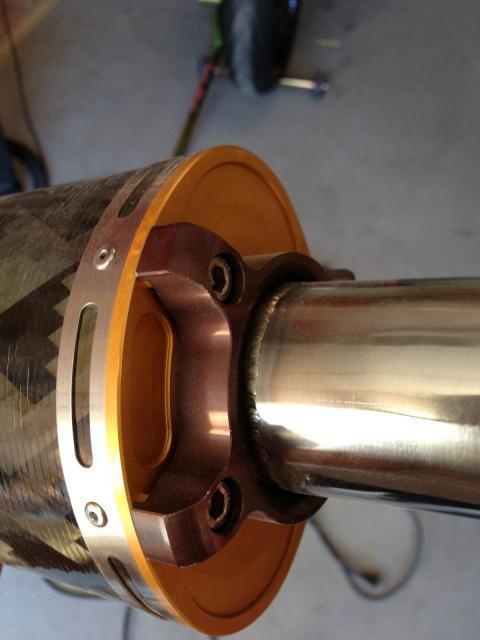
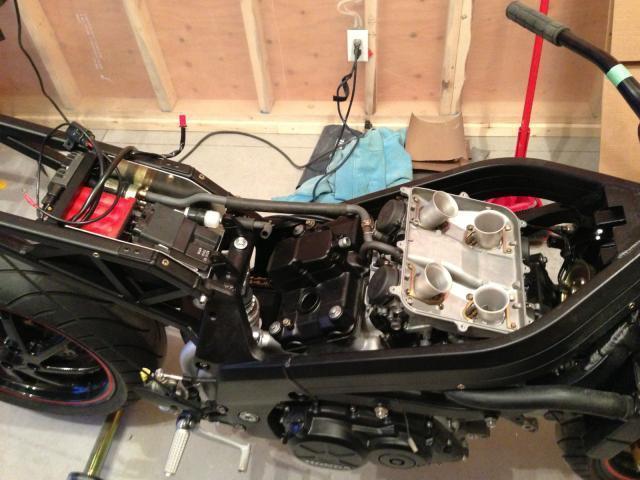
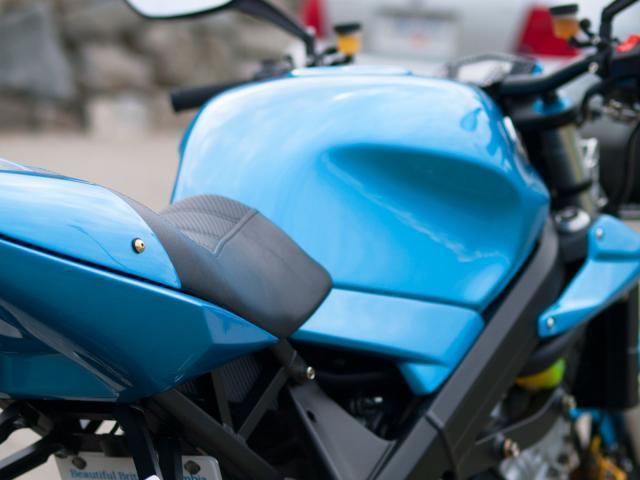
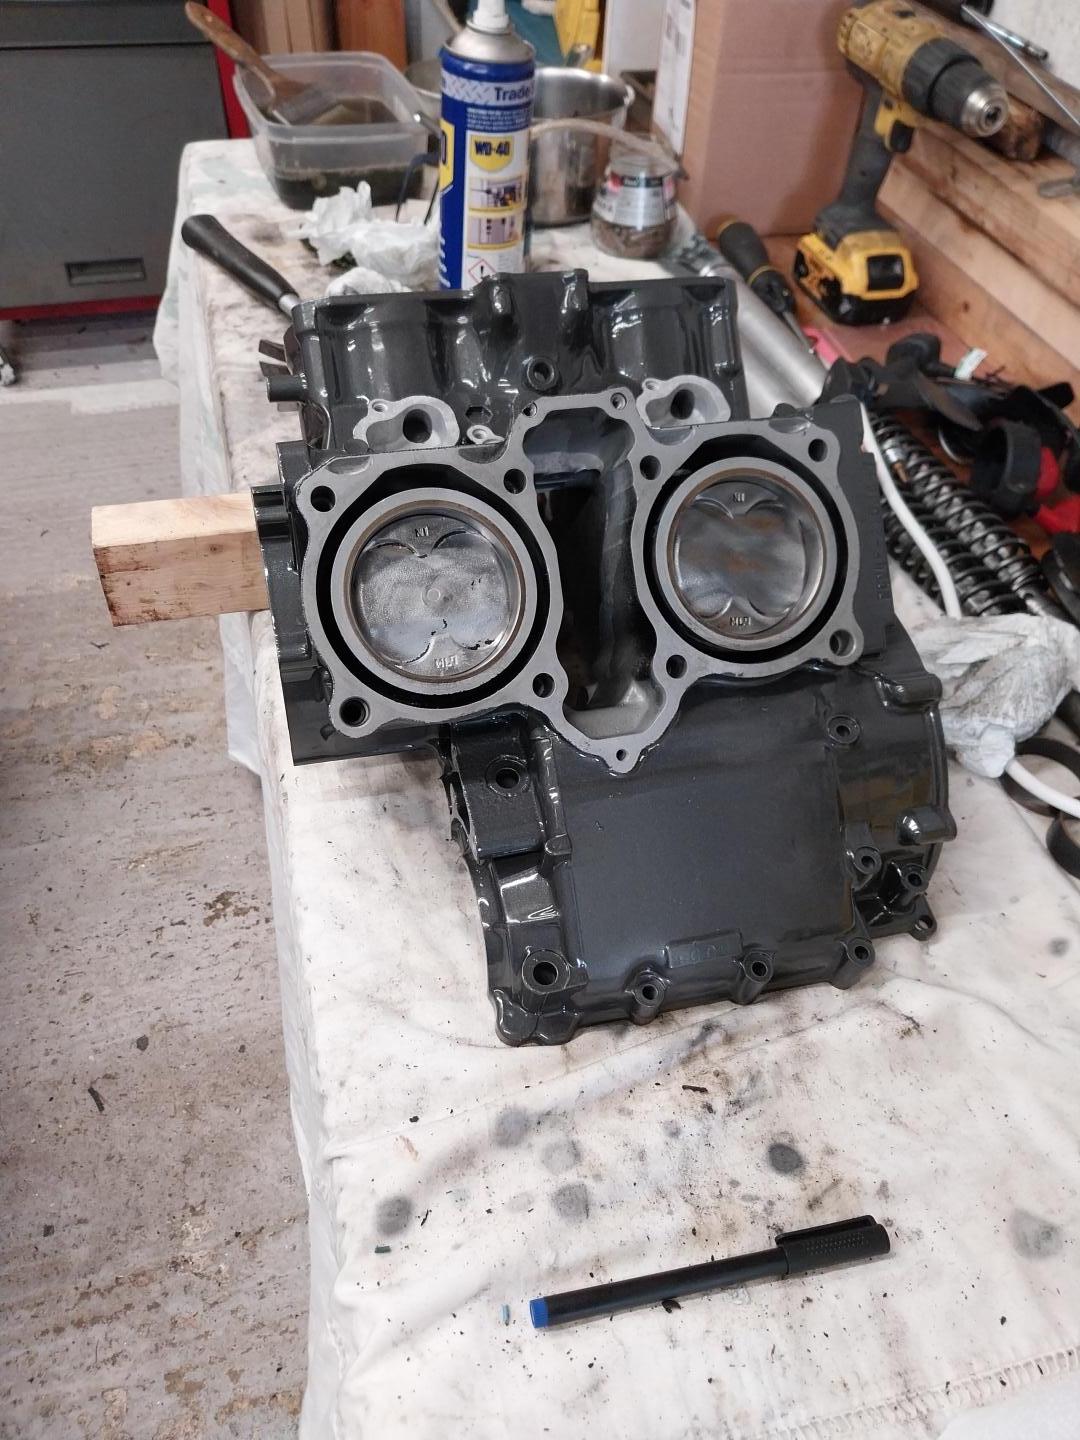
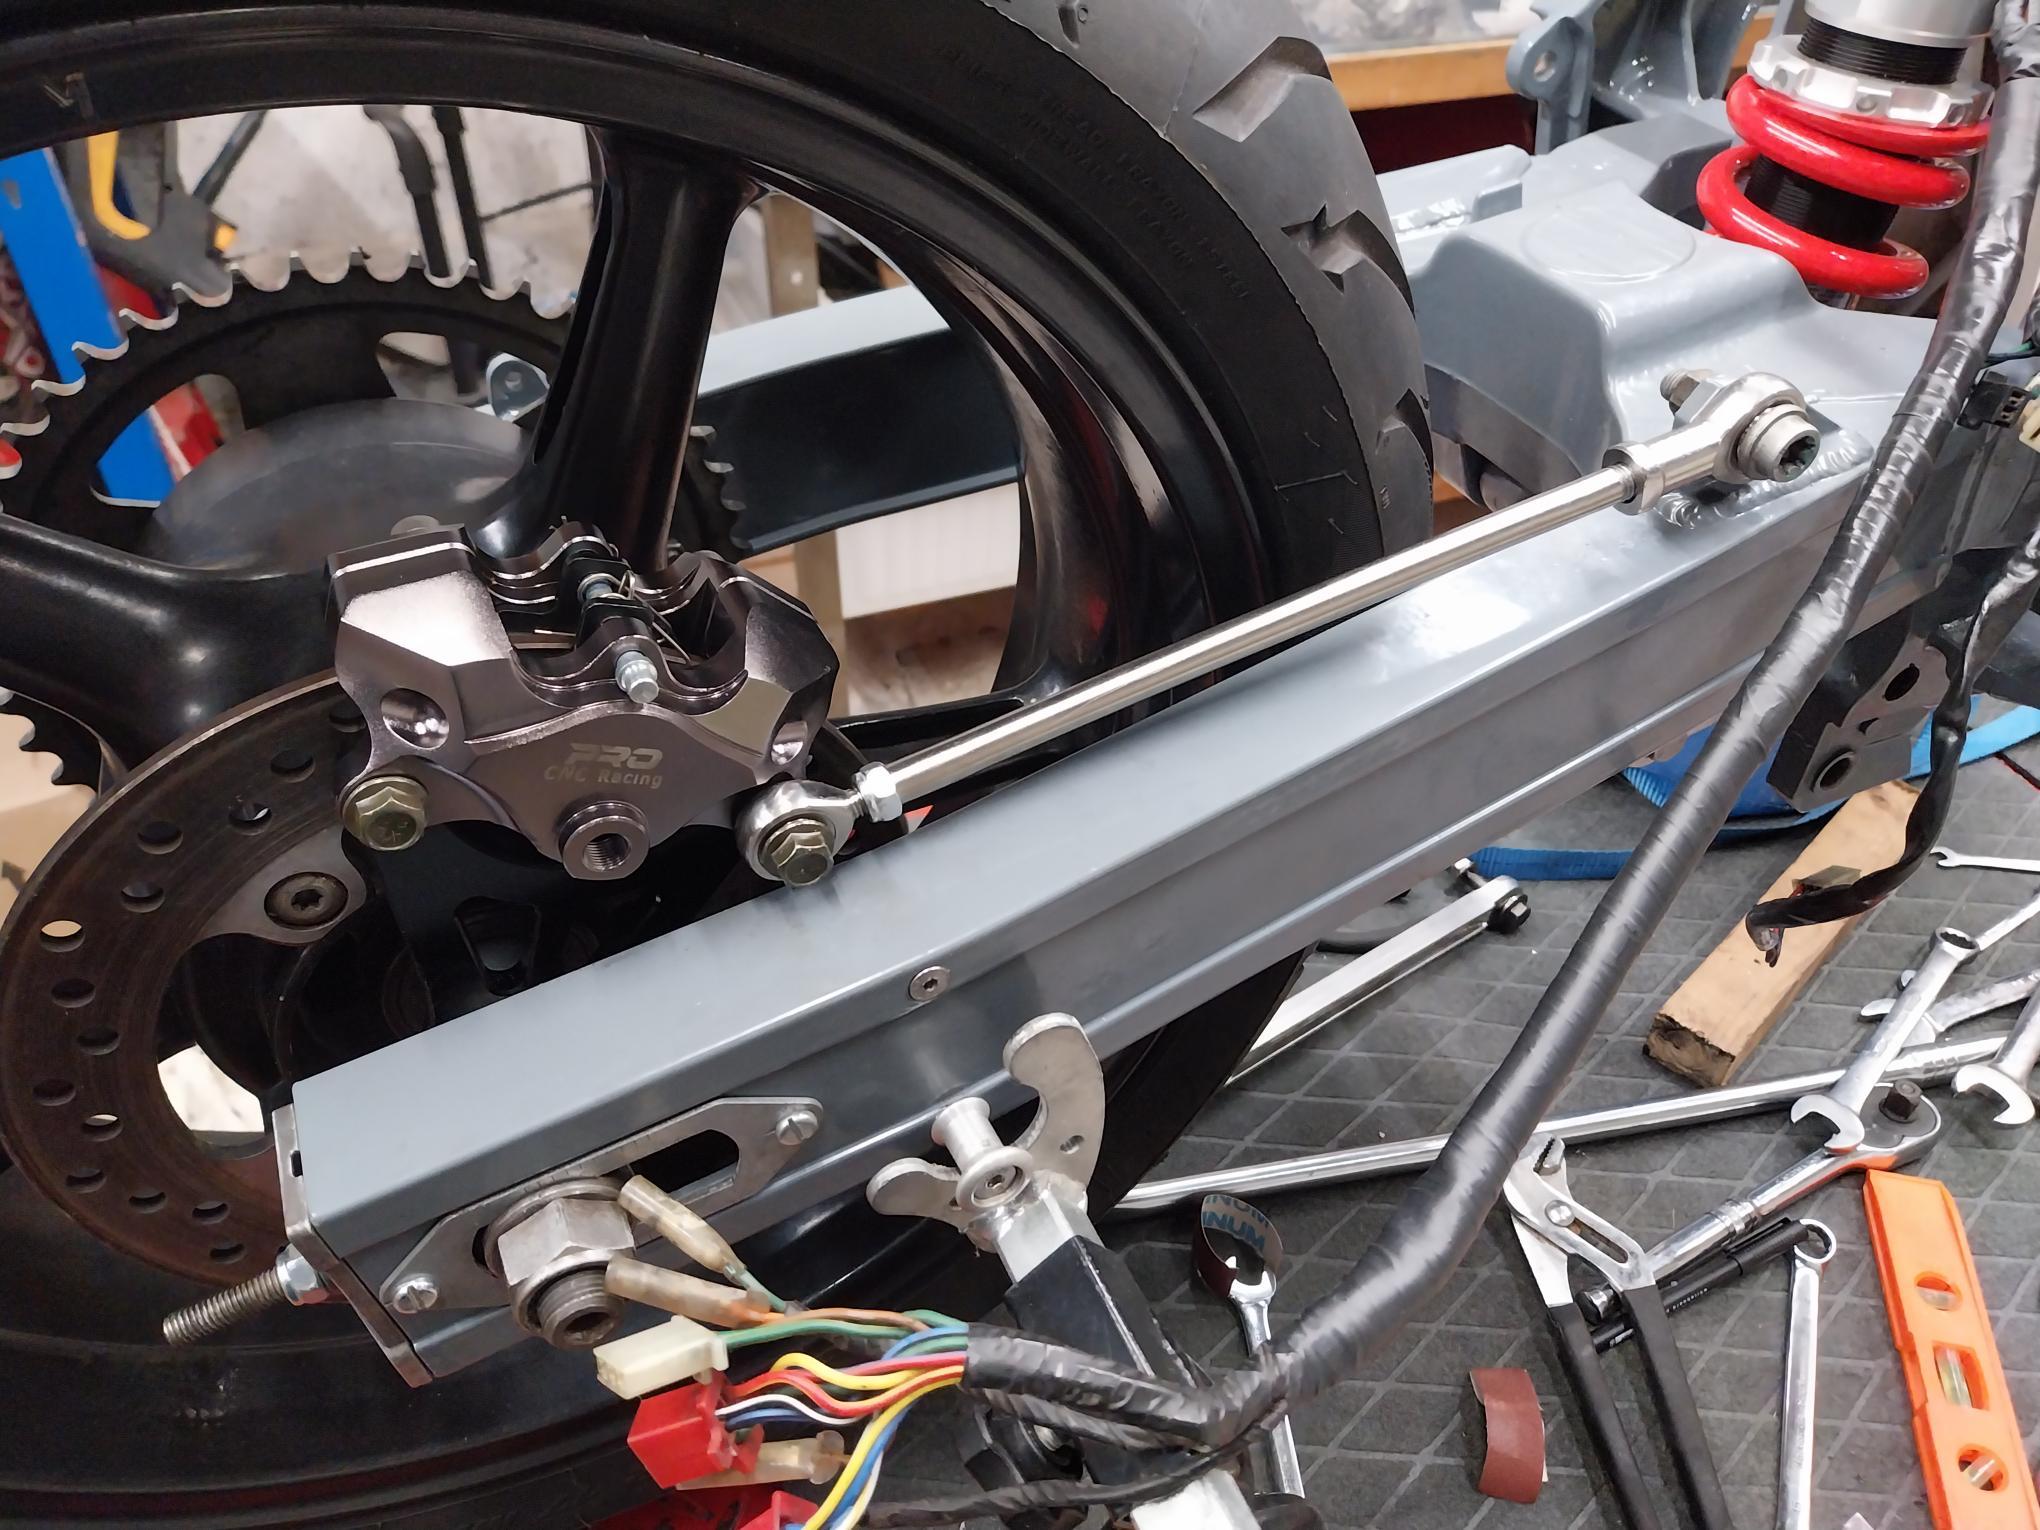
Well, my idea of one, anyway. aka, I collected parts for 10 years and finally installed them all... (a year ago, sorry ) aka, my bike needed a refresh after almost 50kmi and sitting unused for the last 5 years. I started this work early December 2021 and finished just shy of 6 months later in May of 2022, so this story has been a long time coming. I bought this 2005 VFR800 brand new 17 years ago in February 2006, and I started with some light modifications right off the bat. Mostly good practical ones like a throttle lock, comfy seat, mirror extenders, suspension work, luggage, etc. Being a member here prior to purchase and of course ever since, you get a lot of ideas and sometimes even some good deals on gently used parts and unique parts made by other talented members. Over the next series of posts in this thread I'm going to highlight the bucket list of parts I collected & fabricated, plus the modifications I made to my bike to make it into my dream VFR. Here's a pretty comprehensive list of what the build is comprised of: - 2005 VFR800. Bought new, now 48,xxx + mi - Powdercoated frame and subframe satin black - Wheels powdercoated "Wet Charcoal", added angled stems - 2005 Yamaha R1 forks upgraded with: ~Racetech 1.0kg springs ~Racetech G2R comp valves ~Traxxion rebound valves ~cartridges tuned by Traxxion ~Maxima 7wt 125-150 oil @115mm air gap - R1 front fender painted R258 Winning Red - Sebspeed triple clamp set, 35mm offset, integrated bar risers & custom riser bridge - Handlebar conversion to Superbike bar - Brembo 16RCS clutch master - Oberon billet clutch slave - Brembo 19RCS brake master - Tapered head bearings - Carrozzeria front wheel, 6lb - Custom billet rotor adapters - EBC Vee rotors, blue carriers - Titanium rotor bolts - 08 CBR1000RR Tokico monoblock calipers, Cerakoted "Stainless" with black lettering and rebuilt with oem seals - EBC HH pads - Titanium caliper bolts - Mirror extenders - 06 oem windscreen (?) - Dash lcd update film/led converion - Heated grips - NEP throttle lock - Oem CBR900RR grips - Sebspeed windowed clutch cover - Factory Pro shift kit - Throttle body hoses replaced with silicone - Fuel injectors cleaned and matched - A&A Torocharger kit, modified with: ~ added sc oil cooler and custom reservoir ~ modified cooling system to delete right side radiator, added 2014 VFR800 lower radiator with fan - Boost gauge - Knock sensor - Rapid Bike Race fuel & ignition management - VFRD Two Brothers replica big tube stainless header, RC30/8th gen VFR style to accomodate lower radiator - Remus carbon fiber slip on pipe set - Sargent seat - Oem luggage, full three bag set, side racks powdercoated - Ohlins shock with: ~1300lb Eibach spring ~Traxxion 1" spacer ~tuned on Traxxion dyno - Ducati 1098 rear wheel swap with: ~Sebspeed adapter kit ~1098 hub/drive parts and brake ~Braking Wave Fix rear rotor ~titanium rotor bolts ~JT quick change carrier ~titanium sprocket nuts ~Marchesini forged 1098 wheel, 9lb ~Superlite sprocket ~DID 520 chain ~geared -1, +1 (15/44) - Roadstercycle SH847 Super kit - Oem stator replaced with new - New battery - Core Moto custom brake & clutch lines18 points
-
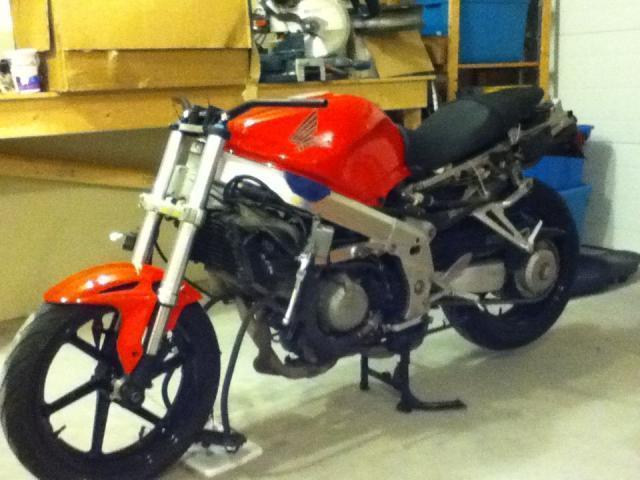
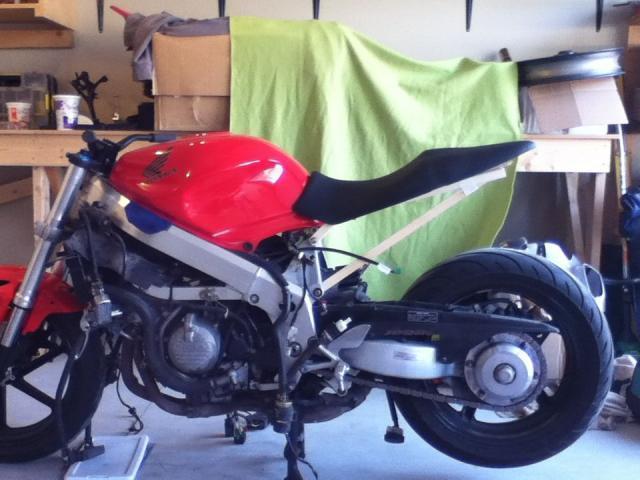
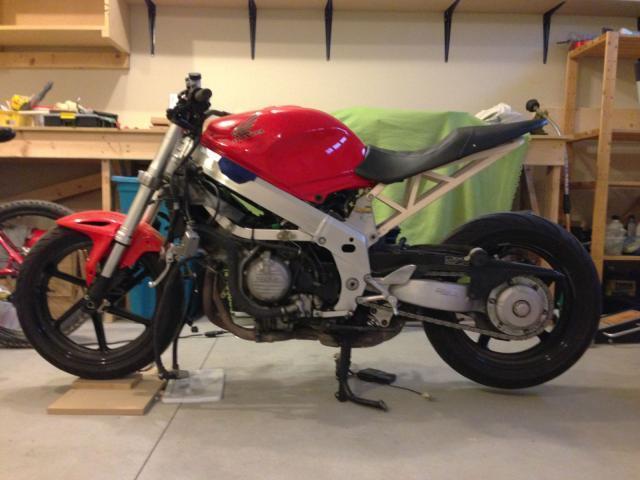
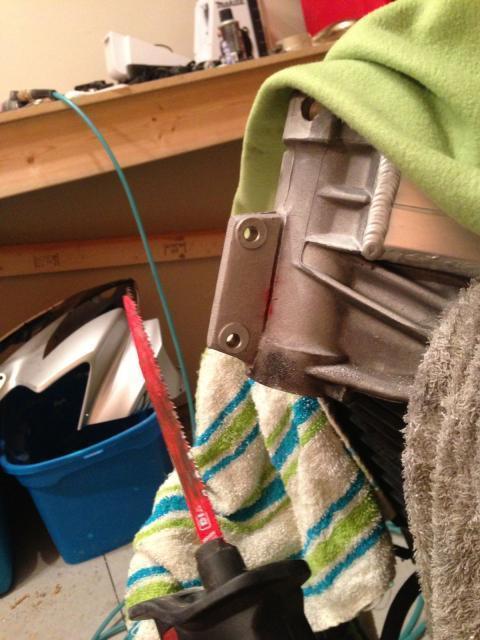
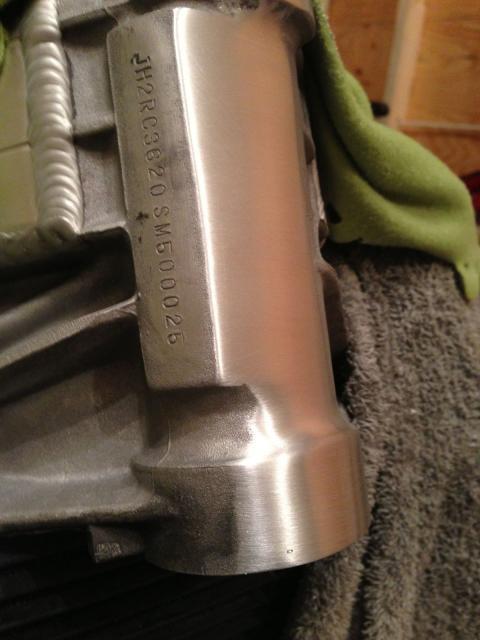
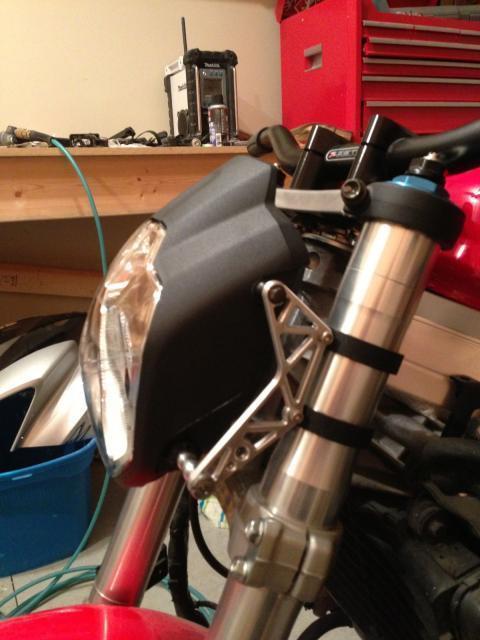
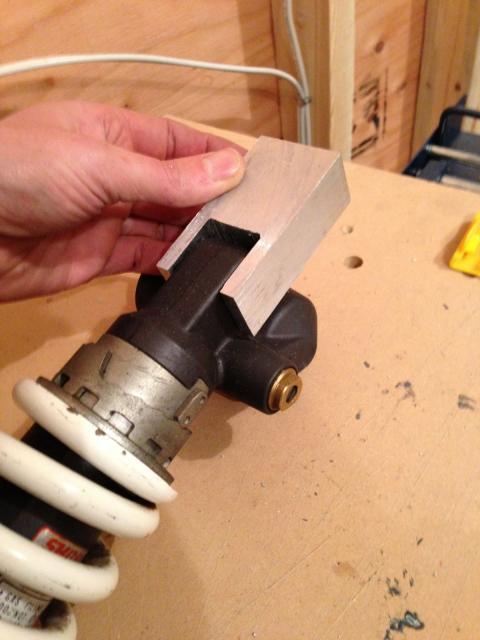
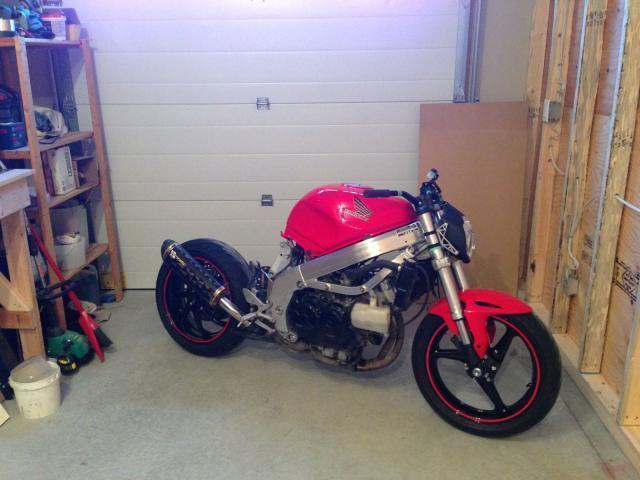
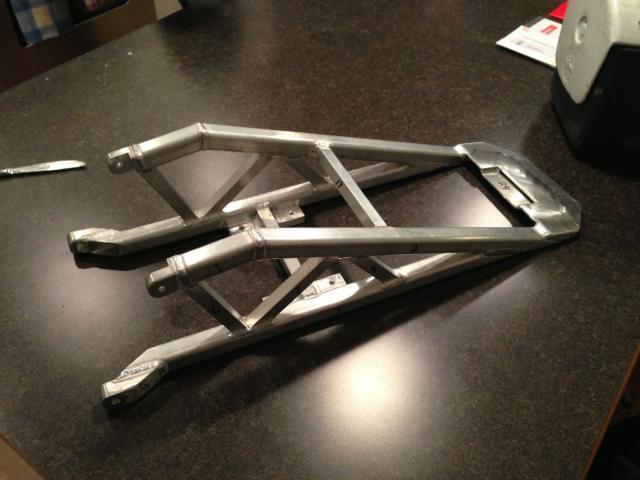
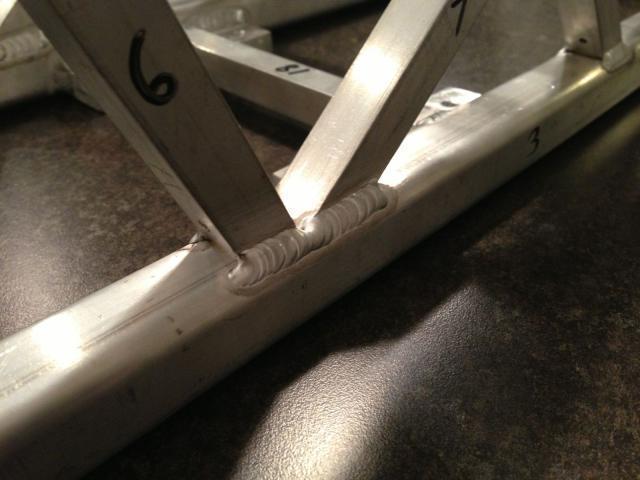
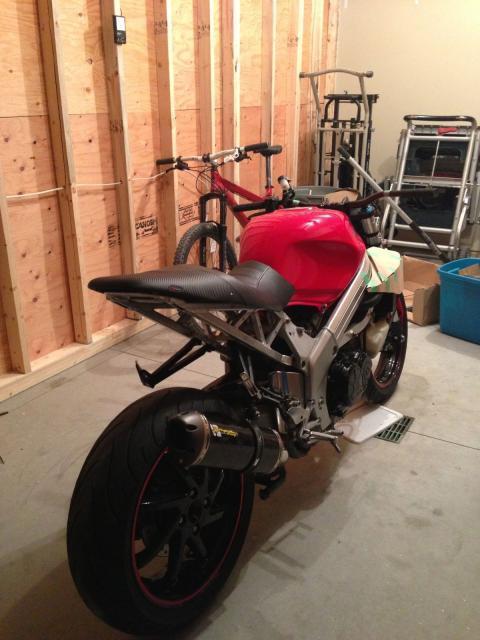
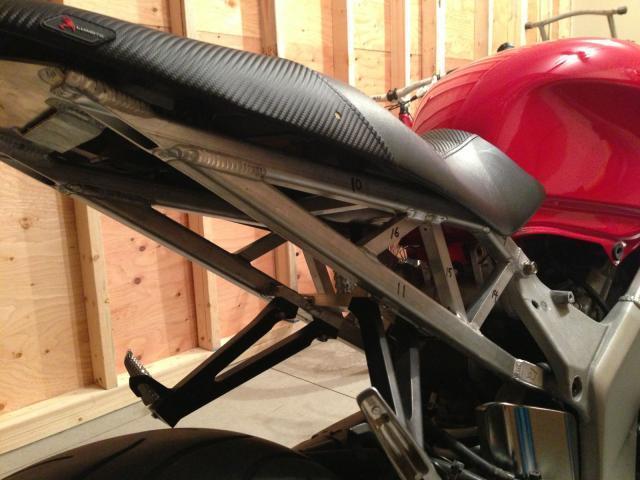
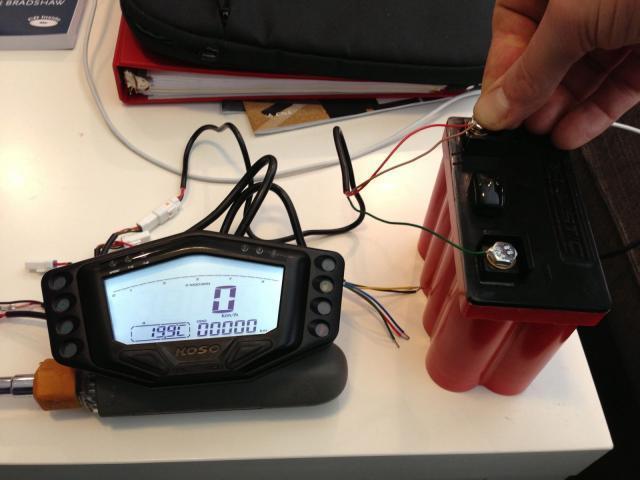
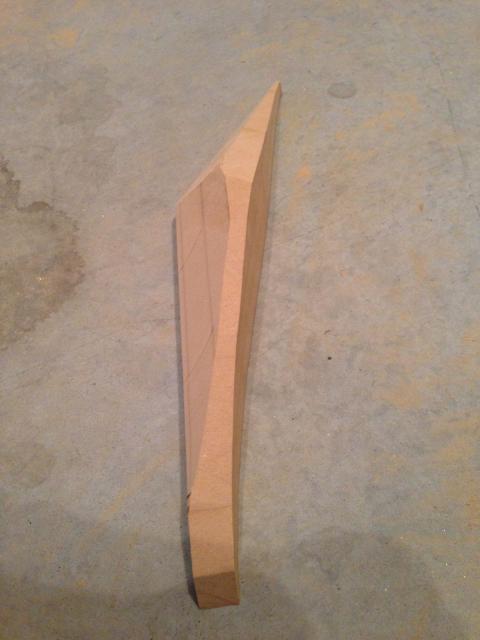
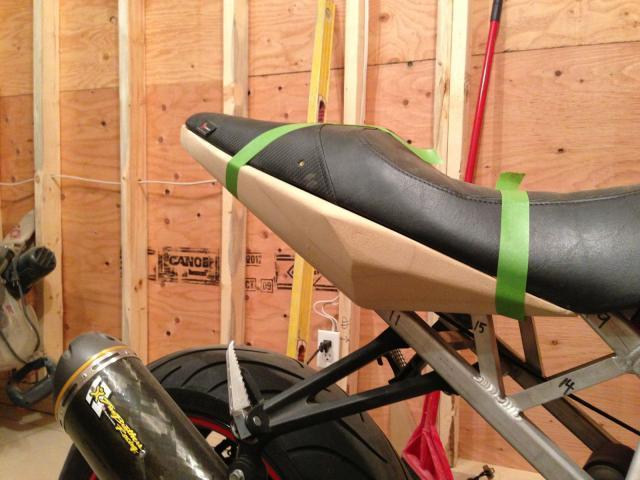
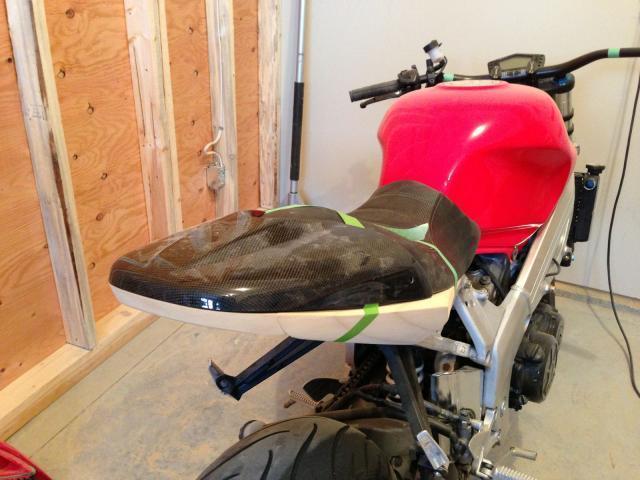
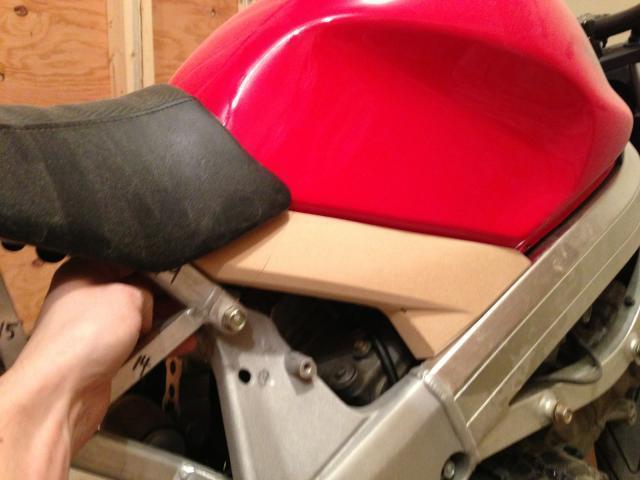
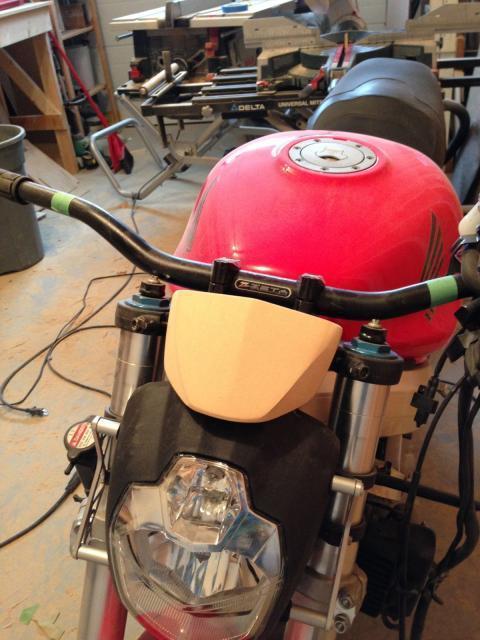
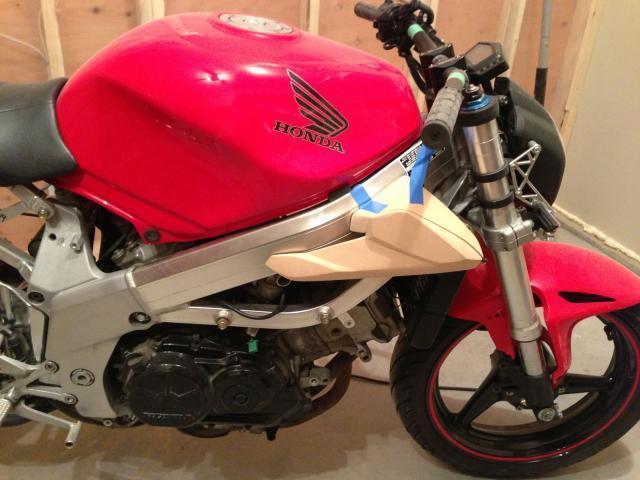
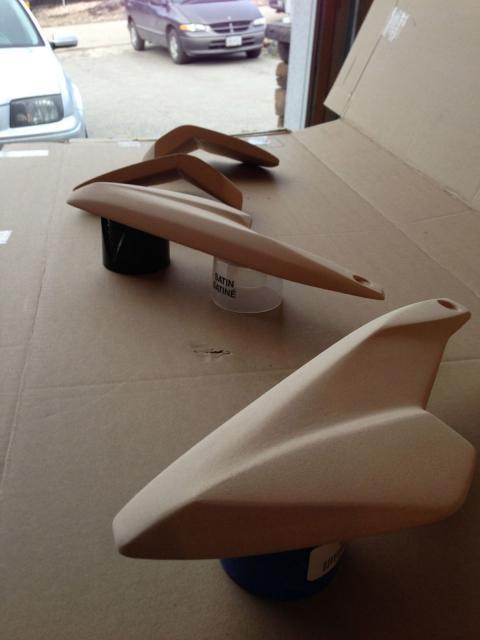
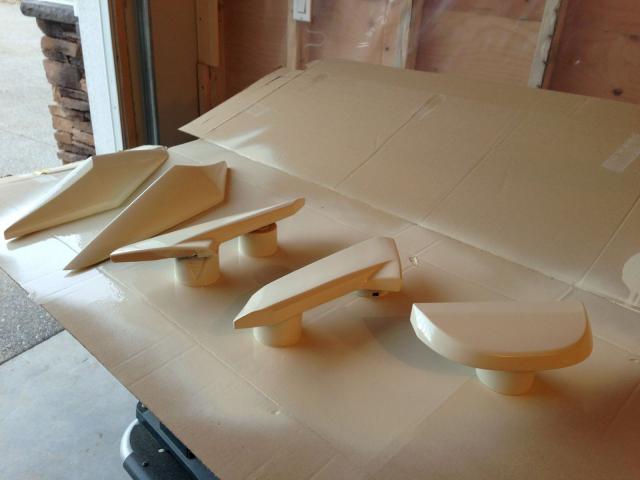
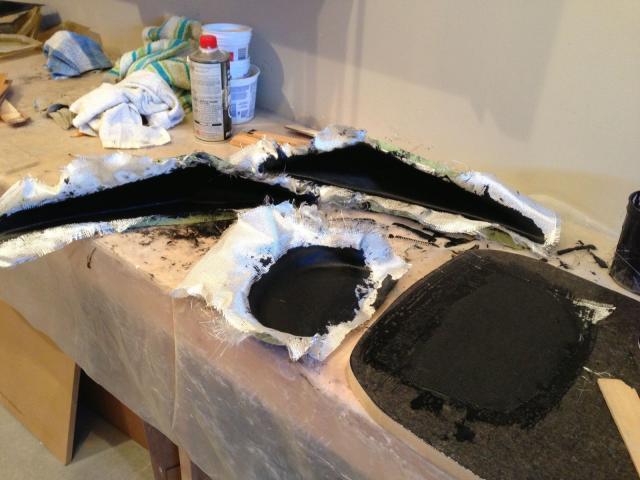
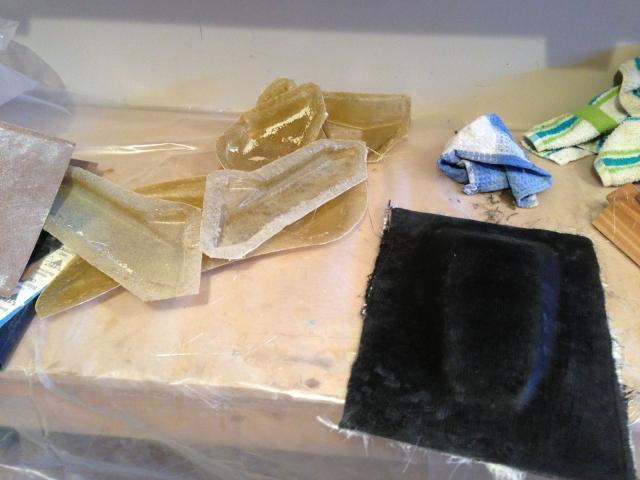
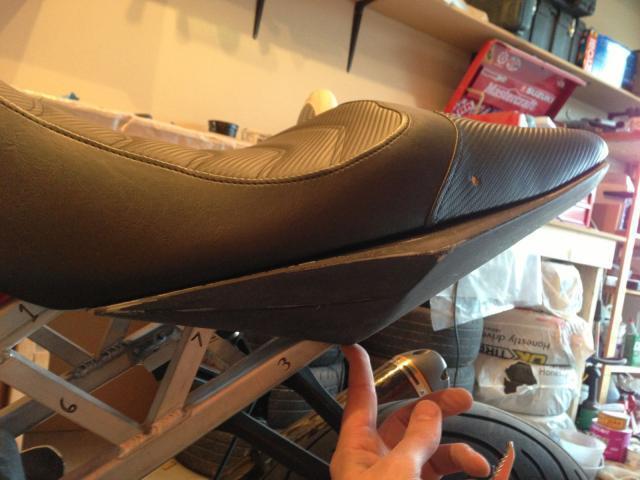
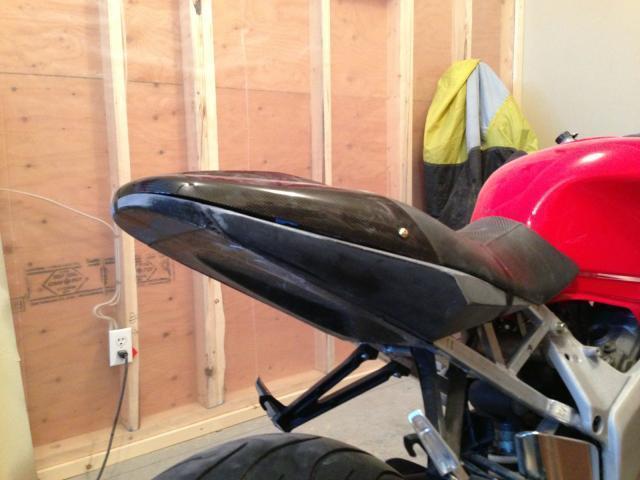
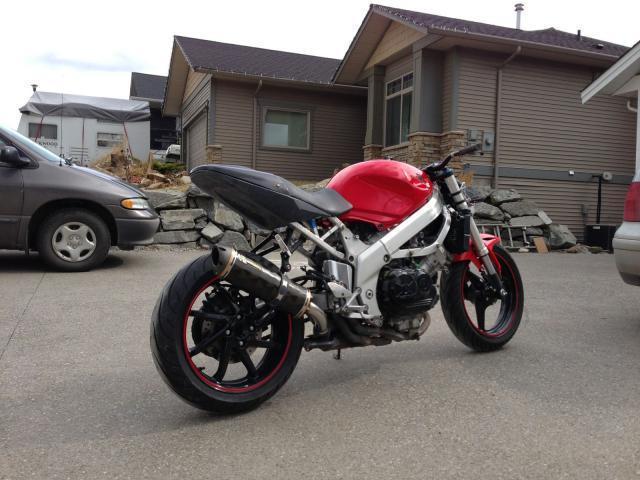
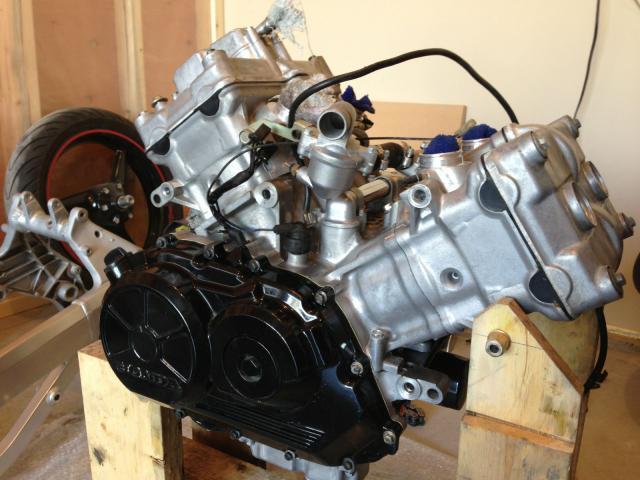
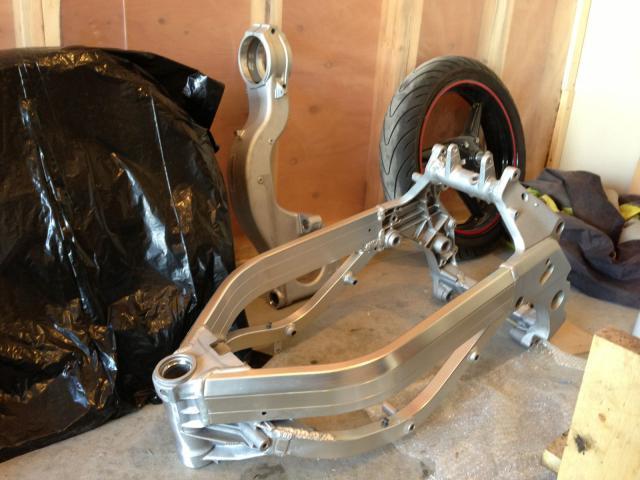
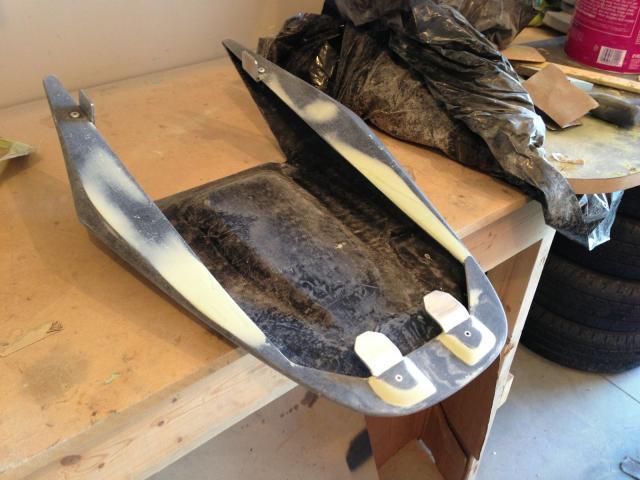
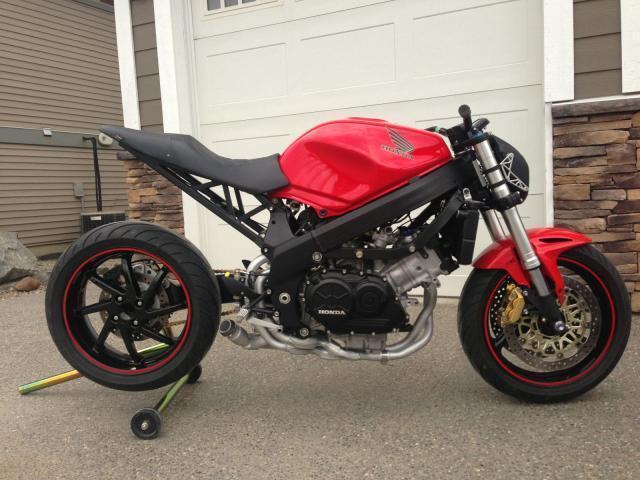
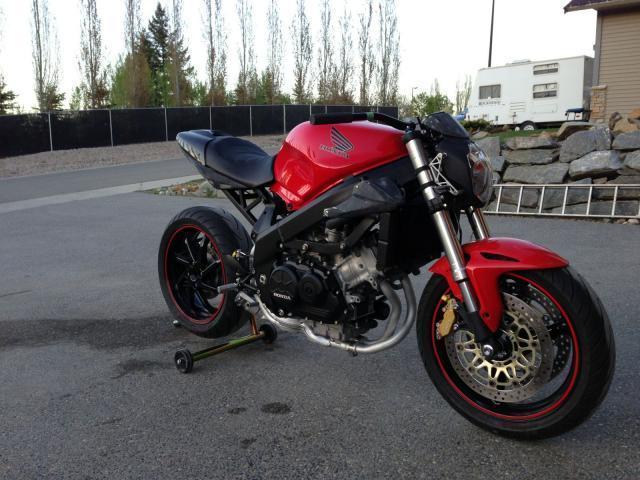
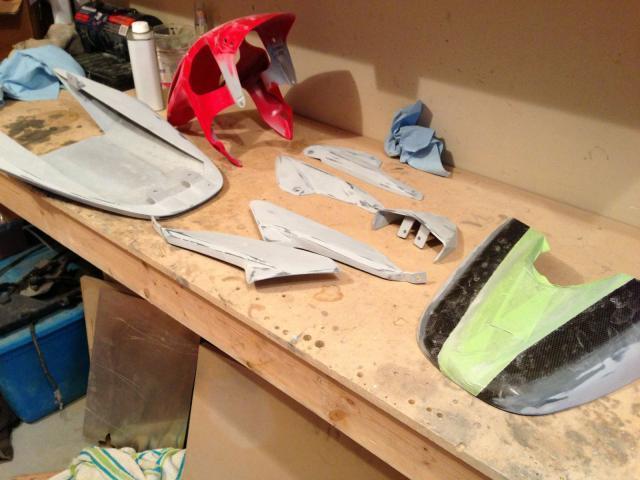
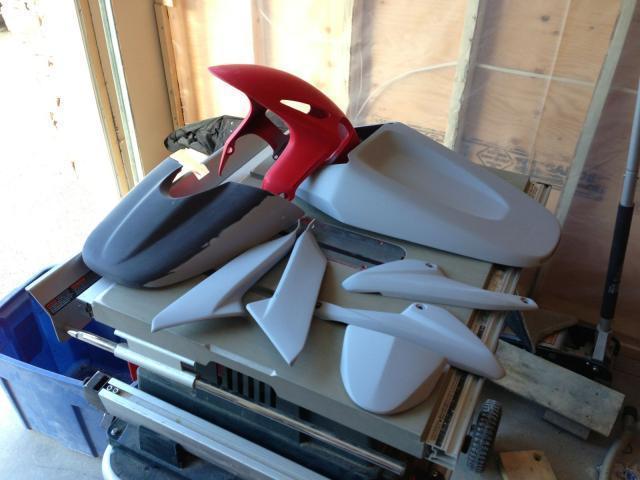
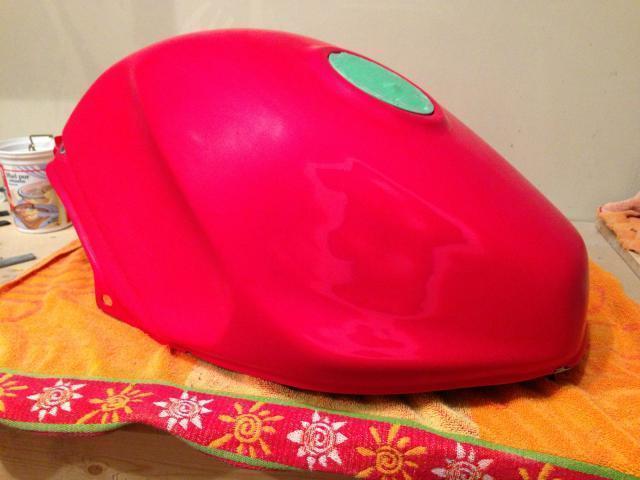
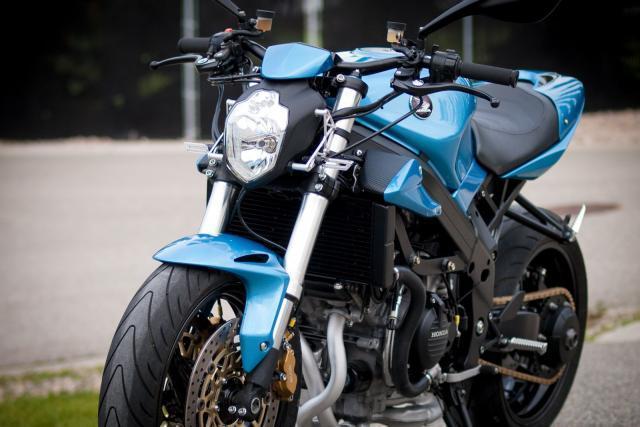
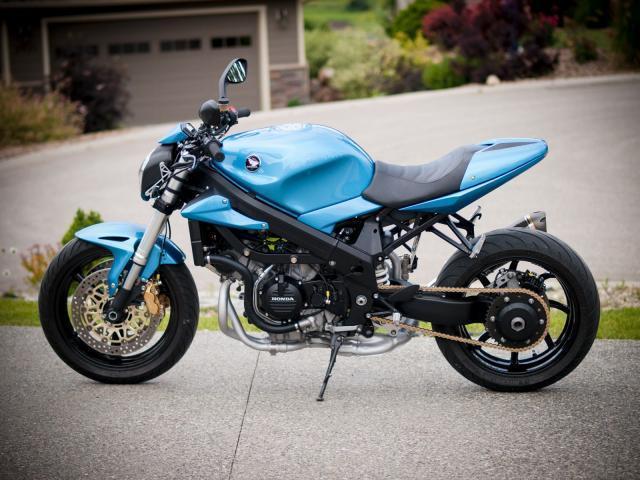
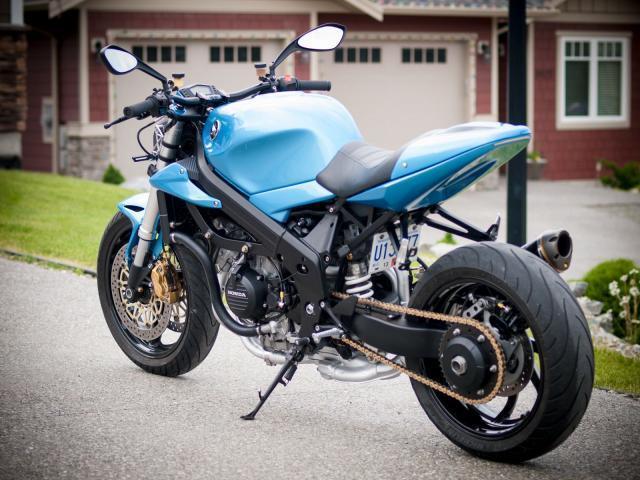
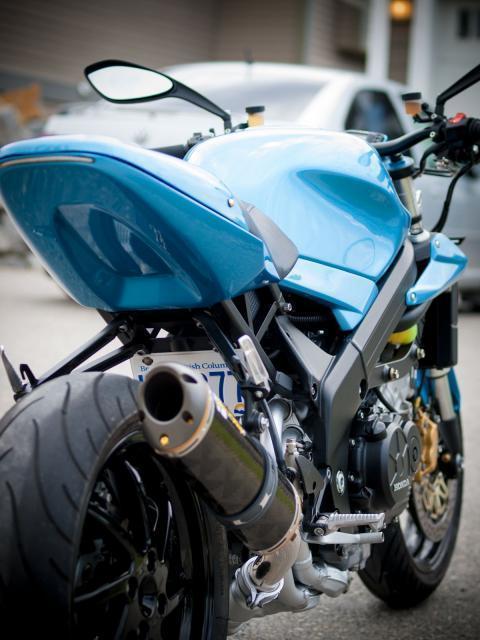
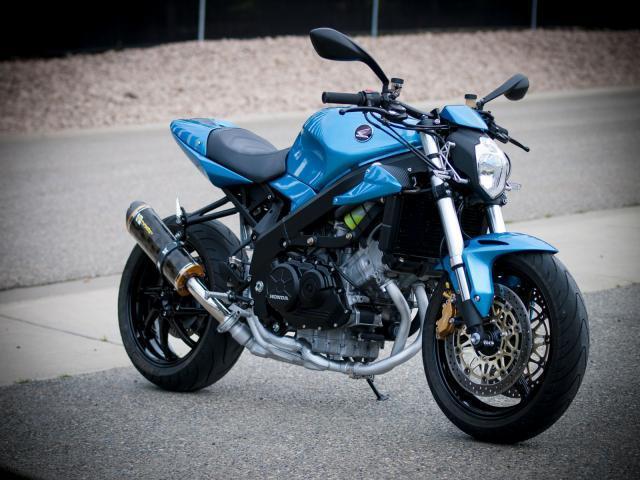
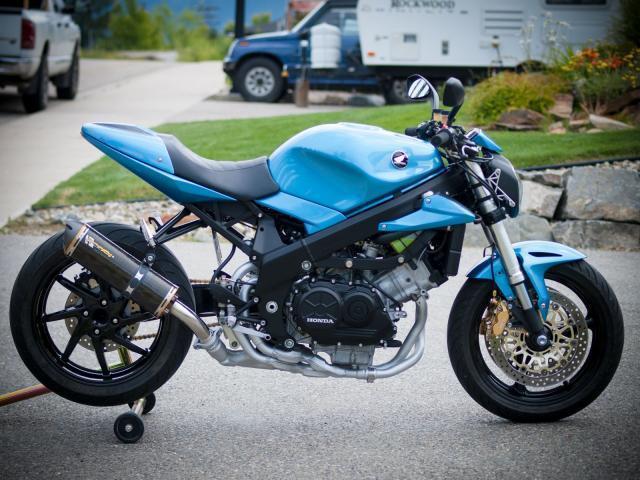
It is finally time to reveal my project, show the process, and hopefully give back to this great community I have learned so much from! I have been riding on the street since I was 16 (I'm now 30) and have owned a few different bikes: 92 ex500, 97 CBR 600 F3, 2000 DRZ400, 1997 GSXR 750, 2002 VFR 800 and now a 95 VFR 750. Please bear with me as I give a little explanation of how this project came to be... there will be lots of pictures to come! Over my time riding I have always liked the idea of owning a naked style bike like a triumph speed triple. Smooth windscreen-less air, fun sit up riding position, a tourqey engine, fairly comfortable, great on a tight backroad, cool looks... etc. And now that I live in a place with a lot of great backroads I decided it was a good time to pursue that idea. I really liked my VFR 800, it was smooth, refined and great for trips with my dad. However the idea of tearing it down for a streetfighter project didn't really make sense... too much complication and lots of things to hide. I thought about buying a naked bike but riding a brand new triumph speed triple showed me dreaming about a bike doesn't mean I'm going to love riding it. Besides... I was really on a tight budget with my wife finishing nursing school. So I sold the VFR 800 to a friend and decided to look for a bike to convert to a naked/streetfighter. I had enough money to buy a CBR1000RR or other similar bikes... but I wasn't sure I wanted that much power at my disposal and really loved the refinement and character the V4 VFR's provide. Really nothing I've ridden compares... The speed triple had character but lacked some of the refinement of the VFR. To me it was a no-brainer picking a 4th gen VFR. They have a good looking frame, a radiator in front, and are less complicated than 5th and 6th gen bikes. So I found a 95 VFR with 34000km in quite good condition to start the transformation. I know many of you will not like that I tore into a VFR in quite good shape, but let me give you a bit of my reasoning. Anyone who has tackled a project bike will probably attest to the fact that starting with a good base will avoid a lot of extra head-aches down the road diagnosing issues, wondering about frame straightness, fixing and repairing all sorts of components along the way... etc. And a bike in good shape allowed me to sell parts along the way to raise money for the build. Besides, I know the look of the VFR is a huge part of it's identity, but really that's just a plastic shell and in the end and the V4 engine is the heart of the machine. Anyway, my goal here was to have a bike that road like brand new in the end. To have a bike that I wish honda would build (though I probably wouldn't be able to afford it anyway...). OEM+ was the idea. I would give a lot of thought along the way to making a bike that functioned, looked and rode for the most part like an OEM product or better. I rode this bike for a few months until my regulator/rectifier went up in smoke... suprise! Oh well... winter was around the corner so it was a good time to start tearing it down! Along the way I had to source A LOT of parts and components (I'll make a bit of a list at the end). A big one at this point was the CBR929/954 front end swap. The forks and brakes were actually purchased from Bailyrock! And let me tell you... I think these forks are brand new :) I did some photoshop work and decided I wanted to try and adapt a speed triple seat. It looked like it would fit around the tank and it would allow my wife to ride on the back. Then I set about mocking up the subframe in wood. Then I recovered the speed triple seat with a luimoto cover Got my wheels powder coated Bought a Two brothers muffler used for a speed triple and had the V.A.L.E flange welded to a delkevic mid-pipe for the 4th gen bikes Put the wheels on so I could keep building After I was happy with the subframe mockup (test fitting the placement of the passenger pegs for my wife was kind of interesting with a wood frame...) I set about using my carpentry tools to cut up some aluminum. My dad gave me the tip of making a jig for the welder to hopefully keep his labor costs down... While the subframe was away for welding I cut off my front fairing subframe mounting tabs, fitted my front headlight (with mounts machined by a custom fighters.com member), and made a 929 shock adapter. It's starting to come together! The subframe back from the welder! I'm very pleased with the result... My ballistic battery and koso gauge came in. Made a gauge mount for the RC51 triple and let the bike out for a little air Now it was on to bodywork making time... This was a HUGE part of the project and I learned a lot along the way. I used 1" LDF glued together to shape the plugs for the parts. I'll let the pictures do the talking... And here are the plugs ready for fiberglass... a lot of things didn't go as planned at this stage and my moulds needed a lot of work to make even rough parts. But in the end I was able to come up with one off fiberglass bodywork. I knew this would be a lot of work... but it ended up being even more. And then I still had to figure out all the mounting tabs... I thought it would never end. Eventually I was finally ready to tear the bike down for thorough cleaning and powder coating. I had everything done in a fine texture black and the exhaust ceramic coated in a kind of matte aluminum color. It was like christmas unwrapping all the parts :) Then it was reassembly time. My dad came and helped me out for a few days. It was great to have his help and skill for this part of the process. I love that we have a common interest in bikes! Had a good weekend and got the bike into a rolling chassis. I'm sure my Dad has had enough of repacking bearings for a while... Then it was back to figuring out how to mount the bodywork and getting the parts ready for paint Found a nice spot to mount my ignition and made some aluminum bezels The CBR1000 front fender has some broken mounting tabs Made a battery/electronics box out of aluminum and covered it in 3m CF vinyl Found a local painter who let me help with the prep work to keep costs lower (he would spray the high build primer and I would do the wet sanding/spot filling) After a few rounds of primer and sanding the parts were all ready for paint. The plan all along was to match the stock pearl red on my tank and the painter didn't think this would be a problem with his ppg system... until he actually tried to enter the info into his computer. Apparently ppg doesn't have this color in their system. So... because the tank was getting painted anyway, I could choose whatever color I wanted! I knew red would look good... but I wanted something unique and fun, without being ridiculous. So I chose something else completely... While I was waiting on paint, I tacked the electrics, fuel pump and wiring harness... which is a TON of work and something I would like to do a better job of eventually. All the connections are soldiered and heat shrinked, and I used good connectors where needed, but to really do a good job of routing the wiring and taking out excess will take more time. And then the parts came back from paint! Its called Azzuro Meditterano (or something like that) and it's a ducati monster color. I know not everyone will like it, but I love blue and am very happy with the color! PS the seat cowl is a Carbon Fiber speed triple part I got off ebay. I haven't started making carbon fiber parts yet... maybe someday. I did however modify the sides of the seat cowl with fiberglass to help it blend in with the tail section better. And now its time to reassemble the bike completely! My dad rode his brand new Multistrada 1200 over from alberta to help out. Final assembly was a lot of work and I would prob still be working on it if it wasn't for my dad coming to help. Anyone who modifies motorcycles knows that every change affects so many other things... needless to say there were many things to figure out, and some that will be a work in progress. It took me over 9 months, and there are still some things to complete or change, but here is the mostly final product!!!! So far I have put about 1300km on the bike and am loving it!!! It has turned out to be pretty much everything I wanted it to be. I will give a more detailed ride report later but for now I need to take a break from the computer :) I hope everyone enjoys seeing the process. There are so many details I didn't cover but I will list the mods later and answer any questions people have as best I can. I need to thank this forum a million time for all for all of the things I learned from those who have done these kinds of mods before. You are a great bunch and I appreciate all of the help. Also my Dad deserves a huge high five for all of his help, My Uncle for all of the last minute tech support and above all a gigantic thank you to my wonderful wife for putting up with me as I built my dream bike!
 18 points
 -
After having met the fund drive for 2020 and the close of that awful year, there was about $600 or so left over from last years budget. I did not spend as much as I planned, since well ...we did not do much by way of meets, rallys, contests and the like. I owe that to the pandemic, and we just did not get together like we have in past years. So I am putting it forward for the future for safe keeping. I plan to upgrade to a new faster server soon, as this one has been a bit of a disappointment for me as admin, I have used every trick in the book and researched google articles, pouring over ways to make the site faster and more responsive and still keep the things we have come to expect with visiting this site. So I am on the lookout for good deals and better hosting, we will see. Thank you for all that donated, its a honor for me to serve as the admin for this group of people, such a great group of people we have here. Let us hope 2021 opens up the road to us again and we can all enjoy the freedom of riding our vfrs where ever we are. HS18 points
-
...I bought this lightly used 2 year old VFR750, and haven't been without a Honda since then; several VFRs and a handful of VTR1000F. I'd bought the bike late that afternoon, and being early March it was a dark, damp first ride to visit my folks. I'd love to have it back, and in that condition.16 points
-
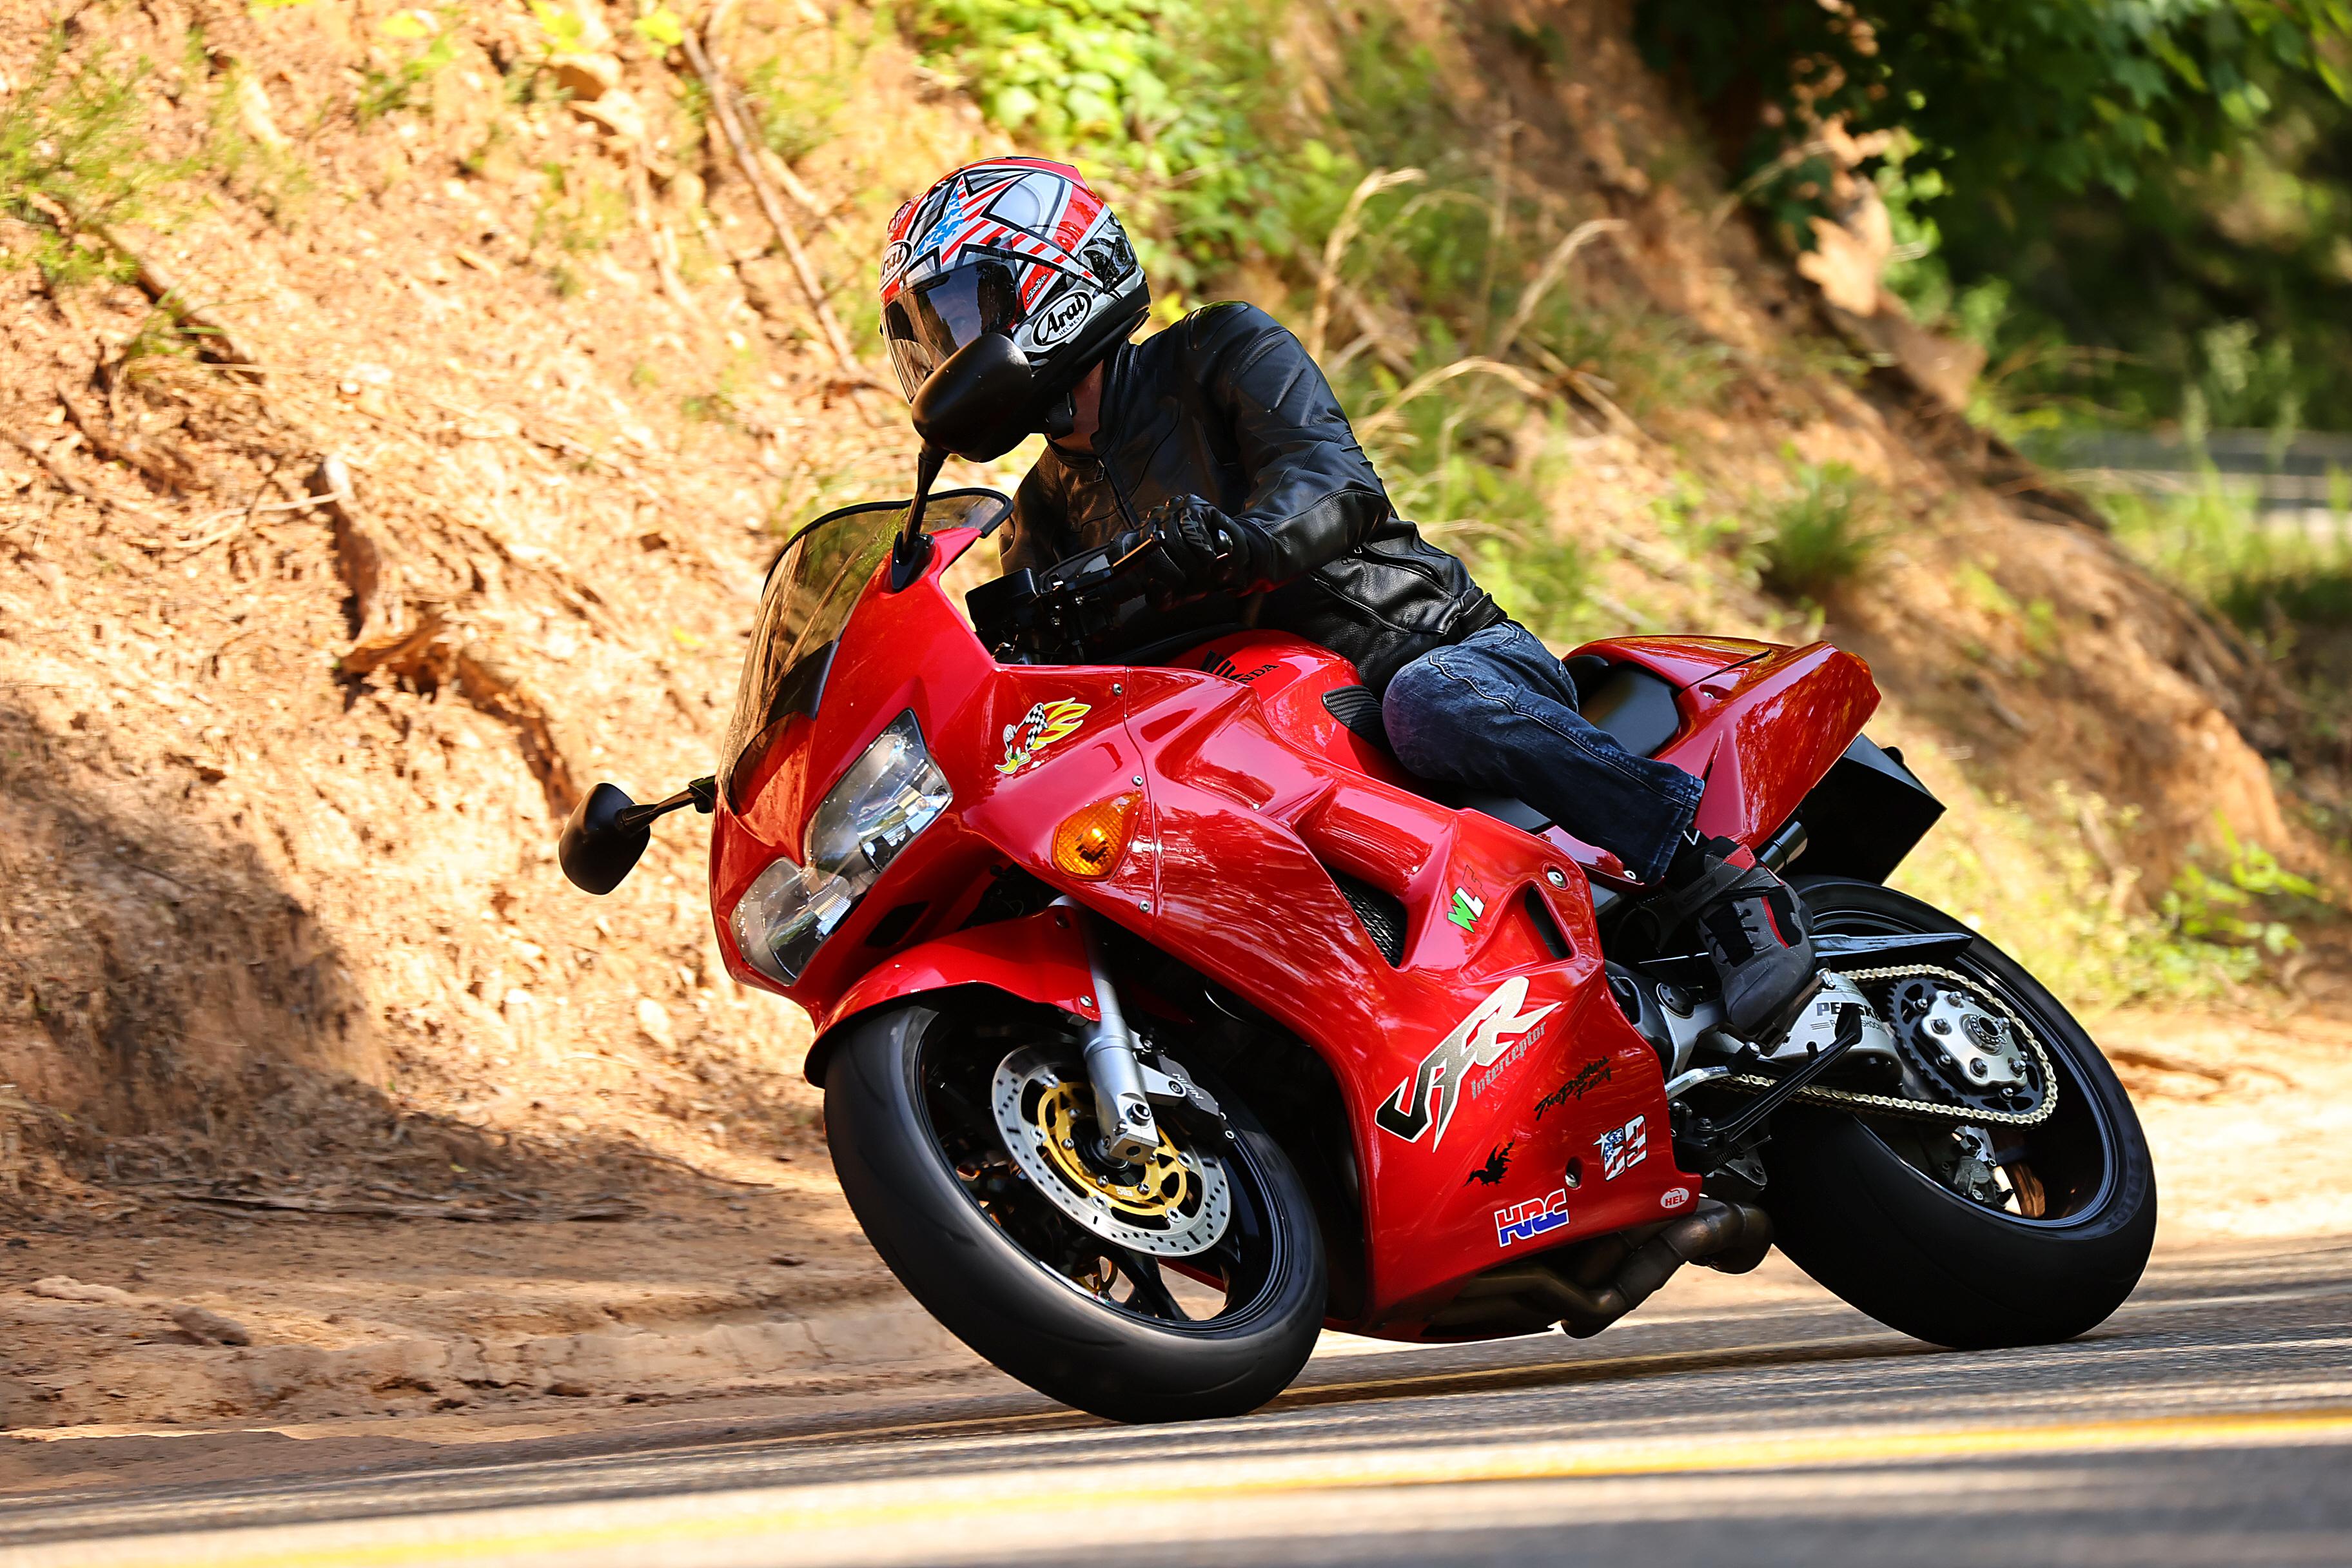
Racetrack? Deals Gap? Just a great shot one of your buddies captured for you that you really like? Let's see your glamour shot of your vfr doing vfr stuff. This has always been one of my favorites. Everybody knows you don't have to go fast at Deal's Gap for the amazing photographers to make you look good. This is no exception. Fairly clean run on a rainy weekday with my buddy on a far superior machine (he thinks so, anyway 😉 ) giving chase. I know a lot of guys are way faster than me. I'm not pretending to be anything special. But damn, talk about lipstick on a pig... Magoo
16 points
-
I'm turning 74... so I'm reminiscing the milestones during 57 years of Riding and Racing... 1963... It all started with a set of mini bike plans from the back of Popular Mechanics... 1964... My first ride was on a step through Honda 55 in 1965 and I recall the experience vividly... I got on the saddle and screwed open the throttle and took off like a shot across the yard... my senses became over whelmed with this new feel of acceleration... I froze on the controls and fixated on the fence growing in my path... will it end the madness??? no to my horror the front wheel just scales up the wire without slowing down driven by the rear wheel digging in the dirt... I was so impressed with the amount of force of 5 whole horse power that I did the one thing I knew would stop it... I lifted the rear wheel off ground... as the engine raced and with the back tire spinning madly I finally remember to close the throttle... Mercy!!! this is not as easy as it looks... 1965... First bike I purchased was a Honda C 200 a iron barrel push rod 90... it lasted two weeks before I traded it in on a Honda S90 at Bar-B Marina... 1965... First new bike was a Honda S-90... I'd wake up in the morning and just ride... anywhere was good... across the Bay Bridge it didn't matter... just racing at 60 mph was enough of a challenge out of 8HP... it helped to have a tail wind... I'm being honest... when I'm on a bike and it don't feel right to me... I stop thinking about riding and start thinking about a solution... and thats been true since 1967 when I inadvertently spun a donut in the dirt on my Honda S90... I thought there was something wrong because it had never done that before... I stopped riding and disassemble the whole bike looking for clues... only after the engine was on the ground that it finally struck my mind that maybe sliding was something to be played with... I assembled the whole mess back together and so began my love affair for donuts and dirt... 1966... Honda CL160... wow real power for two up riding and romance... in fact Mary and I first kiss happened on a ride... 1967... After we got married and moved to San Bernardino... Mary felt daring enough to take pics of my CL160 as it jumped over her... First competition was a USAF sponsored gymnkana or skills test... I was surprised to take 4 of the 5 trophies... I'm never 100% happy with my riding skills... I thought the Honda CL160 was a dirt bike... it was good on jumps but poor on landings... taking 3 bounces to settled down... 1969... Busy Little Shop #1 was the living room in our first cottage... our Land Lady wasn't happy with bike parts inside her spot less rental... so I used the lamp shade over the frame trick to hide the fact I was building a motorcycle... never the less she swore I was a member of the Hells Angel... 1970... Kawasaki 350 BigHorn... I was asked to perform movie stunt work for a Air Force Now film but after my wheelie crash the USAF enlistment board denied my request for enlistment based on their initial perception that I had "no personal concern for my safety"... My film director had to set the record straight... 1972... CR 250 Husqvarna that I raced in the CRC SoCal Motocross... I loved the sandy beaches of Ensenada Mexico... Busy Little Shop #2 was in the spare bedroom of our Land Lady's second rental... she never gave up the notion that I would move the bike outside and make room for kids inside... little did she understand that some of us like motorcycles better... 1976... WR250 Husqvarna... my version of a street legal dirt bike... 1978... My first time over 100mph was on Waldo's hand built Z1 complete with Ocelot fairings... I though you must be nuts to ride at those speeds... 1979... While stationed in Japan I bought a CR250R Honda direct from a Honda factory worker who must have pilfered some extra parts... I recall that the Japanese government turned me down 5 times for a street legal license plate... So I raced the CR in the black sands of Fuji MX park... 1980... Busy Little Shop #3 was inside our home in Japan... P5 Ushihama Heights Tokyo To... 1981... I'll never forget meeting Hirotoshi Honda #1 son of Soichiro Honda 1980... Z400FX Kawasaki... Japanese 4 unique to the home market... I painted the wheels School Bus yellow and installed a Honda fairing and tail cowl... It was deemed the Circus Wheeled Kawasaki by the Honda factory workers at the Saitama Honda Plant they christened the frame with a sticker "Made by Honda Motors LTD"... 1981... While stationed in Wichita Kansas I ordered a new GPz550 from East Side Honda... 3 days later I was off for a 1500 mile round trip to New York and back... next summer I rode home to California and back... I got the 3 spoke magnesium Dymags direct from Harris Performance while on a TDY to England courtesy of the USAF... 1986... XC400 Husqvarna... another Husky I made into a street legal dirt bike... I mainly rode Little Sahara State Park... the Park Rangers would check for your steel whip antenna and orange flag at the entrance... I didn't mind the flag but steel whip antenna would give my helmet a nasty whack every time I stopped... it got so that I'd jettisoned the antenna and then ride out of sight from the rangers patrolling in their dune buggies... 1984... 84 VF500F Interceptor... my first love affair with the V4 begins... 1988... 86 VF500F Interceptor from Golden Gate Cycles... I engineered this into famous Belt-0-Ceptor... I racked up 98,000 trouble free miles... 1998... 94 RC45 found in Tijuana Mexico for 8K... Full circle... the yard where I first rode a motorcycle in 1965... Same yard 43 years later on Mr.RC45...16 points
-
This guide was created because I couldn't seem to find one that was very thorough and included pictures of all procedures. This guide requires the use of Speed Bleeders as it makes life so much easier! You can follow this guide using the old school method as well, but it will require more time and patience. Readers Notes: Left and ride side are determined as if you were sitting on the motorcycle. Images come after descriptions. Initialisms: LBS: Linked Braking System LPCV: Left-side (Servo) Proportional Control Valve (Battery side) RPCV: Right-side (Rear) Proportional Control valve (Opposite battery side) LMC: Lever Master Cylinder (Front) RMC: Rear Master Cylinder (Pedal) SMC: Secondary Master Cylinder (Left-Front Caliper) FSM: Factory Service Manual Parts Required: One man bleeder kit (optional) ATE SuperBlue Dot 4 Speed Bleeders Part Numbers: Front right caliper SB8125 Front left caliper outer bleeder SB8125 Front left caliper inner/centre bleeder SB8125 Rear caliper outer bleeder SB8125 Rear caliper inner/centre bleeder SB8125L Clutch bleeder SB8125L LPCV SB8125LL RPCV SB8125 Part 1: Theory Part 2: Diassembly And Prep Part 3: Procedure Part 4: Assembly Part 5: Clutch Part 1: Theory The LBS is confusing for some when it comes to understanding how it works. The function of the sytem changed from 5th generation LBS to 6th generation LBS. I'm not too sure what the changes were, but I do know they operate differently. The way the 6th generation LBS works is; when the front lever is applied, only five out of the six (three pistons in each left/right caliper) caliper pistons actuate as well as the centre piston in the rear caliper leaving the left caliper centre piston untouched. When the rear pedal lever is applied; only two out of the three rear caliper pistons actuate as well as the left front caliper centre piston. The LBS only works when the motorcycle is moving however, you can test this by propping your bike on the centre stand, rotating the rear wheel and applying the front brake; the rear wheel will not stop spinning. The way it works is by force. The SMC is mounted above the left caliper that's attached to the fork and with the motorcycle moving, the rider will apply the front brake which squeezes the pads on the rotor and that drag pivots the left front caliper up which actuates the SMC and brake fluid gets pushed through to the LPCV and then to the rear caliper centre piston. The rear doesn't work in the same way because there's actually a brake line that goes all the way to the front left caliper that actuates that one centre piston by it's lonesome with the application of the rear pedal. Thanks to BartmanEH for the above picture! Part 2: Disassembly And Preparation You want your bike to be on a level ground and prop the bike up on it's centre stand for this whole procedure. Rotate the handle bar all the way to the left so the LMC is level. Remove both screws and remove all the old fluid inside the LMC. You can use a turkey baster or rags, whatever you wish. Once the old fluid is out, fill it up with fresh new fluid. Make sure you squeeze the front lever a few times just incase you got any air bubbles when removing the old fluid. Using an allen wrench, loosen, but do not remove the left front caliper bolts. Remove the seat and do the same procedure you did for the LMC to the RMC. Don't forget to press the pedal lever a few times to remove any air bubbles. Remove the rear wheel. Remove the two bolts that hold the rear caliper together. The inside one is tricky and I needed to use a long 12mm socket to reach it. Once the rear caliper is removed, mount it at the 10 o'clock position on the rotor. The reason for this is so the inner/centre bleed screw is facing up, not parallel to the ground. Part 3: Procedure The procedure and order we're going to follow is the same one listed in the FSM, but with more pictures and explanations. Sections C. and D. are the most difficult. You will need a helper as well. USING FRONT MASTER CYLINDER LEVER FOR A. AND B. A. Left Front Caliper, Upper/Outer Bleed Screw This is basic bleed. Open very slightly, usually about a 1/4 turn and pump the front lever until new fluid comes out. Even though I use speed bleeders, I still pressurize it old school method just to be on the safe side. The old school method is; with the bleeder screw closed, have your helper pump the front lever five times and hold. While holding, gently unscrew the bleeder screw until fluid comes out and before the lever reaches it's maximum travel, tighten the bleed screw. Top up the fluid level. B. Right Front Caliper, Single Bleed Screw This procedure is the same as above. Make sure you keep an eye on the fluid level as it drains. USING REAR MASTER CYLINDER PEDAL FOR C. TO G. C. Leftside PCV (Battery side), Single Bleed Screw Actuated via SMC This step is the most confusing and difficult one as it requires good timing between yourself and your helper. The SMC is not attached at all to the front lever in anyway. You can unscrew the LPCV bleeder screw and pump the front lever all day long and no fluid will get pushed through. You could manually actuate the SMC by hand and only a little bit of fluid will come out and then stop. The correct method to do this; from what I've gathered on how the system operates and without using a vacuum bleed tool is as follows. Remove the two bolts that hold the left front caliper on. I used an aluminum L-bracket I had lying around to wedge between the pads so they don't close. Tilt the caliper 15° from the ground so the inner/centre bleed screw is facing up. Your helper will be on the RMC side pressing the pedal and you will be at the left front caliper in charge of manually actuating the SMC and loosening/tighten the LPCV bleed screw. The way this system works is; there's a brake line that goes from the RMC to the SMC and from the SMC to the LPCV. Because there's no reservoir at the SMC, there's no way for new fluid to replenish to continue being pushed through the lines and out the LPCV bleeder screw, however, this is where the RMC comes in. When your helper presses the RMC pedal down, the SMC piston will get pushed out filling it with fresh fluid. Once your helper releases the pedal, you will manually actuate the SMC by pressing it in to the caliper with your hand and fluid will get pushed through to the LPCV bleeder screw. Push the SMC in with your hand. Do not release from this point. Tell your helper to press the pedal again which will forcefully push the SMC out and then once your helper releases the pedal, you will manually push the SMC in again watching for new fluid. Once fresh fluid is coming out, I performed a final pressure bleed by tightening the LPCV bleeder, asking my helper to pump the rear pedal five times and release, then I loosened the LPCV bleeder screw and manually actuated the SMC gently half way and then tightened the bleed screw. Note: Even with speed bleeders installed, I did not manually operate the SMC more than once for safe measure. To further elaborate on this; continuously pushing in the SMC numerous times will not bleed the SMC to LPCV brake line because there is no reservoir at the SMC. You will push whatever fluid is in the line and it will become empty with air. One manual push of the SMC followed by one rear pedal actuation by your helper. D. Rear Caliper, Inner/Centre Bleed Screw Actuated via SMC This procedure is the exact same as the above. The only difference is, you're bypassing the LPCV and going all the way to the rear caliper inner/centre bleed screw. Pressurize the sytem the same way as above too. E. Rightside PCV (Opposite Battery), Single Bleed Screw This is the easiest step. Follow the procedure as in Section A. but using the RMC pedal. F. Rear Caliper, Upper/Outer Bleed Screw Another easy step, follow above procedure. G. Left Front Caliper, Inner/Centre Bleed Screw The last procedure, again very easy, same as above. Part 4: Assembly Top up both fluids if they are low and fasten all caps and lids back on the reservoir. Attach the front left caliper and torque the pivot and joint bolts to 23ft-lbs. The FSM says always use new bolts, but I cleaned up the old loctite residue, re-applied some new medium strength loctite and re-used them. Attach the rear caliper and torque the joint bolts to 23ft-lbs. The FSM says replace also but I did the same as the front caliper bolts. Reinstall the rear wheel and torque bolts to 80ft-lbs. Now would be a good time to prime (pump a few times) your front lever and rear pedal lever. Once primed, they should not travel a lot of distance; they should feel stiff. If for any reason the levers travel a larger than normal distance, then there's probably air in the line somewhere or you might have forgot to tighten a bleed screw. Note: The FSM says to use new bolts, not because there is something wrong with the bolts, but because there is probably some sort of loctite already applied to the threads. Thank you Metallican525 for that insight. Part 5: Clutch I don't have to go in to any detail about this because if you just did your whole brake system, might as well do the clutch as it's very simple and same procedure at Part 3, Section A. Remember to turn the handle bars to the right though. At the end, I took my bike for a ride and I had no idea that this bike has this much braking power! Mind you, my fluid was 6 years old which was probably the cause of that but this method works flawlessly. I hope this DIY was very thorough and gave you a good understanding on how to tackle this easy but tiresome procedure!15 points
-
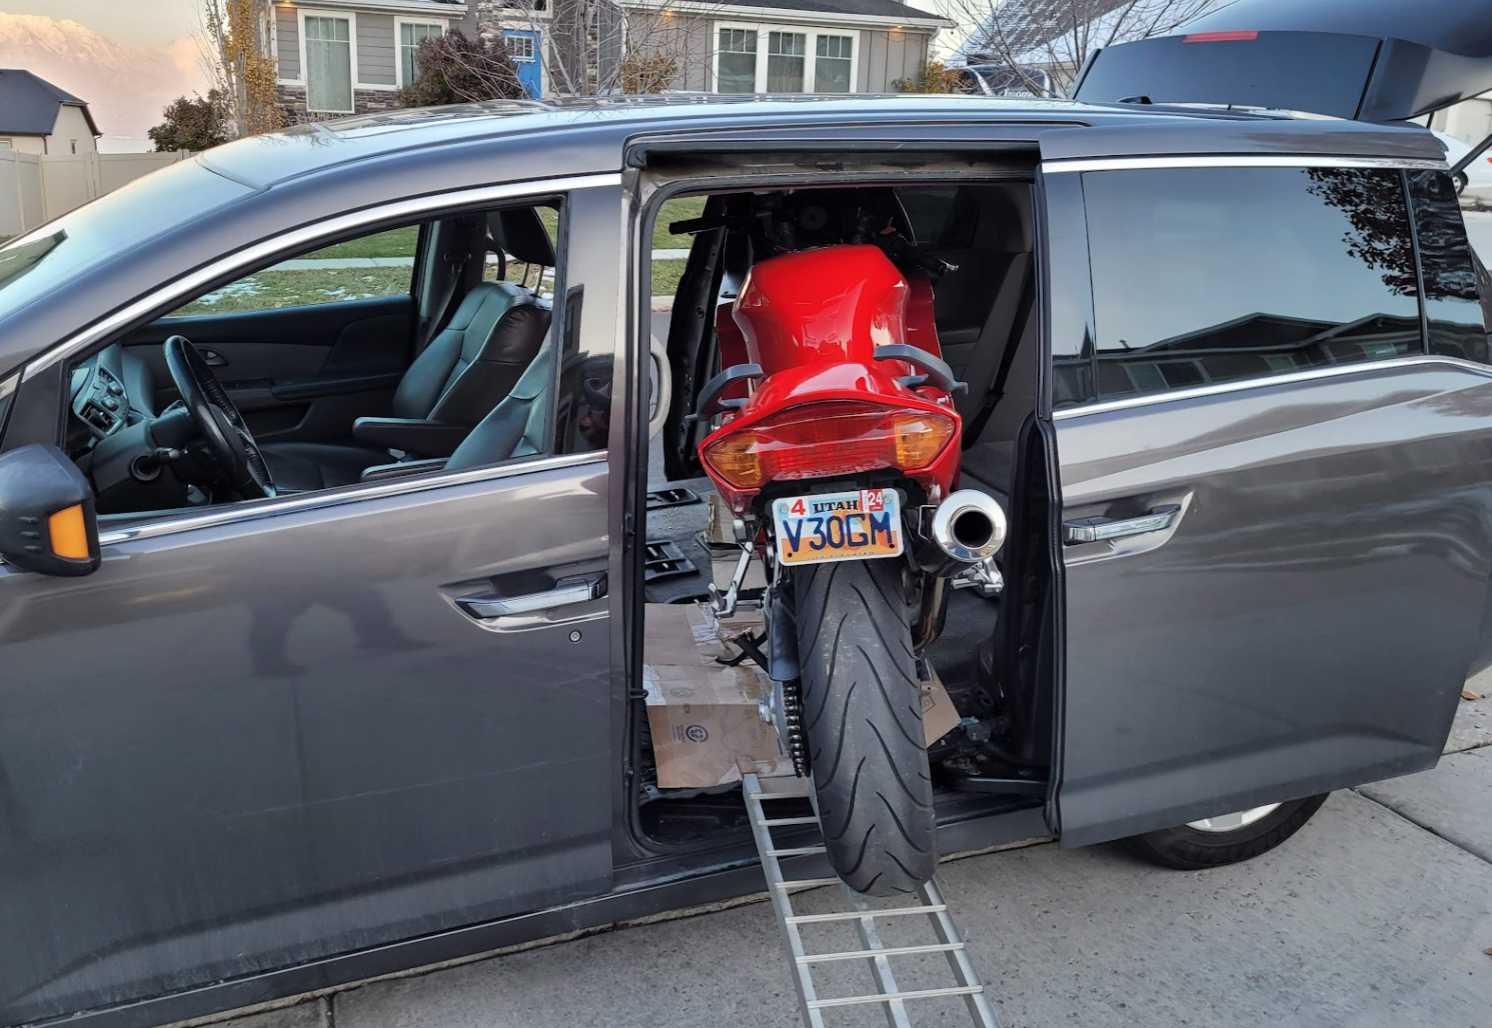
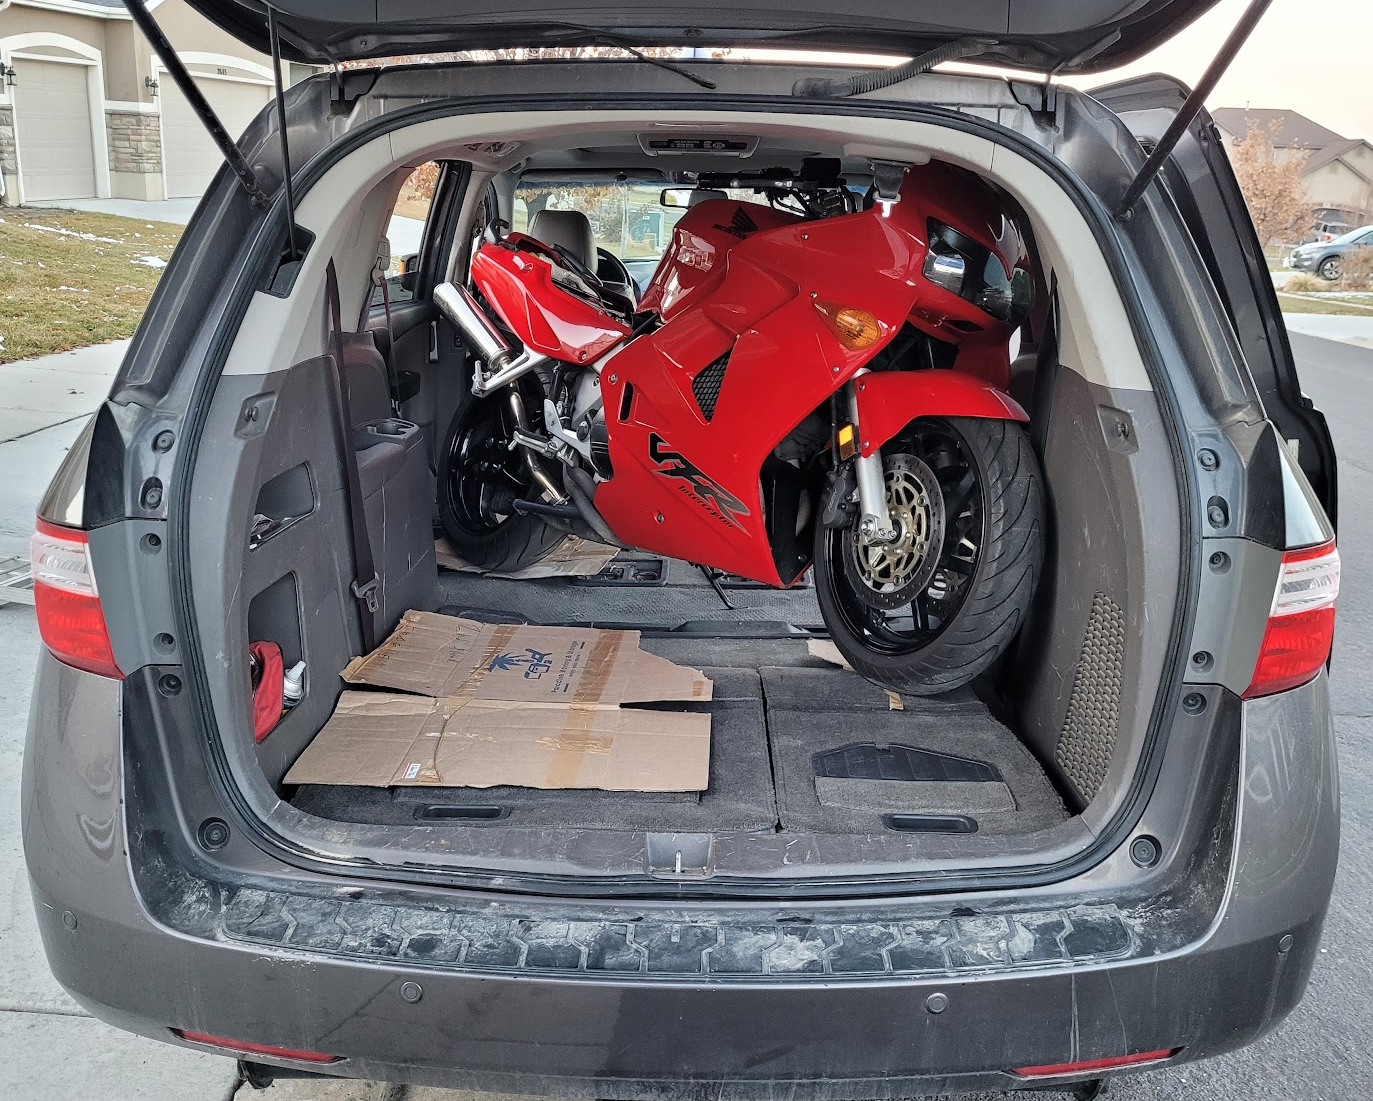
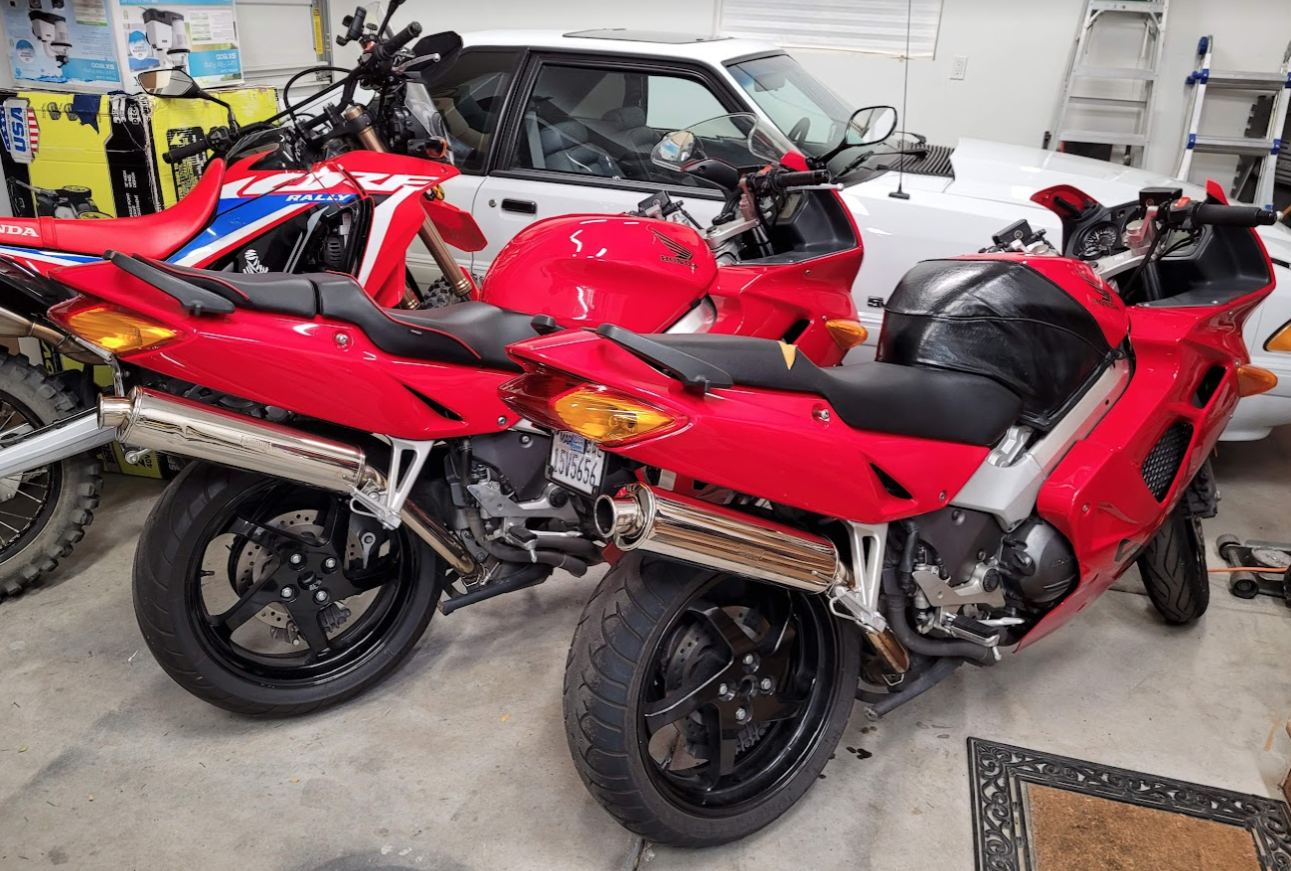
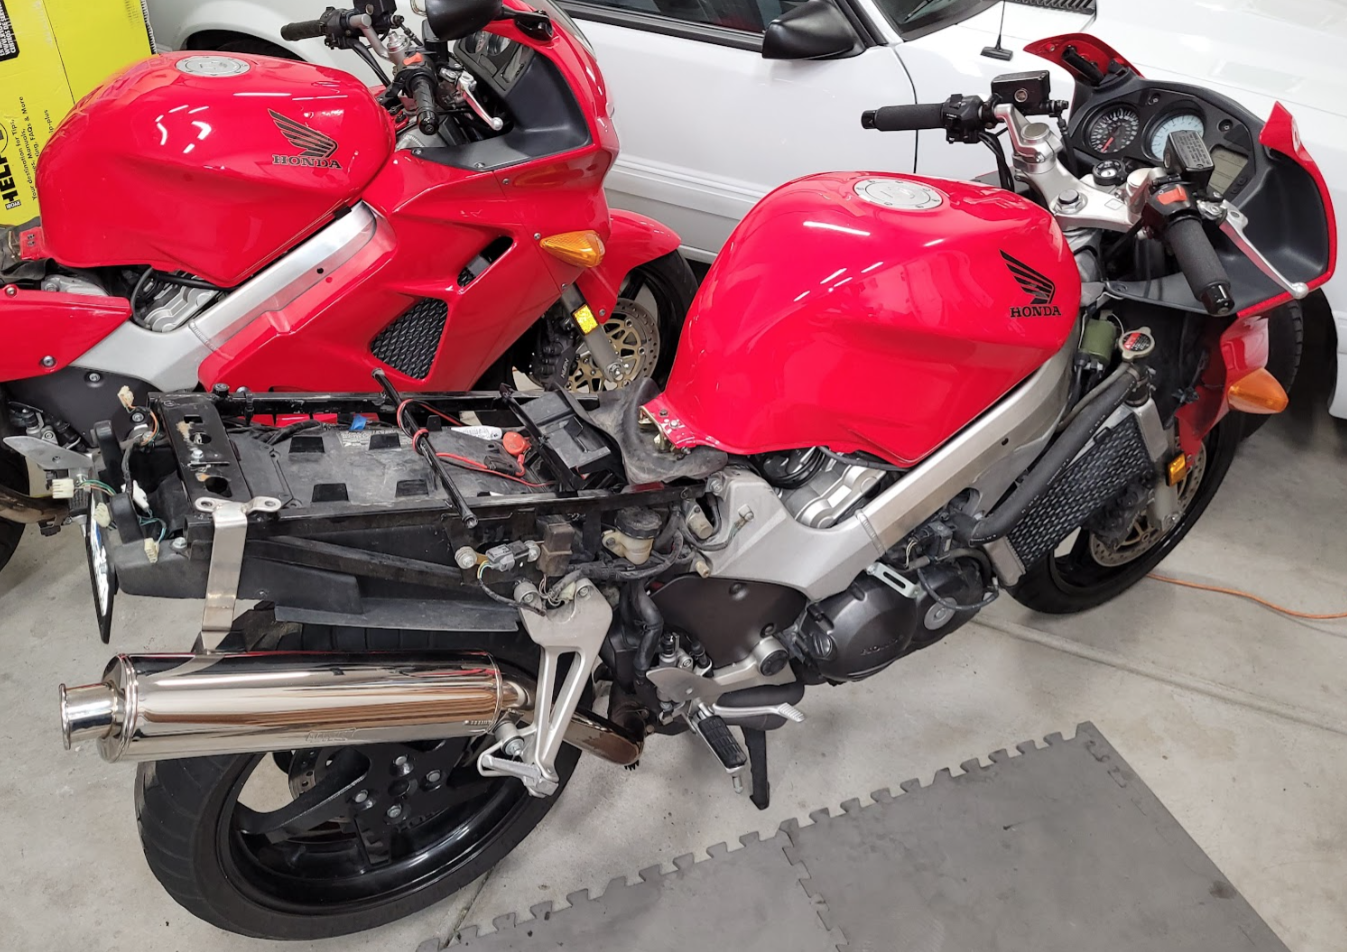
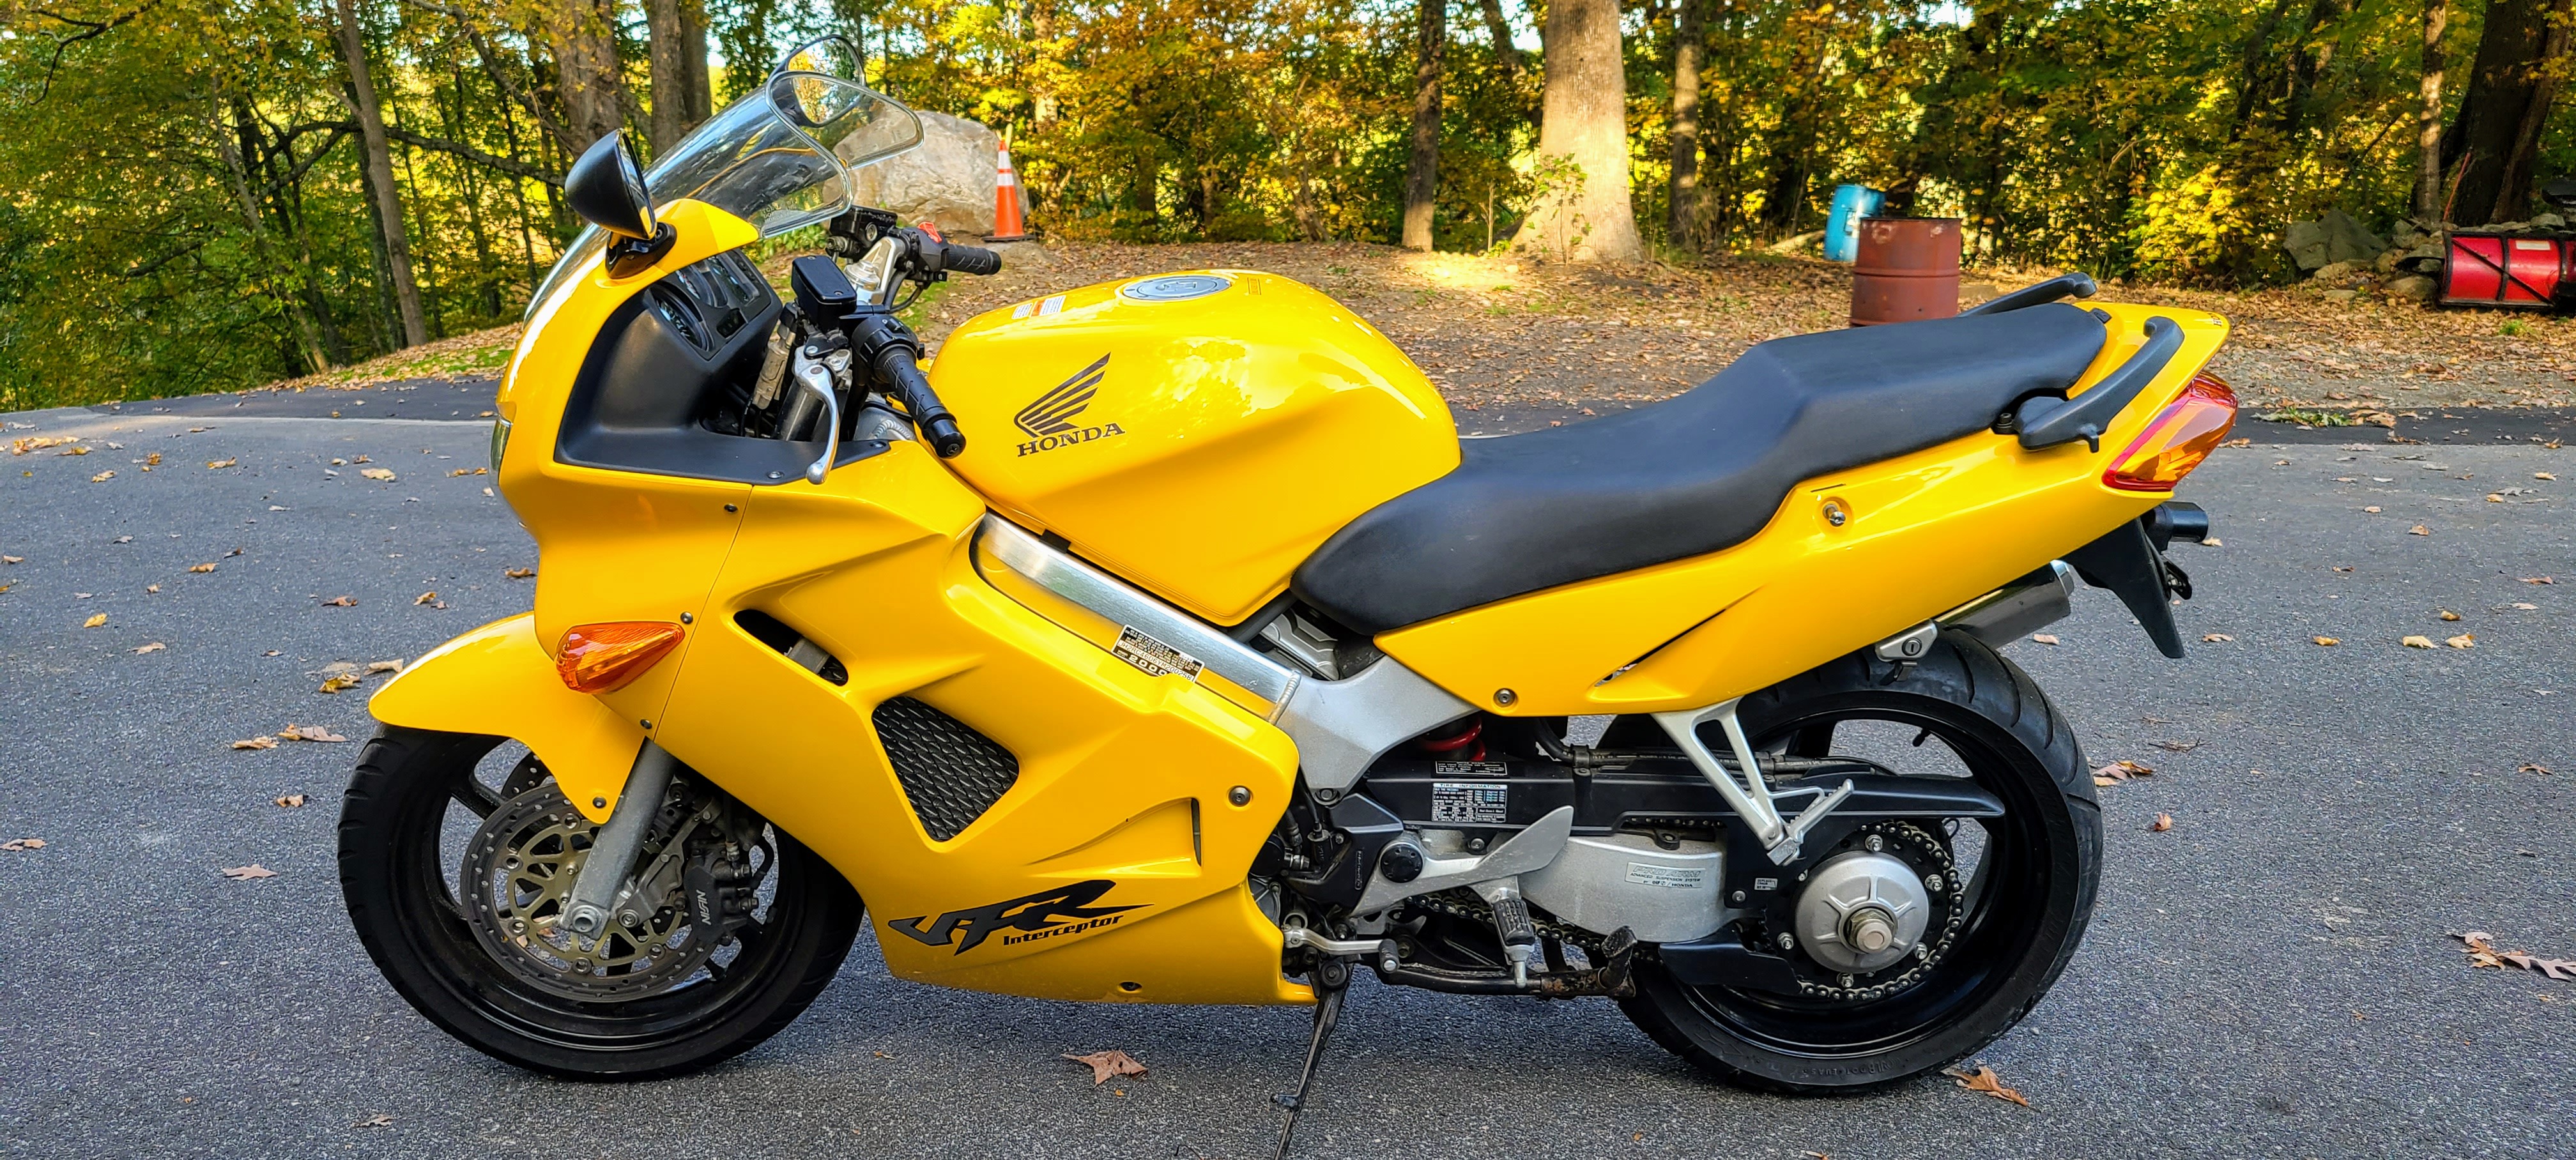
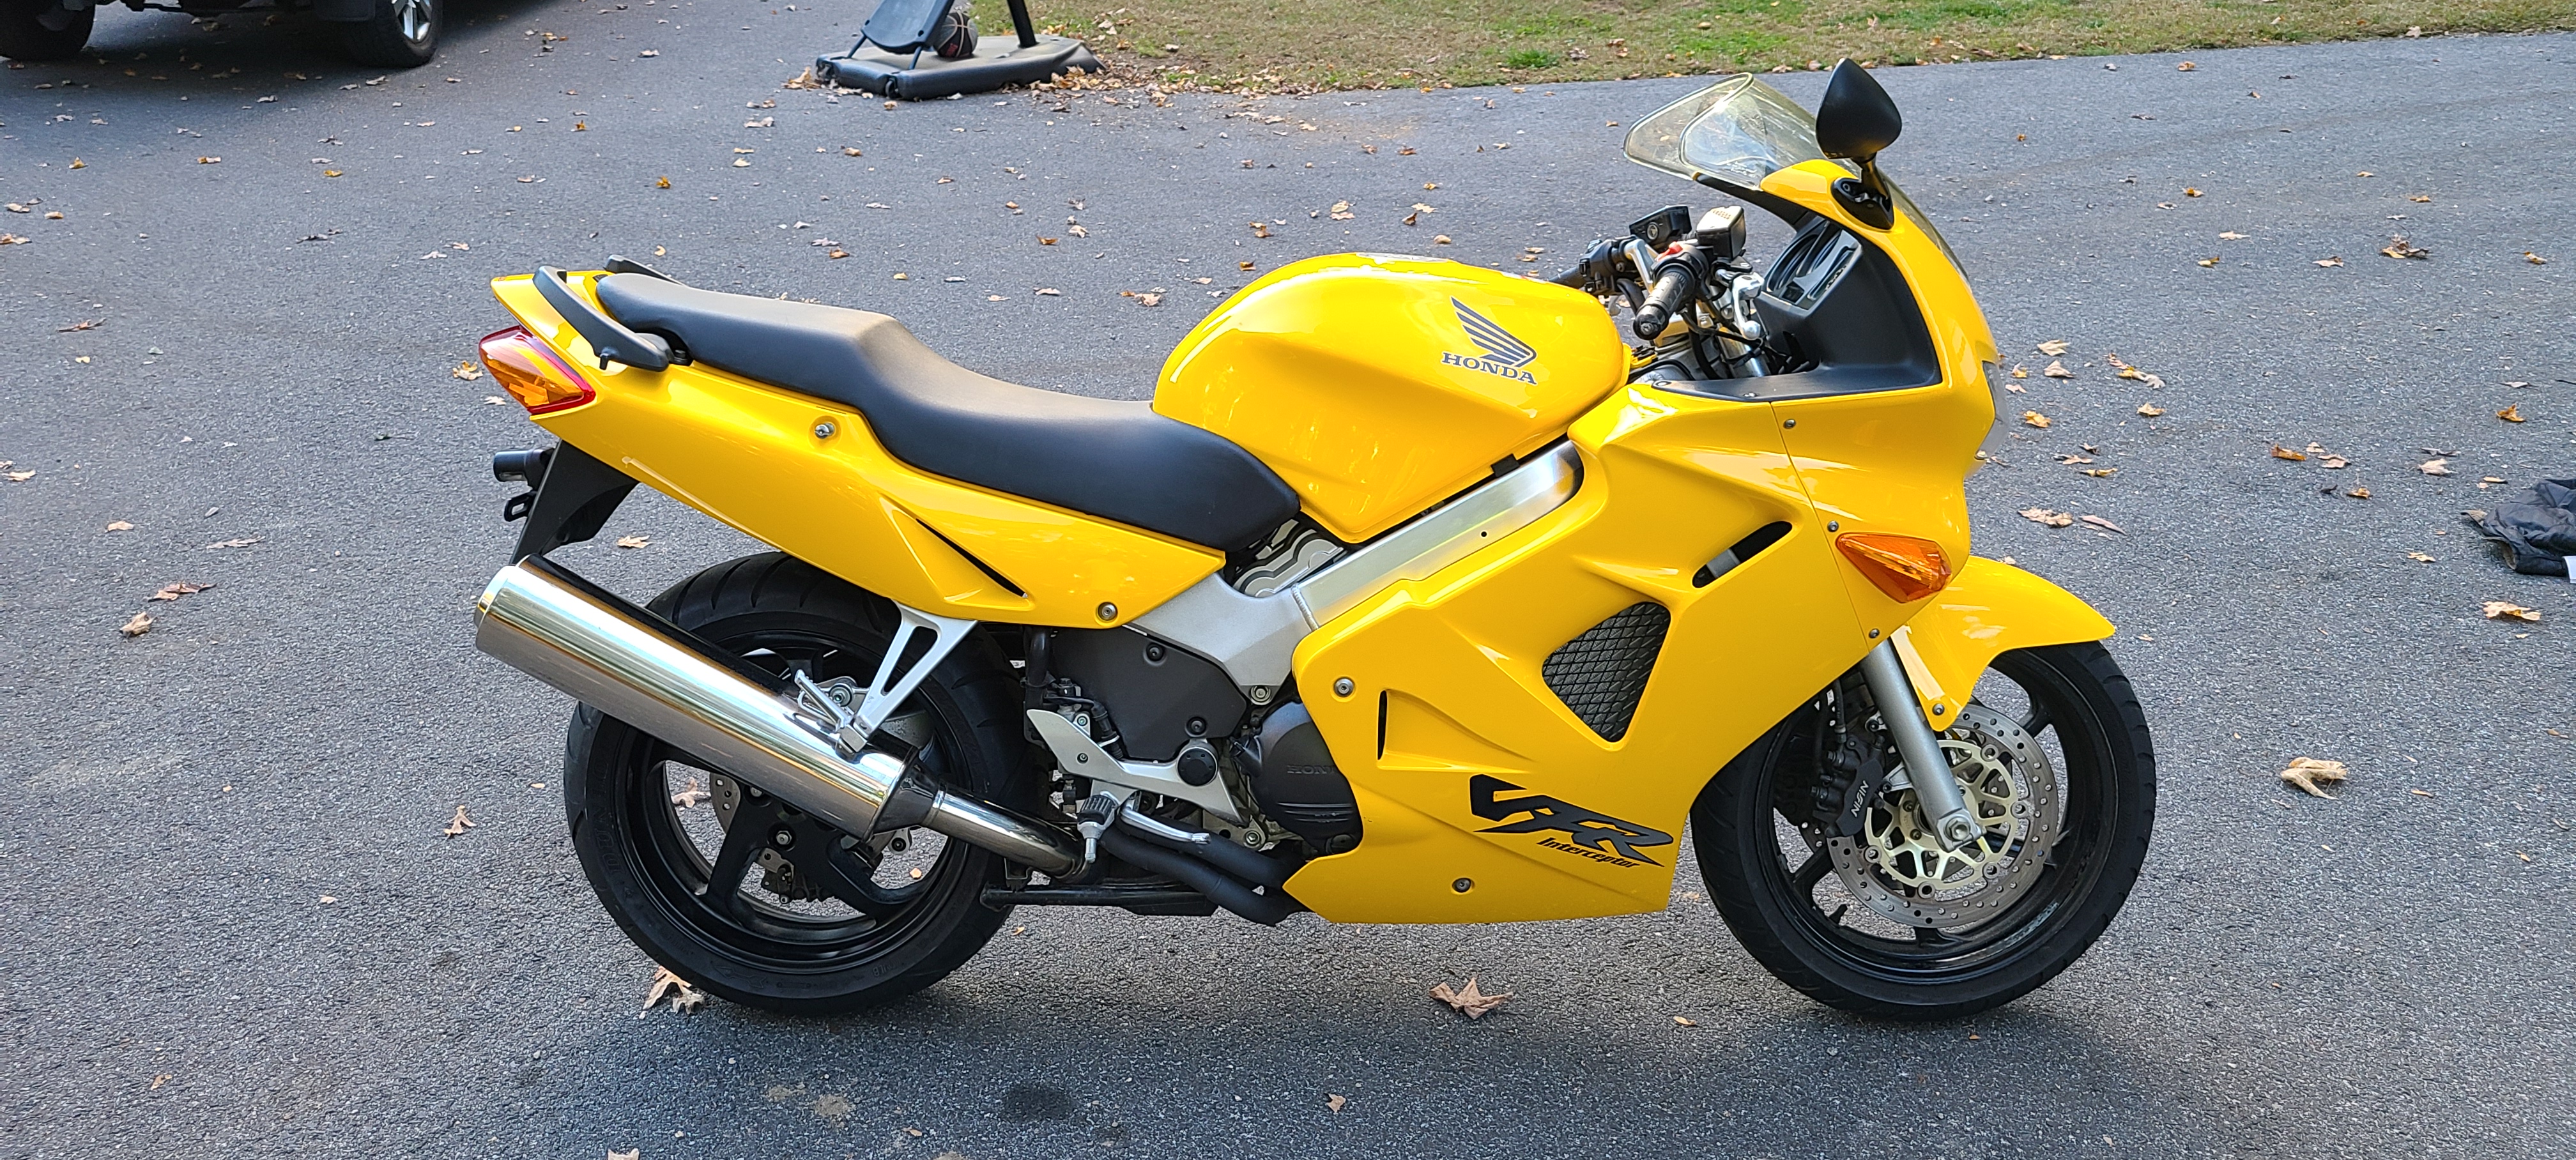
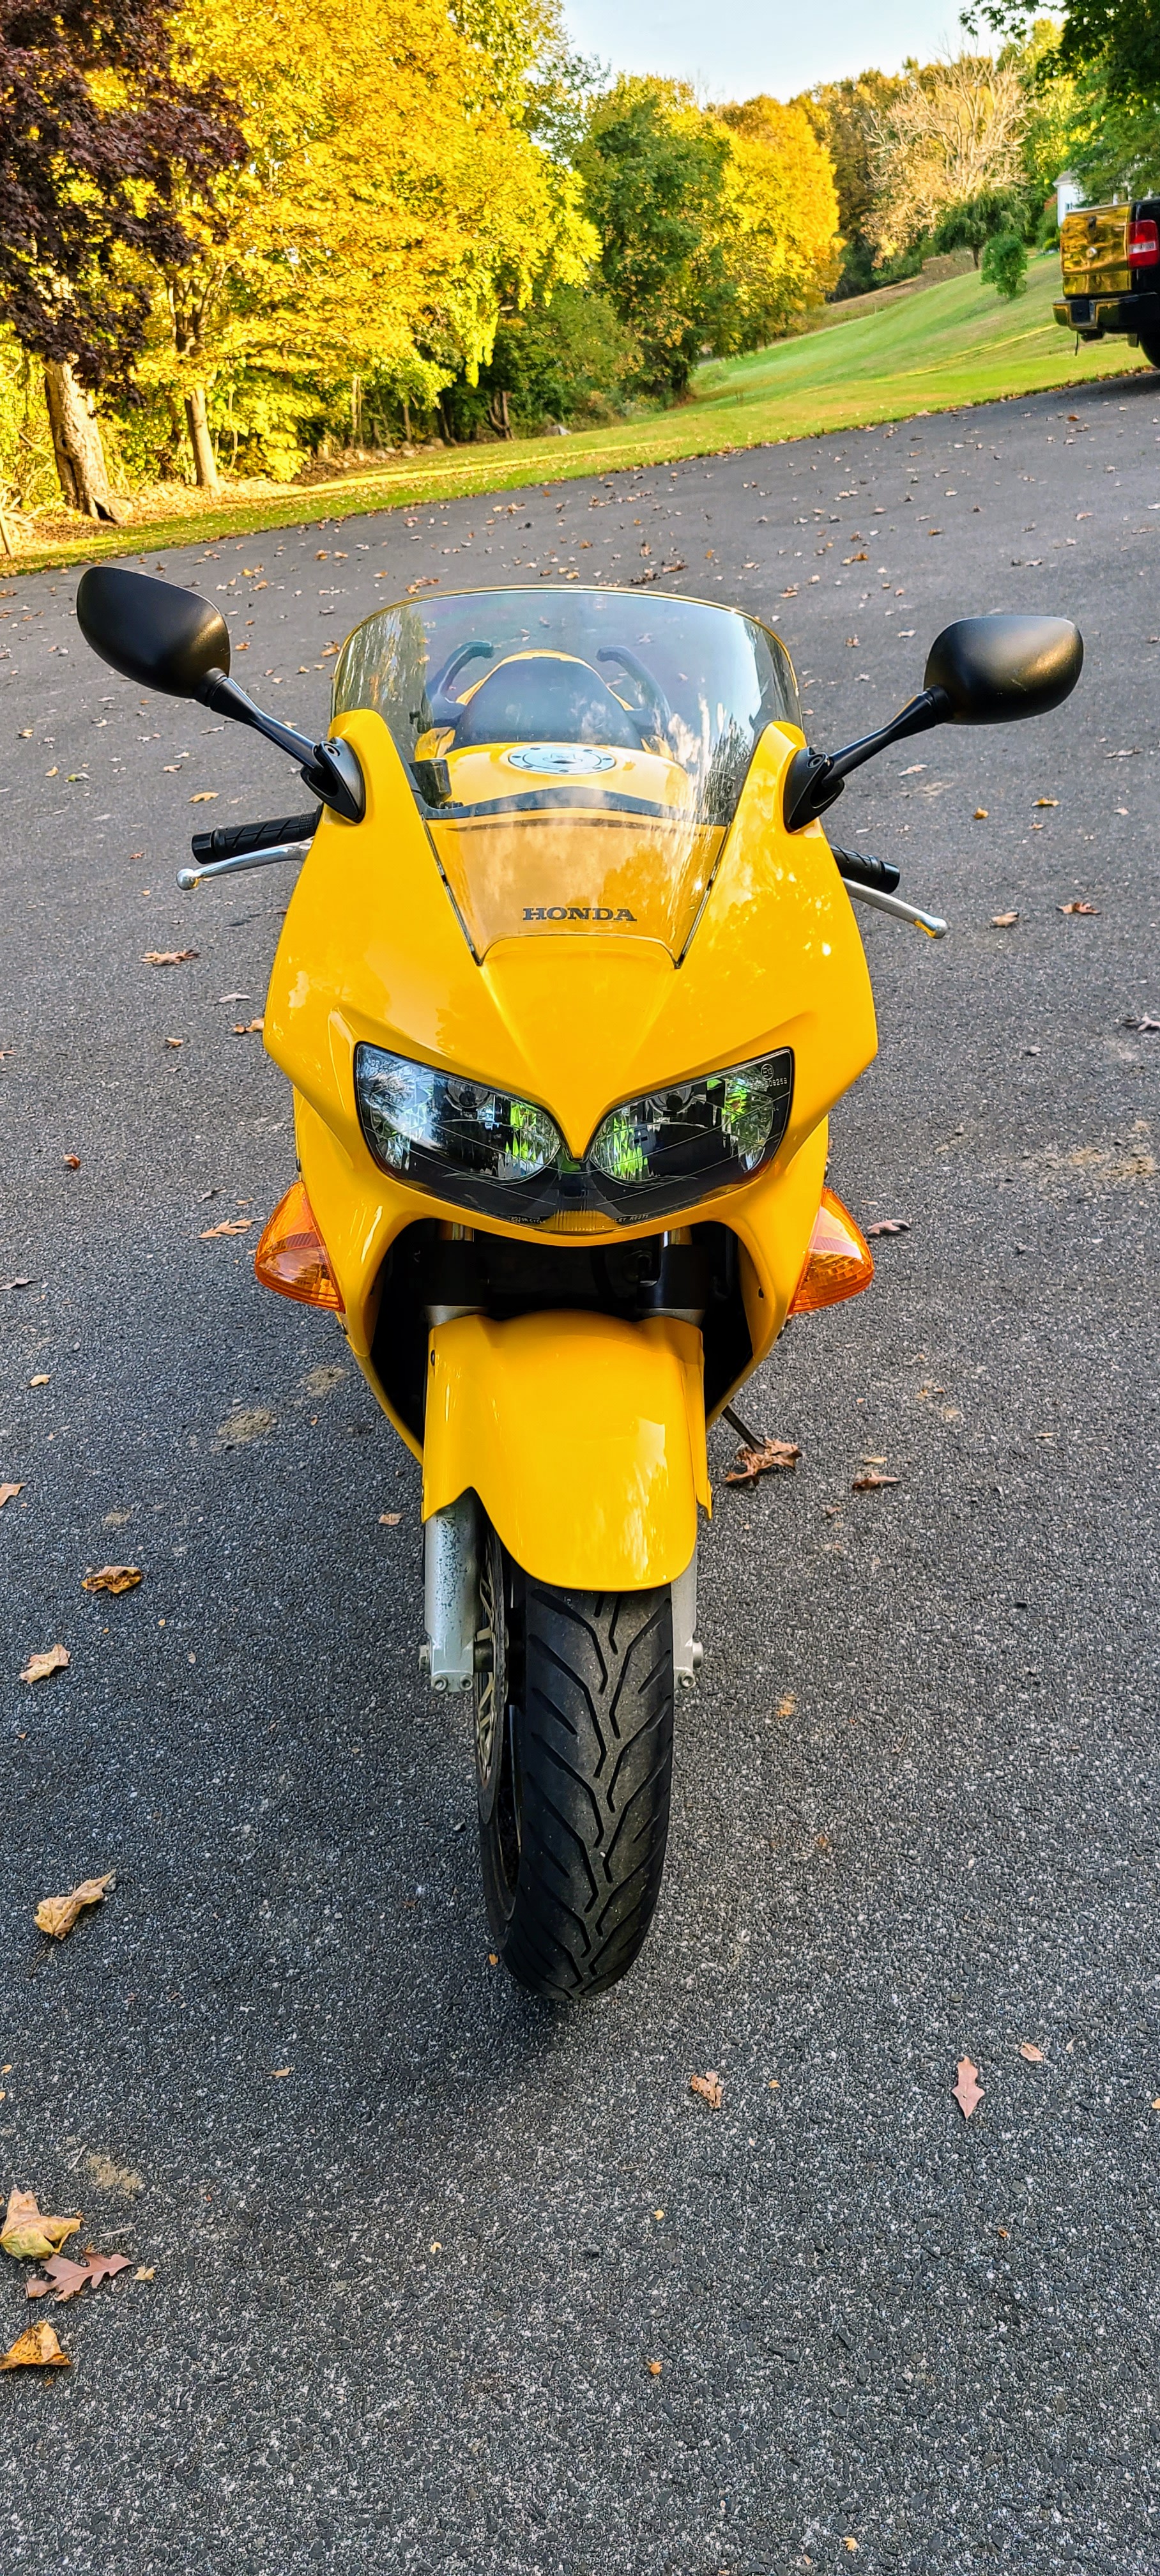
Hello again fellow Vifferini! Some of you may have read my long winded story here of getting back on a VFR after a 15 year absence from riding. I then posted the clean up thread here about that bike. Since purchase I have put about 10,000 miles on it having an absolute blast riding around the fine state of Utah, USA. The warm weather season is short but we do have a handful of excellent roads with endless scenery. The bike is set up just like my first VFR and it runs perfect. I couldn't be happier with it. Well, the plot thickens...which is to say I tracked down and bought back my original VFR. The one that I bought new in Northern California back in 2001. Yes, my actual exact bike, VIN #00089. Turns out the internet can be an interesting and effective tool. I actually got in touch with the owner a couple years ago but he wasn't ready to sell at that time. Finally, in recent weeks he let me know that he had upgraded and would sell it back to me, and at a very reasonable price. I was more than pleased, and my teenage son and I made plans to pick it up two states away in California. Not wanting to drag my small open trailer 1800 miles there and back, I wondered if a motorcycle would fit inside the wife's minivan. The Google machine quickly confirmed that I was not the first to consider this, as I found multiple pictures of various bikes shoehorned into spaces more commonly filled with soccer moms and soccer kids. That said, we had to test before the drive just to be sure. After some general measuring I figured that if we removed the windscreen and mirrors from my current VFR, we might be able to load it through the side door, which is exactly what we did. "Easy does it. Left a bit! Watch the ramp!" Success! Even got the doors to close with room to spare. Took it right back out and put it in the garage, neighbors shaking their heads, unsurprised at my usual shenanigans. So with that confirmed we made our way out to CA to pick up the original machine. Let me say this, one-on-one time with your kids is absolute gold. While going to get my old bike was cool, 20 plus hours in the car with my son was the real highlight of the trip. He's a fantastic kid and we had great time making new memories doing something that wouldn't make sense to most people. We arrived just after dark at the seller's home after a full day's drive. It was great to meet the gentleman and trade a few stories. I pointed out the small scratches on the clutch cover. "Yeah, that was me, trying to put it up on the center stand one day wearing flip flops and it slowly went over on it's side on the driveway. Not my first bonehead move." It was so cool to see that it still had every mod that I had installed more than 20 years prior, save the Sargent seat, but I'll just use the one from my other bike now. Looking over the bike further I noticed that he had the db killer installed on the Staintune, something I never used in my ownership. "Have you heard it without the db killer?" I asked, reaching for my set of Allen keys. "I didn't know you could remove it." he said. A few seconds later I had it out and fired up the bike inside his carport. Let it warm up for a bit and then gave it a few mild revs. "Whoa you can't have it now!!" he said jokingly, "I should have removed that a long time ago!" We both got a laugh. Every VFR guy has their favorite pipe, an uncorked Staintune is mine, though a period Micron is a close second. The Staintune look and sound just can't be matched. I removed the windscreen and mirrors, having done this exercise once before, and we loaded up the bike in the minivan. I strapped it down securely using the factory seat anchors and several ratchet straps. It was almost as if the van was made for this type of thing. We journeyed back home and put the bike in the garage, with some new memories and a new chapter to start. Seeing double, this looks familiar. The more recent left, modded to resemble the original, right. It even has my original plate on the back as plates stay with the vehicle in California. So what now? Get organized, make the punch list. Gotta go over everything to see that it is clean and up to spec. Fluids, charging system, brakes, etc, a nice winter project. The seller provided me with some receipts of maintenance he'd had done recently at a shop near his home. New plugs, valves checked (all in spec), new coolant and brake fluids. Mentioned an issue of stumbling in lower revs that the shop couldn't rectify. Also mentioned a slight coolant leak on the left side and a dent in the left radiator. Interesting but no worries, I have time to look over everything and make it right. When I sold the bike in 2006 it had 26,000 miles on it. Now it shows just 39,000 miles. I can live with that. In general it looks to be in decent shape still, just needing to be gone through a bit. I first removed the side fairings to have a look at things underneath. Hmmm...of the 18 or so fasteners I removed, only 3 were correct and all were finger tight or less. Luckily you can still order the correct ones from Honda. It's clearly been down on the left side at some point. The coolant leak is from an epoxy repair attempt at the bottom of the reservoir. Actually glad to see it's not from the engine casing as the reservoir is easy to replace. Odd repair though. The left rad is indeed dented on the bottom and the bracket bent slightly, though it is not leaking. It will work until I can get another one. When I removed the tail fairing some of the tool kit fell out of the left side, clanging onto the garage floor, and there is a small crack on the left of the tail fairing at the franken bolt insert. Yeah, it's definitely been down. But....(and it's a big but), whomever dropped it did put on an OEM side fairing so that's a win, and everything else I can deal with quite easily. I also took a chance to check voltage and saw 13.70ish at idle and a solid 14.44v at 4,000 rpm, right where it should be as far as I understand. I'll keep an eye on things once I start riding it later. I made a list and ordered a bunch of fasteners and a new coolant reservoir, OEM oil filters and fluids. Just going to take my time and enjoy it. More to come. Cheers, Justin
15 points
-
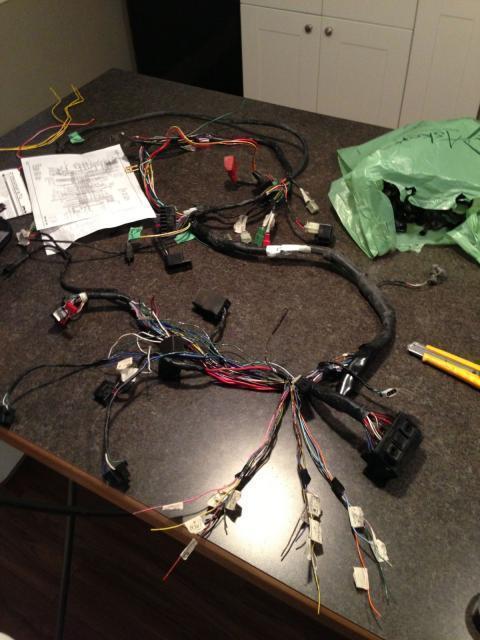
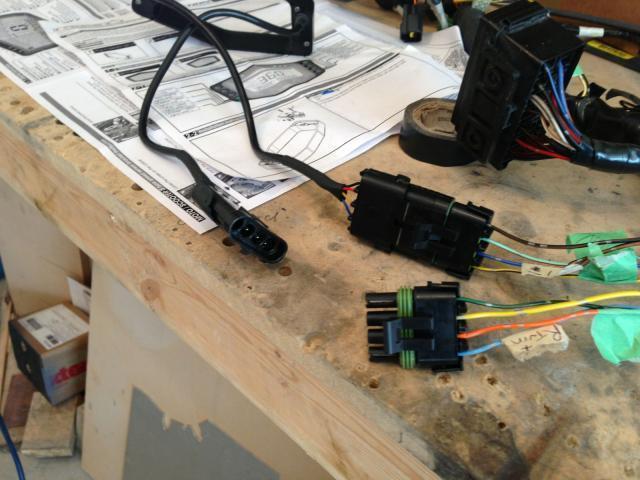
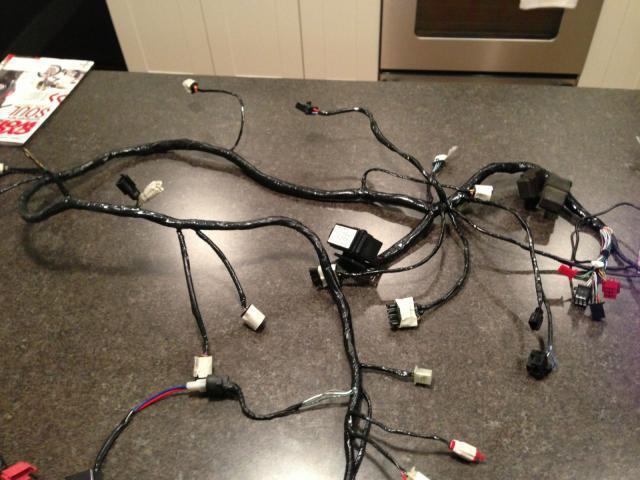
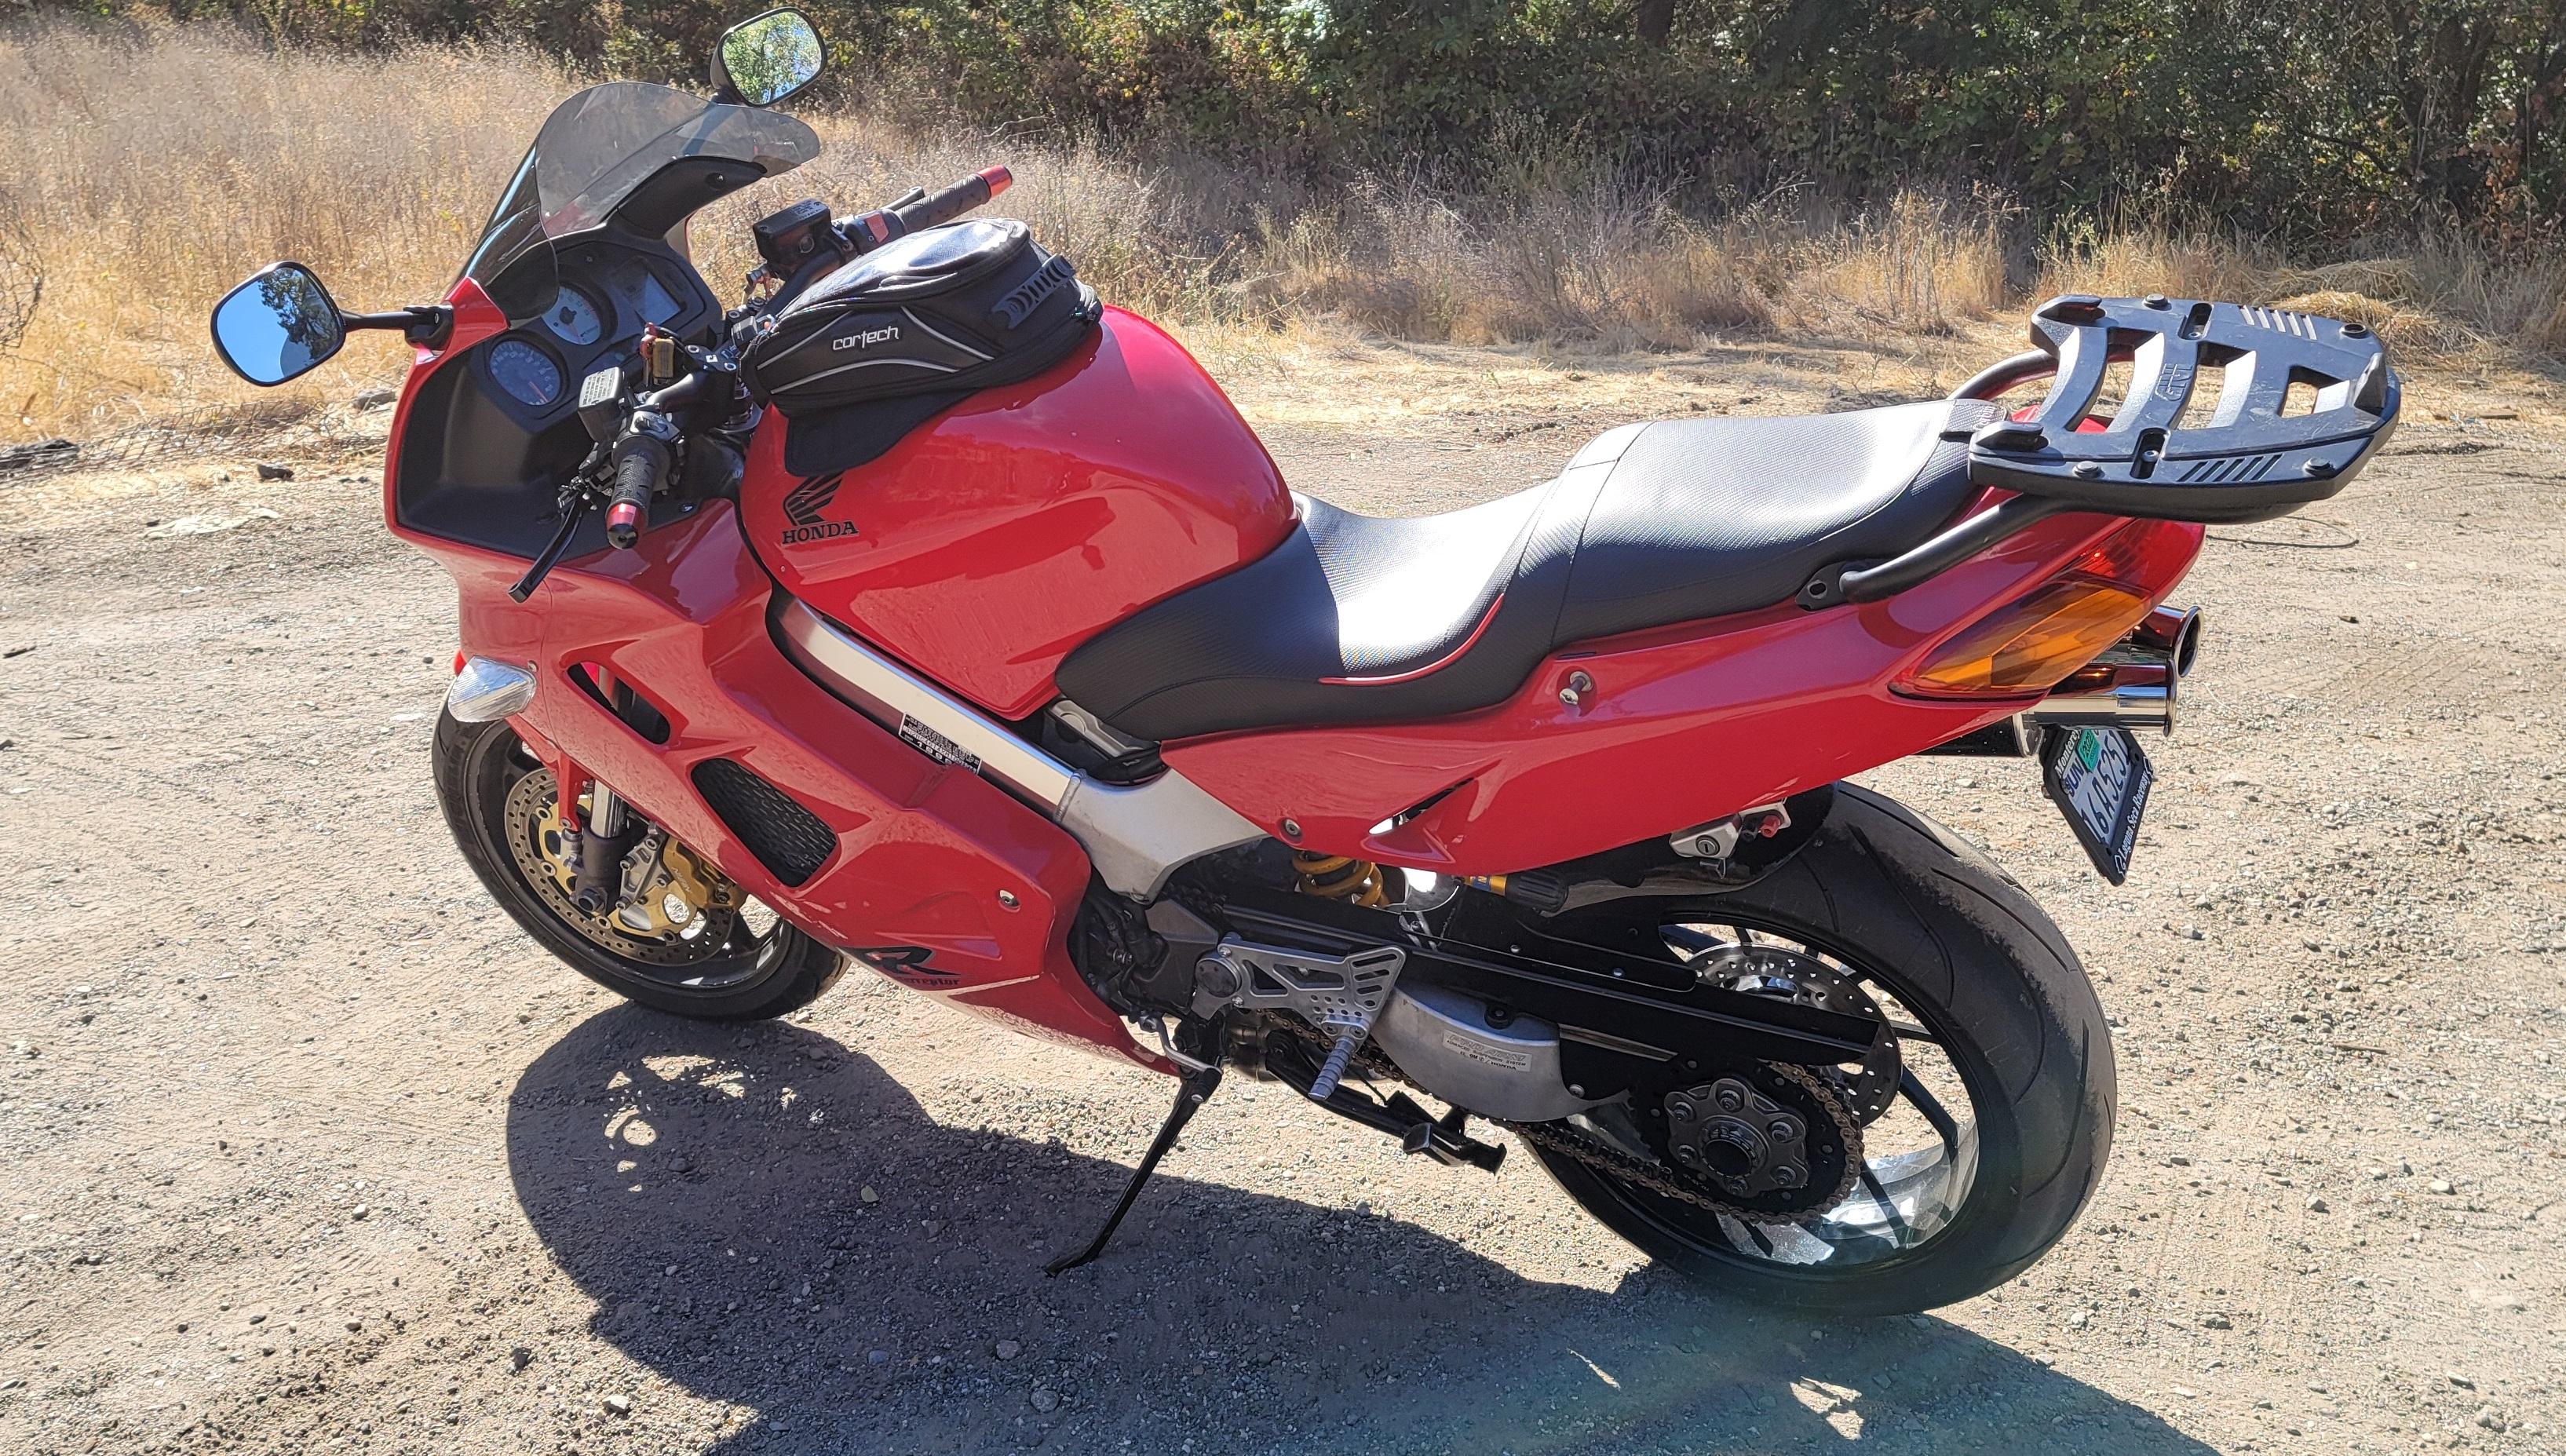
I took advantage of some sunshine the other day to do some pre-season checks. I addressed a fuel stumbling/ground issue and looked everything over since I had literally this entire bike apart last year. I added a heavier ground cable back to the frame from the front subharness, updated the Rapid Bike tuner firmware, reset the fuel and ignition maps 1 & 2 and turned off the autotune. Tightened up 4 of the 8 header studs. Tightened and added loctite to the horn mount. Cleaned and adjusted the chain. Checked fluid levels. Wiped down the forks. Going to save a bath for nicer weather. Put about 30 miles on and temps hovered around 170°f on this 41° day. Pretty fricken stoked at how this bike turned out after the massive work I put into it.15 points
-
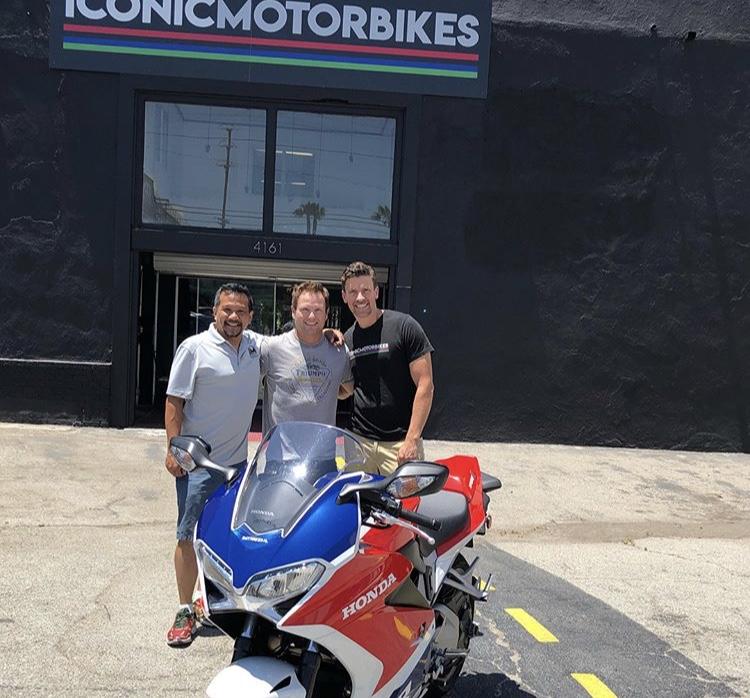
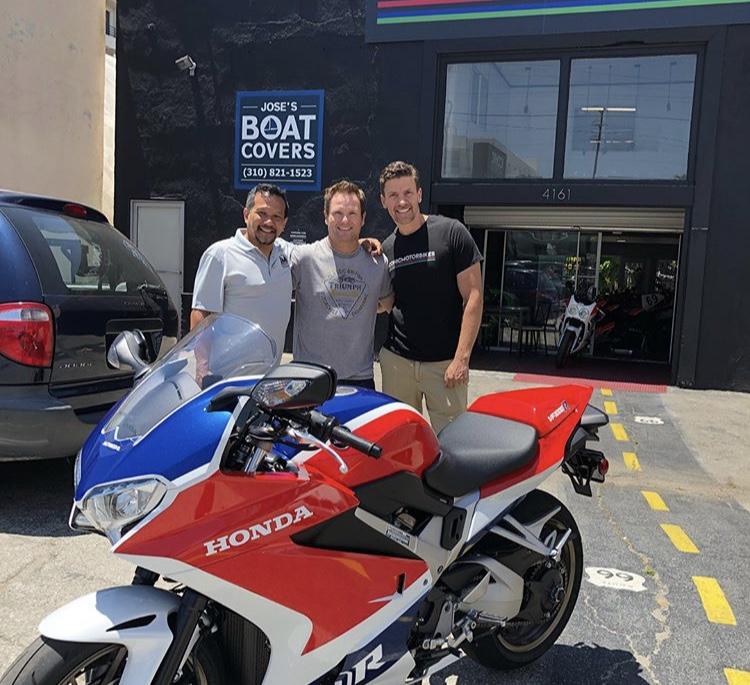
Even with a 6th Gen RWB Anniversary model, this is so awesome and tempting! I knew there was a reason why I always liked AMA legend Steve Rapp! And If you are in the Monterey area near Laguna Seca be sure to check out Iconic Motorbikes. Tad Dimer the owner is a super cool guy and a massive enthusiast. Bring plenty of napkins... Currently they have two VFR 400s there to tempt your bank account balance.
15 points
-
-BFP.jpg.e2d78ae0cad4313237c39d4fbdf88f5b.jpg)
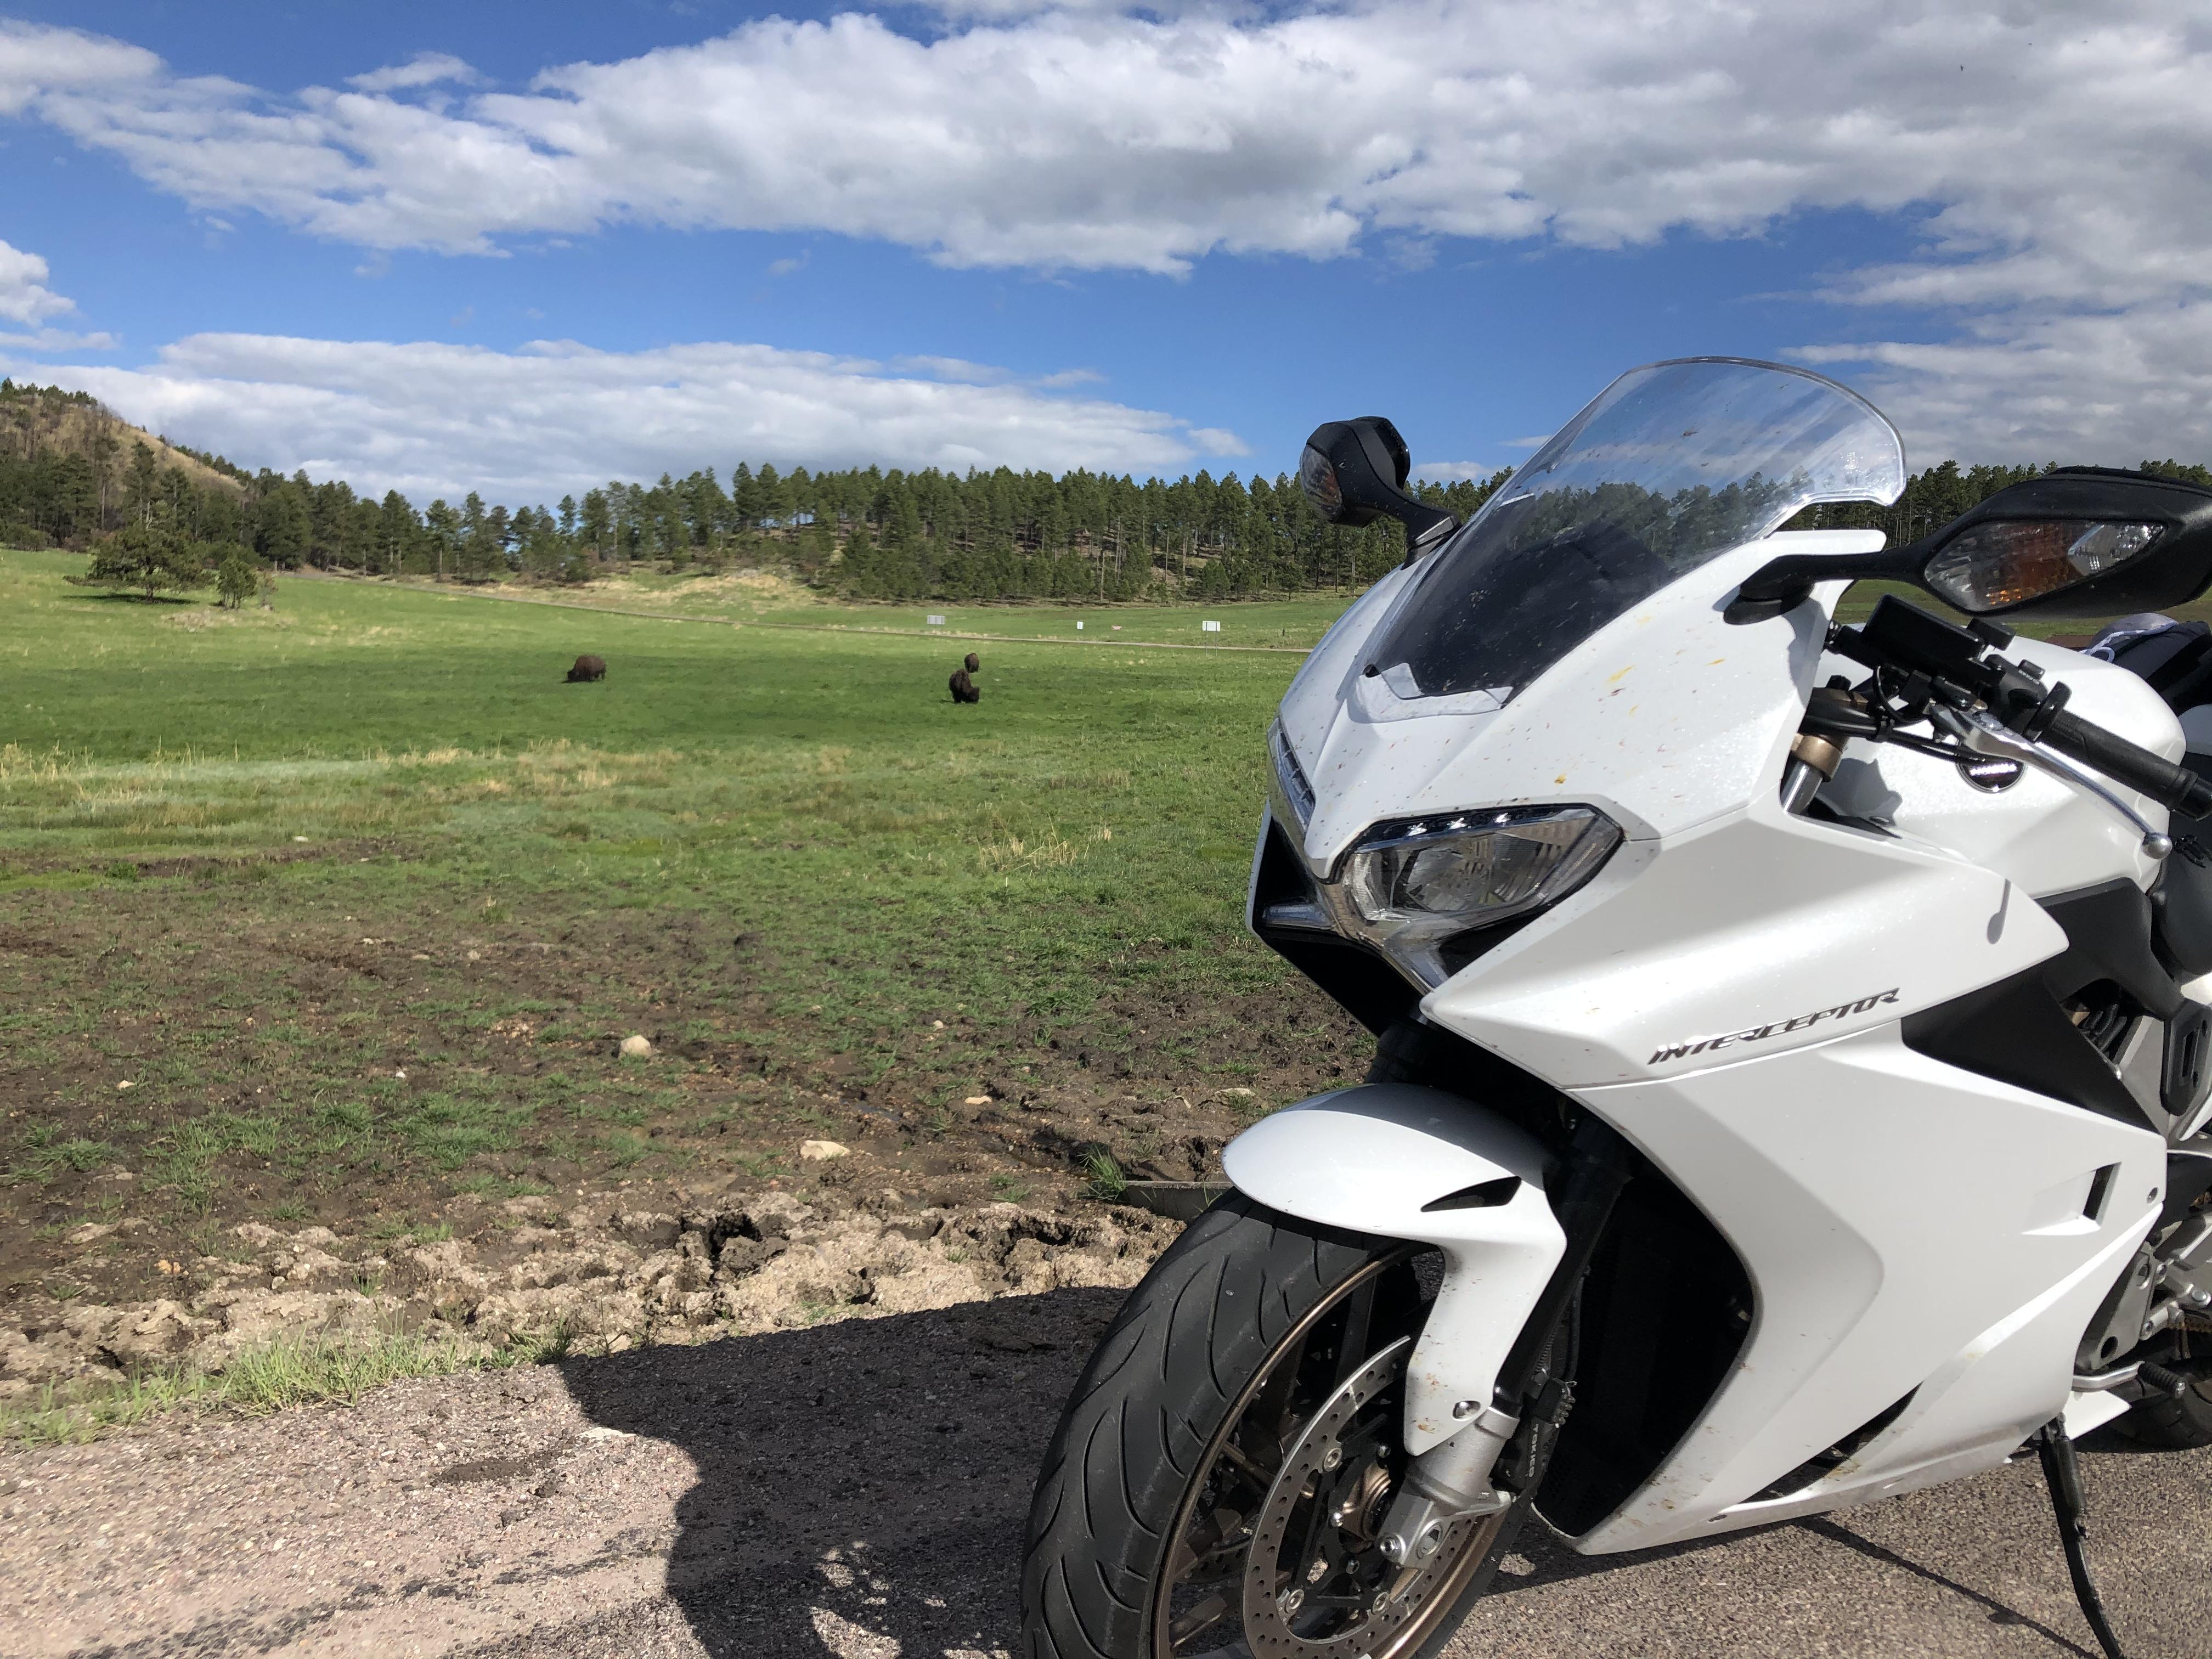
From the album: Random Pics From The Road
Ride here, tent there.15 points -
As most might know, I and fellow member sfdownhill were great friends and were a couple of key members in bringing the high performance headers the VFR community. After his untimely passing, I volunteered to help his family with all of the motorcycle related items Lance left behind. One of which was his prized 5 Gen. After a long battle with DMV hassles, the title was finally transferred to his father’s name and that bike is now up for auction at IconicMotorcycles. Seeing the pics of his bike on the auction site brings back some tears, knowing that his beloved VFR is a step away from finding a new home and me having one less shared physical connection with my friend. (It hit a little deeper than I thought it would). He and I talked a lot about the mods he planned and did and I even helped install some of the parts it still carries. I originally planned on being the one to sell it but after a lot of thought, I felt it would easier for it to be handled by a shop like Iconic. As just seeing the bike being loaded on their van when they picked it up was hard to take, imagine me dealing with someone coming to me to buy it? I’d probably be like the over protective father who feels no man is good enough to take his daughter on date :] Seriously though, it took a lot out of me handling the three bikes I took in, amongst the other moto bits I helped handle. After discussing with Lance’s father we both felt good about letting Iconic handle it. On that end, they were really great to work with, especially knowing that I as the middle man in this process. Anyway, thanks for reading and hopefully whoever does buy Lance’s VFR will get the same enjoyment as Lance did and will appreciate all that went into this special bike. Cheers, D https://iconicmotorbikeauctions.com/auction/2001-honda-vfr800-interceptor-3/14 points
-
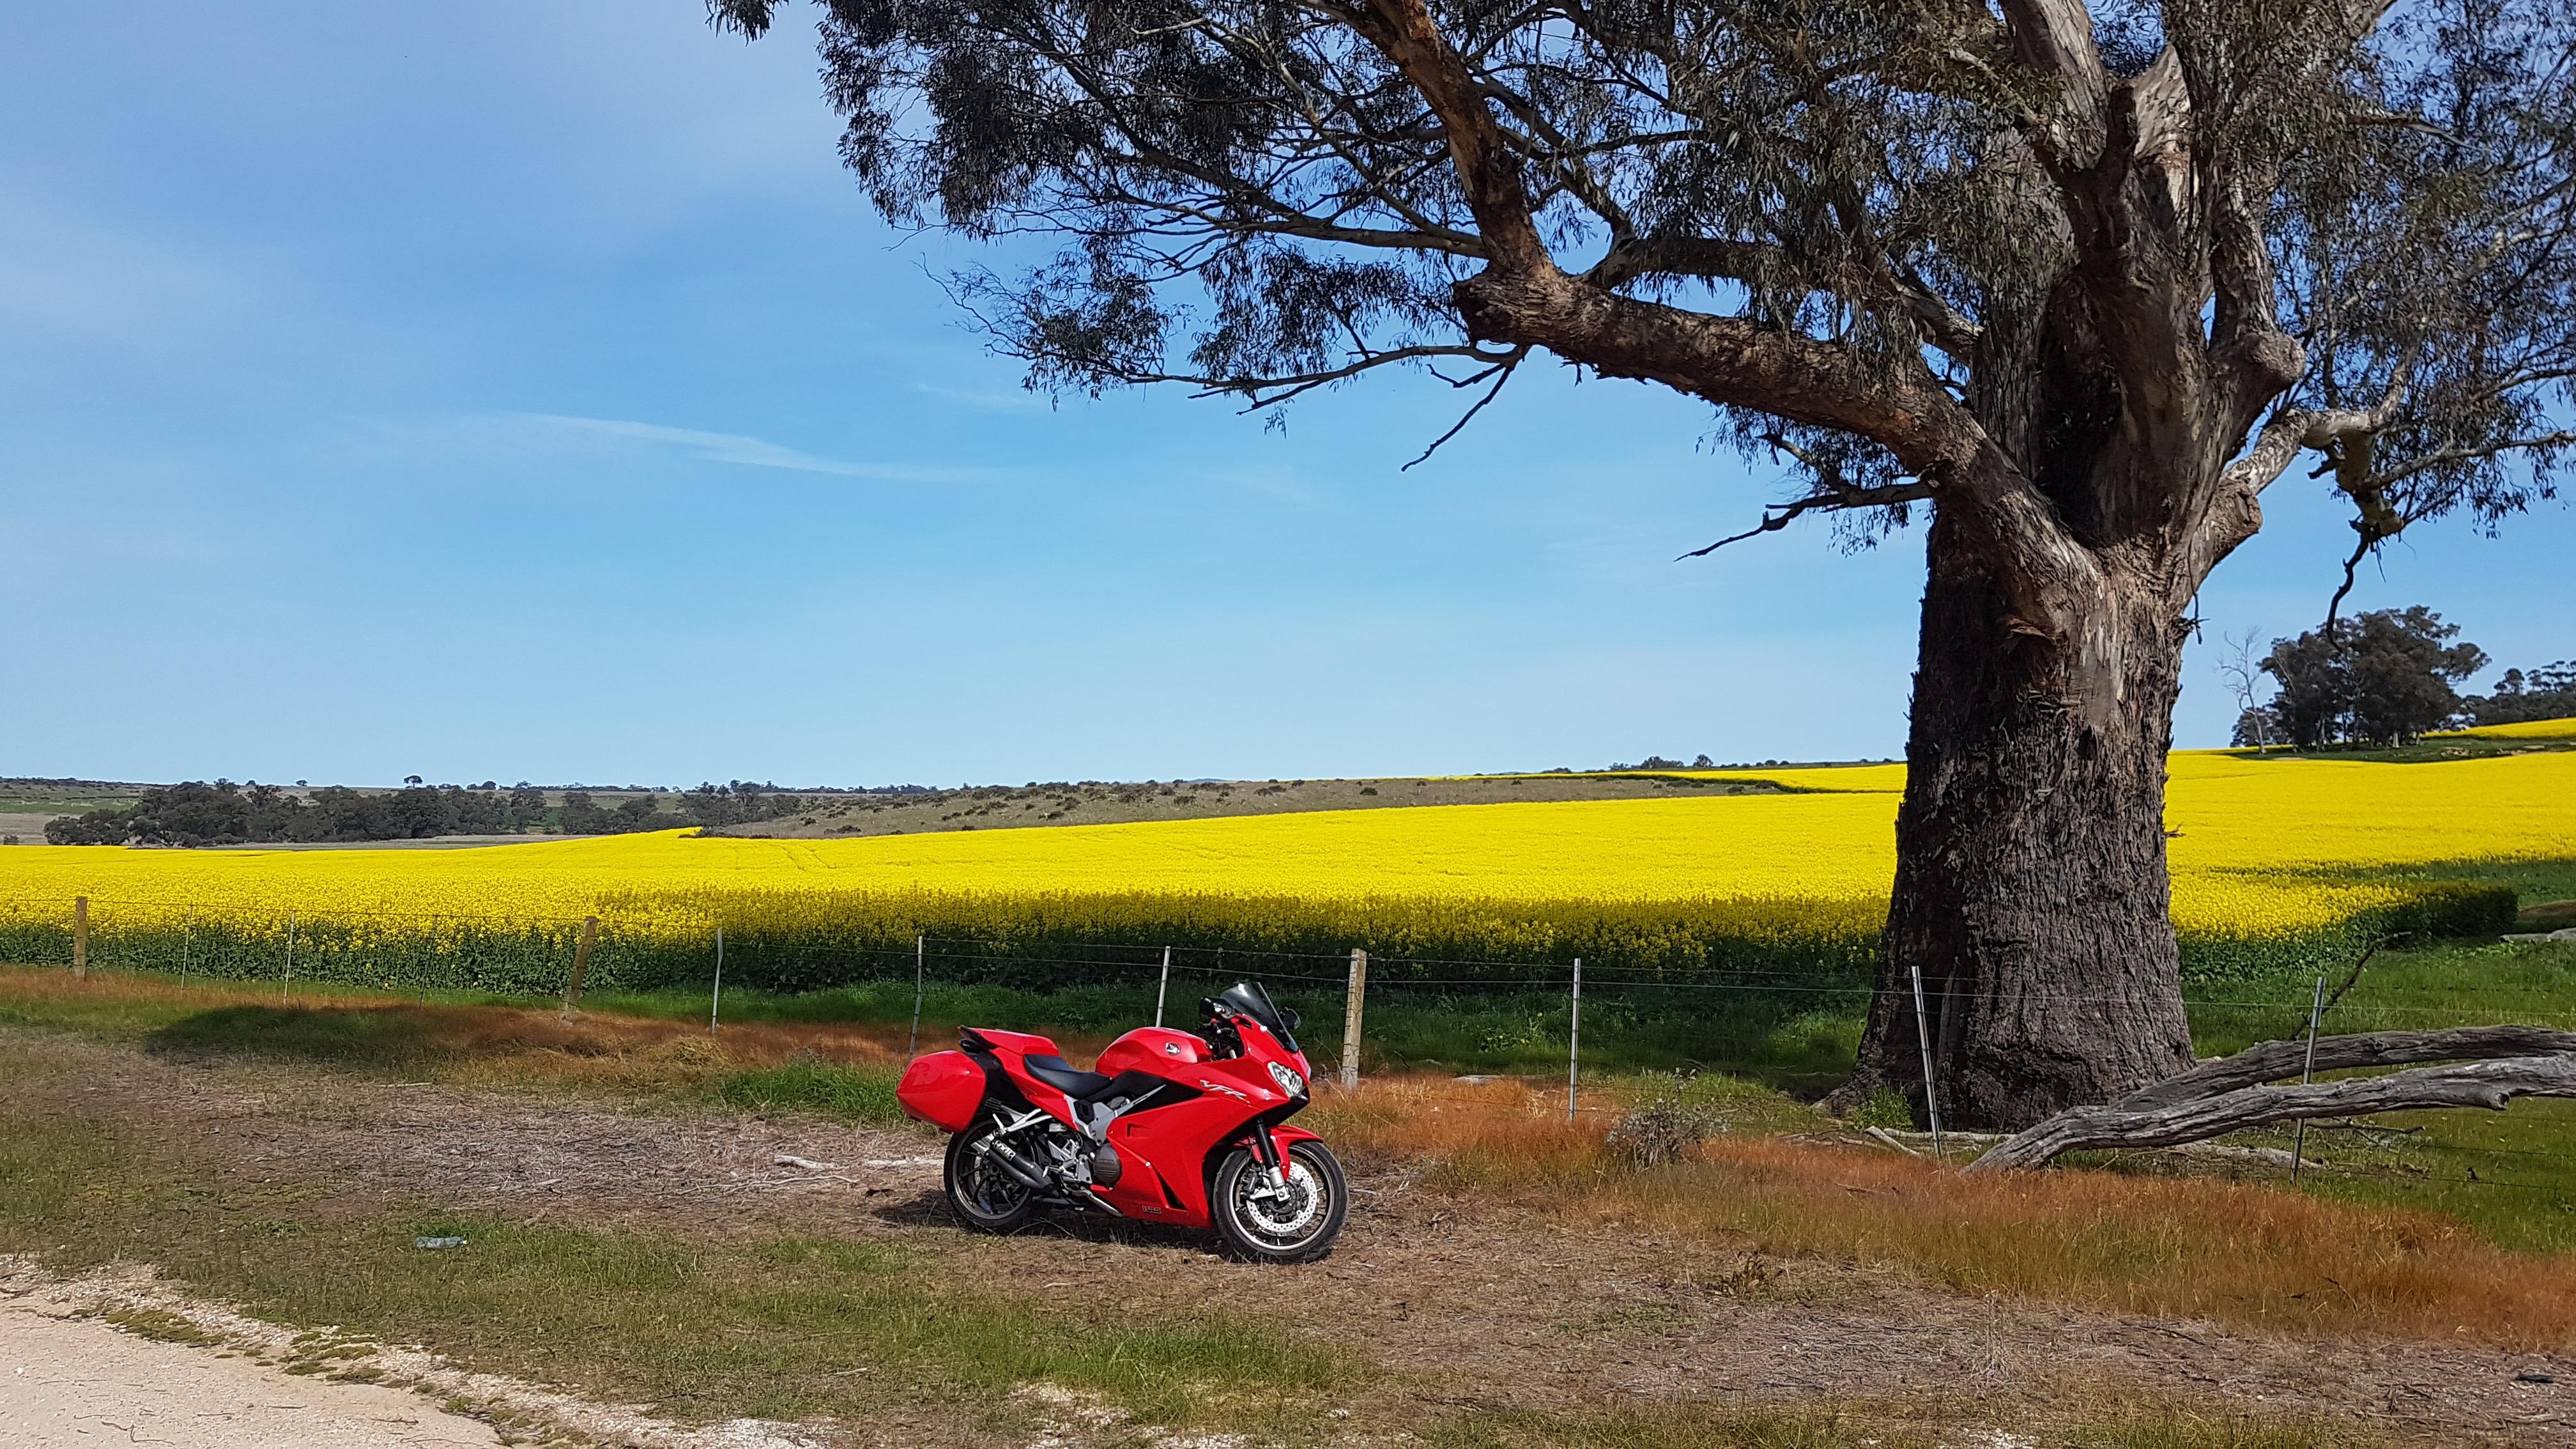
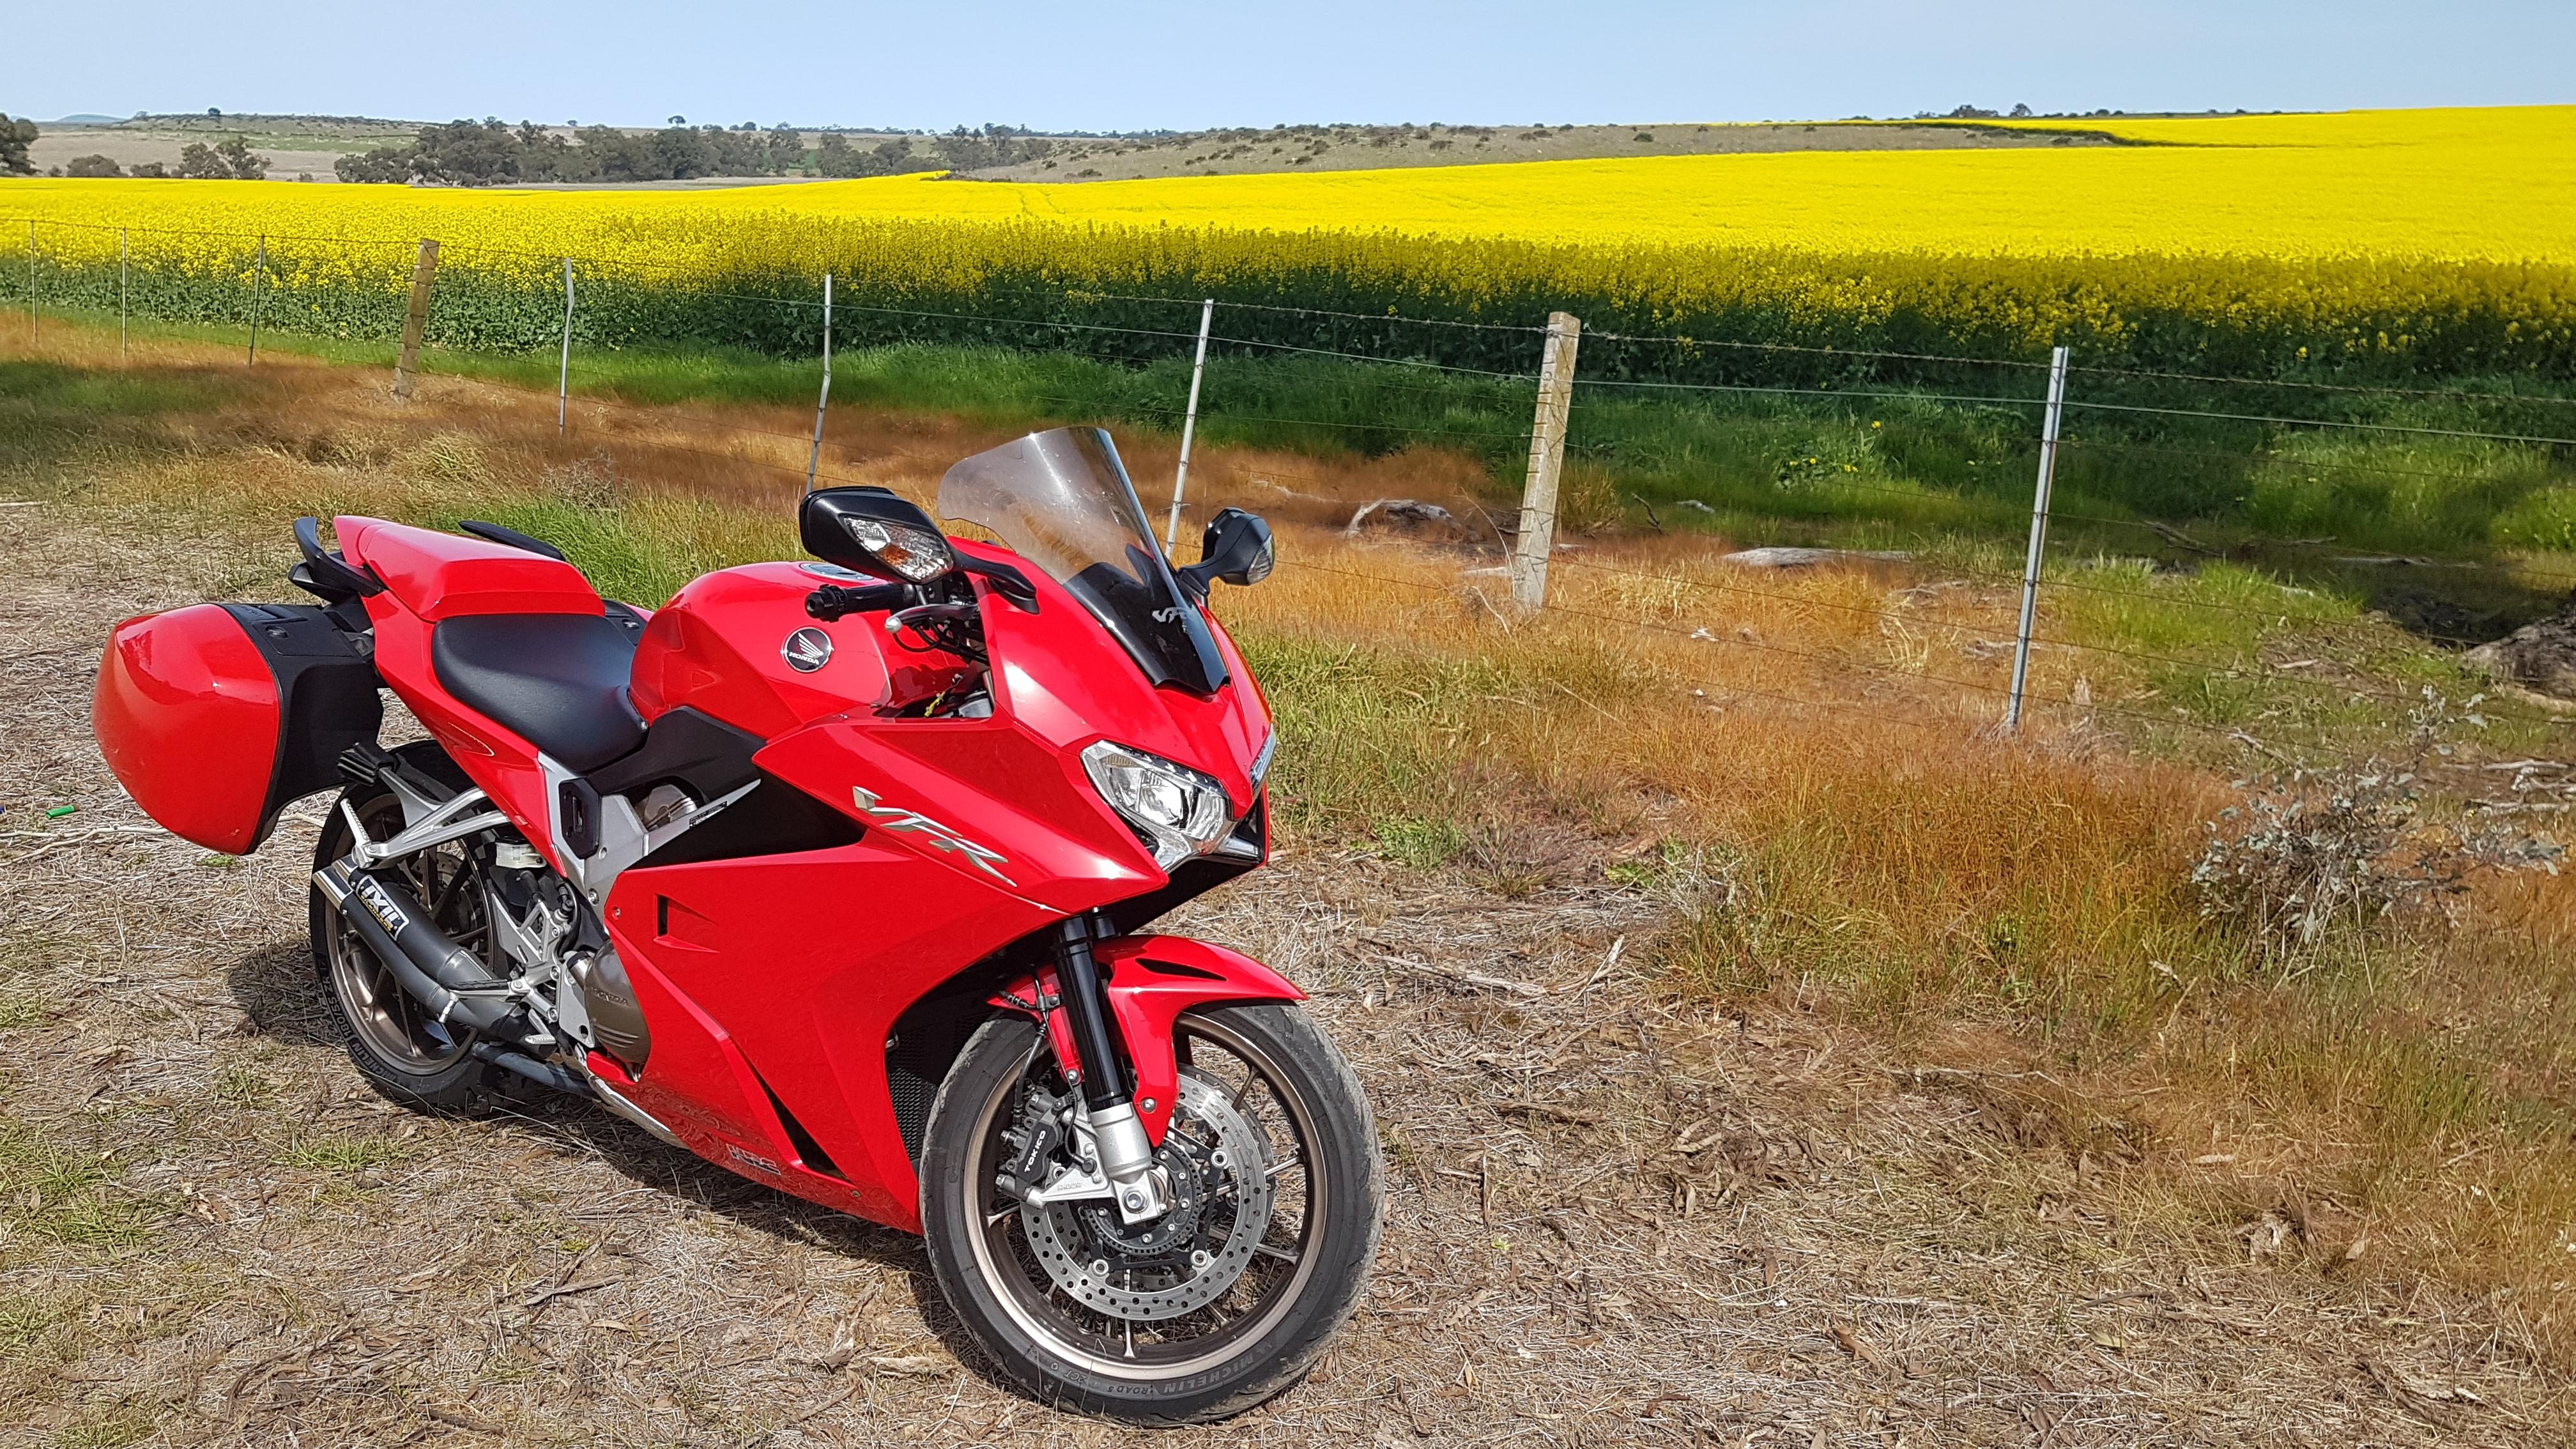
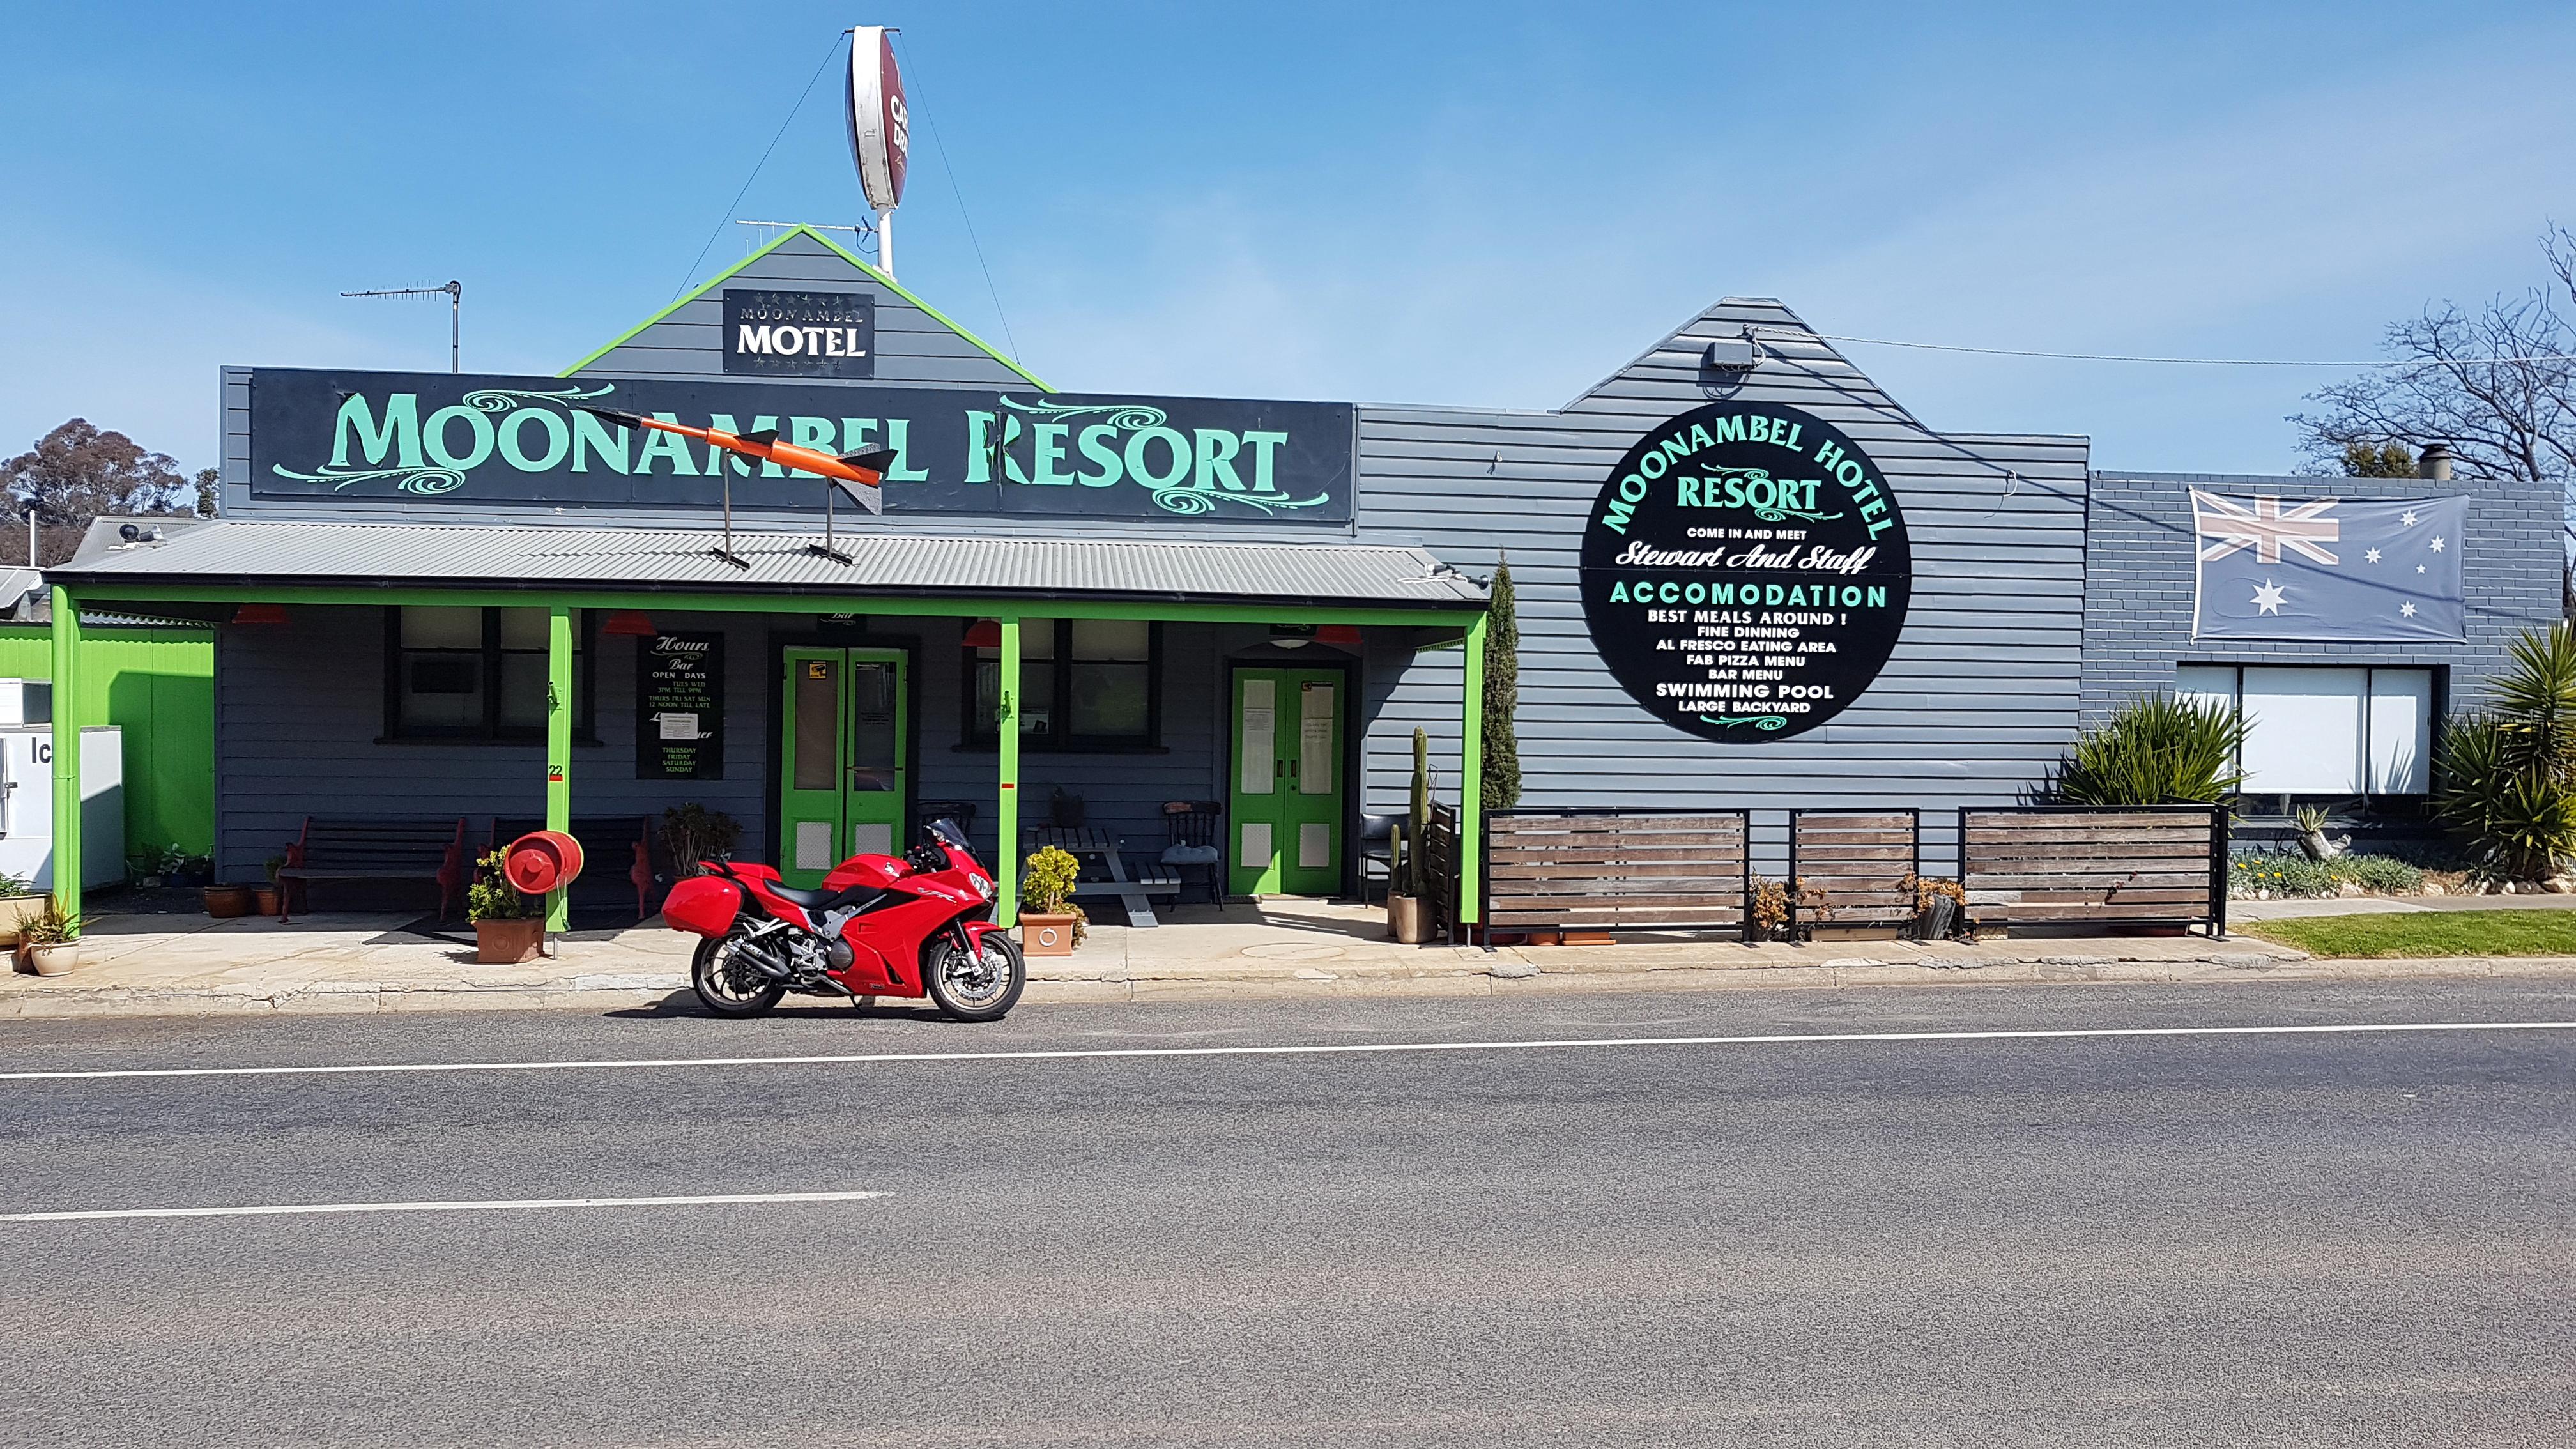
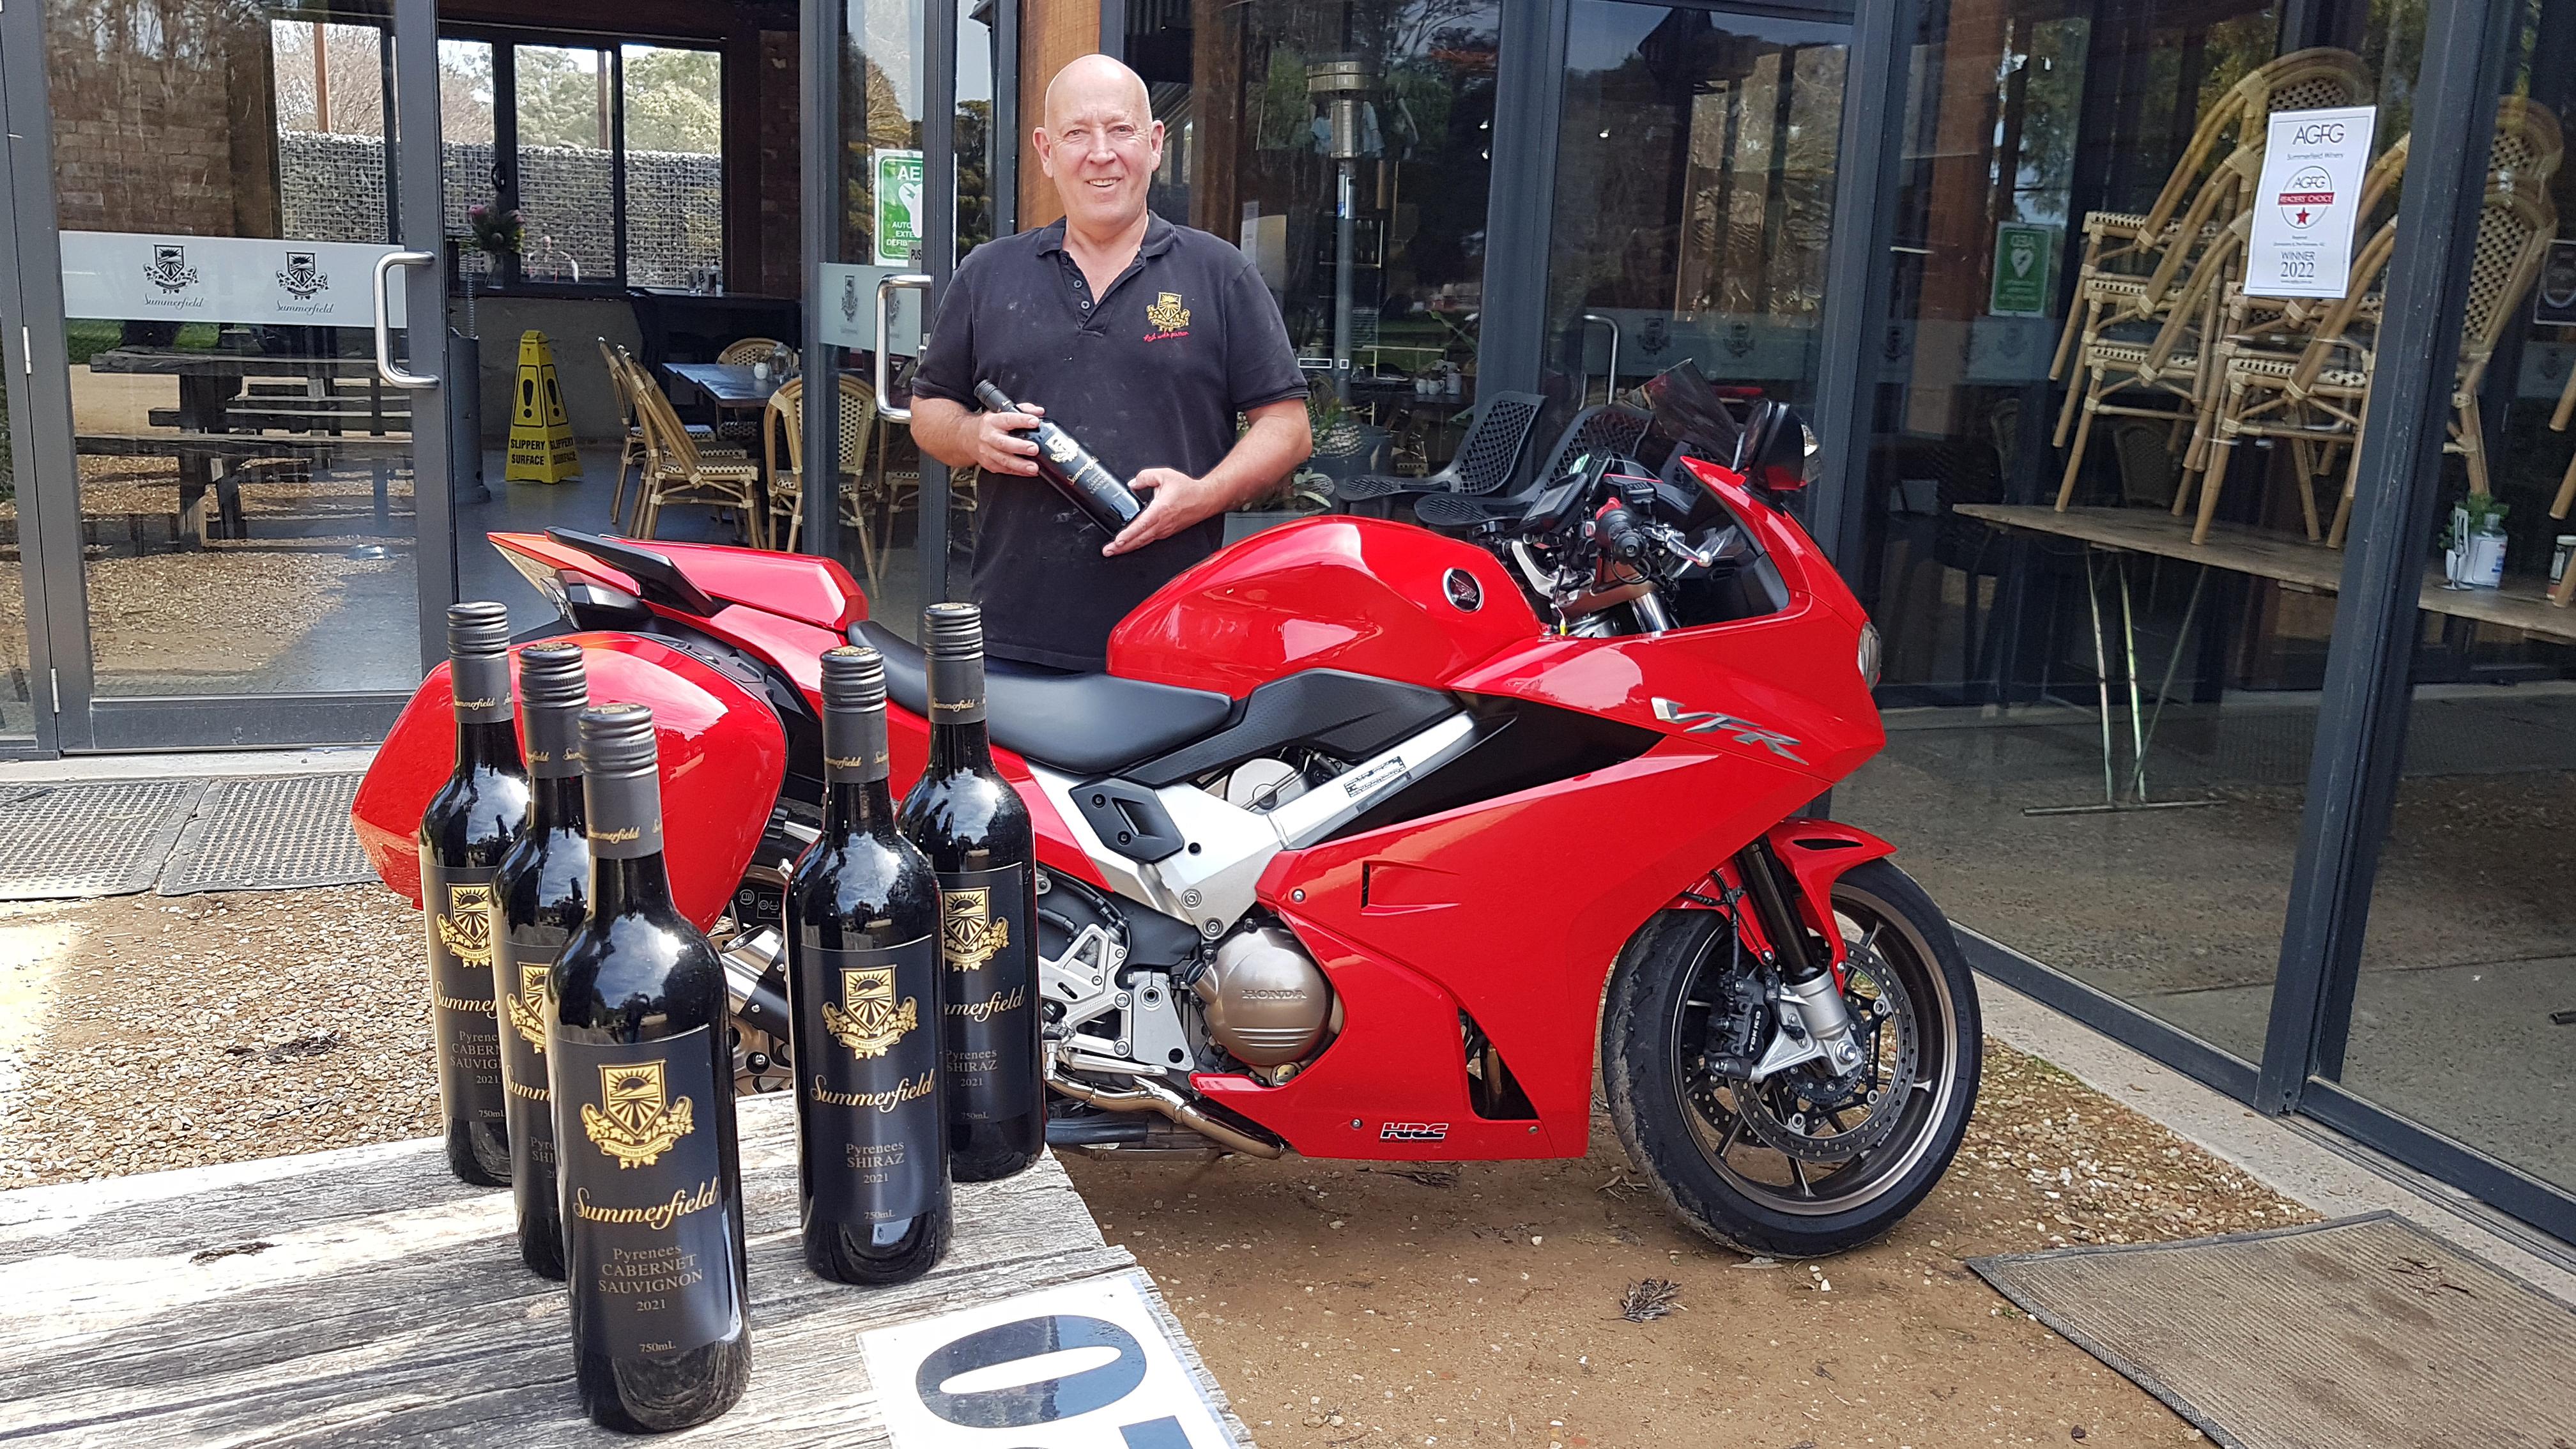
It's been around 18 months or so since being able to do and fairly easy 385k round trip ride to my favorite winery, mostly on nice quiet back roads. I've had a few hospital visits and major cancer surgery to get through, anyhow, the short story is I'm feeling great now and have another 12 months or so of Immunotherapy to get through then hopefully I'll be in the clear. Today was a bit of a test to see how I'd handle the longer times in the saddle along with a picture perfect Spring day for riding, everything went well, happy me. There's a great winery I enjoy riding to in a tiny country town called Moonambel (Victoria Australia, Google Maps will get you there!!), an old Gold mining town, but the only Gold you'll find there now are the Red's produced by - Summerfield Winery. Here's a few happy snaps of the day Safe Riding All. Cheers On the way up "Fields of Gold"everywhere, Canola in bloom. Not quite Las Vegas. Apart from the Winery, there's the Motel and a General Store, a small town well known for its local wineries. The brilliant wine maker himself Mark Summerfield - Liquid Gold! Time to fill up the Panniers and head for home. The bike just loves Reds! Mark and the winery staff know me as "The Red Baron". The VFR and my wine pickups have featured in one of the Wine Club newsletters. I've made eight wine travel canisters out of 90mm PVC storm water pipe with a solid cap on one end. I roll up each bottle with bubble wrap then slide it into one of the canisters, I can fit up to 4 bottles in each of the pannier internal bags and haven't had a breakage yet. Not the most efficient way of purchasing wine, but it's an enjoyable day on the bike and any excuse to pick up some fine Reds is a good one! Have to admit my 8gen with 93,000k's on the clock, never ceases to put a smile on my dial.
14 points
-
My fascination with V4 power started back in 1999. I was still new to riding back then. Having been influenced by an older co-worker as well as a good friend, I purchased my first bike, a 91 CBR600F2. I was having fun, gaining some experience and trying to stay out of trouble. Soon after, that same buddy of mine imported two bikes via the grey market: an NSR250 and an RVF400, the latter resembling a miniature RC45. He let me ride both before he sold them. The RVF with it’s tiny V4 had this unique sound and power band. I was immediately hooked. About a year later I sold the F2 and bought a 2001 VFR800 new off the showroom floor. I quickly added a Staintune high mount exhaust and a Sargent seat, and then proceeded to ride about 26,000 miles over the next 5 years. I was living in Northern California at the time. Weekends comprised of trips to the coast, mountains, commuting, etc. I loved that bike with the power delivery and the sound it made. I went on some great rides and made some great memories. When my first child was born I thought I’d better slow down and be more responsible so I sold the VFR and settled into the idea that I’d probably never own a bike again. Too much risk I thought. Over the years I built a few cars, dabbled in some other hobbies, told my kids stories of riding and how much fun it was. About that time I did a track day at Laguna Seca, and the time I topped it out in Death Valley, only to get pulled over 20 miles outside of Las Vegas for doing 15 over. Thought it would be great to get another bike, if only to have that V4 sound in my garage again. Fast forward some twenty years to 2020. My older brother gets a VTX1300. “Hey man why don’t you take it for a spin?” “Nah, too big for me, besides I’ll never ride again. Too many distracted drivers, people texting not paying attention, etc.” He nods silently “How bad is it?” I inquired with some curiosity but still trying to justify my position, “Do you feel like people are gonna run you over every day or anything?” “Nope, not really” “Hmmmm…………interesting…..” Something to know about me is I have the unique ability to talk myself in or out of anything. If I spend enough time thinking about a certain venture, stuff just materializes. I decided it was time to recreate a memory. I went to the VFR forums and online classifieds looking for another bike, just like mine. Had to be a 2001 due to a few changes that were made when compared to the 98/99 models. Last year of the gear driven cams. Not interested in the VTEC models. 2000 would have been fine but the US only got yellow that year and my eyes just can’t handle that much yellow. Besides, everyone knows that red is faster. That’s been proven. Just ask the Ducati guys. Sent my brother a text with a picture of a potential candidate for sale: “You’re a bad influence. Just sayin’” “lol” His simple yet affirming reply I looked for several months, spoke with a few sellers. Surprisingly the 2001 models were a little hard to come by but a few popped up. Some had higher miles, some had accident damage, some were a little overpriced, some were too far away on the East coast. But then I got tipped off about a bike listed on a different forum. Looked really clean, only 21k miles, some nice mods, priced really well and only two states away. I scrambled to create a user profile on the forum. “I’ll take it!” I posted. “Cash in hand and PM inbound.” That was a Sunday. I spoke with the seller the next day. Hung up the phone and bought a plane ticket for a place called Manhattan, Kansas. I had to look that one up. “The little apple”, the seller joked. I spent the next few days getting things in order. New helmet, gloves, jacket, ear plugs, Ibuprofen, etc. I mapped out the journey. 999.2 miles per Google maps. I would travel due West from Manhattan, KS through the Colorado Rockies into Southern Utah and then North-West toward my home in Utah County. I wondered about the weather, particularly in the mountains of Colorado as they had been pummeled with snow about two weeks prior. The weather report called for 70s in Denver and 50s in the mountains. Road cameras showed clear highways. What luck! Let’s do this! Friday found me on a plane bound for my first stop in DFW, TX. I sat next to a young lady who was travelling to Puerto Rico with her boyfriend. “I’m flying to Kansas to pick up a motorcycle and ride it home” I told her. “I bought one just like it brand new 20 years ago.” “Well I’m 21.” she replied with a slightly perplexed millennial’s smile. I laughed to myself and thought about how I was “in my prime” at that age. Young, single, confident, I still had hair on my head. (Remember those days?) I’m only 45 but part of me still longs for the good old days, until I remember that I’m actually in the good old days right now, just a different version. I have a house, a stable job, and fantastic kids. One day I will miss these days my dad reminds me. And I know he’s right. She told me how they had purchased a bike about a year earlier. Totaled it 3 hours after purchase when a driver turned left in front of them. She showed me the pics on her phone. Both came away with only minor injuries. “It could have been a lot worse” she said. A sober reminder to always be vigilant on a bike. I had a few hours at DFW before my flight. Got some lunch and then found my gate. Settled in to check the news, people watch, and wait for the flight to board. I saw an older woman close by sitting in a chair with small wheels, not anything she could push by herself. She was missing her left leg, right at the knee. She looked miserable. Stranded. Left alone and forgotten. I put my phone away, mustered up a little courage, cleared my throat and walked over. “Can I give you a hand with anything?” “I’m really hungry” she said, glancing over at the vending machine. “Let’s get you something.” I released the brakes on her chair and pushed her over to the machine. She started to look for some change in her pocket. “I’ll take care of it. Anything you want.” I said. She wasn’t fussy. Just a Coke, a pastry and some chips. She seemed genuinely grateful. We spent the next hour talking. Victoria was 50 years old and from Houston. Truth be told, she looked much older. She had short brown hair and she was missing several teeth. He clothes looked like they had just been pulled from a pile at Goodwill. Something someone else had thrown away. She’d never been out of Texas, hadn’t done much. Had a rough childhood and most of her adult life was spent in the clutches of drugs and alcohol. Never one for subtlety I inquired about her missing limb, “What happened, you kick the dog too many times?” “I’ve been in the hospital the past 3 months. They took my leg. I’m diabetic and too much drugs.” she explained. “My dad’s gone, well my step-dad.” She paused and took a long look out the window. “He was my best friend. But my momma’s still alive. I’ll go and stay with her a while.” I asked about her life, and mostly just listened. “I used to be good at art” her eyebrows raised slightly from a rare, good memory then settled back down into her reality, “but it is what it is. I can’t remember much these days.” “Everyone has struggles,” I said hoping to offer some reassurance. “I think everyone could write a book about their life and experiences. And look on the bright side, you’ll save money on shoes!” I said with a wink. She eeked out a laugh while eating her Ruffles. I left her in the hands of a caring airline employee who assured me that she would get her on the plane ok. And that she did. I left thankful to have met her, and more thankful for what I had waiting at home for me. Soon it was time for me to board. I hopped on a small plane headed for Kansas. I overheard another passenger say they had to remove the pesticide sprayers to convert our crop duster into a commercial airliner. He wasn’t far off. It was cozy but got the job done. I was tempted to poke my head into the cockpit and say “I just want to tell you both good luck. We're all counting on you,” in tribute to the late Leslie Nielsen but I chickened out. In hindsight I should have went for it. Instead I proceeded back and found my seat next to a retired Kindergarten teacher from South Carolina who was flying in to see her grandkids. Her name was Kathy, like my mom. “Easy to remember that one,” I said. “My son-in-law is stationed at the base there. Hopefully he doesn’t have to go overseas again. He spent 9 months in Afghanistan on one tour. The baby was born while he was away” she said pensively. “What’s the best thing about being a Kindergarten teacher?” I asked. She didn’t hesitate at all, “Showing up to work every day and feeling loved.” Now I was the pensive one. I like what I do but it’s not like that. Hmmm… Upon landing she wished me a safe ride and I wished her a happy Easter with her grandkids. At the airport I shot a text to the seller’s son who lived close by and had offered to pick me up. “Give me 5 minutes. Red Chevy truck with a KTM front plate” he replied. I could tell right away that Tyler was a good kid. He had sunglasses and a slightly sunburned face from time spent outside. He was polite and well-spoken, like his dad. Gave me the impression that he’d been raised right. Said he worked a lot of hours driving truck, local not over the road. Had bought a Yamaha Tenere 700 recently to do some adventure riding with his brother and their dad. Said it was time to sell the VFR after having owned it for 7 or 8 years. In a few minutes time we arrived at the house and there she was propped up on the center stand. By now it was about 5pm on Friday. My goal was to make it home by late Saturday night so as not to miss Easter morning with my kids. We got right to business. “I installed the rear cowl for you and lubed the chain. Oil level is good and looks amber through the glass,” Tyler said, his riding experience evident. Like I said, a good kid. He threw in the tank bag and a Ram mount for my phone at no extra charge, knowing I would use both on the ride home, which I did. “Oh yeah, the front headlight blinks during the day with a sensor and it’s got a train horn on it,” he says. He gave the horn button a quick blip and I immediately realized he wasn’t joking. Two tones and what had to be more than 120 decibels. Too funny. But I could see how it would be useful. Got the title and bill of sale, gave the bike a quick once over, donned my new gear as the engine warmed up. Gave Tyler a handshake and hopped on the VFR, for the first time in 15 years. Put my hands on the grips and took a quick moment to question my decision and the journey ahead. “Just take it easy, you got this,” I thought. Tyler looked like he was uncertain if I’d really make it all the way home as I had planned. I was a little unsure myself. I double checked my helmet, pulled in the clutch lever, clicked down one for first and eased down the steep driveway and onto the street. First impressions: This thing sounds great. And how did I ever live without Helibars?! Oddly enough getting back on was “just like riding a bike” as they say. Go figure. I acclimated quickly. Two tenths of a mile down, only 999 miles to go. Now, I had brought a throttle lock I harvested off my brother’s VTX in a rush the night before. The Vista cruise I ordered from Amazon wouldn’t arrive on time. My brother’s throttle lock turned out to be too big and wasn’t going to work and I dreaded making this trip without something to hold the throttle in place. Luckily there was a bike shop near the seller’s house and they were still open for a few minutes. They sold me a throttle lock, set my tire pressure at 36 and 42, and even gave me a tire pressure gauge for the trip. “How far you headed?” “Trying to be in Salt Lake City by tomorrow night.” “We did a ride to Toronto last year” he said. “That guy made the trip on an RC51!” pointing to one of the mechanics who gave an awkward smile back confirming the accusation. Suddenly my VFR was a Goldwing by comparison. “Thanks gentlemen! Really appreciate it!” “Ride safe!” they said as they resumed closing up shop. That was 6pm on Friday. I stopped to top off the bike with fuel and get bearings on how to get to the freeway a few miles away. Gently got it up to speed and settled into 6th gear at around 60mph. Then this happened: Holy cow this helmet is loud!! I had forgotten to put in my ear plugs and the wind noise was extreme. Pulled over just before the freeway on ramp to rectify the situation. An older gentleman in a farm truck stopped and asked if everything was ok and if I needed any help. “No I’m good, thanks though.” He waved and drove off. With ear plugs in place I rolled onto the freeway thinking, so far, every person I’ve met in this state has been absolutely stellar. Very cool. On the freeway once again I settled in at 6th gear, 70 mph or so. Love the Helibars, not sure about the double bubble windscreen. It seems the wind hits right at my helmet. At 5 foot 8 I can’t really get above the buffeting. And with the tank bag I couldn’t really get below it. No worries, I can dial that in later. Right now I have several hours of Kansas freeway to tackle. A decent side wind made things interesting but subsided as it got closer to dark. I chased the sunset, pulling over for fuel and to change into my cold weather gear when the temps dropped. For those of you who have never experienced Kansas, let me tell you something. This place is flat, like really flat. Like I looked across the horizon and I could see the back of my head flat. And straight. Hardly a curve or a hill to spice things up. Nothing against the land or it’s people, just not what I’m used to having grown up in NorCal and Utah surrounded by 11,000 foot snow covered peaks. I had driven through West Texas once and that was flat too, unlike anything I’d ever experienced before. Lots of corn fields though. But I trudged on. With my old VFR I could get more than 200 miles on a tank if I recall correctly. Something like 42-45 mpg typically. So I thought I would see how far I could go before filling up. The seller had installed a new front sprocket but couldn’t remember if it was down one tooth or what. The rear sprocket was stamped 43 so we were good there. Couldn’t see the front as it is blocked. The seller had also installed a device to correct the speedometer reading which matched my GPS so that looked good. I kept an eye on the fuel gauge. Around mile 168 on the odometer the reserve started flashing. Hmmmmm…not too many gas stations around here amidst the corn fields. At about 180 miles on the odo I finally found a gas station and filled up. It took 4.7 gallons which worked out to 38 mpg. Interesting. To be safe I figured I would just fill up at around 140-150 miles. Throughout the trip the MPG was a bit of a mystery. Across the trip I saw 38, 36, 44, 49 (downhill stretch), and 43, oddly enough averaging out to 42 overall. I don’t know. The thing ran great though. Smooth and powerful and flawless. Stopping at 140-150 miles had another benefit. I could stop and stretch. After so many miles I noticed a few things: my wrists were fine. Lower back was fine. Ankles were fine. It was the shoulders and the lower glutes that were in pain. I googled up the top 10 shoulder stretches and did some variant of that at each stop. It made a big difference. Would have killed to have my Sargent seat again. But I do have a new one coming in the mail. Here’s something I forgot about, the digital coolant temp reading was generally about 100* F higher than the air temp. I remember my old VFR was like that. Cool that you can toggle between the two on the gauge cluster. I rode into the dark until it was too cold. Stopped and got some IHOP for dinner and booked a room at a nearby hotel that had good reviews. Called the wife to check in and give a report of the trip so far, plugged in my phone and helmet Bluetooth to charge and went to sleep just after midnight. I woke up at around 7am, took a shower and had some of the hotel’s continental breakfast and headed out. The morning temps were cool at first but with the rising sun came warmer temperatures. And eventually the Colorado border. For future travelers it’s worth noting here that Eastern Colorado is just an extension of Kansas. There’s even a small town near the border called Kanorado. It’s the same landscape! But the road is smoother on the Kansas side. Just as straight and flat though. I caught my first glimpse of the rocky mountains about 100 miles off in the distance. Remember this: if you’re doing this trip, the rockies of Colorado are the reward for enduring the flatness of Kansas. Just hang in there, it gets better! I laughed to myself as I quoted a few lines in my helmet from the movie Dumb and Dumber, where there is some debate about the Colorado mountains and the rockiness therein. As I recall, John Denver’s integrity is questioned at one point. I continued on I-70 and rode past downtown Denver. Pulled in for fuel and lunch at Subway, and to do my stretches. Filled up at a grocery store gas station called King Soopers that had a large banner that read #boulderstrong. Took a moment to think of the Boulder situation that happened recently. Just regular shoppers like the people around me, stopping in for hotdogs or milk or bread, who never went home that day. I guess I need to carry everywhere now. Thankful I still have the right and ability to protect myself and my family. Many people in the world don’t. I ate my lunch outside but went in the Subway to clean my helmet shield real quick. Got mildly harangued by a thirty-something Subway employee for sitting at a table that was marked as closed due to Covid and social distancing. Hmmm… Didn’t she notice that all of the tables were marked that way? And that there was virtually no one else in the restaurant? “I won’t be long.” I said. She seemed satisfied with my response and let me be. I quickly cleaned up my helmet and set off again. I had made it halfway, only 499 miles left to go. Now things were about to get fun. Several hours and miles of elevation and gentle curves through some amazing landscape. Can I make it to Grand Junction? Will I make it home tonight? Wow look at those mountains!! Hey there are a lot of Audis on this stretch. And tunnels!! Buckle up Todo we’re not in Kansas anymore! For those of us who appreciate appropriate exhaust scavenging, there is a specific process or tradition if you will, that happens when approaching a tunnel. In my foxbody Mustang for example: windows down, slow slightly, downshift into 3rd and hit it til redline, all in a safe and prudent manner of course. Repeat as necessary. The bike is equally fun but you have to watch the speed as redline in virtually any gear is exceeding posted limits. The Eisenhower Tunnel is 1.6 miles long. Ooh I’m gonna like this (activate stupid grin). Assess traffic, slow down slightly, click down a few gears and hit it. VrrrRRRRRRROWW!! Now in the interest of safety didn’t take it all the way to the VFR’s near 12,000 rpm redline but I did ring it out a bit. Just enough to hear that V4 song resonate out the Vance & Hines pipe and reverberate through the tunnel walls. I quickly let off the throttle, regained composure and washed that down with a couple of hits from my train horn and I was good for the next several miles until another opportunity (that is to say, tunnel) came my way. I could say with some certainty that the young couple in the Kia next to me appeared to be glad that their windows had remained up in the Eisenhower. He didn’t appear to have down shifted either. And it was a Kia. Poor girl. It was all downhill from there. Literally. Things warmed up as I descended in elevation like a pilot coming in for a landing. Almost made it to Glenwood Springs when I just had to pull over for a break. My right shoulder wasn’t having it anymore and the numbness in the Southern quarters indicated a need for some blood flow. I pulled over, put the kickstand down in the dirt and sat on a concrete block for a bit. Stretched out and popped a couple of Ibuprofen. Counted a group of 5 riders on kitted up BMW GS’s cruising by on the freeway in front of me. That looked like fun as well. A local kid on a quad came by to investigate. Not much to see, he turned and left without a word. I pressed on and stopped in at Glenwood Springs for fuel. An older gentleman approached me. “Is that one of the new VFRs?” he said with a slight accent that I couldn’t immediately place. “Nope, it’s a 2001. She’s 20 years old” I smiled. “I have a VFR1200” he returned, “Great bike. Ride safe!” “Will do, thank you Sir.” I was taught in my youth to be respectful of older people. Many of them served in past war efforts and helped preserve the freedoms I now have. They have great experiences and stories. That was another thing I was getting used to again, biker comradery. Lots of waves on the highway and instant conversation at the gas station. Hey I remember this. This is cool. On this next bit I made a slight mistake. I had packed an old Go Pro thinking I might do a little filming at some point. I wondered about the stretch from here to Grand Junction but decided to forego in the interest of time. Well, that proved to be some of the most spectacular riding of the entire trip. Sorry guys. You’re just gonna have to experience it for yourselves. It was amazing though. Great cliffs and rocky ledges, and the road following the Colorado river for miles. It was beautiful all the way into Utah. I stopped in at Grand Junction for fuel and more stretches. Sat on some concrete with my back against a brick wall and was more physically comfortable that I’d been for the past several miles. Orange Fanta and beef jerky never tasted so good. Took a few minutes to rest and then saddled up again. Nightfall would be coming before too long and I had 279 miles to go. Before I left home I purchased a Bluetooth unit to go with my helmet. I hadn’t used it much of the trip but decided to have some tunes for the final stretch. It works fine but I need to do a little fine tuning I guess. I have to have earplugs because of the wind noise, so that means I have to be at or near full volume on the unit to hear the music. I think if I can get the wind buffeting dialed in it will be better. I was able to talk on the phone for a bit on the highway and it worked fine. So that was cool. Never did that before on a bike. May never do it again but it was cool to see that it worked as intended. I am a lifelong guitarist of sorts so my playlist is varied. Tool, followed by Johnny Cash with some Depeche Mode, Daft Punk and Bon Jovi mixed in got me through Southern Utah and pointed toward home. Two good things about Southern Utah: 80 degrees and 80mph speed limit. I set my throttle lock on 85 and went for it. The bike ran flawlessly, gobbling up mile after mile and begging for more. I had no plate on the bike so I didn’t want to risk getting pulled over (nor did I want to increase the risk of dying in a crash or scratching up my new bike) so I kept things pretty reasonable. Cruised past the turn off for Moab and Arches National Park and I was now in my back yard so to speak. Last fill up in Green River and a quick text to the wife: “Should be home by 10pm”. I hung a right onto Hwy 6 and headed North toward home. I watched the sunset on my left as I climbed through Price and into Spanish Fork Canyon, praying the whole time that a deer didn’t run out in the dark, which thankfully one didn’t. Pulled over in Spanish Fork for one final stretch and some water. Just 45 minutes from home now, somewhat surprised I had made it this far without incident. Pulled down my face shield, set the playlist again and hopped on the freeway. Bounced over the concrete slabs for the next 30 miles to my exit. Left over the overpass, cruise for a few miles, then left again toward my neighborhood and my family. I pulled in at about 9:46pm local time. Pulled up to the garage and gave a rev followed by a quick tap of the horn to let my kids know the Amtrak had arrived. It must have worked because the garage door opened and I was greeted by smiling kids and a confused wife. I had made it. 1,000 miles in two days, through prairie and mountains and high desert. Home safe with little more than a sore shoulder to show for it. The old Honda did her part and God kept the roads clear for me so I could get home to my little ones. It was nice to be back on a bike again. Nice to have an adventure with some stories to tell. And it was nice to be home in once piece to enjoy Easter morning with my kids the next day, which we did. I shot a quick text to Tyler to let him know that I’d made it all the way home and show off a pic of the bike next to my Mustang. “Awesome, enjoy it!” he replied. I intend to. Ride safe, Justin14 points
-
Ok here we go...... - Better fuel economy. The 8gen has slightly smaller tank capacity and a nicer more streamlined shape the greater fuel economy far exceeds any loss of fuel quantity. - More improvements on vtec transition. - New cam profiles, engine compression slightly increased to 11.8 : 1. - Lighter weight (by almost 30lbs) and has a more nimble feel to handling and steering, gives you more confidence in the twisty stuff. - A nicer slimmer look due to the side radiators being moved to the front. - Rider seat has adjustable hi and low position. - Greater storage room under the pillion seat especially with the rear cowl in use. - Mirrors are better and are far less prone to being elbowed out of position by some peanut walking by your bike too closely. - Stronger more ridged new SS Swingarm. - Simple adjustment knob for rear suspension preload. Brakes. - Far better brakes with larger diameter 310mm front rotors. - Non linked with ABS, (Australian 6gens were never the ABS version) - Front brakes are dual radial mounted 4 piston fixed calipers. Instrumentation. - Whilst not essential but nice to have, gear position indication. - Fuel usage instantaneous, average etc. readout. - Traction control. - 5 stage heated grips. - Auto cancelling turn indicators...ok once you get used to them! - Turn Indicator and Horn switches have swapped positions! Will drive you crazy initially BUT once you get used to it it's great, your thumb is right next to the indicator switch where it should be. Electrics. - All the electrical issues that plagued the 5th and 6gens appear to have been resolved. - Stator is forced oil cooled. Have not heard of a single 8gen stator failure yet! - R/R is a greatly improved, efficient microprocessor controlled mosfet regulator. - Reduced electrical loads due to the LED headlights. - Gone is the radiator cooling fan thermatic switch now control by the ECM engine temp inputs. - Gone is the speed pickup that was coupled to the drive sprocket mounting bolt head. Rear ABS sensor is the speed sensor. - Gone is the diaphragm type fuel pressure regulator that had caused issues with 5 and 6gen. - Even the ignition switch and starter switch have been simplified to simple single pole switches, improving reliability. - Easier access to all fuses being under the rider seat. OEM Panniers. - Really nice, no ugly added brackets required, just discrete integrated mounting points for panniers. Very simple and fast pannier install and removal. Overall superb build quality, reliability, durability and bloody great fun! You also have the option of fitting a genuine Honda Quick Shifter for the 8gen. Cons. These are my only small gripes I have that may not be issues for other owners, but for me the 8gen is a fantastic all round great looking and sounding road bike. Wherever I take the VFR I'm always getting comments from people of what a nice looking bike it is.....I always agree! - Suspension a bit harsh no matter what the setting. - OEM exhaust is a bit ugly ...easily fixed! - Oh, yeah...Beware the Fuel Tank breather hose!!! - Oil filter is a little more awkward to get at due to it being behind the front cooling fan. - Minor issue in rear wheel removal, you now have to swing the exhaust aside, its a piece of cake, just a simple extra step you didn't have to do with a 6gen. Have I forgotten anything? "My Dream VFR". Taken this morning.
14 points
-
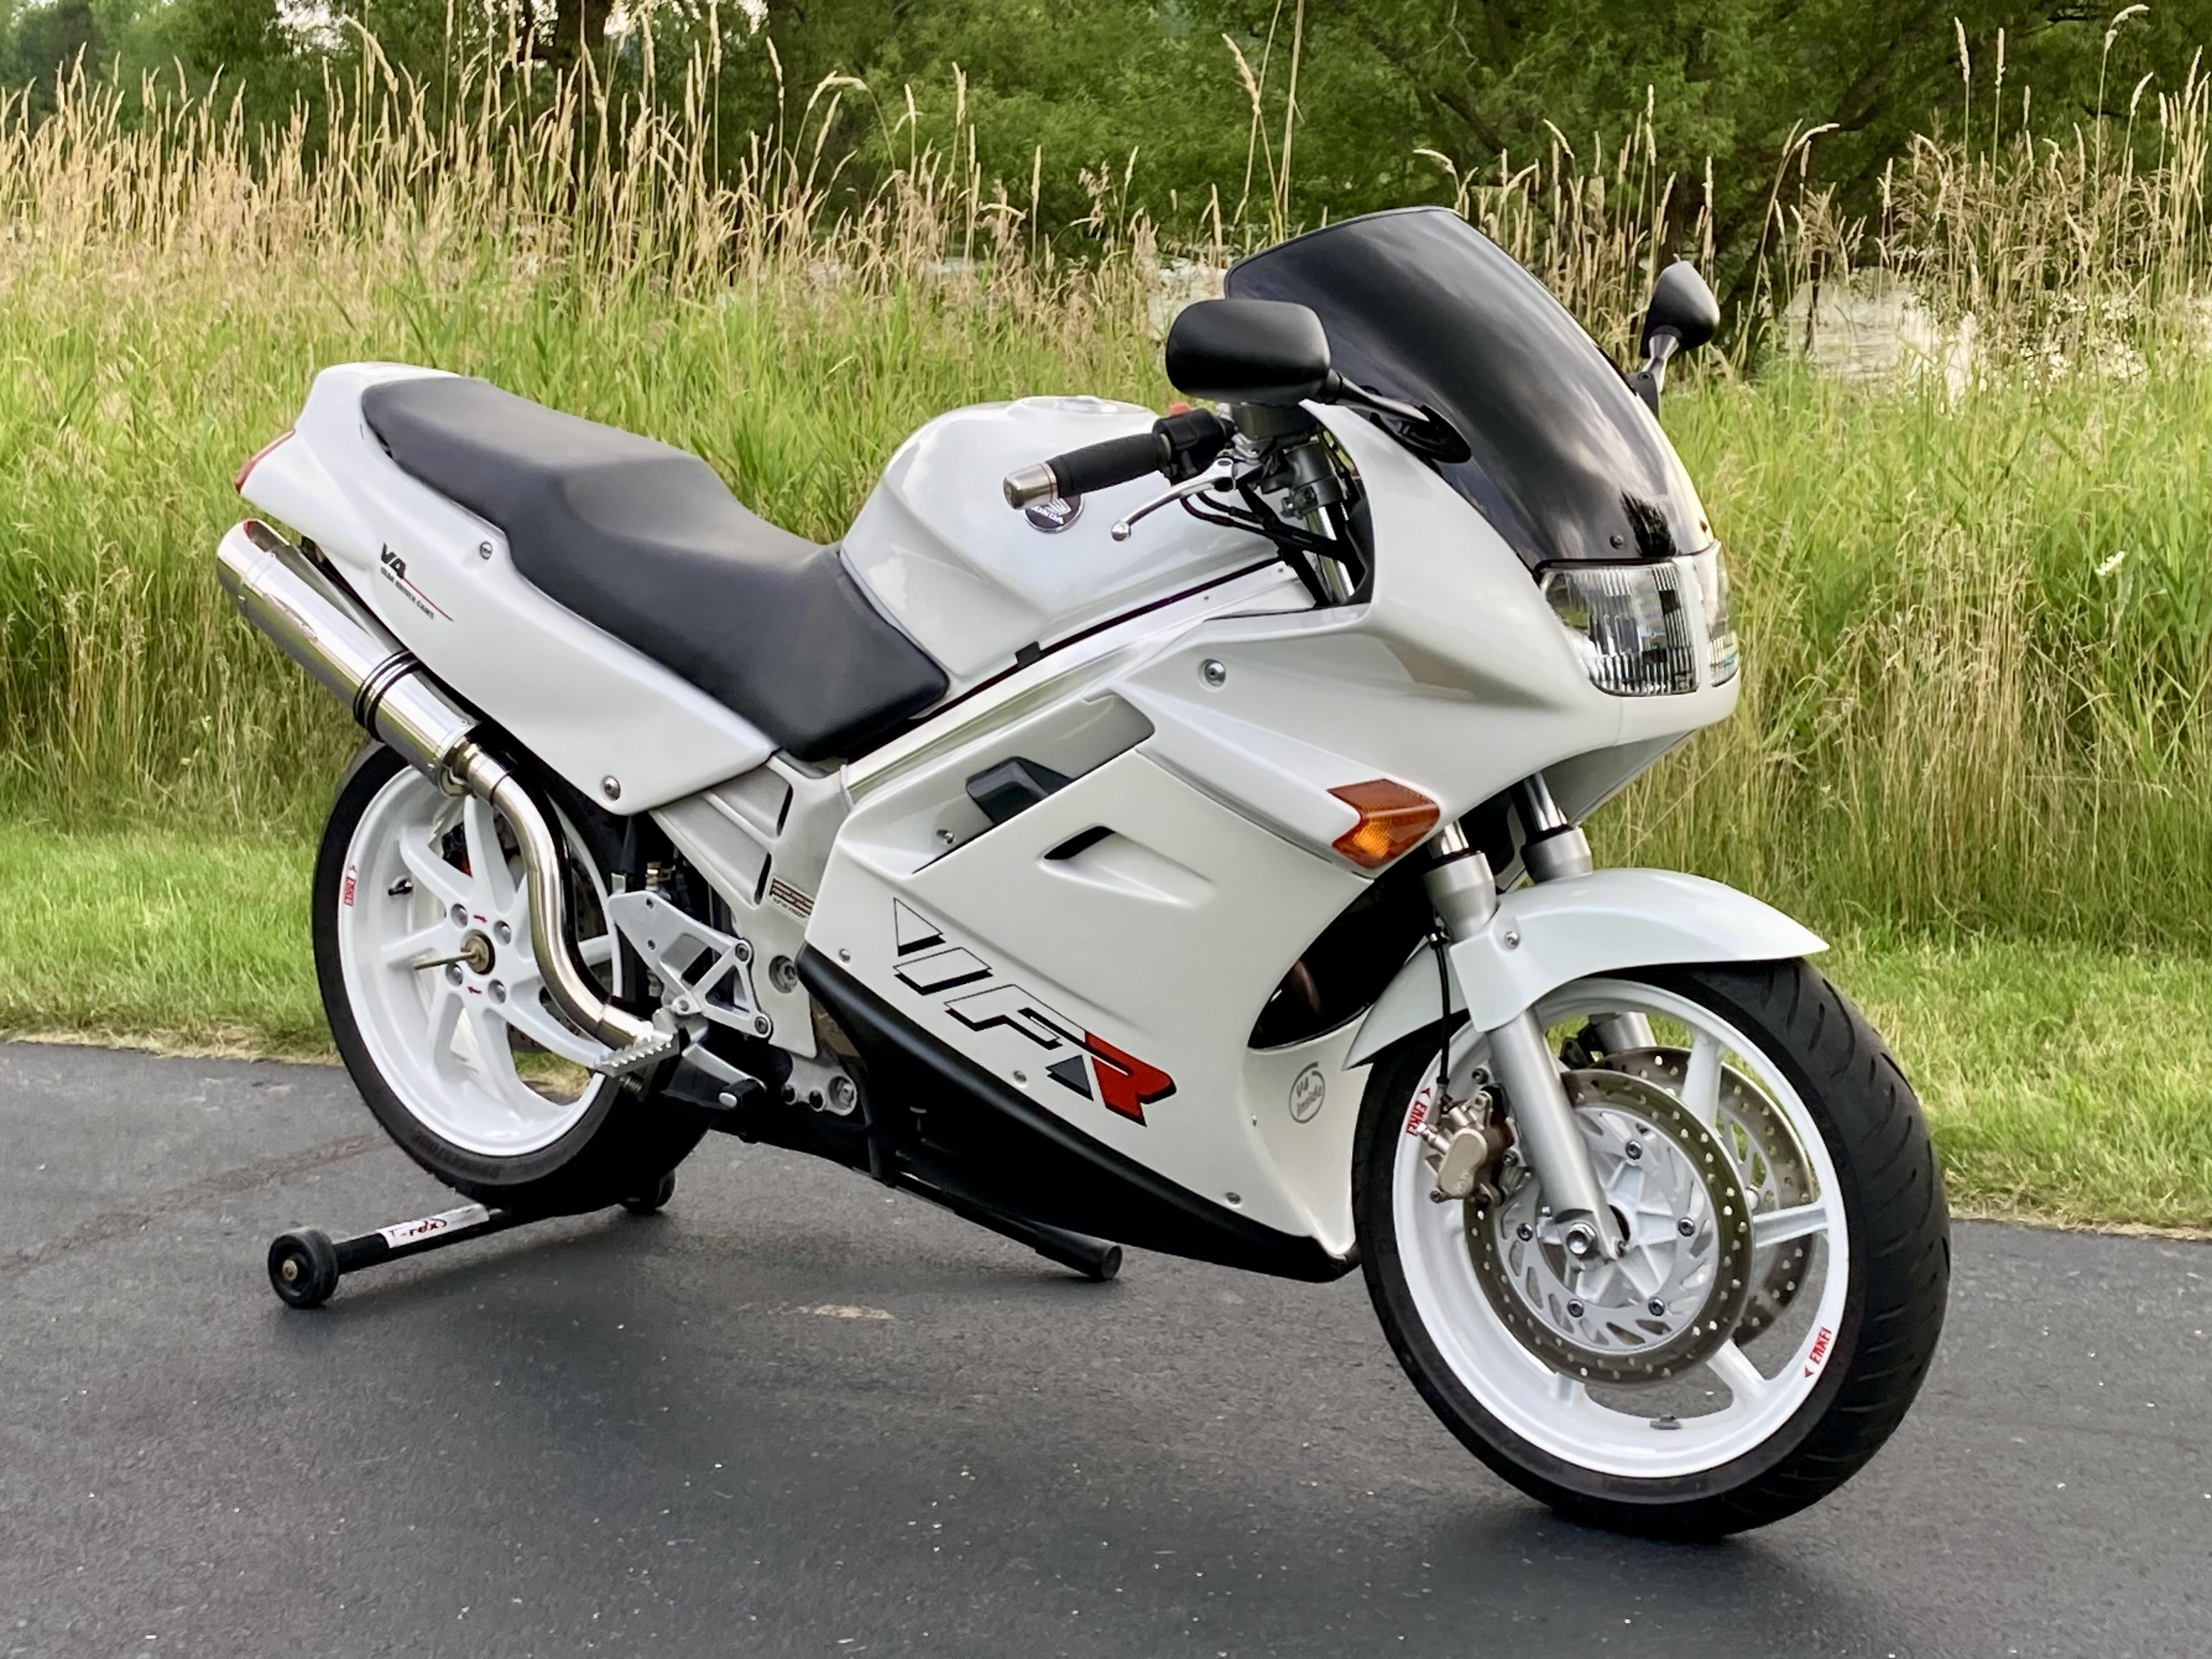
The original VFR🙂
14 points
-
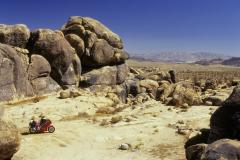
From the album: my trips
I spied this interesting rock formation along Cal-247 just north of Joshua Tree, California in 1994.© Lorne Black
14 points -
 Hwy 3 on the South side of Mt Scott. Trinity Natl Forest.14 points
 -
While looking through my old pics - not for anything VFR related, I came across this shot from late-2019. Probably washed it in preparation for a long winter's nap and decided to record the moment. I think the 6th gen looks pretty good from this angle.13 points
-
I created a PDF of the microfiche for the 1999 model for my own reference. Thought others might find it useful. 1999 VFR800 - Microfiche.pdf13 points
-
Ride safe everyone.
13 points
-
Hi, I put together a poster that I want to mount in my home office. Thanks to Terry for posting the PDFs so I was able to assemble it using the PDFs he uploaded. I will attach it for anyone who wants to do the same. Print it out and have it mounted etc. Thxs VFR Poster.pdf13 points
-
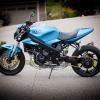
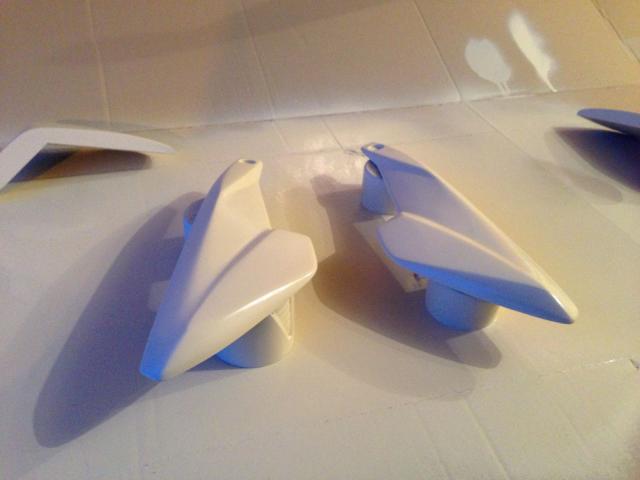
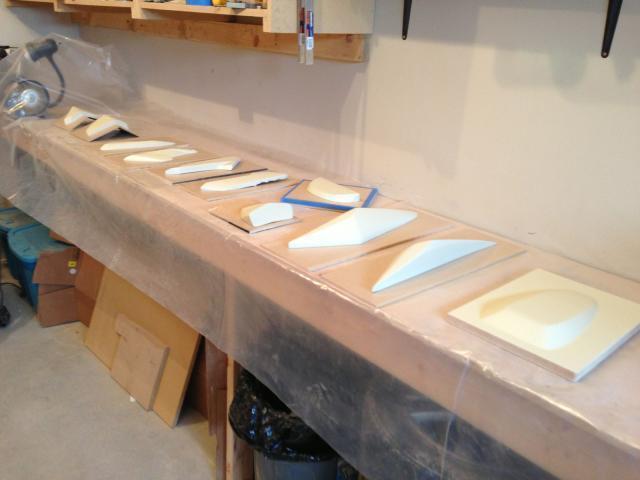
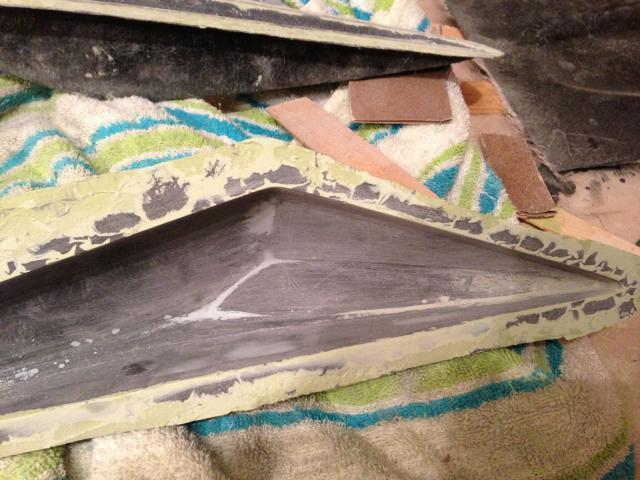
Hi Everyone. My first Post So I'm building a VFR using a lot of different bits and pieces to get in the end my version of a 6X replica. Highlights are Triumph Daytona 675 Wheels. Triumph T595 Forks (45mm) Powder coated Frame, Engine Ported, Vapor blasted and painted. I will start posting photos of the build as it progresses
13 points
-
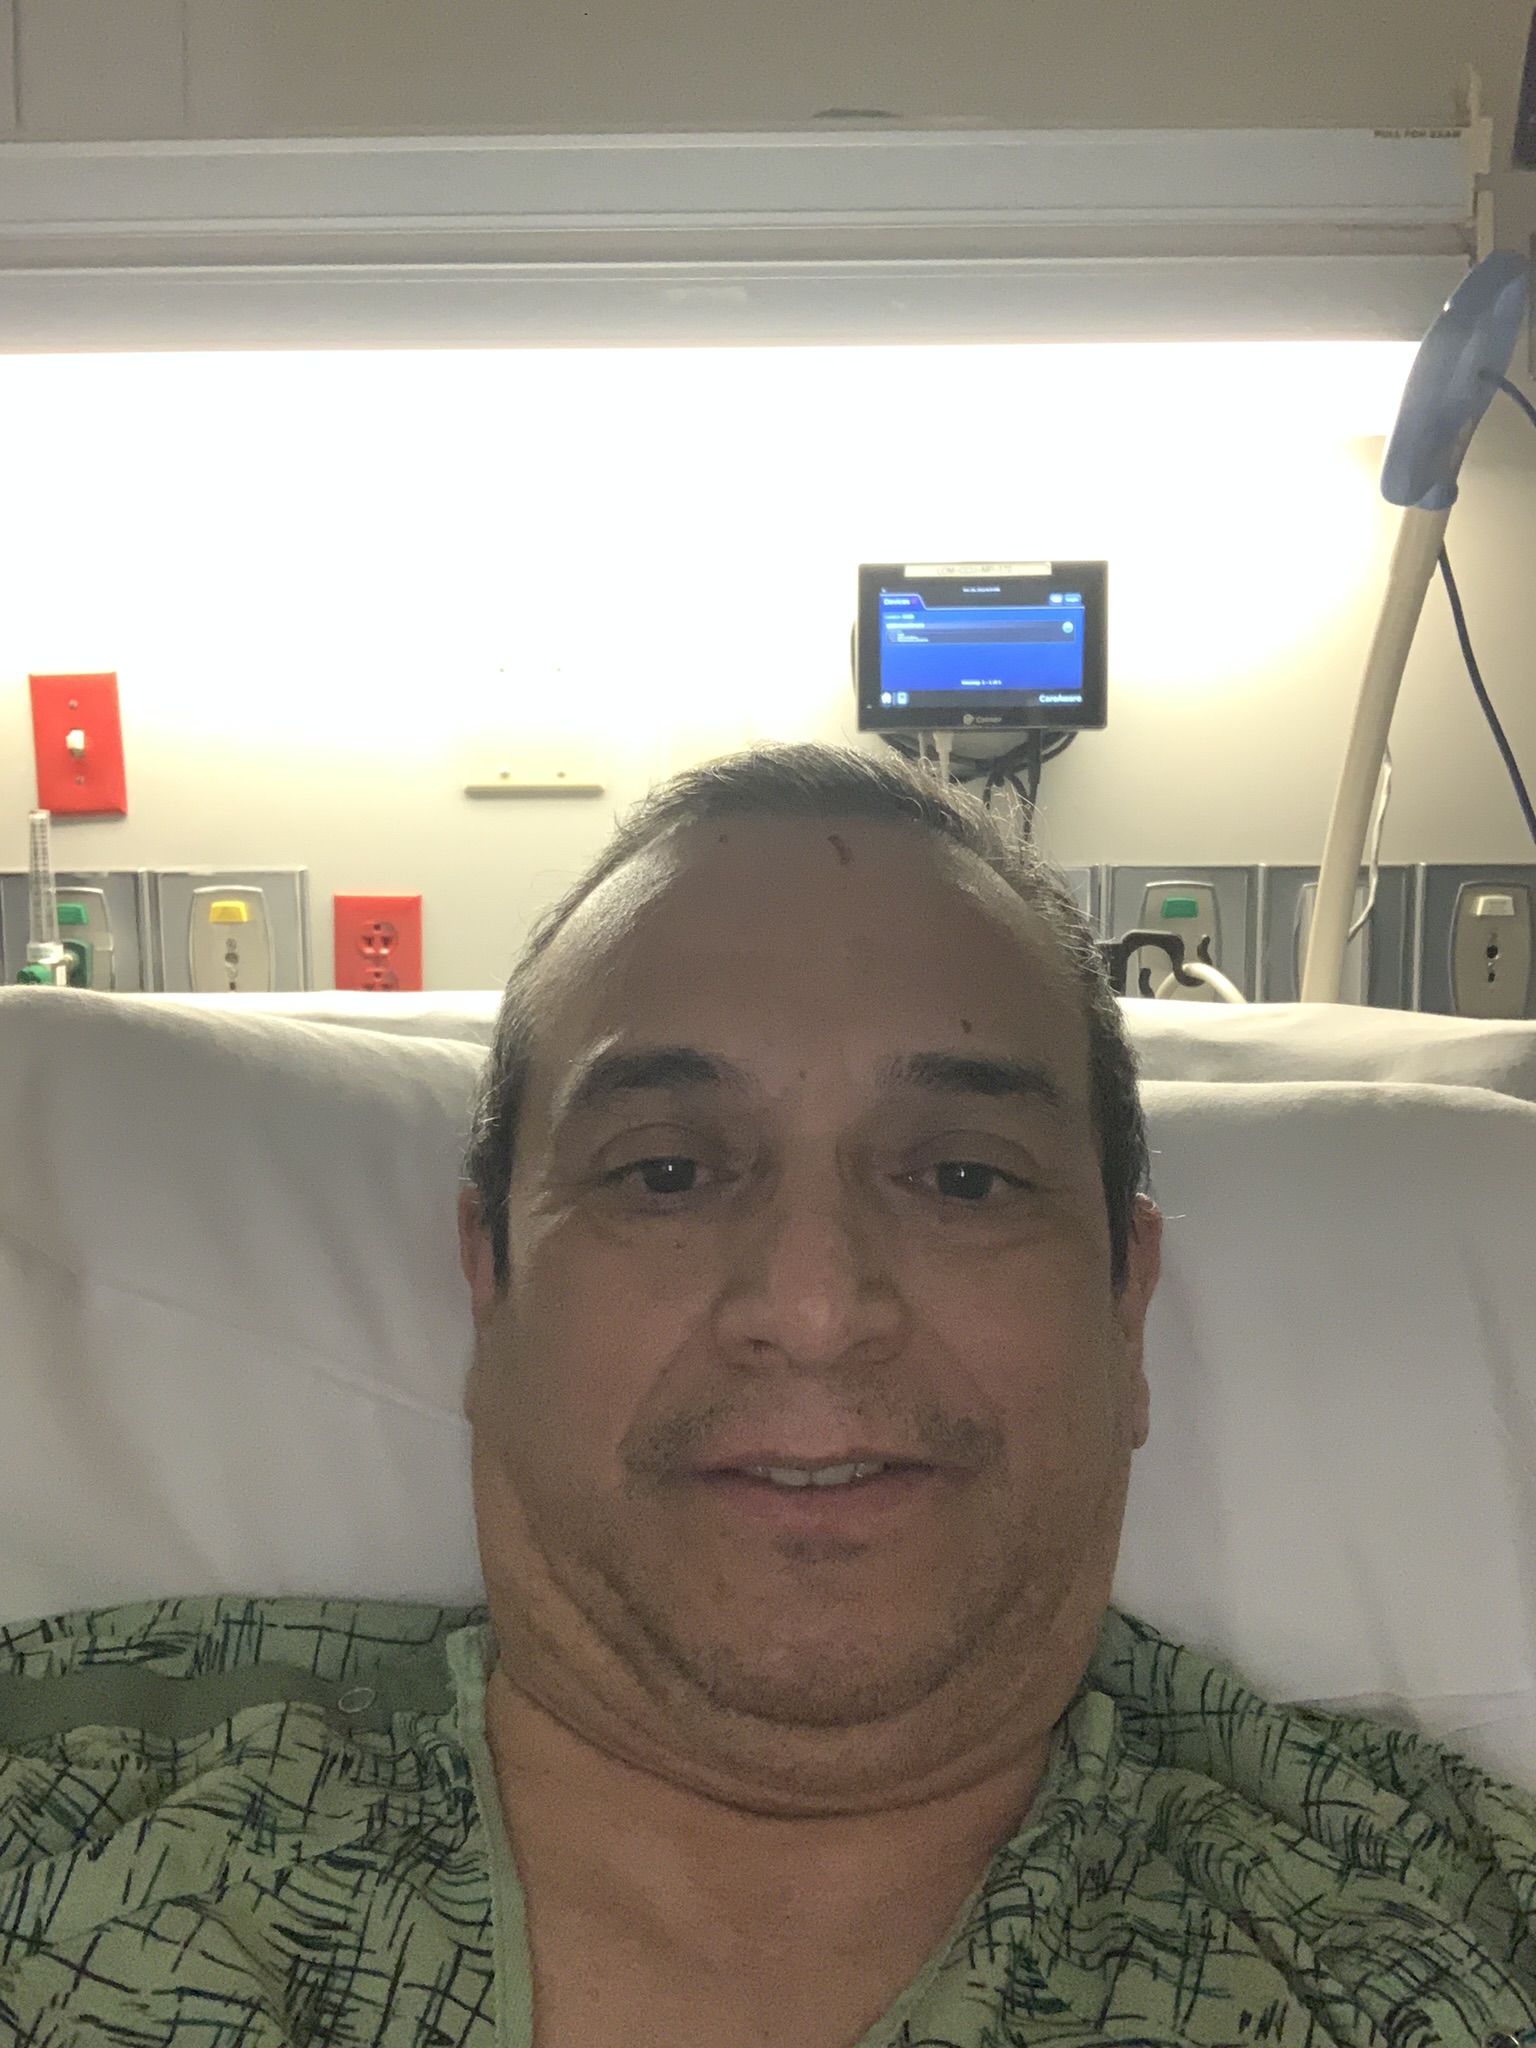
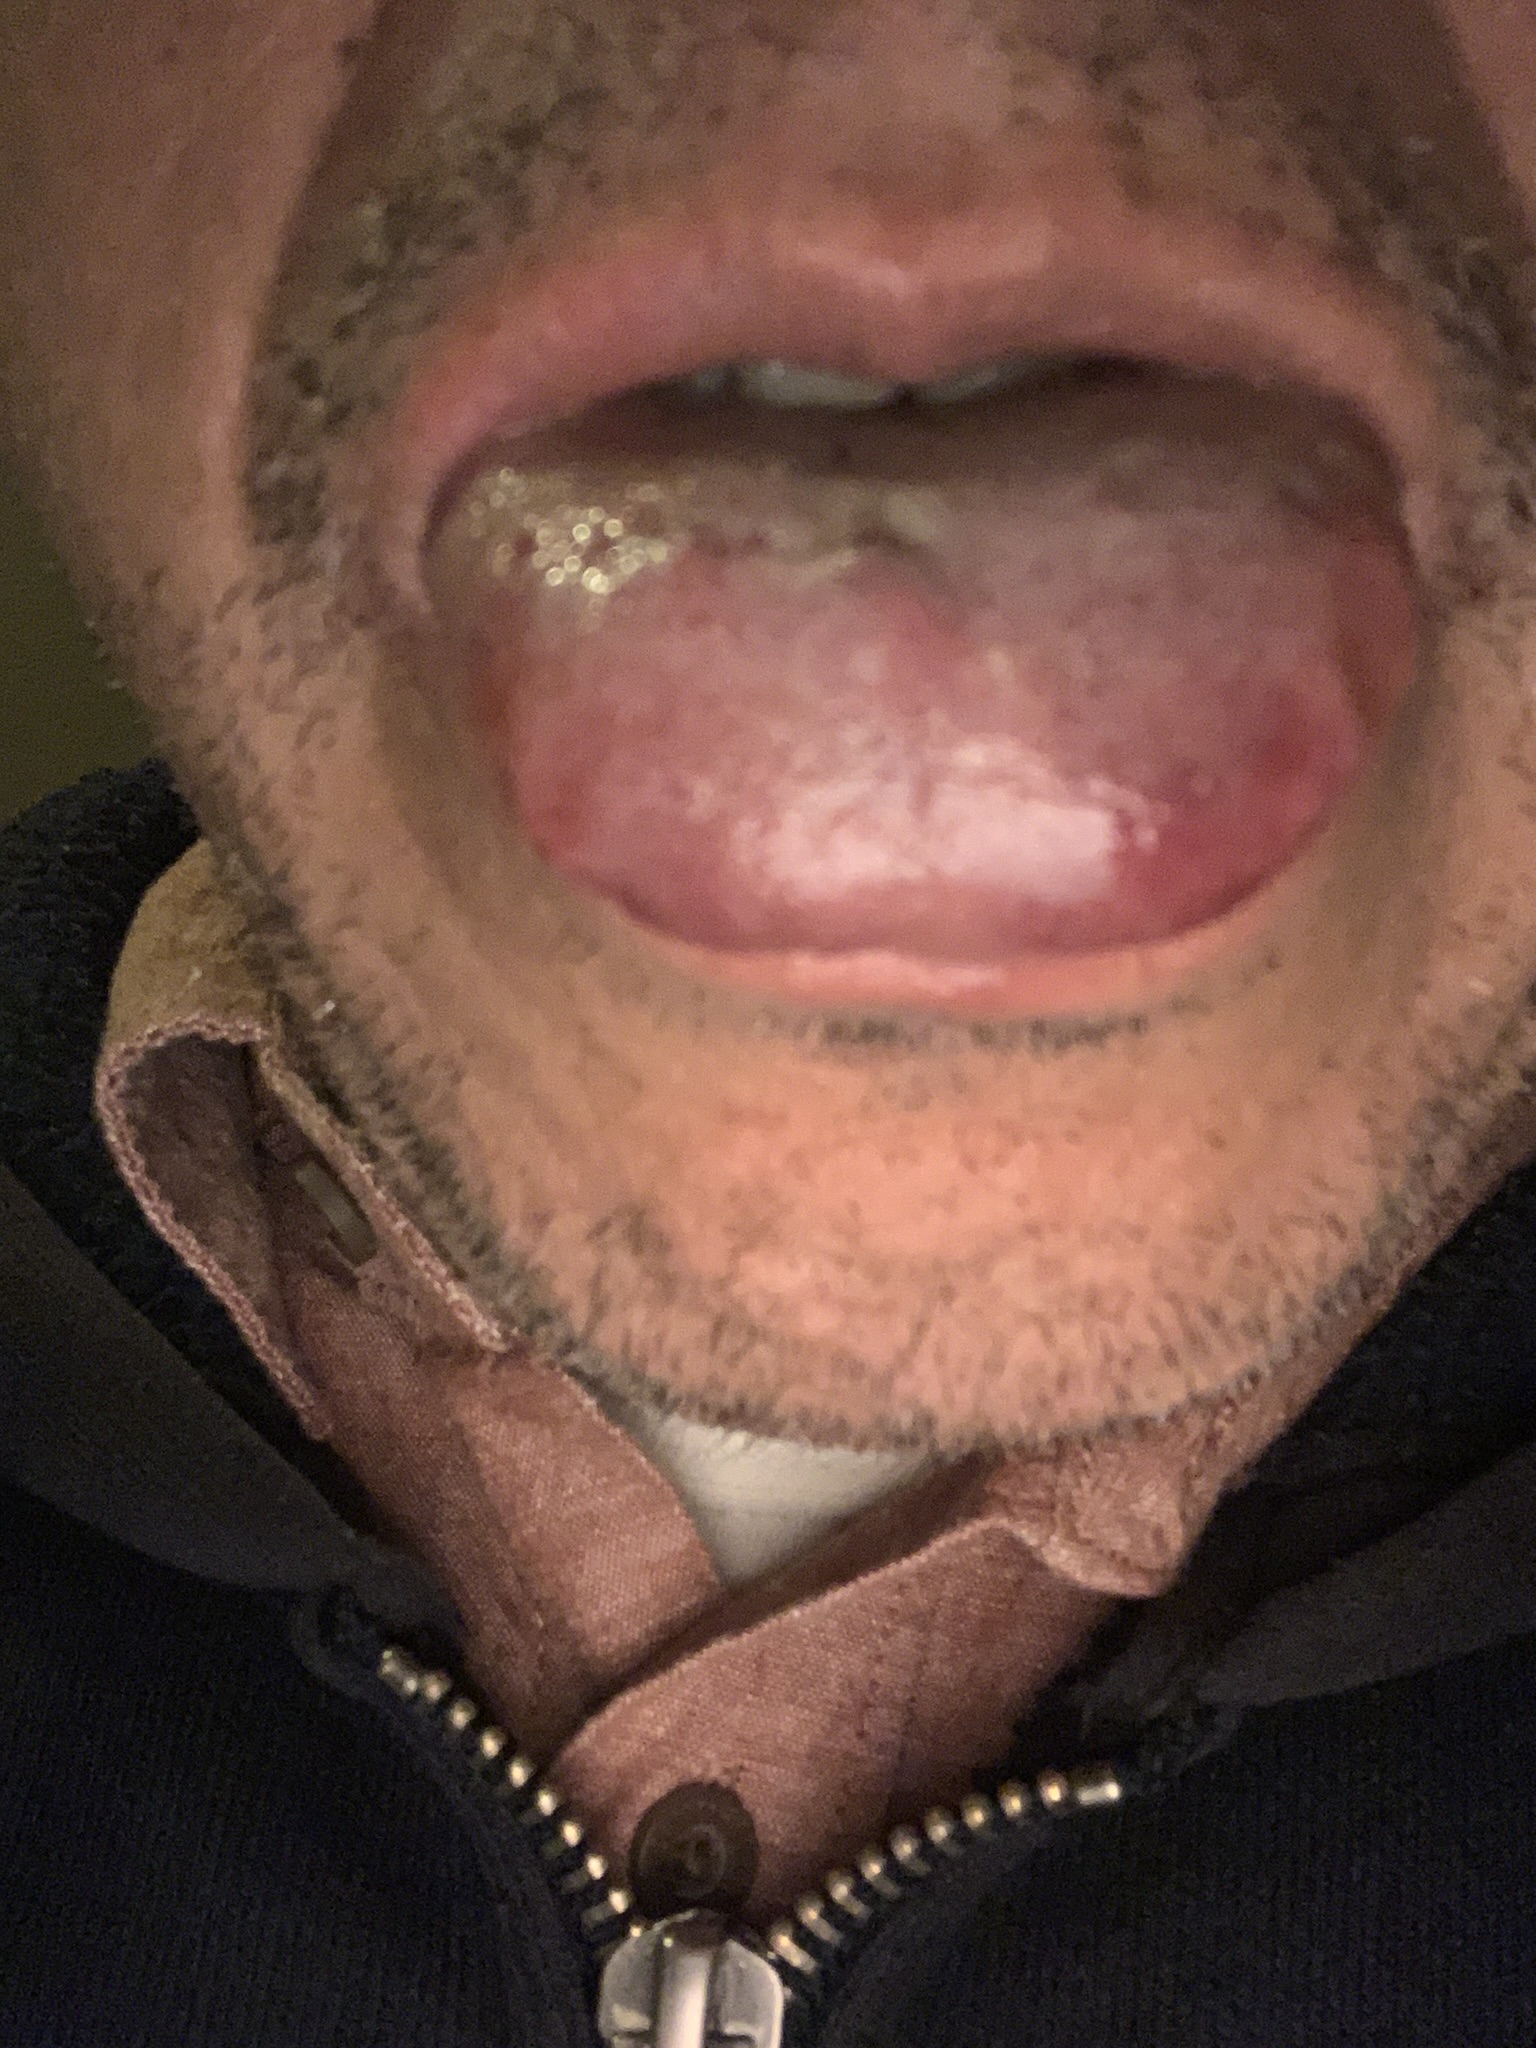
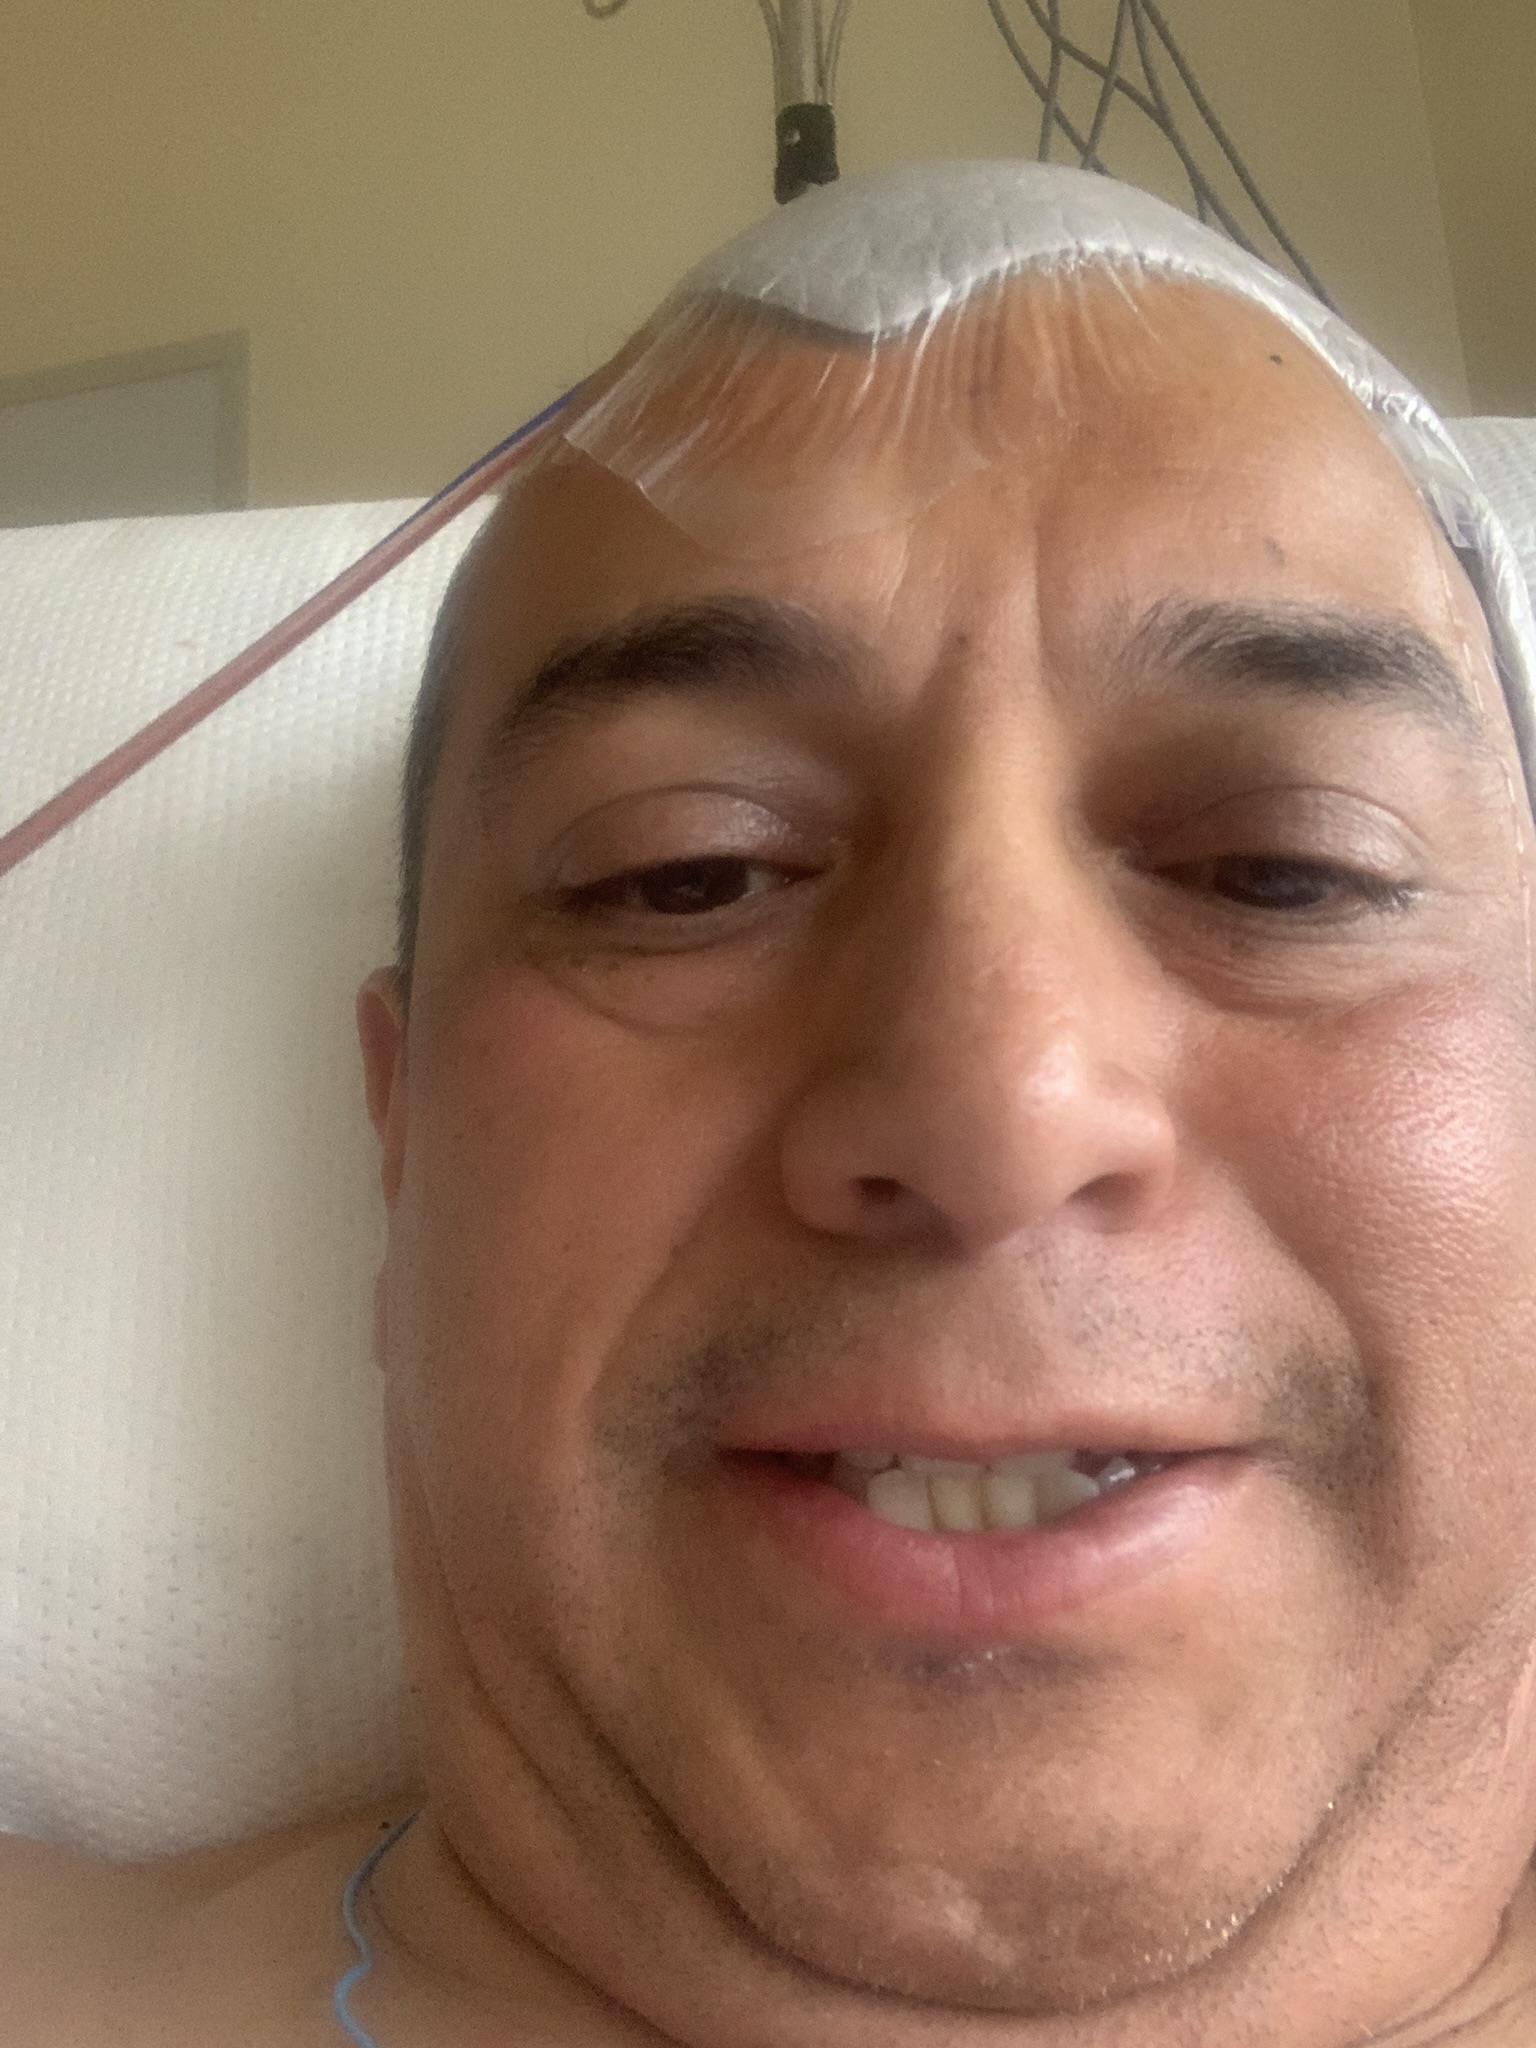
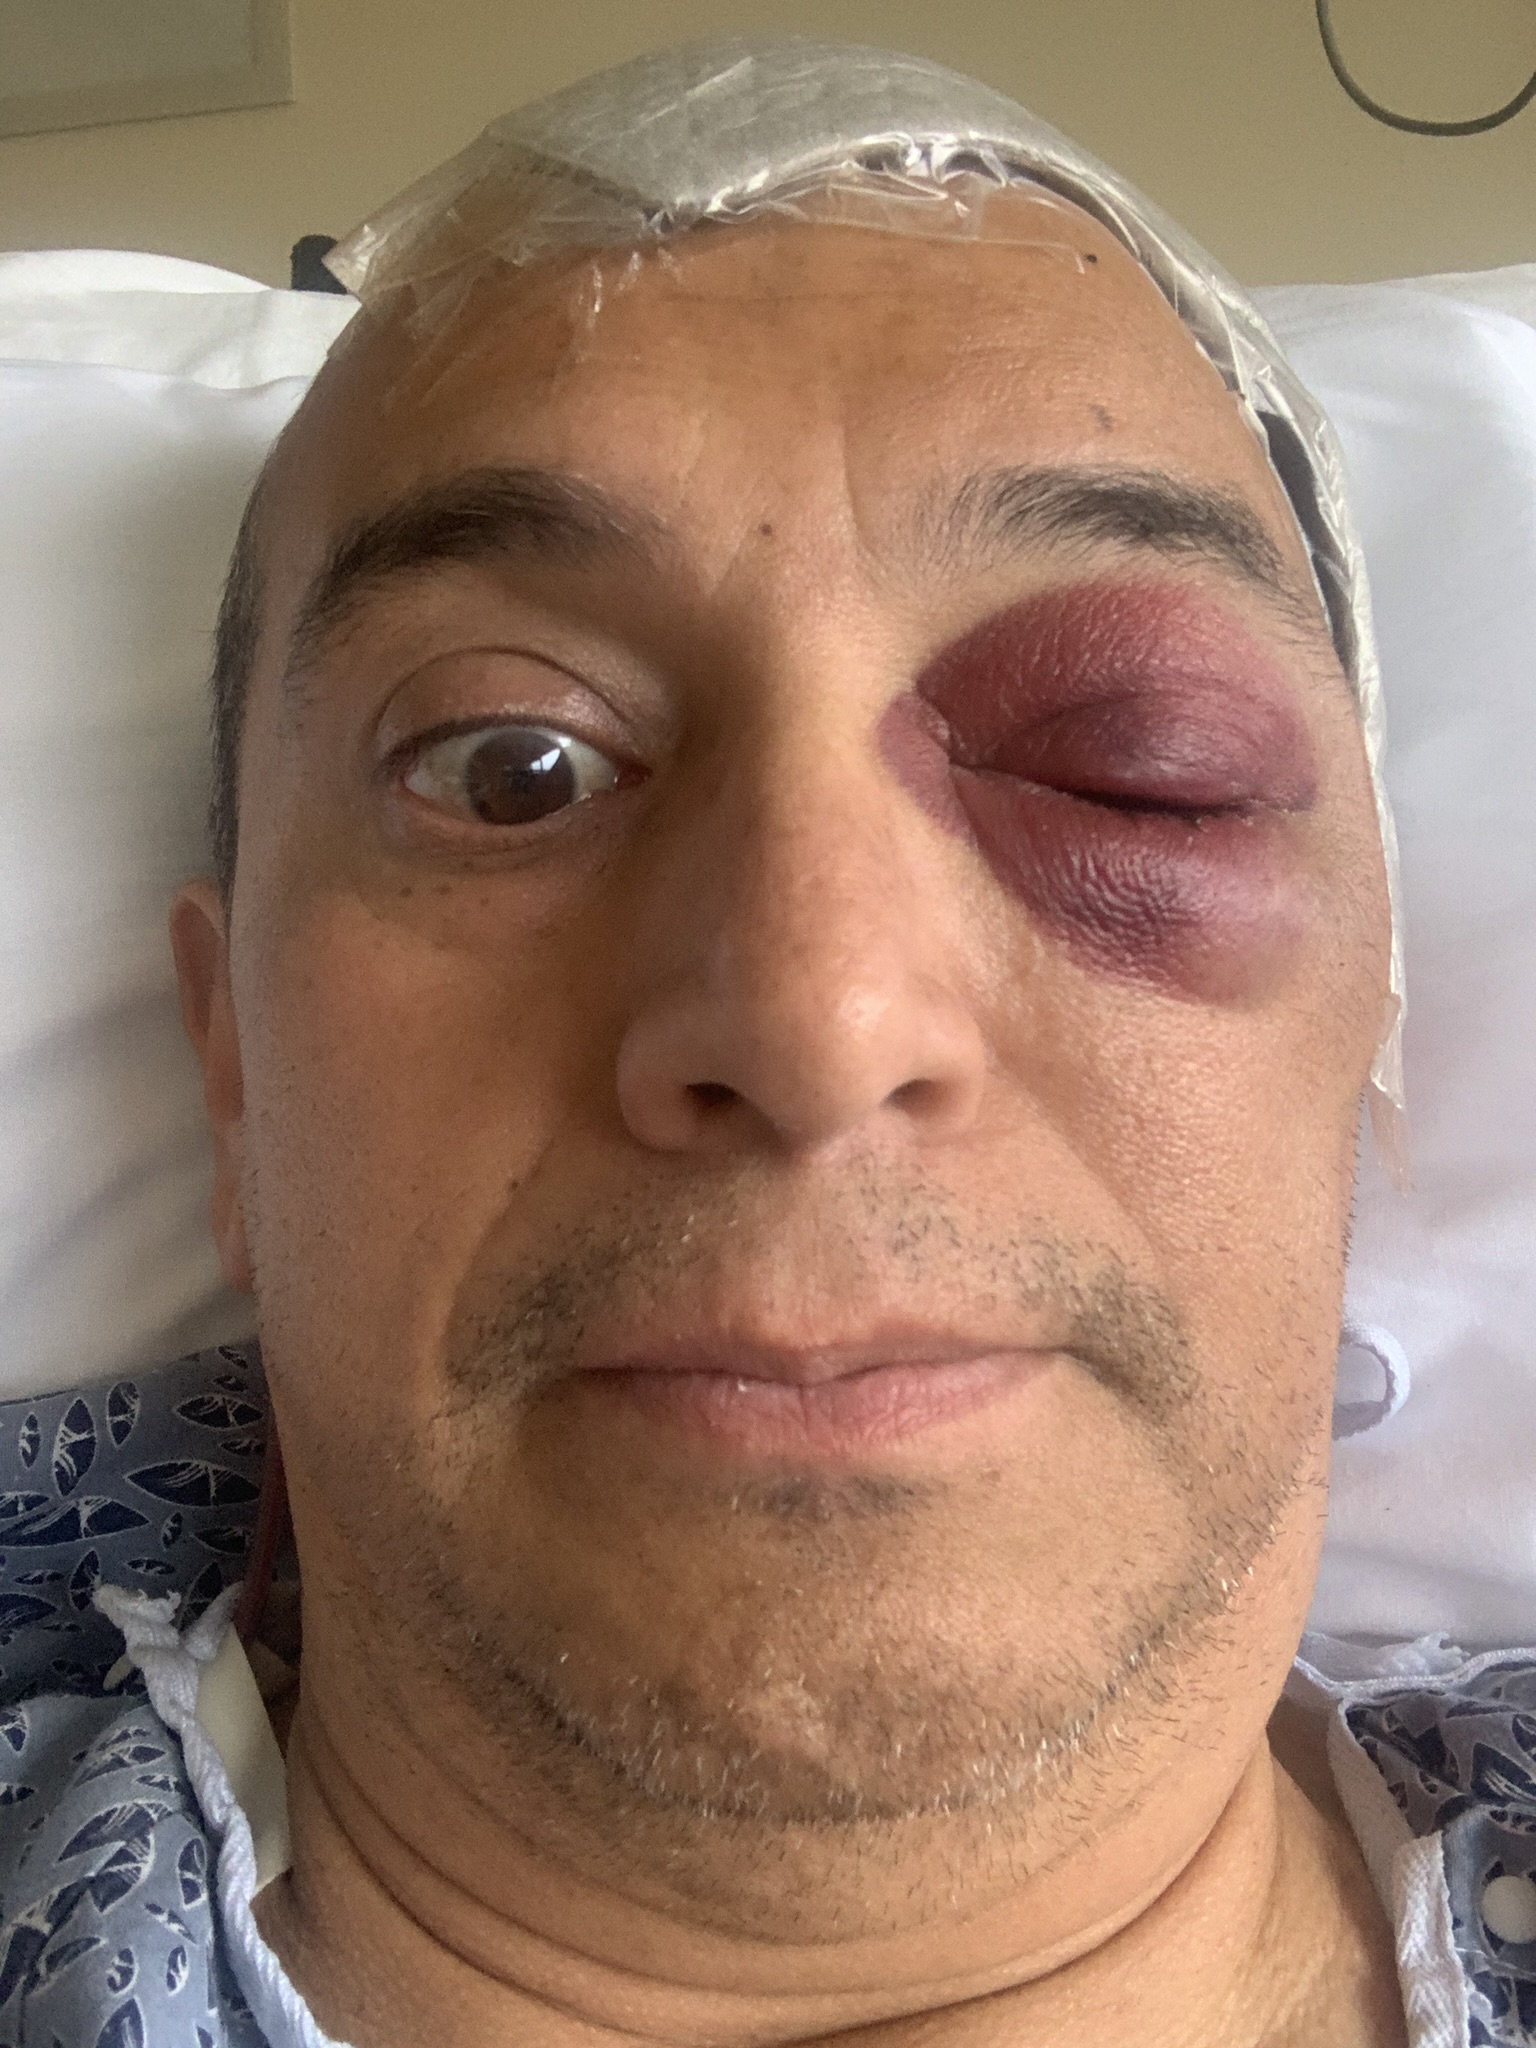
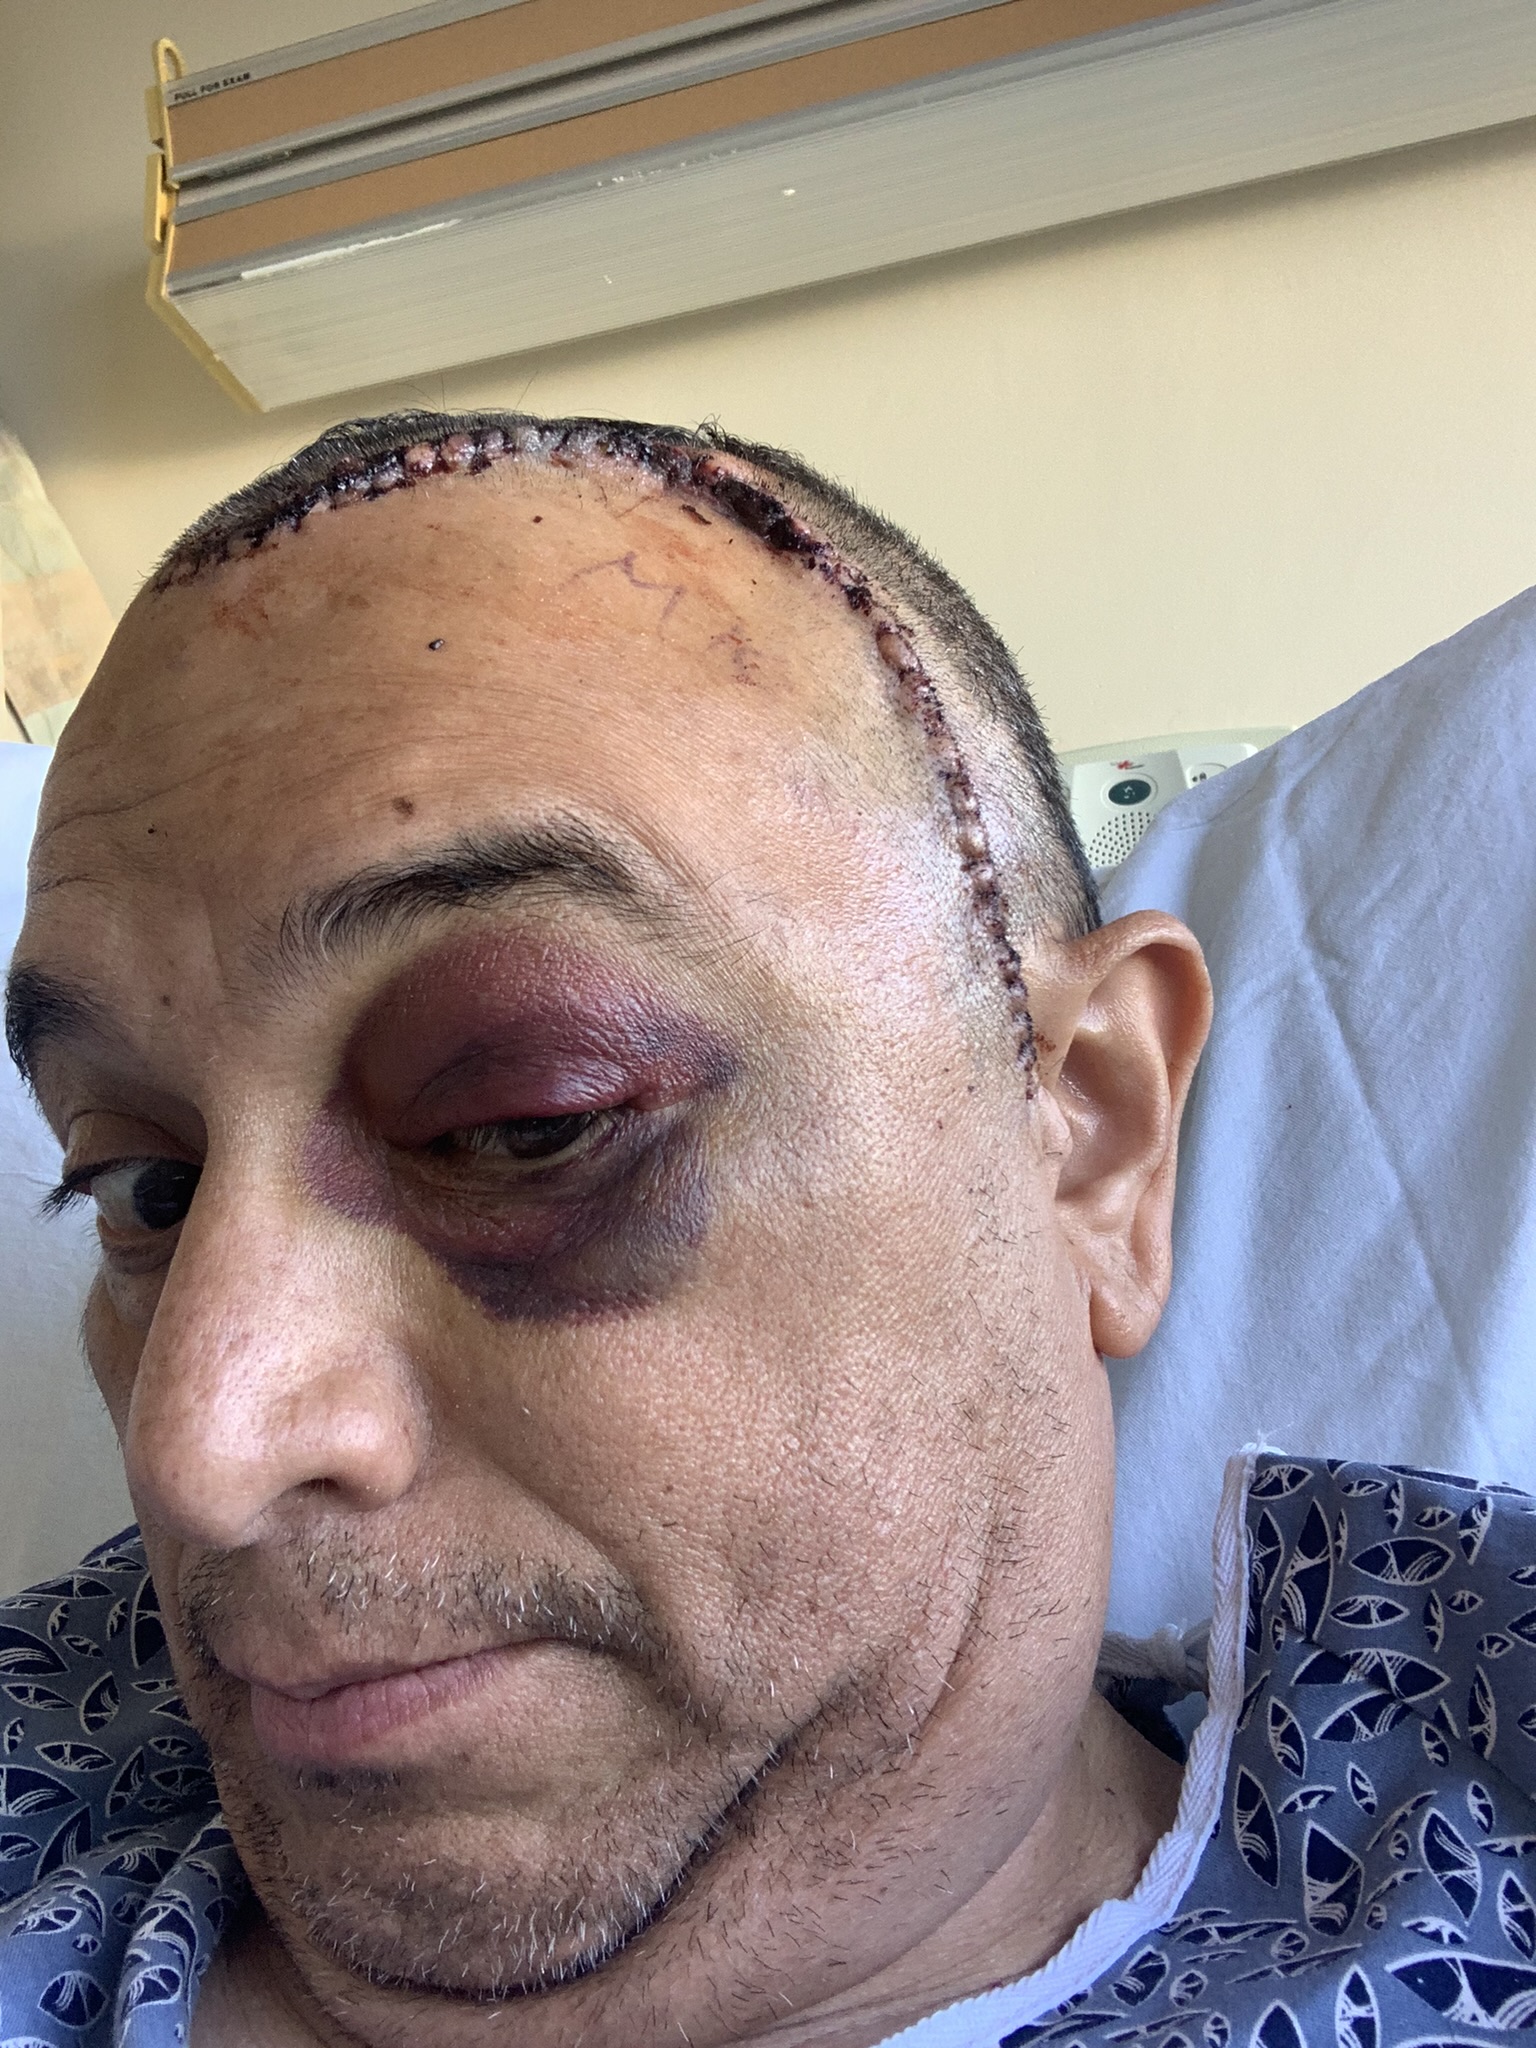
Hey all, I know some of you had read about my latest "adventure" from the header thread posted by sfdownhill. Just wanted to chime in directly, as it was truly an ADVENTURE! I should first say, thank you to both sfdownhill and shotgunz, these two are some of the best people you can have on your side. Even if they could not contribute to my betterment medically, just their presence and their visits really helped me recover mentally. Knowing I have such good people who care about me really made a difference, so thanks guys, I really appreciate you stopping by! As for my story, well, that started 16 years ago I guess, when I went to the Dr. to see why my upper arms seemed to be going numb every once in a while. Well, after being poked and prodded and quizzed and scanned, we did determine a pinched back muscle was the cause BUT they did find something inside my head via an MRI that really shouldn't have been there. Yep, some little "tumor" like item that was beneath my forehead and just behind the left eye. Well, of course that brings up a whole other topic of what to do about it. The Dr. I had did not think it was something overly threatening and felt that it had been there awhile and based on what he saw in the MRI, felt I was probably something we could keep an eye on. That is, unless I wanted to remove it then. After a few conversations and feeling good about it, we decided to just keep an eye on it, meaning take MRIs of it every 6 months or so, so that's what we did. Fast forward another 15 years and BANG! The tumor decided that it needed a little more room, so it grew a CM and that's all it took to trigger a seizure! Yep, 1AM or so in the middle of December 28th, 2022 my wife wakes up to me "snoring". Well, so she thought. The normal process is to poke me in my side and tell me to roll over on my left side so my snoring stops. Well, that didn't work. Let me shake him awake and see if he'll turn...hmm, that didn't work either. Wait a minute is that snoring? Realizing that what we normally do did not work, she listened more carefully, note that she had lost a lot of her hearing some years back, so somethings don't always sound like what they are. Well, on comes on the bedroom light and low and behold, yours truly was having a full-on seizure. She sees me biting my tongue, blood coming out my mouth and me in full on seizure mode! BAM! runs straight to the phone, calls 911 and low and behold, within minutes the ambulance is there ready to rush me to the hospital. She literally saved my life folks, had she not been there or reacted as fast as she did, I would have most likely drowned on my own fluids. So, if I say or do anything here on the forum that upsets you, you can blame her 😉 What was so weird and odd about this happening, I had no recollection of anything up until I wake up in an ambulance strapped down to the gurney. WTF! As I start to come to, I start looking at where I am and what condition I'm in..."Wait, I'm in my pajamas strapped to a bed, holy s#!t, they've taken me from my bed! Where's my wife, please tell me she's not in this same predicament????!" Well, the crew start to let me know what exactly is going on but I'm still a little slow to process but ultimately demand I be released from the bed, unfortunately, I wasn’t, and I finally get to the hospital. Here is where I finally become more myself again and learn of what had transpired. This is also when they start to really quiz you to see exactly where you are mentally. Gratefully I am answering their questions well and accurately BUT one of the crew decides to quiz me on when I was married. I let him know, "October 17, 1998", he then asks, how long have you been married? I say 20 years or so...He snapped back "It's 24 years!" Oh no you didn't! I raise my head look him in the face and say very vocally "At least I got the F#cking date right!" Oddly, this is where I felt I wanted to smack him! Alas, I didn't. Probably for the better. 🙂 Well, a week later I'm talking to the surgeons and getting ready for my Craniotomy. When did that happen? Friday the 13th! Yes, you heard that right, all good though, everything went well, could not have asked for a better outcome. I have to say that all in all, I been through a lot but can honestly say that I feel really good and have very little to NO PAIN! Can't ask for better than that, right? Unfortunately having this surgery means a few things, #1, No riding of motorcycle for quite some time ☹, #2, No drinking for quite some time, but that's not always a bad thing. #3, get healed up! What can I add here, for sure 2 more things, #1, you can never have too many friends and family to support you while you are in the hospital, whether that's before, during or after surgery. And ultimately...IT'S GOOD TO BE ALIVE! Cheers, D
13 points
-
Spring of 1993 and I'd only had my '91 VFR for a couple months when I snapped this photo by Salish Bear totem atop Malahat Drive. Compared to many of the mountain passes I've crossed by VFR this is one of the lowest, but it is close by and offers a good view of Finlayson Arm - and, on a much clearer day, even the Olympic Range in Washington state to the south. Eagle-eyed viewers will notice the Bubba Shobert-replica Bell helmet. It looked cool, but my next helmet, a Shoei X7, was a huge improvement.
13 points
-
Hey guys - great news! Darryl (Duc2V4) is recovering well from his surgery. Visited him in the hospital yesterday. He’s walking and talking and mostly his normal flippant happy self. Pain meds are keeping him comfortable and he will be going home today to begin the rehab process. Heading down to the hospital now to see if I can help with the move. He grilled me about whether I’ve been paying close enough attention to the header project and sends his best to everyone here. Cheers!13 points
-
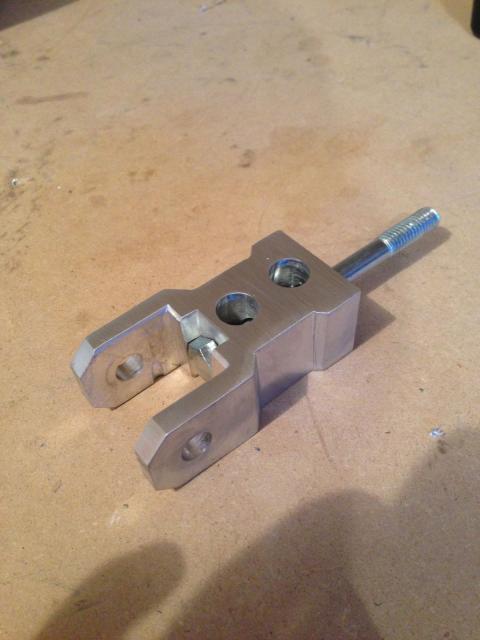
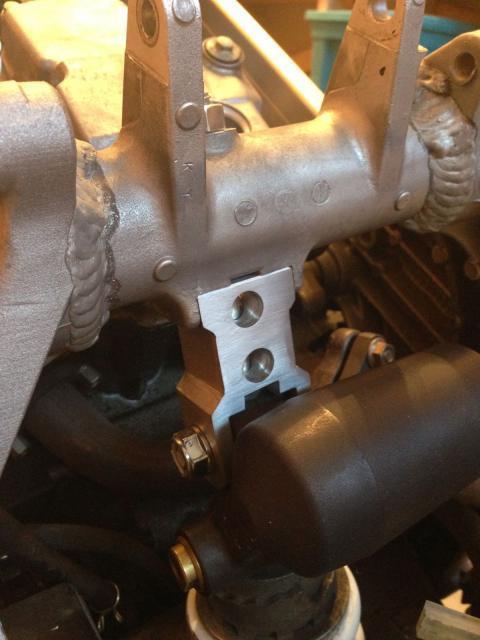
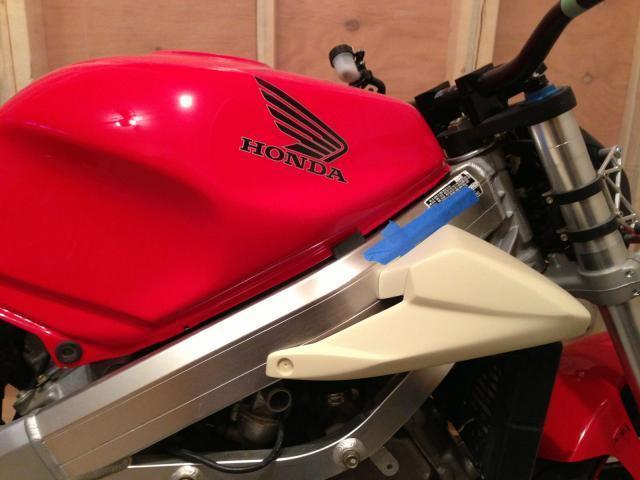
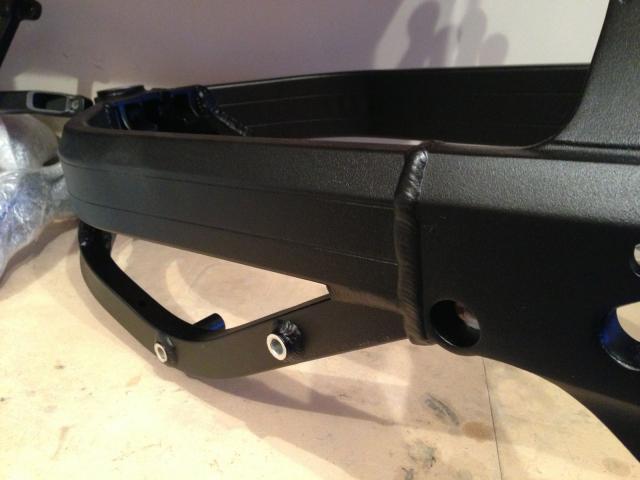
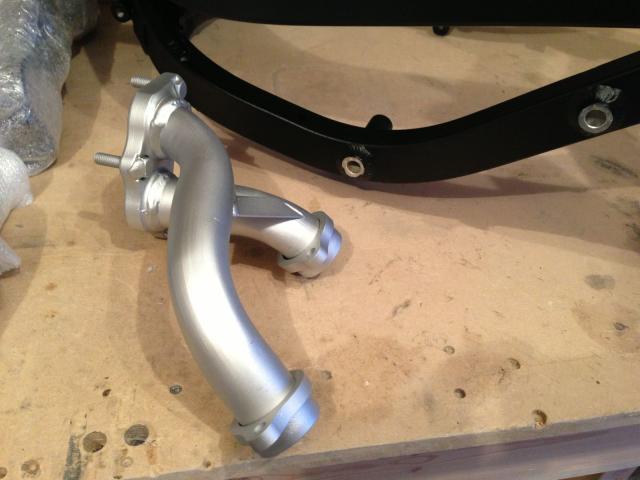
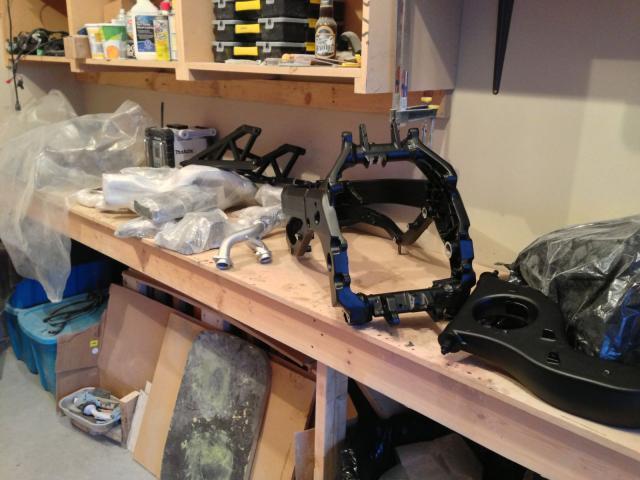
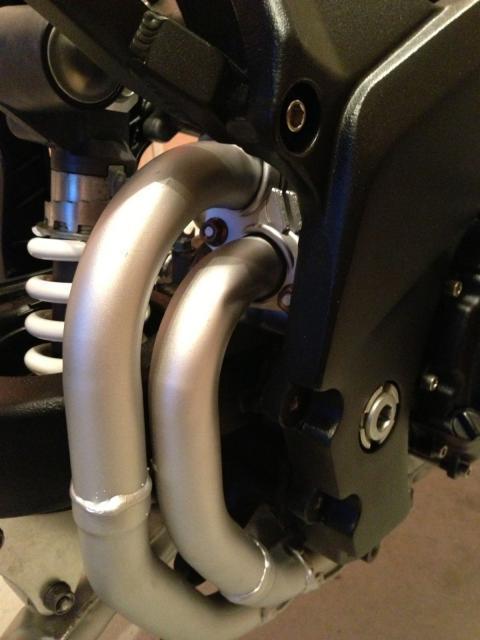
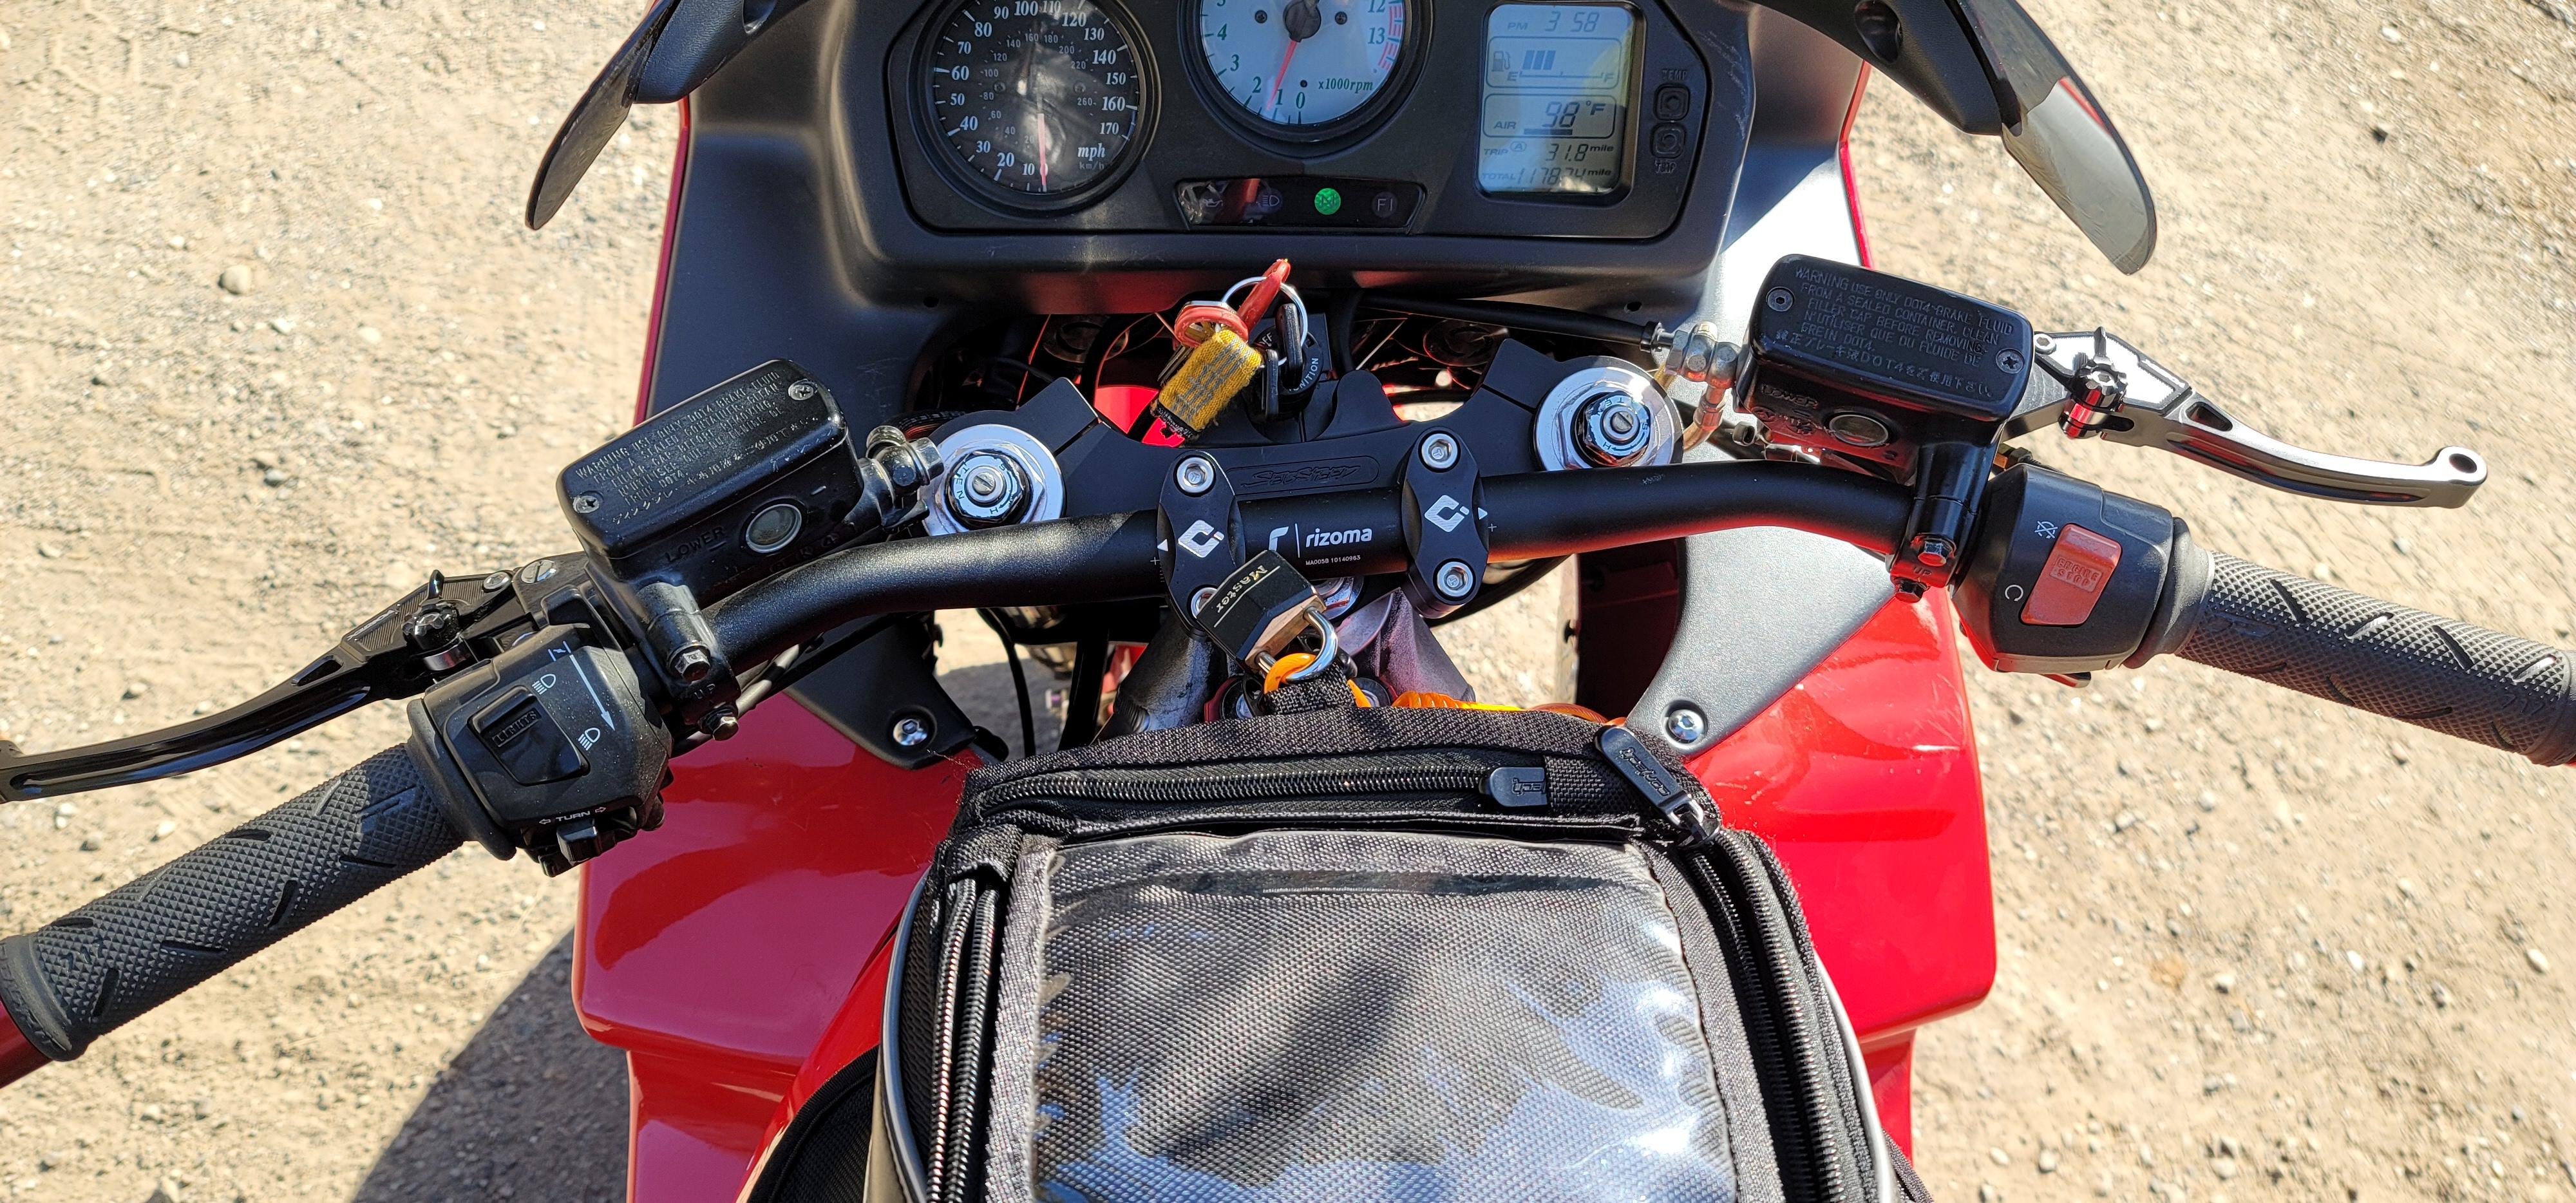
Just posting about a few things done on the '99, I'm coming up on 20-years of ownership this week (9/14) and just short of 118K miles. Finished up adding the Ducati 1098 rear wheel conversion with the Australian Extreme Creations kit. And more Sebspeed Customs parts, custom cut RC51 triples with an offset closer to the original VFR specs, with a Rizoma bar. VFRD Wild headers mated to the completely refurbished Wolf exhaust from sfdownhill, done late last year. And just had the Ohlins serviced a few weeks ago. More to come eventually, on the lookout for some forged wheels. Thanks to Sebspeed for the work to create the triples, awesome design.
13 points
-
Back in January, when it dawned on me there would be no more VFR's made , I bought one . A good deal was done and I did go for many accessories. I always wanted a red one, so Victory red it was. I went for the Akrapovic exhaust, hugger, quick shifter , panniers and a Powerbronze double bubble screen. Having covered 165 miles so far since last Friday. Its still between 3-6C here and it feels it . Having 2 5 th Gen VFR's , its all fairly familiar. Everything fell to hand and the seating position is a little bit sportier. Other than the horn and the indicators being swapped round everything else is exactly where you would find it. It rides very nicely but the suspension is hard. I have softened it down a notch at the back , seems to have helped and I will do the rebound later on as its still too hard and I am no lightweight at around 105 kg. There are 2 things which I havent quite got to grips with yet. The back brake is one. It feels very ineffective atm and the pedal feels long. Maybe the rear brake needs a little running in or perhaps It needs bleeding . I will get it seen to at the first service at 600 miles. The other thing that does bother me is the quick shifter. I'm kind of thinking its a bit pointless. Certainly the standard gear change and clutch are buttery smooth in operation and the gear change is very different with the quick shifter. Whilst I have got used to its size I still say to myself I will take that off when I get home after every ride . The quick shifter pedal is most definitely shorter than the standard shifter, not in length but width , as in the part that goes over your foot when you change up. I don't have big clumpy boots but still find myself pushing my foot to the right to make sure I hook up with the lever. I fail to see why they made it shorter. Otherwise the VFR is exactly as expected. The quality is great, the ride and handling are good and I look forward to getting the V-TEC singing at indecent revs once its run in. You all know what a VFR looks like, but just in case you have forgotten.
13 points
-
Pics.
13 points
-
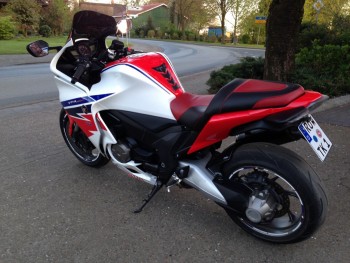
From the album: 2015 Happenings
13 points -
While re-reading all 43 pages of this to answer my above questions I noted the key points to summarize for those looking to weed info out of the banter. I was looking for 5th Gen info so I might have missed something, but maybe this will save someone hours of sifting; Page 1 -General Design Specs Page 5 -Air Filters Page 6 -Prototype Install Page 7 -Fitment and Preliminary Dyno Page 8 -Install with Centerstand instructions Page 11 -Gasket details Page 13 -O2 bungs Page 13 -8th Gen Pics Page 14 -6th Gen Dyno Page 15 -First batch packaging info, weights and dimensions Page 16 - 8th Gen Dyno Page 26 -Power Commander Map Dynos Gen 5, 6 & 813 points
-
mello dude, couldn’t disagree more. My experience is that a R/R disaster will not leave you stranded if you just follow a few simple steps: 1. Discover no-start status in fast food parking lot. 2. Make friends with two HD guys with mini jumper cables. 3. Start 2002 VFR. 4. Start 2002 VFR again. 5. Ask HD guys to hold throttle after 3rd start while putting on helmet, gloves. 6. Head north, knowing bike will not start again without help. 7. Realize that tank has one gallon to make it another 100 miles. 8. Stop and fill bike with gas, brain filled with dread. 9. Try many times to jump start. Sweat profusely. Curse ignorance after multiple failures. 10. Get passing tow truck to provide jump. 11. Repeat step 10 12. Ride home, revving above 5000rpm at every stoplight to avoid fatal stall. Ignore the waving five-year-old in the Suburban. 13. Park bike at home, drink five beers immediately. 14. Belatedly look up R/R issues on VFRD. See it’s easy, no need to be left stranded, just follow the steps. You don't even need a multimeter! Good thing this never happened to me.13 points
-
Haven't been around in a while. Sold my mint 2001 years ago and bought a Diavel. Lately, I've been searching for a perfect 2000. Something to could just cruise on. The Ducati is awesome, but sometimes I just want to take it easy. Getting older I guess. Ive passed on multiple "clean" ones. It's amazing what people think "mint" is. After a year or so of searching, I finally found one. No shit, 2800 original miles. Everything, and I mean everything is there. The only thing that I could find missing was the rubber frame plug for the idle adjustment. Tires, brakes, oil, coolant, brake fluid, all original. Unfortunately, it looked like it was never cleaned. Lots of oxidation on the aluminum parts, and surface rust on steel parts. Chain was almost rusted solid! I've slowly been flushing all the fluids, and cleaning it up. So far, it's coming out great. I probably won't register it this year, so I have nothing but time. Great to be back. This will be my 4th VFR in the past 25 years. This one stays though!
13 points
-
Lost a job recently so decided to spend some quality time on my moto. Took a 3 day tour of SD/WY, solo keeping a generous 6+feet distance from most individuals and animals (luckily) Day 1, left Denver and arrived Hot Springs, SD. I was immediately greeted by lovely twisties of Hwy 395/87 and the bison on a way heading to Custer. Stayed overnight in the Center Lake campground, roughing it sleeping in a hammock (my first). Dipped to 48F overnight so I was a little chilly. The campground is awesome: clean showers, beautiful lake, wildlife around.. Day 2, left the campground and I was immediately on the Needles Highway. I’ve been on it a few times so I did not bother stopping to take pictures because I was enjoying the road basically to myself early morning. The is super twisty and has a few on way tunnels carved out in the rocks. Epic ride! I continued riding to the Spearfish Canyon after a short stop for breakfast in Hill City. SC is another must do: flowy, moderate speeds ride! Left SD heading to the oldest National Monument in US. The roads around it are triple digit sweepers but kept it sane being alone and seeing some cops around. After a quick picture at Devils Tower, rode to my cabin in Buffalo, WY. Day 3, after sleeping not that great, I stopped for a drive through coffee at Macdonalds:). I wonder if I was their first customer on a motorcycle going through a drive through 🤪. After slurping the god-sent beverage, off I went over the Big Horn mountains. It was a cold foggy morning in the mountains so I missed some of the scenery. The fog lifted as soon as I reached the peak, and I was happy to be able to see more than 20 feet in front of me. Again, did not stop for pics, I was just happy to avoid any potential collision with the wildlife and being warm enough to enjoy the corners. The west side of Hwy 16 is better anyways, smooth pavement and nice views. Stopped in Thermopolis, WY at Bear Cafe for brunch-great food! The canyon heading south of town is beautiful!! Then, the boring shit of 120 miles to Rawlins.. Not terribly so but after all the good roads, this was definitely a drag. The highlight of the ride back to Denver was a ride through the Medicine Bowl mountains (Saratoga to Centennial). Nice road and lots of snow still on the sides.. In summary, the best part of my trip is the Black Hills, SD. You literarily can spend 3 days and explore some of the neatest roads and not have to go far. They also take care of their roads, and the wildlife is the icing on the cake: watch out for wild turkeys, deer and bison of course.
13 points
-
So I started the VFR project a couple of month back. going has been pretty slow to be honest. I wanted to make a poor mans ariel ace, and as I want this to be a bit special I went about sourcing an Ohlins TTX shock, a set of ohlins forks from an RSVR 1000R, and a pair of Brembo M40 monoblock calipers. I also sourced the back end from a 2015 speed triple as that will work with the look that I was going for. Honda use different spacings for brakes and things that the european manufacturers, so I ended up having to buy a front wheel from a Ducati multstrada to finish the front end: I made myself up a little mock up of what I wanted it to look like: The bike was stripped (I still have a few spares if anyone is look for something) apart completely, just leaving the engine and the swing arm sat on my ramp. I used the VFR frame to build a jig and copy the original bikes geometry Then I started bending pipes for the top tube: checking that the bends clearance the engine, and follow the right lines on the engine: Triangulation Next up was the rear shock mount: Mocking up the tank and seat unit: And this is pretty much where I am up to for now. Hopefully I will have the lower engine mount picked up and potentially the rear seat unit on the bike over the weekend. I am reluctant to make the framework for the seat unit before the bike is back on its wheels, in case I get the angle wrong.13 points
-
I was finally able to capture the Pearl White beauty of my 2014...in one of the most beautiful areas in the Country, Sedona Arizona.13 points
-
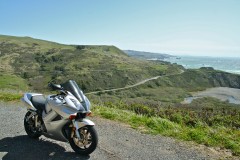
From the album: California Hwy 1 3/22/12
13 points -

From the album: Shinigami's gallery
Fall colors in central UT13 points -
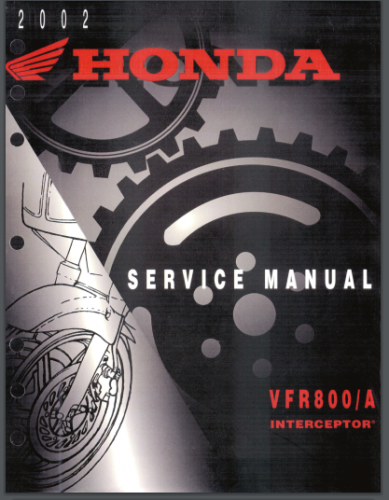
Version 1.0
4,562 downloads
This is the same manual that was available here on VFRD. I noticed it was missing from the downloads section and wanted to replace it. Optimized the file size so that it is only 65 MB. Ran OCR text recognition to enable text searches on the entire book.12 points -
I've finally completed my personal 1993 project. Rescued from a certain death sentence, I've brought it back to be my personal everyday bike. If interested, here's a short post on her story: http://v4dreams.com/shop-blog/my-v4-dream
12 points
-
Today I put precisely 77.9 miles on the RC51 on roads in my back yard, fantastic roads actually, but unfortunately during the summer occupied by vehicles both 10 times larger, and 10 times slower, than my bike. This time of year it is a know hazard, tourist season, but this afternoon I actually had above-average miles of perfectly paved winding coast road open to me and the RC. To be fair, our locals are very nice about pulling over into the frequent turnouts, as the signs tell them to. Tourists not so much (can you say Mustang convertible?) As always, the rule-of-thumb here is that the more cows you see, the more bugs you have to remove from your face shield. Rolling through Tomales I made a spur-of-the-moment left turn towards Dillon Beach, then cut through back roads towards Valley Ford. Looped back south through Nick's Cove, Marshall (I don't like oysters), with hardly a rolling RV roadblock to slow me down. What a great road! By the time I got to Point Reyes Station the parade had slowed to a crawl, but I turned east at Olema to the back roads that I know, bumpy but thinly traveled. I will never sell this bike, what a hoot. 😎
12 points
-
I sent him a PM with a question about a rear rim swap he did a while back on his 86 VFR. We traded a few PM's, then he sent me a fairly detailed write up on how to do it. Tonight, I recieved a full picture tutorial with all the actual parts showing how to do it. To say he went over and above would be an understatment, of an understatement. He saved me time, wasted effort, frustration and embarassment. Whats that worth? Well, certainly a public Thank You. Thanks mate.12 points