-
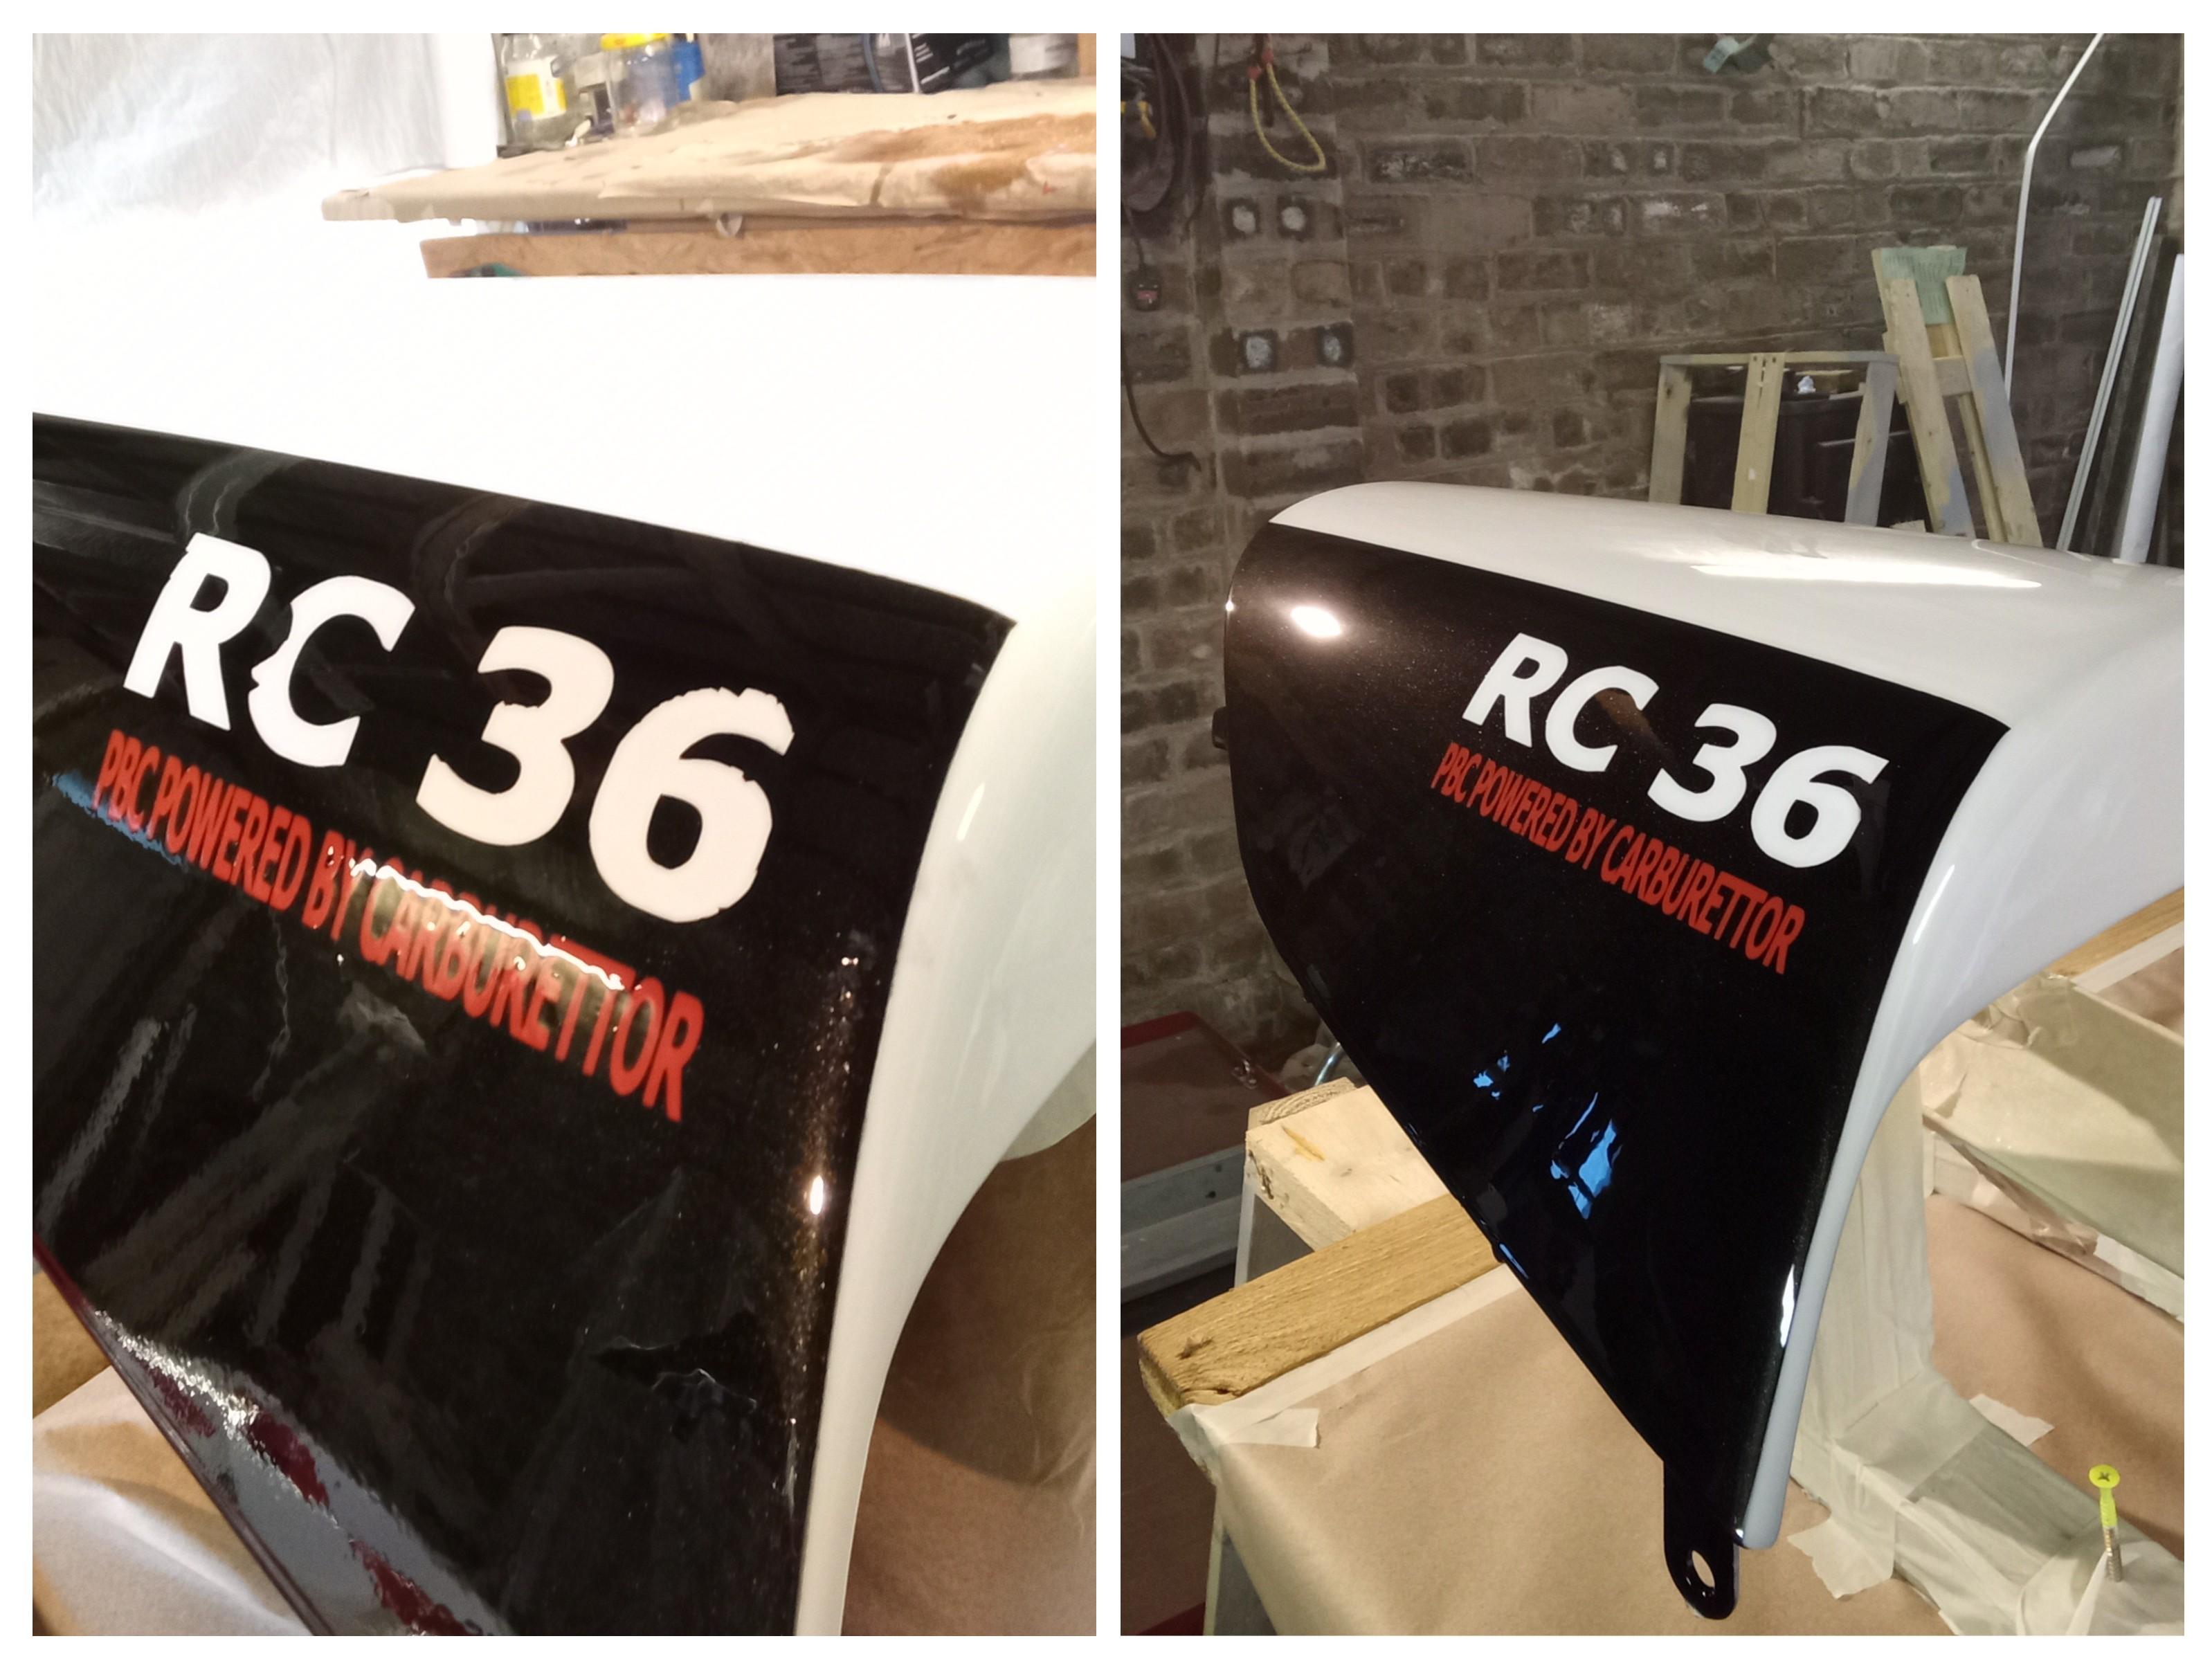
Featured Gallery Photo
 DSC_7455.JPG
All Activity
- Past hour
-

2002 VFR 800 (US) Not Starting (No Spark/Electronics Issues)
SteyrTMP replied to SteyrTMP's topic in Sixth Generation VFR's
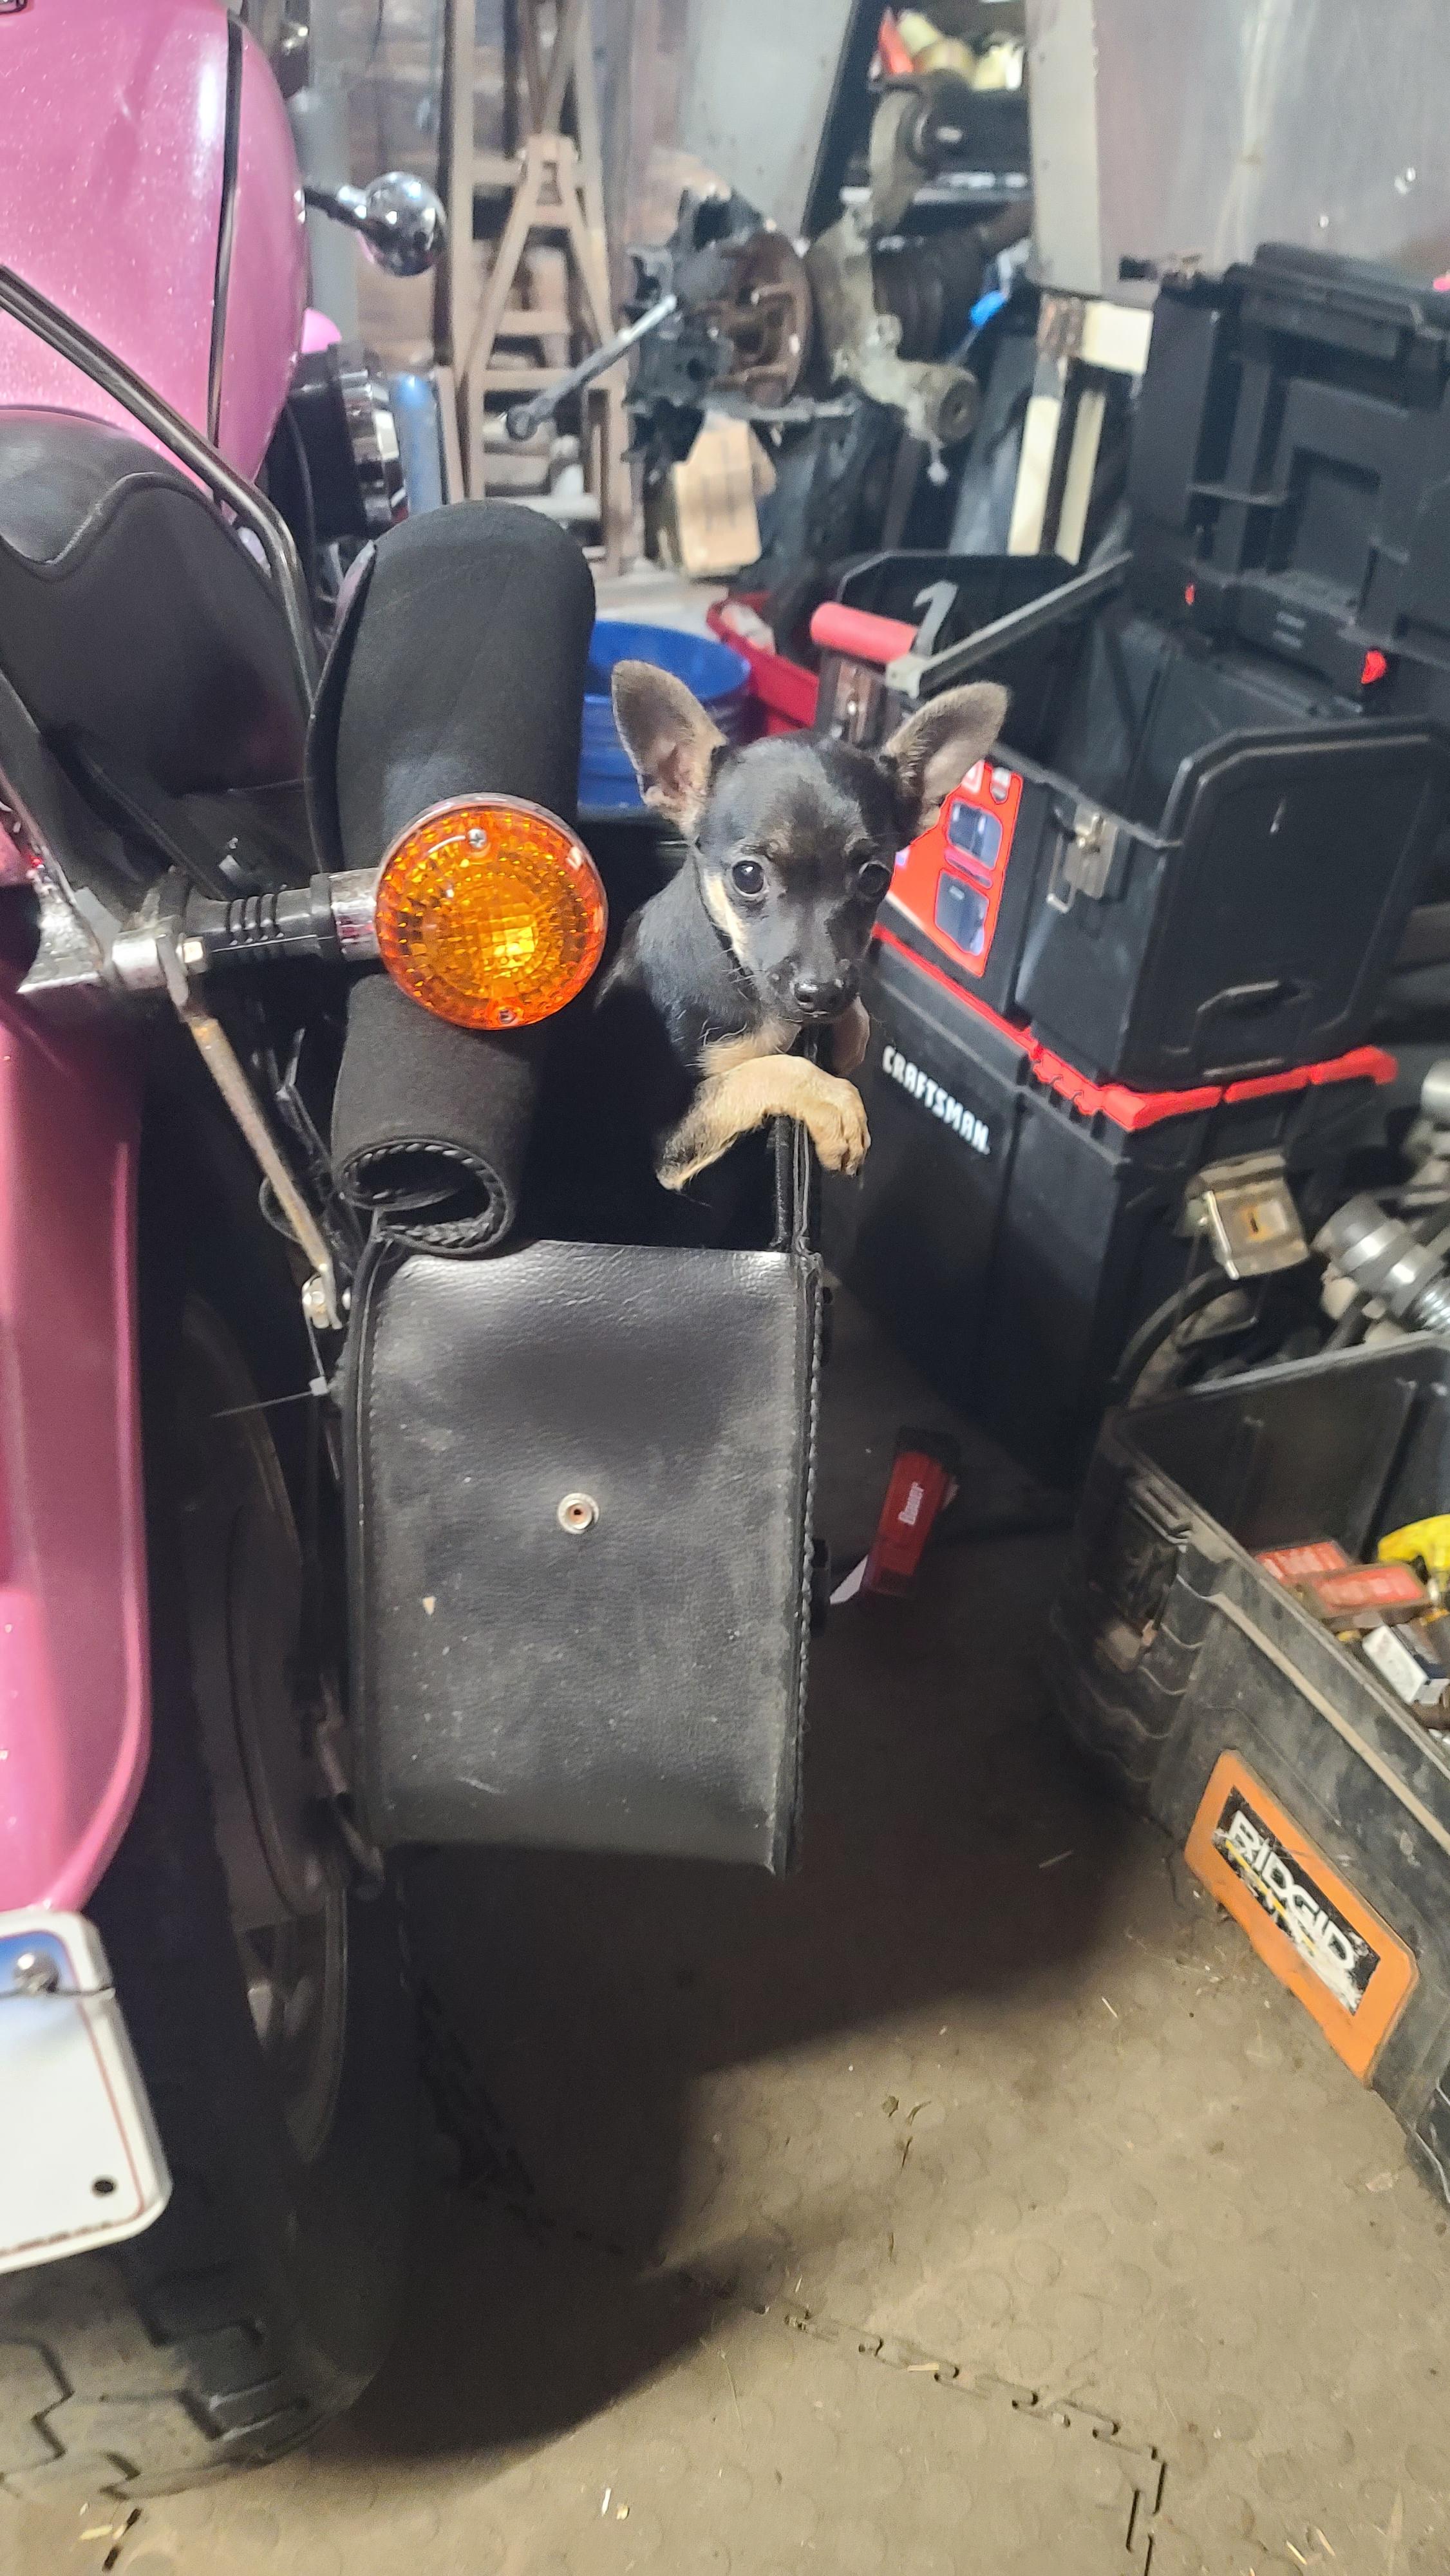
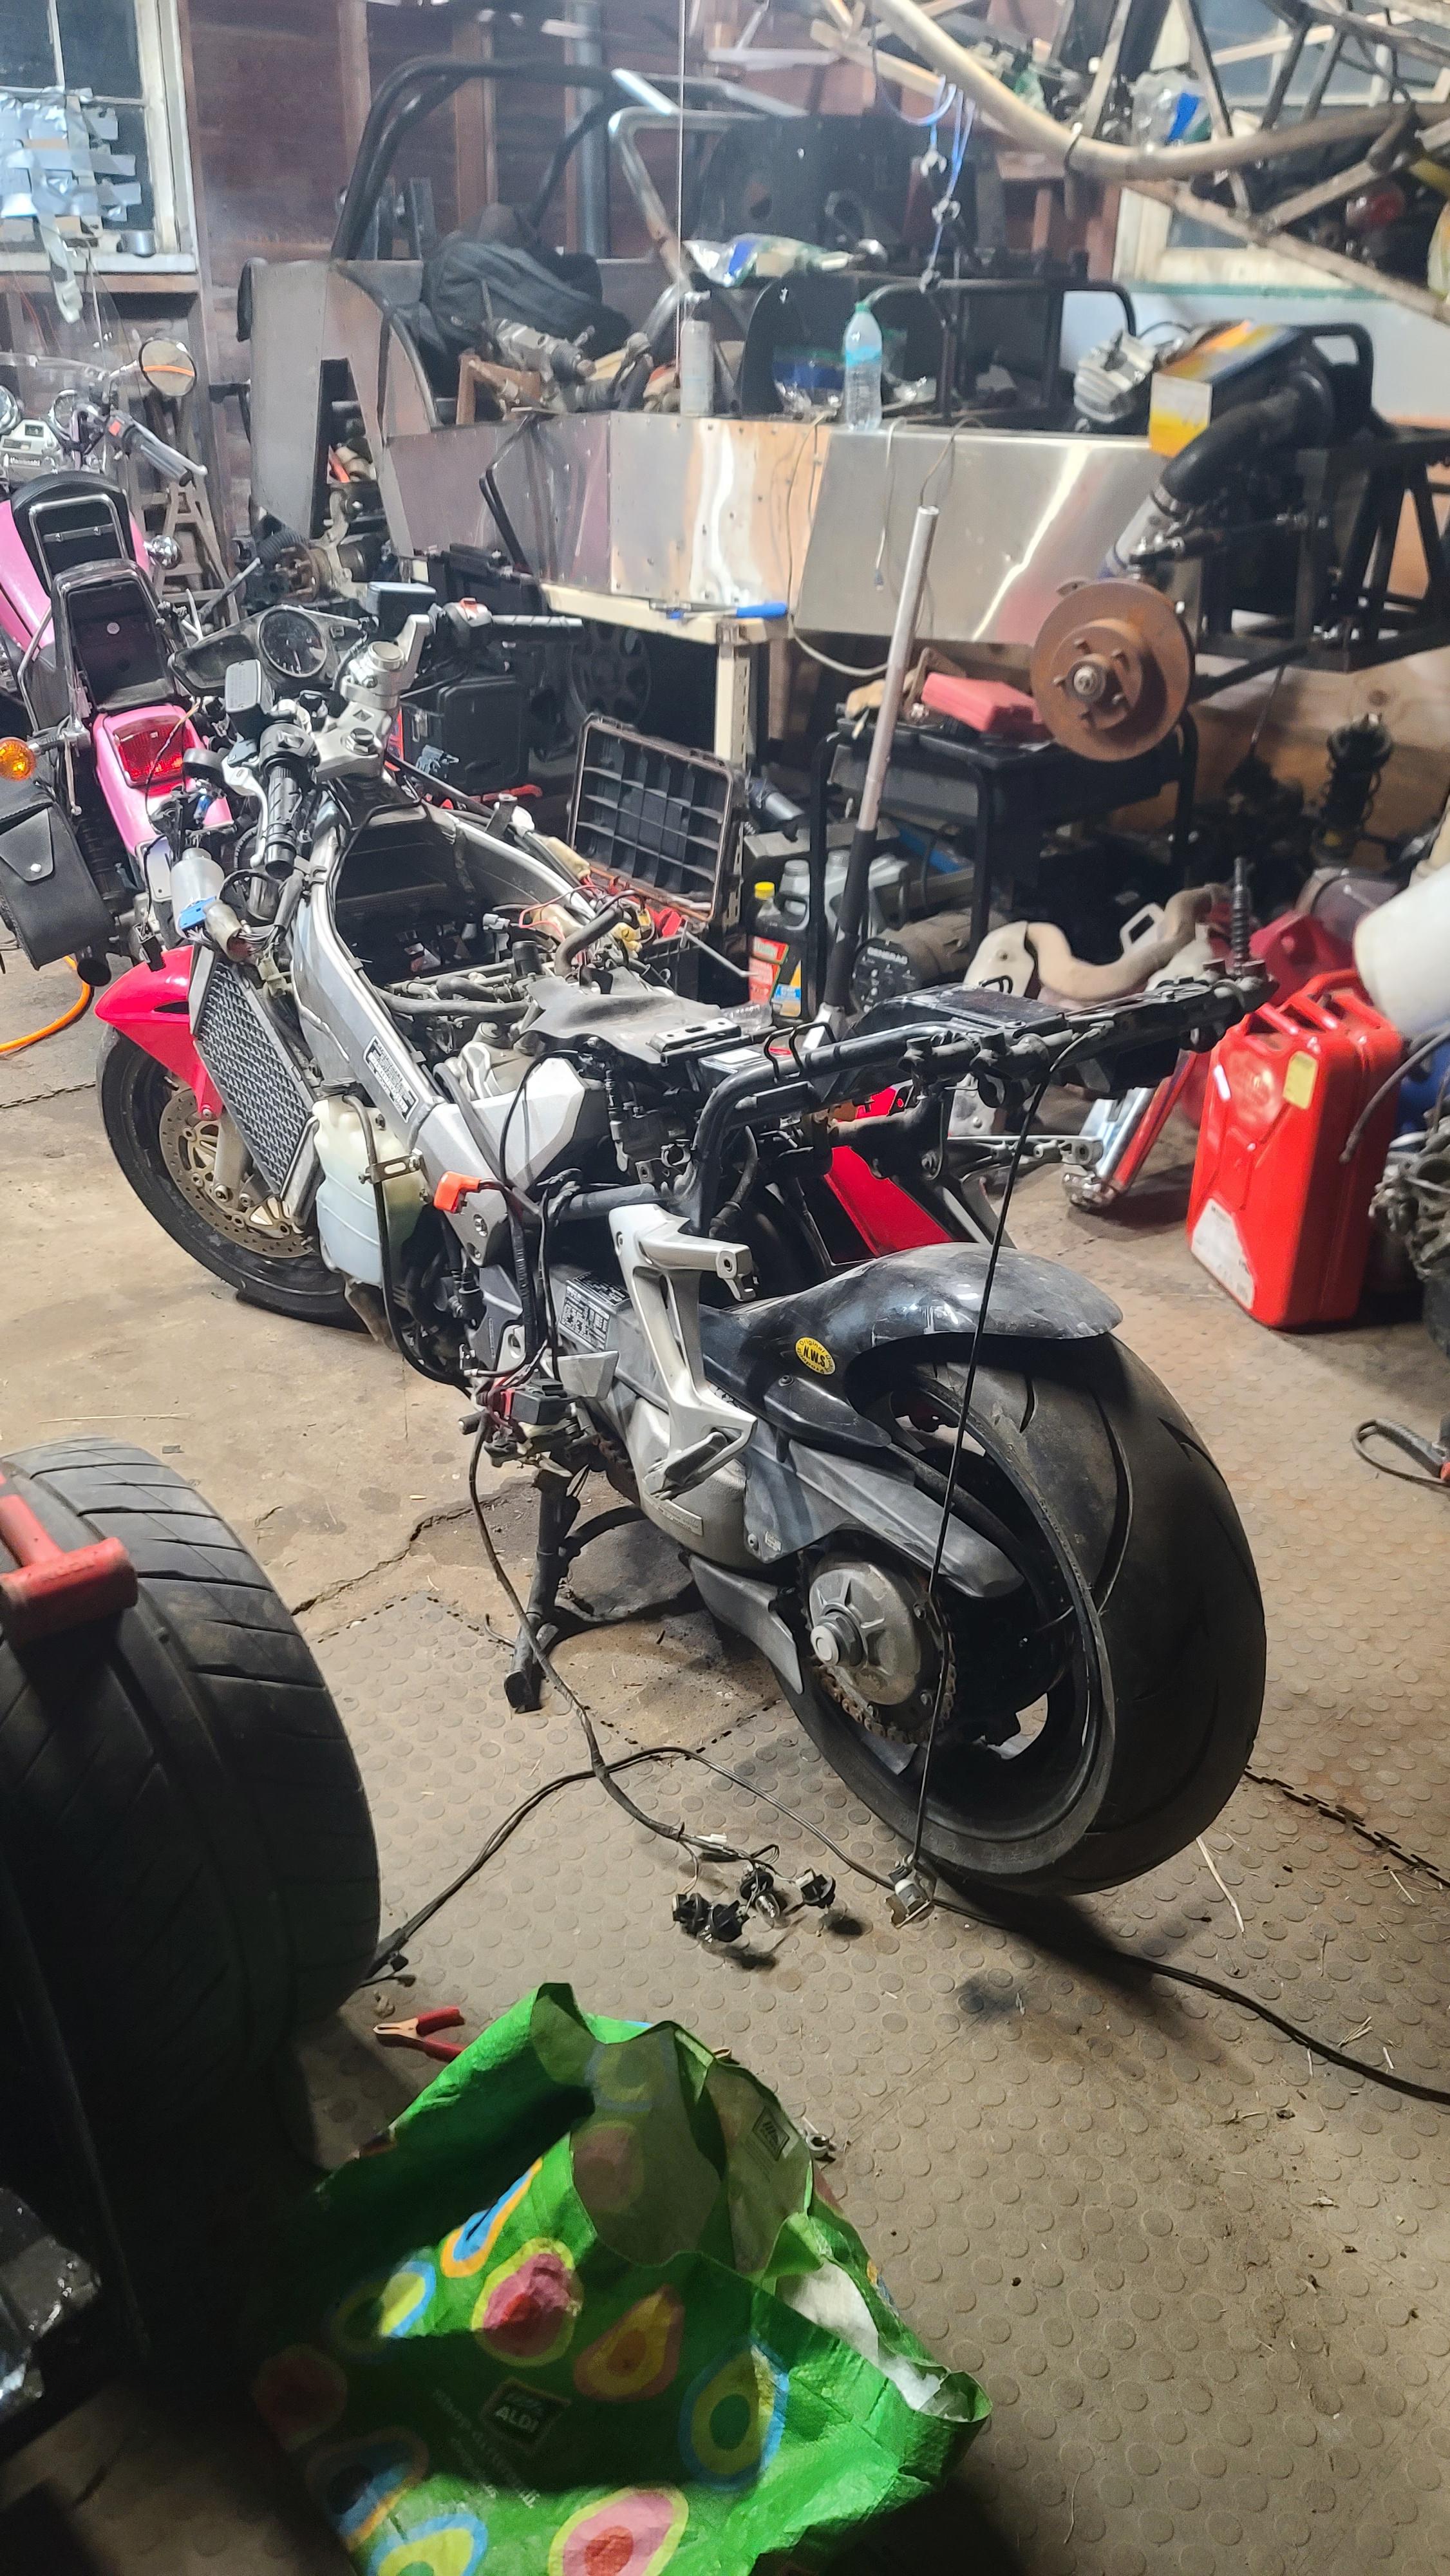
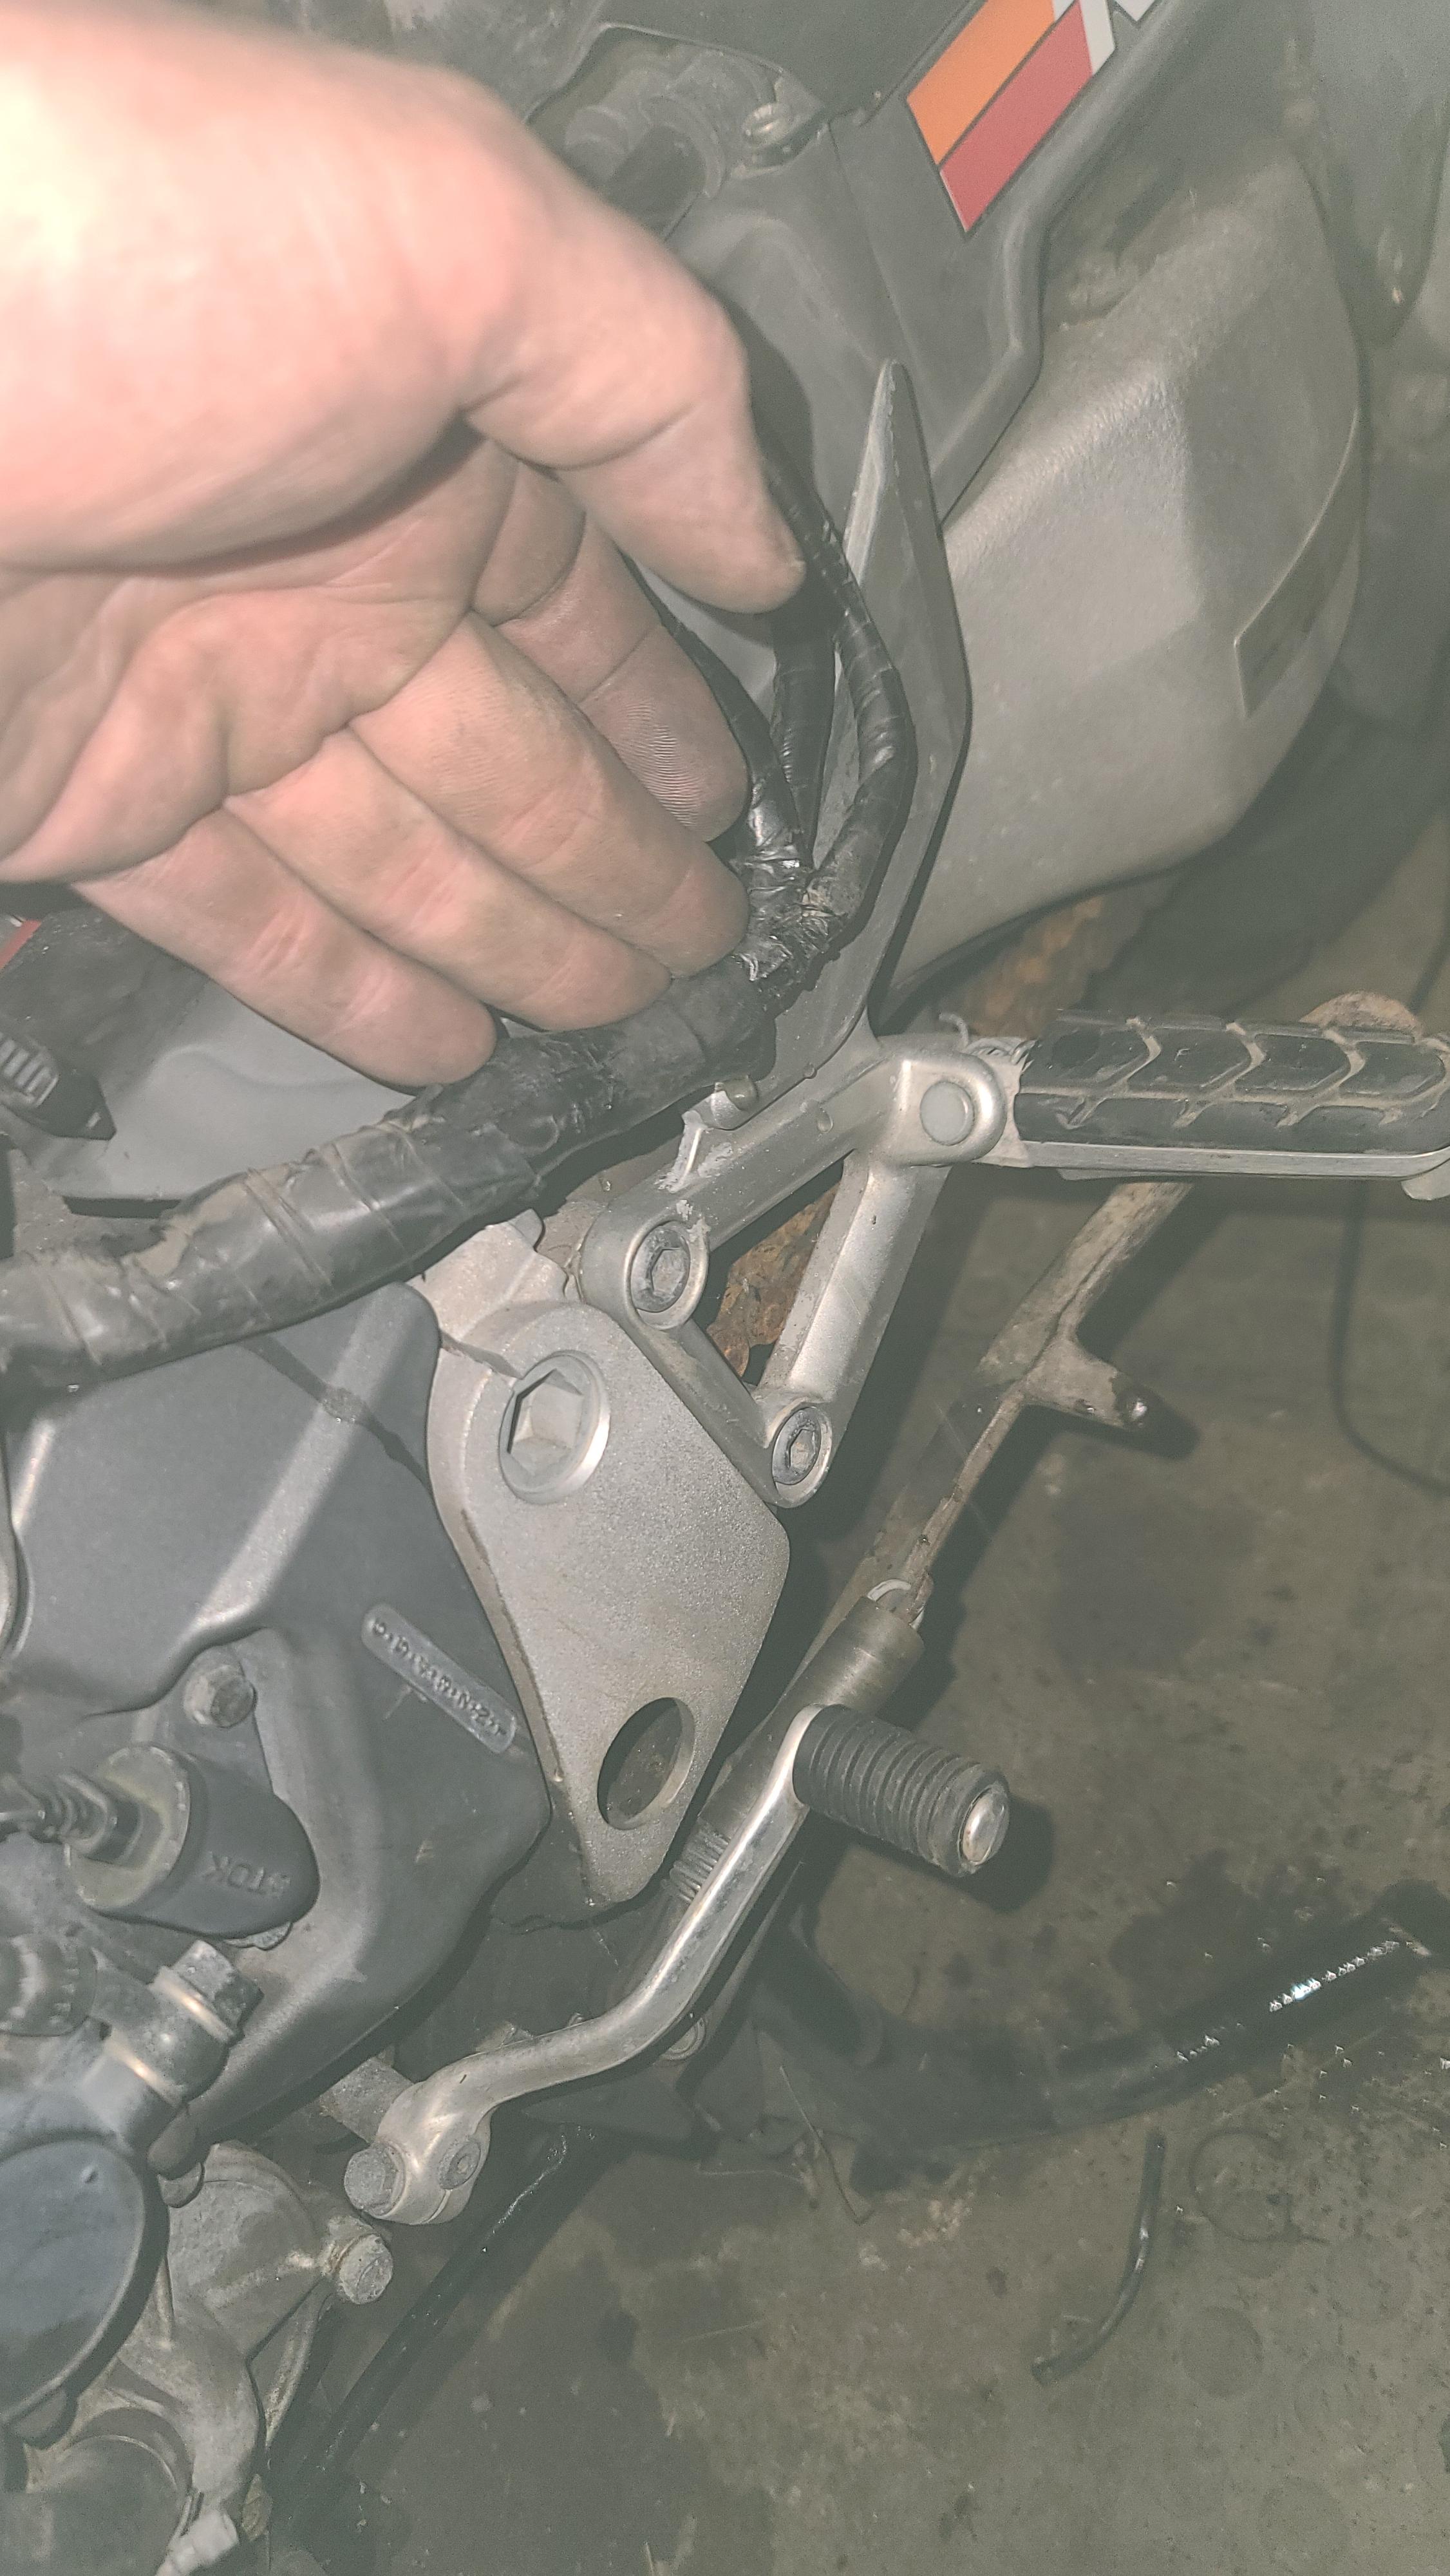
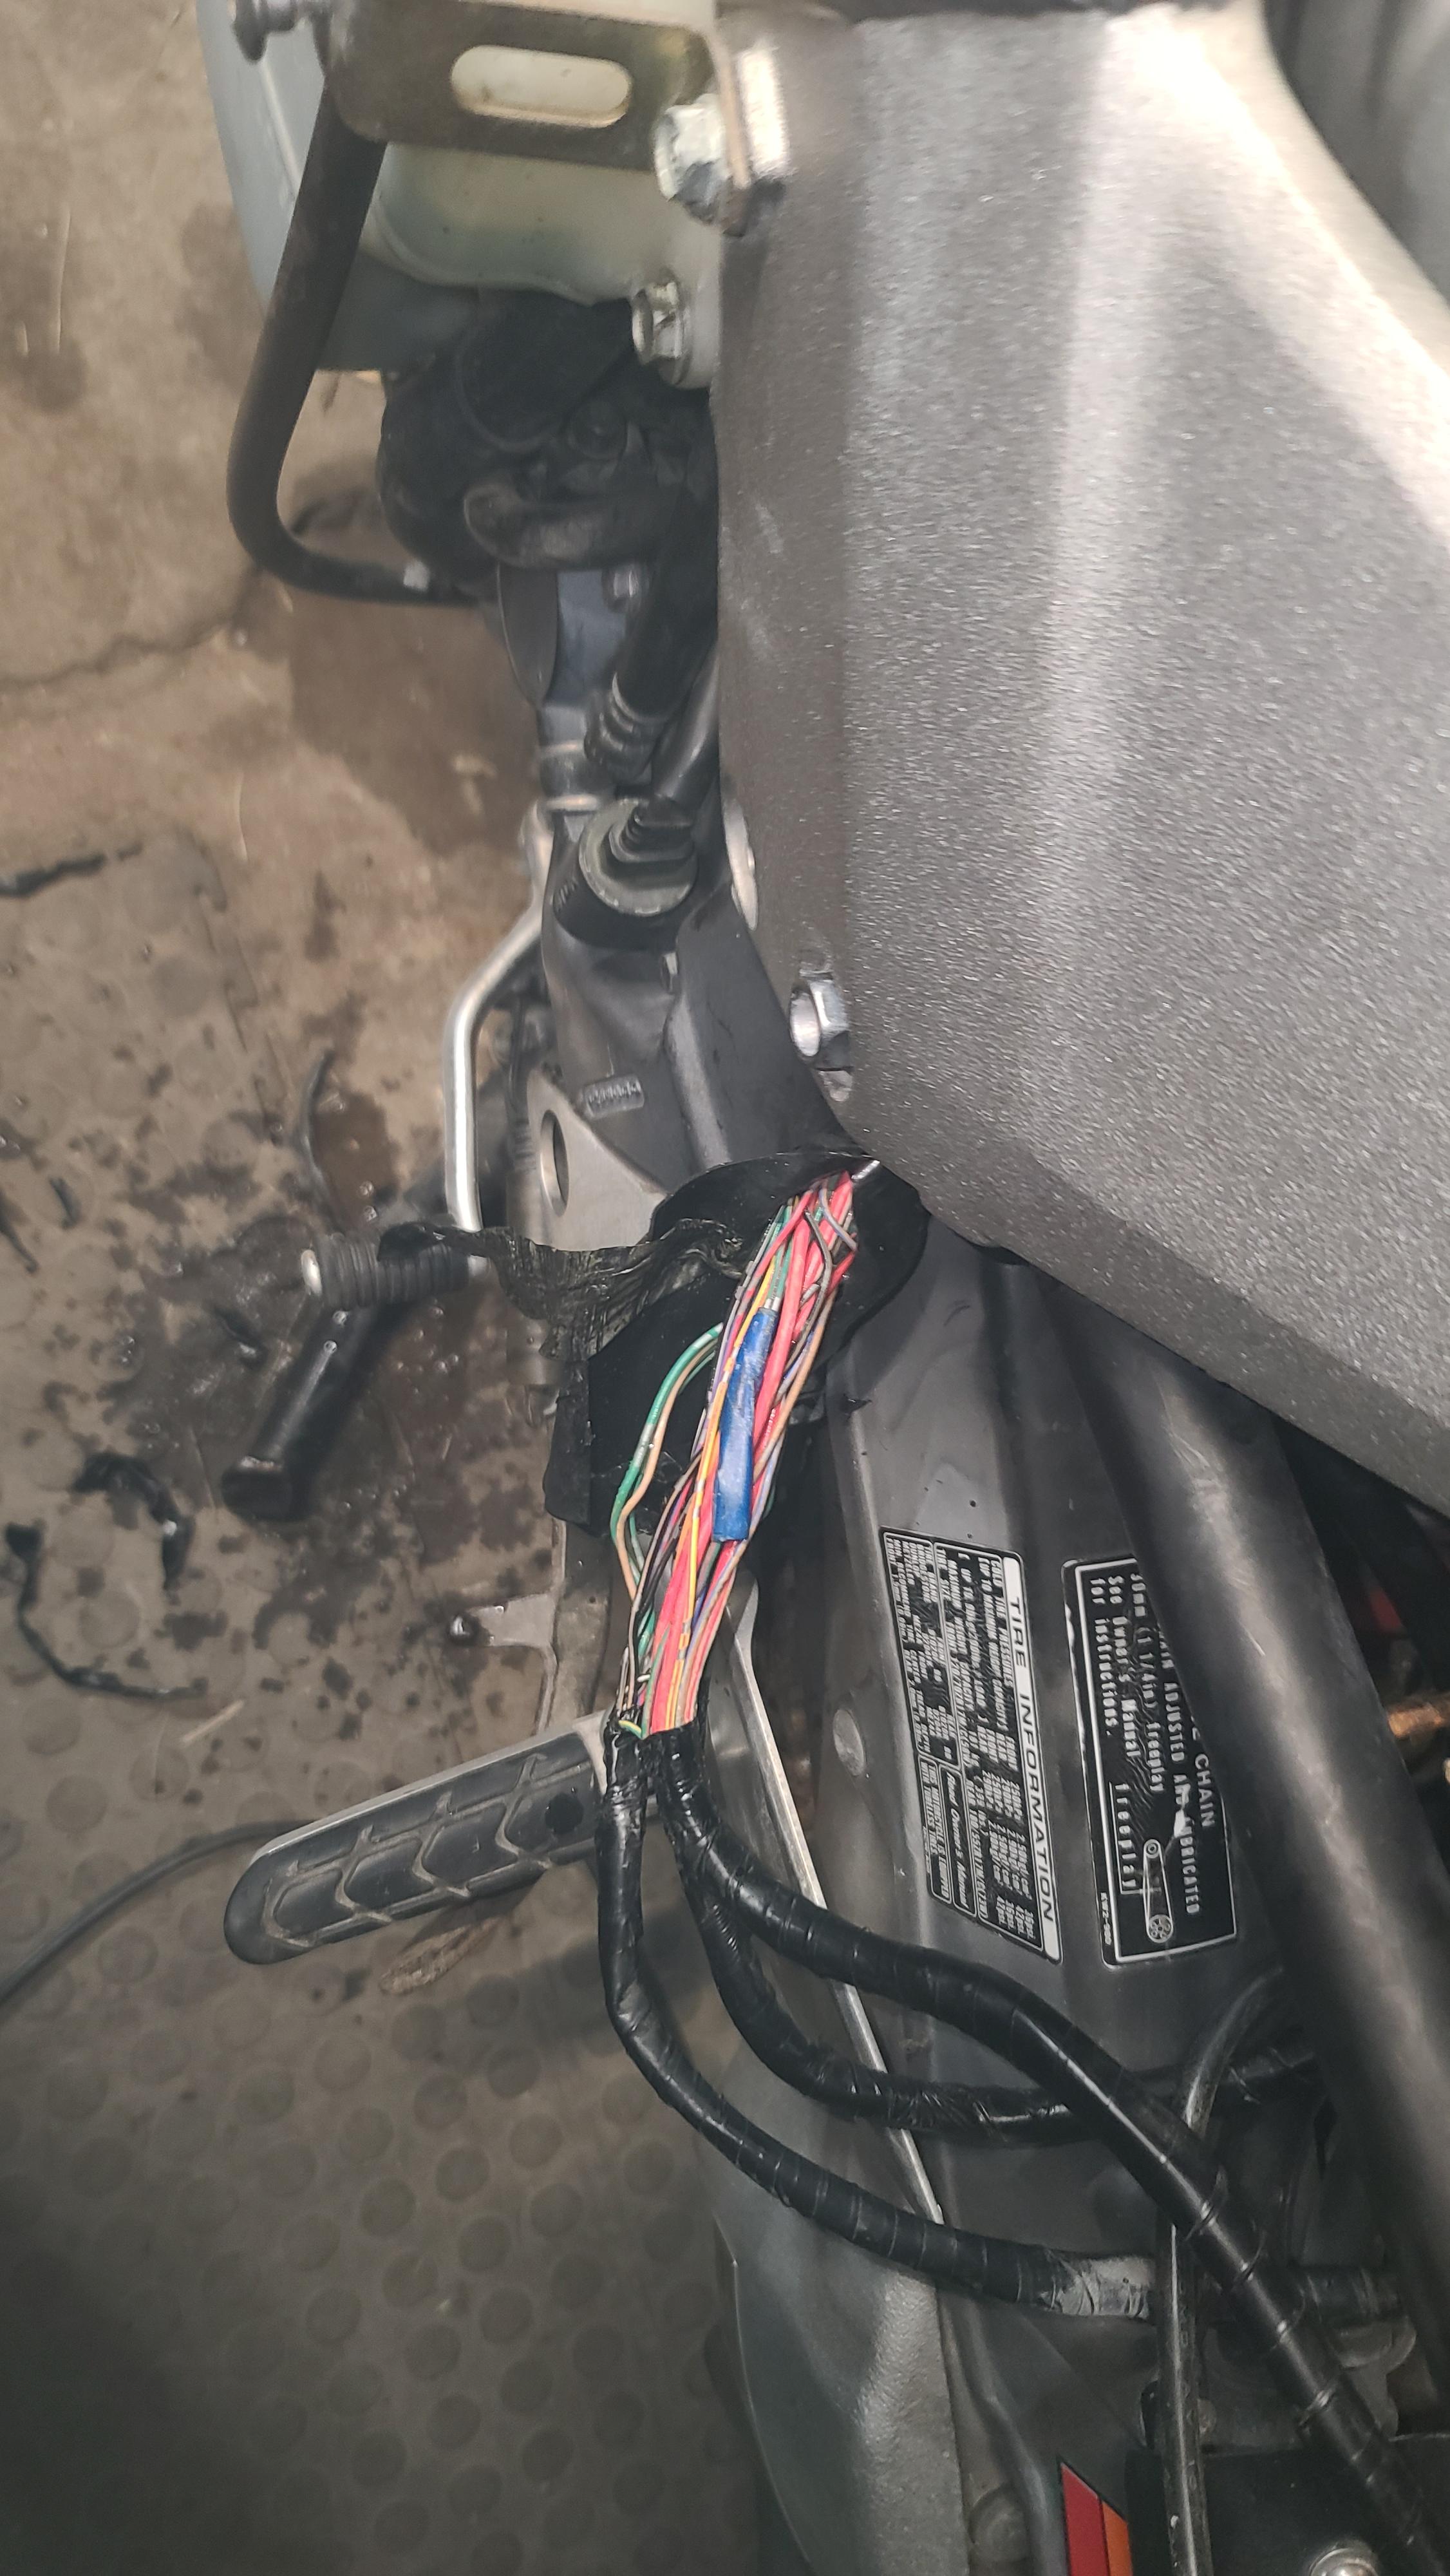
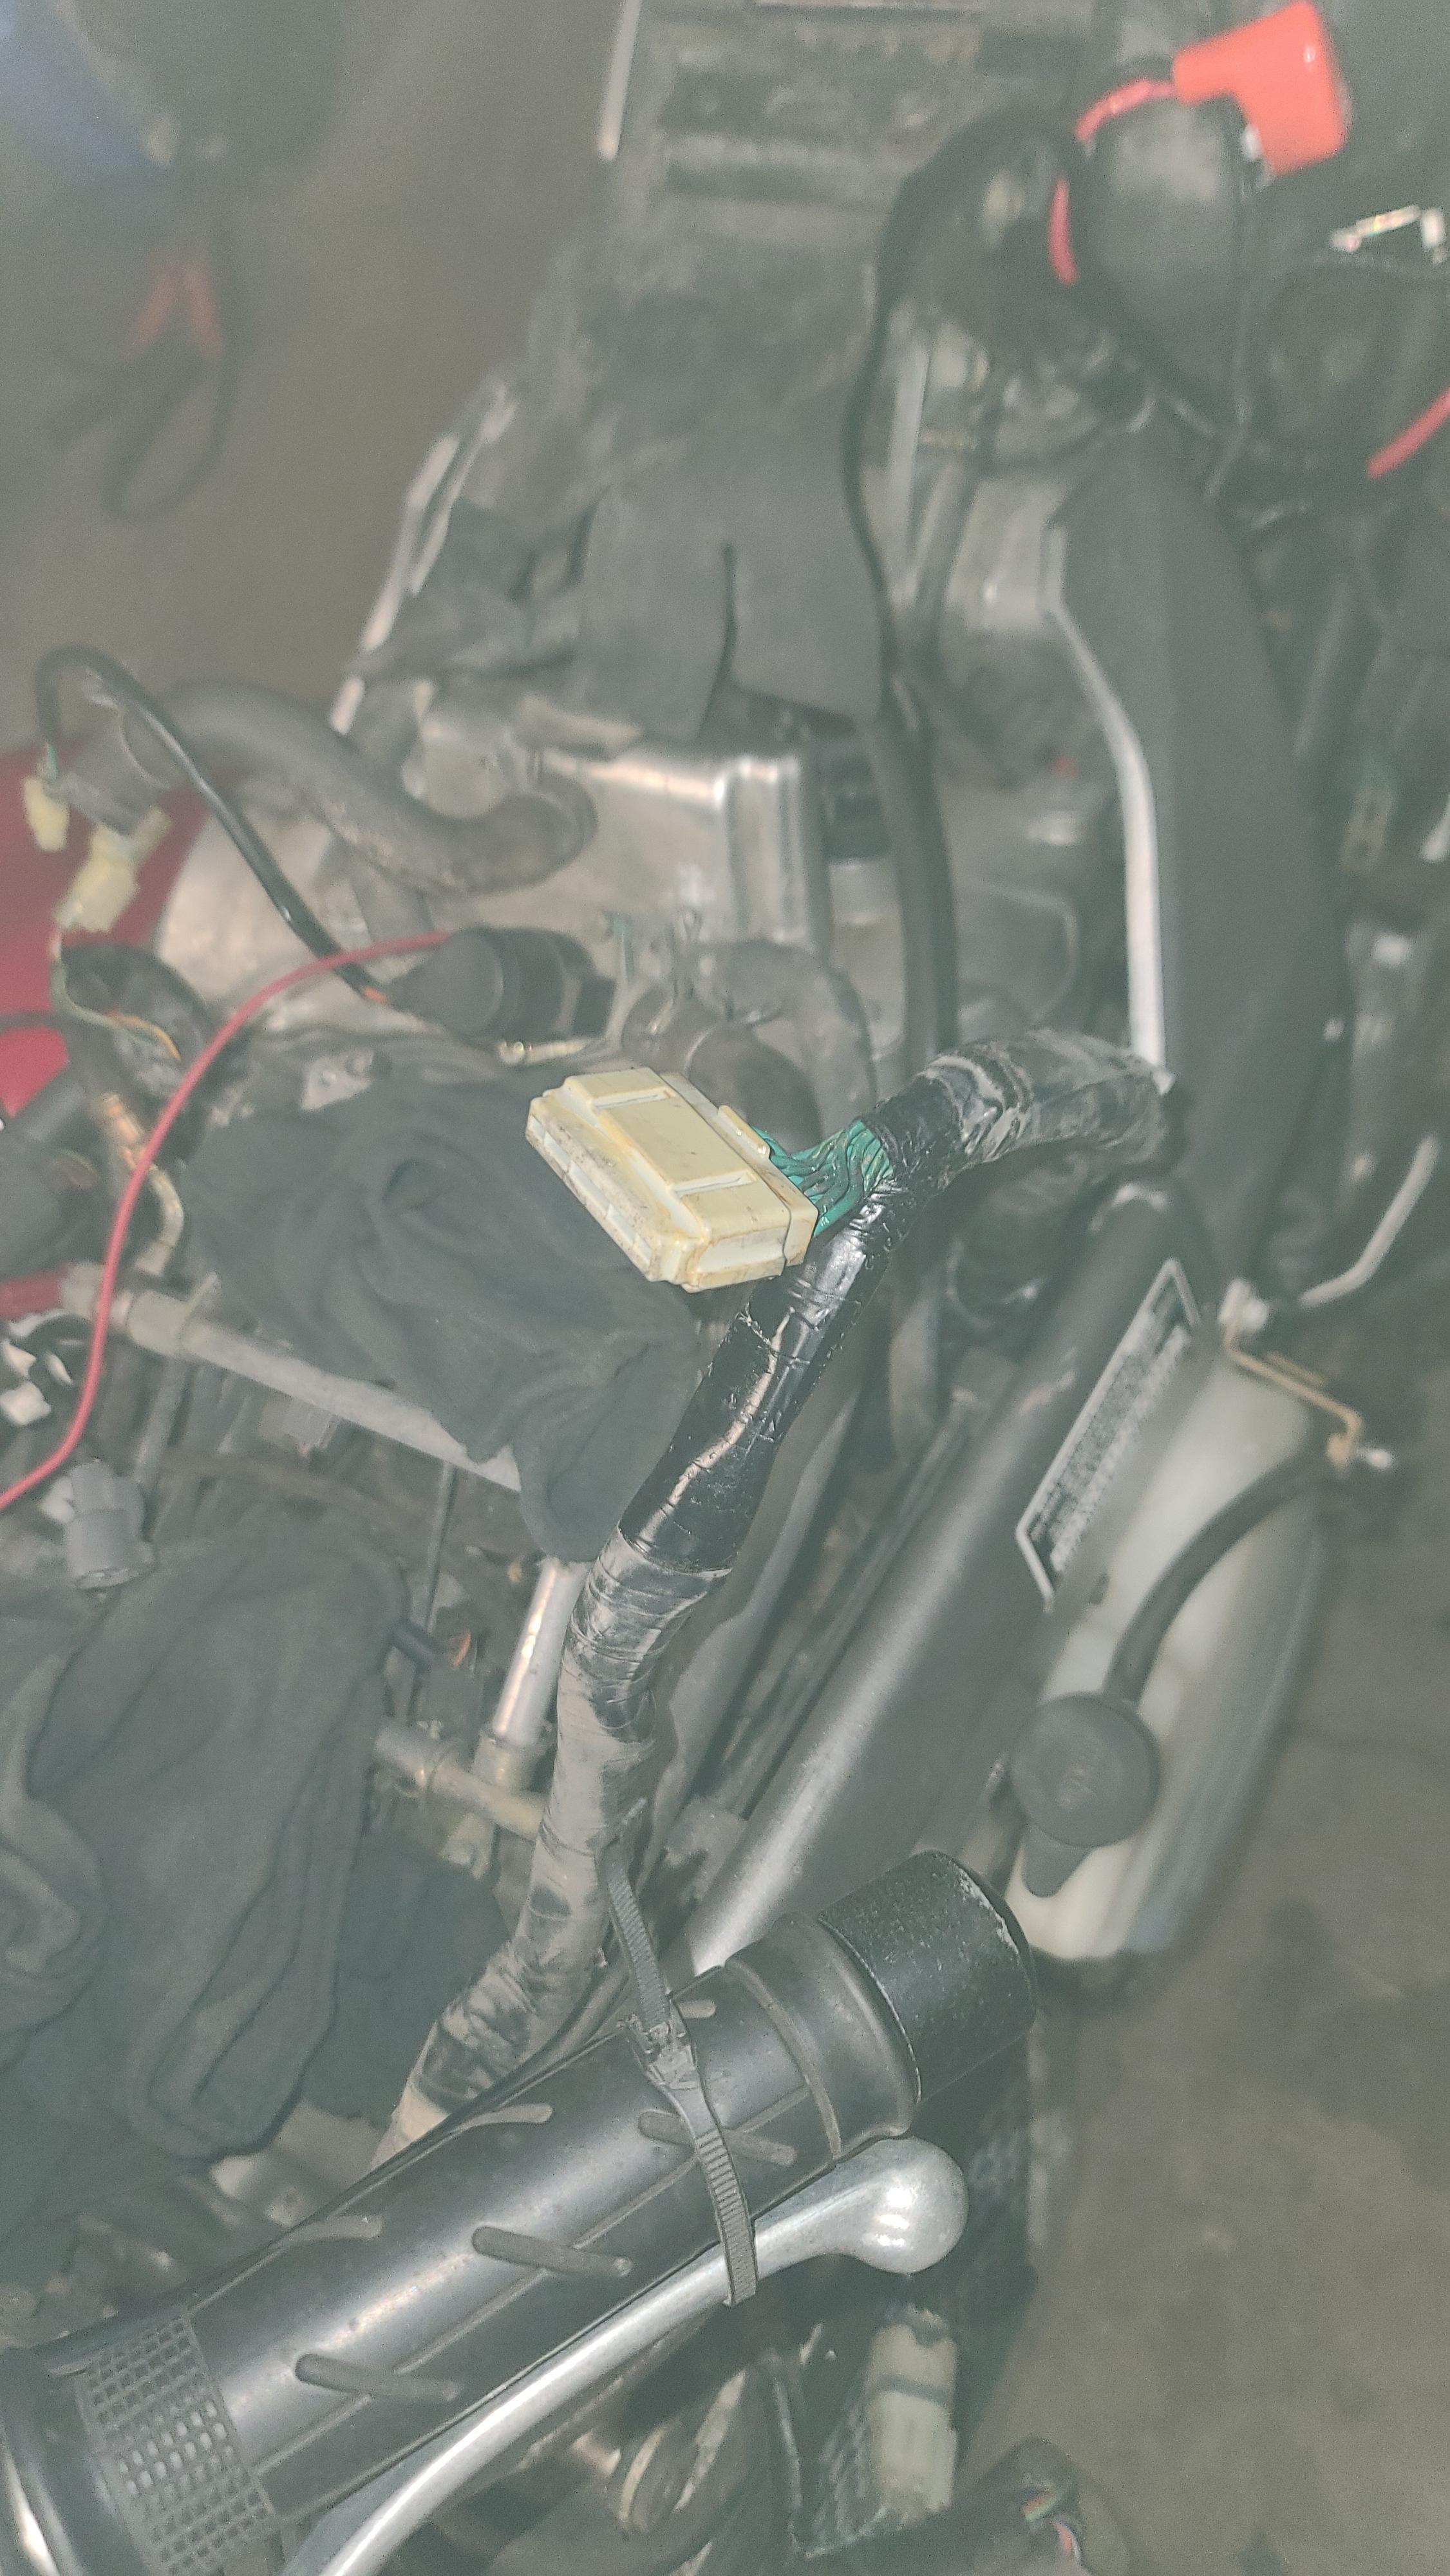
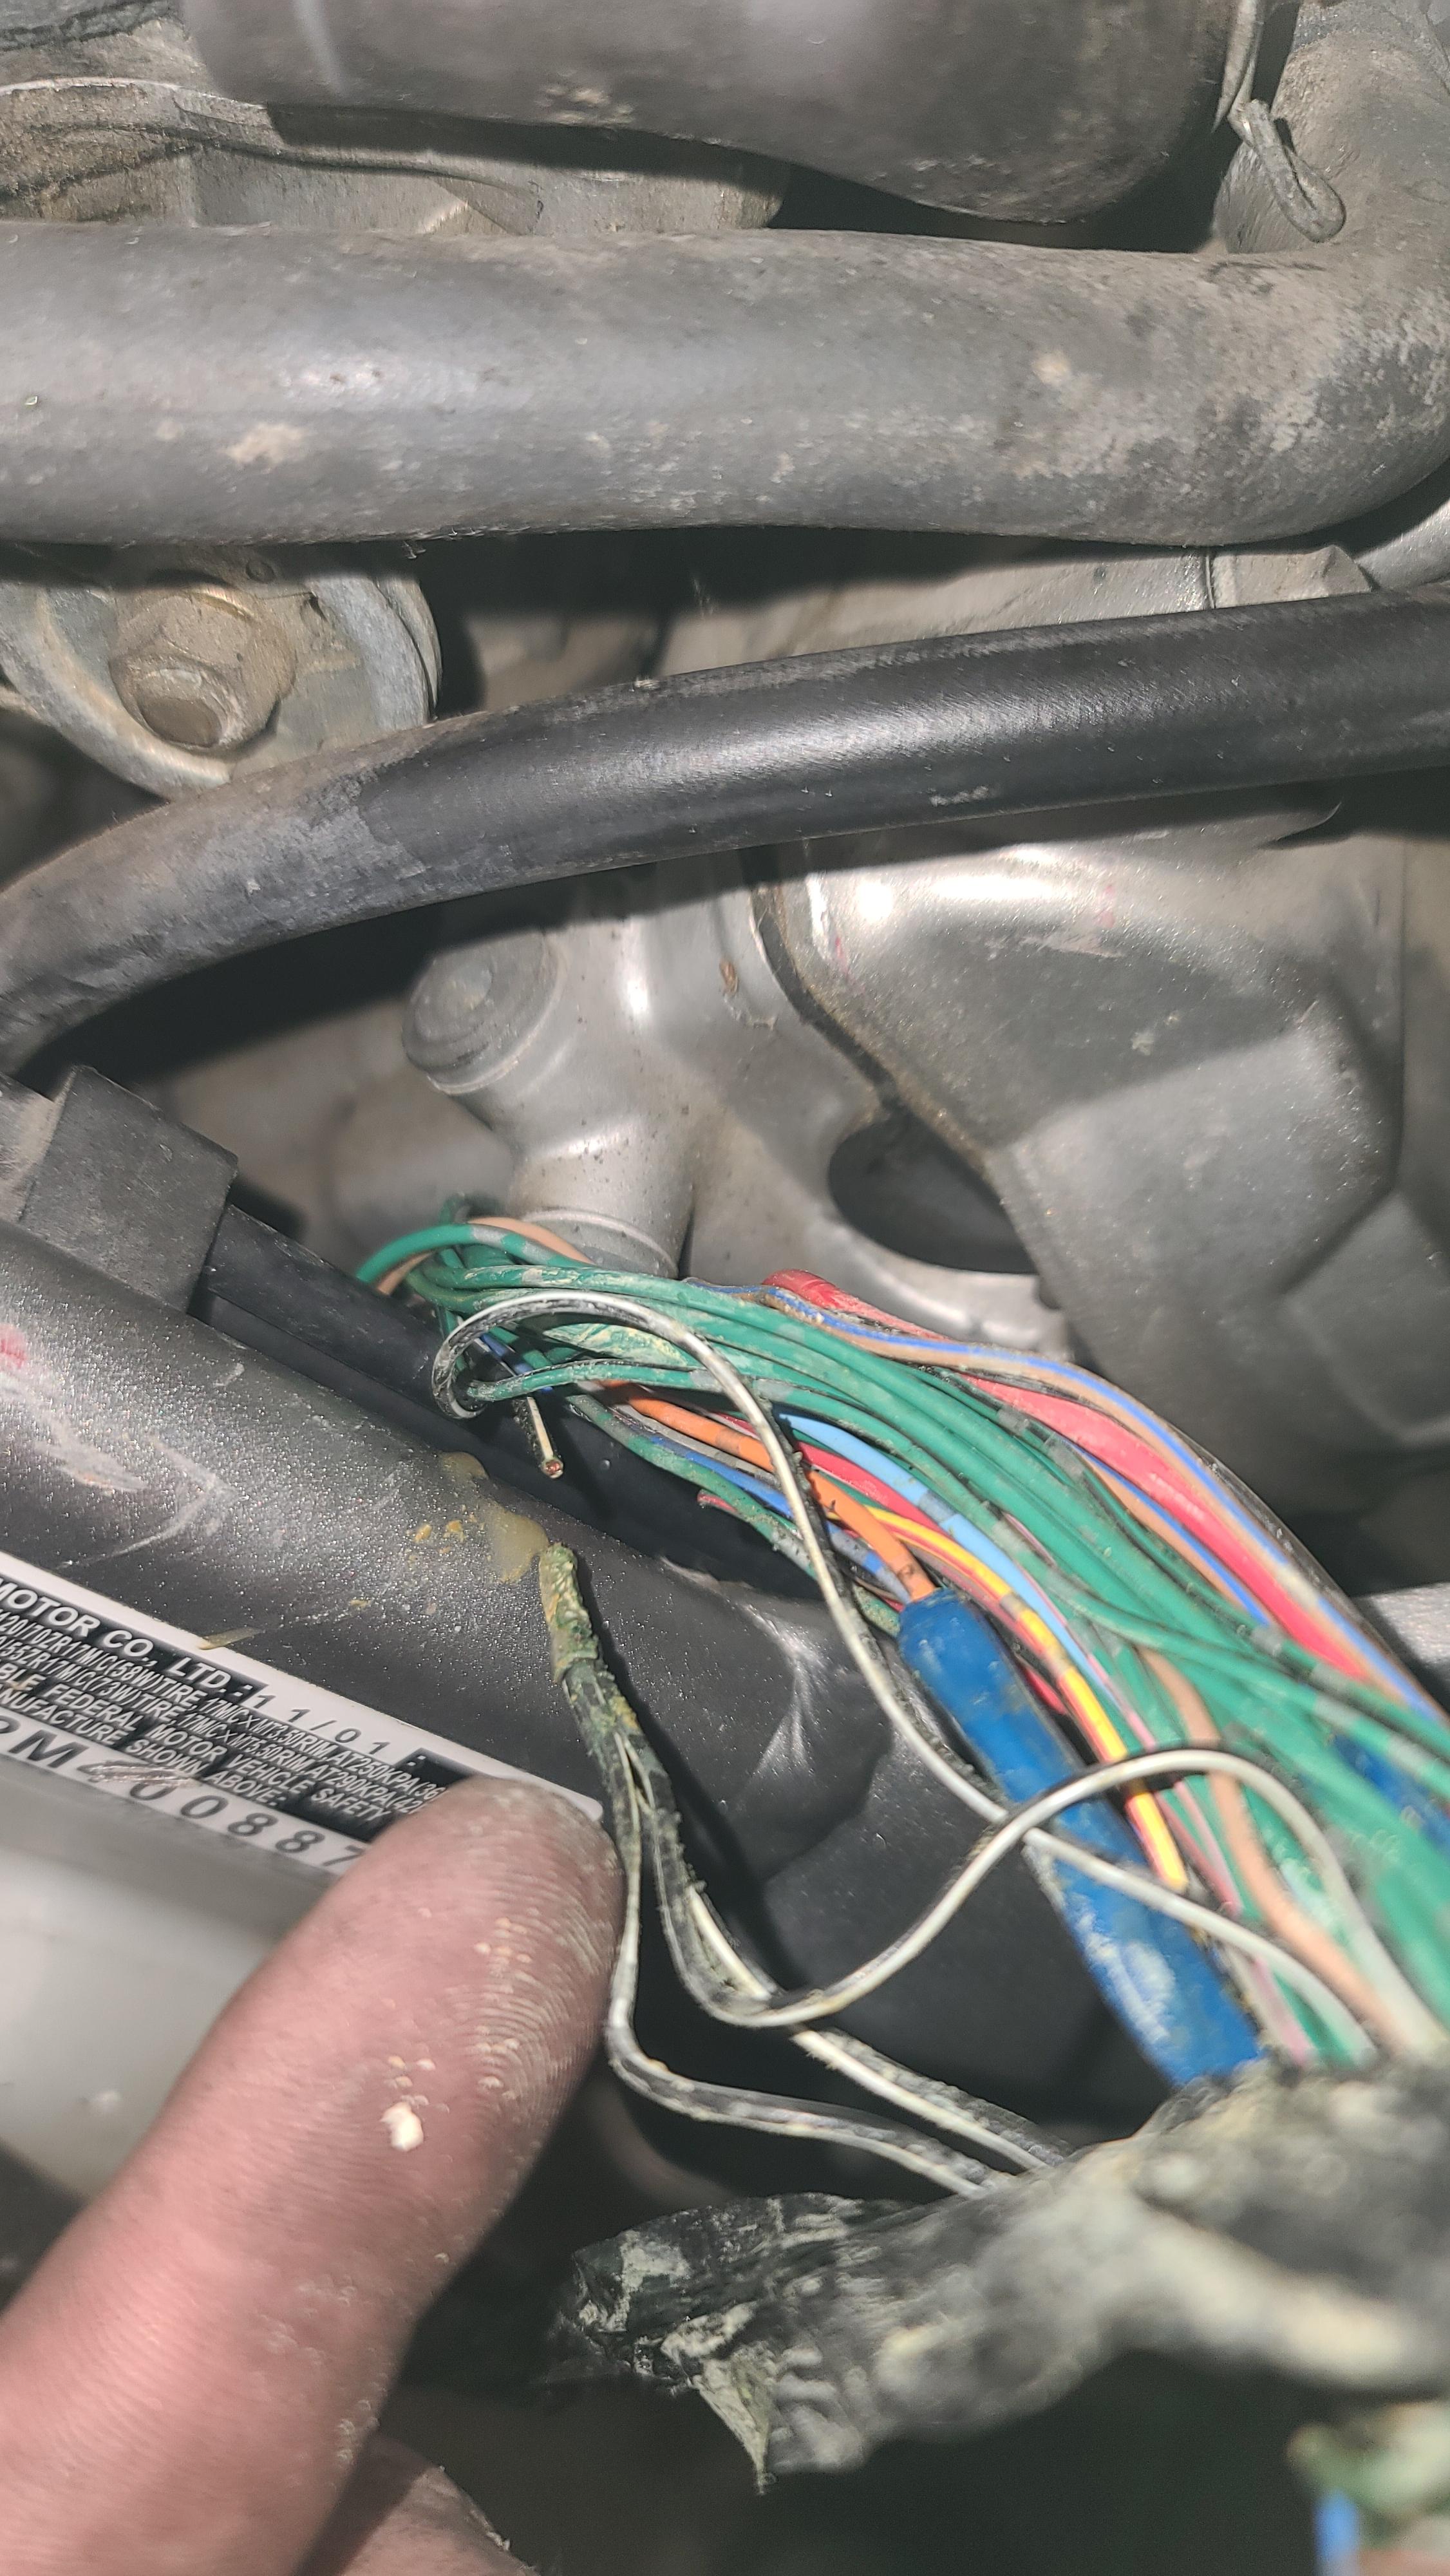
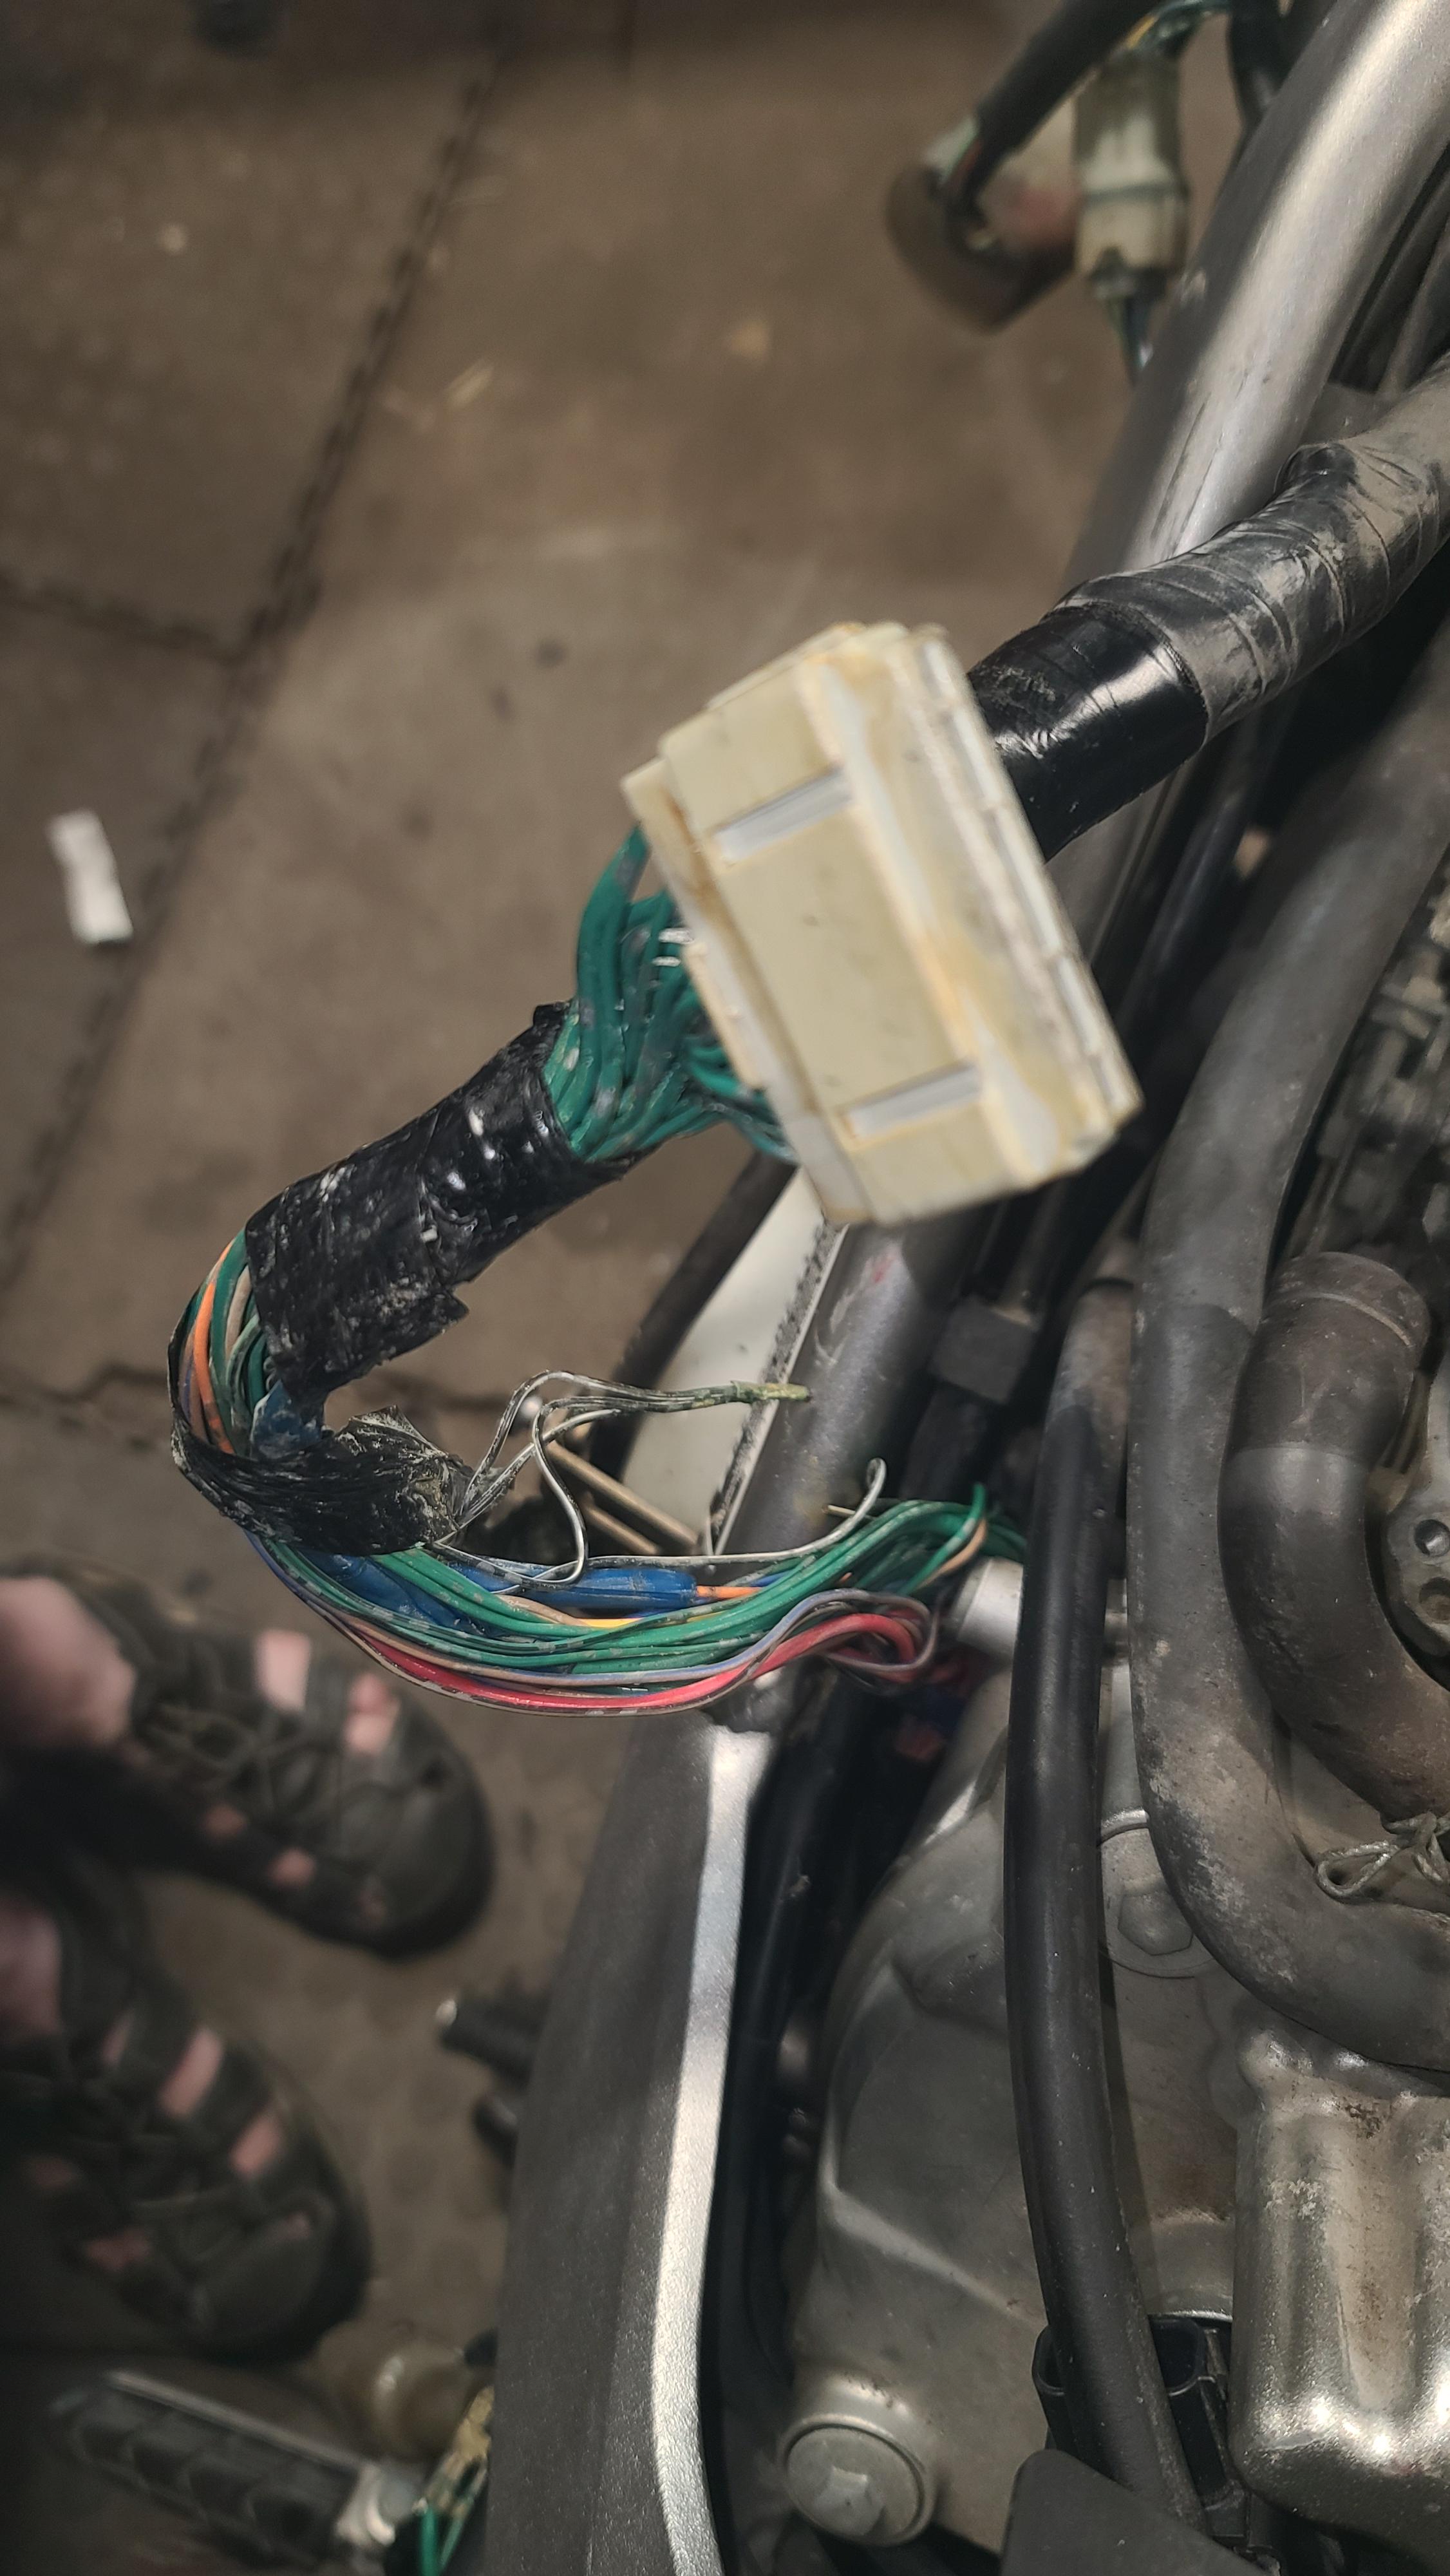
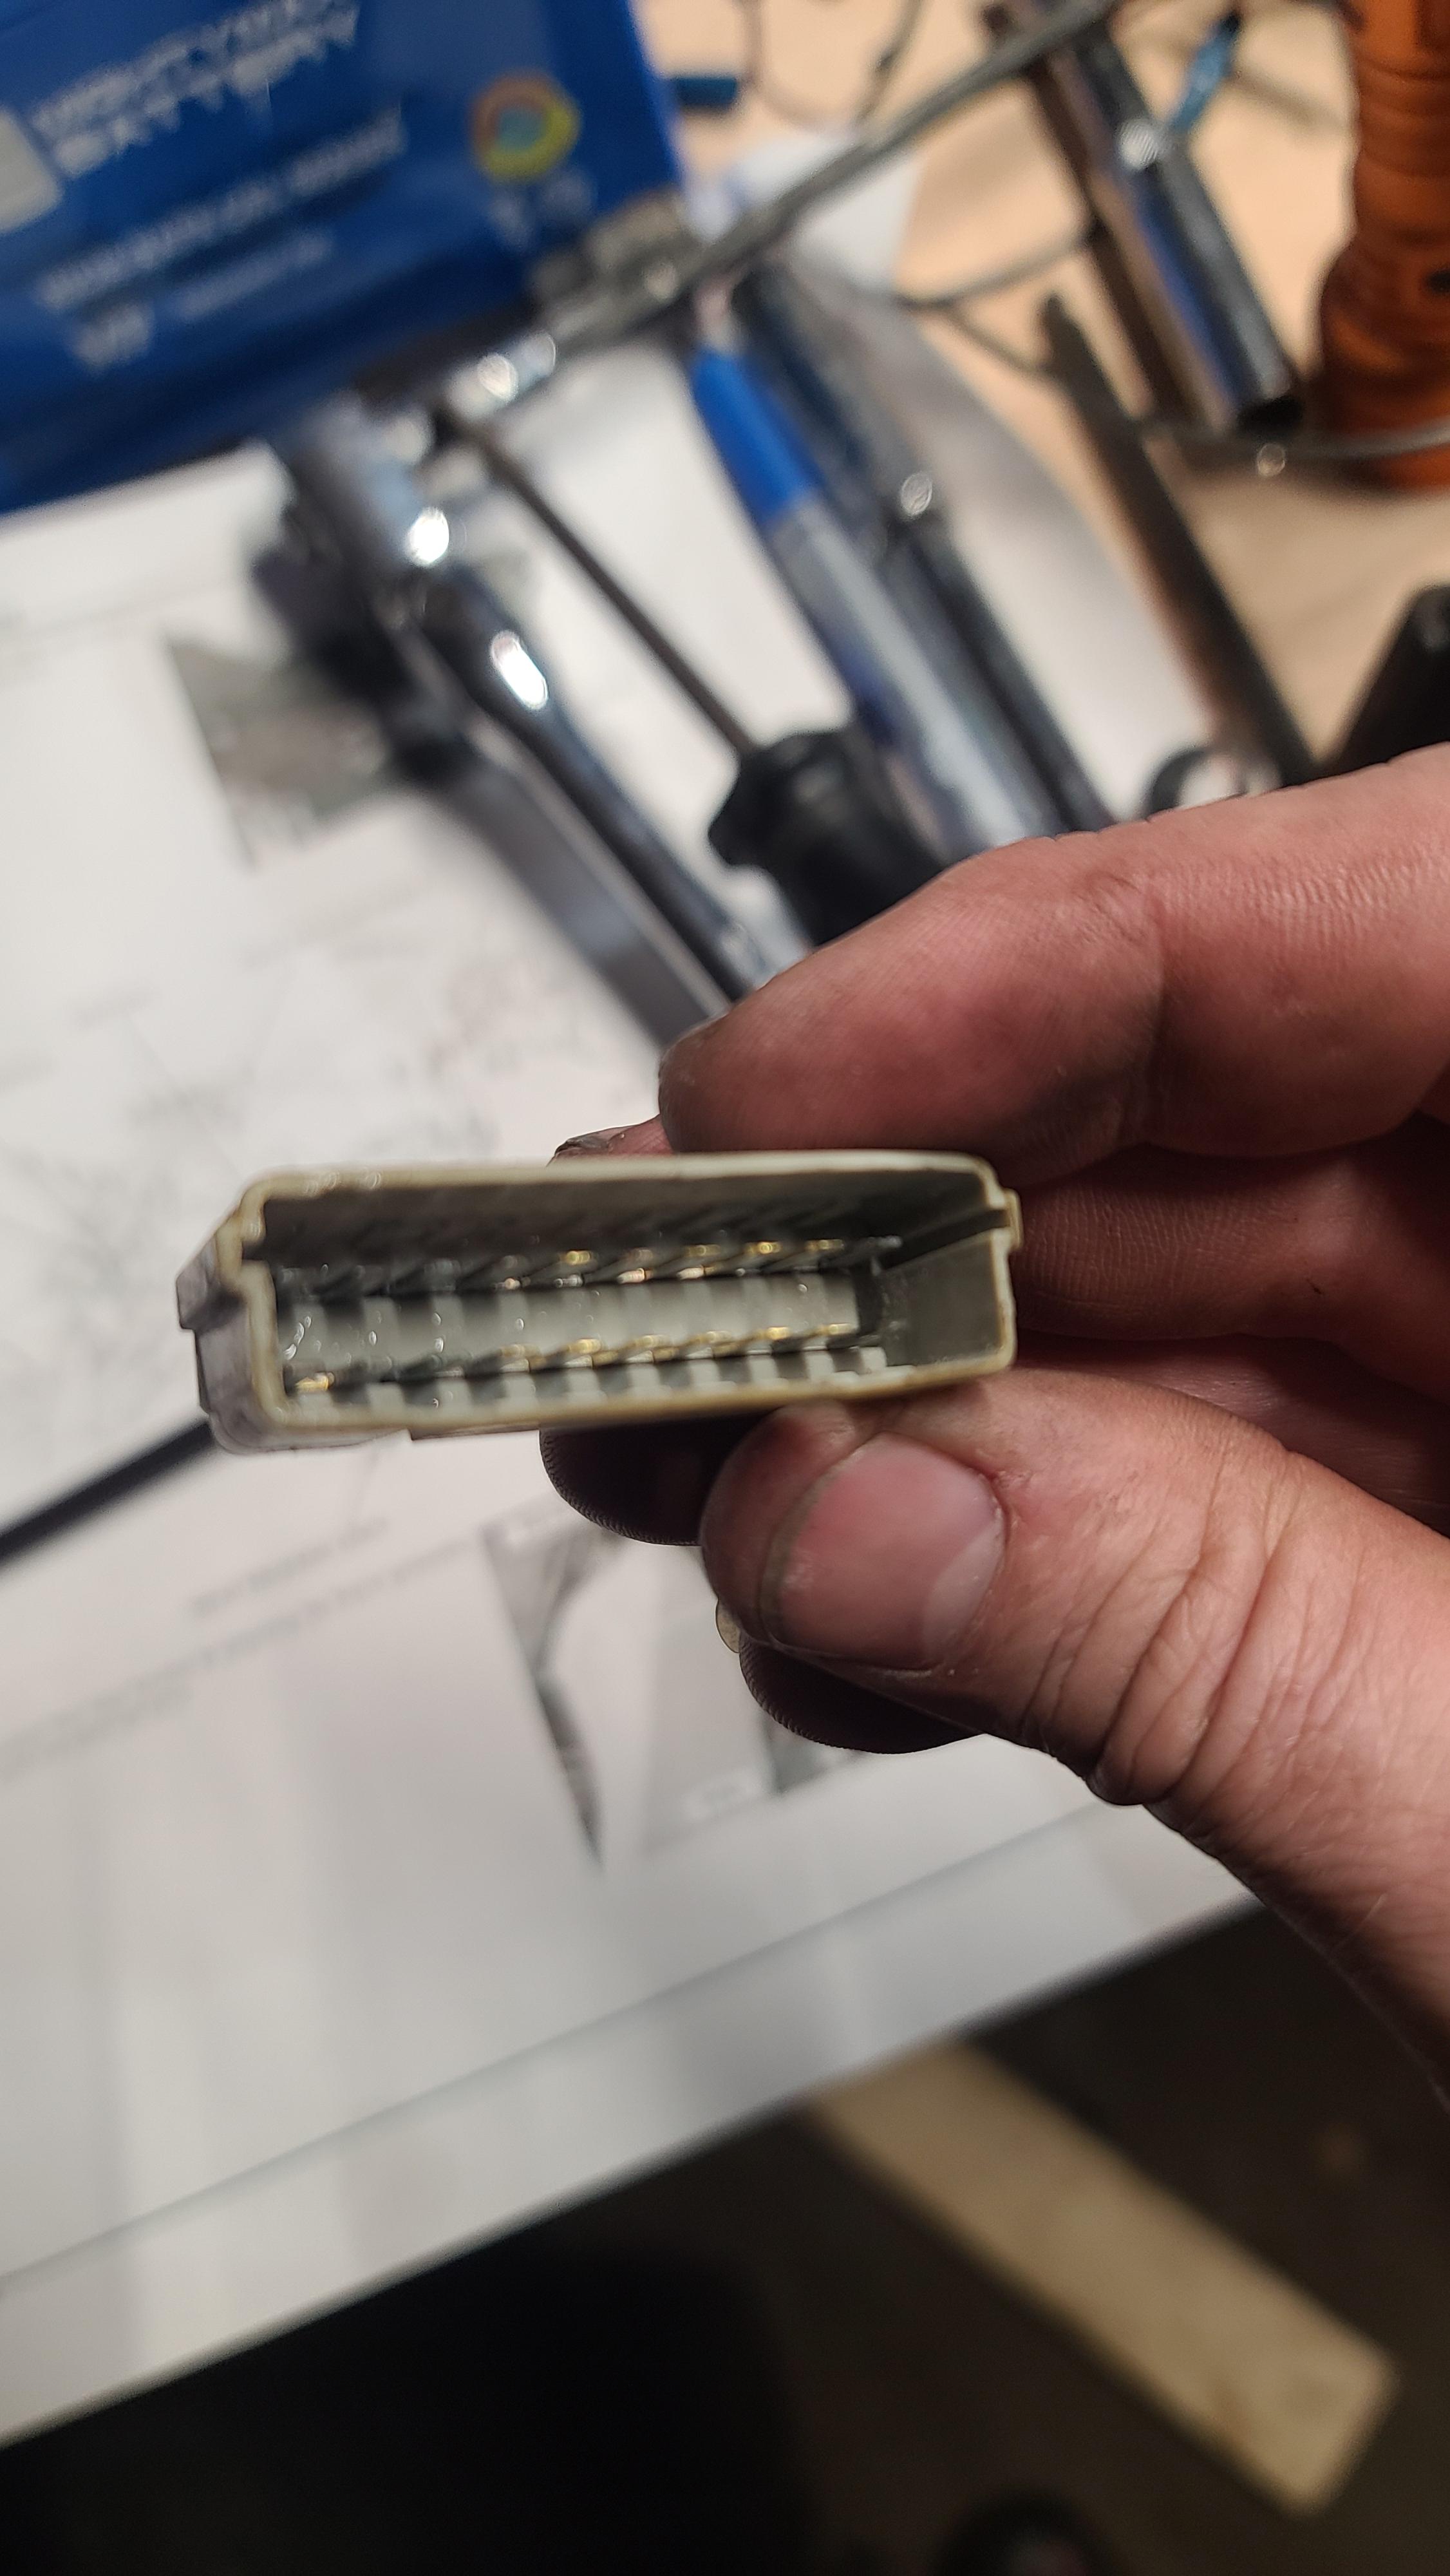
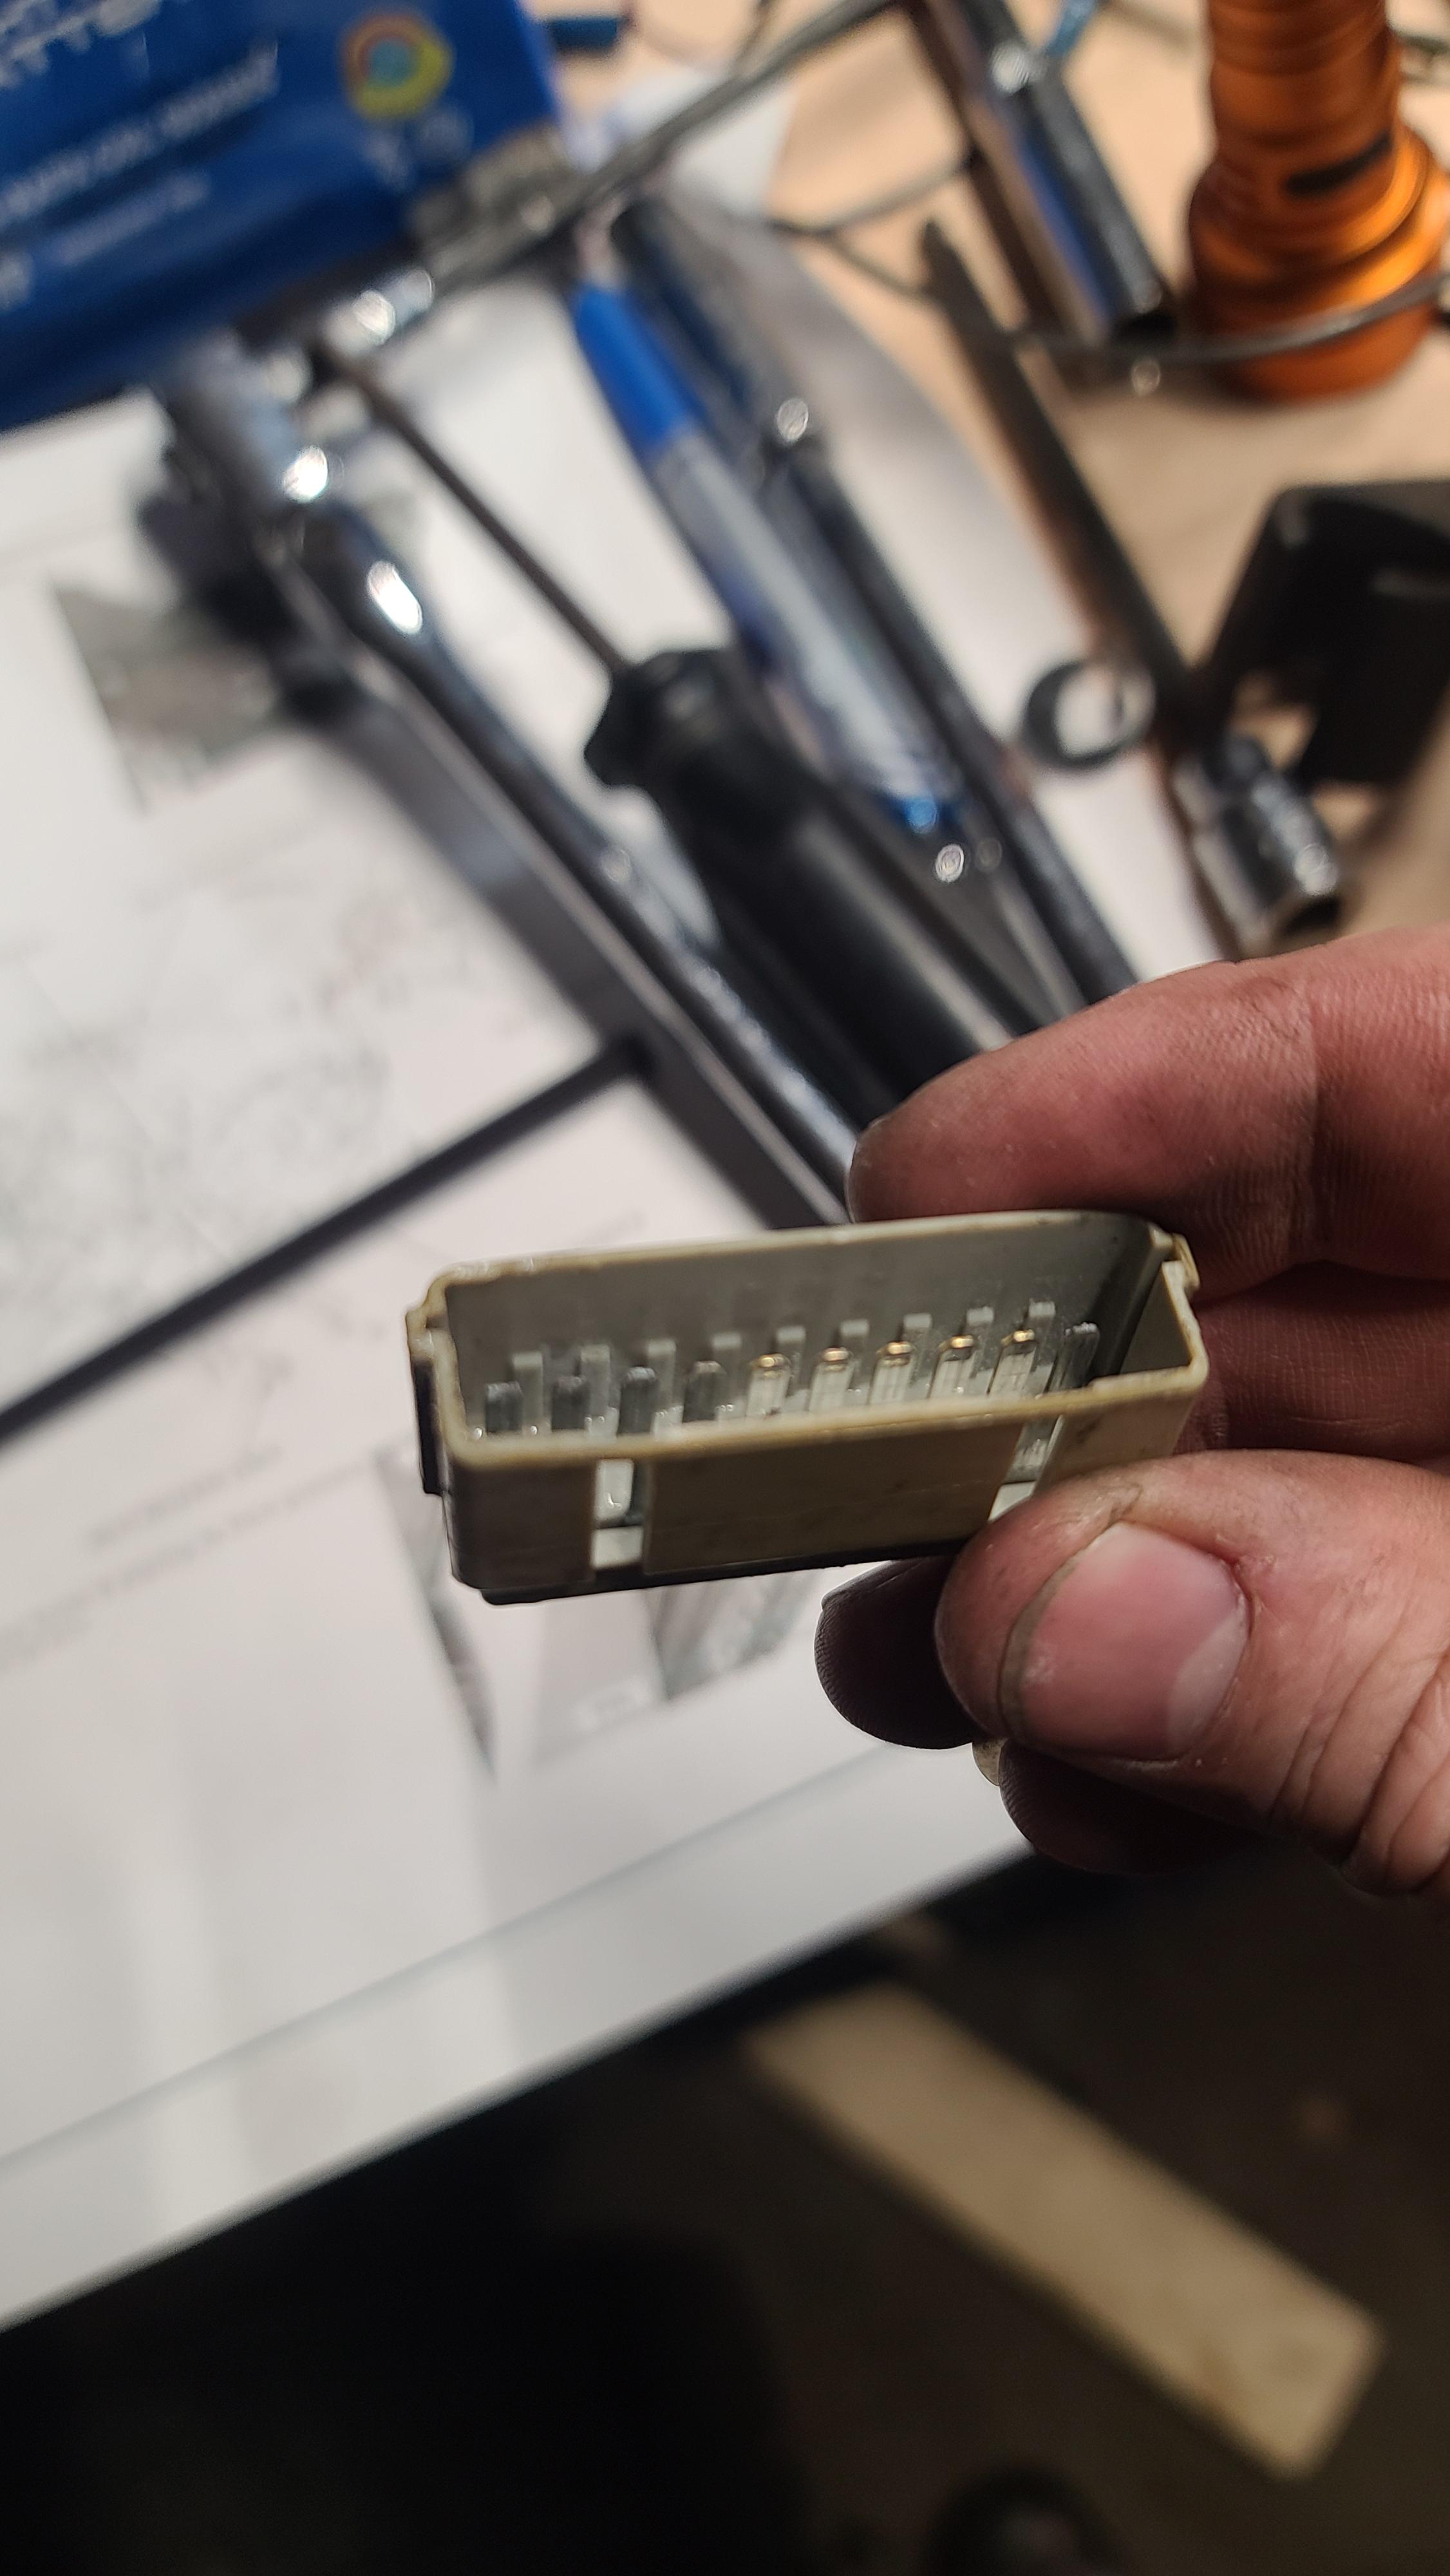
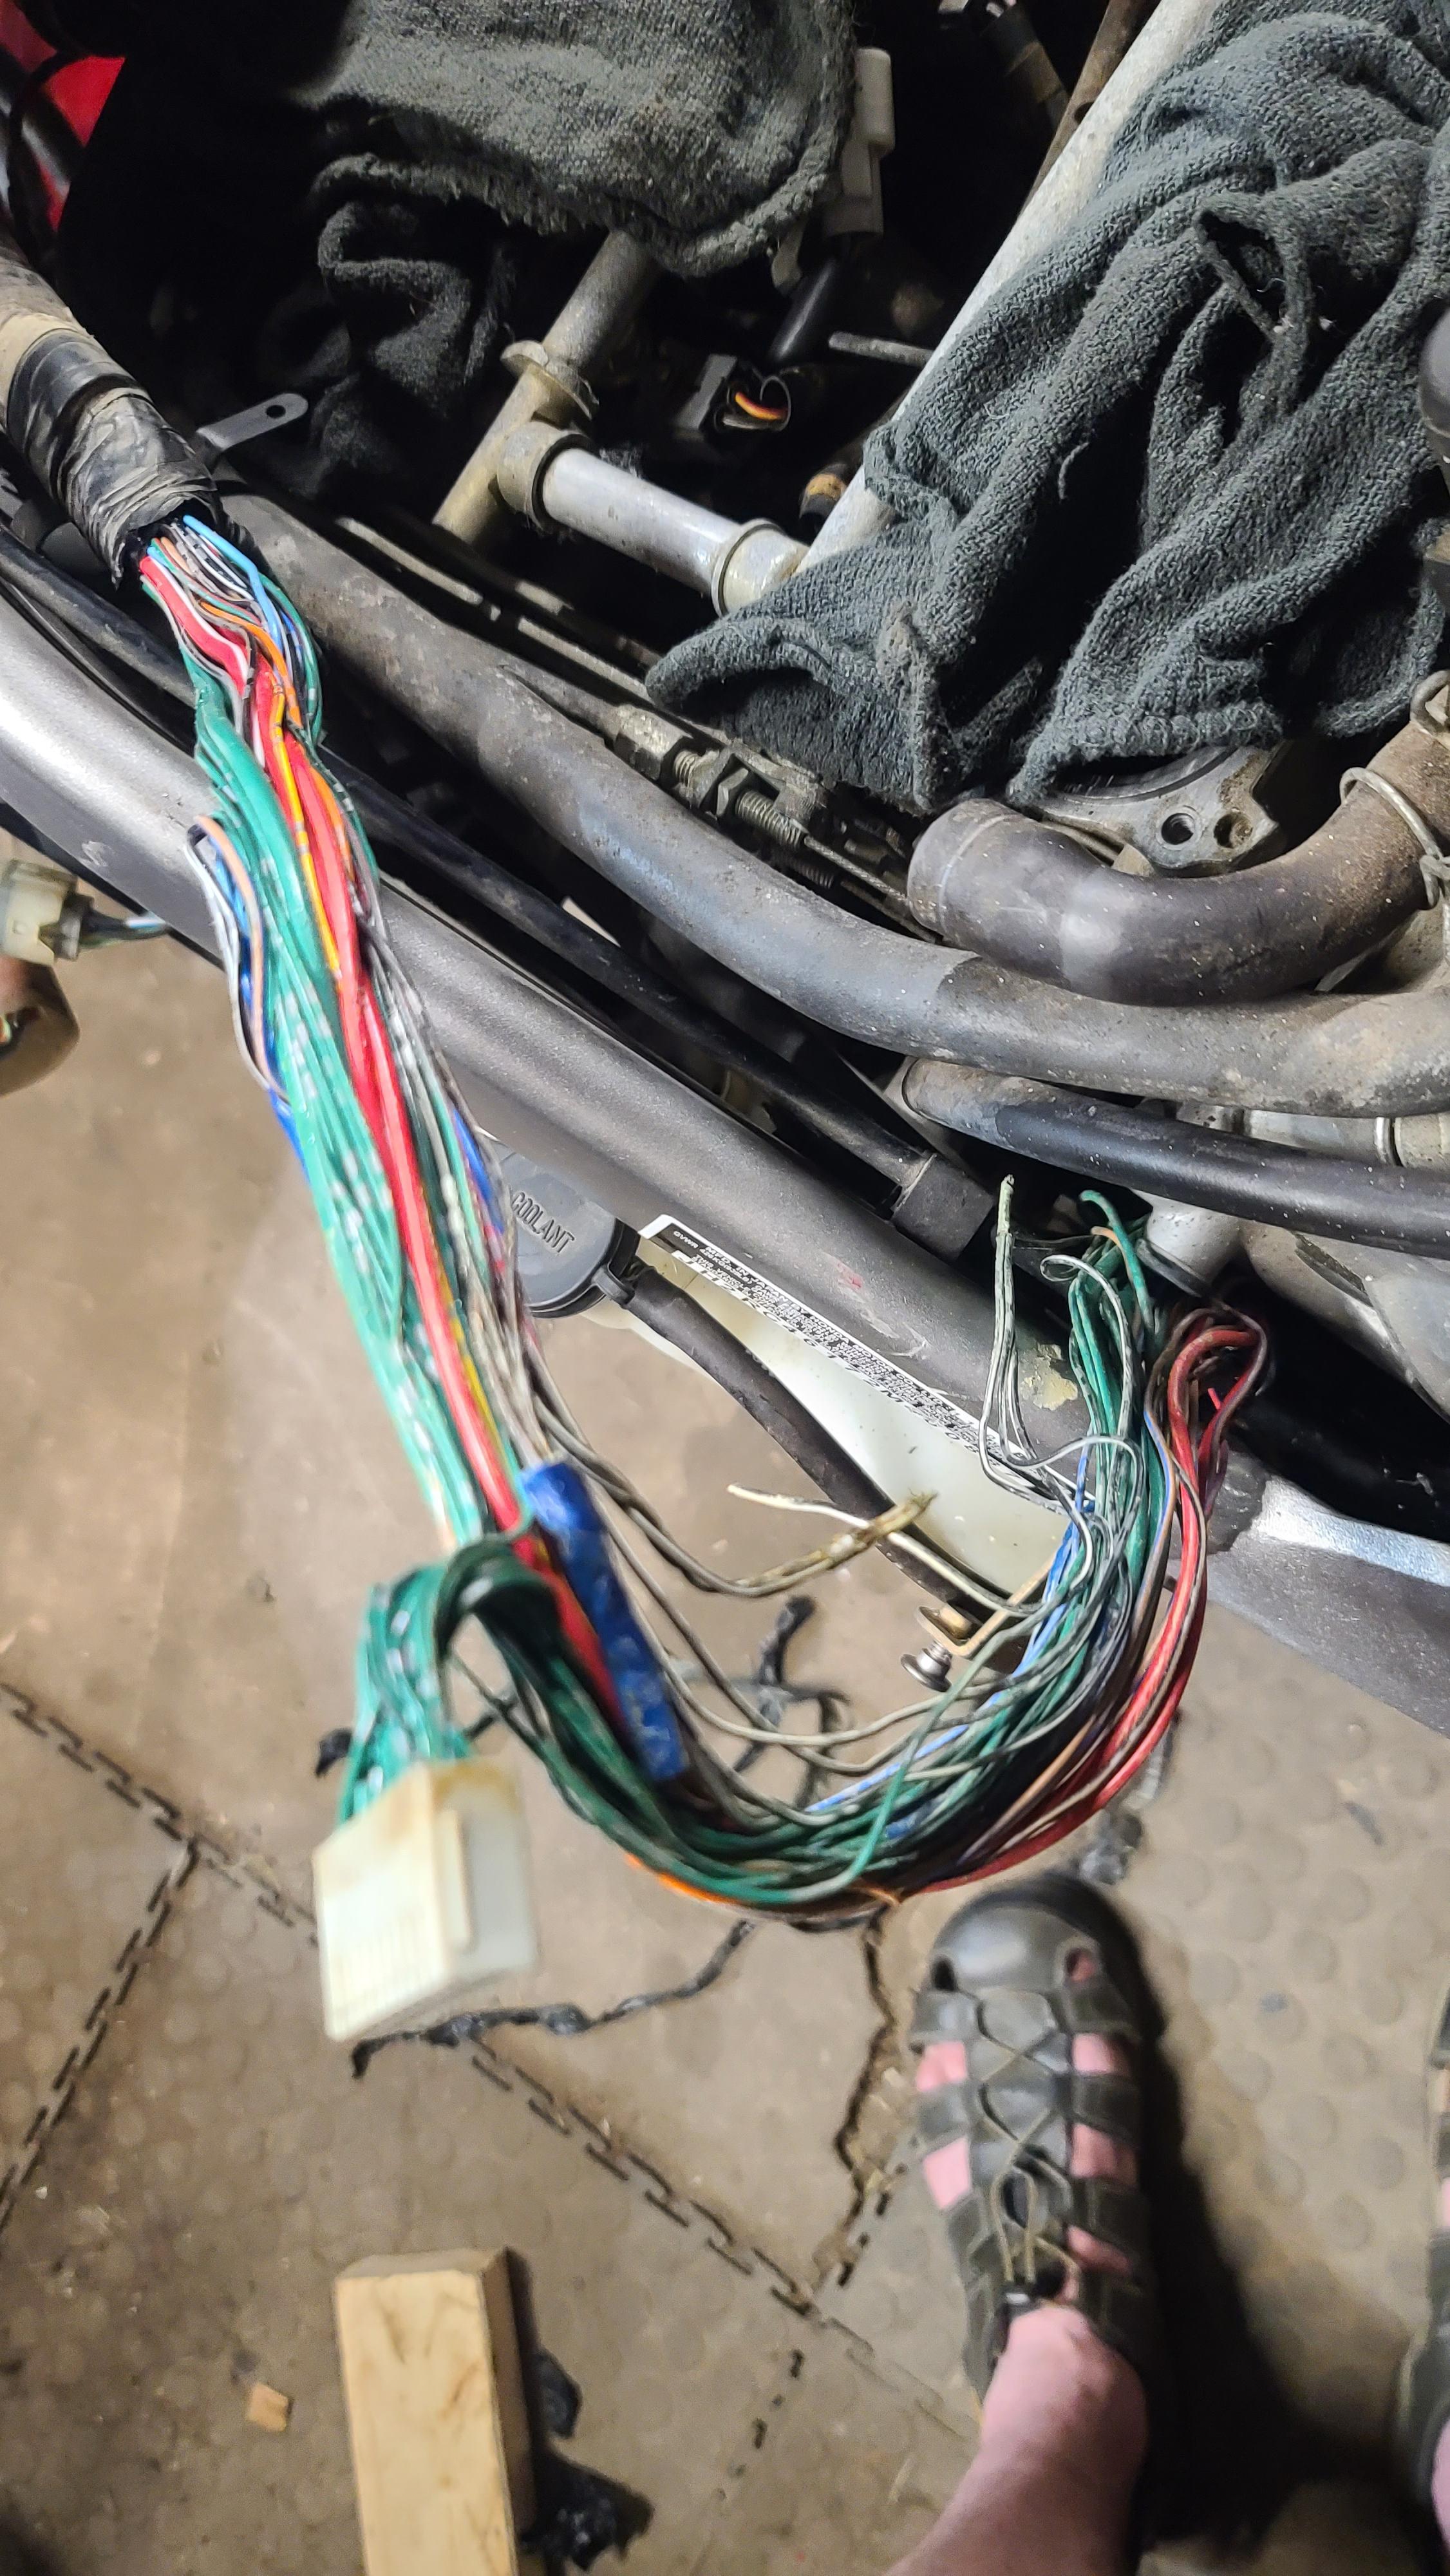
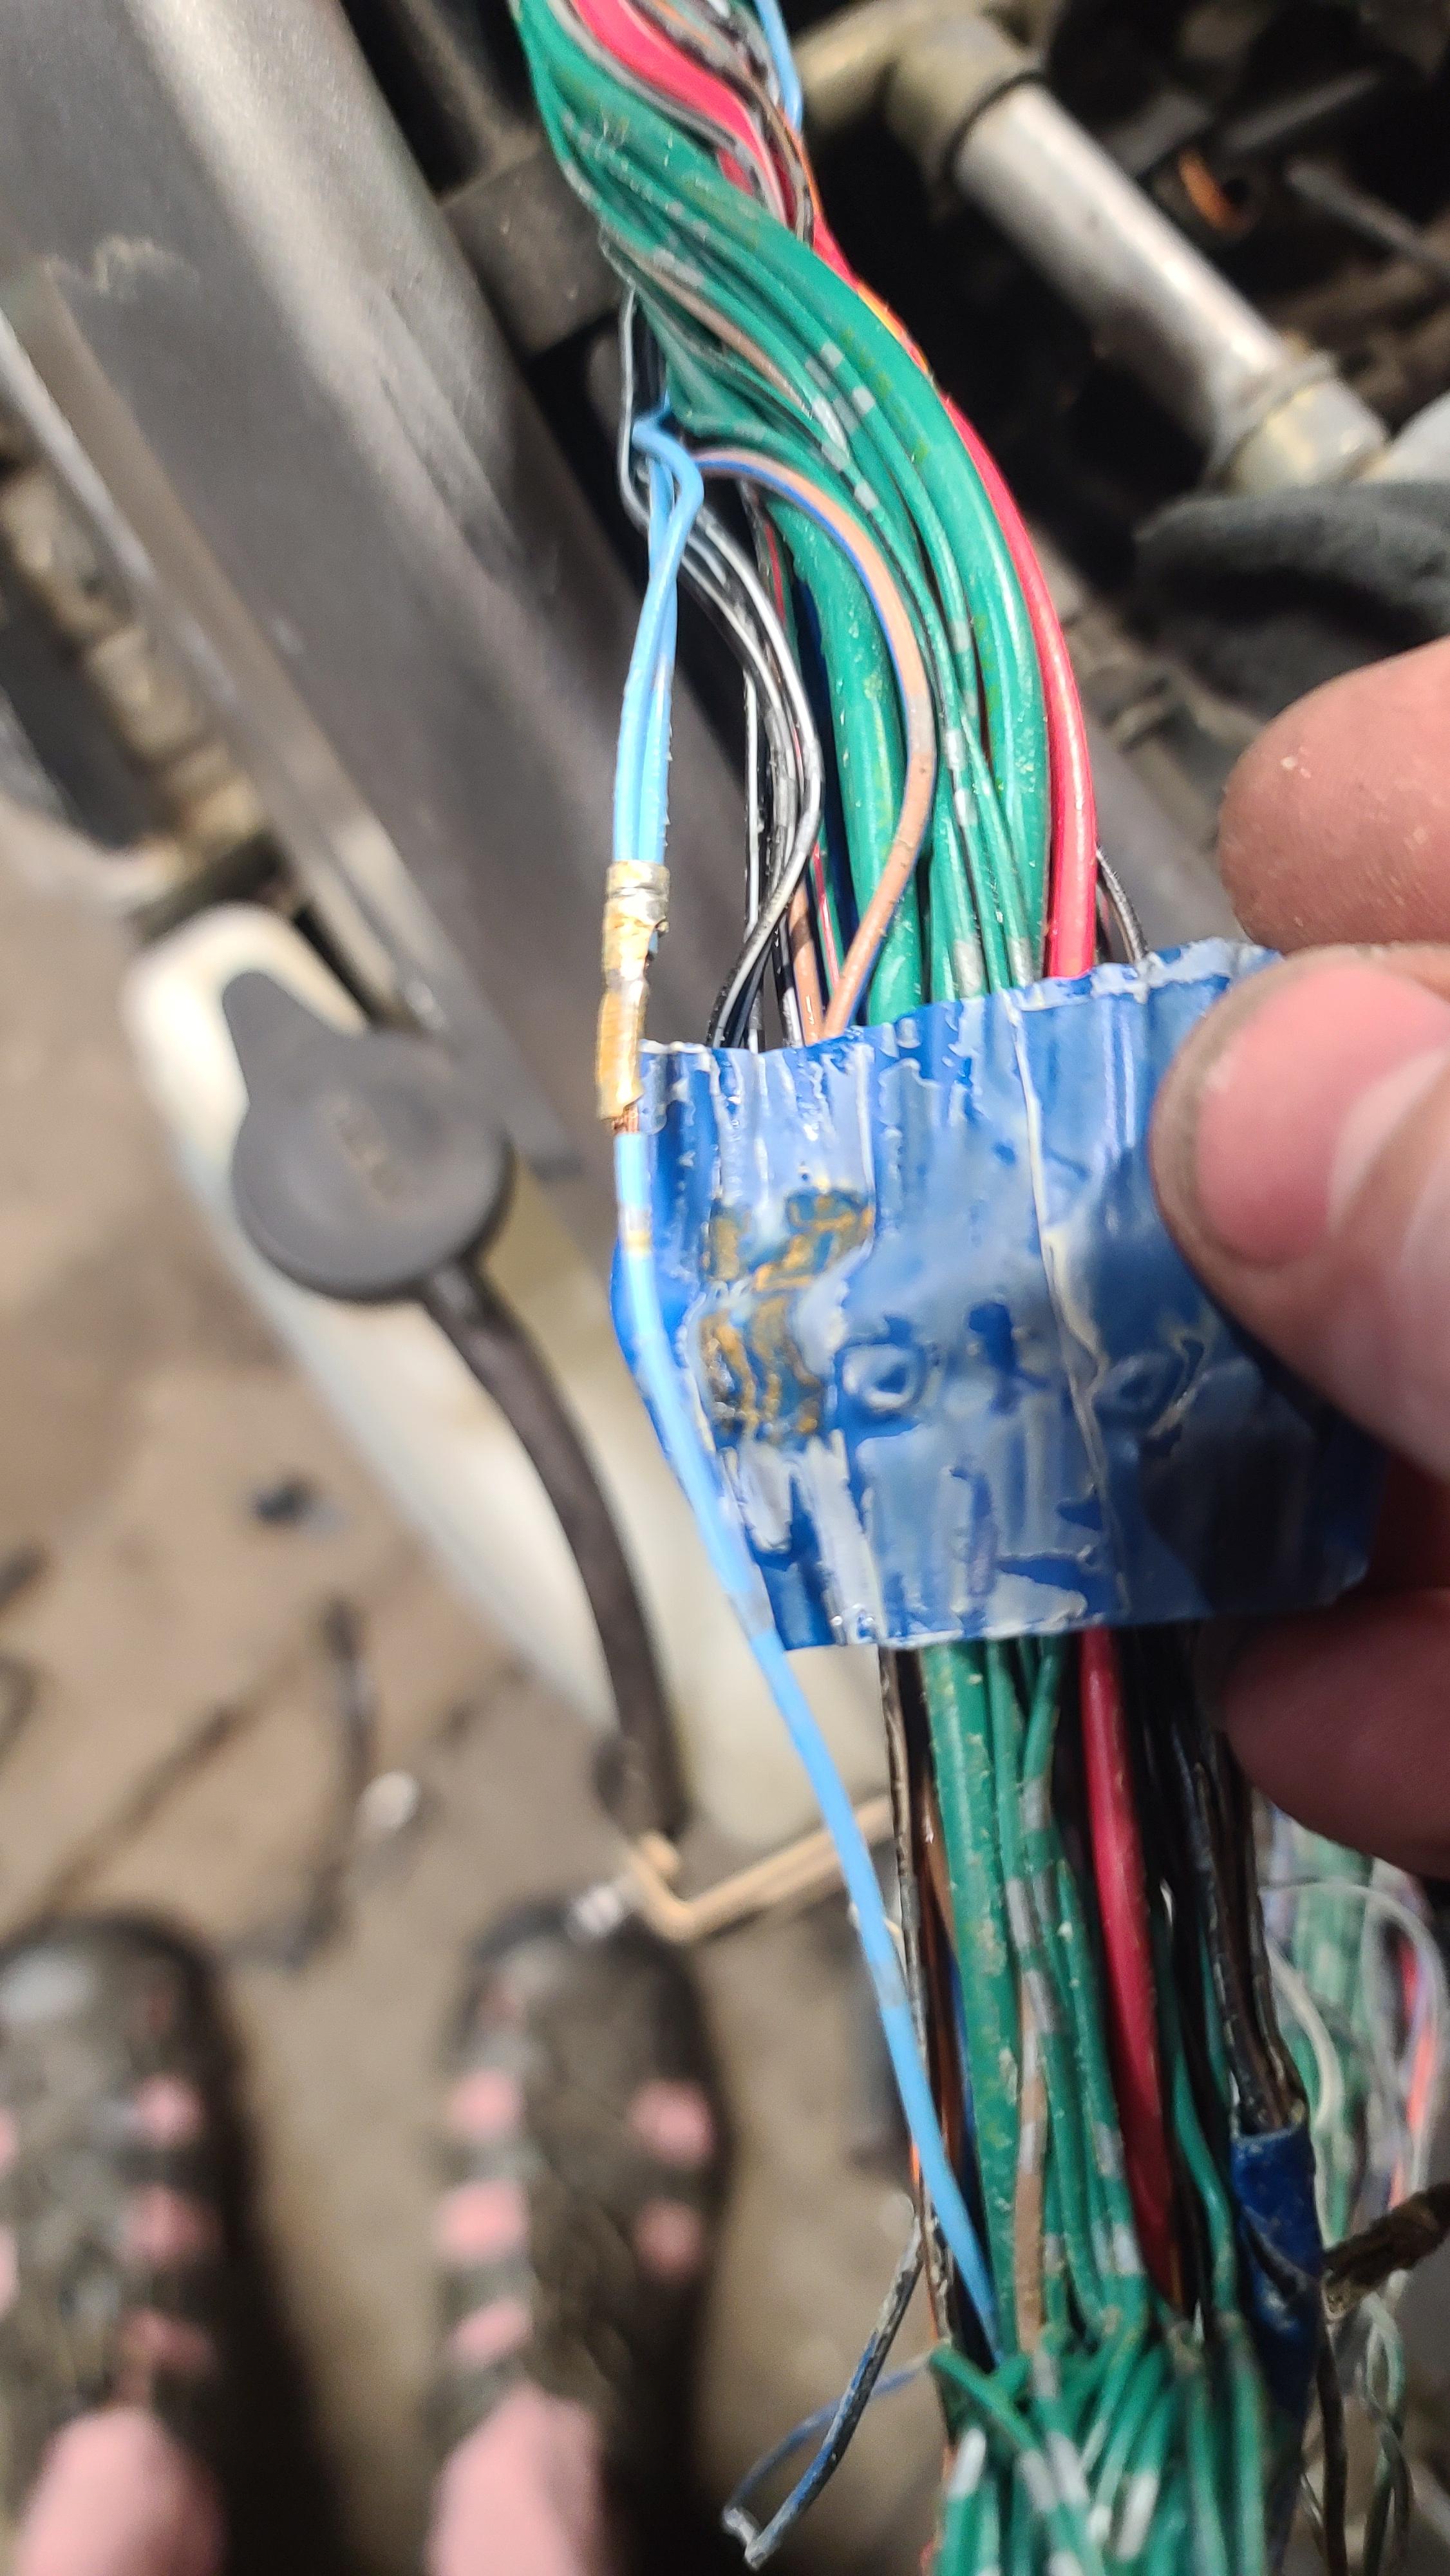
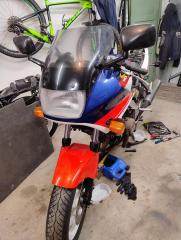
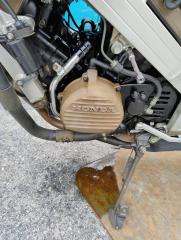
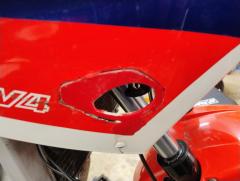
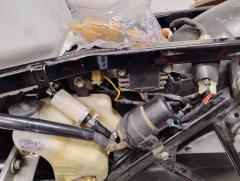
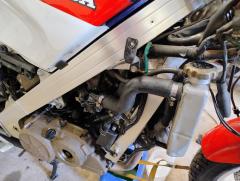
Found it. So, I started tearing the bike apart. To get to the wiring, correctly, at least, you have to remove the rear plastics. So I tore it down to the frame, trying my best to remember where everything goes. I took a lot of pictures. I also removed the exhaust, as I plan on not using it, but just putting a stainless tip on the "breadbasket" with an angled cut, and leave it. If it is too loud, I'll see what options are out there, but the stock exhaust is heavy, and I don't plan on putting it back on. Will probably have it for sale on the marketplace in the next few days, if everything works out. I had a helper for a little while. The wife's bike's saddlebag kept the puppy from getting into things he shouldn't be in. So I finally got the battery tray/rear "bodywork" off. I then carefully snaked the right side coilpack an fuel tank connectors over to the left side, and started untaping the harness, starting right beneath the three-way splice. I had felt moisture once while moving the harness around, and didn't really think much of it, sniffed to make sure it wasn't fuel, and then went on. But when I started opening up the tape, it literally started pouring water out of the harness. It's hard to see, but I'm angling it down, and water is pouring out of the harness. At least 1/4-1/2 cup of water came out of it. I then started untaping the harness in earnest. Everything was damp and wet, but being coated wiring, most of it seems to be fine. Everything looks like it was dragged around in the mud before being taped up. My hope of finding the 4-way splice right at the end was soon dashed, and I realized with the moisture, as well as having to find this splice, I'd most likely need to get to more of the harness. So I disconnected the O2 connectors and kickstand sensor connector/s, and that, as well as pulling the rear sections of the harness up toward the frame, allowed me to pull the main harness up 6 or so inches, so I could reach it and untape it. I unwrapped up to the earth ground, hoping that would be as far as I needed to go. I found it! I found a 3-into-1 black/white splice, wrapped in blue tape. I unwrapped the splice, and it fell apart in my hand. The water corroded the wiring underneath the splice, and seperated it, and the tape was holding it just enough to allow spark to jump sometimes, but not enough to get 12v. Well, that's unfortunate. I continued unwrapping, and I could see a few other taped splices. I was wondering how bad the earth ground would be. It took a lot of effort to take the damn thing apart, but it eventually came apart. My fears were not unfounded. I found corrosion and dampness in there. I was unable to take this one apart, as I was able to do the other one. I will think about weither or not I want to just solder all these into one, or something along that line. Otherwise, I will take a brush and scotch brite, and do what I can to clean up the corrosion on the first few pins. I left it out to dry overnight, and I'll get back to it in the morning. I kept unwrapping, and lo and behold, I found another black/white splice. I carefully unwrapped the tape, and this one fell apart, as well. You can see both breaks in this picture. I went further past the earth ground. The dampness was not as bad as further down, but there was still moisture. I very carefully unwrappe a light blue splice. It showed corrosion, but was not severed. That gives me some hope. My dad, who is far better at soldering than I am, is hopefully coming over tomorrow morning, and everywhere there is a splice in here, the wire will be cut, stripped, and soldered and heat shrunk, before I rewrap the entire harness. I am really hoping this harness is salvageable. I think it is, but I will probably go over it with the heat gun or hair dryer, if being out in the open overnight does not dry everything off. I will go through the entire harness up until I cannot access it anymore, then rewrap the entire thing. I suspect I will be able to get it to run tomorrow evening. I do have some vacuum hoses that I have no idea where they belong. One on the left side has a white connecting male-to-male fastener on it, but no hose after that. No idea what it is. I'll worry about that after I get the wiring fixed and most of the bike back together. I will try to make sure to keep updating, as I suspect someone else is going to come to this issue eventually.
- Today
-
 Stonesthrow joined the community
 -
As an engineer. No. Just....no. Do not put that much moment on your walls. They're not designed for that. Unistrut isn't really meant for doing what you want to do. That angle bracket especially. Its great for easy adjustments and quick builds. Not to hold motorcycles. Figure out how you want to 'tray' the bikes. Make suitable 4 post rack. Use unistrut if you want, but use pallet rack would be easier. Can still anchor it to the wall for safety. Figure your real loading is more like 4x. 2x is considered 'sudden loading' for objects already in contact with each other.
-
Pretty good memory mate! First one I saw on EBay was a FH027AA for a 2021, the next one was a FH020AA for the 2013/17. Thank You.
-
Hi - from my foggy memory....I think CBR500R bikes used the FH020AA....
-
 I'm looking for a cheap, scuffed up clutch cover for my 2006 vfr800 as I am planning on sending it to Sebspeed for clear conversion, As i don't see myself as needing an extra cover, I am Willing to "borrow" (and pay you a fee plus shipping) if someone has a spare or is willing to trade their scuffed one for my not scuffed one, and sending my original one once the other one is completed.
 -
I have lived a charmed life so far when it comes to electrical system issues on VFR's. My 91 I had in the UK, and my 90 and 97 in my garage all came with upgraded charging systems courtesy of the PO's Thank you all! My new to me 01 had 11.5K when it landed in my driveway. The bike was completely oem without a single mod. I did check the charging system output and every connector for corrosion or signs of failure, a nice word for melted. Everything checked out Tickety Boo. The bike now has 18.5K, and I have some down time riding wise, so I think its time to stop rolling the dice and get proactive about a very well documented failure point as my 01 is now my go to long distance bike. So, I have some questions. The preferred upgrade appears to be either the SH847 or the SH020AA. My 90 and 91 had the former, my 97 the latter. For budgetary reasons I would prefer a used unit, preferably a FH020AA. I have come across posts that say some Yamaha R1's and R6's and possibly Suzuki TL1000's used these units. If anyone could confirm which bikes and also which years used these I would be very grateful. I see on E-Bay there are a lot of 98-99 R1 regulators for sale fairly cheap, which leads me to think they may not be SH020AA's. My plan currently is to upgrade the Regulator and its wiring but leave the stator as hopefully the new Mosfet regulator would extend its life. As always, all experience, advice, thoughts, or witty puns are welcome. Thanks
-
 thomasjolly joined the community
 - Yesterday
-

1200 Engine blown at 32000 miles???
swimmer replied to 1996 Beeper's topic in Seventh Generation VFR's
No difference. -
 Articb joined the community
 -
 Looking for Helibars, Hurrican, or Convertibars shipped to Minnesota.
 -
Looking for a sargent with red welt for a 5th gen. Shipped to Minnesota.
-
Hi, i just bought a -97 VFR750F, imported to Sweden from Germany. Headlight won't come on and i tracked the fault to a cold soldered wire which has broken off on the dimmer button switch. Seems to be a hack job made by one of the previous owners. I tried to see where it's supposed to be but it's cramped in there, hard to get access and solder it properly - does anyone have the know-how or some pictures of the left bar switch assy internals? I tried to find exploded views without luck so i'd appreciate any info🙂 thanks!
-
 iaing4dpf joined the community
 -
2002 VFR 800 (US) Not Starting (No Spark/Electronics Issues)
SteyrTMP replied to SteyrTMP's topic in Sixth Generation VFR's
I believe I found the issue. Of all the places, fixya.com. https://www.fixya.com/motorcycles/t19075221-honda_vfr_800_a2_only_firing_1 Mine isn't firing on any. However, I called my dad, discussing about how I had checked continuity, and the four together have continuity to each other, but none to anything else. He suggested hotwiring one of the black/white cables to something else. So I did that. I pulled coil pack #1 out, with the plug, and disconnected the pack. I shoved the jumper wire into the female black/white connector, and then inserted the other end to the back of the fuel shutoff relay connector. I then sprayed starter fluid, and it tried to start. I then pulled the connector off of #3, and plugged in the coilpack I had pulled from 1, and put the plug in into it, and held it next to the frame. Spark! Remove the jumper wire, no spark again. So I am pretty sure the fixya guy is correct about this, so now I think I am going to have to tear the whole rear end off to remove the battery box, so I can correctly access where the wires splice together. Joy. My buddy suggested just replacing the wires and splicing them to another black/white connection, but I really hate doing things half-assedly. I guess I'll see how bad it will be to get to that connection point. I can see where they are taped together, just out of reach behind the front of the battery box. 20250703_110639.mp4 -
Has anyone been able to remove the rear exhaust headers from an 86 Rc24 without dropping the engine? I think one has a leak somewhere even though it is stainess steel. Maybe just needs a new gasket.
-
 Billymc joined the community
 -
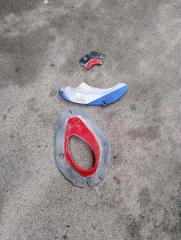
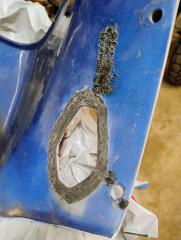
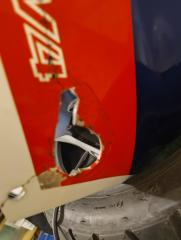
Well this morning started working on the upper front fairing, first talking off the broken part of the cover plate all non Japanese RC24/26 has After a good cleaning to get old glue off as supporting the cracks it was time to fasten a healthy one I did take off the other RC24'S fairing as I mounted the 88-89 RC24 front turn signals. The Japanese front turn signals sure are nice, picture below Well back to my bike, and next the front fairing was mounted as turn signals A bit after midday the part I been waiting for arrived So mounted, added oil to engine as coolant and did drive to get some fresh fuel. But clearly it's not my day The crabs are flooding and clutch cover leaks. Don't know if the O-rings will swell from the fuel? It happened to my white RC24, but not the red one. The clutch cover I need to open and see the reason, I mounted a fresh OEM gasket as cleaned surfaces as good as I could. If carbs still leaking after a few days I just have to take them out..... So no VFR riding still, bummer, but guess 11 month sitting does it's thing. But not my day...
-
Other VFR and other pics....
-
-
 Brainyonus joined the community
 -
What a fun project. From an engineering perspective, the closer you sit the bike to the vertical supports, the lower the bending moment on the cantilever will be. I do occasionally drive a counterbalance fork lift (I have a licence and everything!) and I can tell you that putting 1 tonne loads onto the third level of pallet racking takes some hand-eye coordination and a little nerve. You shouldn't have too many problems with your nifty lift truck as I expect the visibility will be much better. You will need to make sure the floor under your shelves is really smooth as the wheels look quite small.
-
Is it ok for a different sized front tire?
RC1237V replied to RC51Nick's topic in Third and Fourth Generation VFR's
I ran that profile years ago, and under deceleration around 40~30 mph the 3rd Gen got a little bit of speed wobble type headshake, every time and got worse as the tire wore. The problem went away when I went to a 70 series tire. This was the original Dunlop Sportmax tire from 1992, maybe could have just been a bad tire as I'm sure there are bikes that run that tire without issue, hence why they make them... -
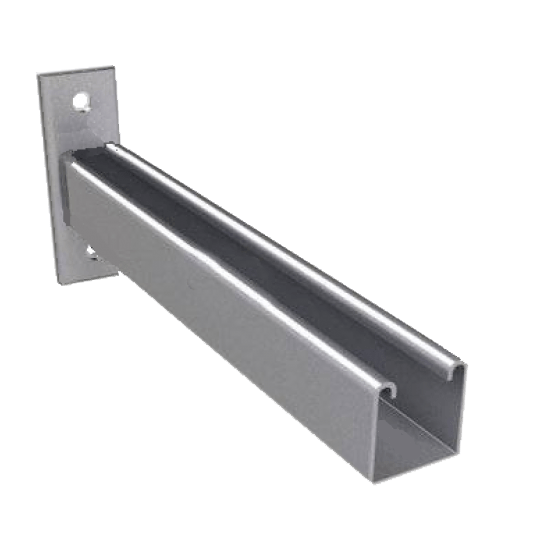
It looks like there are good resources for "Beam Loads" and "Column Loads" for Unistrut at given spans online. The only worry I would have is it pulling out of the wall, or bending just below the 45 degree brace. If they are much taller than the bikes, you can run a piece of Unistrut or metal/wood beams across form side to side to prevent collapsing in on itself, and use those to hang your lighting. Although you are extremely thorough in everything I have ever seen you do, so you probably already have a way better plan than my quick brainstorm... Do post pics as you're building it, we need a good project here to keep us dreaming about our own work spaces! Is it too wet there for painted or epoxy floors?
- Last week
-
I'm enjoying this thread, looking forward to all the other things you will figure out, and the final result. Are the elevated motorcycle "shelves" really just for display, or do you intend to walk downstairs one morning, decide which bike is perfect for a ride that day, bring it down and zoom off?
-
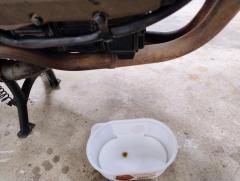
And yet another lot done ! From now on, it might get a little slower (yup, even slower than now 🙄) as I just moved out and don't have a space on my own to work from, I'll have to do whatever I need at work during breaks. Also, before I put her back together, I've got to spend about 1k in parts and quite a few hours, the lady needs a lot of attention ... The most worrying is that constant oil sweating at the top of the engine, I've moved the bike to a storage unit 3 days ago and noticed today that it keeps leaking a bit under even though the engine has been on for over 6 months.
-
Generally, Honda parts like that are bike-specific. That part number includes "MCW", which is the Parts Classification Number for the 6th gen VFR (VTEC), indicating that Honda originally designed that part to fit that bike. It is possible that they then spec'd the same part for other bikes (if so, the part number would not change), but unlikely. Ciao, JZH
-
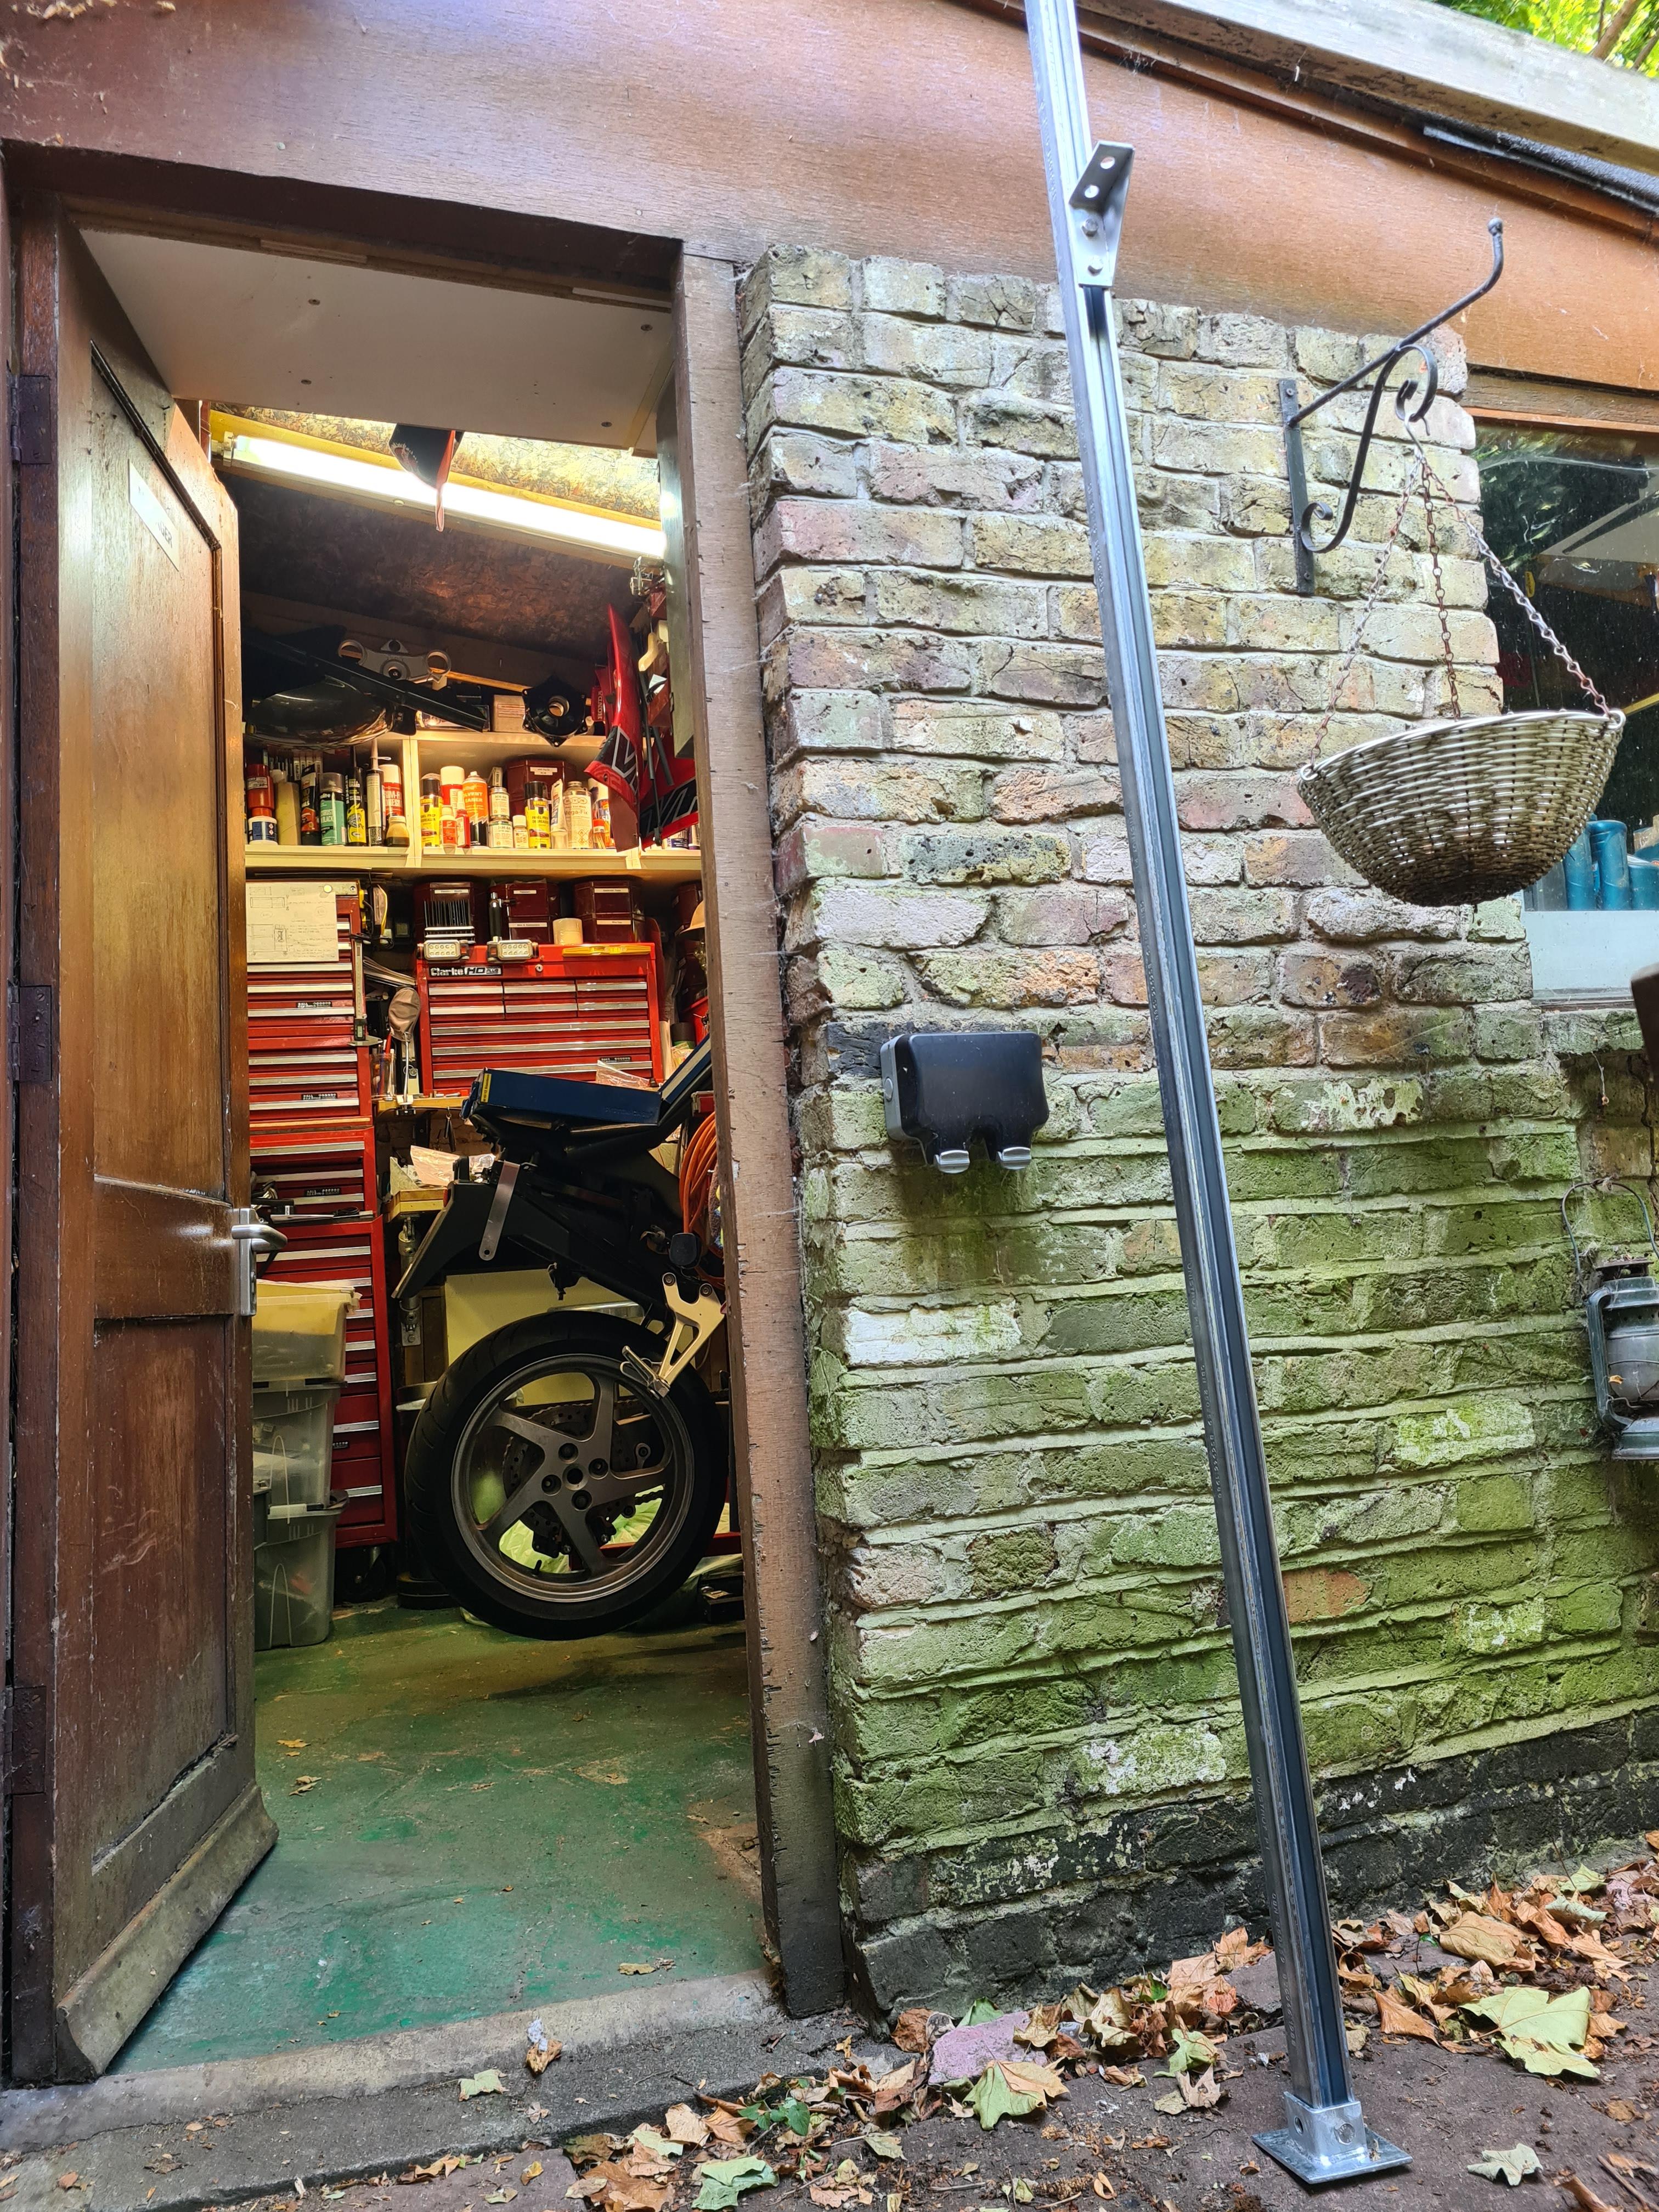
Okay, I see what you mean now. Yes, I plan to make some sort of "sled" to allow the bikes to be lifted up using a fork. The frames don't need to be very heavy duty (i.e., heavy), but I do need at least six of them, so I'm pretty sure I'll be welding them myself. Because the shelves will not go all the way to the wall (because the verticals will be in the way), I was thinking about having each sled extend over the front and rear of the shelf with a kind of 30-40mm "tongue" to keep the sled effectively locked in place until lifted straight up with the fork (lift). Fortunately, I have something like 6-7 of these Baxley Wheel Chock knock-offs already, which is a wheel chock design I like because it pinches and holds the front wheel very securely: The clever bit of this design is the articulated wheel clamp, which would be fairly difficult for me to duplicate, but I could probably create a lightweight, fork lift-compatible frame which simply includes a horizontal bracket with angled pivots like that, thus allowing me to use the parts from the stands I've already got. Another thing to CAD... My Unistrut parts arrived, so I mocked one up to get the scale into my head. That bracket is 2m above the floor, which is where the top of the shelf would be. Yikes, that's up there! I'm not sure how deep the shelves should be, but the minimum would be 600mm, and maximum probably 1m. IIRC, the 5th gen in the background measures ~770mm bar-end to bar-end, but in theory the shelf could be narrower than that. The workbenches below will be a standard 600mm deep, but 41mm from the wall. They make these pre-welded "cantilever arms" for Unistrut in all kinds of sizes, up to 1m long, and they're silly cheap (like £8 each), so I will probably use them for the main shelf supports. I'd then only have to cut, drill and weld the 45-degree brackets supporting them, using 30mm mild steel box section and 40mm x 8mm flat bar. Another fun fact is that because my ceiling is 3.5m high, I'll have to buy the 6m lengths of strut and cut them down if I don't want to couple two of them (and I don't!). Fortunately, they will still fit in the van--so long as I cut them first. Ciao, JZH
-
Webbike Japan lists these for USD79.
-
You were absolutely right about both of those things. Thank you so much
-
The short answer is: You would not be the first motorcycle rider to inspect it for cracks, and if none found, put it in a vise and slowly bend it back into shape with a shifting spanner and maybe a pipe on the handle for leverage. Hopefully somewhere you have a photo of the bike to give you an idea of what the final product should look like. If not cracked but severely bent, you could do the same with heating it at the bend with a torch, but if you have not done this before, I would not recommend it as you can weaken the metal. Looking around, the 5th Gen and the 8th Gen pedals are different part numbers. Does not mean they would not work, but I have no personal knowledge having not swapped them. If you end up looking for a used one, as you are in the UK, you can try David Silver Spares. I bought a few things from them for my 91 VFR when I lived there. Good bunch. Homepage - David Silver Spares If all else fails, CMSNL over in the Netherlands, shows them ( Part number 46500MCWD00) for the princely sum of £120 plus shipping and I assume VAT. yikes. Honda Motorcycle Parts, Kawasaki, Suzuki and Yamaha Motorcycle Parts - ATV, Classic Bike, Dirt Bike Parts Hope this is of some help.
-
 compster joined the community
 -
 Matty1971 joined the community
 -
 M4DN3SS joined the community
 -
What is better than a afternoon ride after some vfr work in the garage, especially as weather is nice, 26°C at highest and sunny ☀️ 😎 This time to a other cafe that has a bit bigger road there, "the green hell" I call it, lots of small elevation change's as curves, shame half the road has a 60km/h restriction these days, your driver's license is sure out in the wind..... But still a delight to ride !


-
Blogs
-
- 122
entries - 565
comments - 296303
views
Recent Entries
 Latest Entry
The Last Day Of Good Riding Weather
Juniper Pass
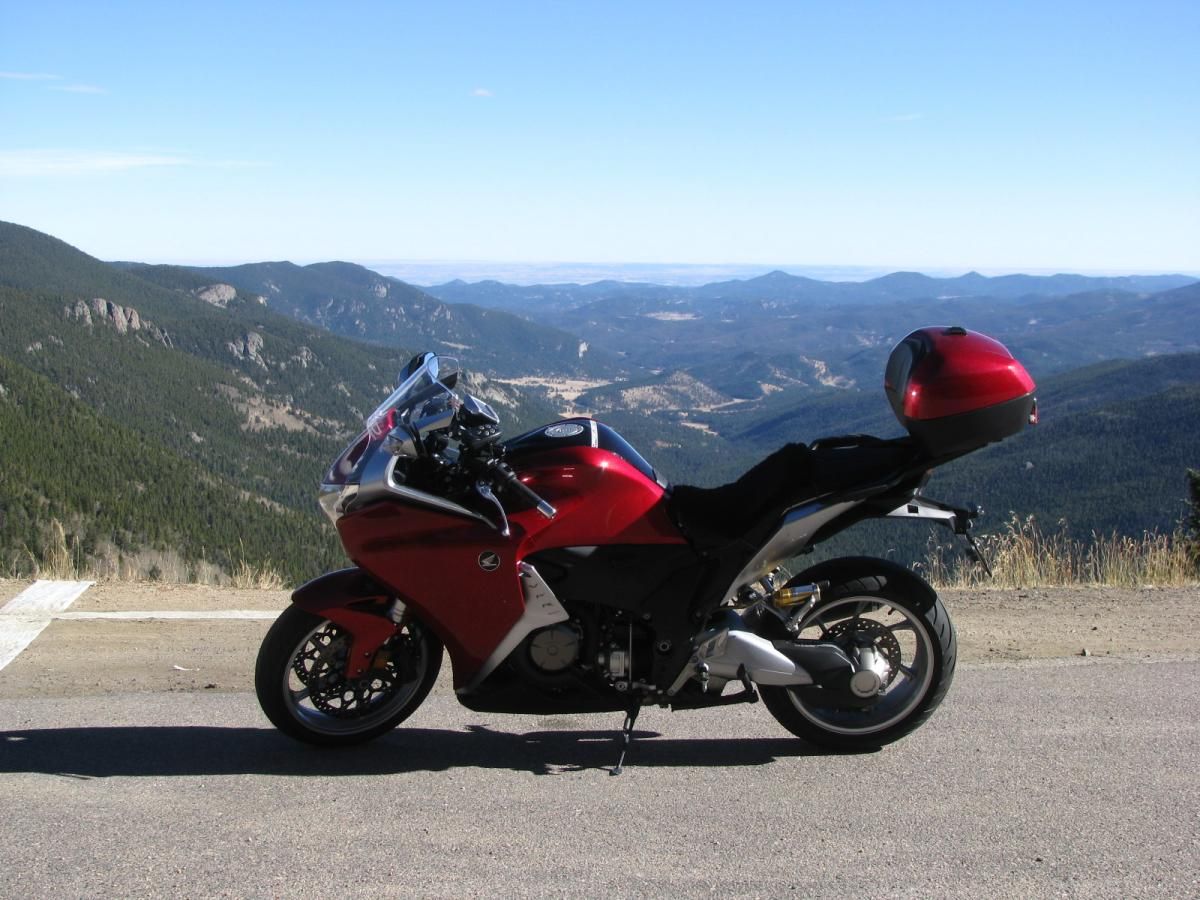
I took a day off from work and also from my bicycle training to take out the Veefalo one last time before the weather turns ugly, supposed to snow the rest of the week and possibly start sticking to the ground along the Colorado Front Range. I took a leisurely pace up hwy 105 toward Morrison and got reacquainted with the bike since its been over a month since I took any sort of twisties on it at all, hwy 105 is a scenic ride along the front range between Denver and Colorado Springs, its mostly easy fast sweepers and lite traffic so its a favorite road of mine when going north. Then I have to negotiate a bit of traffic near Highlands ranch and up hwy 470 into the mountains. I decided to take the Morrison Exit and try either Lookout Mountain or head up Golden Gate Canyon - this time it was Lookout Mountain, I was sort of making it up on the fly as I went along. Lookout Mountain is my old bicycling haunt from my days while I was working at Coors, its a killer ride and all uphill - I don't think I could do it today If I had to, not quite there yet! I saw a whole bunch of riders doing it though and wished I was in shape enough to be there doing it as well. 30 more lbs and I will be able to do it! On this day I would do it on the Veefalo instead.
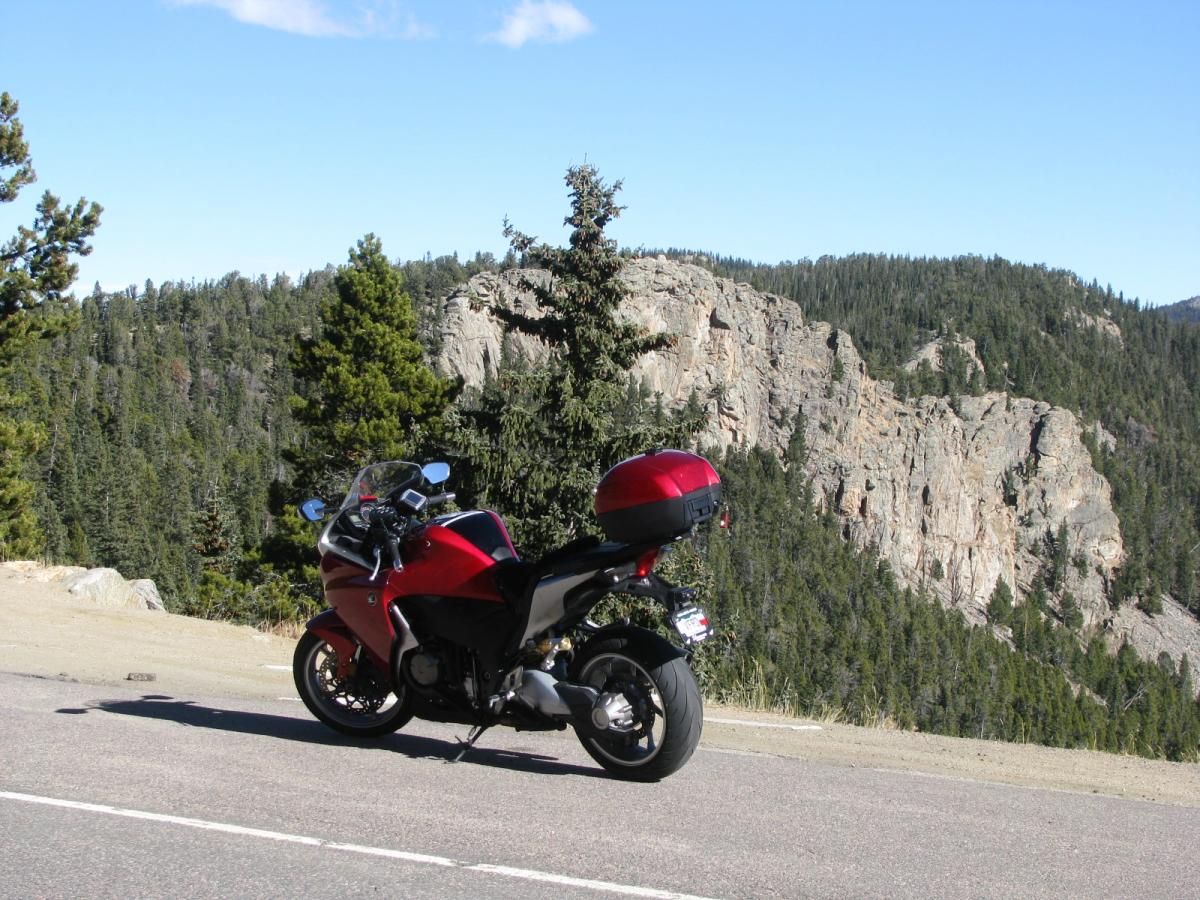
I took a video from the gateway to the top at the Lookout Mountain State Park, getting past riders, the guy in the green jacket actually pretty much astounded me with how far he had gotten in the short time it took me to set up my camera, some 3 miles at least and up to the gateway from the turn off at hwy 6! Amazing I thought. I took the first two turns slow then got more comfortable as I went up further, till I was doing well, I made some gearing mistakes and took the tight 15mph marked hairpins in the wrong gear so I lugged it a bit on one or two. Still enjoyed it though and then got off at the top and hiked over a rock outcropping for an overview of the road for the pictures below.
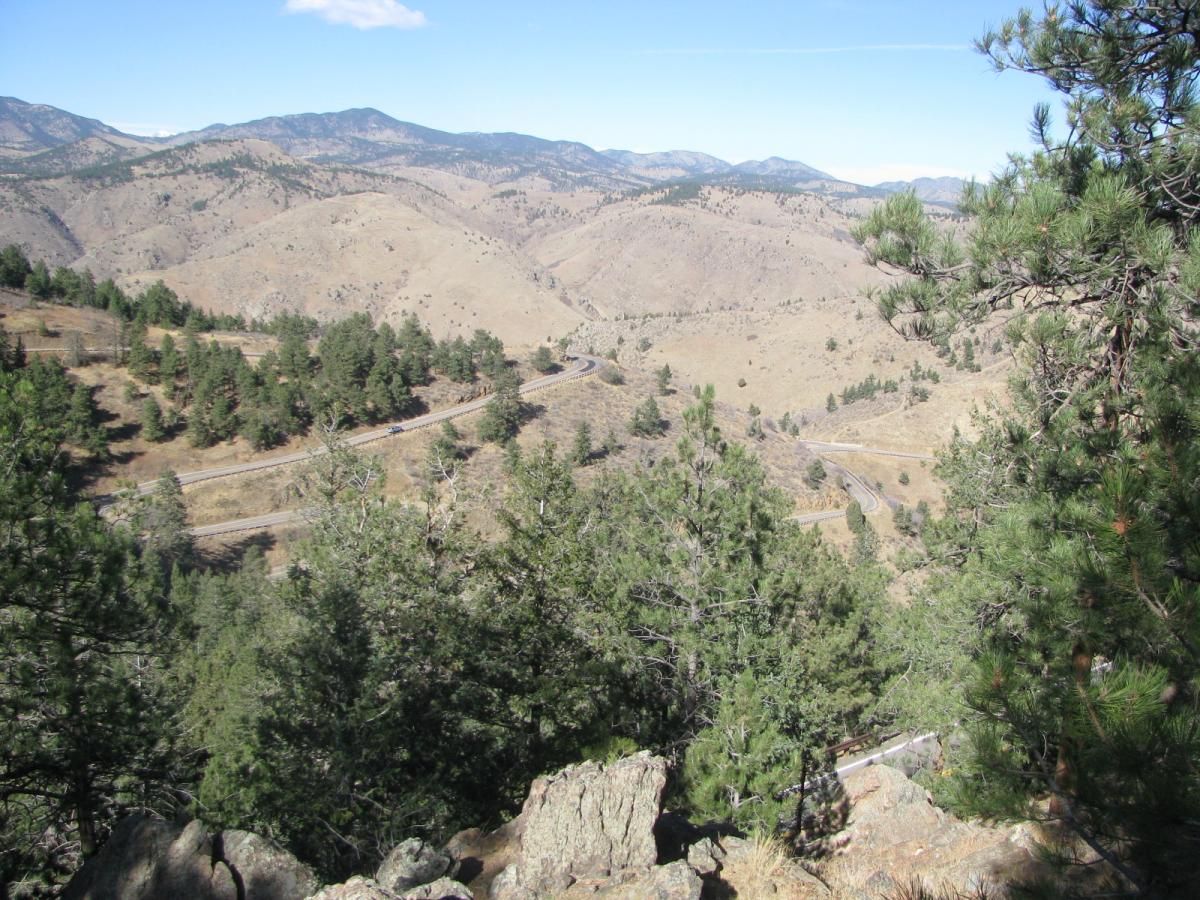
Lookout Mountain - Golden Colorado
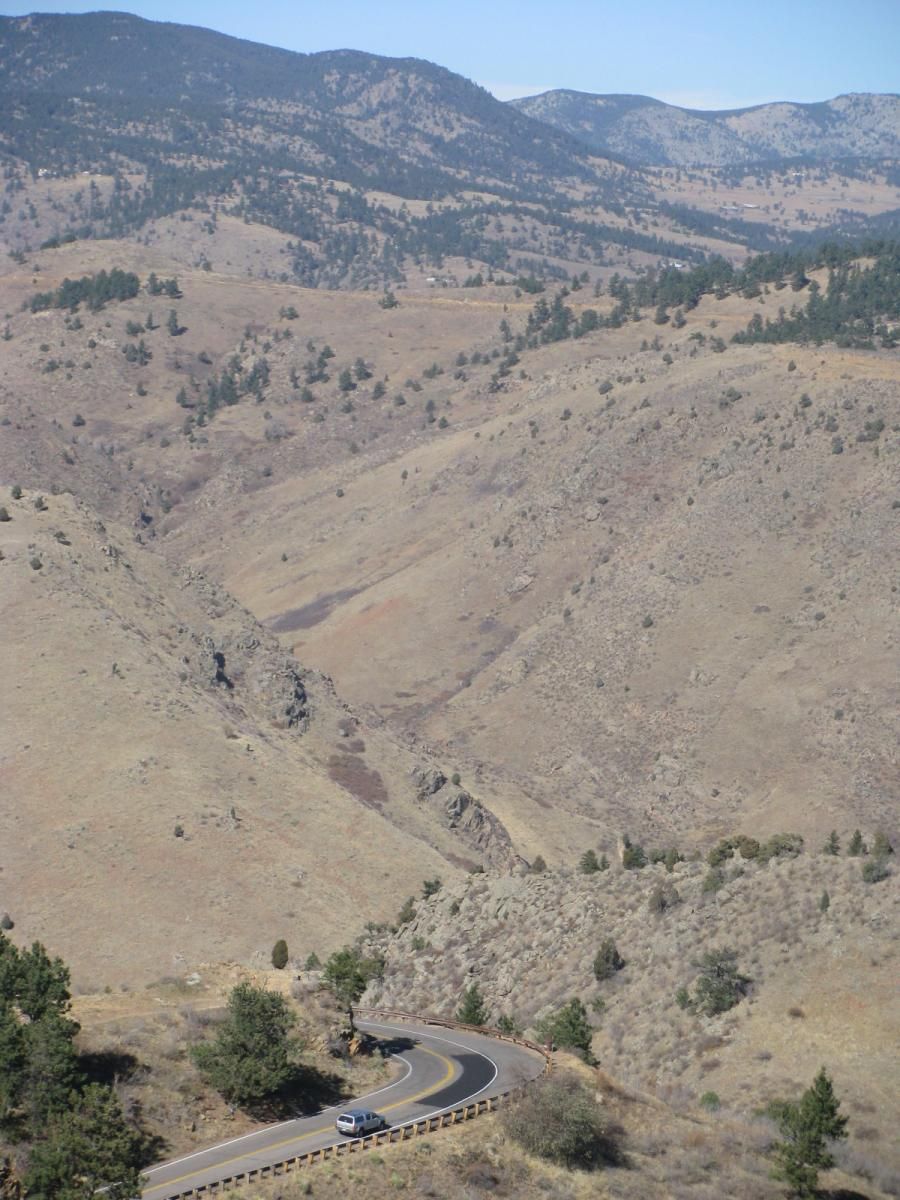
Zoomed in
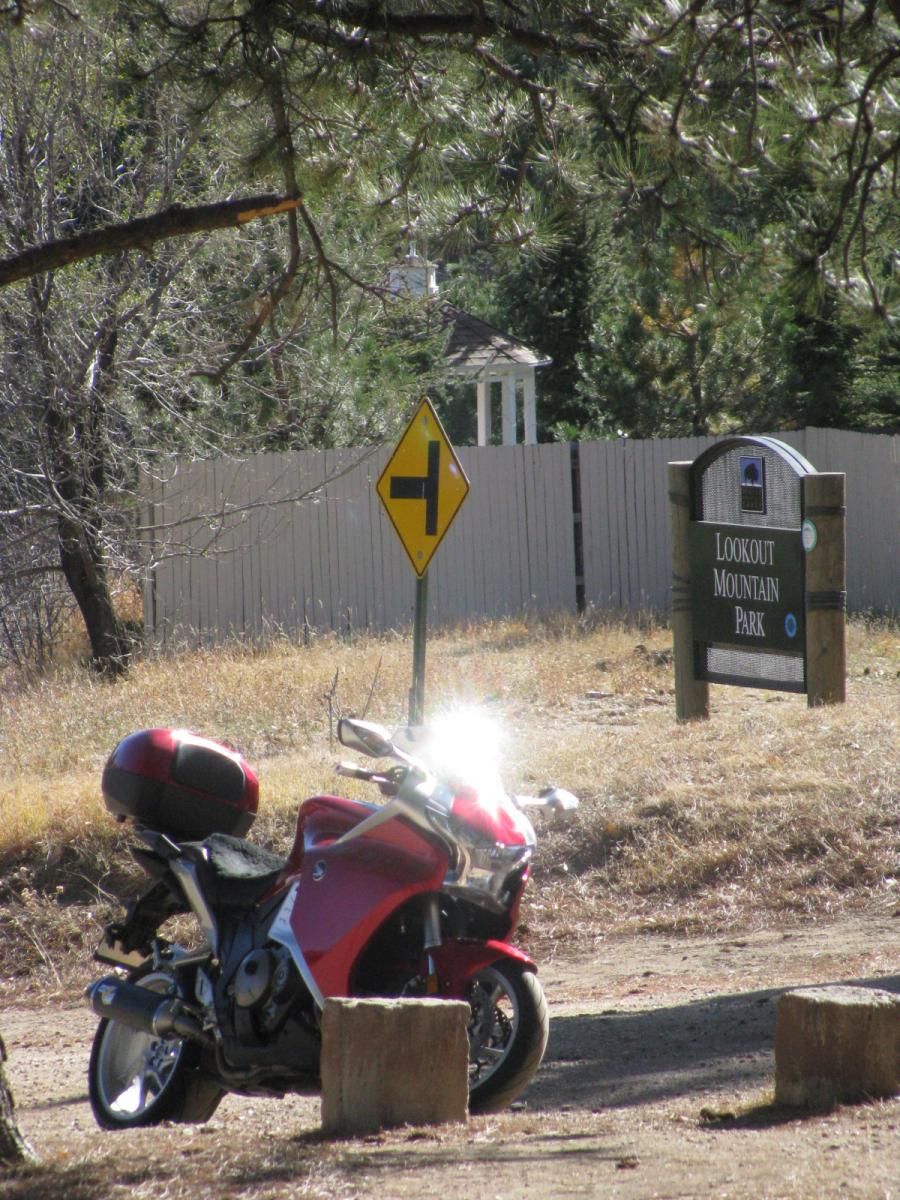
Lookout Mountain Park top of the mountain
From there I headed up interstate 70 to Idaho Springs for a beer at the Tommy-knockers brewery, I was the only customer in the joint - slow day for them so they treated me like a king! I got a nice tour of the place sort of impromptu, they made me a nice Pastrami sandwich on rye and with the brown ale it was fantastic. I must say the beer is much better there than in the bottles - its always good at the brewery. I am glad I stopped
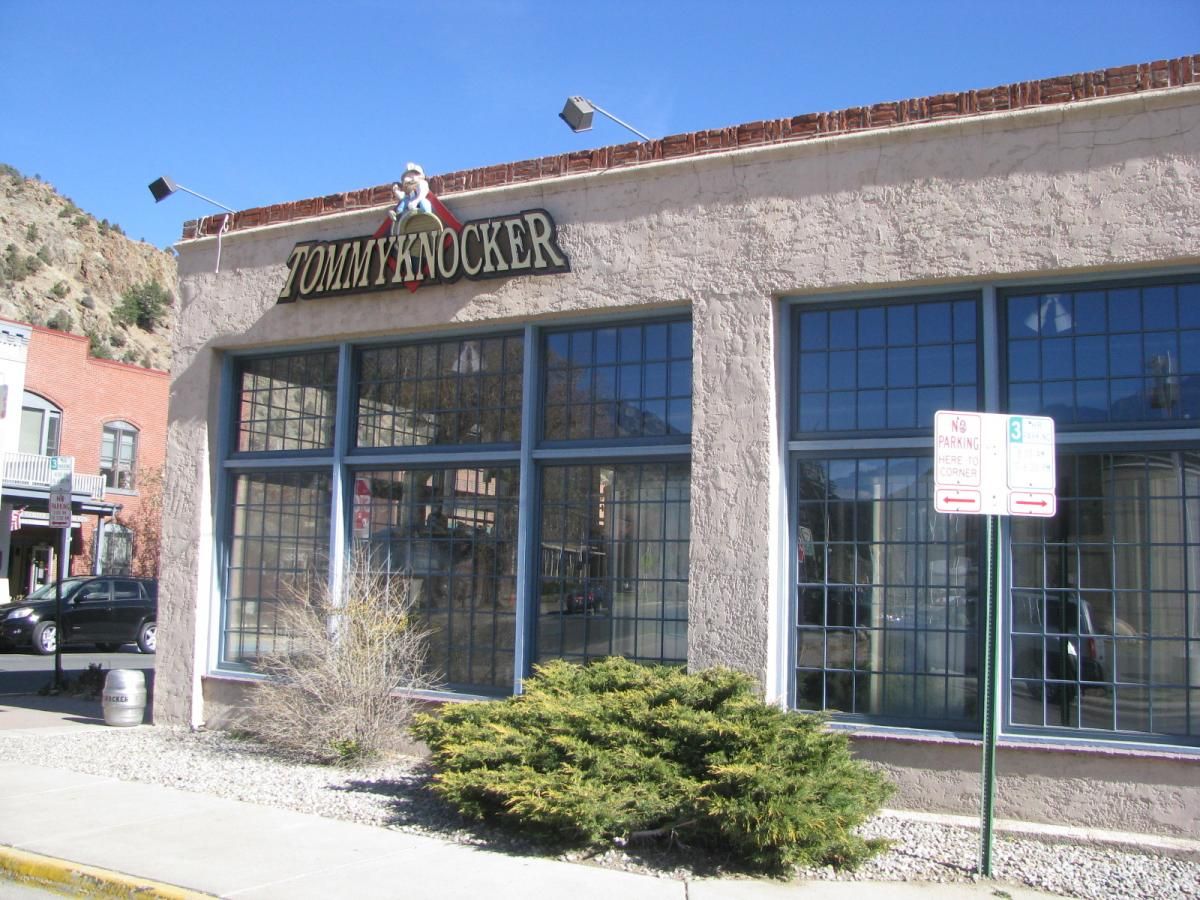
Tommy-knockers Brewpub Idaho Springs
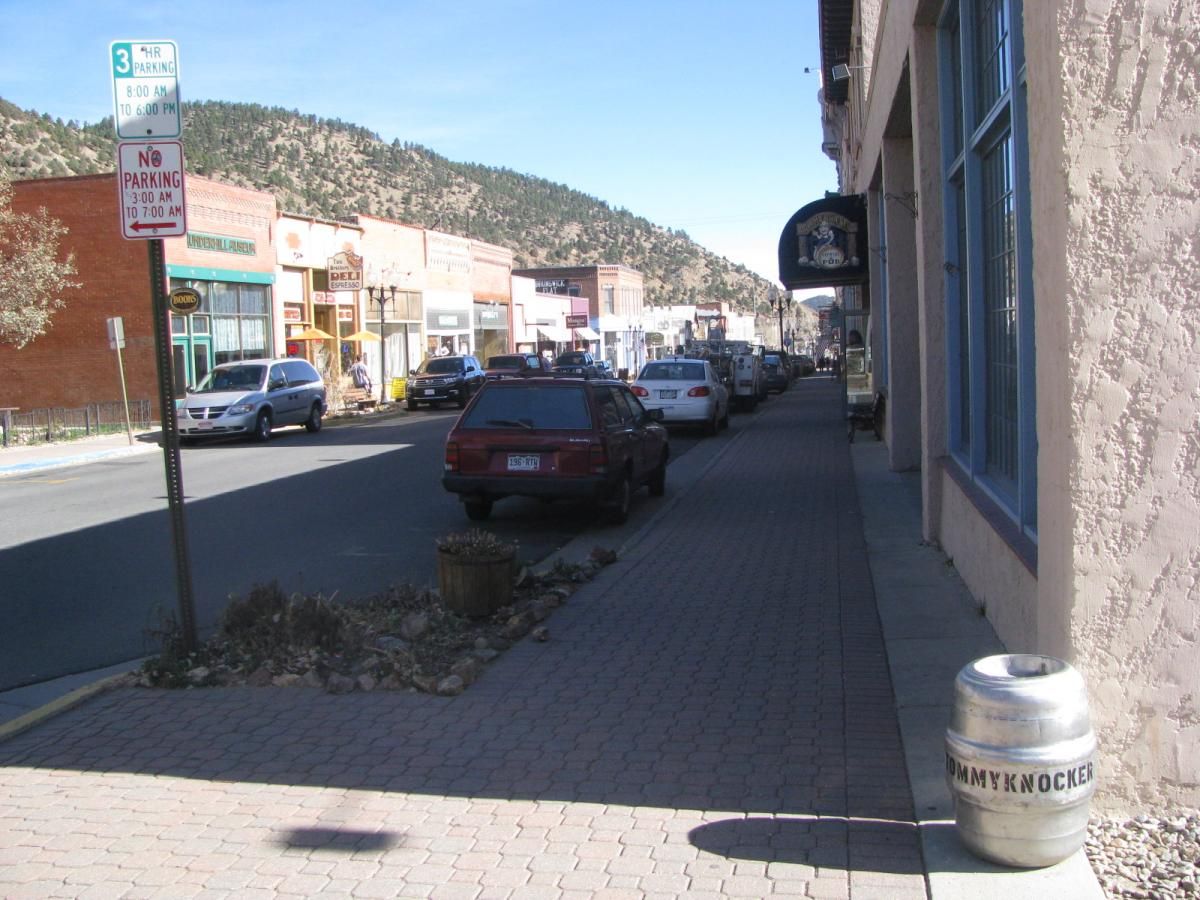
Idaho Springs Colorado
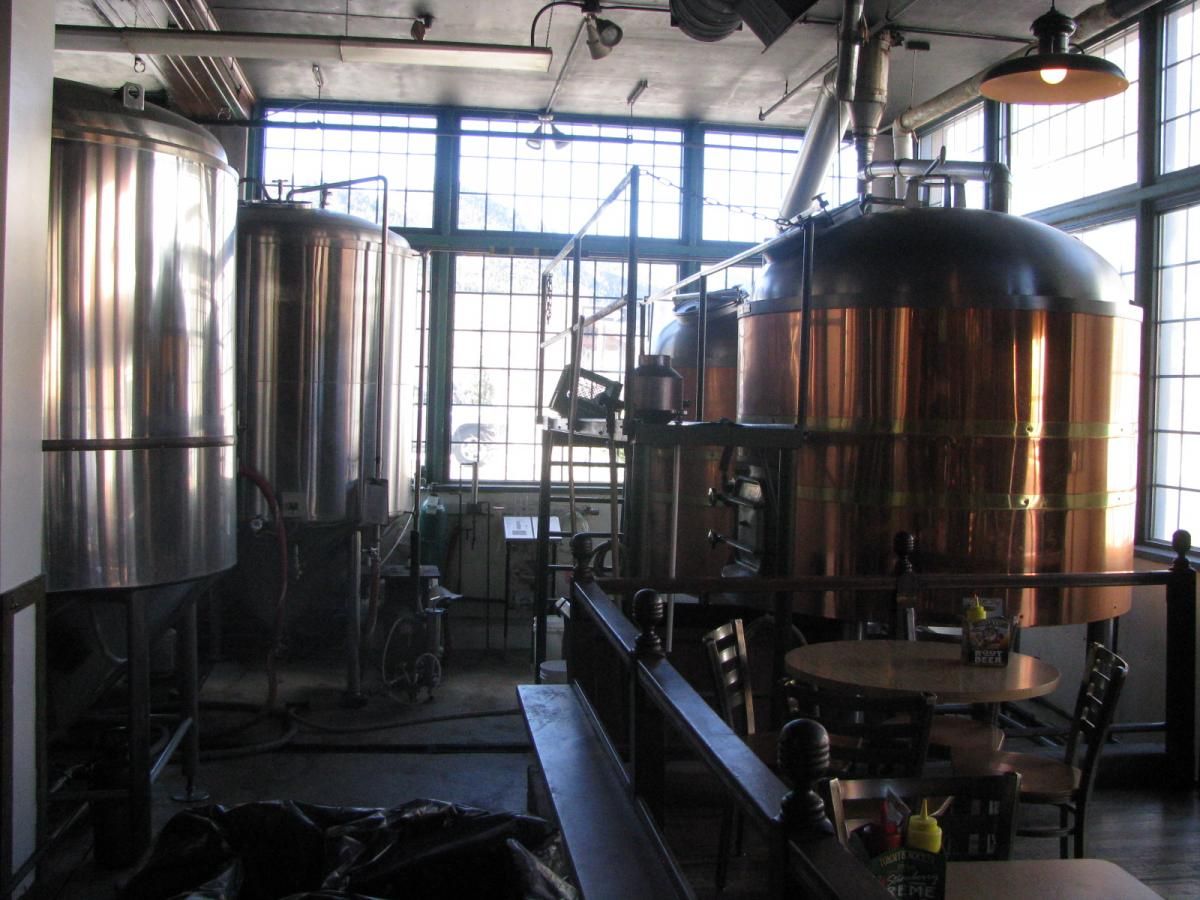
Mashtuns and fermenters
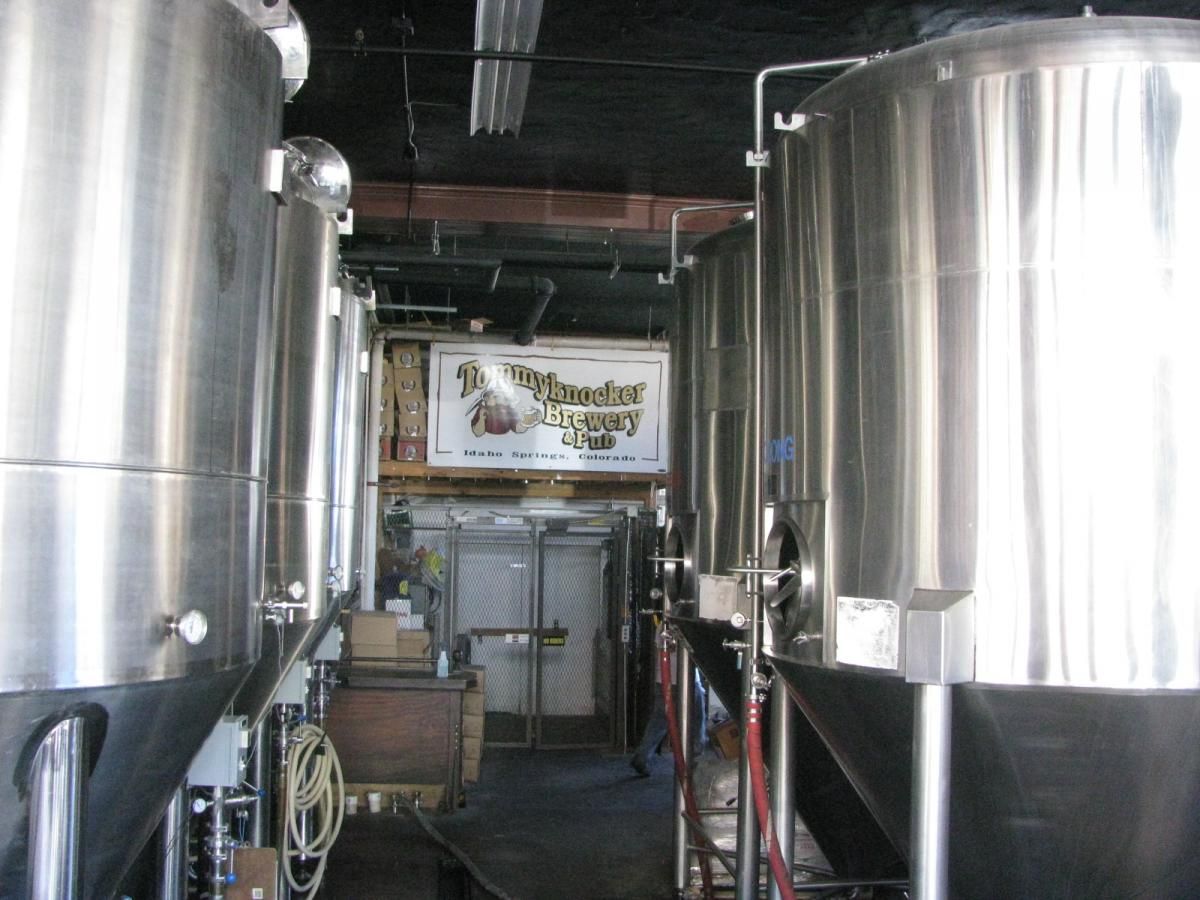
Rows of fermenters
I finished my lunch and since the road to Mount Evans is right there I headed up Squaw pass hoping to get in some nice pictures I wasn't expecting what I found, ICE IN ALL THE SHADY PARTS
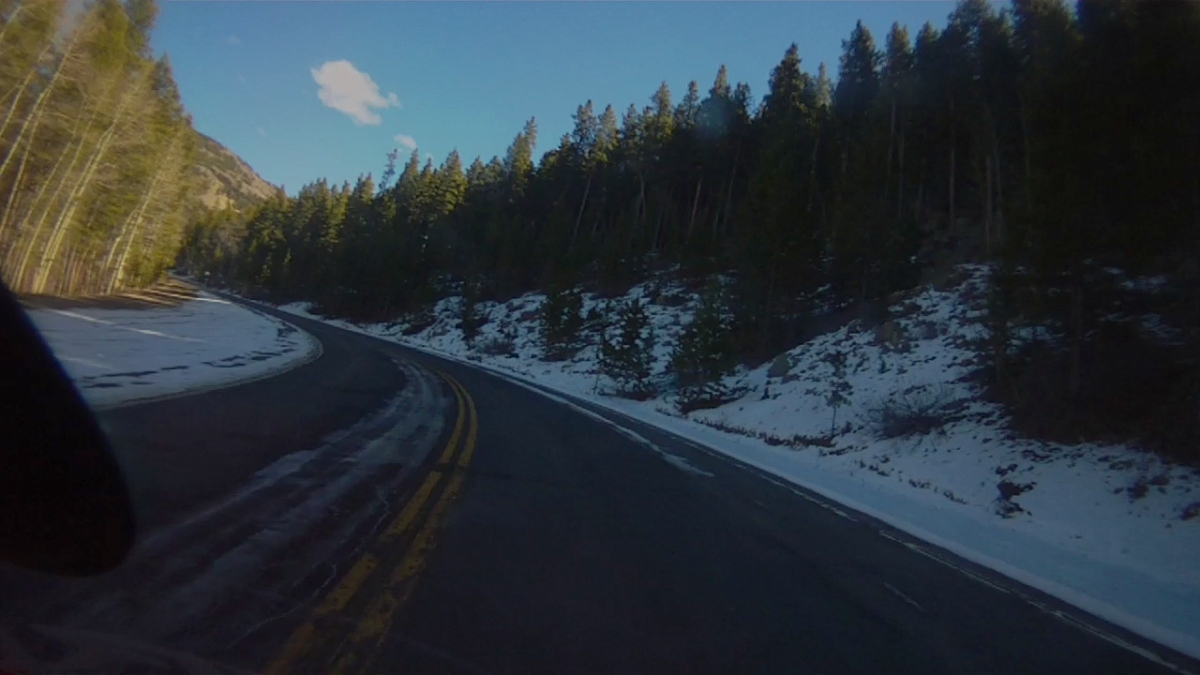
Icy patches on Squaw Pass definitely taking it easy on that road
There were some section where the ice covered the whole road for 300 yards or so I had to roll through it with my legs out to help keep the bike from sliding and falling over, I took it real slow. A Ford pickup was right behind me so I pulled over to let him pass but the guy was going slower then even I was so I pressed on - in places where I could see I just cut over to the oncoming lane and out of the ice where the sun was shining on the road more, but some places there was not alternative so I just had to go slow, good thing it wasn't slick but rather they tossed some gravel over the worst parts so I had some traction!
I did stop for pictures in all the best spots
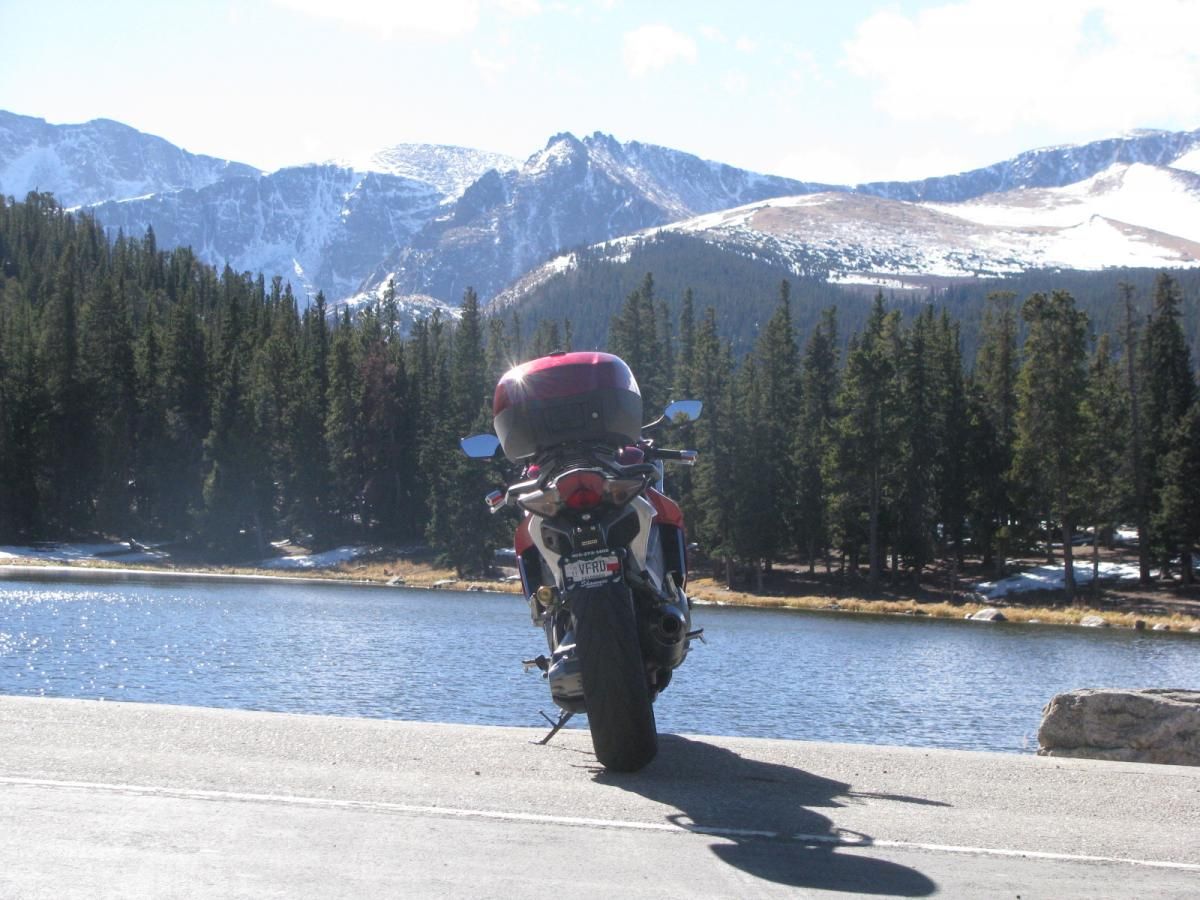
Echo Lake at Mount Evans showing off my new plate
Elephant Butte Park and Denver

Close up
Veefalo on Squaw Pass

Juniper Pass
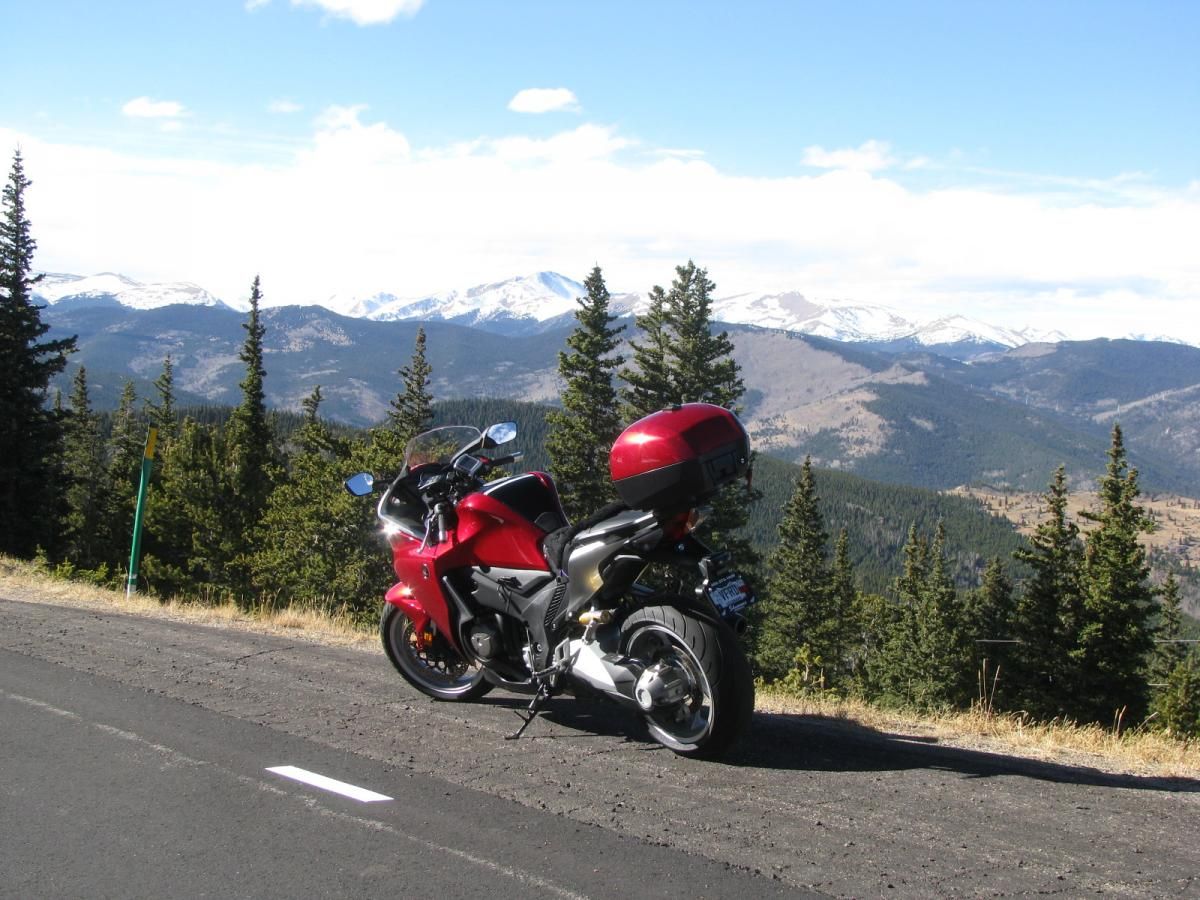
Juniper Pass
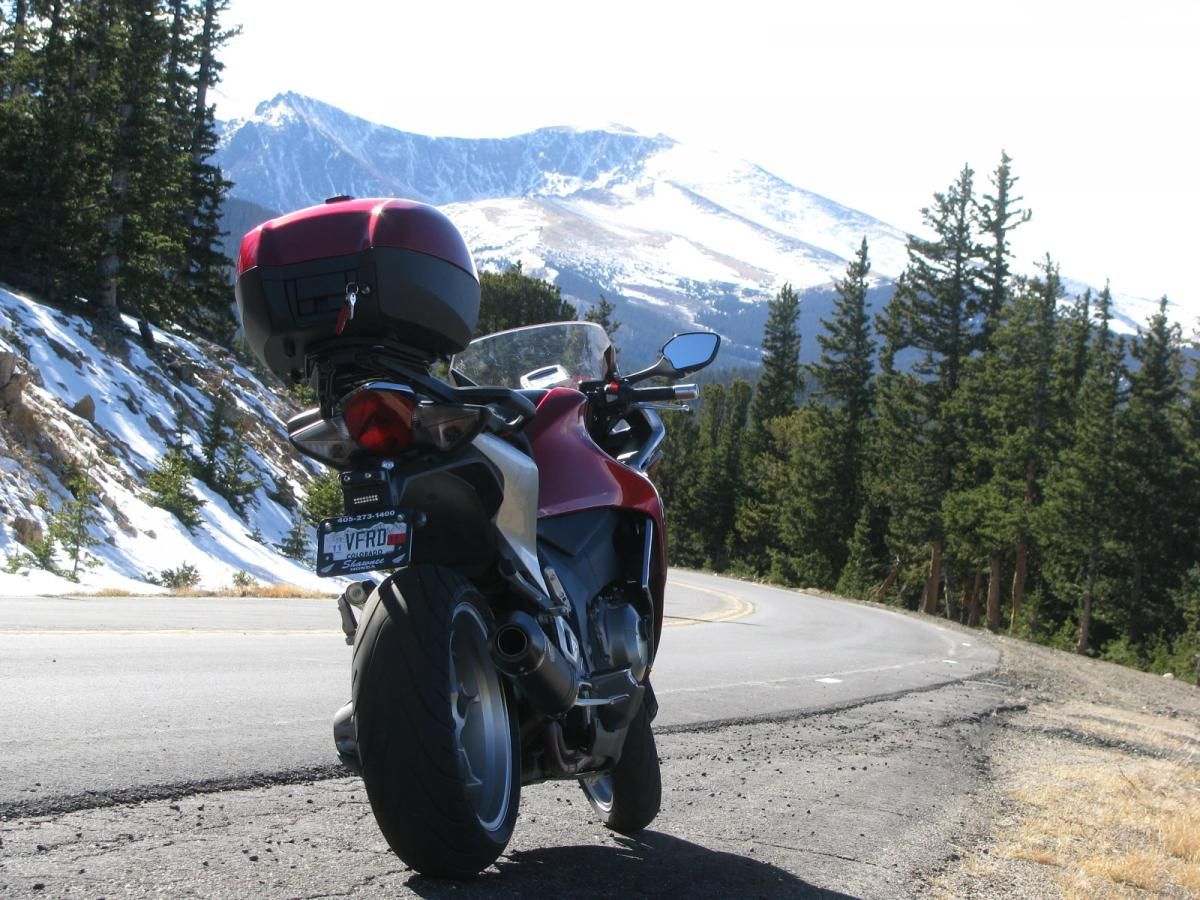
Mount Evans
My route A is home B is Tommy-knockers
- 122
-

- 8
entries - 77
comments - 34222
views
Recent Entries
 Latest Entry
I Am Back !

Not that it matters and not that I expect anyone had noticed, but to those who sent me "where are you?" I would like to say I am back. Not only that I am officially returning to VFRD after nearly 2 months break but I have also ridden my Hawk last weekend and had FUN! Let me restate that; I had major fun riding! Something I have almost given up on.
Most of you have been riding your whole adult lives and riding is not only a hobby to you, it is part of you. But I started riding three years ago and even though I have encounter some setbacks, till this spring I loved riding with whole my heart. However, I have always considered riding as my hobby. As a hobby which suppose to make my life better, more fun and more rich. Life is too short to do something which we don't fully love.
My love of riding received a first major scar this spring: I lost a friend on the racetrack. He was a total stranger who offered me his help after I lowsided at CMP track last year. I still remember hearing his "Hi, my name is Todd, do you need help?" while I was duct-taping my roadrash from ripped jacket. He helped me straighten up the shifter and we kept in touch. The next time we saw each other was the day he died.
With 9 months delay, I can say that Todd's death shook me more than I have realized. It rooted fear in me which was fueled by seeing and hearing about others getting hurt over and over again. If I was to summarize this year - it would be one big accident report. I became sensitive to every broken bone, every roadrash, every lowside. And even though I did 10 track days this year, I became slower and slower and slower. Suddenly, I have acquired this 'grandma' riding style on the road, frozen with fear that behind every corner there is car standing in my lane, or major sand trap or deer staring at me ... I was crippled with fear not only for me about also for my fellow rider.
So, at the end of this year, I rode more and more by myself. I could not bear the feelings of responsibility for others on the road and my lines were crippled by my own fears. It all culminated this fall at WDGAH. In a freaky accident Love2rideh82crash was taken down by a truck crossing into our lane. I was done. I finished the weekend, locked the VFR into a garage and took a break.
Until the last weekend, I pretended that motorcycles do not exists. As a last instance after 2 months break from riding, I decided to go to CMP track to see if I can still have fun. I also felt like I should go for the memory of Todd. I went and I had fun! I had much more fun than I expected and the most fun on track I can remember. Suddenly the whole track connected into an uninterupted line of turns and I felt one with the bike riding around! I was giggling like a little girl in my helmet and keep on giggling ever since

Granted I was not the fastest one and through out the weekend, I have never exceeded about 60% of my riding abilities, but I had no "oh-shit" nor 'blond' moments. I could have maybe go faster, I could have brake later for the turns and I could have lean further, but I am no Rossi nor Stoner. I decided to ride for fun and I had amazing blast riding well within my comfort zone.
I was proud of myself when, after bandaging Ricks arm, I was able to distance myself and go back to riding without the year-long fear. I did feel bad for him but the feelings were not crippling my lines nor my mind. And when a total stranger came to me and said "Hi, my name is Todd", my heart stopped for a minute though but I suddenly knew that my life went a full circle. I probably will never win MotoGP :idea3: , but I am back! :wheel:
- 8
-
-
VFRD Mission Statement
For owners of the Honda Interceptor and related Honda V4 motorcycles, for the purpose of mutual help concerning safe riding, maintenance, and performance of their motorcycles.
Rules of the ride - No one goes to jail, and No one goes to the Hospital.
Contributions - VFRD is a member supported website with no commercial advertising.

-
Forum Statistics
-
Total Topics26.4k
-
Total Posts361.1k
-
-
Who's Online (See full list)
-
Member Statistics
-
Upcoming Events
No upcoming events found -
Latest Classifieds
-
-
Top Downloads
-
-
Popular Contributors
-
Blog Statistics
-
Total Blogs116
-
Total Entries345
-
-
Gallery Statistics
-
Blog Entries
-
-
Blog Comments
-

By vfrpilot28 · Posted
I enjoyed reading this and seeing your story. For the love of motorcycling! -
-
By interceptor69 · Posted
Oops. I do believe I know how to post YT videos or they wouldn't be on YT. However I may have screwed up copying the link to the playlist. Thanks for the helpful comment. -
 I think that you might not know how to post videos. You're in your YT studio in these links. You need the link to the actual video.
 -
-
-
Most Contributions
-