Leaderboard


Popular Content
Showing content with the highest reputation since 06/26/2025 in all areas
-
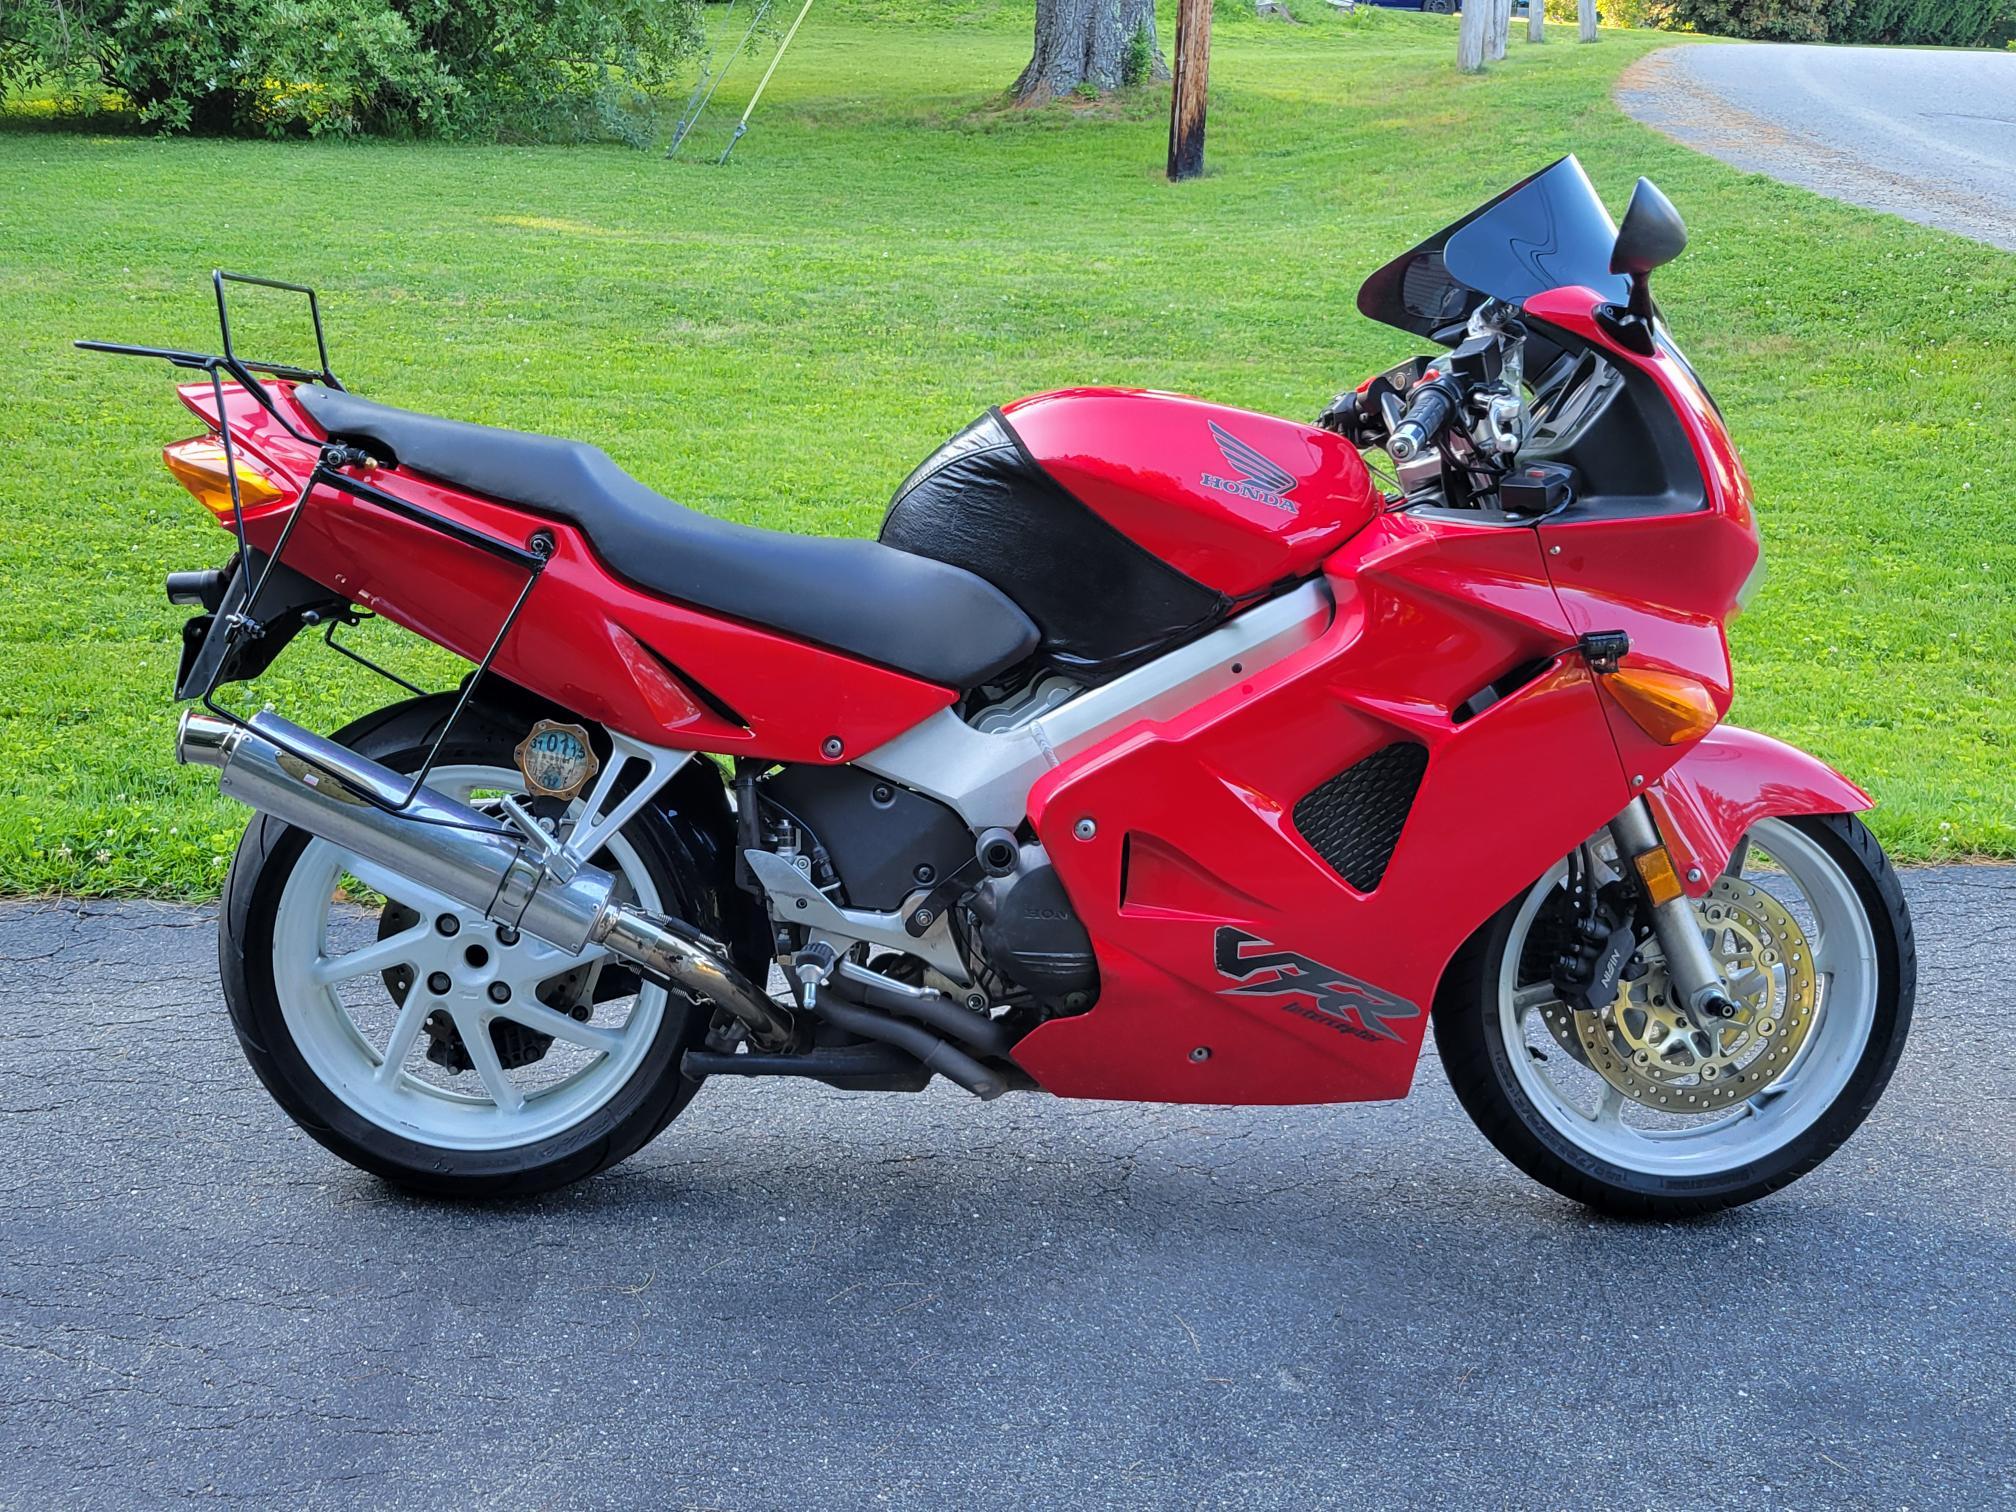
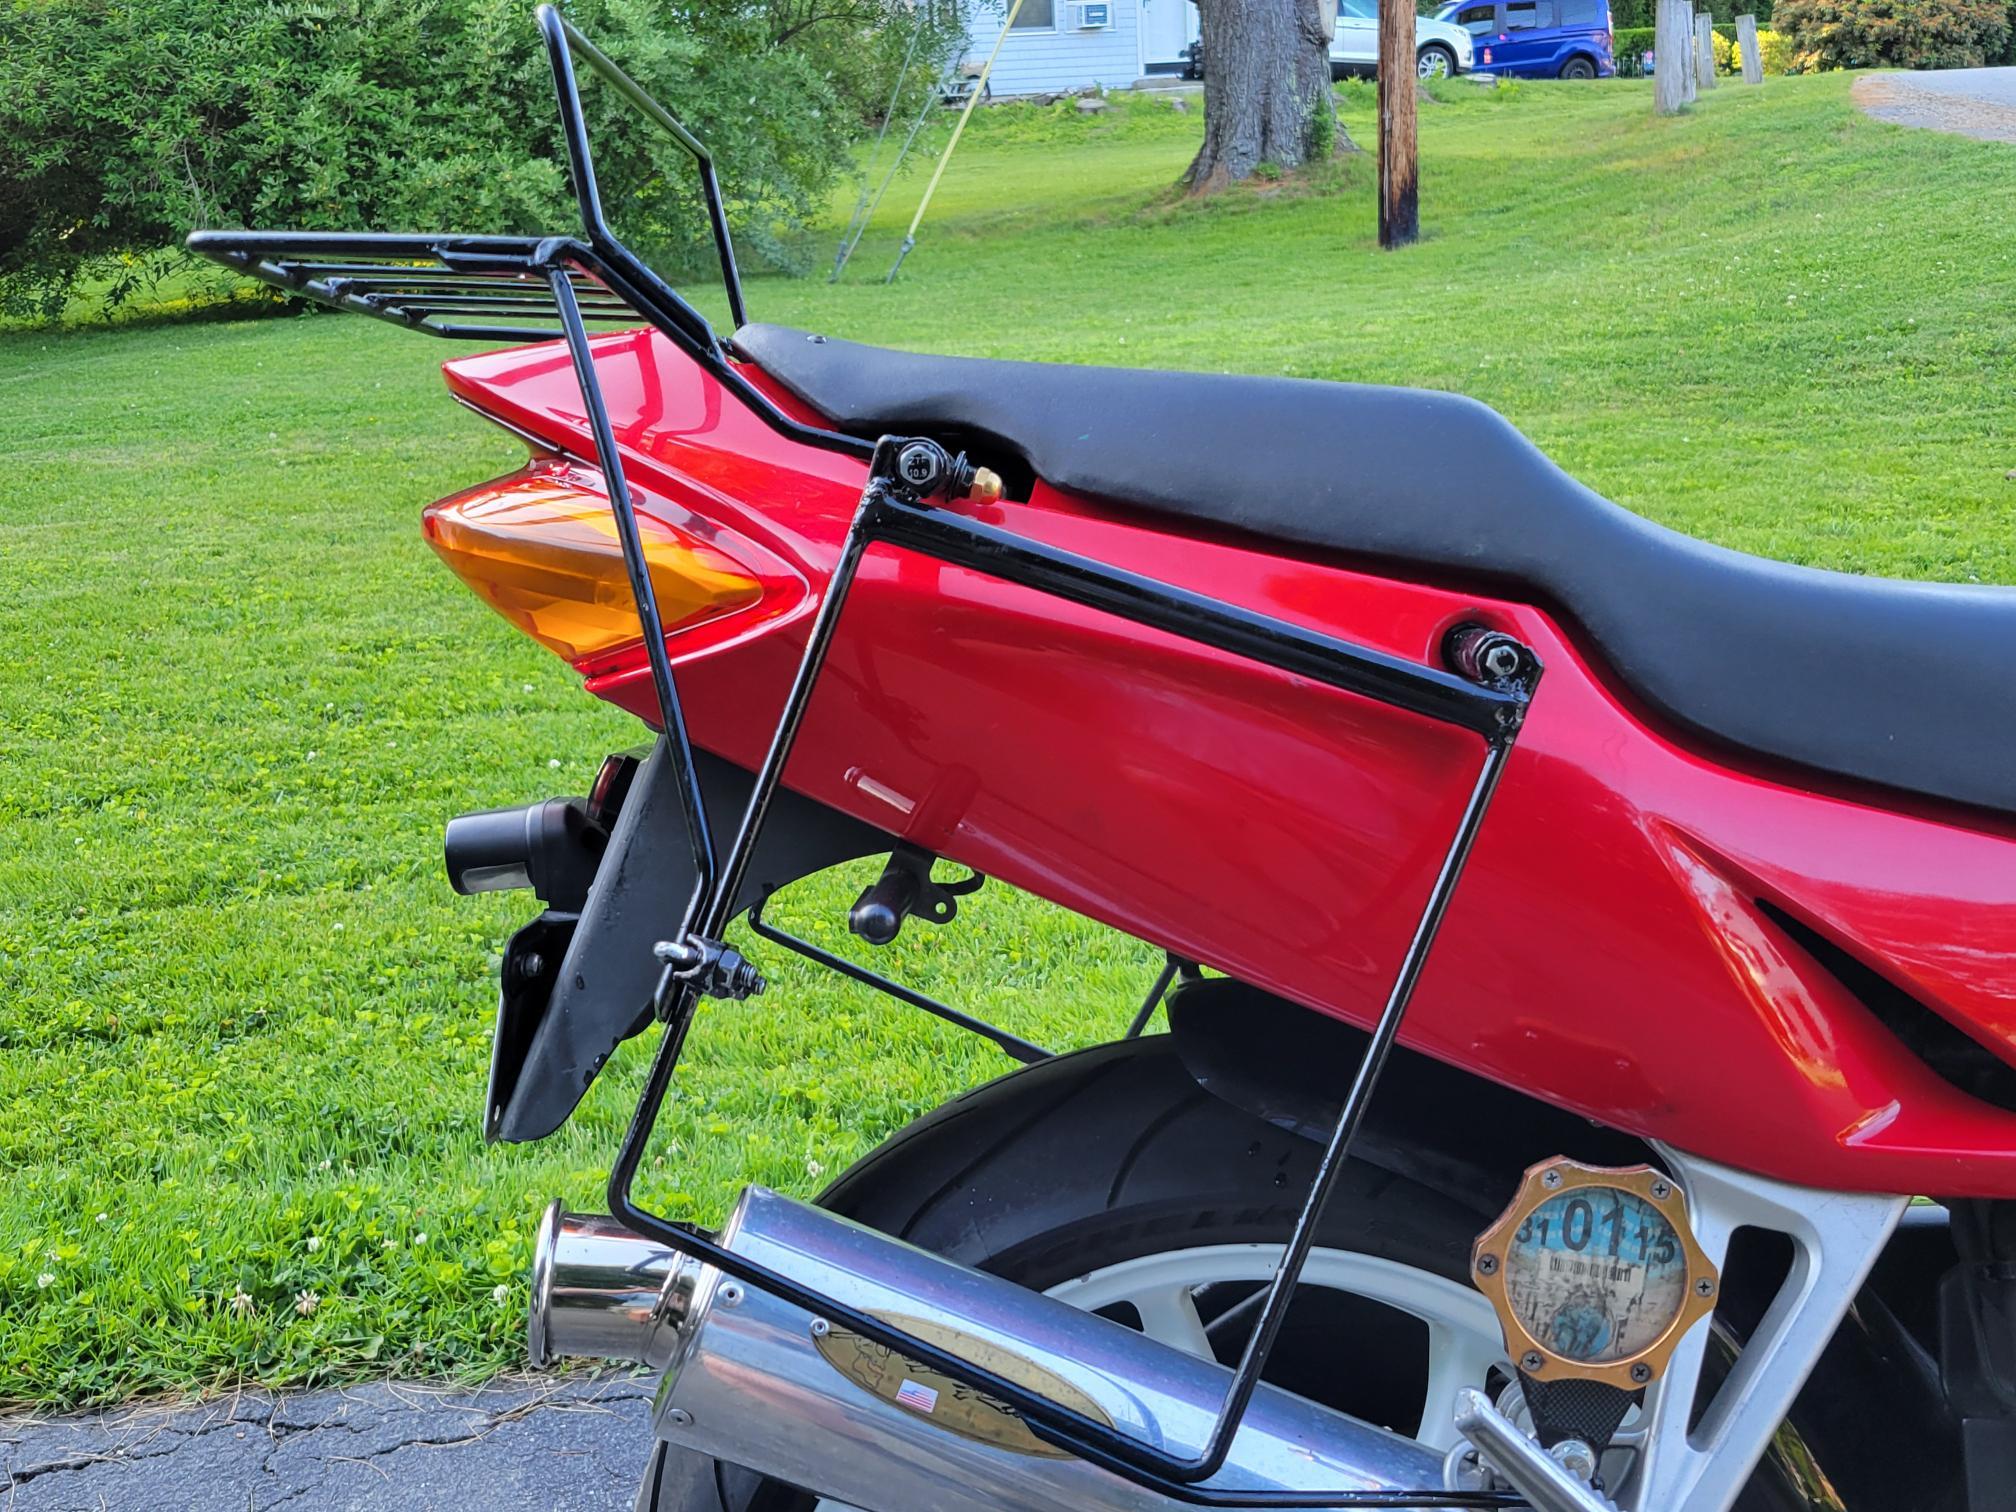
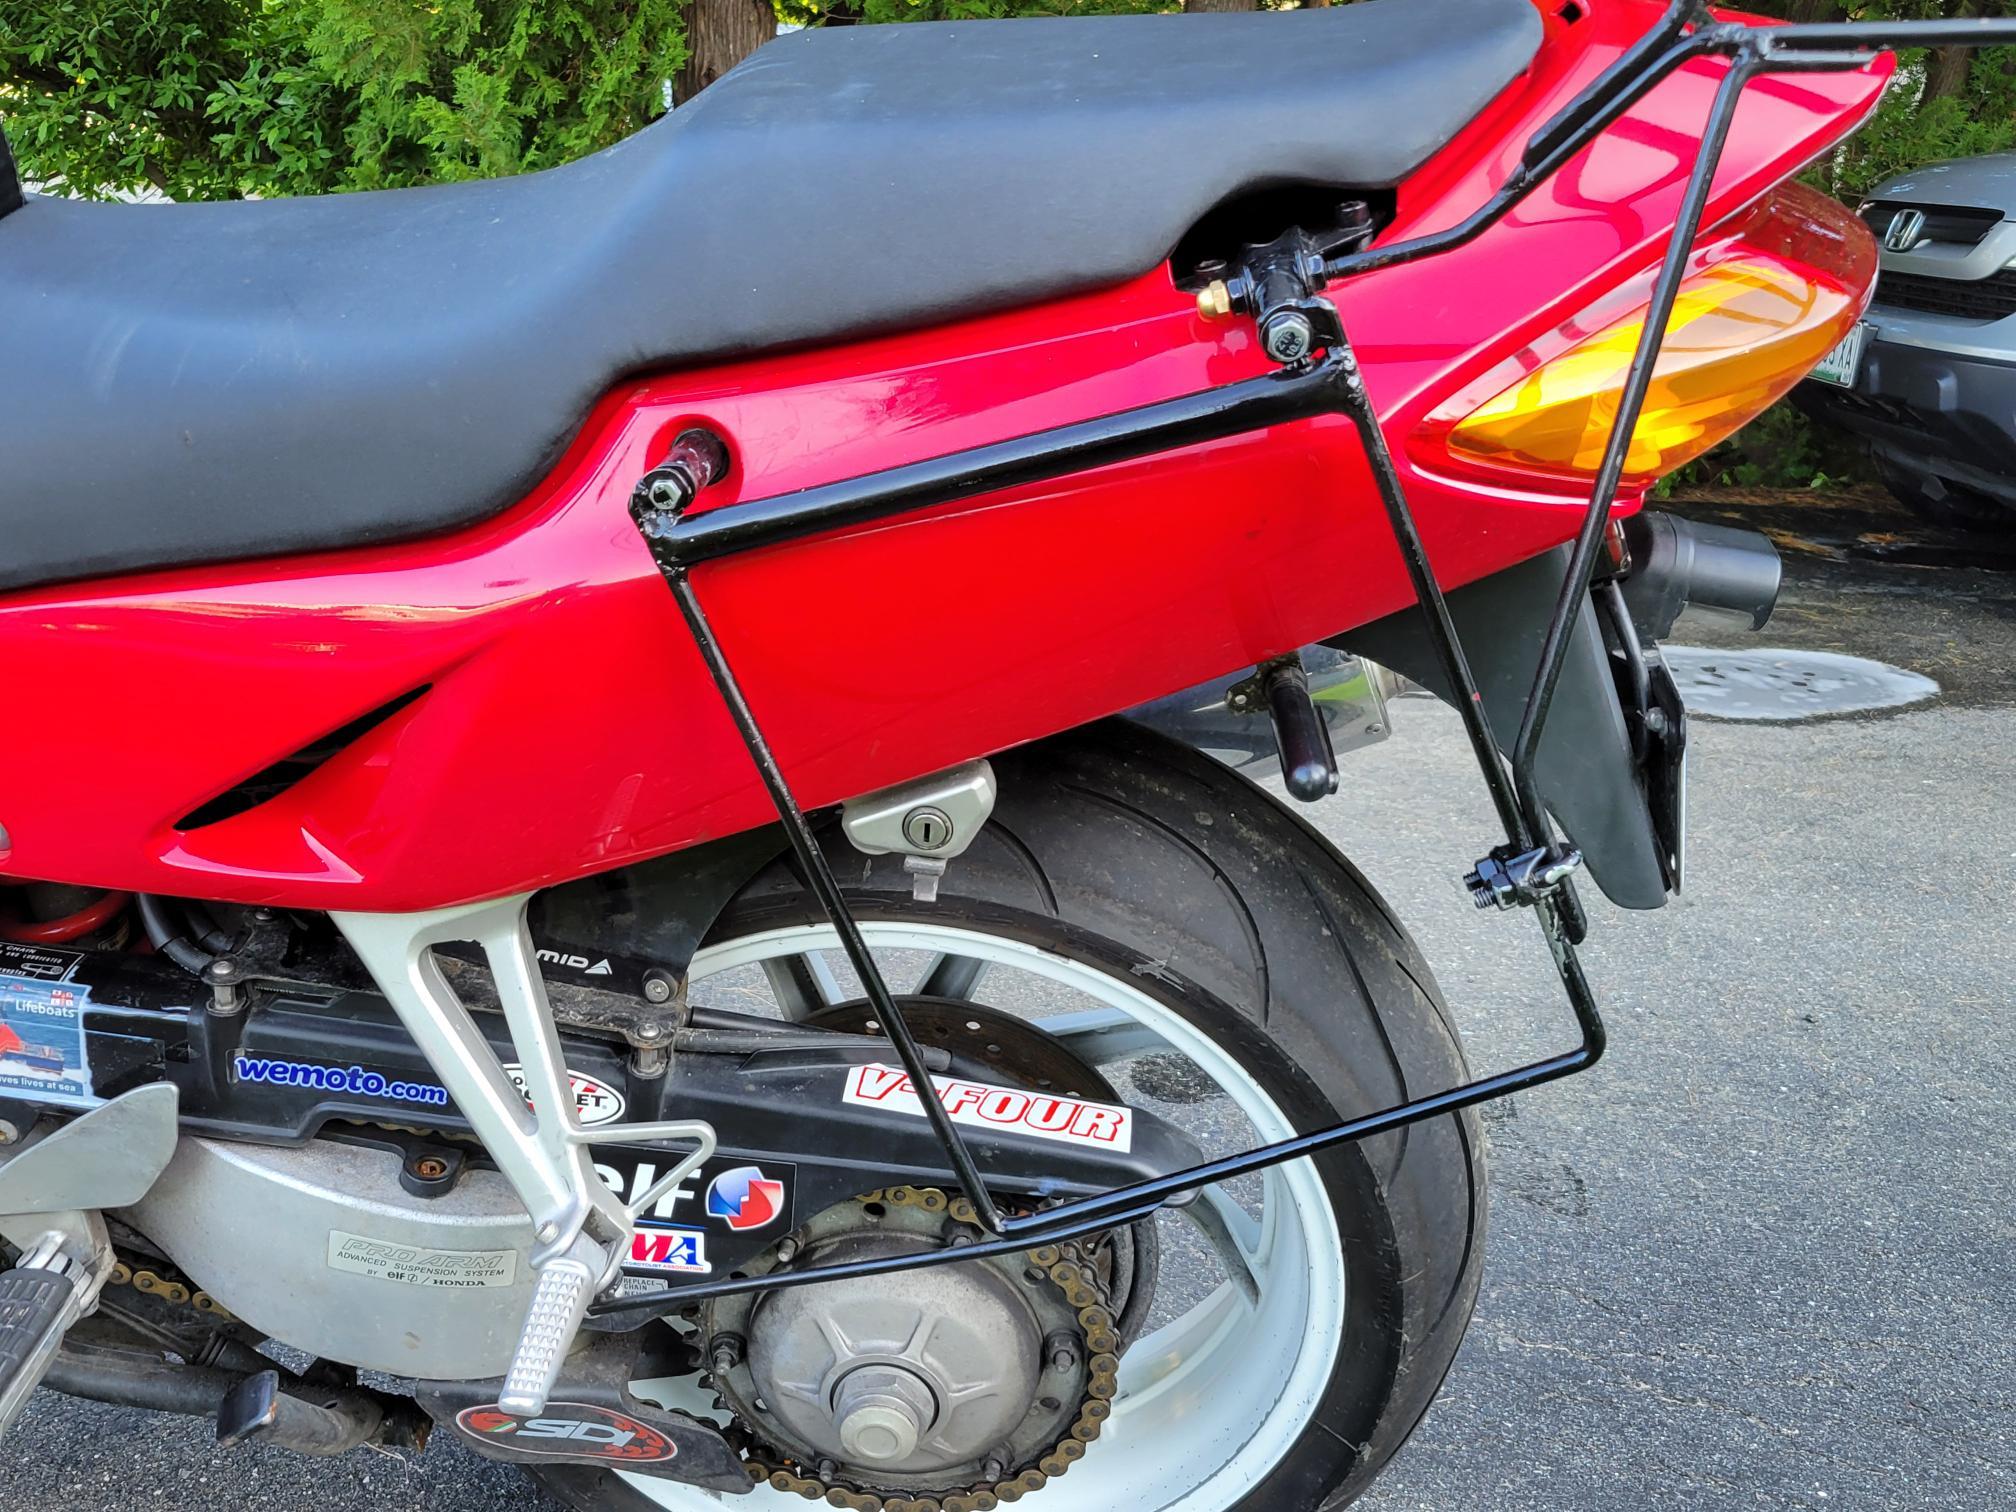
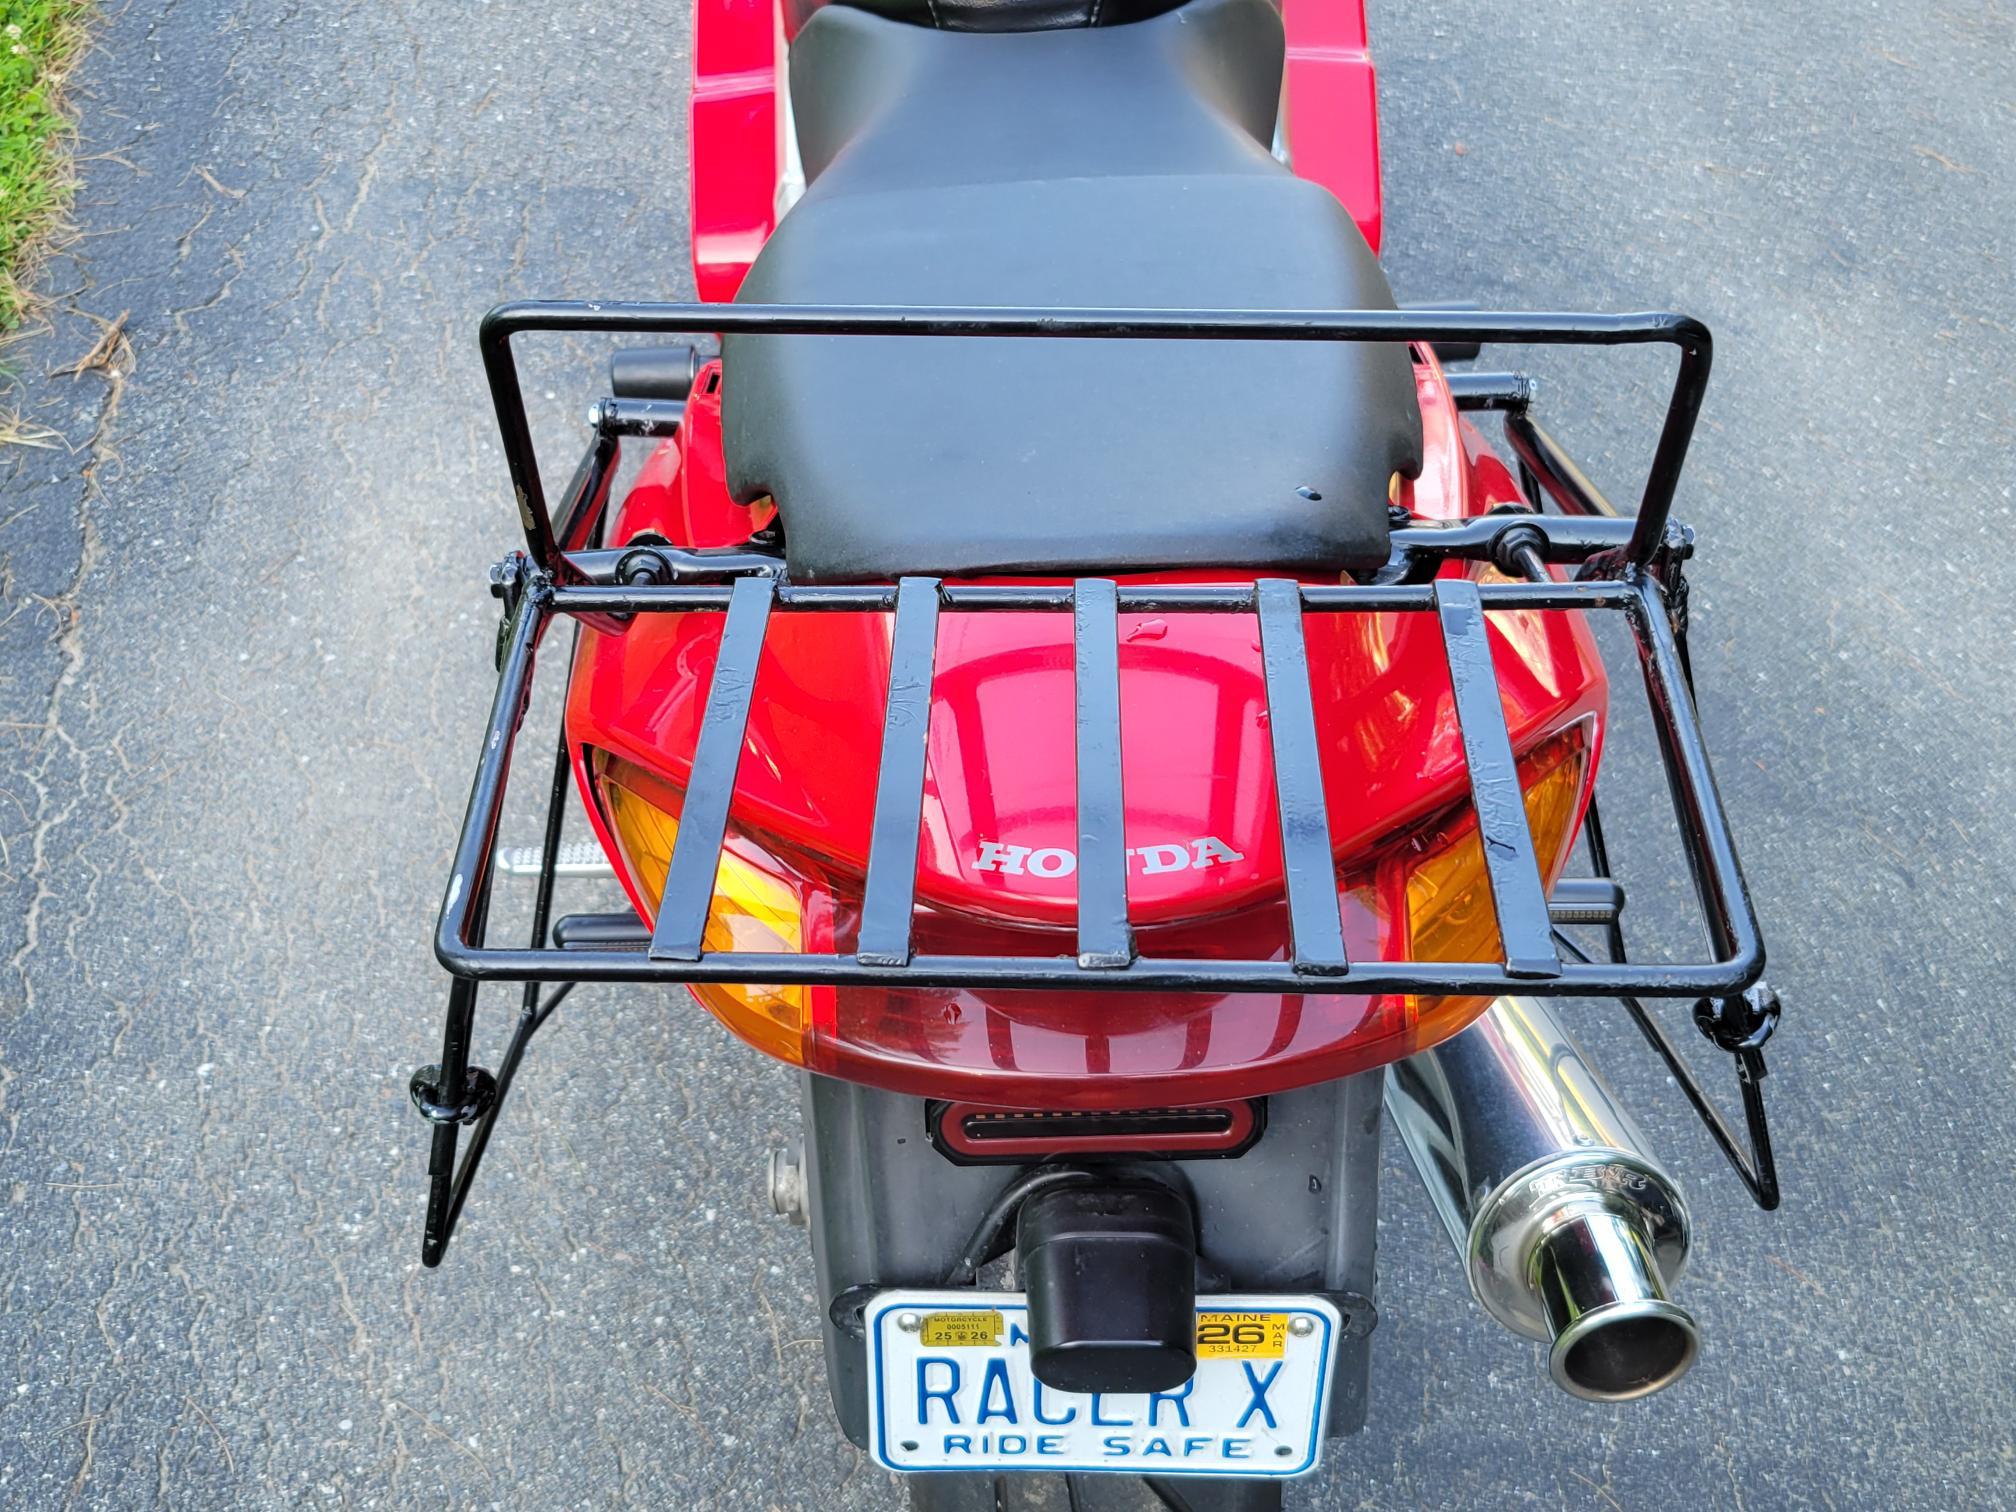
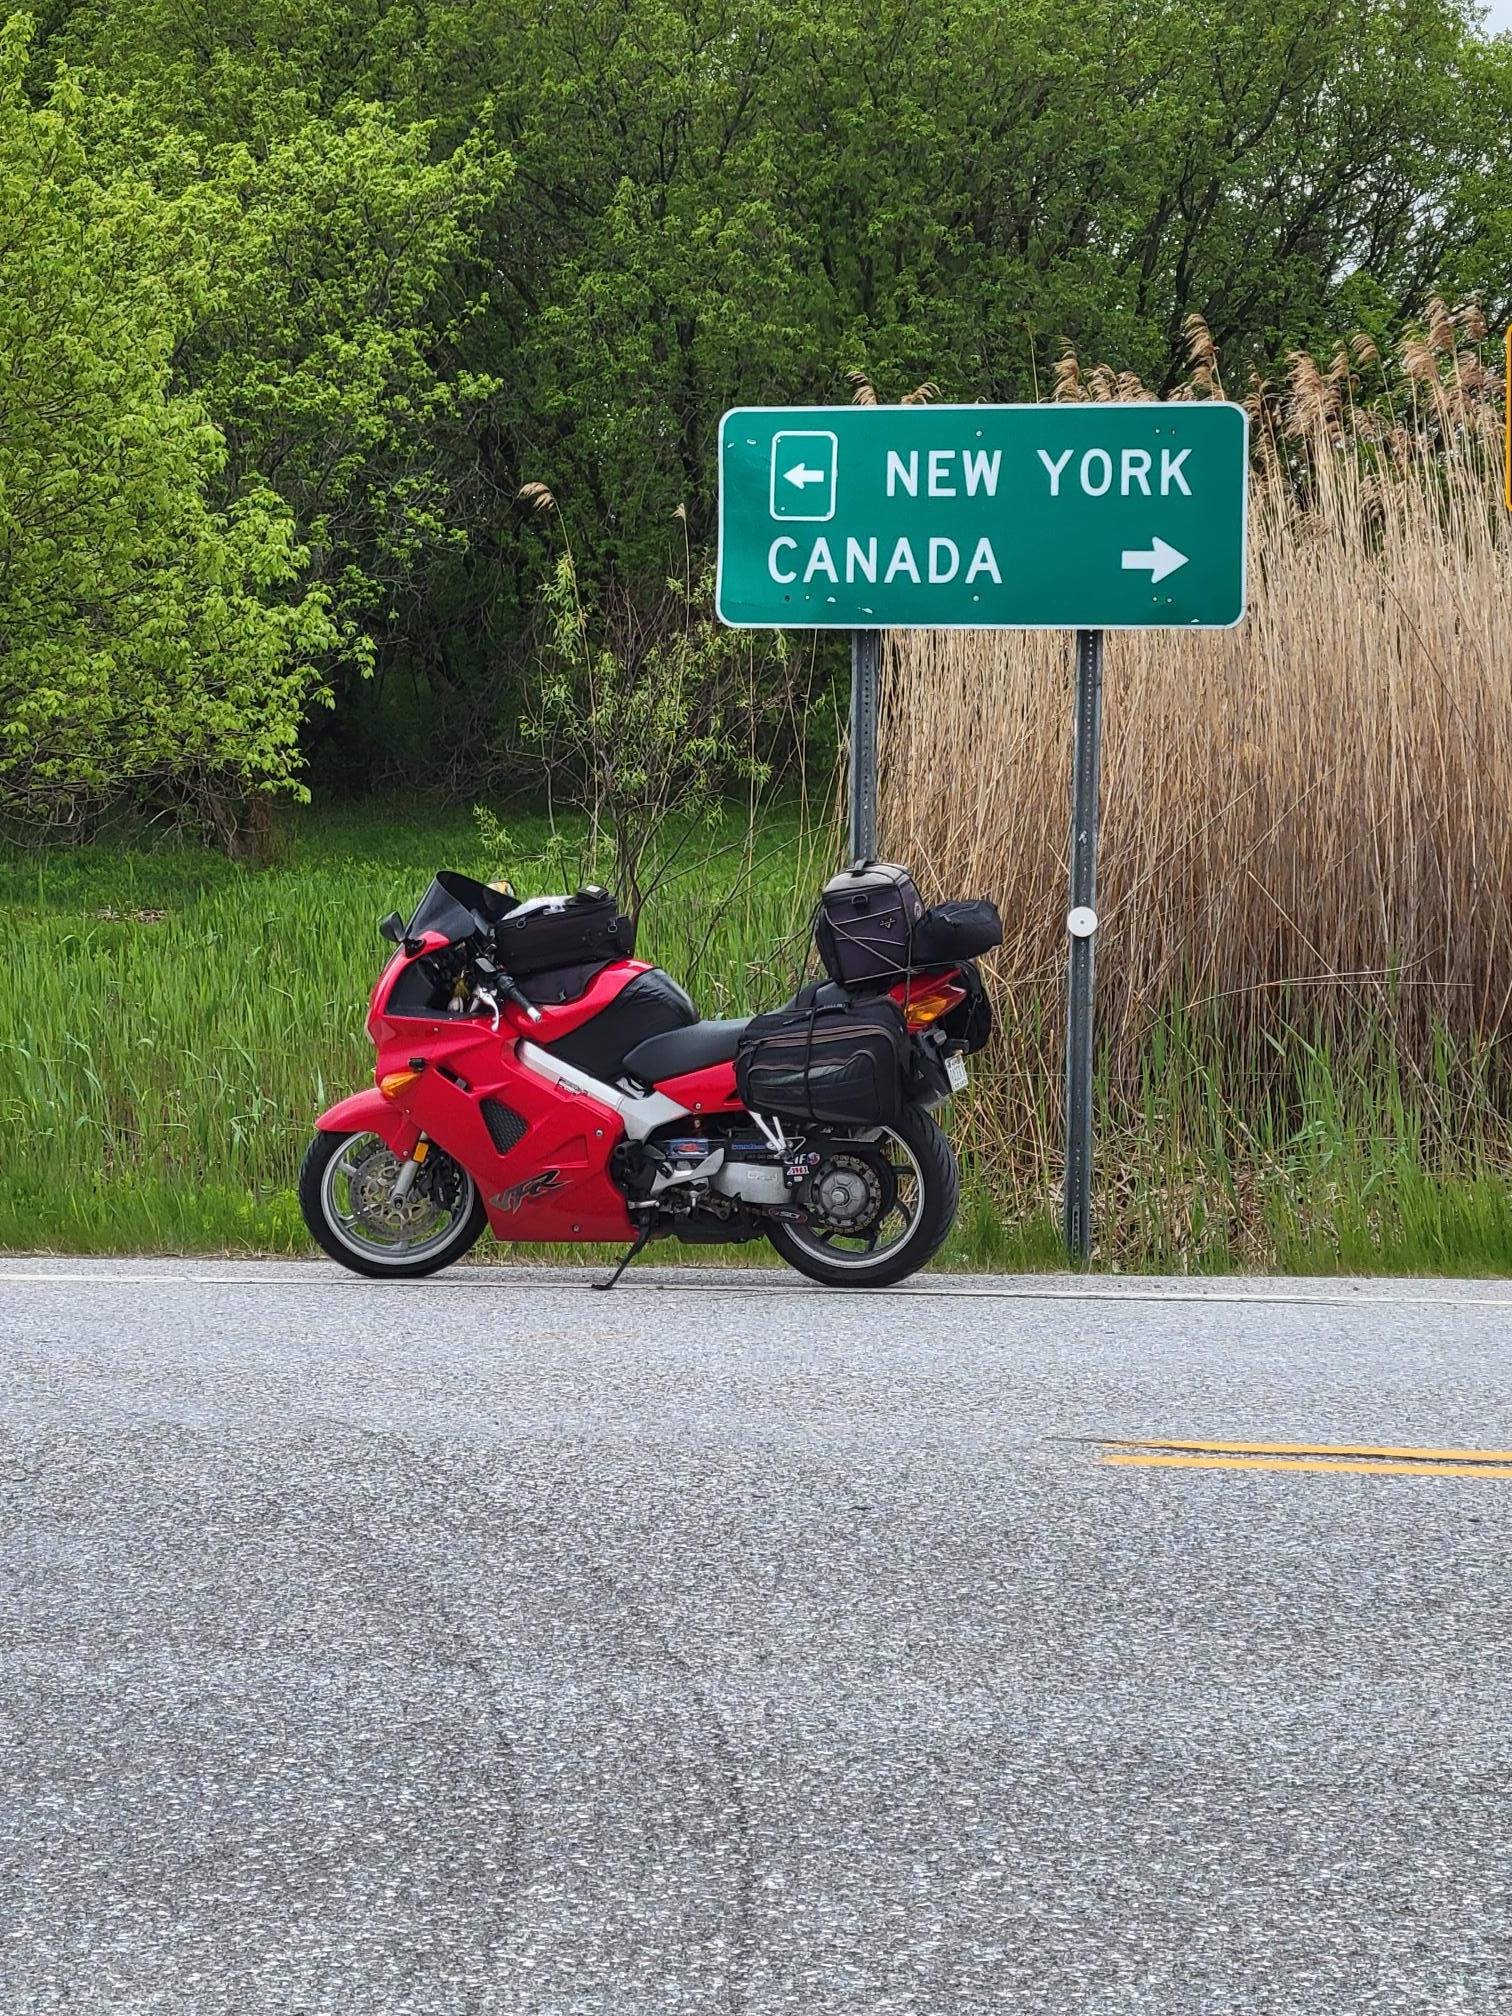
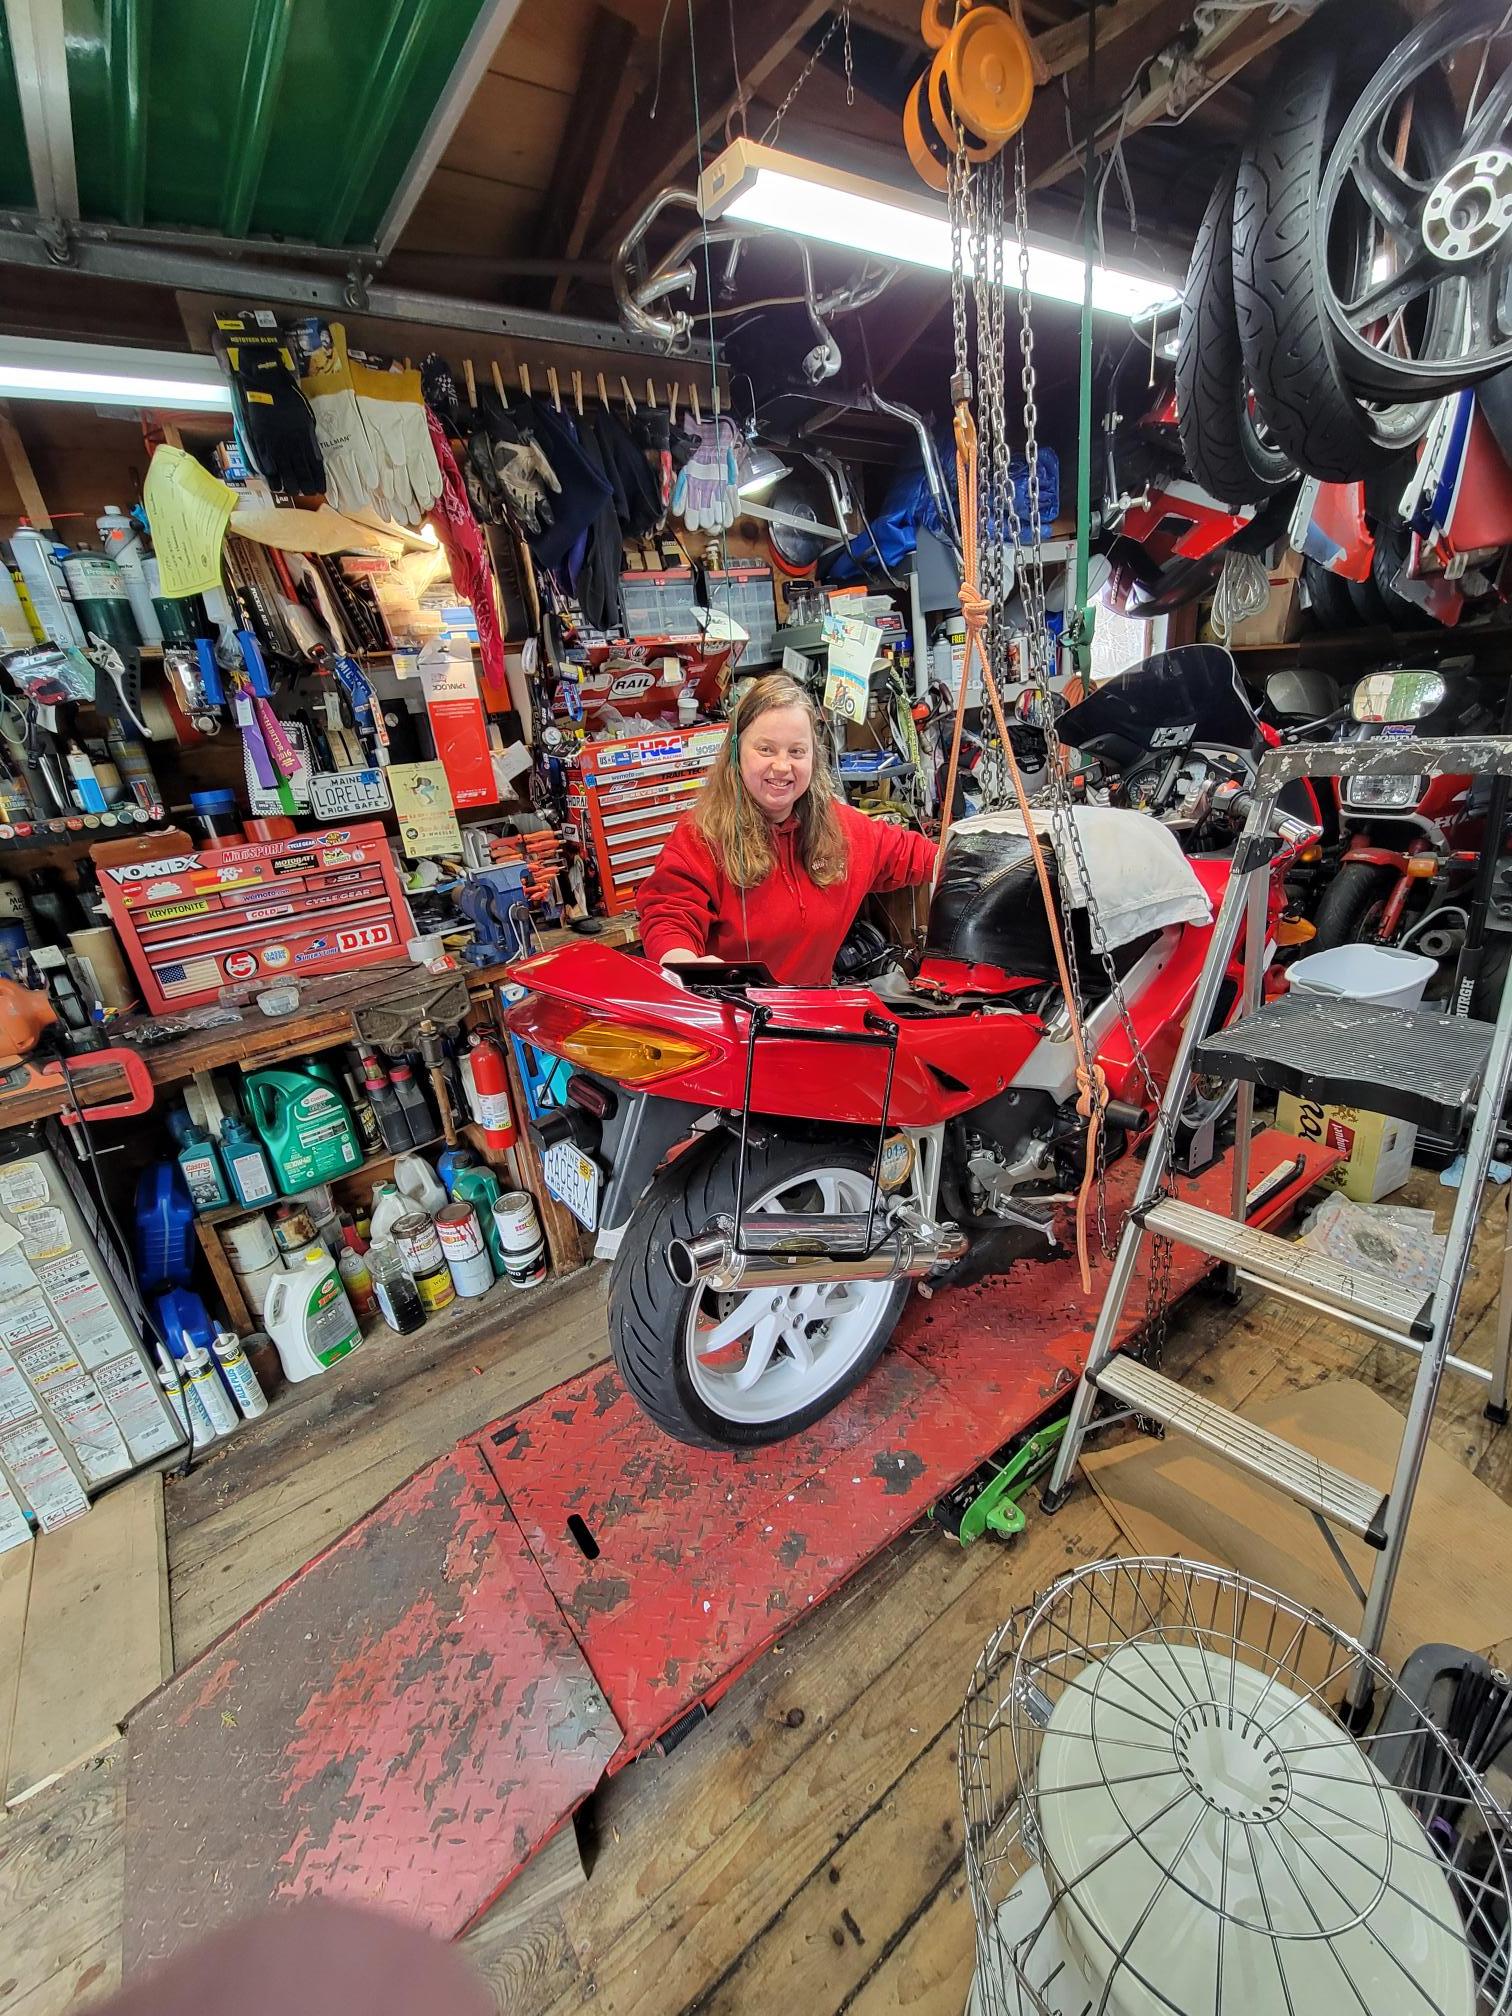
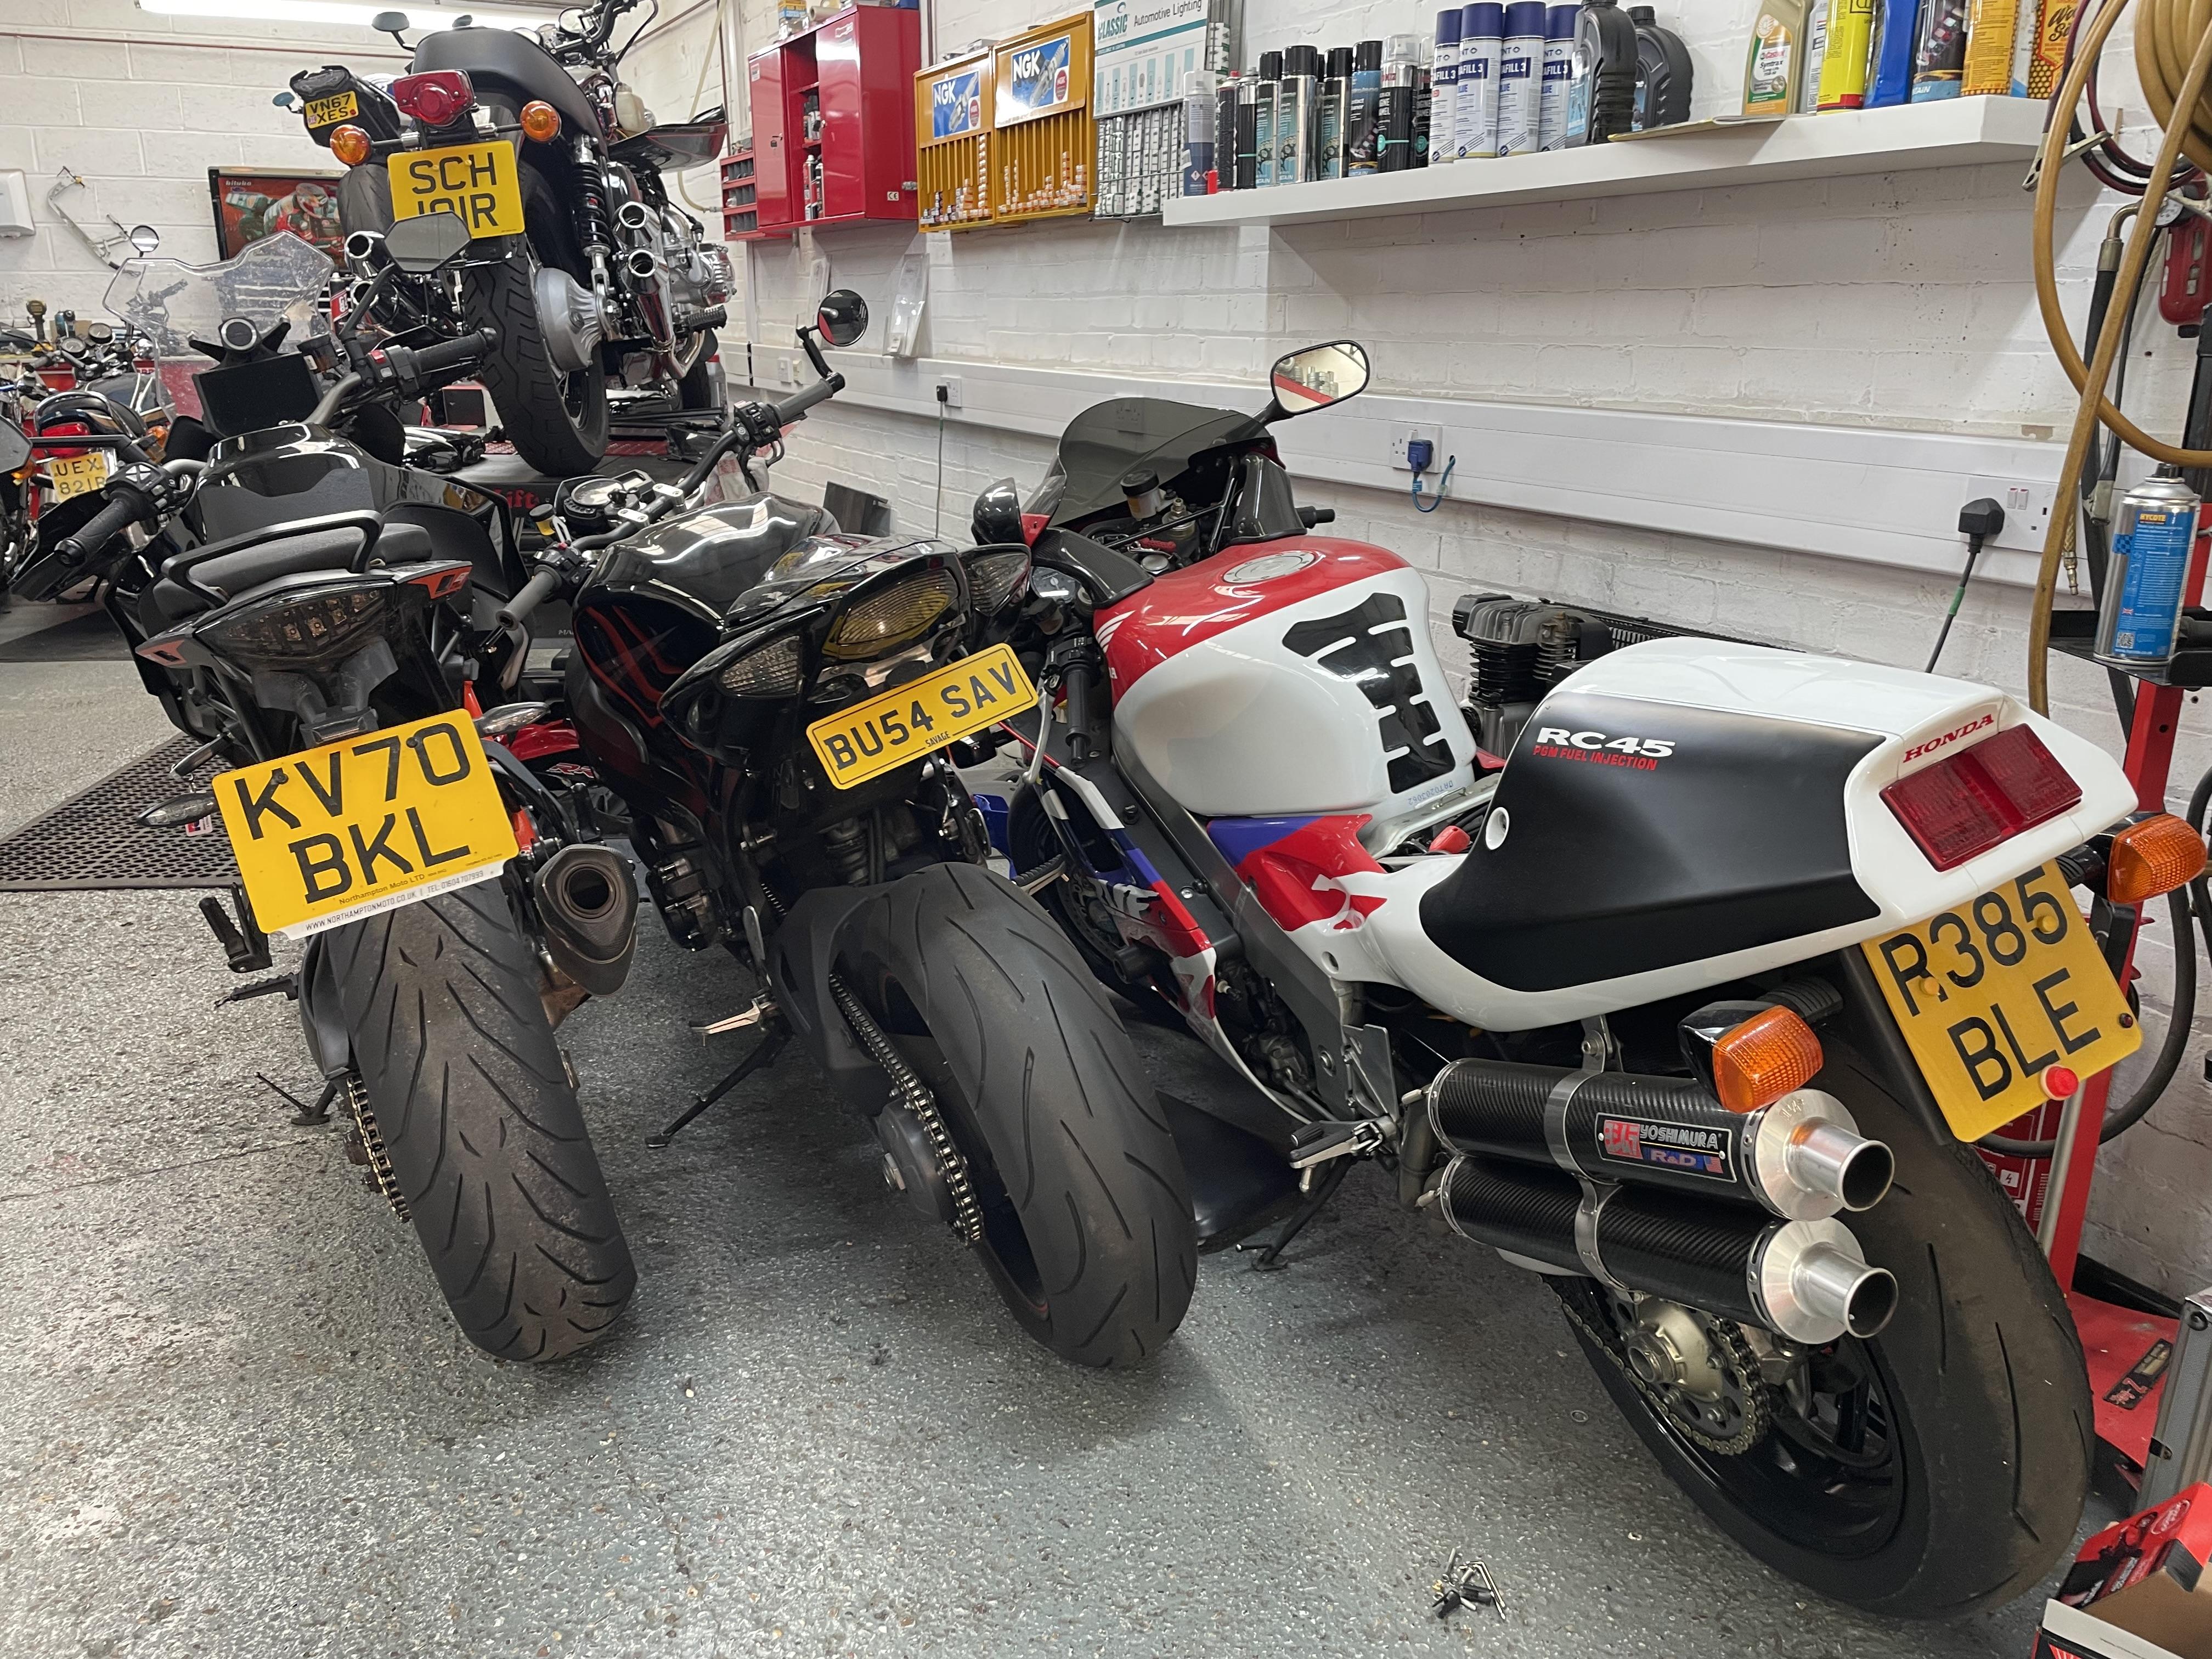
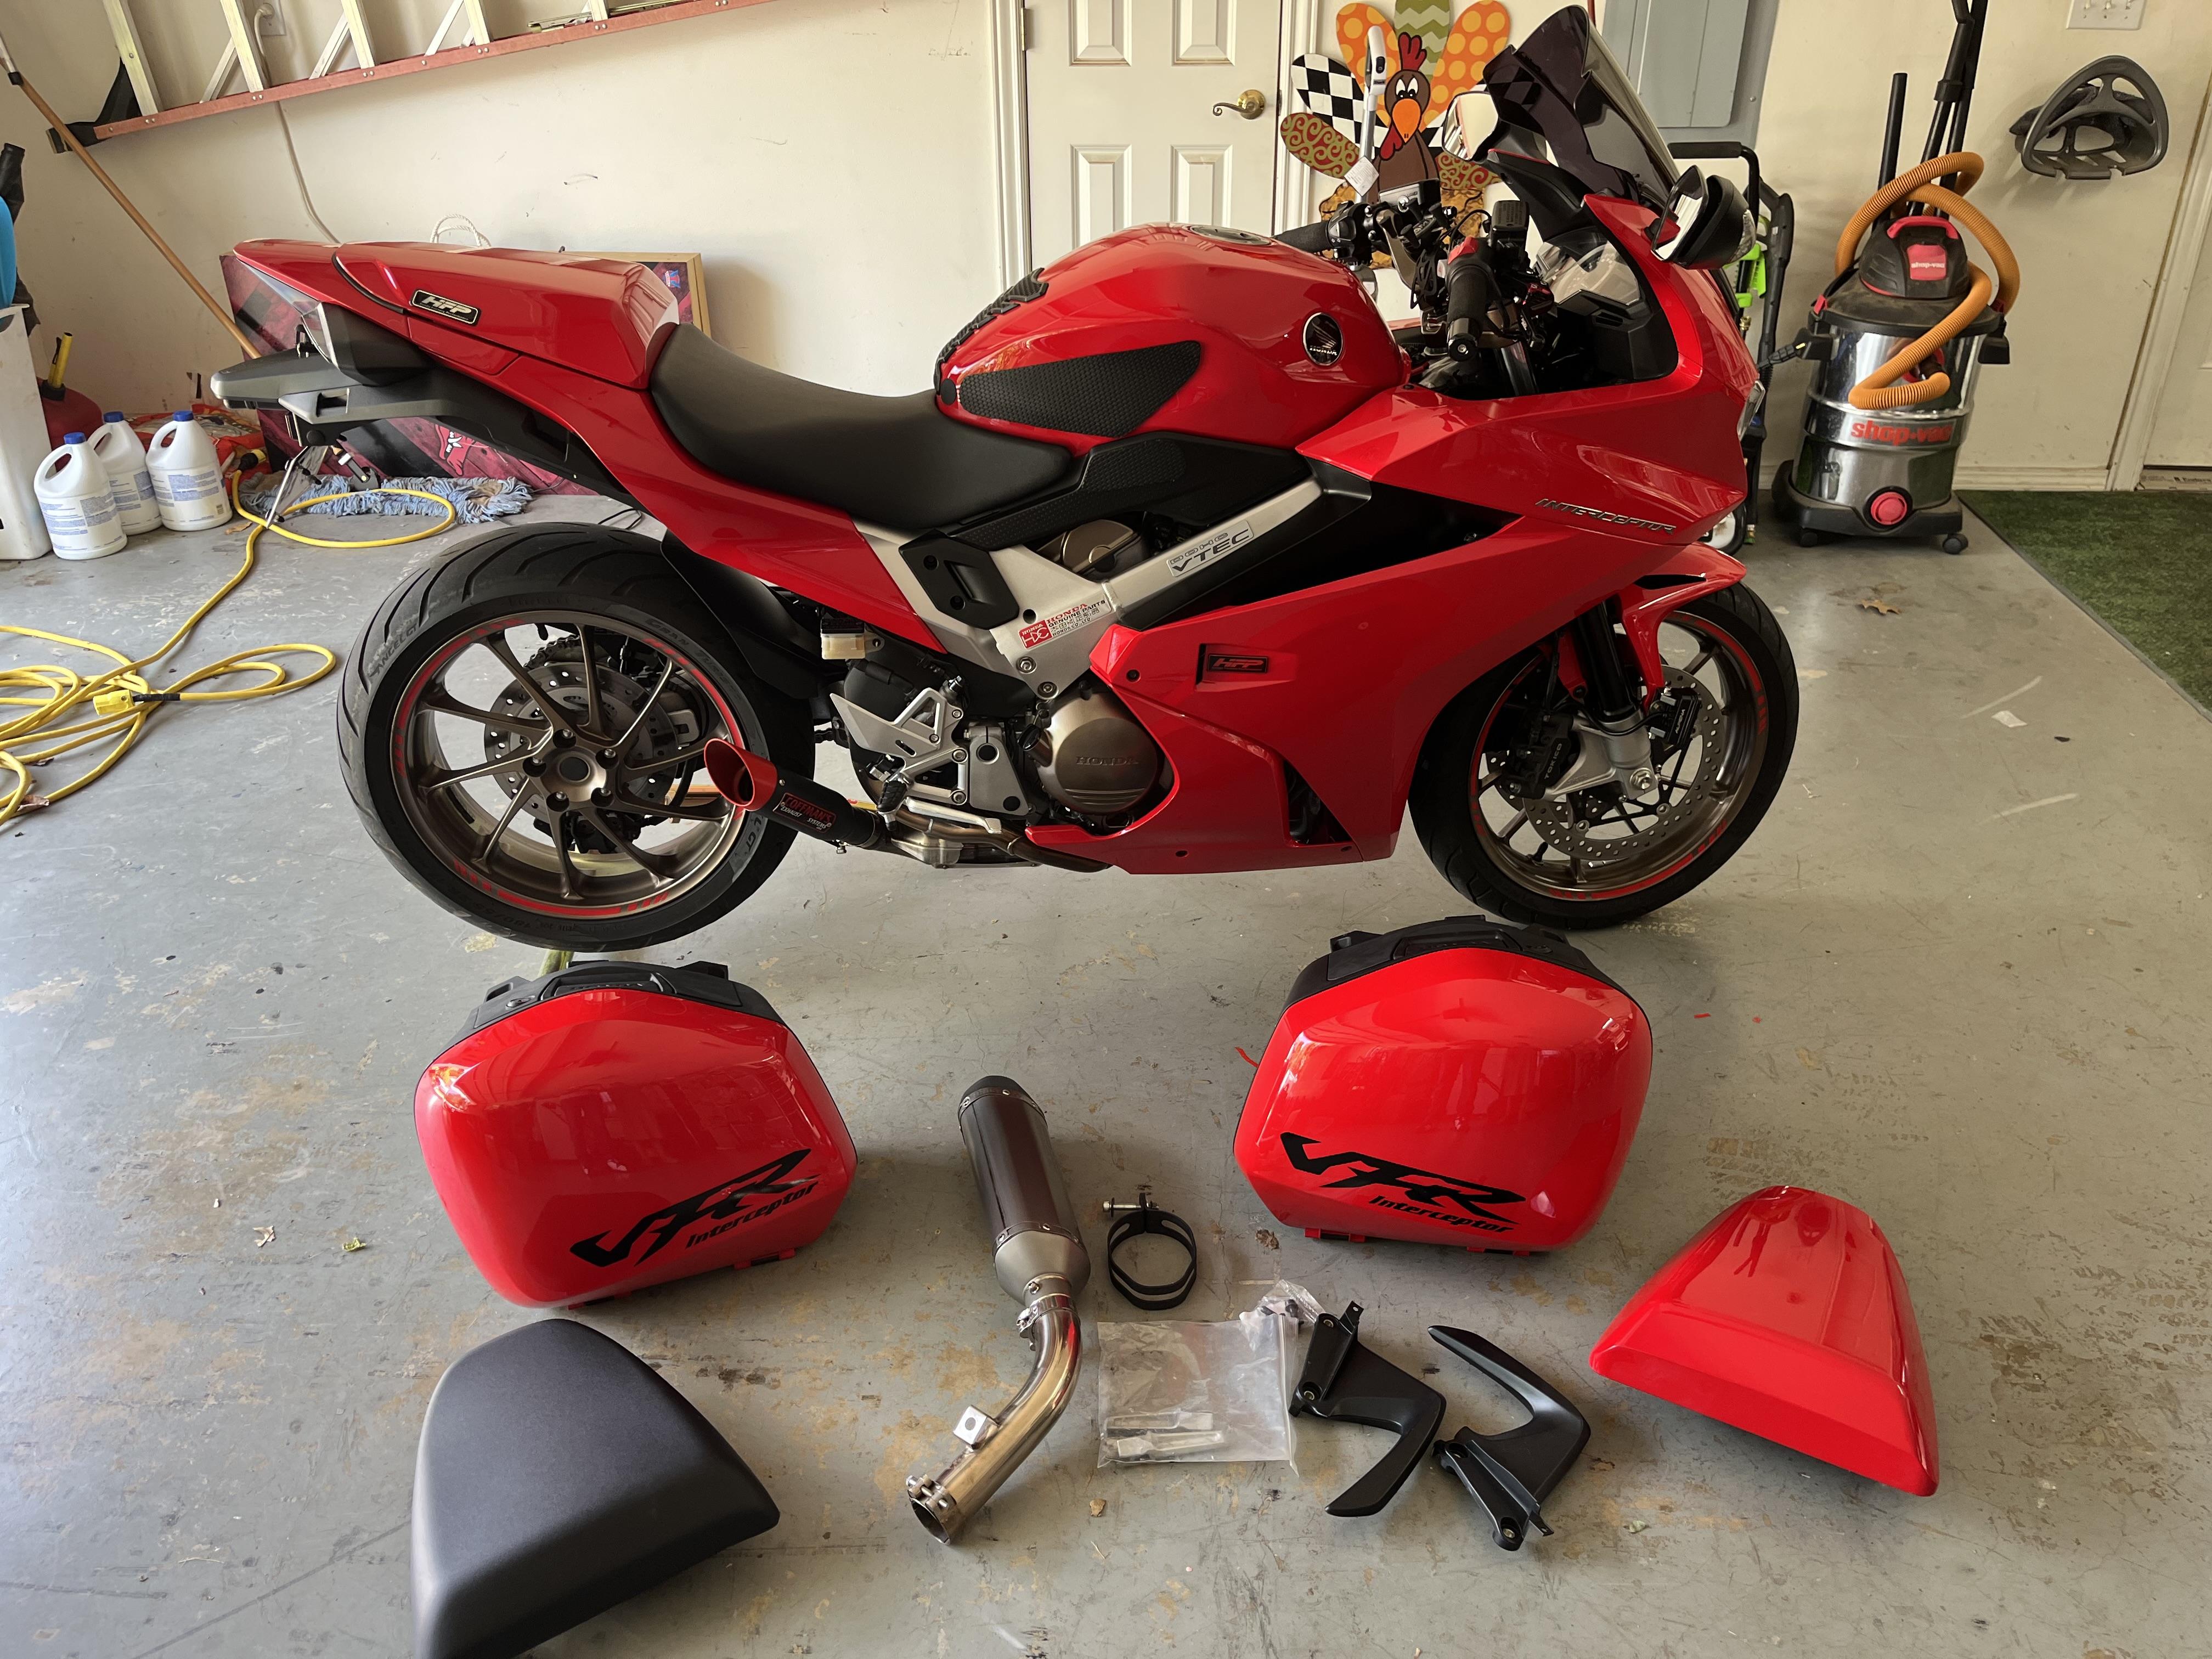
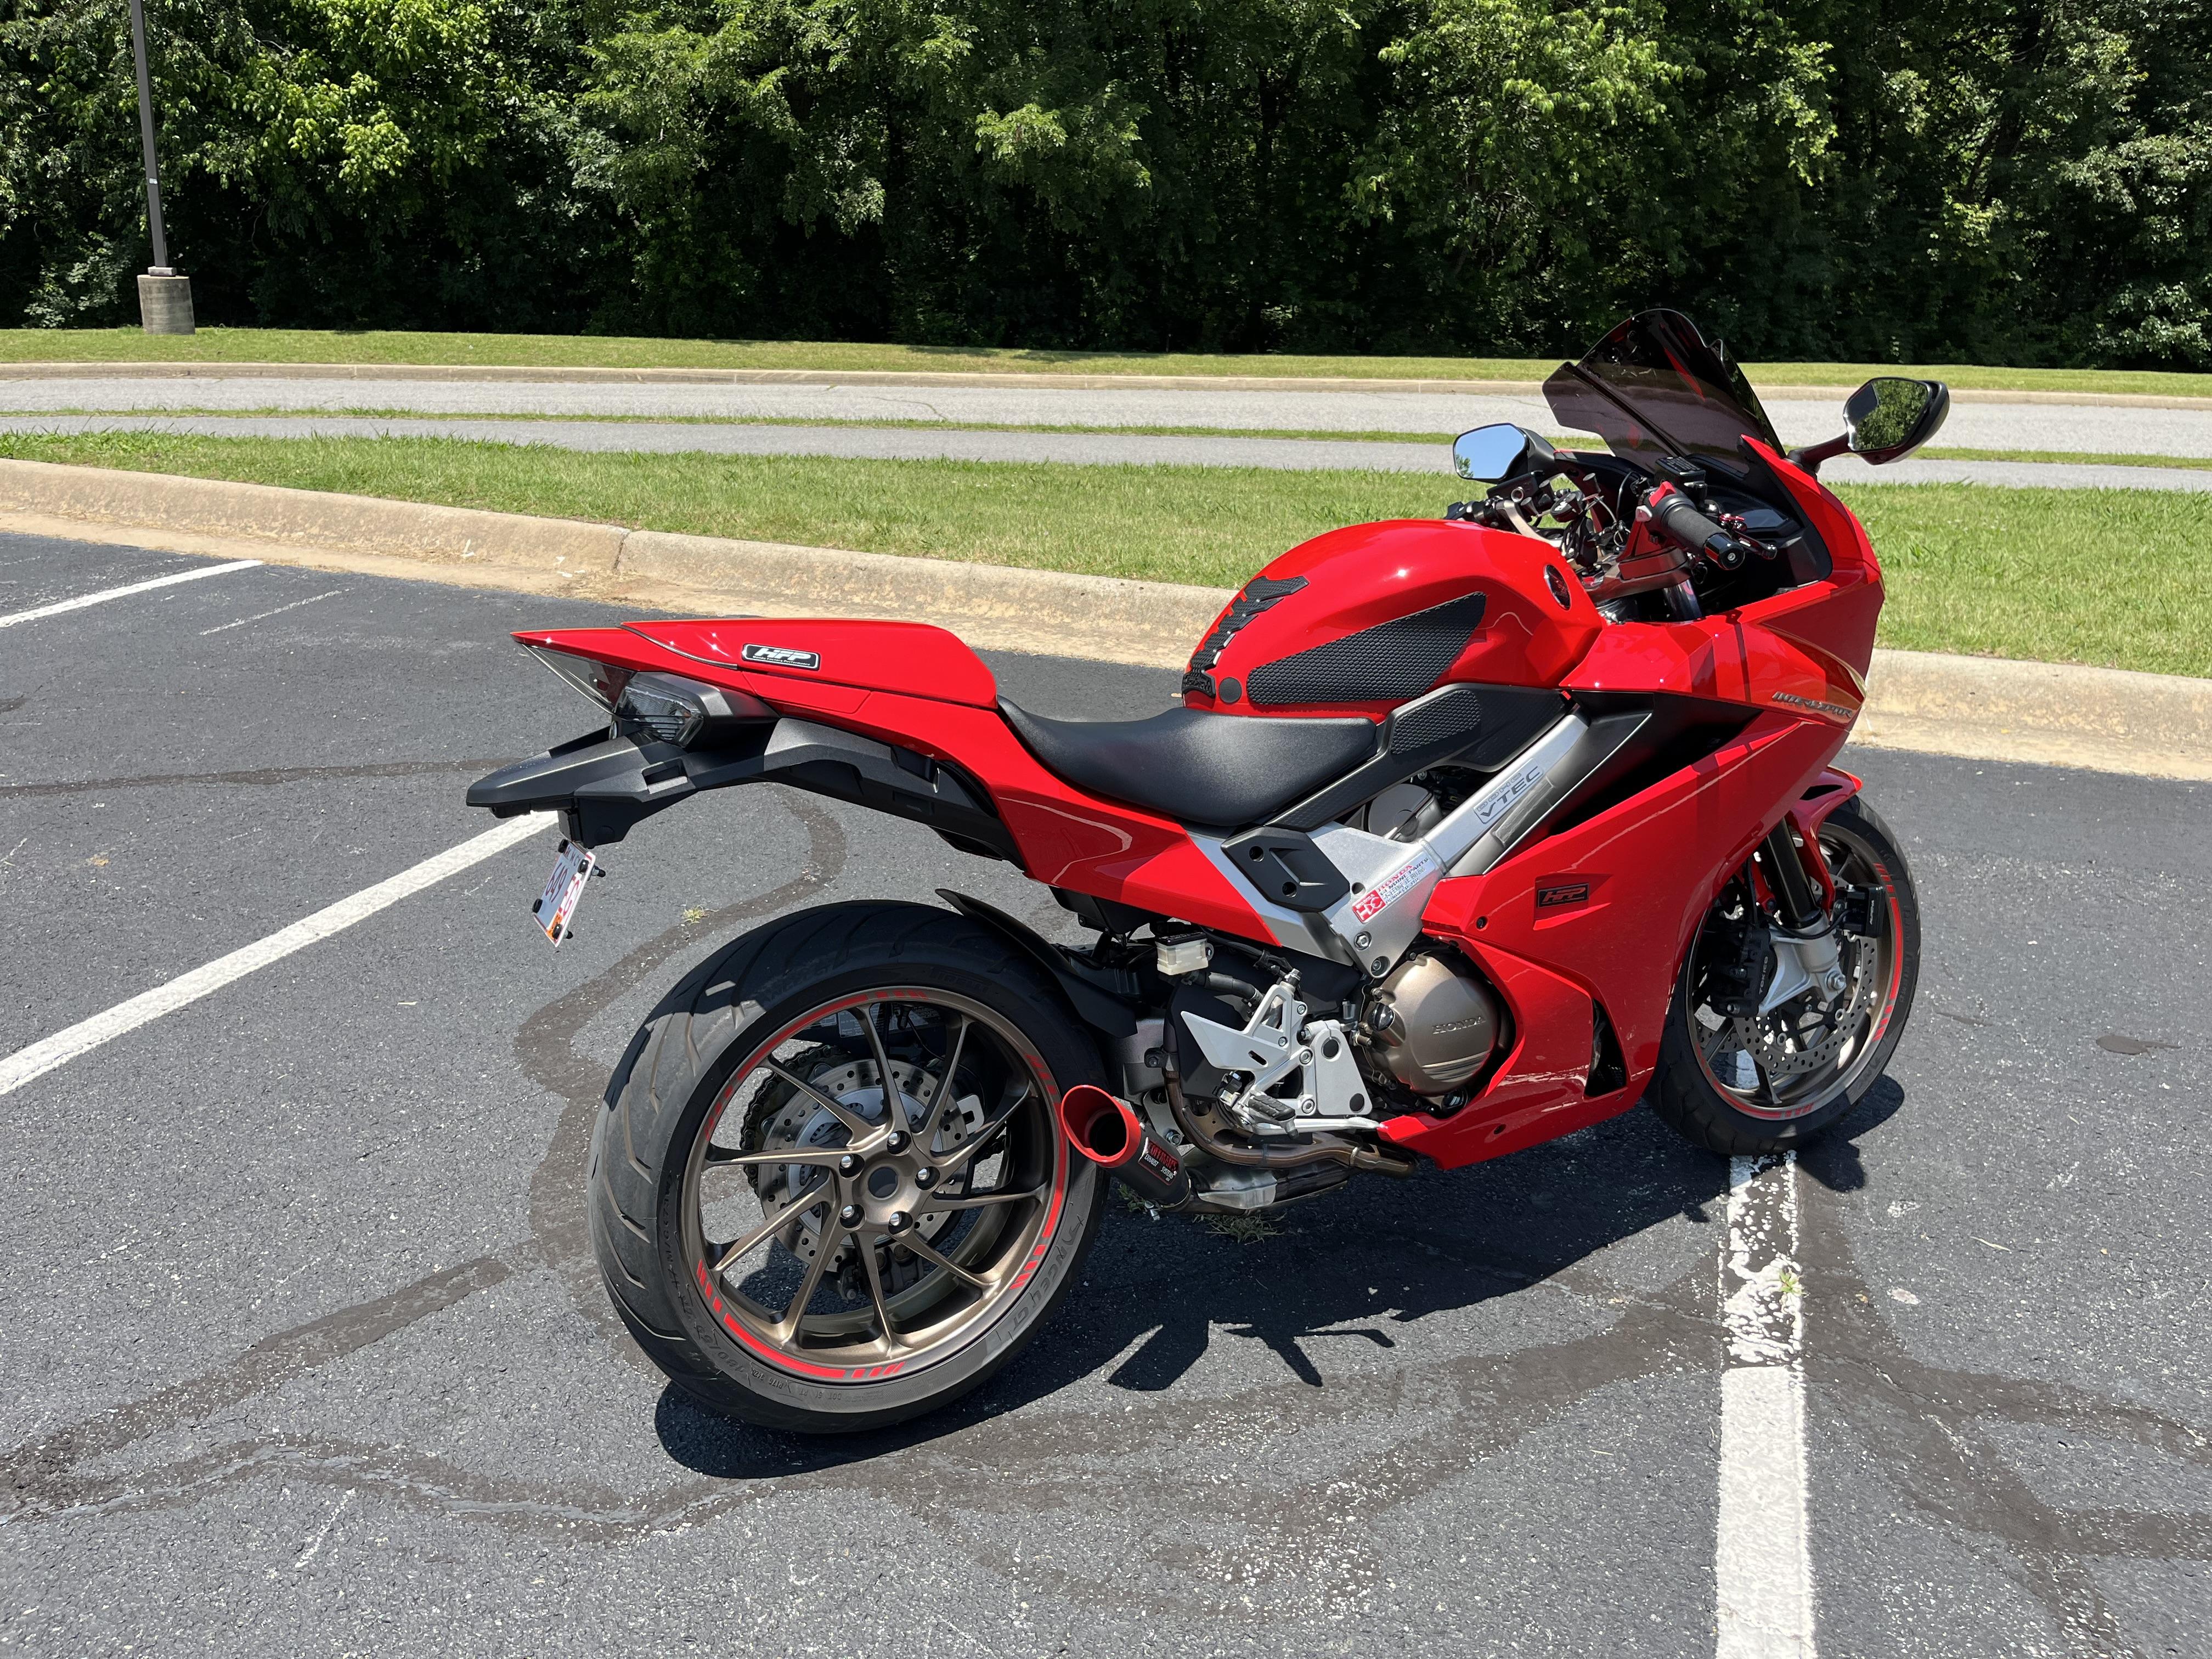
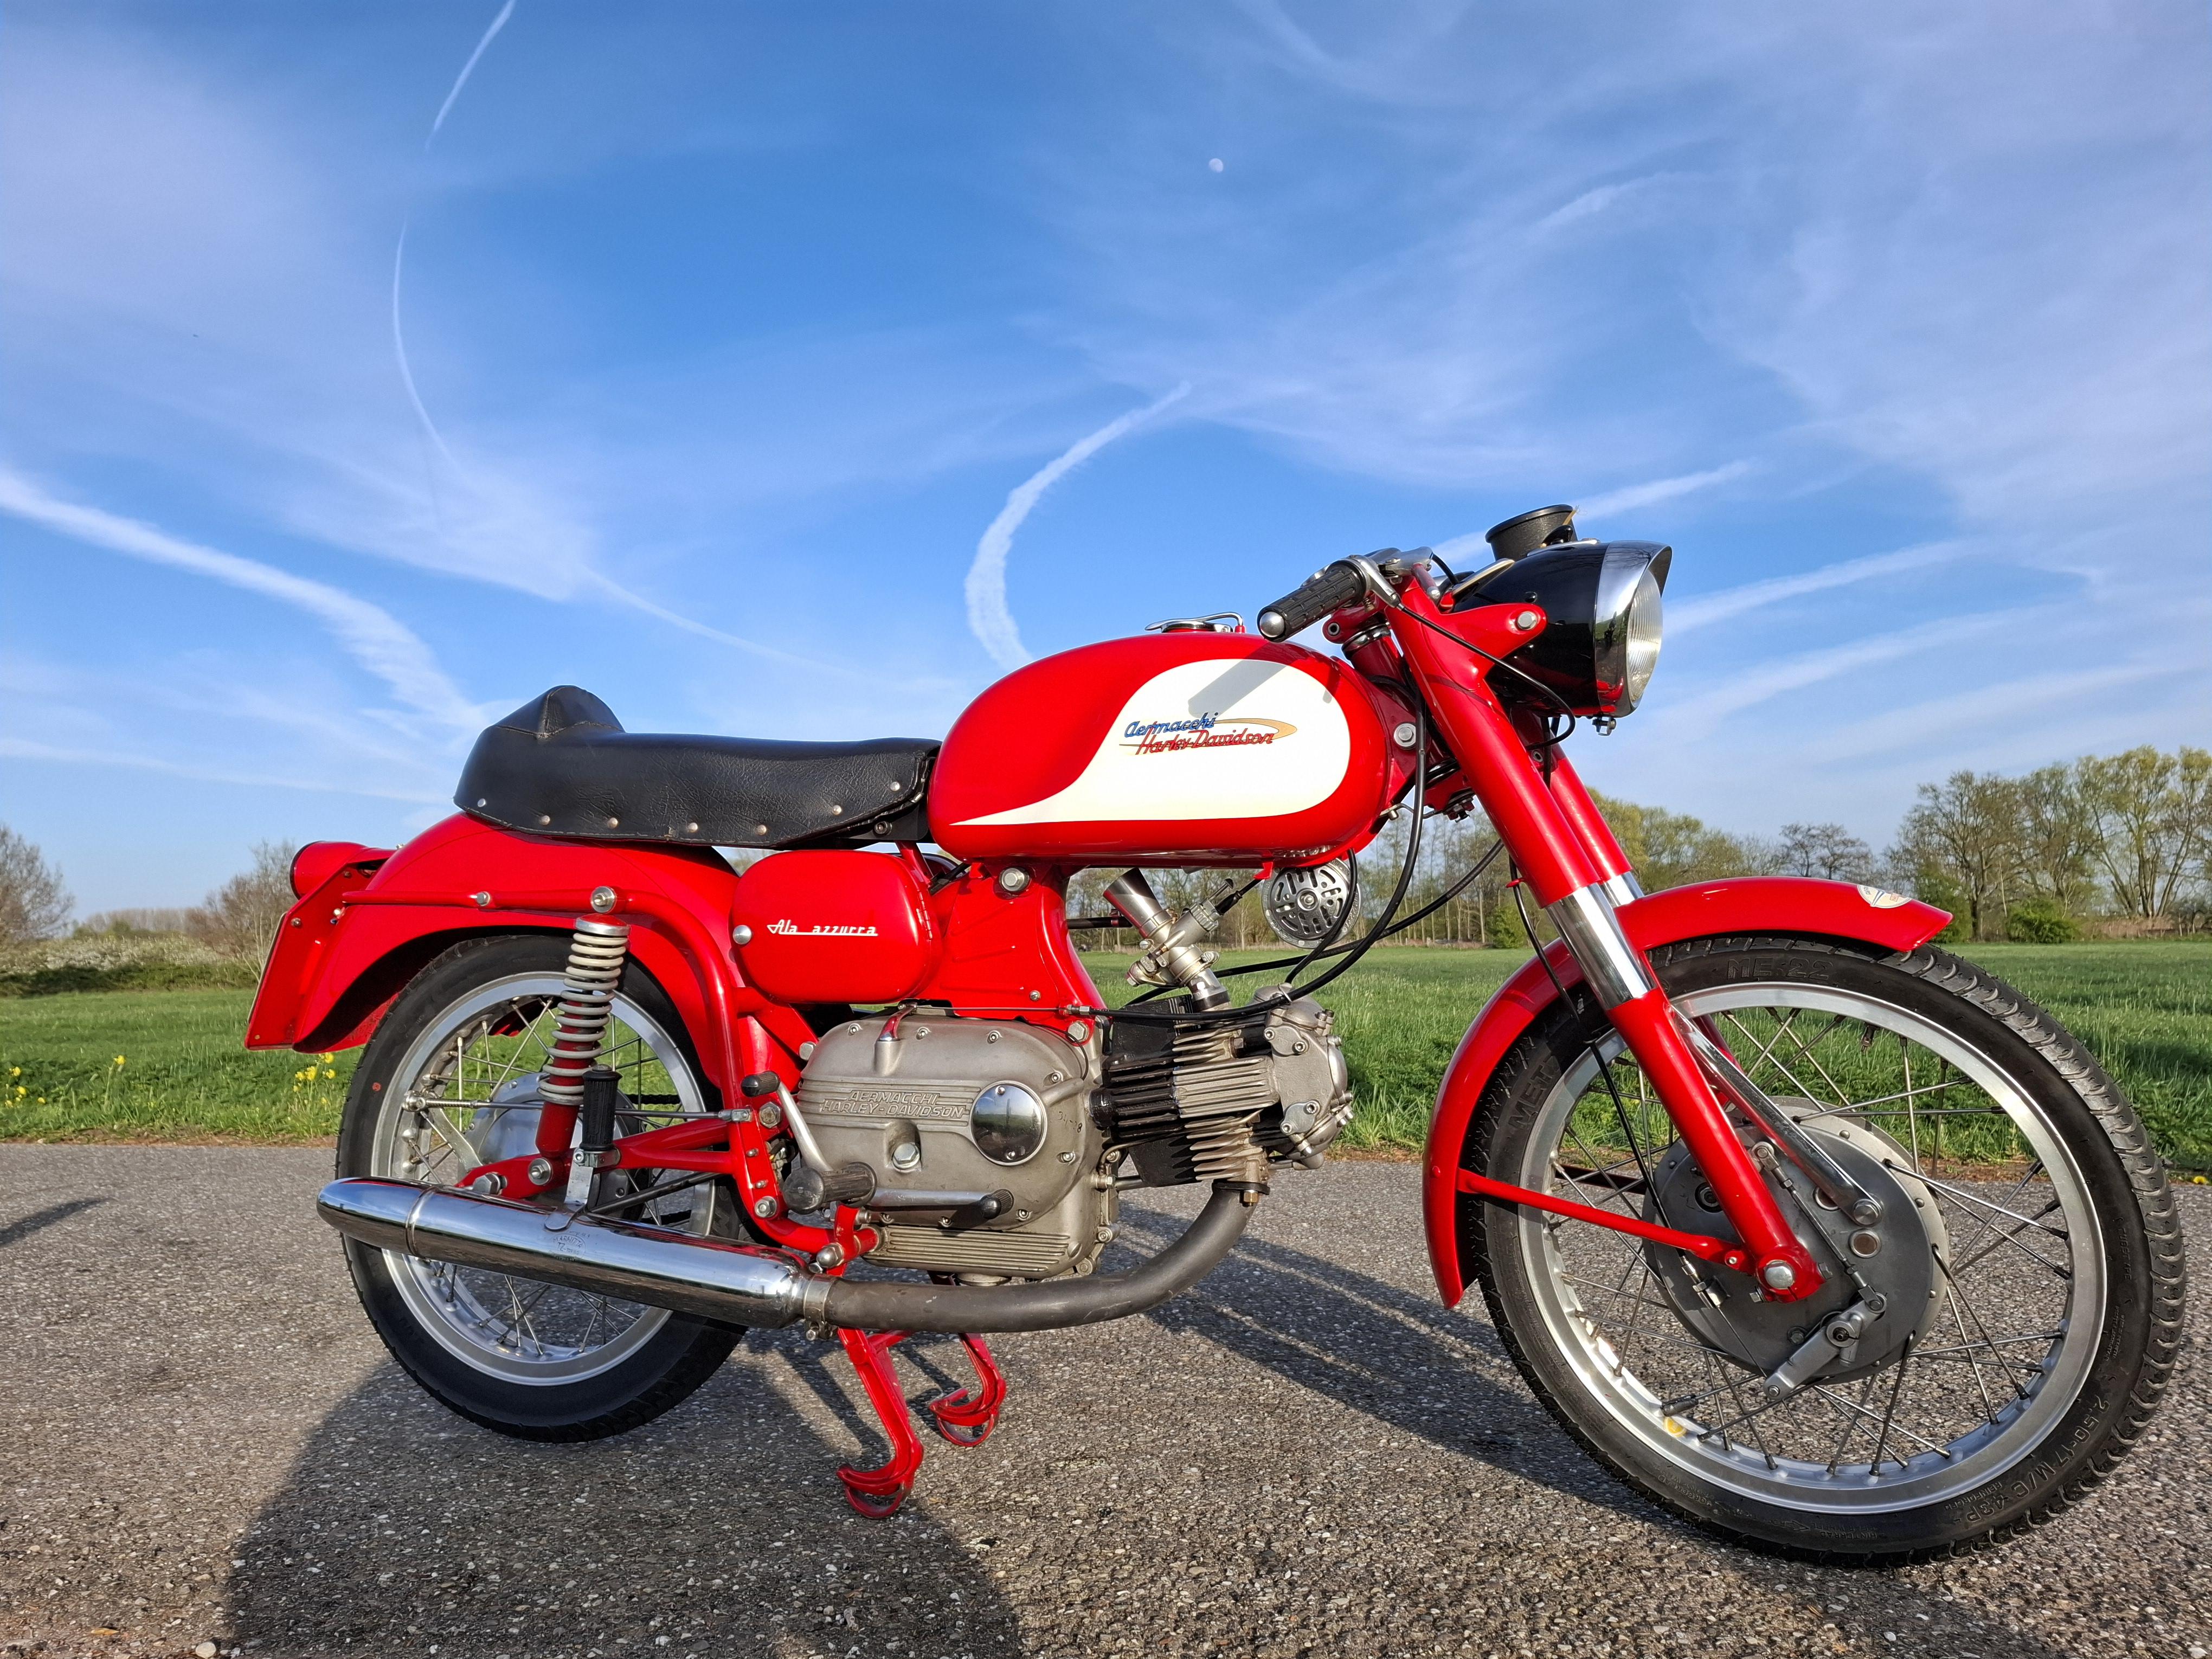
Last Sept. I finally got my new to me 5th Gen in running order. Unable to find any hard bags for it I ended up building a pair if saddle bag supports for my soft bags. I used 5/16" - 8mm weldable rod for most of it, with some 1/4" - 6mm for the forward stays. Everything was cold bent on my 6" vise with a 3lb ball peen, then welded. They are easily removable with 4 fastenings per side. I used them on a 3,000 mile trip that Fall and worked well. I did think though that a six pack rack would be helpful. Not finding anything available for the 5th Gen, and having trips to VA, TN, NC, then 4 days after that up to New Brunswick and the Cabot Trail in Nova Scotia in May, I figured I'd have a go at making a serviceable six pack rack a shot. Again I used 5/16" - 8mm rod for the frame and some 5/8' - 16mm X 1mm flat for the slats. I piggybacked off the Saddlebag supports to make it easier to mount, and threaded the rod at the forward end to adjust the rack, but also make it removable. The cable clamps on the aft lower are for the same reason. I can remove the rack in less than 2 minutes, but it is strong enough that a buddy and I lifted the back of the bike off the ground with it. 2 trips and just under 5,000 miles this May, and it has indeed proved useful. I'm a form follows function guy, so I'm not bothered if its less than elegant. Besides, there's so little in the way of luggage options for the 5th Gen that I had to figure out something if I wanted to go touring The last pic was taken around the 20th of May at Rouses Point NY as I was returning from NC etc. I generally will go up to the Quebec Border and turn right to get back home. This eliminates going through CT and MA, a far more relaxing way to enter Maine.
 7 points
 -
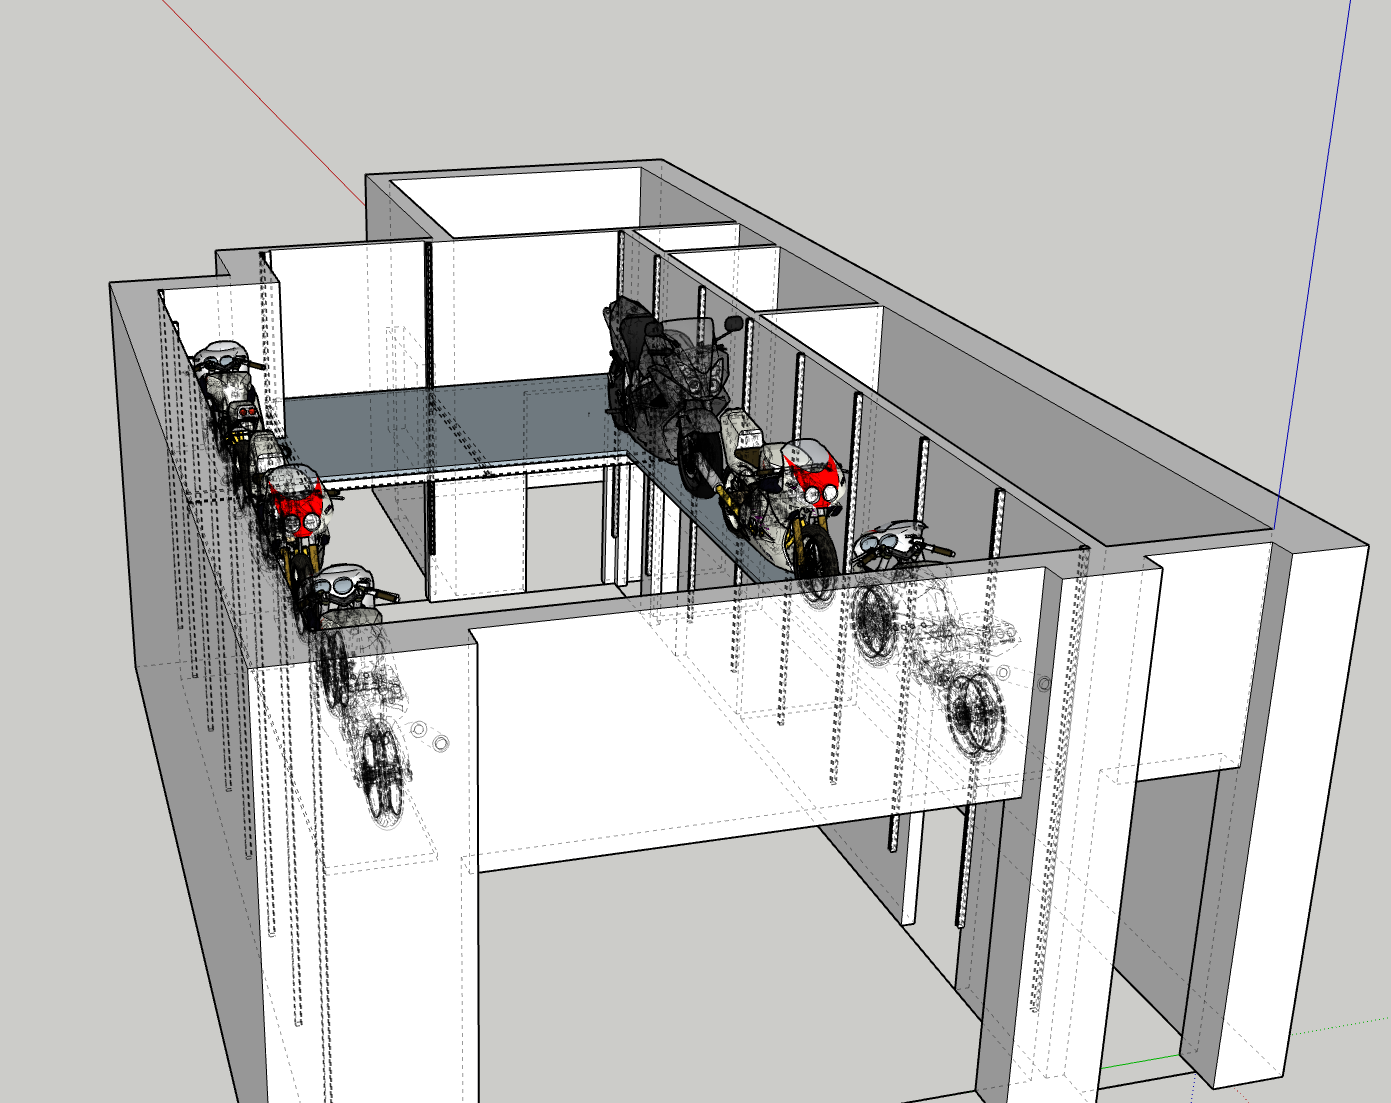
Coincidence, or what?!? So, I'm buying a ~275 year-old, three-story "canal house" in the Netherlands with a ground floor which is destined to be my new garage. Not an American-sized garage by any stretch of the imagination, but if I can manage the space well it should be big enough to meet my current needs. The total garage area is about 40m2--with 3.5m ceilings. The challenge is that if I want to be able to use the space as a workshop (and I do), I've got to find some place to store 9-10 motorcycles... (No, selling them is not an option!) My tentative solution is to use the garage's height in a creative way, such that I will build a heavy duty shelf 2m off the ground on the three side walls and lift the bikes up and down using an electric "pallet stacker". The shelves will be constructed from 41x41 Unistrut, with 1m-spaced verticals attaching at the floor and the ceiling (as well as to the walls). I'll use a 45-degree shelf support bracket made of welded rectangular tube attached to the horizontal and vertical struts. The bikes will sit on metal "sleds" I will design and build, which may be based on the Baxley-type wheel chocks I have 6 of now, or maybe on an ABBA stand-type design. The stacker can lift 1000kg 3.5m (it was either that or install some sort of winch/gantry system to the ceiling--this is simpler!) I'm not a structural engineer, but I've read a bit about the Unistrut system, which is quite versatile and very strong. I won't need to weld anything to the Unistrut (which is good, because it is galvanized steel...), but I can build the 45-degree brackets and the "sleds" from mild steel tubing and plate. I should have enough room for six bikes, even if I only use the side walls. I can only ride one at a time, so as long as they are accessible (and the floor area remains free of obstruction), I should be able to retrieve them whenever I want to worn on them or ride them. It should look something like this: The front wall will have 4x folding doors with windows above, plus there are french doors at the back and a small office. I should get plenty of light. Thoughts...? (Especially re the crazy shelf idea!) Cheers, JZH
5 points
-
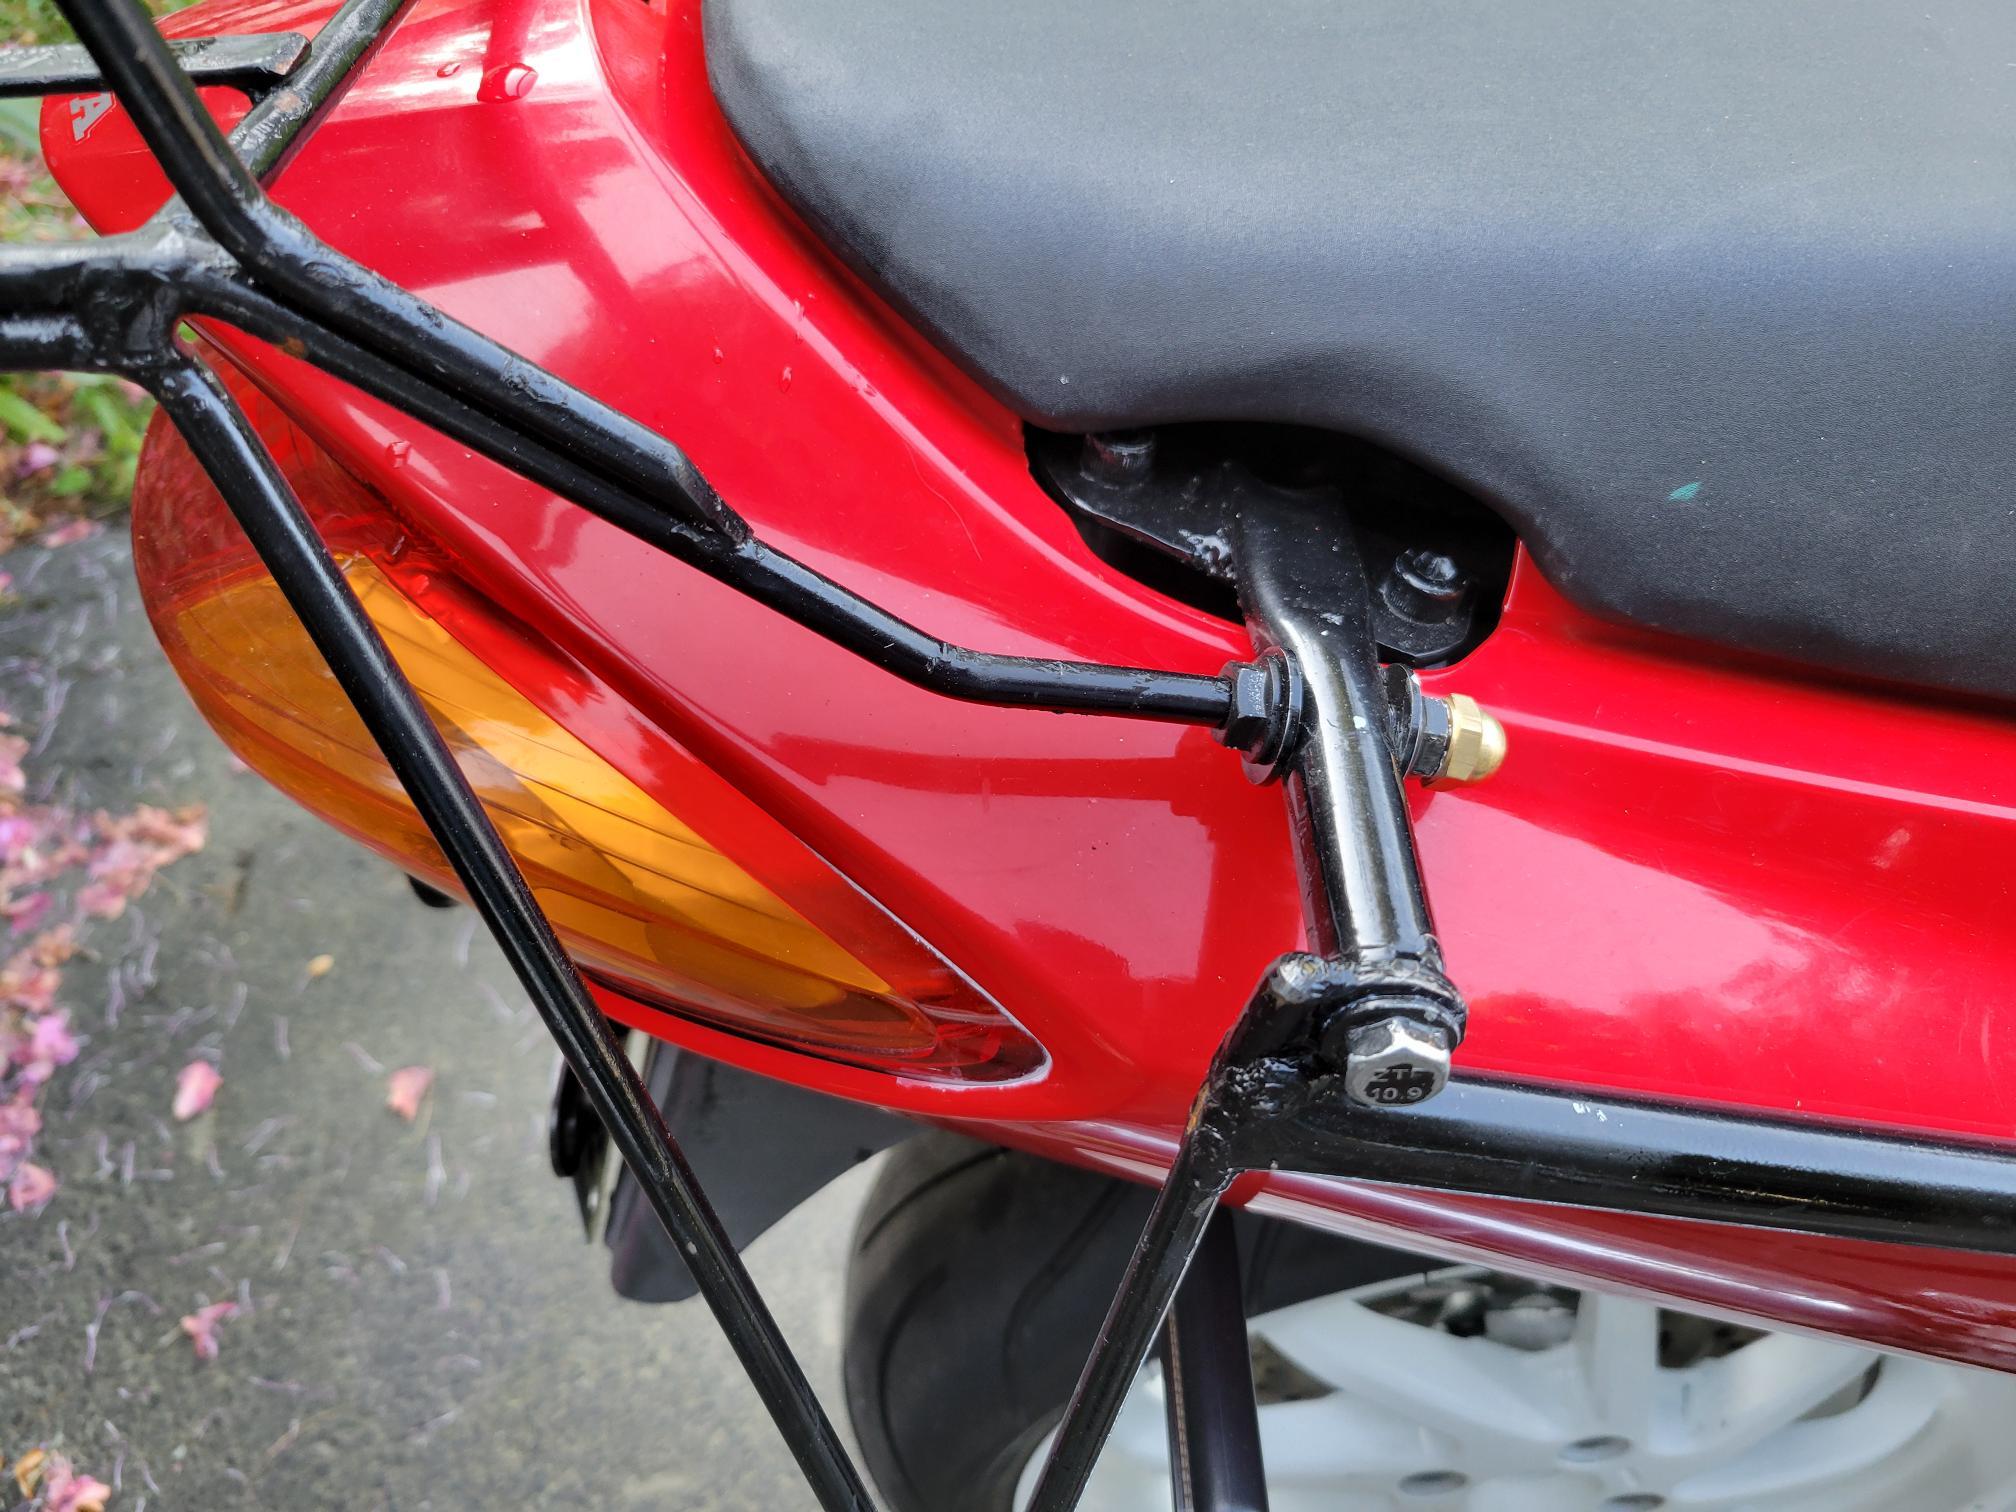
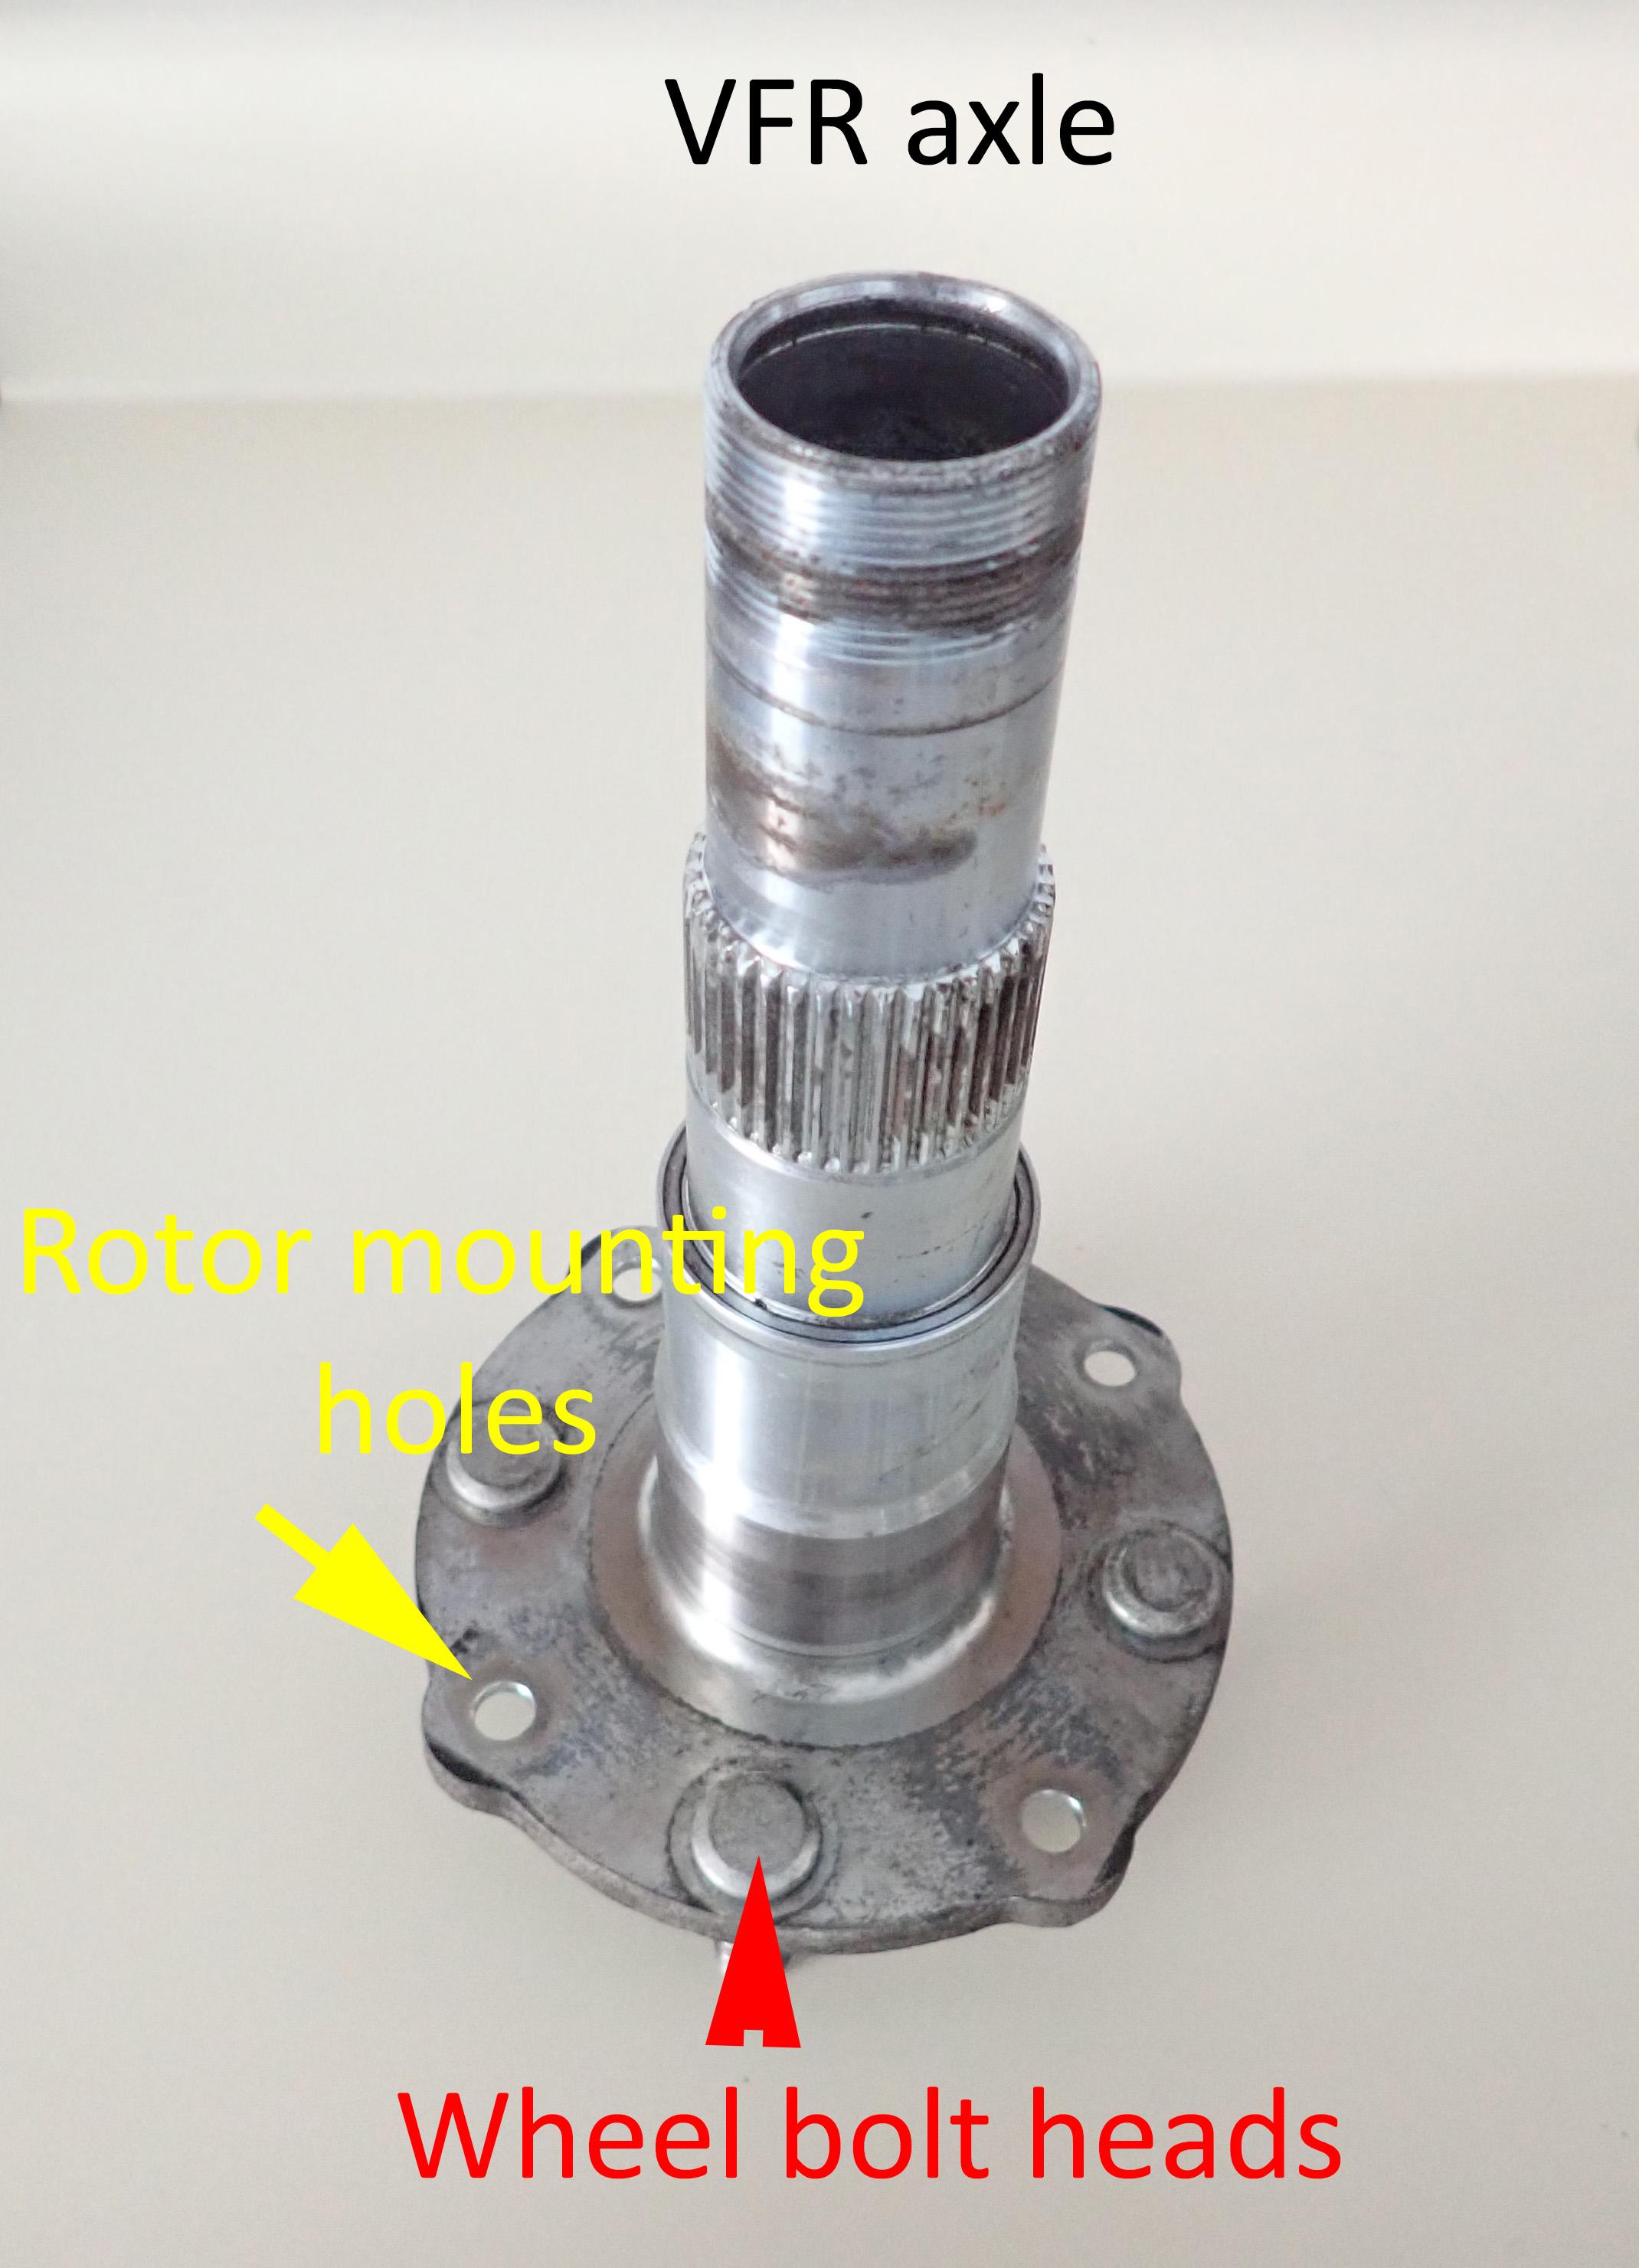
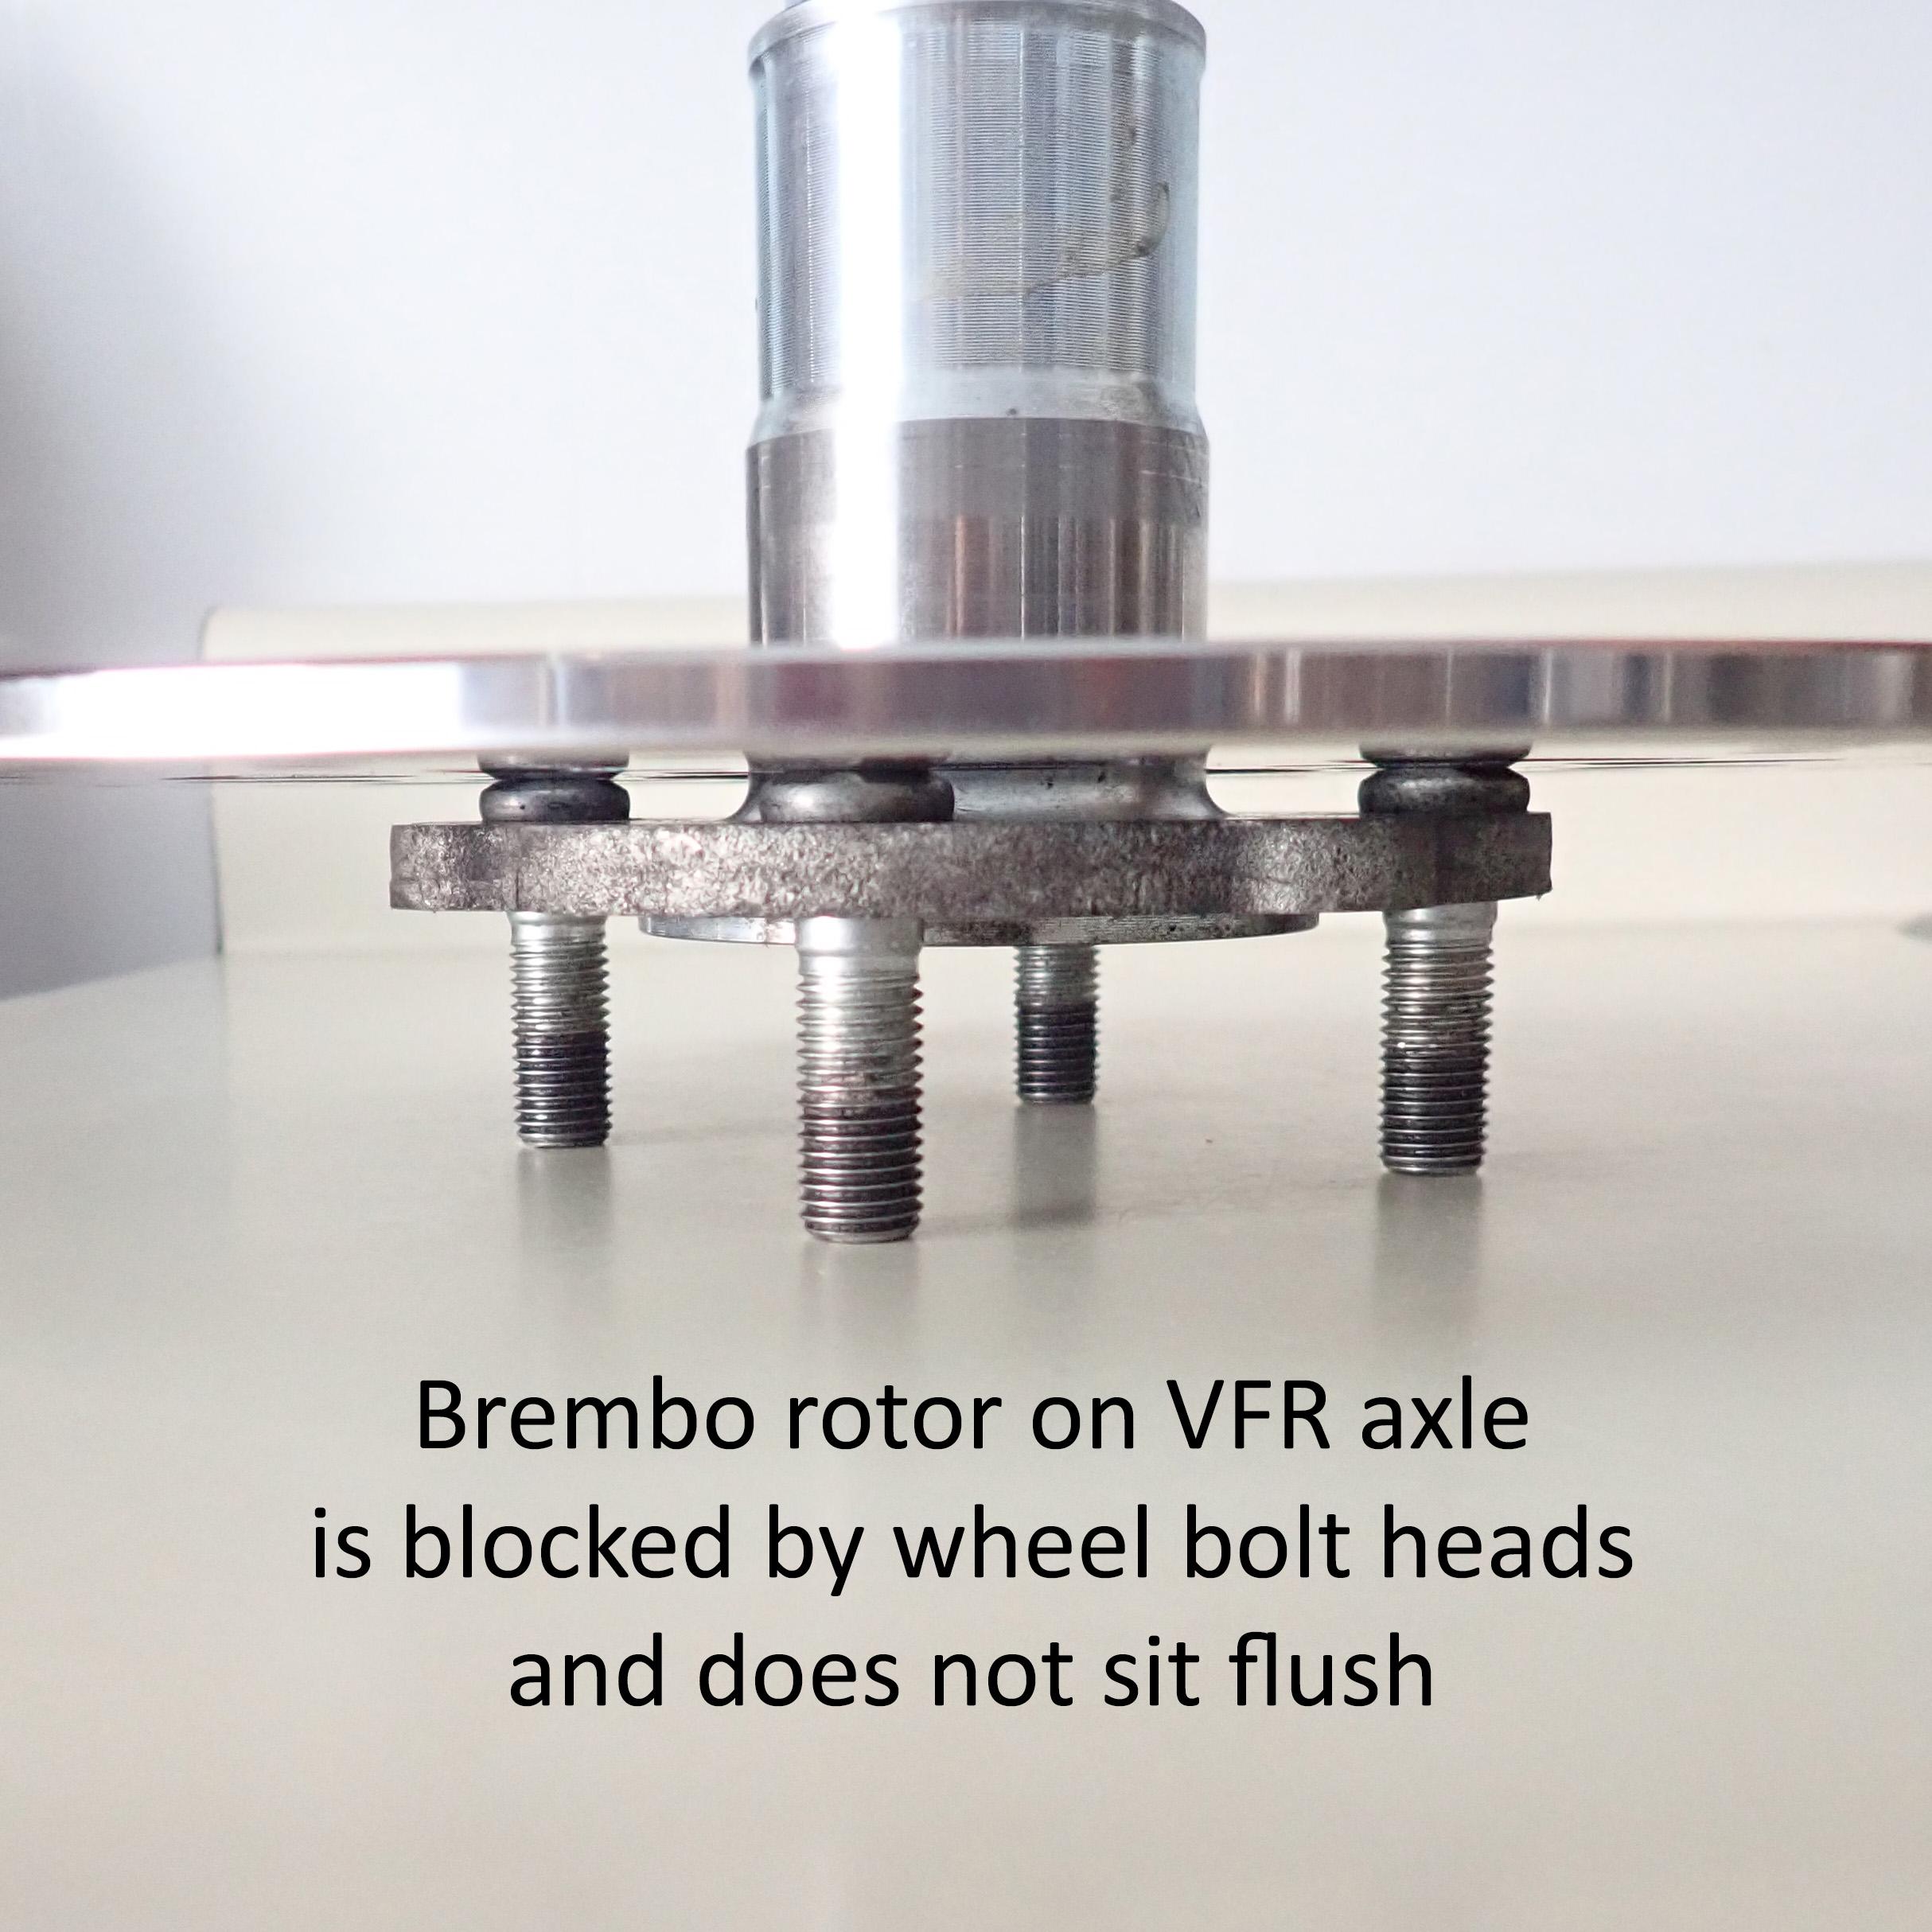
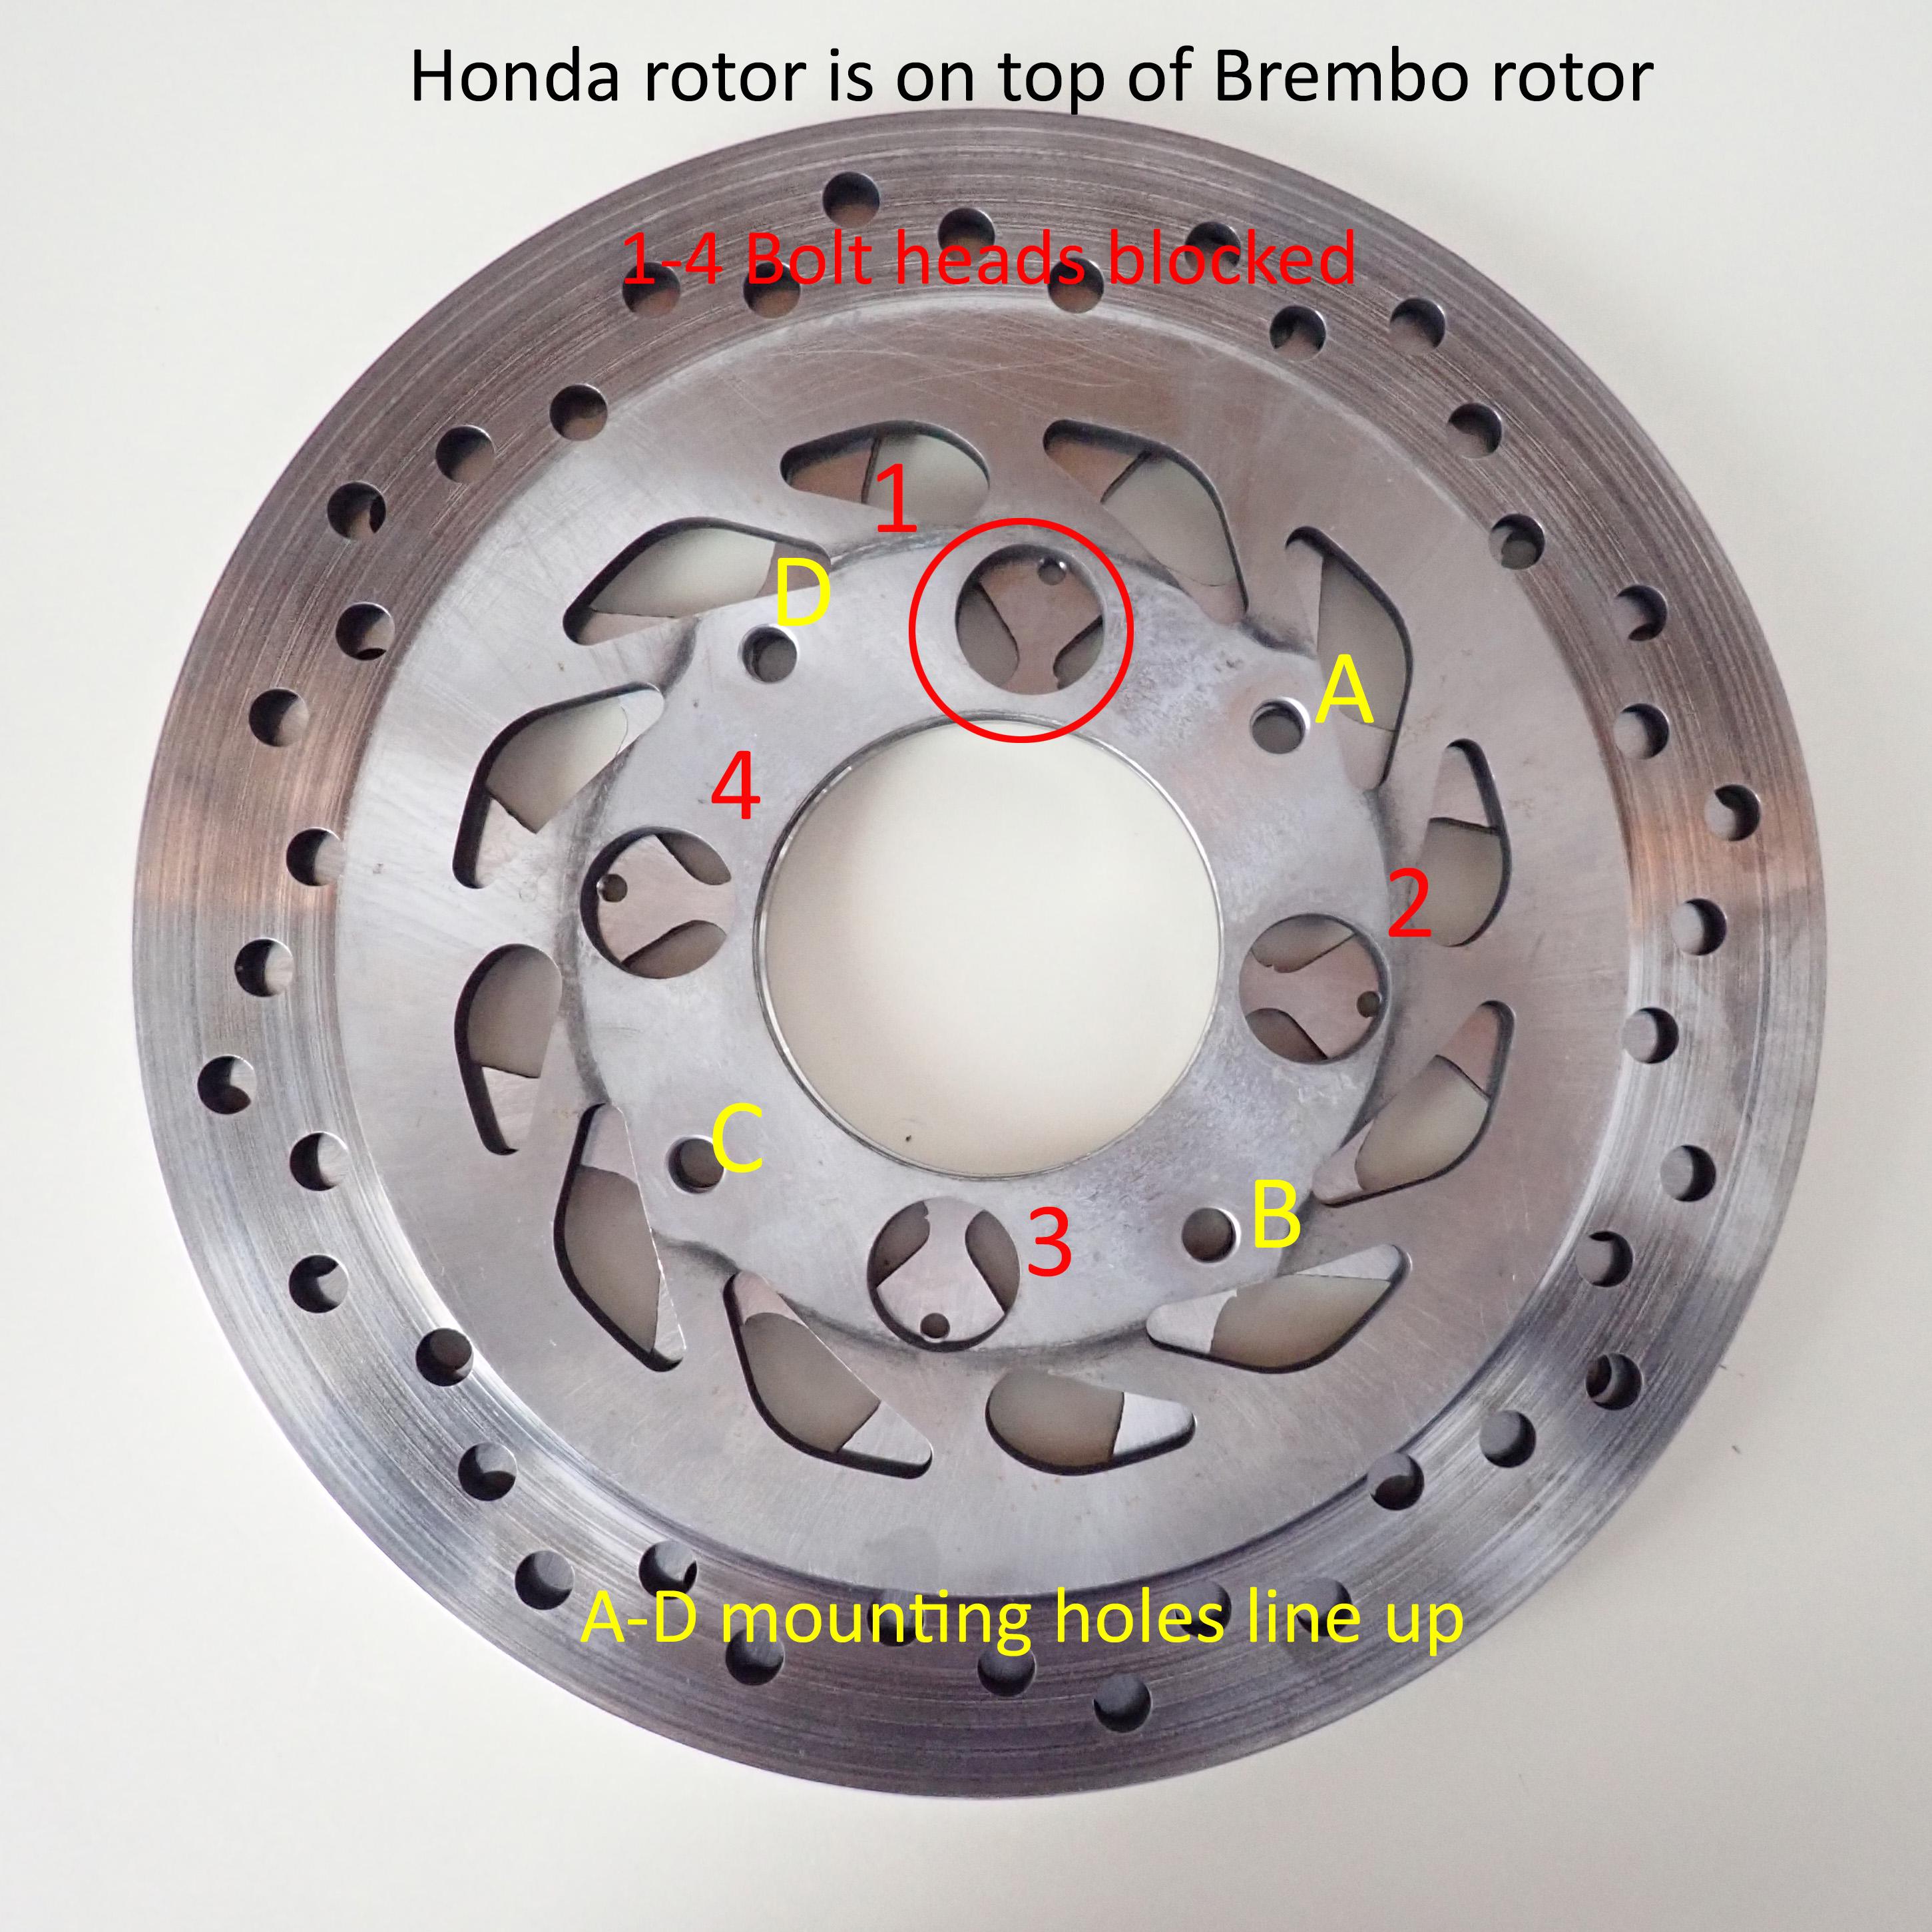
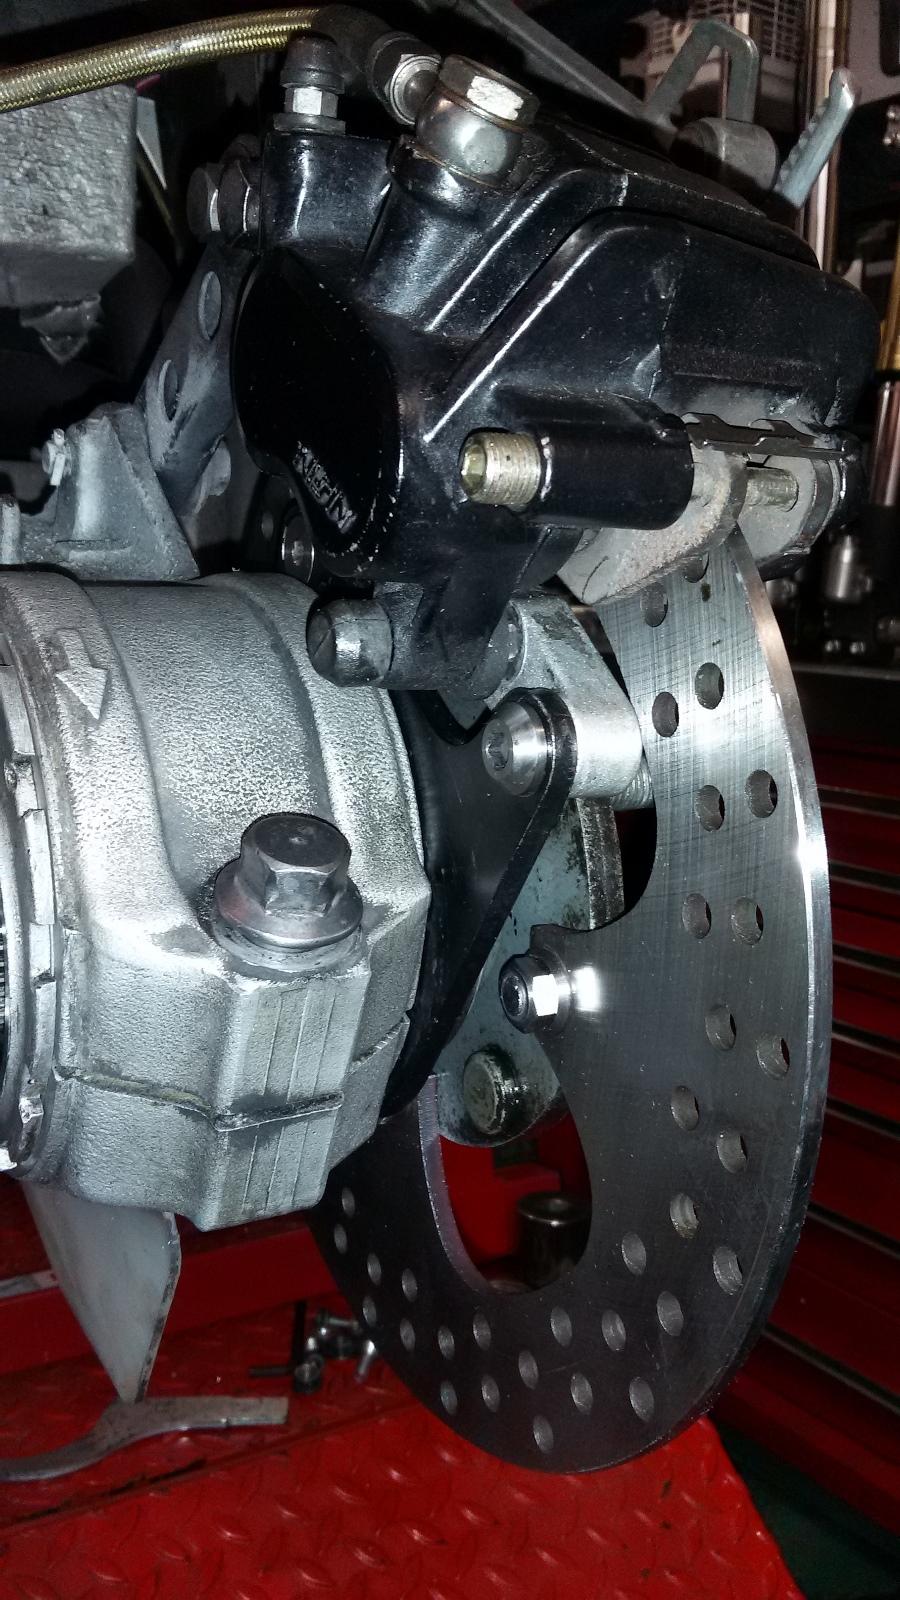
I ordered a Brembo rear rotor for my 2006 non ABS VFR800. Checked with multiple sources including Brembo itself and all said it was model 68B407M6. When it arrived 8 weeks later (they make them per order) it would not fit due to the the Brembo not having the 4 holes to accomodate the heads of the tire mounting bolts that protrude from the axle face. Fortunately they owned up to the mistake and refunded my money. This model is supposed to fit 1998 to 2012 VFRs. Big Fail. They could not determine which model, if any, would fit the VFR or what bikes the 68B407M6 does fit. Too bad. It was half the price of the Honda rotor I eventually purchased.
4 points
-
There are many ways. I like to use a drift that is smaller than the slot. And I don't smash all the way down, but leave a small gap so I can easily get a small chisel in to release it later if I need to do some work.
4 points
-
Couple things: "All fuses are good" Does that include the Main Fuse that is under a cover on the solenoid holder? I have to ask. Also, solenoids come in two styles and they are mirror images of each other. There is usually a "B" (Battery) and an "M" (Motor) molded into the plastic near the cable posts. If you got an opposite (and your original unit was really bad), you will need to re-pin the wires on the plug in the mirror image too. Also closely inspect the wires going into that plug. It is VERY common for those to be melted and burnt and can cause what you describe. Sometimes you don;t realize how bad it is until you really look close. Also, you can plug in your original solenoid just to see if you get any power again. Great choice in a VFR model and good luck.2 points
-
This guy should be able to sort you out, he’s had everything I wanted for my 89 https://shop.xtremedecals.com/shop/category.aspx/vfr-series/38/2 points
-
As Stray points out, having a structural member in your garages ceiling has some benefits as far as options for lifting or stabilizing the bike I have a 1 ton chain hoist mounted above my lift. They are about $70 at HF. First pic I used my hoist to lift the bikes rear up as bit to do some work this Spring. Second pic I used the hoist to stabilize the bike at the handlebars as I was going hammers and tongs working on it this past Fall. Good tip over insurance without having to strap the bike down.
2 points
-
It's this view that cements it for me. The shape of the relief/flare for the handlebars at full lock just flows better with the other bodywork pieces and tank. A little more organic looking. When final placement is done, trim the screen down a bit to compensate for the height proportions and you can even re-angle the top cut to (more) match the angle of the top of the tank. (If that makes sense)
2 points
-
It's a new project. But I'm determined. 99 vfr800. Bought it as a project and am tearing into it... bodies aren't terrible, needs a few misc parts... I'll check mileage when I plop a battery back in. As for pictures, I'm tryin to get those figured out2 points
-
Take your seat off. Look for a sticker similar to the one on the photo, this is the color code for the bike. A company called "Colorite" makes touch up paint for motorcycles. You may have to order it, and it won't be cheap, but should still be available. Alternatively check out the stock touch up sticks at your local auto store. Depending how big and the location of the dings you may find one close enough for your needs. I was able to find a red and blue that were very close for my 85 RWB 1000R that way. Good luck. OEM Motorcycle & Powersports Paint | Touch-Up Pens, Aerosols, Quarts | ColorRite
2 points
-
Not really that hard; remove the small hoses/cables while propped up, then remove the rear pivot bolt and flip the tank right over and then undo the fuel banjo. Place lots of padding on the rear rails to protect the paint then keep the tank upside down while stored. I had my half-full tank off for a fortnight while I serviced the valves on my VTEC and never lost any fuel.
2 points
-
If I tried to dig a basement in South Holland, I'd have a swimming pool! Yes, the reason for the cantilevered shelves is mainly to avoid interference with the workbenches and machine tools underneath. I could, of course, run at least some front verticals, but I've seen other workshops where they're using pallet racks for both storage and workbenches, and the extra vertical supports always seem to be "in the way". I'm trying to avoid that. I'm also trying to avoid supporting anything from the ceiling (which is also the bottom floor of our house). They built these houses very sturdily, but I don't want to chance doing anything which could compromise the structure of the house itself. I will try to post my progress here. I don't actually have the keys, yet, but that day is almost here! Then I've got to move fairly quickly to avoid having everything in the UK delivered to the same space in which I'm trying to build all this stuff... Ciao, JZH2 points
-
5th gen already has oil feed to stator. One of the issues with 6th gen is they closed that oil feed & early 6th gens burned out stators. The 5th gen has the worlds most power hungry clock. If you leave the battery attached & not on a tender it will drain it.2 points
-
Leaky Head Gasket Check... You can visual inspect for a leaking head gasket by pulling the spark plugs and peering down each hole... if the top of the piston is black then no leak that cylinder... if the top of the piston is a bright shiny aluminum then leak detected... because a leaky head gasket allows coolant in and that produces steam under the heat of combustion... the net effect is a super clean piston dome and no nasty black...2 points
-
It looks like there are good resources for "Beam Loads" and "Column Loads" for Unistrut at given spans online. The only worry I would have is it pulling out of the wall, or bending just below the 45 degree brace. If they are much taller than the bikes, you can run a piece of Unistrut or metal/wood beams across form side to side to prevent collapsing in on itself, and use those to hang your lighting. Although you are extremely thorough in everything I have ever seen you do, so you probably already have a way better plan than my quick brainstorm... Do post pics as you're building it, we need a good project here to keep us dreaming about our own work spaces! Is it too wet there for painted or epoxy floors?1 point
-
I'm enjoying this thread, looking forward to all the other things you will figure out, and the final result. Are the elevated motorcycle "shelves" really just for display, or do you intend to walk downstairs one morning, decide which bike is perfect for a ride that day, bring it down and zoom off?1 point
-
And yet another lot done ! From now on, it might get a little slower (yup, even slower than now 🙄) as I just moved out and don't have a space on my own to work from, I'll have to do whatever I need at work during breaks. Also, before I put her back together, I've got to spend about 1k in parts and quite a few hours, the lady needs a lot of attention ... The most worrying is that constant oil sweating at the top of the engine, I've moved the bike to a storage unit 3 days ago and noticed today that it keeps leaking a bit under even though the engine has been on for over 6 months.
1 point
-
What is better than a afternoon ride after some vfr work in the garage, especially as weather is nice, 26°C at highest and sunny ☀️ 😎 This time to a other cafe that has a bit bigger road there, "the green hell" I call it, lots of small elevation change's as curves, shame half the road has a 60km/h restriction these days, your driver's license is sure out in the wind..... But still a delight to ride !1 point
-
I lift my front end with a pulley from the ceiling, strapped to the handlebars. It’s quick and easy and cheap. This allows me to remove the front wheel and full fork assembly for rebuilds. Can you hang the front end off the ceiling? The front end is quite light and can be lifted by hand.1 point
-
The forklift could easily lift this assembly like a pallet. If you put casters under it, you could push it around the garage easily. The 2" hitch would give you an easy way to attach it to your wall assembly.
1 point
-
I like them both. A big part of me likes the 1000F cowl. The larger proportions seem to work for me with the tank and tail.. Maybe trim the windshield down to reduce some overall "height". Anyway.... loving it!1 point
-
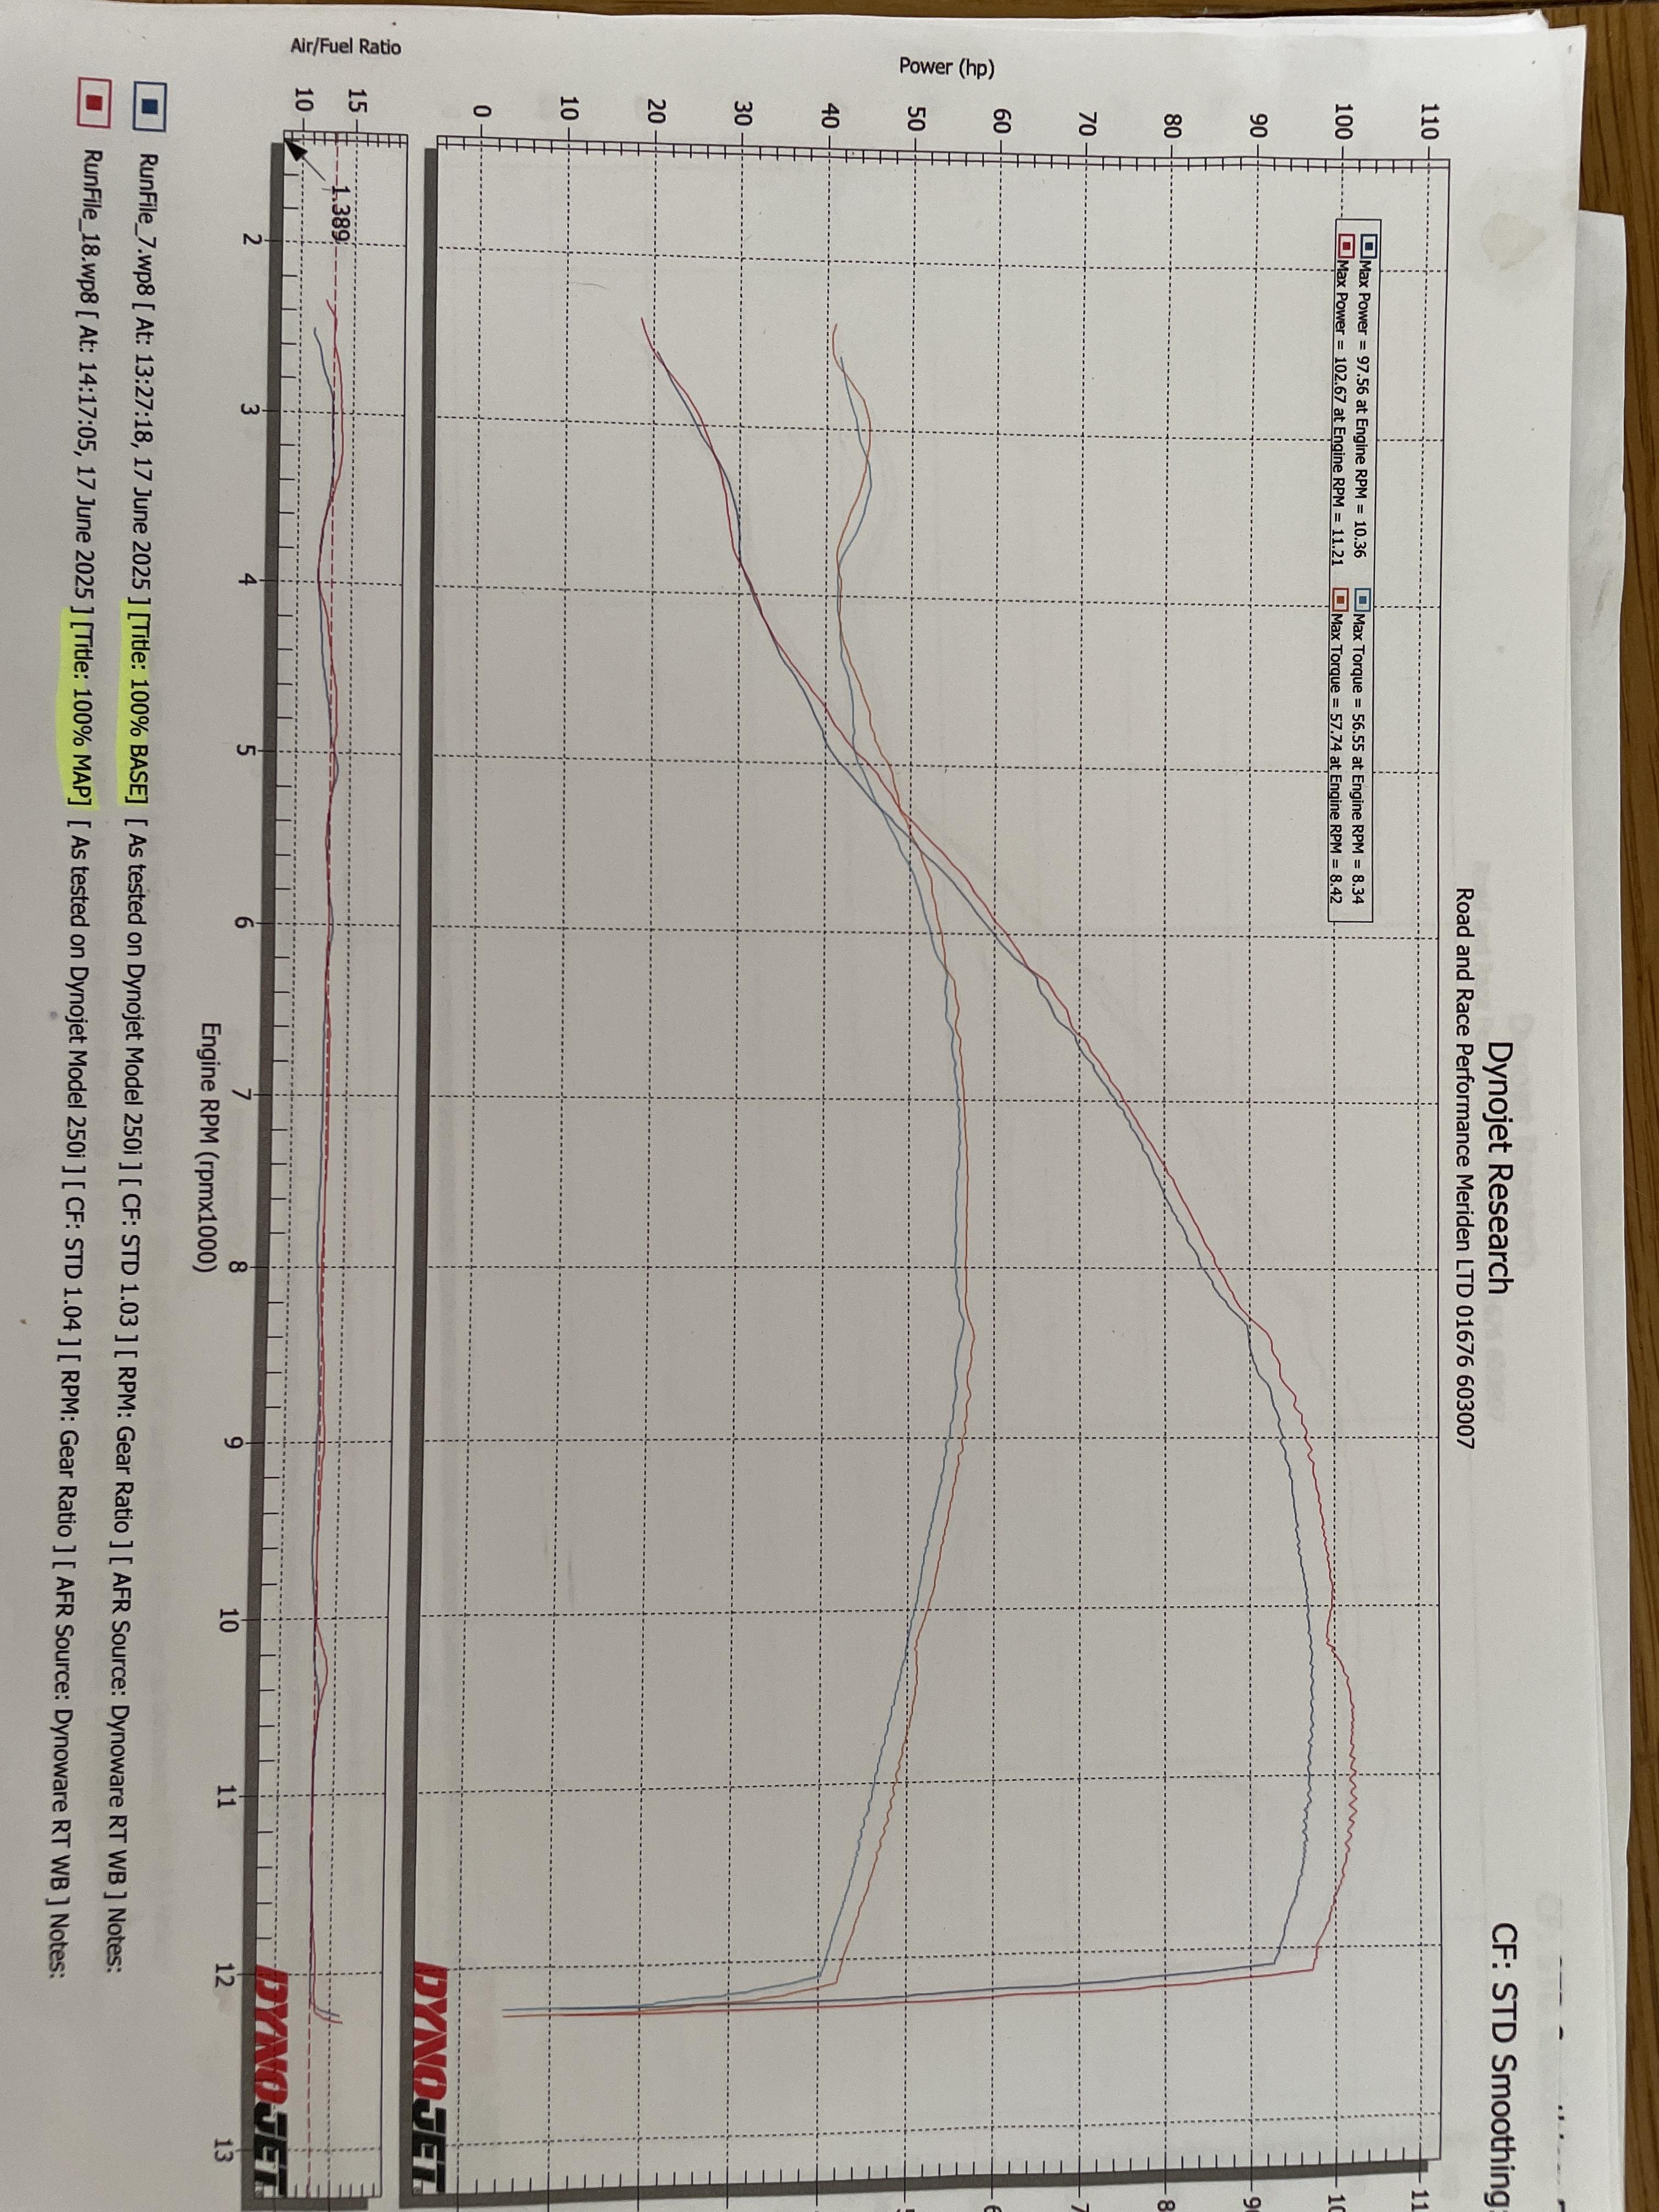
Quick biker’s fairy tale for you guys. 5th Gen had a Rapid Bike Racing but she wasn’t completely satisfied and wanted “more”. So she skipped off to the woods and found RRPM in Meriden (where classic Triumphs used to be made). A nice man called Nick took the little 5th Gen into a dark cave and thrashed her mercilessly for 2.5 hours. She screamed LOUD!!! IMG_7441.mov You can see the puff of smoke as he lets off the throttle. She was rich when she went in… IMG_7446.mov …she was lean and mean when she came out. Breathless and powerful! Well, sort of. She went from 97-104BHP. That’s a 7% increase, which isn’t bad but I was hoping for more at the top. Midrange feels really creamy, though… Dyno results for the numerically inclined: He has an RC45 in his stable, so I didn’t mind waiting! Mods include: - Black Widow exhaust silencer with catless 1998 header - Open airbox with Pipercross filter - Uprated clutch springs (no slipping) And they lived happily ever after.
1 point
-
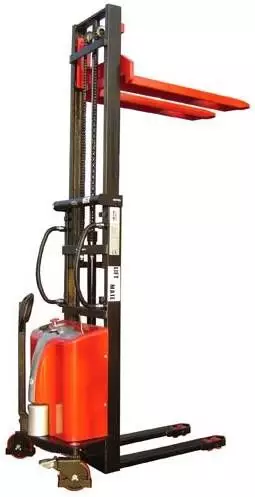
Not sure what you mean? However, there is some question about whether I will be able to get my van (and its hitch) into the garage at all at this point...but there is no question that I would NOT have enough room to maneuver it around inside if I did! I will have some Unistrut to play with in a few days, so I will decide what to do after that. This is an electric "pallet stacker", btw: What makes it different than a "forklift" is that it requires support underneath the load, so I will need to be able to slide the front wheels of this thing underneath anything sitting on the floor of my garage below the bike shelves. So that means everything there needs to be on legs or wheels or a platform. No problem with workbenches and tool cabinets, but more of a challenge with machine tools such as my bandsaw, drill press, welding cart, future plasma table, lathe, mill, etc. Fortunately, I like planning; unfortunately, more than doing! Ciao, JZH
1 point
-
Strange. I once had an EBC (I think) on my 750, and both it and the OEM rotor it replaced had huge cut outs to allow the rotor to clear the axle studs. Bit of an oversight on Brembo's part! Ciao, JZH
1 point
-
Hey VFR peeps, Looking for help. The bike will turn over strong but is not getting fuel. I recently had to fix the BAS wiring as the connectors melted so I removed the connector and spliced in directly. The bike was running well until the BAS wire melted so I figured that was the only issue. The bike died while riding. As you will see and hear in the video, something else is strange. When I turn OFF the kill switch and hold down the start button, you can hear what sounds to me like the fuel pump. It did this 4 times and will not do it anymore. The “pump” sound was only while I held down the start button but again, it’s not doing that now… I’ll take any and all advice/comments with appreciation. TIA! Troubleshooting steps so far; it’s worth noting, that before I spliced/soldered the BAS, I bypassed it and it would still not start. 1) fixed BAS wiring 2) cleaned kill switch button with CRC electronic cleaner, 3 times. 3) checked all fuses are OK 4) made sure all connections under fuel tank are secure 5) the R/R and Stator were replaced within the past year. 6) kickstand up or down, doesn’t make a difference 7) brand new battery today1 point
-
With RED especially, my experience with ColorRite is... ColorRong1 point
-
Wow! That ColoRite site really is easy to use!! I found the needed base and color touch up pens within seconds!! I thought it would be much more difficult for the fastest color on the 5th gen! Thanks @FromMaine !1 point
-
Wow! Thanks! you were a big help. R334. I am just an old man who has been riding since '64 but I love this bike. My FJR has put on too much weight over the years and more likely my old body is weak and this wonderful bike and my 2017 Vstrom get me through the touring season. There are a couple of very small marks but on the pannier there is a patch 1.5 inches wide by 5 inches long. I could put a reflector over it but I thought I would try this first. Thanks for helping me.
1 point
-
This. +11 point
-
https://www.visordown.com/news/longest-day-challenge-raises-more-ps120000-cancer-research-uk1 point
-
Way old photo, but removing just a few more items and it would have been quite easy to lift the frame off the engine..1 point
-
Can you rent an engine lift in Shetland? That would make it so much easier1 point
-
The one I sent you a link to earlier has the throttle bodies etc on1 point
-
Looks great! 👍 The thing I miss most about my VFR is the factory hard bags. I don't do a lot of trips, but those bags were a godsend for sport touring. I have struggled with what luggage to buy for my current bike, as I don't love any of the options. I'm close to making a decision now, but it has taken me a long time to get to this point. Kudos to you for making your own setup for your 5th gen. since there wasn't anything you liked on the market. 🙂1 point
-
Last resort Radweld?1 point
-
If nothing else it'll be a hell of a lot less work/$$$ than Colin Furze's underground lair. I'm guessing your benches/toolboxes will sit underneath the bikes, right? Castors will let you rearrange them easily to suite your needs. Please snap a few pics of the build to show your progress.1 point
-
b.jpg.cf59144f18c2389fcfa22bacc6194b94.jpg)
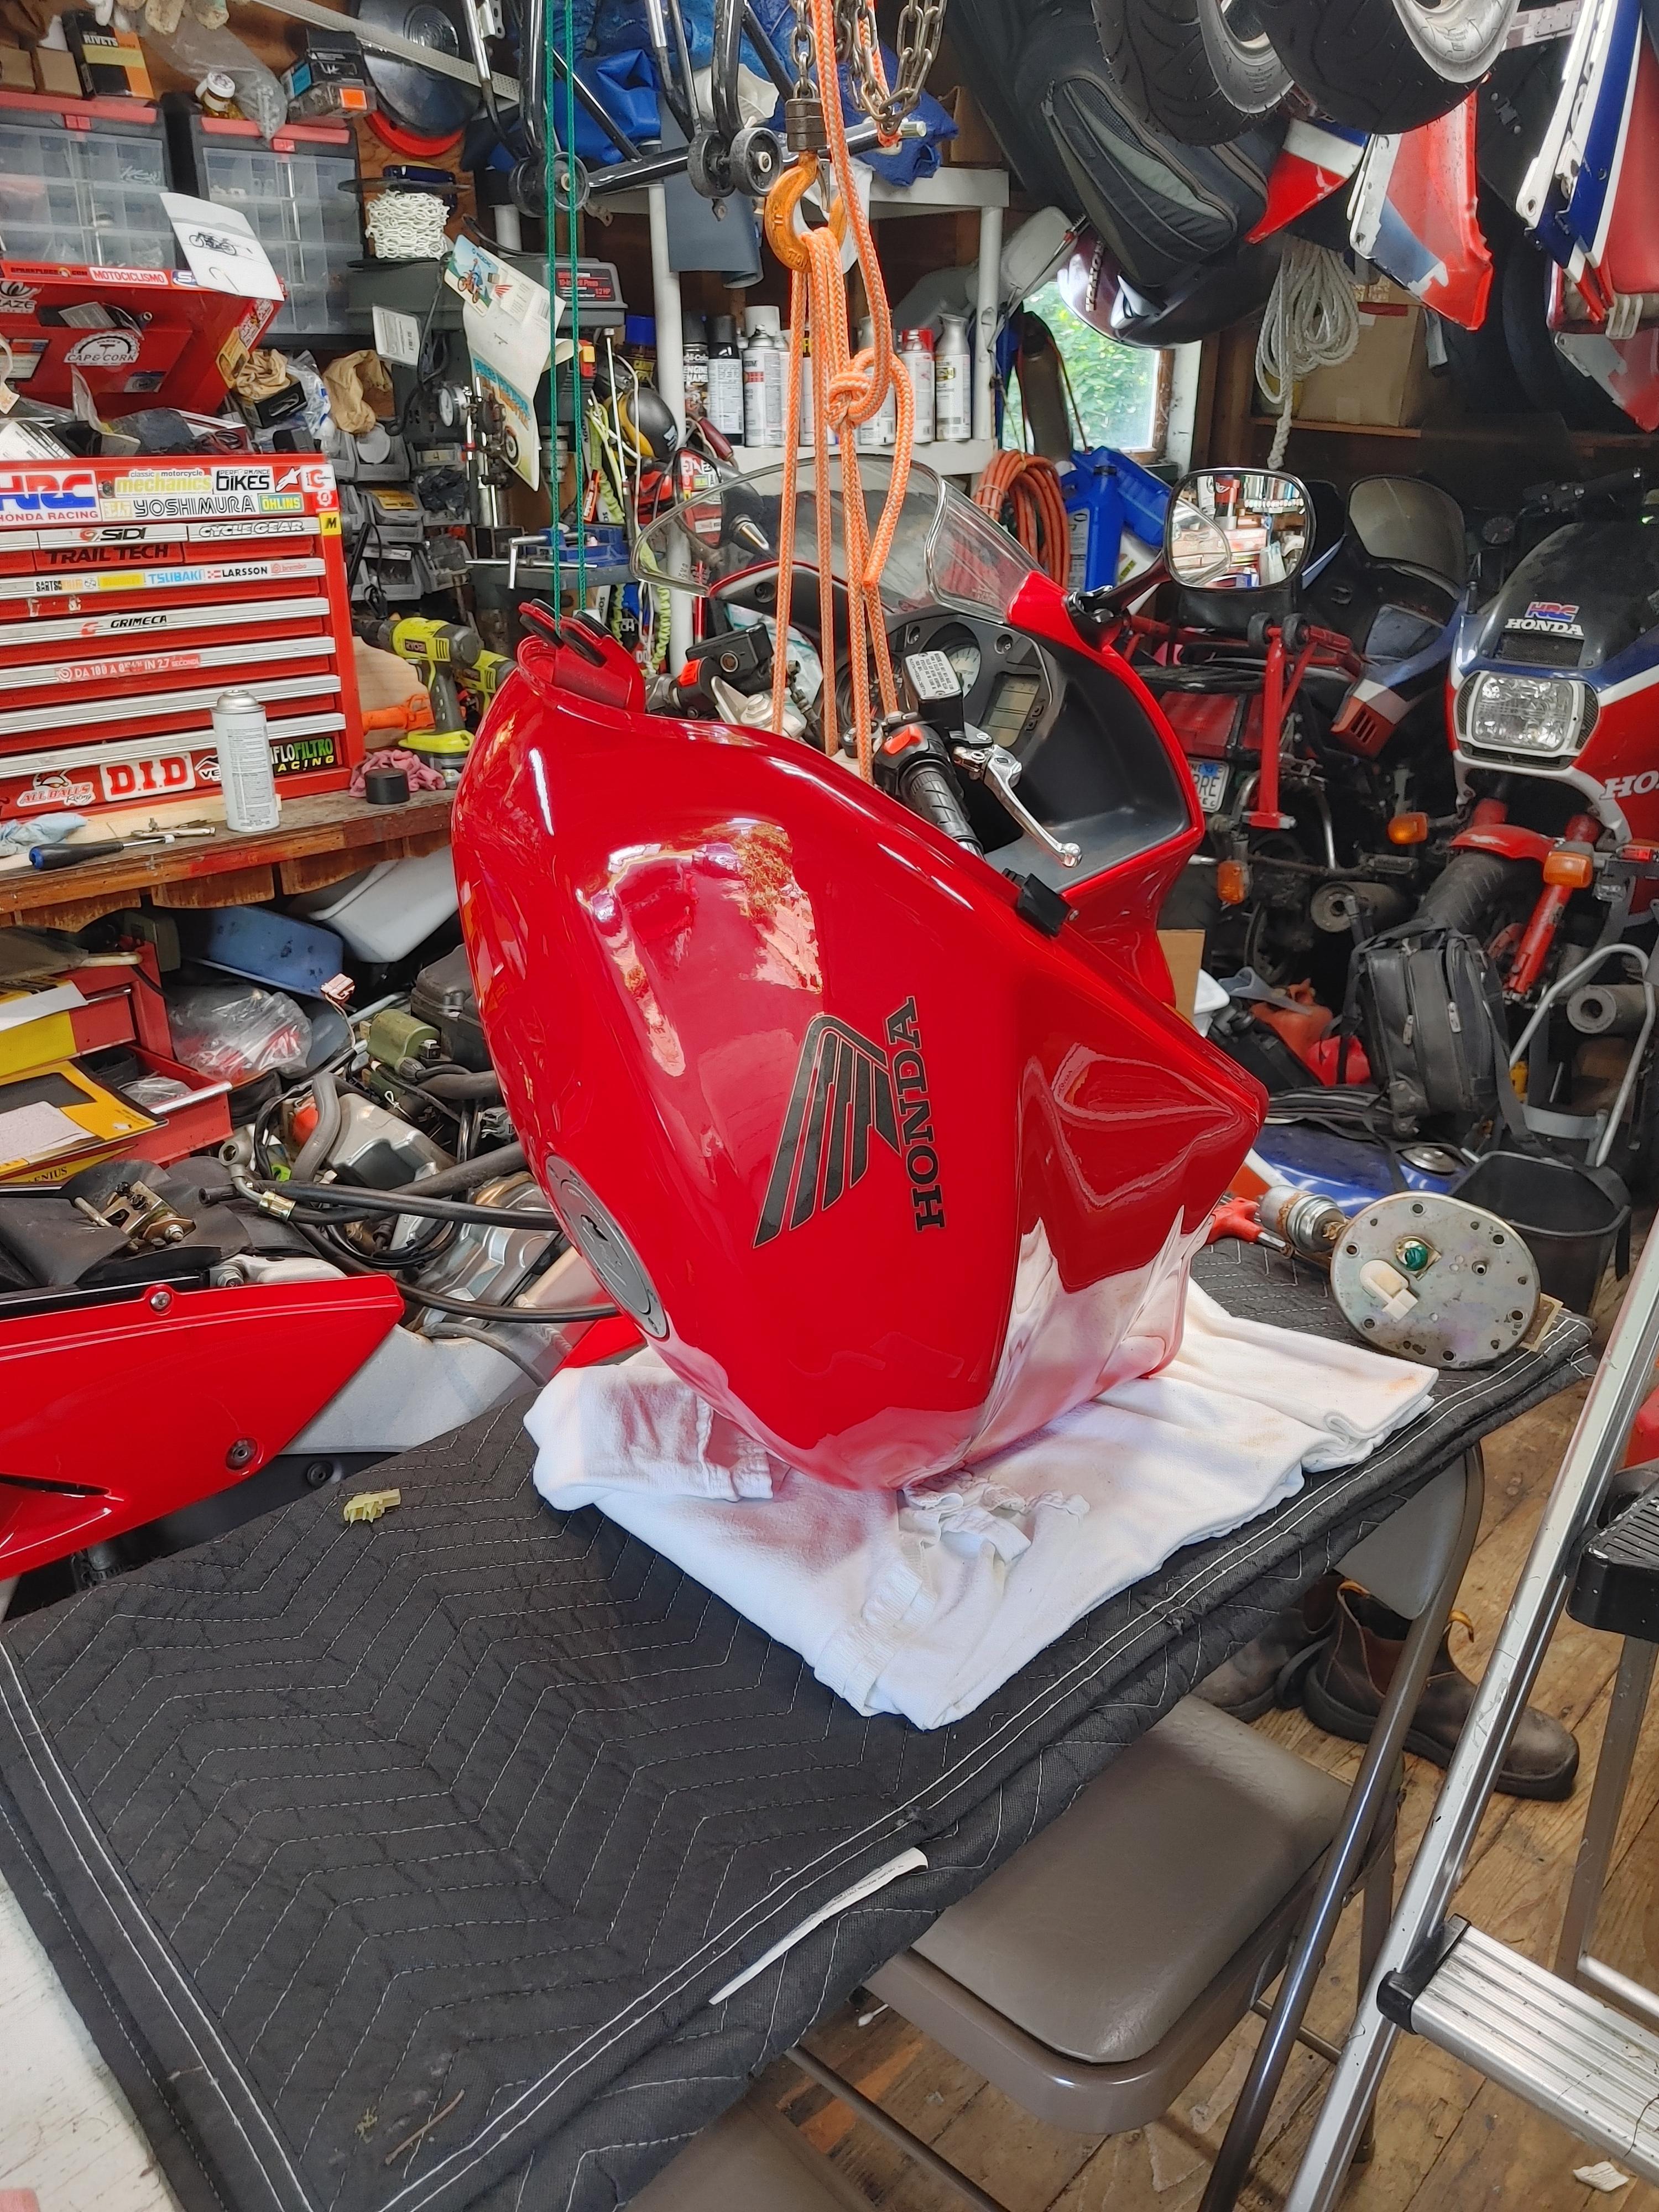
From the album: 5th gen tour 2025
1 point -
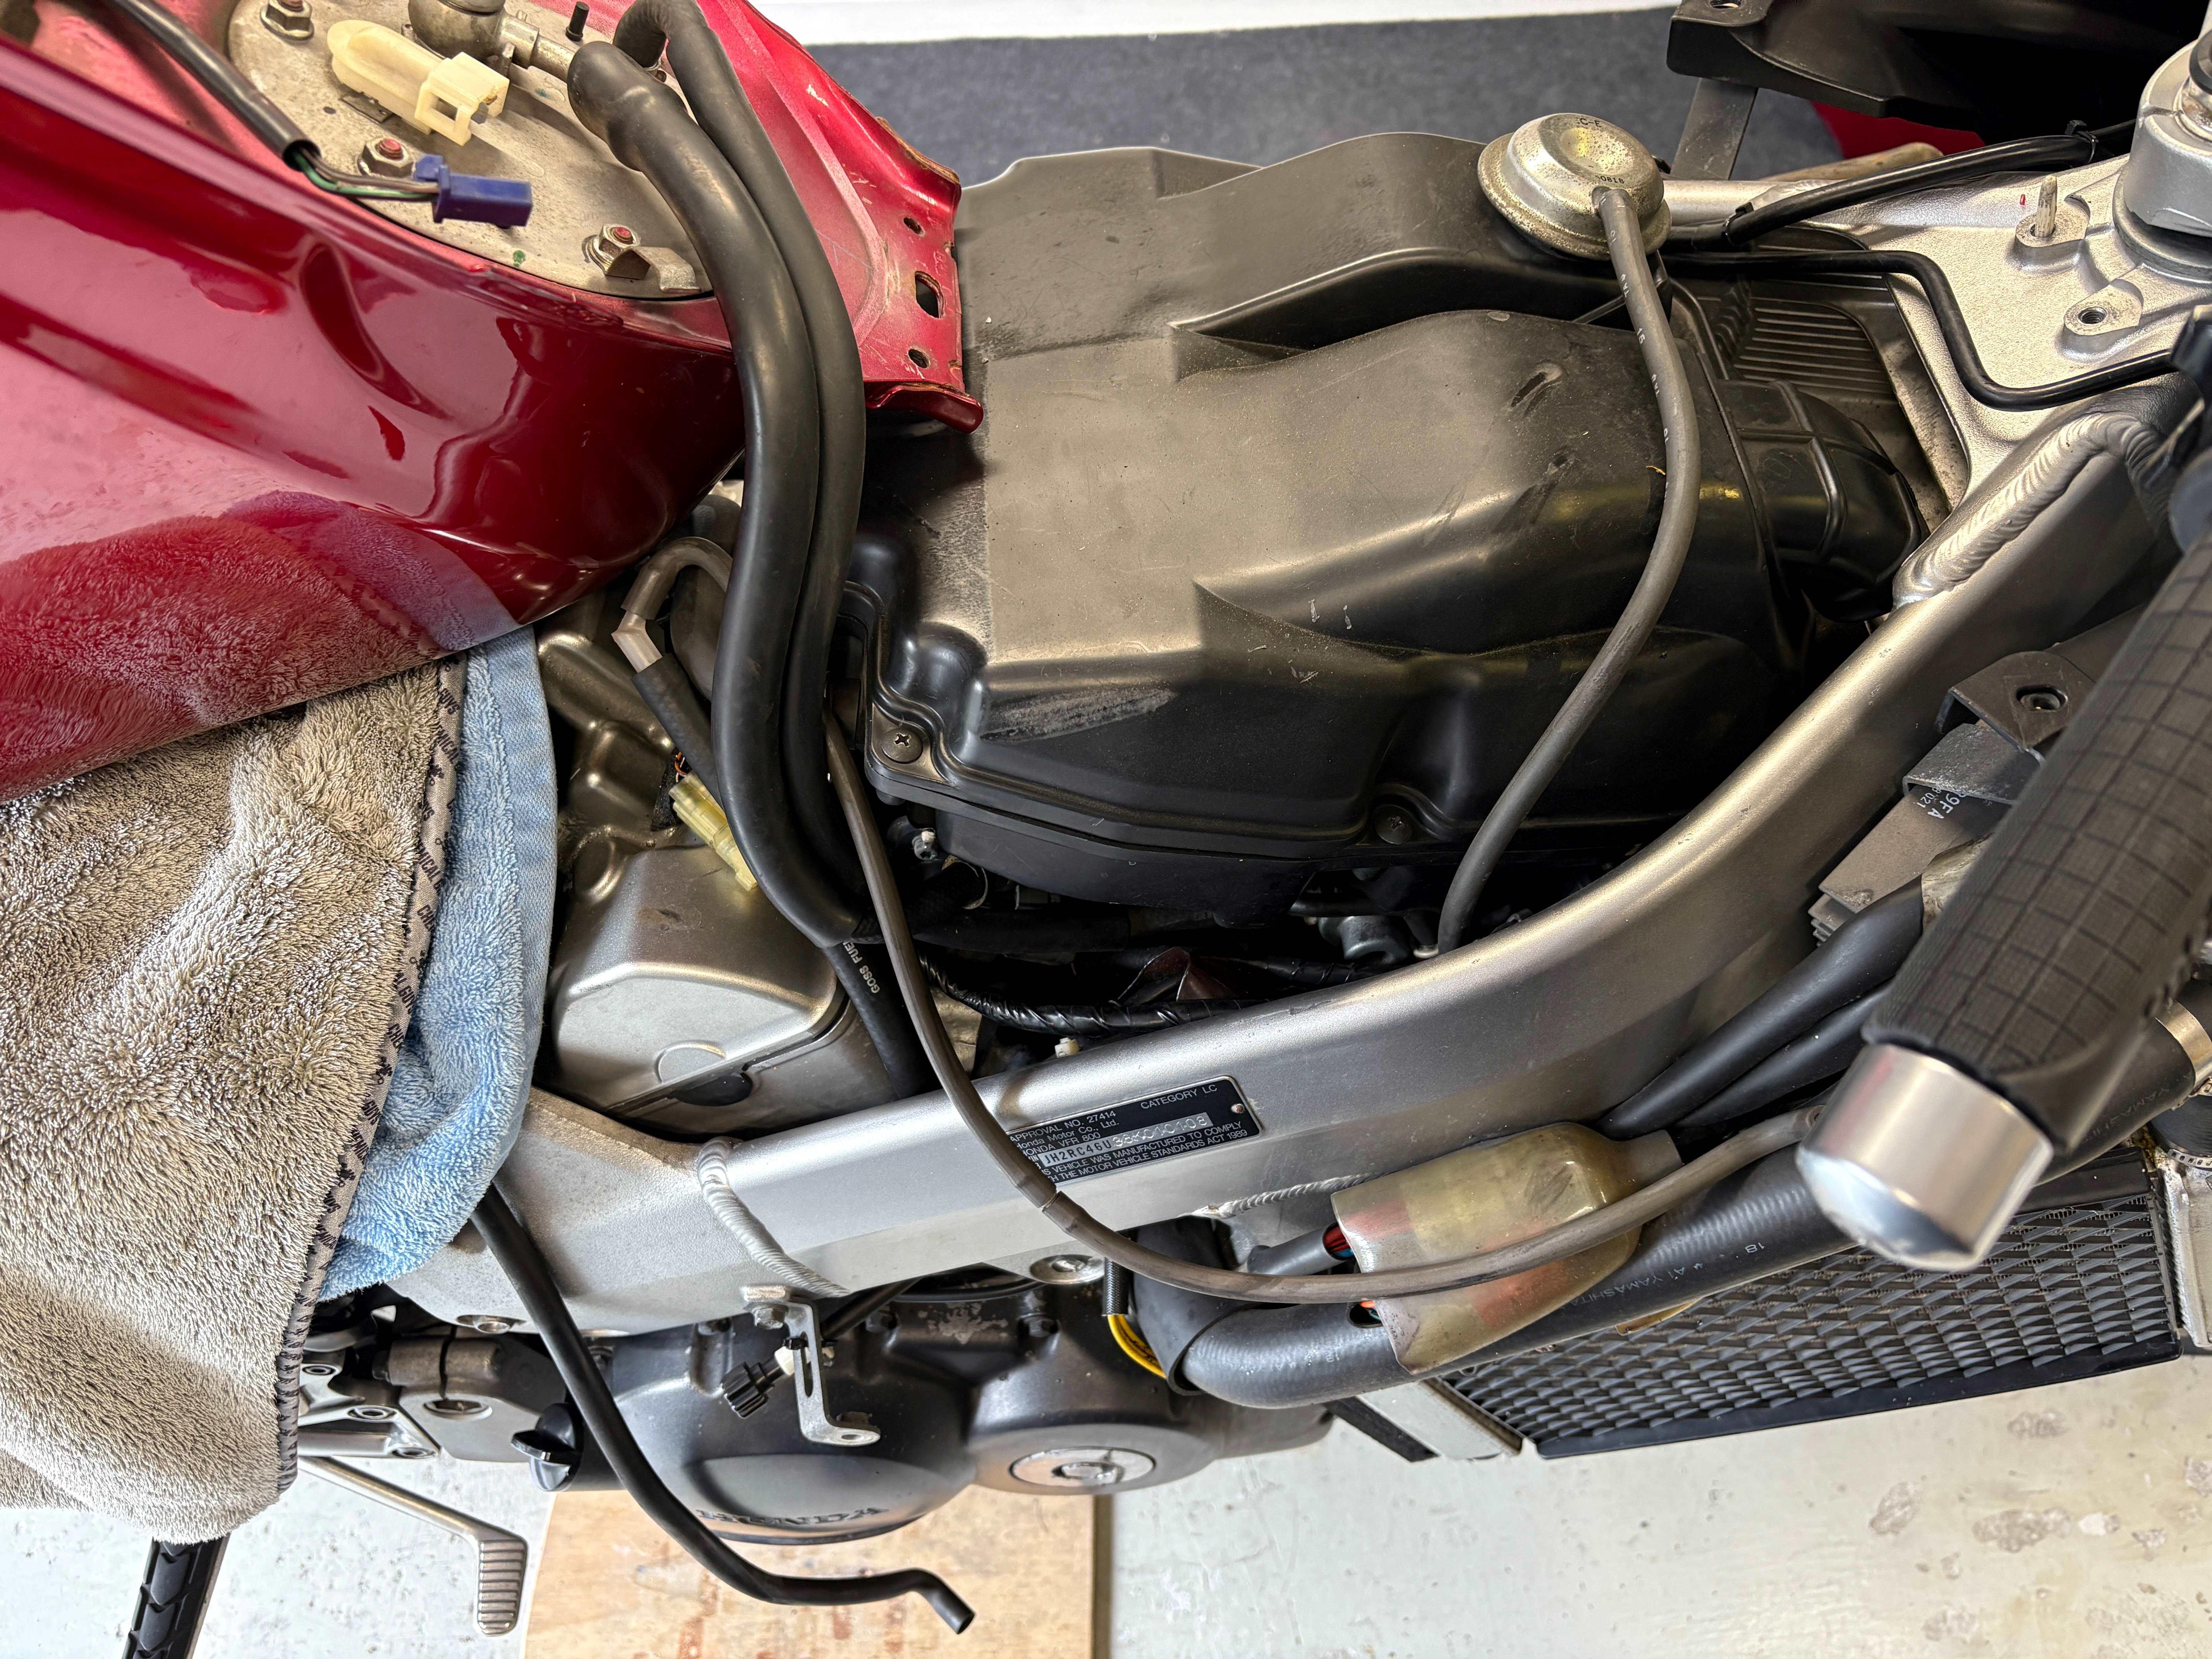
I'm thinking that wire is probably the air temperature sensor; the sensor screws into the nose fairing, projecting straight down.1 point
-
Well both of those are interesting snippets Mohawk. My 5th gen certainly does like to slowly drain the battery when it sits unused, moreso than my other bikes. I had assumed that maybe my battery wasn't the best.1 point
-
Hey everyone, I’m new here and recently picked up a 2005 Red VFR800. I’m located in Houston and would love to meet some folks in my area. Currently the bike is not running, I believe it’s a wiring issue so I’m in the middle of troubleshooting and plan to make a new post or two for help. I also have a 2011 HD Street Glide and 2014 Yamaha Stryker. I used to have a 2006 CBR1000rr and always wanted a VFR. Looking forward to connecting with a few of you soon.1 point
-
Bought these for my current front caliper rebuild, but turns out there's plenty of pad material left on the existing ones already. NEW not opened. Bought for the RC51, but looking on where used also F4i/954 possible CBR600. Please check on Parzilla for where used/diagrams for application. Selling $50 shipped US 48...1 point
-
It least one time in the life of a motorcycle it should make a pilgramage to Gap-Mecca. Featured.1 point
-
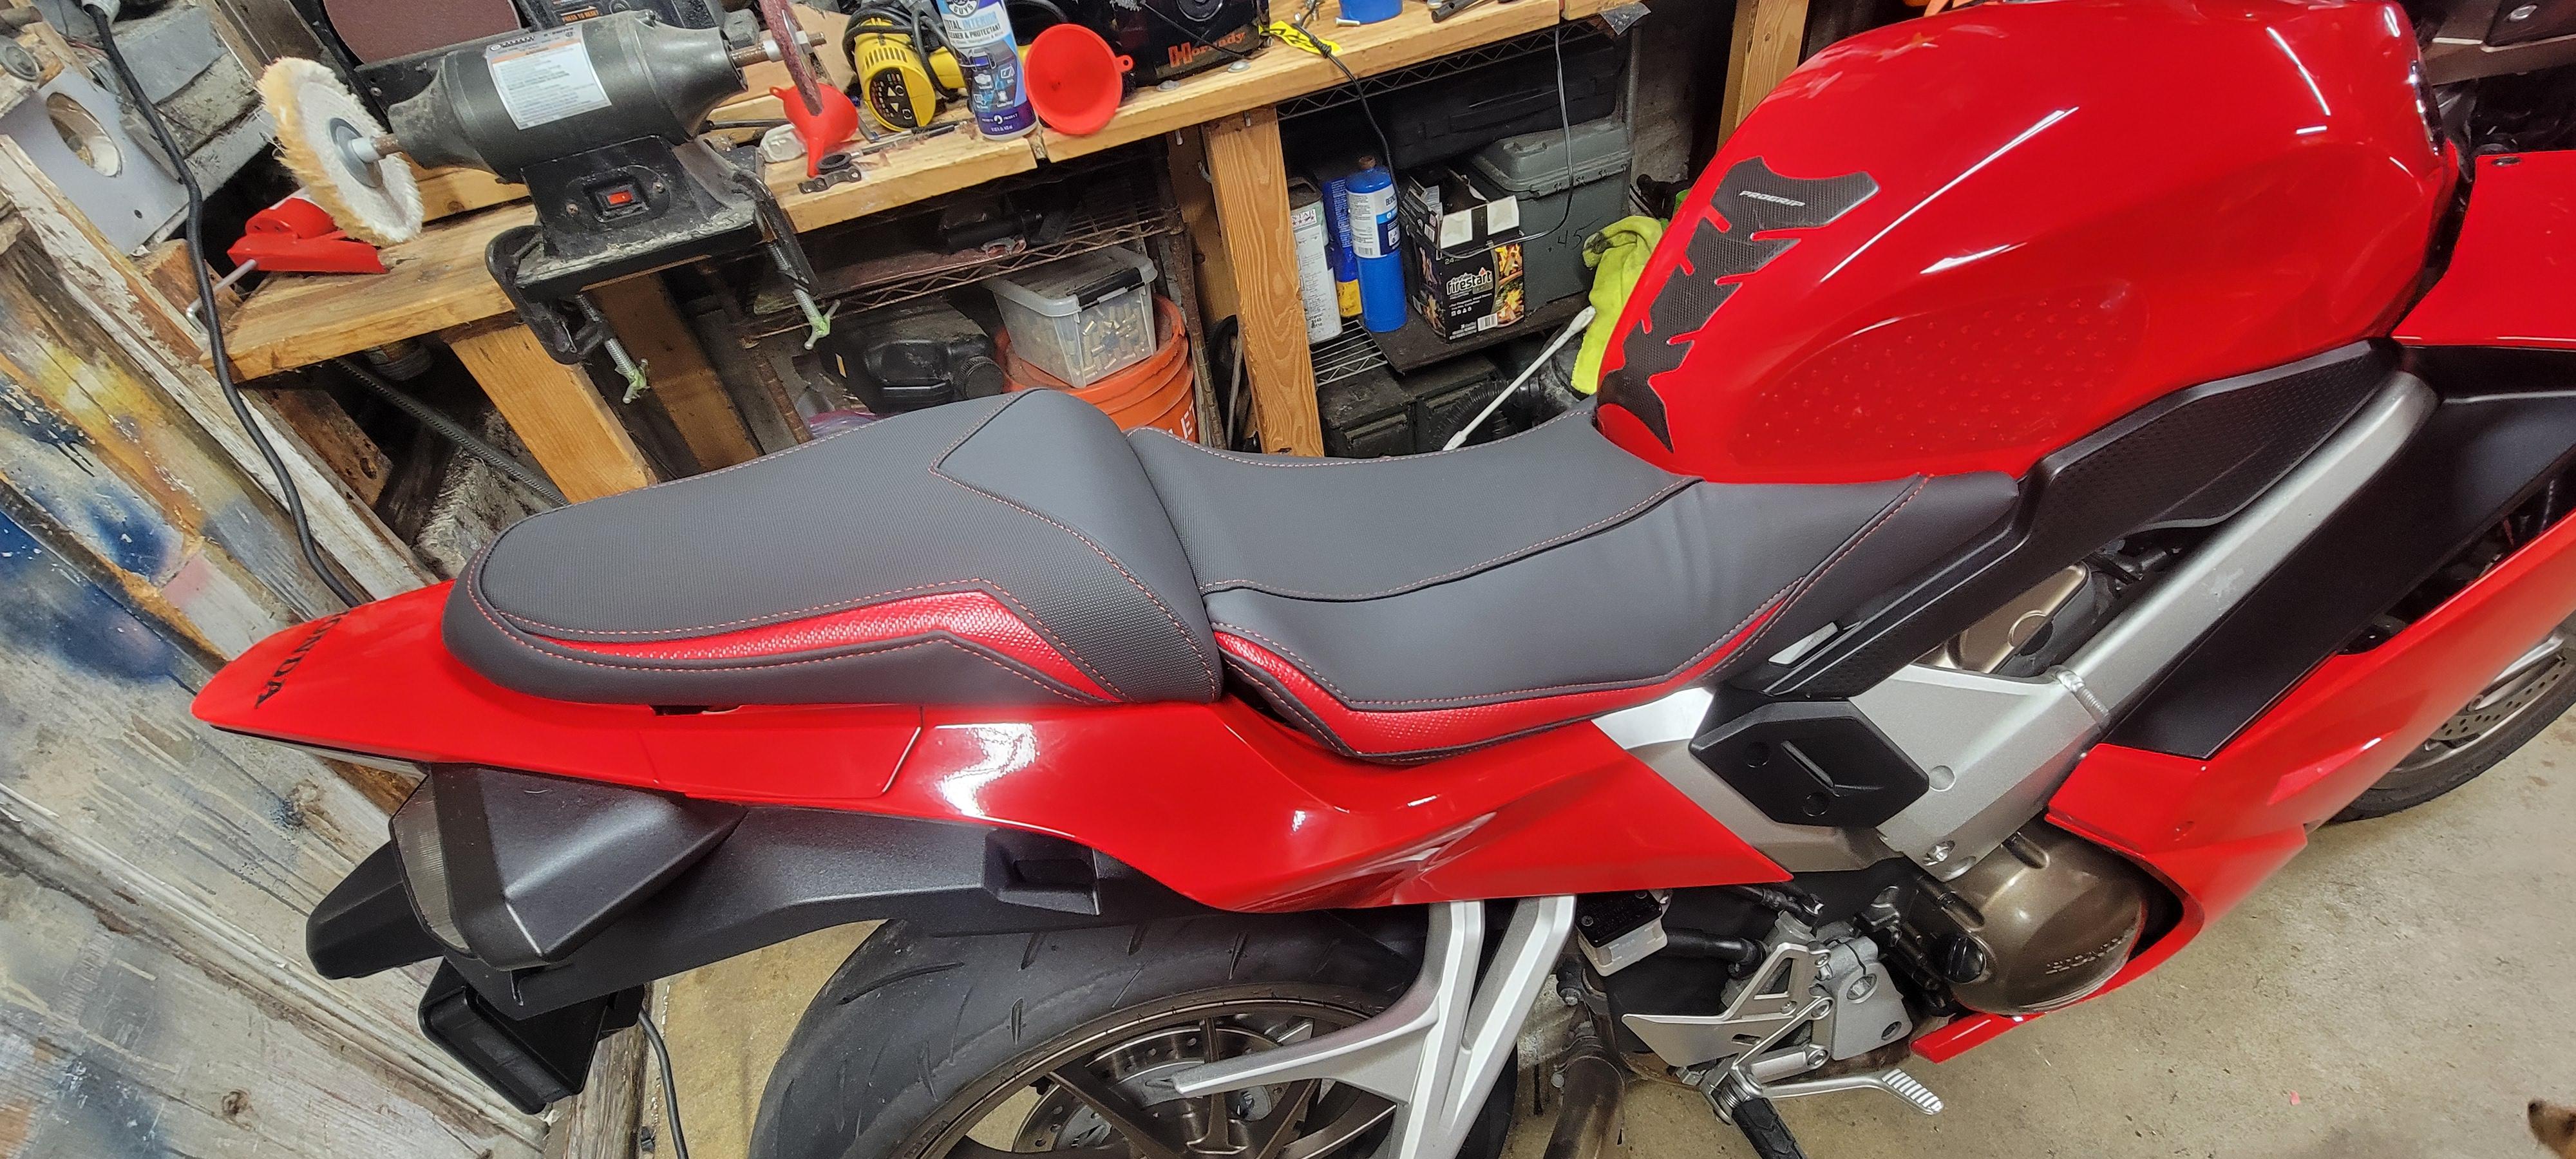
New seat cover! Way more grippy than the OEM. Also bought an OEM windscreen. I'll use the big one it replaced for long trips with lots of freeway miles. I just prefer the look of the original. Also, I just realized there are tiedown loops under the the back seat 🤯
1 point
-
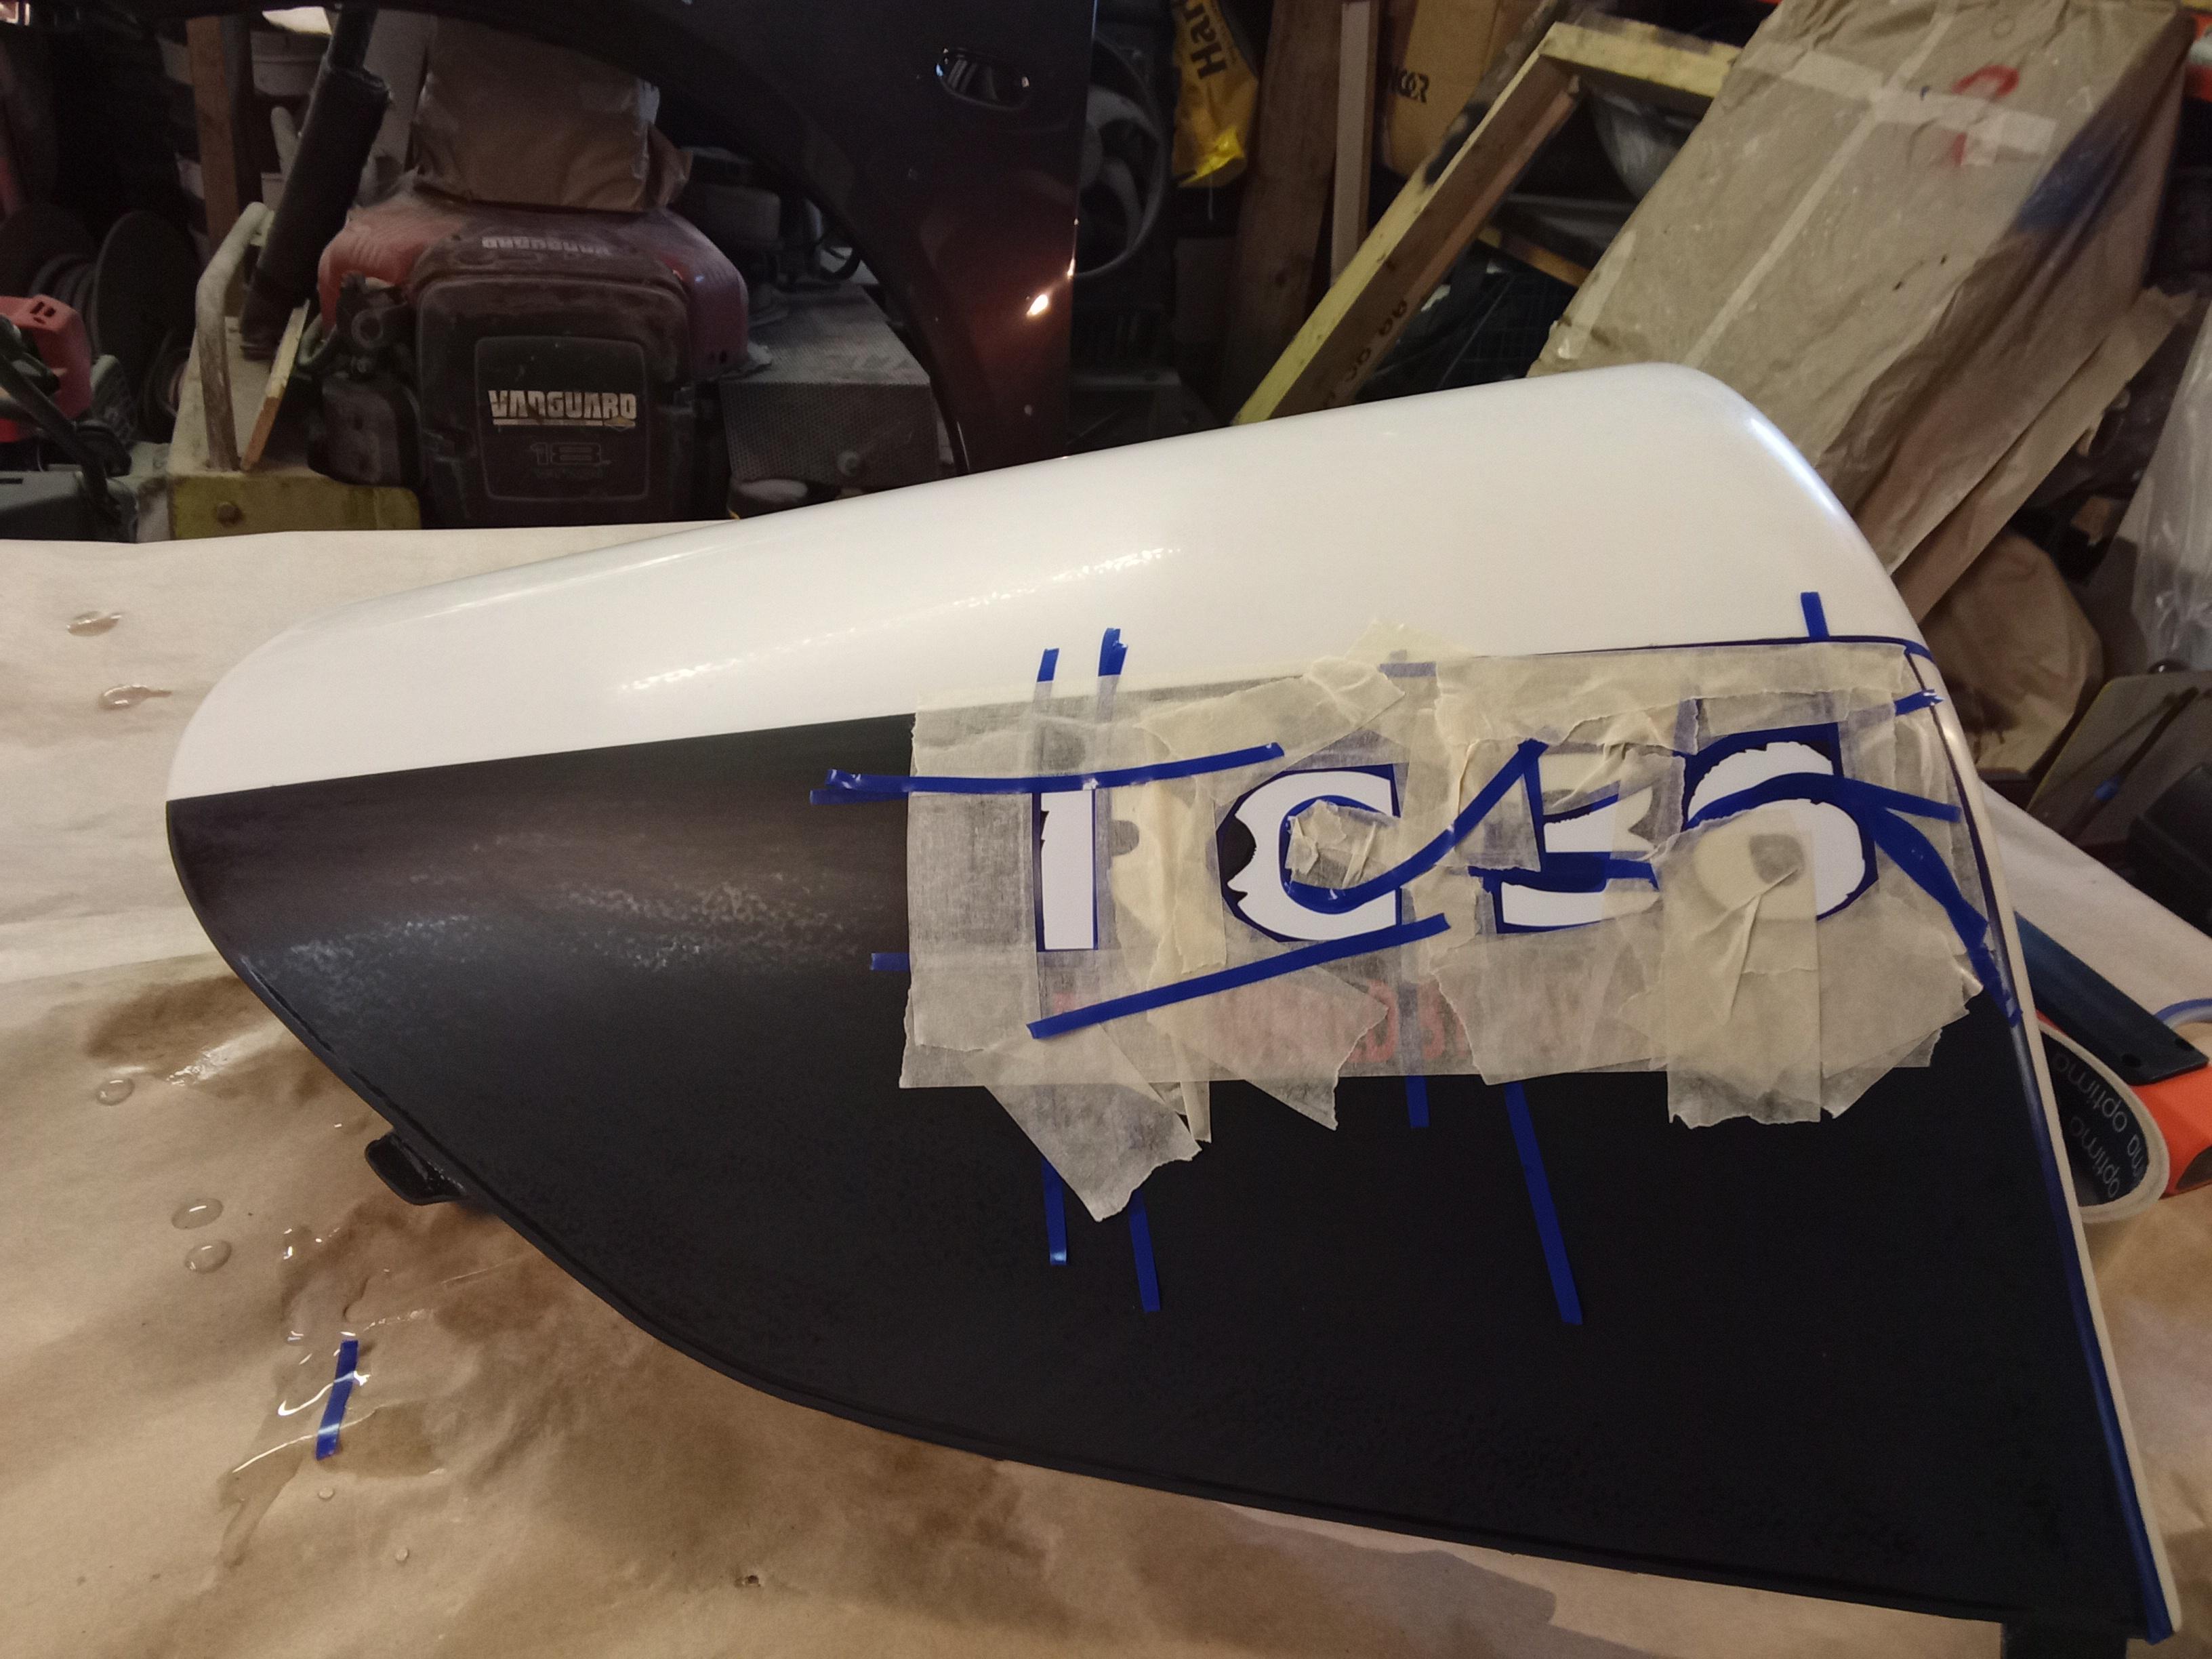
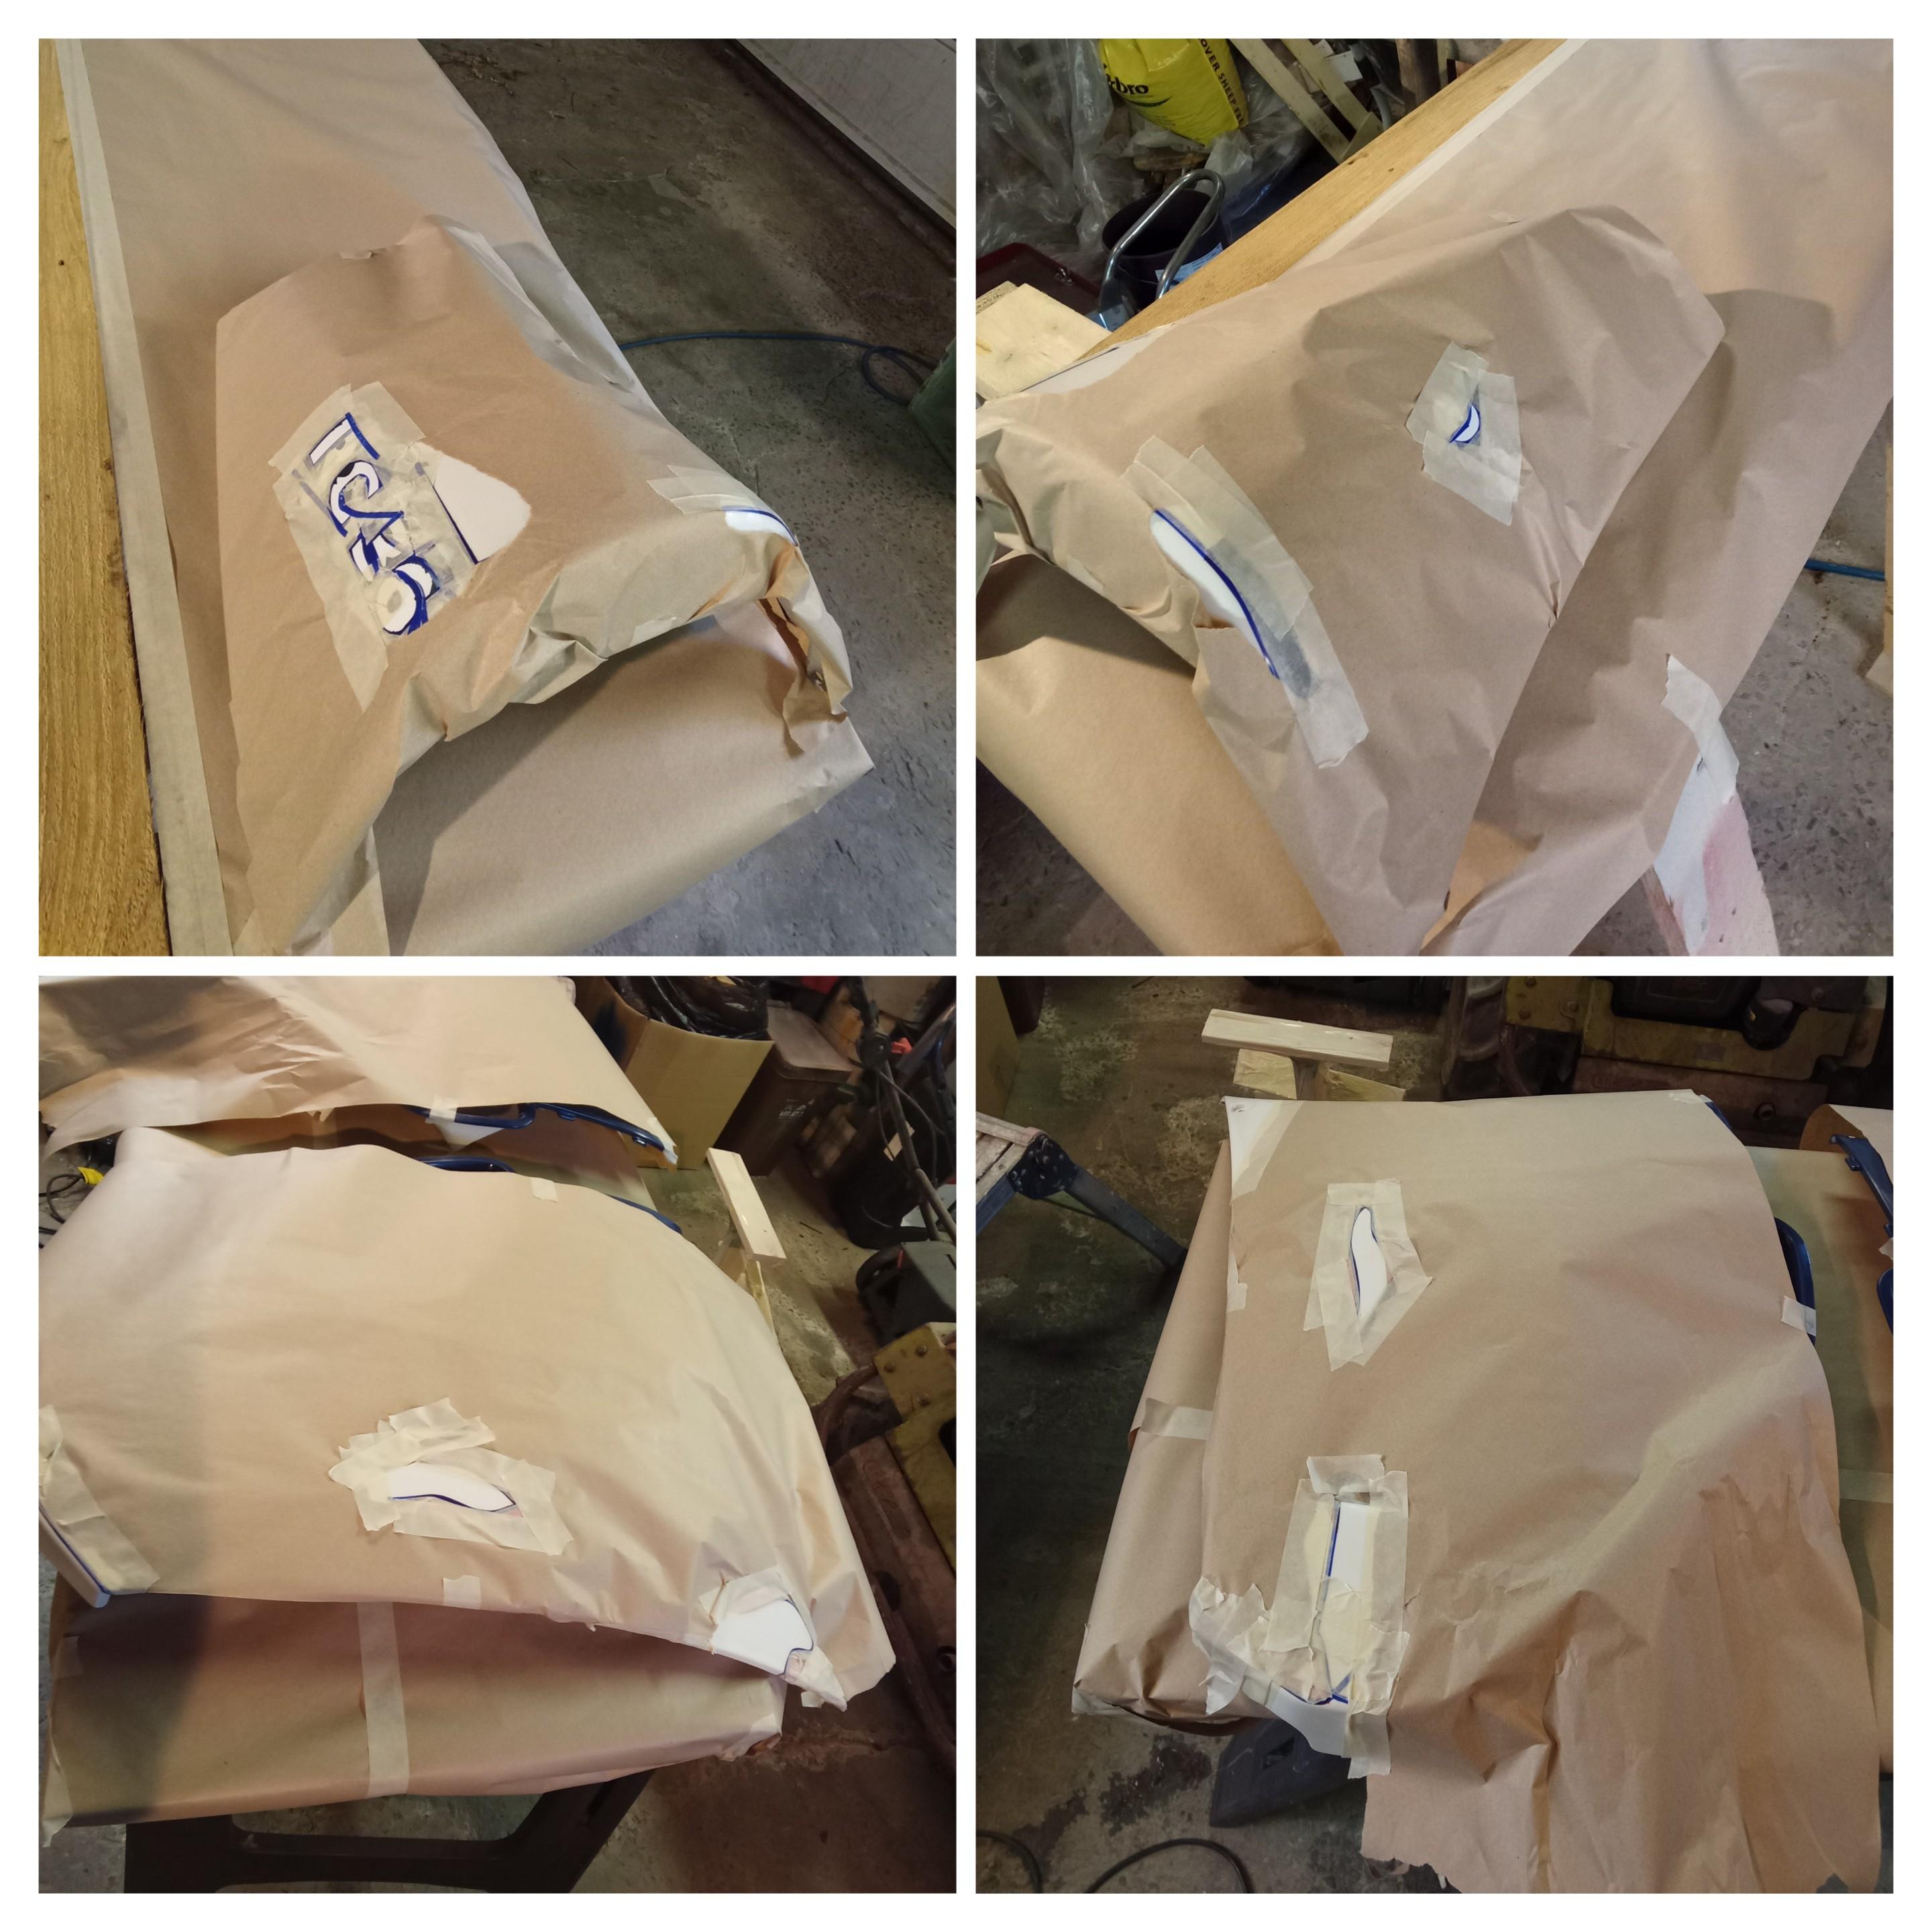
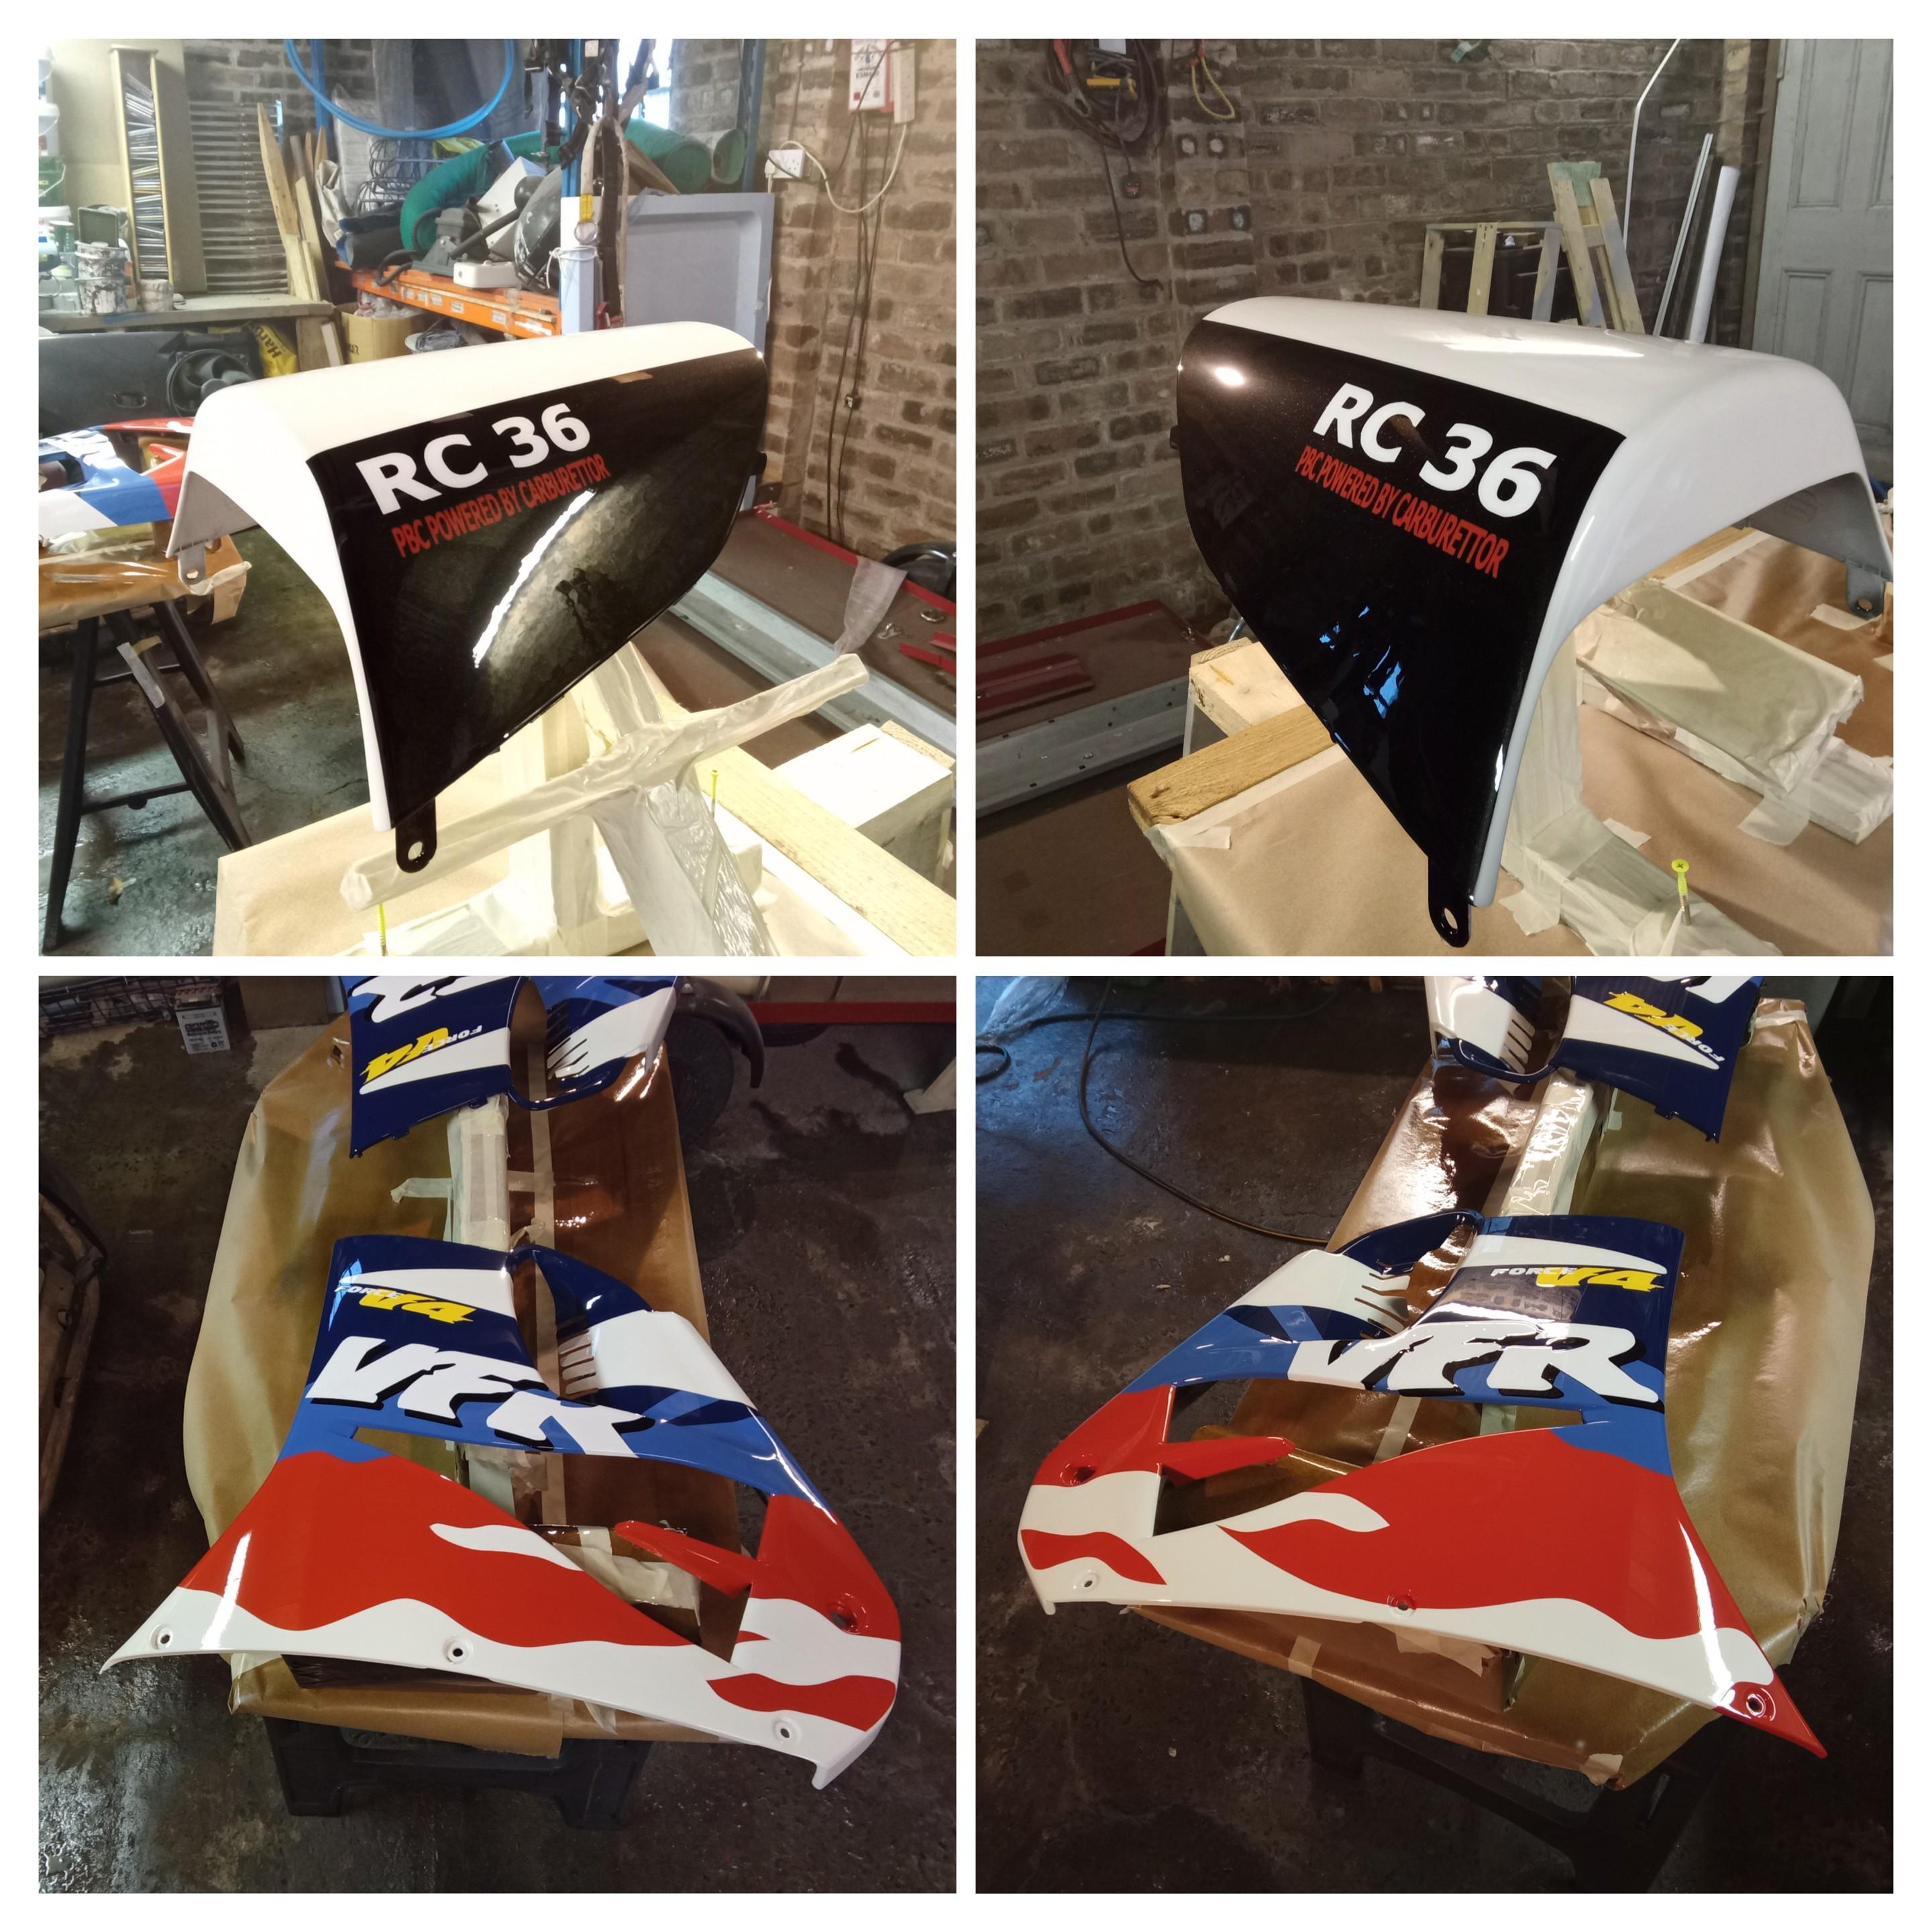
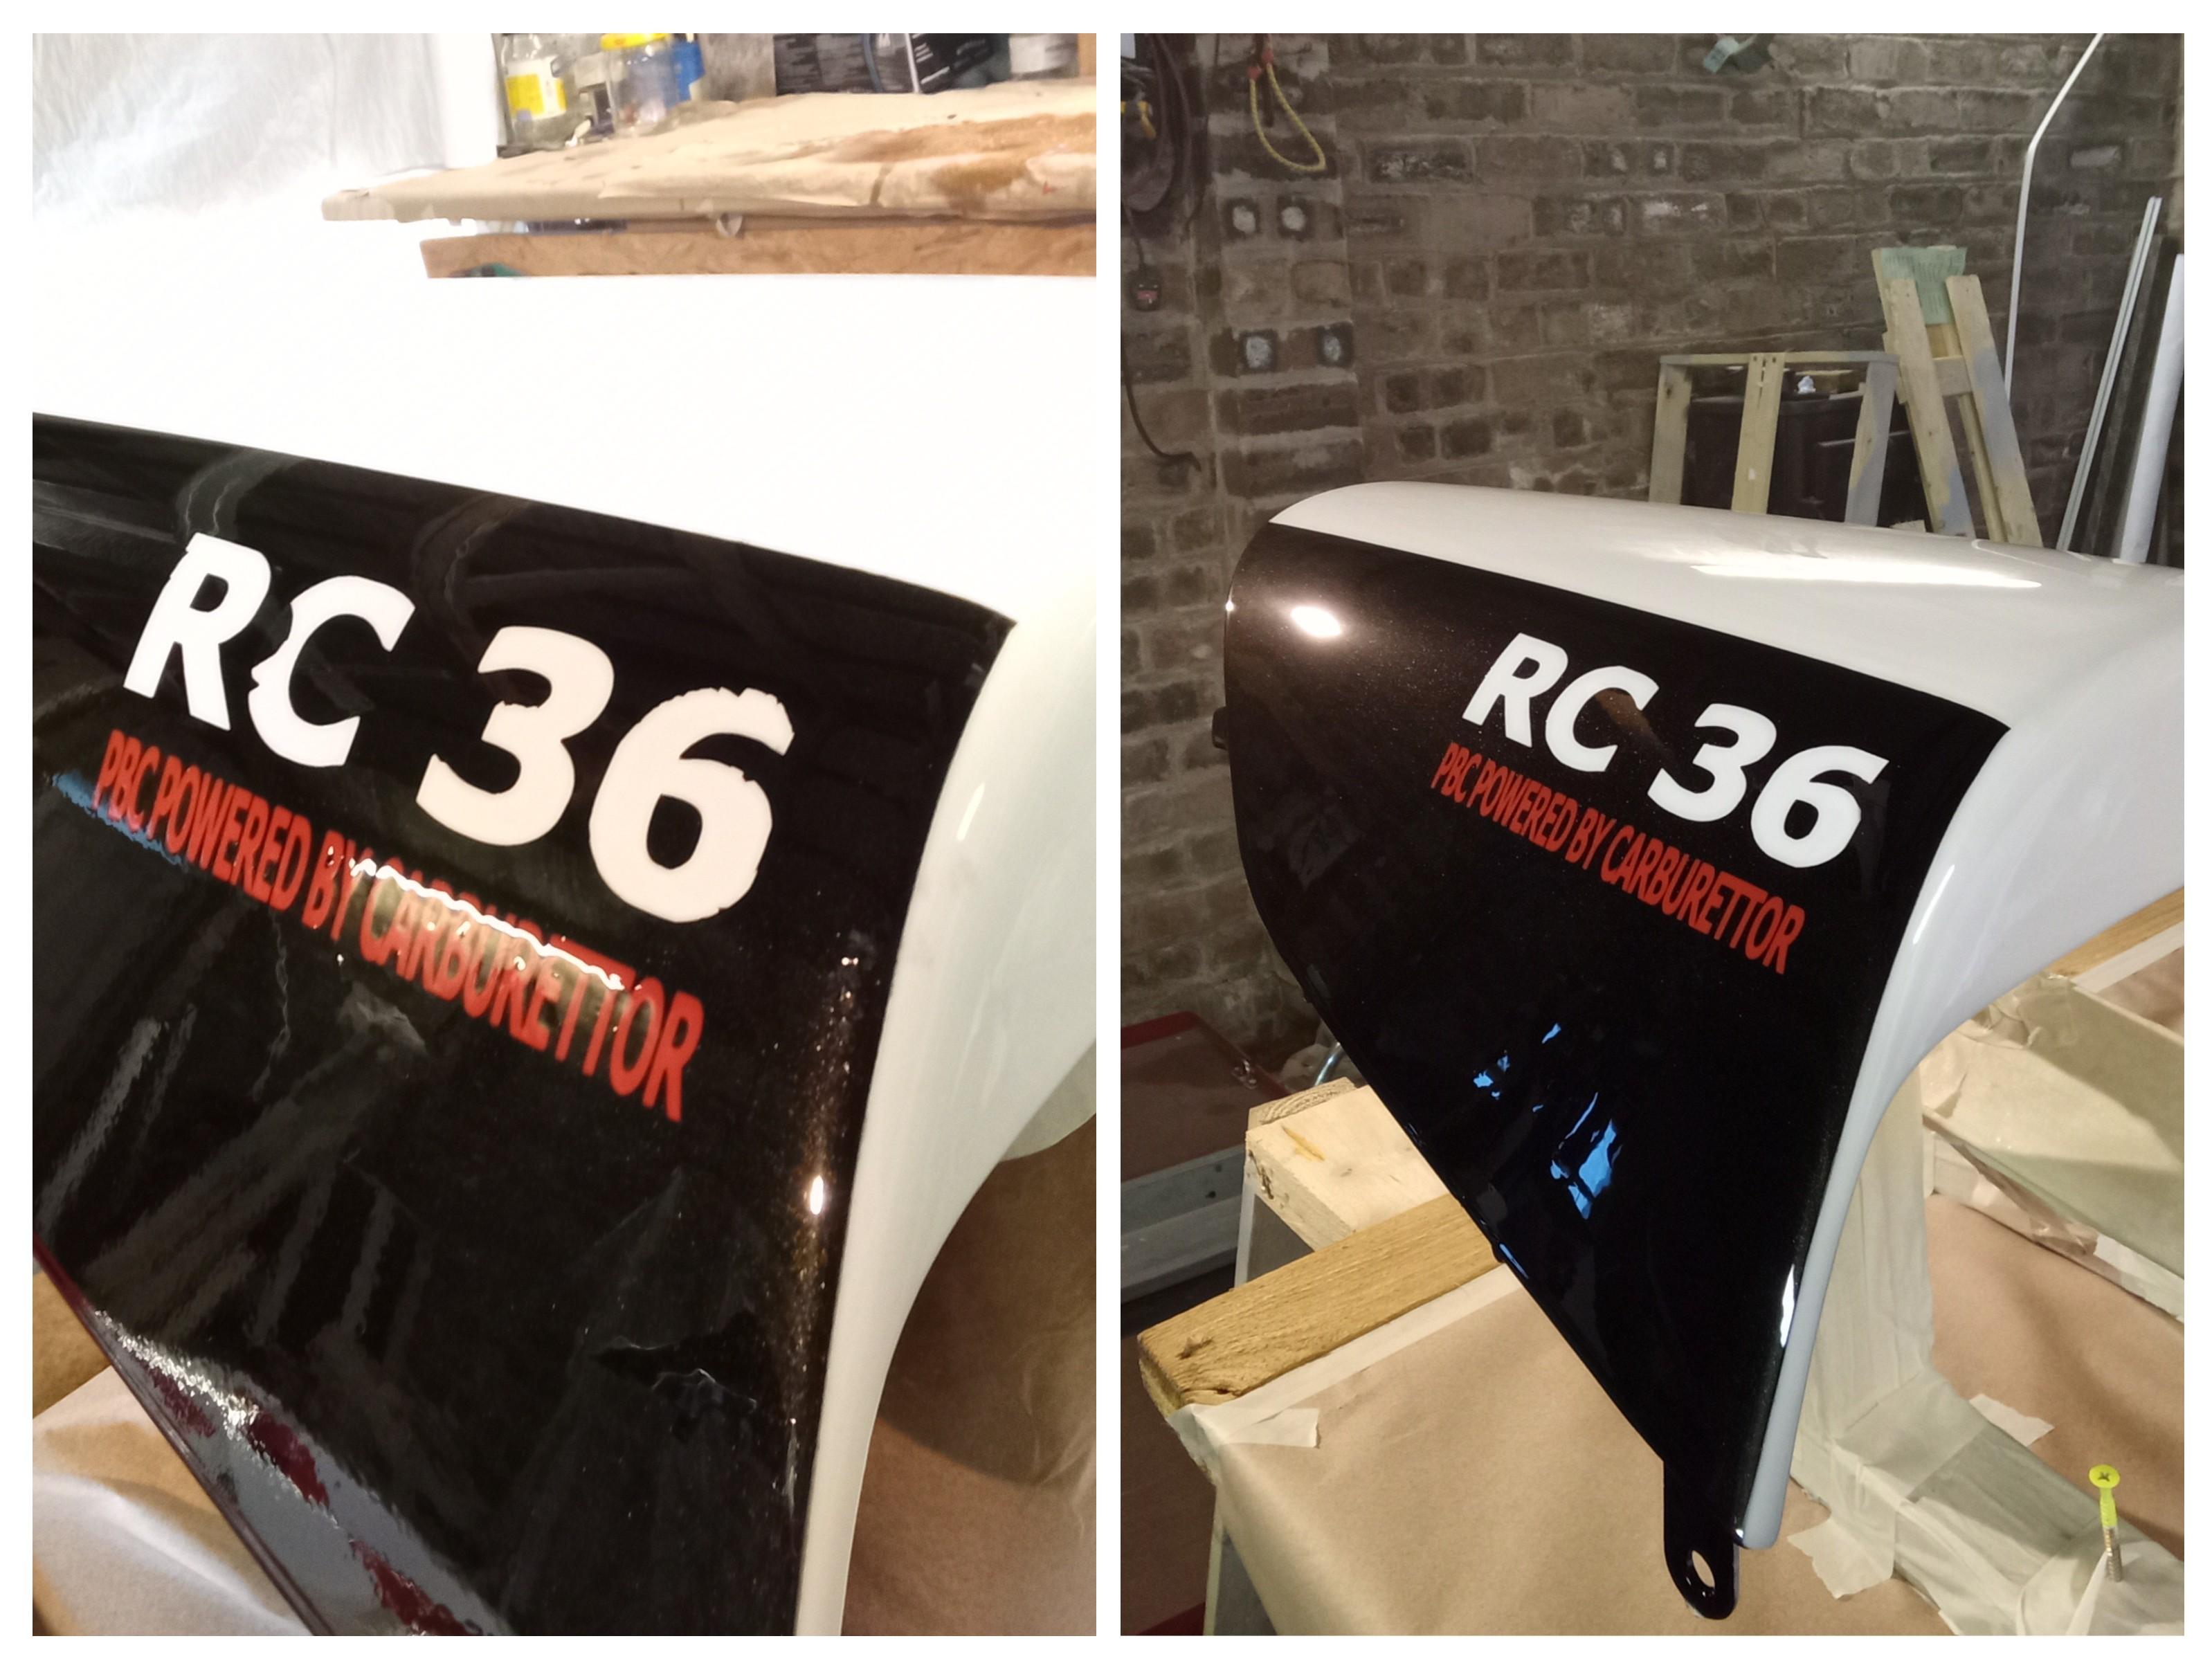
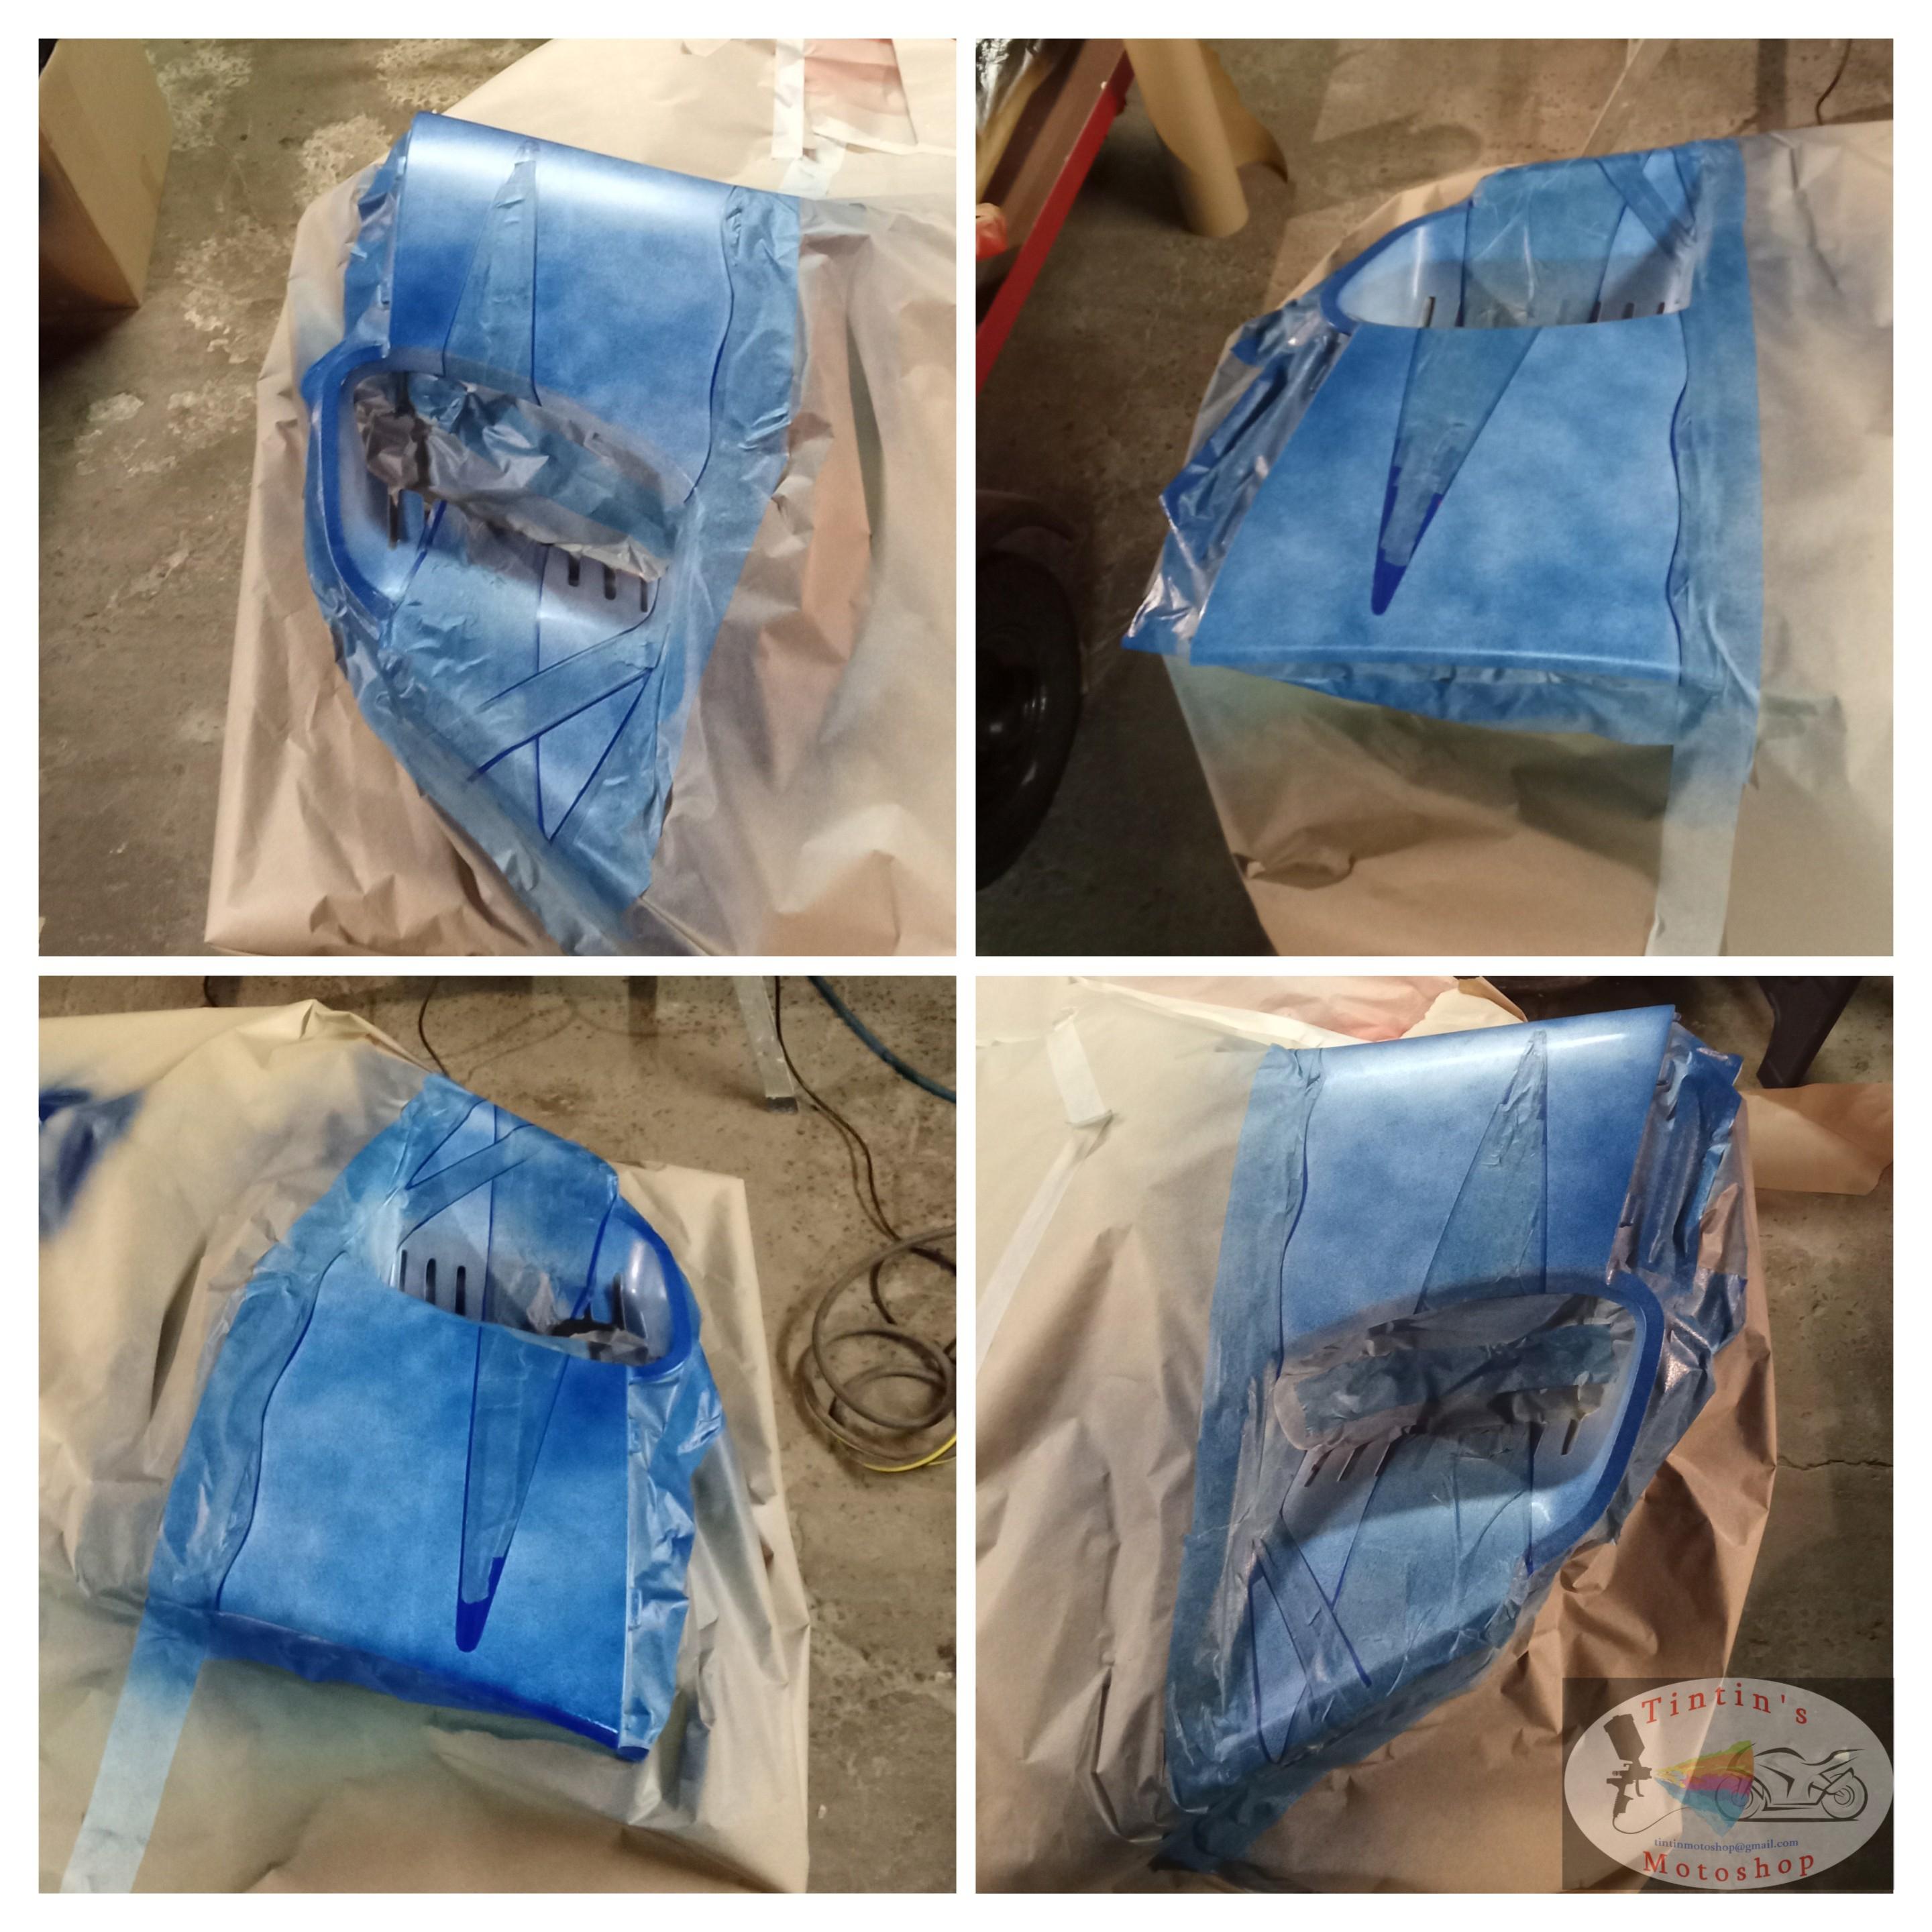
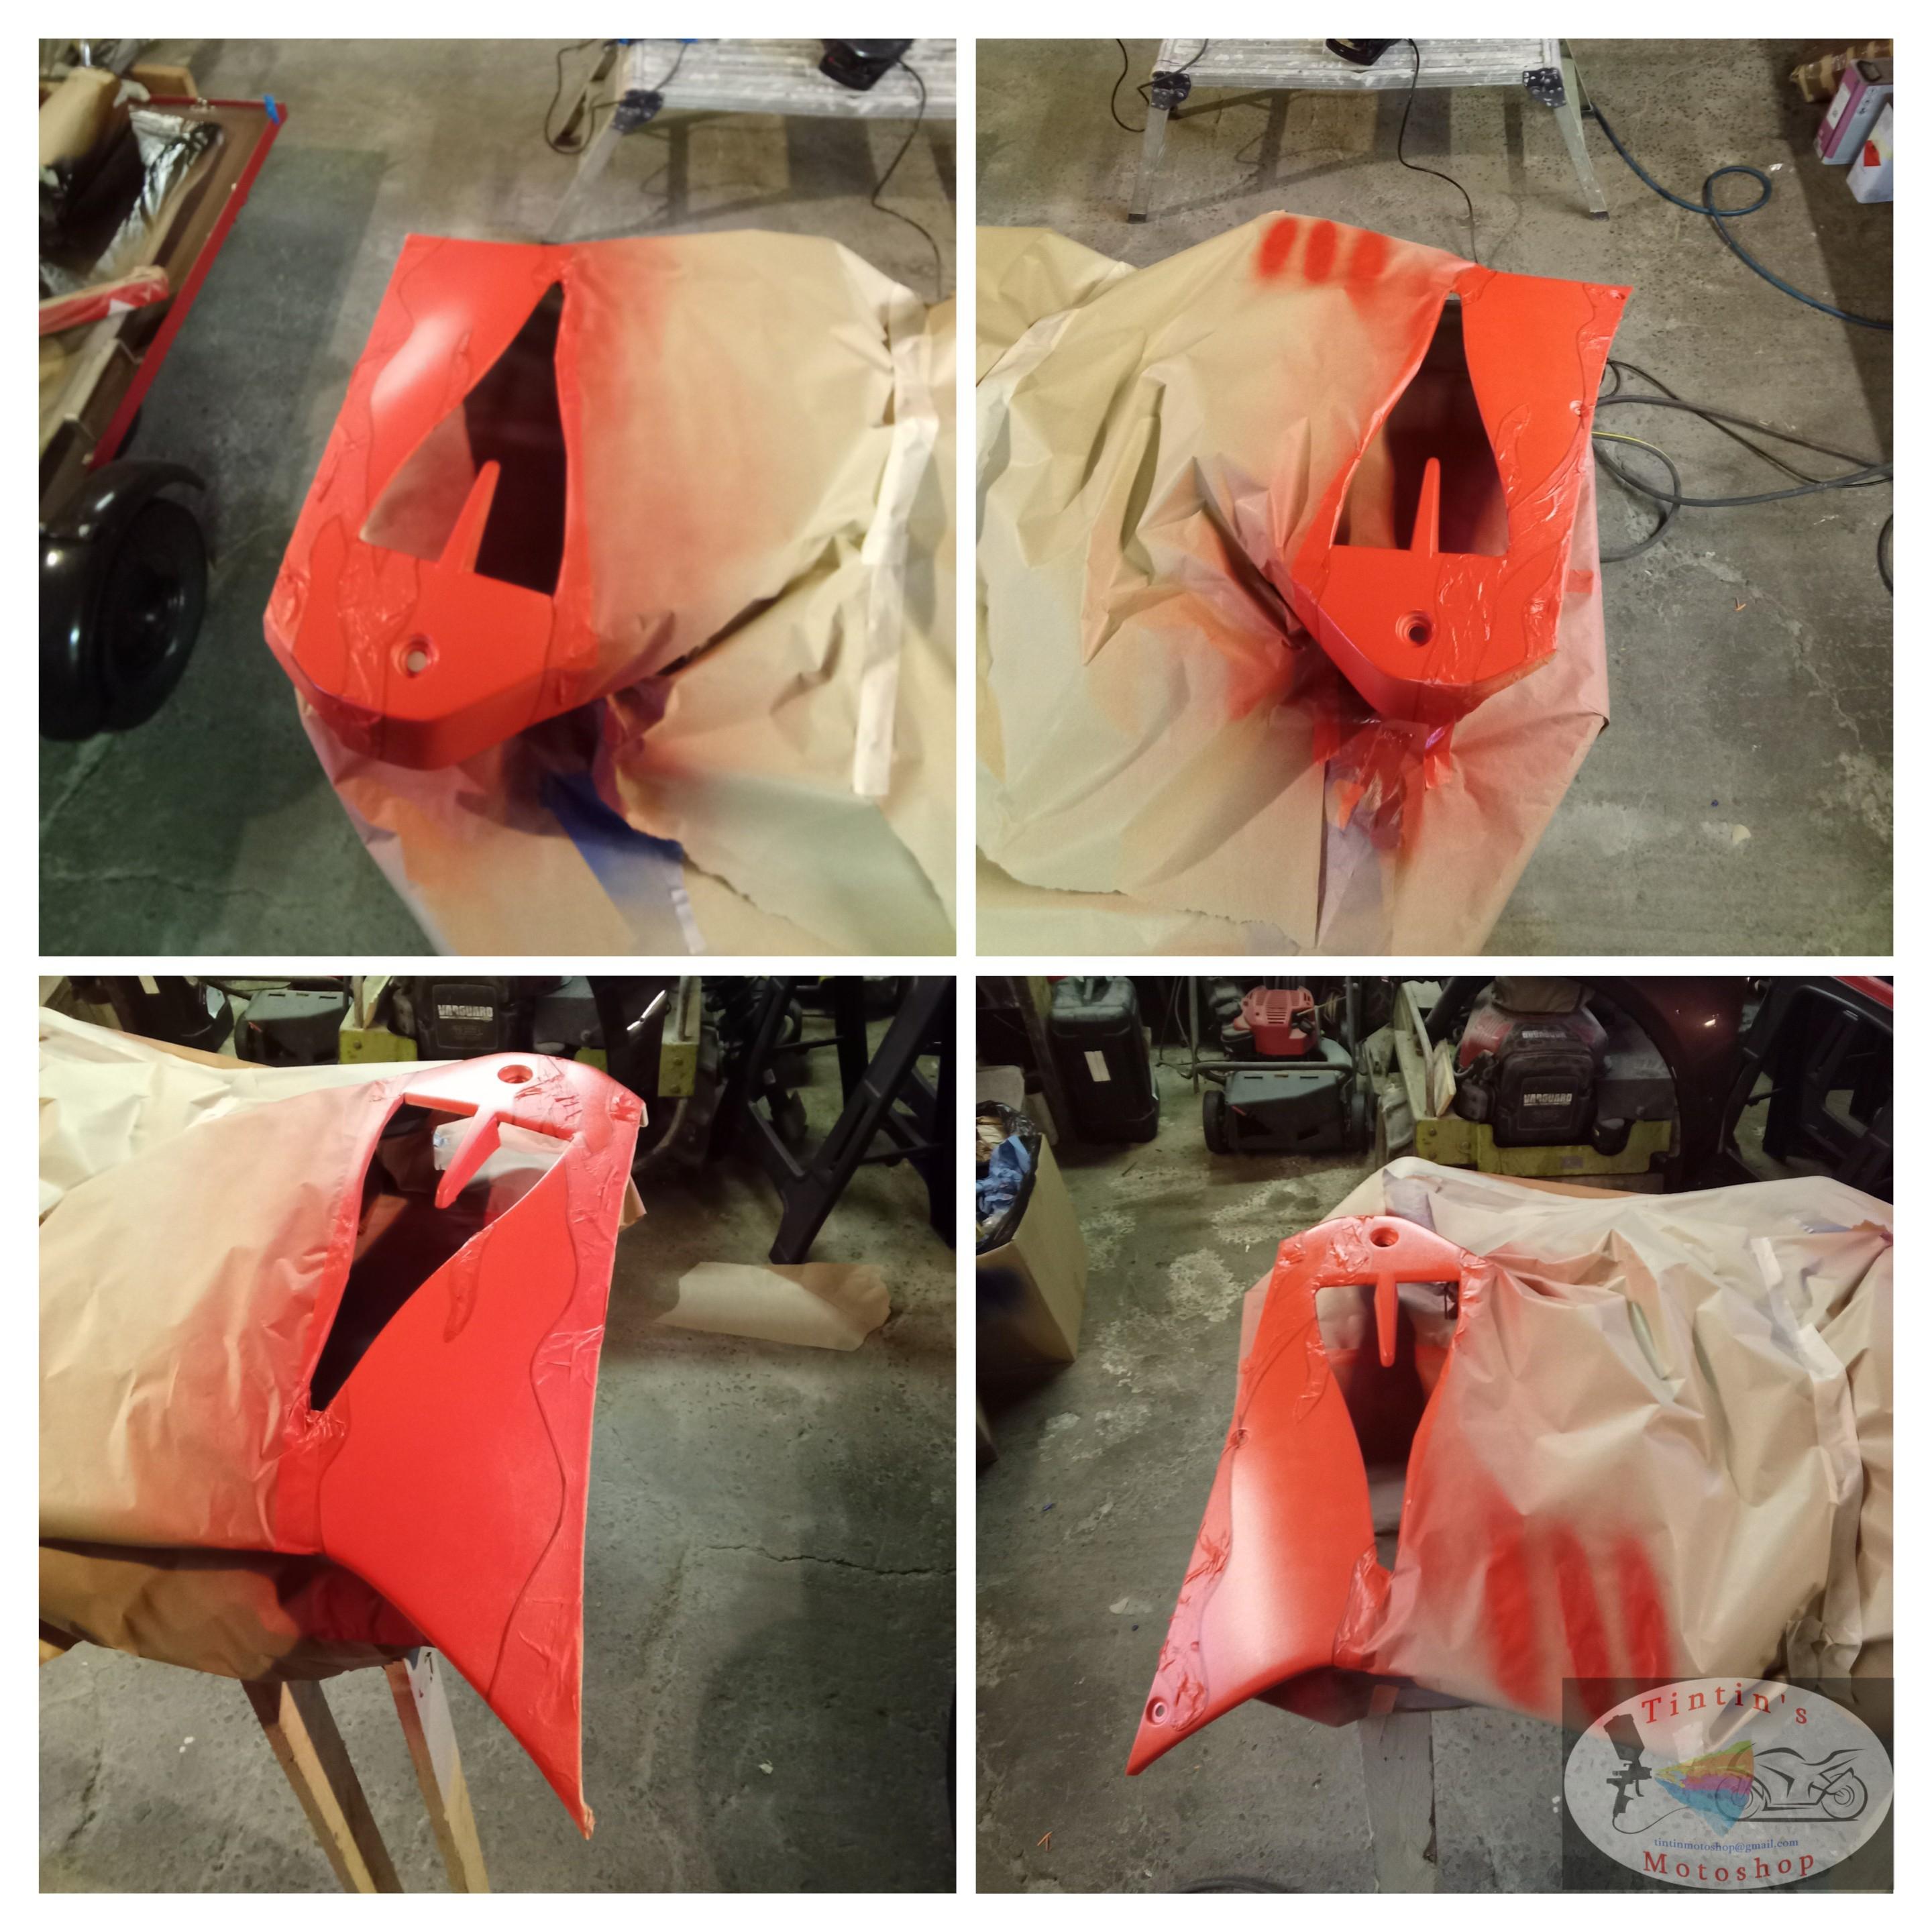
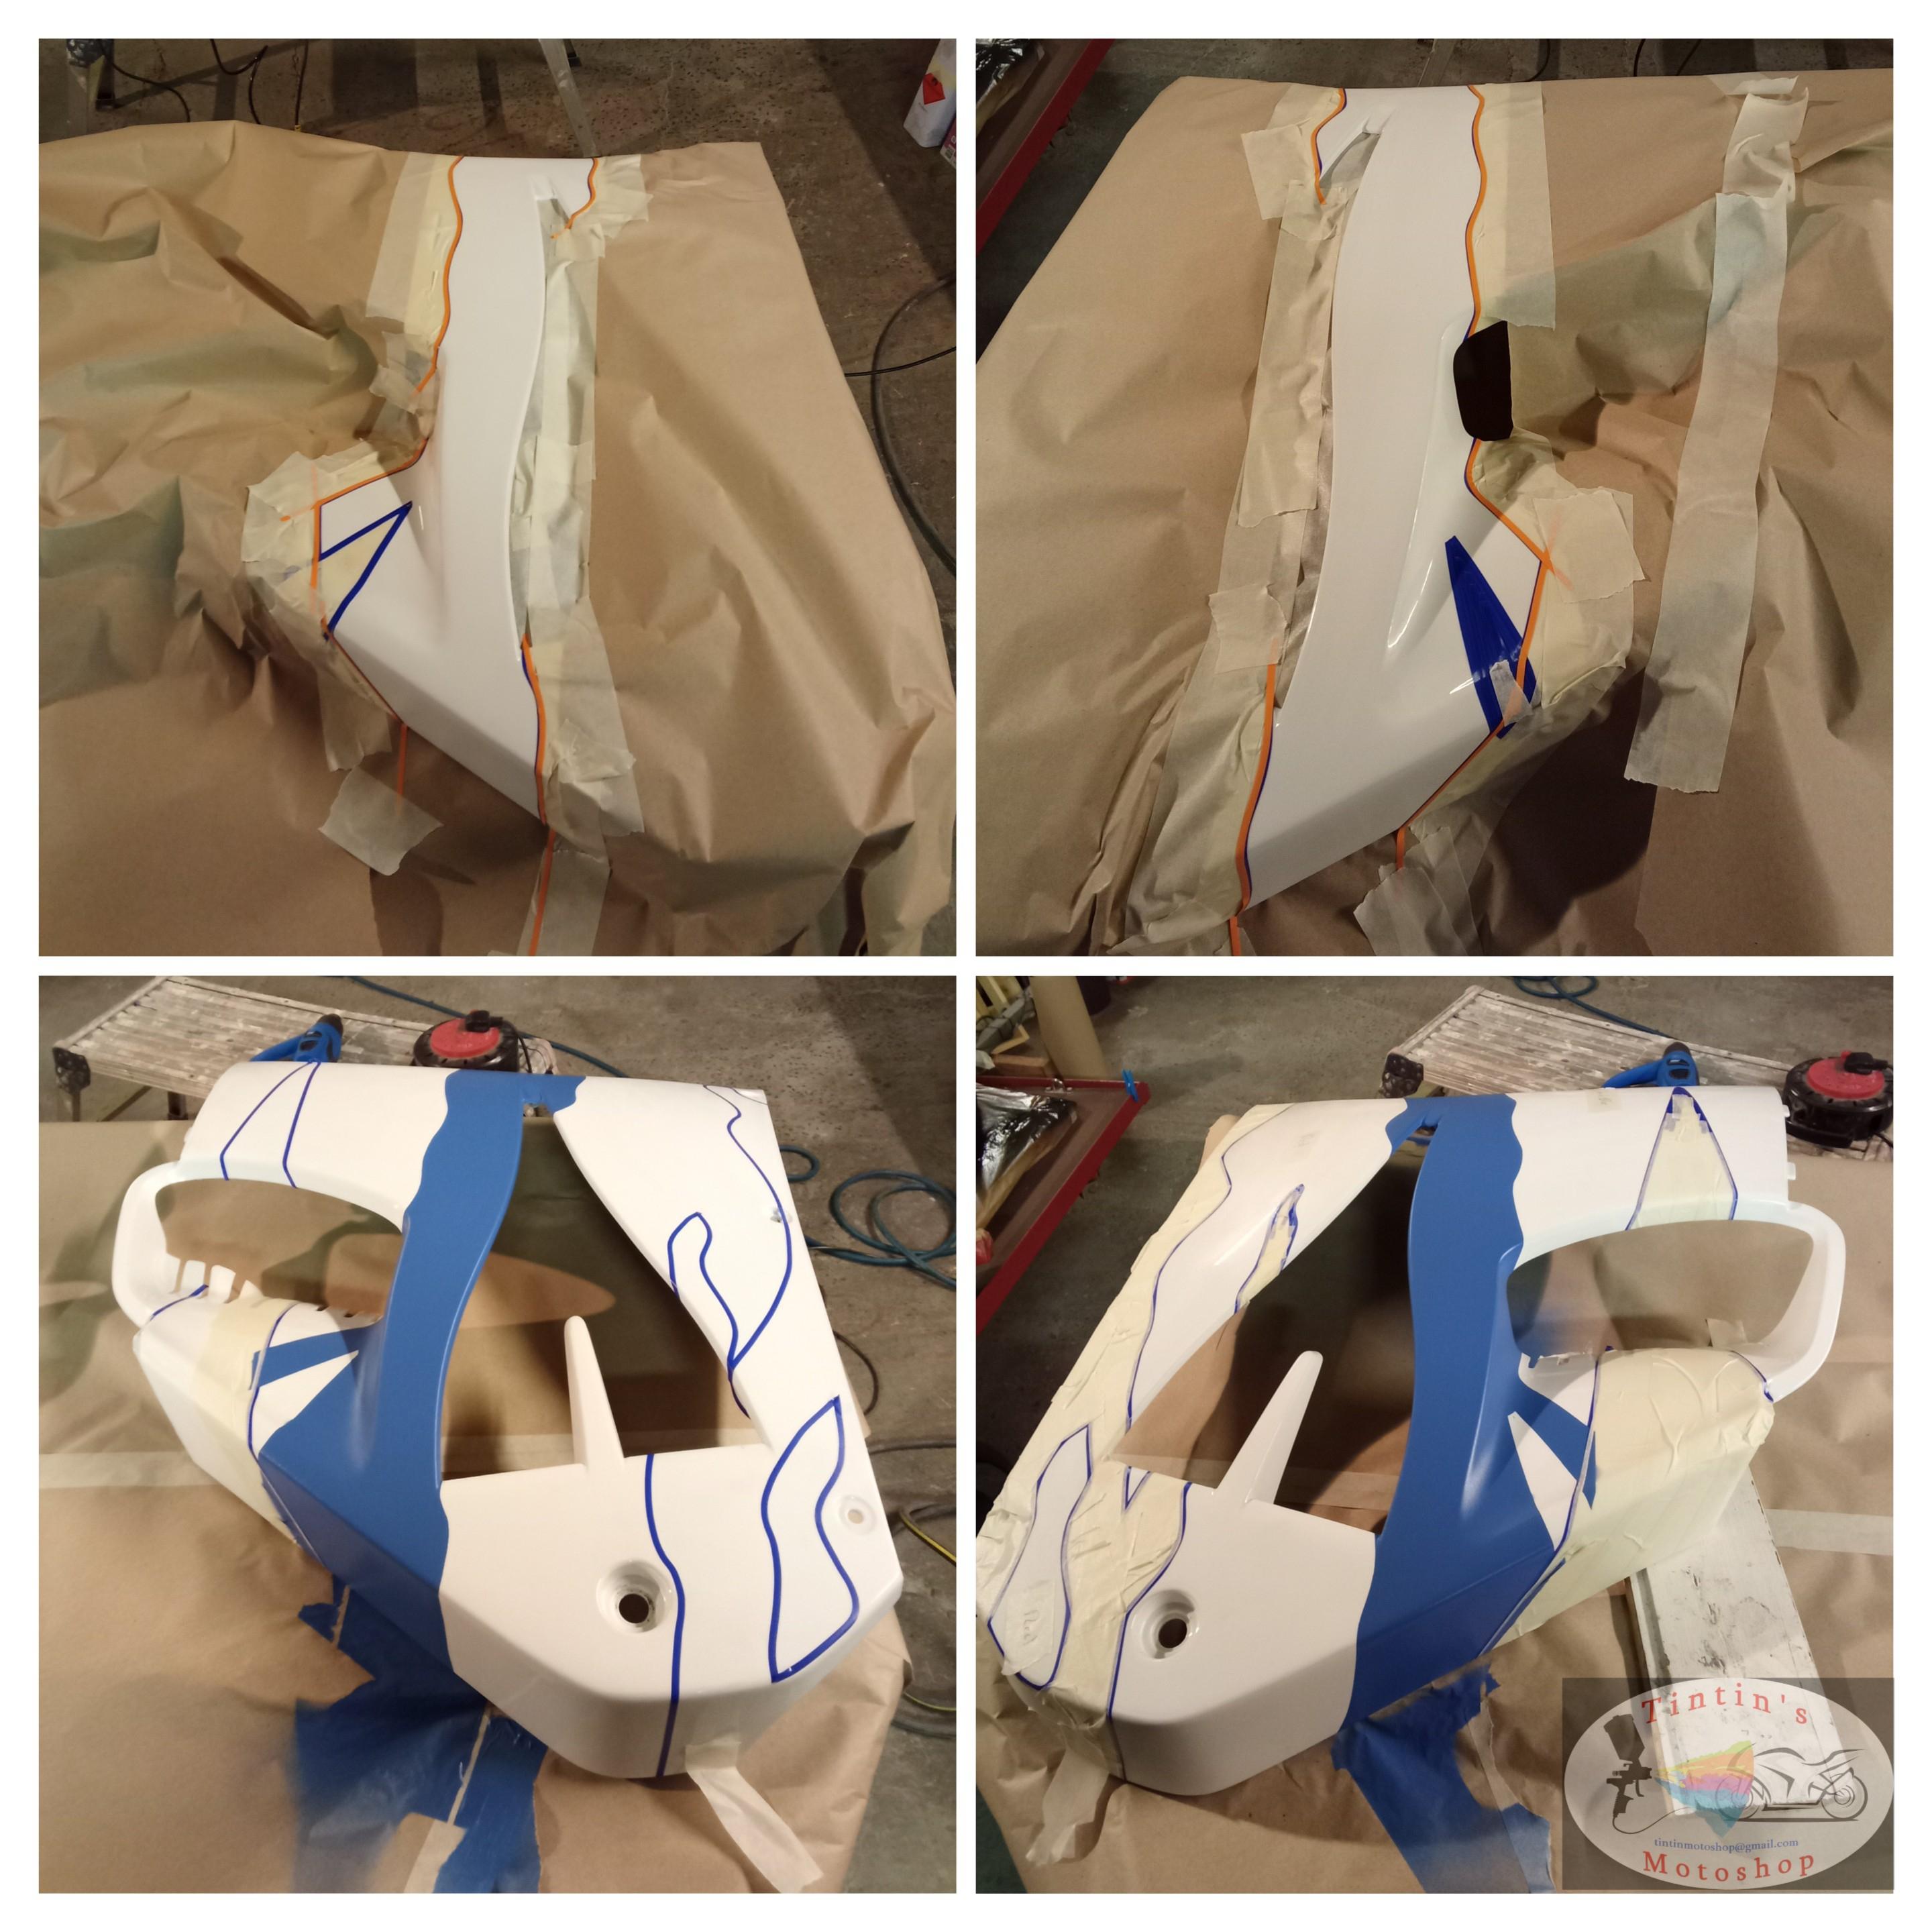
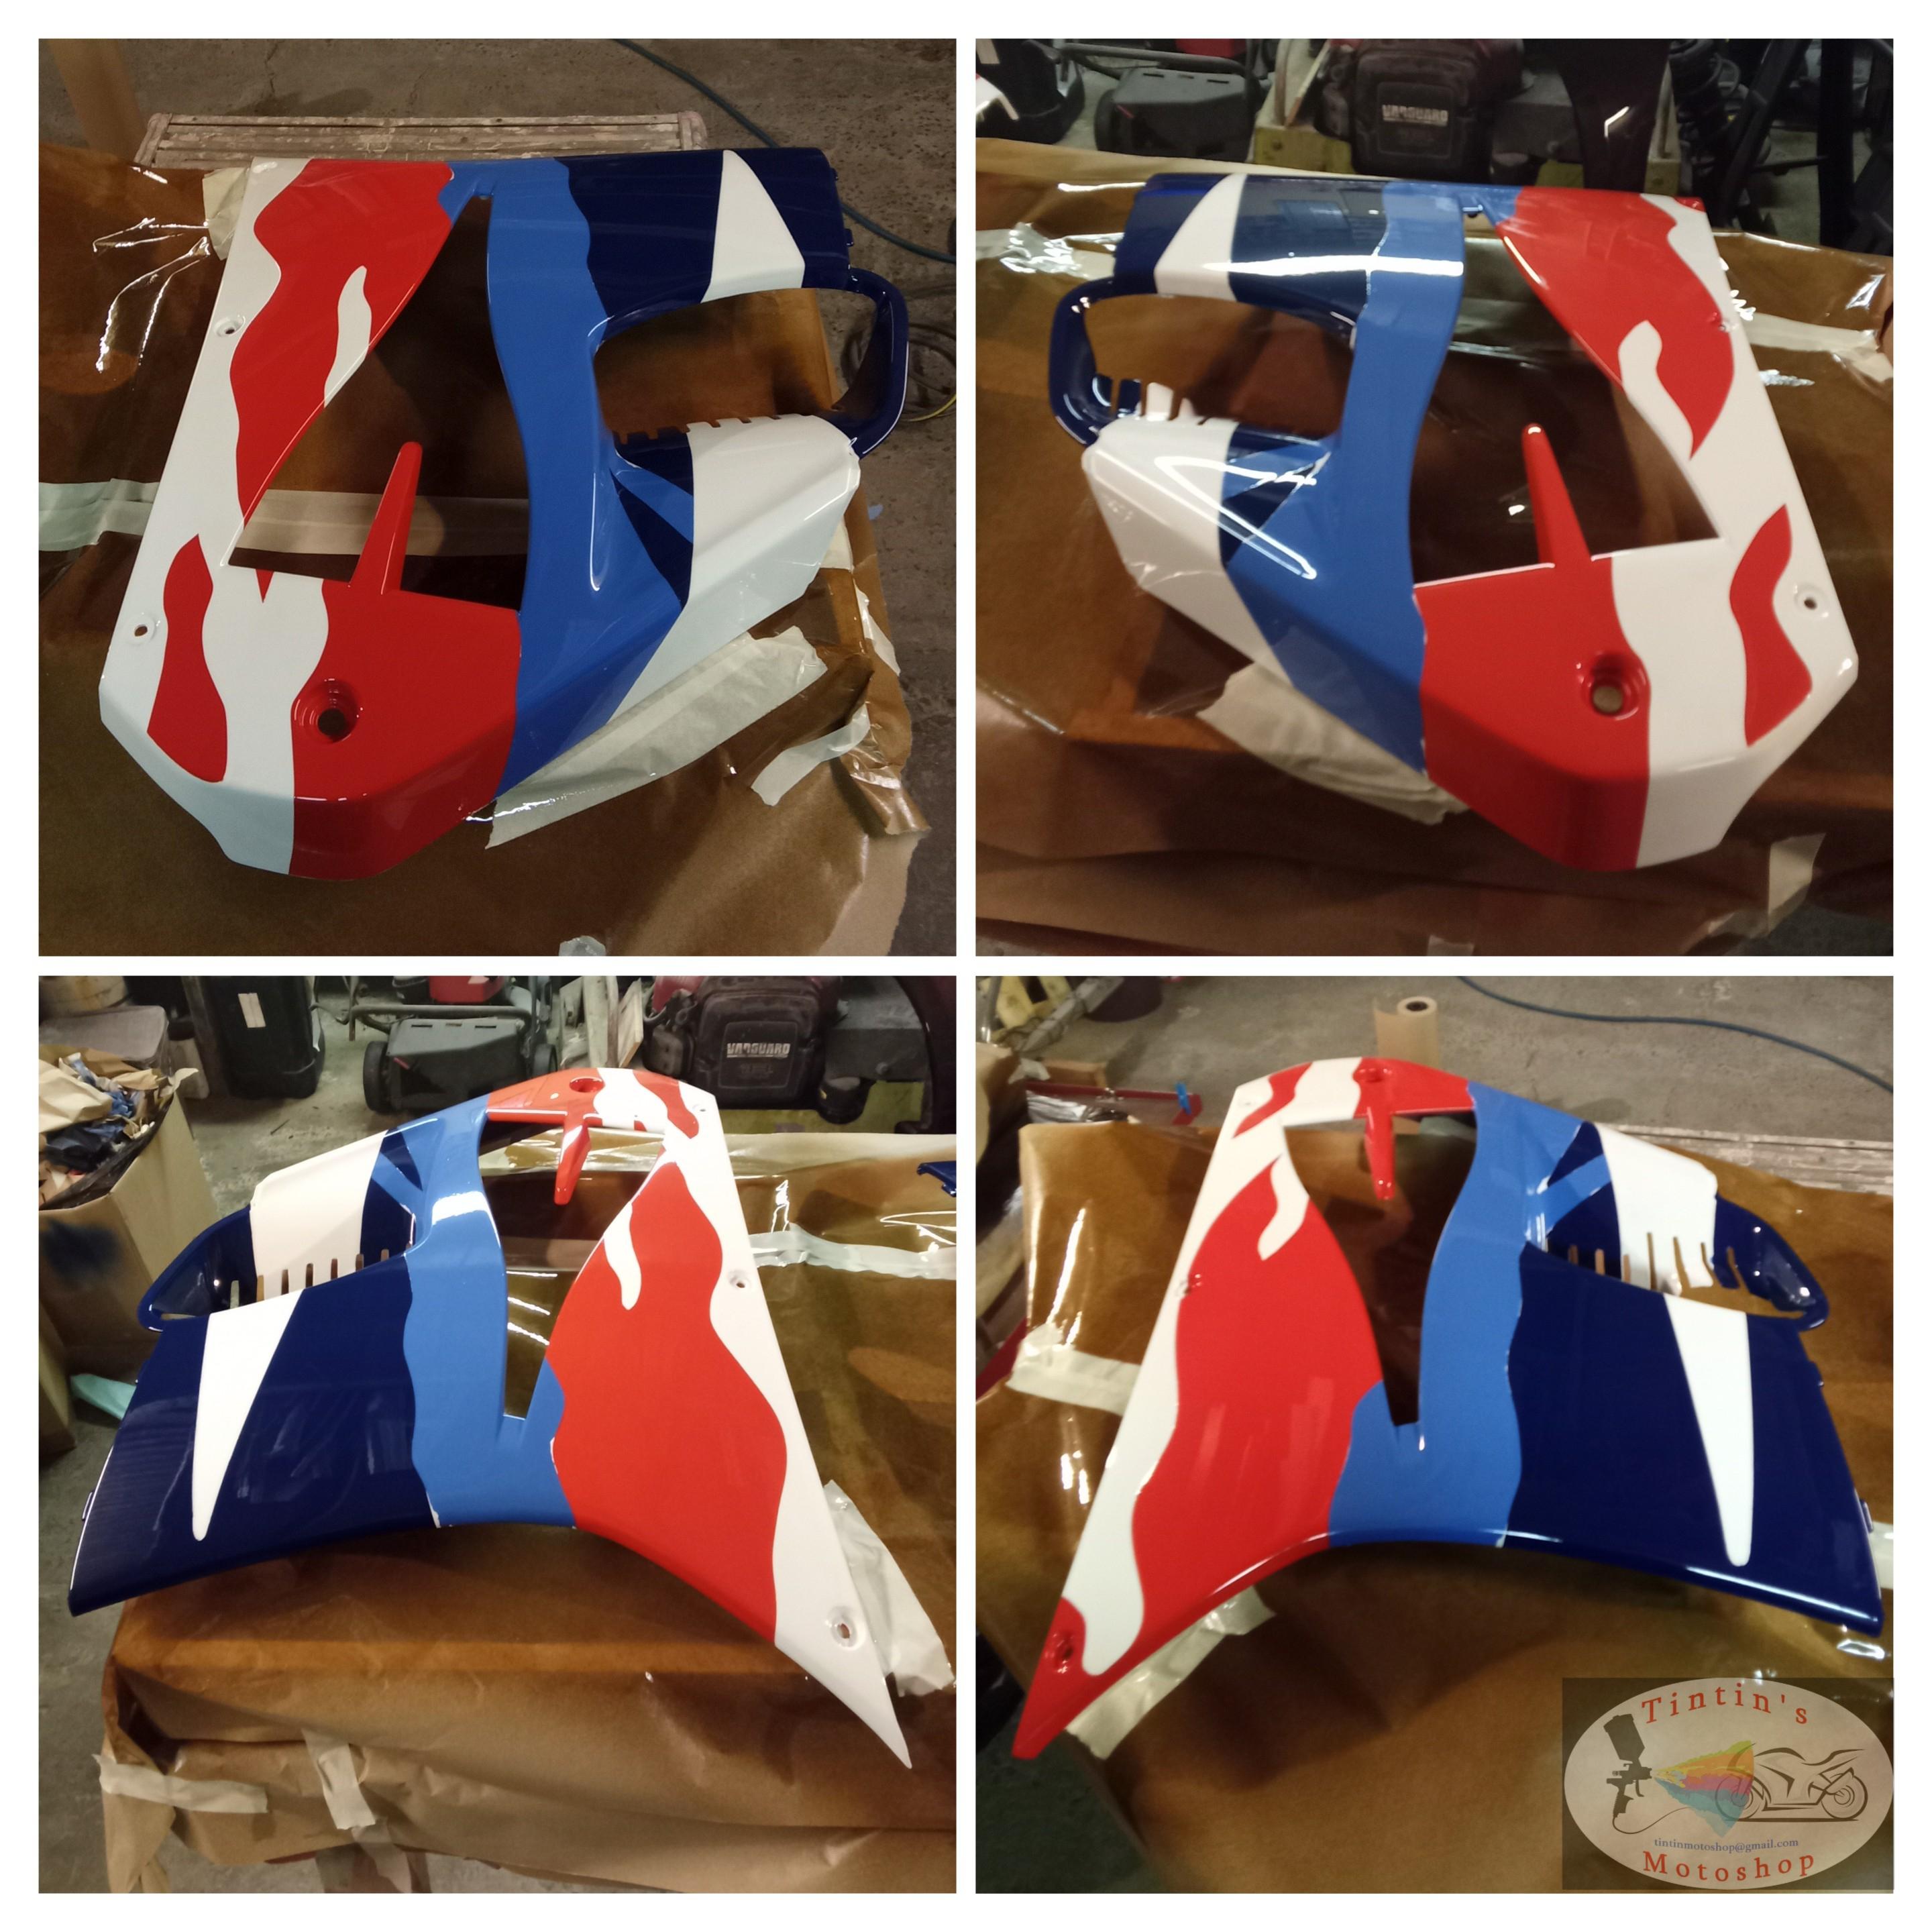
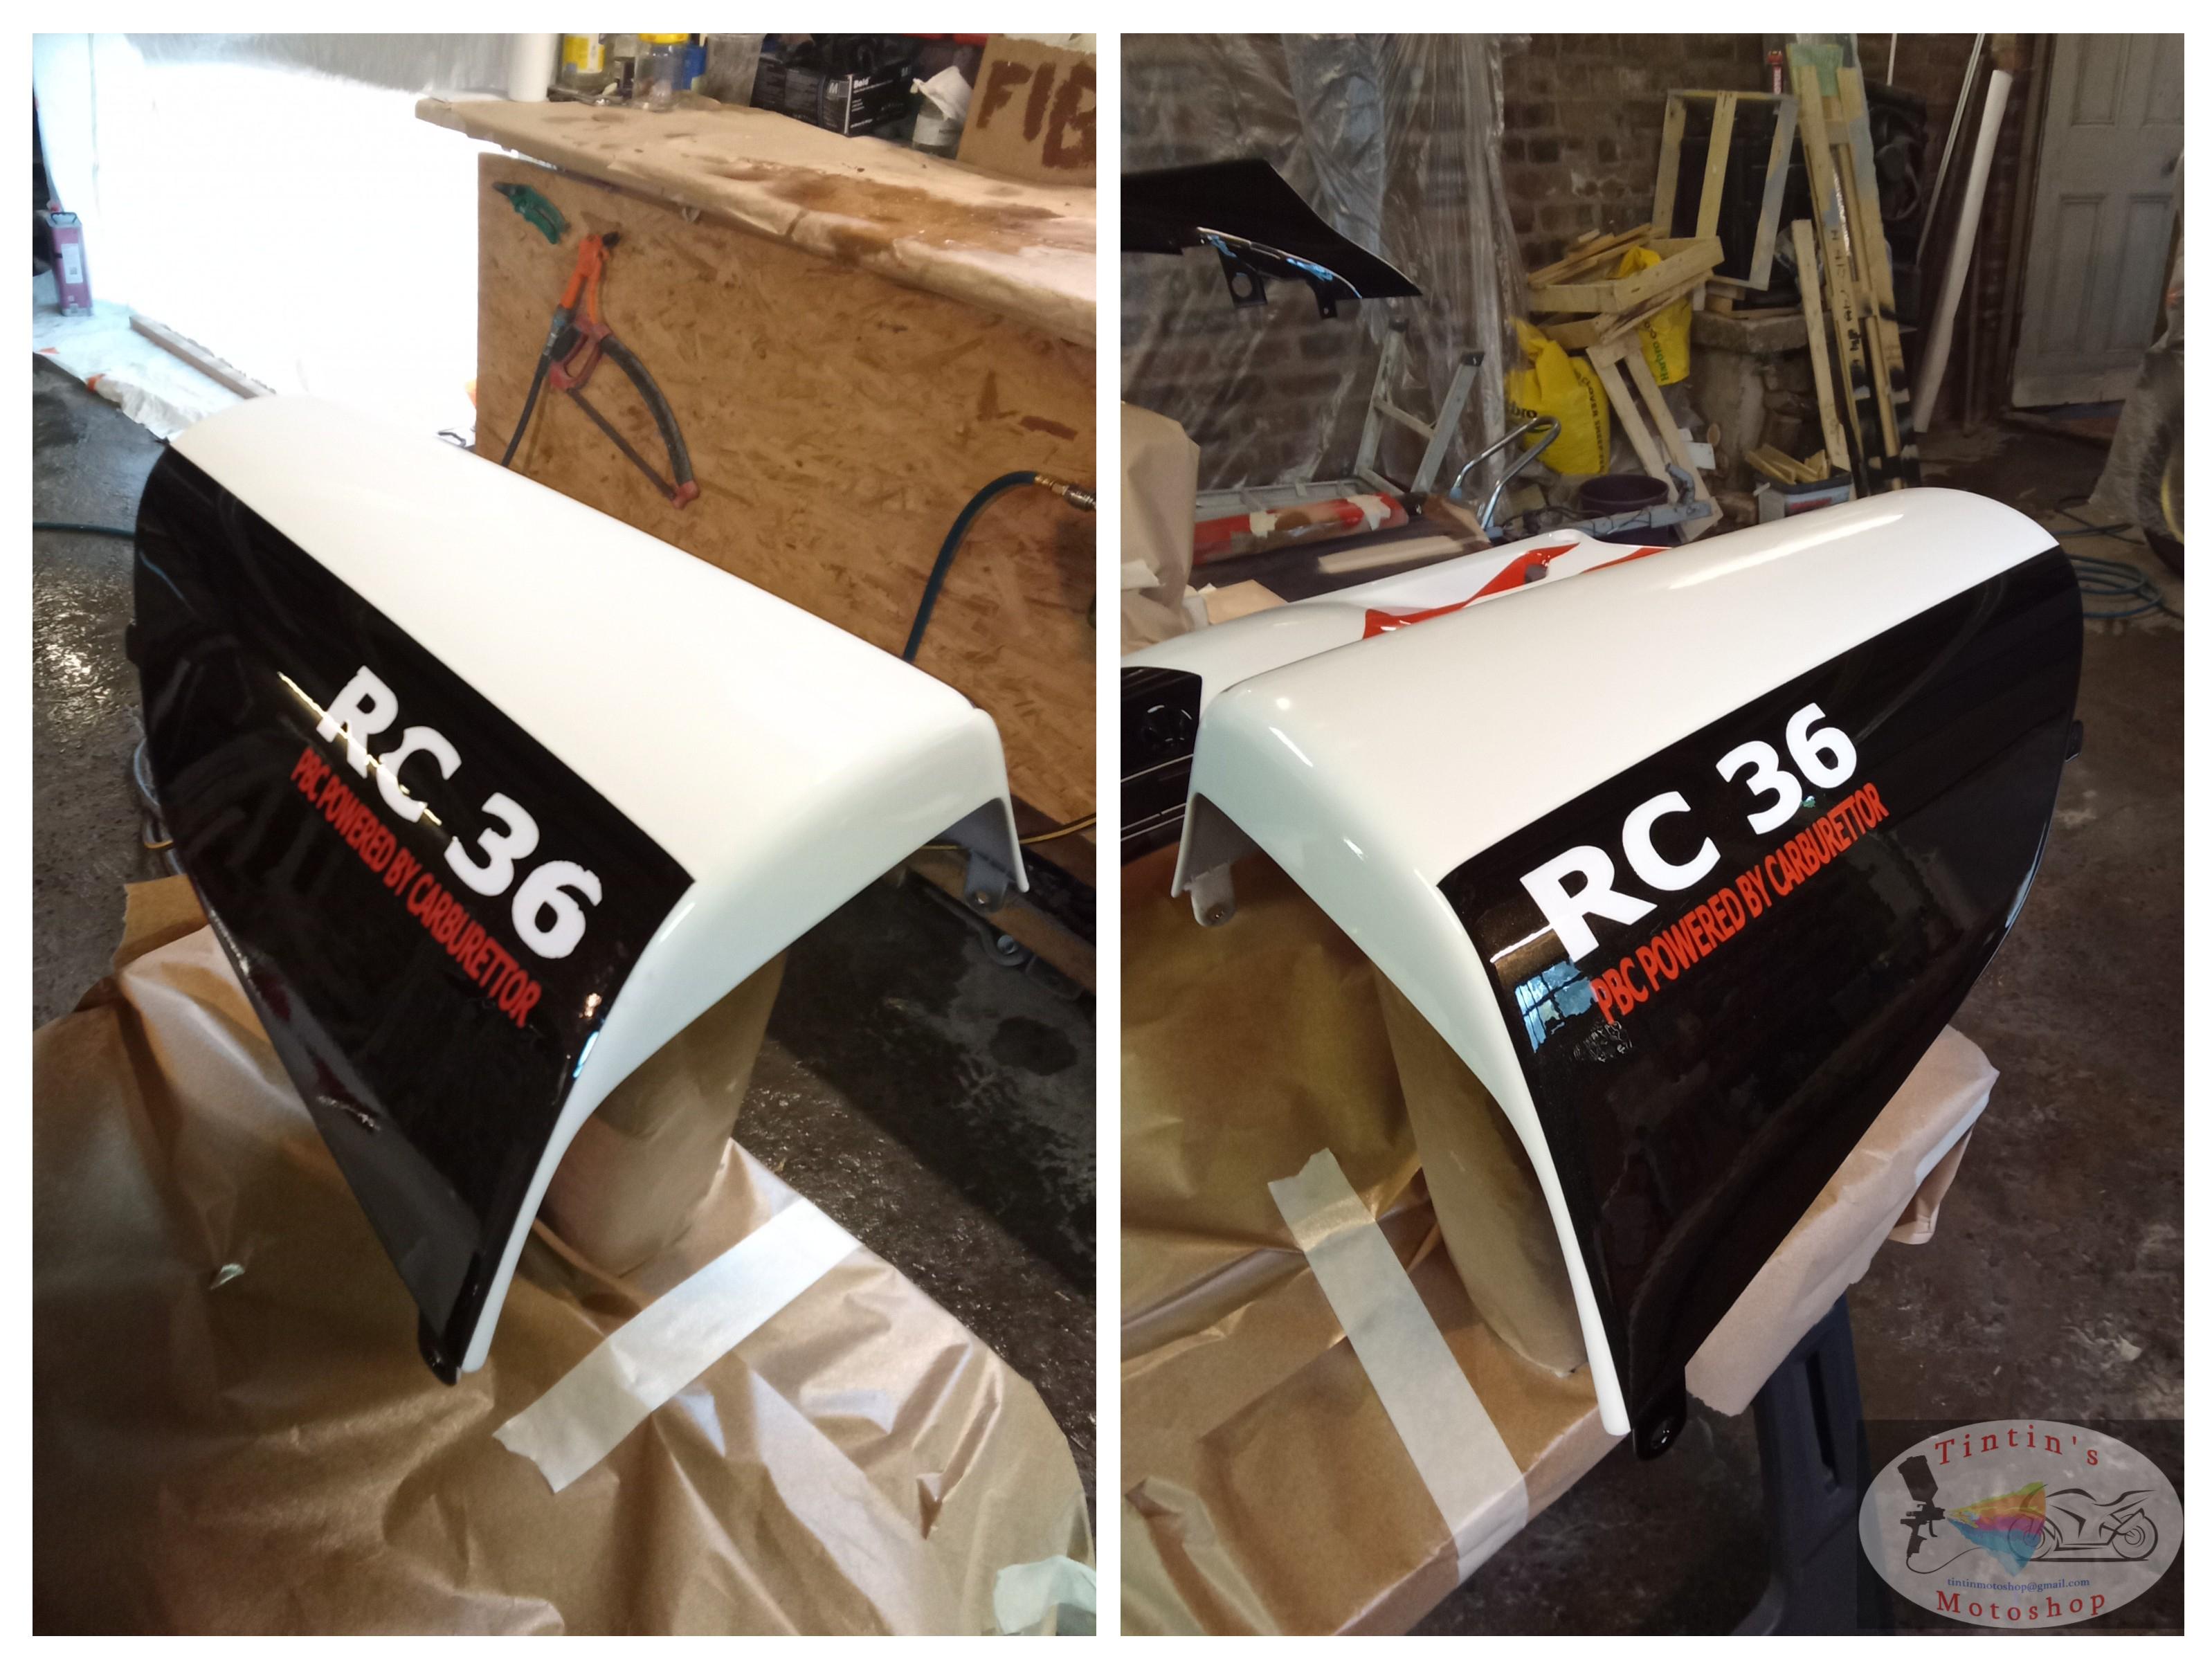
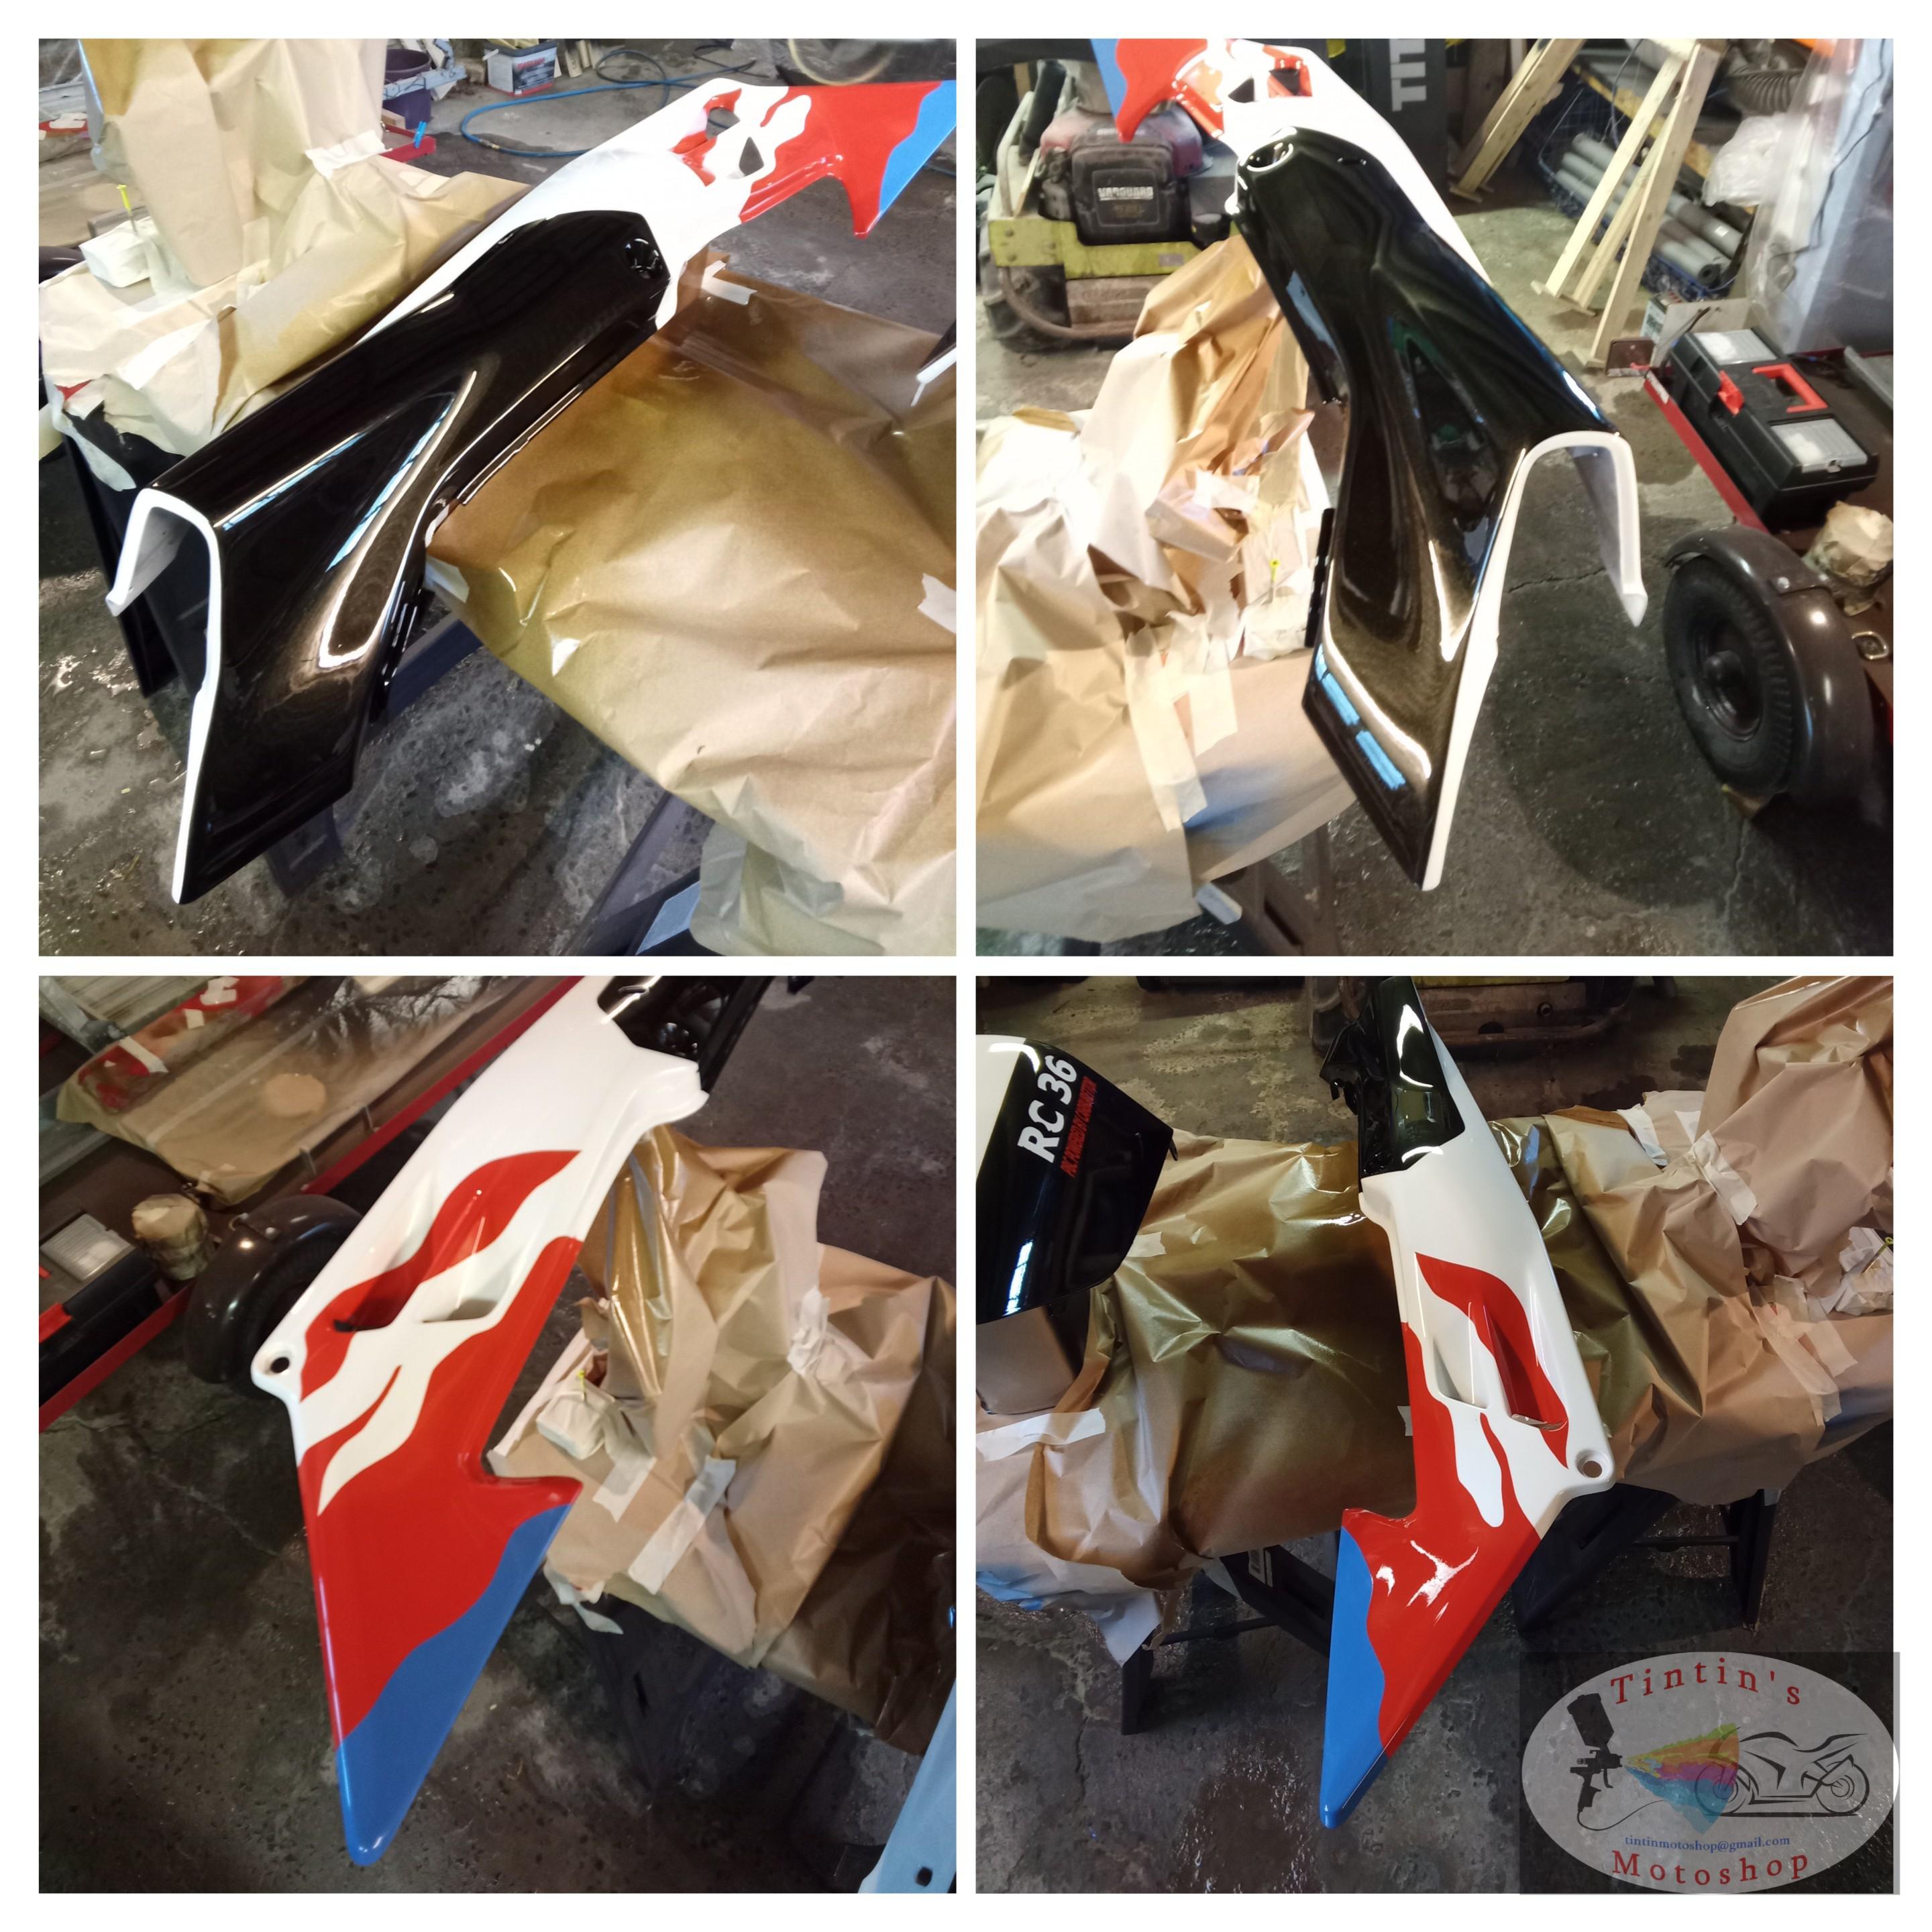
Good morning everyone, Here are the progress and set backs from this week and last weekend. A lot of masking, painting, bleeding, re-masking, airbrushing, repeat. If anything, that job is teaching me patience and accepting my mistakes. Still unsure about what happened about on the "RC36" on the right hand side on the seat cover. Most likely a mix of airbrushing too thick, too soft sanding (p1200) and possibly a bad vinyl ? But once again, that will be adjusted on the next step. Slow and steady wins the race ! 🐢💪
1 point
-
2014 VFR for sale. Immaculate condition. 5700 miles. Lots of extras. Factory bags, 2 exhausts-Coffman’s & Titanium Delkevic, seat cowl, rear grab handles, Bar Risers, speed bleeders, Pazzo Levers, screen, pit bull & trex stands, Ram mount & charger and more. All goes for $7k!
1 point
-
First Pic looks like a Dutch Unicorn in the background. With boobs.1 point
-
Version v3
11,898 downloads
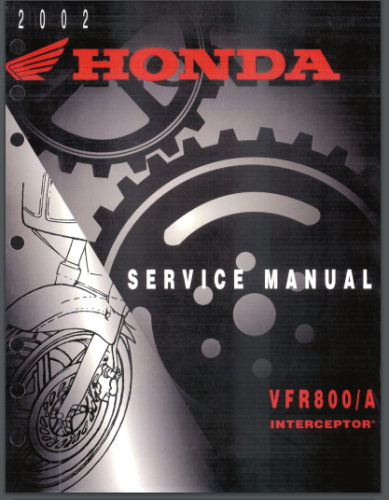
As originally made available by HispanicSlammer, this manual first came out for the 2002 model (first 6th generation model year). Not much has changed with respect to servicing the 6th gen VTEC since it was introduced in 2002. By-and-large, this manual applies to all 6th generation VFRs for years 2002 to 2011. There are only minor differences in some later years, most notably starting in 2006, with changes to VTEC engagement RPM and the wiring harness. All the hard work for this scanned version was done by an unknown source. The actual manual part is not searchable since it is a compilation of page scans only. I was tired of scrolling around the huge document trying to find what I needed. So I spent a few hours generating bookmarks. This version has bookmarks for all the subsections for each major section in the manual. The first page for each major section lists all the subsections and these each now have a bookmark for quick and easy document navigation. If you enable bookmark searching in your PDF reader - and most PDF readers support this - you can then search for major terms and subsections and get search results in the bookmarks. Remember, this Factory Service Manual is far from perfect. Firstly, it presumes you have a reasonable level of mechanic/shop experience. Secondly, it contains many errors. Not just typos, but erroneous information. Some of it was fixed in errata releases in subsequent years but not all of it (trust me, I've checked). I strongly advise that you search for relevant topics, review them and post any questions you may have in this most excellent of forums, VFRD, prior to performing your own major servicing of your VFR. There are amazingly helpful members here and a lot of great How-To posts. Enjoy and be safe! P.S. new version v3 has fully searchable text thanks to Adobe Acrobat's amazing "recognize text" OCR feature which has the added bonus of deskewing the page images as well as generating fully searchable text!1 point -
With this Abba stand you will be able to not only lift both wheels of the ground but also remove the whole front end for instance when you need to replace head bearings.1 point
-
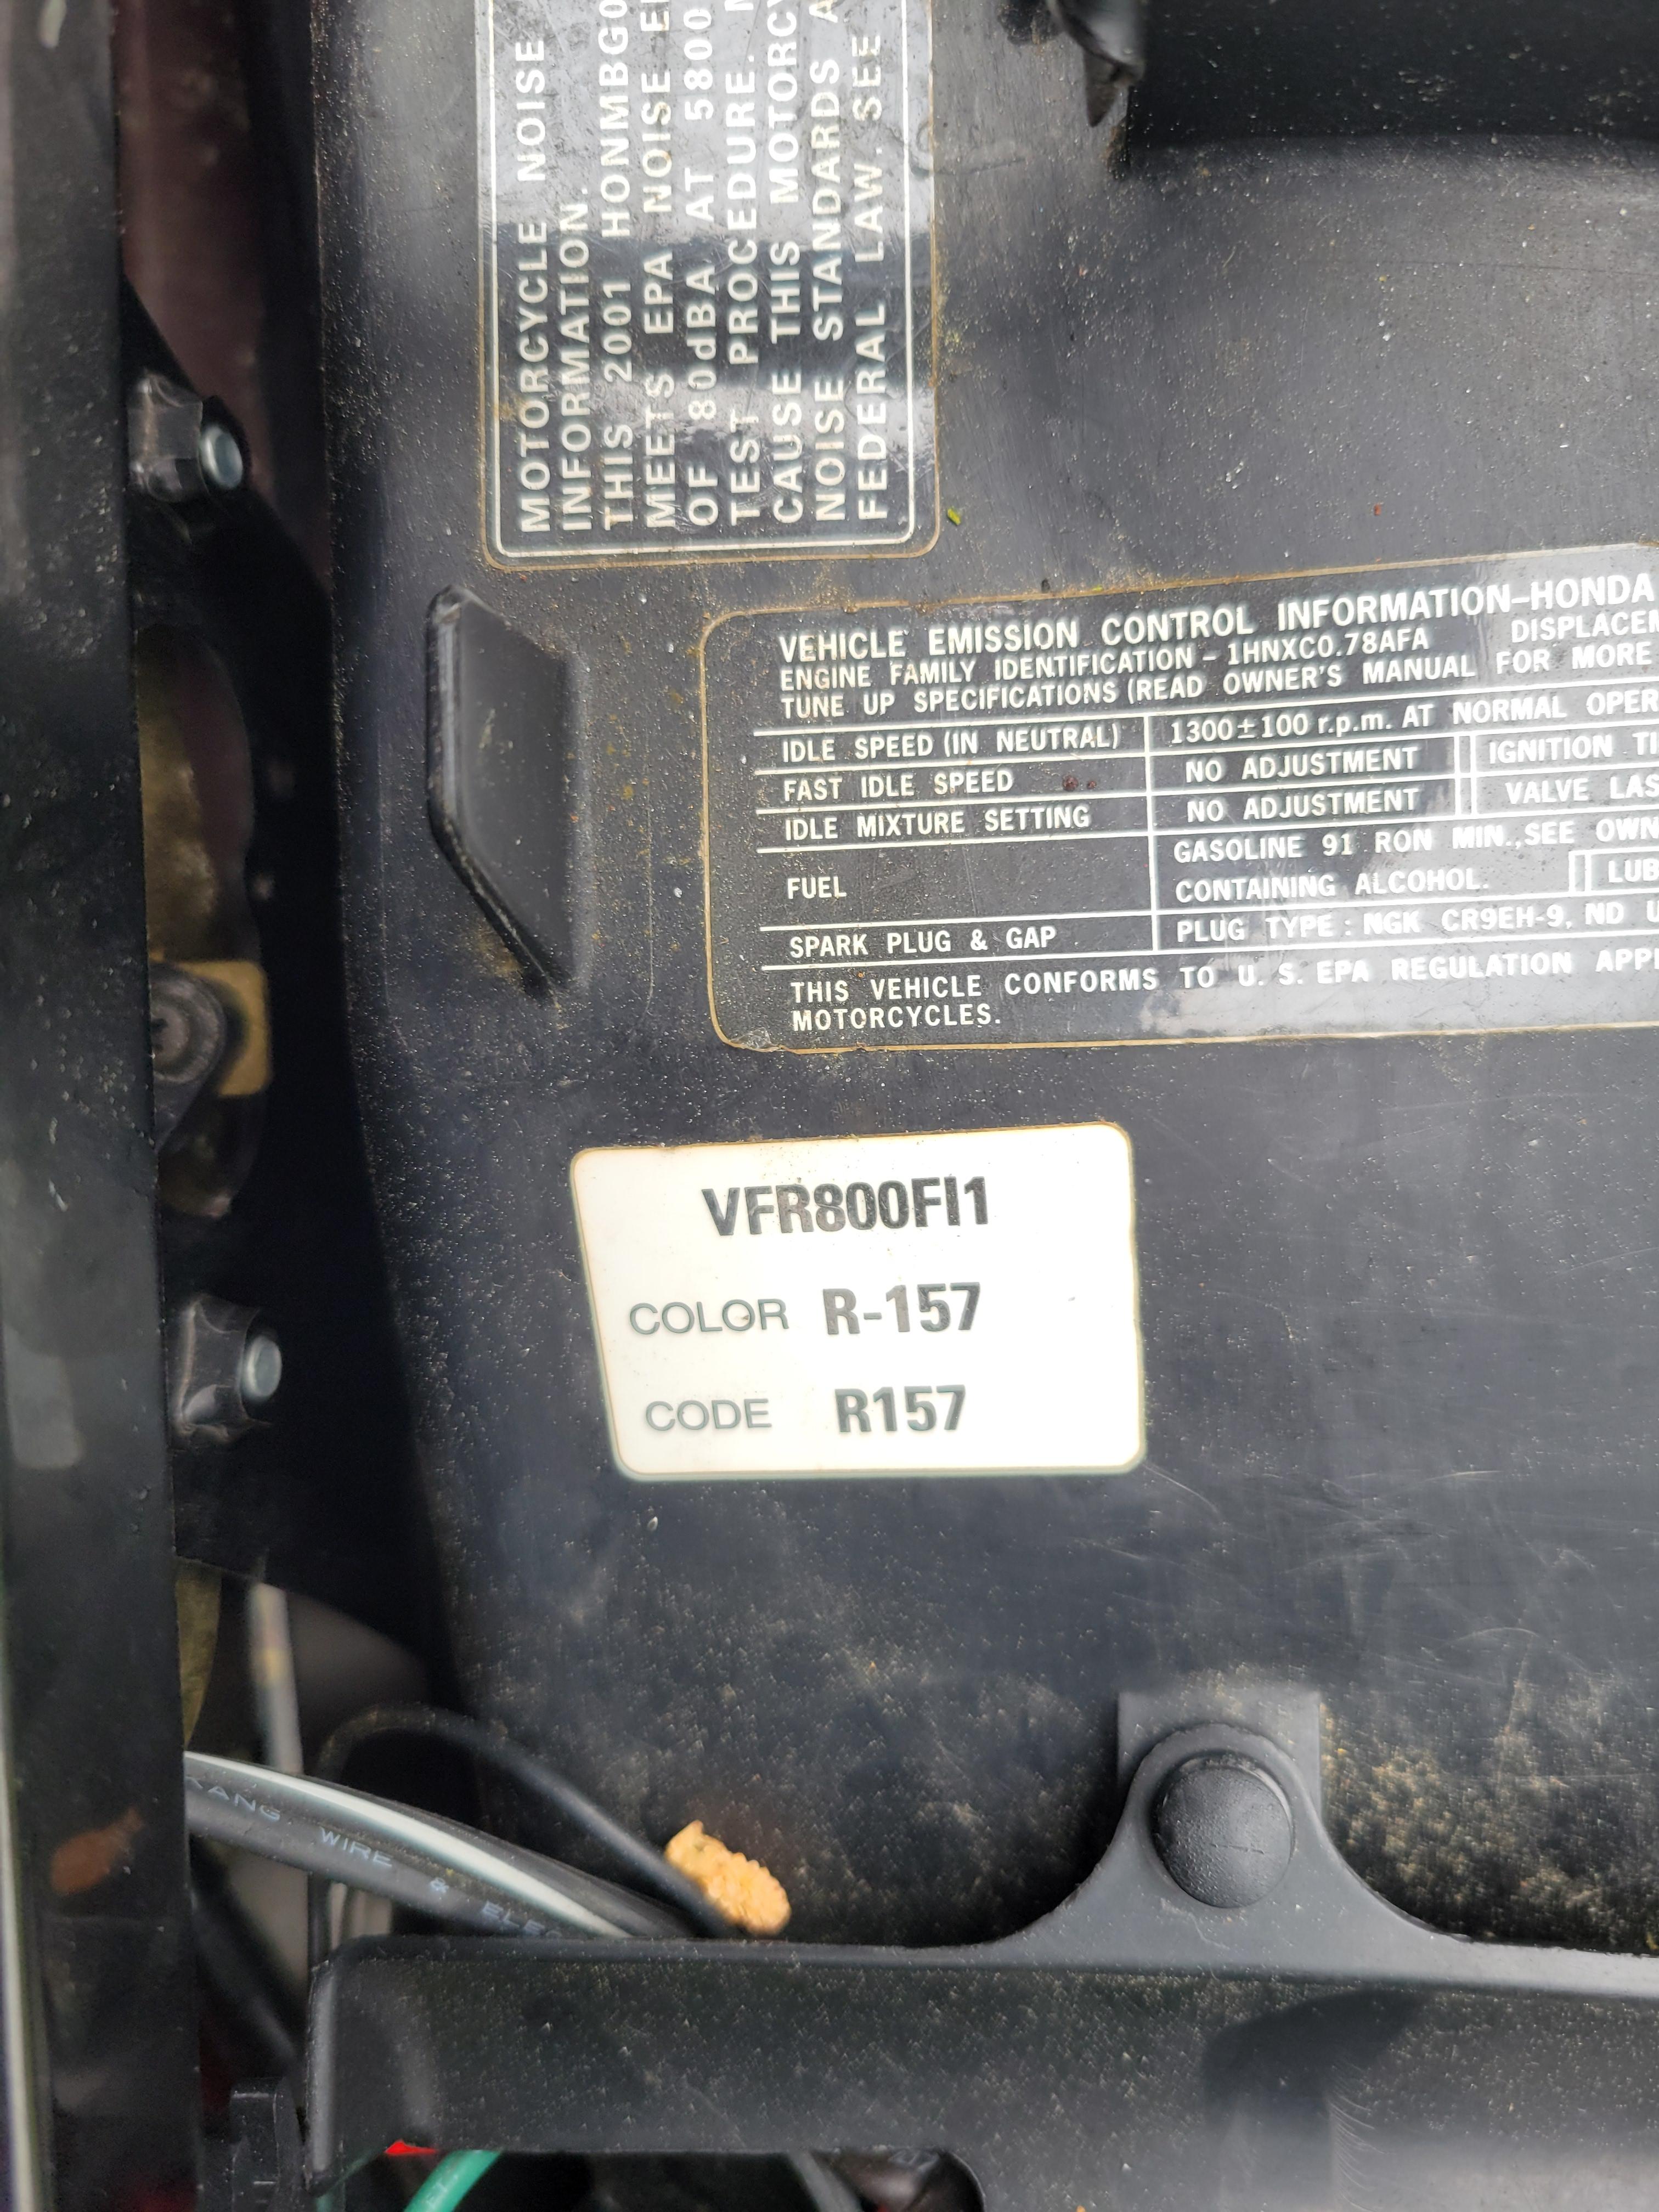
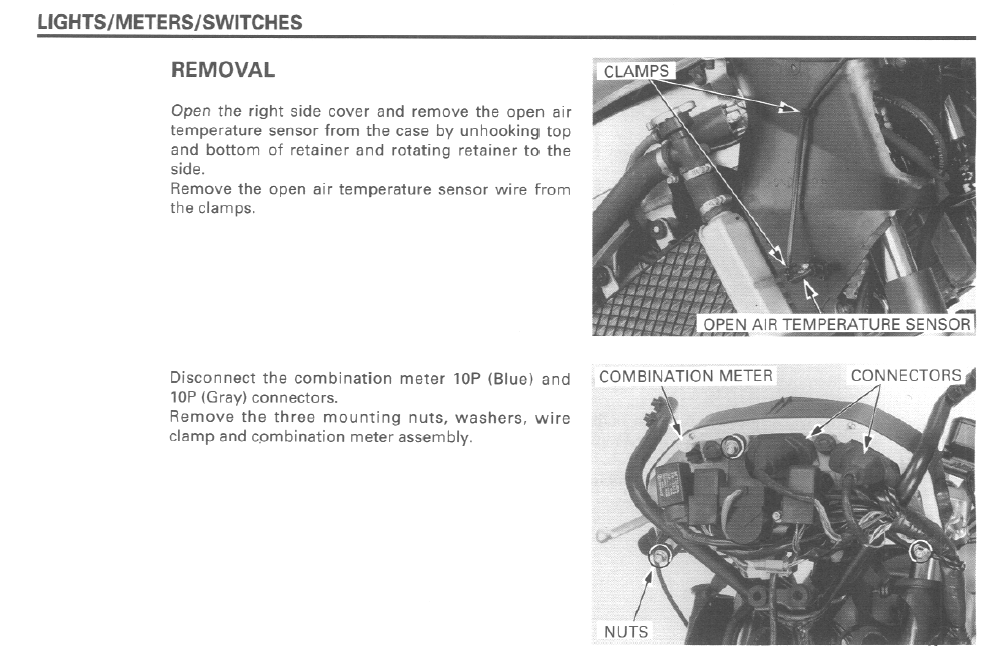
This and many other questions may be found in the service manual - conveniently available in pdf form from VFRD's Downloads section. But to answer your question, it appears to be located under the right-side fairing, just ahead of radiator - page 19-10 of the service manual.
1 point