FromMaine
-
Posts
793 -
Joined
-
Last visited
-
Days Won
29
Content Type
Forums
Profiles
Gallery
Blogs
Downloads
Events
Everything posted by FromMaine
-
Lifting front wheel without center stand
FromMaine replied to Yahya's topic in Seventh Generation VFR's
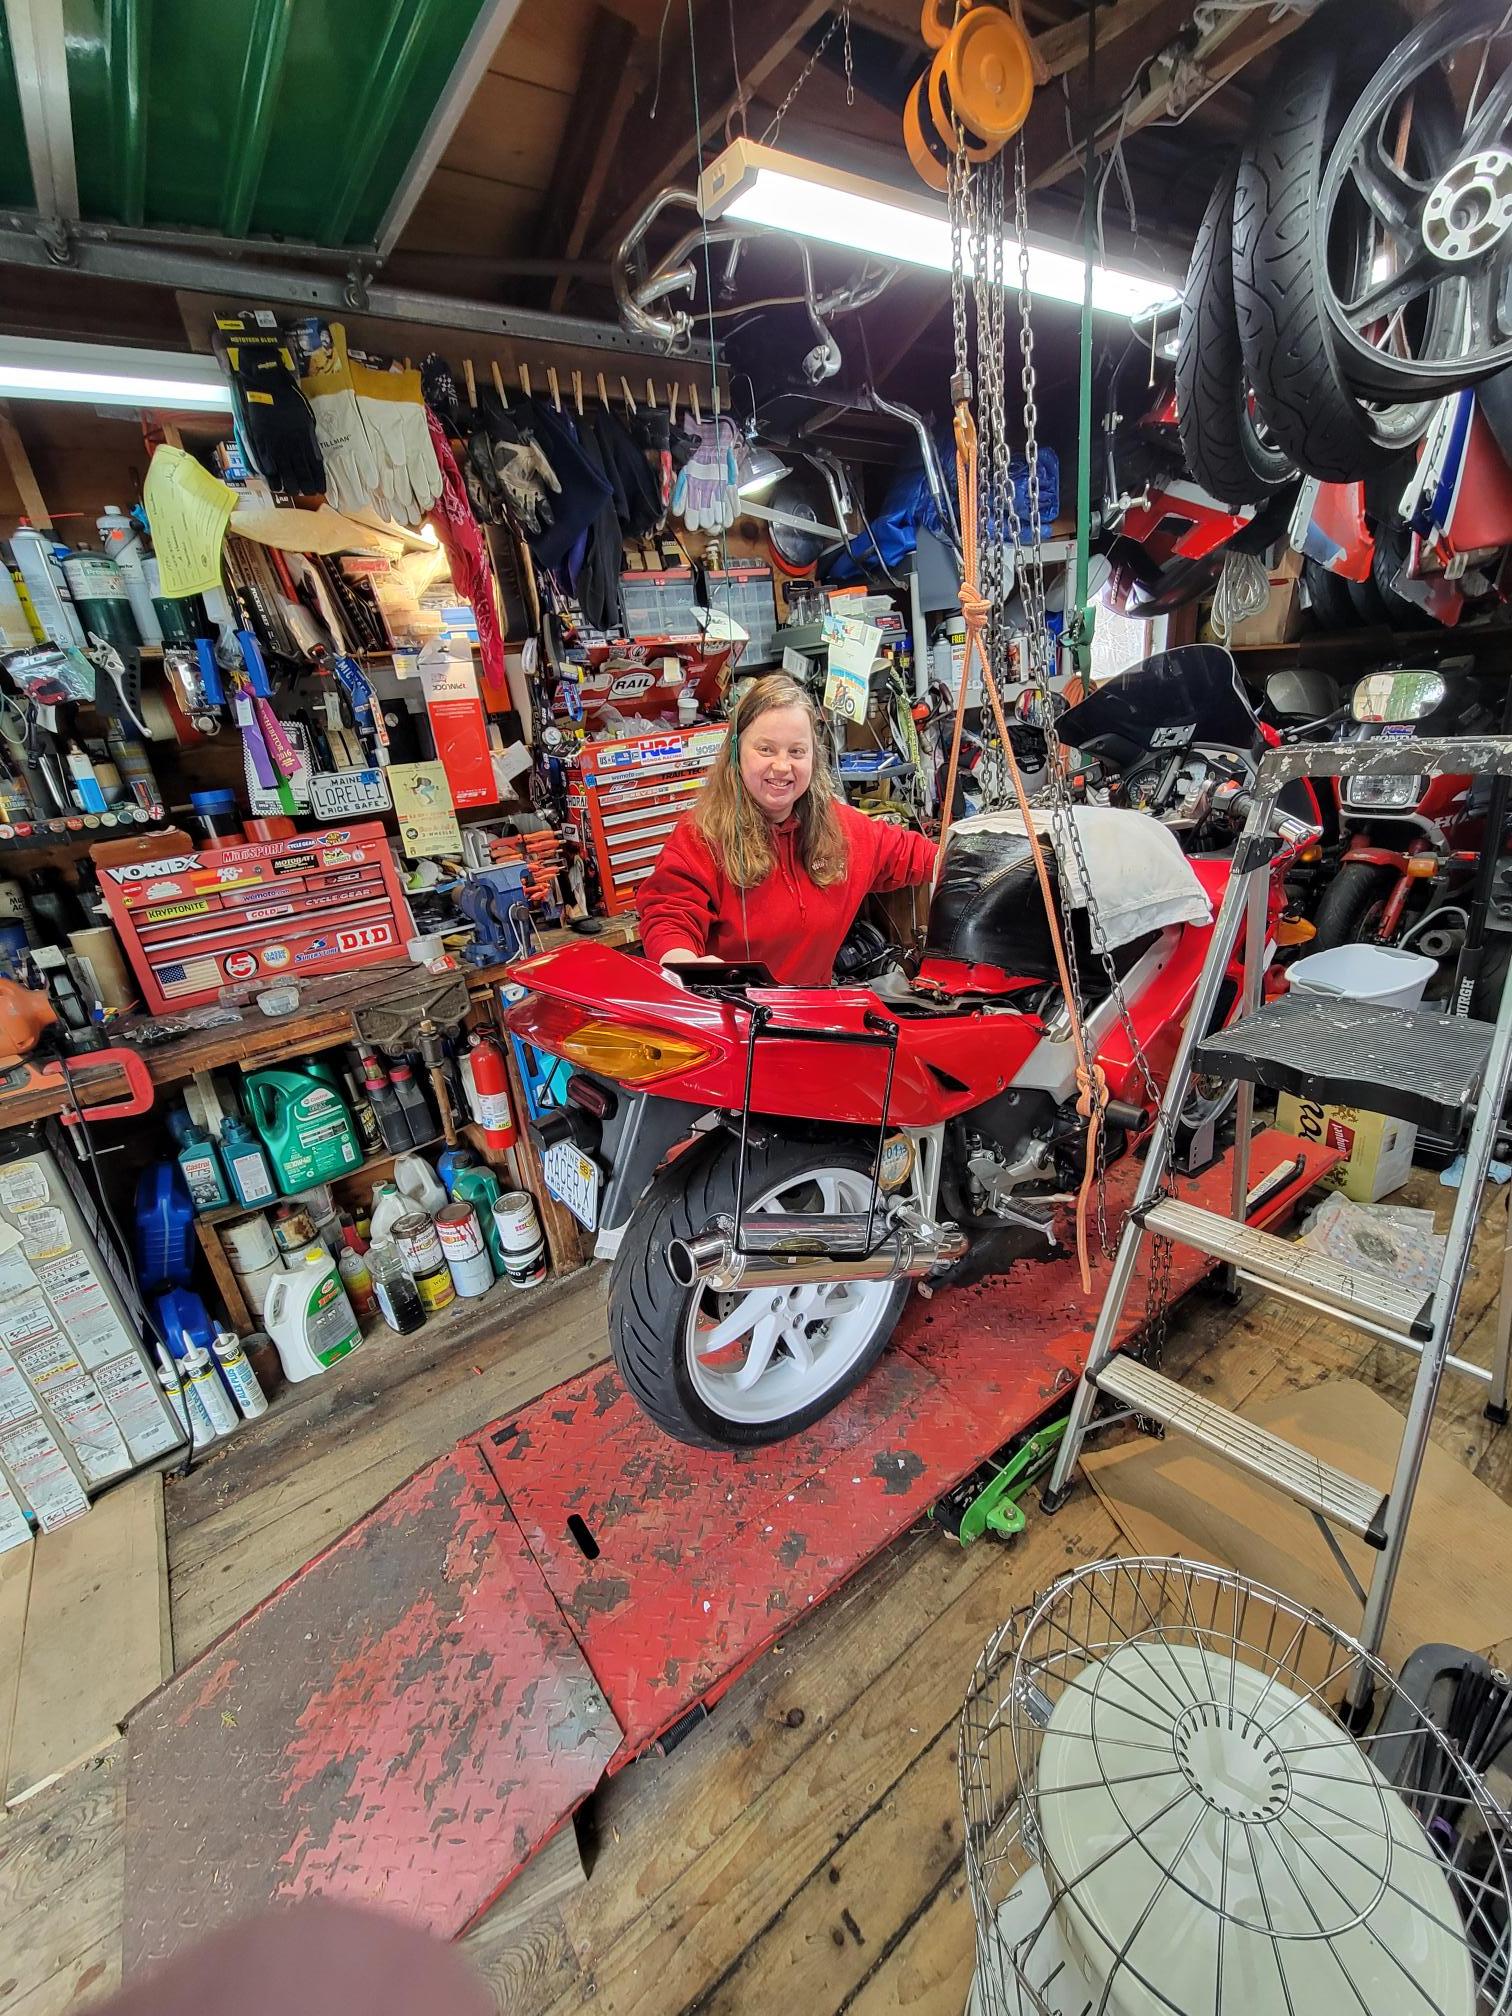
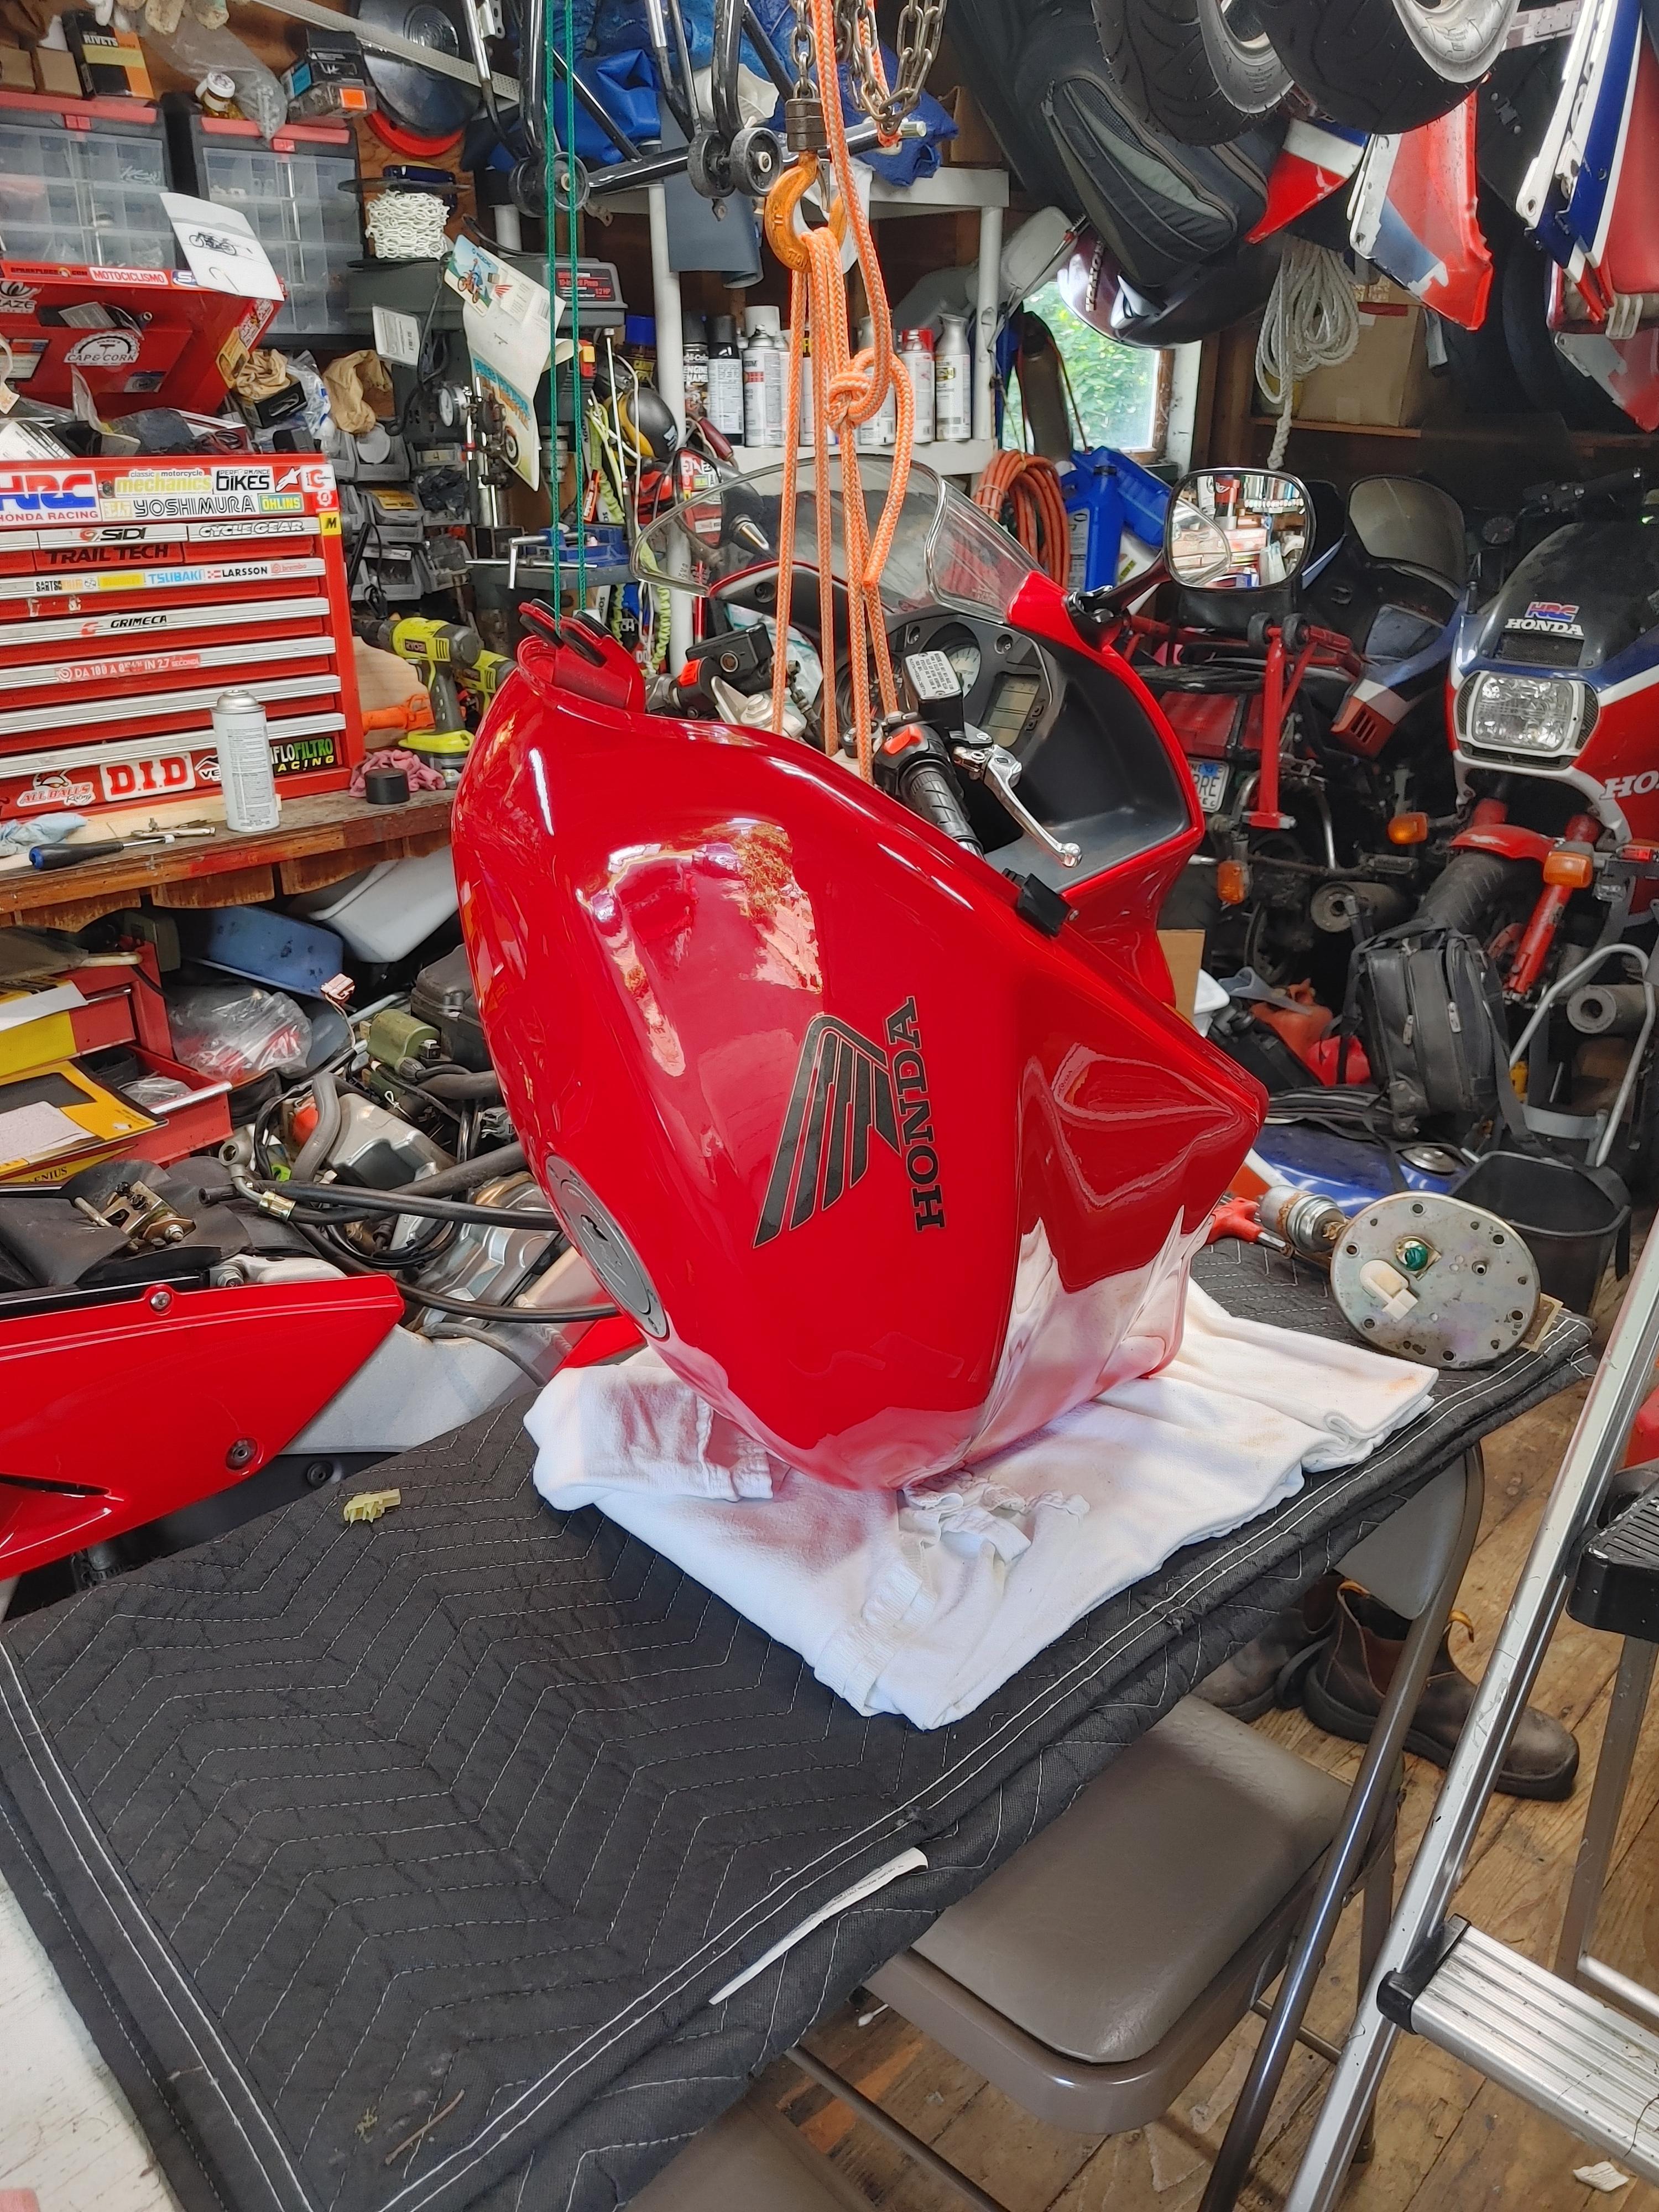
As Stray points out, having a structural member in your garages ceiling has some benefits as far as options for lifting or stabilizing the bike I have a 1 ton chain hoist mounted above my lift. They are about $70 at HF. First pic I used my hoist to lift the bikes rear up as bit to do some work this Spring. Second pic I used the hoist to stabilize the bike at the handlebars as I was going hammers and tongs working on it this past Fall. Good tip over insurance without having to strap the bike down.
-
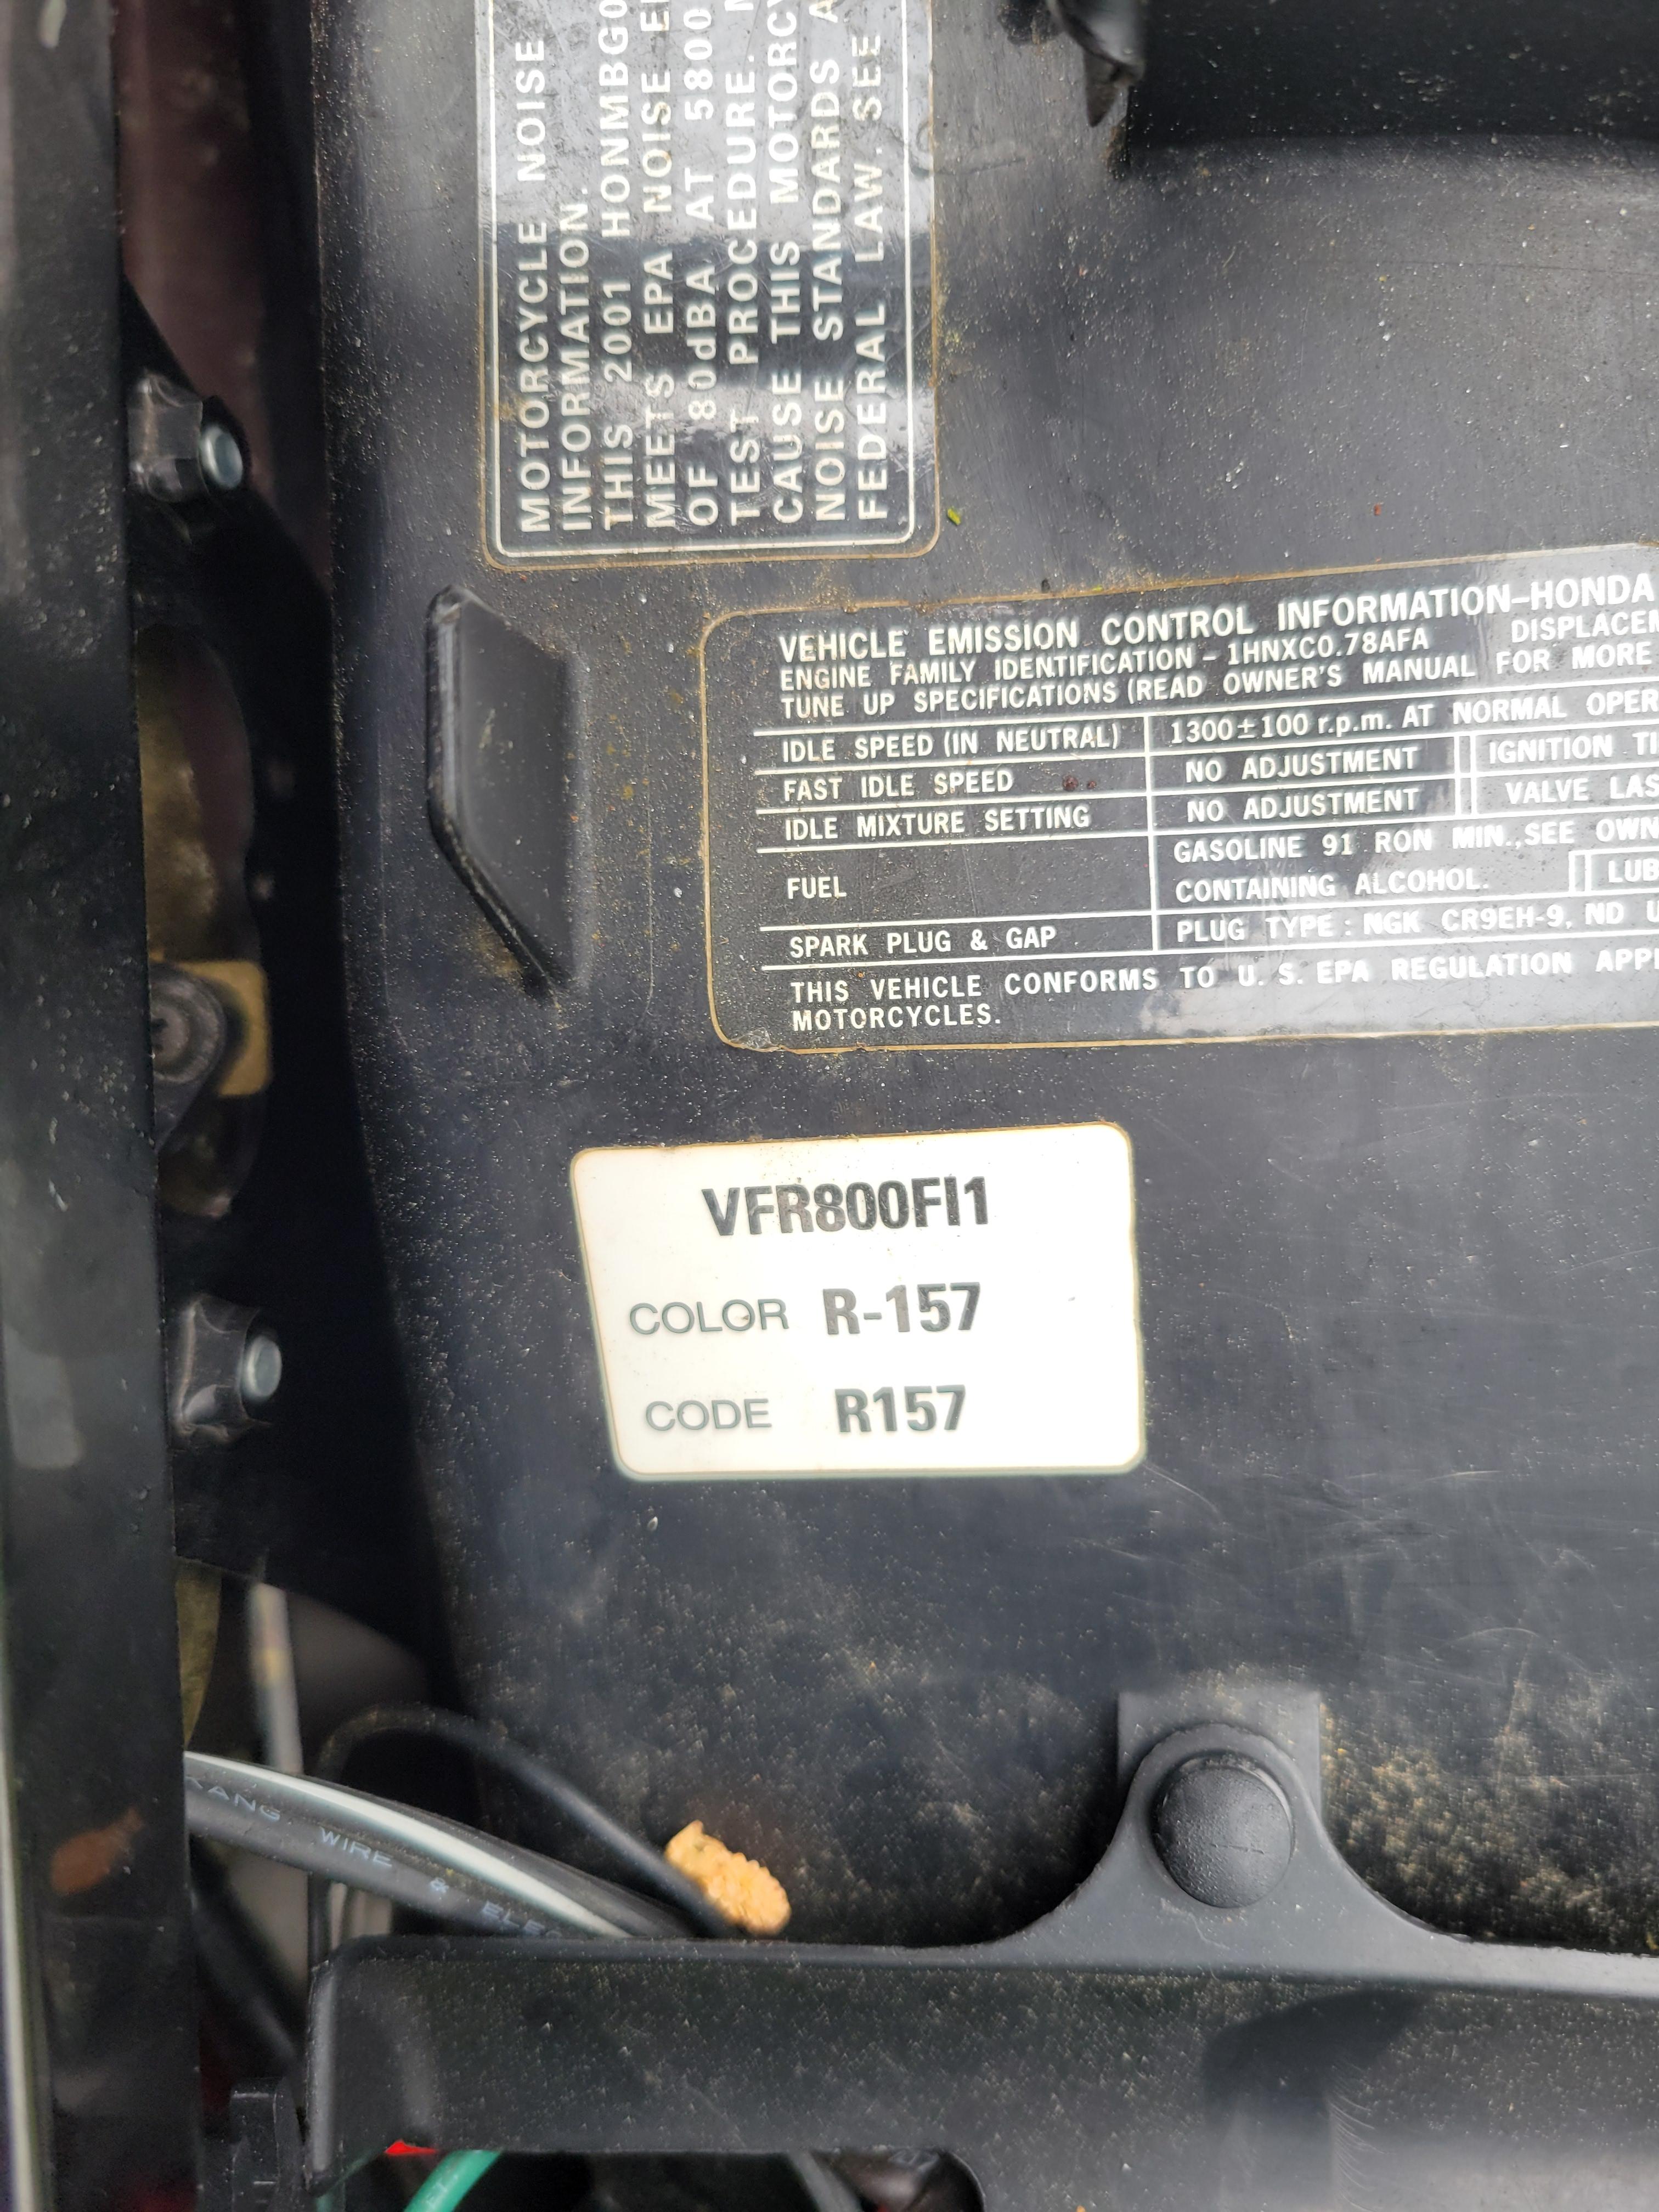
Take your seat off. Look for a sticker similar to the one on the photo, this is the color code for the bike. A company called "Colorite" makes touch up paint for motorcycles. You may have to order it, and it won't be cheap, but should still be available. Alternatively check out the stock touch up sticks at your local auto store. Depending how big and the location of the dings you may find one close enough for your needs. I was able to find a red and blue that were very close for my 85 RWB 1000R that way. Good luck. OEM Motorcycle & Powersports Paint | Touch-Up Pens, Aerosols, Quarts | ColorRite
-
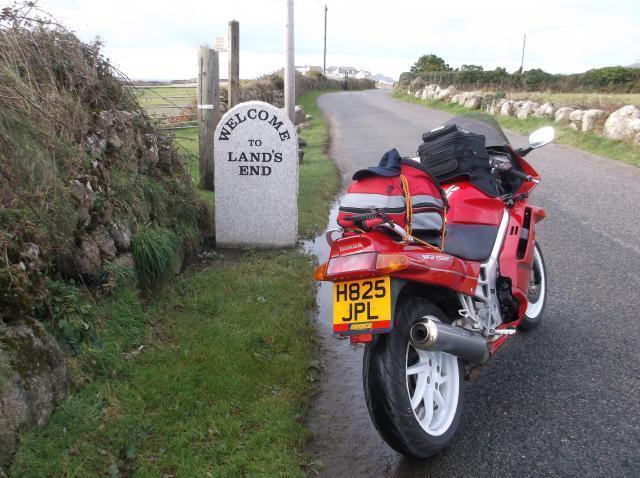
Thanks for posting this. I was not aware of this event despite living 37 miles to the west of Lands End in Falmouth and taking my 91 VFR to there on a number of occasions 10 years ago. Like the fact that there is a £600 limit on the bike that you can use. Posers need not apply.😁
-
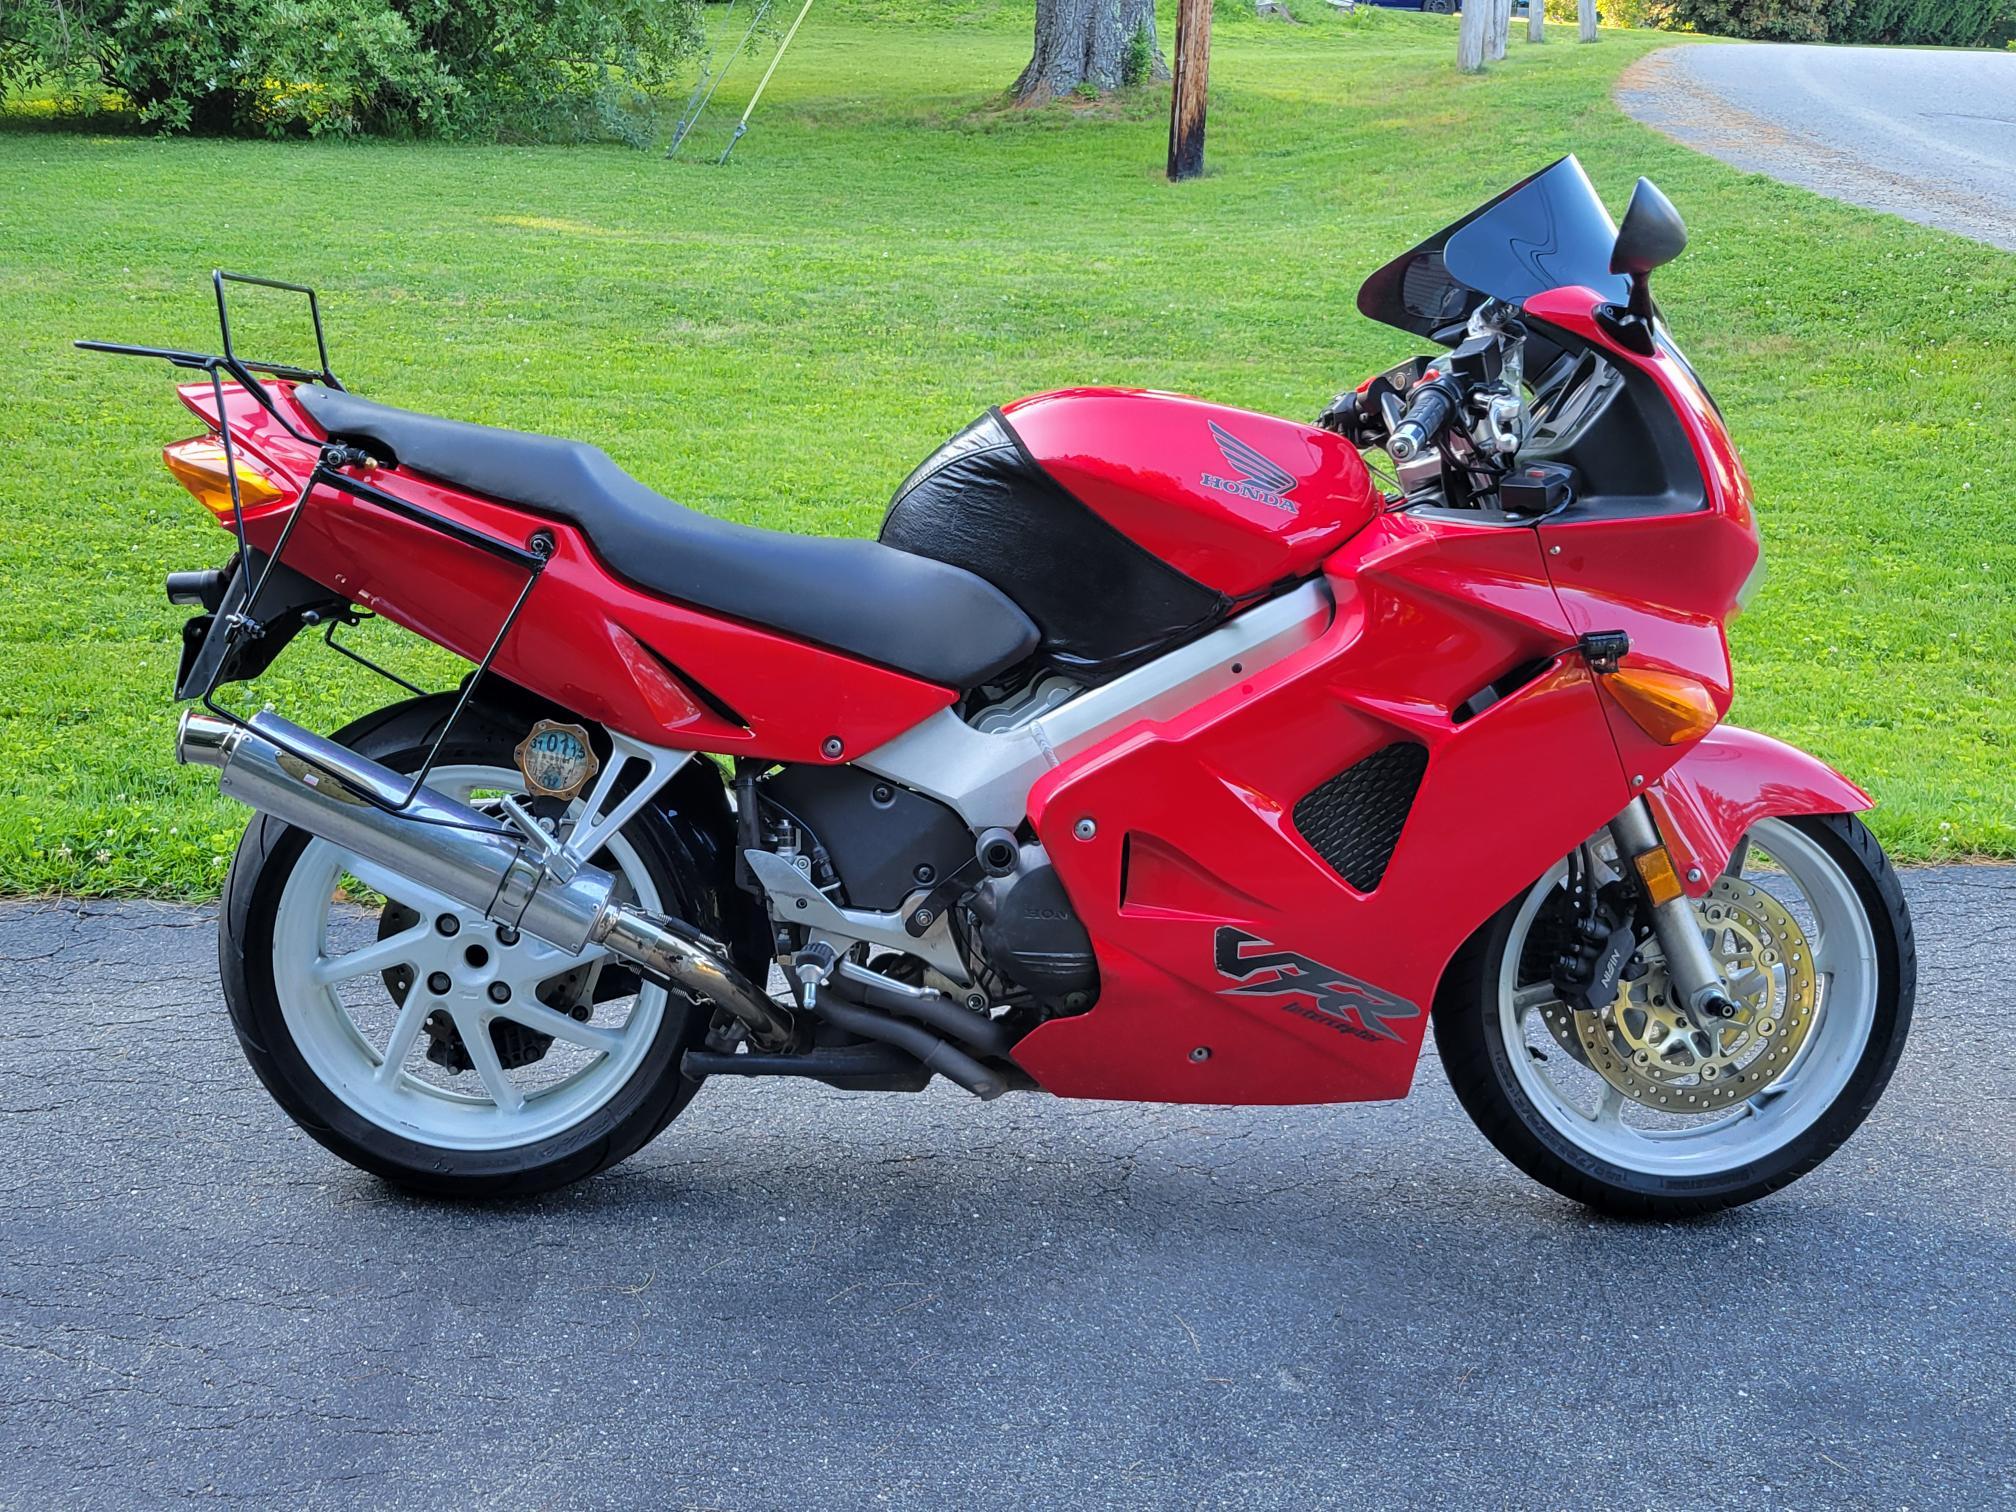
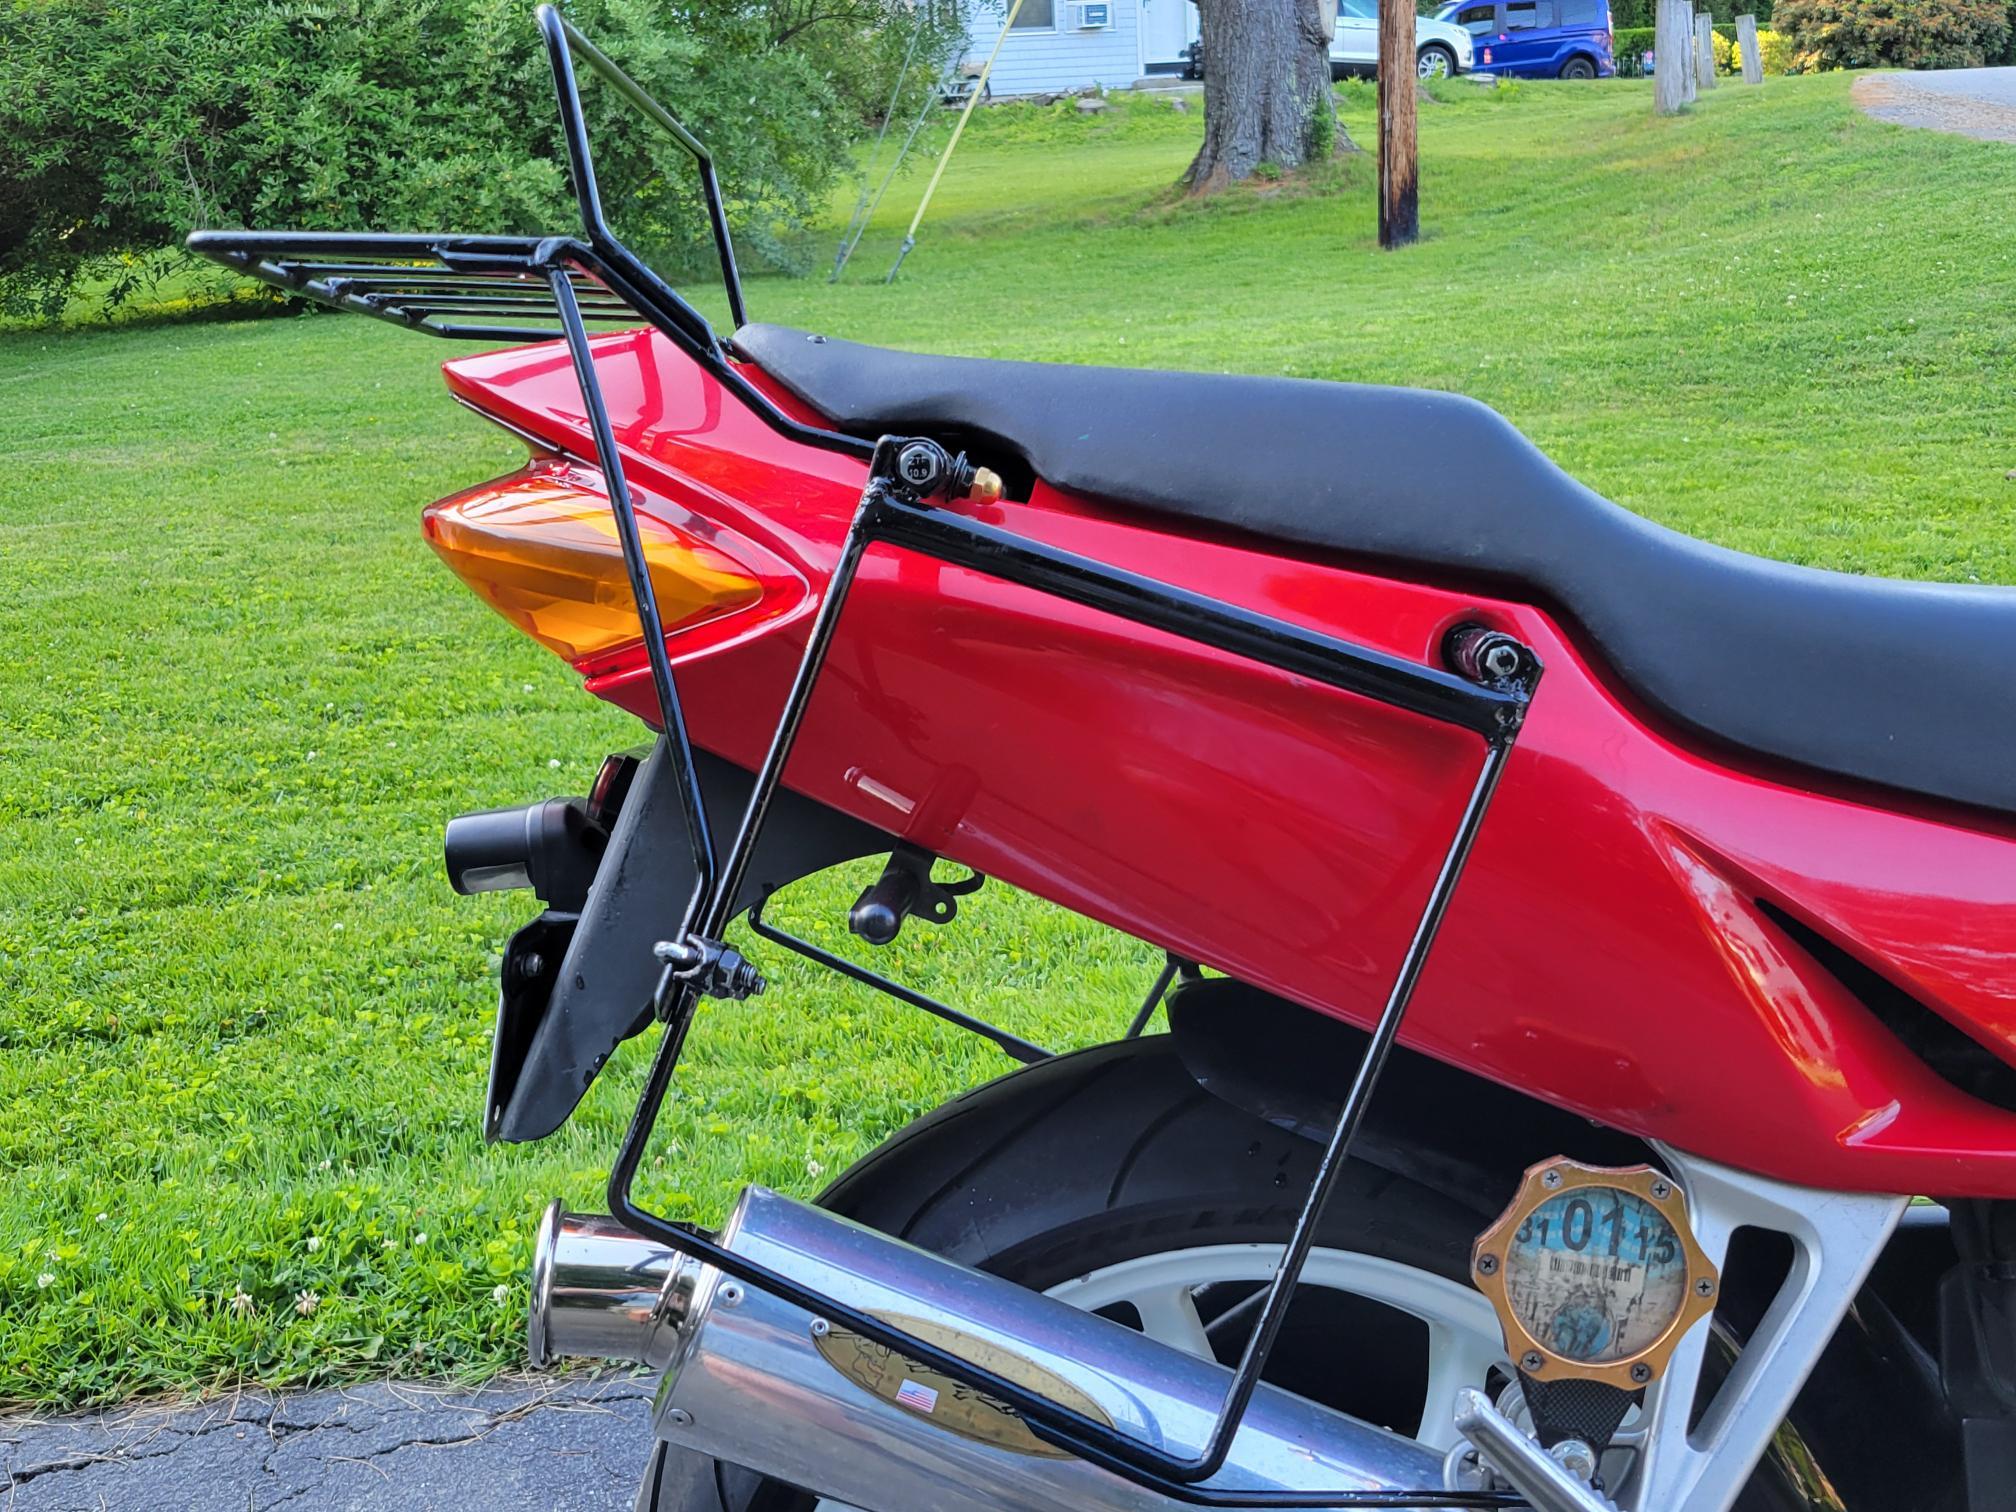
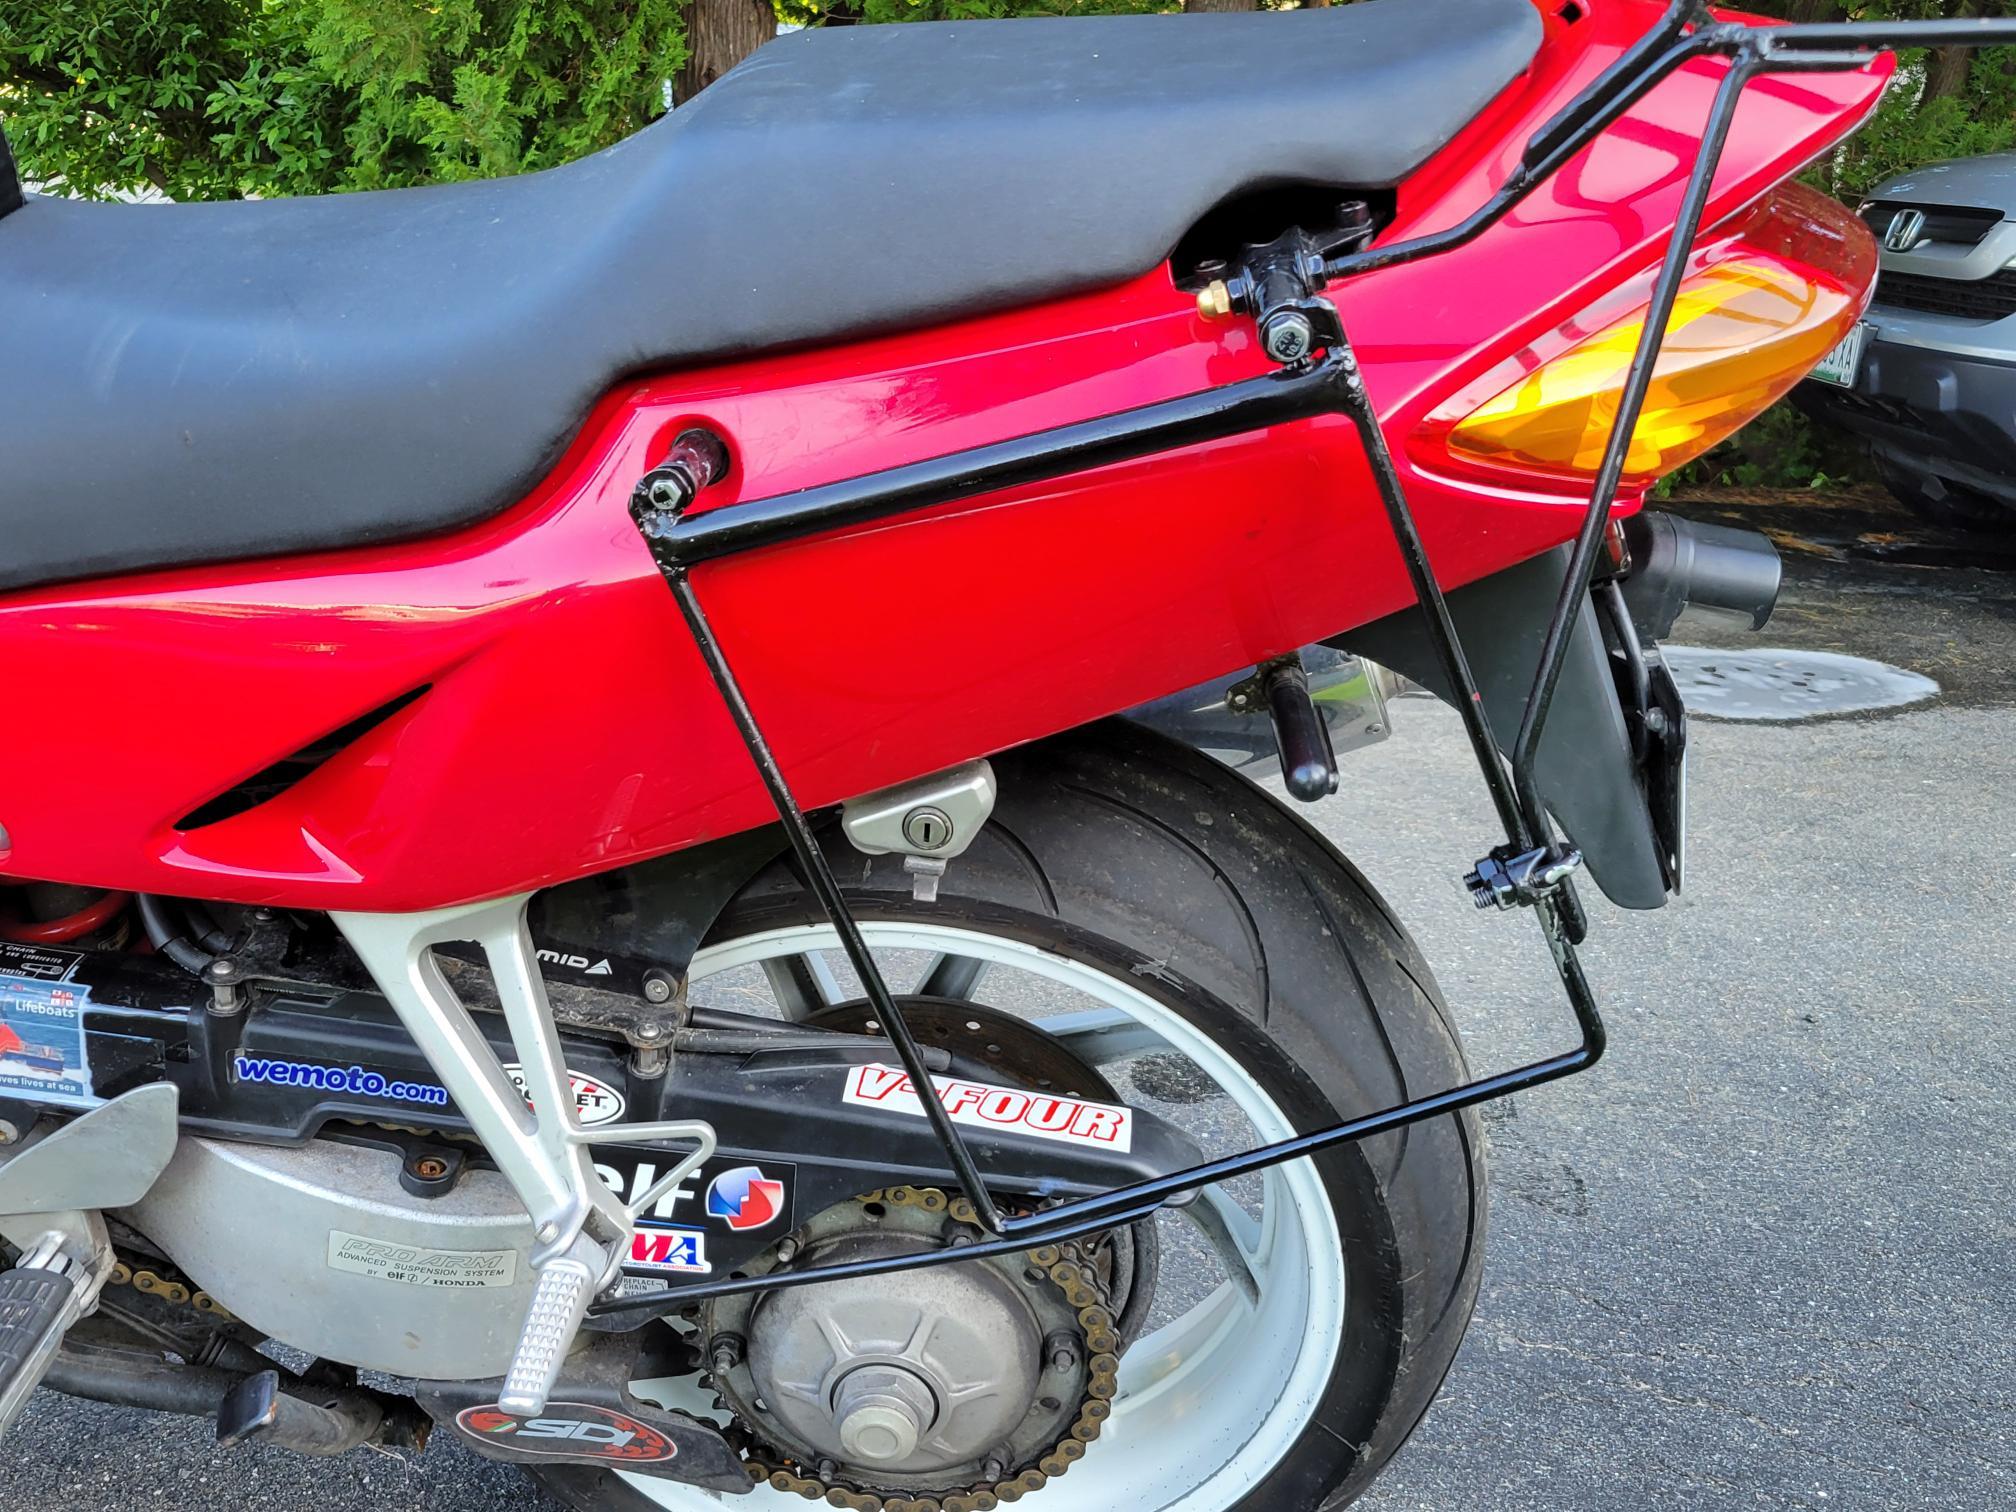
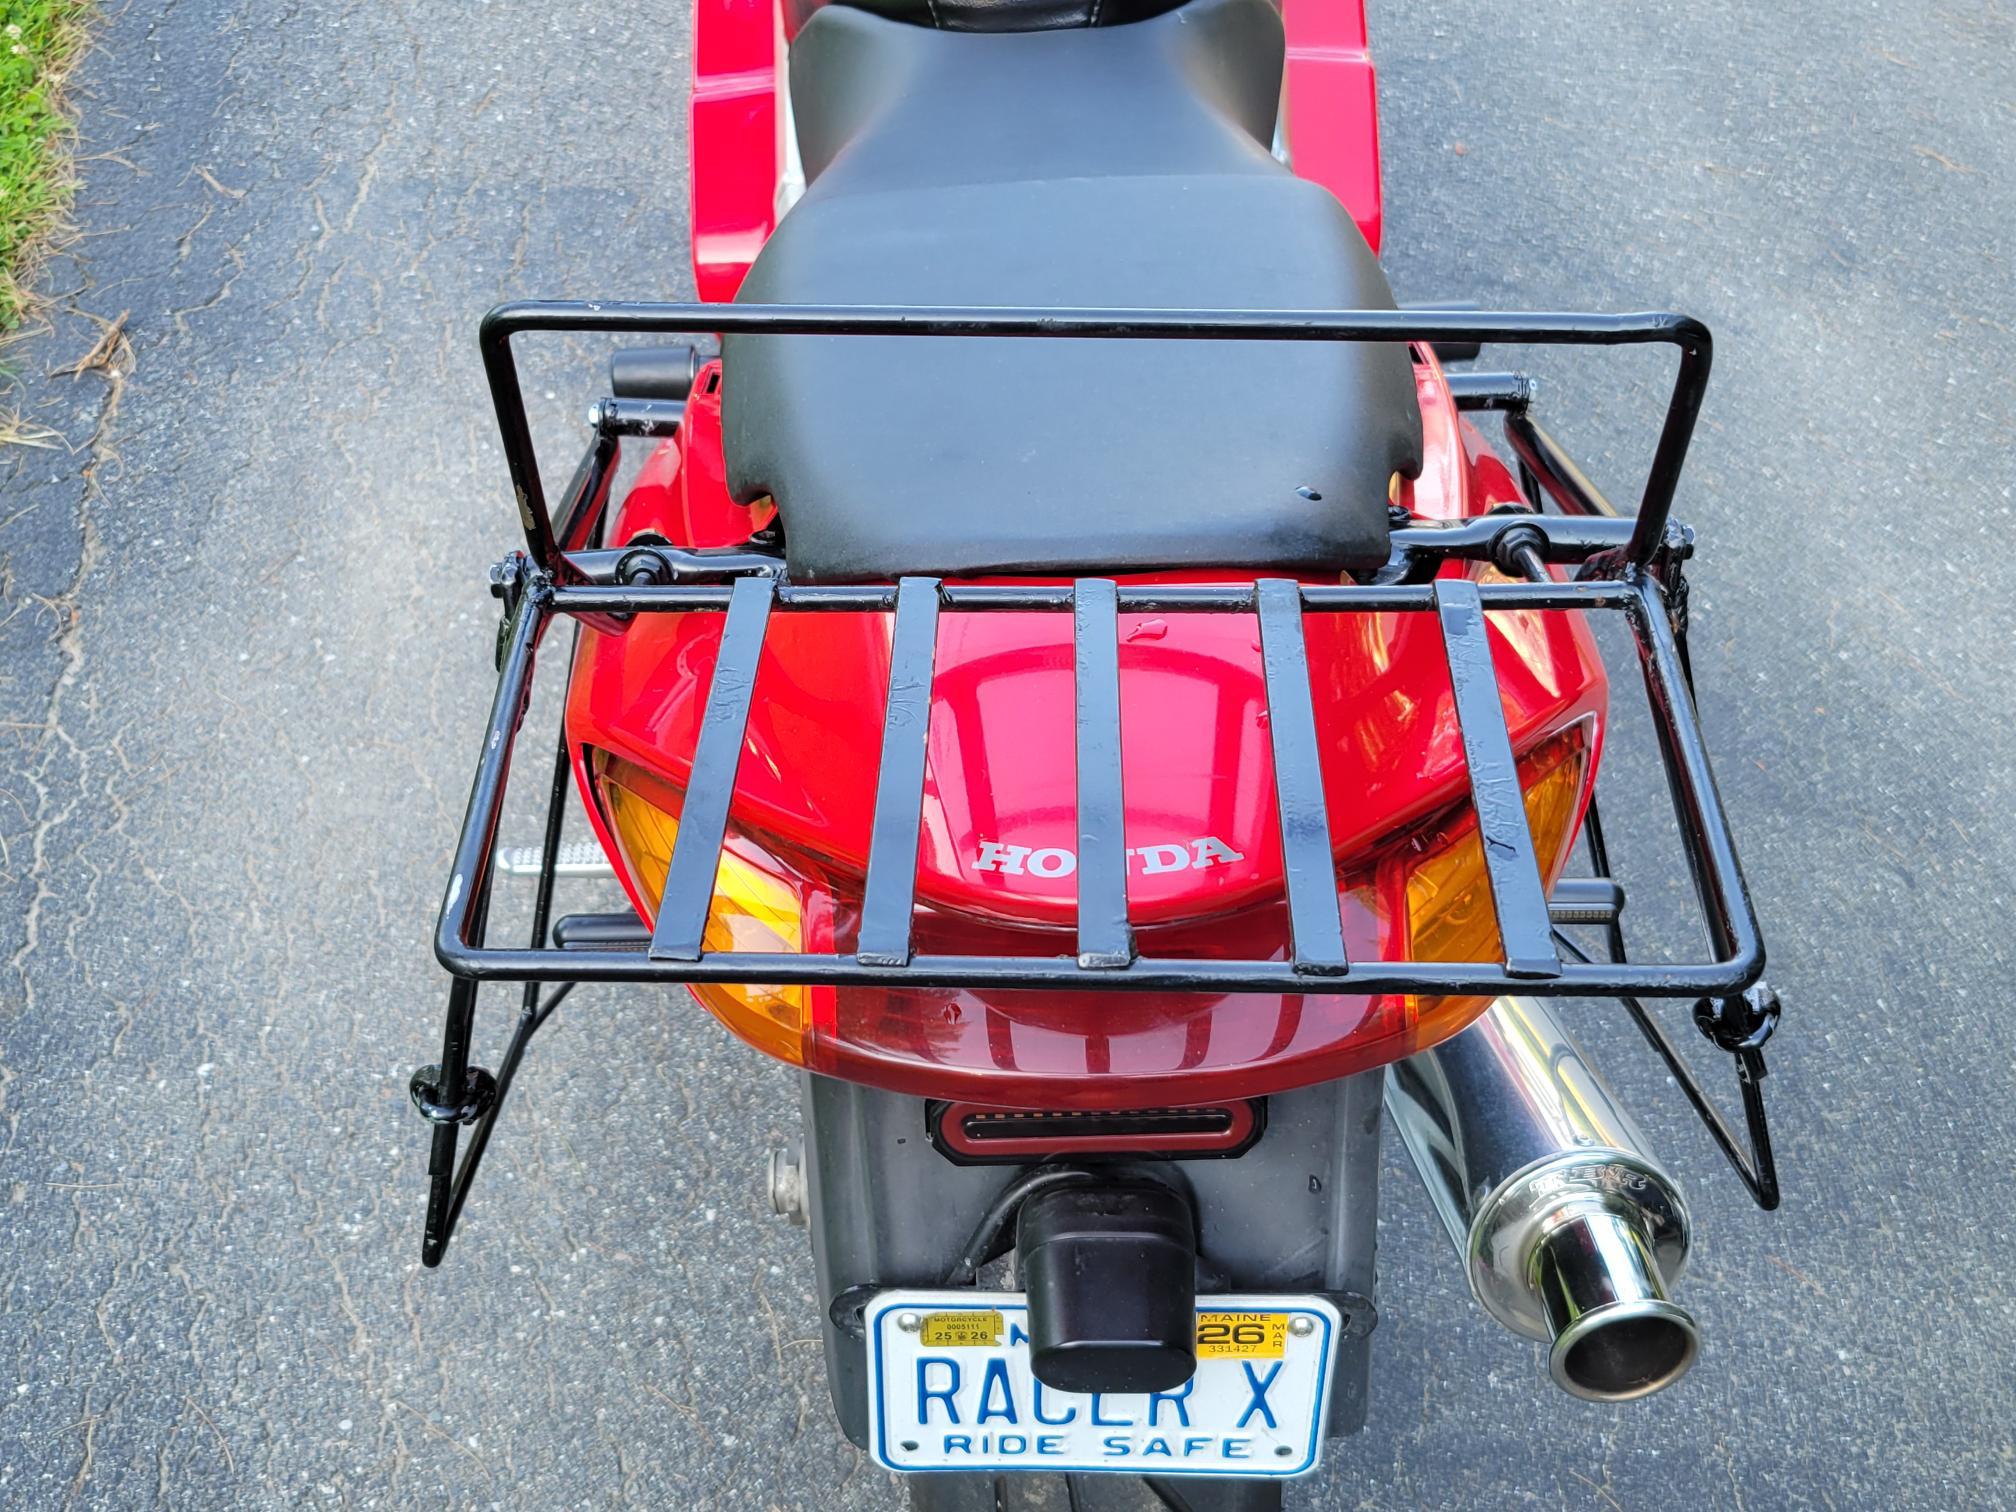
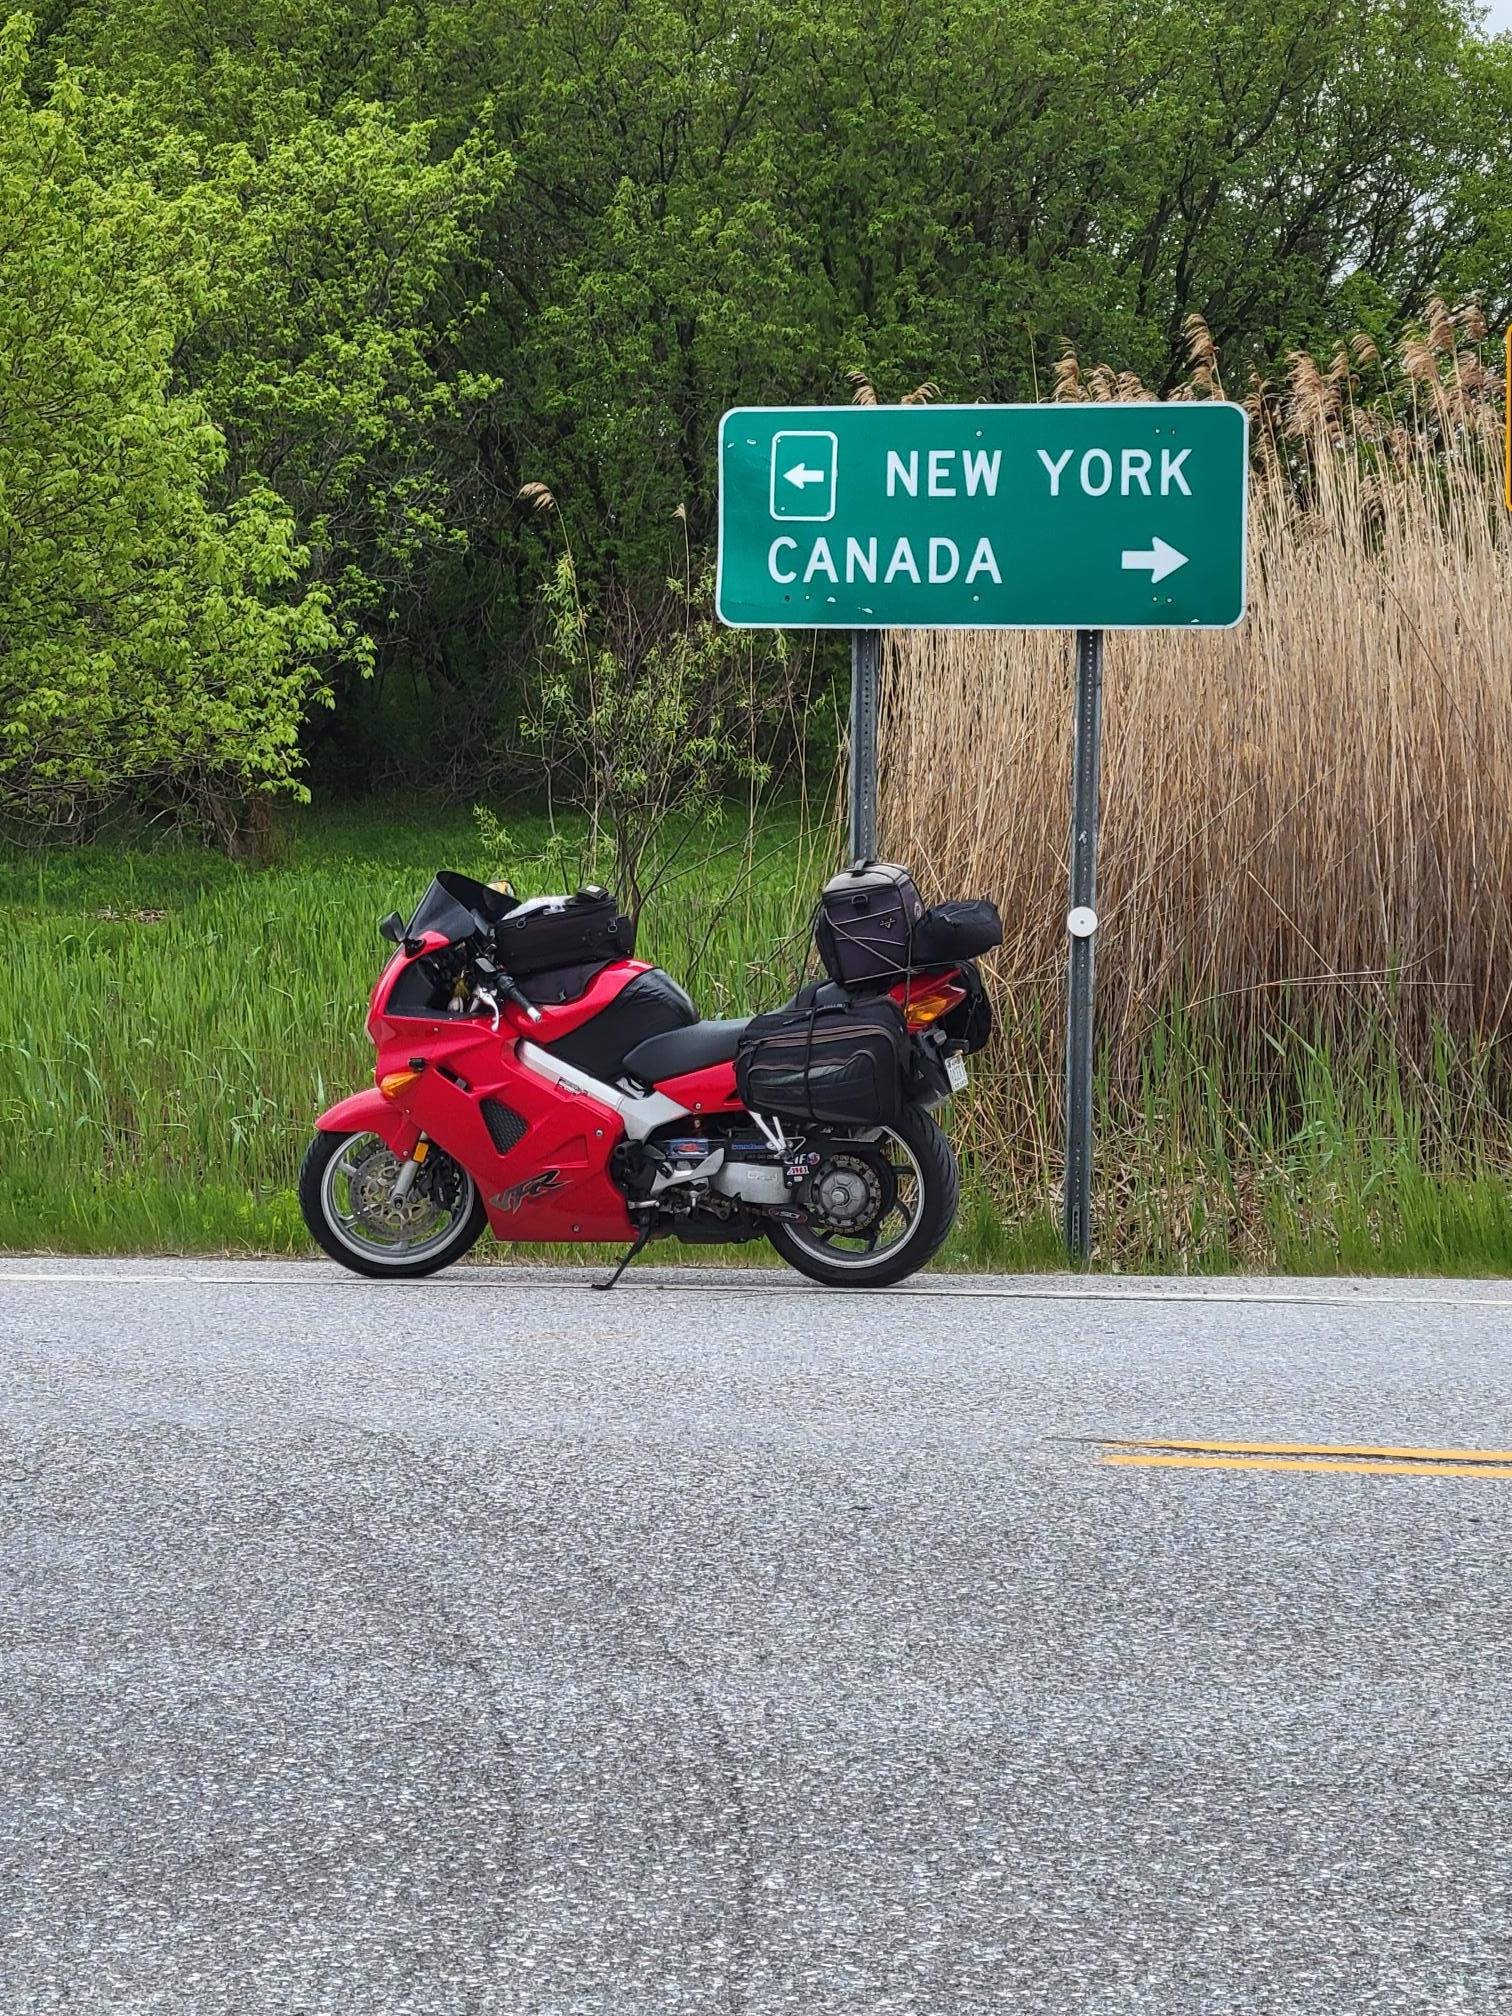
Last Sept. I finally got my new to me 5th Gen in running order. Unable to find any hard bags for it I ended up building a pair if saddle bag supports for my soft bags. I used 5/16" - 8mm weldable rod for most of it, with some 1/4" - 6mm for the forward stays. Everything was cold bent on my 6" vise with a 3lb ball peen, then welded. They are easily removable with 4 fastenings per side. I used them on a 3,000 mile trip that Fall and worked well. I did think though that a six pack rack would be helpful. Not finding anything available for the 5th Gen, and having trips to VA, TN, NC, then 4 days after that up to New Brunswick and the Cabot Trail in Nova Scotia in May, I figured I'd have a go at making a serviceable six pack rack a shot. Again I used 5/16" - 8mm rod for the frame and some 5/8' - 16mm X 1mm flat for the slats. I piggybacked off the Saddlebag supports to make it easier to mount, and threaded the rod at the forward end to adjust the rack, but also make it removable. The cable clamps on the aft lower are for the same reason. I can remove the rack in less than 2 minutes, but it is strong enough that a buddy and I lifted the back of the bike off the ground with it. 2 trips and just under 5,000 miles this May, and it has indeed proved useful. I'm a form follows function guy, so I'm not bothered if its less than elegant. Besides, there's so little in the way of luggage options for the 5th Gen that I had to figure out something if I wanted to go touring The last pic was taken around the 20th of May at Rouses Point NY as I was returning from NC etc. I generally will go up to the Quebec Border and turn right to get back home. This eliminates going through CT and MA, a far more relaxing way to enter Maine.
- 1 reply
-
- 7
-

-
b.jpg.cf59144f18c2389fcfa22bacc6194b94.jpg) Nice photo, kinda sums up why we own our bikes. Looks like a new sign at the store.
Nice photo, kinda sums up why we own our bikes. Looks like a new sign at the store. -
OK, I swapped out my phone for my computer and turned the volume to max and tried your link . Far better sound quality. Then tried your link on my phone and turned sound to max, probably the best sound quality. Yes I do hear something. I cannot say for certain what as I'm a retired mariner not a motorcycle mechanic, but when I close my eyes and listen to it, it reminds me of a bearing squeal. Take that with a grain of salt, ships have more bearings than you've had hot breakfasts, so that's what I'm familiar with.
-
Very nice introduction, it is apparent you are a VFR enthusiast to say the least. Obviously you also have some painting skills, that 2001 looks like it just came out of the factory in Hamamatsu Japan! Shame it got wadded up, but good your buddy only had wounded pride to show. If you are not aware, the same mirrors on your 2001 will directly fit on your 1999, in fact have them on my 1997 4th Gen. Emgo makes replacements that are exact copies, or possibly the same as Honda uses at less than half the cost. Left part number 20-37342, Right part number 20-37341. I spent 4 Seasons on a ship based out of Rijeka about 10 years ago, really liked it there. After I retired I brought my wife to Croatia for 3 weeks in 2023, and again in 2024. You live in a very nice country, I really enjoy the culture and pride of your countrymen. Glad to have you, lots of good technical advice and helpful people here, so join in!
-
Had a 91 when I was in England, and have a 90 now. Listened closely 4-5 times, but did not pick up anything unusual in how your bike sounded. I assume you can hear the sound that bothers you in your videos? If so, I cannot.
-
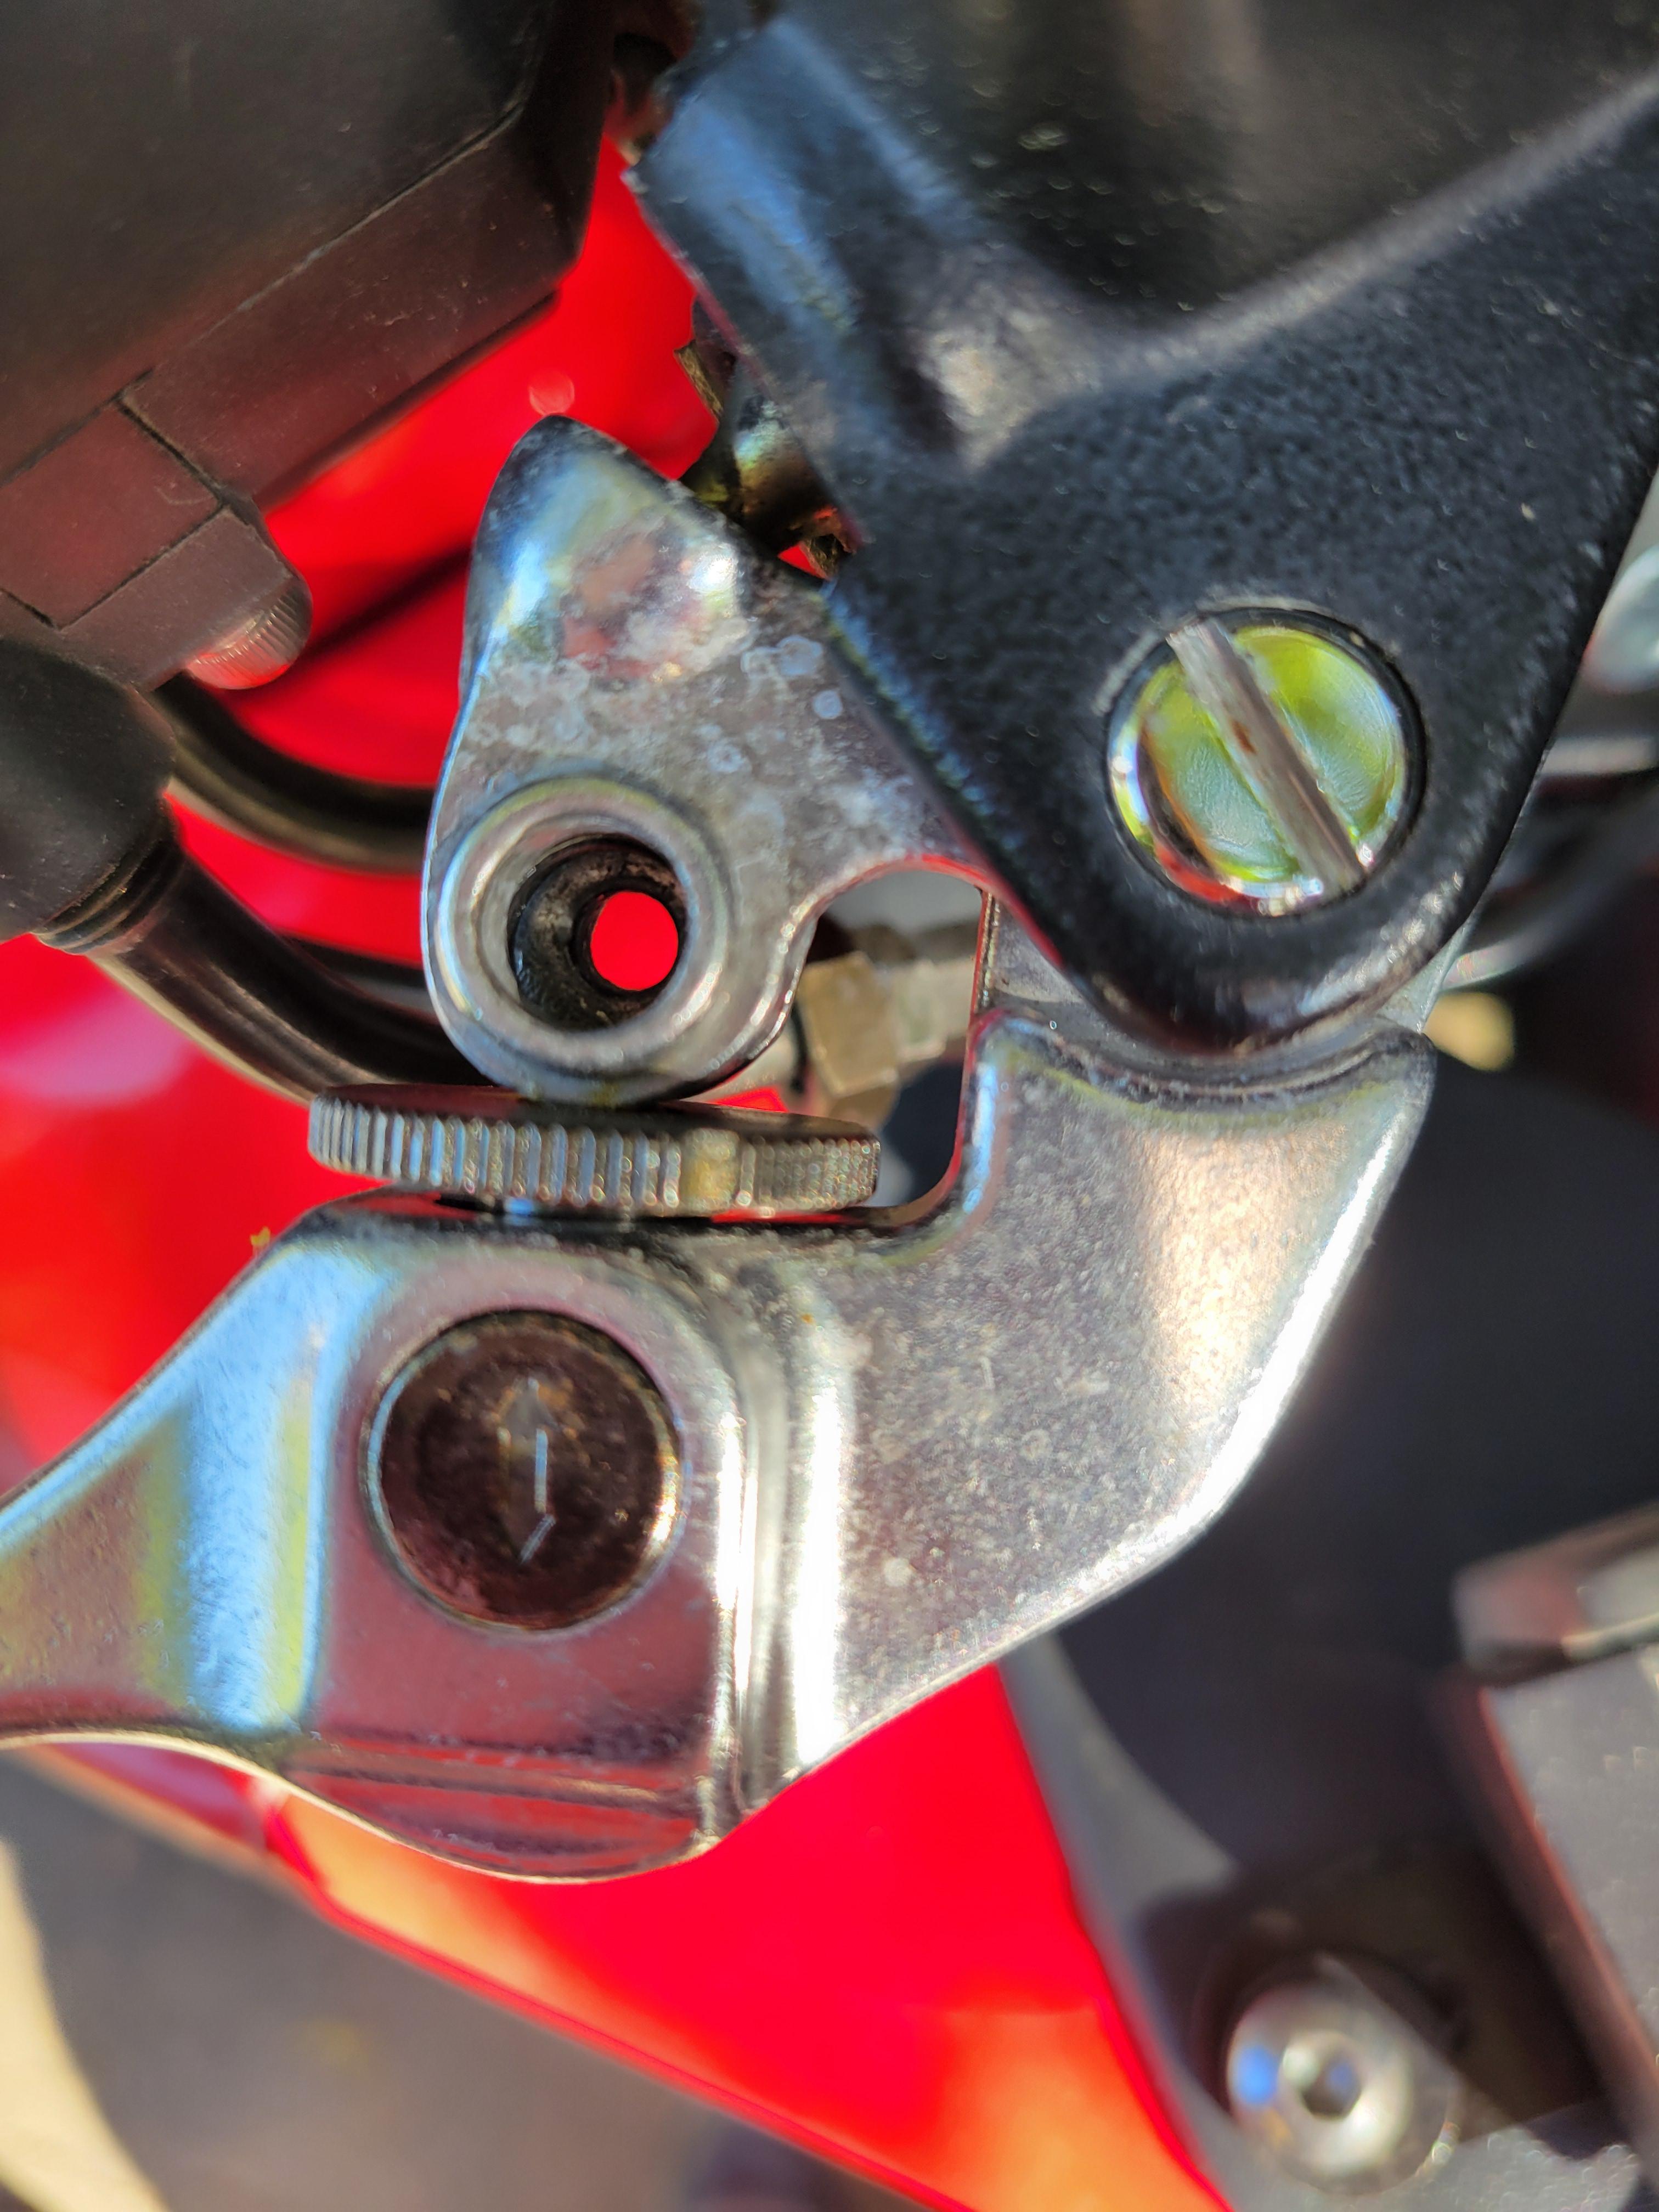
Thanks for the reply. The part number you are referring to is a bushing. Which is the part with the arrows on it in my picture. I do not need that. I you look at the photo, above the bushing is a dial for adjustment, then an aluminum part with a hole where the socket screw would be. That is the part I need, ideally with the socket screw also as they are kinda special in a design way. The screenshot is from the fiche at cmsnl for the 2001 vfr800. The lever is shown as assembly #15 with no breakdown of the adjustment parts, so I really can't reference a part number for that bit. Its interesting you found a part number for that bushing, but it foes not show on CMNL or Revzilla. If you found a breakdown of the lever parts, please post. Thanks again.
-
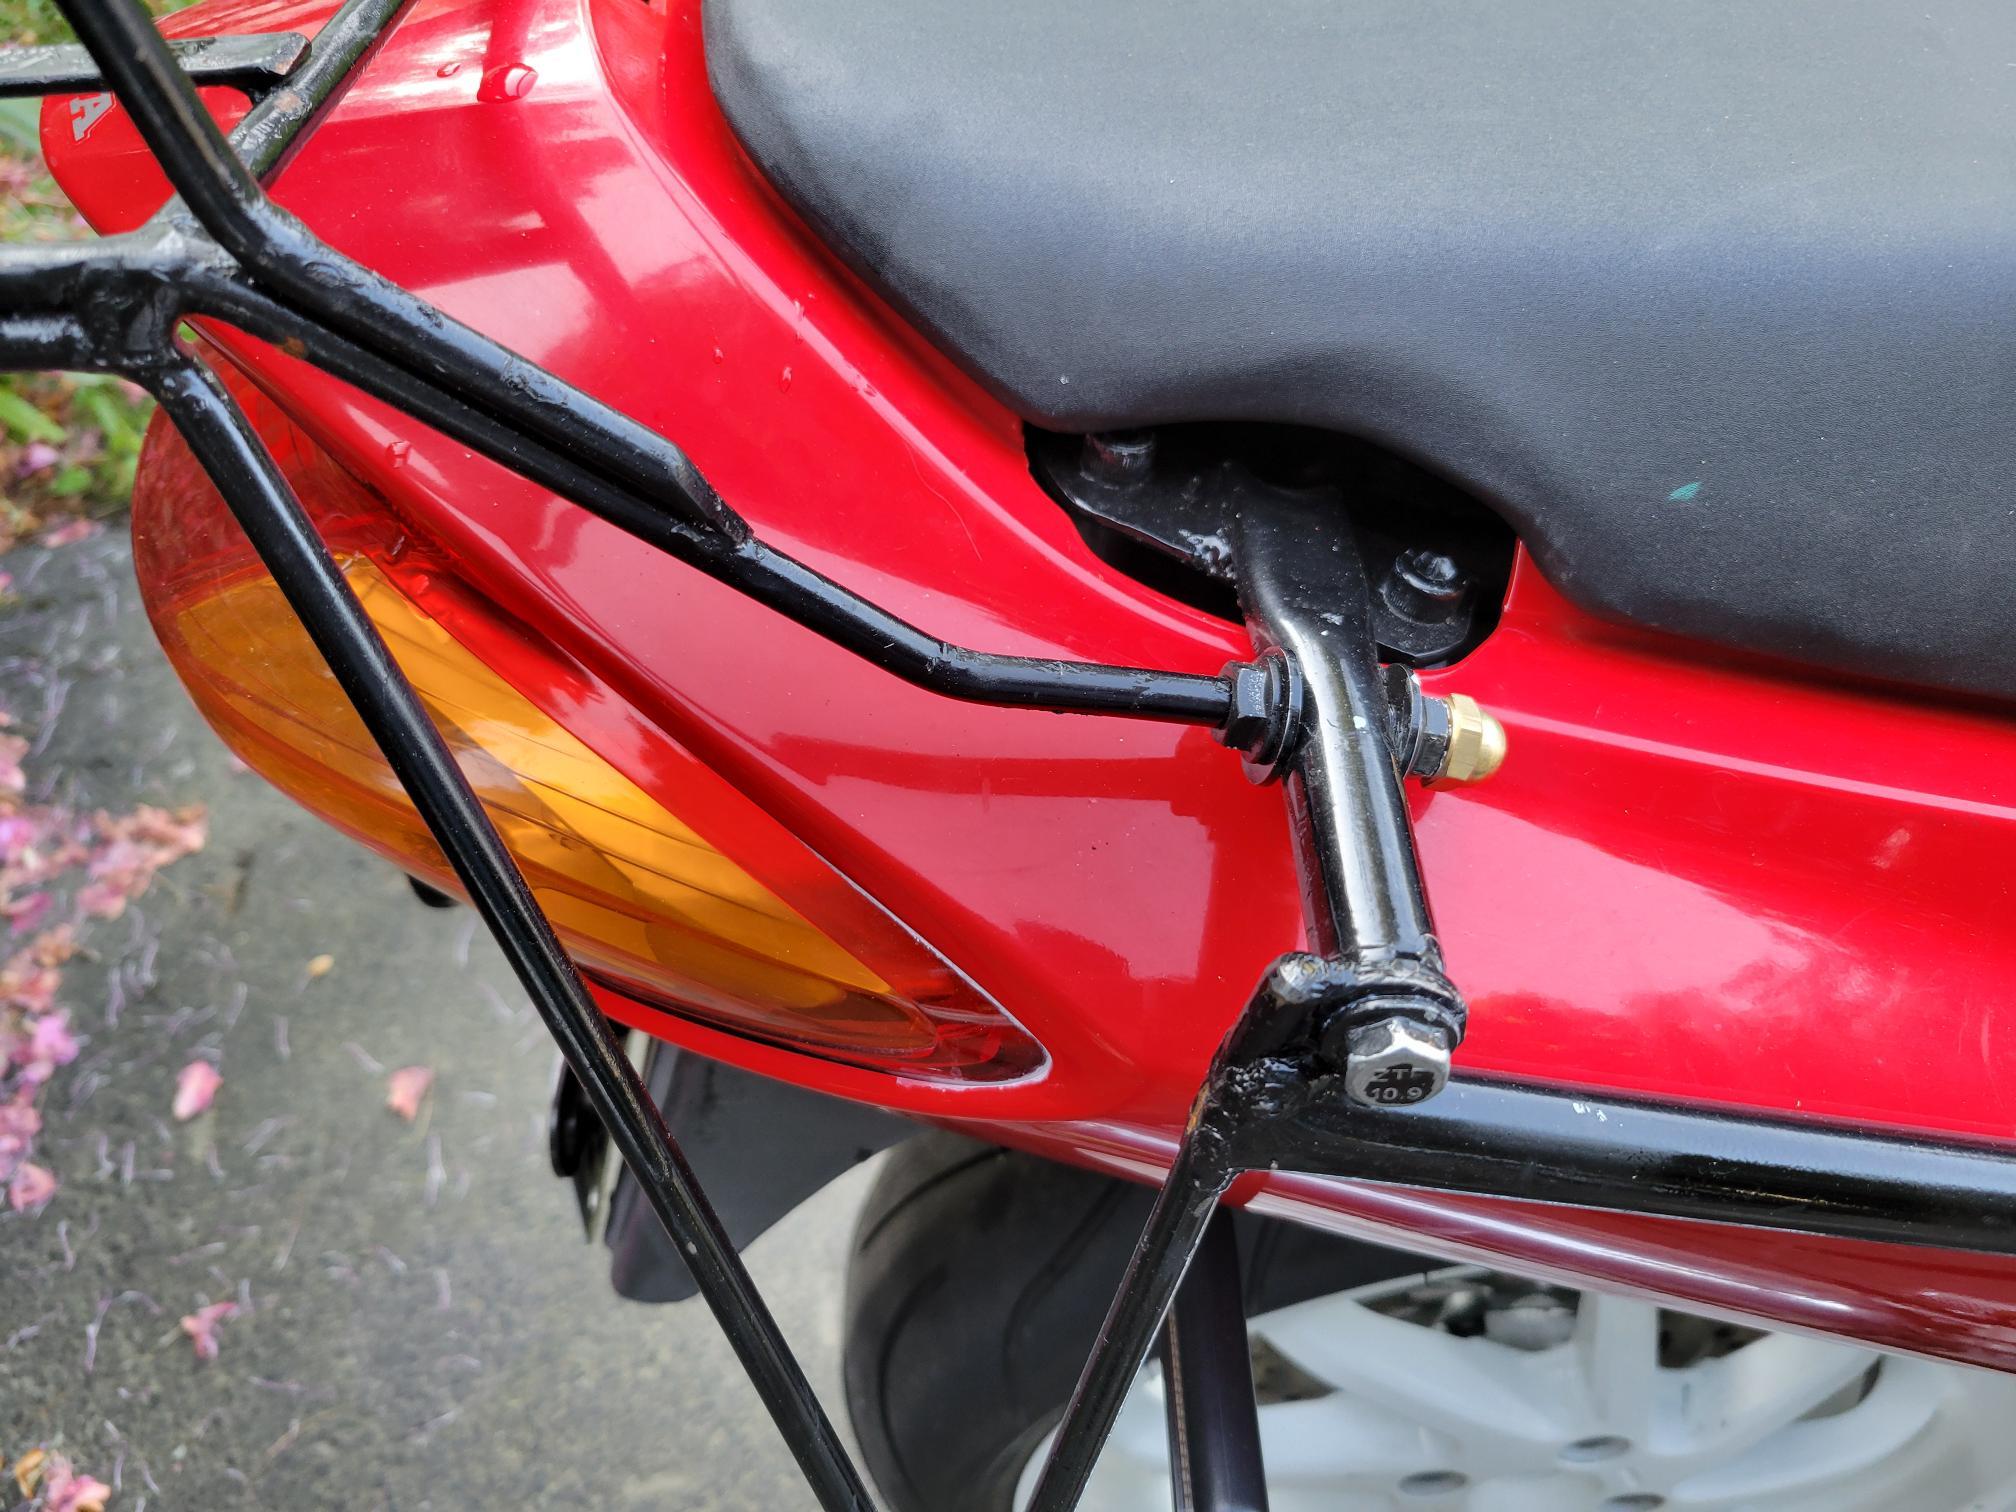
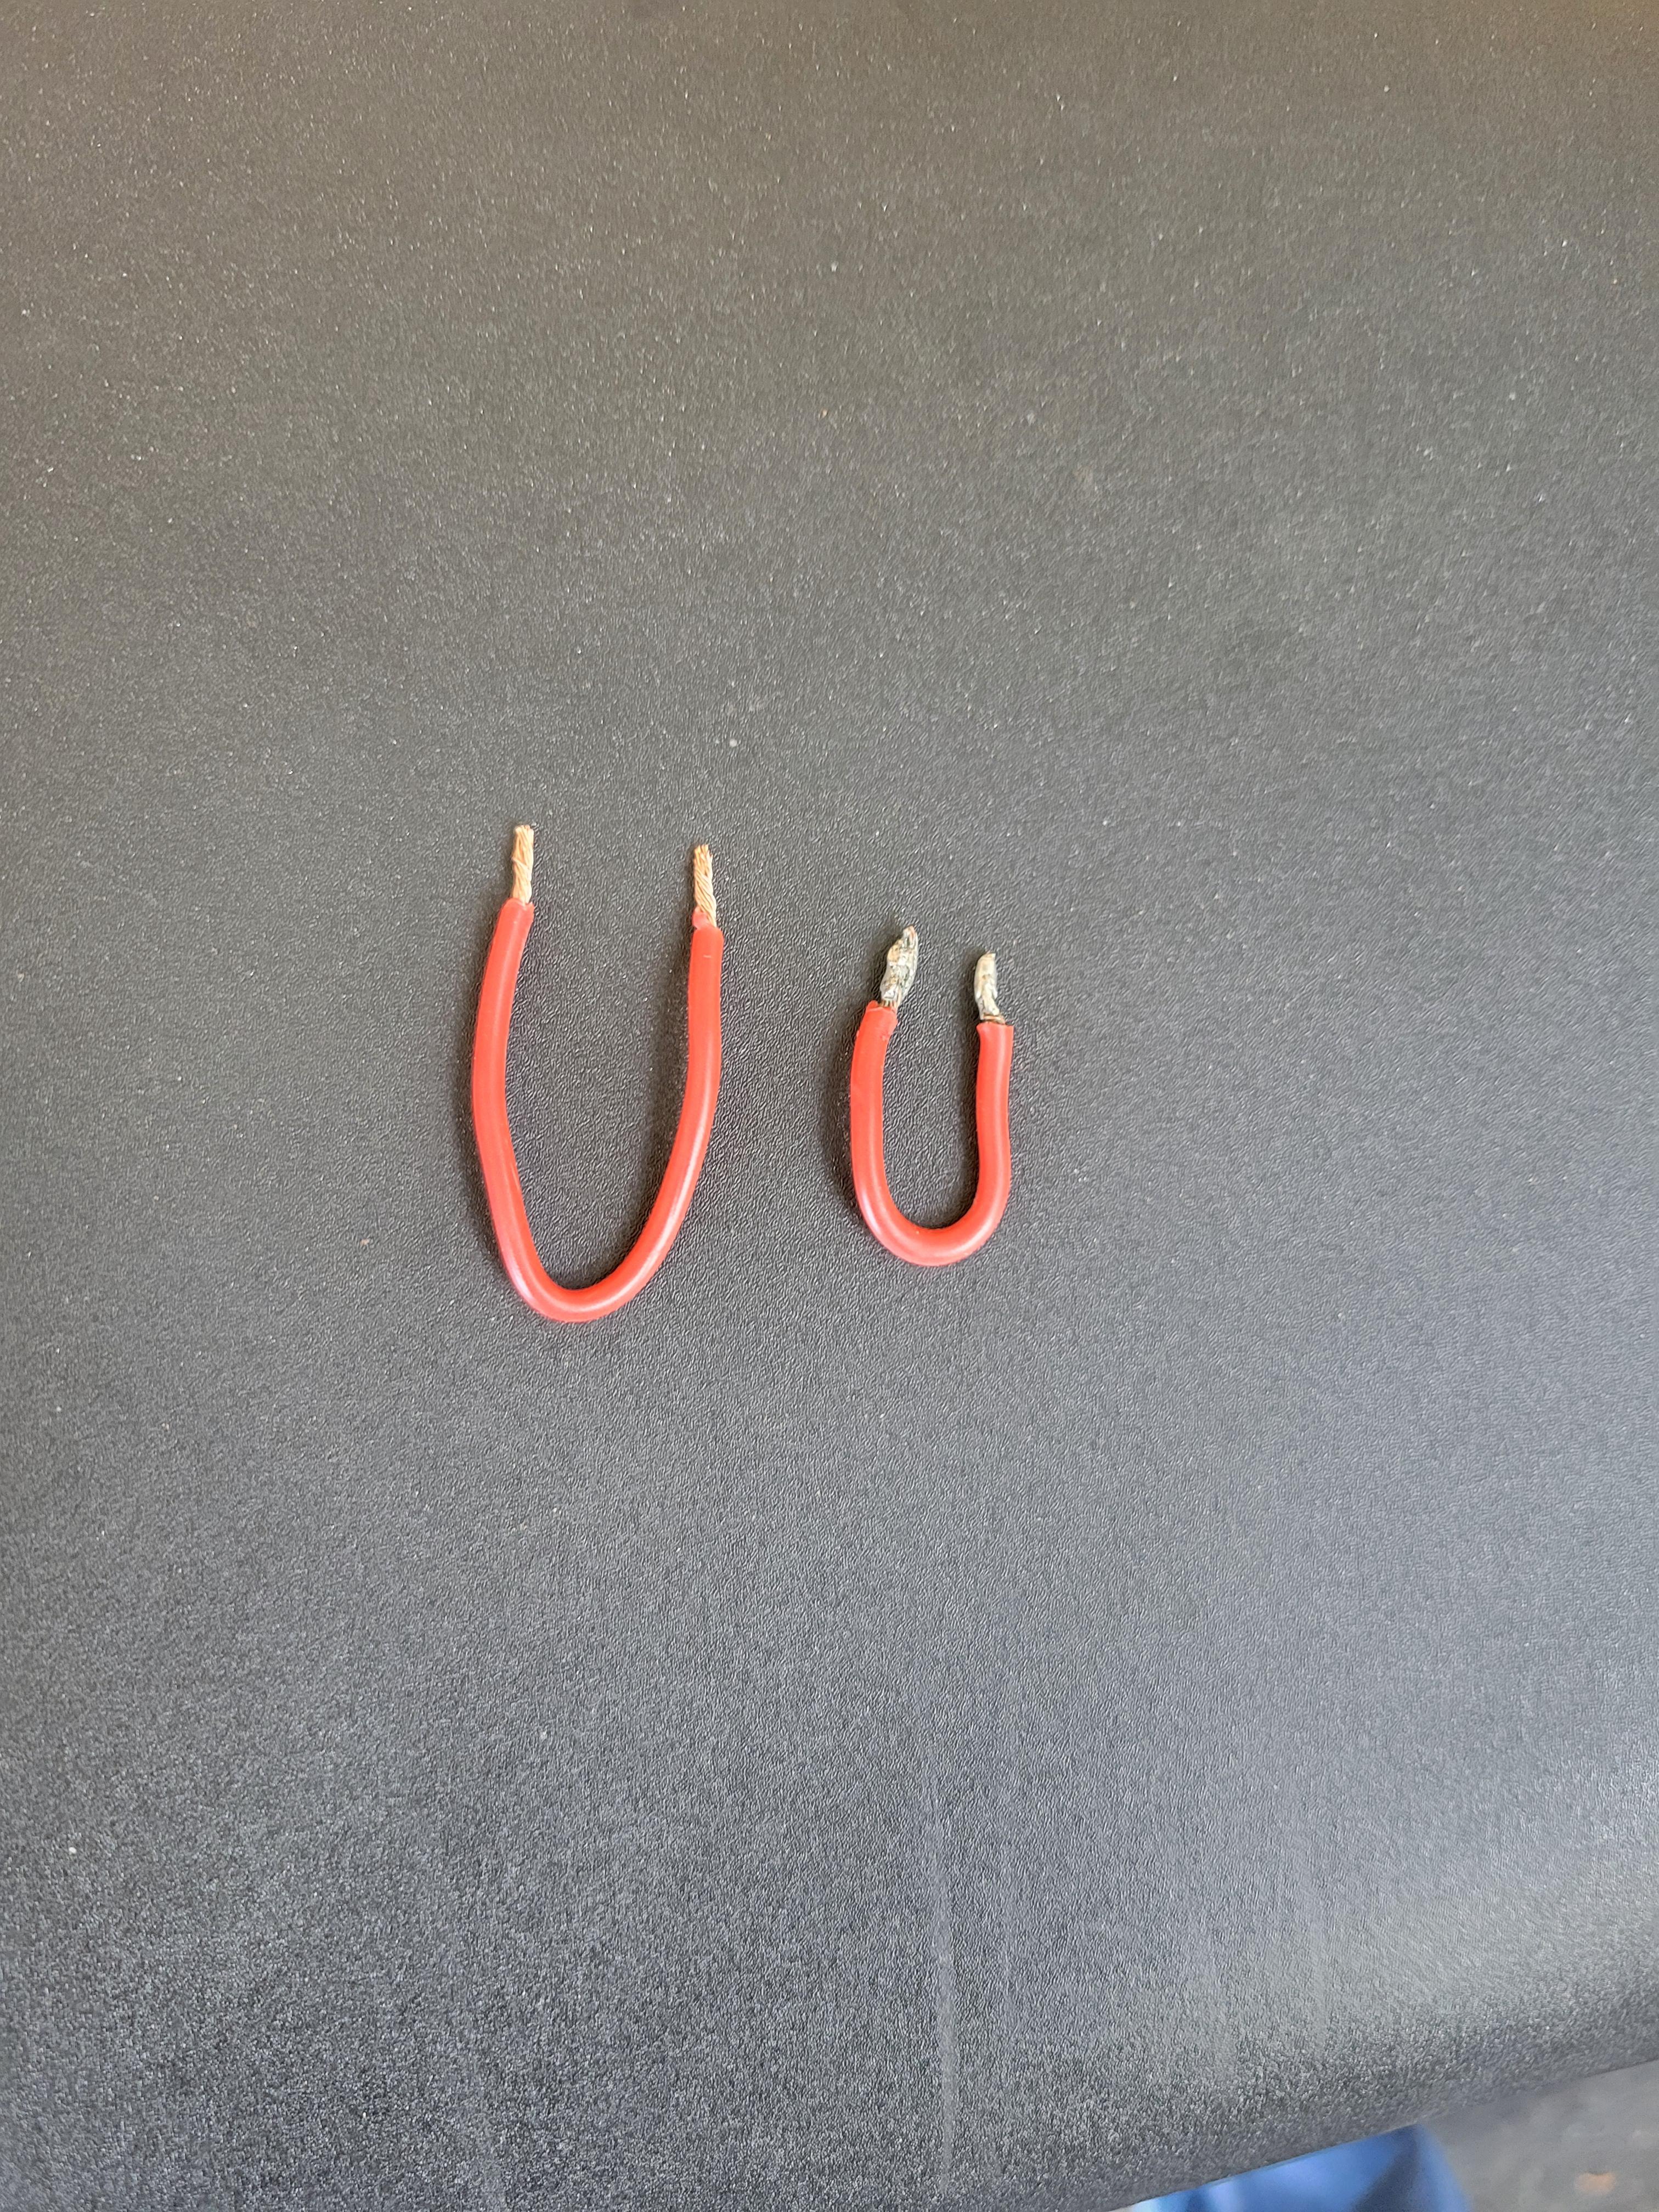
Do not need the whole lever. Just the adjuster part of it. To be clear, just the socket head screw and the aluminum body it goes into. Do not need the wheel part of it. See photo of my front brake assbly for reference to what I'm looking for, there is an obvious hole where the socket head screws should be.😁 So if you have a broken front brake lever kicking around, that would probably work. Thanks Edit: Since there is some confusion, I'm posting pics of the actual parts I'm looking for. Again, Honda only shows the lever as a complete assembly, not the individual parts, so I have no part numbers to reference. # 1 in the photo is threaded 5mm to accept #2, which is a unique 5mm socket head screw. I'm looking for both. As noted above, even a broken lever assembly might have these in good working order. Thanks
-
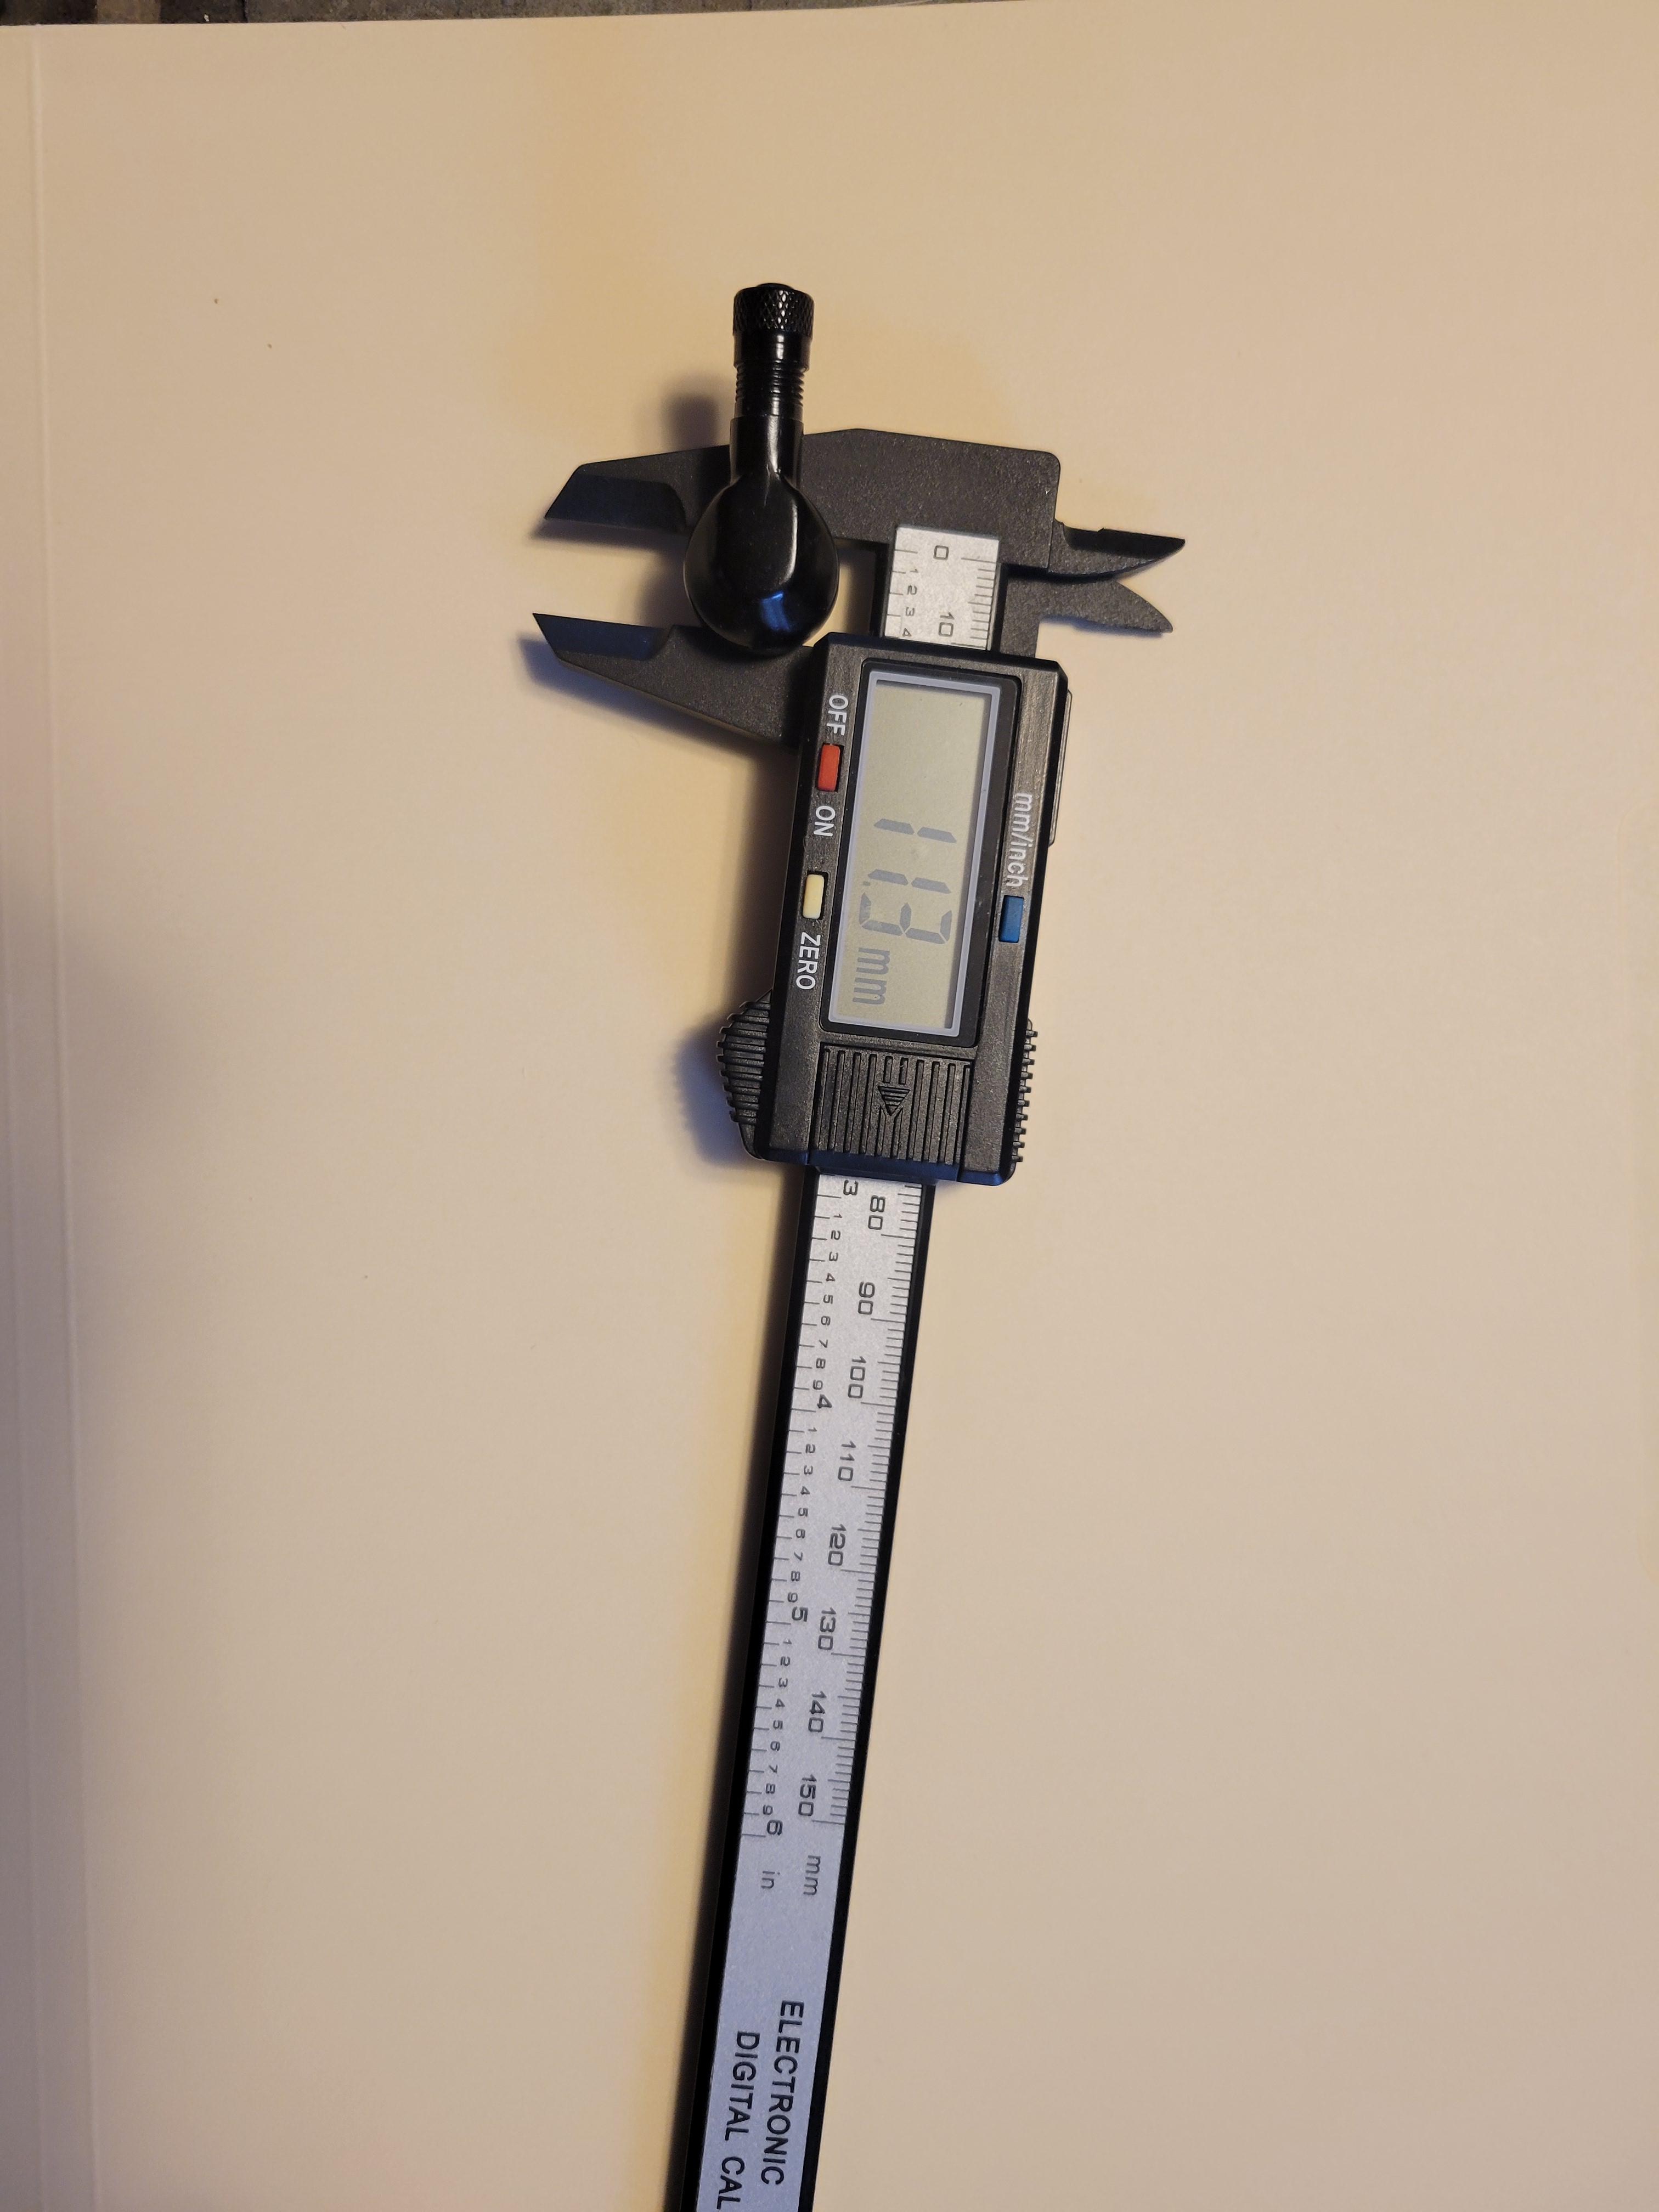
Been a busy Spring riding. Left May 14 for NC, TN, VA to ride with some guys and returned via the Adirondacka in NY, about 2700 miles, 4 days later headed out with a couple of buddies for Northern Maine, New Brunswick and Nova Scotia. Around 30 miles east of Halifax on rt 7 the front brakes suddenly felt a bit soft on the initial press of the lever then were OK. Symptoms of air in the lines, which was disappointing as I had bled them last fall and had 6k of trouble free braking since them. I must say at this time the road was in horrendous shape in places, washboard to the point you could not do the speed limit. Found out at a gas stop in Sheet Harbor, my tool bag, which had lived happily for the last 6k on the rear of the bike, was gone. Anyway, for the next 4 days and 1k as we did the Cabot Trail and a few other roads I just kept it in the back of my mind the brakes had a bit of delay before biting. For the record, some parts of the Cabot Trail were almost unrideable they were so bad. What a shame. Got back to Maine just as it poured again so did not address the bike for a few days., when I did, I gathered my tools, fluid, hoses, containers then went to remove the MC lid to start. That's when I saw the missing fastening. Well Holy Cow, that's a first. I could not conceive how that went missing. I had never removed it, it was flush at the beginning of the riding season, but, there it is, missing. I scavenged a replacement from my 4th Gen as I'm not riding it for a while, and soon discovered why it had exited the bike. The threads on the adjuster portion of the lever were stripped. Thinking about it, it was obvious it came out somewhere on one of the really bumpy stretches of rt 7. What's even more perplexing is that a some point of its 11k of life before I owned it someone had really yarned on it to the point it stripped. Why is anyone's guess. For me, just another reminder I am not the smartest guy in the garage when it comes to diagnosis, there are times when jumping to an instant conclusion is not in my best interest.🙂 Off to classifieds to see if someone had a broken lever with the adjuster intact. BTW, Honda does not show individual lever parts, just the whole assembly.
-
 Wow, a 4th Gen with an early CBR900 ish livery! And an exhaust from a V4 500 2 stroke? That is an inspired take on an early VFR. Painted my rims on my 97 white also, thought they really made the bike. 👍all around.
 -
Welcome aboard. Think you got a pretty darn fair deal on a great bike. That high mount Micron looks at home on the bike. Not sure if I've heard one on a VFR yet, but no doubt its going to sound great. Just finished 4,700 miles in 17 days on my 2001 down to North Carolina, Virginia, etc then up to Nova Scotia and New Brunswick. My 5th Gen. is a keeper. I'm sure yours will be also.
-
I had the same problem when I bought my 2001. I worked on ships my entire life, where rust is a constant problem. We use a product called Phosphoric acid to neutralize rust as it chemically changes iron oxide into iron phosphate, which acts as a barrier to further oxidation. Here is the post I wrote up last fall. I assume you have the tank off the bike, if so set up a table with a soft blanket, drain most of the gas into a container and set aside as you will use it. Place the tank upside down on the table. Use a pair of rubber gloves and a coarse 3M pad and reach inside the tank and scrub everywhere you can reach using the old gas as a solvent. This sound tedious, but does not really take that long. When done, prop the tank upright, I used some line to hold it up and use a hand pump to remove the gas and rust into a shallow pan, like you would use for an oil change, and set that outside in the sun. The gas will eventually evaporate leaving the rust and a bit of sludge which can be more easily disposed of rather than all that liquid. Repeat this process using your old gas until you feel you have gotten everything you can reach out of the tank. Let the inside of the tank dry for a day or 2. When completely dry, take about 1/3 of a litre of fresh gas and use a fresh 3M pad and scrub the inside of the tank again. If the gas turns brown or rusty, drain and repeat until scrubbing with fresh gas does not discolor it. Drain and let the tank fully dry again for a few days or so. Remove your fuel pump from the plate it is attached to while waiting for the tank to dry, you will need it to plug the hole when you add the Phosphoric acid to the tank. When the tank is dry, add about 1/3 of a litre of the acid, and with rubber gloves and a fresh 3 M pad, srcub the inside of the tank. If the acid turns brown from rust, drain and repeat until its fairly clear. I let the tank dry for a day, but at that point you can add about 1/2 litre of acid, seal the tank with the plate, plug the fuel lines and turn the tank around 360 degrees in each direction. When fully coated remove the plate and drain the acid into a container and save. Let the tank dry completely and inspect, it should look pretty good by now. If it does, take the acid you saved and put into the tank and repeat this last process one more time, then drain and let the tank dry. If all goes well it should look like mine in the post. Note, I do not live in a very warm place, if you happen to this process will go much faster. It took me almost 4 weeks, but 95% of that was waiting for the tank to dry. Note. Phosphoric acid sound like a strong thing to use, but look at a can of Coke, its listed as one of the ingredients, so if you can drink something that contains it, well, its not so bad, Note. Phosphoric acid will discolor paint if left on a surface , so be careful when pouring and removing. I keep a spray bottle of water handy along with some rags to clean it up if it does happen to get on the paint. Note. Letting the old gas and rust evaporate in the sun means you do not have to find a way to dispose of it, same applies to any left over old acid. Note. If your pump still functions, you can carefully clean it also with the acid. I used small acid brushes and Qtips. Do not soak the entire pump in it. if the tank is that bad you probably should replace the pre filter and primary filter for peace of mind. Note. When done, I do not recommend you coat the tank with anything. A look inside the tank should be explanation enough for why this is not a good idea. Note. Do not use any Phosphoric acid product that is not a thin liquid. There are some out there that are Gels, avoid those as they will leave a residue in the tank that will ruin an otherwise great day on your bike. Hope all of this long winded post proves to be of some value to you. Take heart, you can get through this and be out riding this summer, it will just take some time and elbow grease. Best of Luck, and don't hesitate to PM me if you need any clarification to what I posted above. Regards, Michael
-
Apparently has a top speed of 200 kph,/124 mph, though interestingly there is no mention of braking distance at that speed, nor of having brakes at all. Think I will sit this one out on the sidelines with a cold one while watching Darwins Theory unfold with the early adoptors on Beta versions making their last YouTube video.
-
Hi JZH: I do not know for certain how old the TBR can is. I bought the bike (4th Gen) in early 2013 from a fellow who was a member here and on a First Gen Board I am a member of also. I was not able to pick the bike up until 4-5 months later as I was working in Europe, but flew out to Iowa in July to pick it up. Knowing I was going from there to Colorado for a Sab Mag meet for 5 days then back to Maine I had a set of tires sent to his house. While I was in his garage putting the tires on he ran through the bike with me. He owned it for 5 years, and shortly after buying it bought a D+D pipe for it, which he instantly hated (me too), then he bought the TB exhaust. Pretty sure he bought both brand new, but the TB may have been a lightly used or NOS he found. So guessing this was around 2008-09. Either way, I repacked the TB 3 years ago and can say with certainty that it had never been molested before I had a go at it. My last communication with him 5 years ago was he had to give up riding, and have not heard from him since. How true...........I was completely stunned when all the measurements stated in the ad turned out to be true, the Stainless was at least of a serviceable quality or better, and even the stop mount for the centerstand was in the right place and angle. Thinking about it I should have bought a Lottery ticket, as that was my lucky day. 🙂 For the record, $37 USD to my door should anyone be thinking of repurposing a 50mm can on their 5th gen.
-
vfrcapn is correct. Have these on the front rim of all my bikes.
-
DrErgal: That link turned out to be great info! Clear, concise instructions and a list of what all the values mean. Jeez 24 of them....... My codes 2 and 11, came up as a maps sensor vacuum connection issue as trmoyer suggested, and a poor connection at the speed sensor. Since I had just installed an aftermarket gear indicator which required that I plug into the speed sensor, I just now unplugged it and put it back to original as I noticed yesterday my speedo and odometer had tanked, so an obvious culprit. I have a full tank of gas now, but will burn it down and have a look at my hoses. Right now there is no FI light with the bike running, so I'm not to worried. I have 2 trips coming up in May for about 7,000 miles (11,300 km) so want to start out without to many known defects. 🙂 Just a thought, I keep a small jumper in my tool kit at all times as it's useful to jump a bad fuel cut relay in a pinch to get your fuel pump running again, so I had one already. Had no idea I'd need one on a 5th Gen for diagnostics. Thank you very much for posting the link, it saved me quite a bit of time.
-
Interesting you mention the ECU. About a week ago I "discovered" where the ECU was located and pulled it out of its cubby back aft. Just visually inspected and re-installed. I will have another look and pull the connector. The bike sat for about 15 years in Northern Vermont, obviously in a unheated garage, so time to check more connections. Thanks
-
To be honest, I never would have known, or attempted this without the knowledge and feedback by the members here. I'm certainly grateful, and never take it for granted when someone on this forum takes time to answer my questions or offer information. Happy Trails guys.
-
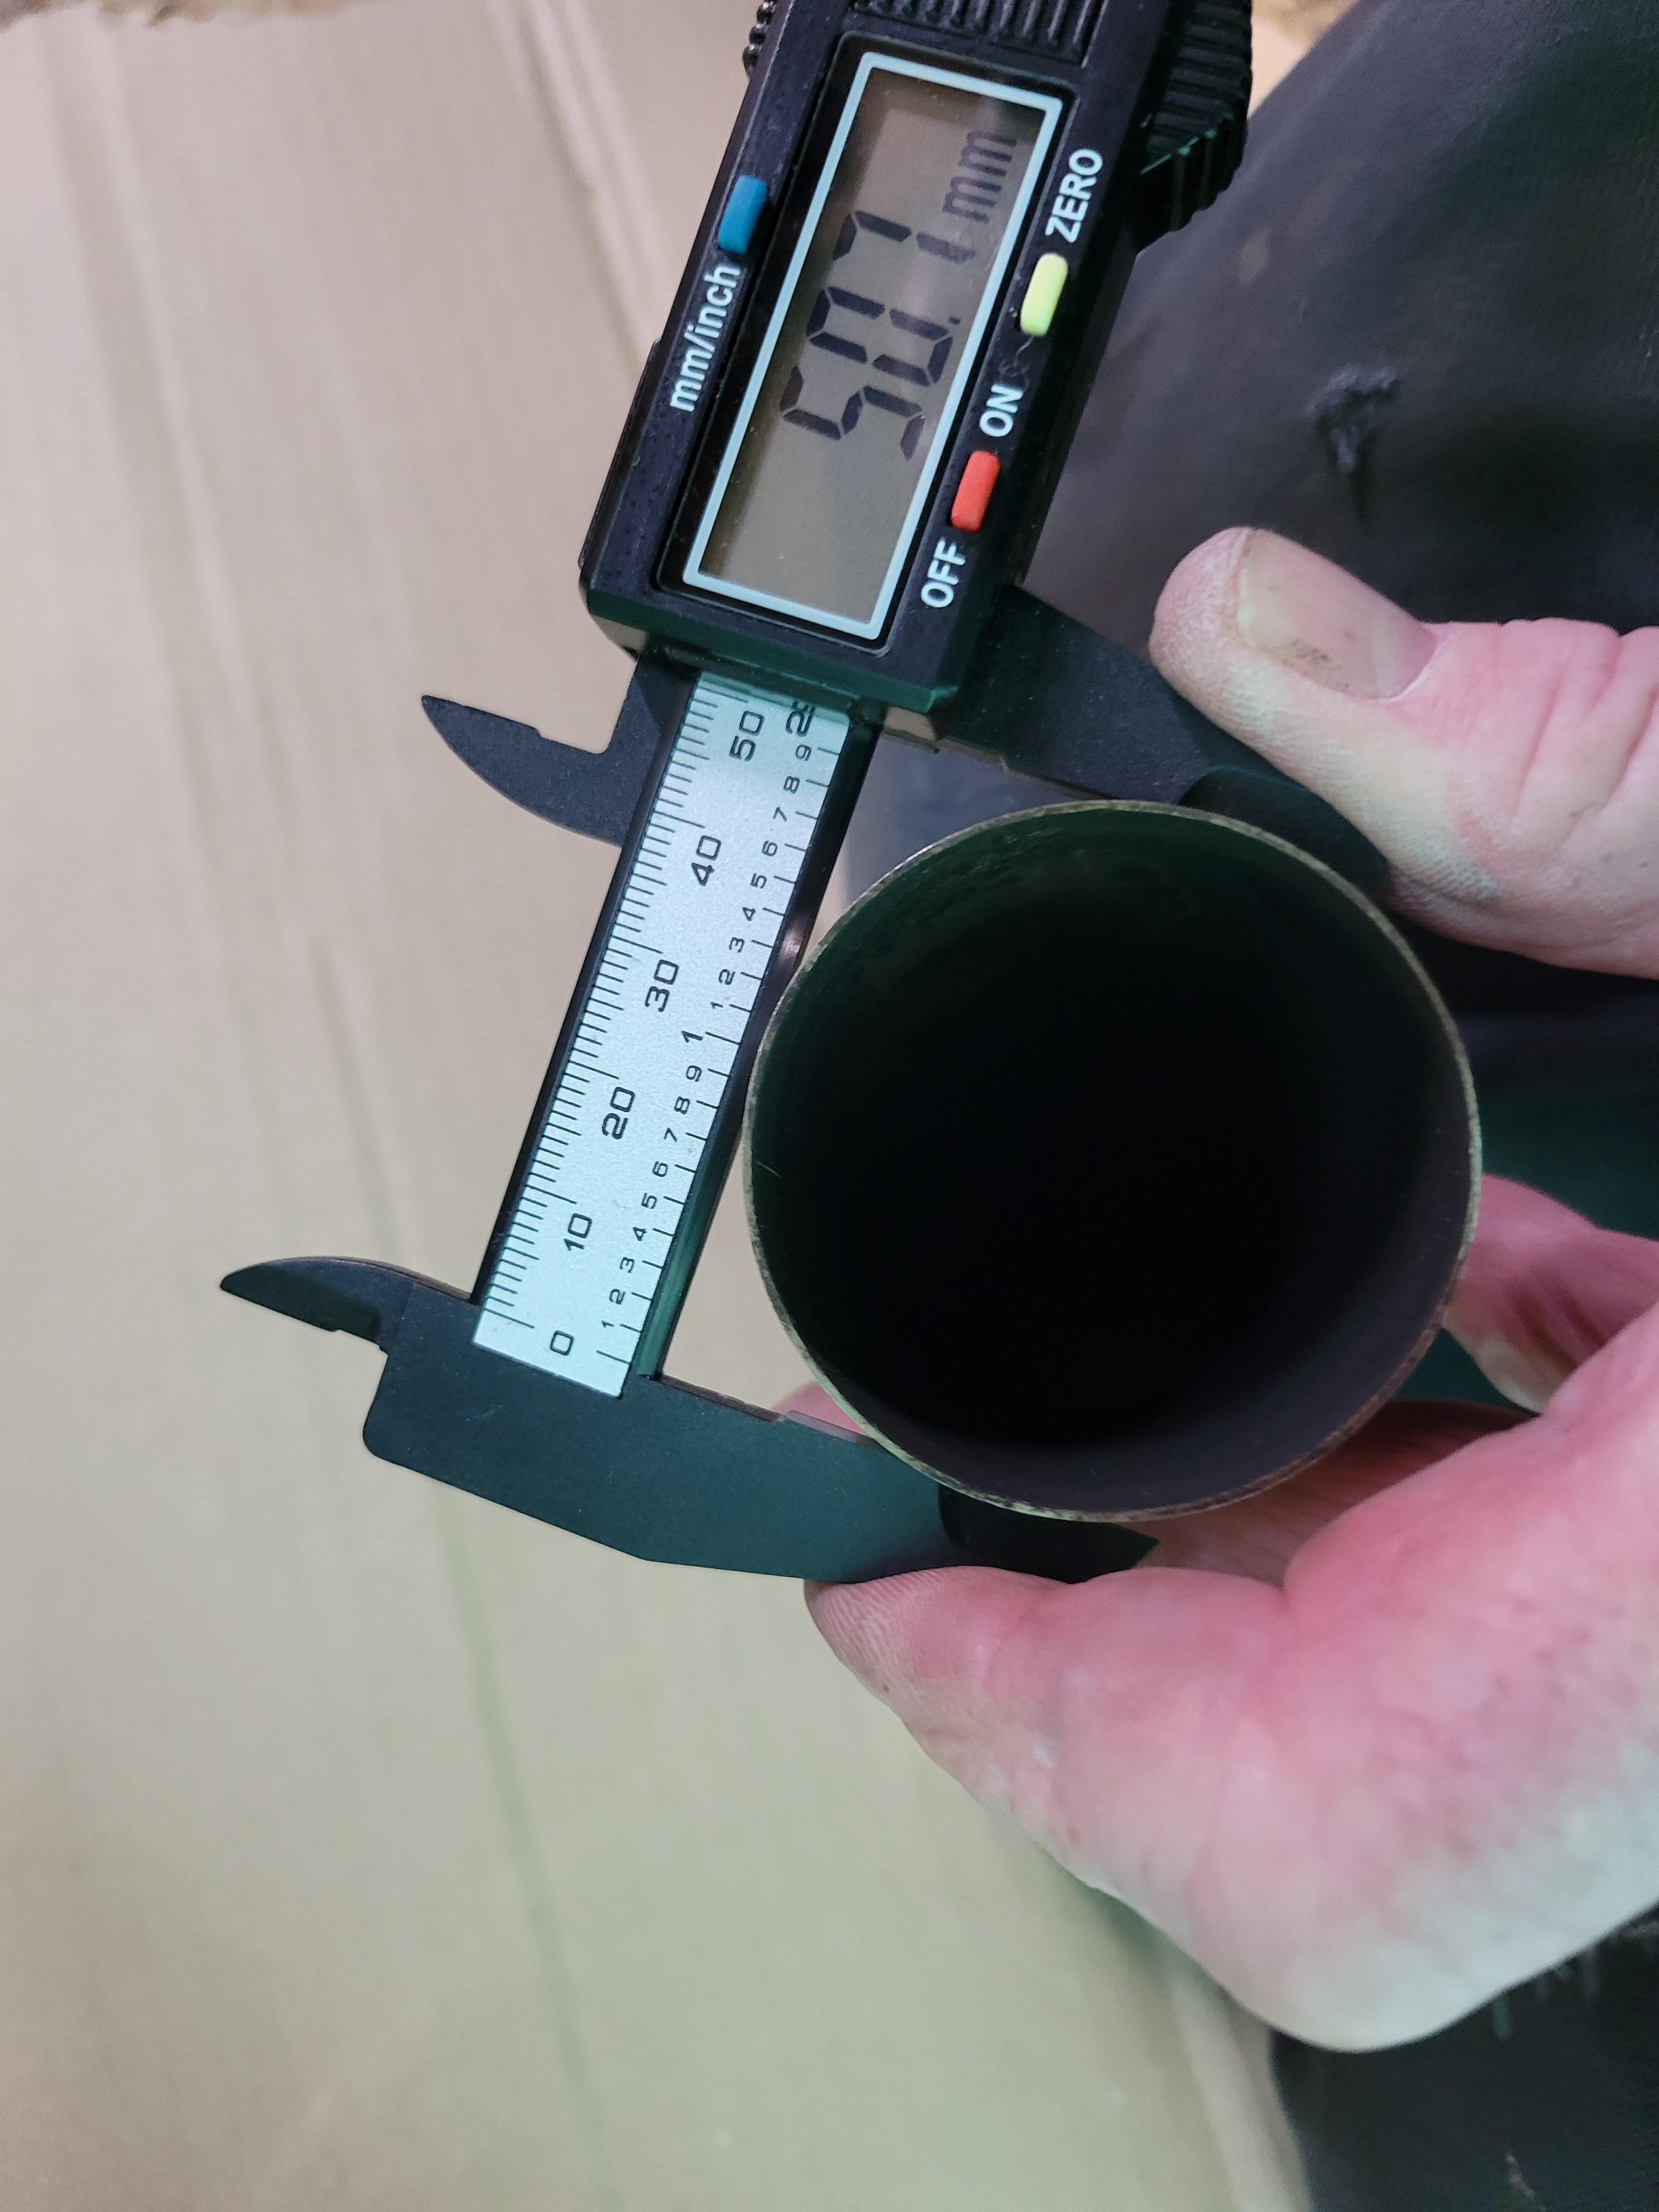
So, bolted everything together, measured and found it was about 25-30 mm longer than the oem, which was fine as I was getting some exhaust residue on my soft bags before. A quick video of the bike running 20250415_145051.mp4
-
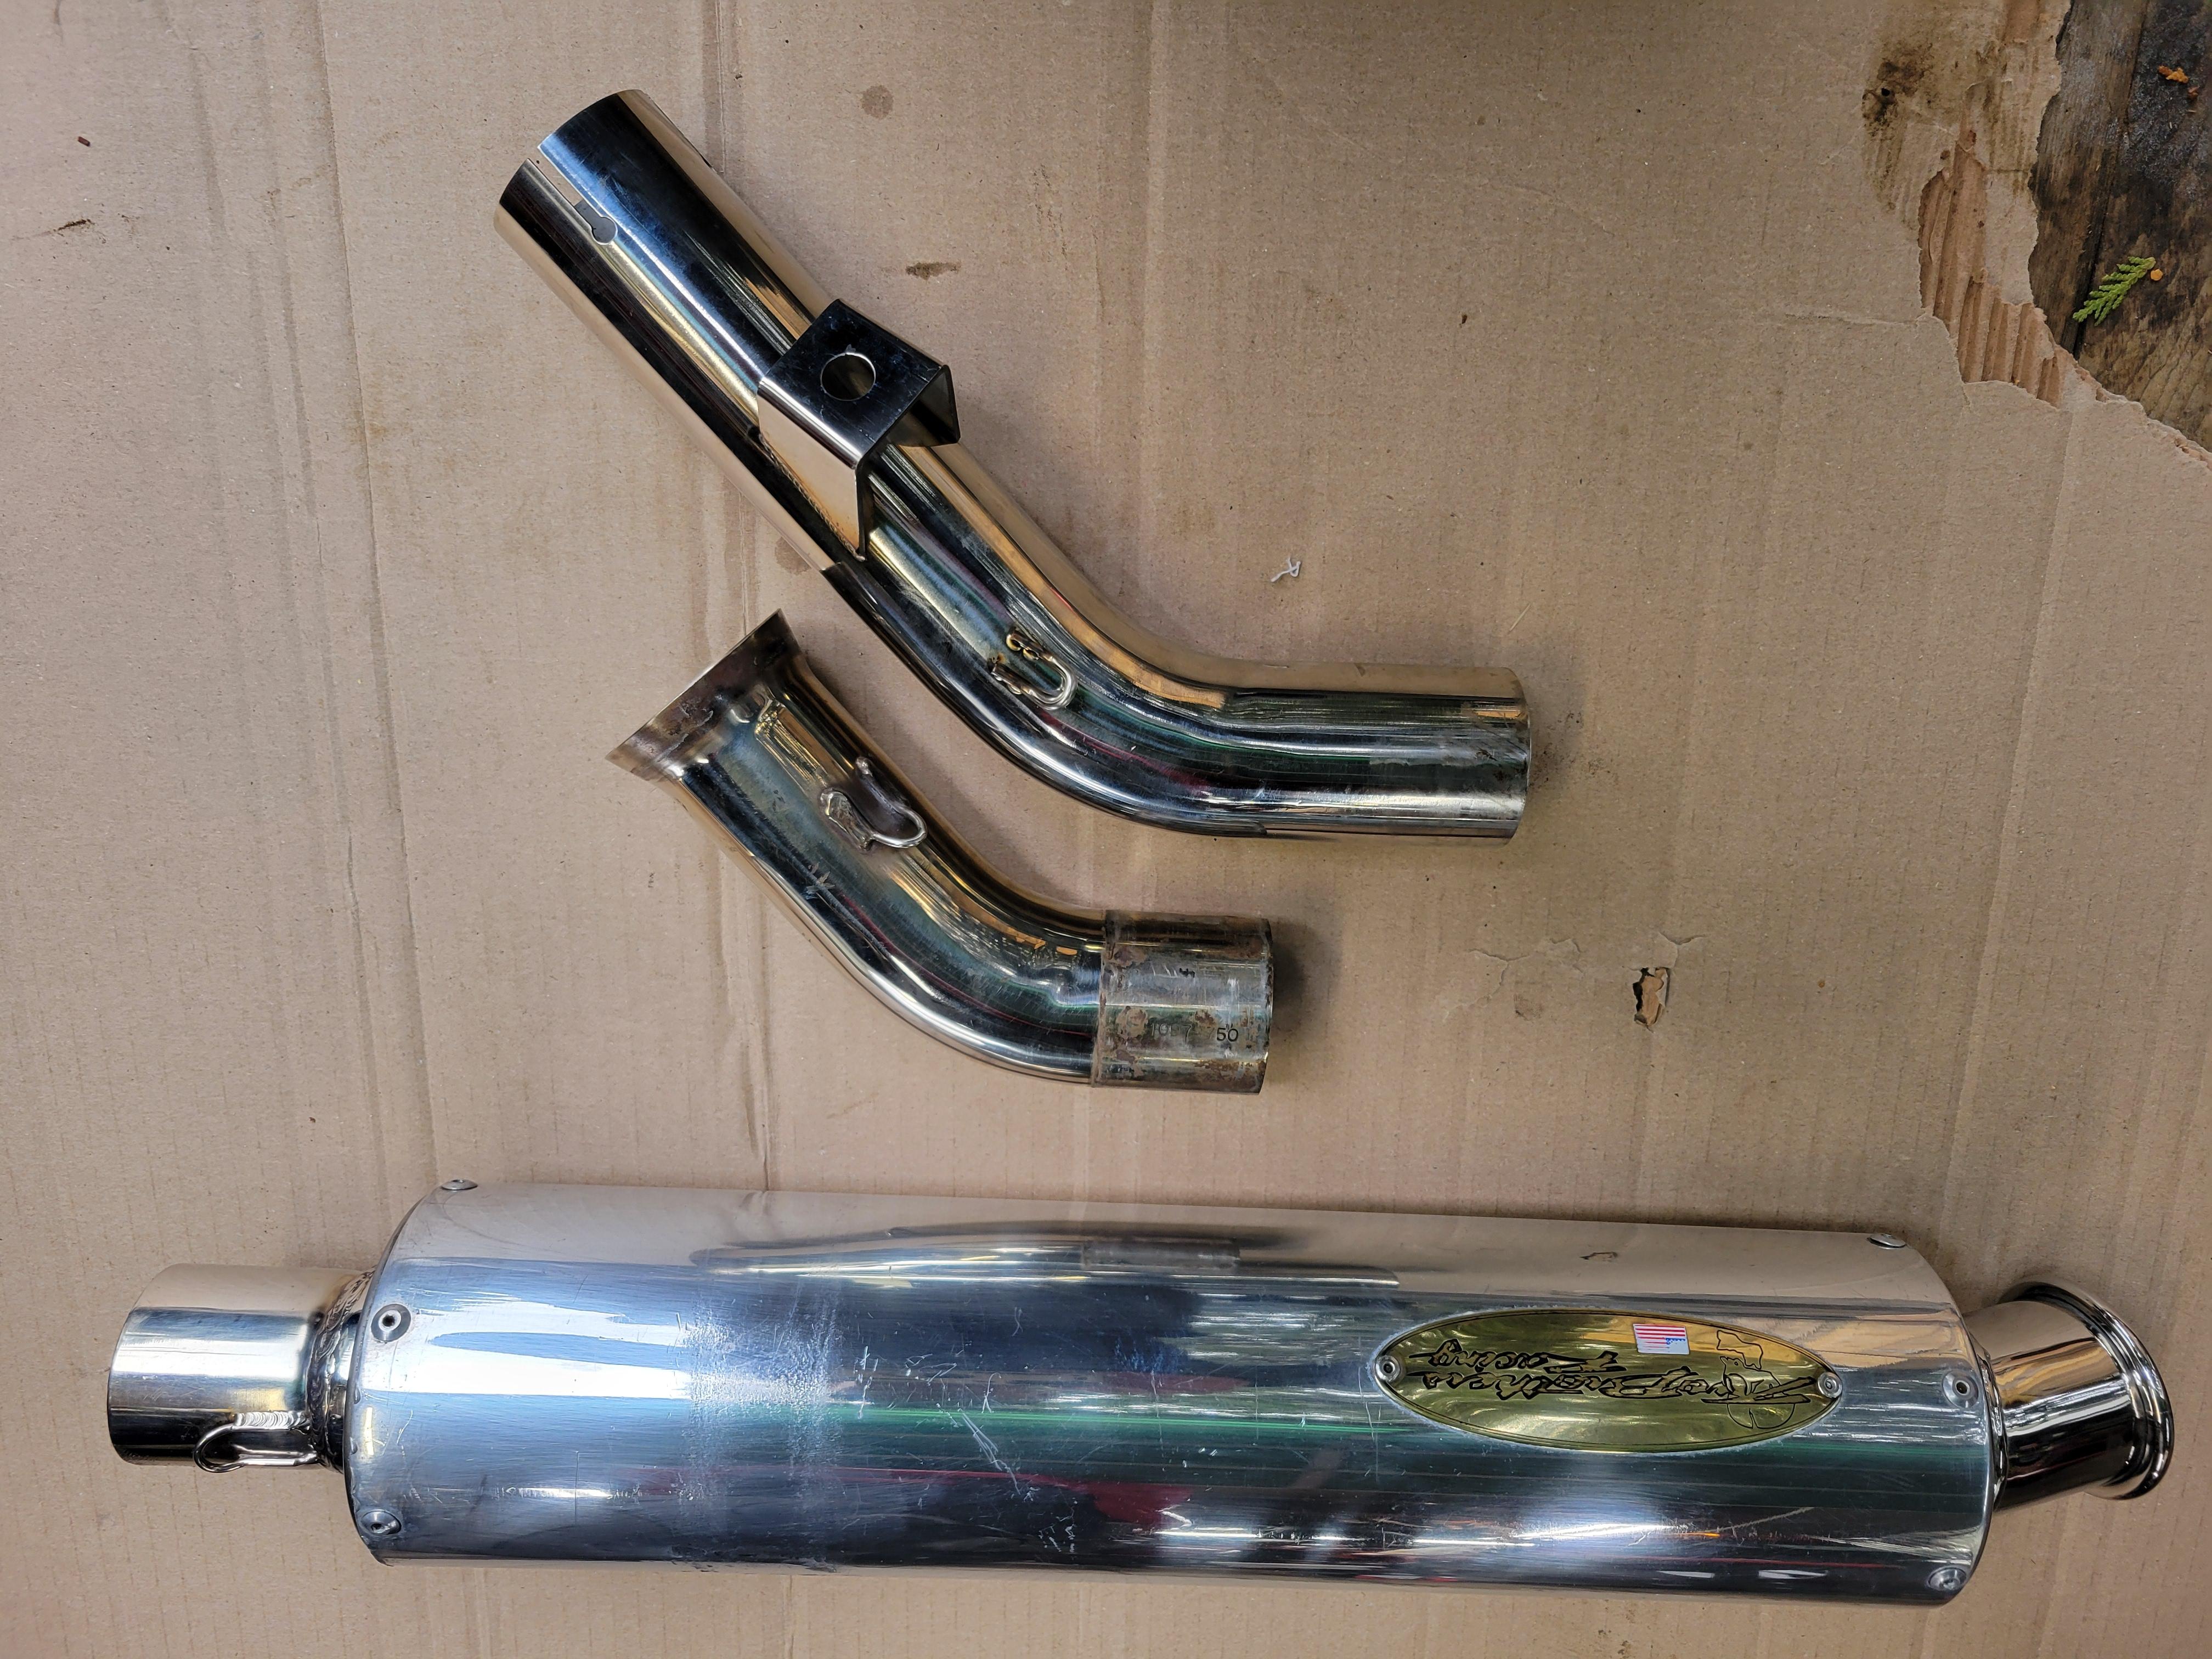
This is the can with the original mid pipe and the Ali mid pipe. A bit longer but seemed to be OK. I dry fitted the pipe to the collector, the can to the pipe, and put in in place on the bike. Did everything line up perfectly? No, but frankly it installed about as easy as any other after market exhaust I have put on. Only thing was at the point where the strap on the can mounted to the rear foot peg, it made contact. That was easily remedied by adding a few washers between the strap and the mounting point. Before I bolted everything up, one more test. I have worked on ships my entire life. I have had to be aware of corrosion and how different metals, especially stainless, react or fail. There is a lot of crap stainless and misinformation out there. Only one way to find out. 20250413_132656.mp4
-
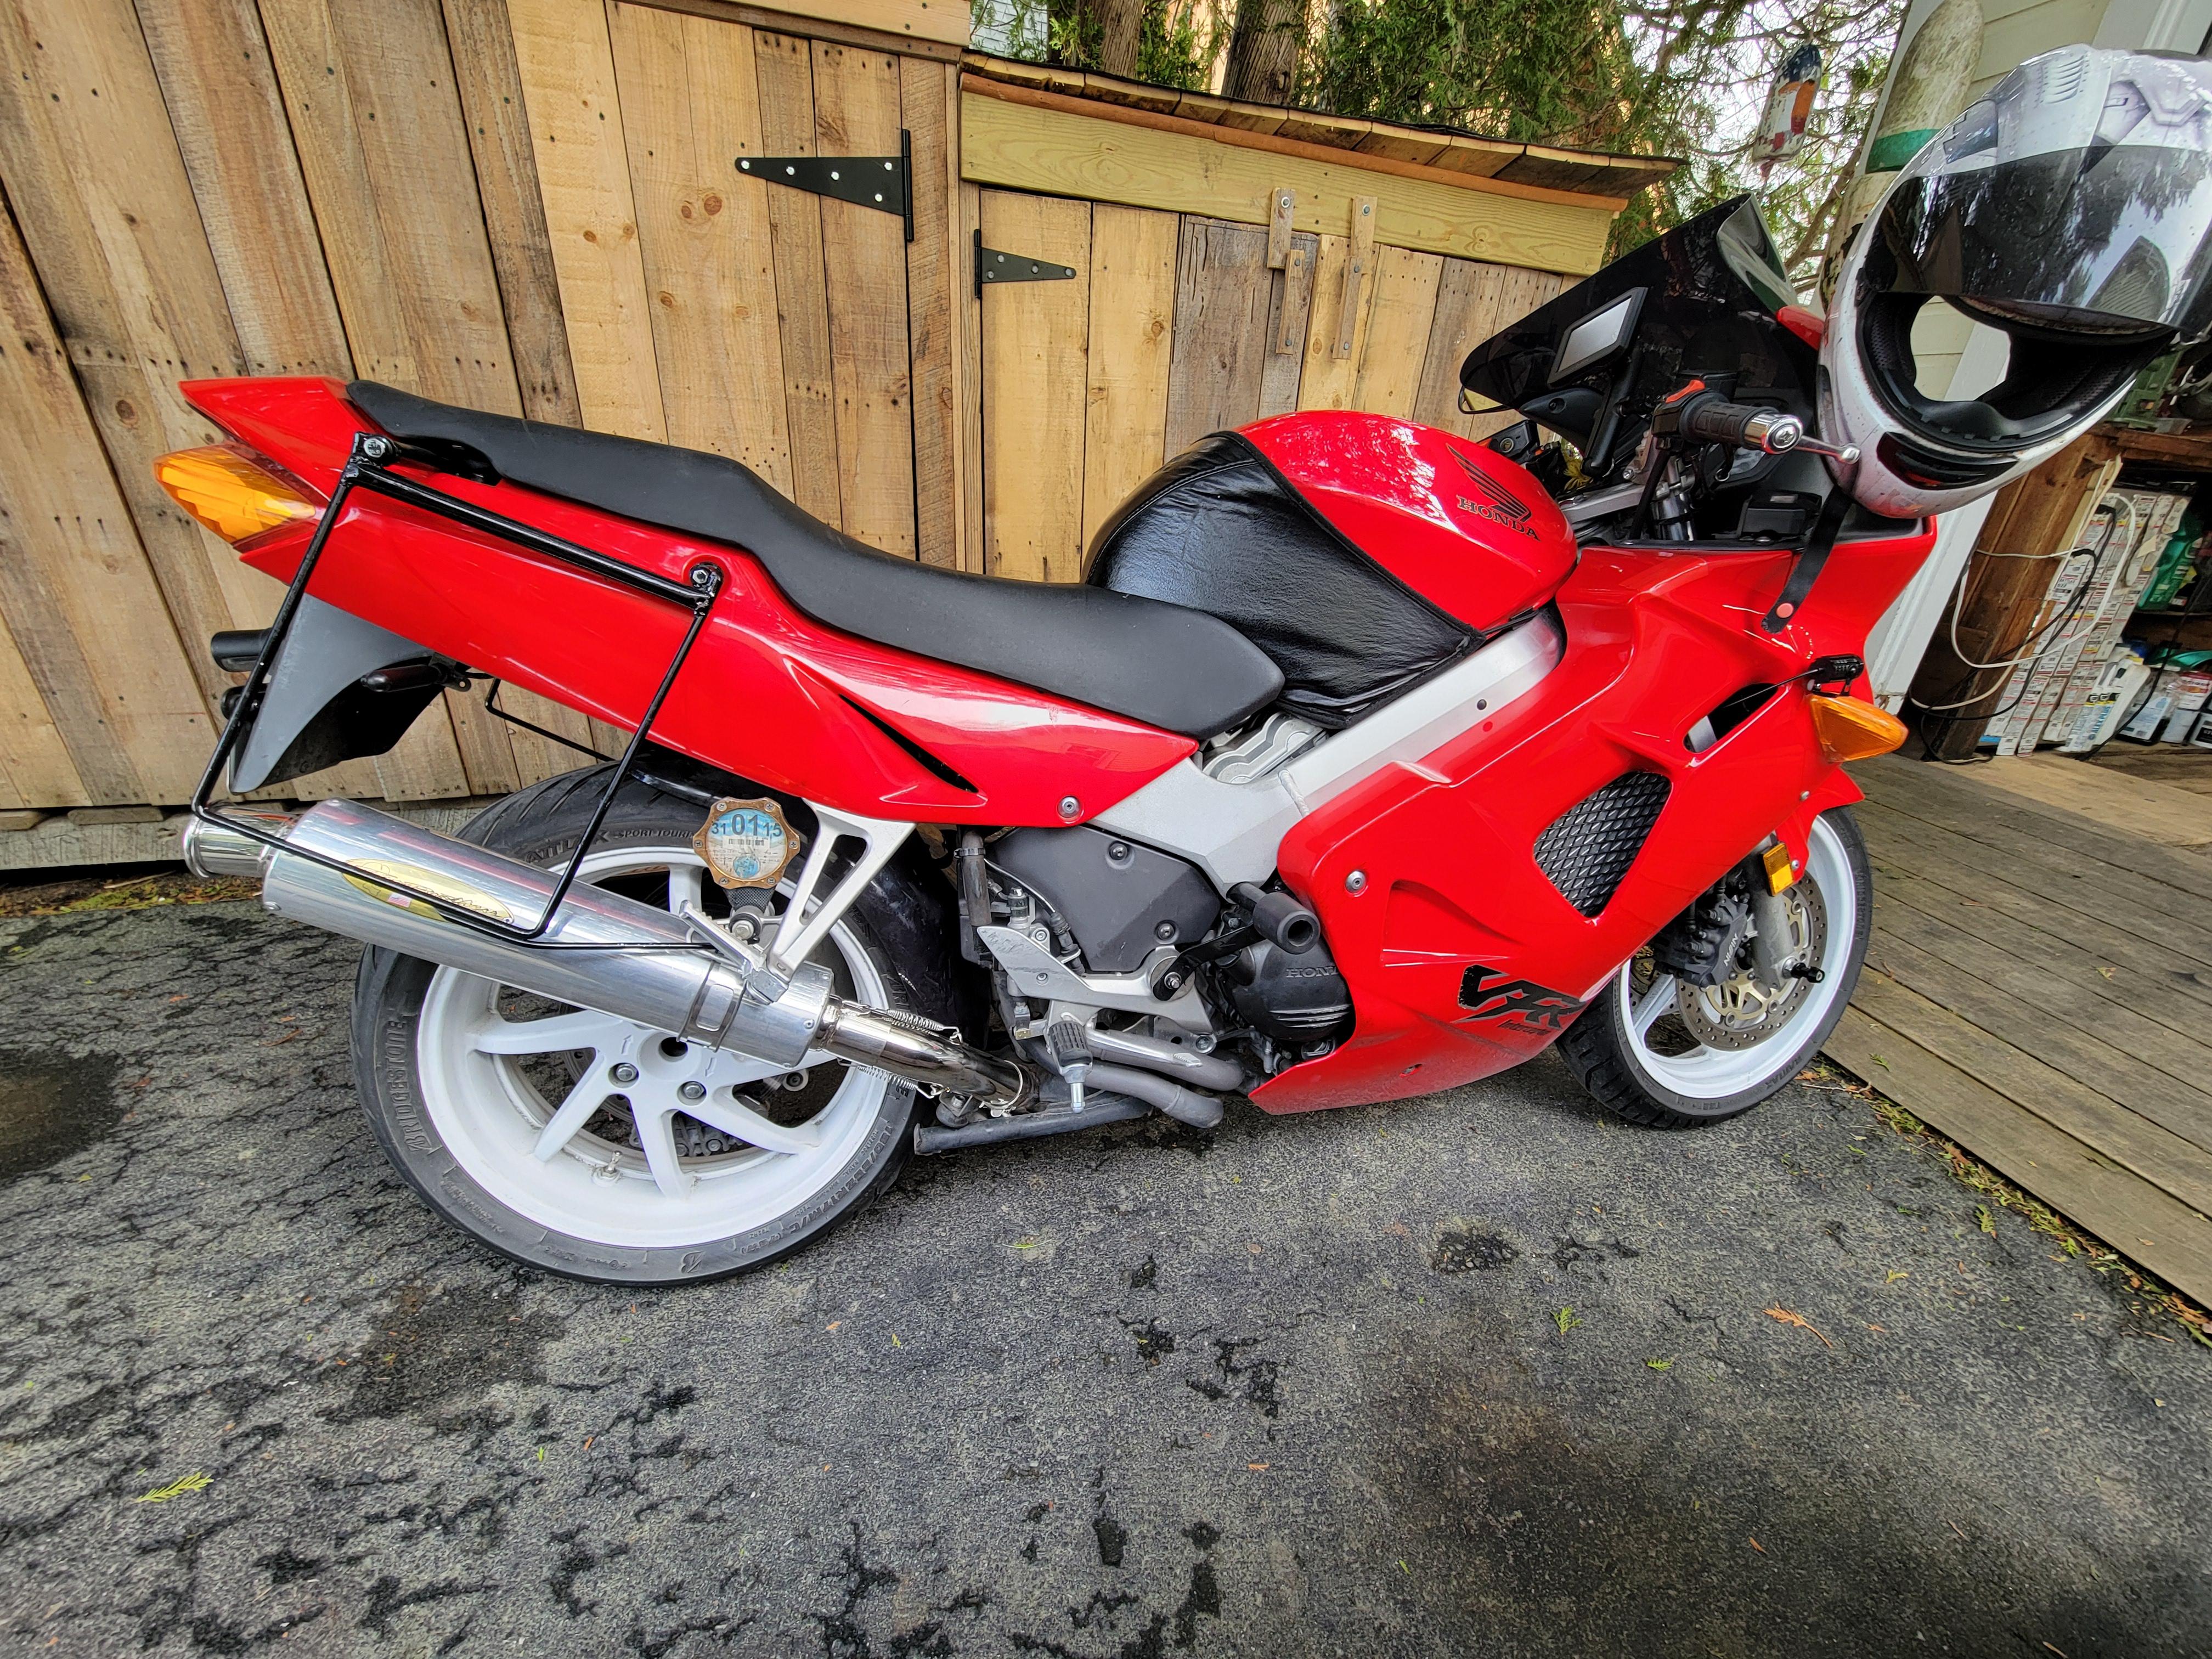
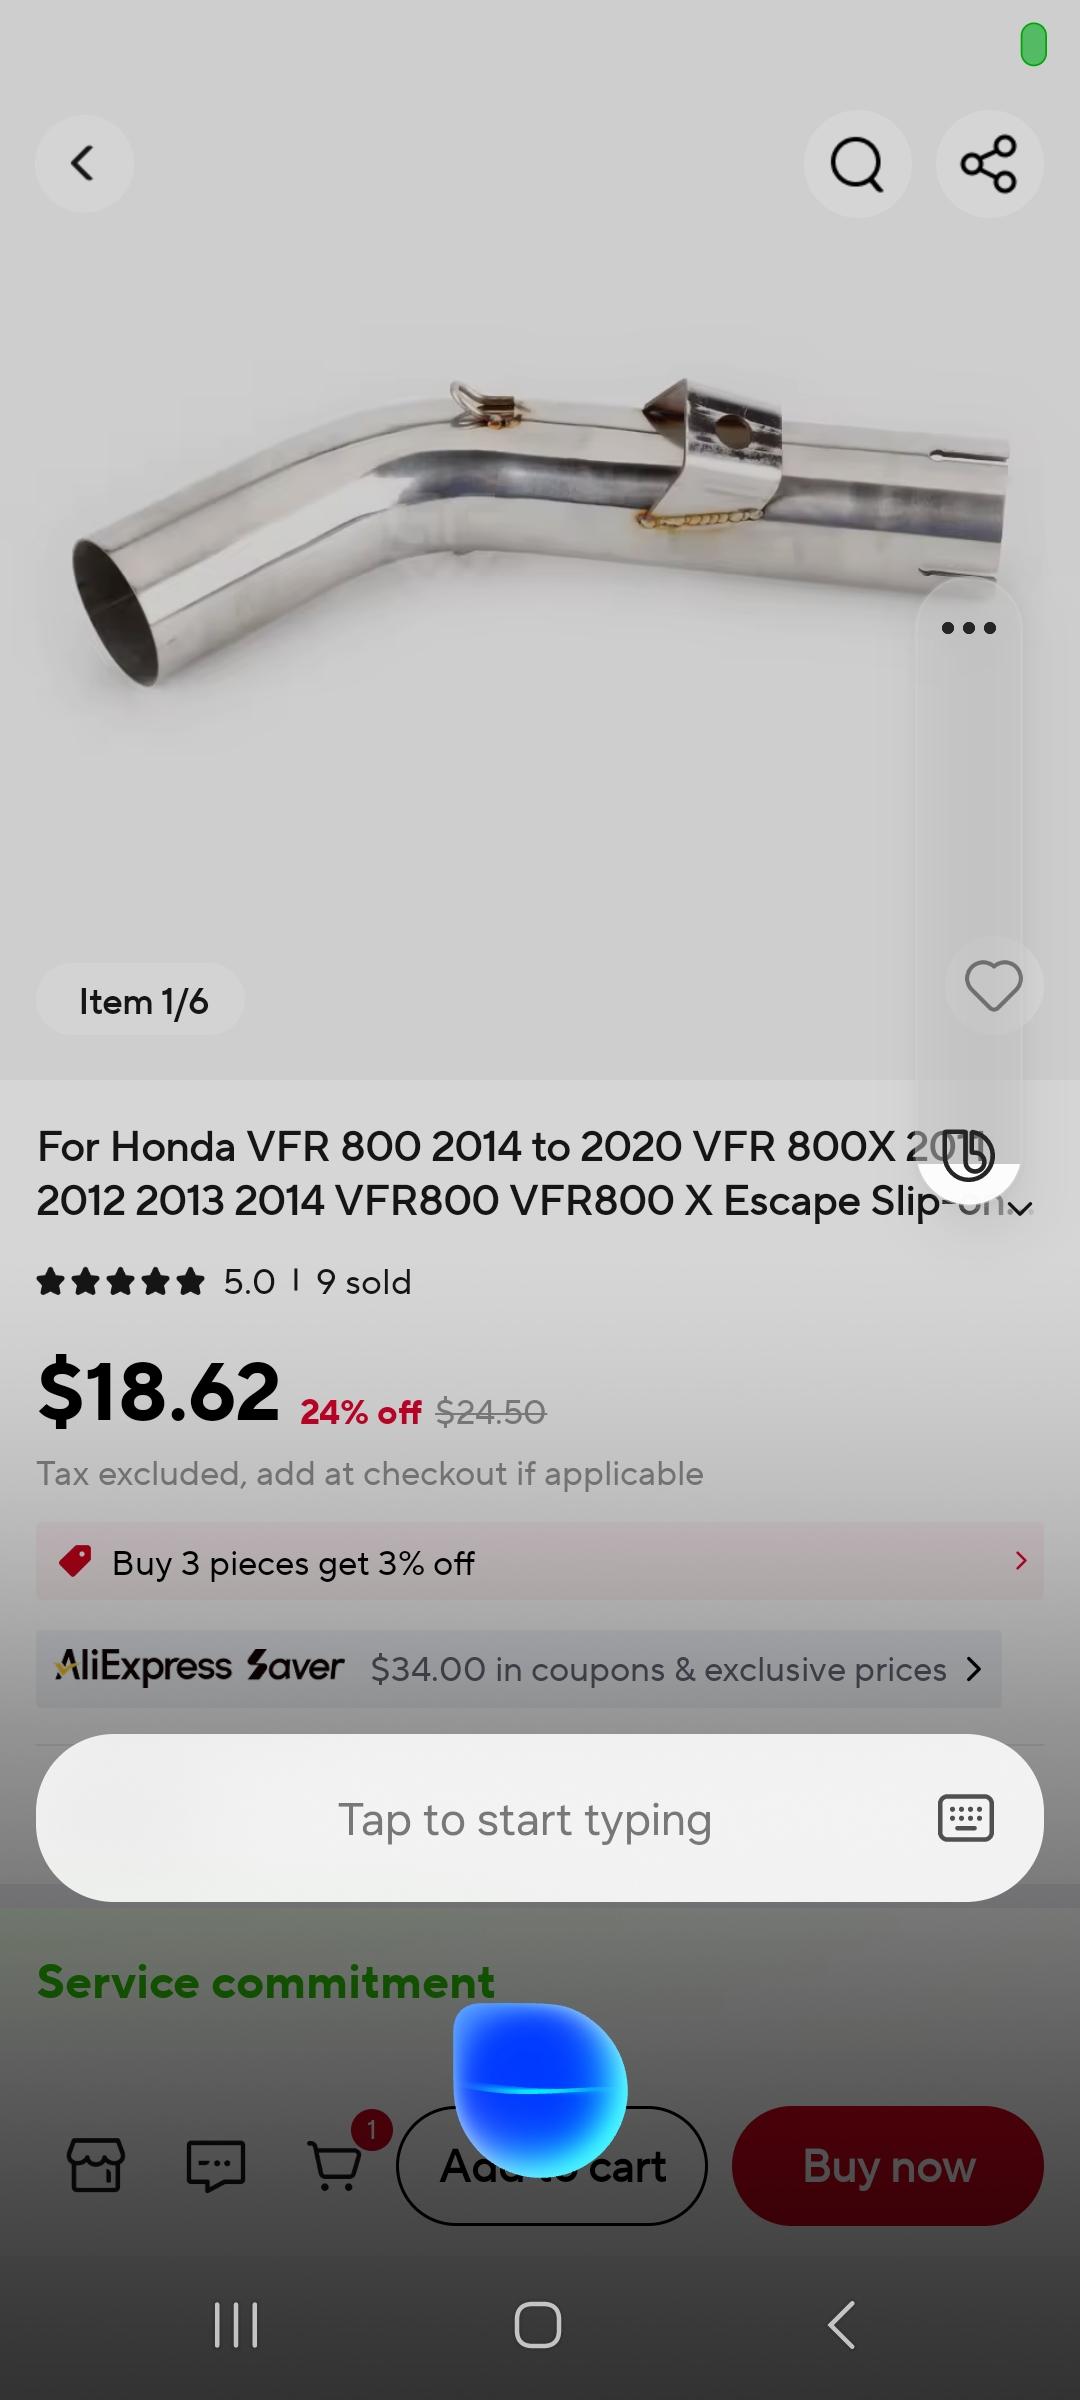
I bought my first 5th Gen back in July last year, bike was bone stock. After sorting out a rusted tank, way wrong spark plugs, missing fastening etc. I got the bike up and running. Only thing i thought would improve the bike was a different exhaust note, the stock was definitely rather milktoast compared to some of my earlier vfr's. After a winters worth of searching for an aftermarket I could either afford, or stomach the sound of, I decided to take a different route. After reading here, and a couple of confirmations from helpful members here that an 8th Gen Exhaust will in fact fit on a 5th Gen, I started thinking. I have a Two Brothers on my 4th Gen, but the mid pipe is flared at the collector, the 5th Gen is slip on. So I started looking for a mid pipe that would work. Yes, I found one that seemed to fit, I'll save you the effort and cue the laughter, it was on AliExpress, that great roll of the dice into the universe. I struggled for months but finding no other option, I bit the bullet. It arrived fairly quickly and seemed true dimensionality when I miked it. I'll break this up for clarity.
-
Yes, that's where I was. Technically in Augusta, but on the border of China. Arrived to find about 100 bikes in the parking lot and some big Spring event going on. NBD, and the service dept. took the bike right in, in fact the service manager took the bike on a quick spin of the lot, before putting it in the bay. There was a girls gymnastic group raising money for a trip, chili cook off, bake sale, and lots of guys wearing back patches wandering around. Pure Maine in a nutshell. Glad they treated you well, as they have me for the last few years.
-
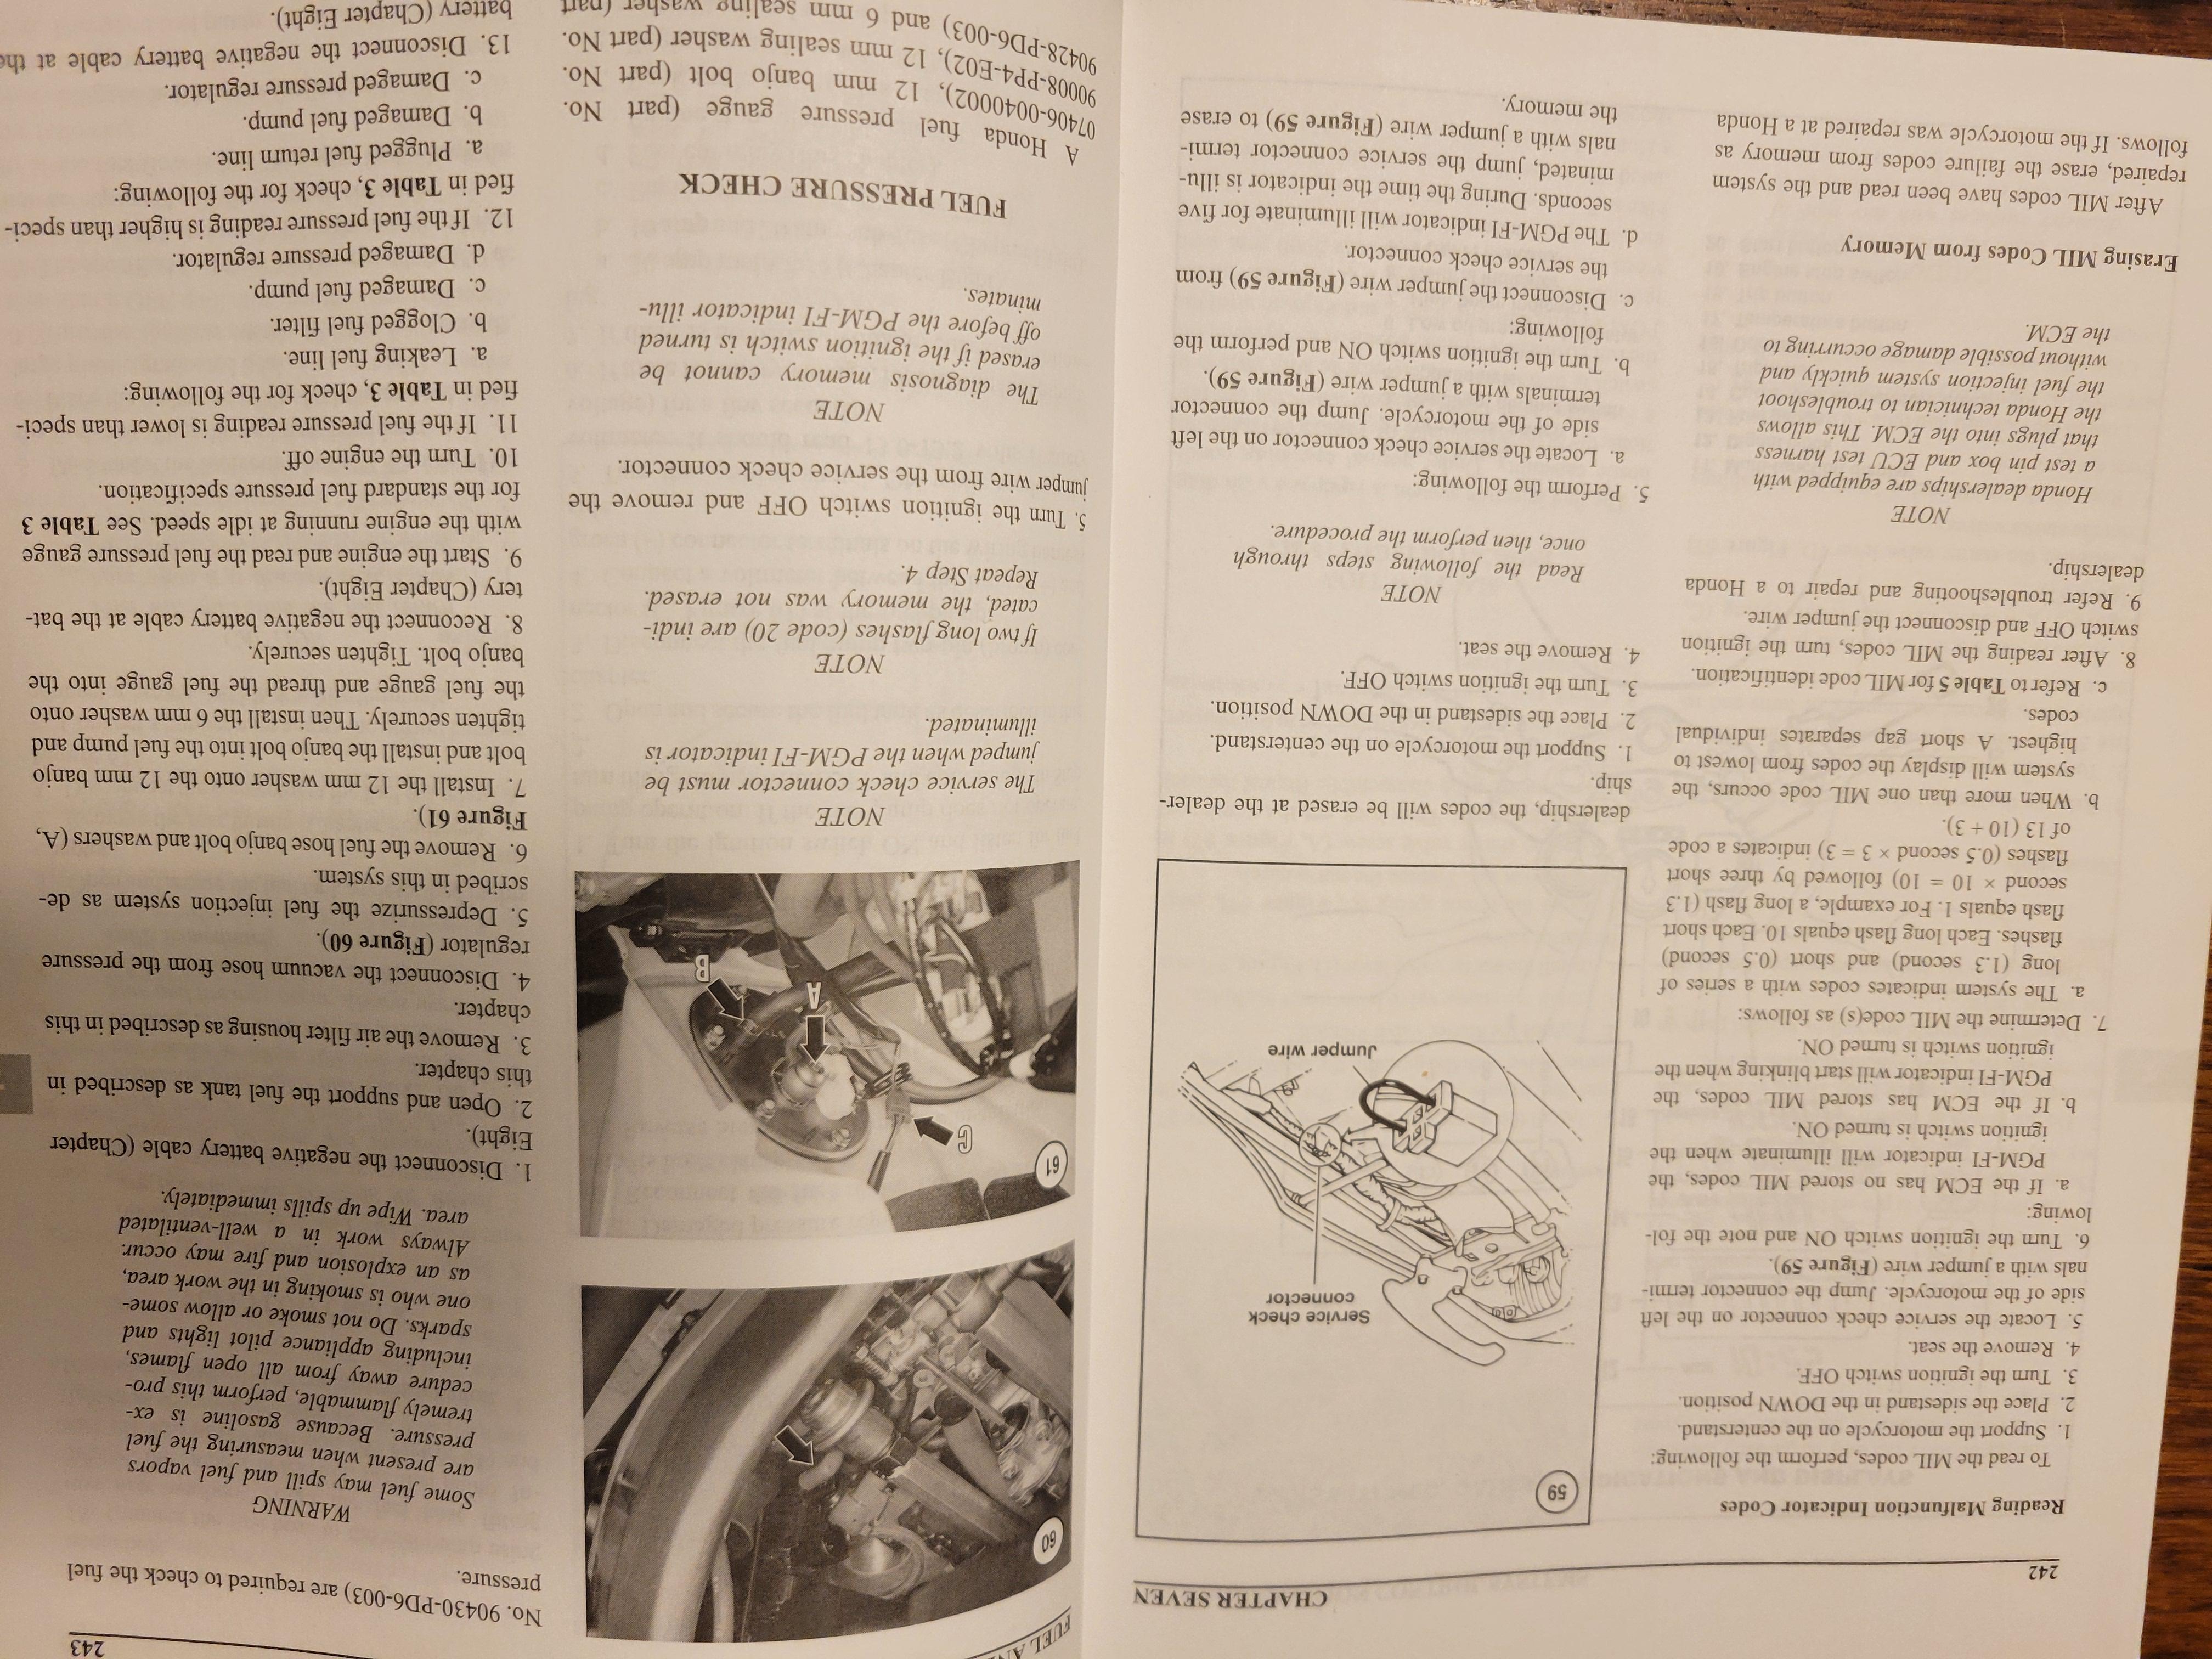
I do not have a Honda Service manual, just a Clymers. I did go through their Trouble shooting section and there is no mention of any FI check procedure. After reading this, plowed back into my Clymers and found the info on page 242. So thanks for taking the time to point out that info is available. Even if I can't find it the first time!🙂