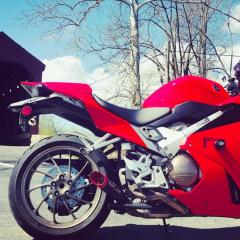
VFR4Lee Posted September 29, 2015 Share Posted September 29, 2015 Looks bitchen from this distance. Link to comment Share on other sites More sharing options...
Member Contributer Cogswell Posted September 29, 2015 Member Contributer Share Posted September 29, 2015 The wheel looks to be a great match for the body color. Link to comment Share on other sites More sharing options...
Guest Posted September 29, 2015 Share Posted September 29, 2015 Ooh! That be mighty purty! VifferCrab - just to confirm, you didn't pay any extra for the custom paint job? $399 TO THE DOOR ! Yeah, that's a pretty amazing price but that kit (and all the other ones on their site I've looked at) doesn't include a tank cover. They quoted me $99 extra for that when I asked about them ~2wks ago. Link to comment Share on other sites More sharing options...
Baileyrock Posted September 29, 2015 Share Posted September 29, 2015 $399 TO THE DOOR ! No Tank cover with that kit! Most don't offer one, a small percentage do though. Link to comment Share on other sites More sharing options...
VifferCrab Posted September 29, 2015 Author Share Posted September 29, 2015 How was it shipped? You got a lot of schtuff for $400. That tank cover is just a plastic cover that bolts over your existing tank, huh? Never heard of/seen those before. Interesting. If you ONLY wanted a few pieces (say side panels) and only OEM colors (no "special paint" like you got), do they sell them separately like that? You went thru Ebay...right? Or was it a website with options? Correct. Tank cover is just that... A cover. I'm interested myself to see how that's gonna turn out. I've ordered a carbon fiber gas tank flap bezel, to hopefully reduce any possible gaps in that area. I'll have pics of all that stuff soon. I reached out to them through eBay but ended up ordering direct from their site. I'm not sure if they sell single pieces but just fire off an email to them. Except for not getting a tracking number during shipment, I can't find a fault yet during this whole process. Sent from my iPhone using Tapatalk Sent from my iPhone using Tapatalk Ooh! That be mighty purty! VifferCrab - just to confirm, you didn't pay any extra for the custom paint job? $399 TO THE DOOR ! Yeah, that's a pretty amazing price but that kit (and all the other ones on their site I've looked at) doesn't include a tank cover. They quoted me $99 extra for that when I asked about them ~2wks ago. I paid $479.00 for everything you see, custom painted, and shipped. Sent from my iPhone using Tapatalk Link to comment Share on other sites More sharing options...
Baileyrock Posted September 29, 2015 Share Posted September 29, 2015 Early tack covers just plain sucked! My non-injection molded one needed to be split opened from the cap opening to the front to even get it on the tank at all, I also ground down one the molded seams on the inside in areas to help. The injection molded one seems to be much better, but still a challenge to get on completely and split slightly on the back seam when I tried. The seller made and sent me another color match cover for free. BR Link to comment Share on other sites More sharing options...
VifferCrab Posted September 29, 2015 Author Share Posted September 29, 2015 Early tack covers just plain sucked! My non-injection molded one needed to be split opened from the cap opening to the front to even get it on the tank at all, I also ground down one the molded seams on the inside in areas to help. The injection molded one seems to be much better, but still a challenge to get on completely and split slightly on the back seam when I tried. The seller made and sent me another color match cover for free. BR Ooof. Hopefully I don't have that kind of issue. *fingers crossed Sent from my iPhone using Tapatalk Link to comment Share on other sites More sharing options...
Guest Posted September 29, 2015 Share Posted September 29, 2015 Ooh! That be mighty purty! VifferCrab - just to confirm, you didn't pay any extra for the custom paint job? I paid $479.00 for everything you see, custom painted, and shipped. Wow. Link to comment Share on other sites More sharing options...
WGREGT Posted September 29, 2015 Share Posted September 29, 2015 So far, even with my cynicism, it appears that the Chinese have beaten us yet again. It looks great. And for you to be able to customize the paint? How hard was that? Did you tell them "I want a 6 inch wide stripe of black paint at the rear, with a centered red stripe of 2 inches wide in Honda Red on top of that"? Somehow it seems in my mind to be more difficult than that though, with many emails back and forth for clarity? I good bit of your potential problem (or maybe I'm imagining this in my head how it would go) seems to be the translation back & forth. I always wonder why Chinese companies like this wouldn't just hire someone who speaks perfect normal English to make this part a lot quicker and handle the orders for them. I'd go with an American who speaks Mandarin, rather than a Chinese person who learned Eng-rish over there, in my mind. Link to comment Share on other sites More sharing options...
Member Contributer Switchblade Posted September 29, 2015 Member Contributer Share Posted September 29, 2015 $399 TO THE DOOR ! No Tank cover with that kit! Most don't offer one, a small percentage do though. Did not catch that . Link to comment Share on other sites More sharing options...
VifferCrab Posted September 29, 2015 Author Share Posted September 29, 2015 So far, even with my cynicism, it appears that the Chinese have beaten us yet again. It looks great. And for you to be able to customize the paint? How hard was that? Did you tell them "I want a 6 inch wide stripe of black paint at the rear, with a centered red stripe of 2 inches wide in Honda Red on top of that"? Somehow it seems in my mind to be more difficult than that though, with many emails back and forth for clarity? I good bit of your potential problem (or maybe I'm imagining this in my head how it would go) seems to be the translation back & forth. I always wonder why Chinese companies like this wouldn't just hire someone who speaks perfect normal English to make this part a lot quicker and handle the orders for them. I'd go with an American who speaks Mandarin, rather than a Chinese person who learned Eng-rish over there, in my mind. The only real "issue" if you want to call it that, was the 24/48 hour email reply schedule. And the inability to just pick up the phone and talk to someone real time. But, I gotta tell you, they did every thing they said they were going to do. As for the paint design question... What I did, was scour the Internetz for something VERY close to what I wanted, sent them as many pictures and angles of that scheme, then described the subtle differences that I wanted. The only problem we hit, was when we decided to bring the extra color onto the other 3 pieces that were sent back for a respray. And actually, THEY caught that, I didn't even notice. Then THEY sent me artist rendering (with MS PAINT) of what the changes would look like. Those pics are posted in this thread as well. I've only swapped the tail section, but that was pretty easy. The tail light assembly, has 4 screws that hold it to the tail fairing. The two rear most screws, actually use clips that conveyed from the OEM fairing. Those clips were ~1mm too long to fit onto the new fairing, preventing the screw from going straight it, so I took a drill bit to the new fairing to bore it out just a hair, and I do mean just a hair. Everything bolted up tight, straight and without drama. Let's hope the same goes for the other pieces... BTW, I got my tracking number last night. :) Link to comment Share on other sites More sharing options...
marriedman Posted September 29, 2015 Share Posted September 29, 2015 I think it was already mentioned, but it never hurts to repeat a warning. There was a member who restored a crashed 6th gen and got a tank cover as well. While he was putting it on, it split from the fuel cap cutout to the front of the cover by the triple tree. He finished putting it on and then used a cut out tank protector I believe to conceal the split. It turned out very nice looking and did not bother him I believe. I remember the bike being the 2007 candy red color, but I don't remember if it was truly a 2007 model. Link to comment Share on other sites More sharing options...
VifferCrab Posted September 29, 2015 Author Share Posted September 29, 2015 I think it was already mentioned, but it never hurts to repeat a warning. There was a member who restored a crashed 6th gen and got a tank cover as well. While he was putting it on, it split from the fuel cap cutout to the front of the cover by the triple tree. He finished putting it on and then used a cut out tank protector I believe to conceal the split. It turned out very nice looking and did not bother him I believe. I remember the bike being the 2007 candy red color, but I don't remember if it was truly a 2007 model. ABS injected or compression molded? Link to comment Share on other sites More sharing options...
marriedman Posted September 29, 2015 Share Posted September 29, 2015 It's been a few years, so I can't really remember. I am betting that being an older thread it was the compression molded type. Aha! I found the thread: http://www.vfrdiscussion.com/forum/index.php/topic/72267-6th-gen-rebuild-project/?p=854442 That should take you to the post where it shows the crack/tape fix. Link to comment Share on other sites More sharing options...
VifferCrab Posted September 30, 2015 Author Share Posted September 30, 2015 I'll give it a read this evening.... I've got all of the fairing off except the nose. Any tips/tricks for getting that off? Seems to be a lot going on up in there... I will say for certain your tank will get scratches when installing the cover. I slid it partly on, just to get a feel for the look, and it scratched my tank, so I'm all in now. :) Once it's on, I can't imagine it moving at all. It's going to be tight, hope it doesn't break when installing. I've emailed the seller asking for install tips on the cover.. We'll see what they say. I should have it all buttoned up in another evening or two... Sent from my iPhone using Tapatalk Here's another with the front tire cover on... Sent from my iPhone using Tapatalk Link to comment Share on other sites More sharing options...
Member Contributer Cogswell Posted September 30, 2015 Member Contributer Share Posted September 30, 2015 Looks like that answers my earlier question about how the tank will fare with the cover on it. AFAIK, this is the first I've seen of anyone installing one, so very helpful. Here's a youtube video of how to remove the front fairing / headlight assembly - it takes you through step by step. The only thing I might add is that the instrument bezel cover has two push pins that go through grommets on the fairing stay. I don't know about other bikes, but on mine they were a bitch to remove. I honestly thought I was going to break them. I finally used the side of a shorty flat blade screwdriver to push on them from the back. Once off, I trimmed them with a knife and then put some silicone grease on them to make subsequent removal easier. A second set of hands is also helpful, as you'll need to remove the temp sensor wire once it's pulled forward a bit, and that takes 2 hands leaving none to hold the assembly with. I cover the front fender with a blanket while doing this to prevent scratching it. Link to comment Share on other sites More sharing options...
VifferCrab Posted September 30, 2015 Author Share Posted September 30, 2015 Thank you sir... I'll give this a shot tomorrow. I'm done for the evening. I've swapped the two rubber grommets on each side fairing over to the new ones as well. That was a bit trickier than it sounds. Sent from my iPhone using Tapatalk Link to comment Share on other sites More sharing options...
Member Contributer Rush2112 Posted September 30, 2015 Member Contributer Share Posted September 30, 2015 You might want to try warming up the tank cover before installing it so it is more flexible... Link to comment Share on other sites More sharing options...
WGREGT Posted September 30, 2015 Share Posted September 30, 2015 I've used wd-40 on grommets like those before. Helps with sliding them in. I know you asked them to paint the insides of the fairing, but now that I see it I can't remember why you asked for that. You gonna complete the job yourself before you put them on? Link to comment Share on other sites More sharing options...
VifferCrab Posted September 30, 2015 Author Share Posted September 30, 2015 I've used wd-40 on grommets like those before. Helps with sliding them in. I know you asked them to paint the insides of the fairing, but now that I see it I can't remember why you asked for that. You gonna complete the job yourself before you put them on? I figured that the inside of the nose of the fairings wasn't going to be pretty. So, I asked them to paint any possible front pieces, that might be open to the eye, black. I've never done anything like this before to a bike, so I was just covering my bases, in order to make it aesthetically pleasing. I wanted to make sure it didn't look cheap to the eye. All that said, this is a little bit more work than I had it worked out in my head. Getting there... Sent from my iPhone using Tapatalk Link to comment Share on other sites More sharing options...
VifferCrab Posted September 30, 2015 Author Share Posted September 30, 2015 Went ahead and used some detailers clay on the lenses and cleaned up the housings... Sent from my iPhone using Tapatalk Link to comment Share on other sites More sharing options...
VifferCrab Posted September 30, 2015 Author Share Posted September 30, 2015 Looks like that answers my earlier question about how the tank will fare with the cover on it. AFAIK, this is the first I've seen of anyone installing one, so very helpful. Here's a youtube video of how to remove the front fairing / headlight assembly - it takes you through step by step. The only thing I might add is that the instrument bezel cover has two push pins that go through grommets on the fairing stay. I don't know about other bikes, but on mine they were a bitch to remove. I honestly thought I was going to break them. I finally used the side of a shorty flat blade screwdriver to push on them from the back. Once off, I trimmed them with a knife and then put some silicone grease on them to make subsequent removal easier. A second set of hands is also helpful, as you'll need to remove the temp sensor wire once it's pulled forward a bit, and that takes 2 hands leaving none to hold the assembly with. I cover the front fender with a blanket while doing this to prevent scratching it. Cogswell, this video was invaluable. Thank you. Link to comment Share on other sites More sharing options...
VifferCrab Posted September 30, 2015 Author Share Posted September 30, 2015 Front lenses swapped. 100% spot-on fitment here...Sent from my iPhone using Tapatalk Link to comment Share on other sites More sharing options...
Member Contributer Polarbear Posted September 30, 2015 Member Contributer Share Posted September 30, 2015 Very nice. And glad to hear about the fit. Waiting on final verdict on the rest. Btw how is the thickness and sturdiness of the new panels?? Just curious. Thanks C Link to comment Share on other sites More sharing options...
RedRicer Posted September 30, 2015 Share Posted September 30, 2015 boy, if this all works... these guys might be getting a run on new plastics! Link to comment Share on other sites More sharing options...

Recommended Posts
Archived
This topic is now archived and is closed to further replies.