E-Ticket Posted December 29, 2009 Share Posted December 29, 2009 Boy, stating that I have wood, would only make me feel more inadequate - what with all that billet flying around... :blush: :goofy: Very well said.... E-Ticket Link to comment Share on other sites More sharing options...
Member Contributer arrow Posted December 29, 2009 Member Contributer Share Posted December 29, 2009 Awesome work Toro! . . . . . . . . . So when are you going to start working on the 6th gen then :goofy: ? Link to comment Share on other sites More sharing options...
Member Contributer sa1713 Posted December 29, 2009 Member Contributer Share Posted December 29, 2009 I cut the bars to the right length, installed some M5 button heads, and voilà, all done (well, almost, I still need to paint them black). Toro, I vapor lock every time you put idea to pencil to design to production. Just another outstanding piece of work. How much would a set of these bars and risers run if someone else would like to use this mod? Link to comment Share on other sites More sharing options...
Member Contributer vfrcapn Posted December 29, 2009 Member Contributer Share Posted December 29, 2009 I cut the bars to the right length, installed some M5 button heads, and voilà, all done (well, almost, I still need to paint them black). Toro, I vapor lock every time you put idea to pencil to design to production. Just another outstanding piece of work. How much would a set of these bars and risers run if someone else would like to use this mod? :goofy: Link to comment Share on other sites More sharing options...
Member Contributer toro1 Posted December 30, 2009 Author Member Contributer Share Posted December 30, 2009 So when are you going to start working on the 6th gen then :fing02: ? Well, as soon as I can find someone who wants a kit and is willing to donate their bike, I'll start working on the 6th-gen. I had a few different guys lined up, but they had to back out for one reason or another. So...if you've got a 6th-gen, want a kit, and would be willing to be the guinea pig, let me know. How much would a set of these bars and risers run if someone else would like to use this mod? Boy oh boy, I don't know. I did it this way because 1) I wanted maximum adjustability due to the unique nature of my setup, 2) I didn't want to spend a lot and had a CNC sitting in the other room, and 3) I already got a great deal on the Attack clip-ons. So, if you swap to an RC51 front end and then end up getting the Attack clip-ons, give me a holler. Link to comment Share on other sites More sharing options...
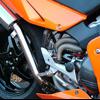
Member Contributer toro1 Posted December 30, 2009 Author Member Contributer Share Posted December 30, 2009 Got the bars all painted... I also turned up a filler piece to get rid of the gap around the ignition switch, and it helps make the top triple stand out a lil bit... From Cape Town to Huntingdon Valley... All bolted up with the clip-on bases installed as well. I also added some dry film moly coating to the area where the throttle tube rotates. The risers pretty much get covered once the controls slide on there, but all bolted up, they are rock solid. One aspect I'd been unsure of the entire time was the stock front brake line setup that came with the calipers. I've tried to do things as economically as possible in this swap, and really wanted to keep this line setup, but after I made a stainless bracket, drilled and countersunk the lower triple, and got it all bolted up, I realized it wasn't going to work. It's close, for sure, but there just isn't enough space between the fender and the mounted hard lines for me to be comfortable, and the lines are too short to move them up further -- I've got a (new to me, but still used) set of aftermarket lines coming as we speak. Link to comment Share on other sites More sharing options...
Member Contributer arrow Posted December 30, 2009 Member Contributer Share Posted December 30, 2009 Well, as soon as I can find someone who wants a kit and is willing to donate their bike, I'll start working on the 6th-gen. I had a few different guys lined up, but they had to back out for one reason or another. So...if you've got a 6th-gen, want a kit, and would be willing to be the guinea pig, let me know. I'd love to, but there are several problems: * The biggest problem: I live in Istanbul, the commute to your shop would be a pain in the neck :fing02: Perhaps I should get a frequent miler card for the Viffer :dry: * My PCIII is a RapidBike3 Module (I hope when your kit is out, I'll be able to somehow convert the PCIII map to RBIII map, here's hoping) * My finances won't exactly be permitting until May-June So close, yet so far... Link to comment Share on other sites More sharing options...
Veefer800Canuck Posted December 30, 2009 Share Posted December 30, 2009 One small suggestion: The two small holes on either side of the ignition switch, obviously they are for the bolts that hold the stock plastic key surround in place (which you are not using). If you are not planning on using them to mount something else, I would fill them with a couple of likely looking bolts as "dummies" and nut them on the underside. :fing02: Maybe a couple of matching Allens like your clipon clamps? Link to comment Share on other sites More sharing options...
Member Contributer mello dude Posted January 1, 2010 Member Contributer Share Posted January 1, 2010 I cut the bars to the right length, installed some M5 button heads, and voilà, all done (well, almost, I still need to paint them black). Toro, I vapor lock every time you put idea to pencil to design to production. Just another outstanding piece of work. How much would a set of these bars and risers run if someone else would like to use this mod? :rolleyes: Mind blowing clip-on set-up. ---> It never occurred to me to do a custom design set up for a fork swap. MD Link to comment Share on other sites More sharing options...
Member Contributer tok tokkie Posted January 1, 2010 Member Contributer Share Posted January 1, 2010 In SA the VFR comes with HISS (Honda Ignition Security System). That is what those two screw holes & additional spigot at the ignition were for. Link to comment Share on other sites More sharing options...
Member Contributer JZH Posted January 1, 2010 Member Contributer Share Posted January 1, 2010 In SA the VFR comes with HISS (Honda Ignition Security System). That is what those two screw holes & additional spigot at the ignition were for. For my US-spec ST1300 I picked up an HISS receiver (the part that surrounds the key and bolts into those holes) on UK eBay, just for the psychological effect! Doesn't do anything at all, and couldn't w/o the proper ECU, but it does look the part... Ciao, Link to comment Share on other sites More sharing options...
Member Contributer poconovfr Posted January 1, 2010 Member Contributer Share Posted January 1, 2010 .........................dam. I have got to get me one of those bad ass cnc machines. :goofy: Link to comment Share on other sites More sharing options...
Member Contributer toro1 Posted January 7, 2010 Author Member Contributer Share Posted January 7, 2010 Some more progress to report... Here's the completed control on the clutch side: I had to remount the horn, so I was able to bend the existing bracket and attach it to the upper fairing support. The remote mount reservoir needed a bracket to keep it from moving around, so after first fabbing a mock-up out of cardboard, I made the final piece out of some aluminum sheet and painted it black to match. I didn't want to mount the gauges the same way as before, and decided beforehand to instead mount them off the ends of the bars...except I didn't know how I wanted to do it. I came up with an idea to have the gauges sit in aluminum rings, and use angled spacers to connect the rings to the bars. Making the spacer. The angle matches the offset of the bars, and the one hole had to be drilled and counterbored perpendicular to that angle. I turned the rings first, and then had to mill a flat on one side to mate up with the spacer. Doing it this way allows me to position the gauges at pretty much any angle I want and gives me tons of clearance away from the dash panel. I'm still unsure of whether or not to paint the brackets (the gauge bodies will be black no matter what) and where to place the switch & LED idiot light for the wideband datalogger. I also found out that the Galfer brake lines I got such a good deal on won't work due to the spaced-out radial mount brakes -- the lines ended up being too short. Luckily, I found a local shop that will make me custom lines in any length I want. Link to comment Share on other sites More sharing options...
Member Contributer vfrcapn Posted January 7, 2010 Member Contributer Share Posted January 7, 2010 Some more progress to report... That is a good looking cockpit! (Also reminds me it's time I got some new grips.) Link to comment Share on other sites More sharing options...
Tightwad Posted January 7, 2010 Share Posted January 7, 2010 looks very nice! I suggest cutting the mounting bolts under the gauges a tad shorter, since you won't need them...it will clean that view up nicely. Link to comment Share on other sites More sharing options...
Member Contributer toro1 Posted January 7, 2010 Author Member Contributer Share Posted January 7, 2010 looks very nice! I suggest cutting the mounting bolts under the gauges a tad shorter, since you won't need them...it will clean that view up nicely. You beat me to the punch. I just had the gauges mocked-up in those pics -- it would drive me crazy if the posts were left that length. Link to comment Share on other sites More sharing options...
Member Contributer toro1 Posted January 14, 2010 Author Member Contributer Share Posted January 14, 2010 I decided to paint the gauges and mounting brackets black... I initially wanted to go with a 2 line brake setup, but decided to go with the standard T-split setup instead. I had a local hydraulic shop make them up for me, and the whole deal worked out great. The completed cockpit... I ran the toggle switch and LED for the Wideband Commander in the pillar plastic this time around to simplify the gauge area. The Öhlins damper was won on ebay for a substantially reduced price and should help tame the new suspension setup. BTW Rob, I filled those holes next to the ignition switch with some stainless button heads, which finishes it off nicely. Next up, the obligatory Before & After comparison... Before After It took a lot of work to get to this point, but it's all worth it in the end. The next step, of course, was taking it for a quick spin around the parking lot to test it out. I set all the adjustments halfway and treaded very carefully... It was cold, and very slippery, so my ride was pretty short. Initial impressions: The ride is fantastic. The new forks and Elka shock are working together beautifully, and this thing now soaks up bumps like never before. It's like riding on a new bike. With proper damping. The front brakes work well for not even being broken in yet (I was able to lock the front wheel a bit too easily on the salted surface, so I was extra careful), and the rear brake still feels wooden, but will instantly lock the rear tire if pushed hard enough. With the damper turned up, low speed tight stuff is a bit awkward, but once you're moving it feels like our 08 gixxer thou. So far I'm very happy with everything, and I can't wait to go for a real road test. PS - When I pulled back in the shop, another bike seems to have joined the stable. I wonder what I should do with it? Link to comment Share on other sites More sharing options...
SEBSPEED Posted January 14, 2010 Share Posted January 14, 2010 PS - When I pulled back in the shop, another bike seems to have joined the stable. I wonder what I should do with it? Oh snap... I gotta get that second job now!!! :goofy: :goofy: Link to comment Share on other sites More sharing options...
Member Contributer vfrcapn Posted January 14, 2010 Member Contributer Share Posted January 14, 2010 PS - When I pulled back in the shop, another bike seems to have joined the stable. I wonder what I should do with it? I'll take that old 5th gen off your hands cheap if you need the room. :goofy: Beautiful work as always. :goofy: Link to comment Share on other sites More sharing options...
Veefer800Canuck Posted January 14, 2010 Share Posted January 14, 2010 Hey good stuff. The steering damper probably isn't necessary, since the increased trail due to the RC51 triples actually makes the bike MORE stable. In all likelihood, you'll run the steering damper fully backed off methinks. But it sure looks blingy. Did you come up with a solution for the lack of threads on the top nut? Link to comment Share on other sites More sharing options...
Member Contributer toro1 Posted January 14, 2010 Author Member Contributer Share Posted January 14, 2010 Hey good stuff. The steering damper probably isn't necessary, since the increased trail due to the RC51 triples actually makes the bike MORE stable. In all likelihood, you'll run the steering damper fully backed off methinks. But it sure looks blingy. Did you come up with a solution for the lack of threads on the top nut? True, but I also dropped the front end 1.5", and besides, I love the effect of dampened steering -- it ties the whole bike together every time you turn the bars. Undampened, the act of turning is super quick and feels disconnected from the bike, but with the damper on there, every action is greeted with a reaction of the whole bike, which automatically starts leaning. To me, it just feels so much more controlled and precise, but then again, I'm now used to riding the newer bikes equipped with steering dampers (which at first I thought turned far too slowly -- funny how opinions change). The top nut torqued up to the proper spec without issue for me. With such a fine thread pitch on the stem, I'm not too concerned, as only a few threads are handling the load regardless of the length. Link to comment Share on other sites More sharing options...
The Phantom Posted January 14, 2010 Share Posted January 14, 2010 Looks great. A VTR1000F clutch master would help integrate the cockpit, maybe with a pair of smaller fluid pots from a dirtbike? Link to comment Share on other sites More sharing options...
Member Contributer mello dude Posted January 15, 2010 Member Contributer Share Posted January 15, 2010 Looks great. A VTR1000F clutch master would help integrate the cockpit, maybe with a pair of smaller fluid pots from a dirtbike? I'm not sure I would agree with that, I think the stocker clutch master being low profile and black kinda blends it in with everything. Its just taste and who am I to say anything considering what Toro has done, but I'm on the other end of the stick. It's been the trend with the RR bikes to have the plastic reservoirs that sorta have a urine cup in your face feel to them. Visually it just feels like a bit of a wart to me. That was some of the thought I had when I went to RC51 brakes on my '98 and used the RC master. I used a gixxer reservoir, painted it flat black, and worked through several bracket iterations to get that sucker as low as possible and out of my face to blend it into the cockpit. If I had the torobike, I probably would do the same. The present reservoir would bug me silly. A few pics. ---->>> Major kudos to Toro1 for the outstanding craftsmenship with now the argueably the finest VFR on the planet! :unsure: MD Link to comment Share on other sites More sharing options...
Guest vfrrider Posted January 15, 2010 Share Posted January 15, 2010 On the master cylinders, I ended up with hayabusa cylinders and levers. Bolt-on, low profile, large capacity. You sure dropped it a lot. :unsure: Larry VFRrider Link to comment Share on other sites More sharing options...
The Phantom Posted January 15, 2010 Share Posted January 15, 2010 Looks great. A VTR1000F clutch master would help integrate the cockpit, maybe with a pair of smaller fluid pots from a dirtbike? I'm not sure I would agree with that, I think the stocker clutch master being low profile and black kinda blends it in with everything. Its just taste and who am I to say anything considering what Toro has done, but I'm on the other end of the stick. It's been the trend with the RR bikes to have the plastic reservoirs that sorta have a urine cup in your face feel to them. Visually it just feels like a bit of a wart to me. That was some of the thought I had when I went to RC51 brakes on my '98 and used the RC master. I used a gixxer reservoir, painted it flat black, and worked through several bracket iterations to get that sucker as low as possible and out of my face to blend it into the cockpit. I agree that the OEM m/cyls are a much nicer way to go, but when you have to have a plastic one, matching on each side works better for me. I really like what you did with yours, I might go that way with mine too (but the smaller dirtbike ones are good, they are common on streetfighters). Link to comment Share on other sites More sharing options...

Recommended Posts
Archived
This topic is now archived and is closed to further replies.