Veefer800Canuck Posted December 16, 2009 Share Posted December 16, 2009 Oh BTW, how do you like the fuel filler cap? Is that one of those cheap Chinese units from Fleabay? I was looking at them the other day, thinking...... Link to comment Share on other sites More sharing options...
Member Contributer toro1 Posted December 16, 2009 Author Member Contributer Share Posted December 16, 2009 Oh BTW, how do you like the fuel filler cap? Is that one of those cheap Chinese units from Fleabay? I was looking at them the other day, thinking...... Nope, it's a Vortex unit. I screwed up the paint on my original cap, so on it went. Looks wise, it's great -- you can get whatever base and cap color combo you like. Weight wise, it's no contest between this and the stocker -- Honda: 1 lb, Vortex: 1/4 lb. Function wise, eh, the stock one is better. The threads aren't the greatest on the cap, so you need to keep them oiled, and as far as actually filling up the gas, you always have to find a spot to rest the cap (and hope you don't drop it). If I were to do it again, I'd probably go with one of those 1/4-turn jobs with the smaller cap, but then again, most of those are 3x the price of the Vortex. Link to comment Share on other sites More sharing options...
Member Contributer JZH Posted December 16, 2009 Member Contributer Share Posted December 16, 2009 Don´t mean to interrupt BUT I know you´ve got the radials on but do you know what bolts are used to fix the caliper carrier brackets to the fork legs. NOTE not the caliper bolts! Mine didn´t come with and surprisingly they don´t have a part number for them. Thanks Bren Hey Bren, I forget if those threads are fine or coarse thread, but I'm thinking they were coarse thread (which would make them M10-1.5x25). If so, just go to McMaster-Carr's site, click on "Screws & Bolts" and go from there. They have them in stainless and also in high-strength Class 12.9 steel, which is what I used for the caliper bolts. You can get them in any length & style you want (no need for Torx). That would be the first OEM use of M10x1.5 thread on any modern Honda I've ever heard of! Gotta be M10x1.25... Maybe you were confused, with all that "foreign" SAE hardware you spec'ed on your supercharger kit! Ciao, Link to comment Share on other sites More sharing options...
Member Contributer toro1 Posted December 16, 2009 Author Member Contributer Share Posted December 16, 2009 That would be the first OEM use of M10x1.5 thread on any modern Honda I've ever heard of! Gotta be M10x1.25... Maybe you were confused, with all that "foreign" SAE hardware you spec'ed on your supercharger kit! You're probably right, John. I know the crank bolt is M10-1.25, but I guess I'm just too used to the M10-1.5 hardware associated with the Rotrex -- the Danish must like their M10 threads coarse... ...and hey, what fun would installing a supercharger kit be without having all different kinds of hardware? Link to comment Share on other sites More sharing options...
Member Contributer Bren Posted December 16, 2009 Member Contributer Share Posted December 16, 2009 Don´t mean to interrupt BUT I know you´ve got the radials on but do you know what bolts are used to fix the caliper carrier brackets to the fork legs. NOTE not the caliper bolts! Mine didn´t come with and surprisingly they don´t have a part number for them. Thanks Bren Hey Bren, I forget if those threads are fine or coarse thread, but I'm thinking they were coarse thread (which would make them M10-1.5x25). If so, just go to McMaster-Carr's site, click on "Screws & Bolts" and go from there. They have them in stainless and also in high-strength Class 12.9 steel, which is what I used for the caliper bolts. You can get them in any length & style you want (no need for Torx). That would be the first OEM use of M10x1.5 thread on any modern Honda I've ever heard of! Gotta be M10x1.25... Maybe you were confused, with all that "foreign" SAE hardware you spec'ed on your supercharger kit! Ciao, Yes that 1.5 thread pitch did throw me for a minute, thought you meant 1.25 though. I´ve also heard over the years that stainless bolts are not to be used in places where there are torsional stresses on them ie. rotors, calipers etc, but they are fine for engine cases and the like. As always thanks for the help and info Gents and sorry for misdirecting this thread. I love these threads :biggrin: Bren Link to comment Share on other sites More sharing options...
Member Contributer toro1 Posted December 17, 2009 Author Member Contributer Share Posted December 17, 2009 I´ve also heard over the years that stainless bolts are not to be used in places where there are torsional stresses on them ie. rotors, calipers etc, but they are fine for engine cases and the like. It all depends on the forces involved and the quality of the fastener. ARP & SPS make some extremely high quality, high strength stainless bolts that would be perfectly fine in this application. In fact, if you took the time to do a full free-body diagram analysis of the brake setup, you would get a pretty good idea of the forces involved. So let's simplify things and see if we can get some numbers...if we assume ideal traction and completely discount the added effects of friction force between the caliper bracket and fork bottom, here's the worst case scenario... Imagine the bike's mass to be ~450kg (basically, fully fueled with two 250lb riders). Now, imagine you are to slam the front brakes on as hard as a GP bike and are somehow able to manage 2g's worth of deceleration -- this means a torque of 2750 N•m would be applied to the front wheel. An M10-1.25 bolt has a minor thread diameter of 8.25mm, with a cross-sectional area of 53.52mm2, and since we know the distance of the bolts from the center of rotation (~42mm & ~96mm), we can compute how much load each bolt will see. The highest shear force would be encountered in the bolt closest to the axle, so: 2750 N•m / 2 brakes / 2 bolts per bracket / .042m = 16400 N. Now, regular old A2 (18-8) stainless bolts have a shear strength of ~310 N/mm2, meaning the max load they can support is 16600 N (in an M10-1.25, that is). What all this means is that even with the completely ridiculous assumptions I'm making, the bolt is still technically a little under the failure limit. Considering braking forces don't even approach 1g on a streetbike (thus halving the moment on the front wheel), I'd say these bolts would actually be usable in this application. Having said all that, I'd still use the 12.9 bolts to hold the bracket on. What the numbers don't take into account are impurities in the material and/or stress concentration points due to poor machining if the bolts are not quality pieces, so any way you can increase your chances with something as important as the brakes is a good idea to me. Thanks for the brain exercise, Bren. I think (hope) it makes sense :fing02: Link to comment Share on other sites More sharing options...
Guest vfrrider Posted December 17, 2009 Share Posted December 17, 2009 Best show in town, this season. :fing02: Larry VFRrider Link to comment Share on other sites More sharing options...
Member Contributer Bren Posted December 17, 2009 Member Contributer Share Posted December 17, 2009 Thanks for the brain exercise, Bren. I think (hope) it makes sense :comp13: Actually, surprisingly, it does, cool stuff. If you´d really like to thank me then hurry up with your project and make sure to post lots of pictures!! :goofy: Ps. what did you do about the spacer to make up the difference in height between the bearings? Pete Mc Crary has a thread on this spacer right now. :biggrin: Link to comment Share on other sites More sharing options...
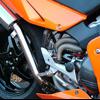
SEBSPEED Posted December 17, 2009 Share Posted December 17, 2009 From this angle, it almost looks like your fender is going to hit the lower triple under hard braking. What measurements did you take before you set this all up? Link to comment Share on other sites More sharing options...
Member Contributer toro1 Posted December 17, 2009 Author Member Contributer Share Posted December 17, 2009 Ps. what did you do about the spacer to make up the difference in height between the bearings? Pete Mc Crary has a thread on this spacer right now. :biggrin: As this front end was already on a VFR, I had to do very little research with regards to steering bearings and spacers. It's an SP1 lower triple that was already modded to work with a spacer. I just had to replace the bearing races and slide it in. From this angle, it almost looks like your fender is going to hit the lower triple under hard braking. What measurements did you take before you set this all up? It's an optical illusion Seb. While close, even if the forks compressed down to the seal (which they don't), it would still be 1/4" away, which is a mile in my book. I measured fender to fairing clearance, the distance from the bars to the ground, the neck to the ground, and the bars to the neck (I'm most concerned with the fender to fairing spec). Link to comment Share on other sites More sharing options...
Member Contributer 2FAST4U Posted December 18, 2009 Member Contributer Share Posted December 18, 2009 I'm curious, what do you eventually hope to do with the bike? Are you gonna turn it into a track bike? Link to comment Share on other sites More sharing options...
Member Contributer toro1 Posted December 18, 2009 Author Member Contributer Share Posted December 18, 2009 I'm curious, what do you eventually hope to do with the bike? Are you gonna turn it into a track bike? Nope, I just want to ride & enjoy it. I've been spoiled rotten by the literbikes' handling and want to get closer to that with this bike -- basically put the emphasis heavily on the sport side of sport/touring (and I've already got the acceleration nailed). No matter how radical I get with the suspension & riding position, it's still going to be more comfortable than modern supersports, which is where I want to be. Plus, the RC51 swap was something I wanted to do before I even got the bike. Link to comment Share on other sites More sharing options...
Member Contributer arrow Posted December 18, 2009 Member Contributer Share Posted December 18, 2009 Nope, I just want to ride & enjoy it. I've been spoiled rotten by the literbikes' handling and want to get closer to that with this bike -- basically put the emphasis heavily on the sport side of sport/touring (and I've already got the acceleration nailed). I am straying from the topic but.. I need to ask... Have you done live tests against liter bikes, such as roll-on, quarter-mile, top speed etc ? Enquiring minds need to know... :biggrin: Link to comment Share on other sites More sharing options...
Member Contributer toro1 Posted December 18, 2009 Author Member Contributer Share Posted December 18, 2009 I am straying from the topic but.. I need to ask... Have you done live tests against liter bikes, such as roll-on, quarter-mile, top speed etc ? Enquiring minds need to know... :fing02: Well, uh, I've done one such "test" against an RC51 from a stop, and here's how it went -- neck and neck through 5 gears as the front end was just a little bit light (translation: :unsure:), and once settled back to earth, I just pulled away. Back when the bike was in its original weak-sauce 145whp guise, I rode around with JES and his '01 VFR800. Maybe he'll chime in and give you a ride report... From a back-to-back ride comparison between an '08 GSX-R1000 and my bike, around town it's no contest -- the gearing of the VFR makes it a lot more fun to ride as the power is just there instantly. The GSX-R puts the power down better (that is, keeps the front end on the ground), and as such would be better in a drag race, but the sense of acceleration going full tilt is pretty much the same between the two of them, with the nod going to the VFR in the "scary" department. As for the ZX-10R we just supercharged, well, the bottom end is somewhere between the VFR and the GSXR, but the sense of speed is just ridiculous. The powerband actually feels just like my VFR, but you are going faster in every gear. Much faster. The top of 4th gear comes up so quickly that you can hit it even on an average stretch of pavement, at which point you're doing nearly 150mph (but then again, that's what 220-230whp will do in a 410lb bike). Link to comment Share on other sites More sharing options...
Guest Posted December 18, 2009 Share Posted December 18, 2009 What did you do about the spacer to make up the difference in height between the bearings? Pete Mc Crary has a thread on this spacer right now. Actually I got that issue resolved. I joined the RC-51 website and have been picking their brains for about 2 weeks about the in's and out's of SP-1/SP-2 front ends. Come to find out, the front end package I picked up off of FleaBay (courtesy of SebSpeed) came with a 954 lower triple clamp. If you go to All Balls, the same kit (part # 22-1020) fits both the 6th Gen VFR and the 954. As I already have an All Balls set-up in the VFR, all I have to do is install a new internal race on the steering stem. I know the 954 comes with tapered steering stem bearings from the factory, but not knowing the angle of the thrust face and the fact that an All Balls kit is only about $35, I figured on just removing the existing lower tapered roller bearing and installing a new All Balls internal race. Just looking at it you can't tell if it's an All Balls or factory Honda. Half a degree difference on the thrust face angle would mean all the difference in the world. Better safe than sorry when working with a part of the front end that is critical. Link to comment Share on other sites More sharing options...
CandyRedRC46 Posted December 19, 2009 Share Posted December 19, 2009 I am straying from the topic but.. I need to ask... Have you done live tests against liter bikes, such as roll-on, quarter-mile, top speed etc ? Enquiring minds need to know... :fing02: Well, uh, I've done one such "test" against an RC51 from a stop, and here's how it went -- neck and neck through 5 gears as the front end was just a little bit light (translation: :unsure:), and once settled back to earth, I just pulled away. Back when the bike was in its original weak-sauce 145whp guise, I rode around with JES and his '01 VFR800. Maybe he'll chime in and give you a ride report... From a back-to-back ride comparison between an '08 GSX-R1000 and my bike, around town it's no contest -- the gearing of the VFR makes it a lot more fun to ride as the power is just there instantly. The GSX-R puts the power down better (that is, keeps the front end on the ground), and as such would be better in a drag race, but the sense of acceleration going full tilt is pretty much the same between the two of them, with the nod going to the VFR in the "scary" department. As for the ZX-10R we just supercharged, well, the bottom end is somewhere between the VFR and the GSXR, but the sense of speed is just ridiculous. The powerband actually feels just like my VFR, but you are going faster in every gear. Much faster. The top of 4th gear comes up so quickly that you can hit it even on an average stretch of pavement, at which point you're doing nearly 150mph (but then again, that's what 220-230whp will do in a 410lb bike). how the #$%^ did you get the bike in original "weak sauce 145whp guise" ?!?! thats what my inquiring mind wants to know lol Link to comment Share on other sites More sharing options...
Veefer800Canuck Posted December 19, 2009 Share Posted December 19, 2009 how the #$%^ did you get the bike in original "weak sauce 145whp guise" ?!?! thats what my inquiring mind wants to know lol Version 1.0 of the supercharger kit with the original "proof-of concept" square log-style intake manifold, and not enough fuel mapping done to the Power Commander yet. Link to comment Share on other sites More sharing options...
CandyRedRC46 Posted December 22, 2009 Share Posted December 22, 2009 how the #$%^ did you get the bike in original "weak sauce 145whp guise" ?!?! thats what my inquiring mind wants to know lol Version 1.0 of the supercharger kit with the original "proof-of concept" square log-style intake manifold, and not enough fuel mapping done to the Power Commander yet. well that makes sense. Link to comment Share on other sites More sharing options...
Member Contributer toro1 Posted December 23, 2009 Author Member Contributer Share Posted December 23, 2009 To those of you unfamiliar with CNC machines, here's the process that allows you to go from a solid block of metal to functional parts... First off, you need to draw up what you're going to machine -- for most parts I use AutoCAD. After the design is finalized, you need to write a program the machine can run, which in this case means importing the geometry into a CAM package, generating toolpaths, and then creating G-code (which is the universal language for CNC machines). So, starting with a 12" block, I sawed up some blanks and then faced them to size... I also needed to add two 1/4" holes to mount them to a fixture (which I also made). Then, it was cutting time... I programmed it to do both sides and then contour the outside. Once that was done, I removed the fixture, clamped on the sides, and machined the bores. All done. The next step will be mating the bars up to these risers. Link to comment Share on other sites More sharing options...
Veefer800Canuck Posted December 23, 2009 Share Posted December 23, 2009 They look very robust. Will be even nicer once they're anodized black. :biggrin: Is you father looking to adopt? Have suitcase, gears in my head, will travel! :fing02: Link to comment Share on other sites More sharing options...
The Phantom Posted December 23, 2009 Share Posted December 23, 2009 OK, I give up - how do they clamp the bars? Nice work, as usual :fing02: Link to comment Share on other sites More sharing options...
Member Contributer vfrcapn Posted December 23, 2009 Member Contributer Share Posted December 23, 2009 They look very robust. Will be even nicer once they're anodized black. :rolleyes: Is you father looking to adopt? Have suitcase, gears in my head, will travel! :fing02: :fing02: Even if I had all the equipment and experience you have I'd still lack the creativity. Looking great. :unsure: Link to comment Share on other sites More sharing options...
Member Contributer toro1 Posted December 27, 2009 Author Member Contributer Share Posted December 27, 2009 The bar riser bores were designed to be an interference fit with the bars, and after creating the lower adapters, I pressed them together. The next step was to check fitment and figure out where the holes needed to be drilled for the controls. I'm also retaining the original bar weight assemblies, so holes needed to be drilled for them, as well. Even with a .0015-.0020 interference fit and Loctite retaining compound, I still wanted to pin the bars, just in case. I cut the bars to the right length, installed some M5 button heads, and voilà, all done (well, almost, I still need to paint them black). The final finishing pieces to the bar puzzle are some spiffy little plugs for the open end of the bars. The only things left to do now are mount the gauges, finish the wiring, make a few brackets, bleed the brakes, and put it all back together. Shouldn't be too long now... :fing02: Link to comment Share on other sites More sharing options...
Veefer800Canuck Posted December 27, 2009 Share Posted December 27, 2009 As always, Top Shelf work! :fing02: Link to comment Share on other sites More sharing options...
SEBSPEED Posted December 27, 2009 Share Posted December 27, 2009 Boy, stating that I have wood, would only make me feel more inadequate - what with all that billet flying around... :blush: :fing02: Link to comment Share on other sites More sharing options...

Recommended Posts
Archived
This topic is now archived and is closed to further replies.