Member Contributer sfdownhill Posted February 4, 2017 Member Contributer Share Posted February 4, 2017 On 1/11/2017 at 7:48 AM, 3dcycle said: in stages. I was just looking at them last night but the money is getting tight. I will take care of them when I unleash power and do a full tyga system Didn't someone lock out use of the phrase "unleash power" on this website? Beautiful build 3D. Is there evidence that the Tyga header system may appear in the near future? Link to comment Share on other sites More sharing options...
SEBSPEED Posted February 4, 2017 Share Posted February 4, 2017 5 hours ago, sfdownhill said: Huge +1 on the wheel color, Seb. I'm trying picture it on my factory red 2001, but can't quite make it click for some reason. Thoughts? Well, I'm a little biased, but I think it would look good! Link to comment Share on other sites More sharing options...
Member Contributer 3dcycle Posted February 4, 2017 Author Member Contributer Share Posted February 4, 2017 I don't think you could go wrong with that wheel color, well maybe you could on a RWB bike but anything else would be bad ass, it is a much darker bronze color that the factory bronze on the 8 gen. Link to comment Share on other sites More sharing options...
Member Contributer Dutchy Posted February 4, 2017 Member Contributer Share Posted February 4, 2017 On 1/30/2017 at 9:19 PM, deltaboxii said: Gotcha. It's all going to be worth it in the end. I like the Lazer cans its amazing how someone could make such a cool looking and unique exhaust, and then cheap out on the mounting brackets. Be aware that Laser went belly up (again). This NL-based company folded a few years back and re-emerged with a lot of Chinese-made junk that eventually caught up with them..... So you are back to "buy american" cans...... Link to comment Share on other sites More sharing options...
Member Contributer JZH Posted February 4, 2017 Member Contributer Share Posted February 4, 2017 On 1/31/2017 at 1:57 AM, 3dcycle said: ok anybody use a smaller rear brake reservoir, I am having a issue having room for the oem and my acc. fuse panel. wondering what people have used You could use an "HRC" rear reservoir. It's not a reservoir at all, really, just a section of clear Tygon tubing with a plastic plug in the end of it! All of the parts have Honda (or HRC) part numbers, so they can be ordered. I have them somewhere, if you're interested. Ciao, Link to comment Share on other sites More sharing options...
Member Contributer 3dcycle Posted February 4, 2017 Author Member Contributer Share Posted February 4, 2017 well I think I can up with a simple bracket to space the reservoir out of the way of the fuse box, then trimmed the little black fairing under the seat to make room for it. it does not hit anything and looks good so I will run that, will take a picture later. Link to comment Share on other sites More sharing options...
Member Contributer sfdownhill Posted February 6, 2017 Member Contributer Share Posted February 6, 2017 On 2/4/2017 at 5:20 AM, SEBSPEED said: Well, I'm a little biased, but I think it would look good! Thanks Seb! Link to comment Share on other sites More sharing options...
Member Contributer 3dcycle Posted March 6, 2017 Author Member Contributer Share Posted March 6, 2017 wow been a while I should be ashamed, I have been very busy with some other things lately but, I think riding season is quickly approaching so here we go. got my blue lugs in the a while back, they are the ball radius lug nuts for Honda wheels, I have 15 more if anyone wants a set or 2-3. not sure if this video will work but I will try. should be a clip of the exhaust, way deeper tone now, before it was very harsh and raspy, not the sound I wanted out of a v4, sounds more like a good staintune. IMG_0037.MOV Link to comment Share on other sites More sharing options...
Member Contributer 3dcycle Posted March 6, 2017 Author Member Contributer Share Posted March 6, 2017 so looks like the above video works so here is another one for you try not to get dizzy watching it, and sorry for the shaky video. IMG_0038.MOV more goodies, opted for the knights design lowering pegs, got the shifter and brake pedals adjusted no issues Link to comment Share on other sites More sharing options...
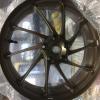
Member Contributer 3dcycle Posted March 6, 2017 Author Member Contributer Share Posted March 6, 2017 ok so then I got the bike turned around on the lift and started ripping into it cockpit view with my garmin mount removed upper clamps to prep damn anti-tamper bolts, one came out fine the other got a drill, drilled the head off then came right out ready to get blasted wheel is all done yes the mounting surface is taped still. Link to comment Share on other sites More sharing options...
Member Contributer 3dcycle Posted March 6, 2017 Author Member Contributer Share Posted March 6, 2017 so I did like 10 hours in the shop yesterday to get every thing powder coated. forks, upper clamp, wheel, a bunch of brackets, and cerakoteing the last of my nuts and bolts. cerakote in the way to go on things like that, very hard does not scratch and very thin coating. very very time consuming though. 3 hours of oven time for the damn bolts lol. anyways tell me what you think, will try to get another update later today. Link to comment Share on other sites More sharing options...
Member Contributer 3dcycle Posted March 6, 2017 Author Member Contributer Share Posted March 6, 2017 I know in some other post I have seen question on gas cap disassembly, here are some detailed pictures, this assumes you have the cap off the tank. gently pull back the rubber seal on the bottom you will see a metal ring, carefully remove the ring, don't want to bend it or damage the seal. once the ring is out again pull back the seal there are three screws, take the out this will remove the lock mechanism if just replacing the lock stop here if you are coating the lid remove these two screws as well, that will remove the key hole cover. there paint and reverse Link to comment Share on other sites More sharing options...
CandyRedRC46 Posted March 7, 2017 Share Posted March 7, 2017 Look what just popped upSent from my Nexus 6 using Tapatalk Link to comment Share on other sites More sharing options...
Member Contributer 3dcycle Posted March 7, 2017 Author Member Contributer Share Posted March 7, 2017 Next time you come across one like that put dibs on it. I will buy it, missed out on this I think. Link to comment Share on other sites More sharing options...
CandyRedRC46 Posted March 7, 2017 Share Posted March 7, 2017 Did you message him?Sent from my Nexus 6 using Tapatalk Link to comment Share on other sites More sharing options...
Member Contributer 3dcycle Posted March 7, 2017 Author Member Contributer Share Posted March 7, 2017 I did, even offered more $$ Link to comment Share on other sites More sharing options...
Member Contributer 3dcycle Posted March 8, 2017 Author Member Contributer Share Posted March 8, 2017 getting closer Link to comment Share on other sites More sharing options...
Member Contributer jackleftzuo Posted March 8, 2017 Member Contributer Share Posted March 8, 2017 what a wonderful 6gen! Link to comment Share on other sites More sharing options...
Member Contributer dgordon Posted March 9, 2017 Member Contributer Share Posted March 9, 2017 Epic. Link to comment Share on other sites More sharing options...
Loftust Posted March 9, 2017 Share Posted March 9, 2017 Loving the fuel tank filler cap... Link to comment Share on other sites More sharing options...
Member Contributer KevCarver Posted March 9, 2017 Member Contributer Share Posted March 9, 2017 How do you keep it stuck to the wall like that? Link to comment Share on other sites More sharing options...
Member Contributer 3dcycle Posted March 9, 2017 Author Member Contributer Share Posted March 9, 2017 Construction adhesive. Also makes the tires stick better in the corners. Shop space is tight got to do what I got to do. Haha Link to comment Share on other sites More sharing options...
Member Contributer 3dcycle Posted March 13, 2017 Author Member Contributer Share Posted March 13, 2017 ok got another round of pictures for everyone. mounted a new volt meter/ usb charger. it even works too bit of a shout out to sebspeed clutch cover and plate mount are perfect thanks for taking this project over the top. ok I those pictures are cool and all but here is what you guys/gals have been waiting for.... ....... ....... suspenseful isn't it? yea I know the picture quality sucks but its from a iphone5 and its not happy with my lighting, once it warms up above 30 and melt some snow I will get better pics but that wont be for a couple of weeks. Link to comment Share on other sites More sharing options...
Member Contributer MooseMoose Posted March 13, 2017 Member Contributer Share Posted March 13, 2017 On 2/4/2017 at 0:12 AM, sfdownhill said: Huge +1 on the wheel color, Seb. I'm trying picture it on my factory red 2001, but can't quite make it click for some reason. Thoughts? Dude, just go look at a 1990 VFR. It's the same color code for paint (Italian Red) and came stock with white wheels. Here's a random google image: I'm not a white wheel fan. My first bike had them and they were always dirty. However, I think they look good against the red. They look perfect for the RWB. Much better than black. Link to comment Share on other sites More sharing options...
Member Contributer dgordon Posted March 14, 2017 Member Contributer Share Posted March 14, 2017 3D, just so excellently well done! The best RWB out there imho. Really ace work here. Love the wheels, and basically everything else too! Dave Link to comment Share on other sites More sharing options...

Recommended Posts
Archived
This topic is now archived and is closed to further replies.