FinnRC36 Posted August 25, 2010 Share Posted August 25, 2010 OK, at some point I promised to do a write up of the conversion of my '91 so here goes. The bike is far from completed but it's driveable and I've logged some 3000km on it this summer. Next winter the work continues. Here's an early pic from the spring of 2009 when I started with VTR1000F front end conversion along with CBR918RR brakes. In the early stages At this point I also went through the internals of the fork after having read about the poor suspension quality of the VTR. The springs are 0.866kg/mm (8,5N/mm) Öhlins straight rate springs for the VTR. The modified the shim stacks are the following: Compression stack: 17 x 0.4 Showa 3 port surface dressed - bleed notches removed, with 1mm bleed 17 x 0.10 16 x 0.10 (2) 15 x 0.15 14 x 0.10 C 8.5 x 0.20 11.4 x 0.4 Rebound stack: 17 x 0.4 Showa 3 port surface dressed - bleed notches removed, with 1mm bleed 17 x 0.10 (8) 16 x 0.10 (3) 15 x 0.15 14 x 0.15 C 8.5 x 0.20 11.4 x 0.4 12.5 x 2.6 After some testing I settled on 120mm oil height IIRC which seems to be working great. Here's a little pic of the work: DSCN7761.JPG And one with the finished front end: DSCN7894.JPG The bike was ridden like this almost the whole summer of 2009. And while the front end felt great the rear suspension was not up to par and so I decided to contact Jamie D for a CBR929 rear shock. That was a great decision. I could feel the tremendeous improvement in ride quality and stability right from the start. Then last fall I had read enough about FotoMoto's CBR600RR and other's conversions to have a go at it myself. I'll let the pics tell the story: DSCN7908.JPG Fitting the CBR fairing stay. DSCN7909.JPG Test fitting the front fairings. Also note the Coerce fork brace made for the VTR. Fit's perfectly. DSCN7910.JPG New chinese front rotors from Ebay. Currently I ridden 3000km with these and no complaints what so ever. DSCN7915.JPG The Koso gauges installed. I had the same trouble FotoMoto had with bouncing tach needle above 6000rpm and no trick I tried cured it while using the original tach wire for gauges. Switching to the coil sensor wire supplied with the Koso remedied this. It's connected in between the the coil low voltage terminal and ECU and the gauge is set up for a 2 stroke 1 cyl engine and "Hi act" IIRC. Can check this if anyone needs the info. The temp sensor is the one supplied with the gauges. With this set up the gauges work perfectly. Koso RX1N gauges All wired in and working but no temp yet. More test fitting, now with the windshield installed. Windshield installed Bracket for the fairing made out of aluminium sheet to use the original speed fasteners. DSCN7987.JPG Wiring in the electrical speed sensor from a 2001 VFR800. Using the Koso's 5V supply for speed sensor and splicing the VFR800 unit into the gauges original wire worked perfectly. Currently my speedo is set up with GPS within 1% accuracy. DSCN7990.JPG The fuel gauge also works nice. It's even accurate where the original was not quite. :laughing6-hehe: DSCN7997.JPG Also installed Factory Pro shift kit (the kit I got must have been made on Monday since I had to reassemble it correctly), a lighter battery, an aluminium rear sprocket with 15-45 gearing, VTR1000F clipons and more. Current state of things Trial fitting of the CBR600RR upper. Oil change in process and Factory Pro shift kit installed. Still lots to be done. Also installed LED signal mirrors from Ebay. It's a driver... ...and also very incomplete. The VTR clipons are visible in this pic. Also the brake master is a radial unit from a 06 GSX-R1000 but I could get it blead properly so switched back to the CBR918RR master that works great. Probably the problems with the bleeding are caused by me using original VFR length braided lines where I would have needed shorter ones with 90deg ends for the Suzuki master. The cockpit as it's now. After the last pic I've installed VTR1000F clutch master and a Delkevic titanium stubby muffler (only 1,25kgs). I've calculated the bike has lost some 12-15kgs (26-33lbs) in total and will lose more during next winter. Made some measurements using the Koso's performance test and got a couple of 4,2s 0-100kph runs so she runs strong (the needles shimmed and a BMC filter installed). Coming up is a jet kit with larger intake snorkel, an aluminium rear subframe with a '04 GSX-R600 tail fairing and LED lights and either a high mount of left exit exhaust using the Delkevic can without the huge collector box and of course a paint job (original color). Will post pics when get them things done. EDIT: Also changed to GP-shifting using modified gear linkage from an old CBR600F. Link to comment Share on other sites More sharing options...
Member Contributer Dutchy Posted August 25, 2010 Member Contributer Share Posted August 25, 2010 Very Hyyva!!! :laughing6-hehe: (hyyva meaning good in finnish i think....) :goofy: Link to comment Share on other sites More sharing options...
FinnRC36 Posted August 25, 2010 Author Share Posted August 25, 2010 Very Hyyva!!! :goofy: (hyyva meaning good in finnish i think....) :fing02: Thanks! And yes, hyvä does mean good in finnish :laughing6-hehe: Link to comment Share on other sites More sharing options...
SEBSPEED Posted August 25, 2010 Share Posted August 25, 2010 Nice work, good luck finishing it! Link to comment Share on other sites More sharing options...
Member Contributer RollinAgain Posted August 25, 2010 Member Contributer Share Posted August 25, 2010 You should really swap that ugly 8 spoke wheel for a modern 6th Gen wheel. Lucky for you I am willing to do the swap for free :fing02: Rollin Link to comment Share on other sites More sharing options...
FinnRC36 Posted August 25, 2010 Author Share Posted August 25, 2010 Nice work, good luck finishing it! Thanks! That means a lot coming from you. :biggrin: You should really swap that ugly 8 spoke wheel for a modern 6th Gen wheel. Lucky for you I am willing to do the swap for free :biggrin: Rollin You better keep trying cause I'm not going for that one :fing02: Link to comment Share on other sites More sharing options...
Baileyrock Posted August 25, 2010 Share Posted August 25, 2010 :fing02: Link to comment Share on other sites More sharing options...
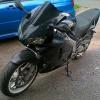
Member Contributer V-FORE Posted August 25, 2010 Member Contributer Share Posted August 25, 2010 Very Nice :fing02: in the first picture is that a Vega parked next to it? Gary Link to comment Share on other sites More sharing options...
SEBSPEED Posted August 25, 2010 Share Posted August 25, 2010 Very Nice :fing02: in the first picture is that a Vega parked next to it? Gary Or maybe a 71-72 Camaro? Link to comment Share on other sites More sharing options...
FinnRC36 Posted August 25, 2010 Author Share Posted August 25, 2010 Very Nice :fing02: in the first picture is that a Vega parked next to it? Gary No that's my of my old '73 Z28 Camaro. Sold this spring. Link to comment Share on other sites More sharing options...
Member Contributer V-FORE Posted August 27, 2010 Member Contributer Share Posted August 27, 2010 Very Nice :biggrin: in the first picture is that a Vega parked next to it? Gary No that's my of my old '73 Z28 Camaro. Sold this spring. The front corner looks just like the 71-73 Vega Nose, the only diff would be the camaro hood lifts up from the front, the vega lifts from the rear.... Link to comment Share on other sites More sharing options...
Member Contributer Polarbear Posted August 27, 2010 Member Contributer Share Posted August 27, 2010 Did I hear the word Vega?!?!? Good job Finn!! Looking forward to pics of you riding it. C Link to comment Share on other sites More sharing options...
Member Contributer FotoMoto Posted August 27, 2010 Member Contributer Share Posted August 27, 2010 After the last pic I've installed VTR1000F clutch master and a Delkevic titanium stubby muffler (only 1,25kgs). I've calculated the bike has lost some 12-15kgs (26-33lbs) in total and will lose more during next winter. Made some measurements using the Koso's performance test and got a couple of 4,2s 0-100kph runs so she runs strong (the needles shimmed and a BMC filter installed). Coming up is a jet kit with larger intake snorkel, an aluminium rear subframe with a '04 GSX-R600 tail fairing and LED lights and either a high mount of left exit exhaust using the Delkevic can without the huge collector box and of course a paint job (original color). Will post pics when get them things done. EDIT: Also changed to GP-shifting using modified gear linkage from an old CBR600F. AWESOME!!!! :biggrin: :fing02: :fing02: It doesn't seem all that long ago that you ask me those first few questions. Looks like you've been putting those Finnish winters to good use! :happy: Stage two this winter should be even more fun. Keep us updated. Link to comment Share on other sites More sharing options...
FinnRC36 Posted August 27, 2010 Author Share Posted August 27, 2010 AWESOME!!!! :fing02: :woohoo: :wheel: It doesn't seem all that long ago that you ask me those first few questions. Looks like you've been putting those Finnish winters to good use! :wink: Stage two this winter should be even more fun. Keep us updated. Thanks man! You're right it wasn't long ago but time seems to just fly by. Well if you've got snow on the ground for 5 months a year you really gotta have something to tinker with :fing02: Link to comment Share on other sites More sharing options...
Member Contributer TexOz Posted August 27, 2010 Member Contributer Share Posted August 27, 2010 Very Hyyva!!! :fing02: (hyyva meaning good in finnish i think....) :woohoo: Thanks! And yes, hyvä does mean good in finnish :fing02: Good in Finnish and a nice looking finish! :wheel: Well done mate! Link to comment Share on other sites More sharing options...
FinnRC36 Posted December 7, 2010 Author Share Posted December 7, 2010 So here's a little peek on something I've been working on: 07122010008.jpg It's the new subframe I mentioned earlier. Or at least the start of it. It's made out of 3mm aluminium sheet. I'll be making it one piece with the rear fender and battery box, all made out of aluminium sheet. 07122010007.jpg Here's a mockup pic from the tail fairing. I'll be using the stock seat so the fairing is modified to fit that. Can't wait to see it finished :biggrin: 07122010006.jpg 07122010005.jpg 07122010004.jpg 07122010002.jpg Sorry for the poor quality of the pics (taken with my phone). Link to comment Share on other sites More sharing options...
SEBSPEED Posted December 7, 2010 Share Posted December 7, 2010 Now this is the kind of stuff I love to read about! Pending some better quality pics, that looks great! I like how you've integrated the stock seat with the GSXR tail! Link to comment Share on other sites More sharing options...
Veefer800Canuck Posted December 7, 2010 Share Posted December 7, 2010 Looks like you will not be carrying any passengers with the new subframe due to the weight? Link to comment Share on other sites More sharing options...
FinnRC36 Posted December 7, 2010 Author Share Posted December 7, 2010 Looks like you will not be carrying any passengers with the new subframe due to the weight? Carrying passengers is not a real priority for me but the subframe does support the seat under the passenger too. I just haven't calculated would it need reinforcing around the (upper)mounting points to be strong enough to carry passengers. I'm thinking maybe it would but I'm not sure. It does have quite a lot of material up there. Link to comment Share on other sites More sharing options...
FinnRC36 Posted December 7, 2010 Author Share Posted December 7, 2010 Now this is the kind of stuff I love to read about! Pending some better quality pics, that looks great! I like how you've integrated the stock seat with the GSXR tail! Thanks man I really appreciate it :cool: The better pictures might take a while though as I'm more into building than I'm into taking pictures. Link to comment Share on other sites More sharing options...
VIFFER93 Posted December 7, 2010 Share Posted December 7, 2010 Nice, I presume you have access to a metal break / bending machine? If you are bending that by hand you have talent. I might have to do my own interpretation of this, I really like it. Link to comment Share on other sites More sharing options...
The Phantom Posted December 7, 2010 Share Posted December 7, 2010 Wow Jaakko, that looks truly amazing! You have a great eye for proportion. Inspiring stuff, I might have to go back to work on mine ;) Link to comment Share on other sites More sharing options...
FinnRC36 Posted December 8, 2010 Author Share Posted December 8, 2010 Nice, I presume you have access to a metal break / bending machine? If you are bending that by hand you have talent. I might have to do my own interpretation of this, I really like it. Well I do have a little manual bender but it's not sturdy enough to bend the long flanges on the sides, those were done with a hammer using the bender as a vice to hold the plate in place. I tell you it's really hard work hammering 3mm thick sheet even though it's aluminium. The shorter bend under the passenger seat I was able to bend with the bender but I had to hammer those bends also to get the angle sharp enough. Wow Jaakko, that looks truly amazing! You have a great eye for proportion. Inspiring stuff, I might have to go back to work on mine ;) Thanks Murray. Yeah you really should go and finish yours :fing02: Link to comment Share on other sites More sharing options...
Forum CEO HispanicSlammer Posted December 8, 2010 Forum CEO Share Posted December 8, 2010 Looks like you will not be carrying any passengers with the new subframe due to the weight? Carrying passengers is not a real priority for me but the subframe does support the seat under the passenger too. I just haven't calculated would it need reinforcing around the (upper)mounting points to be strong enough to carry passengers. I'm thinking maybe it would but I'm not sure. It does have quite a lot of material up there. 3mm? I had a 3mm steel folded sheet metal rack rip at the bends just with a small mini hard case attached to it. I would be more worried about that then a passenger, Perhaps some reinforcing just for YOU would be in order! The sub frame takes a beating. Link to comment Share on other sites More sharing options...
Member Contributer gll429 Posted December 8, 2010 Member Contributer Share Posted December 8, 2010 are you going to box it up? ..usa ,speak for weld up it with more walls.. that WILL make it very strong.. you may not carry a babe much.. but you may want to haul some other stuff. :fing02: Link to comment Share on other sites More sharing options...

Recommended Posts
Archived
This topic is now archived and is closed to further replies.