fonque Posted December 17, 2015 Share Posted December 17, 2015 My Chinese fairing kit arrived, and it is very evident that it is the compression molded set because the fit is Terrible!! However my oem fairing are all damaged beyond repair except for the rear fairing. So I am making do with what I have. Pictures will follow shortly Link to comment Share on other sites More sharing options...
Member Contributer adeyren Posted December 17, 2015 Member Contributer Share Posted December 17, 2015 Fonque Where did you order from? Due to pick mine up tonight, ordered from Auctmart. According to their website they are injection moulded. Had a nice surprise though £75 ($111) in customs fees! Link to comment Share on other sites More sharing options...
Member Contributer V-FORE Posted December 17, 2015 Member Contributer Share Posted December 17, 2015 Fonque Where did you order from? Due to pick mine up tonight, ordered from Auctmart. According to their website they are injection moulded. Had a nice surprise though £75 ($111) in customs fees! I also ordered from Auctmart per Terry's Chinese Fairing AdventureI received the pictures of the painted fairings have not received tracking info yet...... I am confident that I will have a similar experience to Terry Link to comment Share on other sites More sharing options...
Member Contributer VFRMAN Posted December 17, 2015 Member Contributer Share Posted December 17, 2015 Nice Christmas surprise from customs Ade, the tax man always has the hand out, hope they fit your bird ok Link to comment Share on other sites More sharing options...
Member Contributer adeyren Posted December 17, 2015 Member Contributer Share Posted December 17, 2015 Nice Christmas surprise from customs Ade, the tax man always has the hand out, hope they fit your bird ok You will find out next week when you see them! ☺ Link to comment Share on other sites More sharing options...
fonque Posted December 18, 2015 Author Share Posted December 18, 2015 If you go the chinese fairing route and end up with the compression kit. Prepare for a ton of dremeling! Almost all holes need to be either widened, slotted, or redrilled altogether. The gauge cluster surround is the source of most of the fitment problems. The piece must have shrunk which causes alignment to fail all over the place. I had to dremel the corner of the cluster to get the panel to sit anywhere close to flush This is the zero gravity windscreen I am using. It has a fitment very close to stock which means it doesnt fit these fairings at all. This is after 2 round of fitment battles. Surprisingly I did not have to dremel any part of the upper fairing and the headlight fit pretty well, even with all of the HID equipment behind them. windscreen fitment. none of the holes lined up with the metal frame. here is a better picture of the alignment of the windscreen. I drilled 2 small holes at the top and used an m5 screw and nut to pin the upper fairing, the windscreen, and the inside finishing piece together. bolt installed I used a neoprene washer to try and spread the weight out. I didnt want to crack the fairing by cranking down to hard. After all of the wrestleing to get the upper fairing and windscreen to fit each other, the corner of the fairing by the headlight cracked. I suspect it was from the pressure of pushing the upper fairings down hard enough to get the mirrors mounted. gauge cluster cover doesnt line up at all. This is the rear fairing which didnt line up at all. It shrunk and all of the holes were off about 1 inch to the rear. This is the real battle. The side fairing were missing holes that I had to dremel out to fit the rubber threaded grommets. The side holes that use the large flat allen bolts were off by about an inch to the front. I used a long bolt with grease on the end to mark where to drill. The upper fairing actually lined up pretty well with the side fairing. This is where the mount for the lower bolt ended up. I also used a greased bolt to mark this hole, then dremeled it out. so this is where I am stuck at right now. I have to figure out a way to reduce that ridiculous gap. This is the best I could get it by pushing on it with my hands. I have not dremeled or bolted down the top of the side fairing. reduced the gap by a bit, but still too much for me. This is where the bike currently stands. I still have to install the left side fairing and the lower cowl near the headers. I also have to dremel out and bolt down the wheel fender. I am hoping to have this done within the next week or so. Fonque Where did you order from? Due to pick mine up tonight, ordered from Auctmart. According to their website they are injection moulded. Had a nice surprise though £75 ($111) in customs fees! I order my kit from Bliss-star on ebay. It was a good company to order from. They packaged the parts pretty well and I had no broken pieces. The paint job was much better than I expected. It has alot of paint and good amount of clear on it. There are some runs and couple of weird greenish blemishes on 2 parts on the edge. But I can buff that stuff out. I was happy with the kit, It just doesn't fit well. If there is an injection molded version for the 5th gen I could not find one when I was looking to buy. Link to comment Share on other sites More sharing options...
Veefer800Canuck Posted December 18, 2015 Share Posted December 18, 2015 Boy am I ever glad I bought lightly rashed OEM panels off eBay. Link to comment Share on other sites More sharing options...
duccmann Posted December 18, 2015 Share Posted December 18, 2015 Wow what a waste of $$$$ Link to comment Share on other sites More sharing options...
fonque Posted December 18, 2015 Author Share Posted December 18, 2015 Wow what a waste of $$$$I don't think it was a waste of money. I got what I paid for, which was cheap poorly fitting pre-painted panels. Chinese fairings were the best option for me to have a decent looking bike. I don't have a garage and the oem panels were literally falling apart. Link to comment Share on other sites More sharing options...
duccmann Posted December 18, 2015 Share Posted December 18, 2015 Get it....get what cha pay for....haven't heard one positive thing about them there kits......enjoy ;-) Link to comment Share on other sites More sharing options...
Member Contributer Dutchy Posted December 18, 2015 Member Contributer Share Posted December 18, 2015 Nice Christmas surprise from customs Ade, the tax man always has the hand out, hope they fit your bird ok Only 2 guarantees in life you will die you will pay tax Link to comment Share on other sites More sharing options...
Member Contributer Terry Posted December 18, 2015 Member Contributer Share Posted December 18, 2015 The Auctmarts parts turned out to be compression moulded (but their site did say injection). All of the stock mounting holes worked out fine (but tight), fit around the headlight is good and no issue at the instruments or fairing. The top fairing does seem to sit slightly crooked (small gap alongside the instrument surround on the left) but I can't swear that the fairing stay isn't bent after my drop. Link to comment Share on other sites More sharing options...
Member Contributer VFRMAN Posted December 19, 2015 Member Contributer Share Posted December 19, 2015 I predict a few quid going in the swear tin before that bird is dressed again Ade Link to comment Share on other sites More sharing options...
Member Contributer ecn Posted December 19, 2015 Member Contributer Share Posted December 19, 2015 It won't work if your fairing stay is bent. You can use a wire to measure the distance from the fairing mount to the end of each "horn". If uneven, you can clamp the stay in a vice and use a floor jack to adjust horn to mount distance. Link to comment Share on other sites More sharing options...
Member Contributer wagzhp Posted December 19, 2015 Member Contributer Share Posted December 19, 2015 It's a shame that the alingment was so poor, but all in all I'd say it looks much better than rashed up or broken stock parts. I like that the paint on the gauge surround matches the rest of the fairings, that looks nice! Link to comment Share on other sites More sharing options...
fonque Posted December 22, 2015 Author Share Posted December 22, 2015 I managed to tighten up the right side fairing and reduce the gaps a good amount. i also added extra bolts on the side to cover up the misaligned holes. This is the best I could get it before tightening this side down. Link to comment Share on other sites More sharing options...
Member Contributer Switchblade Posted December 22, 2015 Member Contributer Share Posted December 22, 2015 Man just two holes off or is the other side off also ? Link to comment Share on other sites More sharing options...
fonque Posted December 23, 2015 Author Share Posted December 23, 2015 I've only installed the right side, I'm starting on the left side tomorrow. Link to comment Share on other sites More sharing options...
fonque Posted December 28, 2015 Author Share Posted December 28, 2015 I finally had time this wekeend to finish the fairing install. I will get pictures up later today. The only issues that I could not resolve were the giant gap on the left side of the gauge cluster where it meets the upper fairing. It was also impossible to alight the bottom of the lower fairings together under the headers. I ended up using zip ties. Link to comment Share on other sites More sharing options...
Member Contributer VFROZ Posted December 29, 2015 Member Contributer Share Posted December 29, 2015 From what I can tell, it looks like the Acumart 6th gen fairings are injection, and the 5th gen are still compression moulded. I know you think that it's better then a rashed up one, but I couldn't live with them gaps, or the double bolt thing on the side. It's a shame, because I think they would get lots of sales for the 5th gen if they were good quality. Link to comment Share on other sites More sharing options...
Member Contributer adeyren Posted December 29, 2015 Member Contributer Share Posted December 29, 2015 I finished fitting the Auctmart fairings to the Bird in two days with no real problems at all, a few holes had to be slightly enlarged, one bolt hole was about 7 - 8mm out, paintwork and colour are really good. Right side top and bottom fairing were out of a line a bit. All in all am extremely pleased with them. Anybody see whats wrong with the decal wording on the second photo? Link to comment Share on other sites More sharing options...
fonque Posted December 29, 2015 Author Share Posted December 29, 2015 That blackbird looks really good. Why does the decal say "carburated"? Link to comment Share on other sites More sharing options...
GigemVFR Posted December 29, 2015 Share Posted December 29, 2015 Looks great to me. Paint quality seems to look really nice too from what you can see from a pic. Link to comment Share on other sites More sharing options...
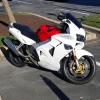
fonque Posted December 30, 2015 Author Share Posted December 30, 2015 I finished installing the fairings and this was as good as I could get the gaps. This is the worst gap because it is so visible I could not think of any way to reduce it. It just didnt fit. I did not have this issue on the right side of the bike. mounting hole is about 1/2" to the rear of the bike lower mounting hole is about 1/2" to the rear of the bike these are shots of the heat shielding I put behind the left and right fairings to reflect some of the heat from the exhaust This piece needs the most heat shielding. I am still worried this piece is going to melt. this is by far the worst gap where the left an right fairing meet at the bottom. They do not meet at all. I ended up using a zip tie to bring both panels together. It doesnt bother me too much becuase it is not too visibible. Here is another angle. another angle of the poor fitment All done pre-seat cover install. new grips and bar ends to complement the new fairings. All finished and back in my parking spot showing off the new projector headlights LEDs in the gauge cluster The finished product. After the new year I am going to get a quote to have the tank and my solo seat cover painted white to match. If it ends up being too expensive for me, then I will do a rustoleum job. Link to comment Share on other sites More sharing options...
Member Contributer V-FORE Posted December 30, 2015 Member Contributer Share Posted December 30, 2015 I really like the white, I received the tracking info on mine so soon my new 5th gen will be white also. I found & ordered this for mine, I chose the Grey/White http://www.ebay.com/itm/271216512034?_trksid=p2057872.m2749.l2649&ssPageName=STRK%3AMEBIDX%3AIT I am sure after awhile I will paint mine, but since I have no place to paint right now & its cold out so I figured this would work. Link to comment Share on other sites More sharing options...

Recommended Posts
Archived
This topic is now archived and is closed to further replies.