Member Contributer Hingley Posted February 13 Member Contributer Share Posted February 13 Afternoon guys, I was going through the chain and sprockets on the 1999 and I was wondering if you guys may know the answer to my questions I was wondering if you think this front sprocket is a Honda part . I see that it has the rubber on it to help with noise and has the correct ( stock ) number of teeth but I do not see any Honda markings, the rubber ring looks like it has depressions around the edge, my guess is from the chain. What is the best way to know if it is worn out?, the back one sits fine on the chain with no air gap between chain and rear sprocket. Quote Link to comment Share on other sites More sharing options...
Member Contributer bmart Posted February 13 Member Contributer Share Posted February 13 17/43 530, sizes are surely stock and they look stock to me. If either sprocket or the chain is worn to out of spec, you'll want to replace all three at the same time. It is a great time to improve the ratio. I love mine at 17/45 on the '98 and '00. I had the same on my '99. Wear doesn't look bad to me. I'd clean them and the area around them so that you can see them more easily. Likely the same for the chain. A quick Google search will give you good examples of bad chains/sprockets. (sprockets looks fine to me. share chain pics?) Here's what mine did at end of life. 1 Quote Link to comment Share on other sites More sharing options...
toreckman Posted February 13 Share Posted February 13 JT sprockets also have the rubber. I picked this up recently - https://jkmoto.ie/product/jt-front-sprocket-jtf339-16rb-16-tooth-pitch-530-rubber-damper/ Its the 16T version, they also do the stock 17T version. I went with 16/43 on my 01 vfr, not a huge difference, but I do notice a little more grunt at low rpms. 1 Quote Link to comment Share on other sites More sharing options...
Member Contributer bmart Posted February 13 Member Contributer Share Posted February 13 For reference, this is nearly done. lol 2 Quote Link to comment Share on other sites More sharing options...
Member Contributer Grum Posted February 13 Member Contributer Share Posted February 13 5 hours ago, Hingley said: I was wondering if you think this front sprocket is a Honda part Yep looks like a genuine Honda sprocket to me. Quote Link to comment Share on other sites More sharing options...
Member Contributer Captain 80s Posted February 14 Member Contributer Share Posted February 14 3 Quote Link to comment Share on other sites More sharing options...
Member Contributer Grum Posted February 14 Member Contributer Share Posted February 14 Just for info.... Here's my original 8gen drive sprocket after 74,000 km and the new replacement JT one fitted. (allow for a little Mobile Phone lens distortion, even the new sprocket looks a little non uniform in shape) My current original rear 43T Sprocket has done 96,000 km and has no visible sign of wear! I do have a replacement rear sprocket ready to go for the next chain replacement, but will it really need replacing???? The bottom line here is that always replacing sprockets and chains as a set is old school and a waste of money. Meticulous attention to chain tension and regular Chain/Sprocket lubrication will see good quality sprockets last for ages, particularly the OEM. And as Honda descibes in their Owners Manual, if there's no sign of visible wear, there's no need to replace them. I guess it's also fair to say that riding styles, riding conditions and weather, along with those who unfortunately have to ride on salt laden roads will have a big effect on both chain and sprocket mileage. BUT, As always YMMV. 1 Quote Link to comment Share on other sites More sharing options...
Member Contributer bmart Posted February 14 Member Contributer Share Posted February 14 That's magic. I don't think that even with proper care, they're made to go that long. O-rings break down. Lube comes out. Rollers break. My VFRs have been ~20k miles nearly like clockwork. The track bikes go ~5k-6k miles. If you've ever seen what a breaking chain does to a calf... 1 Quote Link to comment Share on other sites More sharing options...
Member Contributer Grum Posted February 14 Member Contributer Share Posted February 14 Hi Bmart. I make no reference to the racing scenario, purely general road riding and on average I'm seeing around 36,000 to 38,000k per chain, (22,500 to 23,600 mile). Only ever used high quality Jap chains D.I.D or EK. and riveted Master Link. Cheers Quote Link to comment Share on other sites More sharing options...
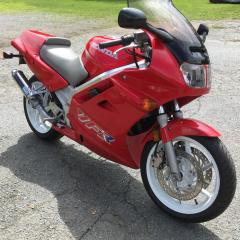
Member Contributer Hingley Posted February 14 Author Member Contributer Share Posted February 14 Amazing You guys have put together the best dam real life examples of chain and sprocket wear I have seen in a long time, laughable ones as well I looked for hours to find a picture of a front Honda sprocket and Grum flashes one up quicker than a knee dragging through corner 9, cool This 1999 VFR chain and sprockets do look good to my old eyes, but I have been out of the loop for years and it has 50,000km on it so I was hard pressed to think the previous owner installed Honda parts Keep it up 1 Quote Link to comment Share on other sites More sharing options...
Member Contributer Grum Posted February 14 Member Contributer Share Posted February 14 Nice comments Hingley. Yep, and I freely admit to have learned a lot from the collective experience of many long time members on this forum. As a last bit of info, and you can take it or leave it. If it was my bike, and it's service history is unknown, I wouldn't hesitate in baselining it's maintenance. I'd start afresh and shout it new sprockets and chain, along with all the normal maintenance items, fluids, plugs, air filter, oil and filter etc. I'd also dive into the electrics, solder up all the grounds in the dreaded orange earth block, solder the stator lead wires to the R/R and its output connector, upgrade the R/R if needed and make good the Main Fuse B 30amp fuse holder and wiring. Enjoy your ride. The Yellow 5gen looks GREAT and deserves all the TLC you can give it. Cheers 1 1 Quote Link to comment Share on other sites More sharing options...
Member Contributer Hingley Posted February 15 Author Member Contributer Share Posted February 15 I'd start afresh and shout it new sprockets and chain, along with all the normal maintenance items, fluids, plugs, air filter, oil and filter etc. I'd also dive into the electrics, solder up all the grounds in the dreaded orange earth block, solder the stator lead wires to the R/R and its output connector, upgrade the R/R if needed and make good the Main Fuse B 30amp fuse holder and wiring. I did most of this last winter, just after I got the bike, also went through the front end ( bushings, dust seals, rotors pads ) and settled on Race tech springs and rates suggested by the Capt. ( one of the best things I could have done, what a difference in the front end ) also tore down the motor to the cams and checked all the valves, surprised to find they were within spec, removed the PAIR system while I was in there, rebuilt the clutch slave cylinder and flushed all the old brake fluid out ( clutch and brakes ), had the injection system cleaned and replaced all the water cooling hard line O rings etc., surprised how bad they were, also new thermostat, I would never have guessed it by running the motor but the old one was stick wide open, new coolant, plugs etc This winter I want to check out and update the rear systems such as chains and sprockets, I doubt I will pull the rear axle system as it rotates fine for chain adjustments and the bearings seem good I like to think I have had a lot of different bikes over the years but this 99 is better feeling than even the 90 VFR750 I have, a keeper for sure 3 1 Quote Link to comment Share on other sites More sharing options...
Member Contributer Hingley Posted February 17 Author Member Contributer Share Posted February 17 Finished cleaning the sprockets and the EK MVXZ chain ( all of which looks in good shape ), so I am just going to use the set on it for this summer. When I removed the chain I of course had to grind off the rivet master link and since I do not have a rivet chain install tool I am going to use this type of screw master link that EK has. This screw link is rated for the MVXZ chain and everything I have read about these screw links sounds positive, I know this link would not be the ticket if I was on the track or dragging a knee somewhere but those days are over Any Thoughts? 1 Quote Link to comment Share on other sites More sharing options...
Member Contributer jefferson Posted February 17 Member Contributer Share Posted February 17 Those master links are the cats meow. No special tools needed and very easy to do. Can't get things too tight or out of whack. Quote Link to comment Share on other sites More sharing options...
Member Contributer bmart Posted February 17 Member Contributer Share Posted February 17 I'm not sure what the pic sequence is telling me. Do you end up with a riveted shaft or one with a nut on it? Quote Link to comment Share on other sites More sharing options...
Member Contributer Hingley Posted February 17 Author Member Contributer Share Posted February 17 I think the attached video will be a better explanation than I can give Quote Link to comment Share on other sites More sharing options...
Member Contributer bmart Posted February 18 Member Contributer Share Posted February 18 I couldn't sleep if I attached my master link like that. Is there any data on if they stay on under pressure? Quote Link to comment Share on other sites More sharing options...
Member Contributer BusyLittleShop Posted February 18 Member Contributer Share Posted February 18 Mileage is a loose standard because wear depends on so many variables... A more accurate standard of chain wear is after the 3rd adjustment because that is undeniable evidence that the factory installed grease is beginning to fail to lube the critical pin roller junction hidden behind the X ring... the length of the chain is growing because of this metal to metal wear... I can not call a chain serviceable that is grinding metal... it's like saying that a dry bearing that runs ruff is acceptable... the net result is another 2 to 3% drop in RWHP as more energy is lost grinding metal behind the X ring... This is what we don't see behind the X rings... metal to metal wear every time we adjust the chain that eats into our engine's available HP... a new pin measures 206.5 and wears down to 205.5 at the 8K mile mark... looks good to the naked eye but multiply that 1 thousand of an inch times 108 links and you have 108 thousands of an inch wear or about the range of the green marks provided by Honda's wear gauge... 202.8 show the very visible wear at the 12K mile mark... the pins are turning red from extreme heat of grinding dry metal... a chain in this condition may consume up to 6 to 8% of our RWHP... not to mention it may snap into and cause case damage... Some manufactures provided a handy guide to monitor chain wear... stay with in the green and you'll be looking for a new chain and sprockets at the 8 to 10K mile mark... What we are lubing are external roller and between the roller and the sprockets (red area in my drawing)... we are not lubing the X rings nor behind the X rings so any oil applied in that effort is a waste and will only fling off... We are lubing the external roller and between the roller and the sprockets (red area in my drawing)... we are not lubing the X rings nor behind the X rings so any oil applied in that effort is wasted fling off... 2 1 Quote Link to comment Share on other sites More sharing options...
Member Contributer Hingley Posted February 19 Author Member Contributer Share Posted February 19 What we are lubing are external roller and between the roller and the sprockets (red area in my drawing)... we are not lubing the X rings nor behind the X rings so any oil applied in that effort is a waste and will only fling off... This is dam interesting to an old guy like me, makes a lot of sense once you see it in an image I was going to soak my x ring chain in Kerosene for a few days, followed by a brush scrub but by this all I will accomplish in the end is possibly flush out or thin out the factory grease/lube behind the x rings in the chain, looks like a short Kerosene bath and little brushing will do the trick followed by a good soak in lube or 90w for a while Quote Link to comment Share on other sites More sharing options...
Member Contributer JZH Posted February 19 Member Contributer Share Posted February 19 On 2/17/2024 at 4:07 PM, Hingley said: had to grind off the rivet master link and since I do not have a rivet chain install tool I am going to use this type of screw master link that EK has. Any Thoughts? I've ground off link rivets before, but I've found it's a lot easier (and quicker!) to use a cut-off wheel or even a hacksaw on any two side plates. You're not going to re-use the chain, so there's no need to be so "polite" by carefully grinding off the rivets! Ciao, JZH Quote Link to comment Share on other sites More sharing options...

Recommended Posts
Join the conversation
You can post now and register later. If you have an account, sign in now to post with your account.