BusyLittleShop
-
Posts
2,434 -
Joined
-
Last visited
-
Days Won
50
Content Type
Forums
Profiles
Gallery
Blogs
Downloads
Events
Everything posted by BusyLittleShop
-
Me and Mr.RC45 always have a wheelie nice day...
-

1999 vfr 800 clutch sticking
BusyLittleShop replied to lawnmowerman's topic in Maintenance Questions
Milky oil is a greater danger to your engine than to your clutch... Milky oil significantly reduces the lubricating properties of the engine oil, leading to increased friction and wear and tear on engine components. This can lead to: Engine overheating: Without proper lubrication and cooling, the engine can overheat. Corrosion: Moisture in the oil can lead to rust and corrosion of engine parts. Clogged passageways: The thickened, contaminated oil can clog lubrication pathways, preventing proper oil circulation. Potential Engine Failure: Ignoring milky oil can result in serious engine damage and even complete engine failure. More likely the cause of Condensation is short trips or riding in cold, when the coolant operates below 180ºF... also humid weather can cause condensation to build up inside the engine, which can then mix with the oil. -
Engine temps below 180ºF or 82ºC is an problem... it means that the moisture produced during combustion is not getting hot enough to evaporate out the pipe as steam... instead that moisture will migrate to the oil and produce a milky white contamination... Note normal by products of combustion is water... . Every gallon of gas creates roughly 8 pounds of water vapor... we all have witnessed water escaping out of tail pipes on cold mornings...
-
Leaky Head Gasket Check... You can visual inspect for a leaking head gasket by pulling the spark plugs and peering down each hole... if the top of the piston is black then no leak that cylinder... if the top of the piston is a bright shiny aluminum then leak detected... because a leaky head gasket allows coolant in and that produces steam under the heat of combustion... the net effect is a super clean piston dome and no nasty black...
-
I replaced my PIAA 60/55 watt Xenon gas Super White bulbs that glow in the 4200 Kelvin range with Speed Metal's 25 watt Cree LED H4 with a working high and low beam... At the time Speedmetal LED kits were $69 each at Cycle Gear... Out back the twin tail light bulbs are replaced with dual round circuit boards of LED... a plug and play system sourced at WSB Laguna Seca... RC45 LED Custom Tail Lights... Adapting the LED to center inside the existing housing requires some mild fabrication... Behold LED tail lights... Hit the stop lights and now you're really shinning.. in fact the intensity hurts the eye... Up grading to LED and you're riding so bright you gotta were shades...
-
If you see *continuous* temps higher than 220ºF or below 180ºF then trouble shooting is in order: Continuous engine temps above 220ºF or 104ºC is also a problem and the proper order of items to trouble shoot are: 1)Faulty radiator cap... system should hold 1.1 pressure ratio... 2)Insufficient coolant... 3)Passages blocked in the radiator, hose or water jacket... 4)Air in the system... 5)Thermostat stuck closed... 6)Faulty temp meter or thermo sensor... 7)Faulty fan... 8)Faulty fan switch... Engine temps below 180ºF or 82ºC is an problem... it means that the moisture produced during combustion is not getting hot enough to evaporate out the pipe as steam... instead that moisture will migrate to the oil and produce a milky white contamination... Note normal by products of combustion is water... . Every gallon of gas creates roughly 8 pounds of water vapor... we all have witnessed water escaping out of tail pipes on cold mornings... The sequence of events to trouble shoot are: 1)Faulty temp meter... 2)Thermostat stuck open... 3)Faulty fan switch... (stuck on)
-
I hear a moan like tire noise or a drive chain too tight... check pressure and slack...
-
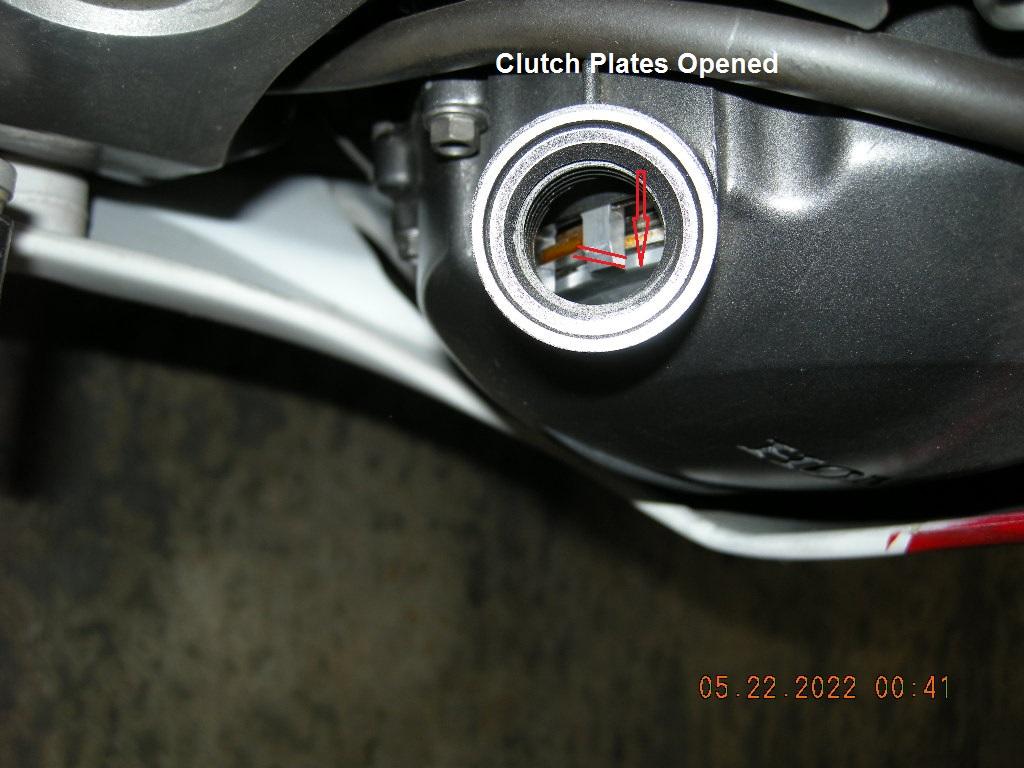
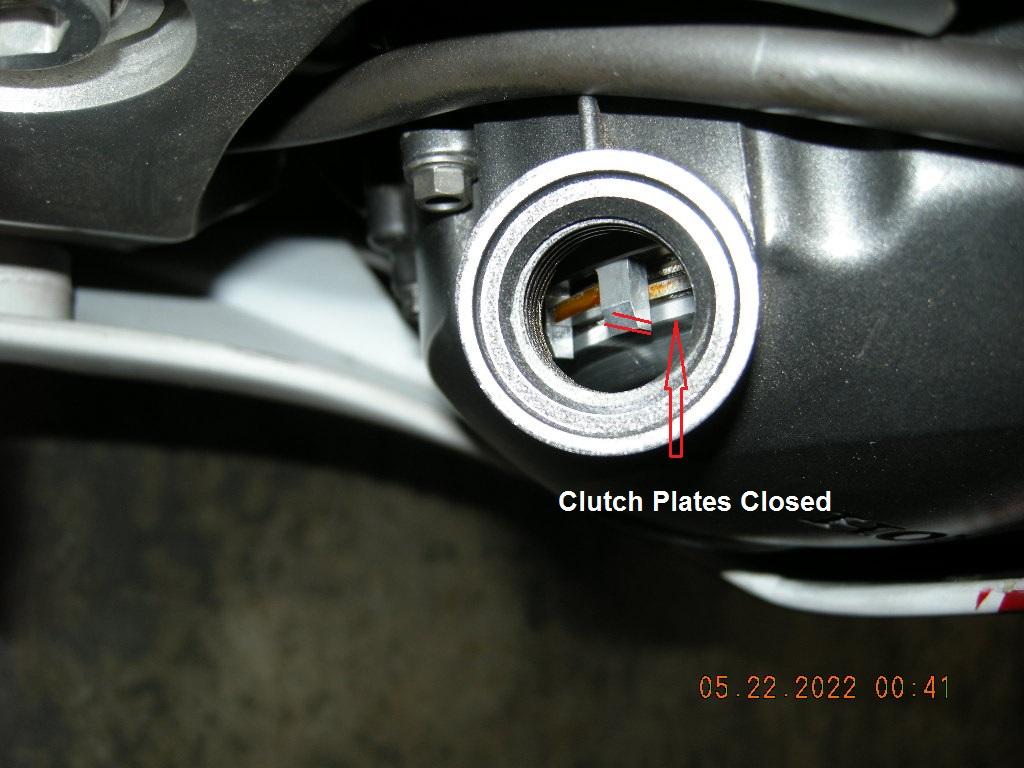
Yes... plates can be cleaned and reused... First inspect the friction plates for glazing... make sure you have plenty of material to work with... your shop manual states clutch thickness in thousands of an inch or mm... Next removed the contaminants with Acetone... pick a hard surface to lay over a 600 grit black dry emery paper... rotate the clutch plate in a circle... you're just busting the glaze... don't get carried away remove too much material... You should end up with a friction plate looks dull like a new one as opposed to a shinny glazed one... recheck thickness... Finally check the pressure plates for bluing caused by localized heat... make sure they are not warped... consult the manual for a thickness range... now removed the contaminants with Acetone and wire wheeled them to erased the blue and also to generally scuff up the surface... you should end up with a dull surface free of Blue marks... Steps to check your clutch for drag... your gears can't shift smoothly if your clutch is part way engaged... 1 Place your bike on the center stand... 2 Start engine and establish a warm steady idle... 3 Squeeze in the clutch lever and shift into first gear... 4 Hold in the clutch lever and note if the rear wheel coast to stop... if it continues spinning trouble shoot the lever for travel and master cylinder for condition... open the oil filler and look at the clutch pack to note just how far the plates spread apart when you squeeze the lever... Ultimately you want the rear wheel to coast to a stop when the engine is idling and first gear selected with the clutch lever is squeezed in... Bike on its side is a simple way to shift the oil level to an angle in order to remove the clutch cover without spillage... Have a new gasket standing by...

-
If you see *continuous* temps higher than 220ºF or below 180ºF then trouble shooting is in order: Continuous engine temps above 220ºF or 104ºC is a problem and the proper order of items to trouble shoot are: 1)Faulty radiator cap... system should hold 1.1 pressure ratio... 2)Insufficient coolant... 3)Passages blocked in the radiator, hose or water jacket... 4)Air in the system... 5)Thermostat stuck closed... 6)Faulty temp meter or thermo sensor... 7)Faulty fan... 8)Faulty fan switch... Engine temps below 180ºF or 82ºC is also a problem... it means that the moisture produced during combustion is not getting hot enough to evaporate out the pipe as steam... instead that moisture will migrate to the oil and produce a milky white contamination... Note normal by products of combustion is water... . Every gallon of gas creates roughly 8 pounds of water vapor... we all have witnessed water escaping out of tail pipes on cold mornings... The sequence of events to trouble shoot are: 1)Faulty temp meter... 2)Thermostat stuck open... 3)Faulty fan switch... (stuck on)
-
Ths is the method of aluminum fork polishing I used to returned the factory luster of my RC30 forks... 1)Strip the factory clear coat with paint stripper... 2)Sand with fine foam sanding block in one direction only... you want to curve around the tube like Honda did and not sand down the length of the tube... 3)Polish with 3M gray micro fine pad... again only polish in one direction only... you want to curve around the tube like Honda did and not sand down the length of the tube... 4)Spray with clear coat...
-
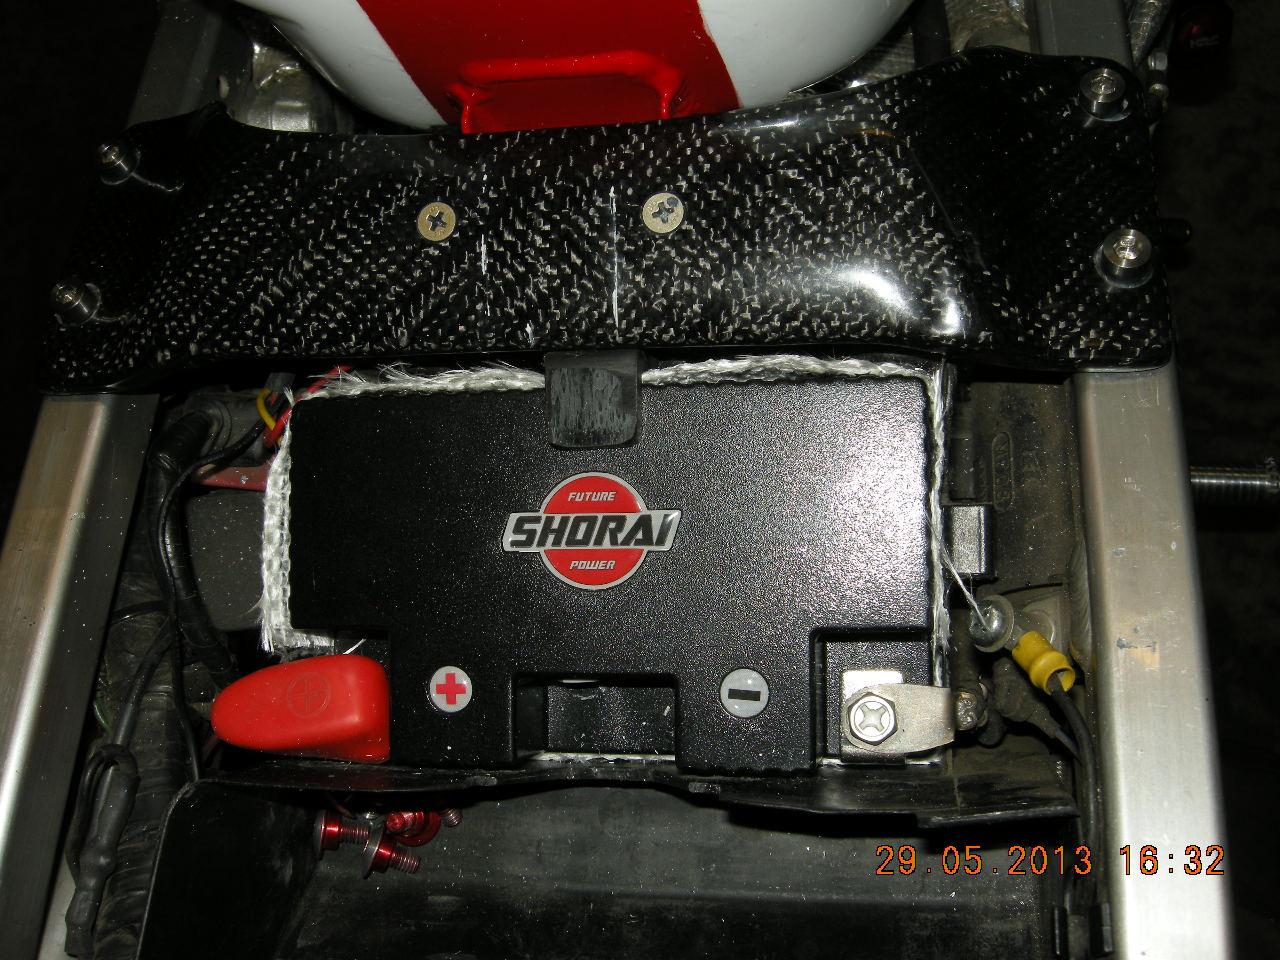
Hiya... up grading a Lithium Ion battery is the quickest and easiest way to shed 6 pounds of unwanted weight but I’ve noticed the cost is not for everybody...
-
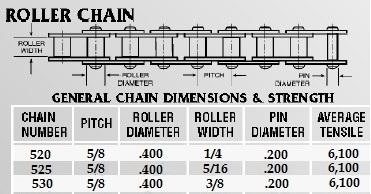
Stock factory chain is 530 110 links... the only difference between the sizes is roller width not chain strength... the wider the roller the longer the chain last...
-
As the RC45 Club's tech advisor I received this urgent photo and a request as to the reason why fire almost claimed this members RC45 ... Story goes that Bob and Pam Solloway of Coventry UK... a couple of RC freaks... were on the way to Misano WSB... Pam's RC45 caught fire while stopped at a light... the flames were beat back by bottle water from a passing van... they were lucky the incident did not happen out in the middle of nowhere for it would have spread rapidly to the fuel lines and then the tank... nothing is worst as watching bike flambeau... First call was to check the alternator quick disconnect at the transformer rectifier... I was positive that the QD had suffered enough resistance to heat and melt the insulation on the wires... the wires got enough to start a fire which all most consumed her prize... I seen this problem before... As I prepared my case for Pam I pulled the seat cowl off my RC45 to send her a pic of the quick disconnect in question... Mercy was I ever in for a shock... my quick disconnect was bad and about to turn my bike into a crispy critter...
-
Basics of Rake... Rake is defined as the angle of the steering head with respect to a line drawn perpendicular to the ground (left). A smaller angle, or less rake, is sometimes referred to as being steeper. Less rake = quicker steering and less straight line stability whereas more rake = heavier steering and more straight line stability... Basics of Trail... Trail gives a motorcycle stability because of the self-centering effect caused by the front wheel being behind (or trailing) the steering axis. Too little trail, and this self-centering effect is decreased to the point of instability. Too much trail, and the effect is so great that steering becomes heavy. Stock VFR Rake 25.5º Trail 95mm Shimming the rear shock 6mm will change rake and trail towards these numbers... Mod VFR Rake 24.5º Trail 92mm Count the number of chain links to insure you have 110... if you have `108 your cassette will cost you ride height because it is not at the 6 O clock position... Wrong... lost ride height... Right... correct ride height...
-
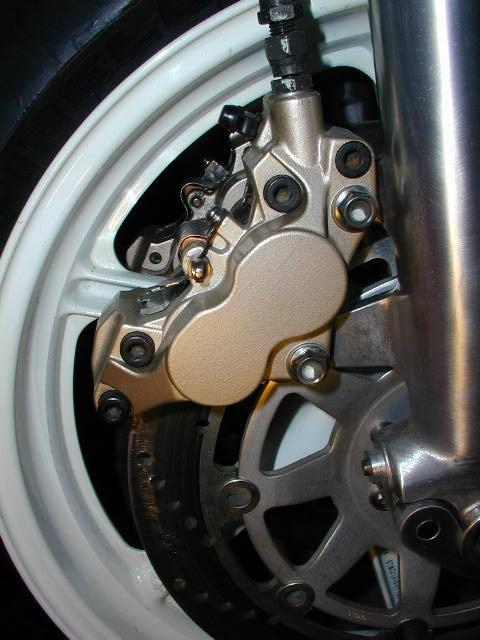
I bought an RC30 with tenacious brake dust that nothing seem to cut it... Only Mineral Spirits would cut it and return the luster of the calipers...
-
Steve is indeed a V4 bike nut and his wife is hoot too...
-
1999 Hard Starting, Winter Project
BusyLittleShop replied to Hingley's topic in Fifth Generation VFR's
For the system to work as designed on start up the butterflies must be 100% closed... this is because close butterflies equals sufficient vacuum... without sufficient vacuum the fuel cannot be drawn into the combustion chamber to support start up... the result is hard starting... the drill for cold or hot start is 1 100% close throttle for sufficient vacuum 2 Full choke on when cold no choke when hot 3 Hit start Eliminate the possibility that the throttle body butterflies are not closing 100%... if any any air is bleeding pass the butterflies then the metered flow of the idle air can not draw sufficient fuel to support combustion... -
My VFR800 mod related questions and thoughts.
BusyLittleShop replied to RdChinoy's question in Modification Questions
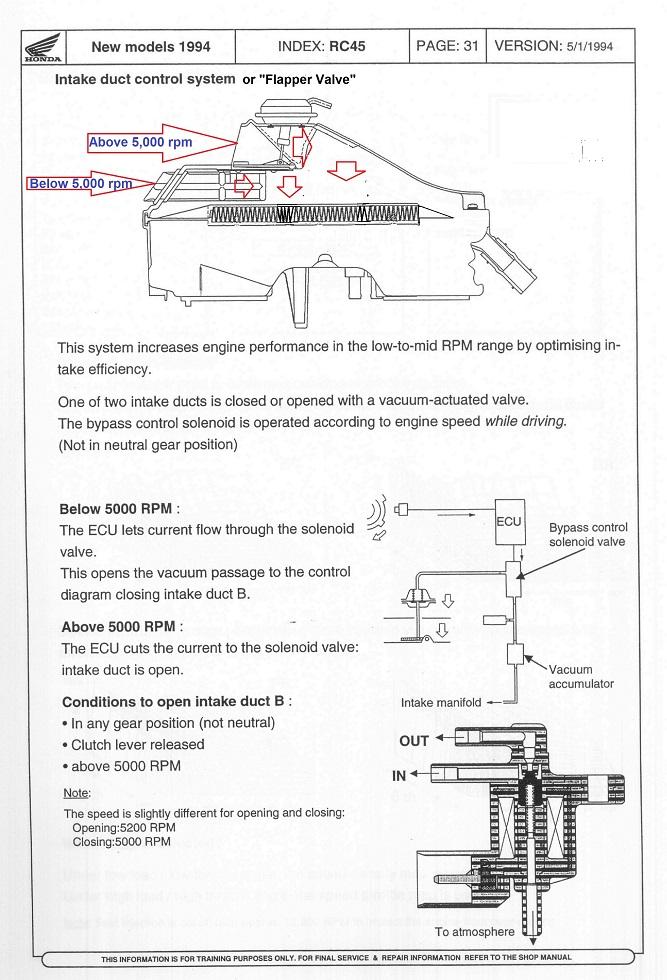
Negative... The flapper is necessary to tune the airbox so the engine doesn't hit any sour notes through the RPM range... Honda engineered it like a finely tuned instrument to optimize intake efficiency and I don't advise any owner to remove the flapper... In fact my RC45 flapper is still installed and working to tune the airbox... Kevin Cameron explains What Is The Secret Importance of a Motorcycle Airbox? If you have ever had the gas tank off your late-model sportbike, you will notice that the front of the fuel tank doesn’t hold fuel; it holds an airbox. In the old days, when you bought a new bike, it had an air-filter case attached to feed the carburetors or the fuel-injection intakes. All the sharp, young guys would immediately rip off the filter case and replace it with four sock filters. Reduced airflow resistance. Much better performance. One day in the late 1980s, they began to rip off the airboxes of their new bikes and their engines fell on their faces. They lost a bunch of performance. “This can’t be happening! Putting on sock filters always worked before.” But it turns out the industry found a way to boost performance by making what is known as a resonant airbox. We have all in an idle moment blown across the mouth of a beer bottle and heard the "whoooo" of the bottle resonance. As air goes across the mouth of the bottle, it creates a low pressure, which causes air to flow up. That deflects the air away from the mouth of the bottle. Then the air goes back in, the airflow from your mouth goes back across, and the cycle repeats, rapidly fluttering and producing that deep tone. The compressible air in the bottle is acting as a spring, and the slug of air in the neck of the bottle is the mass that vibrates against that spring. This intake airbox from a Honda CBR600RR is just a glorified beer bottle. Instead of the engine blowing across the mouth of it, its four throttle bodies are sucking from the box, pulling its pressure down. Air rushes in through the ducts in the fairing to fill up that low pressure. The next cylinder sucks the bottle pressure down and more air rushes in and restores the pressure. If the volume of the box and the mass of the air in the intake pipes are correctly chosen, the box will hum like the beer bottle. The trick is to get your engine to draw air from the box when the pressure is up and then the box refills when the pressure is down. And that is why ripping the airboxes off and putting on old-time sock filters resulted in a reduction in performance. In a specific zone of rpm, a resonant airbox can boost your engine’s torque by 10 percent. That’s worth having!
-
98 VFR800 Has a pressurised fuel tank
BusyLittleShop replied to Drtmonster's topic in Fifth Generation VFR's
Pressurize is not the worry... vacuum is... because if the vent plugs the fuel pump will create enough vacuum to collapse the tank... I've witnessed a VFR tank collapse after the gas cap vent clog... -
Honda's V3 aided with a electric supercharger will be most noticeable in the rarefied air of high mountain passes...
-
Master cylinder piston diameter?
BusyLittleShop replied to rafcom's topic in Seventh Generation VFR's
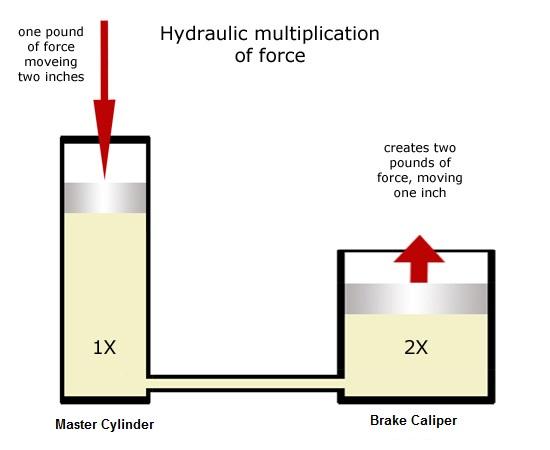
Brembo 17 or 19 numbers correspond to piston bore... the bore diameter determines how the lever feels. Bore: The bigger the area of the bore, the less pressure is generated for a given input lever force. The smaller the bore area, the more pressure can be generated from that same input force... The bigger the area of the bore, the less stroke required to move a given volume. The smaller the bore area, the more stroke is required to move that same volume...
-
Me too... Going from an RC30 to an RC45 is like going from a Jack to King... HRC improved everything... they transformed the analog RC30 into the digital RC45...
-
Start with the battery for it's the weakest link in the whole system... To determine the condition of an Maintenance Free battery give it a refreshing charge... wait 30 minutes... measure terminal voltage... 12.8 or higher is a good battery... 12.0 to 12.8 is a insufficient charge... recharge... 12.0 or lower... battery unserviceable...
-
If you see *continuous* temps higher than 220ºF or below 180ºF then trouble shooting is in order: Continuous engine temps above 220ºF or 104ºC is a problem and the proper order of items to trouble shoot are: 1)Faulty radiator cap... system should hold 1.1 pressure ratio... 2)Insufficient coolant... 3)Passages blocked in the radiator, hose or water jacket... 4)Air in the system... 5)Thermostat stuck closed... 6)Faulty temp meter or thermo sensor... 7)Faulty fan... 8)Faulty fan switch... Engine temps below 180ºF or 82ºC is also a problem... it means that the moisture produced during combustion is not getting hot enough to evaporate out the pipe as steam... instead that moisture will migrate to the oil and produce a milky white contamination... Note normal by products of combustion is water... . Every gallon of gas creates roughly 8 pounds of water vapor... we all have witnessed water escaping out of tail pipes on cold mornings... The sequence of events to trouble shoot are: 1)Faulty temp meter... 2)Thermostat stuck open... 3)Faulty fan switch... (stuck on)
-
I run a 30 grade all year because it gives the right flow at the normal engine operating temperature of 212ºF and that would be the viscosity of 10 at operating temps... so that means for every 1000 rpms increase of oil pressure increases another 10 psi... a 30 grade flows more oil at higher rpms which flows more oil between the critical bearings which carries away more heat and I'm not wasting HP just pumping oil through the blow off valve... 40 grade and 50 grade builds pressure at the expense of flow and I wastes HP by blowing oil through the pressure relief valve... I went to trouble to installed a digital oil pressure gauge on my RC45 to know... 30 grade at 8000 rpms 82 Psi close enough to perfect... 30wt psi 1000 10 2000 20 3000 30 4000 40 5000 50 6000 60 7000 70 8000 80 9000 90 10000 99 11000 99 blow off by the pressure relief valve 40wt psi 1000 12 2000 24 3000 36 4000 48 5000 72 6000 84 7000 96 8000 99 blow off by the pressure relief valve 9000 99 10000 99 11000 99 50wt psi 1000 15 2000 30 3000 45 4000 60 5000 75 6000 90 7000 99 blow off by the pressure relief valve 8000 99 9000 99 10000 99 11000 99 RC45 coolant 212F oil 85 psi @ 8,000 rpm RC45 coolant 203F oil 10 psi @ 1,000rpm