MadScientist
-
Posts
642 -
Joined
-
Last visited
-
Days Won
6
Content Type
Forums
Profiles
Gallery
Blogs
Downloads
Events
Everything posted by MadScientist
-
Please Harley, don't make these with a belt drive..
MadScientist replied to Rollos's topic in OTHER Motorcycle Talk (non vfr)
I don't know if this play is going to work, but HD has to do something. They basically just sell one type of bike in about 20 variations, but they are all still "cruisers". I'm interested to see how the "streetfighter" will do, considering the bikes it is supposed to compete against "...the likes of the Aprilia Tuono, Ducati Monster and BMW S1000R" carry a massive advantage in prestige and refinement in the sector. HD better be prepared to sell at bargain basement to get a toehold, because nobody considering one of those 3 bikes is going to pay a premium just to have H-D on the tank. -
What other chain guards fit 5th gen swingarm?
MadScientist replied to Stray's topic in Body and Paint
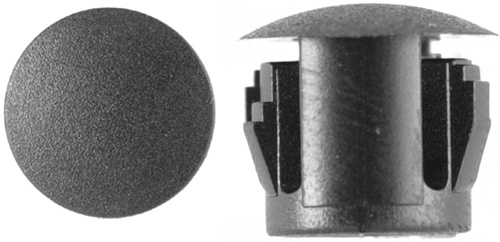
I can confirm that the skidmarx hugger has a smooth top, however it has 3 small holes to mount the brake line brackets. These can be easily plugged with plastic automotive plugs or ignored. I used plugs that look like this:
-
I just noticed R19 is missing from the bottom(?) side of the board, there may not have been a resistor installed at that position though. Check out the solder pads for evidence of broken solder and maybe check in the potting material to see if it got stuck upon removal. R64, R65, and R68 appear to have virgin solder pads, so I think they were not installed. This is somewhat common, I would bet they are populated on different versions of the board. I assume you know a diode allows directional control of current flow. You may have to try both orientations when you replace it, unless you were able to determine the direction of the original diode. Thanks for the pictures!
-
Kev, did you replace the radiator cap? Pressurization of the cooling system leads to higher coolant density and better heat transfer. At least it's an easy swap...
-
Anyone installed the delkevic headers?
MadScientist replied to Rollos's topic in Eighth Generation VFR's
The merge collector looks nearly identical to that in the 5th gen and 6th gen kits. It is not really a performance oriented design, if that is your goal. You might save a little weight by dropping the catalyst, but I don't think I would bother unless your OEM headers are damaged in some way. -
My usual engine temperature for cold weather riding (<45 F) is 168 F. If the outdoor temperature is above 60 F, I rarely see engine temps below 180 F. This is with a brand new $30 price gouged OEM t-stat.
-
Great job removing the coating from the board, it usually doesn't come off very easily. You will want to replace the burned diode with another to provide the same reverse current protection of the original. I HATE soldering SMDs, especially semiconductors and capacitors because the heat of the soldering iron can easily damage them. If you don't have a flux pen already, you might want to consider getting one. Putting a light coating of flux on the terminals of the diode and the PCB will encourage the flow of solder into the joint and reduce the time the components are exposed to heat. The other method I use is to melt a tiny amount of solder onto the pads, place the component on top and hold it in place as I re-melt the solder on the pads. I'm sure DynoJet is not thrilled that you got the potting/conformal coating off the board. I wouldn't mind some more detailed pictures of the front and back of the board, if possible.
-
Don't know about current ownership, but it looks like they started out that way. https://www.penskeshocks.com/about-us/
-
Just to make sure, you have O2 sensor eliminators right? I assume you are using one of the existing holes for your autotune sensor as well so, is it the front or rear and have you tried using the other location? I've been running it for years, so I assume my F/W is not updated. Also when do you notice the surging (steady state, accel, after decel)?
-
Having torn apart quite a few brake systems of varying age during my project, I wouldn't use anything from the wreckers without rebuilding it. Once they pull off the system it is no longer sealed up reasonably well and water from the atmosphere will make its way into the brake fluid. Even the rear brake off a 2014 8th gen had evidence of corrosion and deposits in the caliper and seals. You never know how long that stuff has been sitting open to the environment and slowly rotting at the breaker. If you are going to de-link you will still need to address the lower fork tubes, since the left side mount has an integrated master cylinder. It's your prerogative to use parts from the breaker without rebuilding, but I wouldn't screw around using parts of unknown internal quality from a junk yard. It's your ride and all but my advice is to do the de-link the proper way or just rebuild the 5th gen setup.
-
Your computer has recorded trouble codes, most likely something didn't get plugged back in. First: Download the manual Second: Refer to section 5 page 7 (5-7) to read stored codes. Count the flashes then refer to the table on 5-11 through 5-13 to interpret the codes. If you are having issues deciphering the code, feel free to post a video.
-
Power Commander Autotune MAP Switching
MadScientist replied to Kraythorne's question in Modification Questions
The switch I have looks very much like this: https://www.amazon.com/Superior-Universal-Adjustable-Vacuum-Switch/dp/B00BZODN9A/ref=sr_1_1?ie=UTF8&qid=1525878540&sr=8-1&keywords=adjustable+vacuum+switch Might be the same, but has been a few years now. People use them to set lockup of automotive automatic transmissions. Vacuum pump is perfect. I actually used the gauge on the vacuum pump to measure engine vacuum on overrun, just taped the whole thing to the dashboard. Sorry, I don't know what the original ID is, but the end measures about .16" so I would guess it was 1/8. Could be metric too, so like 4mm. End was a little stretched out from being over a fitting. -
What octane fuel are u using on your VFR?
MadScientist replied to VFR80025th's topic in Sixth Generation VFR's
The old PC2 had the ability for you to program in some additional ignition advance (I think max +4 deg). Even doing that with a custom map was not worth the justification in extra fuel cost. Was only worth a couple extra HP up top and barely noticeable on the street. -
Power Commander Autotune MAP Switching
MadScientist replied to Kraythorne's question in Modification Questions
You can use both features - enable autotune once the bike hits about 160 and use the manual switch inputs to disable autotune under closed throttle. I would say the easiest way to disable autotune under closed throttle is with a vacuum switch. Here's how I did it: First I used a vacuum gauge temporarily mounted onto my dash, tapped into the vacuum lines off the throttle bodies, to determine the vacuum under overrun conditions, I've long since forgotten the actual value. You have to ride the bike on the road to determine this, it can't be done in the garage. Second, use a handheld vacuum pump to set the switch point on an adjustable vacuum switch to just slightly below the lowest vacuum reading from step 1. Most adjustable vacuum switches have 3 terminals - one is common (COM) and the others are either normally open (NO) or normally closed (NC). You want to use the NC side so that when vacuum exceeds our setpoint, the contacts are open. This will require a test light and a power source; or multimeter. Just to be clear your are testing continuity between the COM and NC terminals, we are setting the vacuum at which point continuity is broken. Using the same point that you tapped into vacuum in step 1, attach a vacuum line from that point to the vacuum switch. Wires should connect from the power commander to the COM and NC terminals. Now when your throttle is closed under overrun, the vacuum increase causes the switch to open and autotune to cease. Just to note you need a vacuum switch with a setpoint range from approximately 10-25 in Hg. This could be done with a MAP/vacuum sensor but you would need to know the operating characteristics of the sensor then send that output into a voltage comparator. Output from the comparator feeds a relay that does the switching. Way more complicated and subject to voltage fluctuations of the electrical system of the bike. -
I would say the most likely reason for saying that the Bazzaz is not for street use is because it will alter the exhaust emissions. While adding power may be construed as altering the safety measures of the bike, by that reasoning things like aftermarket automotive super/turbochargers and tuning chips (both road legal in certain cases) could be used as reasoning to deny a claim. While I've never personally heard of this happening, I'm sure that if the insurance company can find significant proof that an aftermarket power adder contributed to the loss, then coverage may be denied. Again, I have zero experience with European insurance though so YMMV.
-
Strange, my 2 insurance reported crashes actually paid out more to cover fixing my non-road use parts. Sorry chaps, sounds like some kind of EU bullshit to me...
-
Stretch bolt is a term used to describe bolts that are torqued beyond the point of plastic deformation, otherwise know as torque-to-yield. Modern VW owners are intimately familiar; seems like I throw away at least $50 worth of fasteners for any remotely major maintenance task. Some manufacturers, like M-B, give a total fastener length at which point the fastener must be replaced. I usually re-use the caliper bolts 3x and replace. Strange that when you go to the dealer, they never have any in stock...
-
Anyone have the part number or, even better, know where to purchase a set of those tank pads? Holy crap, after continuing my search I've got: 17506-MCP-901 and 17507-MCP-901 for the knee pads. Even found a set on yahoo Japanese auctions....only $233
-
New donation from Anonymous
MadScientist replied to MadScientist's topic in 2018 Operational Budget topics
LOL, how is this possibly anonymous?!? -
Hi Anonymous, Thank you for your donation of 50.00 USD. We look forward to improving the forums with your donation. Thanks VFRDiscussion
-
Thanks Terry, I'll have to look for that. The K&N oil I have is just in a plain bottle with one of those flip up tips. Now that my air filter is kind of a permanent part of the upper airbox lid, the aerosol will be much more convenient.
-
There's nothing special about the filter material or oil. K&N, BMC, and others just use oiled cotton gauze. They all claim "special proprietary formulation designed especially for their filter system." All just marketing BS, if they sell you a "lifetime" filter, how would they stay in business if you could just buy anyone's recharge kit? So use whatever is conveniently available, or find the special BMC oil, whatever helps you sleep better at night. The BMC washing kits are available on Amazon (PN: WA250-500) or you can order direct from bmcairfilters.com
-
Much to be Gained from Power Commander?
MadScientist replied to V4moto's topic in Fifth Generation VFR's
Sorry, not going to be very useful to most people since I'm running a bosch 3 bar (43psi) fuel pressure regulator in a Radium Engineering housing. I had some bad luck with leaky and expensive OEM regulators and binned the whole thing. Other mods are a Large volume airbox: Velocity stacks: Stock 98 header + micron low mount Engine internals all stock Right now the bike is totally disassembled. I'm looking at the feasibility of installing the later 12 hole injectors, but looks like I will need to custom make some hard parts. Also thinking of making the switch to rapidbike since I'm not sure that the non-harley PCV will support the dual wide band sensors. -
Much to be Gained from Power Commander?
MadScientist replied to V4moto's topic in Fifth Generation VFR's
The only time I really see a drawback in the PCV system is when I'm using autotune to adjust for changes. I've noticed some hysteresis or "ringing" in the adjustment in coming to final trim values - overshoot high then low until gradually the final value is achieved. A faster system should reduce some of this. If you don't tinker often with the bike, then this is probably of minimal concern. As far as a stand alone system - well I like to tinker. I'd do it just to find out if I could reduce the abrupt throttle further and maybe gain some efficiency during cruising. No guarantees and a steep learning curve have kept me away. -
RC51 SP1 SP2 Parts Interchangeability
MadScientist replied to JZH's question in Modification Questions
Since we are brushing on the topic of brakes, I will share one thing I found while rebuilding brake calipers for a couple different projects: In addition to being different diameters than the SP2/954RR, the SP1 and 929RR front calipers have aluminum(?) alloy pistons where the later are heavier steel pistons. It's not so much a big difference, but this is unsprung weight. If you are looking for every advantage, this might be worth pursuing, but I didn't care given my modest abilities and usage. I would be surprised if the difference added up to 1 lb.