


Q-Dawg
-
Posts
174 -
Joined
-
Last visited
Content Type
Forums
Profiles
Gallery
Blogs
Downloads
Events
Everything posted by Q-Dawg
-
Thank you for the reminder, Derek. Knew I was forgetting something lately. Just booked for Erin and I. See you all there!:)
- 315 replies
-
- 3
-

-
- summer summit
- sumsum
- (and 1 more)
-
I voted Custer, as it's marginally closer and Rob and I barely got a taste of it on the way back from SumSum1 and I would love to explore the area more. That being said, I would love Dillon again and want to go back sometime. So either choice is good. I just hope I/we can figure out a way to attend this year as "we" can't bike together anymore. Missed everyone this summer! Not wanting to miss out next year.
- 54 replies
-
- 1
-
-
- sumsum
- summer summit
- (and 2 more)
-
Take a bow, Mr Seb. Nicely done. Like other posters have mentioned, the closer shots reveal many subtle touches that impress. I sat here for 10 minutes looking the pictures over in detail. It wouldn't be "your" project without the trademark clear clutch cover, hehe. How long did it take to clean up smooth and paint that swing arm? That's two AMAZING streetfighter builds on VFRD this last couple years (yours and apexandy)
-
Dragonfly (my wife) and myself (Q-Dawg) are booked at the hotels mentioned at the beginning of the thread. See you there! BTW, what is the official attendance count now? Last list I saw was on page 4 of this thread.......
-

Anyone Played With 3D Printer? Make Custom Bike Parts?
Q-Dawg replied to Q-Dawg's topic in Modifications
Thanks for the ABS info, Jamie. It confirms my guesses on the strength of an ABS printed part. I think that would work adequately for my needs, should I decide to pursue my projects further. Well for my immediate (starter) project, I think I will look at just buying some ABS sheet, cutting and gluing/welding the parts together. I may decide to make a production run of about a dozen of these parts, just for fun. But I think it would be just as easy to cut pieces from a pattern and shape by hand, as it is a fairly simple shape. -
Ditto. Better confidence inspiring tires, some seat time, and lots of left-handed (side I spilled on) sweepers helped me a lot. And patience. The key was to overcome my panic instinct (to let up off the throttle when I felt threatened: almost always a bad thing for you and the bike) and push my comfort level SLOWLY. I still get that feeling once in a blue moon it turns out. Like when I was pushing a corner hard in Utah and experienced some noticeable front tire slide over tar snakes, it kicked in again. I drifted wide in the corner and crossed the centerline, much to my disgust. I really think track days would help, and I plan on taking part in some next riding season, if possible.
-
Anyone Played With 3D Printer? Make Custom Bike Parts?
Q-Dawg replied to Q-Dawg's topic in Modifications
I know they aren't as strong as a solid part, and can suffer from poor fusing of layers adding to weakness of part. Some people are reporting that dipping their ABS parts in acetone helps "glue" any poor bonds and results in a smoother, glossier part. I don't mind doing a bit of sanding, etc. I wouldn't be expecting to mass produce parts, just make some things otherwise difficult to make and might have to be made of fiberglass otherwise. Custom gauge / car stereo pods, some small molds for making C/F parts for bike, etc. I am also very much into plastic model making, and these machines are good for that (as long as you have one running good resolution) to make model kits or model kit conversion parts. Say you buy a Japanese car model kit with the RHD version only offered but want to make the US version. Scan the dash, flip it with the software, and print out the correct version. May not be that simple in practice, but these are the sort of ideas I am toying with. Also a set of plans for a model kit could be scaled into different model scale sizes at the push of a button without investing in expensive injection mold tooling. And model kits do not have to be overly strong; they just sit on a shelf anyway. I agree the technology has a ways to go, but I think there are some good niche markets outside the rapid prototyping world. -
Thinking about trying my hand at 3D printing, for a variety of reasons. I think it is a wave of the future, and more importantly, suitable for making small run plastic parts. Some of these parts I had planned in my head and was struggling to come up with a way to manufacture for my own use. Just wondering if anyone here has played with one. I think they offer a lot of possibilities in their current form, but once metal printing becomes more attainable it will turn the manufacturing world upside down. I want to try to make custom light housings among many other personal things. I am particularly interested in how to interface with Google Sketch-up, and if that is a good software platform to begin with. I know it may not seem like much of a bike mod question, but it has a lot of applications that could be useful in this area.
-
Haven't booked the vacation days for this event yet, but shouldn't be a problem with this much notice. Count us in! Just got back from ride down to Baker City. Some fantastic roads there. Tried the Middle Fork Road (cut-across from #7 near Austin, OR to #395 north of Long Creek, OR) and it was fantastic! Lots of relentless 25 to 35MPH curves. What the road may have lacked slightly in terms of asphalt condition (and abundance of cattle gates) it made up for in epic twisties and no traffic!!!!! What a great ride! The ride down from Lewiston, ID to Baker City, OR is pretty nice too.
-
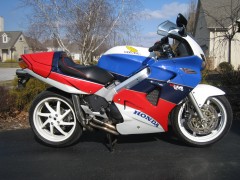 love the paint. what front signals did you use? kawasaki?
 -
www.theretrofitsource.com is the place where I bought a lot of my HID equipment from. I can attest that their customer service is great and they stand behind their products. Had a couple issues with one order and they sent me replacement harness, no questions asked. I've installed the 55w overdrive ballasts on my wife's hyundai minivan and I'll attest to there being minimal heat. I want to do an HID install on the VFR too, but too many other projects and there's the matter of the EMF generated from teh high tension wires interfering with my Pro-Oiler and where to mount the ballasts, as my cruise control servo is inside the left front fairing where a lot of people put them. Anyhow, there are lots of good resources on retrofitting HID's and the proper way to do it. It is more art than science at times, but the end results can net a real WOW factor that is hard to match. And the lighting performance of course is second to none! Hope the link helps with peoples' interest on the subject.
-
 Hmm, that looks familiar to me. Seems to me that's where I got the speed tax collected from what APPEARED to be just another black truck with camper shell on the back. I had a "case of stupid" that day :laughing6-hehe:
 -
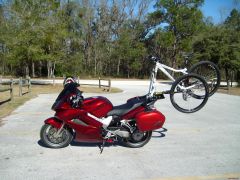 Interesting wheelie bar....... :fing02: Actually, that looks like it would be pretty handy. Wonder if there's a way to make it more compact., though. Perhaps use one of those folding bikes?
 -
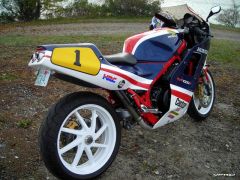 Sweet bike! Can't imagine how many hours were spent getting it to look like this..... Great build!
 -
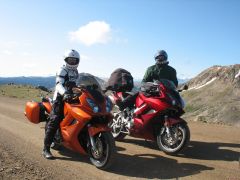 Ahhh yes. The Beartooth in all its "under construction" glory. A familiar sight! Great pictures!
 -
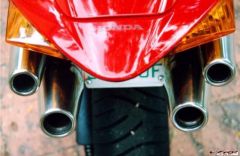 Gotta love those Lasers! (I love mine!) Always draws the comments from people who've never seen the "weird pipes" before, don't they?
 -
Thanks for the info. Been wanting to possibly do this mod but wanted to know the difference. Had the opportunity to ride Veefer800Canuck's bike (you should have named it the Phoenix, Rob) and the shifter felt really nice. Nice to know the rest of the story on the install. I am guilty of being one of the lazy shifters sometimes, that's why I wanted to know.....
-
Yep, as I figured. But they didn't tell you to reinstall the sprocket and chain, you could have been sitting there turning that wheel for DAYS trying to get the tranny to shift! :biggrin: My "ride report" after 5 years of using the kit is that it's a very nice mod, providing more precise shifting and rare false neutrals going into second gear. But it does require that you get away from "lazy shifting" tendencies and shift it like you mean it! :fing02: Can you elaborate on this bit about lazy shifting tendencies? What in particular and what happens if you don't?
-
I was going to go this route, but as soon as I started to research it seriously, Dan came along and wowed us all with the Torocharger. It is such a beautifully engineered system (reasonable price as well: just look at what you get in other car and bike supercharger kits and you'll see), I can't fathom why anyone would want to go and develop their own custom turbo or S/C arrangement. If I decide to go the forced induction route, the supercharger is the way to go if you ask me. Smooth power delivery and pretty darn efficient for a supercharger. Each to their own, though. Turbo set-up is still way cool and I love the sound and feel of the turbo whoosh. I would love to see that bike move.
-
Anorexia and a bottle of nitrous? :happy:
-
Where are you gonna stuff the ballasts? I want to do HID install on my bike, but with cruise and other farkles jamming up the underseat area, I have no idea where the ballasts will fit. My cruise actuator sits behind the left front turn signal of the bike. I'm thinking about trying to relocate the cruise actuator to behind the r. brake resevoir and put the ballasts behind the turn signal. Good idea, or is there another way?
-
- Why would you be waiting for the high beams to warm up if you stay halogen? They will light up the same speed as always unless you switch them to HID (bad idea). As for other aspects to the discussion on HID lights: - get a good kit with bulbs that are nicely centered and decent ballasts. - don't run cooler color temp than 6000K if you want decent lighting. 6000-6500K is noticeably blue, with 5000K being slightly blue. 4300-4500K is pretty much the brightest, purest white light you can get. 2500-4000K will give you a yellow look (yellow color increasing with drop in K-value) and will be good for contrast and poor weather. If you just want HID blue lights for the "look" then save yourself the money and headache of install and just get yourself a set of blue tinted halogen bulbs. Both are useless, but look "cool" if you are into that sort of thing. - Blue lights don't get you noticed any better, as every other idiot on the road seems to think 6500K to 10000K blue lights are the shit. Intense yellow color stand out more, if you ask me, and aren't as annoying to other drivers. - I could go on and on with this subject, but I will spare you all. If you want to educate yourself, look up HIDplanet or The retrofit source and do some reading.
-
Funny how you were getting so much EMI on your install. I had no issues at all, and mounted controller on left grip. Just wanted to add some observations about this system as I learned from my trip down to the Summit meet and back. *** IF YOU ADJUST CHAIN TENSION, DO NOT FORGET TO RE-ADJUST THE PRO-OILER NOZZLE *** I adjusted my chain tension and forgot to adjust the Pro-Oiler. Ended up with oil flinging everywhere because the sprocket and nozzle became separated, so wind was catching oil and blowing it everywhere. Also, the teeth from the rear sprocket ended up catching on the nozzle and chewed it up pretty bad. Will have to order another nozzle soon. I found the preset table to be a bit rich for the VFR but it is not a bad starting point. I understand that there will ALWAYS be some fling-off; after all that is how the system is designed to operate. So if you want totally clean rear tire and wheel, then revert back to periodic cleaning and lubing of chain. Otherwise, it is just something you will have to live with. All in all, not a bad set-up. Looking forward to 7th gen VFR coming out. I hope to scoop one after a few years and price comes down (I don't ride enough to justify a new one and I don't like first year models) and look forward to no chain maintenance. The ultimate solution to chain maintenance after all is to not have one!
-
Just got my PO installed last night in preparation for the Summit meet in CO. Followed this guide and the PO instructions and got everything working OK in the end. Great write-up Just wanted to add a couple things: -You can tap the PINK speed wire from the large grey connector (near the blue one under left front fairing). It is third position on connector, next to a yellow wire with green stripe. I tapped mine here for my Audiovox CCS-100 cruise install and killed two birds with one stone. In retrospect, there was VERY little room to work here to do the soldered heatshrunk tubing connections that I do for everything. I think I would rather use the POSI-Tap here or else use lower connection if doing soldered connections. But for the Posi-tap, the upper mounting location is probably better protected. -I found the directions on saving the correction factor a tad confusing and it was easy for me to miss the extra step to save the value. Go to oA, press (-) to get it to display SA, then press AGAIN to get it so show the ST. It has only saved the values after it shows ST. If I read the PO instructions a little closer, I would not have missed this. It is only briefly mentioned once, though. If you keep getting "CF Err" after you think you have stored the CF, then try this. -I routed my tubing slightly different as well. I used a small bolt-on metal wire loom clip to hold the tubing right to swing arm next to the chain guide on the top of swing arm. Then zip tied once to brake lines. Then added a protective sleeve over the tubing and ran it through on left side of the seat's key release, behind battery, and up to same location for components as shown in guide. I found that the tubing stuck up a little too much on mine, so I mounted the oil bottle at an angle so the lines would not get pinched when seat pushes down on everything. Used a couple old plastic bags to stuff around the bottle to hold it tightly into position. Low tech, but it works. -If I re-did this install, I would extend the oil pumps wires by about 6" to give more options on mounting location and make it easier to move things around when positioning the components in the tail section. I found things a tad tight to work with. -Mounted my controller using a simple piece of aluminum bracket I fabricated from scraps at work. Bracket hold the controller above the left grip, and is secured by the same two bolts that hold the handle bar lever assembly to the bar end. Audiovox CCS-100 control mounted below this. Thanks for the awesome write-up!
-
Nice bars. I like the extra bit sticking towards the middle. Looks like it was intentionally left there to mount gadgets? If I had those bars i know I would find a GPS parked there soon, and whatever else I could clutter things up with.