Member Contributer RC1237V Posted December 20, 2020 Author Member Contributer Share Posted December 20, 2020 I realized the CBR had a cable clutch, so I remembered I had an RC51 setup in my spare parts bin. Still attached to the slave, which bolted right up! I might have to route the throttle cable across the underside of the fuel tank as they may be a bit short. Will need to use the VFR brake lines as well. Should have the brakes, clutch and throttle cables sorted tomorrow. Link to comment Share on other sites More sharing options...
Member Contributer RC1237V Posted December 20, 2020 Author Member Contributer Share Posted December 20, 2020 4 hours ago, Captain 80s said: If the fitting or o-ring leaks, it will drip back, away from your brakes. Yep, probably just going to cut and patch with some hose clamps, at least initially to get a good location, and get it running. Link to comment Share on other sites More sharing options...
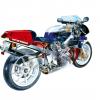
Member Contributer RC1237V Posted December 21, 2020 Author Member Contributer Share Posted December 21, 2020 Mounted the calipers after a good washing, then bled them. Also routed the RC51 clutch line - I think it's going to work! Link to comment Share on other sites More sharing options...
Member Contributer RC1237V Posted December 21, 2020 Author Member Contributer Share Posted December 21, 2020 Didn't get much else done, as I took off early to get shots of the great convergence. And a few of the moon...sorry, no beer as I had to drive home through the Santa Cruz mountains... Link to comment Share on other sites More sharing options...
Member Contributer RC1237V Posted December 25, 2020 Author Member Contributer Share Posted December 25, 2020 Made a little more progress. The VFR brake lever did not fit, so I made some shims, and filed it down to the right shape for a CBR929RR master cylinder. Works great, and is keeping within my budget (free). The shop was closed today, and didn't want to be there alone working on my own stuff, so I did some garage engineering. Reamed out the 1/8" to 10mm adapter for the temp sensor, seated and sealed it with some Hondabond, and fabbed up a bracket for the speed sensor. It's a bit rough, but I will clean it up at work next week. It was better to do that one in my garage anyway, because it was measure, cut, fit, - measure, cut, fit, - measure, cut, fit, until I got the gap and distance correct. Also measured for the ignition/steering lock bracket and made a napkin print for the CNC next week as well. Link to comment Share on other sites More sharing options...
Member Contributer RC1237V Posted December 25, 2020 Author Member Contributer Share Posted December 25, 2020 Now time for some liquid refreshment! Normally we would be with the wife's enormous party-animal family with 30-40 people right now. But today, it's just me the wife and kids - kinda quiet, so I got some Juice Bumps, and some Nose Goblin...this should liven things up! 9.2% and super smooth! 😌 Merry Christmas Everyone! Link to comment Share on other sites More sharing options...
Member Contributer vfrcapn Posted December 25, 2020 Member Contributer Share Posted December 25, 2020 Is there a magnet to go on the wheel for the sensor? Link to comment Share on other sites More sharing options...
Member Contributer DannoXYZ Posted December 26, 2020 Member Contributer Share Posted December 26, 2020 Or trigger off rotor bolts? Link to comment Share on other sites More sharing options...
Member Contributer JZH Posted December 26, 2020 Member Contributer Share Posted December 26, 2020 Could be either, but I don't think those triggers work with titanium rotor bolts. Ciao, JZH Link to comment Share on other sites More sharing options...
Member Contributer Gebruiker Posted December 27, 2020 Member Contributer Share Posted December 27, 2020 On 12/24/2020 at 9:07 PM, RC1237V said: Works great, and is keeping within my budget (free) I was really thinking your idea of 'budget' in 'budget rebuild' and my idea of budget were two different things. 😉 But the more I read, the more I get the idea you have a bottomless spare parts bin and first class shop, not to mention skills. The bike's gonna be impressive. Following up on the speedometer. Is it then programmable? I mean, do you have enter the diameter of the wheel and also the number of magnetic triggers (rotor bolts?) in order to calibrate? It's my understanding that some grades of stainless steel are not magnetic. For that matter, am I wrong to assume this is a magnetic trigger in the first place? Maybe there's a laser counter in there. And in the end, do you just take the bike for a ride with a friend on a pace bike for confirmation you're in the ballpark? Link to comment Share on other sites More sharing options...
Member Contributer RC1237V Posted December 27, 2020 Author Member Contributer Share Posted December 27, 2020 Sorry for the late reply, took the day off yesterday to do some dirt riding through the Santa Cruz Mountains. Link to comment Share on other sites More sharing options...
Member Contributer RC1237V Posted December 27, 2020 Author Member Contributer Share Posted December 27, 2020 Came across this deathtrap in Corralitos....wet knobbies, on slick wet steel - NO THANKS Link to comment Share on other sites More sharing options...
Member Contributer RC1237V Posted December 27, 2020 Author Member Contributer Share Posted December 27, 2020 Yes, there are magnets that go inside the hex holes in the bolt heads. I have not installed them yet as I have a better front wheel, if I can find it in my pile of spare parts. It's similar to the bicycle speedos where you tell it the diameter of your tire, and how many magnets per revolution. The more you use, the finer the resolution at low speeds, and probably displays values quicker. If they are easy to remove once installed, then I will probably use all 6. The gauge also calculates rpm/speed to determine which gear you are in. Although It's 1/3 smaller than I thought it would be by the pictures on the web, but I really just need it for speed, temp, and fuel level. Link to comment Share on other sites More sharing options...
Member Contributer RC1237V Posted December 27, 2020 Author Member Contributer Share Posted December 27, 2020 On 12/26/2020 at 9:12 AM, JZH said: Could be either, but I don't think those triggers work with titanium rotor bolts. Ciao, JZH I won't be putting those on this bike, unless you're buying. 😀 Link to comment Share on other sites More sharing options...
Member Contributer RC1237V Posted December 27, 2020 Author Member Contributer Share Posted December 27, 2020 By BUDGET, I was trying to build a fun bike for as little money as possible, using as many "spare" parts as I could. Now that I'm into it, I appreciate the time and money others have invested, particularly Sebspeed and Apex Andy. There is no justification for cost on something like this, except that you have fun building it, and get exactly what you want in the end. The project seemed easy at first, but as always, the devil's in the details. Every time I mount something, I have to look at all the ways to route the wiring, or brake lines, or mounting bracket of some sort. And many times I have to fabricate those brackets. Without a CAD model of the entire bike, sometimes it's easier to fab up something close, then refine it one or two times to get it perfect. The sprockets and chain were ~$200, as was the KOSO gauge. I also bought the kickstand bolt and some brake fluid. Luckily all the fabrication, welding, and powder coating are free to me, so I might be under $2,500 when I'm done, including the bike! Link to comment Share on other sites More sharing options...
Member Contributer RC1237V Posted December 27, 2020 Author Member Contributer Share Posted December 27, 2020 Decided to go with the RC51 start/stop switch as it is much smaller. Also installed the "Traction Control" Link to comment Share on other sites More sharing options...
mtnpat Posted December 28, 2020 Share Posted December 28, 2020 Love the traction control 👊 ✊ Link to comment Share on other sites More sharing options...
Member Contributer Gebruiker Posted December 28, 2020 Member Contributer Share Posted December 28, 2020 16 hours ago, RC1237V said: except that you have fun building it Yes! Putting money in any project is a different approach. And sometimes just necessary. But there's fun in figuring alternate solutions to challenges. Genius too. And you'll have endless happy conversations with other riders at coffee shops and gas pumps in days to come. Link to comment Share on other sites More sharing options...
Member Contributer RC1237V Posted December 29, 2020 Author Member Contributer Share Posted December 29, 2020 Work was busy, so I did not have time to make the ignition bracket. Sooooo...yeah... Link to comment Share on other sites More sharing options...
Member Contributer RC1237V Posted January 2, 2021 Author Member Contributer Share Posted January 2, 2021 Finally was able to make the bracket and pacers for the ignition/ steering lock. Rewired the connector for the on/off switch, and drilled/tapped a hole and made a small plate to touch the brake light switch. Link to comment Share on other sites More sharing options...
Member Contributer RC1237V Posted January 2, 2021 Author Member Contributer Share Posted January 2, 2021 Debating whether to use the VFR or RC51 light / turn signal switch. The choke cable is a bit weird, so may go with the RC51 and use the RC51 choke cable. Still undecided... Cut the lines for the oil cooler and will re-route that tomorrow as well. Still waiting for the fork tube headlight mounts to show up, so I can make the correct brackets, mount the headlight and complete the wiring. The harness looks like colored spaghetti right now. Getting close to being ride able now. Once I make sure everything is good, I will dig into the back of the bike. Then I get to tear it all apart and paint/anodize everything. Link to comment Share on other sites More sharing options...
Member Contributer RC1237V Posted January 10, 2021 Author Member Contributer Share Posted January 10, 2021 Put the other shiny CBR wheel on the front, and mounted the tire that came with the bike. Link to comment Share on other sites More sharing options...
Member Contributer RC1237V Posted January 10, 2021 Author Member Contributer Share Posted January 10, 2021 Made a mock-up bracket for the dash, and mounted it, after trying several different configurations... Link to comment Share on other sites More sharing options...
Member Contributer RC1237V Posted January 10, 2021 Author Member Contributer Share Posted January 10, 2021 Made some mock-up headlight mounts from my extra radiator brackets I had laying around.... Link to comment Share on other sites More sharing options...
Member Contributer RC1237V Posted January 10, 2021 Author Member Contributer Share Posted January 10, 2021 Had a colored spaghetti feed... Link to comment Share on other sites More sharing options...

Recommended Posts
Archived
This topic is now archived and is closed to further replies.