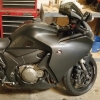
TiN Posted May 9, 2012 Share Posted May 9, 2012 CF for the fairings + CBR front fender then she is all done for now. Damn the CF fairings look good.Maybe I will do a mock up on the RH side to see how it looks which should be very good I think. Here is my own homebrew theory which may be way off base but I think I have found the solution as to why my bike always looks better in person than in a pic. The bike has so many subtle angles that just do not show up in 2d. Its almost like my brain gets confused trying to size up the dimensions from a 2d pic so it doesnt look as good as in 3d Hopefully the CF should solve this problem by making the dimensions pop better. I'm not a fan or hater of CF finishes. When I see it in a pic now I think it looks good because my brain can actually make sense of the dimensions. Just my theory. Probably bs :ph34r: :ph34r: . Link to comment Share on other sites More sharing options...
PhotoOp Posted May 9, 2012 Share Posted May 9, 2012 Is that actual carbon? If so I bet that wasnt cheap, but damn is it ever cool looking Link to comment Share on other sites More sharing options...
TiN Posted May 9, 2012 Author Share Posted May 9, 2012 Just carbon fibre vinyl wrap. It seems to be pretty tough stuff. I cant stop looking at it. Link to comment Share on other sites More sharing options...
PhotoOp Posted May 9, 2012 Share Posted May 9, 2012 ahhhhh, like that laptop wrap material! thats a cool idea. Might borrow it to fortify a few bits on my 5th gen Link to comment Share on other sites More sharing options...
Jessman Posted May 9, 2012 Share Posted May 9, 2012 Interesting... Now lets see some pics of that on the bike... Now! Lol Link to comment Share on other sites More sharing options...
Member Contributer jeremy77 Posted May 9, 2012 Member Contributer Share Posted May 9, 2012 Interesting... Now lets see some pics of that on the bike... Now! Lol :+1: Link to comment Share on other sites More sharing options...
Member Contributer Rice Posted May 9, 2012 Member Contributer Share Posted May 9, 2012 OOHHH I love that! I have a bunch of plastics prepped for paint, but I've never painted before, so it will probably come out bad. Now, this is a great idea. Do you mind sharing where you sourced that wrap, how much is enough to cover the bike and the price? I am thinking to do the tank as well. I also wonder if stickers will hold on the vinyl. Link to comment Share on other sites More sharing options...
TiN Posted May 9, 2012 Author Share Posted May 9, 2012 Will be working on the bike for the next few days after work. Just taking my time and having fun with it. Will have pics up after I finish. I am kind of new to this CF wrap but it looks like there are 2 grades to the stuff. Automotive which has some kind of UV protection and plotter which is used more for decals and such. Link to comment Share on other sites More sharing options...
The Phantom Posted May 9, 2012 Share Posted May 9, 2012 Rice, look up Di-Noc on ebay (only get the genuine 3M stuff). It comes in different sizes, it will take stickers, and I believe it will even take paint ok. Link to comment Share on other sites More sharing options...
TiN Posted May 9, 2012 Author Share Posted May 9, 2012 OOHHH I love that! I have a bunch of plastics prepped for paint, but I've never painted before, so it will probably come out bad. Now, this is a great idea. Do you mind sharing where you sourced that wrap, how much is enough to cover the bike and the price? I am thinking to do the tank as well. I also wonder if stickers will hold on the vinyl. I just ordered the basic automotive style wrap to start. Not the 3m. Figure it was a 50 buck shot in the dark and if I liked it I would go back over it with the pricey stuff. Just got mine off of ebay for 50bucks shipped. search black carbon fiber vinyl and a lot of stuff should come up. I should be able to do all the red fairings minus the front fender with 2qty 60x36 sheets which is a standard size apparently. The front fender would be impossible to do so I got a 85 dollar Hotbodies fender for a CBR1000 to paint instead of messing with my 250 dollar original. Hope that helps Link to comment Share on other sites More sharing options...
Member Contributer Ryanme17 Posted May 9, 2012 Member Contributer Share Posted May 9, 2012 Am I the only one who thinks making a bike harder to see is a bad idea? Link to comment Share on other sites More sharing options...
Member Contributer Polarbear Posted May 9, 2012 Member Contributer Share Posted May 9, 2012 Am I the only one who thinks making a bike harder to see is a bad idea? You've got a good point. I am not sure if it is better to keep it flexible or make it harder--it may create tension zones and eventually crack? Time will tell? But don't take my word for it, I'm going on intuition only and I really don't know nothing about bikes... C Link to comment Share on other sites More sharing options...
Headhunter Posted May 10, 2012 Share Posted May 10, 2012 I got some of the 3M stuff and did the red nose piece just above the headlight. It came out real nice. With the extra, I wrapped the fork tubes. IMO, it hits off great with the carbon fender I snagged from Powerbronze. I can't wait to see your "Stealth VFR". Link to comment Share on other sites More sharing options...
TiN Posted May 10, 2012 Author Share Posted May 10, 2012 Got the 2 tank panels and the nose to go. Its slow going but better to do it slow and get it right the first time. Then just need to put resin on the back of the fairings at the seams to seal it and should be able to get the fairings back on after that. Hopefully the new front fender will be in today. Damn it looks good so far. Link to comment Share on other sites More sharing options...
Headhunter Posted May 10, 2012 Share Posted May 10, 2012 I had to do the nose piece in 3 pieces like a window tinting seam. The curvature of the piece made it impossible to lay on smoothly in one piece. Link to comment Share on other sites More sharing options...
TiN Posted May 10, 2012 Author Share Posted May 10, 2012 I had to do the nose piece in 3 pieces like a window tinting seam. The curvature of the piece made it impossible to lay on smoothly in one piece. You should be able to do it with one piece sections. The stuff is made to hit it with a hairdryer or heat gun to stretch it over corners and bends. I am looking forward to the nose piece being the easiest part. I have tried both methods of application. Applied to a dry surface and using a medium (50/50 glass cleaner water mix). Both methods have advantages. For large flatter surfaces that may attract more bubbles the wet method works well. For curvy surfaces that you need to heat and stretch a lot the dry method allows for more pulling leverage. For bubbles, use the smallest, pointiest exacto blade you can find hitting the bubble at a low angle at the base of the bubble holding the flat side of the blade parallel to the surface while hitting the bubble with a heat gun. Get the surface hot first to build up some pressure in the bubble and push the blade lightly till you feel it pop then keep the blade inserted to allow the air to escape while the heat gun does the work shrinking the vinyl. It wont leave a hole in the vinyl and the blade wont mark the underlying paint that way. Just some things I have found that might help in application if it is something you want to do. Link to comment Share on other sites More sharing options...
seth89 Posted May 10, 2012 Share Posted May 10, 2012 more pics please :D Link to comment Share on other sites More sharing options...
Member Contributer Yokel Posted May 10, 2012 Member Contributer Share Posted May 10, 2012 Here's plan #2 when I eventually dump mine in a gravel parking lot. Link to comment Share on other sites More sharing options...
TiN Posted May 10, 2012 Author Share Posted May 10, 2012 You ain't kidding. I cant help but notice that extra scratched middle fairing sitting in my garage that I could have saved the 250 dollars on replacing just for the scratch in the paint. Link to comment Share on other sites More sharing options...
TiN Posted May 11, 2012 Author Share Posted May 11, 2012 Not gonna get the whole job completed for a couple more days. Had to order some more carbon fiber wrap. I finally got the tank covers figured out but ran through a couple extra pieces doing it. I could do the tank covers in 2 pieces but it just wouldnt look as good as a single piece. Kind of learning as I go on this stuff. Link to comment Share on other sites More sharing options...
Headhunter Posted May 11, 2012 Share Posted May 11, 2012 It's definitely a learn as you go. Let me know how it goes with the nose piece. Link to comment Share on other sites More sharing options...
TiN Posted May 11, 2012 Author Share Posted May 11, 2012 Will do. I don't think I have enough material to do the nose this weekend but maybe I'll do the nose instead of the other tank cover since it is more straight forward. Link to comment Share on other sites More sharing options...
interceptorrider Posted May 12, 2012 Share Posted May 12, 2012 Pretty! Link to comment Share on other sites More sharing options...
Member Contributer Switchblade Posted May 12, 2012 Member Contributer Share Posted May 12, 2012 NICE .................. Link to comment Share on other sites More sharing options...
TiN Posted May 15, 2012 Author Share Posted May 15, 2012 got the stuff to finish. got a little backed up by other things. taking tomorrow off to see if i can finish up. Btw the cbr1000rr front fender does work on the vfr12. Link to comment Share on other sites More sharing options...

Recommended Posts
Archived
This topic is now archived and is closed to further replies.