Stray
-
Posts
615 -
Joined
-
Last visited
-
Days Won
18
Content Type
Forums
Profiles
Gallery
Blogs
Downloads
Events
Everything posted by Stray
-
Depends on the concentration but phosphoric acid isn’t one of those nasty ones that burn through flesh and cause land to be contaminated forever. It’s a reasonably gentle acid (we drink it in Coca Cola!). Dilute about 1/10 and dab it until rust turns black. If it doesn’t react add more acid. Mix a small batch - you won’t need much. Then rinse well to stop it reacting. I’m told baking soda and water helps with that but I just rinsed with lots of water. You can buy rust converter which is 99% based on phosphoric acid. Or just use Diet Coke (takes much longer but does work).
-
Correct! Good thinking Danno but it’s not that simple. Pump needs to circulate coolant even when cold or I could end up with hotspots around the cylinders. And simply turning the pump on at X degrees is a bit crude. Needs PWM to ramp up circulation gradually as it’s needed. No point running a pump full throttle if the temp is only just coming to operational levels. Or having it completely off when temps are just below X. Also, the controller would allow me to fine tune the pump and run it after shutdown. A simple switch wouldn’t cut it.
-
Hello All, I’ve been dreaming of an electric water pump for years. No real reason other than I like the idea and want one. The existing mechanical piece does a fair job but the electric ones have several advantages: 1. Can run them after shutdown to avoid heat soak 2. They can be configured run at an optimal speed and aren’t forced to run at engine speed. This means they don’t cavitate at high revs and aren’t hopeless at idle 3. Electric pumps can improve MPG and apparently release some (very little!) extra power as they’re not run by the engine 4. They offer better control over cooling if you can get a decent controller 5. Better coolant flow if you can delete the thermostat I’ve decided to try the Davies Craig Electric Booster Pump 40 (EBP40). It pushes 37 litres per minute which is more than enough as loads of litre bikes run fine on their 15 lpm pumps. The EBP40 is a wonderful brushless motor rated at 100,000 hours. My problem is the controller - can’t find one to work with the EBP40! Davies Craig’s controller is designed to run their bigger car pumps. The smaller booster pumps apparently don’t have a high enough starting voltage to trigger the controller so Davies Craig don’t support their use. Davies Craig say best thing is to leave the mechanical thermostat in place and run the EBP40 at full speed all the time. Thermostat will open & close to control cooling. But I don’t like that idea for 4 reasons: i. The stock thermostats are notoriously fragile and a bitch to replace. It would be worked hard by the EBP and will likely fail quickly ii. EBPs don’t like pushing against a head of pressure. Pushing against the thermostat isn’t ideal, neither when closed nor open iii. Removing the thermostat opens the pipes to full bore giving less restriction/turbulence/pressure iv. Need the controller to get full control over cooling system (running after shutdown, choosing optimal operating temp etc) Apparently Pulse Width Modulation (PWM) is the best way to control these things. So does anyone have any ideas or experience with these? Any advice? How do I control mine without a thermostat? Know my way around a spanner but electrics are a nightmare. Programming controllers is an absolute black hole in my knowledge. All advice gratefully received. Stray
-
My opinion - go cheap and see if you can salvage them first. Doesn’t look like the rust has penetrated deep, as others have observed. My method is to rub with aluminium foil and phosphoric acid (or Coca Cola if you can’t get some - use diet to avoid stickiness). The Phosphoric converts rust into a honeycomb phosphate coating - this stuff is TOUGH. The tinfoil breaks off into microscopic bits that embed in the phosphate layer. Scrape any big rust lumps off with razor blade. Make sure all rusty spots are blackened by phosphoric acid. If not, wash it with phosphoric acid (or Coke) again until it does. You can’t do this too much! Then epoxy any deep craters (JB Weld works great) . Don’t worry if it sticks out - deal with that later. Once cured for 24 hours, use razor blade to scrape down bumps of epoxy until it’s all level. Now rub fork oil over the surface. Phosphate coating absorbs and traps oil beautifully, making the repair waterproof. Then, VERY fine sand (I used 2000) followed by grey scotchbrite pad. Use oil as lube rather than water. Epoxy is softer than steel so will wear down even. DO NOT SAND/BUFF UP-AND-DOWN! Do it sideways. As Magneto says, chuck the stanchions on a drill and spin it to buff. If you can’t do that, throw them on a broomstick and buff like a shoeshine. This helps create horizontal ridges that hold oil and stops cutting up seals. Same idea as cylinder honing. Aim for a 45* cut. You’ll end up with slightly less mirror-like chrome and your stanchions will work great for years to come. This works even on worse rust than yours. Give it a go before you spend any real money. Will cost you less than £5 ($7?) in kit and about 2 hours in work. Good luck and post pics when you’re done! Stray
-
My new Grinder has an extension!
-
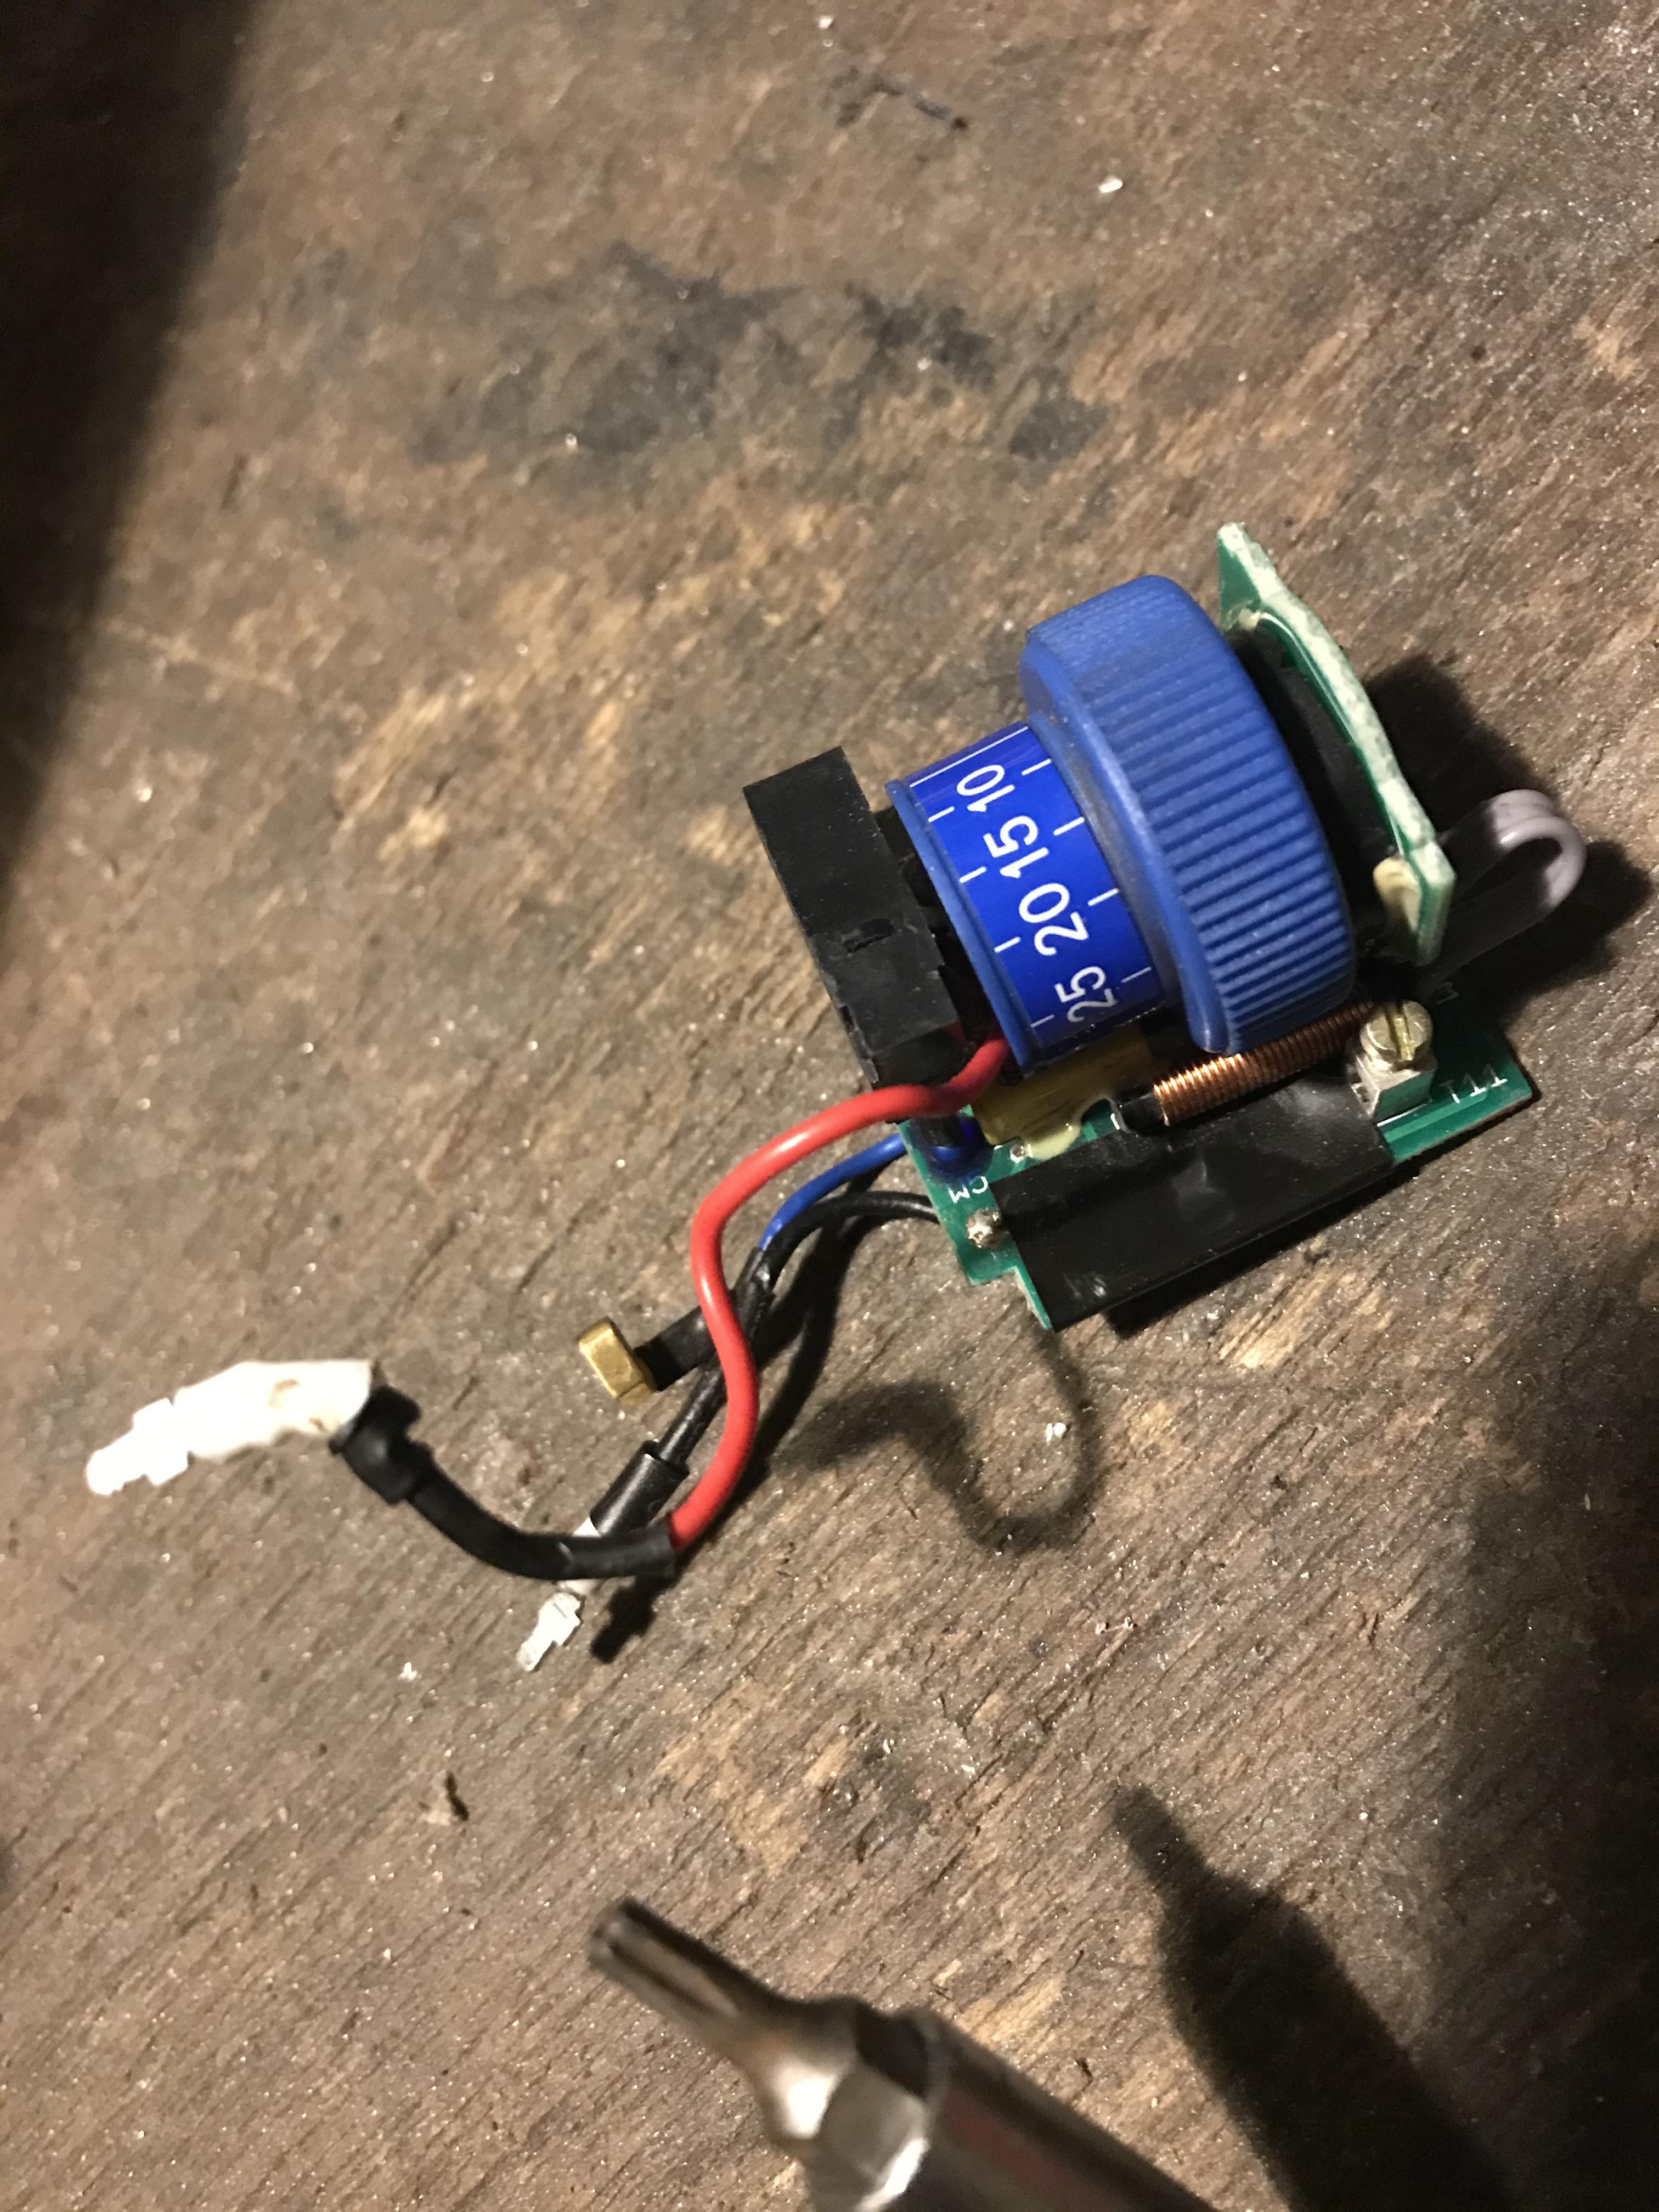
Update: I repaired the Dremel 4000. Faulty switch. God bless YouTube tutorials! It’s just a little thing but what a nightmare packing all the wires in properly so they don’t foul or catch the slider/armature. Then trying to seal the cases without the brush springs shooting out whilst seating the circuit boards flush. May as well be trying to put toothpaste back into the tube! The sliding switch is a glaring example of poor design and I’m shocked Dremel still employ this crude technology. It’s prone to wear of the knob that actuated the switch. Anyway, I no longer trust this tool to be my main precision grinder so I’ve packed it away and will rely on the Foredom. Dremel might get an outing occasionally if lucky. Stray

-
New 5th/6th/8th gen performance header now in production in USA
Stray replied to sfdownhill's topic in Exhaust Systems
Chaps, is there going to be another run of these or are we done now? I fancy an 8th gen system. -
Wow. Just WOW!
-
Not sure about being Photoshopped. I think the stinger/fender being removed just makes it look that way. See where the tail light finishes: between the rim and end of rear disc. Same on both bikes. Same with the silver panel. One point about removing the stinger - you’ll end up with “skunk back” if the roads are wet. Look at the bike without a fender and imagine a rooster tail trajectory. It lands right on the rider (I’ll even reach your helmet and dashboard!). You’ll need to use the license plate as a fender and push it further back than the picture with the eliminator. The one in the pic offers no protection at all. Plan it carefully, Magneto!
-
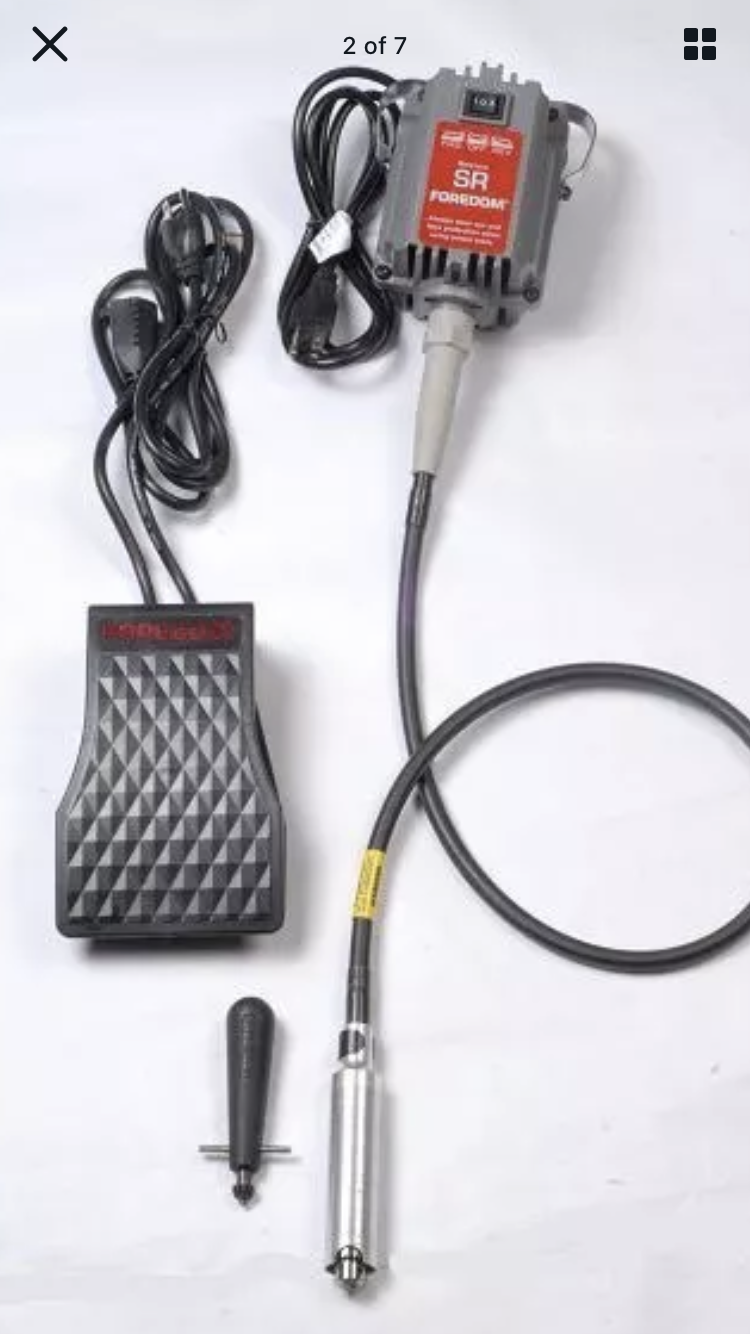
Apparently they have very high torque motors that can go for hours without overheating so you may be on to something, Cogswell! So if I’m looking to do a little grinding and “her indoors” has pilfered the Foredom, should I knock on the bedroom door or wait politely? They look like this, by the way:
-
Wooo, you boys brung out the big guns - I‘m loving the selection! Wish I could go with an air tool but my compressor’s not up to it and it’s tucked away. I only wheel it’s out for a task once a year and then put it away again. Plus noise would have neighbours up in arms! I do like that pencil tool Danno! Magneto, looks like your Black & Decker is the RTX after all. You’ve got more grinding tools than any man should have! In the end I bought a Foredom pendulum grinder. The 220v version they make for Europe. At £67 it’s slightly cheaper than the Dremel 4000 and gets excellent reviews from industrial users so I’m taking a punt. Plus it comes with a foot pedal to modulate speed- how cool is that! It’s got a very weird name. Cross between foreskin and femdom: Foredom. If it plays nice I may buy a pencil type tip like Danno’s for it (they’re cheap and quick change). One thing for sure is whilst I’ve been researching a decent rotary tool every site I visit is full of disappointed Dremel owners. I feel very let down by them as they’re widely regarded to be the best. Seems their reputation is ill deserved... Stray
-
Thanks FJ12Ryder for the air grinder suggestion. This will also help with a rattle gun I want to acquire but Magneto is right about needing a smaller tool. I’ve got 2 x 4in (115mm) angle grinders on the go already. One with a grinding disk and one with sanding disc. The Dremel style tool is great for delicate work the grinders can’t do. And it’s quick! Air tools need the compressor to fire up and pressure building, not to mention mine’s tucked away and inconvenient. Then there’s the noise - not really suitable for a quick late-night cut. Which Black & Decker do you have, Magneto? The RTX isn’t really available here but I’d love one. And do they take Dremel attachments?
-
Well I got bit by a street fighter
Stray replied to HispanicSlammer's topic in OTHER Motorcycle Talk (non vfr)
Really cool KTM, HS. Enjoy it mate! -
Full left exit header install progress
Stray replied to panamawing's topic in Third and Fourth Generation VFR's
That looks amazing! Wish there was something similar for 5/6/8th gen. Really annoys me that the exhaust has to be moved to change wheel on a SSSA. It would look better too! -
Hello All, Like many of us I have acquired an array of tools over the years. Mostly I like to buy decent value-for-money kit that lasts. That’s why I bought a Dremel 4000 with all the bells and whistles. But the sodding things keep sh!tting the bed on me. I’ve had 2 Dremel 4000s die with minimal use (brushes are still 95% - the first one died within 30 minutes intermittent use). I’m sympathetic to my tools and use/care for them properly so it’s not abuse. Rarely use top speed, never overheat them and keep them away from dust. Suspect the latest fatality is due to a faulty switch (no continuity on multimeter). A new Dremel switch costs about £40 ($50?) here: a new unbranded rotary tool can be had for the same money. So can anyone recommend a good quality rotary tool for decent money? Not bothered about brand. Must be corded as I don’t want the hassle of battery replacement/charging. Ideally something that can use my vast array of Dremel accessories as they’d be wasted otherwise, but will still consider good tools that aren’t compatible. All advice gratefully received, as always. Best, Stray
-
Coxy, I’m loving your work mate. Mad, mad skills! The TRX project looks fantastic and I really enjoyed the video. You built a bike that looks good AND work - you sparked everything else on track! The VFR1200 has a great stance and that trellis frame...just perfect! What material tube are you using? How does it compare for weight? Mostly I envy your skills and productivity. Your projects are so much more ambitious than mine and you get so much more done! Keep the updates coming mate. Stray
-
That’s a beauty!
-
I like the look! New subframe shouldn’t be that hard to weld, no? Few ally tubes and some accurate measuring would do it.
-
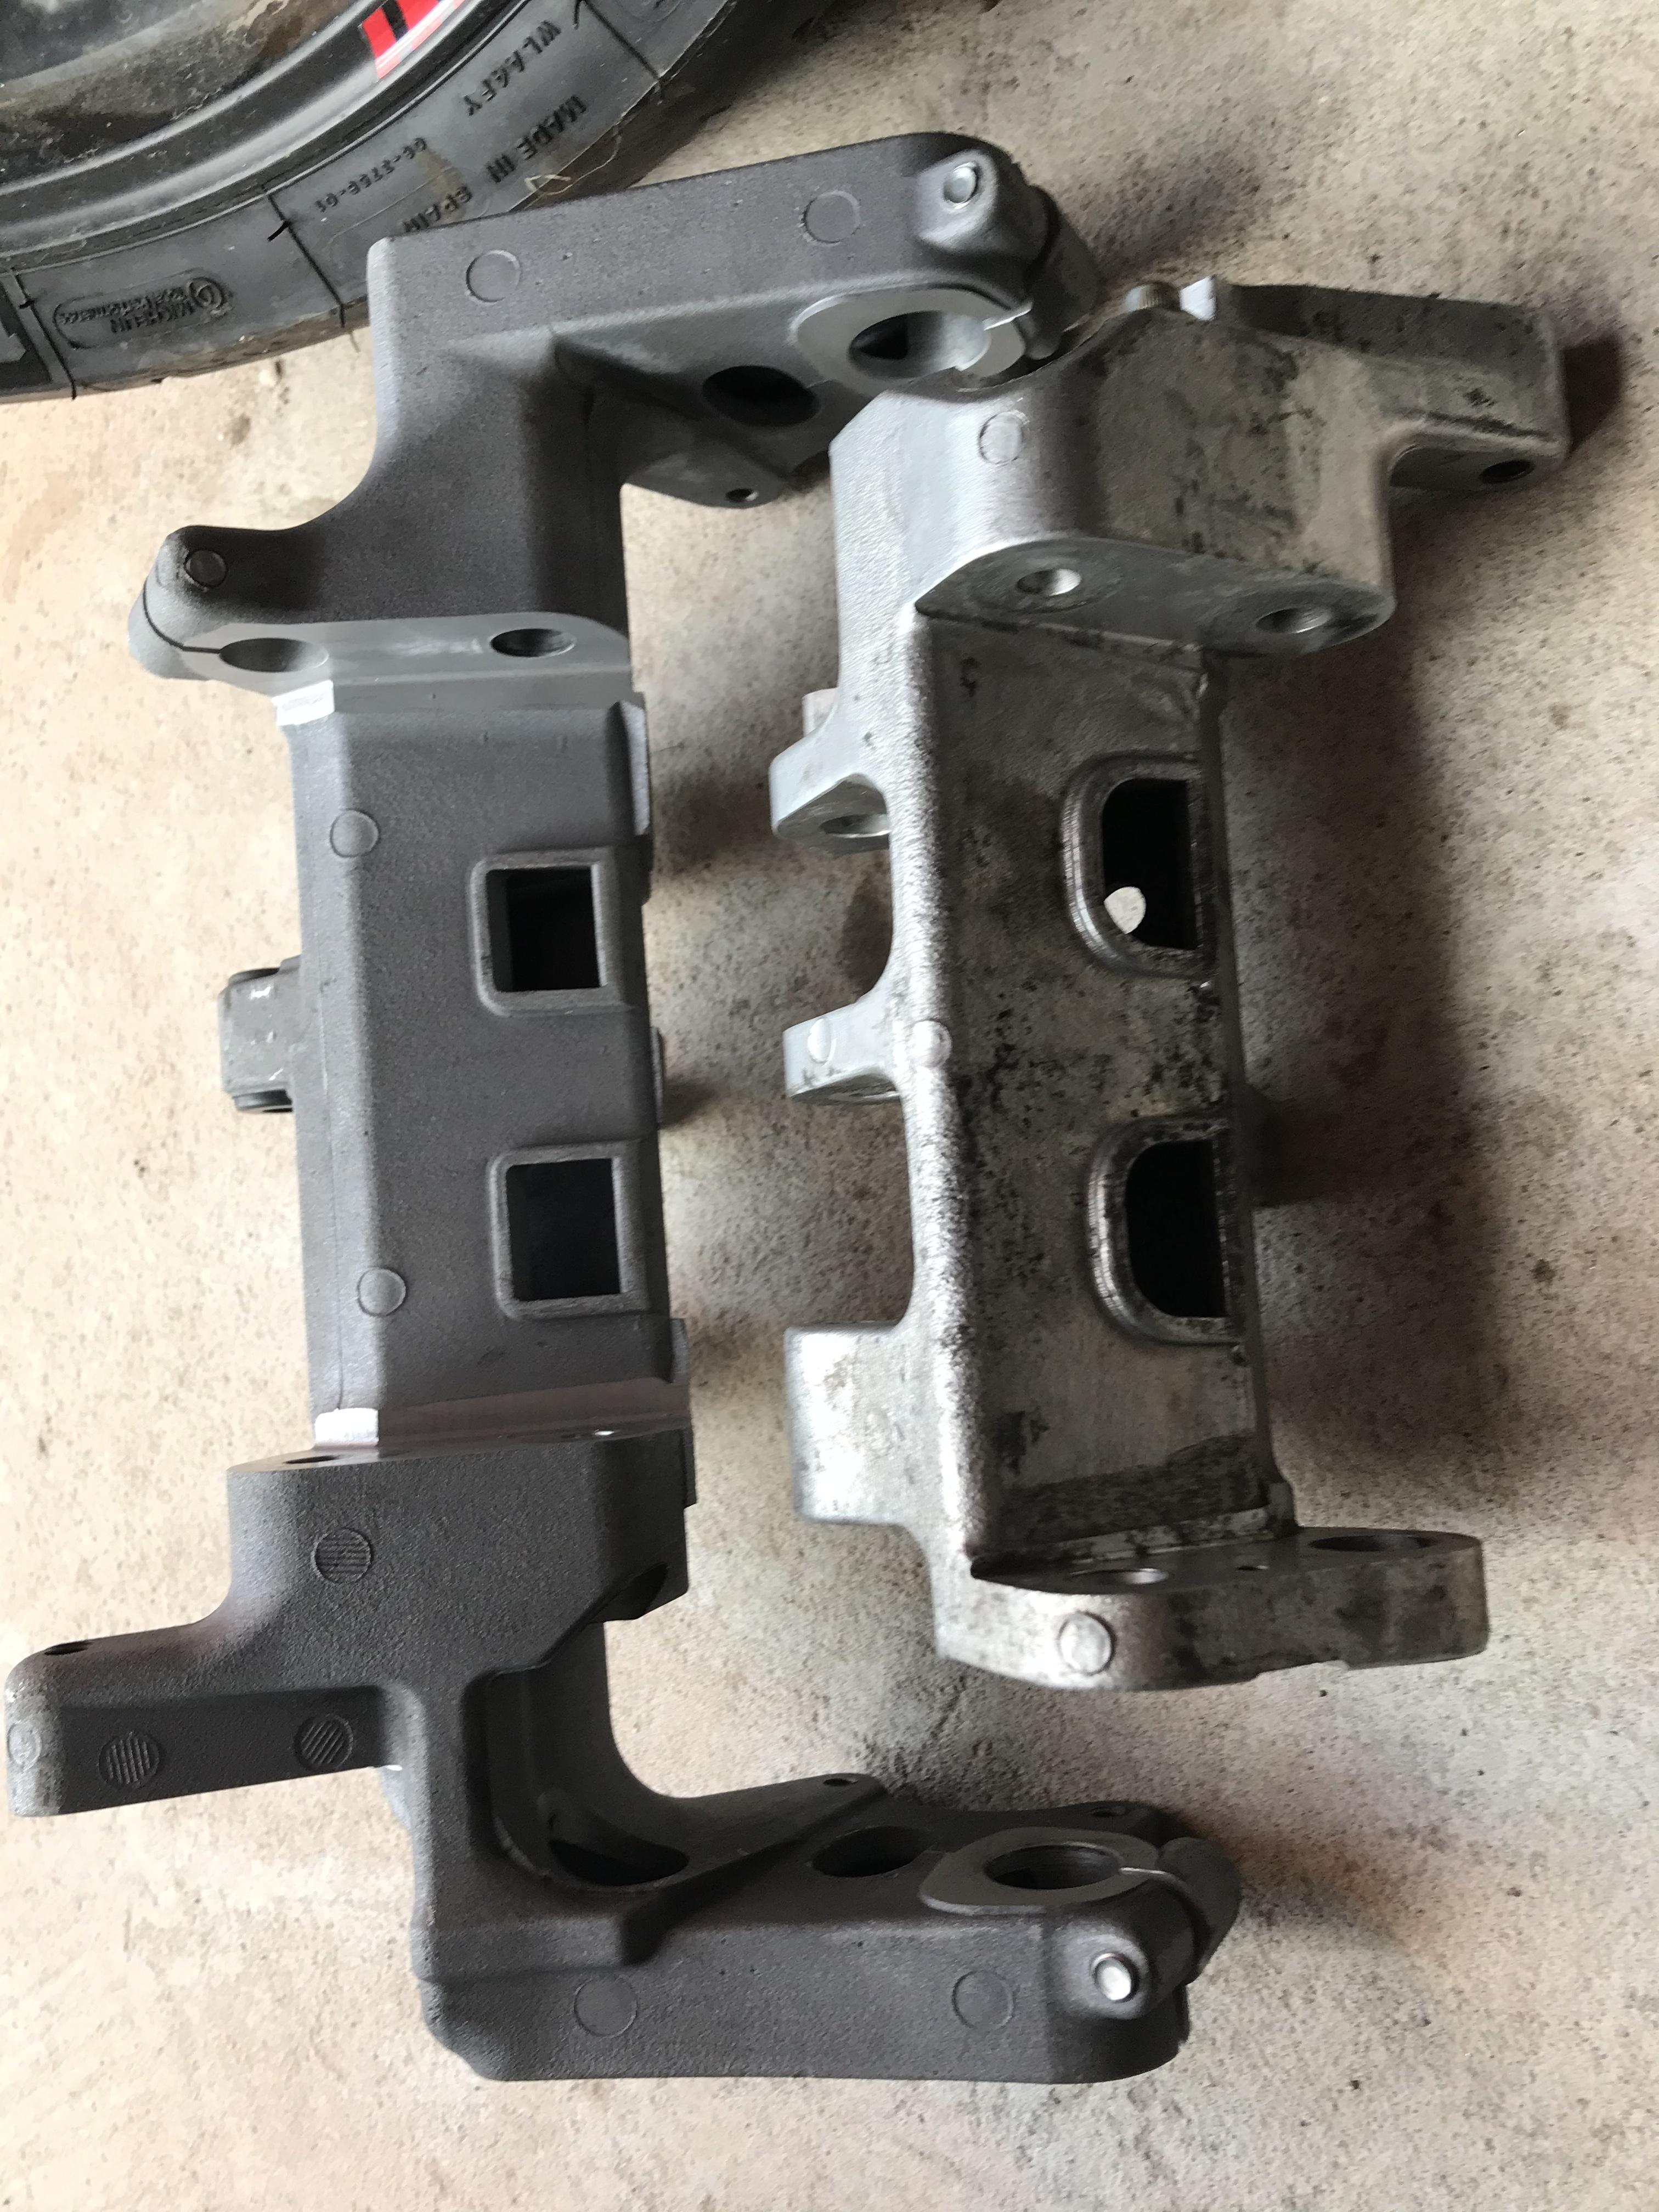
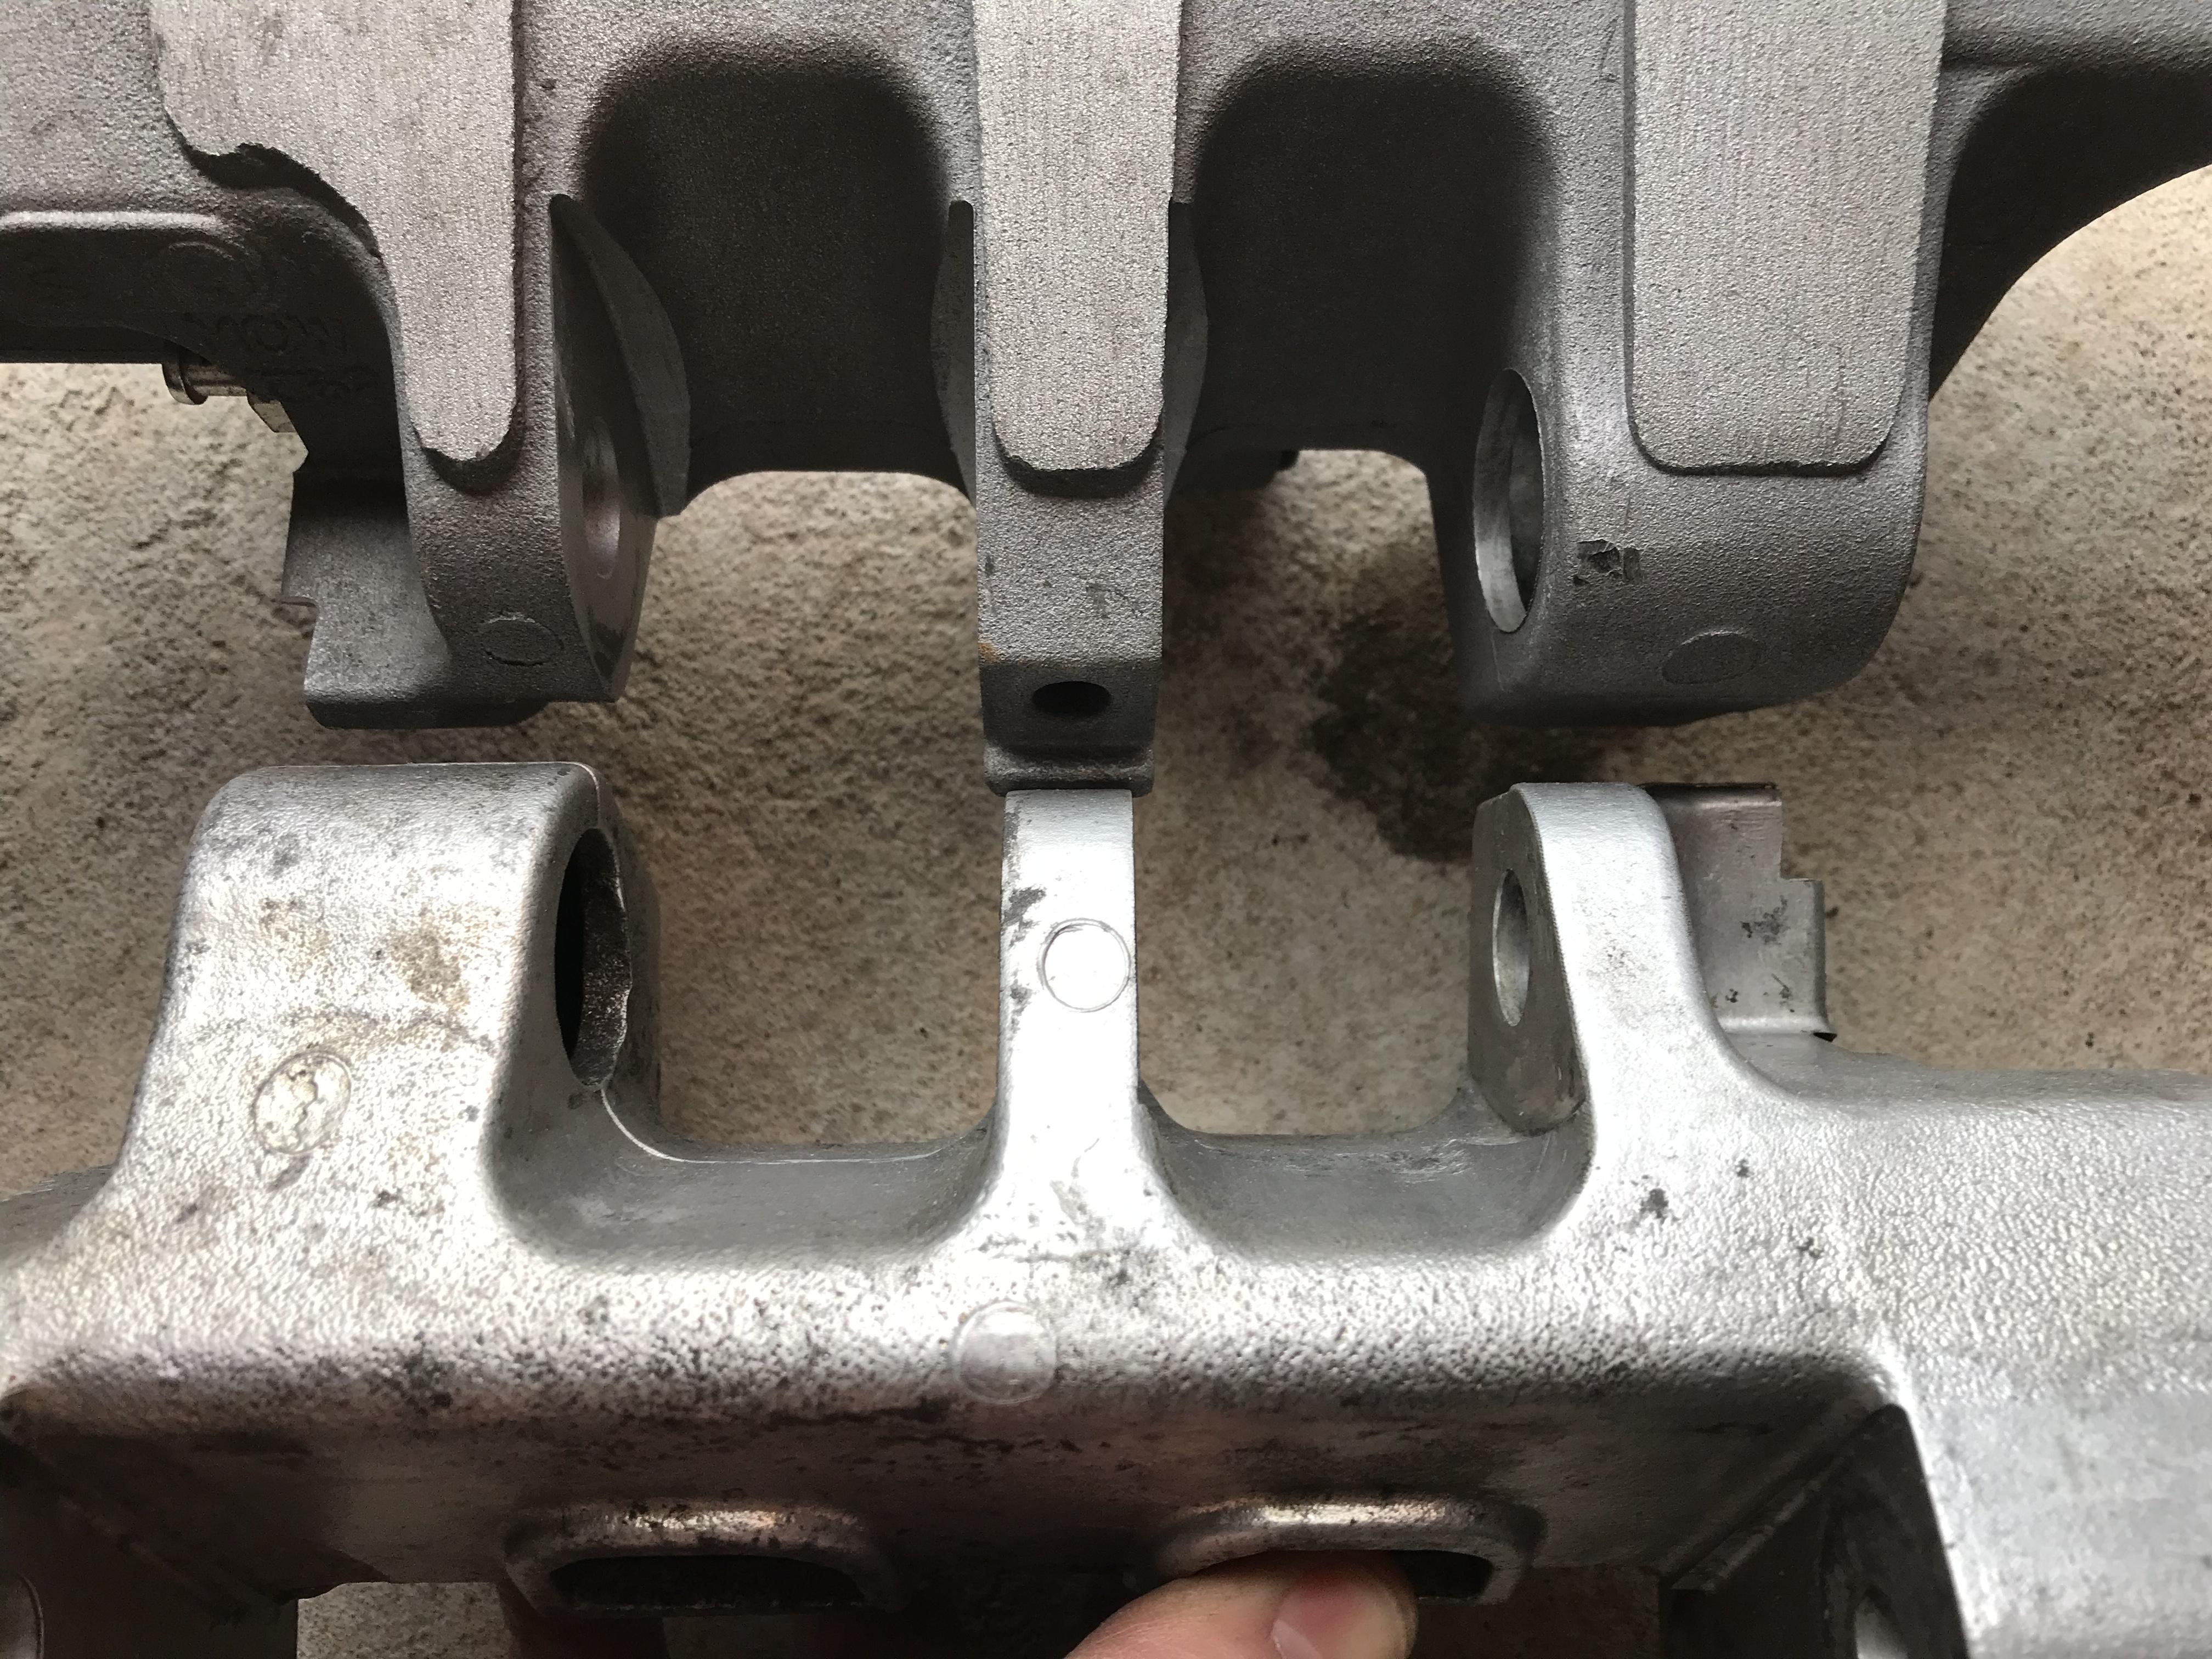
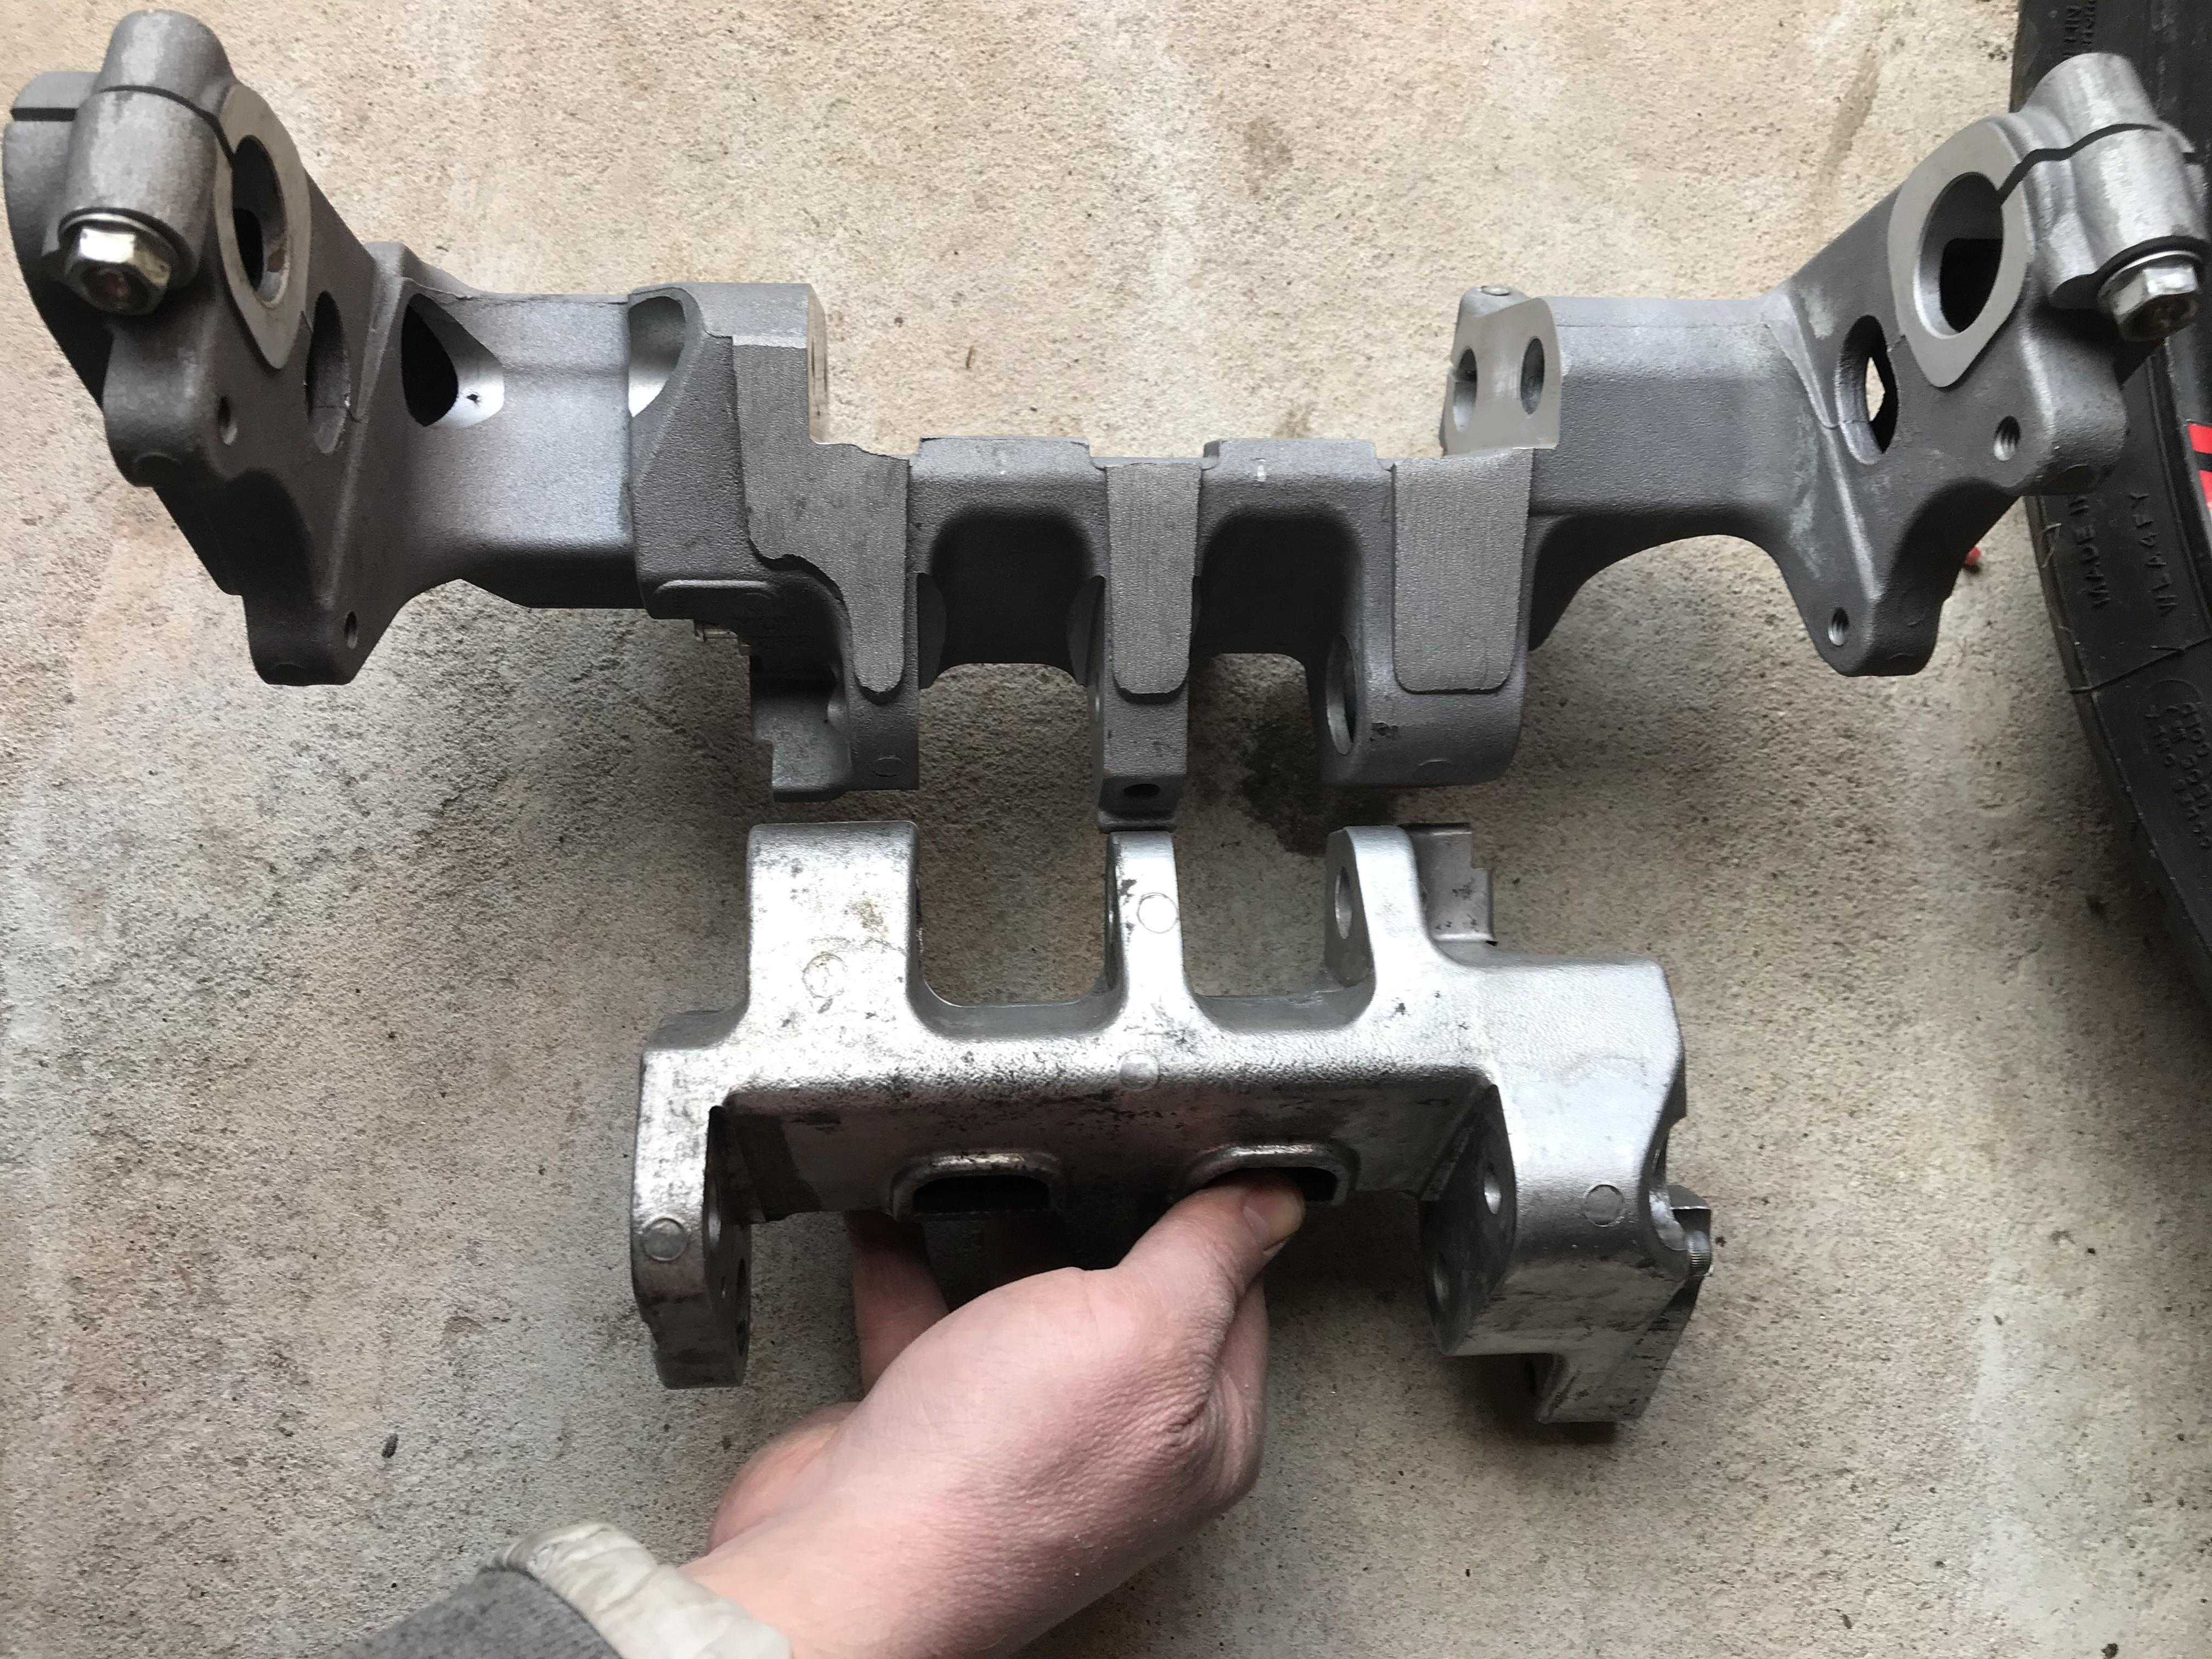
Hello All, Been toying with the idea of using an 8th gen cushion to mount different rearsets and possibly a slightly longer swingarm on my 5th gen (6th/8th gen swingers are slightly longer than 5th gen). For those of you wanting to swap cushions across the 5th, 6th and 8th gen bikes, here are some comparison pics. First off, they’re not a straight swap and they’re quite different in size! In this pic the 8th gen cushion is on the left and 5th gen is on the right. Note how the 5th gen item is narrower overall as the rearsets on that model make up the difference. 5th gen engine mounting gap, however, is much wider than the 8th gen. Here you can see the swingarm mounting points aren’t the same on both cushions. Note the centre lug is thicker in the 8th gen. I “believe” 6th gen cushions have the same spacing as 8th but please correct me if wrong. The above pic shows how much more substantial the 8th gen item is. 5th gen cushion is 1.264kg. 8th gen is a whopping 2.161kg - nearly double!!! Edit: the 8thbgen item has a little extra weight from the broken centre stand bolt stud stuck in its lug. Few grams maybe? I’ve decided to remain stock and keep weight down. Not sure how much more the 5th gen setup weighs with its rearsets (these form part of the cushion) but can’t imagine it adds up to the same as an 8th gen. Also curious how Seb’s rearset adaptors compare for weight. Can’t be very much (and they look sooooo cool!). Also not sure how the 6th gen cushion compares. I believe the mounting spaces are same as 8th gen but shape for rearsets is different. Just some info for anyone wanting to do these mods. Best, Stray
-
Roundabouts seem tricky because they require an advanced thinking style of driving. Needs forward planning in choosing your lane as you approach them and a civic-mindset where you have to work with other drivers to keep things smooth. It all falls down when drivers don’t have that advanced thinking capacity and/or can’t work together with other road users. A pet hate is those who enter the roundabout in the left lane when they want to turn right, or in the right lane when they want to turn left. Screws up everyone else and stops traffic flowing. Good indicator discipline is also essential, both when entering and when exiting the roundabout. Some drivers behave like everyone else telepathically knows where they’re going! I like roundabouts (particularly when there’s no one on them!) but they have a few flaws. 1. they’re awful in very heavy traffic and often “gridlock” where an intersection with lights would have kept things flowing. This is only a problem in really heavy traffic. Problem is town planners site them in areas where traffic is low but eventually builds up due to construction of new homes/businesses. Town planners need to plan ahead, just like drivers on a roundabout. 2. there are often diesel and gravel spills ready to take out motorcycles. Any roundabout near a fuel station will have spills from truckers that overfill their tank. That’s another pet hate. Finally, I love roundabouts for overtaking. If you plan ahead and choose your position well you can absolutely smoke other road users on a roundabout without breaking the speed limit or a sweat. Very satisfying to enter the roundabout alongside someone and exit it before they’ve even managed to get halfway round!
-
Love these bikes - excellent project!
-
Those Gileras look wonderful!
-
Life’s full of choices. We can’t have everything - we have to choose. Otherwise we’d all have garages like Jay Leno and I’d have all three ex wives. HA HA HA!
-
Any advice on where to pour a bit of engine oil to aid first startup? Do I drop some down the spark plug hole? Drizzle a bit over the open area under the camshafts?
-
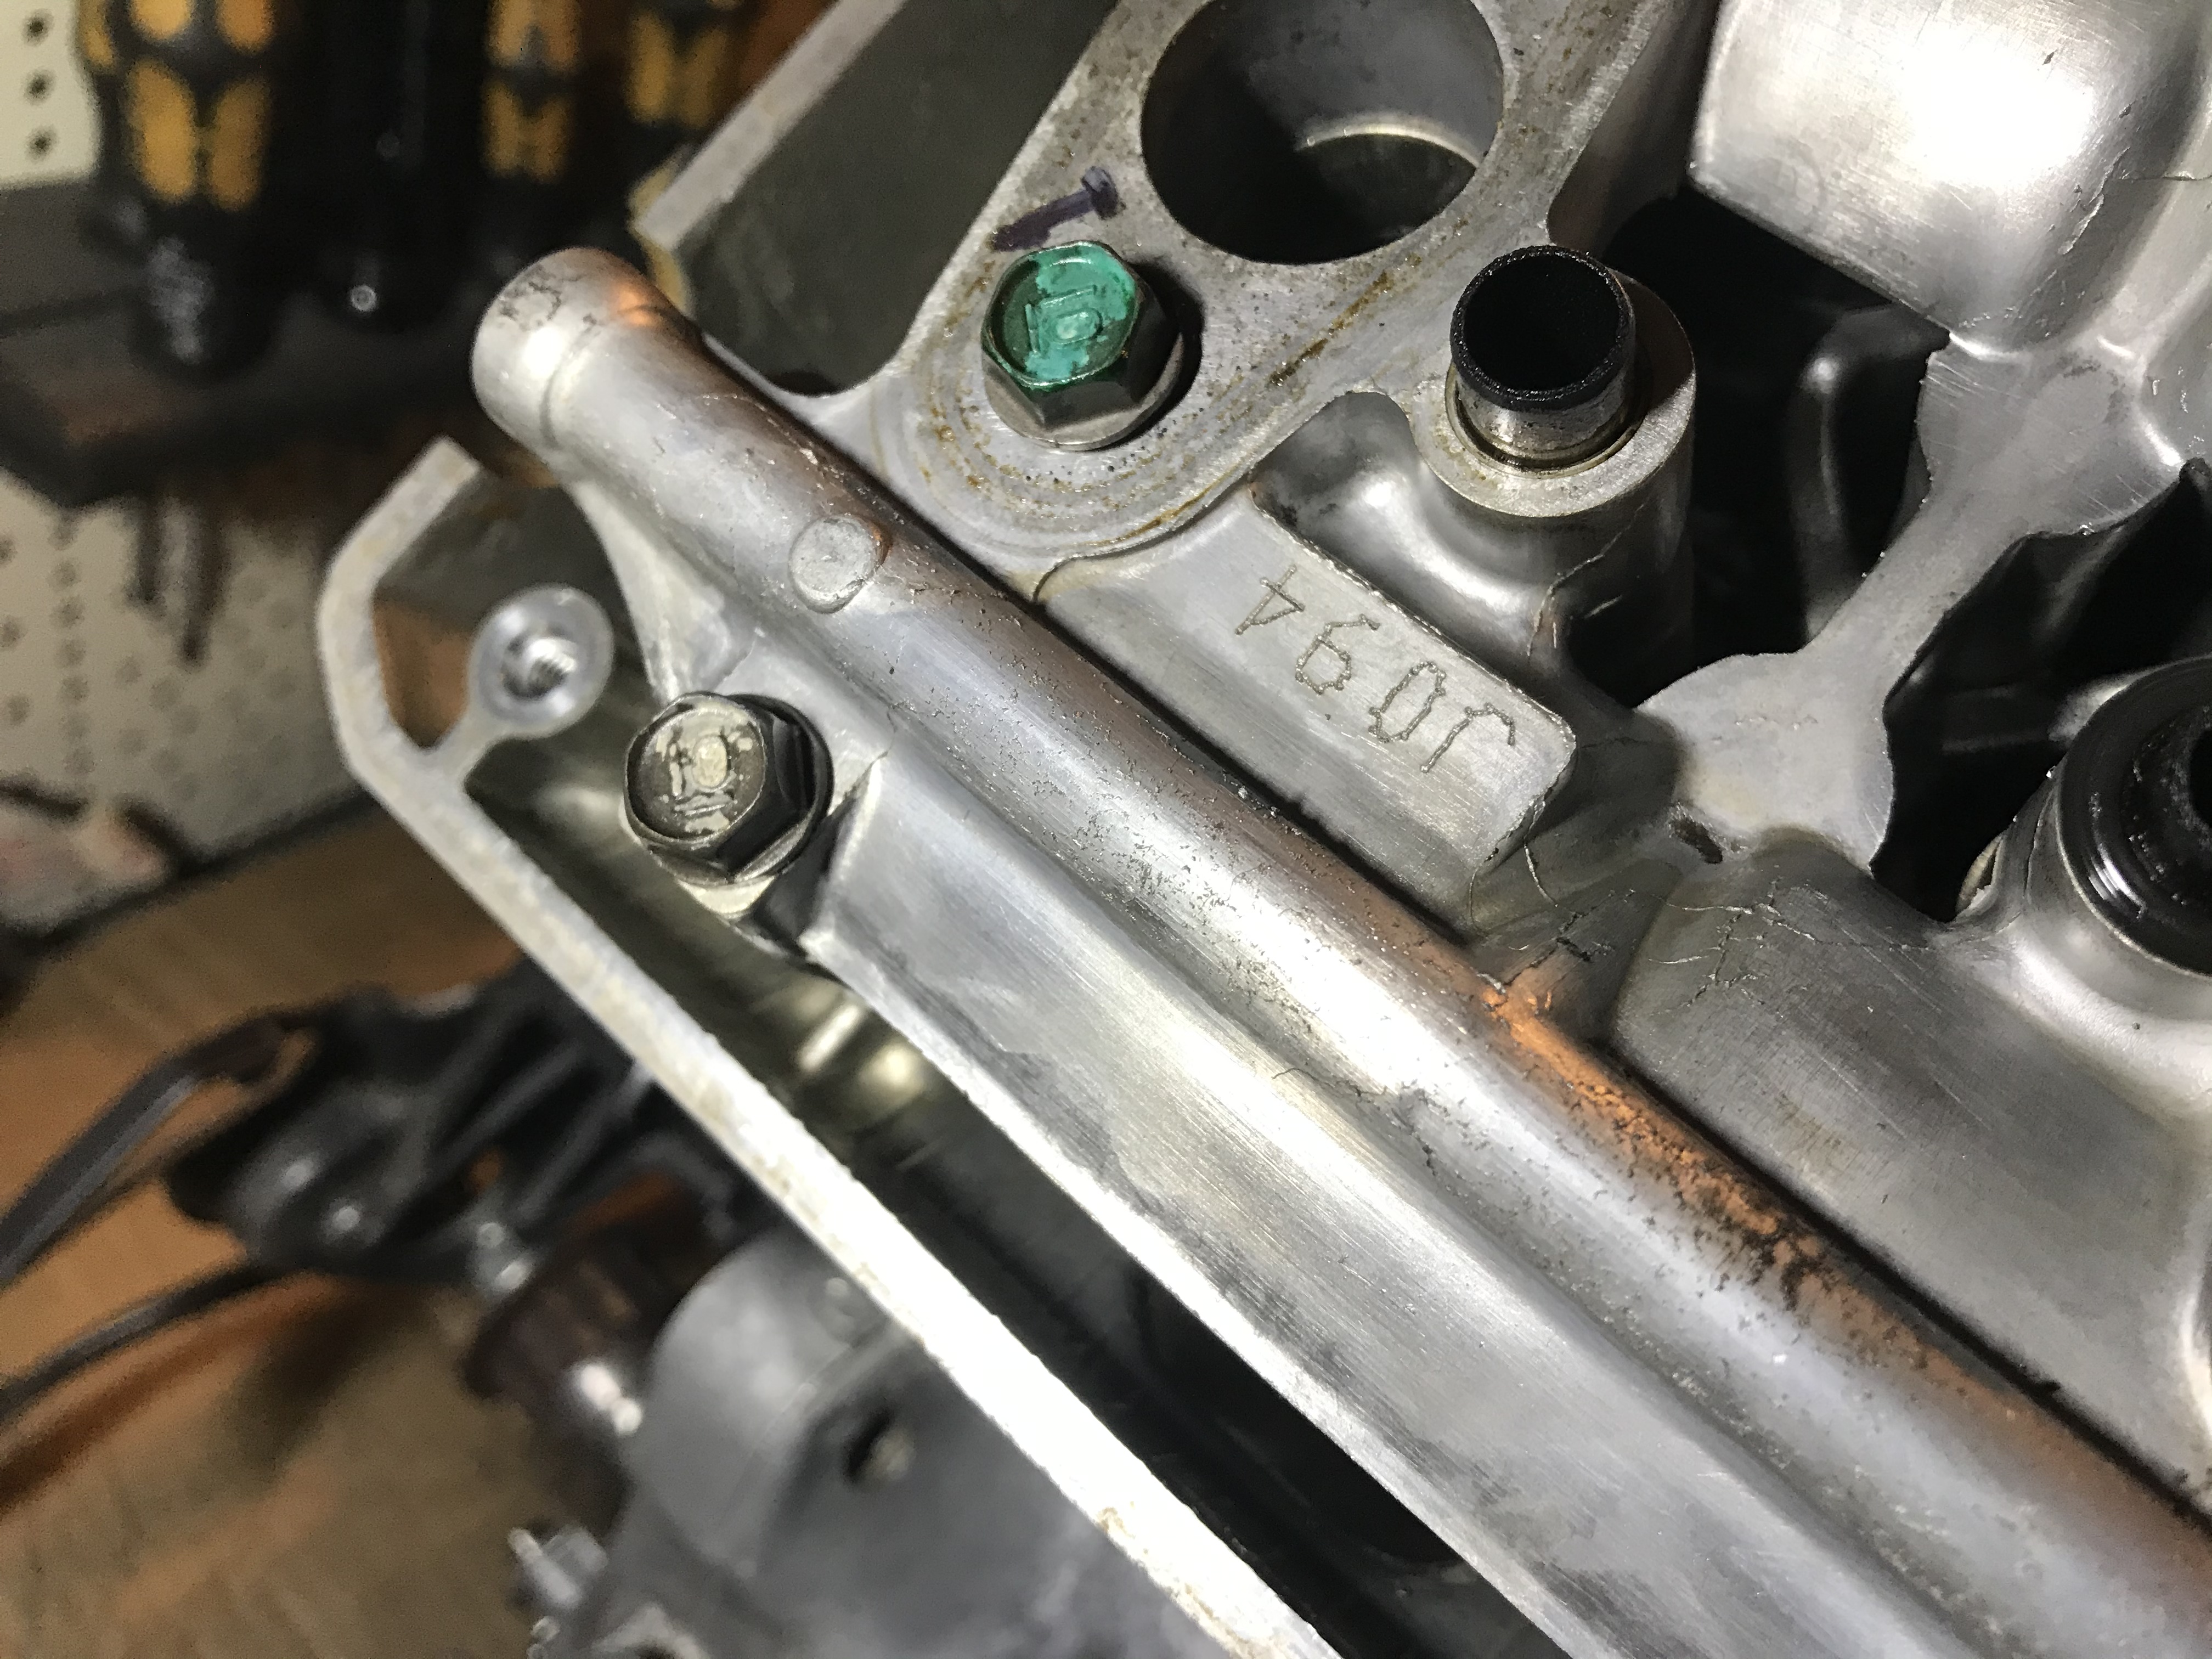
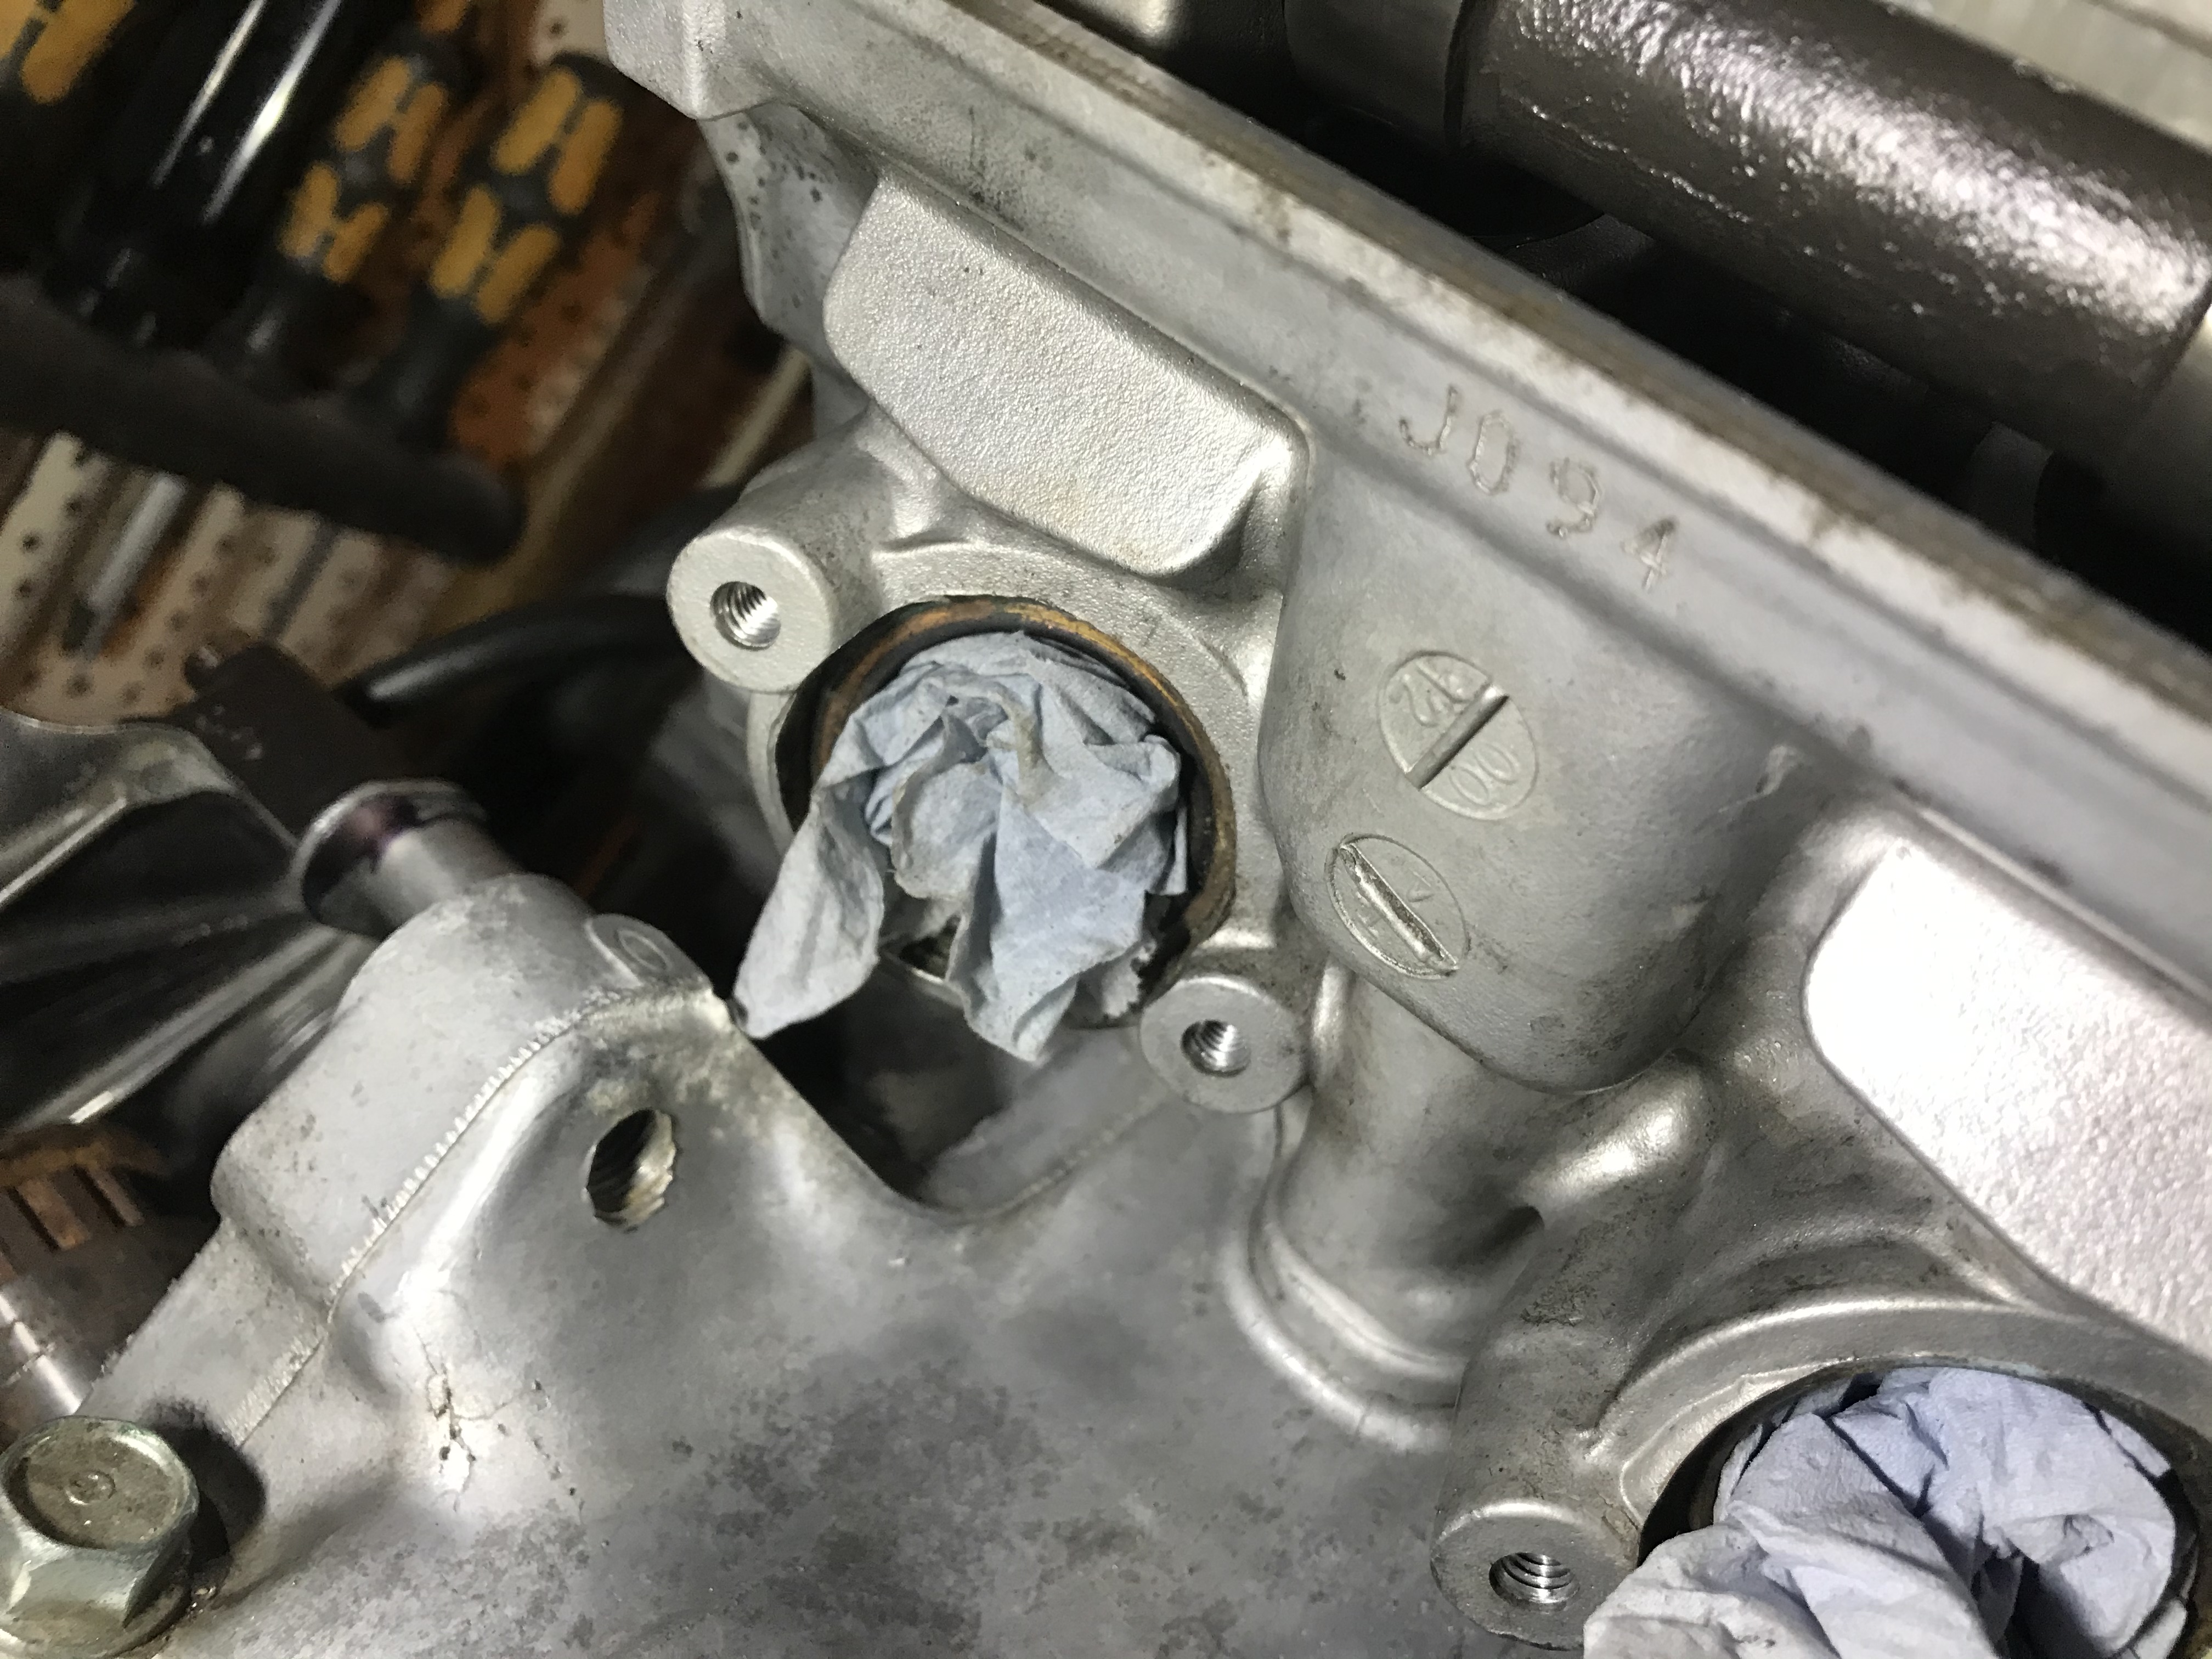
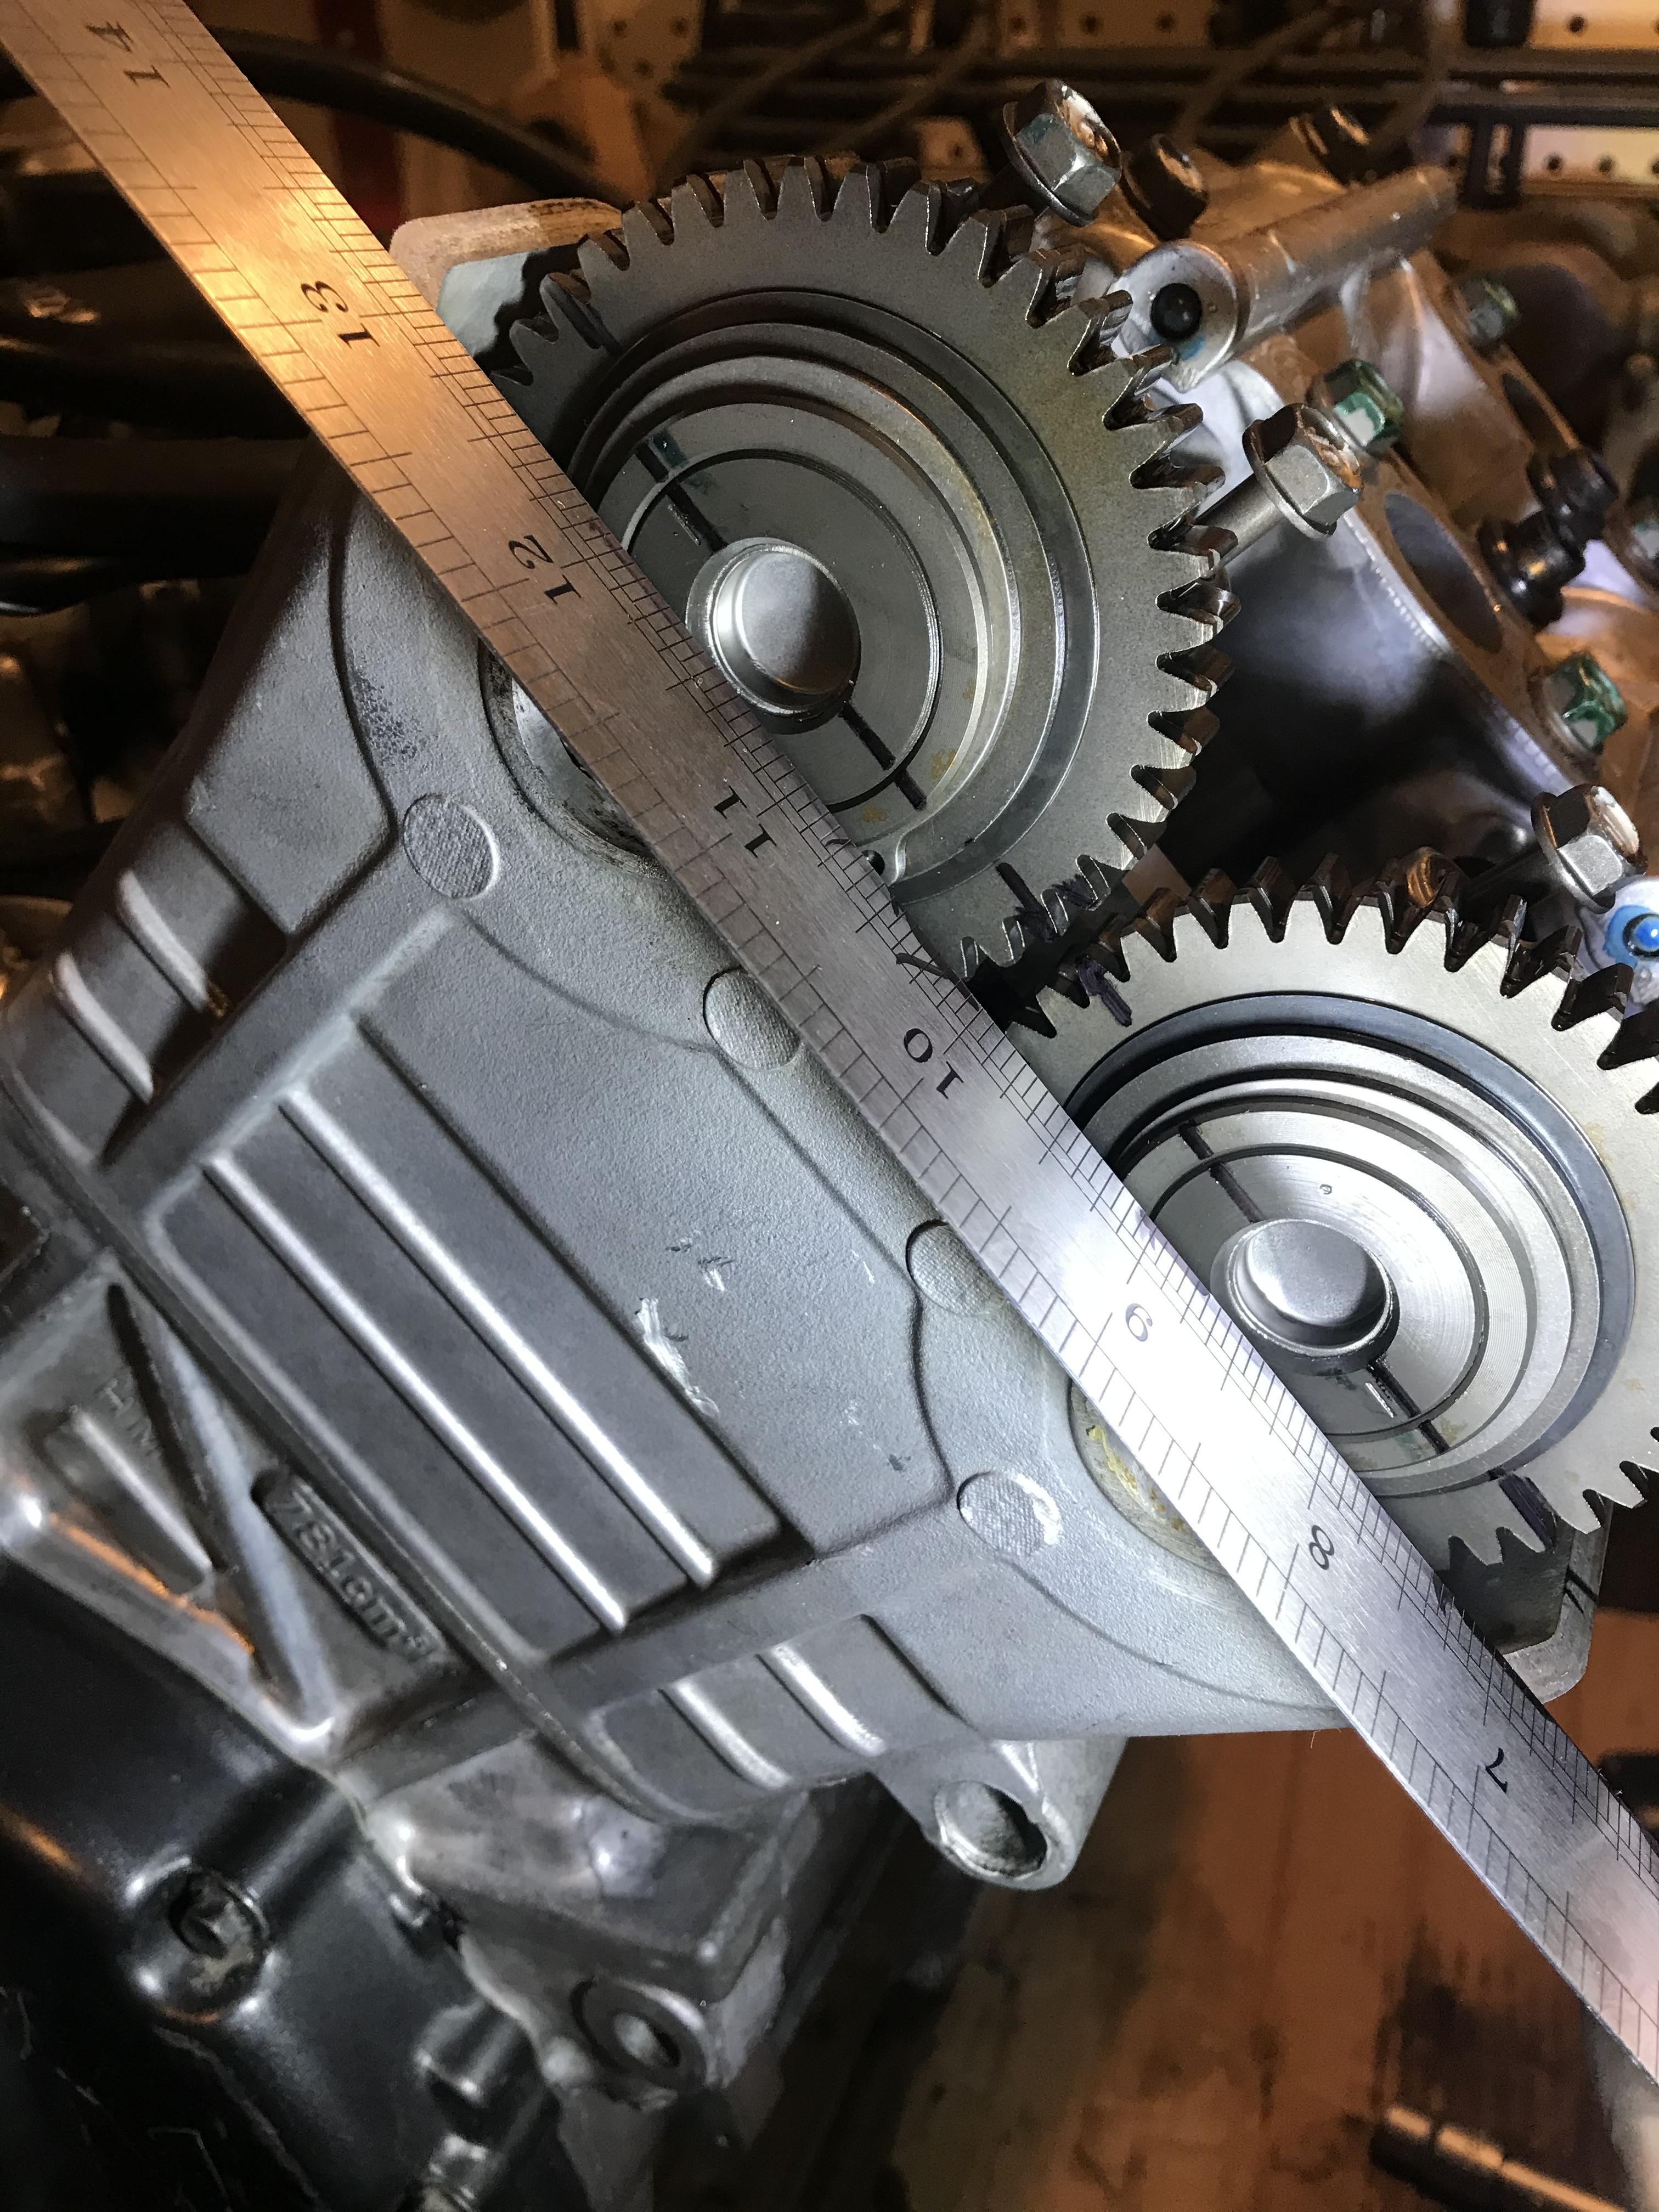
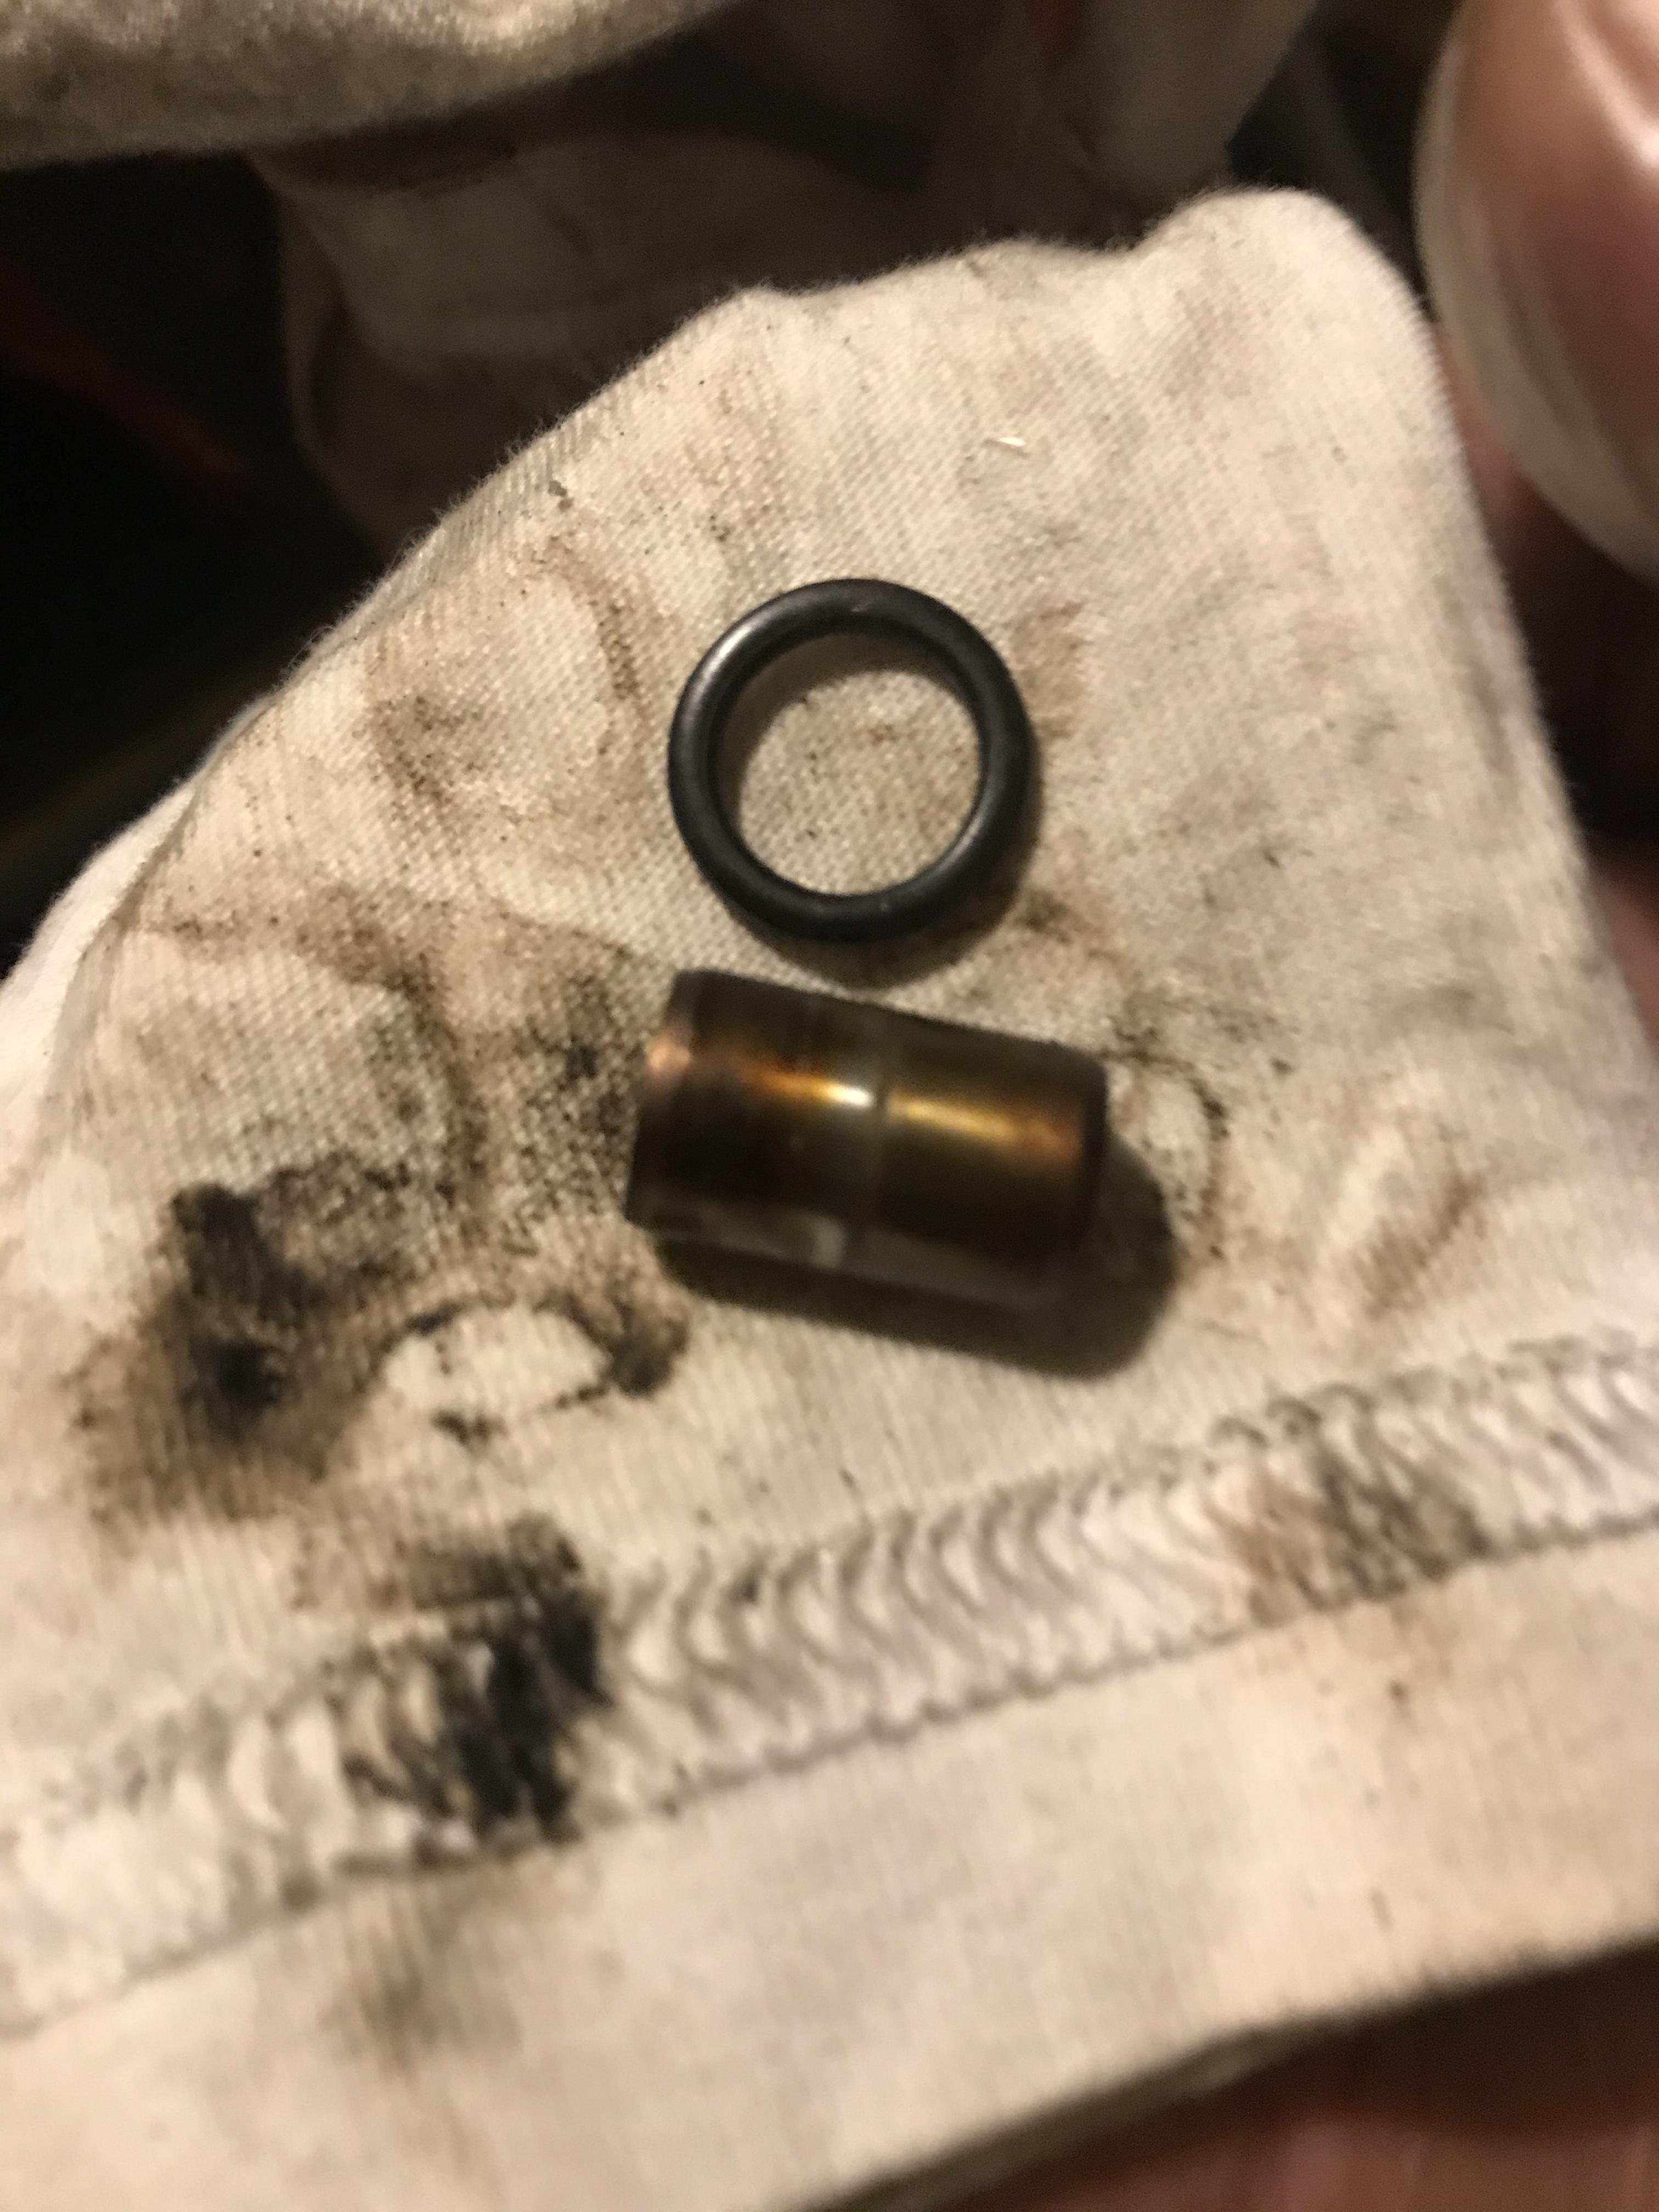
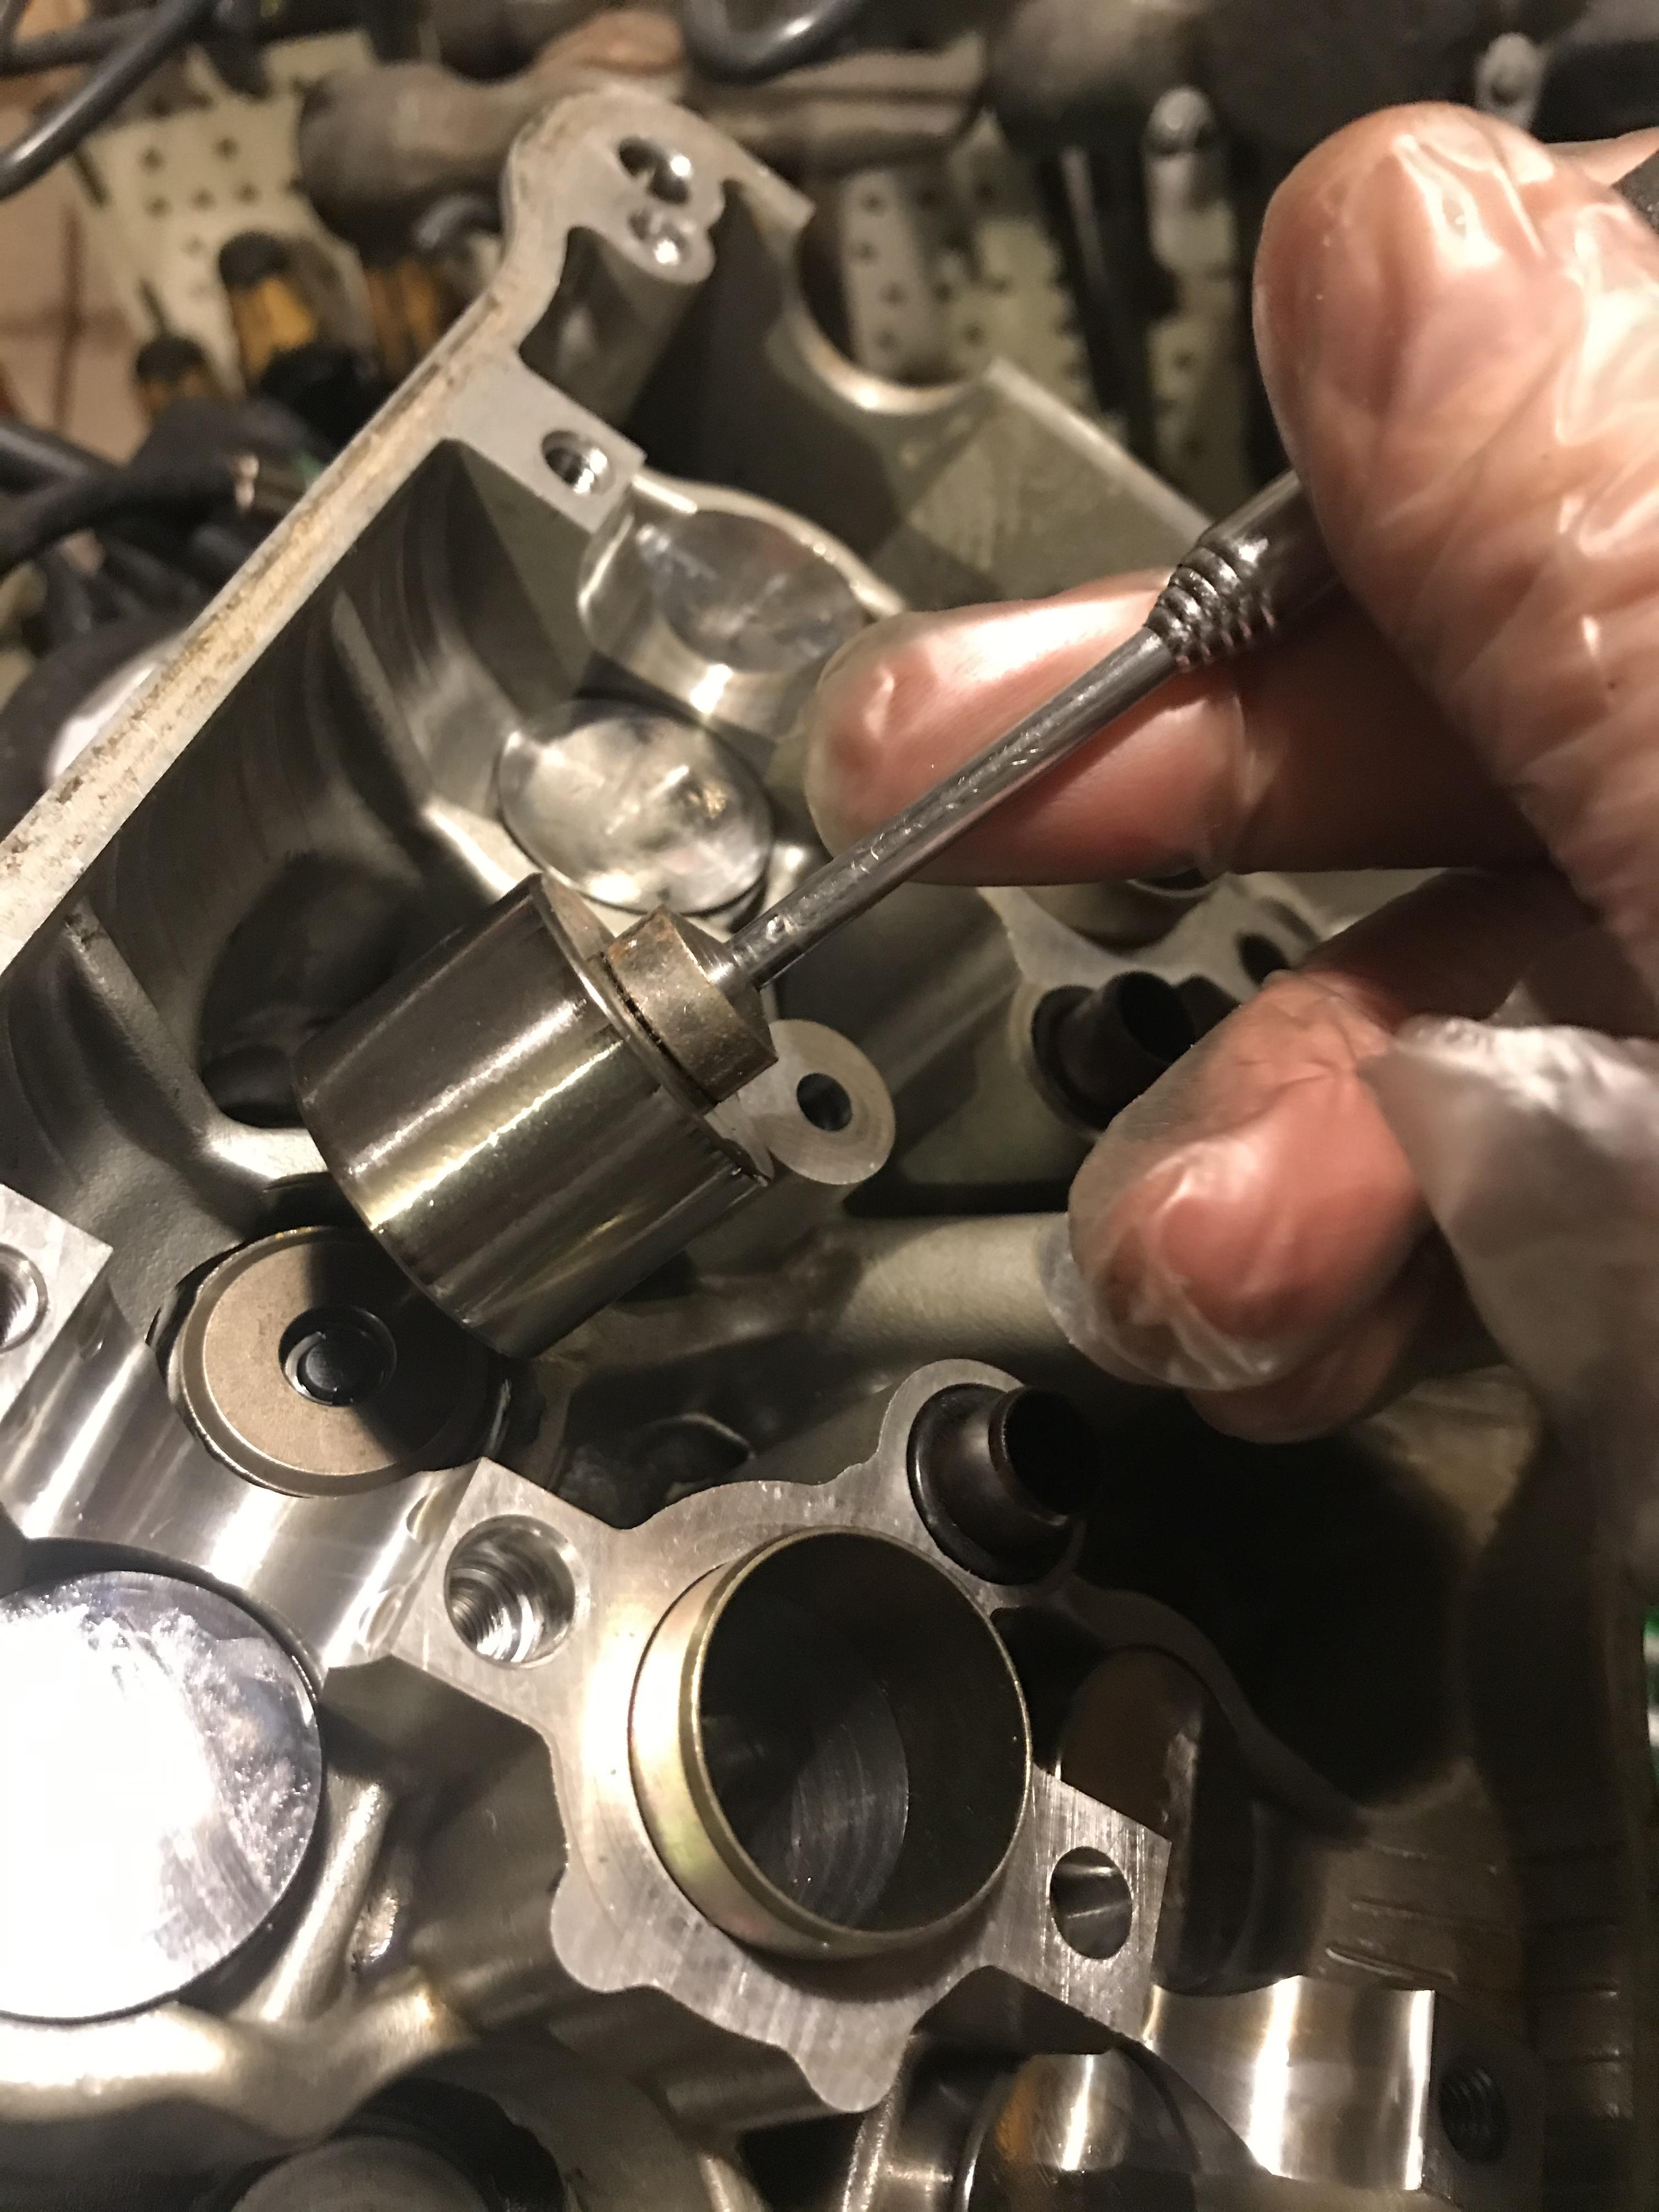
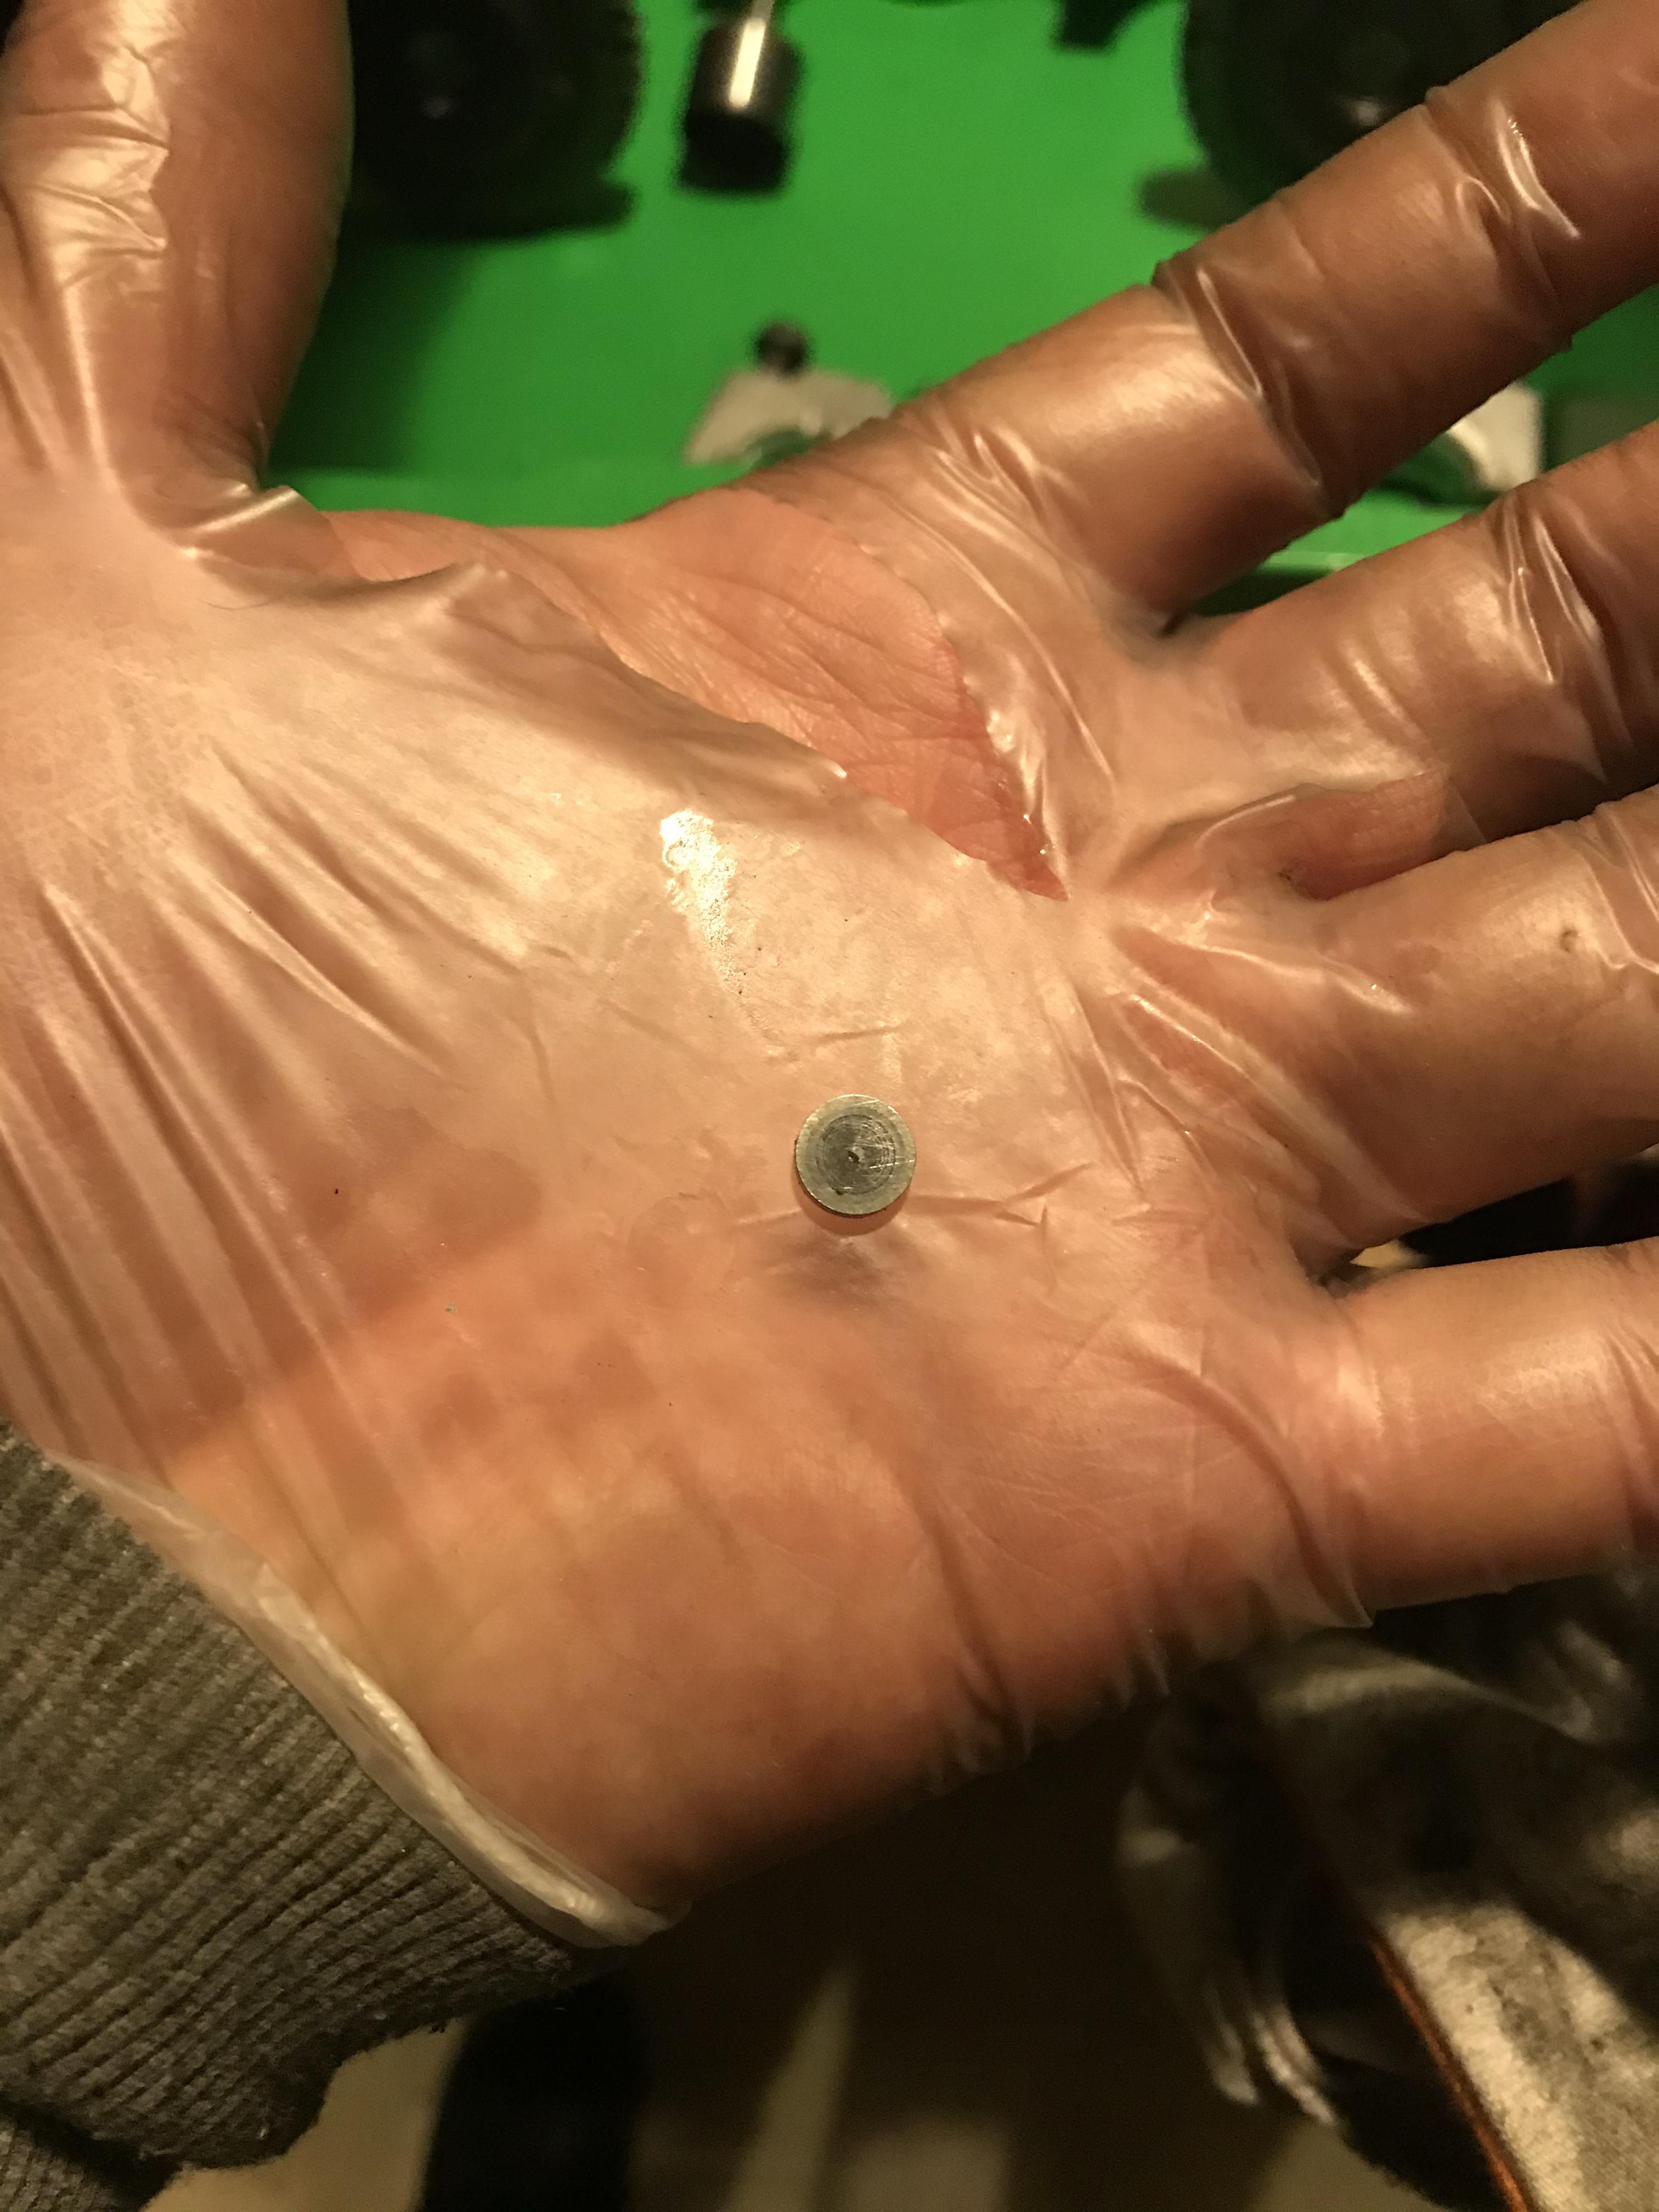
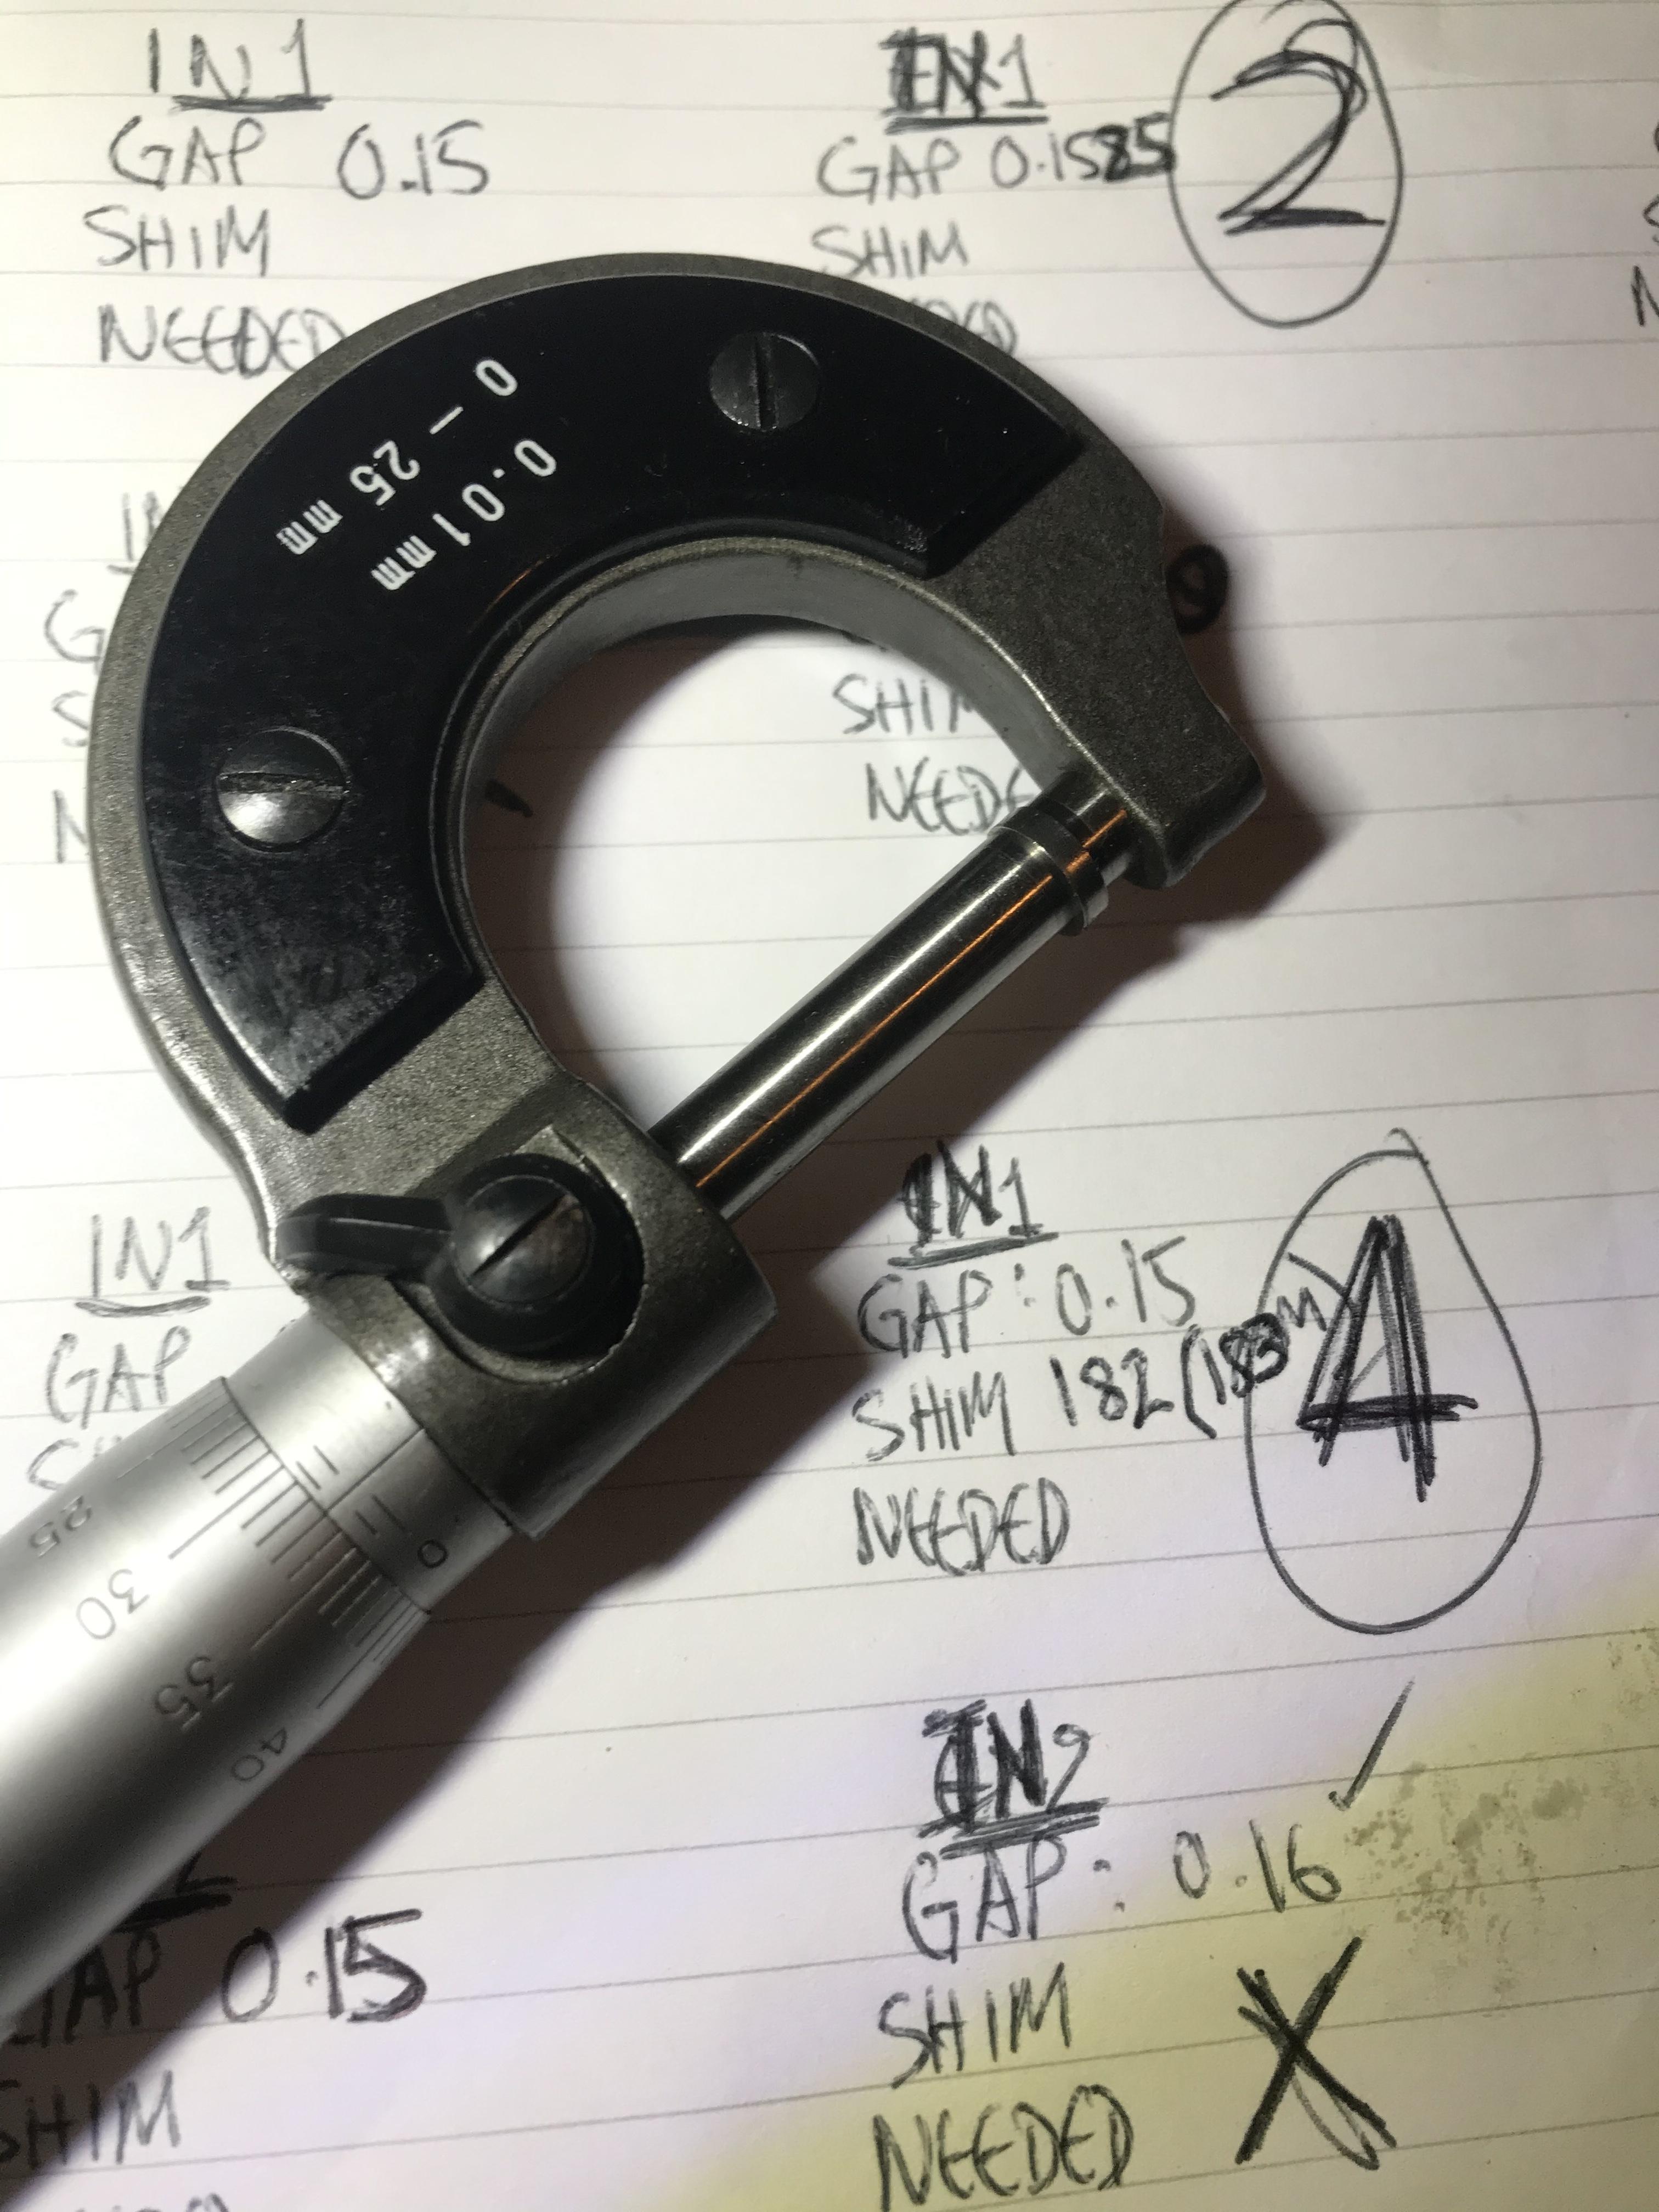
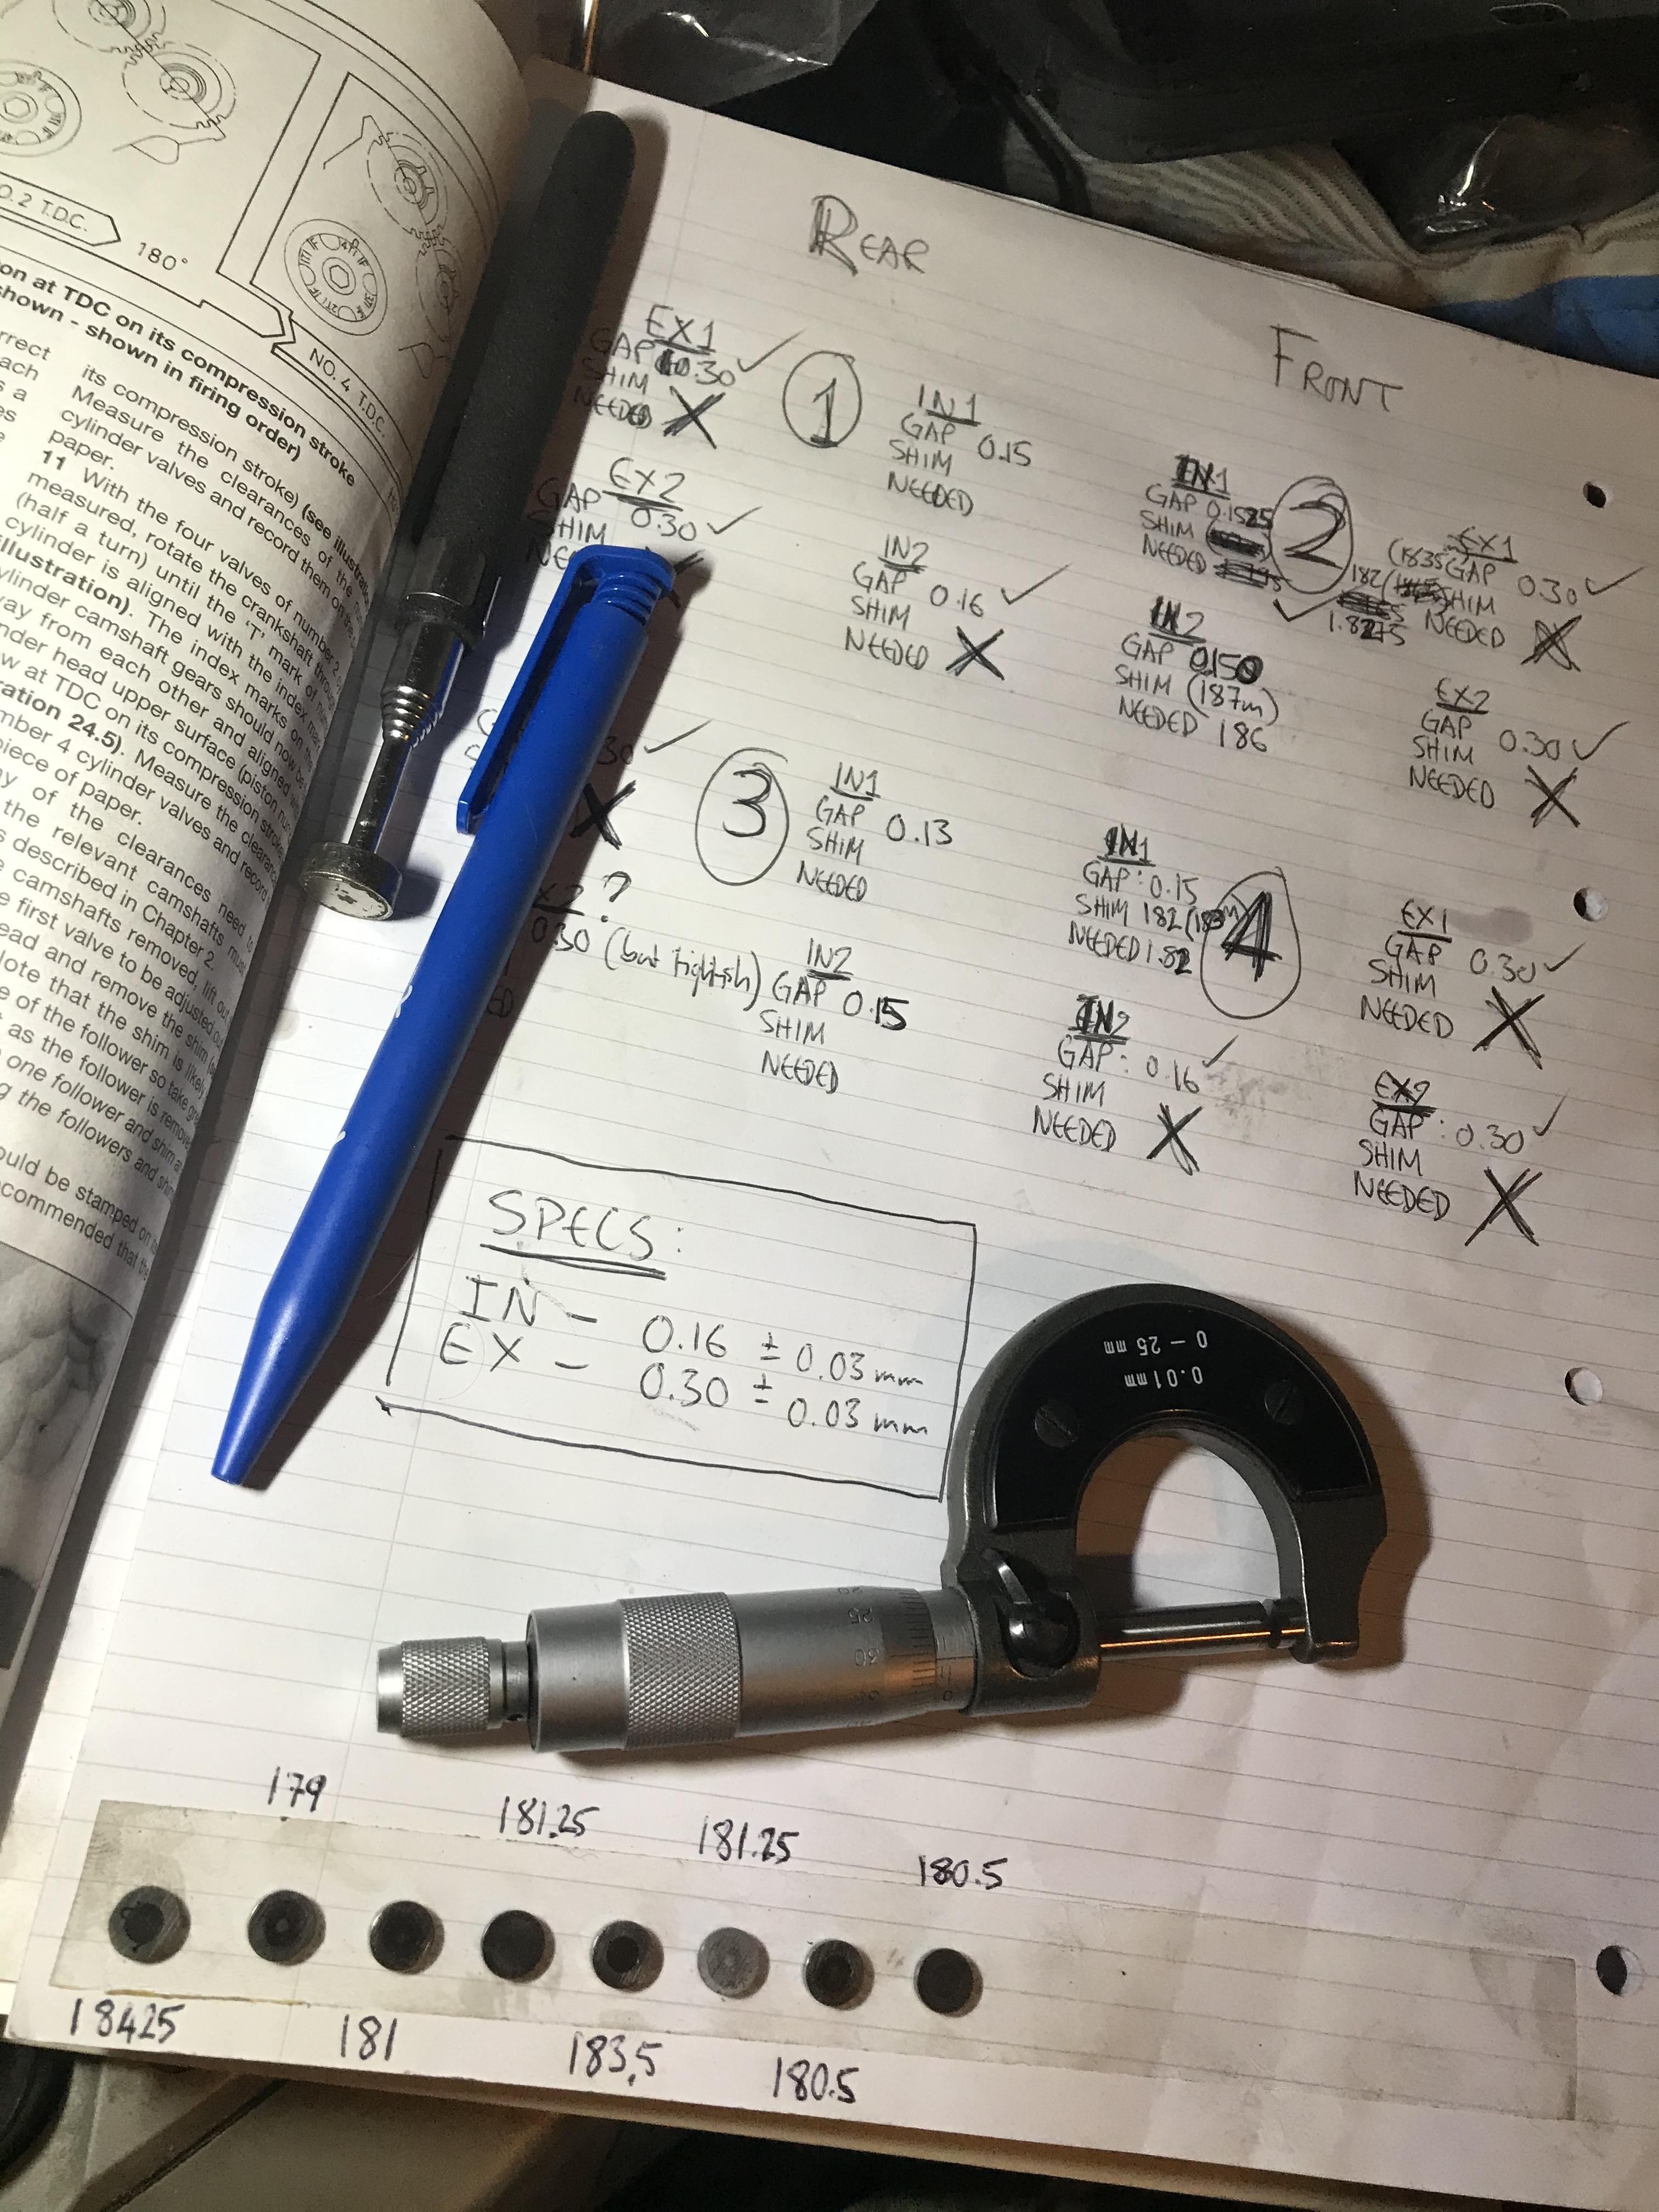
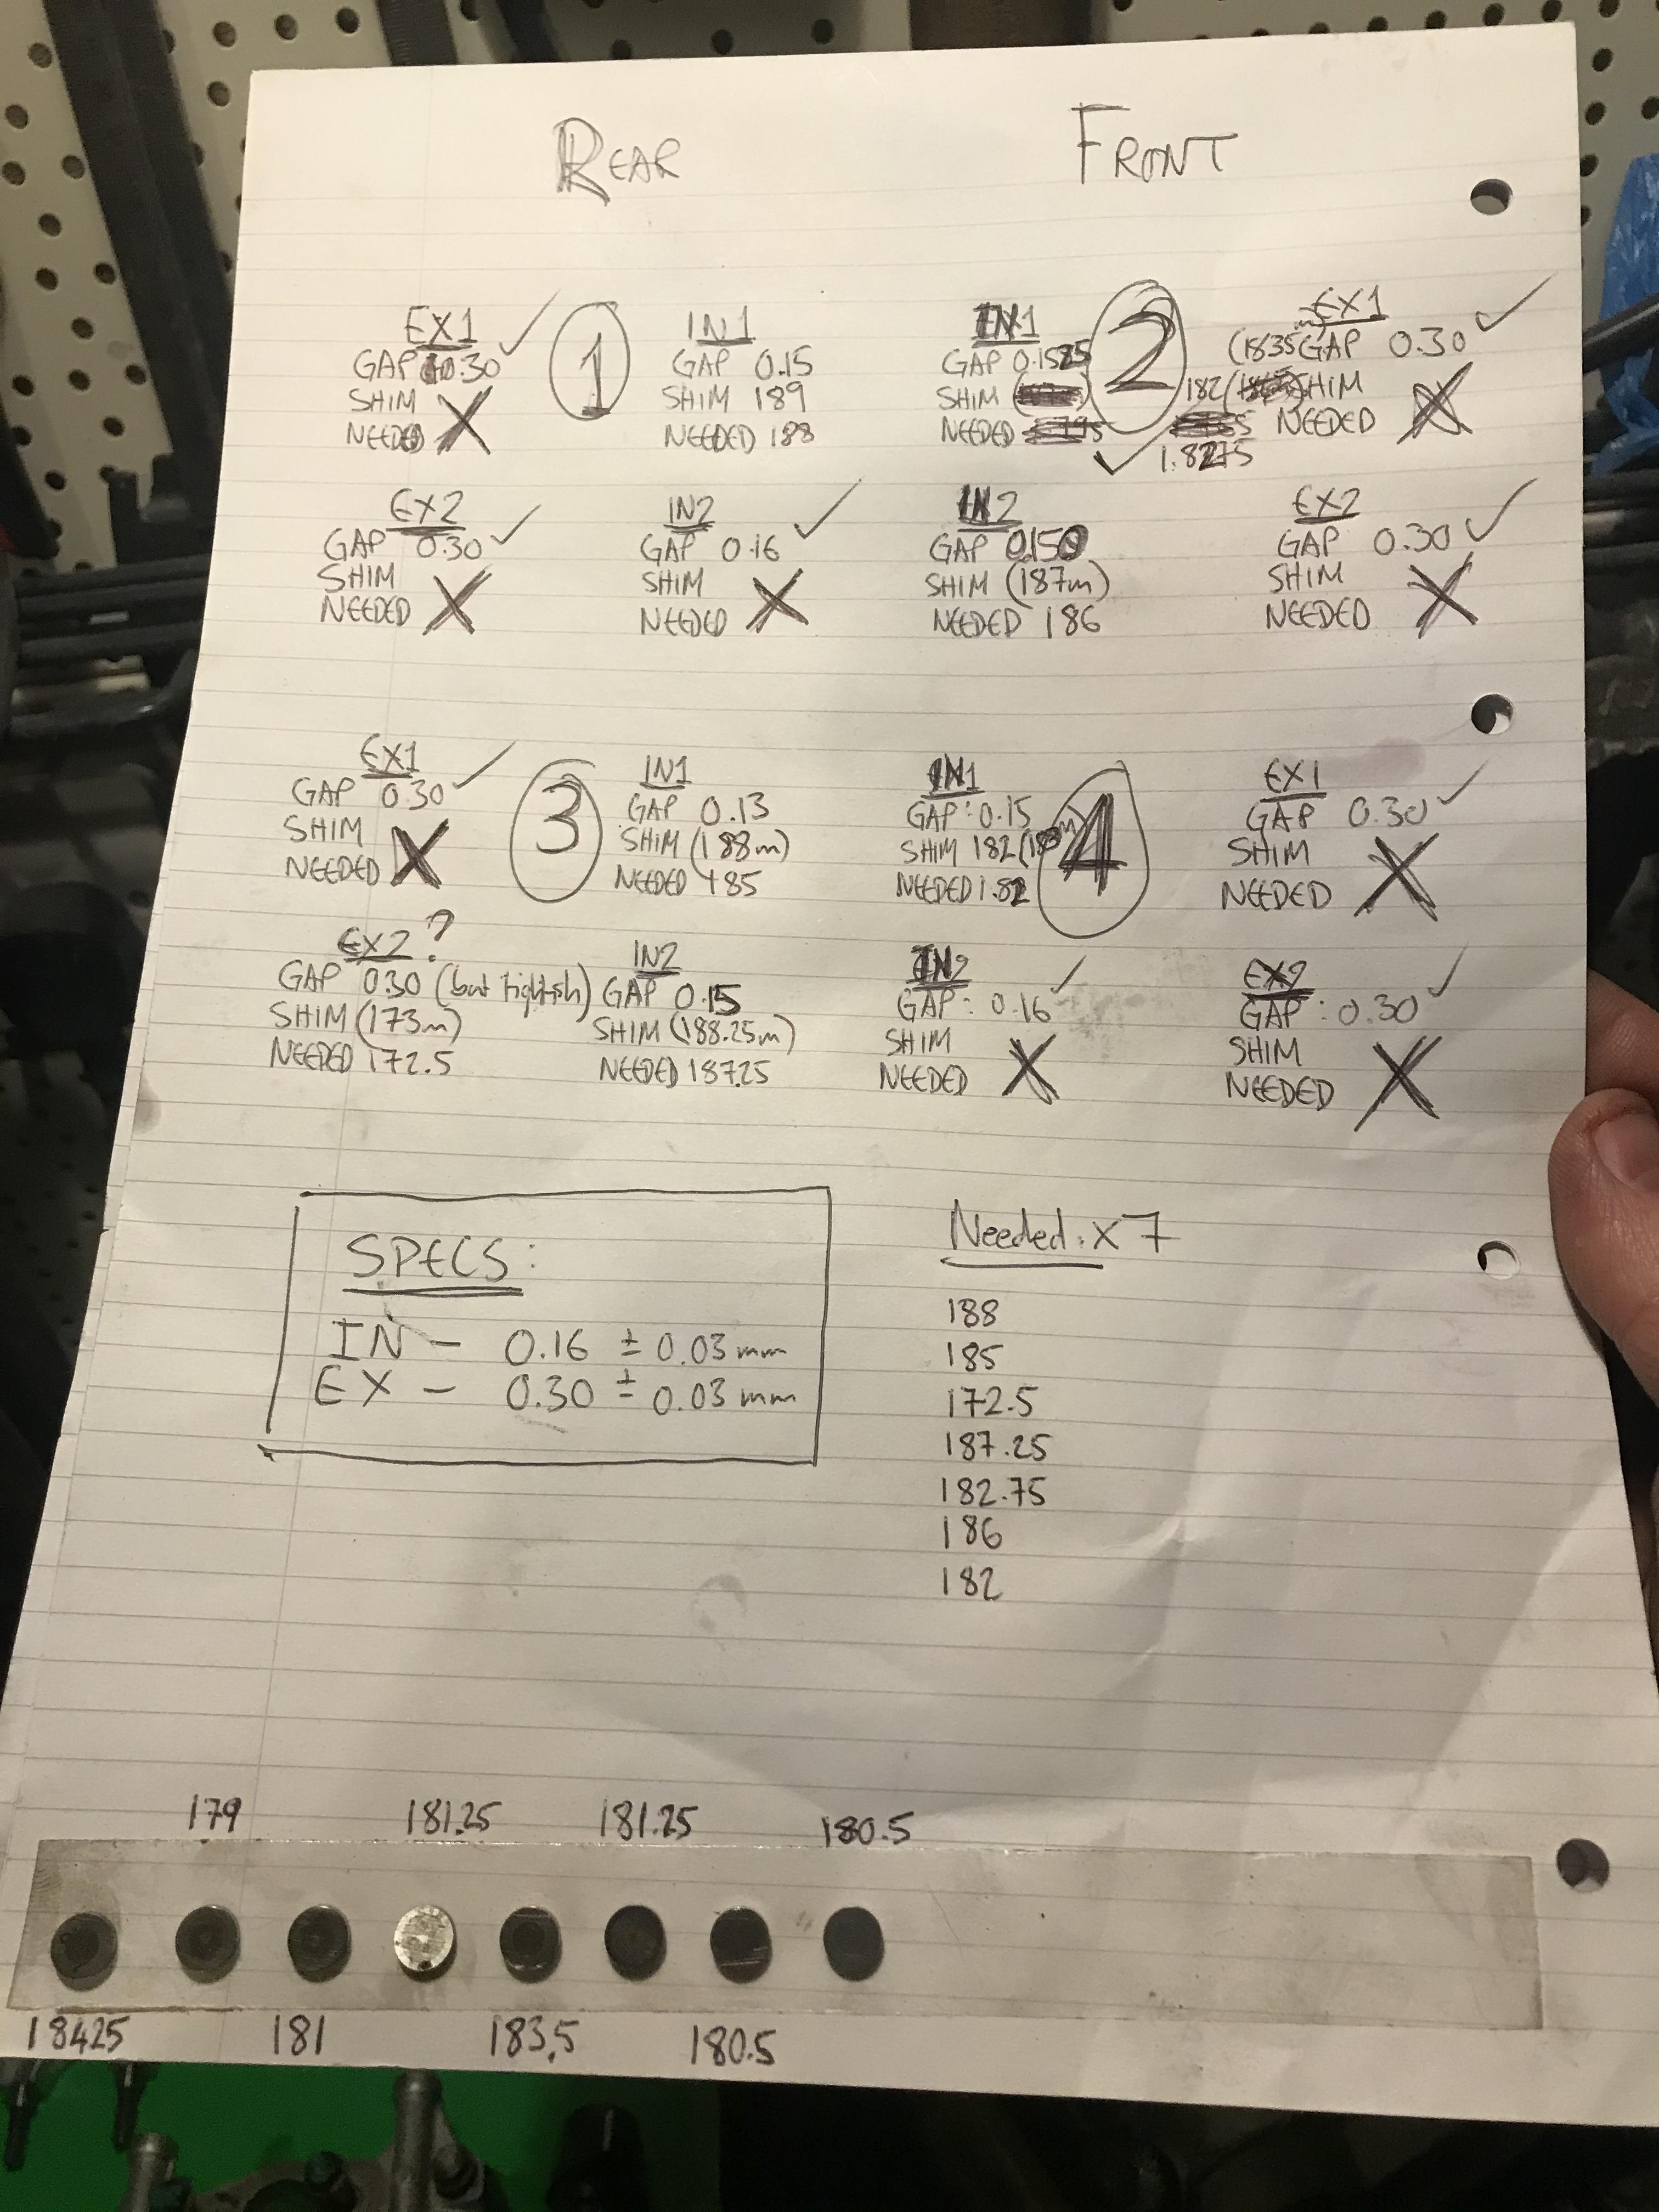
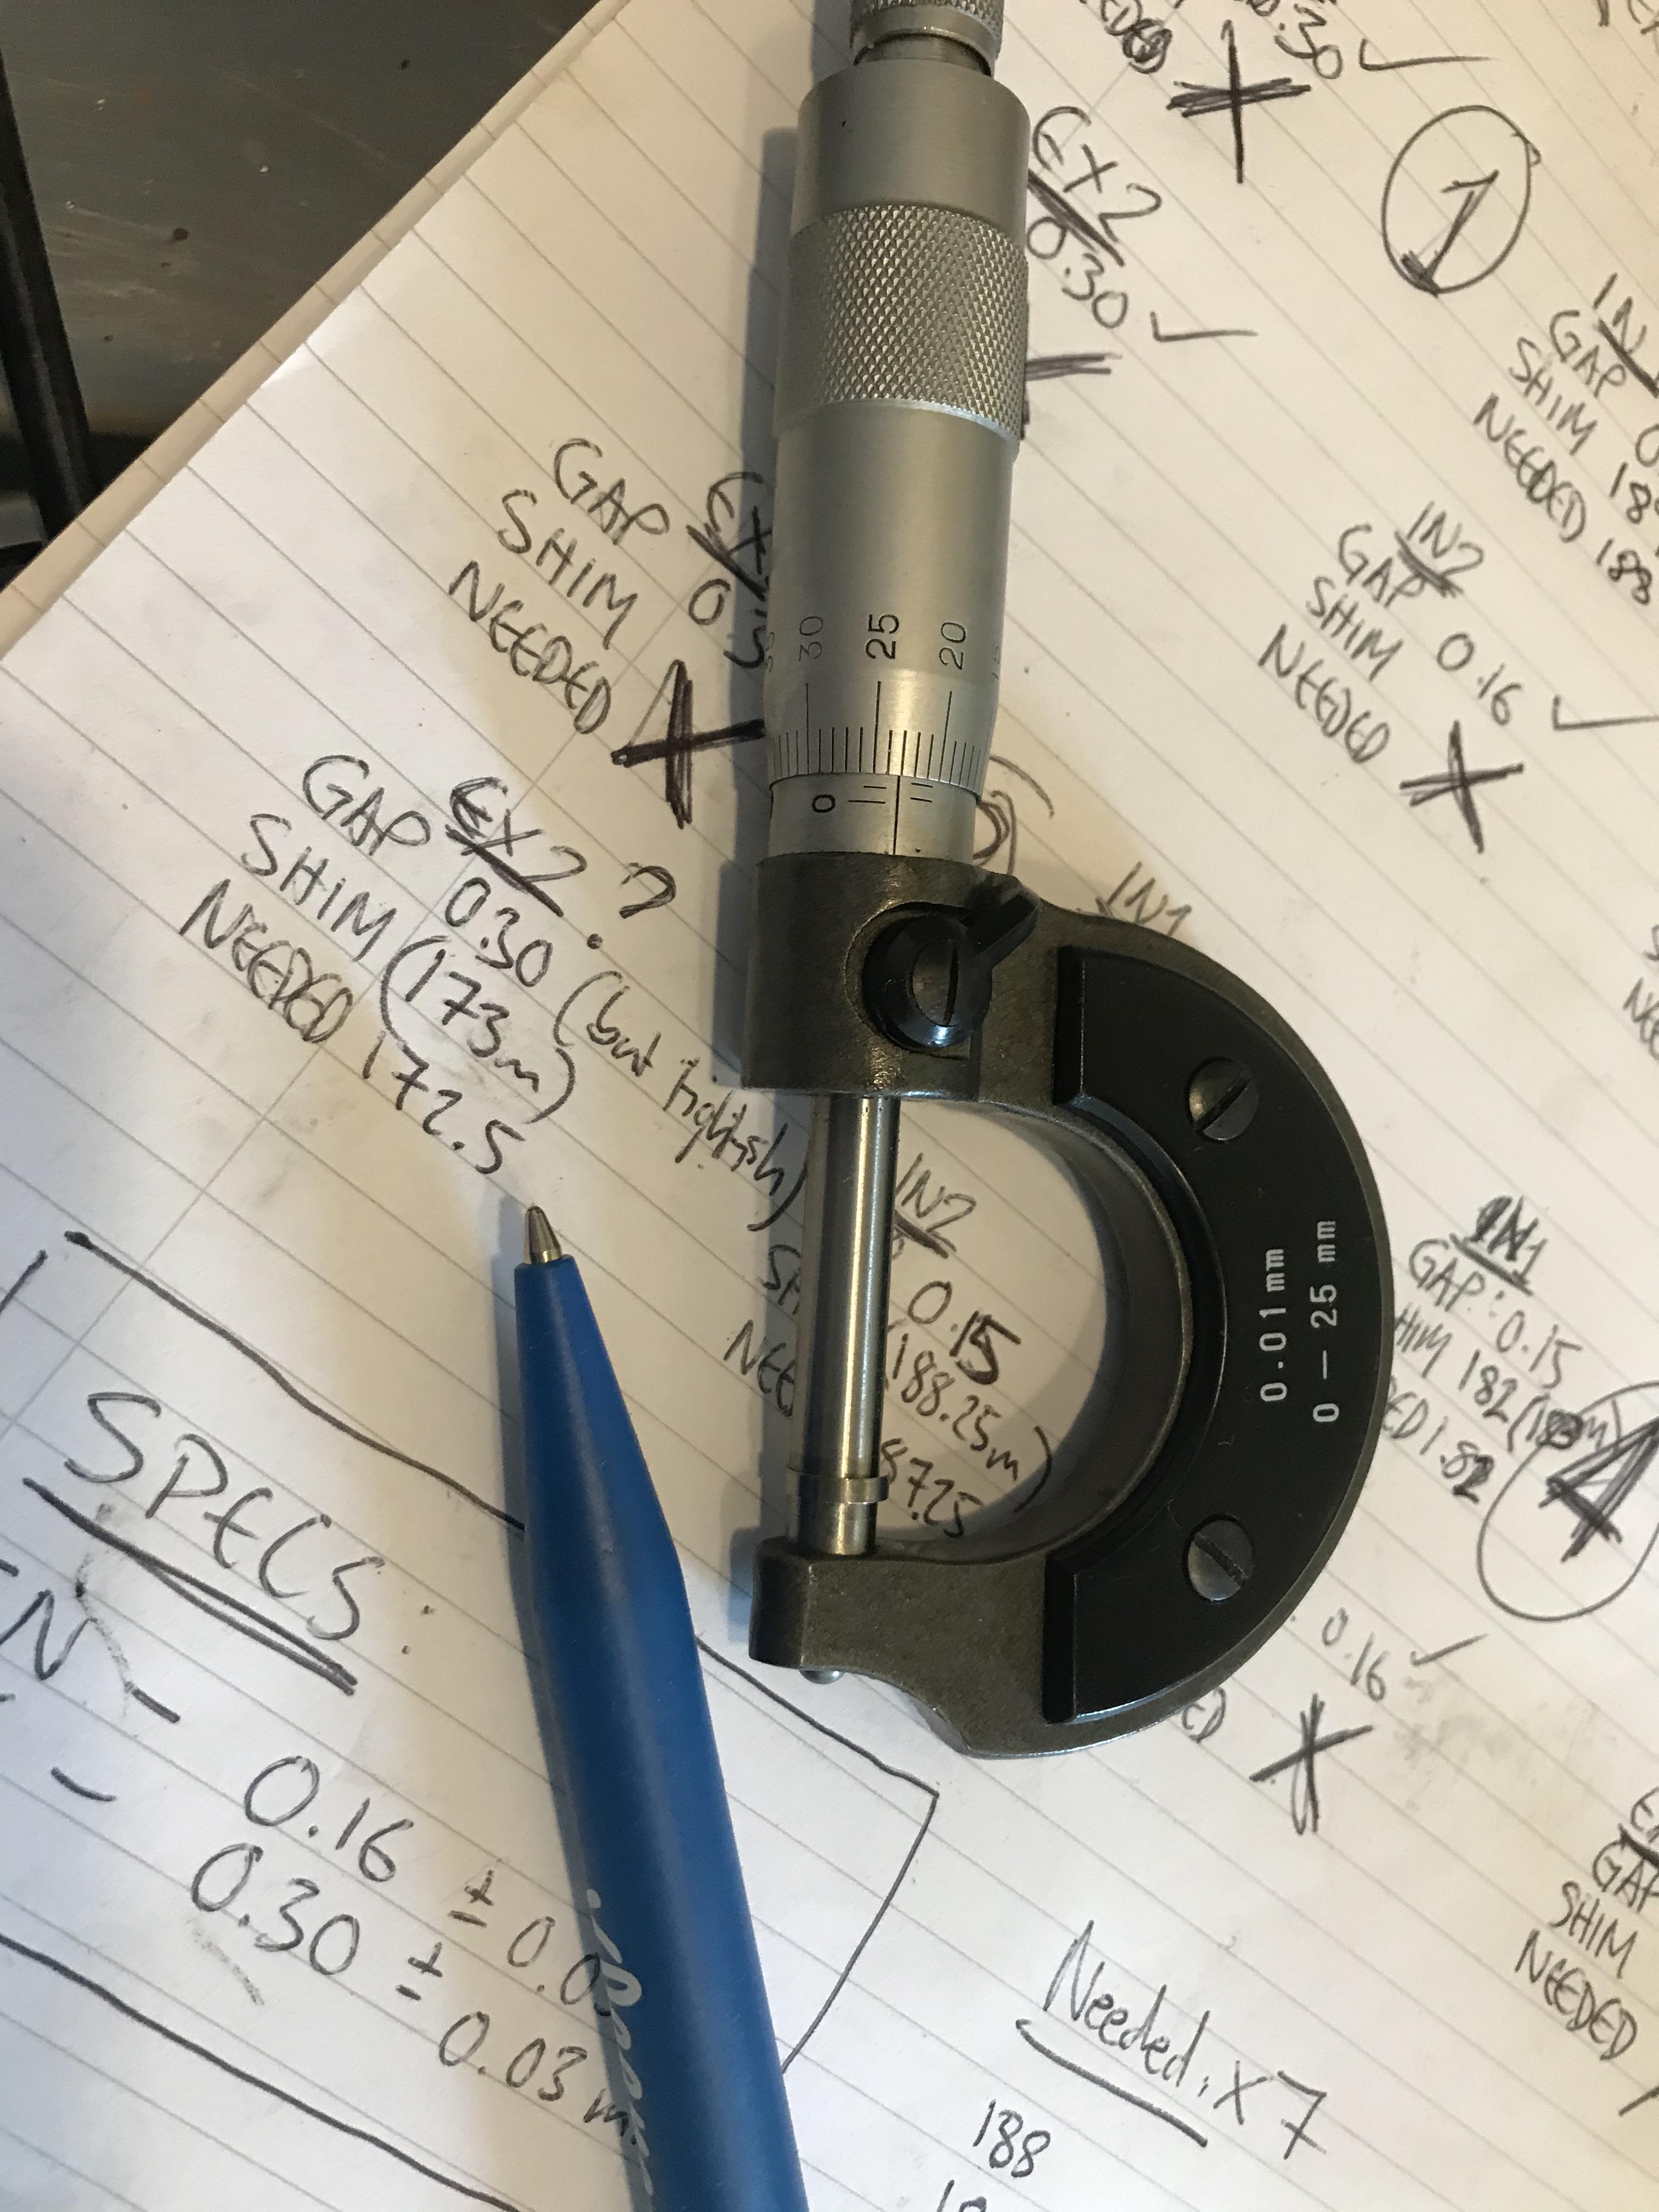
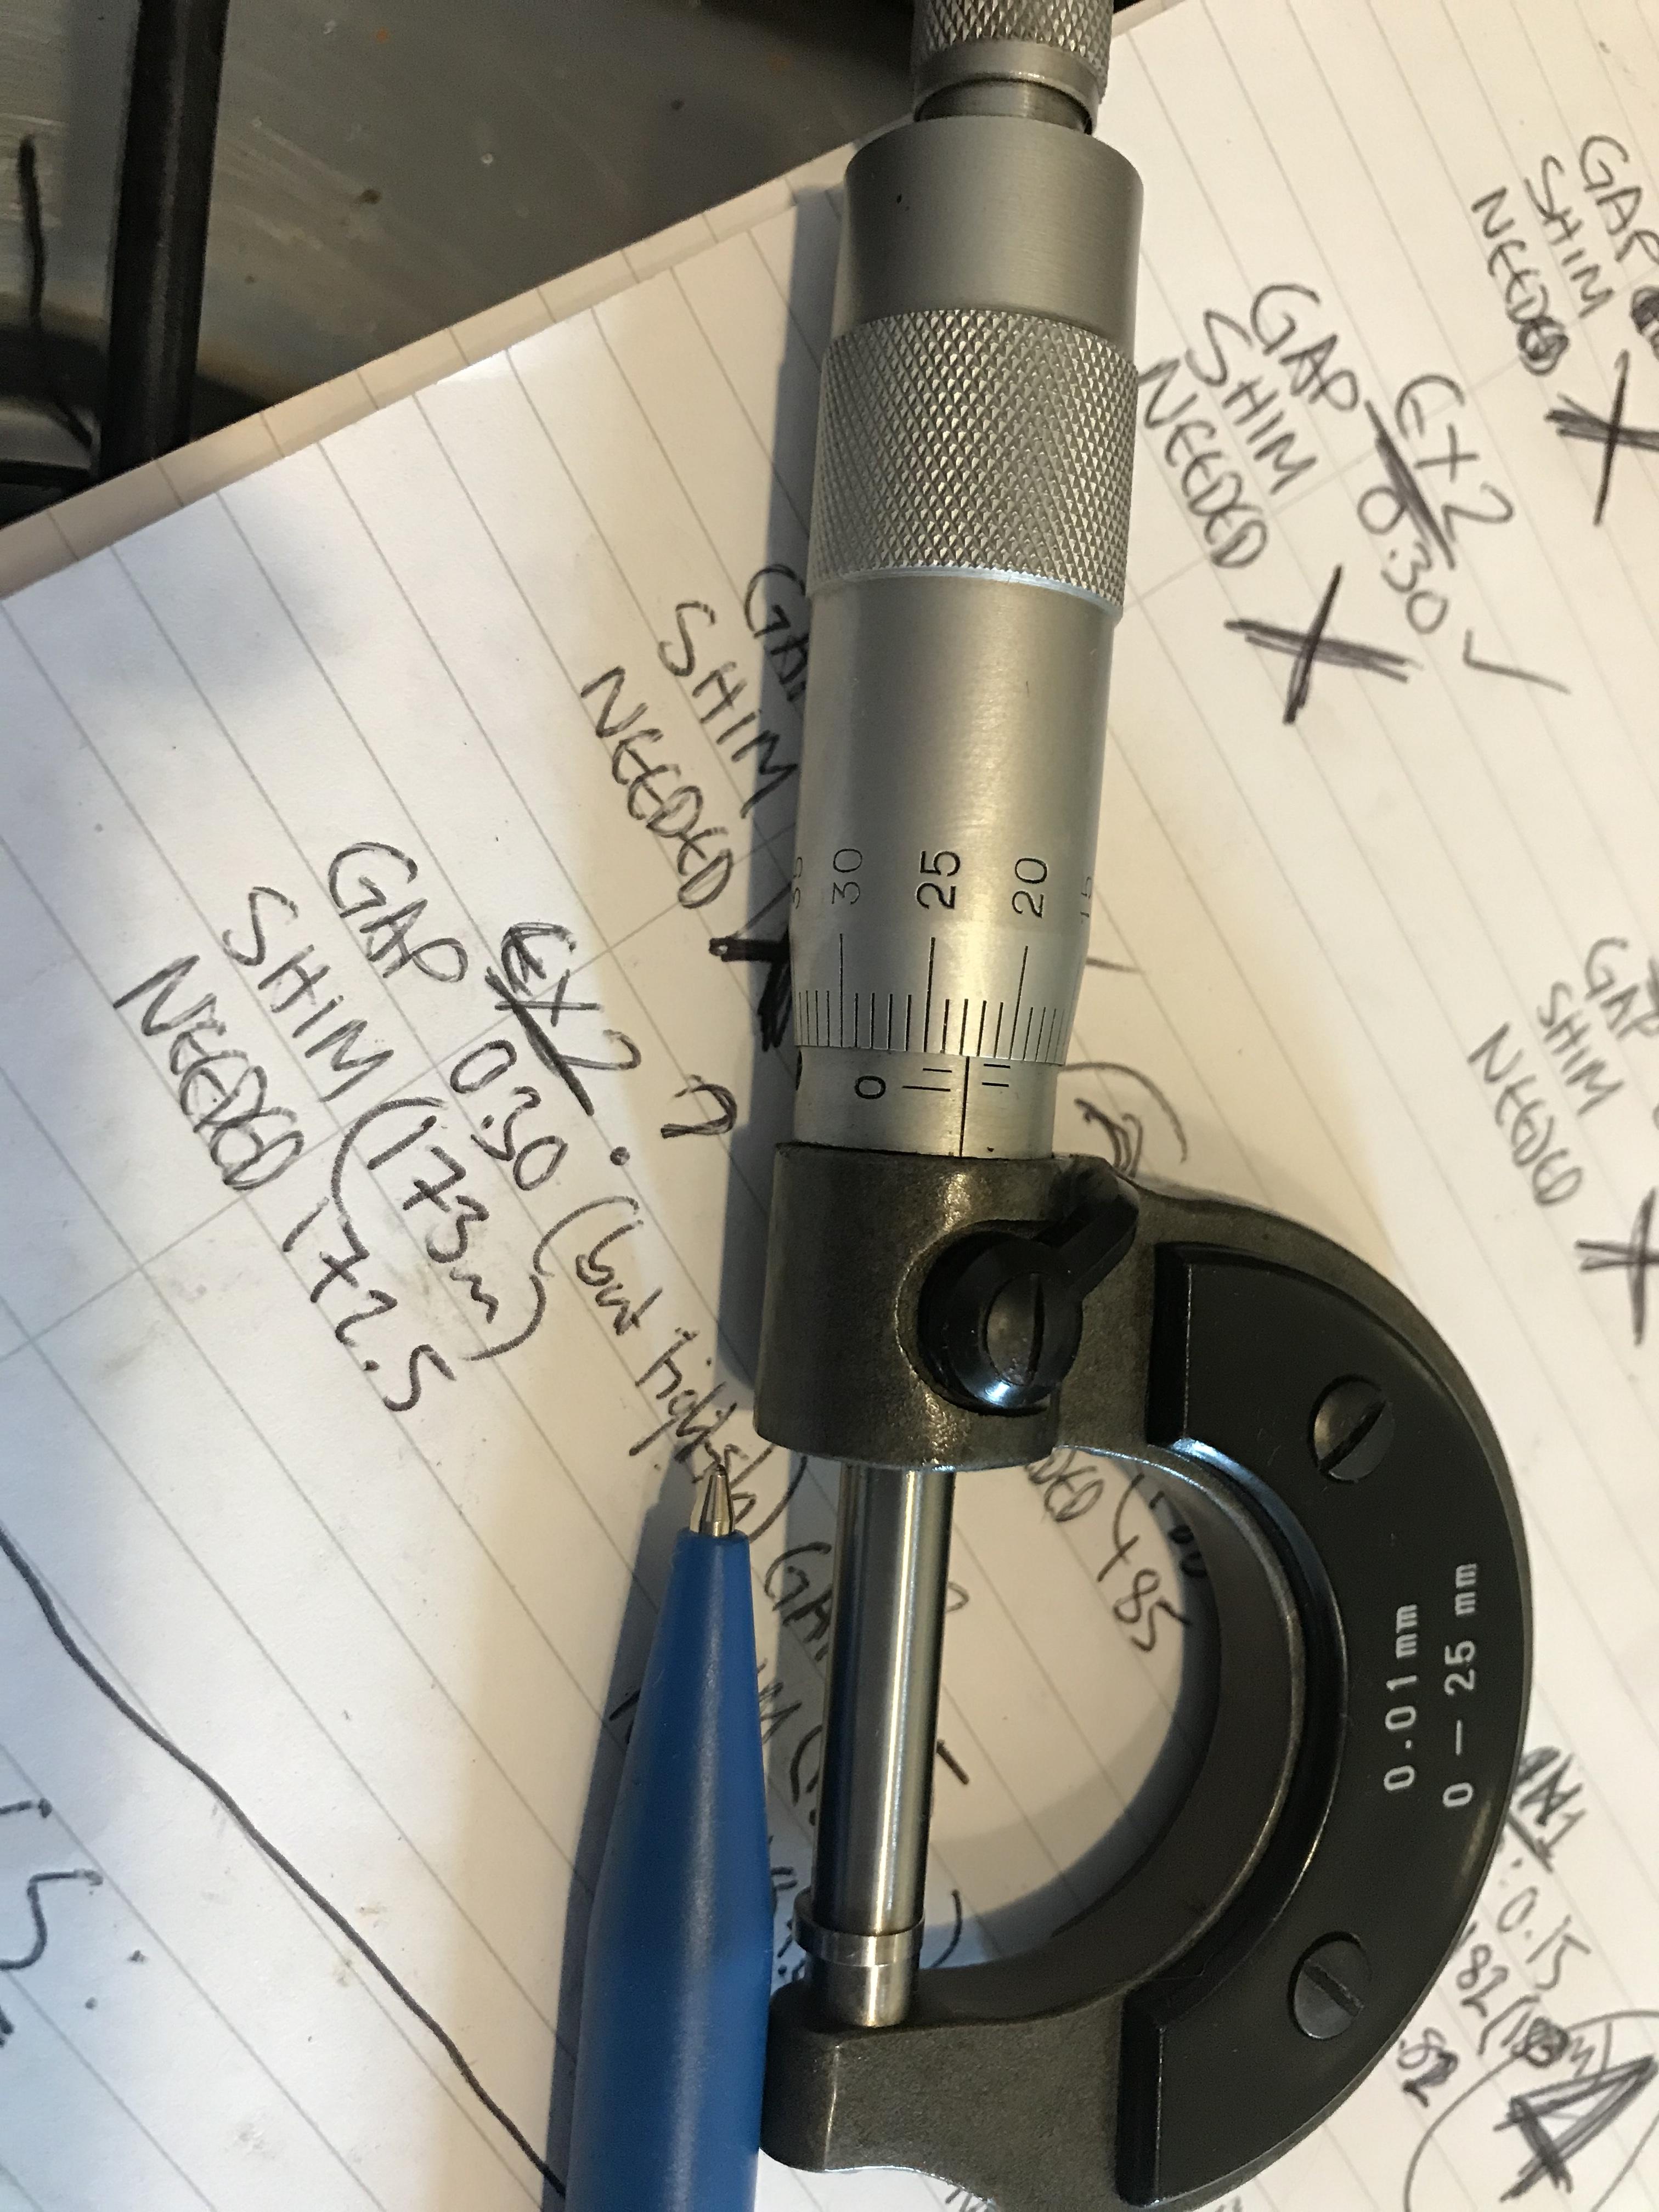
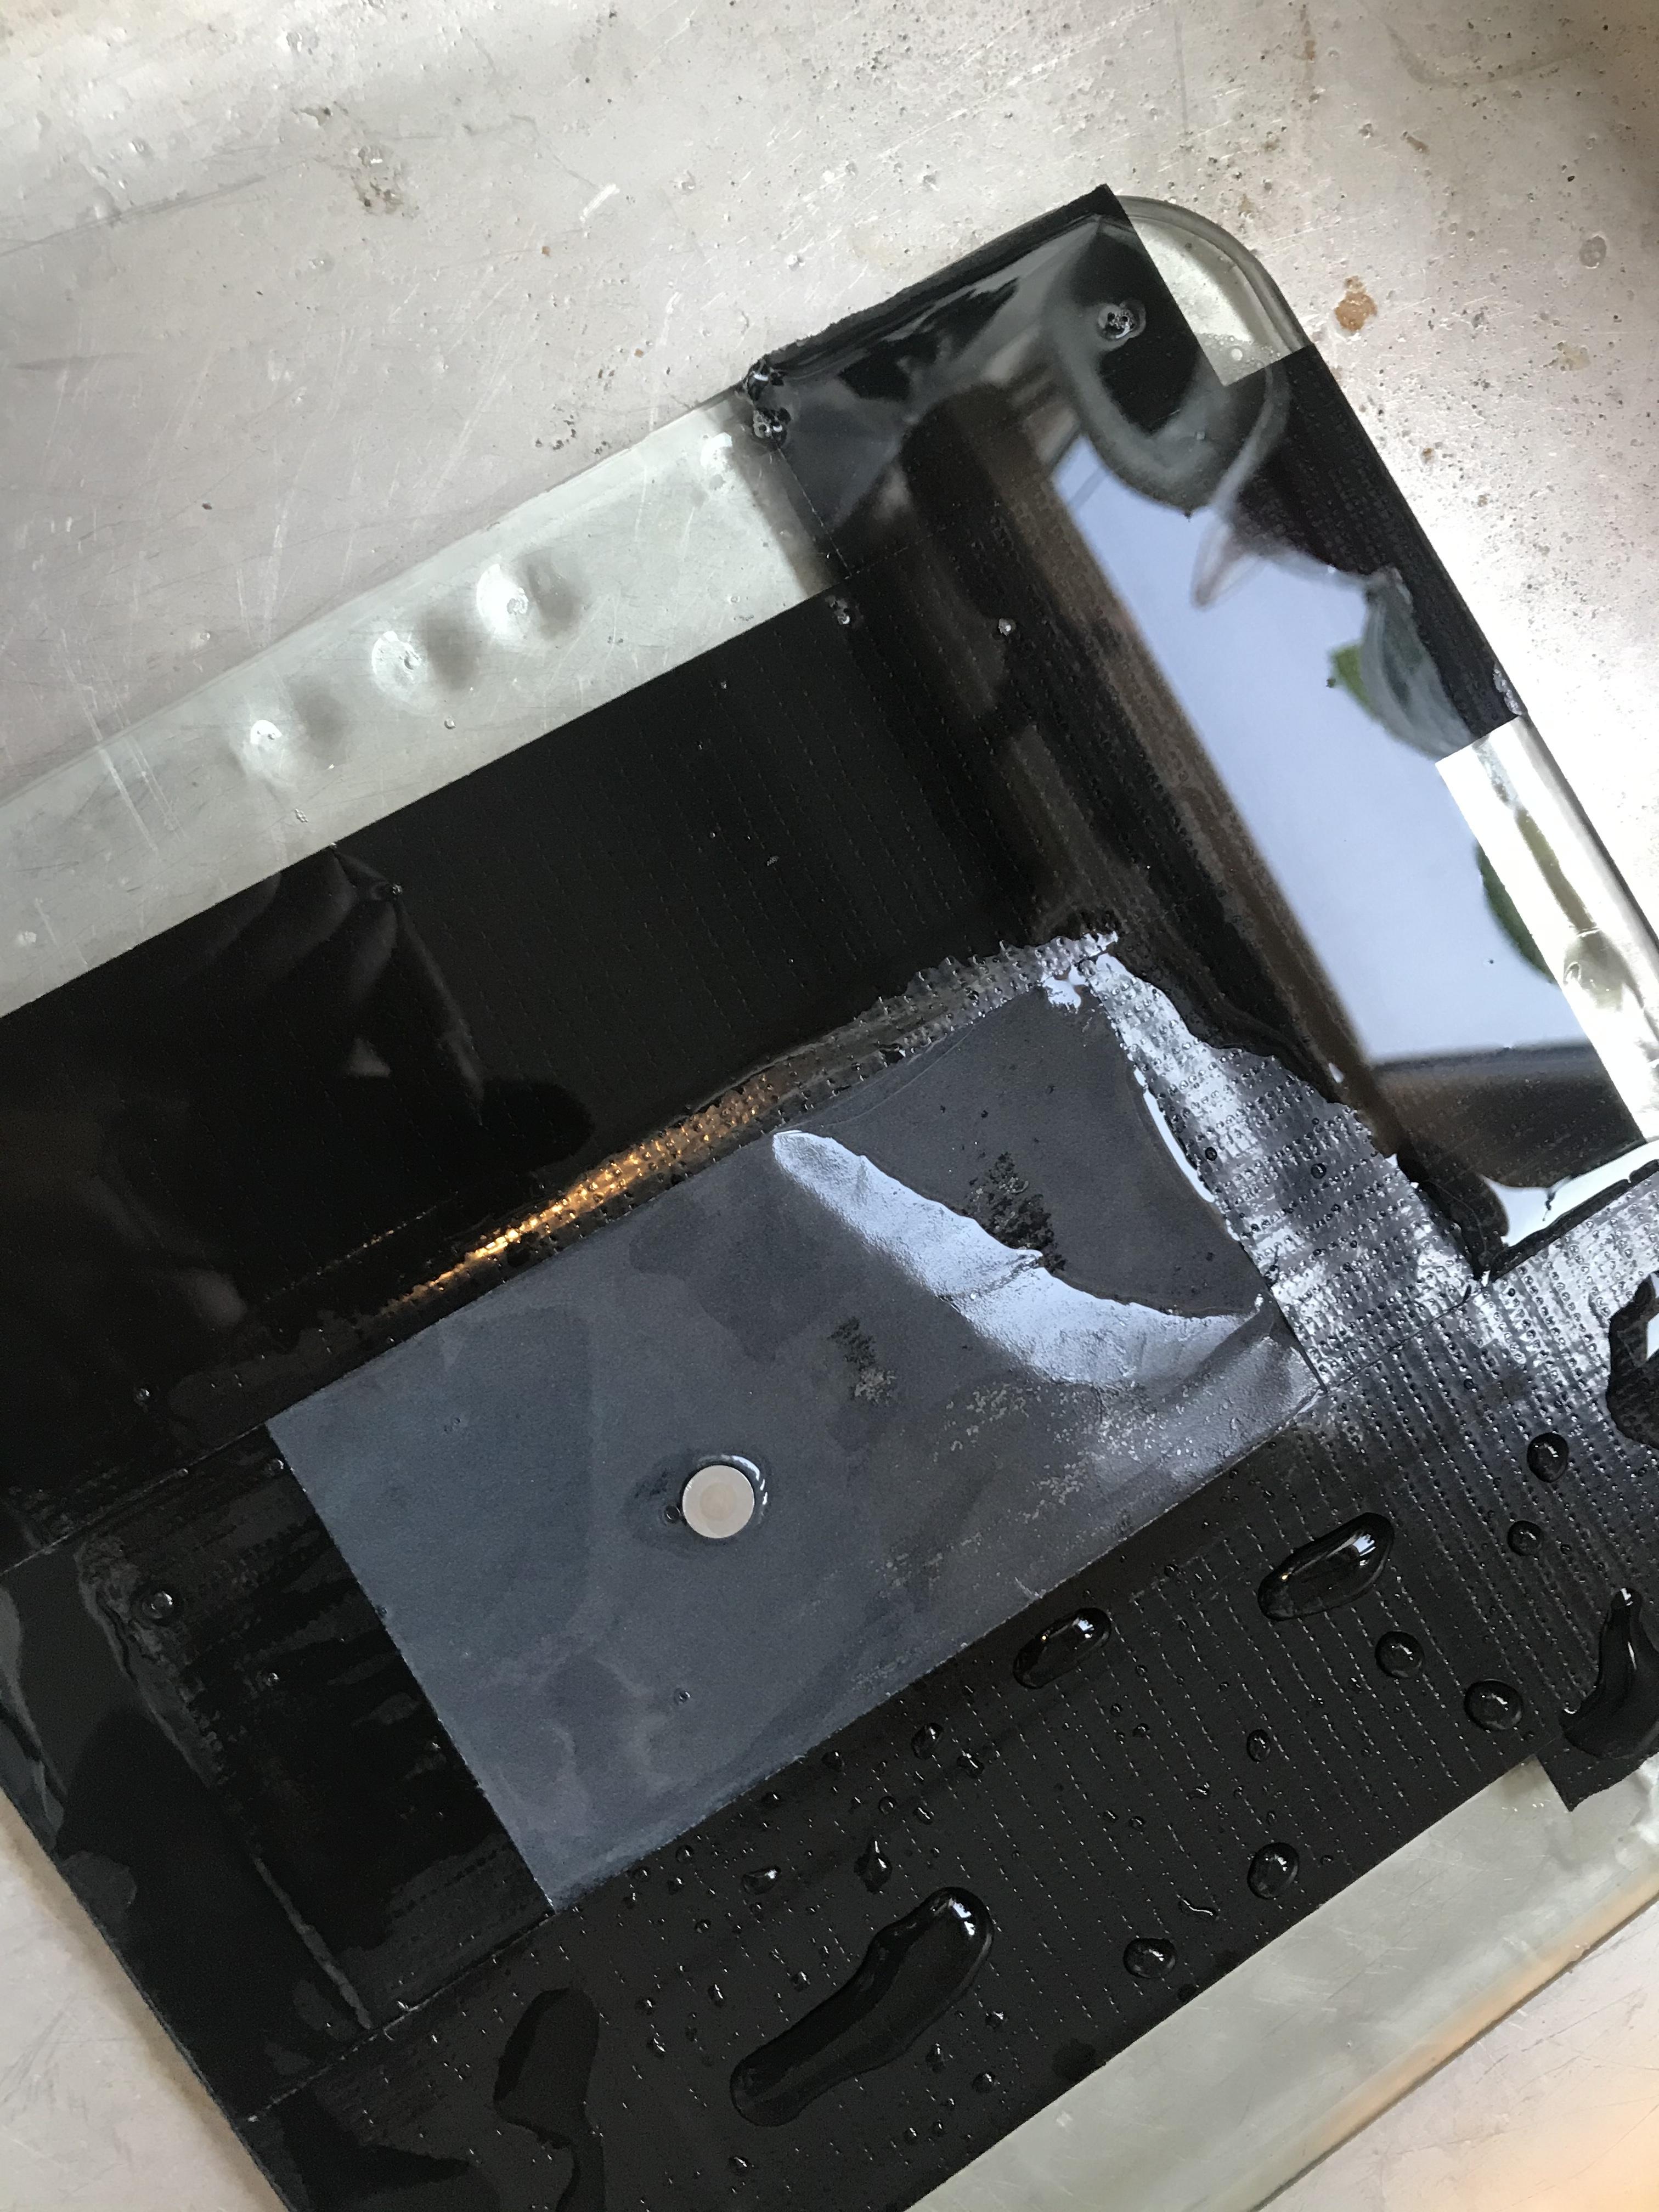
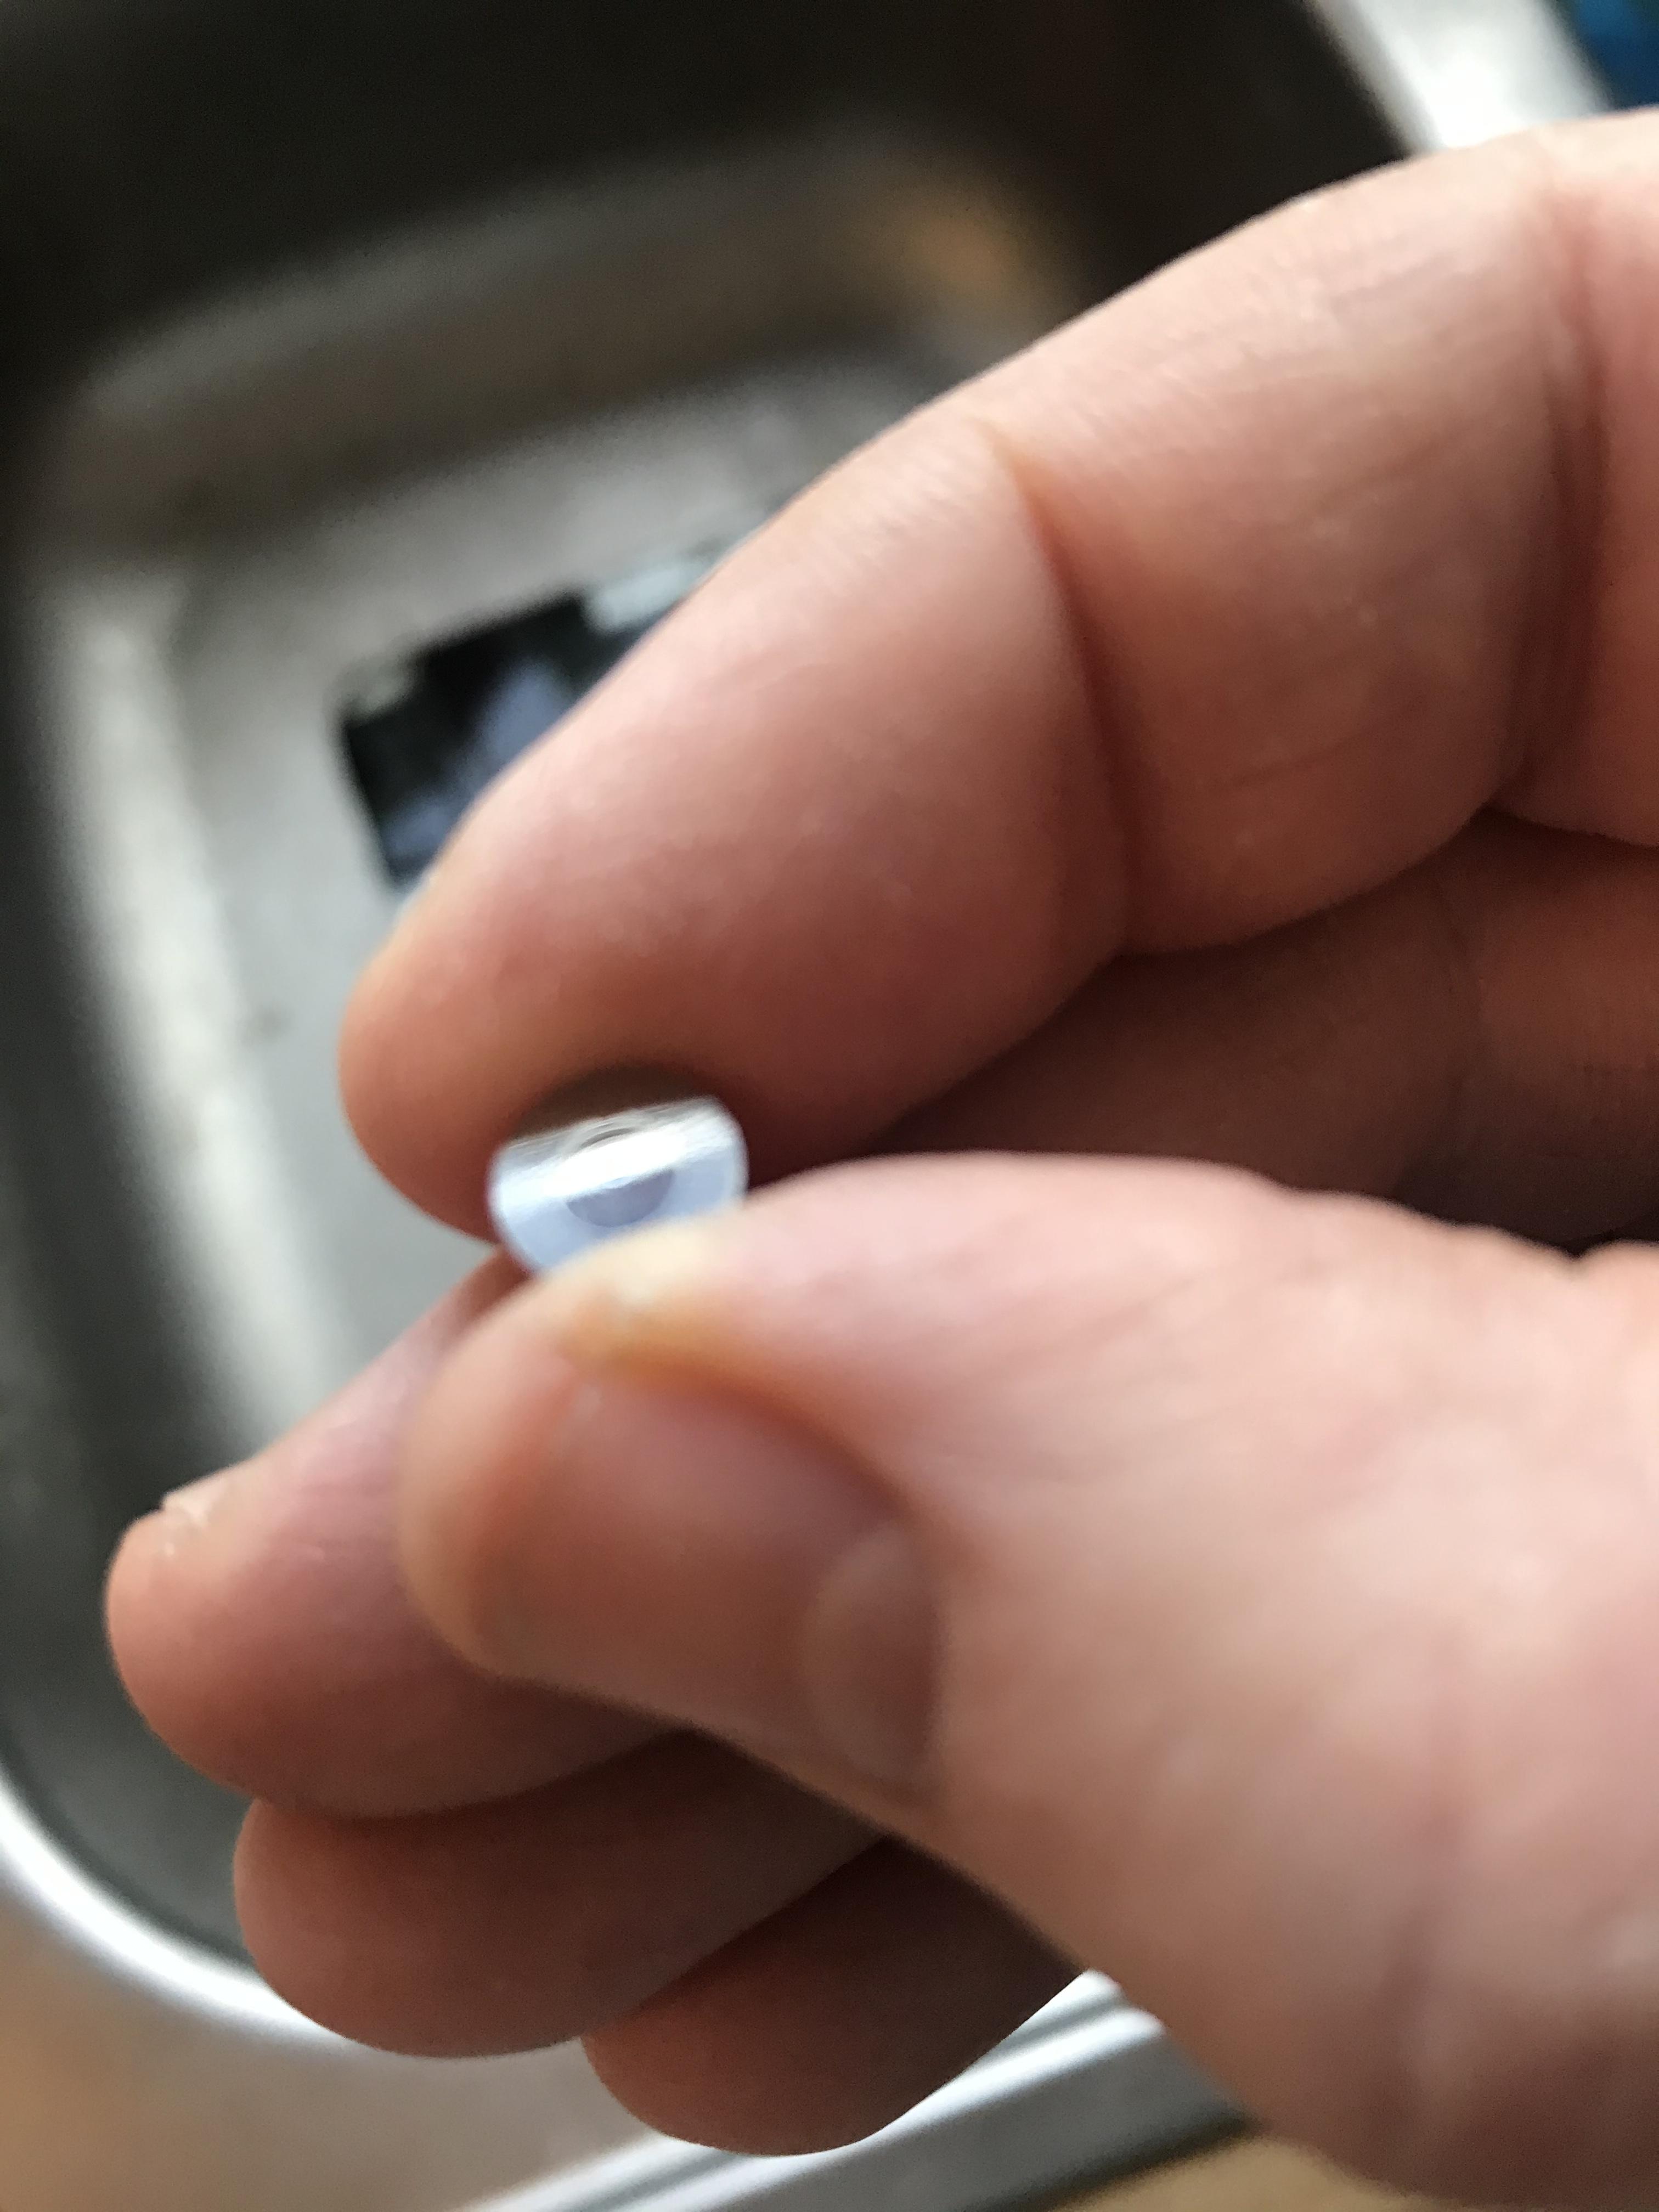
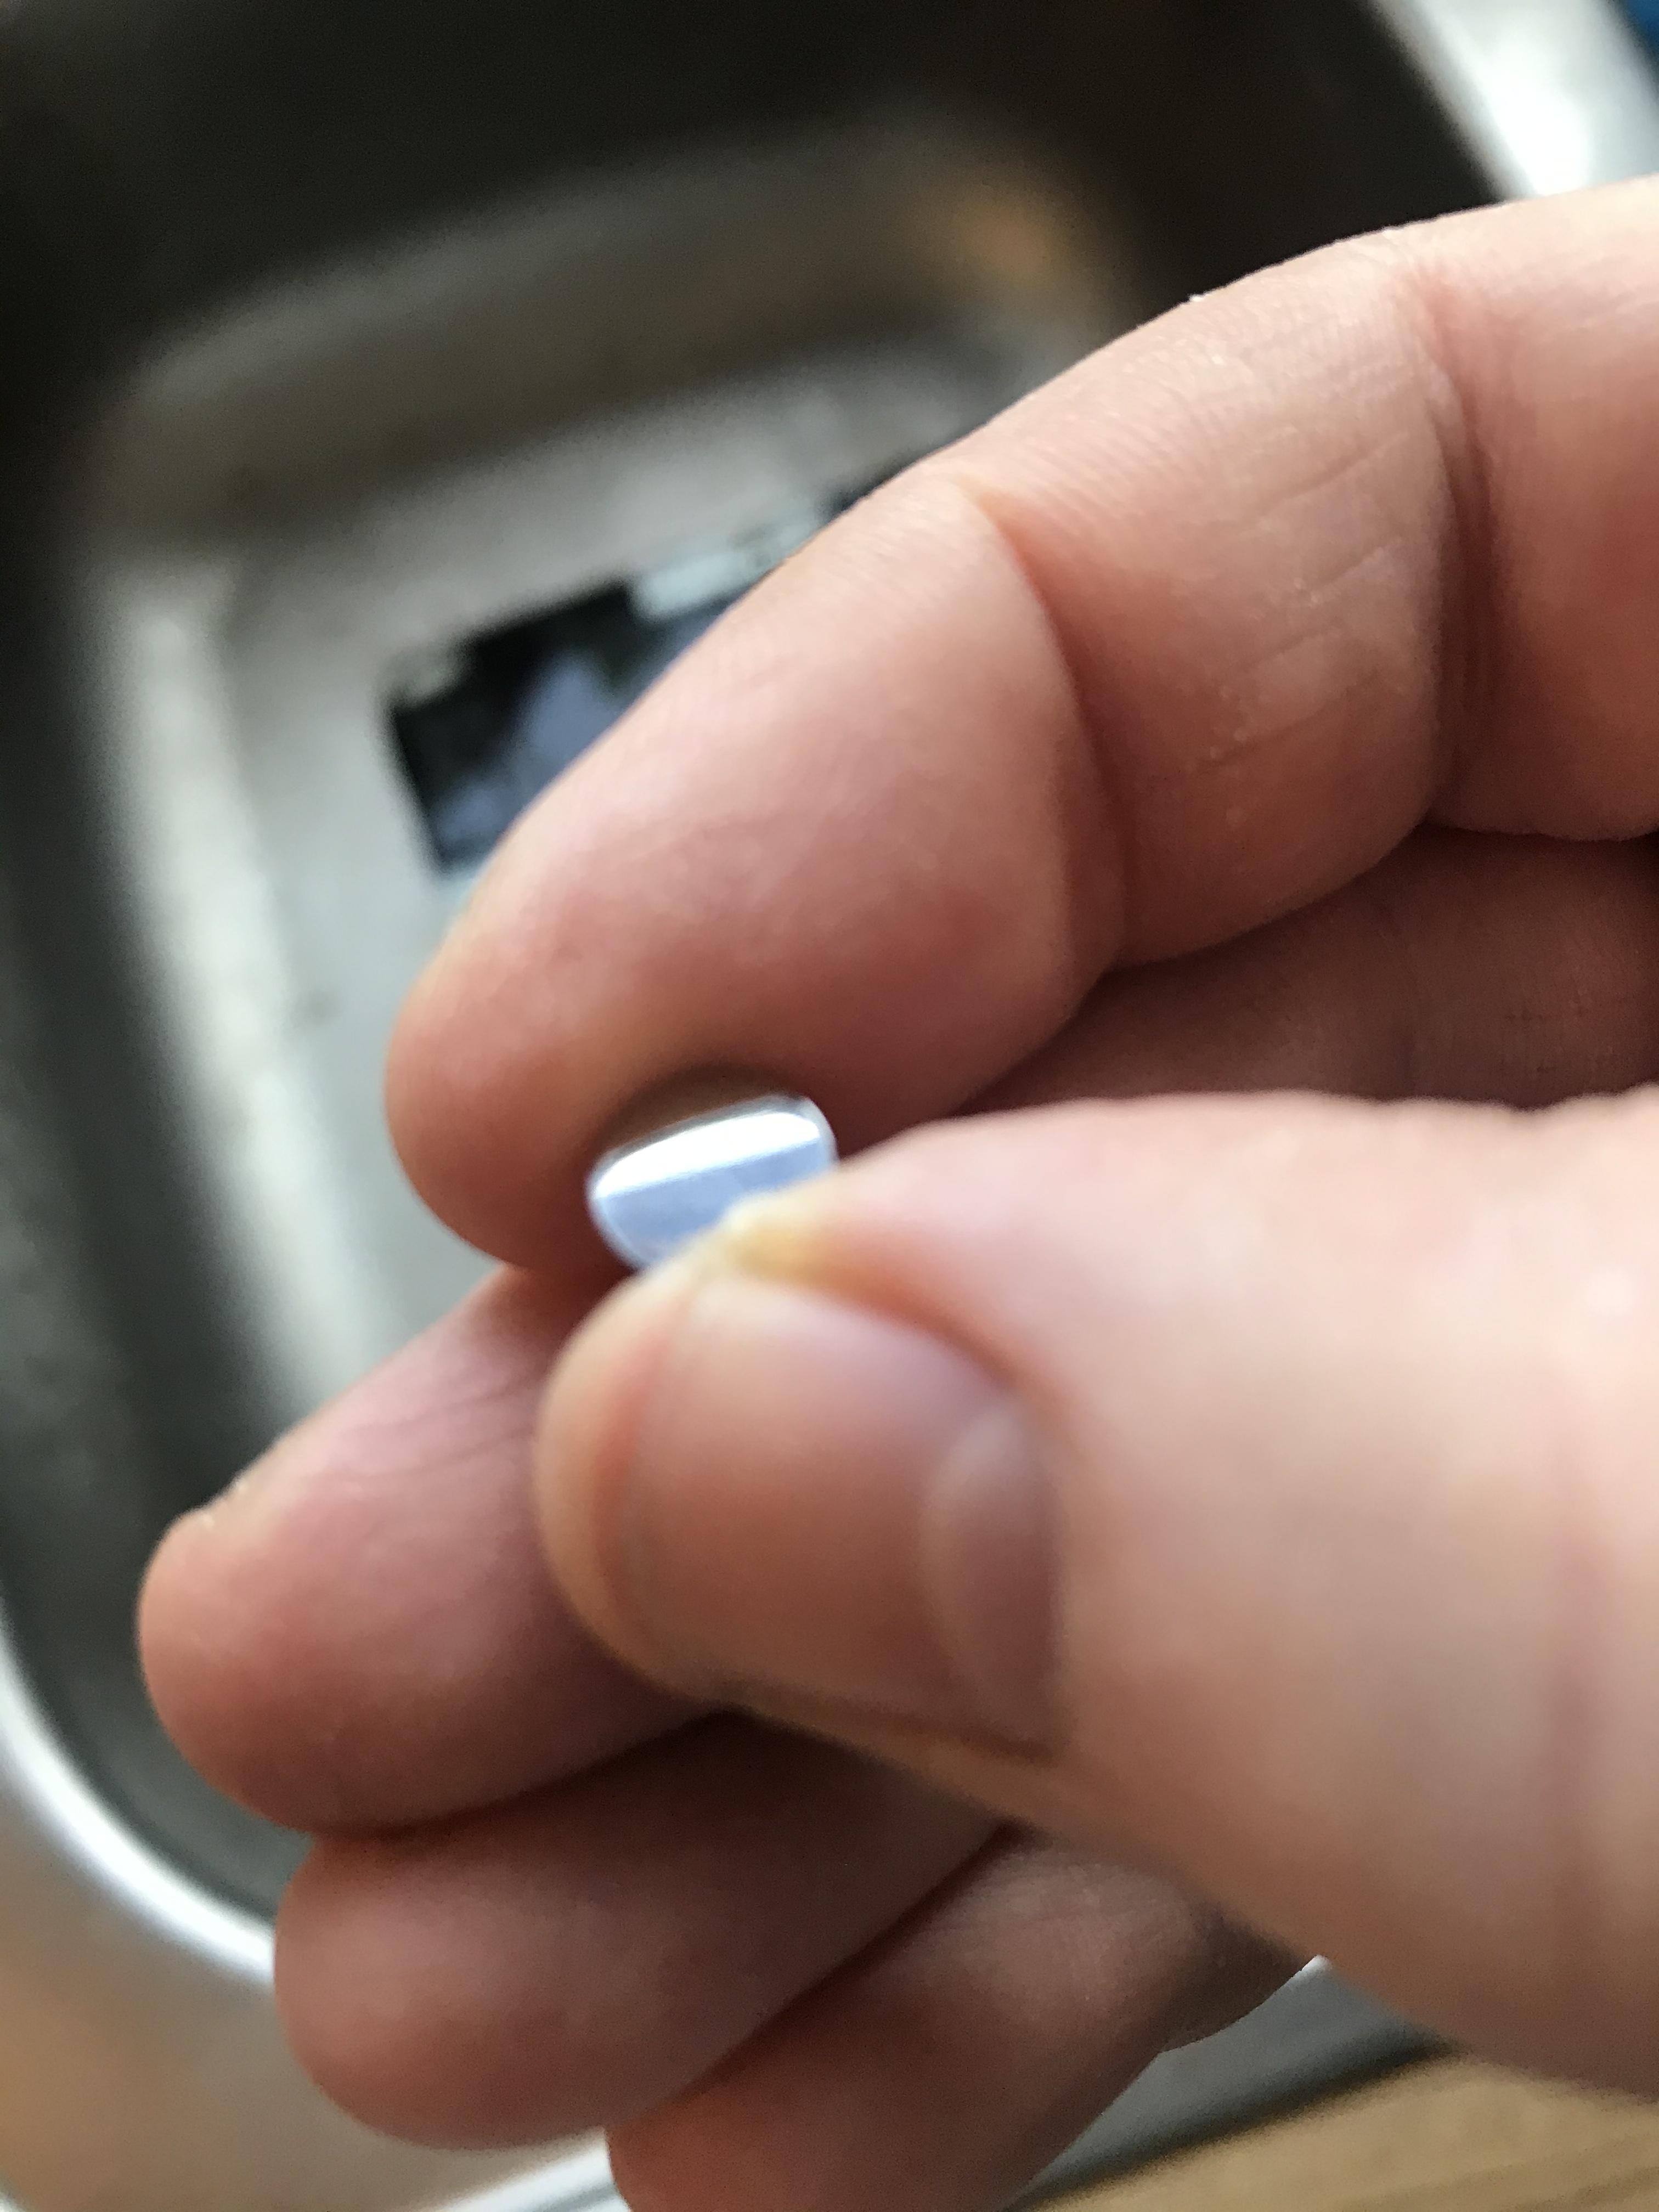
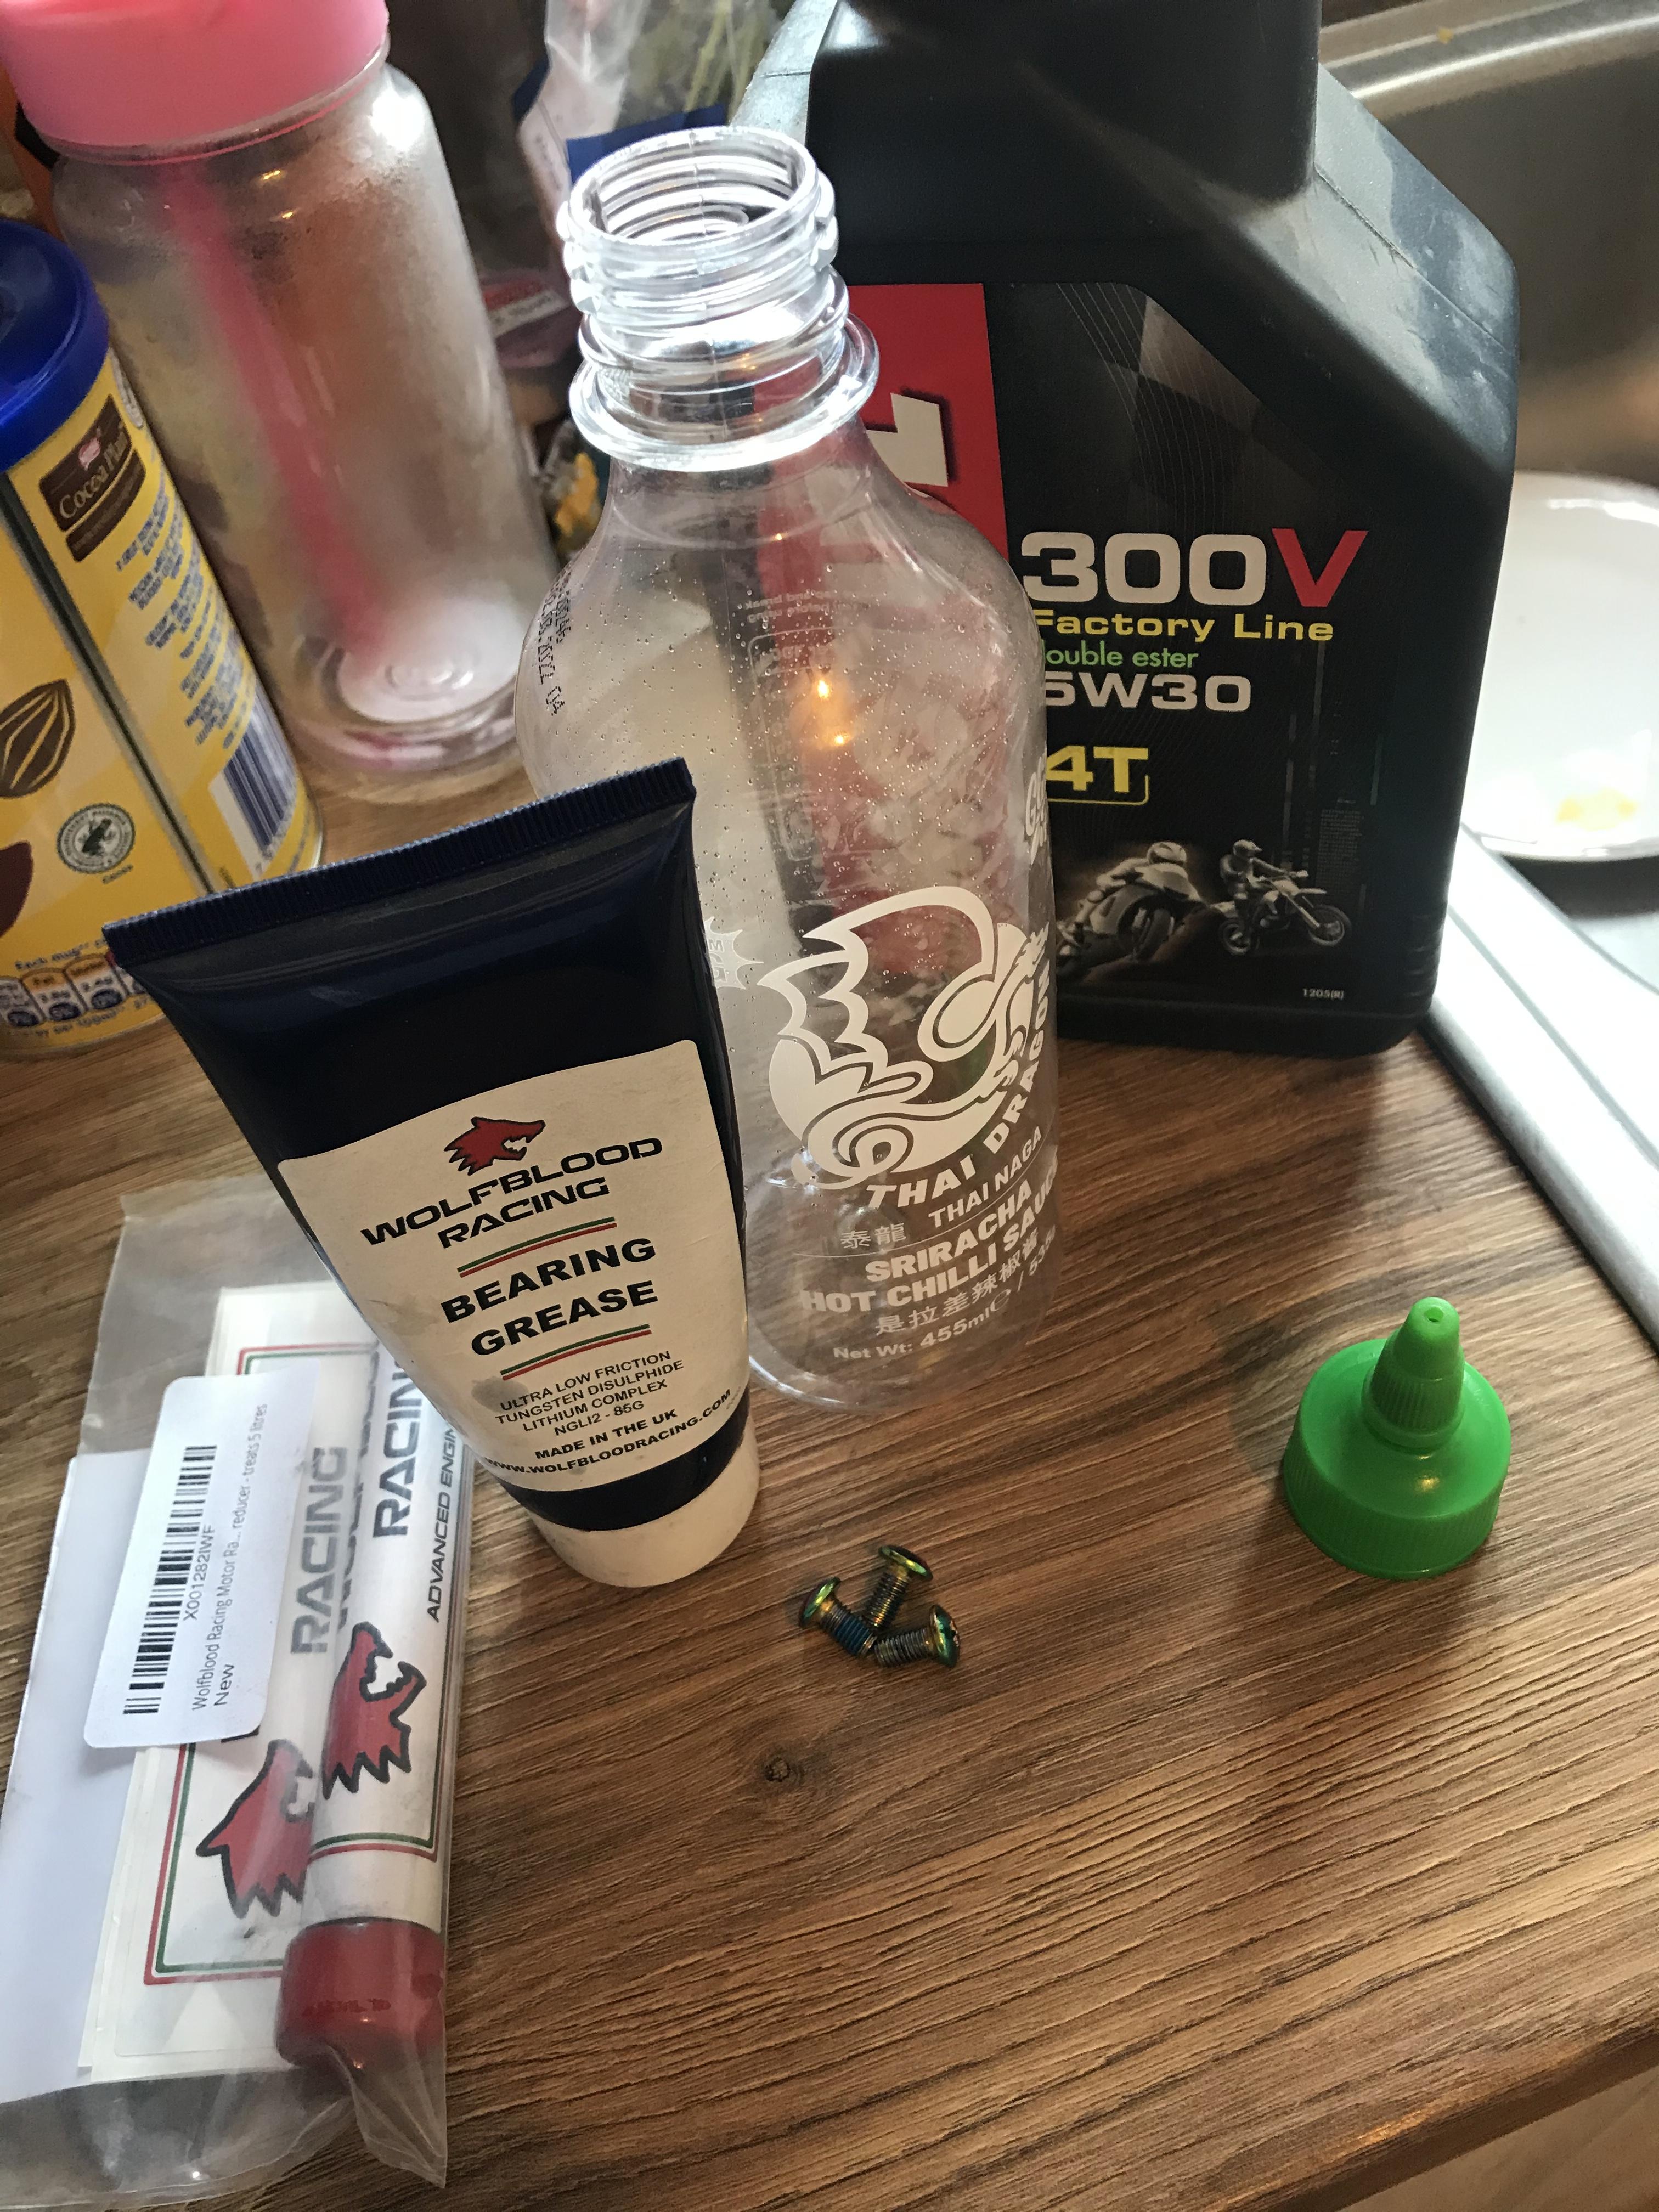
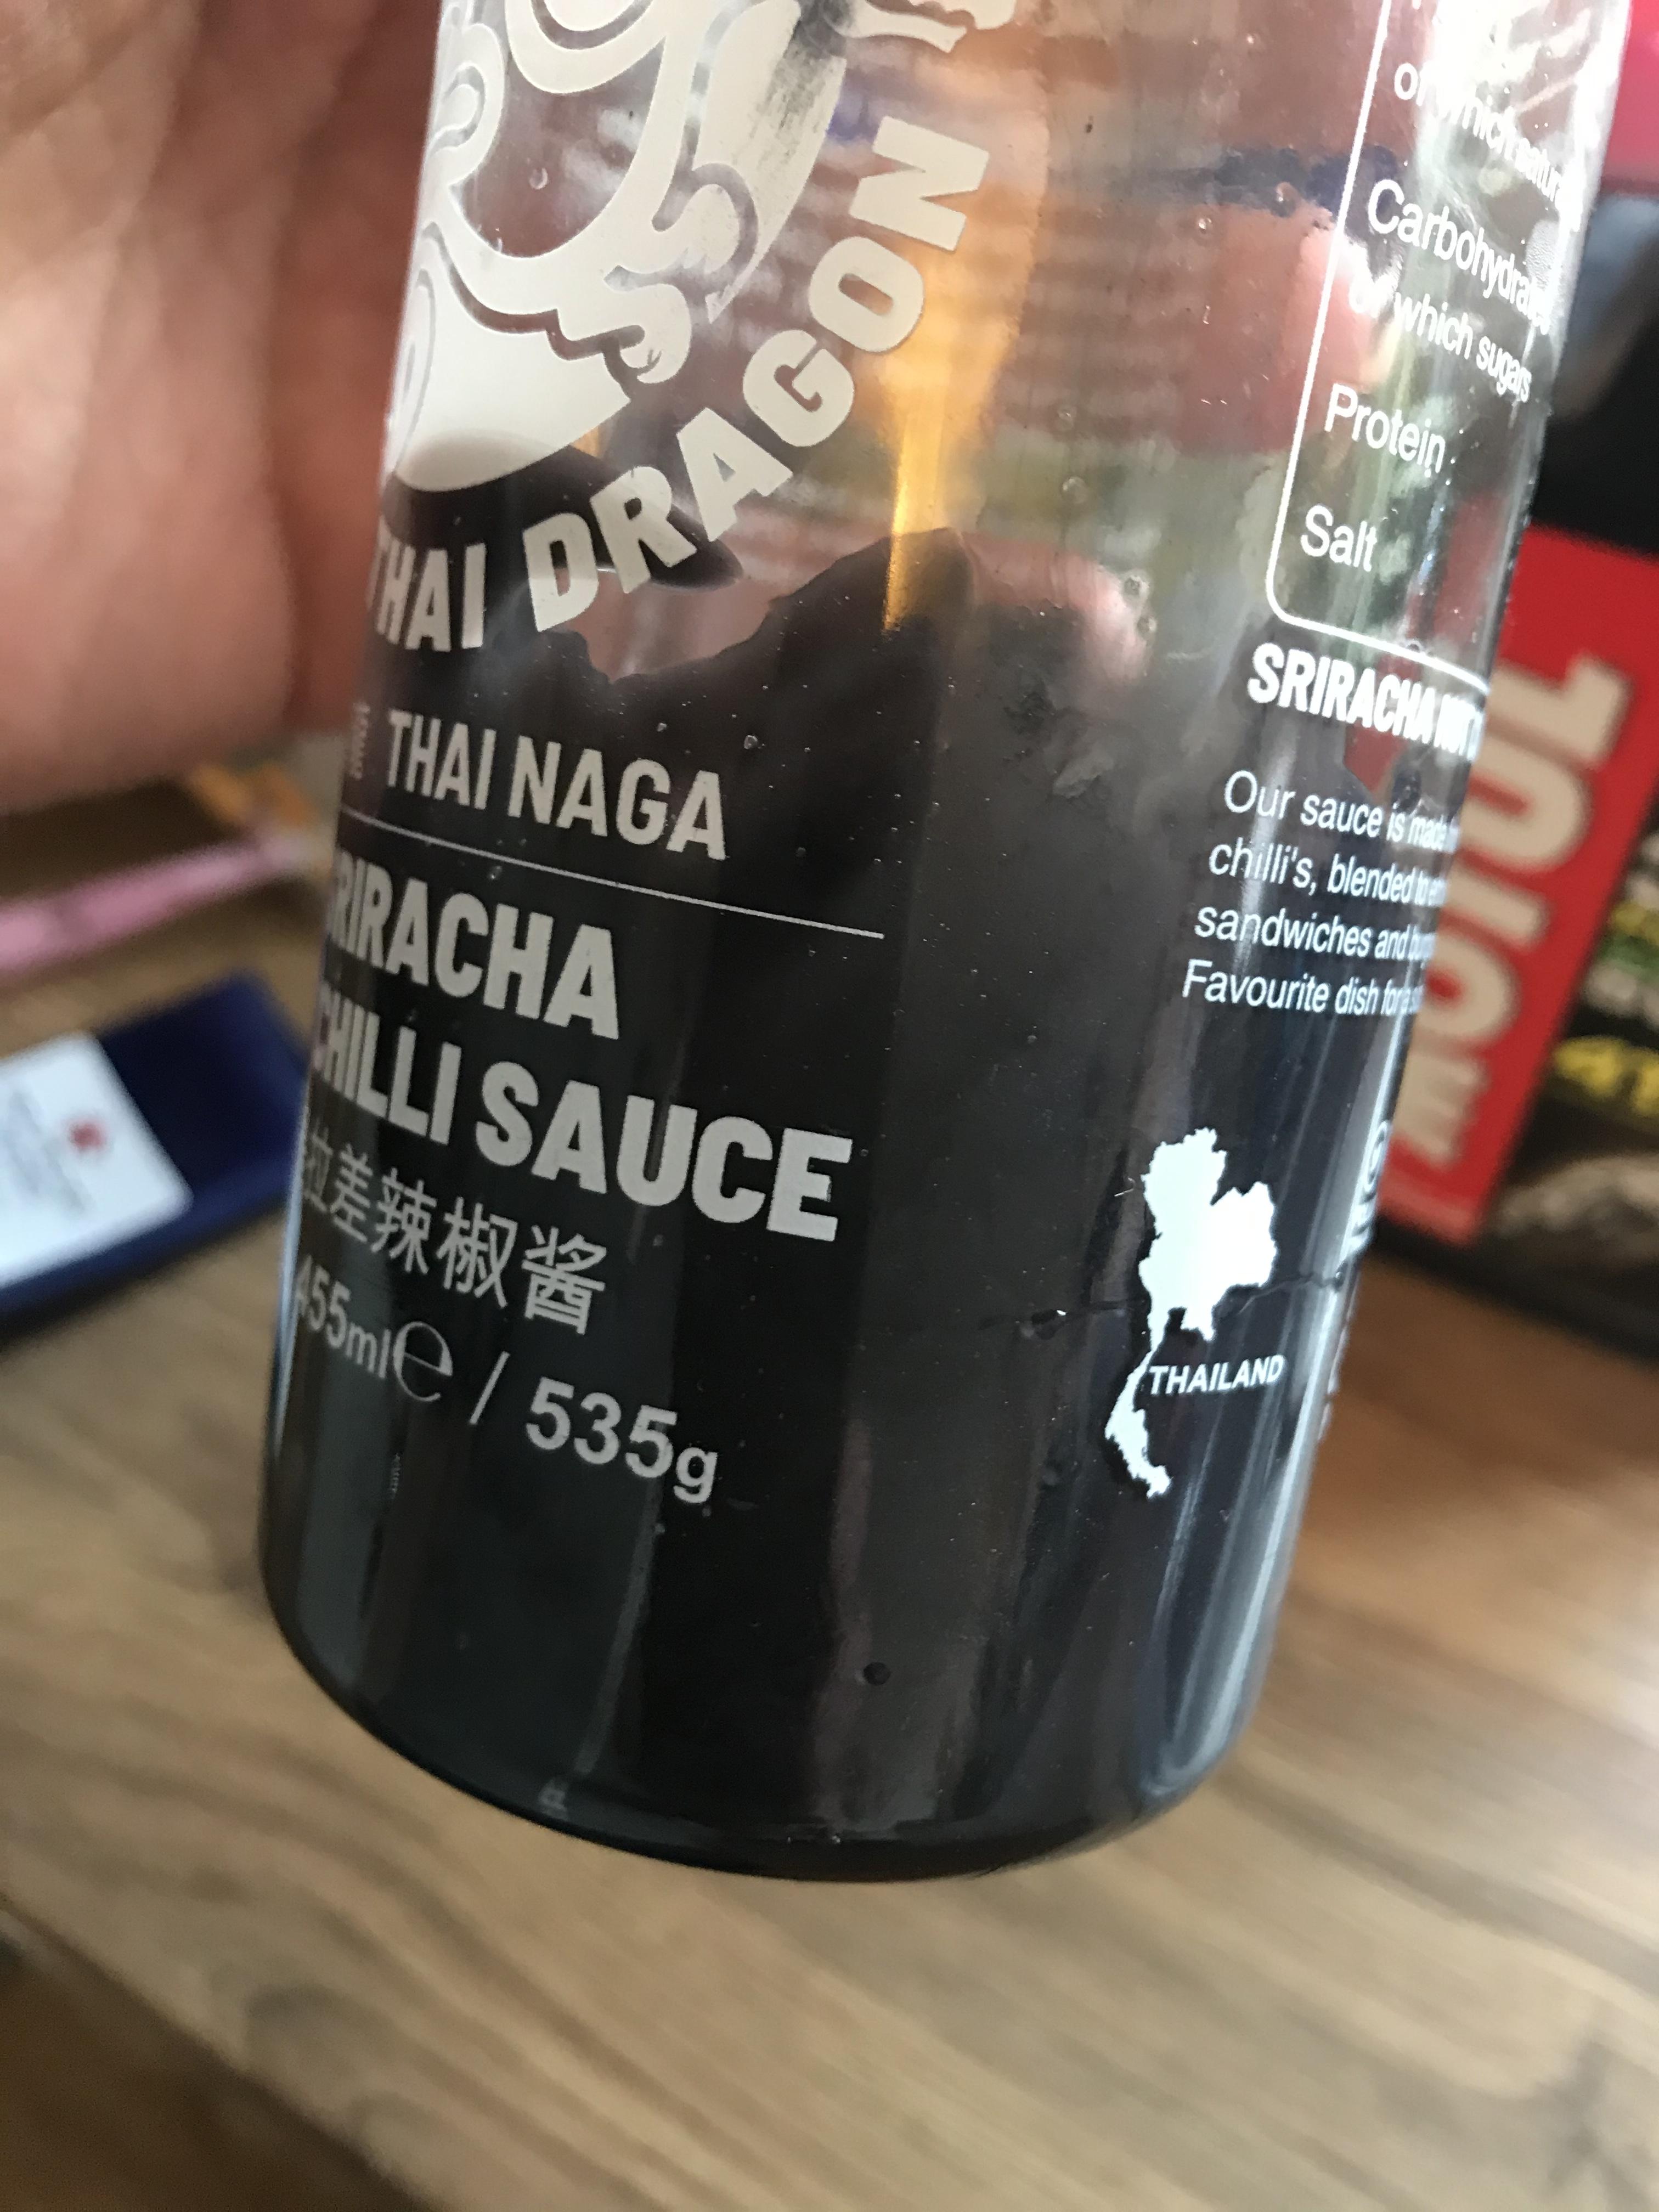
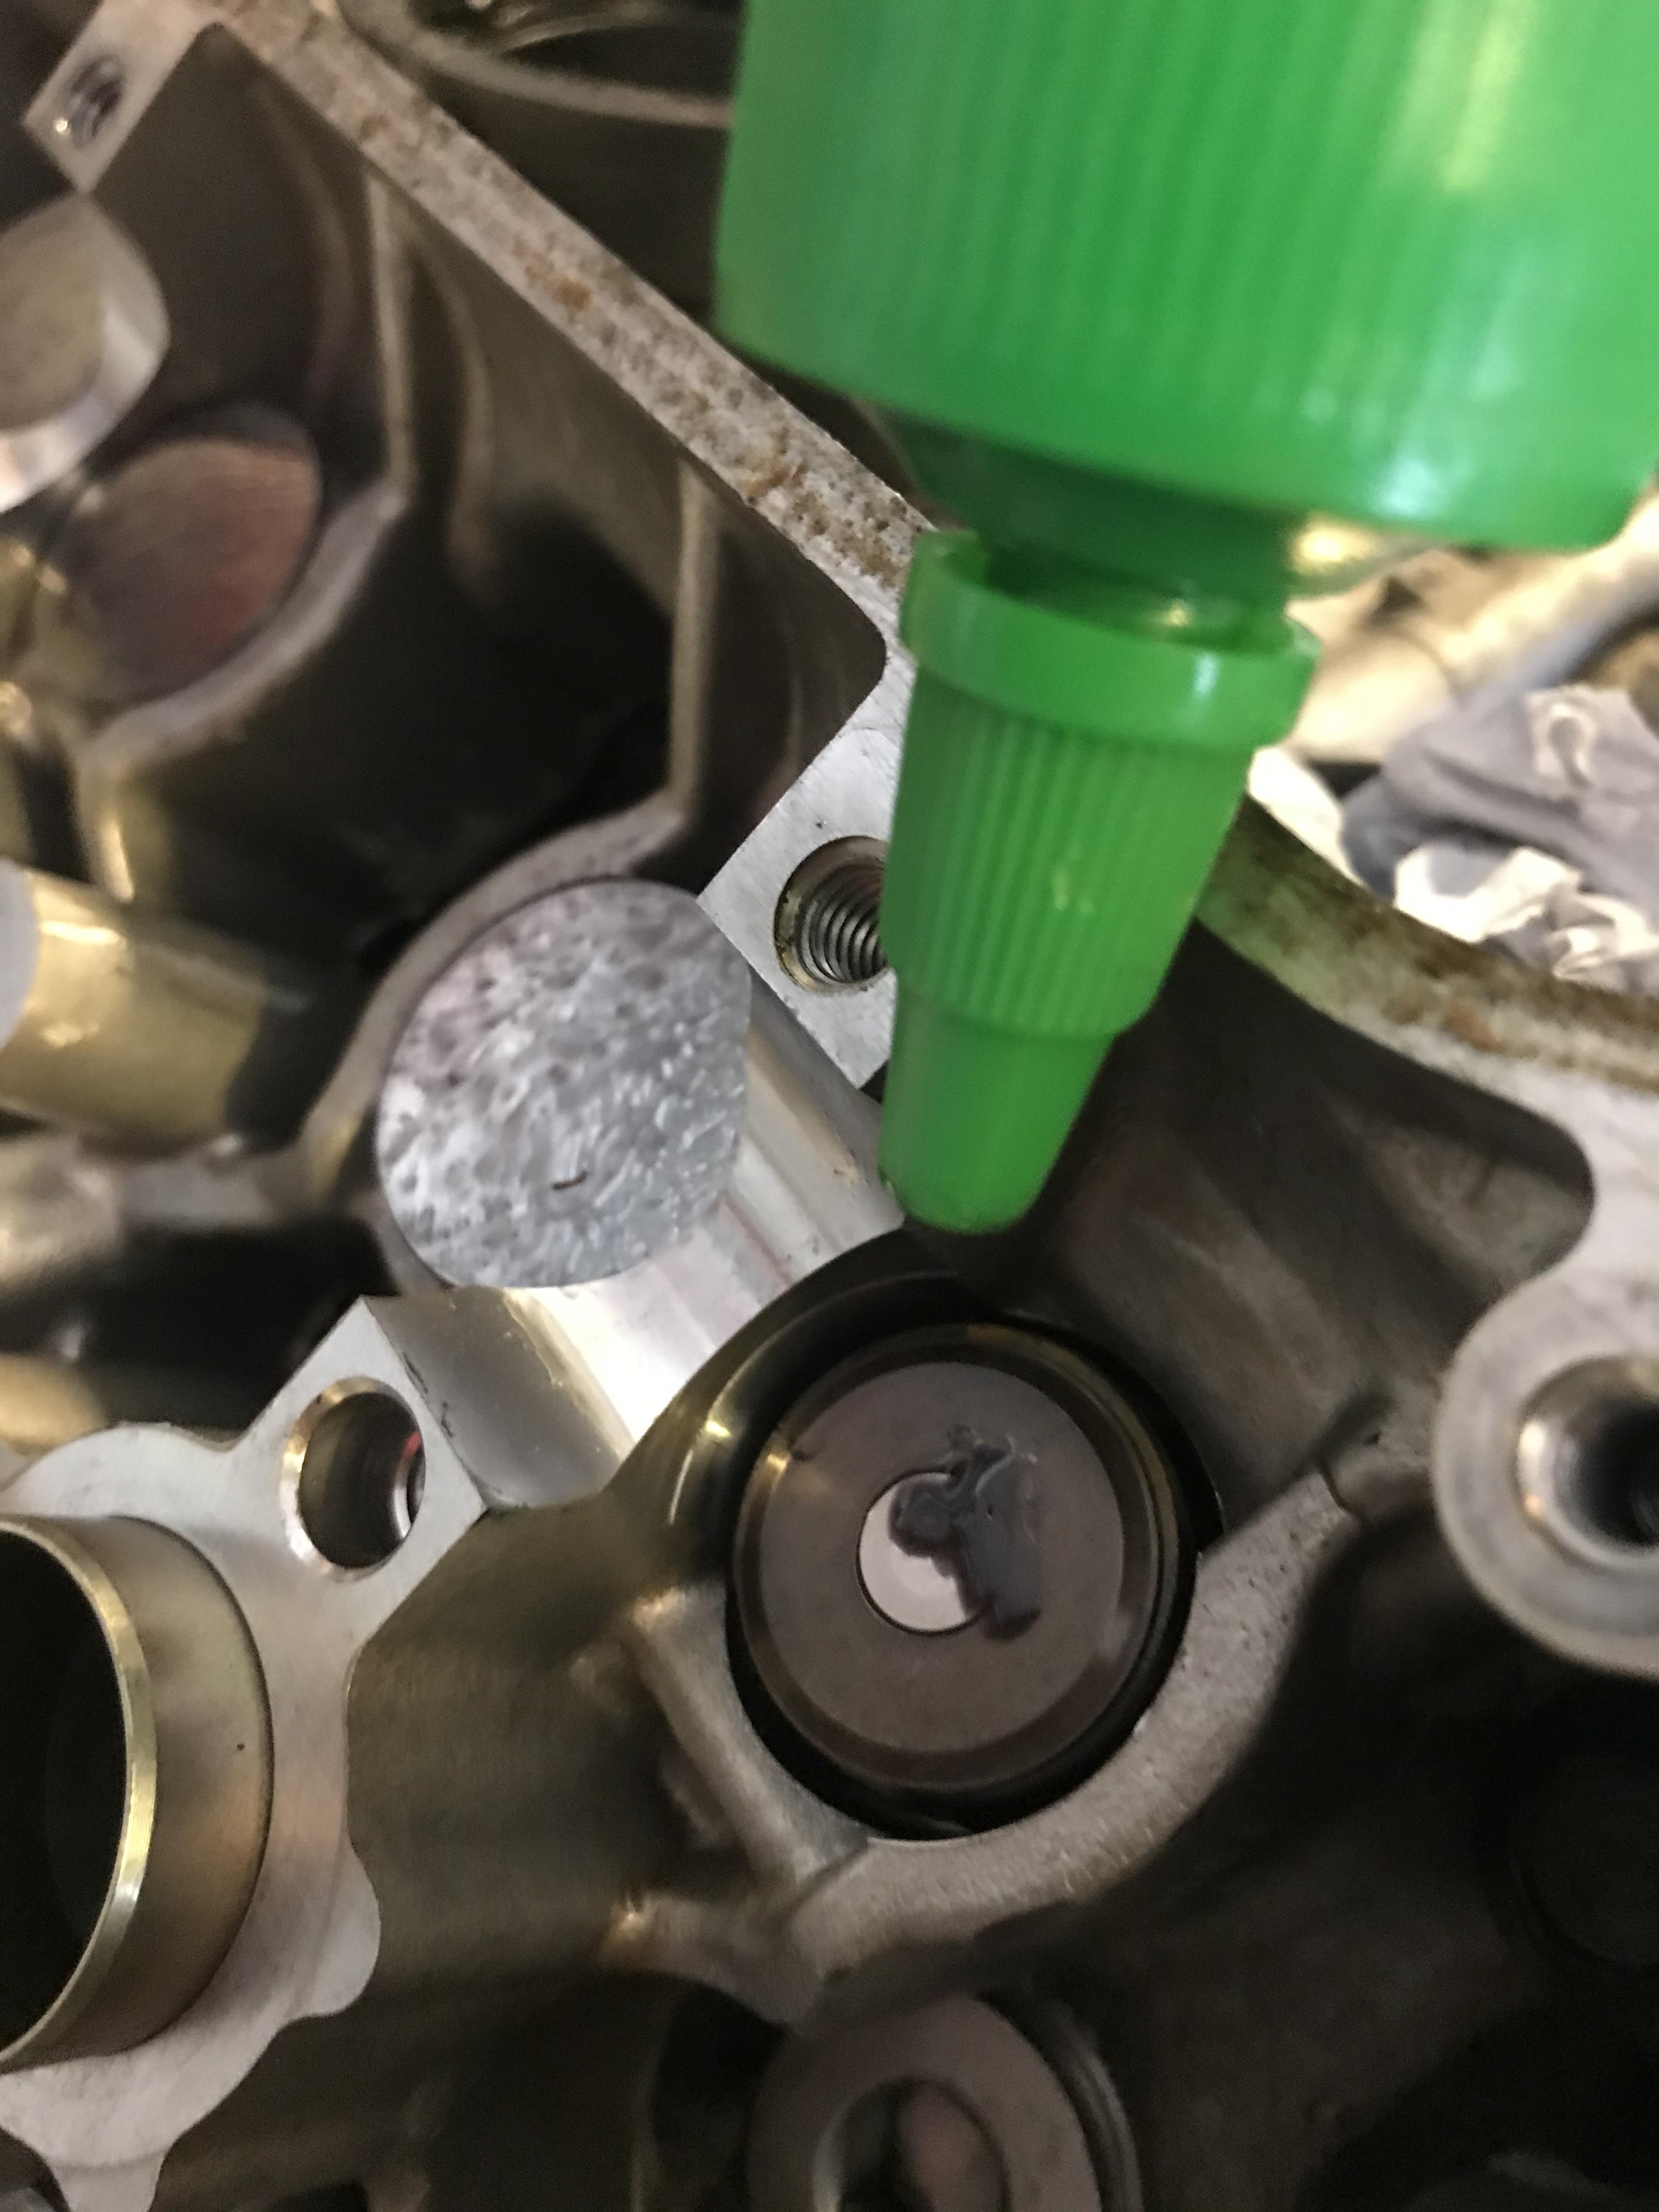
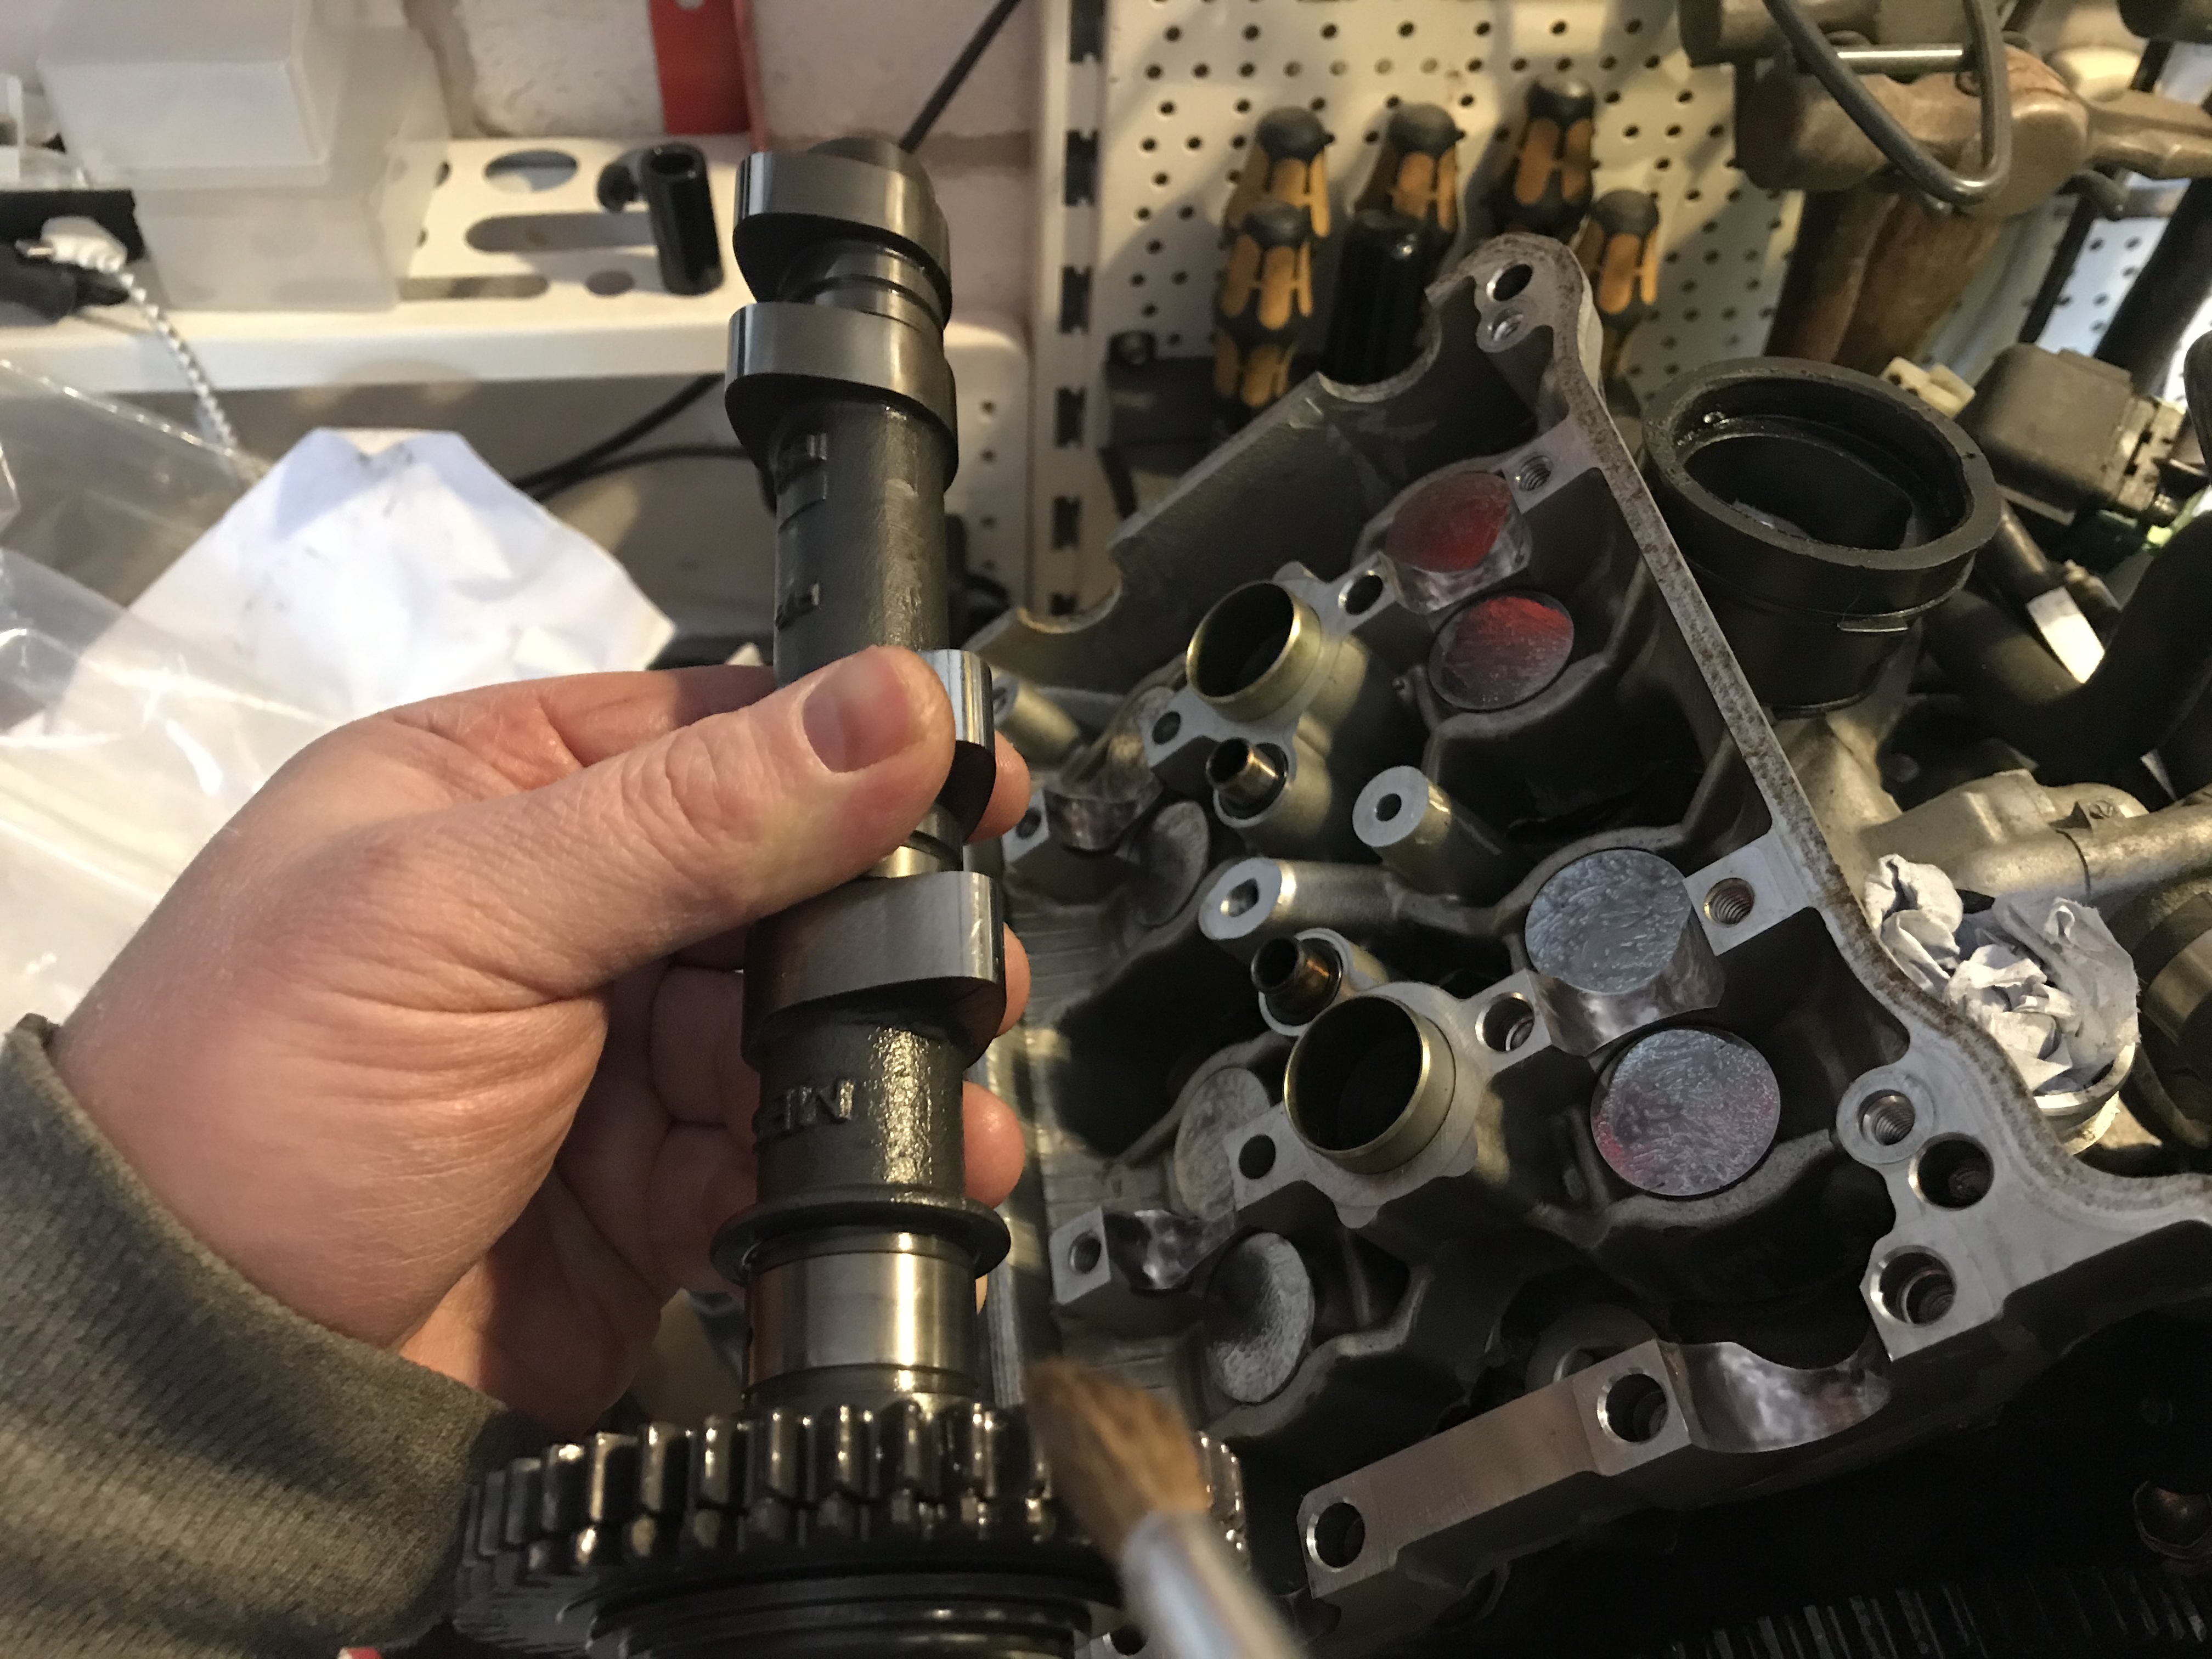
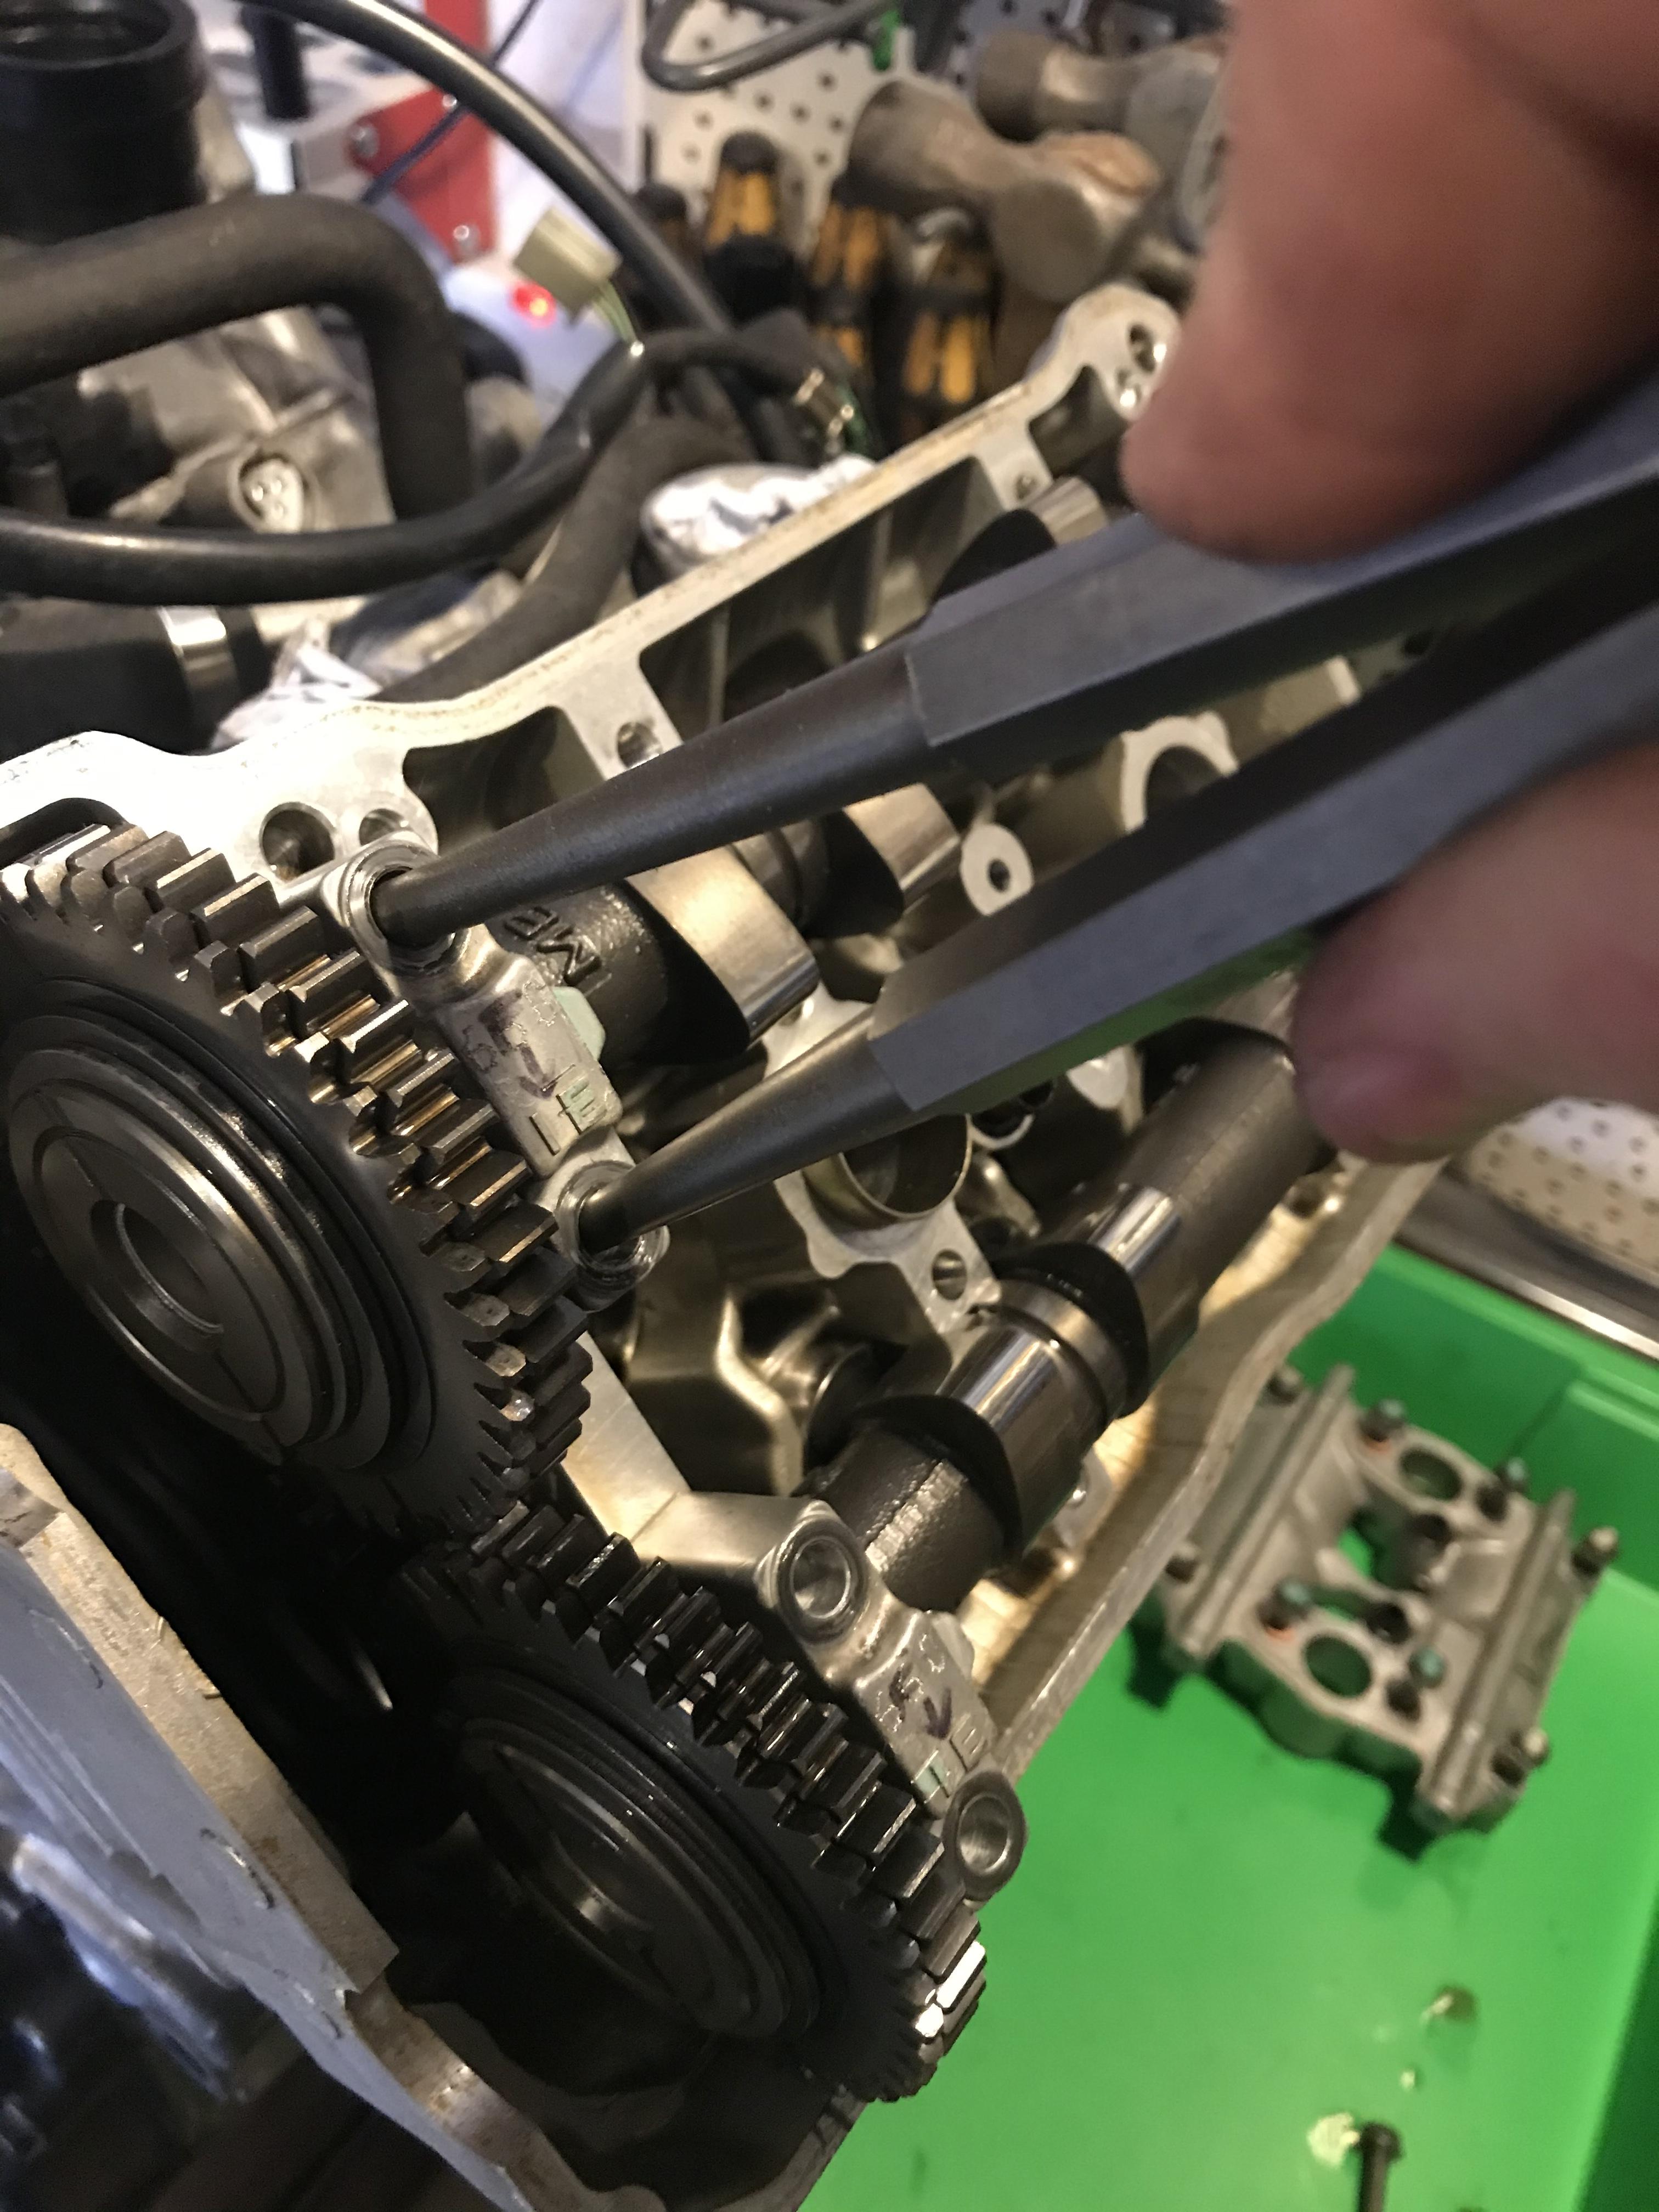
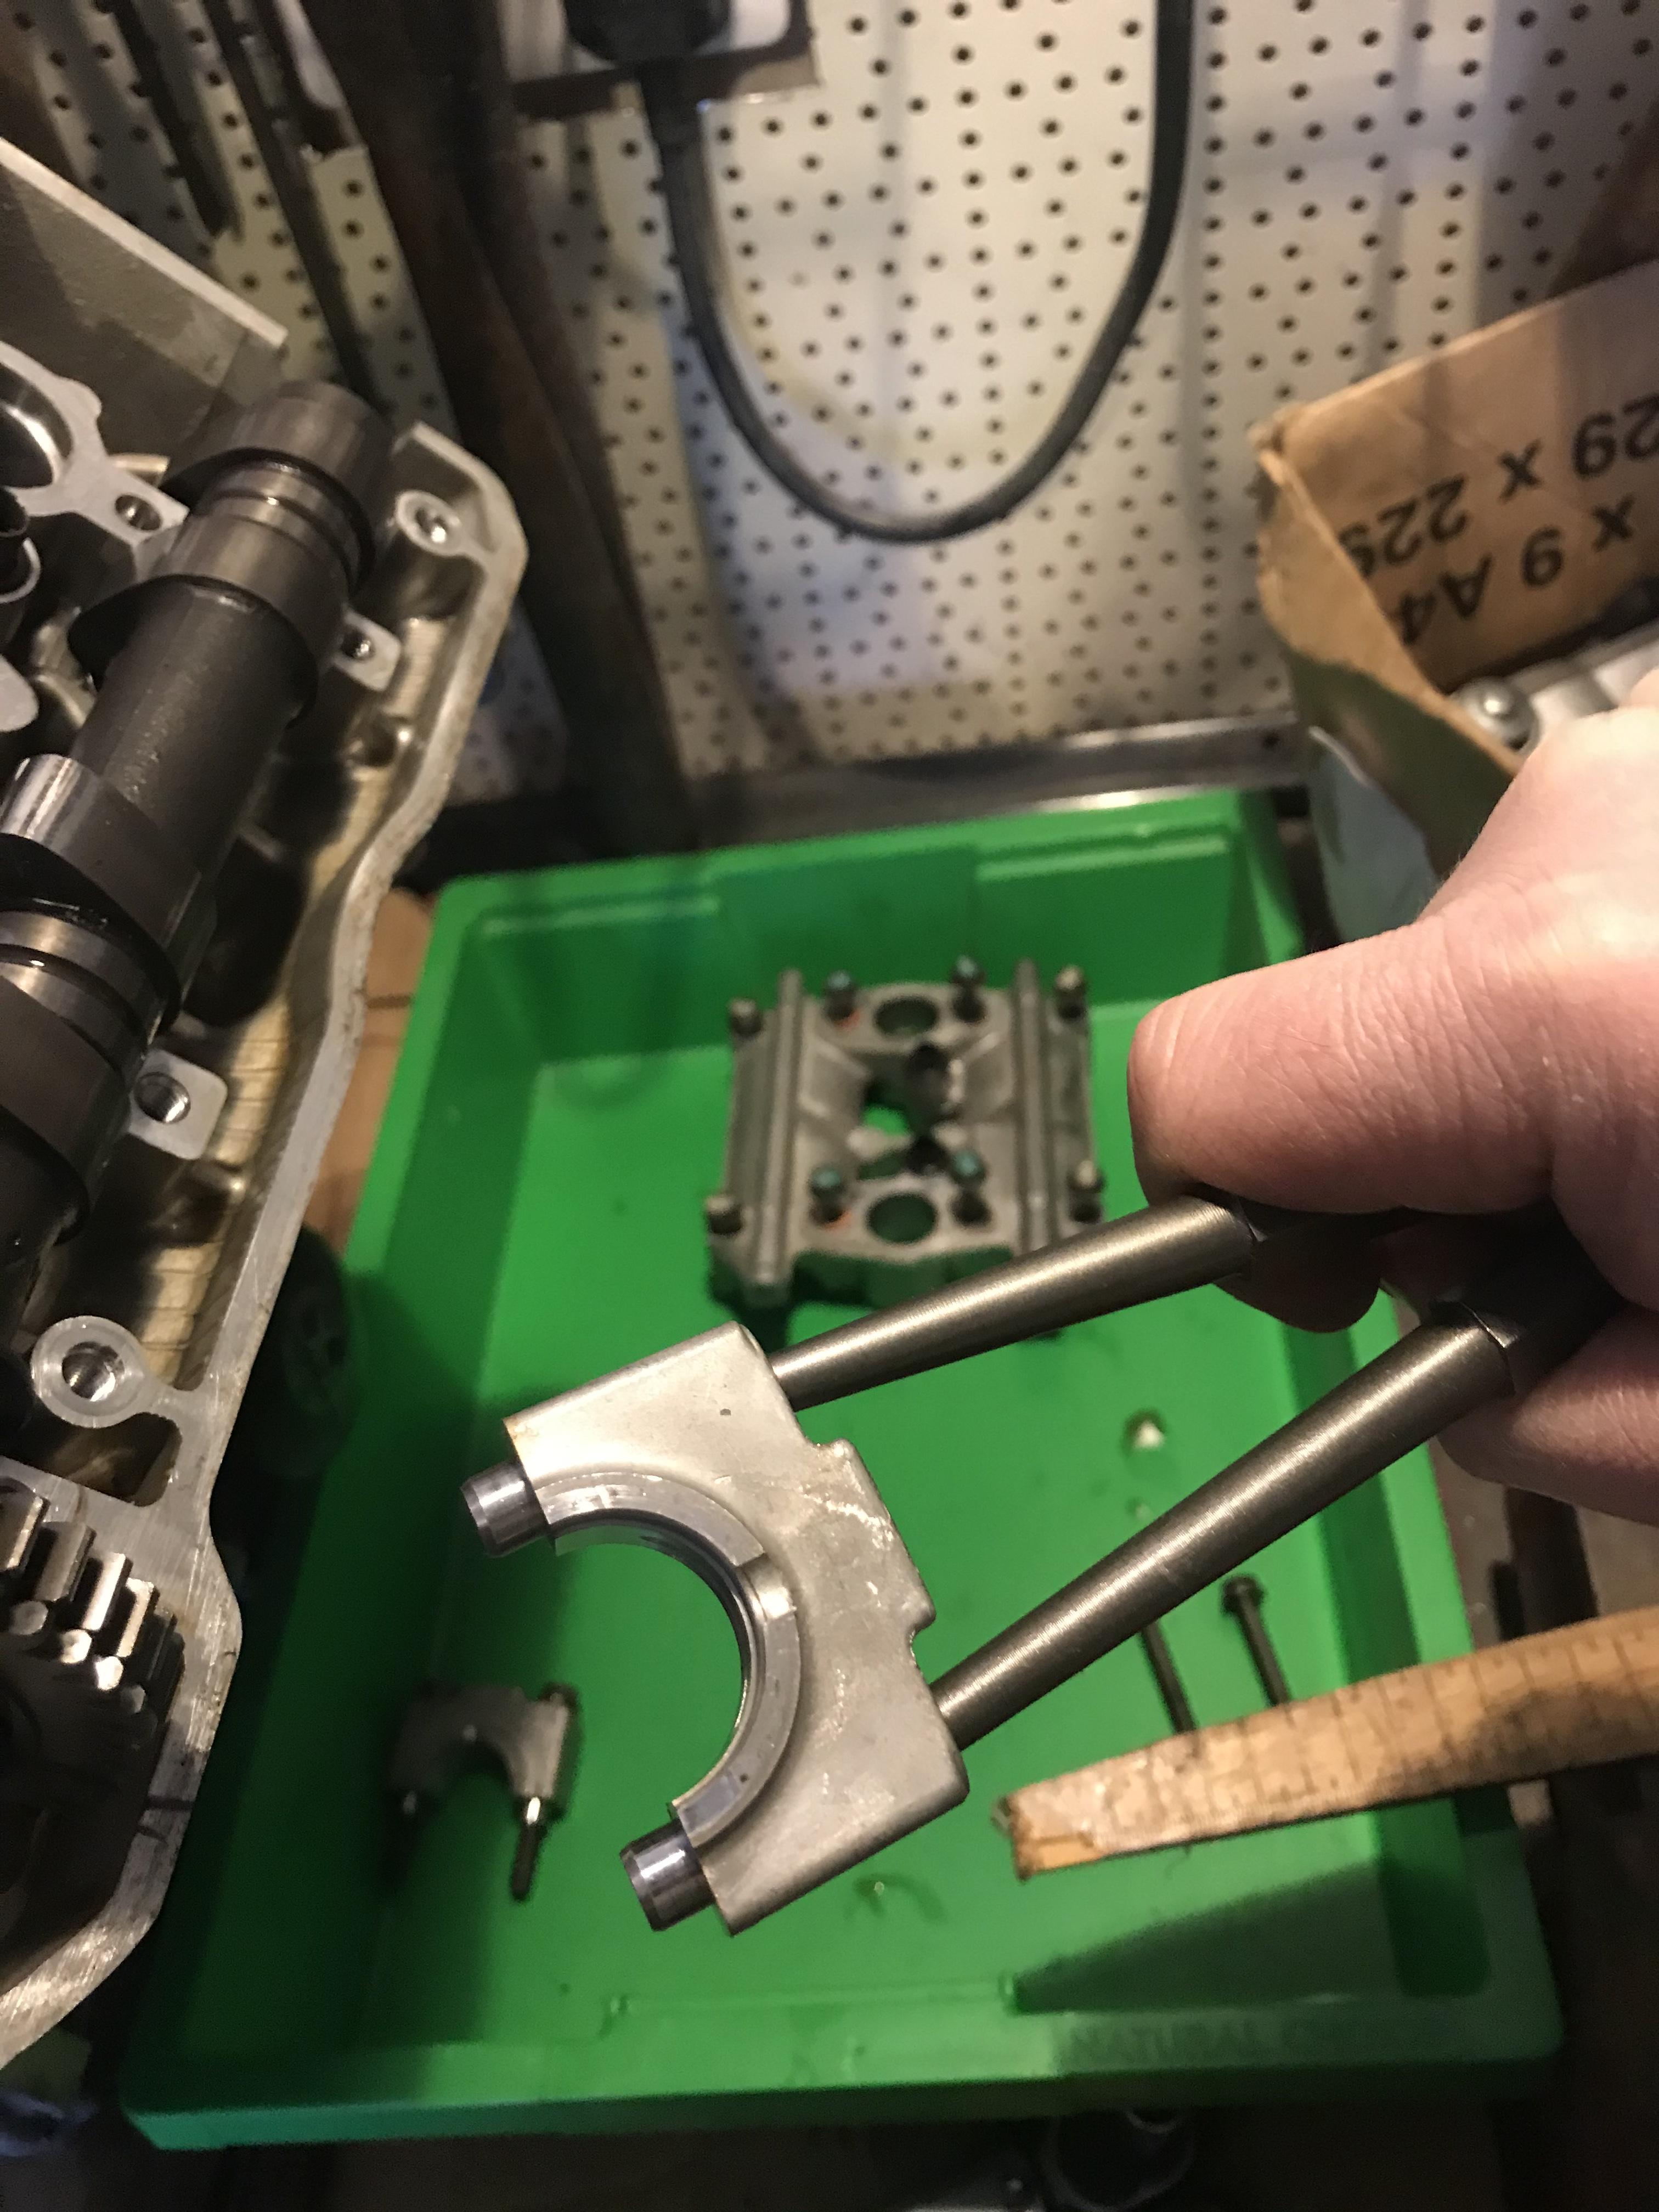
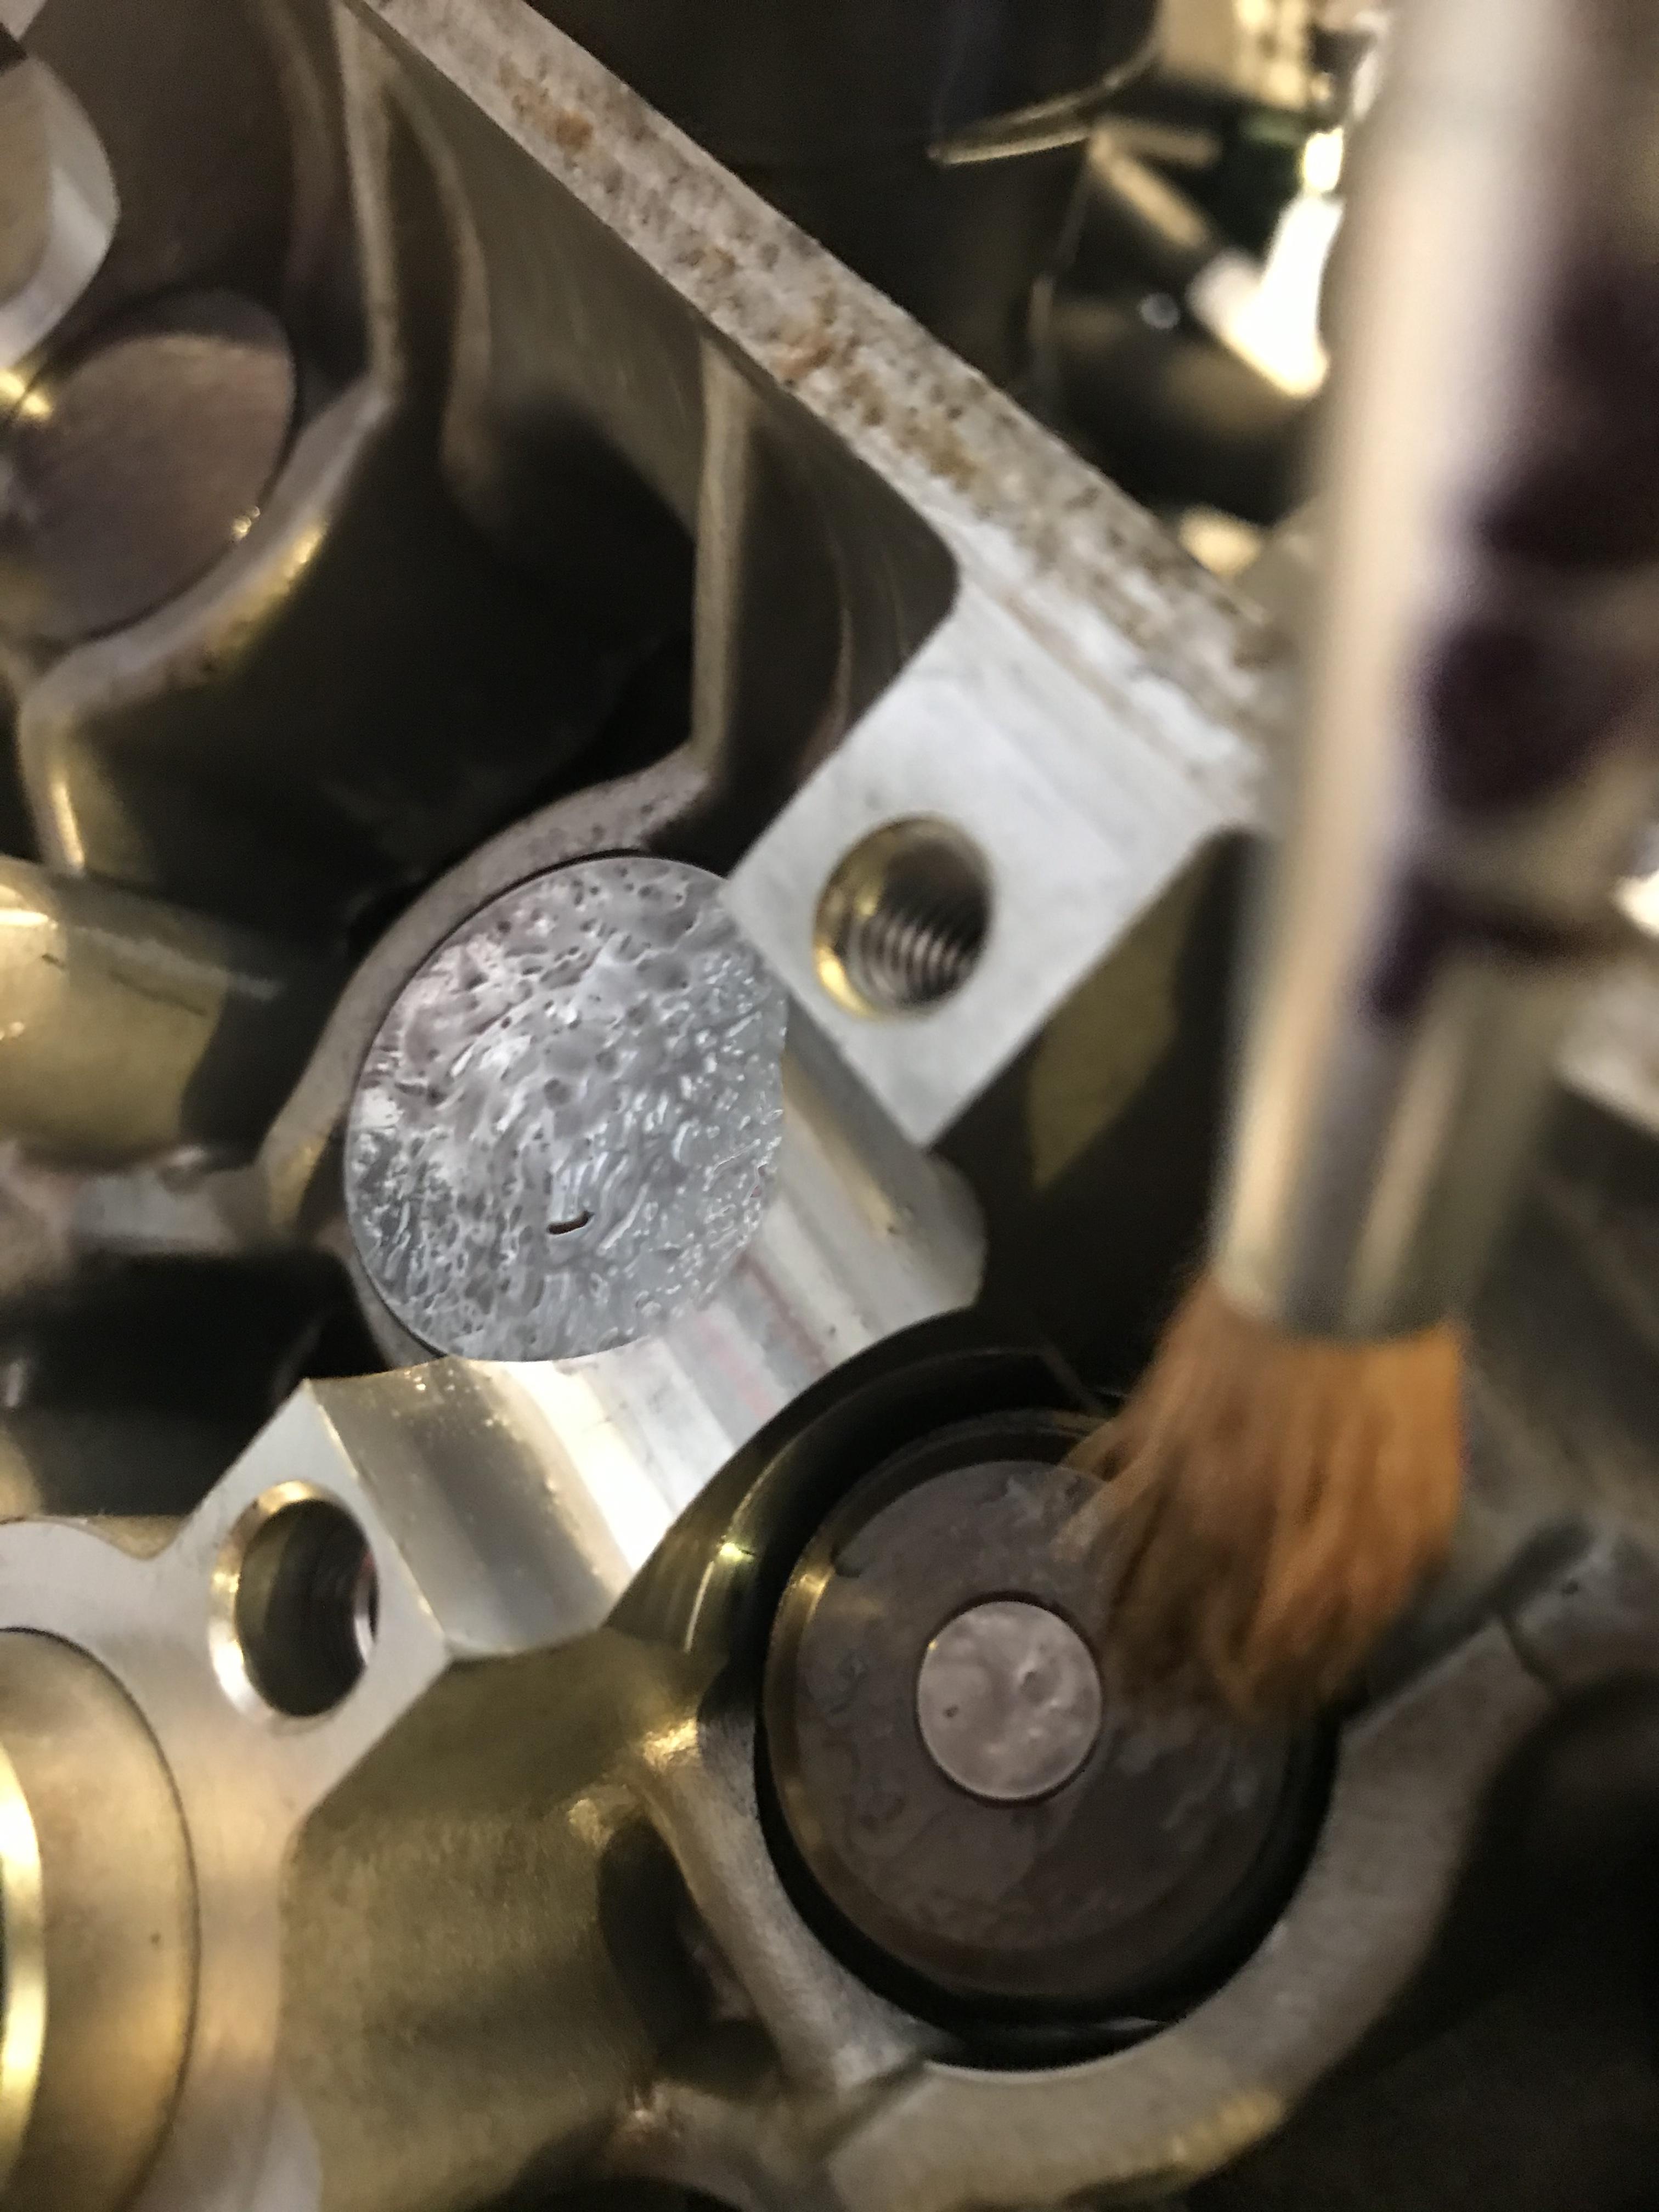
Hello Folks, Got a bit more done today - valve shims adjusted and buttoned up. More on that below. First, an update on some of the engine case markings. The ones that look like they were made by machine match the camshaft clamp numbers inside. Funny how I’ve never noticed before (although my engine has never been clean enough to make them out before!). Markings on outside of cylinder head (facing throttle bodies)... ...matching camshaft clamp. Different code in front and rear cylinders and they both match their respective clamps. Must be paired up at the factory. Also, that “stress cracking” described earlier is all over these engines. Inside and out. Even the cam clamp has some. I opened up one of my scrap engines to harvest the shims and that one had crazing all over too. Must be a casting flaw as Dangeruss says. Anyway, on to the valve adjustment. First thing is to spin the engine with a 14mm socket on the crank until cylinder 1 T mark lines up with the cutout on the clutch cover (no photos of this - sorry!). The gear markings must be facing away from each other and parallel to the cylinder head. If they don’t, spin another 360* until they do. You’ll have to spin the engine separately to measure each cylinder as per the manual. It’s simpler if you go 1, 3, 2 then 4. This helps keep the lobes properly aligned and you can separate the front and rear cylinder heads. Fit the feeler gauges between the cam lobe and shin bucket to measure clearances. Intake is 0.16mm and Exhaust is 0.30mm with a tolerance of 0.03 on both. Any shims out of spec must be removed, measured and replaced with an appropriate size to bring the gap back into spec. With only 10k miles I didn’t expect much to be wrong but there were some that required attention. One of the intake valves in cylinder 3 was on the very edge of spec at 0.13. Here are my notes: Had a few old shims from another engine so I stuck them on a strip of double-sided tape along with micrometer measurement in case they could be reused. Initially, I planned on getting everything exactly in the centre of spec but even with playing “shim shimmy” that was impossible. I’d have to settle for good enough. Once measured the head would need taking apart so the shins can be accessed and swapped. Before undoing any bolts I like to mark the cams with sharpie and a ruler so they can go back in exactly the same way. Also I colour in the teeth where cam gears meet for extra precision. Undo cam holder bolts in a crisis-cross pattern about 1/2 a turn at a time until loose. This helps the clamp rise true and not warp. If the cam clamp binds on one side it can start rising skew - just tickle it with a rubber mallet to keep it flat. If you’re struggling to remove cam gear clamps try sticking some close-fitting tools in the hole so you can wiggle them free. I used some chisels but screwdrivers will do. Just avoid going deep enough to damage the bolt threads. Wiggling and judicious application of a rubber mallet will have it all apart briskly! I like to keep bolts in the same holes just in case there are any minor variations. Best not to mix up your hardware. Good chance to give the PAIR and spark plug dowels a good clean. My o-rings looked OK so they got reused. Now use a magnet to pull out the shim bucket so we can remove the shim under it. Careful: sometimes the shim comes out with the bucket and can roll free. I spent 15 minutes hunting one on the floor and another 15 minutes fishing one out of the engine with the magnet... Here’s the little shim: 7.48mm diameter. Tiny little things! They don’t seem to have a way up as they’re factory fitted with their size markings facing both up and down. I noticed where they meet the valve they develop a small circular wear mark. The side meeting the bucket has a bigger circular wear mark. This, along with minor swirls on the buckets suggests these spin as the camshaft lobes hammer them. Interesting design... Another observation: virtually none of the size markings are exactly right. The micrometer found most markings were wrong - only two on the whole engine were bang on! Here’s an example: shim is marked 182 but micrometer says it’s 183. All measurements finally finished. I was planning to get everything to exact spec (0.16 intake and 0.30 exhaust) but shins are only available in 0.05 increments (or 0.025 from dealer at eye watering prices, so I couldn’t get it bang on no matter what I did. Then I read the KevCarver has had success with sanding his shims to the exact size he needs, so I thought let’s give it a go! Got a piece of flat glass, some worn 400grit wet-and-dry paper, duct take and a drop of dish soap. Experimented on the slightly tight exhaust valve that only needed 5 hundredths of a mm (mm, not inch!) removed. Took measurements before sanding. Was 173... ...and after sanding (now 1725). Sanding is done in a figure 8, measuring every few strokes and turning the admin 90* every now and then to keep the cutting even. Within about 5 mins I’d rubbed off the 5 hundredths and the rubber side was smooooth! But upon inspection of the shim it seems the side I sanded now had chamfered edges and the face was ever so slightly domed where I probably rocked the shim with my finger whilst sanding. Compare the straight reflection on the original face... ...with the slightly domed reflection on the sanded face. See how it’s rounded on the edges? Probably from rocking when rubbed and possibly where water made the sandpaper warp. Very hard to hold these shims flat as they’re so small. Might work better with shims of a bigger diameter (like on my Yamaha) but these are just too small so I decided not to sand any more of the VFR ones. Time to swap the two shims I could service and button everything back up. For this I’d need my own home-made camshaft moonshine to keep things smooth on first startup when there’s no oil. For that we need equal measures of engine oil and WS2 grease, with a pinch of WS2 powder to taste. Similar sort of thing to molly EP grease only slightly more slippery (and a bit more expensive!). All thrown into a sriracha sauce bottle with 3 old bolts to help mix things up. Give the bottle a good shake and let the bolts mix everything together nicely. It’s a homemade engine assembly paste, I suppose. With a bit of luck the WS2 will burnish into the cam lobes and journals to help reduce wear. This special sauce is then dropped on the shims, buckets and most importantly on the cam bearing surfaces. A paintbrush helps achieve good coverage. Also brushed this sauce on the cam gears and cam journals to minimise damage on first startup. At last everything is back in position and properly greased up. With everything in place it pays to spin the motor a few times and recheck valve clearances. On the rear bank I found some of my clearances had shrunk by 0.005. Much swearing ensued!!! Upon inspection I realised my torque wrench was set to 13Nm instead of the specified 12Nm. So I loosened all the bolts and redid them at 12Nm, at which point my clearances were fine again. You MUST use a torque wrench for this procedure as just a bit too much could wear your camshaft bearing surfaces and mess up your valve timing! Hope this helps someone on the same journey. Stray