atx
-
Posts
173 -
Joined
-
Last visited
Content Type
Forums
Profiles
Gallery
Blogs
Downloads
Events
Everything posted by atx
-
Never even considered that or had issues on the couple of these bikes i've done, but on the 400 i'll keep a close eye on the clamps for sure. Looks like a great list to me. Beefed up charging, good coolant plan, good carb plan, you should be ready to rock. I'd do a quick tclocks check and make sure the bike overall is set. I get so focused on a carb rebuild or whatever and want to rush to ride, but i have to remind myself that the chain etc should be checked haha
-
Yeah i love plastex. You have to be careful with the liquid portion because it messes with the finish of plastic it touches, but otherwise it's super easy to use. I used to mix it in a little cup and goop it on like epoxy, but i saw some vid where they put the plastic powder right on the area for repair then dripped the liquid onto it, and have had good luck doing that and doing that way a little bit at a time. It will stink up the whole house if you do it inside, so be careful haha. I've not tried plastic welding setups before, those might be the way to go for bigger jobs, but this works well for my uses. I used it all over the back of my fairings to repair and strengthen cracks, left it thick because who cares on the back, and it has held up well. https://www.webbikeworld.com/plastex-plastic-repair-kit/ This page has a decent guide on what appears to be a rebranded version of it, i didn't try it this way either but looks good. https://www.polyvance.com/repair-broken-fairing/
-
For years i kept mine in the closet stored safely, one in good shape, one with a broken ear, but no more! I want to enjoy life. I just recently plastexed mine back together and if they crack more i'll repair em again. Just looks so much cleaner now. If anyone has a decent fiberglass shop these could be reproduced i imagine, though yeah the prices would be nuts for such a small part... I'm with capn on the voltmeter though, with modern regrec bypassing the melty red connector going straight to it's own fuse and the battery, soldered stator leads, just ignore it. You can also mount one of the trick single LED meters if you want, i've also got one i've been meaning to install but I just haven't gotten around to it. https://gammatronixltd.com/ There's one mode where you tell it to be stealthy/off under healthy voltage so you'll only see the light when it's over/under preferred range so i won't have to shut it off to keep it from bugging you. I would really like to sneak in a tiny fuel gauge, something surface mount on top of a side panel for peace of mind. I can't seem to find any era appropriate looking ones though, or anything not huge and ugly. I found a tiny LED bar one that works on bikes with measurable hydrostatic pressure, but it won't work with our weird deep tanks that require pumps, i already asked if it would work with a float gauge(which we could get from 88/89 model and replace our low sensor) but it is not compatible. https://www.lskelectronics.com/store/FuelGaugePro-Bar-Graph-Display-Panel-Kit-p286787313 I just recently redid the carbs on my 700 and used the guide from Joe over at v4dreams and it worked a treat, such a great resource. All the tips i needed, though i did take a ton of pics of the my own from all angles just to make sure I wasn't messing anything up. http://v4dreams.com/maintenance.html I also read stuff bookmarked from magna forums that seems to work well for me: http://v4musclebike.com/articles/magnandy/Andy's Carb Cleaning Guide.pdf Setting the bench sync was easiest for me with a 1/8" wide strip of paper(found that tip on some random forum post), dragging that under the throttle plate on the nonadjustable one first and setting the idle screw, the setting the other 3 to match using the linkage adjusters. On the bike at first start the thing was super close right off the bat, barely needed any tweaking to get about perfect per the MotionPro Sync Pro tool i've got. I installed the metal fuel joints from vinscoottubes on ebay while I was at it, no more worrying about the plastic joints and old o rings. https://www.ebay.com/str/vinscoottubes

-
Finally found a CBR600F3 front wheel
atx replied to Captain 80s's topic in Third and Fourth Generation VFR's
That long ass phillips head screwdriver is just what the factory manual orders for pulling the throttlebodies on 6th gens, assuming you don't have one already of course... Great find. I've had no luck on a f3/f4 for wheel/fork upgrade for my 86, but i'm also not checking offer up, maybe i should expand the search a bit. -
Some bicycle lights i have gotten rid of because they have too many settings. I need high, low, bright blink, dim blink. If you haven't tried a helmet light, highly recommend. This unit has a blinky built into the back as well, but still bright enough for medium speed trail riding. When you're coming up over a hill you can see and be seen much quicker as the lights are as high as possible. Also one less thing to fuss with, just take your helmet with you when you get somewhere and the lights are attached to it. https://lightandmotion.com/collections/mountain-biking/products/vis-360-pro
-
Honestly just looks like animals without necks to me https://www.sunnyskyz.com/blog/168/25-Animals-Without-Necks-The-Results-Are-Hilarious
-
Ahhh got it, yeah i'd be down for 1 set if under say 100 bucks? But really your best bet may be to reach out to the maker and get price ranges for batch sizes.
-
Wow those look great, one of mine is pretty well cracked so i've not wanted to install either side for fear of them just shattering. What's the pricing like on those?
-
I too have a full set of cobalt bodywork i need to put to use some day, he was the one i was thinking of who used to make spacers...
-
Is anyone making cbr spacers right now? There used to be a vendor i think that was back in the day, but nothing anymore I'm aware of. I'd be happy to buy a set to throw on the shelf for future conversion...
-
Honestly not sure off the top of my head, and mine is in my buddy's garage at the moment... If you need fresh ones though they aren't much: https://cbdecals.afegraphics.com/view_product.php?adminshopping=&product=86vfr750f-LabelKit-CB00433
-
Was the stator connected when you plugged the r/r in? Disconnected the stator, meter those out and see if you get similar resistance between all 3 wires, but more importantly make sure none of those have path to ground. Again you don't need to go for the expensive kit if you can't afford it, ebay search for FH020AA or whichever mosfet regrec you want and you'll find workable chinese versions, and you can swap those out to genuine later if the cheapie fails.
-
These bikes aren't getting any younger...
atx replied to RidinSandy's topic in Third and Fourth Generation VFR's
Everything ages out differently based on UV exposure, temperature, the elements, etc, all depends on how you stored this thing and the age more than the miles in my eyes. I'd buy a 50k mile garage kept bike over a carport kept bike with 10k miles any day. Pull all the plastics off, check for signs of cracking, and reinforce with plastex or your epoxy of choice. These old fairings are unobtanium, and trying to get one paint matched will never look right. If you reinforce now, they'll give you many more years of trouble free service. Look around mounting points, corners, especially on the backside. While they're off, look at the electrics. Pull connectors apart, clean, dielectric grease, put it back together. Update the reg/rec and hard solder or crimp the stator wires. Make sure the red connector on the main fuse isn't crispy looking. Check all hoses as mentioned, you may end up decided to change out brake lines if they look bad, cheap and easy. -
Yep all too common. Pull the body panels and gas tank etc off, clean and check every connection. Pull every single connector apart, clean the terminals, pack with dielectric grease to keep corrosion at bay, and put back together. Your hand controls might feel crunchy and need to be taken apart and refurbished as well. Pull fuses, check, and clean those little terminals and put it back together. Pull bulbs, make sure they look good, clean the sockets, toss em back in. You're prolly going to have a melted connector with the 3 yellow wires coming off of the stator. You can get a cheaper reg/rec kit to hard wire to that(as in snip that connector and direct solder the wires together), then hook the charge wires directly to ground/the battery and skip that little main fuse. Roadstercycle has nice kits if you want USA nice stuff, or feel free to read about why he does it this way and source your own dubious kit on ebay or something http://www.roadstercycle.com/Easy Mosfet Install.htm Toss the battery on a trickle charger and get it nice and topped off, motorcycle charge systems aren't meant to charge a flat battery, that can cause extra heat in the system and end up melting things. If you spend a weekend doing all of this work you won't have to fuss with the electrical system ever again in your lifetime, short of battery swaps. The fastest/emergency way to do it is replace that connector, pull all fuses, and replace one by one until it start blowing. It could be something as silly as a light bulb hard shorted out and the fuse for that circuit being over sized. I would vote do the full check and inspect though, these bikes are antiques at this point and it being a Florida bike I assume it has lots of corrosion in those connectors, which are bad even in the rust free central Texas environment mine grew up in. Those old school spade style non sealed connectors just suck honestly.
-
I have similar problems with bicycle routing. The best solution i've found is doing it in google maps in a laptop web browser, get it exactly how i want nice and easy, then use this site to convert it to GPX: https://mapstogpx.com/ I can then uplaod that gpx straight to my garmin device, or put it on the cloud service for garmin or even strava.
-
That is awesome work, always nice to be able to trade labor like that.
-
You've got 2 bikes, i'd suggest something you can use on both. Heated gloves are a game changer for me when it gets cold, and well under budget. Nice tank bag maybe? Or just pony up for some maint items, like fluids, tools, etc. Garage upgrades are HUGE, putting in a ton of LED 4' long shop lights is the number one mod i've done recently. I spent ~$120 on a bunch straight out of china, and I can work all hours on projects without eye fatigue or silly mistakes because i can't quite see what i'm doing. I have a 2 car garage with split doors, ran 8 of these. 2 along the side wall, 2 in the middle, 2 along the other side wall, and 2 in the side without garage doors. https://www.amazon.com/Hykolity-Linkable-Workshop-Workbench-Equivalent/dp/B07TM97LWY/ref=sr_1_9?crid=1AOLTJWLMKIXJ&dchild=1&keywords=4'+led+shop+lights&qid=1587653922&sprefix=4'+led+shop%2Caps%2C179&sr=8-9
-
Seriously awesome, love the progress on that blog so far.
-
Here is a decent list of parts available from HRC, pics as well if you sign up for a free account. https://www.cmsnl.com/honda-vfr750rk-hrc-racing-kit-usa_model35114/partslist/ Would love a clean red/white/blue tank if you have one...
-
I'm having a hard time understanding what was done here, but good job, i hate those springs. I put mine up on the center(or side) stand so the spring is full extension, jam a bunch of pennies in the spring between the coils, and then when you push the stand in a bit the spring won't retract all the way and is easily removed. You can then reinstall it at about that same point as well.
-
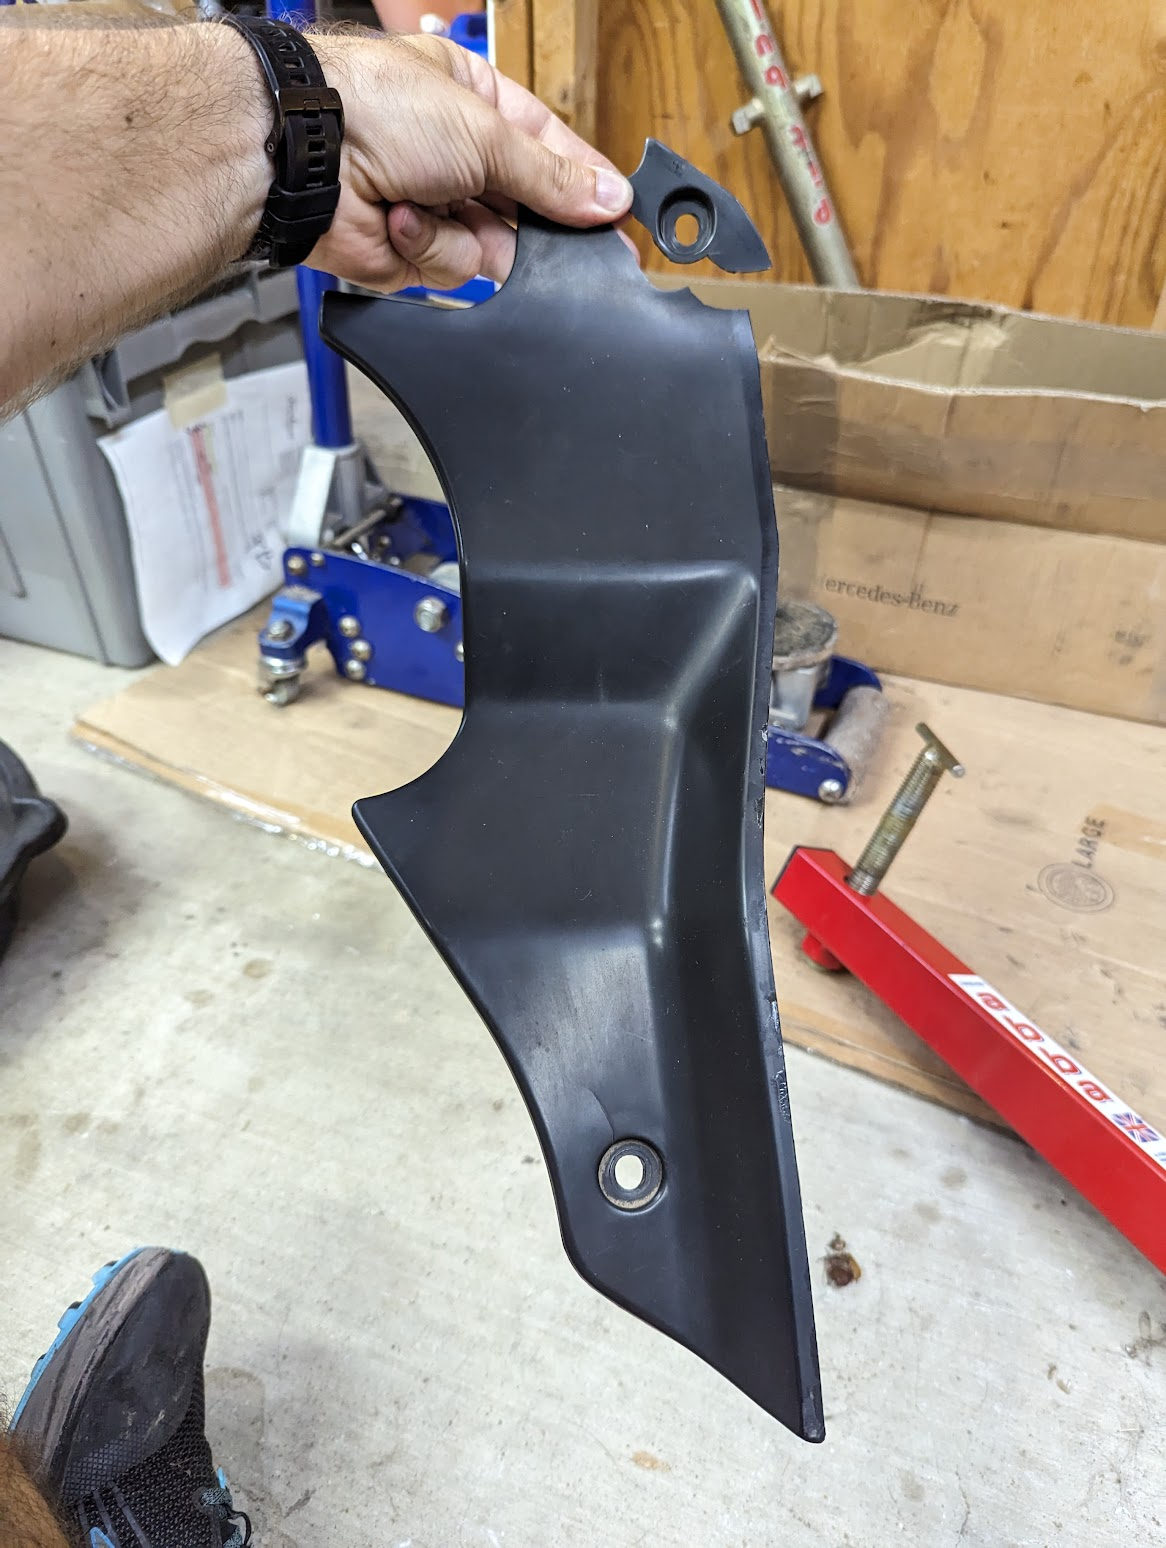
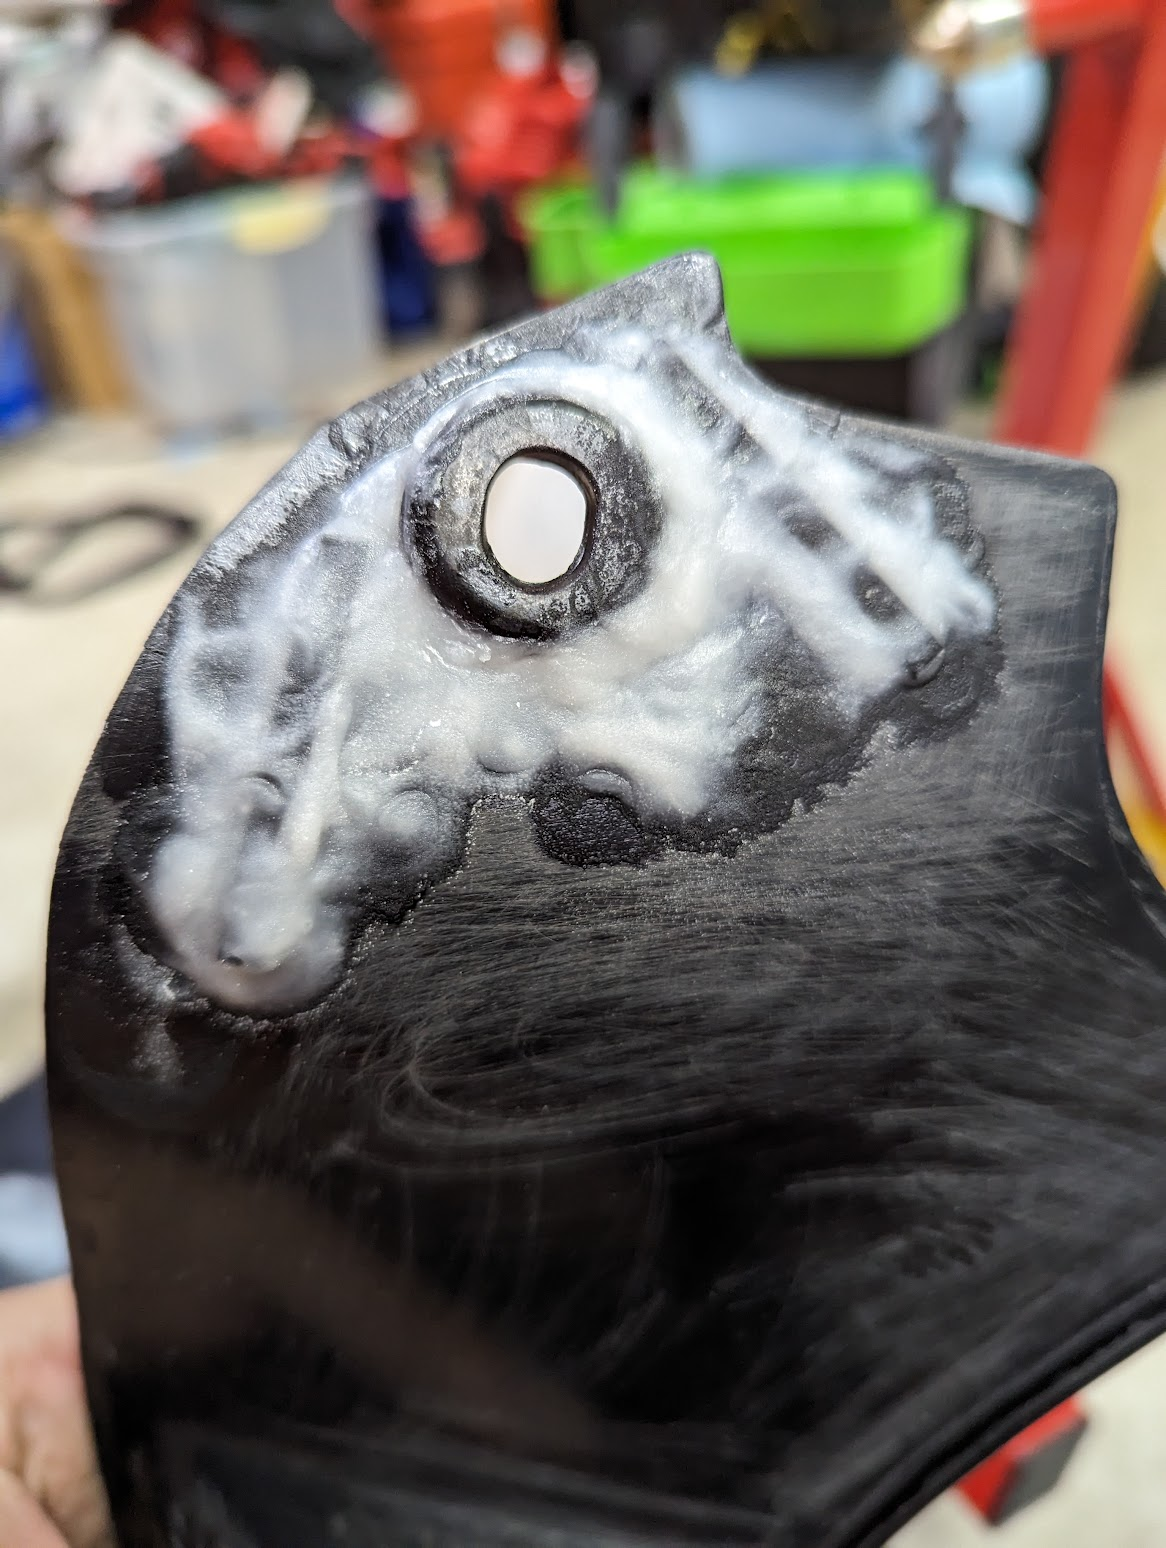
86 VFR400R NC21 refurb, sure wish parts were easier to get in Texas...
atx replied to atx's topic in Earlier VFRs
I had a vision daydreaming, it looks like it may be the speedo cable stabilizer to me. #5 in this pic that bolts to the brake caliper. Bah no not quite. It's close though 😄 -
86 VFR400R NC21 refurb, sure wish parts were easier to get in Texas...
atx replied to atx's topic in Earlier VFRs
Standard heat gun on the boots and wrestle with the carbs for about an hour trick seemed to work. New boots on the way, but trying soaking these in silicon spray as a i read somewhere else that mayyyy soften them up? Just for giggles really, or if that order gets lost in transit and never shows up. http://v4musclebike.com/forums/showthread.php?t=13477 Found some sort of bracket in the valley, not sure where it goes though. These things are filthy as all get out, and last person inside em used a ton of gasket sealant which could have caused blockages. Definitely badly in need of a cleaning. This is my goto: The throttle bodies aren't even close to setup the same everywhere, nothing a good bench sync won't fix to get me in the ballpark, and then my standard aquarium tubing sync tool while running should do the fine tuning. http://www.powerchutes.com/manometer.asp http://www.400greybike.com/forum/viewtopic.php?t=40719 From what I can tell, these are the proper jets/tubes and everything for this year model, so nice to know that it hasn't been completely messed with. Someone did install a can though, would be nice if i could get some solid info on if any standard carb adjustments could be made here, but honestly I'd rather just source a stock/quieter can 😛http://www.400greybike.com/forum/viewtopic.php?t=22317 I did find that float height is 6.8mm, so that's something http://www.400greybike.com/forum/viewtopic.php?t=21480 I think I know enough to be dangerous here, time to knock these things out. Float bowl o-rings come in sometime next week hopefully, i think i can get it all done by then. I also have some electric work to attend to, and some valves that need adjusting... -
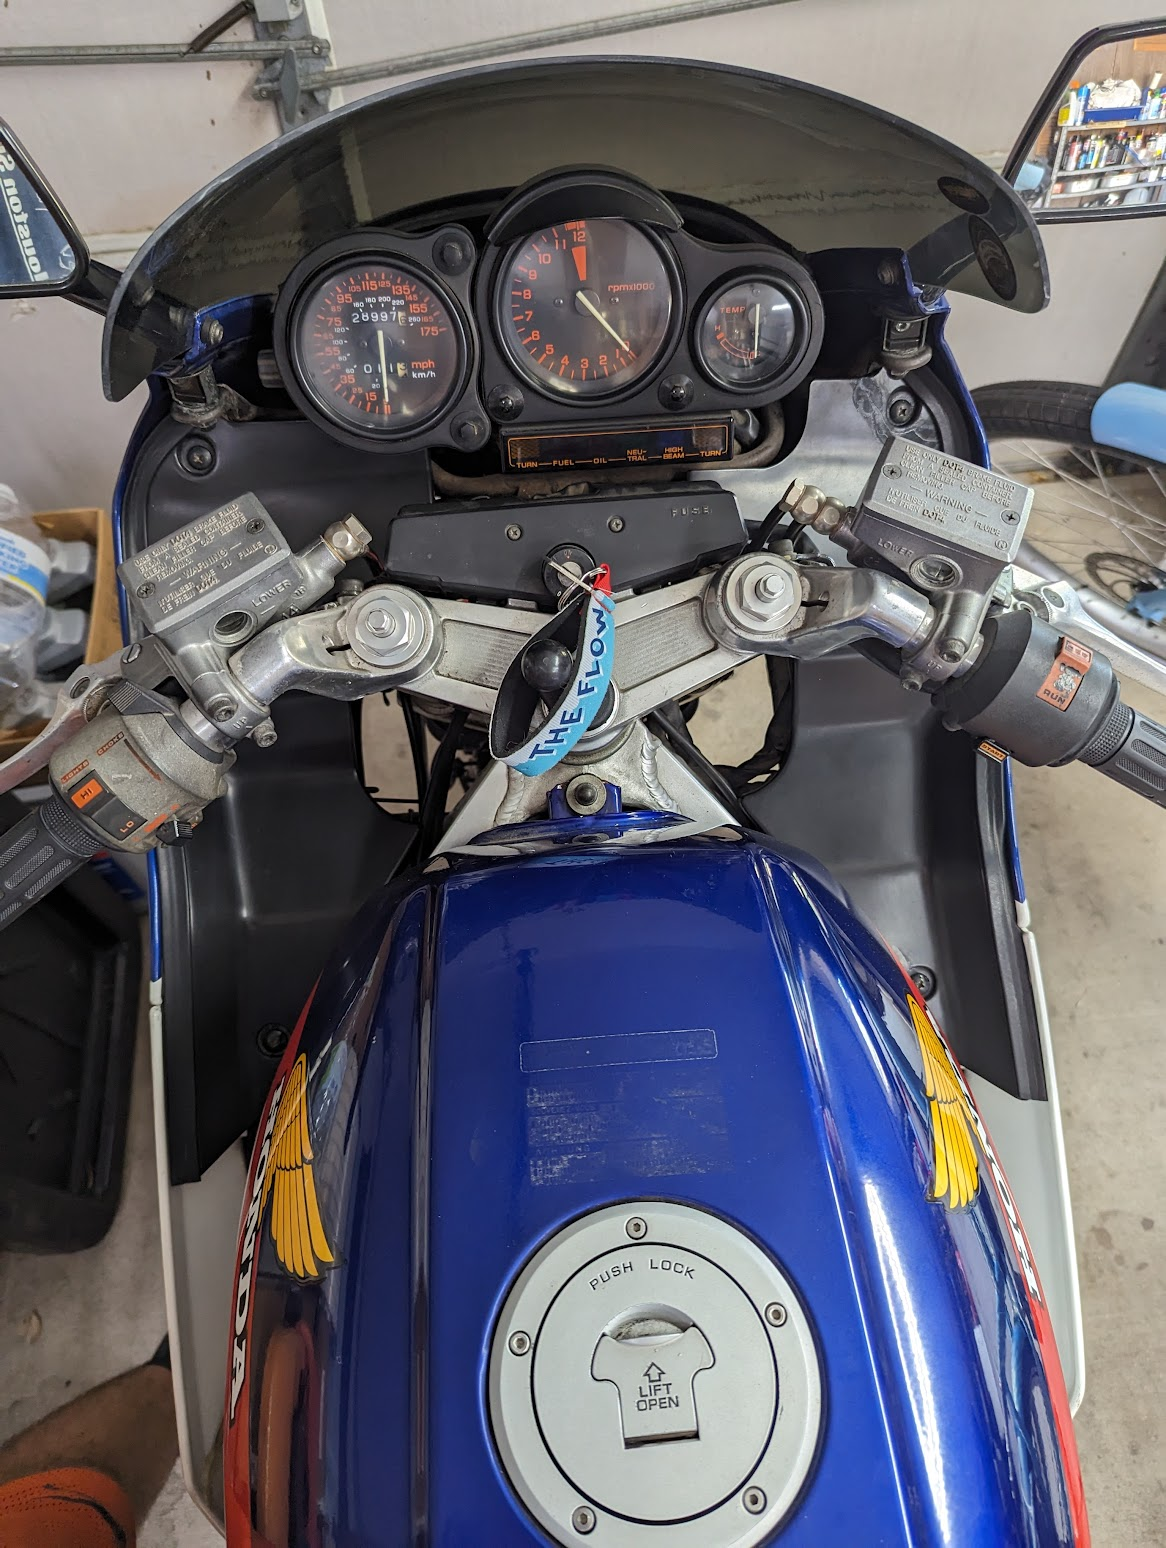
I picked up another project just in time, and it seems like many of the same parts from my 86 VFR 700 rebuild are compatible if not very similar to what is on this 86 VFR400R. The previous owner road it around while teaching in Japan, and then imported it with a bunch of other stuff a couple of years ago. Lots of function over form type of fixes on this thing, like the wrong color scheme tank, weird custom brackets with welds and stuff to keep mirrors and the shifter alive, i sort of dig the ingenuity honestly. Shortly after picking it up: The idle is about 4500 rpm's, the battery is shot, fork seals gone, and lots of cosmetic issues, but otherwise not a bad start. Story is he took it to a shop to get the carbs "tuned up" and that was botched, so he got a refund and lost interest. My plan is to pull these carbs off and rebuild em using a viton o-ring pack assortment i've got coming, or if none of those fit order a bare bones nc30 kit as the float bowl gaskets are the same supposedly. Quick test tide before taking this thing apart. Little sketchy thanks to the high idle, no rear brake, and front brakes covered in fork oil. Apologies for the vertical video, gf took that one and i had the thing inoperative before i could get a do over on it 😛 Never seen this before, some sort of foam jammed in to these bolts, my assumption is to stave off rust. I haven't pried it out yet because no need, just weirded me out and thought it was cool: Kickstand mod, it is actually pretty easy to kick this puppy out thanks to this contraption: Mirrors are being kept alive by Frankenstein-esque methods: As she sits now: I actually did the last bit of work while on a zoom call for work. It was a non-mandatory happy hour video chat, so what better way to enjoy than in my own garage. I wheeled the laptop out on a standing desk i've got, and enjoyed their company while yanking this old thing apart. I just got this thing a day before the stay at home order in my town, and have already ordered a ton of parts that are rolling in about now. Using many of the same ones i've used before as i know what I can trust. NGK's, Motobatt AGM battery, mosfet reg/rec to get wired straight to the battery bypassing that damn red connector, clean and dielectric grease every ding dang connector, OEM fork seals, wheel bearings just so i can take that stuff apart and call it good, and the rest i'll order as needed because it seems good. Still on the hunt for either a muffler silencer for this weird JDM can or a stock one cause this thing is LOUD, as well as a front brake lever and windshield. I tried signing up over at 400greybike.com as searching that site has been hugely beneficial, but their admins are not responding and there is no contact link, so i'll keep twiddling my thumbs and install what I've got coming already. Shooting for a goer that I can start up and ride around at will, and one that isn't so pretty that I can't ride it around in any weather.
-
Happy to share, i guess i should also specify that I was trying to come up with a mount solution that allows my wing rack to be mounted. If i stuck it towards the rear i would have been unable to mount the racks.
-
Here we go, looks like i need to trim a couple of fins down juuuuuust a touch. I went on a couple hundred mile trip recently and it appears to have rubbed a bit at some point. You can see the two little white spots on fins, and little spots dug out of the side cover. The shorai battery was a little different size than stock so i used heavy duty velcro strap to keep it secure, but same reg/rec mounting method would work for stock battery, especially if you aren't using this chonker i used. I didn't want to cut into my under seat space, and didn't want to trim anything to make this huge thing fit. Instead of nuts on the back of the plate i used rivnuts/nutserts, which will change your life if you've never heard of them 😄