Scottay951 Posted January 29, 2015 Author Share Posted January 29, 2015 Did you have to change the bearings for the front end as I'm buying a 2005 CBR600RR front end for my VFR. Any issues with radiator clearance etc? I ordered new bearings just because the ones on the bike were worn out from 67k miles. Link to comment Share on other sites More sharing options...
750 Posted January 29, 2015 Share Posted January 29, 2015 But same size as mentioned by someone else? So if mine are ok on either the VFR or CBR...I can use either of them, I assume? p.s - just checked out the staintune exhaust, made my eyes water at how expensive it is over here in the UK, over £600!!!!?? Link to comment Share on other sites More sharing options...
Scottay951 Posted January 29, 2015 Author Share Posted January 29, 2015 But same size as mentioned by someone else? So if mine are ok on either the VFR or CBR...I can use either of them, I assume?p.s - just checked out the staintune exhaust, made my eyes water at how expensive it is over here in the UK, over £600!!!!?? Yes, both sets of bearings will fit into the VFR's bearing races. And yeah, It was just plain dumb luck that I saw ysrebob's post in the classifieds section and snagged it before anyone else! Link to comment Share on other sites More sharing options...
750 Posted January 29, 2015 Share Posted January 29, 2015 Good moves! Bet it sounds terrific. So what's next on the build? Link to comment Share on other sites More sharing options...
Scottay951 Posted January 29, 2015 Author Share Posted January 29, 2015 Good moves! Bet it sounds terrific. So what's next on the build?Right now, I'm pretty sure my throttle cables are binding so it won't spring back closed. Other than that:Finding a good place to hide the spark packs Figuring out what I want to use as a radiator overflow Re-installing the wiring harness and making the mods to the headlight connections and gauge connections Make the struts for the lower mounts that will connect the subframe to the frame New chain and sprockets Re-mount the oil cooler (I'm probably forgetting other stuff, but I'm between classes and my mind is mush) That's just the functional mods, there are a lot of cosmetic things I'll eventually get to but my priority right now is to get it roadworthy Cosmetics: Powdercoat stator cover and clutch cover, probably the gas tank too Clean up the engine in general, the salt air of south Houston hasn't been nice as far as surface corrosion goes. Edit: just checked the tracking # on my countersunk washers, they're at my house so they'll go in as soon as I get out of class tonight and can make a quick jaunt to Home Depot for some SS washers to go underneath per Dutchy's suggestion Link to comment Share on other sites More sharing options...
Scottay951 Posted January 30, 2015 Author Share Posted January 30, 2015 The bolts that came with the washers were only 15mm long, so I opted for a 25mm M6 Allen head instead Link to comment Share on other sites More sharing options...
SEBSPEED Posted January 30, 2015 Share Posted January 30, 2015 Must be some special Australian type of bolt? Link to comment Share on other sites More sharing options...
750 Posted January 30, 2015 Share Posted January 30, 2015 ooo, nice Link to comment Share on other sites More sharing options...
Member Contributer Dutchy Posted January 30, 2015 Member Contributer Share Posted January 30, 2015 The bolts that came with the washers were only 15mm long, so I opted for a 25mm M6 Allen head instead Sure hope I do not see your gold paint bubbling/peeling....... Link to comment Share on other sites More sharing options...
Scottay951 Posted January 30, 2015 Author Share Posted January 30, 2015 The bolts that came with the washers were only 15mm long, so I opted for a 25mm M6 Allen head instead Sure hope I do not see your gold paint bubbling/peeling....... No, those are just imperfections on the clutch plate that ended up coming through the powdercoat. They're really not that visible, but the camera's flash made them much more obvious Link to comment Share on other sites More sharing options...
80sDweeb Posted January 31, 2015 Share Posted January 31, 2015 You're really moving along with this project, so congratulations, it looks very nice so far. Good luck figuring out all the little finicky details. One thought I have for an overflow tank is a paintball CO2 tank, could look a lot like a nitrous bottle... I had seen a customizer in the UK (YouTube) that used a bottle for a hair care product, maybe a hair mousse bottle? Had a kind of rounded look to the top, was an aluminum bottle and he spun with a drill press or something and took the paint off with sandpaper, which gave it a spun aluminum look. However, the aluminum was pretty thin, which is why I thought of the paintball bottle. Scott in Brighton NY Link to comment Share on other sites More sharing options...
Scottay951 Posted January 31, 2015 Author Share Posted January 31, 2015 You're really moving along with this project, so congratulations, it looks very nice so far. Good luck figuring out all the little finicky details. One thought I have for an overflow tank is a paintball CO2 tank, could look a lot like a nitrous bottle... I had seen a customizer in the UK (YouTube) that used a bottle for a hair care product, maybe a hair mousse bottle? Had a kind of rounded look to the top, was an aluminum bottle and he spun with a drill press or something and took the paint off with sandpaper, which gave it a spun aluminum look. However, the aluminum was pretty thin, which is why I thought of the paintball bottle. Scott in Brighton NY Thank you, any and all encouragement is appreciated. I was thinking about the overflow earlier today when I drove past an army surplus store, I'll probably pop in there tomorrow and see if they have anything cool I can use. I like the CO2 bottle idea though, I'll have to look into what sizes they come in Link to comment Share on other sites More sharing options...
Scottay951 Posted February 11, 2015 Author Share Posted February 11, 2015 Oil cooler delete complete. That right side bolt was a HUGE pain the ass to tighten! Link to comment Share on other sites More sharing options...
Scottay951 Posted February 11, 2015 Author Share Posted February 11, 2015 Also found good spots for the rear spark packs.Ugh, pictures are rotated when I submit via mobile, I'll fix it tonight. Link to comment Share on other sites More sharing options...
750 Posted February 12, 2015 Share Posted February 12, 2015 Reckon it's worth getting a VFRness in there while it's all stripped down? Looks to be shifting along nicely, I'm impressed! Quick question. You mentioned getting a Hayabusa left exit exhaust. Has this been done before, how would it work? Link to comment Share on other sites More sharing options...
Scottay951 Posted February 12, 2015 Author Share Posted February 12, 2015 I'm not going to bother, I pulled the stator cover off and everything looks to be fine underneath. It's gone 62k miles as is so why mess with it? :) I did, I was going to take the headers to a muffler shop and have them cut the header and bend up a mid pipe for the left exit. But then I found that Staintune can on here and abandoned the 'Busa yoshi idea Link to comment Share on other sites More sharing options...
Member Contributer paladinreed Posted February 17, 2015 Member Contributer Share Posted February 17, 2015 Great progress so far! Link to comment Share on other sites More sharing options...
Scottay951 Posted February 18, 2015 Author Share Posted February 18, 2015 Got a call from the powdercoater this afternoon, my clutch cover and stator cover are ready for pick up. Can't wait to see how they look! Link to comment Share on other sites More sharing options...
Member Contributer Dutchy Posted February 18, 2015 Member Contributer Share Posted February 18, 2015 Stop teasing! Deliver!!! Link to comment Share on other sites More sharing options...
Scottay951 Posted February 18, 2015 Author Share Posted February 18, 2015 Stop teasing! Deliver!!! I have pic(s)!!! I have an exam tonight, so they'll be on the bike tomorrow morning! Link to comment Share on other sites More sharing options...
SoCal97VFR Posted February 19, 2015 Share Posted February 19, 2015 This is looking really nice! I'm looking forward to pics of the tail completed. I've just finished my 600rr front end conversion and starting to think more about a tail swap. I hadnt considered the z1000 so very interested Link to comment Share on other sites More sharing options...
Scottay951 Posted February 19, 2015 Author Share Posted February 19, 2015 This is looking really nice! I'm looking forward to pics of the tail completed. I've just finished my 600rr front end conversion and starting to think more about a tail swap. I hadnt considered the z1000 so very interested I wasn't sure what I was going to do with the tail, luckily a friend had recently had his Z1000 written off by insurance so I was able to pick whatever parts I wanted from his bike (the entire subframe along with his Sargent seat.) It's not a direct swap by any means, I had to shave a few mm of aluminum off the Kawi subframe to make it fit the VFR frame mount. The lower subframe mount needs a 5 inch piece of steel to connect it to the lower VFR frame mount. It also has a bit of a gap between the tank and the seat, but that's a purely cosmetic issue so that's pretty far down on my to-do list. Link to comment Share on other sites More sharing options...
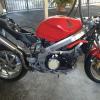
Scottay951 Posted February 26, 2015 Author Share Posted February 26, 2015 Powdercoated parts are in (and on...mostly).My excitement was cut short though. I was definitely under the recommended 9 ftlbs of torque when one of the clutch cover bolts stripped and took out a chunk of the thread with it >:(The good news is that it was the very beginning of the thread and there's an extra 15mm of thread depth left. Hopefully I won't need to get a tap and can just grab a longer bolt.Anyways, enjoy the eye candy, I know I am! Edit: Re-uploaded the pictures, they always get rotated for some reason when I post from my iPhone Link to comment Share on other sites More sharing options...
SEBSPEED Posted February 26, 2015 Share Posted February 26, 2015 If you had trouble with it, you should have run a tap in to clean up the threads. You don't need to torque those bolts down, either. Snug + 1/4 turn in a criss cross pattern will do it nicely. Link to comment Share on other sites More sharing options...
Scottay951 Posted February 26, 2015 Author Share Posted February 26, 2015 Yeah, I was just excited to use my new torque wrench -_- Link to comment Share on other sites More sharing options...

Recommended Posts
Archived
This topic is now archived and is closed to further replies.