


FotoMoto
-
Posts
1,137 -
Joined
-
Last visited
-
Days Won
3
Content Type
Forums
Profiles
Gallery
Blogs
Downloads
Events
Everything posted by FotoMoto
-
Hey Matt, GREAT job! :unsure: :fing02: We need a side profile shot to see how the styling lines of the two Gens "line" up. What are your considerations for side covers? I'm currently working on version 2.0 for mine plus a few other cool mods. Ahh, it just never seems to stop. :blush: One word for ya' Kevin: aluminum
-
First of all, you guys shouldn't be riding in jeans but that's your choice. Second, those and underwear will slowly cut off your blood flow to that region. Smooth cycle shorts and proper riding gear don't have these seams. Everyone has their limits and 6-7 hours is when I start getting serious monkey butt even with the shorts and a good seat. A throttle lock will not only relieve your right wrist but it will also allow you to shift to different seating positions for temporary relief and that really, really helps on long straights.
-
Hmm, those bars look very familiar..... :fing02: SuperBike Bars Gold renthals with off-road mounts. Nope. I think mine had more rise. What bend number is yours?
-
I've done the same thing concept wise but with a $4 fram from walmart. Just cut out the OEM paper element yet leave the wire screen below and RTV Silcone the fram back in its place. Did this both on the superhawk and my 4th gen. Disclaimer: I'm now running a K&N I got cheap off ebay as my upgraded jetting/pipe combo' called for it.
-
WOW, great job. :goofy: Blending the upper into the VFR mids looks very nice. Besides the possible heat issue all ready mentioned, the only downer I can see is the need for very low clip ons to clear the upper. I, too, considered a 916 as the basis of my hybrid VFR but found used parts prices prohibitive here in the US.
-
Todd, Yes, it is off THAT much. As I said, you will need Verison 4.0 of the speedohealer which is the only one with enough range to handle this. I tried three others: "regular" speedohealer, a yellow box, and a daktronics box before speedohealer's tech support :unsure: helped me figure it out. Ver.4.0 has only been out since march so make sure you're not getting old stock when ordering. I got mine here: http://www.calsportbike.com/cgi-bin/store/...988&count=1 I originally solved my limited mirror view buy adding spacers as seen in some of the pics but I just didn't like the looks nor the "dirty" air coming off the fairing. So, I'm now using bar end mirrors which greatly cleaned up the lines of the bike and greatly reduced turbulence. Pics to come soon. Gazman, Yes splicing into the cbr gauge/headlight harness (cheap on ebay) is the only way to go. Also, I saw your youtube video and the KOSO tach looked to be working fine.
-
JACKPOT! Guys I did write it down. :wheel: Seeing gazman's schematic finally trigger one of my last functioning brain cells :beer: which let me recall that I enlarged the schematic and printed it in the hopes of reading it better. Anyway, I found that print out and I did label things. Starting from left to right on the above connector of the cbr1000rr gauge harness: CBR wire colors=function P= Speedometer (1) Br/W = Instrument lighting (switched) R/G= Instrument power (non-switched for clock, etc) Gr/Y= Not used (cbr steering damper) G= Ground Gr/R= Water temp Y/G= Tachometer Bu/R= Oil W/Bu= Not used (FI light) Br/W= Speedometer (2) Br/Bl= Fuel Reserve Lg/Bl= Neutral Lb= Right Turn Bl/Bu= High Beam O= Left Turn G/Bl= Speedometer (3) For the three speedometer sensor connections: CBR=VFR color wire Speedo (1)= Pink Speedo (2)= B/Br Speedo (3)= G/B Pink is the actual signal wire and the other two are power & ground. HTH and, oh yeah, disconnect battery before surgery! :wheel: Good luck :beer:
-
Great, now I have a waiting line of folks wanting me to take my harness apart since, being the lazy ass person that I am, I didn't write down the wire color codes!!!!! :warranty: Roadkill, Todd, and Gazman: I must have downloaded the same cbr pdf file as it's also very low quality and I can not make out many of the words at the meter connection. So, here's what I did. Just as in the above image, I could make out the cbr wire color codes but not the words at the gauge connection (grrrrrr). So, I looked all over the cbr schematic till I found the sensor or switch I needed (neutral, oil, high beam, etc) and then followed it back up to the harness connection. Just a process of elimination really and didn't worry about the extra cbr wires used for FI and other uses. Many (most) of the wires run to the ECM first so don't get lost. I cut off the 4gen green and blue connectors and connected the vfr wires to the cbr gauge harness to plug into the cbr gauge. That way the instrument is removable and not hardwired to the bike. Hope this makes sense. I'm truly sorry I can't take my bike apart and unwrap the harness to give you definite answers to color codes but I'm in the middle of a house restoration, bike is in storage, and I've only ridden once in the past 3 months or so. I'm beginning to understand what PMS is now. :fing02: Gazman, your 3gen streetfighter is MAGNIFICO! :goofy: Did the RX2 tachometer function not work properly? That was the only thing the RX1 didn't solved or I would have kept it. My 4gen coolant sensor didn't work correctly with the cbr gauge but the KOSO sensor did so I'm using that one. A cbr temperature sensor might bolt onto the vfr thermostat but I don't know that for a fact and am just guessing. You will also need a speedohealer version 4 (latest) to calibrate the speedometer correctly. Roadkill, Remember you are adding a digital gauge on an "analog" bike so yes there are going to be many unused functions (wires) on the cbr's end like the electronic steering damper. Don't worry about them. You'll also need the ver4 speedohealer. Post some pics of that front end, please.
-
No, I'm referring to the coolant rad, even hanging down your oil rad won't be a problem (BTDT). I think the fender will be hitting either the coolant rad or cylinder head on full compression. The dark green (DG) are grounds. I recently upgraded my computer and don't have the cbr manual I downloaded on it so I can't check to see nor recall what the common ground wire color is on that bike. Yeah I know what you mean about listening for the redline but I wanted a set of clocks that were close. Just an attention to detail kind of thing. I'm, ahemmm, nearly as old as Baileyroc :fing02: and a more comfy riding position is a priority item so I try to add superbike bars to my bikes if at all possible. Keep at it. :wheel:
-
I used a cbr1000rr gauge because the redline is the same so the wire colors could probably be different. Now is the point where I wished I would have written things down more often but basically I just traced the cbr wiring schematic from the sensors back up to the gauge to determine what color wire went where. The cbr gauges will have extra wires for digital functions (FI light, etc) so don't panic. 4 inches shorter huh? WOW, that's a lot. You are probably going to run into radiator clearance during fork compression. I loved the plates. I did the same thing during mock up stage but mine were more flimsy.
-
Oh man I'm sorry I didn't see your post any sooner. :fing02: Shoot, you're probably finished by now! Sounds like an awesome project. :wheel: I do have a concern on the 600RR front end. Most of these newer USD units are pretty short. How's that going? No major issues with the electronics other than two minor things: 1) Water temp probe (used an aftermarket) 2) Speedometer calibration (need latest SpeedoHealer) I solved the choke cable issue by using a CBR900RR triple clamp mount (cheap). In your case with the low 600rr clipons, you maybe able to run the choke cable in the stock 4gen position with no length issues. Remember I have more upright handlebar setup. If I had a better local dealer, I would have just taken my cable and compared lengths of their in-stock supply but a request like that would just blown their minds. Keep us posted and Good Luck! Doug
-
I tried that on my first vtec. Got the gels out of a bicycle accessory seat cover. I hated it. I also tried a factory suzuki gel seat on my old bandit. Didn't like it either; they're just squishy and isolate you too much from the bike. YMMV tho'.
-
I've posted this on other forums but I see a continued interest here by fellow cheap bastards looking for an alternative to Sargent, Corbin, Bill Mayer, etc. This a short write up for the front rider section of the VTEC seat but the same can be done for the passenger as well. I've owned three cobins and two sargents over the years so it's obvious I think they are a worthy mod but sometimes money is tight, right? So....... Sargent will sell a 12X12X2in blank of their foam for $25 plus shipping (foam is shipped in box of foam peanuts=oh the irony). You'll need a stock seat (duh), an electric carving knife or a very sharp blade, med. to fine grit sand paper, cotten batting (walmart fabric section), spray adhesive or some sort of glue that works with foam, and a staple gun (not a desk stapler). Remove staples with a flat blade screwdriver or similiar from the front working your way about 3/4's of the way back. No need to remove entire cover which would only make recovering more time consuming. Determine the part you want to replace, mark it, and get busy with the knife. Next is to measure, cut and shape the sargent foam back into the void. Take your time, measure twice/cut once, etc on this part. Once satisfied, glue in place. If you examine these first two photos, you may notice how little padding there is near the "hump" on the stock foam. I added more there which reduced the step a bit and gave me a little more "user" space. :cool: Add batting on top to mask any blems. If you're damn good at the shaping/fitting part, you might be able to skip the batting. When trimming it, leave enough to wrap underneath the seat to staple along with cover. I didn't glue it in place in case I wanted to try a different shape (I did) or need to make adjustments (ditto). Recover, pull tight and staple. An extra pair of hands on this step really helps. While stapling, the seat base needs to reinforced on the backside by a rigid source (countertop, etc) or the staples will not fully go in. This will make better sense when you're doing it. TIP: leave seat in sun or use hair dryer for easier cover stretching. I rate this mod as about 60% effective of the real deal. I've done a 1600 mile weekend on one and only got monkey butt near the end of the day of interstate droning; never an issue in the twisties. BTW, that tank bag is huge because it's holding two sweaters and a liner I wore during the much chillier morning (damn deserts......) The better seat bases, covers, and shape design are what make the pro's that additional 40% better. This is my arbitrary rating; others make think this is just as good while others may rate it as not worth doing at all. Full discloser: I have a sargent on it now because: a) I got it used ($$) here on the forum :fing02: and b) the red piping looks sooooo much better with my rim stripes. :beer: As always but especially on things like this: YMMV :fing02:
-

Gen. 6th Vfr: The Brake Lines Are Now Runnging Through The Swingarm!
FotoMoto replied to 2FAST4U's topic in Modifications
Love the brake line mod :fing02: :laugh: but not so much the chain guard chop. The end section that was cut off catches a greatest amount of goo according to the ones I've had the pleasure of cleaning over the years (only surpassed by the front cover). It does look better (cleaner lines) tho'. -
I mounted mine on the left on my RCBVFR (4gen): Hanger is (was) a modified cbr1000rr rear peg hanger.
-
From the album: Miscellaneous
© ©vfdiscussion.com
-
HUH? yeah right..... :goofy: :D :P :lol: FYI, gll429 is deaf (seriously). How about rotating them until the bell is facing down and backwards. Should lessen the water/bugs issue and sound travel will not be affected at those dB levels.
-
Just checking VFRD before getting on my way home.
FotoMoto commented on V4 Rosso's gallery image in Member's Gallery
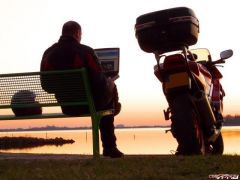 Yeah, great shot idea and execution Rosso.
 -
+1 Like Buell uses on all its bikes.
-
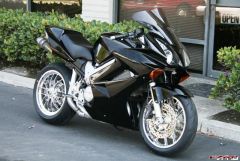
A next trick I've learned is to paint the wheel weights a matching color. Pretty easy for me with black wheels as that gold might be harder to match but it should look better than the gray. Bike looks really great!
-
From the ashes..... Man, fresh powdercoat sure looks suh-weeeeet!
-
Haven't taken it to a bike night yet. Maybe this spring I'll "spring it" on 'em. LOL Finally got around to a minor mod for the rear shock reservoir mount. A crash damaged cbr1000rr passenger peg hanger became the unknowing donor part for a much slimmer mount after hacking about 2/3rds of it off as suggested by Dutchy. You can't really tell from these pics but it's tuck in more for better protection against crash damage; not that it will ever need it. (fingers crossed knocking on wood) I'll either paint or powdercoat it black to blend in better. Before: After:
-
West* Texas never ends. (*thanks, I'm and idjit.)
FotoMoto commented on Nixx's gallery image in Member's Gallery
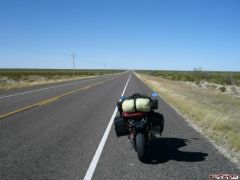 Umm, yeah that ain't EAST Texas 4sure. Kinda' like the folks who call San Antonio south Texas. :pissed: More like the high plains of upper central north and west Texas to me. But we can all be certain of one thing: that sure is one straight road!
 -
 GREAT shot! :thumbsup:
 -
I love the folding lever idea. NICE. The price for the avg street rider, not so nice. :warranty: Thanks for posting this eye candy (drool). :thumbsup:
