


HispanicSlammer
-
Posts
6,987 -
Joined
-
Last visited
-
Days Won
69
Content Type
Forums
Profiles
Gallery
Blogs
Downloads
Events
Everything posted by HispanicSlammer
-

Counter Shaft Front Sprocket Replacement
HispanicSlammer replied to spud786's topic in Motorcycle Maintenance
After you remove the old sprocket you might notice the thickness is different from the oem, for a cush rubber on both sides of the sprocket that quiets chain slap. I have replaced mine several times in 100k miles, just make sure that when you replace the sprocket cover that the nylon speed sensor nut is fully engaged with the sprocket bolt or your speedo wont work = and put the bike on the center stand before starting up again to make sure the clutch engages properly with the clutch lever. -
Cam Chain Tensioner, Without Throttle Body Removal
HispanicSlammer replied to Tightwad's topic in Maintenance Guides
Ok, I am not a writer. I don't have the witty banter abilities of great technical writers who pull you into their project no matter the subject. Instead I am a typical desk jockey who rides VFR and fixes stuff if he can. Before I get into the "easy" way to change the CCT, let me point out that I did not come up with the process on my own. I borrowed bits and pieces from lots of people. The best replacement guide can be found here, CCT change by Rad, where it is done "by the book". In the resulting discussion it was revealed that removing the Throttle Bodies and so forth was a waste of time, as the CCT can be removed without it. As a second note, I did not change the rear CCT, and I don't imagine I know or could discover any easier way...it seems simple enough already. See the link above to find how to change that CCT if needed. As a third note (I like notes), I don't believe the CCTs EVER go bad...I think they make noise when the spring loses a bit of tension...more to come on that later (see how I "hook" you...just like the creative writing class said!) So on to CCT removal and replacement (this order works best I have found)...Anyway, I didn't have music playing, I don't drink beer, and I barely remembered to take pictures....so bear with me. Finding the CCT was the first chore. It is located on the right side, kinda behind and back of the R/R. To find it you need to remove: Right Fairing 8 allen screws 1 blind rivet Slider (if applicable) Seat Just use the key, and remove Tank two 8mm head bolts, use 1/4" driver Restraint Cable Two 10mm head bolts at back of tank Air Box Top Hose from top screws around perimeter Air Box Bottom Velocity Stacks, Phillips Head Bolts Sensor connector on bottom Vacuum line going in front of box Small connections at the back When moved, the airbox looks like this: Note the airbox was just rotated away from the CCT. Tank was also rotated the same way and laid across the seat rails. You can see the CCT at the very bottom, just right of center. Now you are almost there....just need to remove those cooling hoses to make it stupidly easy to reach the CCT. Remove the one pointing out first, and connect a short section(2-3 feet) of 1/4" or similar hose (I didn't measure it, just some I had around, but 1/4" should be about right). Route this into a drain pan or later you get this: next remove the second hose....this is what makes the first connection take a bit of a leak not much fluid is lost...a bit more than is pictured here: Don't leave this for the dog/cats to drink, unless you don't like them much.... Now it's time to remove that CCT! Simply use your 8mm socket on extension, and take the center bolt out: This is where the "key" goes in. The keys job is to stop the CCT from extending when you remove it from the engine. Keeping it from extending makes it less likely that you knock a bit off into the motor, and also makes it easier for the CCT to clear the various bits above it. If you are really ambitious you could actually rotate the CCT to shorten it and make it even easier...but that would be over kill. After loosing both mounting bolts, and removing them, the CCT just slides right out: Here is where I have to admit I have a problem. I enjoy seeing how things work. I managed to restrain myself from taking apart my new CCT to see how it works, but the old one was just there....so I had to do it. Initially I planned to try the Reddog idea of tightening the spring....but I screwed up my spring after I removed it, so that was nixxed. Here is a nice picture of my CCT doing it's best Humpty Dumpty impression: you can see where the spring is messed up....yours won't look like that (don't take it apart to see tho). Let me describe the parts, so hopefully this makes more sense to those who want to know. Those who don't want to know can skip to anther thread or something... Clockwise starting from the left you have: CCT Gasket CCT body, with circlip just slid back key Sping(in the middle) bushing/sleeve Worm Drive Shaft with puck on end The sleeve/bushing goes around the worm drive, and over the shaft below the locking tab. The locking tab doesn't come off the shaft (without removing far too much). The way the CCT works is this: The spring is coiled around the shaft, with one end going into the slot at the bottom of the worm drive, and the other end into a slit at the top of the CCT body. As the worm drive is rotated clockwise, the spring winds up....and if allowed the worm drive will rotate counter clockwise to release tension. The worm drive can only rotate 4 times before the Shaft reaches its stopper. I believe the reason you begin to hear CCT noise is that the spring is able to unwind with a bit of Cam Chain stretch, and thus the spring is not as tight as it was originally. This loosness allows a bit more play that normal, and oscillations begin. Whether different oils help or not I don't even want to discuss. If you wish to attempt to modify your CCT to save some cash, here is how you do it: Holding the CCT in such a way that your finger restrains the shaft from advancing, remove the "key". Using a small (probably modified for the purpose) screwdriver, rotate the wormdrive from the access hole clockwise until it stops. Counts the revolutions. It will stop with the shaft all the way compressed. Now reinsert the key, and while still holding the shaft, slide the circlip down so it no longer restrains the locking tab. slide the locking tab carefully up the shaft out of the grooves, noting 2 grooves are wider than the other 2. Then very carefully rotate the shaft counter-clockwise 1-2 times as many revolutions as it took to compress it initially. (this figure is a guess, your results may very, I make no guarantees..written, expressed or otherwise, not available in all locations, subject to rule changes etc). After rotating the shaft counter-clockwise, slide the locking tab back down, and replace the circlip. Re-insert the screwdriver and rotate the gear clockwise to compress the shaft once more. Now you can reinstall the CCT and see if you saved $100. Reinstalling the CCT is the reverse of removal (I hate it when manuals state that, but it's true. Just check and make sure all connections are replaced or you may not like the results...I didn't. That is the connector I forgot. The FI light was blinking when I started the bike. I was able to get it back on without removing the air box again using a long thing screwdriver. Speaking of which, here are all the tools I needed to do the job: 1/4" driver handle 1/4" Rachet 1/4" x3" extension 1/4" x 6" extension 1/4"x1/4" socket for hose clamp 1/4"x8mm socket for CCT bolts and tank bolts Phillips Screw Driver 3/8" Rachet 3/8"x10mm socket 3/8" x 6" extension Needed this time, but not always required: Long Needle Nose pliars Extra Long thin screwdriver Telescoping Magnetic pickup tool Some pictures were not included, you can see them all here: http://www.wiremybike.com/Slideshows/CCT%20Change/ -
I like the pushbuttons on the 550, easier to use than touchscreen IMHO. Then the 660 uses microsd cards rather than the SD cards my 550 uses so I would have to get those too? Naw I like the 550 just fine. I like the larger screen, the shape would seem to be easier to set on a table and manipulate the gps, if your sitting in a resturant and want to change your route while you eat lunch, the 550 isnt flat anwhere you have to hold it with 2 hands. I dropped mine a couple of times on the road cause it wont just sit strait.
-

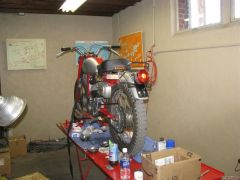
From the album: Stuff
© ©vfdiscussion.com
-
I would take the alternator cover off, pull the plugs, and try to turn the crank with a wrench.
-
where ever vfrs gather it is a good group of folks
-
Cycle Hill Tire Changer, Licensed No Mar Product
HispanicSlammer replied to Bad Boy's topic in Tires
Hmm HF tire changer $49.99 Motorcycle Attachment $59.99 Mojolever $99.00 MojoBlocks $30.00 ------------------------------------------------ My total Investment $238.98 50-60 sets of tires changed since 2003? 45 minutes per set of tires I dont see how this tool is a better "value" than the HF changer? -
Fort Donelson Ride
HispanicSlammer replied to Baileyrock's topic in Ride Reports - VFR Touring/Riding
My first taste of Tennessee was at Fort Donelson on my way to go meet you for the 05 TexasMac meet. I was surprised to have ridden over a 1000 miles to meet two retired Army Vets who were also Civil War Buffs. I talked with them for a short while and found out they were from "Colorado Springs" where I live, Small world. I had just traveled down the Land Between the Lakes in Kentucky, and entered the Fort at the Suggestion of a gas station clerk in Dover just at the very southern end of "The Trace". I noticed right away Southern Folk live up to thier repution for hospitality in greeting me with kindness and attention. This was also the first time I had seen an honest to God Civil war battlefield and the power if it wasn't wasted on me. It was as if I was standing on the very spot the Gettysburg address was given, however I know it wasn't. I just knew I was standing on consecrated ground. I have photos of that same battery of guns on the Cumberland. There is actually a Civil War battlefield on Raton Pass on the boarder between Colorado and New Mexico - a battle ensued when the south attempted to bring gold from the goldfields of Colorado into a southern trade route in New Mexico to finance the war. I have just never been there. -

-
I dont know where I saw it priced at $300, but at $30 I went with the 3M kit! I am going to get some acetone from work to get the baked on adhesive off as much as I can, it will discoulor a bit but I am gonna sand it off anyway. That $300 quote must have been for a large 3M shop kit?
-
A friend from work got a new Sandisk 4 gig with an FM reciever. It looks like an Ipod Nano but with more bells and whistles and can run on most any computer A(ie downloads) I was really impressed. Check it out I $89 for 4 gig, and they have an 8 gig plus it comes with a mini sd slot for more storage
-
What Fork Oil Weight To Use With New Springs?
HispanicSlammer replied to johnmark101's question in Modification Questions
Here is what I would do. Heavier springs with 10w oil will give you a very harsh ride if you keep the stock valves. I also went this route and ended up going with 5w oil which gave me some great results with compression but then it was giving me a lot of chatter with low speed braking into very twisty corners from the lack of rebound damping, not what you want where you live! You could remove a couple of shims from the compression valve and add them to the rebound valve, the rebound valve uses all the same size shims, and a couple of the compression shims match, just remove one or two and add them to the rebound stack. Its cheap but it will involve you removing the cassette and taking it apart. -
12 volt terry had a set of R1 cans on his VTEC at the KootHoot in Canada
-
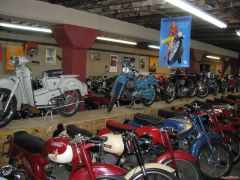
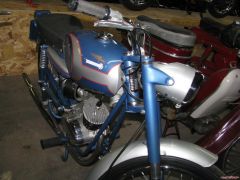
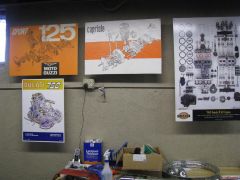
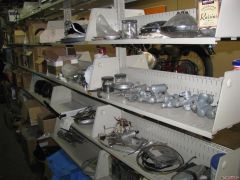
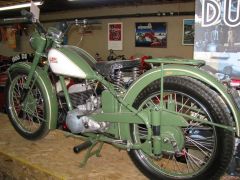
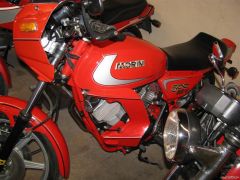
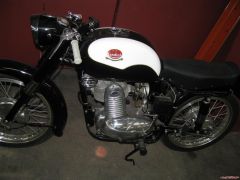
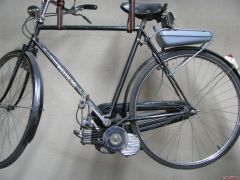
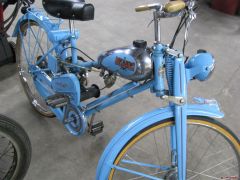
Jim Dillard's Vintage Motos Vintage Motorcycle Museum and Restoration I had the opportunity to visit my old college friend in Denver Tuesday - he suggested we go visit this vintage motorcycle museum in Lo-Do down by Coors Field. We jumped on his two scooters and headed across Capital Hill and made our way across downtown Denver on two vintage Italian scooters. I couldnt remeber what they were called if you tourchered me about it? All I know is it shifted funny, and I kept honking the horn every time I tried to use the turn signals. Anyway I had a lot of fun riding that little thing with its left hand shifter (on the left handle bar, it rotates as it shifts). Andy says it gets 100mpg where abouts on a full tank of about a gallon and a half. It was rather large for a scooter and it had a spare tire bolted to the back, Andy says he sunk about 3k into it all together with a chrome frame protector and rack. I usually don't like motorcycling in a large city but dadgum it if that wasn't a hoot riding that scooter. Andy was riding 2up with his Girl Friend Joann on the back. She was visiting from L.A. out for a ski trip to Vail, Steamboat and Winter Park. Andy had her whole 2 week vacation all planned out for her in advance, she said she was so busy doing stuff she hadn't had a chance to sleep! He also had our day planned out as well. So the three of us headed downtown and met Jim Dillard and looked over his collection of vintage euro bikes and scooters. Vintage Motos 2762 Walnut St Denver CO 80205 (303) 993-7693 jeducati@vintagemotos.com http://www.vintagemotos.com Parts shelves Carbs, magetos, suspension components Jims Cleaning area Ducati Scooter Hybrid Looking east Jim Dillard's Vintage Motos Vintage Motorcycle Museum and Restoration Bennelli Being restored 1955 BSA Bantum Morini 500 SEI-V Mondial 175 Bianchi Aquilleto Motorized bicycle again notice the dual lever front suspension - BMW did not invent this technology with the k1200 Bennelli Bianchi notice the Springer dual lever front end - Hossack like Moto Guzzi Scooter Jim called it a toaster motor 1938 AJ's Identical to the Matchless Little Ant 1956 Moto Rumi Formichino Parrila Scooter circa 1950 Ace Marchi Scooter 1972 Moto Guzzi Facon Sport Ducati Desmo Cagiva 750 by Ferrachi circa 90's Center Research Ducati (crd) 1984 Bennelli 900 SCI Honda Dream 50 I beleive these were sold as collectors items as late as 2006 by Honda 1950 IMME R100 100cc 1974 Ducati sport Bevel Drive 1938 Binelli 250cc sport Race bike 1933 Puch 250L featuring direct oil injection KTM 80 Pro Lever 1974 Laverda 750 SFC Twin Jim's most expensive bike I was talking to Jim about a number of motorcycle news items, the way AMA has squadered the American series - how the 600 class has changed into the premier class and the relative ease these bikes are to ride compared to the bigger more powerful bikes. He gave me a bit of a tour of the bikes talked about how he started collecting, side stepped a question about the value of his collection (understandable) and then he had to work on a photo backdrop for his website, photographing his collection. The museum is relatively new having opened this last September. It is not hard to find, if your in Denver, its about 1 block south of Erico Motorsports where he has even more bikes on display. Take Park Avenue to Walnut and head north about 5 blocks and turn east on 28th is on the side street, with a ducati sign in the door window, go down the stairs.
-
-

From the album: Vintage Motos
© ©vfdiscussion.com
-
From the album: Vintage Motos
© ©vfdiscussion.com
-
From the album: Vintage Motos
© ©vfdiscussion.com
-
-
From the album: Vintage Motos
© ©vfdiscussion.com
-
From the album: Vintage Motos
© ©vfdiscussion.com
-
From the album: Vintage Motos
© ©vfdiscussion.com
-
From the album: Vintage Motos
© ©vfdiscussion.com
-
-
From the album: Vintage Motos
Motorized bicycle again notice the dual lever front suspension - BMW did not invent this technology with the k1200© ©vfdiscussion.com