
Grum
-
Posts
3,816 -
Joined
-
Last visited
-
Days Won
118
Content Type
Forums
Profiles
Gallery
Blogs
Downloads
Events
Everything posted by Grum
-
?? Did you see his video of the fault code? Sure looks like a 23 to me.
-
Well if it stinks of fuel plus your running symptoms, then the first and easy thing to check is the FPR for a ruptured diaphragm. Dumps excessive raw fuel into 3 and 4 via vacuum hoses. Remove the FPR vac hose, see if fuel is dripping from the FPR or the vac hose wet with fuel = ruptured diaphragm.
-
Wonder if you have a leaky/ruptured Fuel Pressure Regulator diaphragm? This will dump excess fuel into cylinders 3 and 4 via the vacuum hoses. Might also relate to your bad O2 sensor reading especially if its the 3 - 4 one playing up!
-
Again, No Sir........ The schematic doesn't mislead! The R/R output definetly ends up with ONE 12v line and ONE Ground line. The two R/R outputs are not set up as one to feed the battery and another to feed electrical services! Power distribution all begins with Main Fuse A 30amp and Main Fuse B 30amp, both effectively supplied by battery and the single R/R output. Perhaps in other bikes the dual output wires Might be configured as you say, I'm only familiar with the VFR. The 4P plug arrangement is basically the same for both 5th and 6gen ( appart from the additional voltage sense wire for the 6gen using a 6P plug). The 4P plug is the easy point of disconnecting the R/R from the main wire harness. Having the two grounds and two power wires makes for a better load share throught the spade connectors and makes use of a standard plug with same size spade connections. The main problem with the 4P connector (and the 3phase AC input connector) over time is due to moisture ingress, corrosion and ulitmately high resistance joints, hard wiring can be the best alternative once a good non oem R/R is fitted.
-
Assuming you had No fast idle issue Prior to your coolant flush, then it sounds to me like an air lock situation, adding to poor coolant circulation to the wax unit. Running the bike to high temps without the radiatior cap on will cause the volcanic eruption you had and especially if there is air trapped. Did you follow the fill and burping process in the Service Manual?
-
No Sir! Not when you look at the wiring diagram. The four wires become a normal two wire configuration beyond the 4P connector. The single 12v wire then goes to the battery, protected by the one fuse, Main Fuse B 30amp.

-
Nothing more complex than just being able to supply minimal voltage drop Power output by using two smaller, more flexible cables each for both 12v and Ground, rather than a singular heavy gauge cable for each, makes for easier smaller standard sized interconecting spade connections within the plugs/sockets I guess. The 5th Black wire you mentioned (which I think is from an R/R for 6gens). Is a Voltage Sense feedback wire.
-

2001 VFR800 FI Speedometer and Rev Counter not working
Grum replied to CalvinVFR800FI's topic in Electrical
Tacho and Speedometer are mounted and electrically connected to the pcb by three Phillips screws. Both instruments share the same Power and Ground source. Suggest using the wiring diagram and take some simple Voltage and Ground measurements at the Instrument mounting screws to discover what's missing. 12v power is the Brown/Blue wire, Ground is the Green/Black. See partial drawing attached. A good clean of the connections of the two main Instrument Panel connectors and a smear of OxGard on the contacts is a good thing to do. Have a close inspection of ALL the pcb copper tracks for corrosion and open tracks, these can be easily repaired via a solder bridge wire. Good luck, hopefully your fault won't be too hard to find.
-
You swapped a 1998 5gen ECU with a 2003 6gen ECU!!!! NOT possible! Different connectors, different wiring, different sensors etc !!!! What checks did you do to "realize a problem with the ECU Unit"??? OR.... Are you saying you swapped the FCR (fuel cut relay) with the one from your 2003? Do you have the Service Manual or a wiring diagram to work with? With the Sidestand down, Ignition to On, what is the Fi code being flashed by the Fi light??
-
Bike used to shut off randomly, now has MAJOR grounding problems
Grum replied to styran's topic in Sixth Generation VFR's
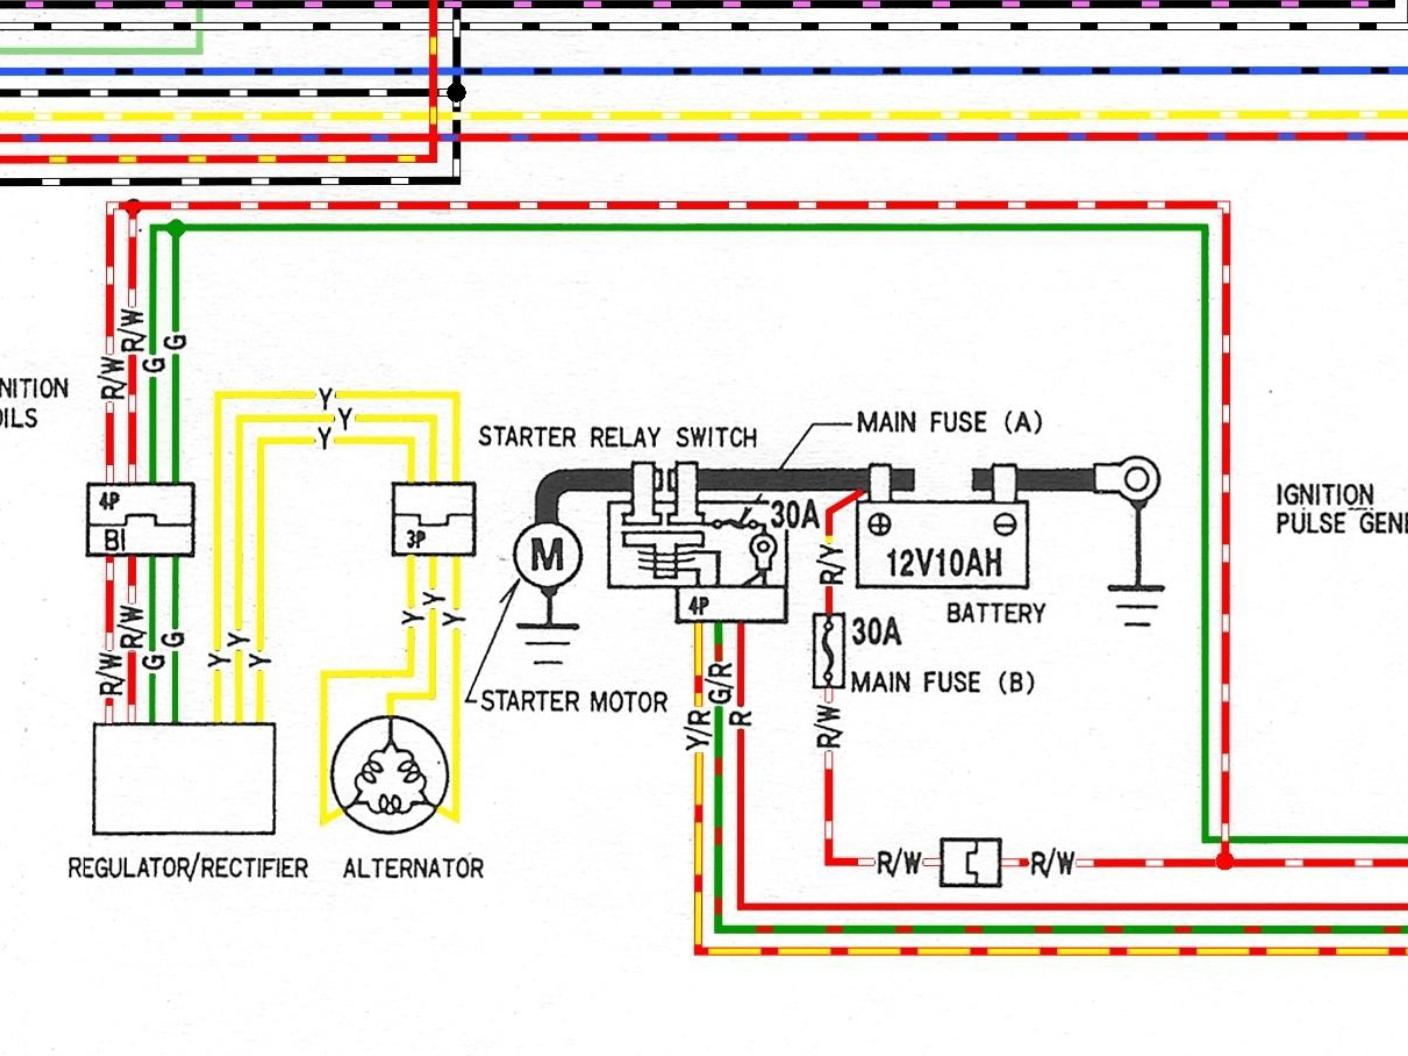
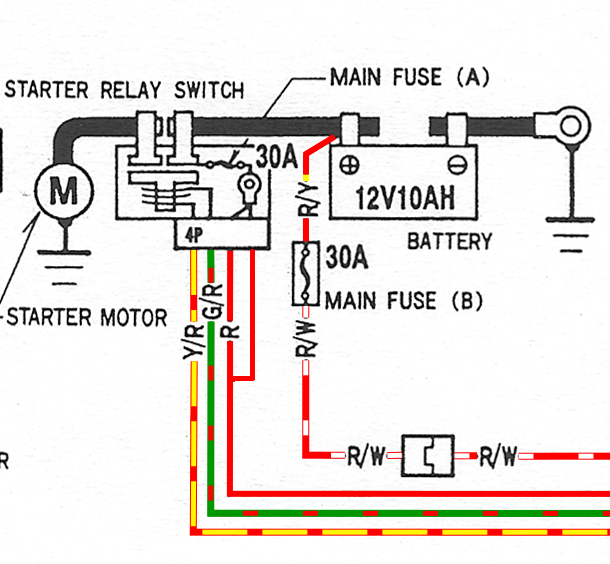
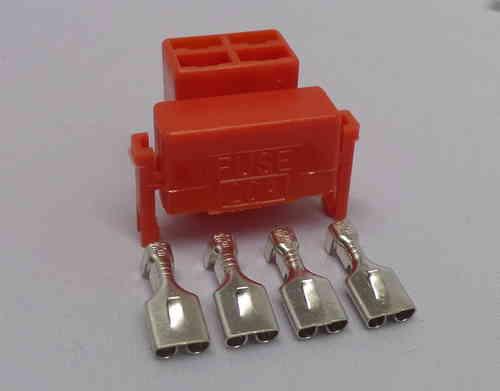
That is definitely heat stressed, the Red wire has turned brown and the red plug has melted, a hot and high resistance joint. Think you've found the fault! The Red wire will need cutting back to good unheated copper and new spade connector fitted. Its not essential to replace the relay coil spade connectors but if you can, then just do it. Replace the red plug with these high quality tin spade connectors, sorry can't remember the web site, just do a Google on Starter Relay Plug replacements should find them. Make sure the Red Wire male spade in the Relay isn't burnt or corroded. You could also try the wiring mod shown using the additional spare spade connector to the Main Fuse to share the electrical load, splicing an additional wire into the main Red wire. Some OxGard on these conections will also help. The coloured drawing is just a section from the 5gen Hi Res downloadable drawing from the forum. Starting circuit and wiring is the same as 6gen.
- 14 replies
-
- 1
-

-
- electrical
- charging
- (and 1 more)
-
Congratulations Hammy, your dream has come true at last. A very nice looking 6gen. If it's been well cared for it should serve you very well. You can download the Service Manual from this site so you can get to know your bike more intimately. Hope it brings you many miles of riding joy. Find out what servicing has been done, to assess what might need doing in the short term. Regular brake/clutch fluid flush every year or two is very important and so often neglected. Just wondering - Does the Canadian version have H.I.S.S.(Honda Ignition Security System)? If it does hopefully you'll get the two original transponder Ignition keys, if it does and you only get one key, then get a second cut and programmed ASAP. Cheers
-
Bike used to shut off randomly, now has MAJOR grounding problems
Grum replied to styran's topic in Sixth Generation VFR's
No Clock power and resetting is a definite sign of Main Fuse A 30amp power loss, located in the Starter Relay, it will also kill power to the Engine Stop Relay coil = Dead Engine, and power for the Starter Relay coil = No Starter Cranking. Further info - Loss of Clock backup power and it resetting also confirms that the fault can't be an Ignition Switch problem, as backup power is Not switched through the Ignition Switch. Check the Red plug at the Starter Relay. Check for any sign of heat stressed wires and burnt spade connections for the Red wire. Check the fuse and its legs for any signs of heat stress or poor/loose connections. Even though you have replaced the battery it still could be an issue. What does the battery voltage drop to as you attempt to start the engine? Is your replacement battery a good quality item or Chinese cheapy? I've heard of a couple of new battery scenarios that were down on capacity straight out of the box, and not able to hold a charge, it may have been sitting on the store shelf for too long! Let's know how you get on, good luck.
- 14 replies
-
- 1
-
-
- electrical
- charging
- (and 1 more)
-
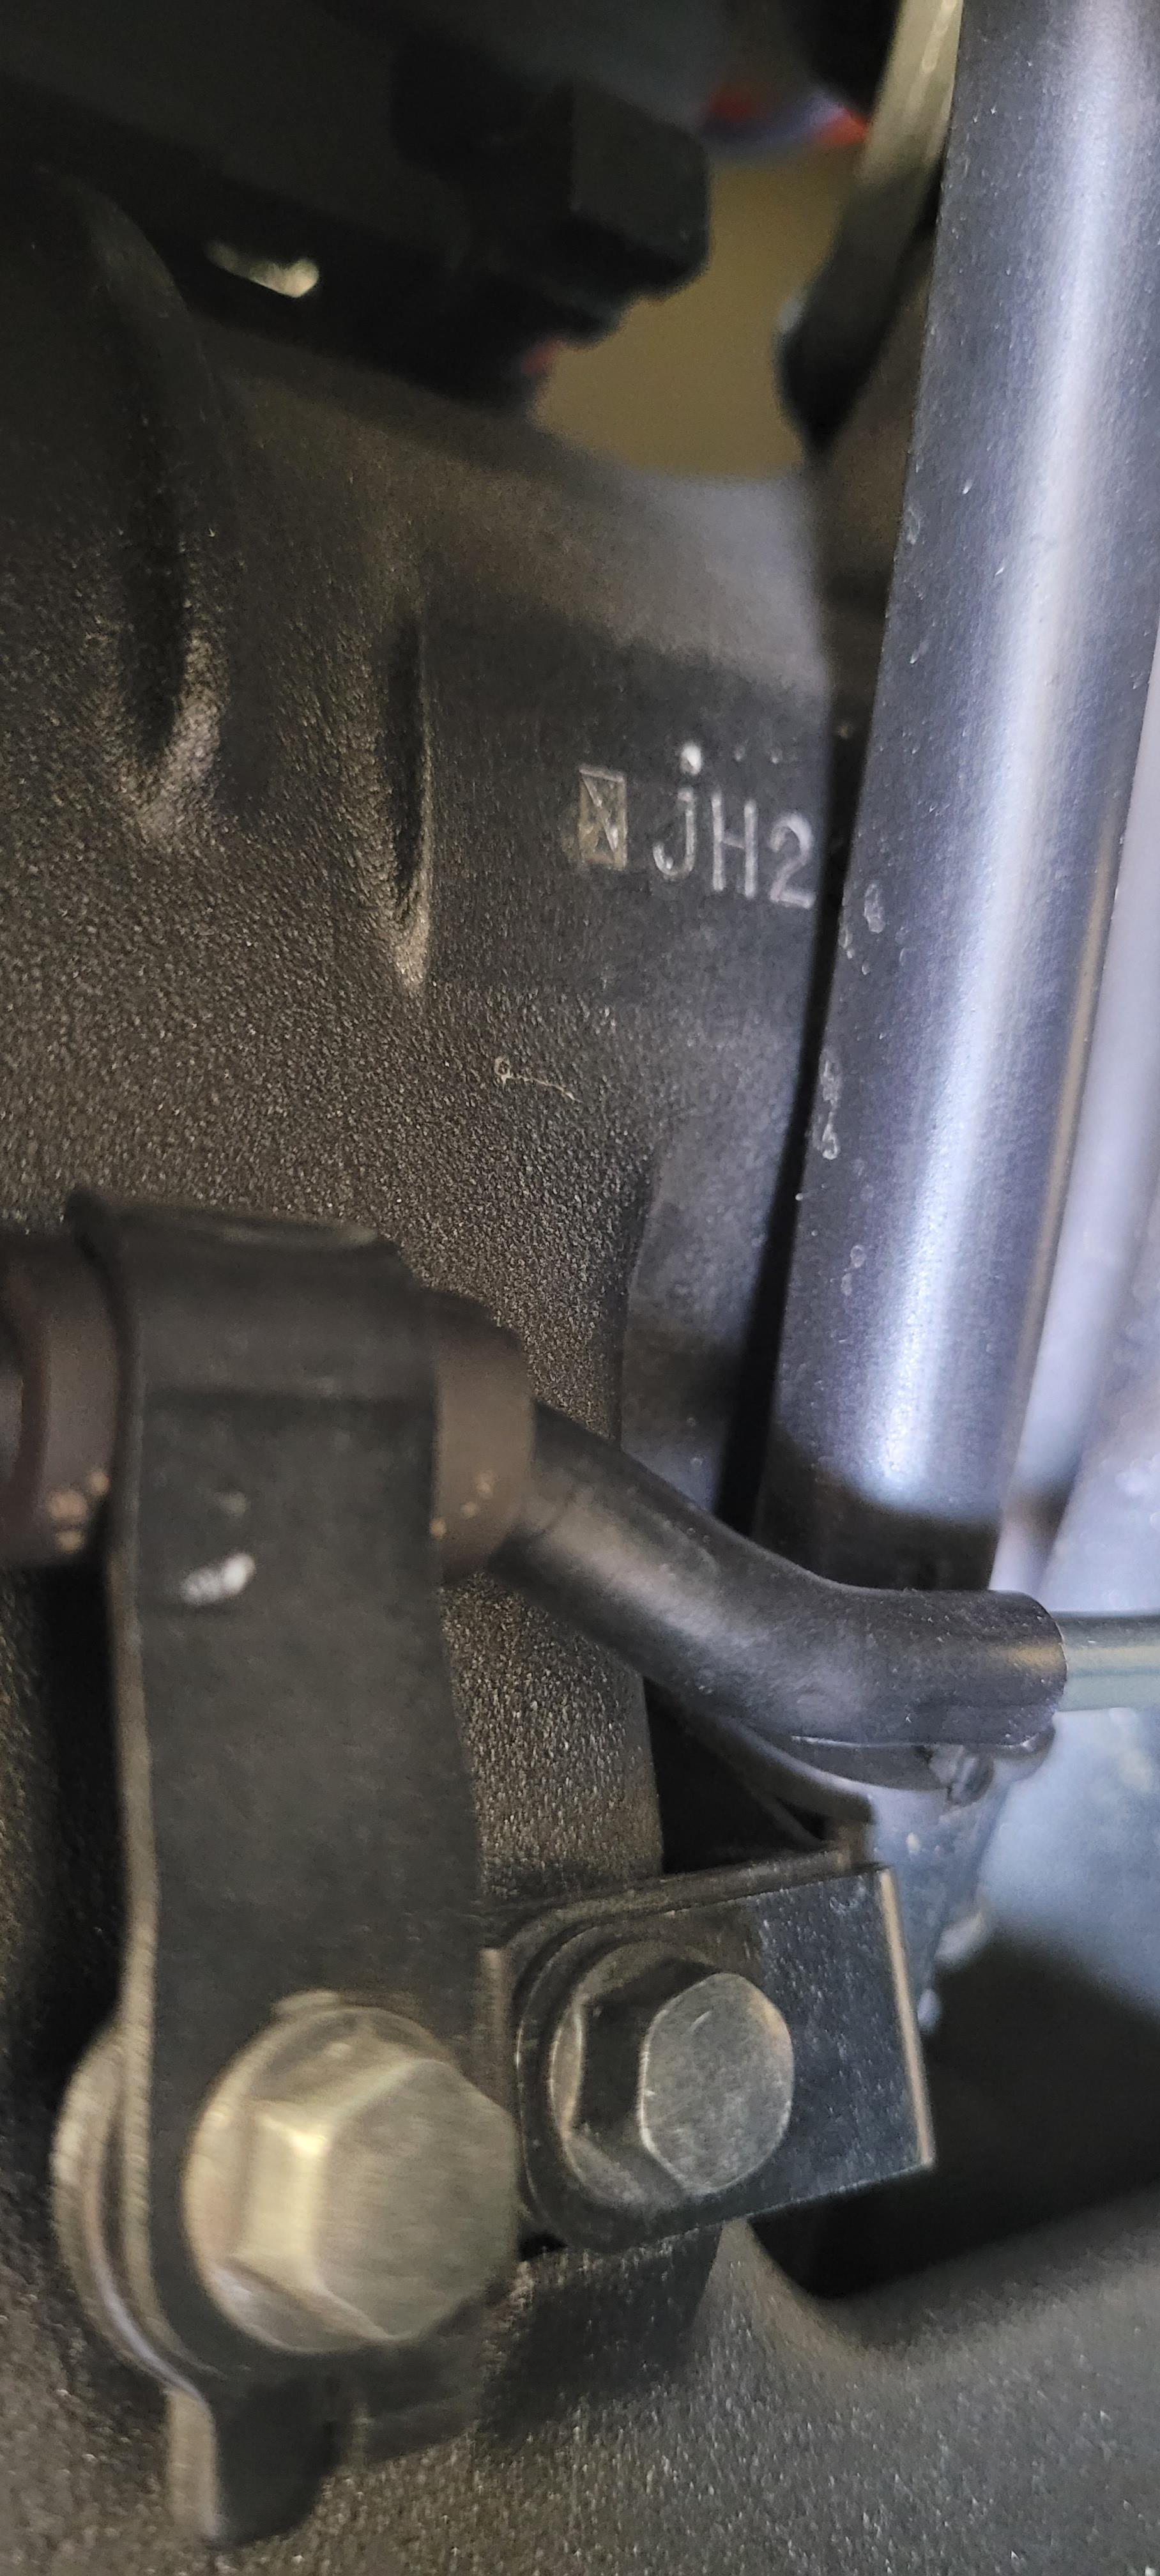
VIN Number is stamped on the R/H side of the steering head. Here's what you should be looking for - a dot stamped just above the J. (Thanks for the pic Skids!)
-
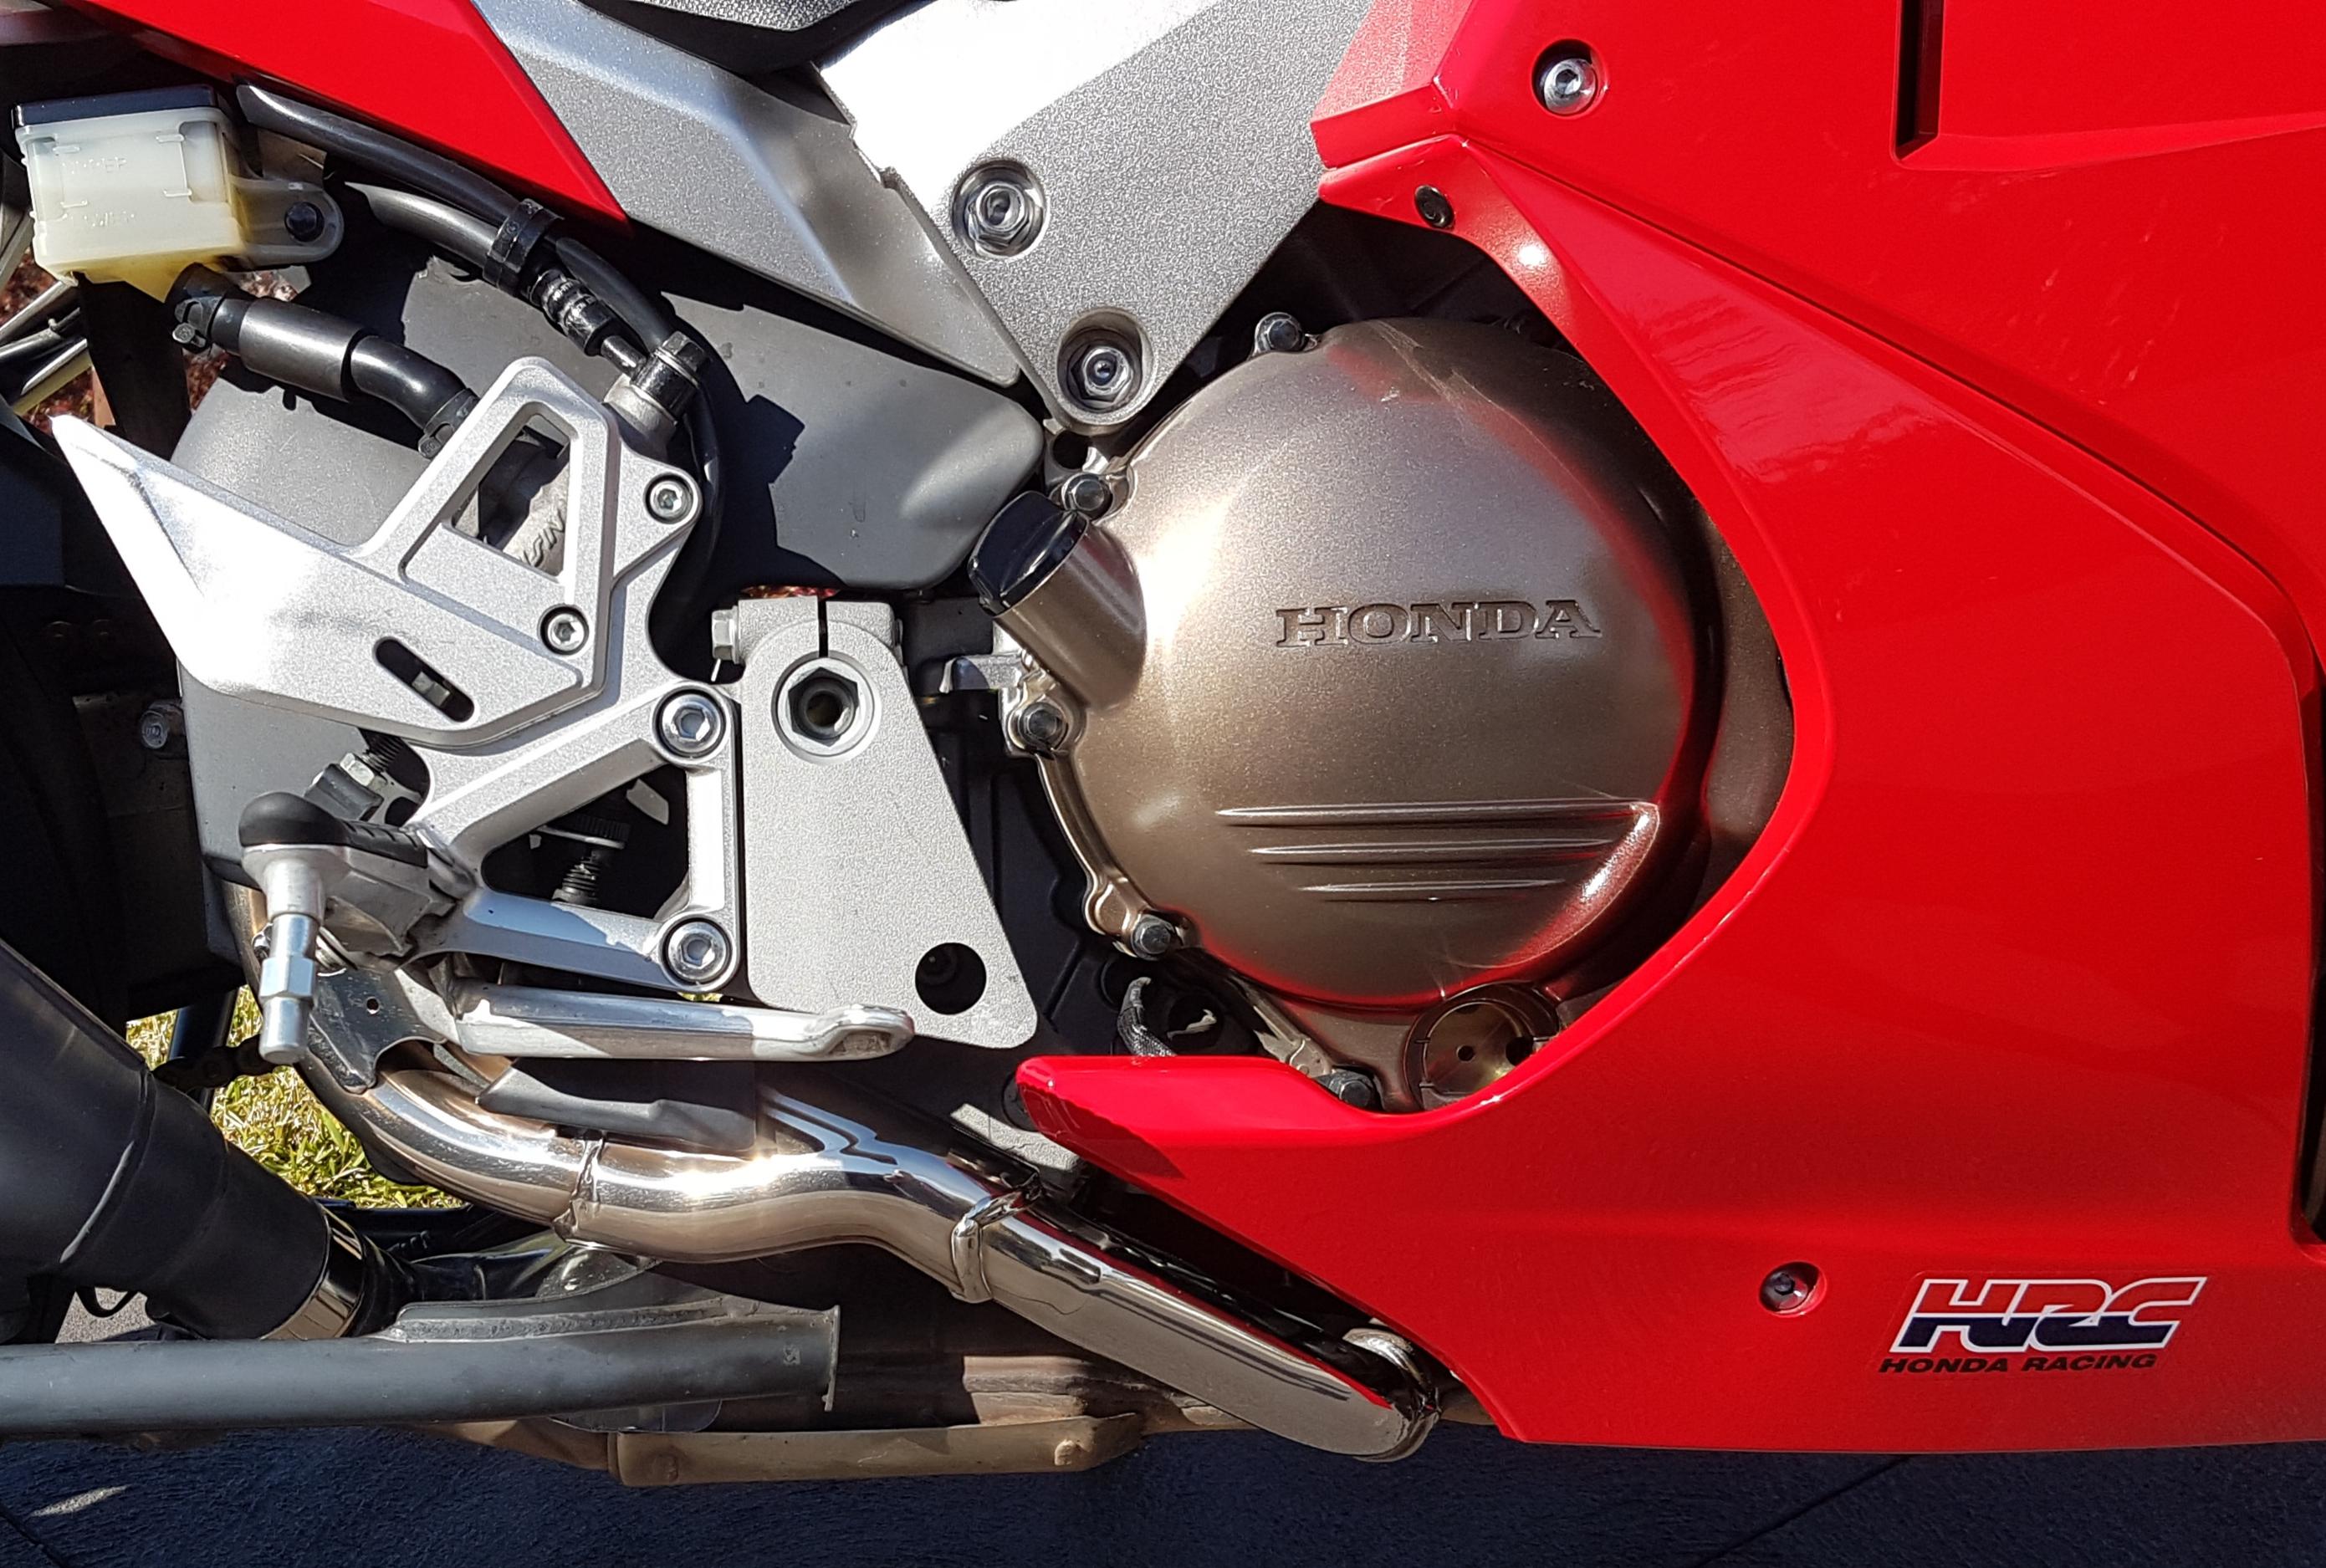
Looking good Lorne. The experience I've had with CCT's is that the clatter noise has always been evident high up at the cam covers on the R/H side, and its not difficult to identify if its the front or rear playing up by the noise location. Clutch basket noise obviously should come from down low around the clutch cover region. So it should be easy to determine whether its clutch or cct noise. Clutch noise might also change (unlike cct noise) if you pull the clutch in. Cheers
-
If you have either bad injectors or a ruptured FPV you should certainly notice poor running and terrible fuel economy. The FPV is an easy thing to check, so might be worth checking this before moving to the injectors.
-
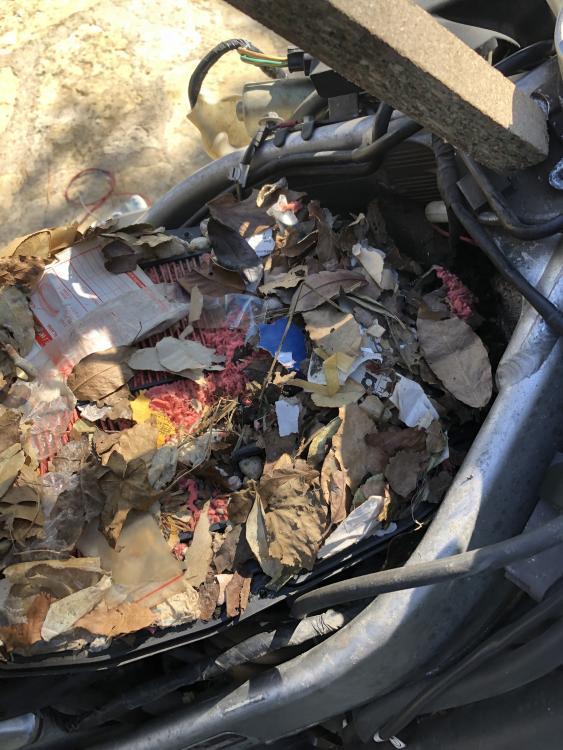
Might be worth doing a "critter nest" inspection check in the airfilter box! Seeing she's been outside for so long without a run.
-
And to add to the good advice above...... Check for a ruptured diaphragm in the Fuel Pressure Regulator. If ruptured it will dump fuel into cylinders 3 and 4. via the vacuum hoses.
-
Justin...All I can say is c'est magnifique! Great job. I guess your son has a grin from ear to ear. Magic photos, beautiful scenery. Enjoy.
-
Whatever coating they have it appears to be pretty thin, the coating seems to suffer as the tools bounce around against each other while in the kit when riding. Some rubbing with steel wool and a little metal polish will help. BUT is it really worth worrying too much over some surface corrosion on a set of spanners you most likely may never use? As long as they are usable and there as a backup is probably all that really matters. As always YMMV.
-
Sorry Justin, can't honestly say and have never removed a cat from any of my VFR's, but seeing the O2 sensors are ahead of the cat and the cat has no active influence on the EFI system, and that its role is to reduce the toxicity of exhaust gasses, then I can't see how running without it would be a problem, other than to the enviromentally friendly people! Other owners who have removed their cat will offer better advice I'm sure.
-
I've used this stuff on the lower exhaust on my 8gen. Keeps it nice and shiny. Picture - Lower exhaust after 90,000k's.
-
Very nice work Justin. Looking Great
-
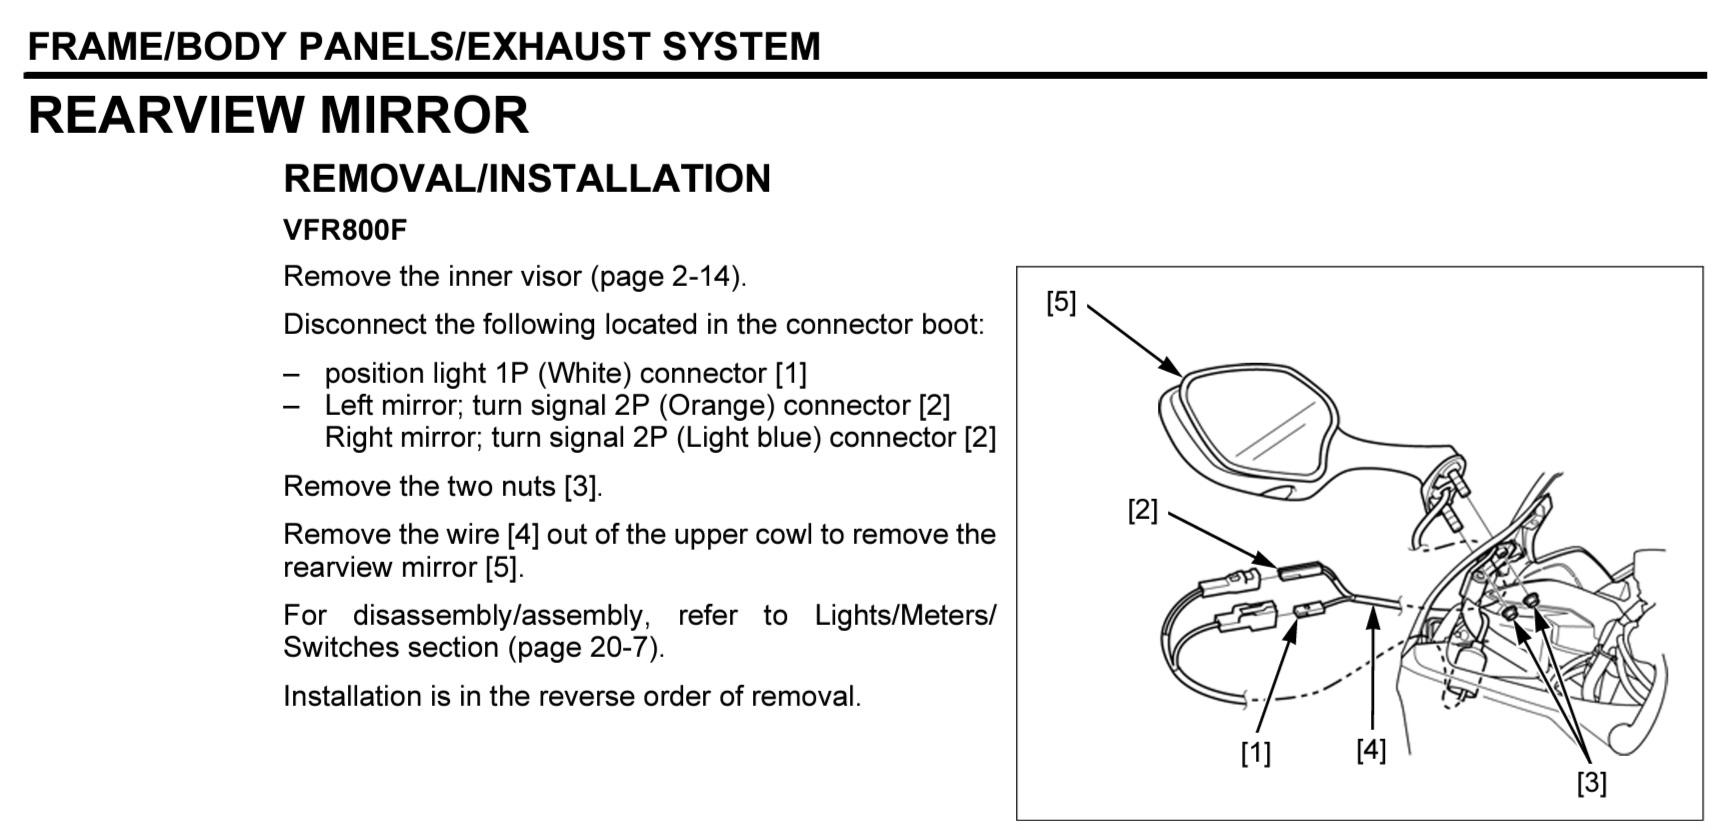
Nothing annoys you more when something like this happens, I feel your pain. Hopefully this helps. Check out Partzilla or Revzilla for parts. R/H Mirror Part No. 88210-MJM-305ZA ($122.82) OR Part No. 88210-MJM-D10ZA supersedes the original, see Revzilla site ($121.50).
-
Things to check...... 1. Check for continuity of the Sensor Body (Ground) back to the Battery Negative Terminal. 2. Make sure the connector to the Sensor is clean and making good contact. 3. Measure 12v between the Sensor wire and Ground, ignition to On. Refer Service Manual. 4. Check continuity of the Sensor wire, from the Sensor up to the Instrument. 5. Check 12v at the Instrument Black/Brown 12v, Green/Black Ground. 6. Check the three connections at the instrument are good and clean. 7. Do the resistance checks for the Sensor. Refer Service Manual. The Service Manual is downloadable from this forum if you don't already have it.
-
Hey Skids. Am I seeing something strange?? Does that look like a broken Wax Unit shaft circled in Red?.


.JPG.c7fc62745d583ef2c34a15d3784b0da3.JPG)