zoomzoom
-
Posts
510 -
Joined
-
Last visited
-
Days Won
7
About zoomzoom

- Birthday 08/02/1969
Recent Profile Visitors
10,511 profile views


zoomzoom's Achievements
")


-
Being someone who suffers from chronic low back pain, I feel it interesting to offer up this tidbit of info. Over the years I’ve done a few different things to help alleviate low back pain while riding, and a lot of the suggestions on here help immensely. The most helpful are like Maxswell mentioned, doing isometrics for your abdominal muscles while riding certainly helps and maintaining strong core muscles is key BUT, keep the rest on your back and neck muscles strong as well. I’m 6’-1” and two of the best additions I made to my bike over the years that helped aid in the comfort of riding were a Sargent Seat and HeliBars. The HeliBars gave me a slightly more upright riding position and the seat forever changed the way I sit. The factory seat seemed to slope endlessly toward the tank causing discomfort, well you know where, down by area that contacts the seat. LOL. I‘d compare it to straddling a banana, and the narrower the seat the more Uhmmm pressure points, causing an increase in discomfort and an increased tendency to move around more on the seat to alleviate this pressure. This in turn caused an increase in low back pain and a viscious cycle of discomfort. The Sargent seat is shaped more like the saddle on a horse so instead of sitting “ON” the seat, it’s more like you sit “IN” the seat. Since the Sargent seat slopes a bit upward at the front it helps control movement on the seat that you may experience from sliding/rocking forward and back when you accelerate/decelerate. The mere fact that the seat removes some of the pressure points on the butt and inner thigh area, will help keep those muscles relaxed and prevent cramping/spasming of the low back muscles. The HeliBars help relax my reach to the bars, and allow me to have a bit more of a bend in my elbows while riding. This aids in discomfort caused between the shoulder blades and the low back. I still noticed a bit more tension between my shoulders and would experience a bit of a knot, but nothing too terrible. Over the last few years, this knot seemed to becoming more prevalent so I tried, you guessed it, a new windscreen, to help reduce wind turbulence on my helmet. After trying about 3 different styles of screens, the one that worked best FOR ME, was an MRA Touring screen with the adjustable lip spoiler. The final thing I have added to my bike that has made the biggest difference yet was a used set of Throttlemeister bar ends. Unfortunately no longer available the Throttlemesisters are type of throttle lock. One brand still available that is similar in design is the Kaoko Throttle lock by the way so you may want to consider those instead. They use friction to help prevent throttle hand fatigue by preventing the throttle from snapping shut when you let go of the throttle. The throttle can still be easily manipulated, even with the “lock” engaged. By being able to engage the lock while riding gave me the ability to release my grip a bit on the throttle without having to come to a stop, and as a result I could shake out my right arm, and my left. It’s hard to imagine how much stress your right hand is under until you release it while riding, and this can be especially true on longer rides. Because of the way the human body works, when your right arm gets sore and the muscles on that side of the body become sore, guess which side of your body usually hurts MORE. You guessed it, the OPPOSITE side, as that is the side of the body compensating to relieve stress on the other side. in my particular case, all of the additions have made a positive effect on my level of comfort while riding, but this is very personal as what might work for me may not work for you. There are sooooooo many things that can affect the feel of a certain accessory. Another issue in modern day society, that most all of us are guilty of, myself included, is spending far too long staring at our phones. You know what I mean, sitting in a chair with your phone in your hand, staring down with your head bent forward. This postural position is HORRIBLE for your neck and upper back muscles. Guess where you will feel the effects of this pain the most. When riding, you’re doing a little bit of the opposite by trying to hold your head up, using the muscles that have now been fatigued by staring down at your phone/tablet/computer screen. The long and short of this whole long winded explanation is that any change you make to your bike may change an angle somewhere else, that may increase or decrease some level comfort elsewhere. So just be conscious of what each change does or may to your bikes ergonomics, and if you make a change pay conscious attention to whether it helps or hinders the level of comfort. NOW, for GAWDS sake, if you’ve made to the end of this little rant, you’ve been spending far too long reading on your phone/tablet/computer so go stretch a bit and get out for a RIDE. YOU NEED THE RELEASE.
-
I did roughly the same thing as Mello and trimmed the fender using a dremel tool. I decided where I wanted to trim and to ensure I made the same trim on both sides I took a string and scribed a line on the fender using the center of the wheel as a guide. Overkill I know, but I got the fender trim straight on both sides. LOL. I trimmed the length to about the same length as Mello but I wanted keep the arc on the fender. This is where the string came in. I attached a string to a piece of broom stick and placed it through the center of the hub and used the scribe to make a mark. For the plate light, I went a bit different. I purchased an LED self adhesive strip light at a local auto parts store and stuck it to the bottom of the factory tail light. Works like a charm and you can’t even see it, unless you look up under the tail section. It’s wired using the stock connector, with the LED wires soldered to the wire ends of the stock connector.
-
Hey Seb, if you had to repaint the forks before using the gold candy, do you have to paint them with a bright silver base coat?? And a clear coat over top I assume ?
-
2000 VFR800 Daugherty Motorsports CBR929 Shock Upgrade
zoomzoom replied to zoomzoom's topic in Fifth Generation VFR's
Glad the thread was helpful. What kind of shock did you install?? -
2000 VFR800 Daugherty Motorsports CBR929 Shock Upgrade
zoomzoom replied to zoomzoom's topic in Fifth Generation VFR's
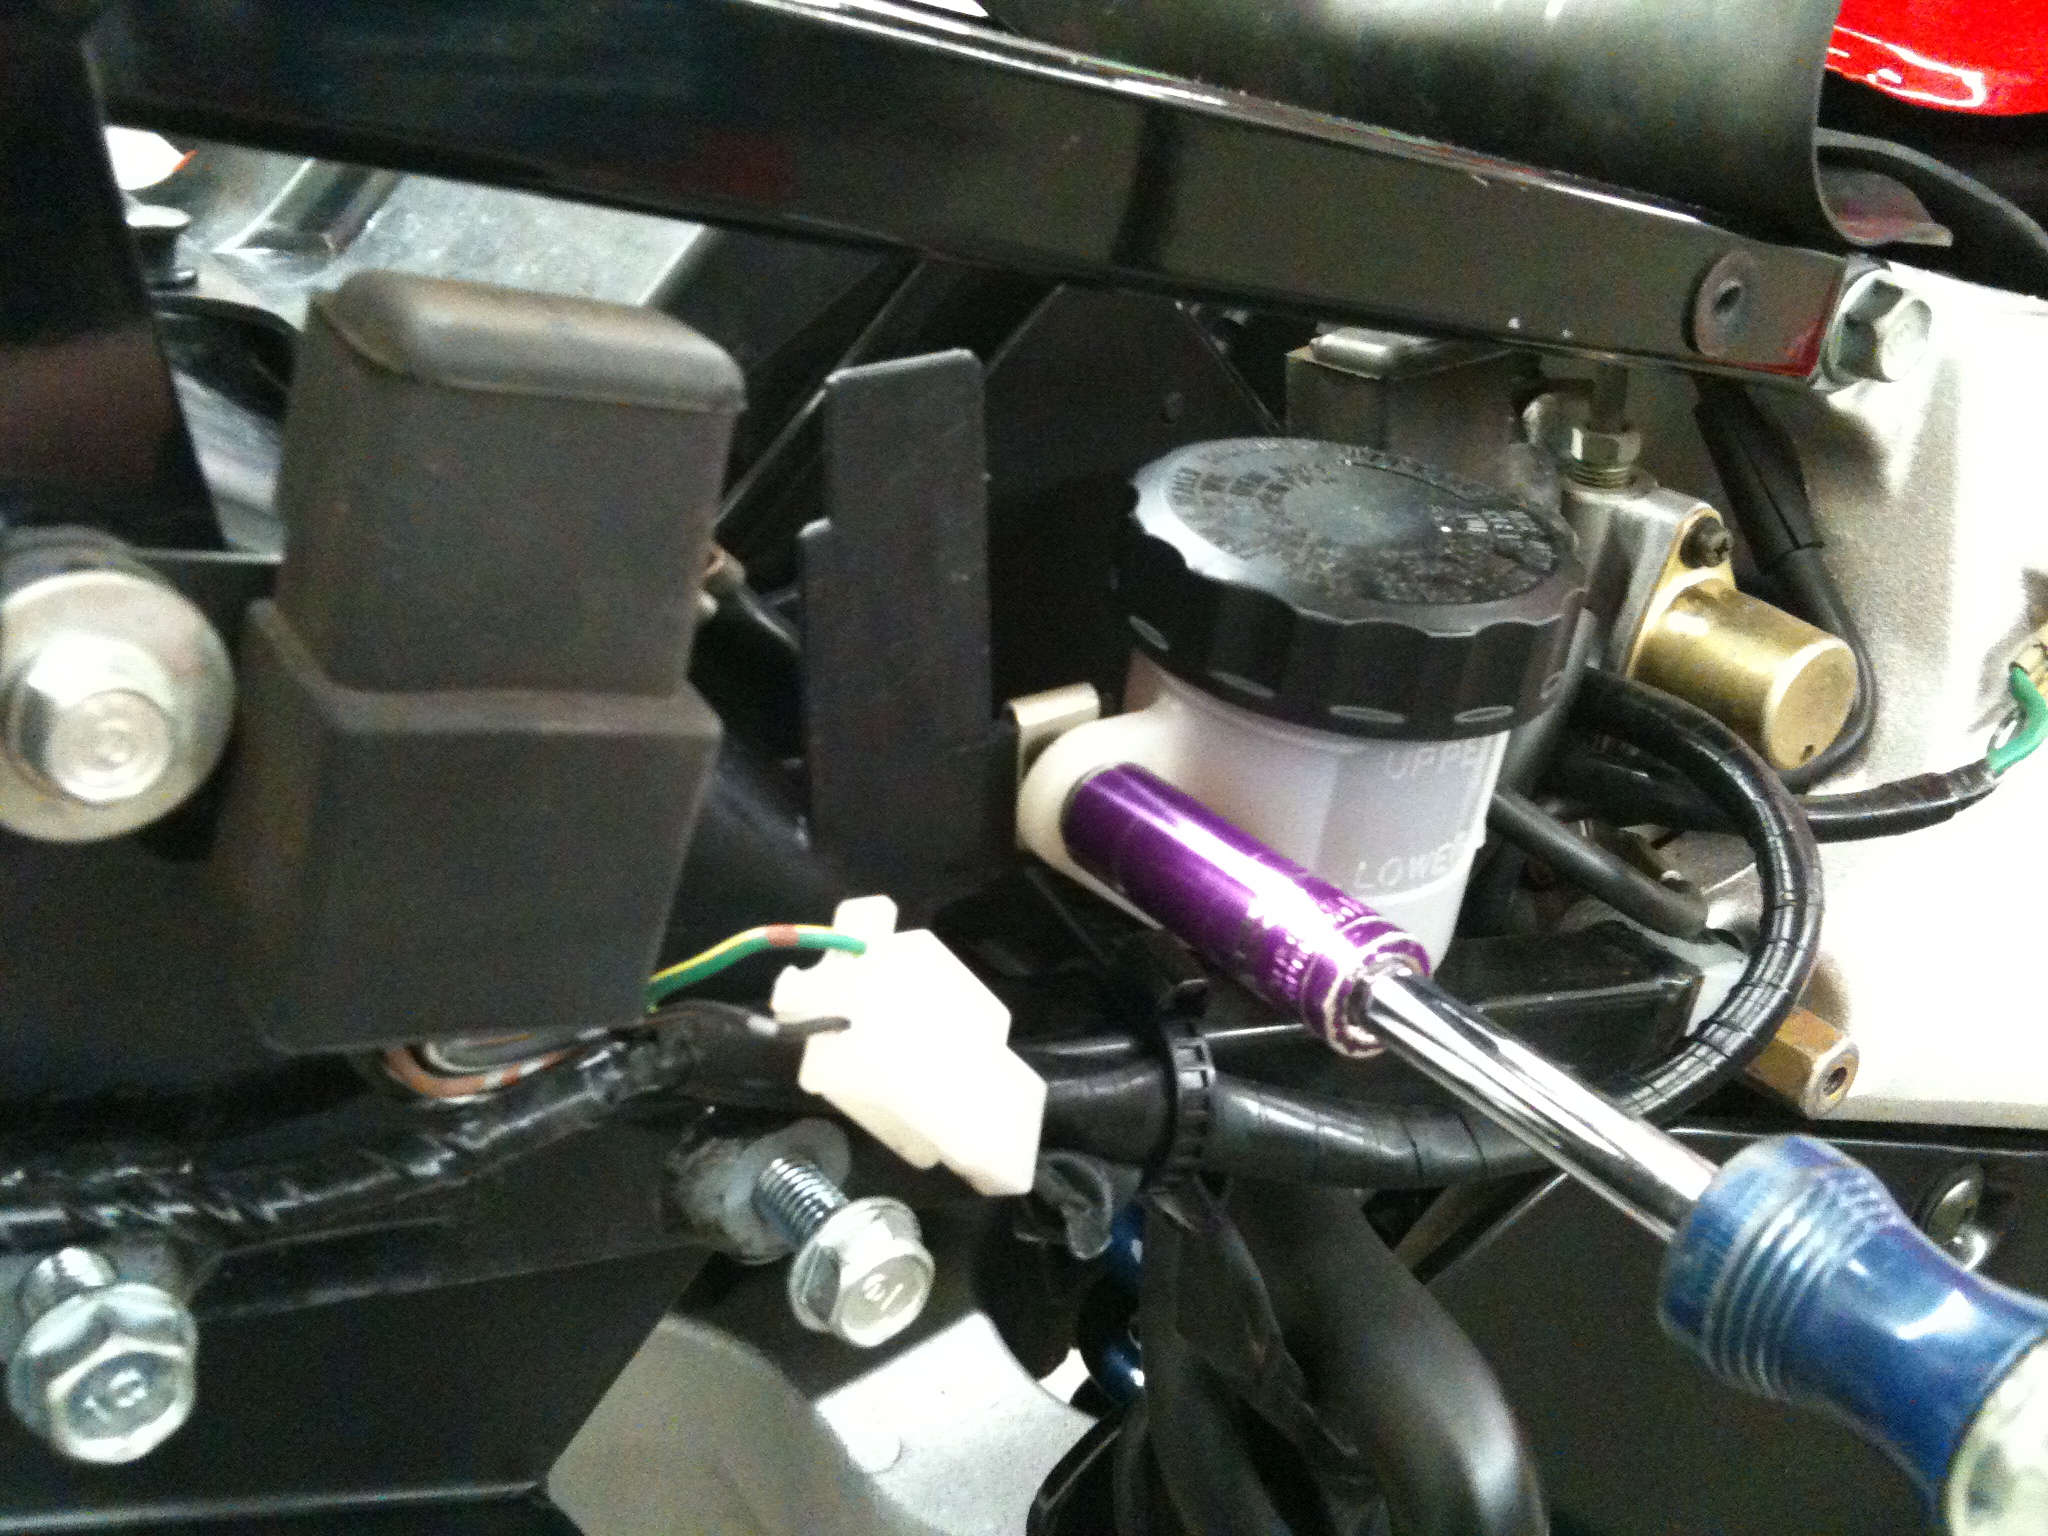
By inserting a long screwdriver between the top of the exhaust heat shield and the frame, I can adjust the upper screw (compression damping IIRC) If you shine a flash light in from the back of the bike toward the shock, you can see the adjuster screw, but it is a tad awkward. The compression adjustment screw faces the same way as the factory shock and was/is readily adjustable as I recall. -
How To - Upper Cowl Removal On 5Th Gen
zoomzoom replied to zoomzoom's topic in Fifth Generation VFR's
If your LED replacement headlights have a power supply connector and cooling fans, perhaps this is the connector for the cooling fan on your bulbs. Mine have a connector for the bulb which screws together and the cooling fan has a separate connector which looks very similar to the one you show in the photo. Just a thought ??? Not sure where all the photos from this thread disappeared to. I had reloaded them a while ago, and they appear to have vanished again. LOL -
2000 VFR800i throttle and idle nightmare
zoomzoom replied to SlimWhitey's topic in Fifth Generation VFR's
I had a very similar problem with my 5th gen just before I put the bike away for the season this year. Previously, I had installed heli-bars and not re-routed the throttle cables as per the instructions provided by heli-bars (they appeared to have enough slack even at full lock on turns) when I noticed that the throttle did not snap back as it did before. After changing the routing of the cables per the instructions, the throttle snapped back better but still not quite as well as before. Lesson learned. LOL The next thing I installed were Throttle-Meister bar ends and once again I had a similar problem with the throttle not snapping back as per normal. Long story short, it turned out that over time the throttle grip had worked its way down the tube a bit and was rubbing against the bar end. When I removed the bar end, it worked perfectly, so I removed the throttle grip completely cleaned the throttle tube and re-installed the grip, ensuring the grip did not make contact with the bar end. Throttle now works perfectly. Try the simple things first. LOL -
Where did you find these style LED's Terry?? Do they have cooling fans built in, or are they just a finned aluminum heat sink??
-
I also have replacement LED headlight bulbs in my 2000 VFR and have nothing but good things to say about the quality and quantity of the added light. The beam cutoff is nearly identical to the stock halogen bulbs, and I have never experience a single oncoming vehicle flash their high beams at me in disgust, with one exception. On a trip last year, I had one car flash me, but it was late at night, in the pouring (and I do mean monsoon style) rain, and I was carrying about 60 pounds of gear in my hard luggage between the top and side cases. As a result, I'm sure the headlight beam was raised a bit higher than normal due to the added weight above and behind the rear wheel. I've ridden in the dark in similar conditions without the luggage, and not had a single person flash me in disgust.
-
Hey Lightduty when I got my cover from Seb a few years back, the shipping from Seb in NY to myself in BC was about US $25 if I recall correctly. Costs might have gone up a bit since I had mine done, but shipping to Ontario shouldn’t be too bad at all.
-
I had posted this thread a number of years ago, but it had disappeared after the site rebuild a little while ago. A couple people on the forum had asked me to re-post, and just finished about 5 minutes ago. You will need the manual for the appropriate torque specs for anything you remove but hope this provides a bit of assistance.
-
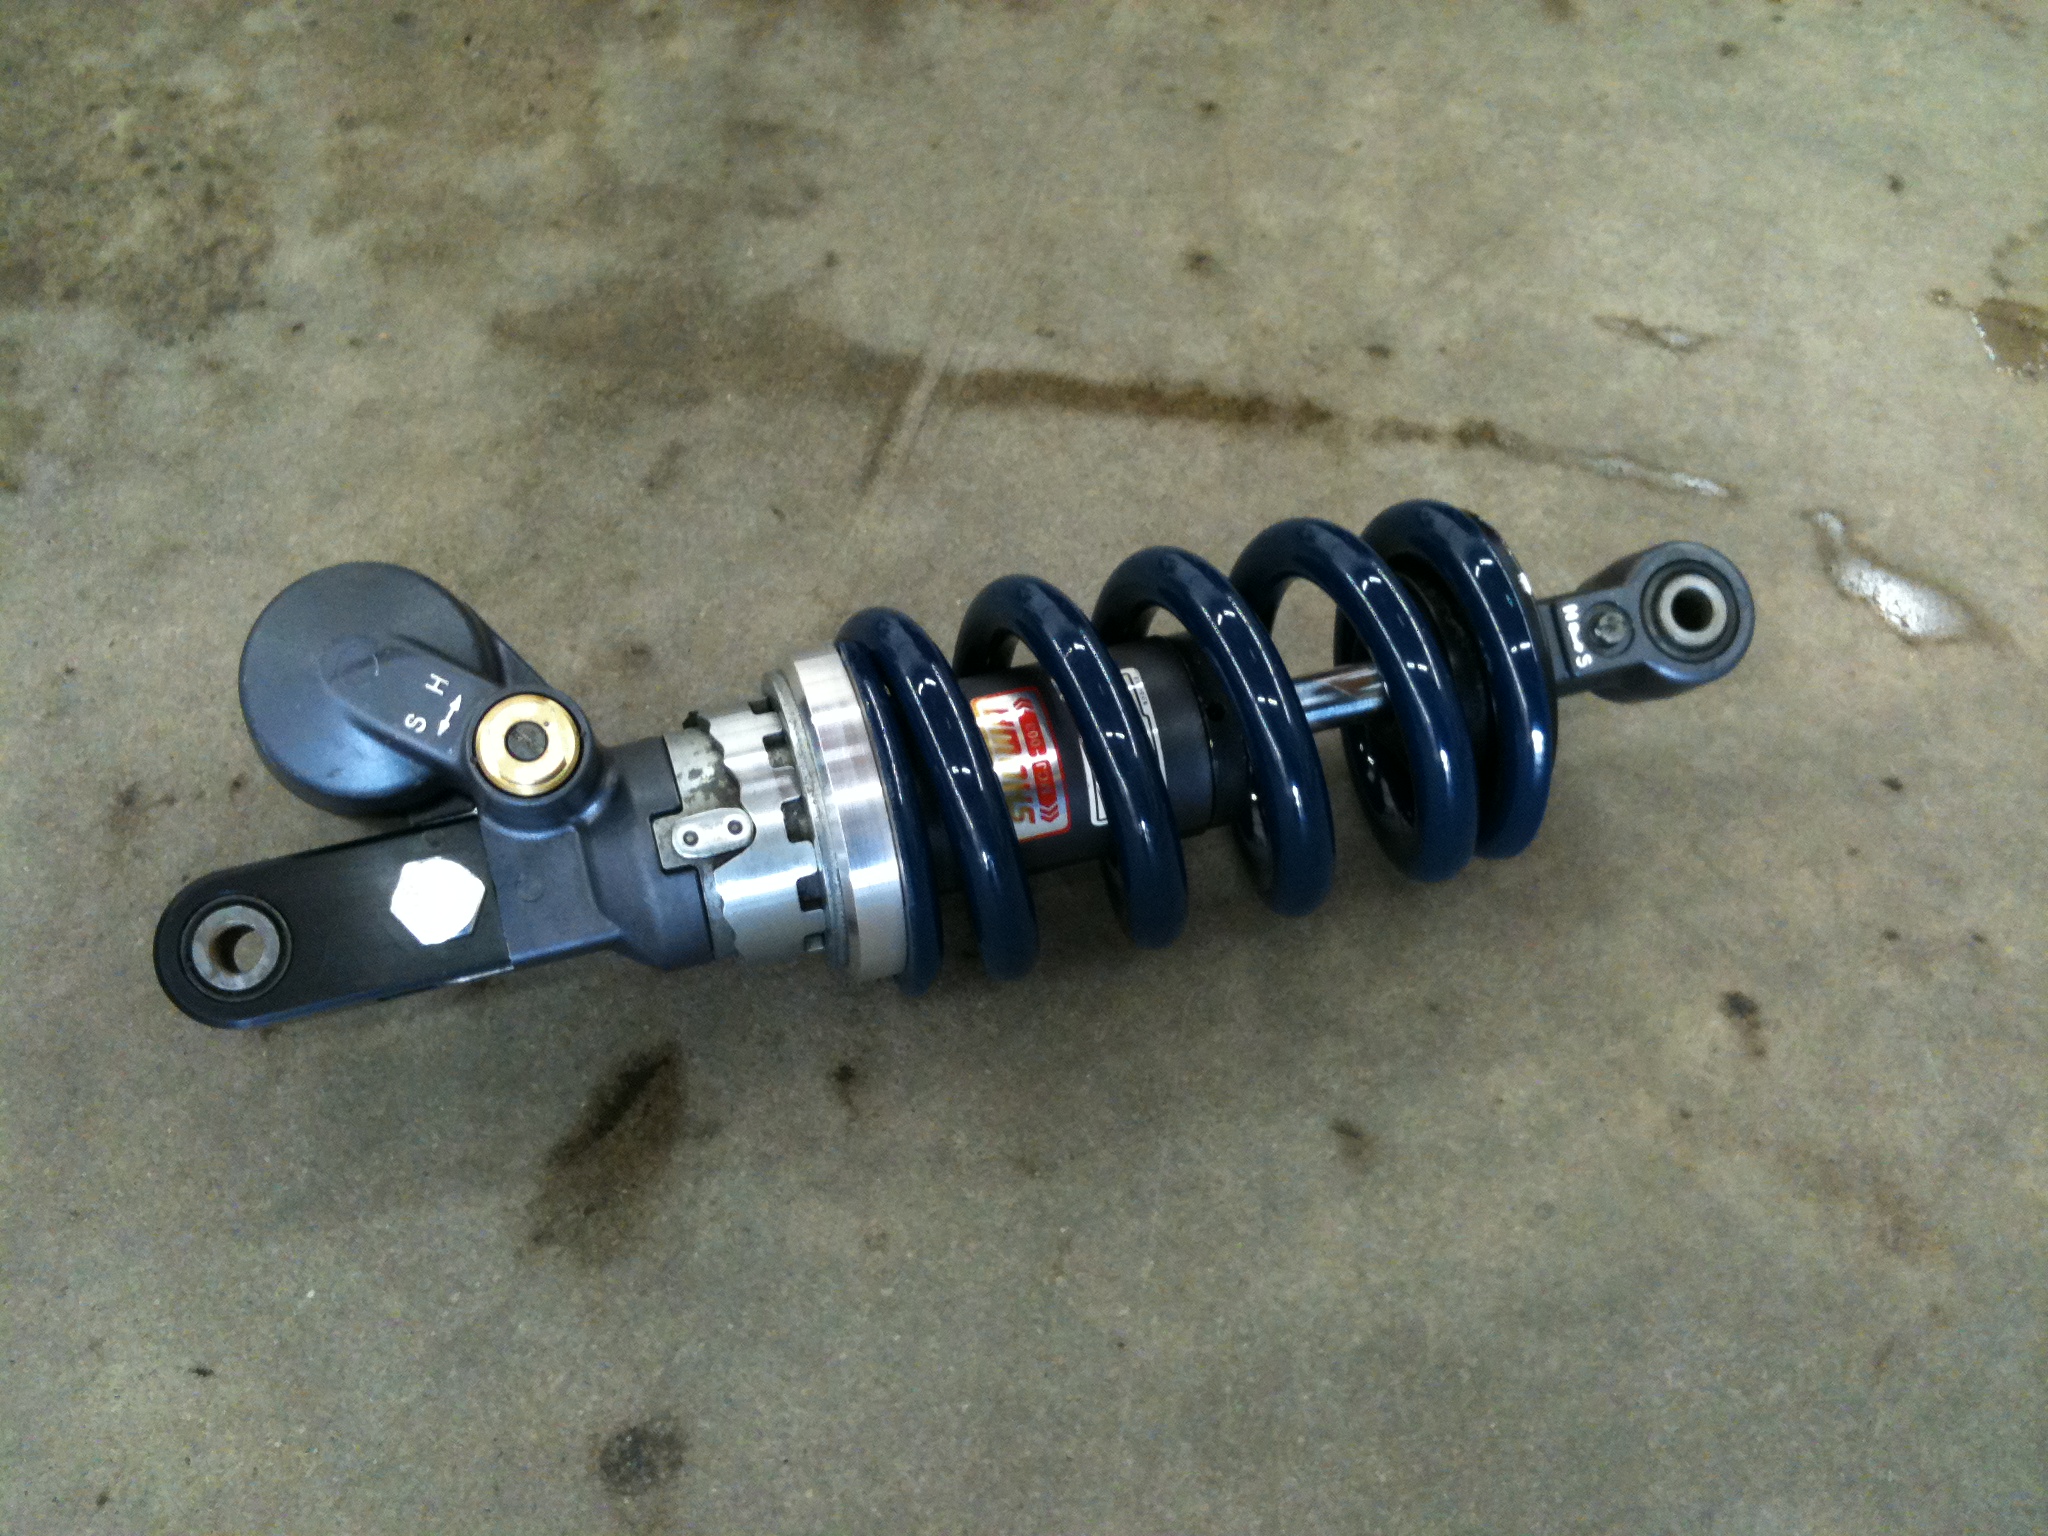
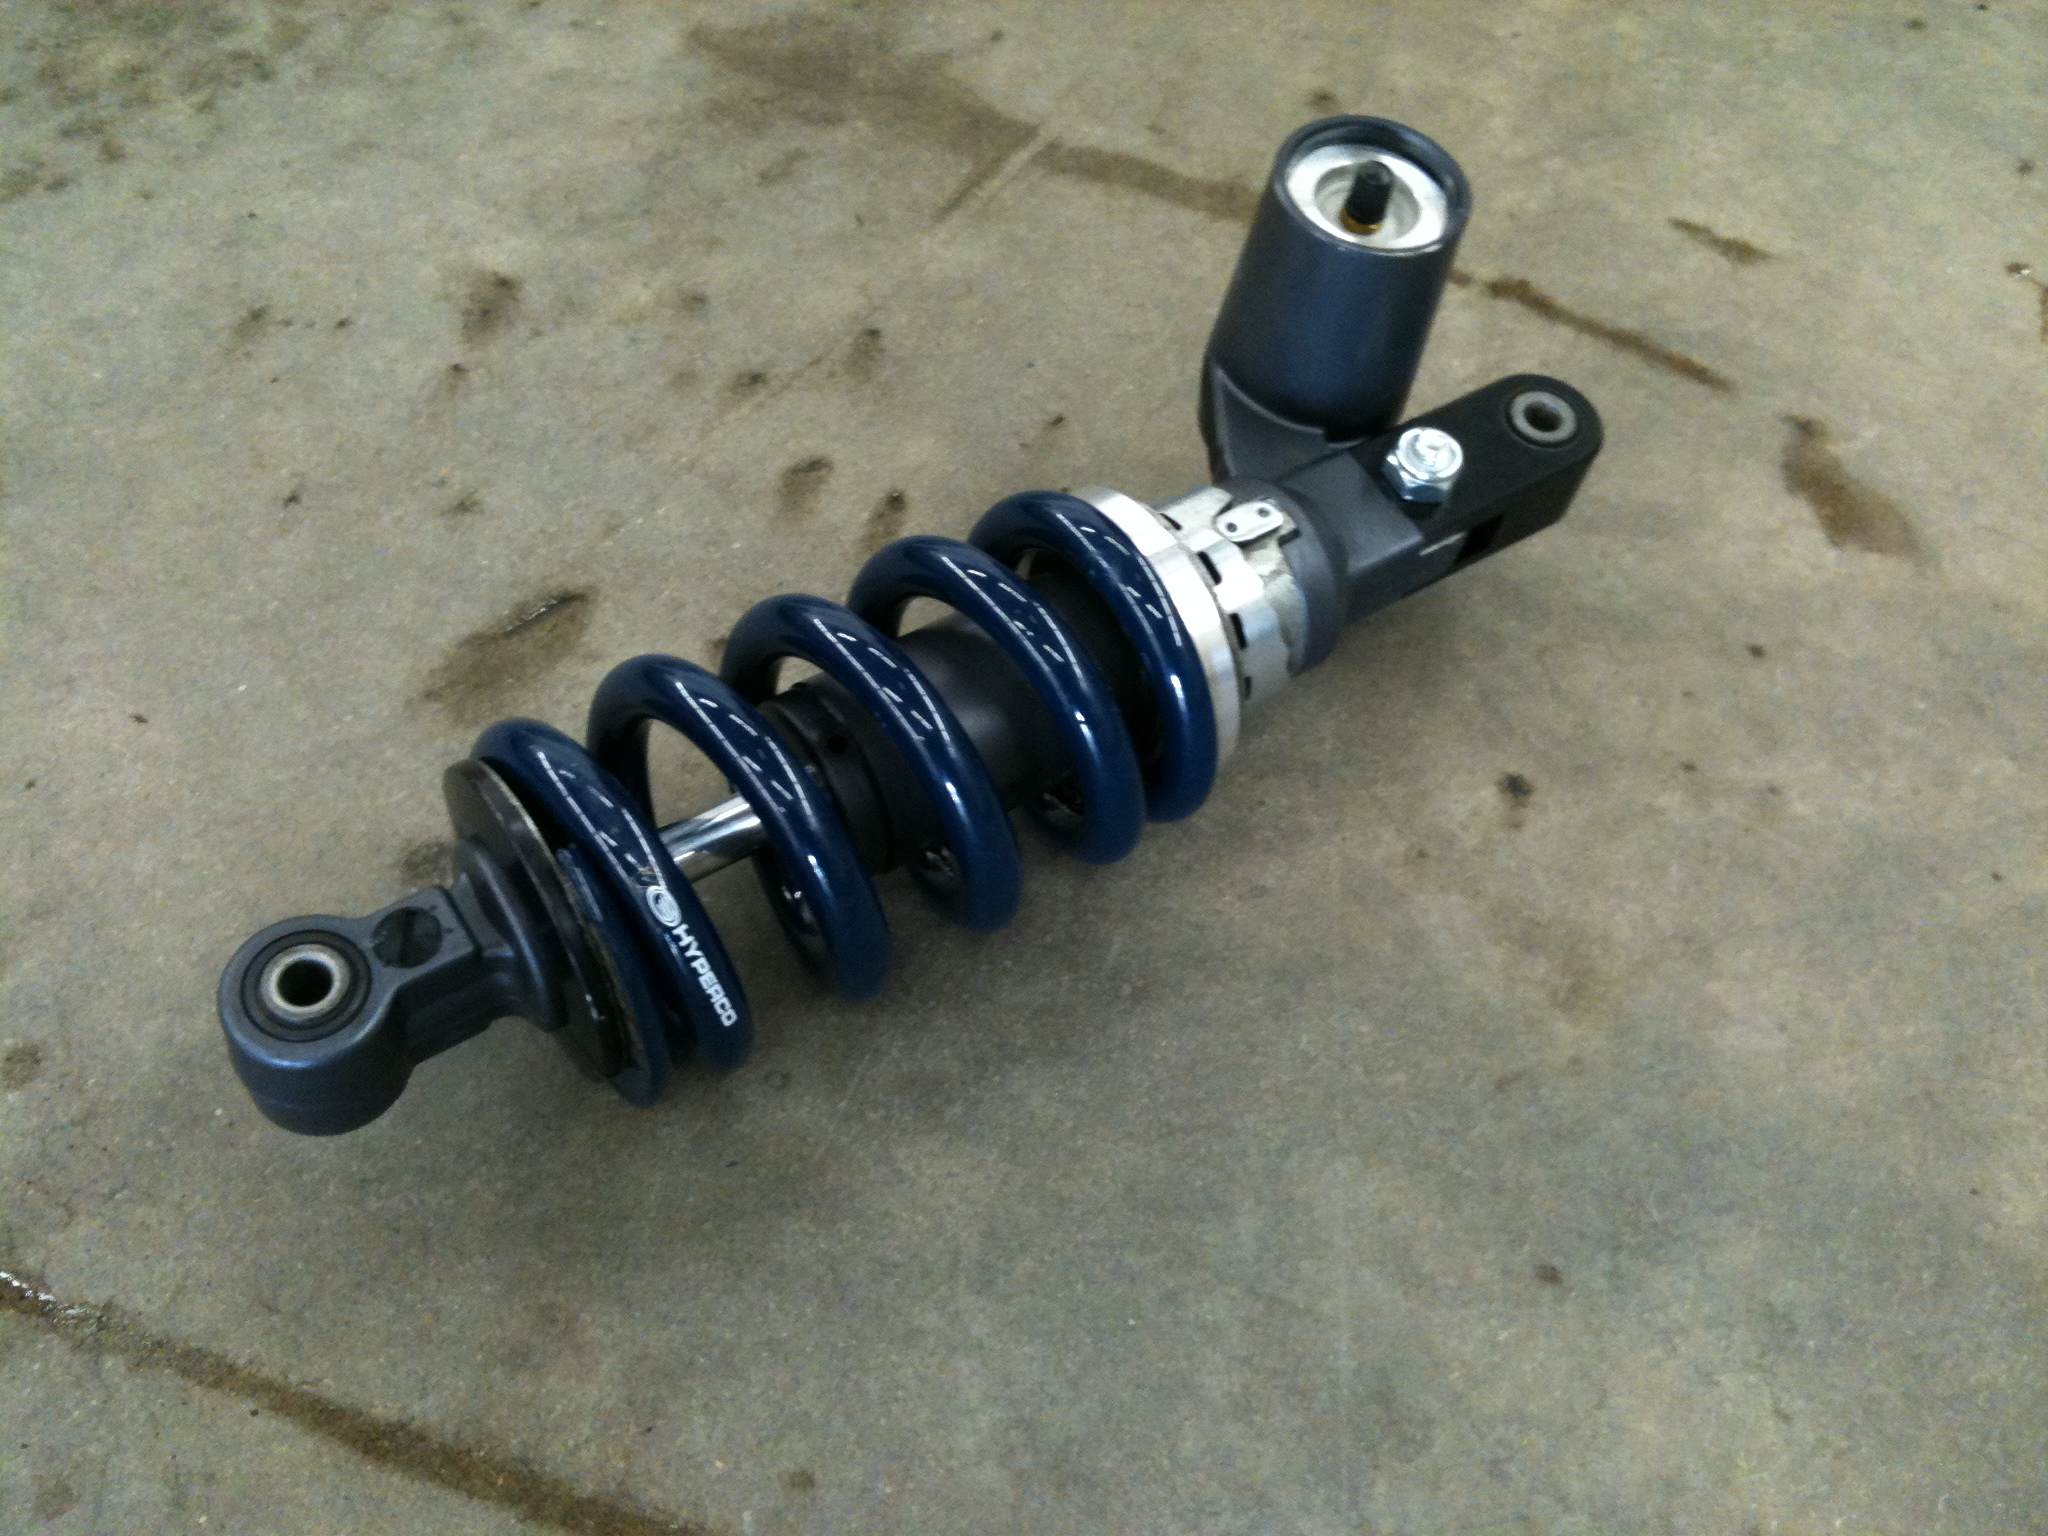
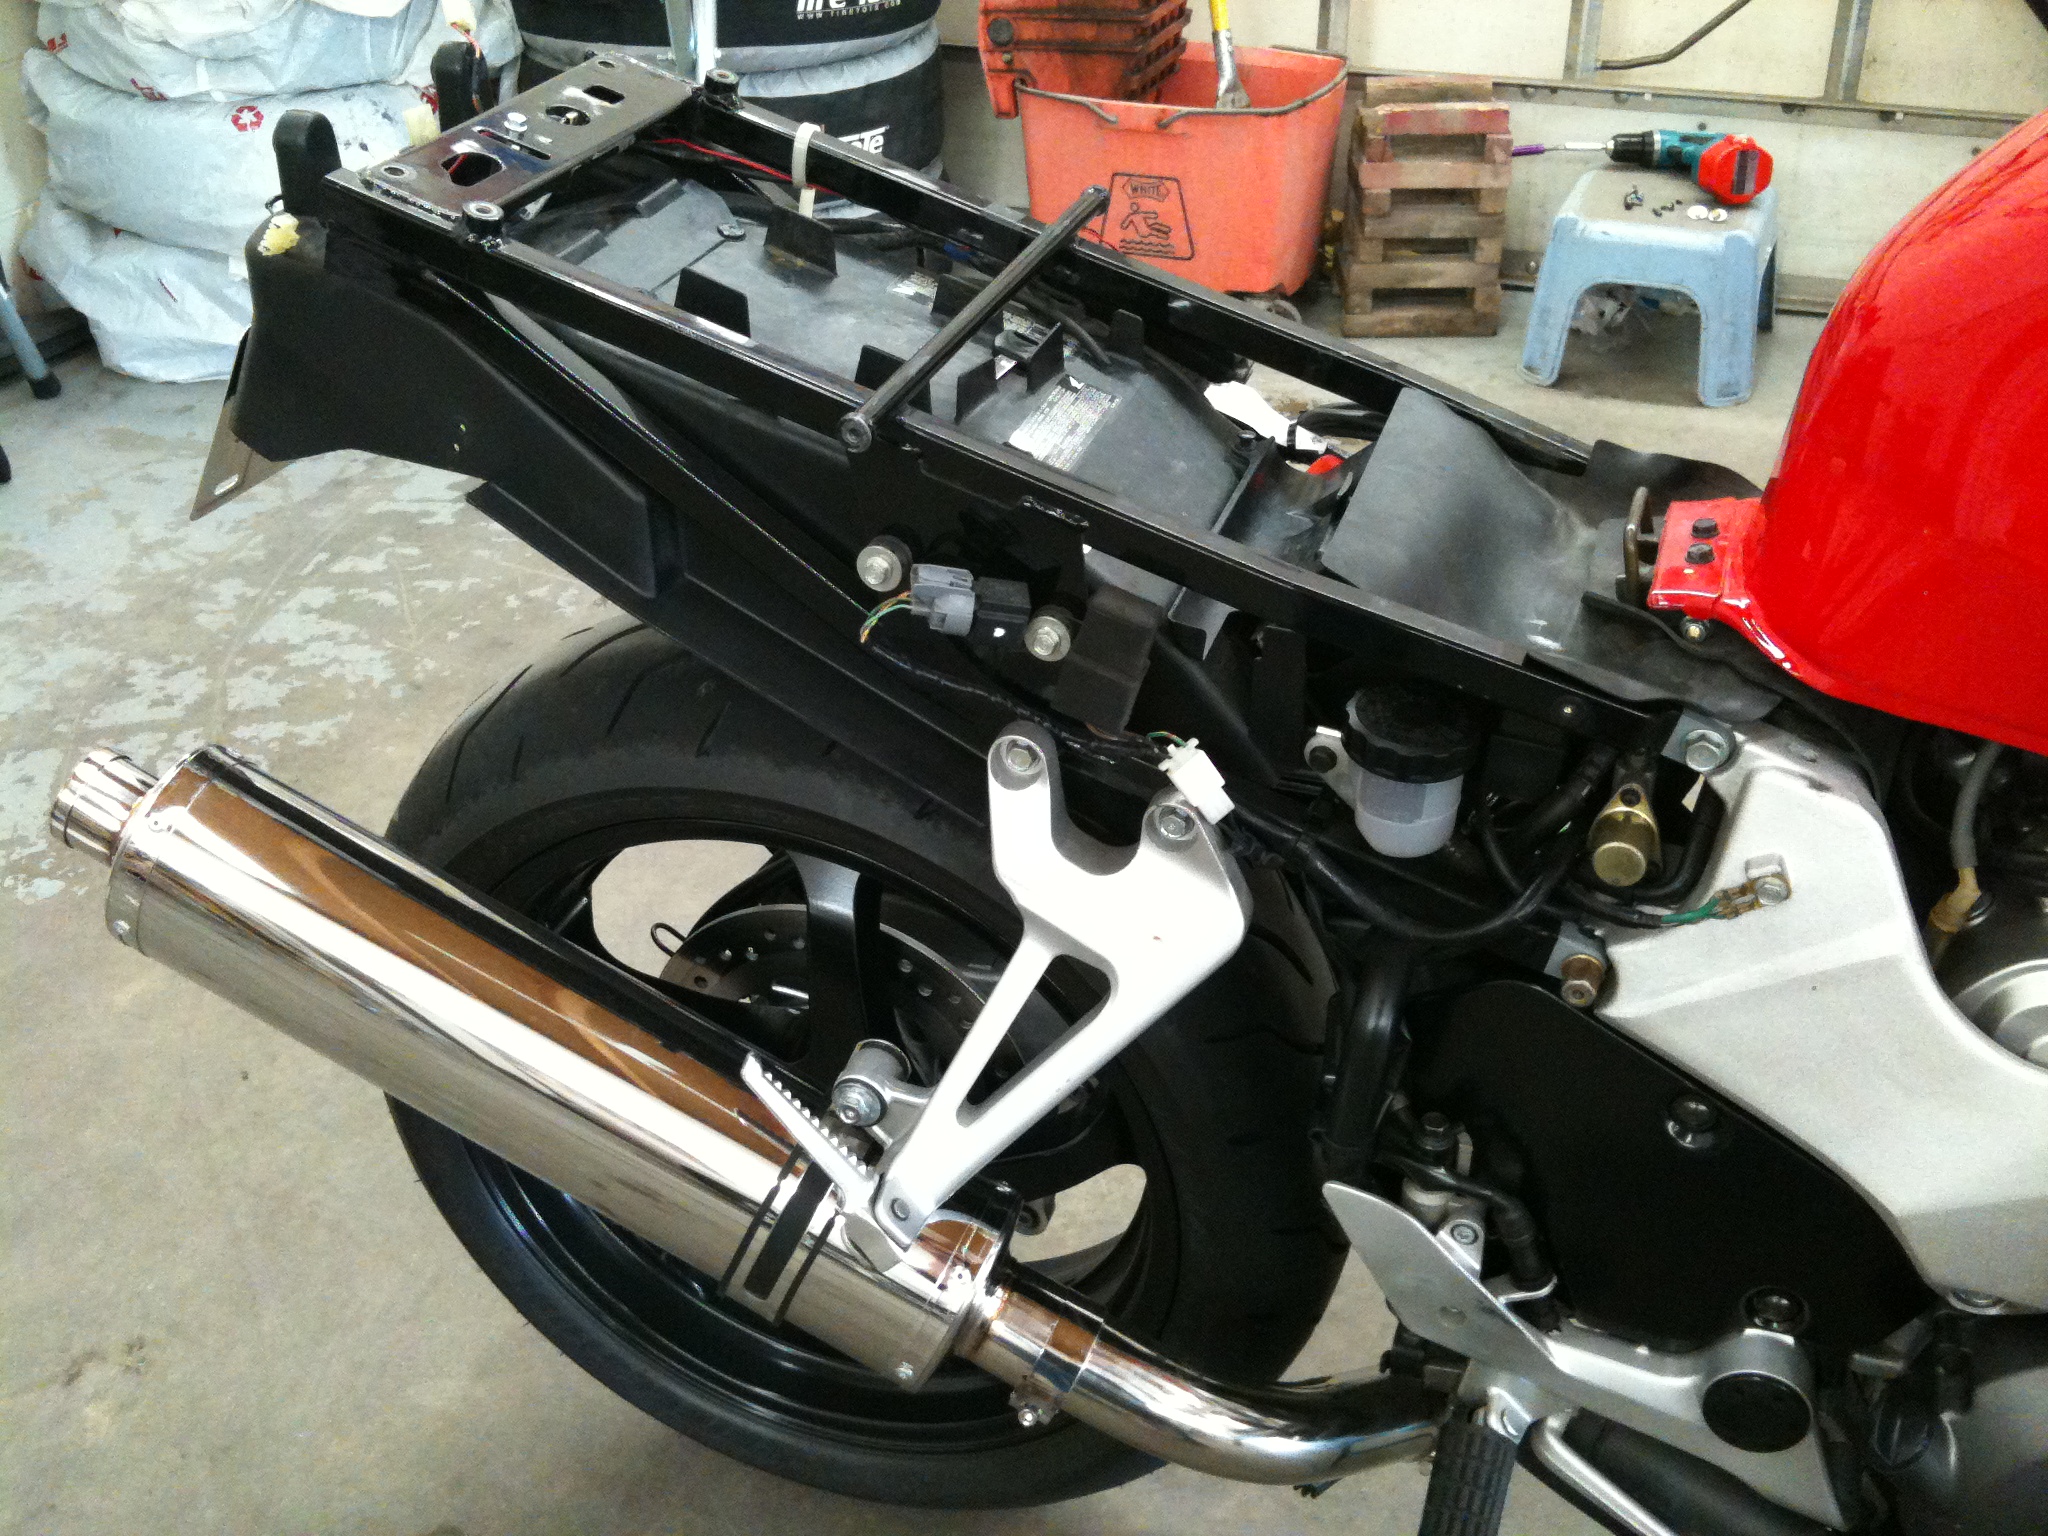
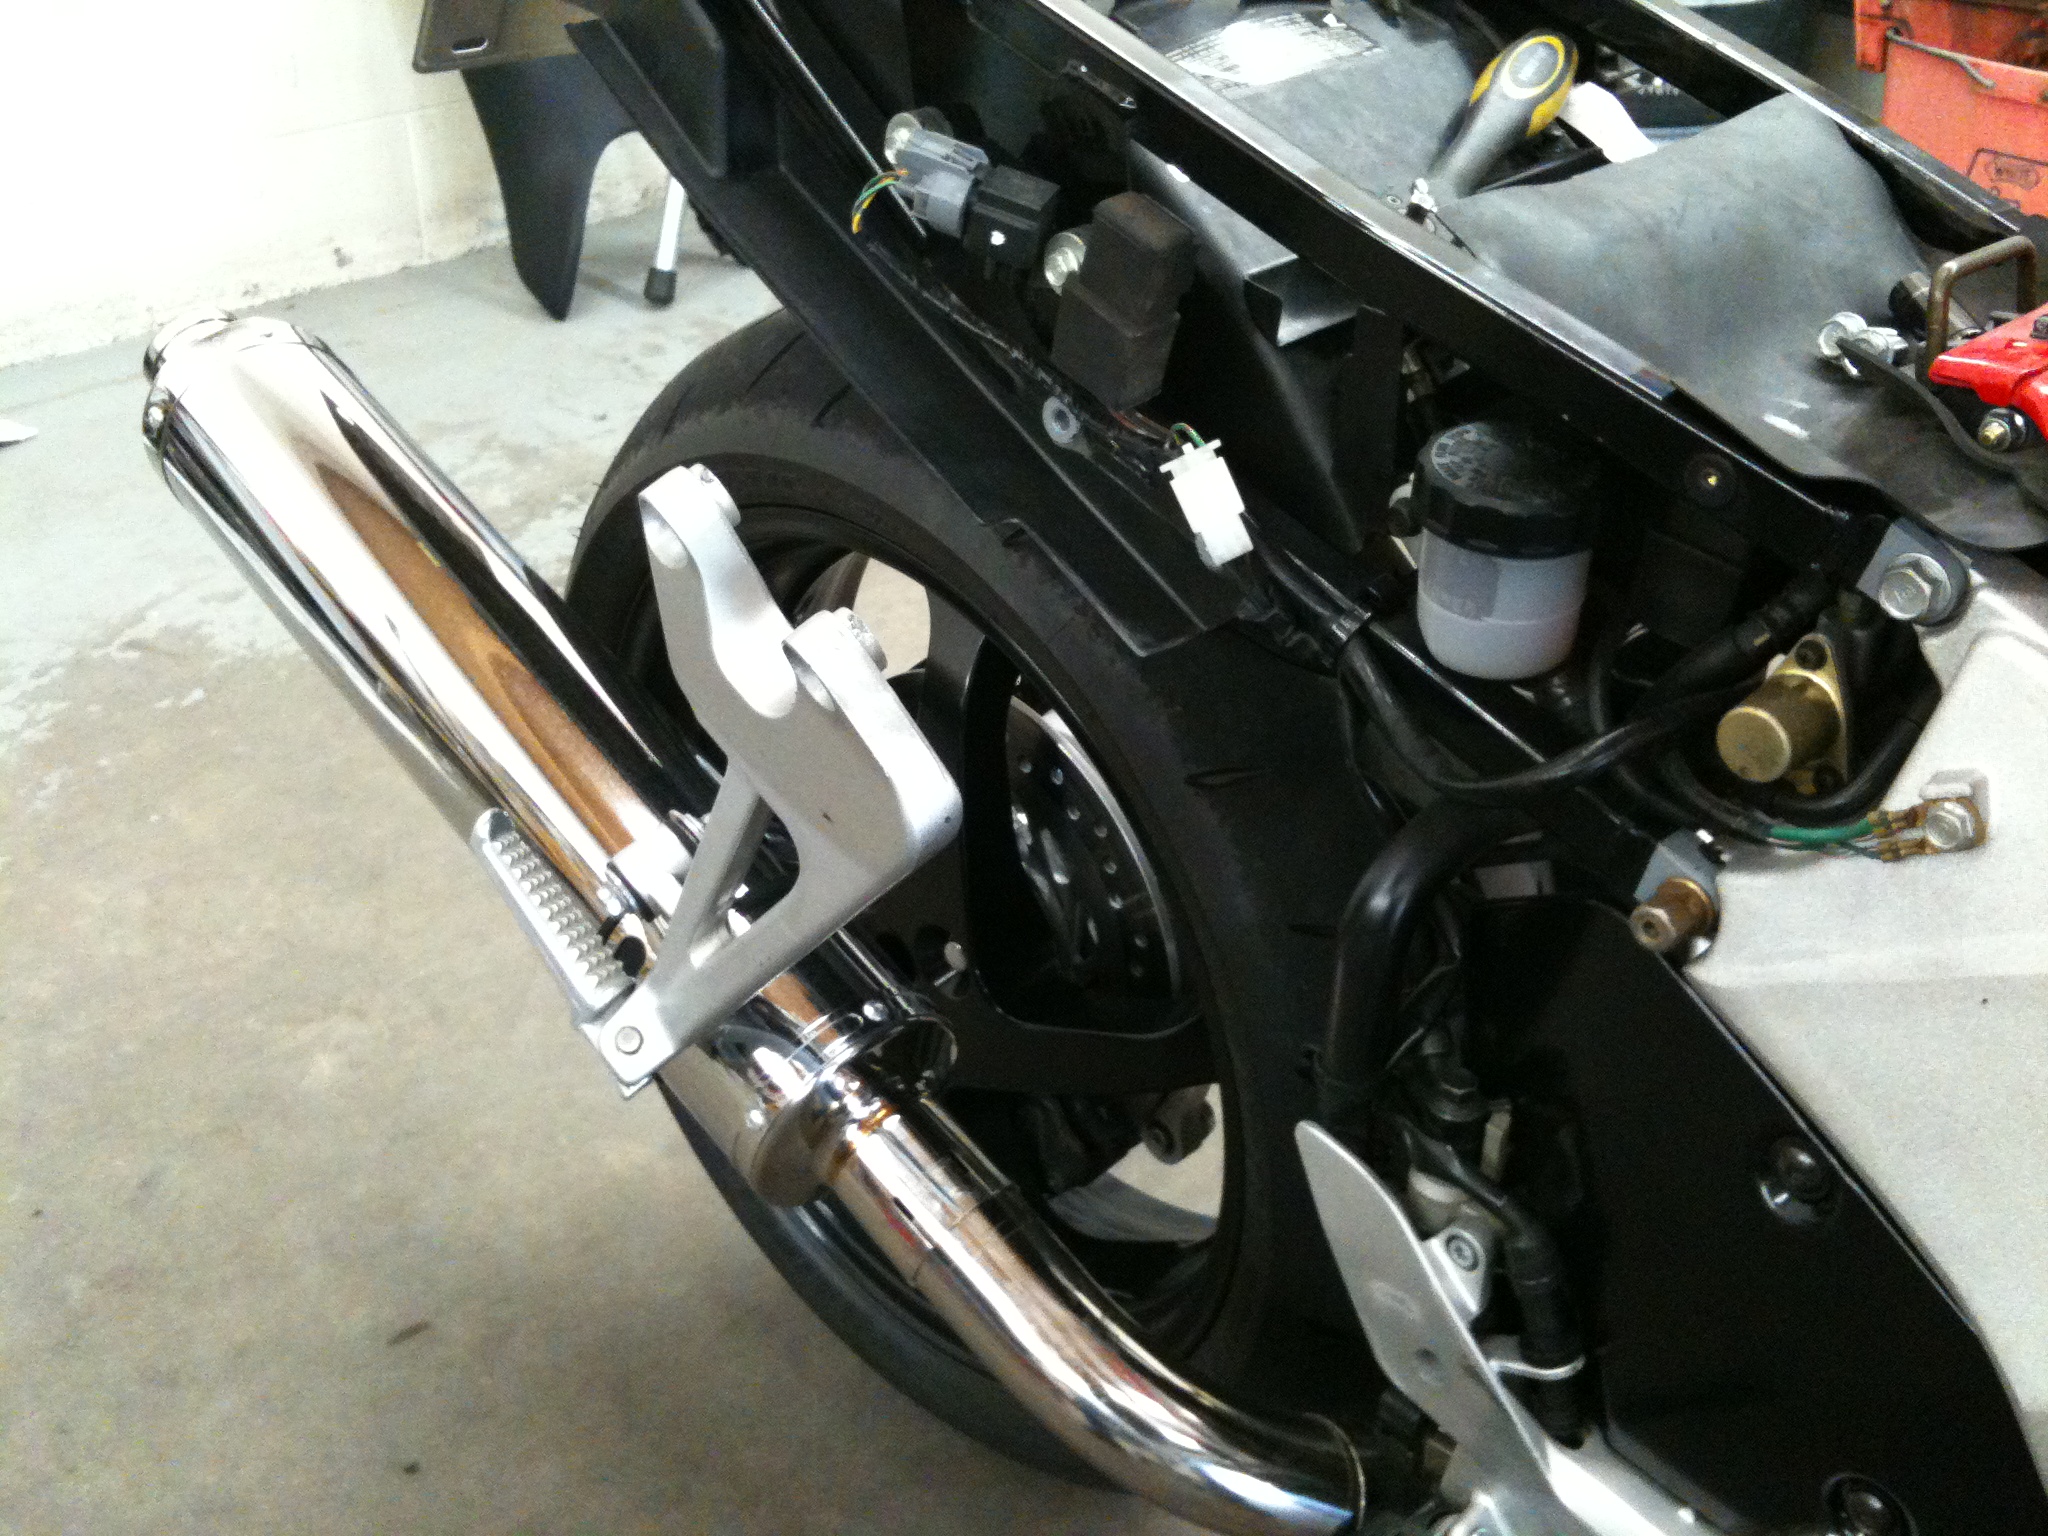
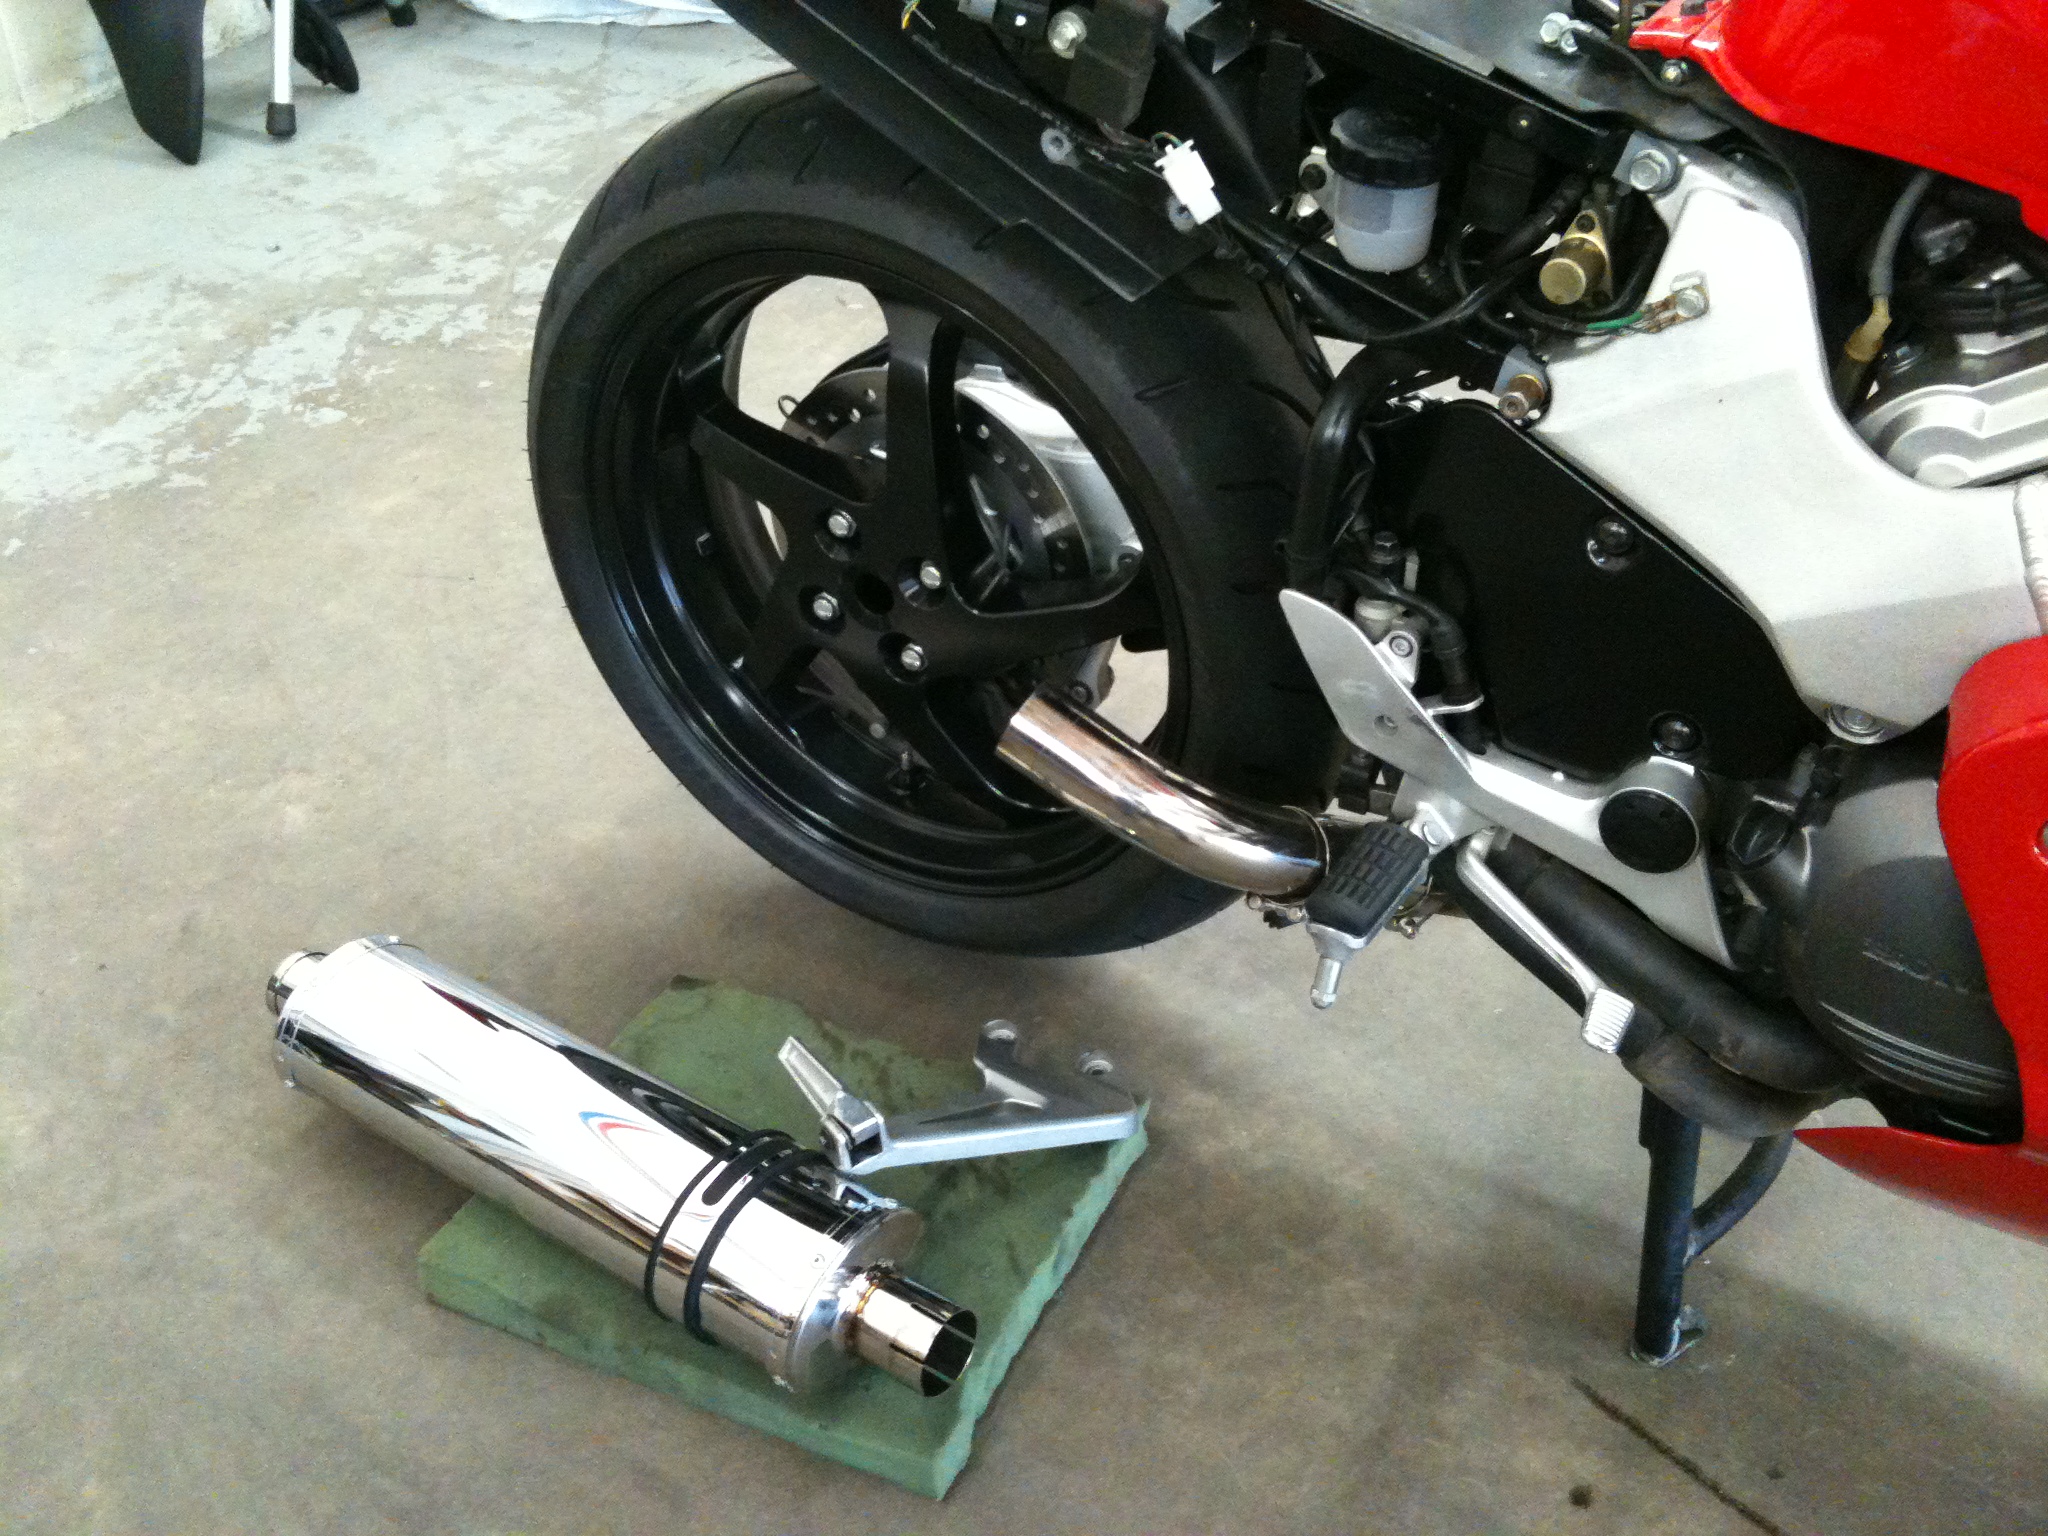
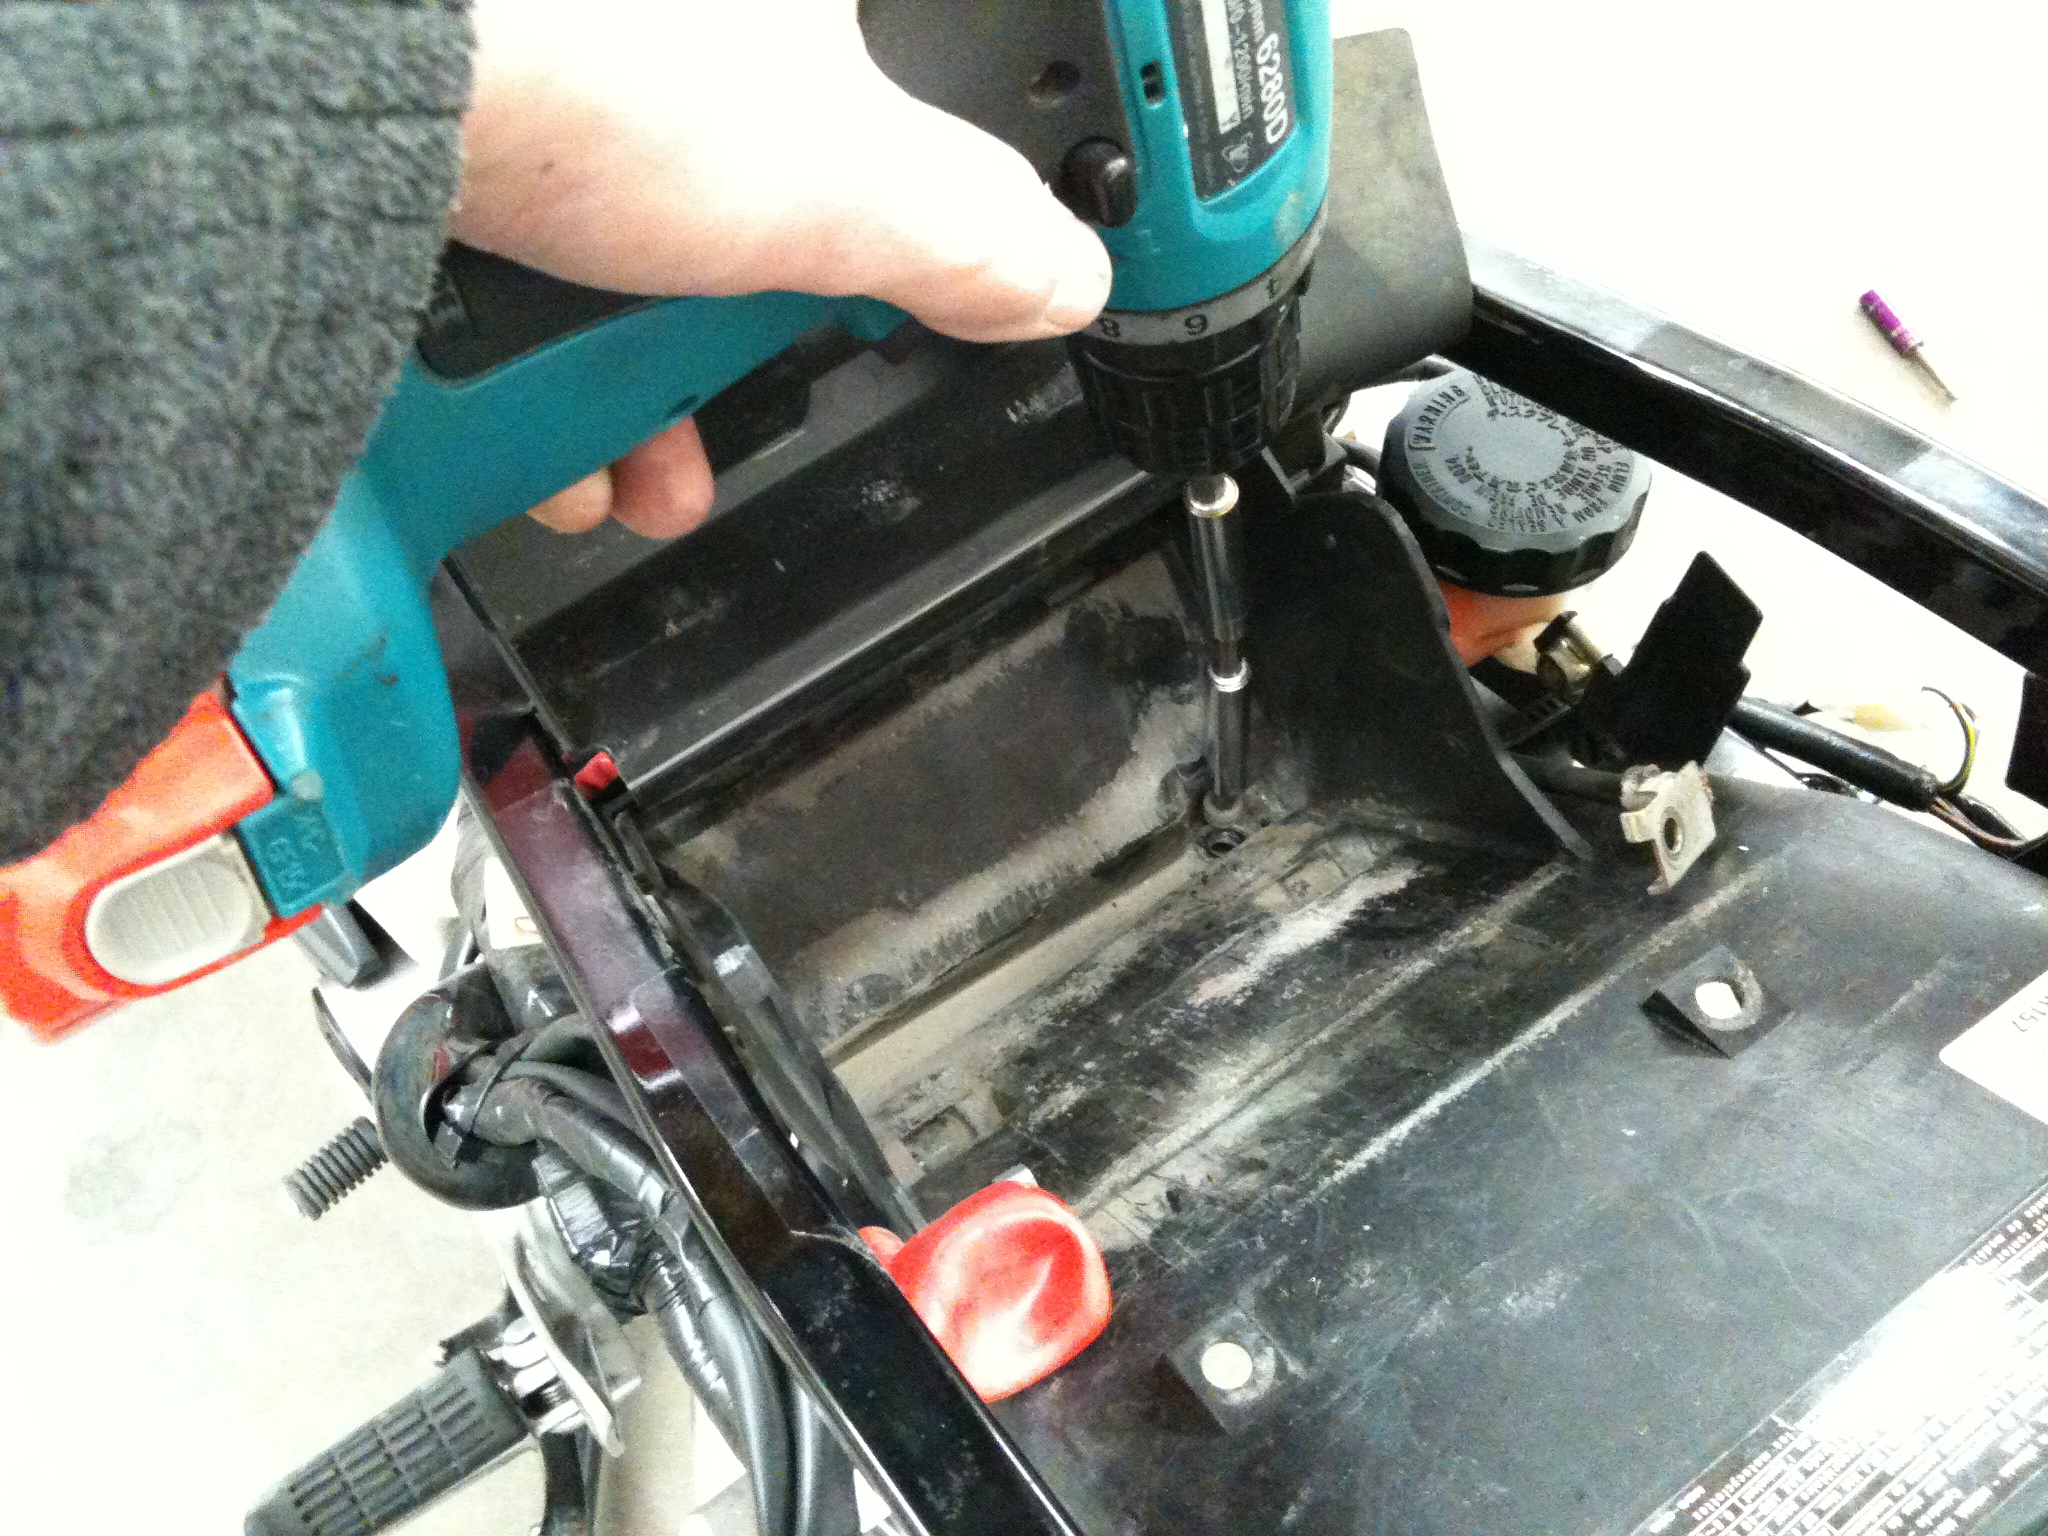
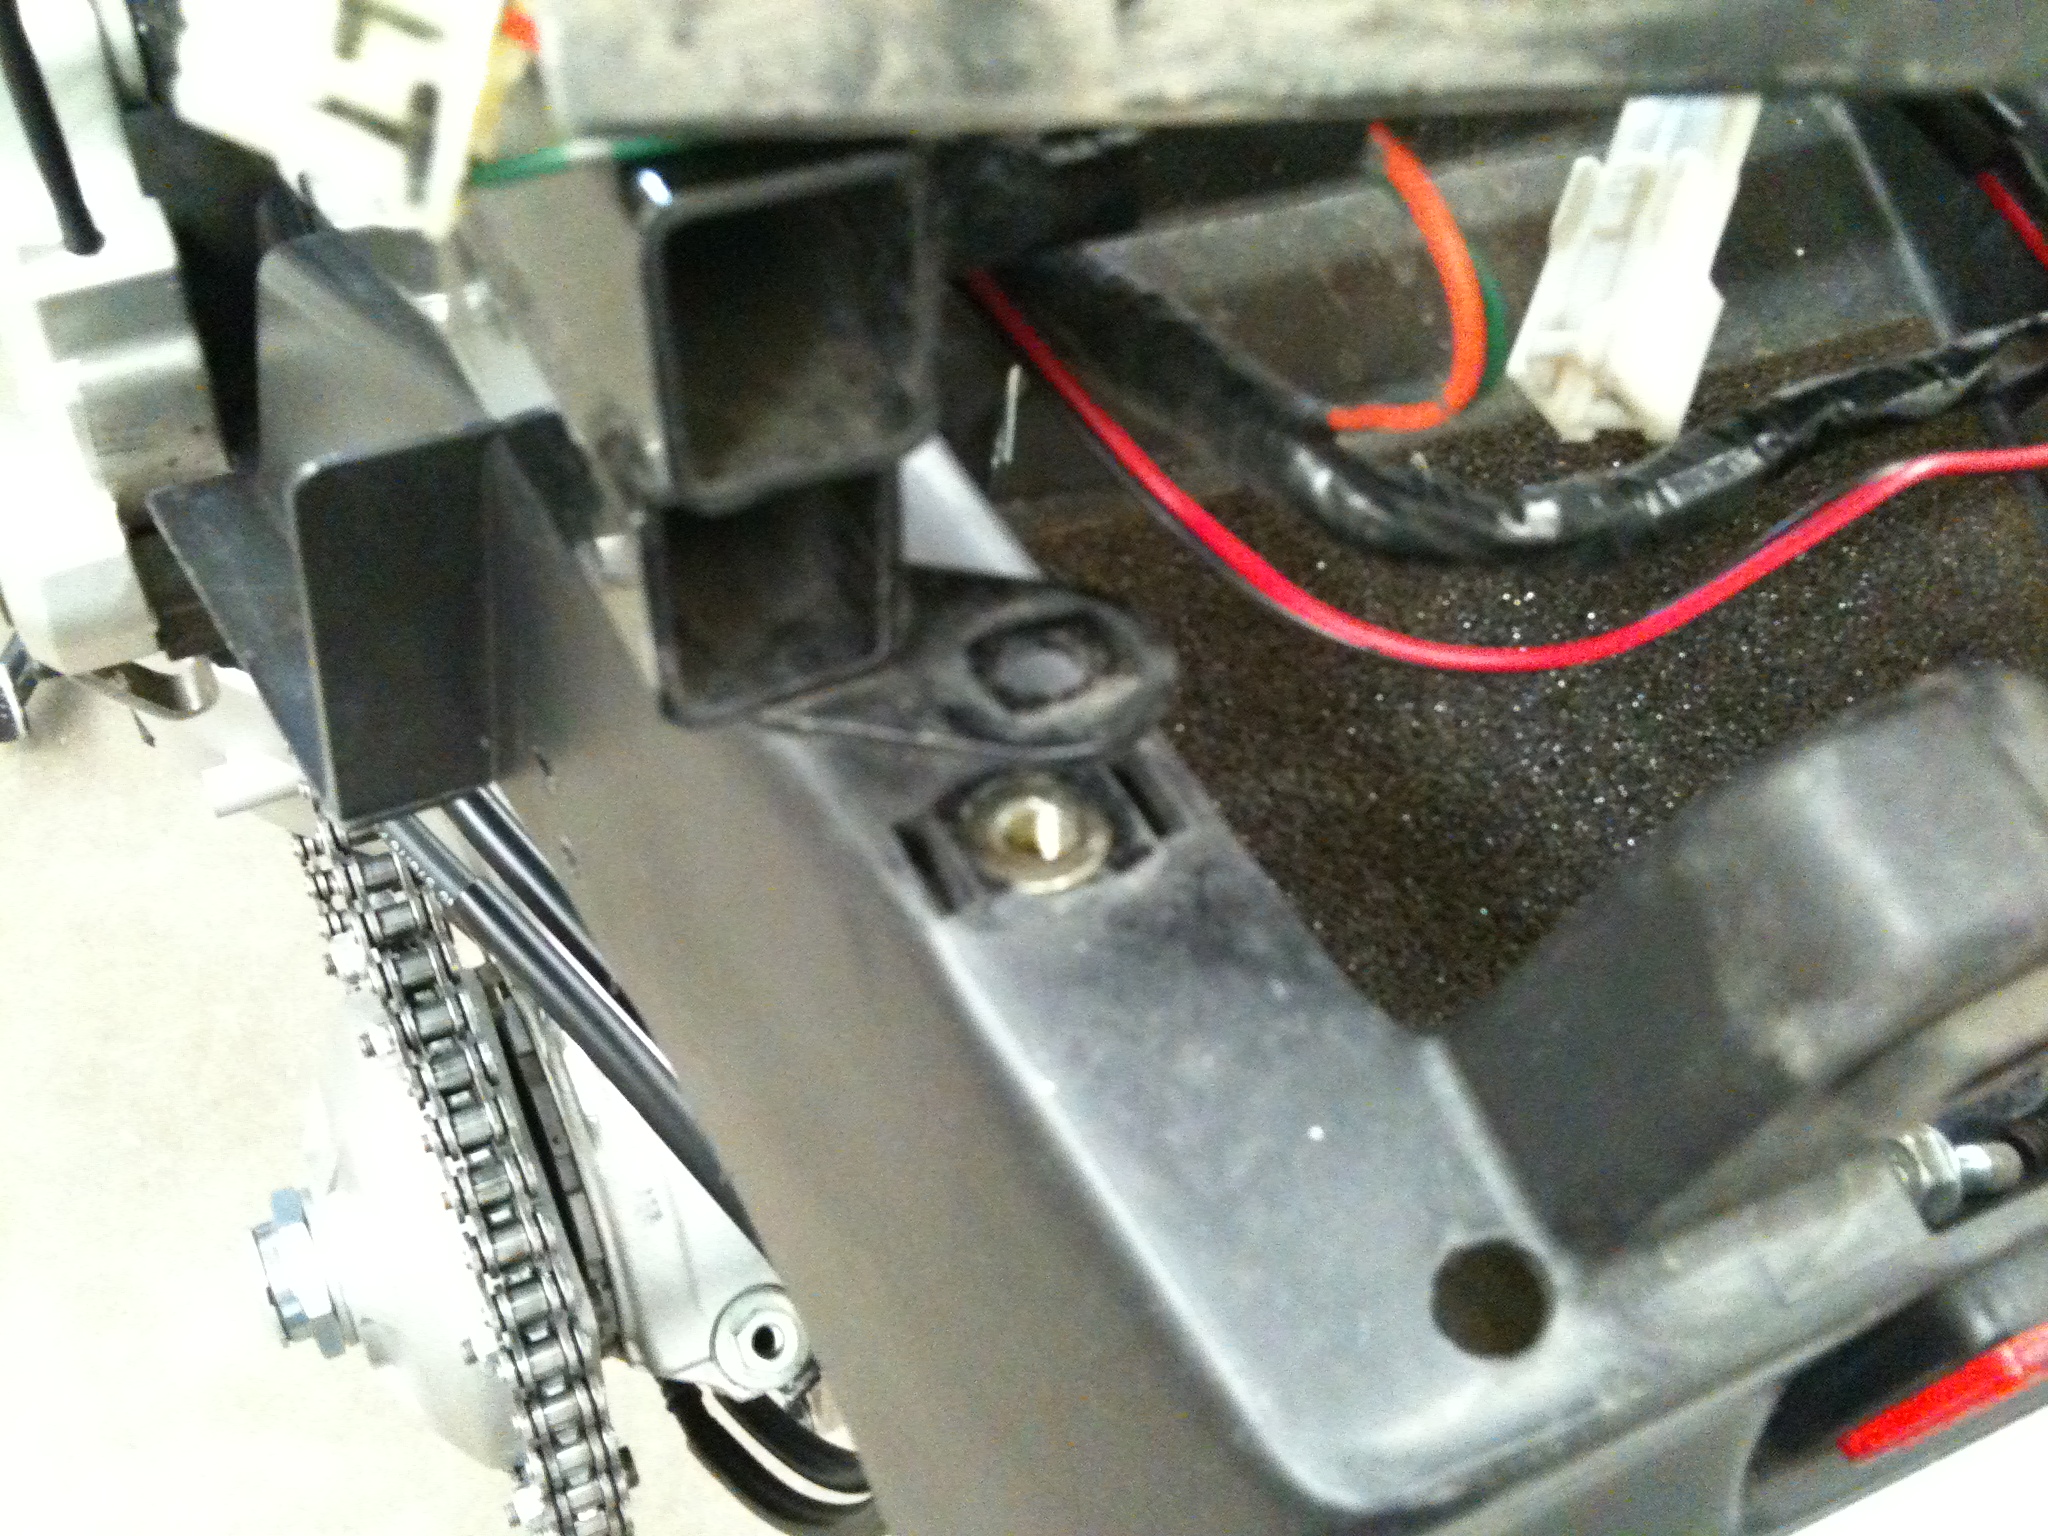
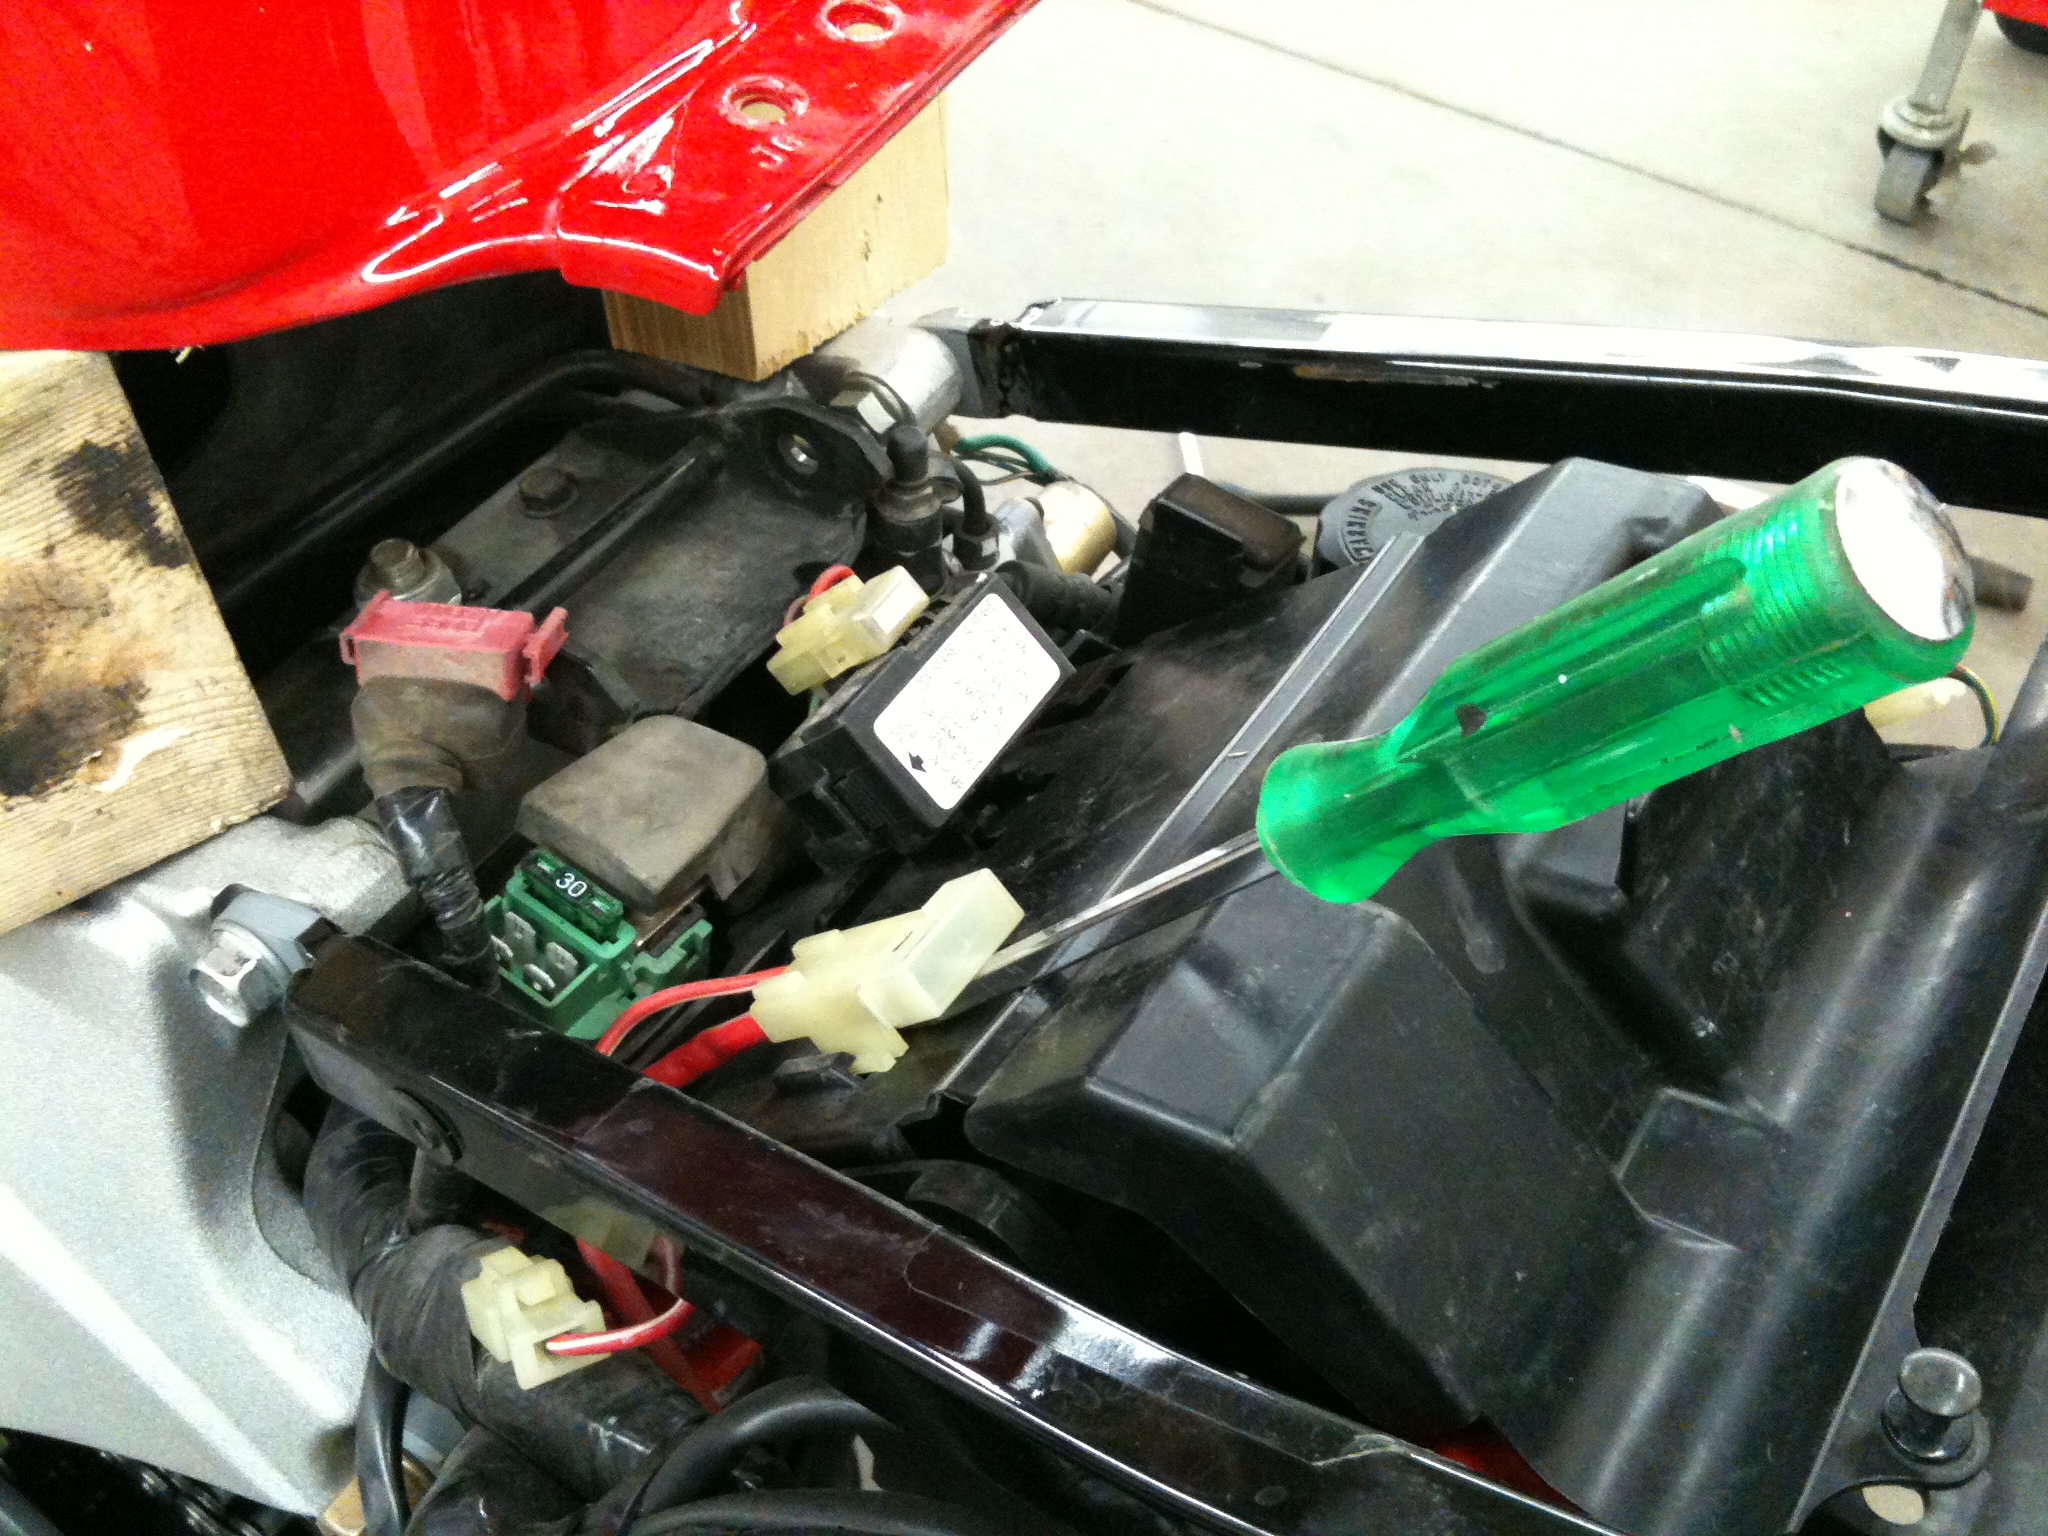
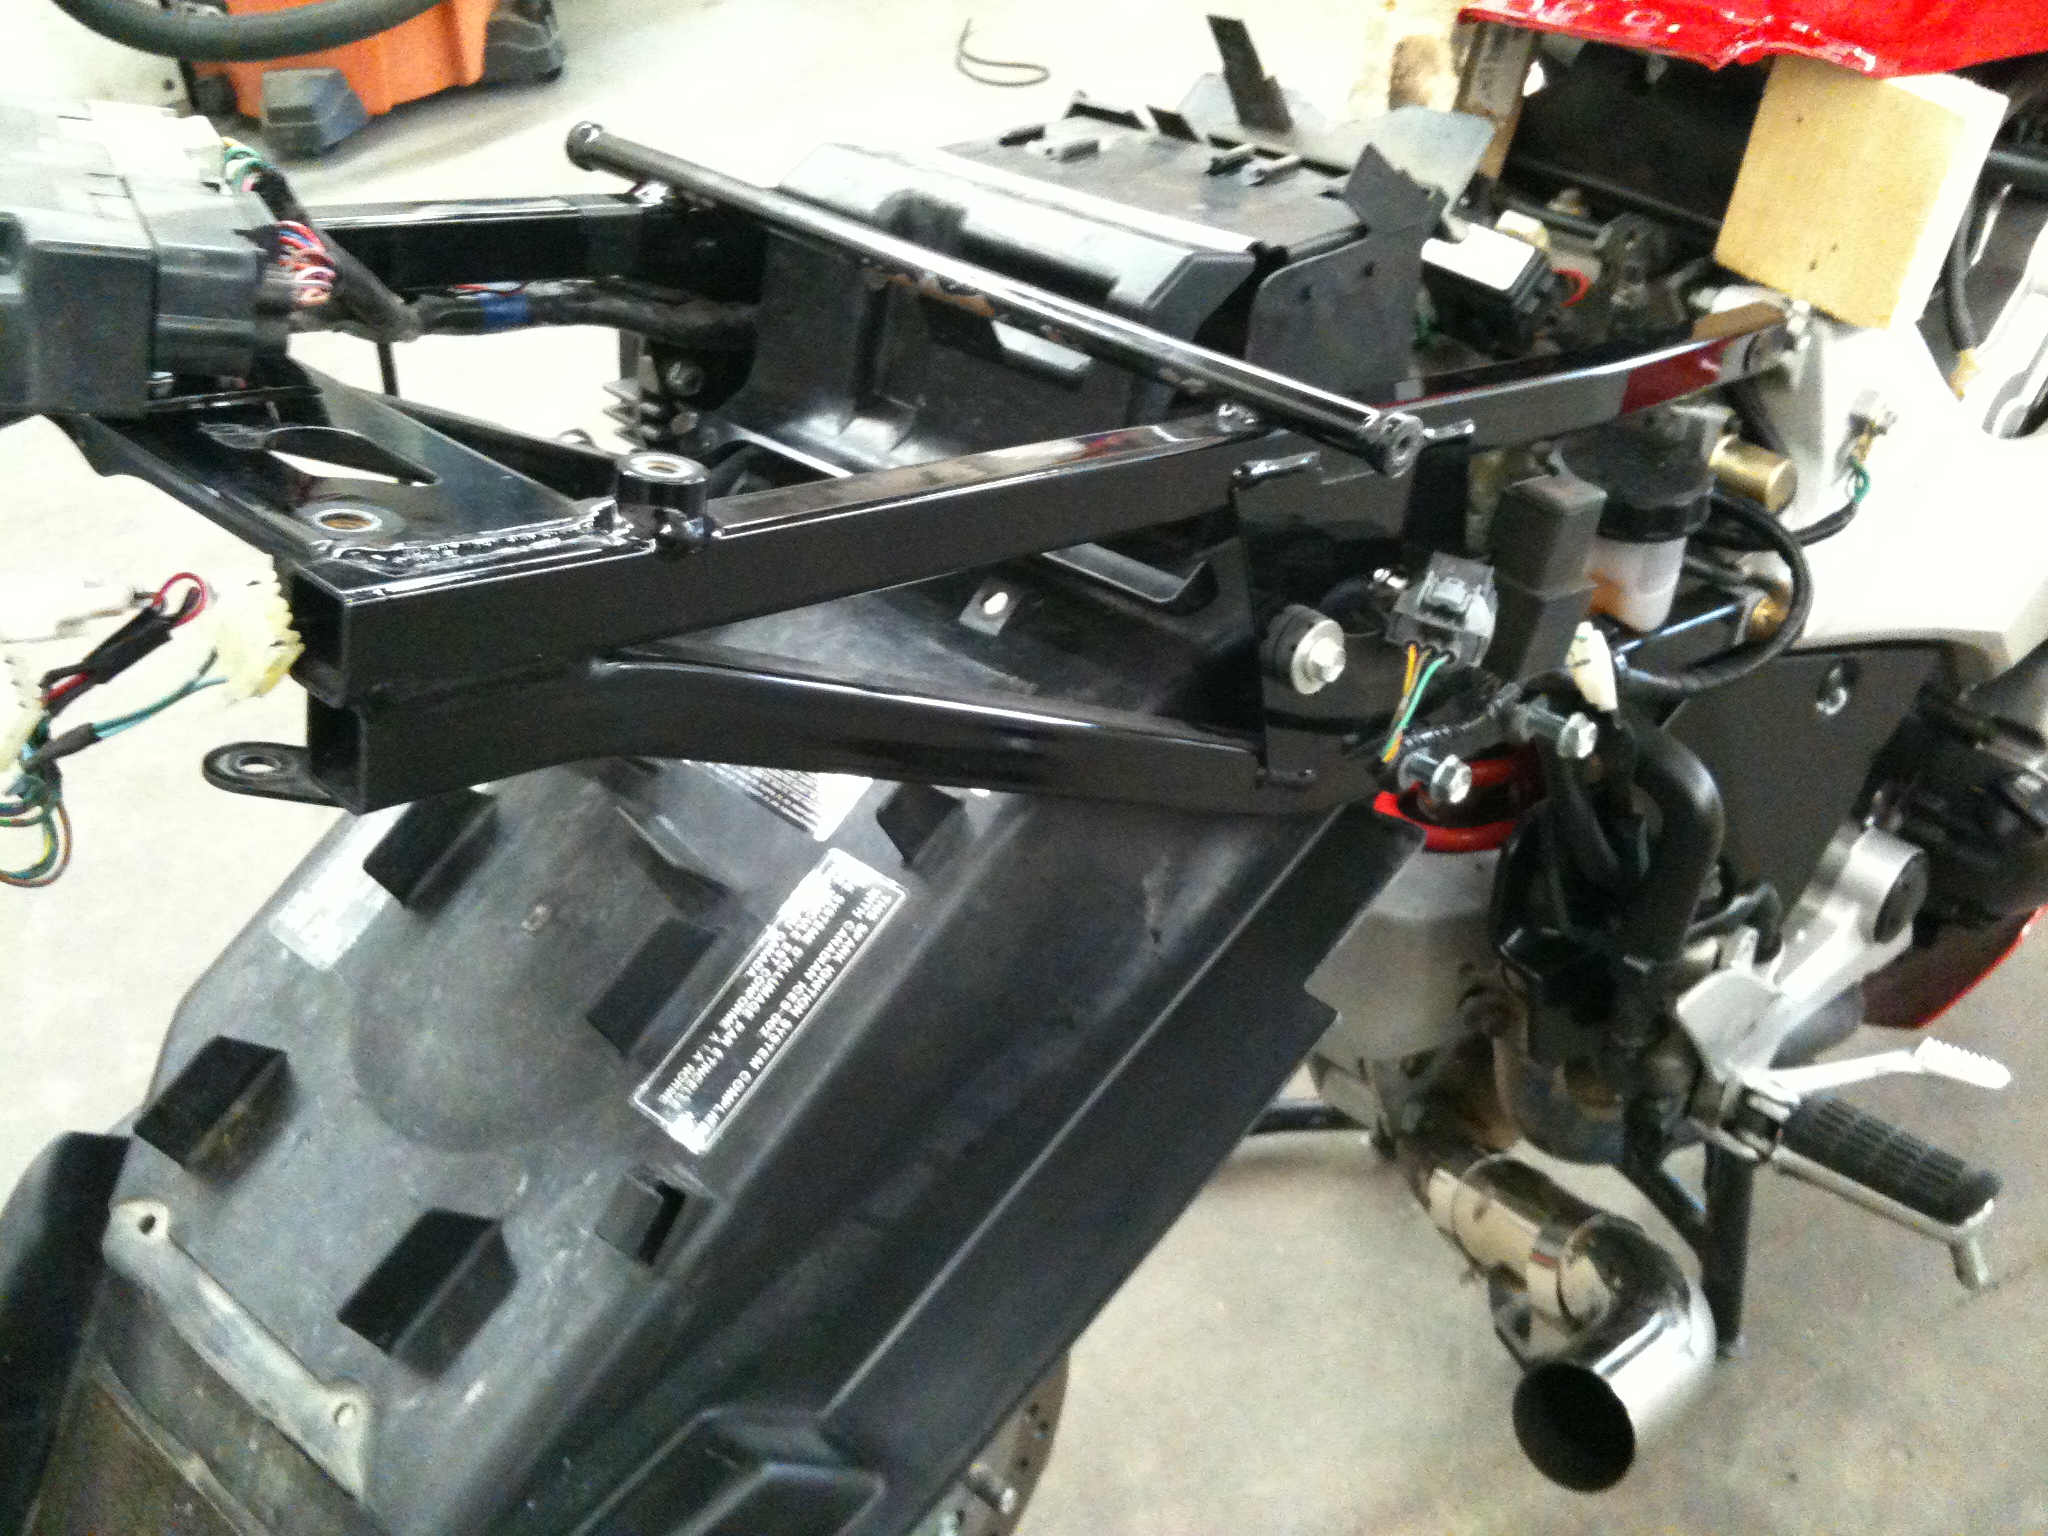
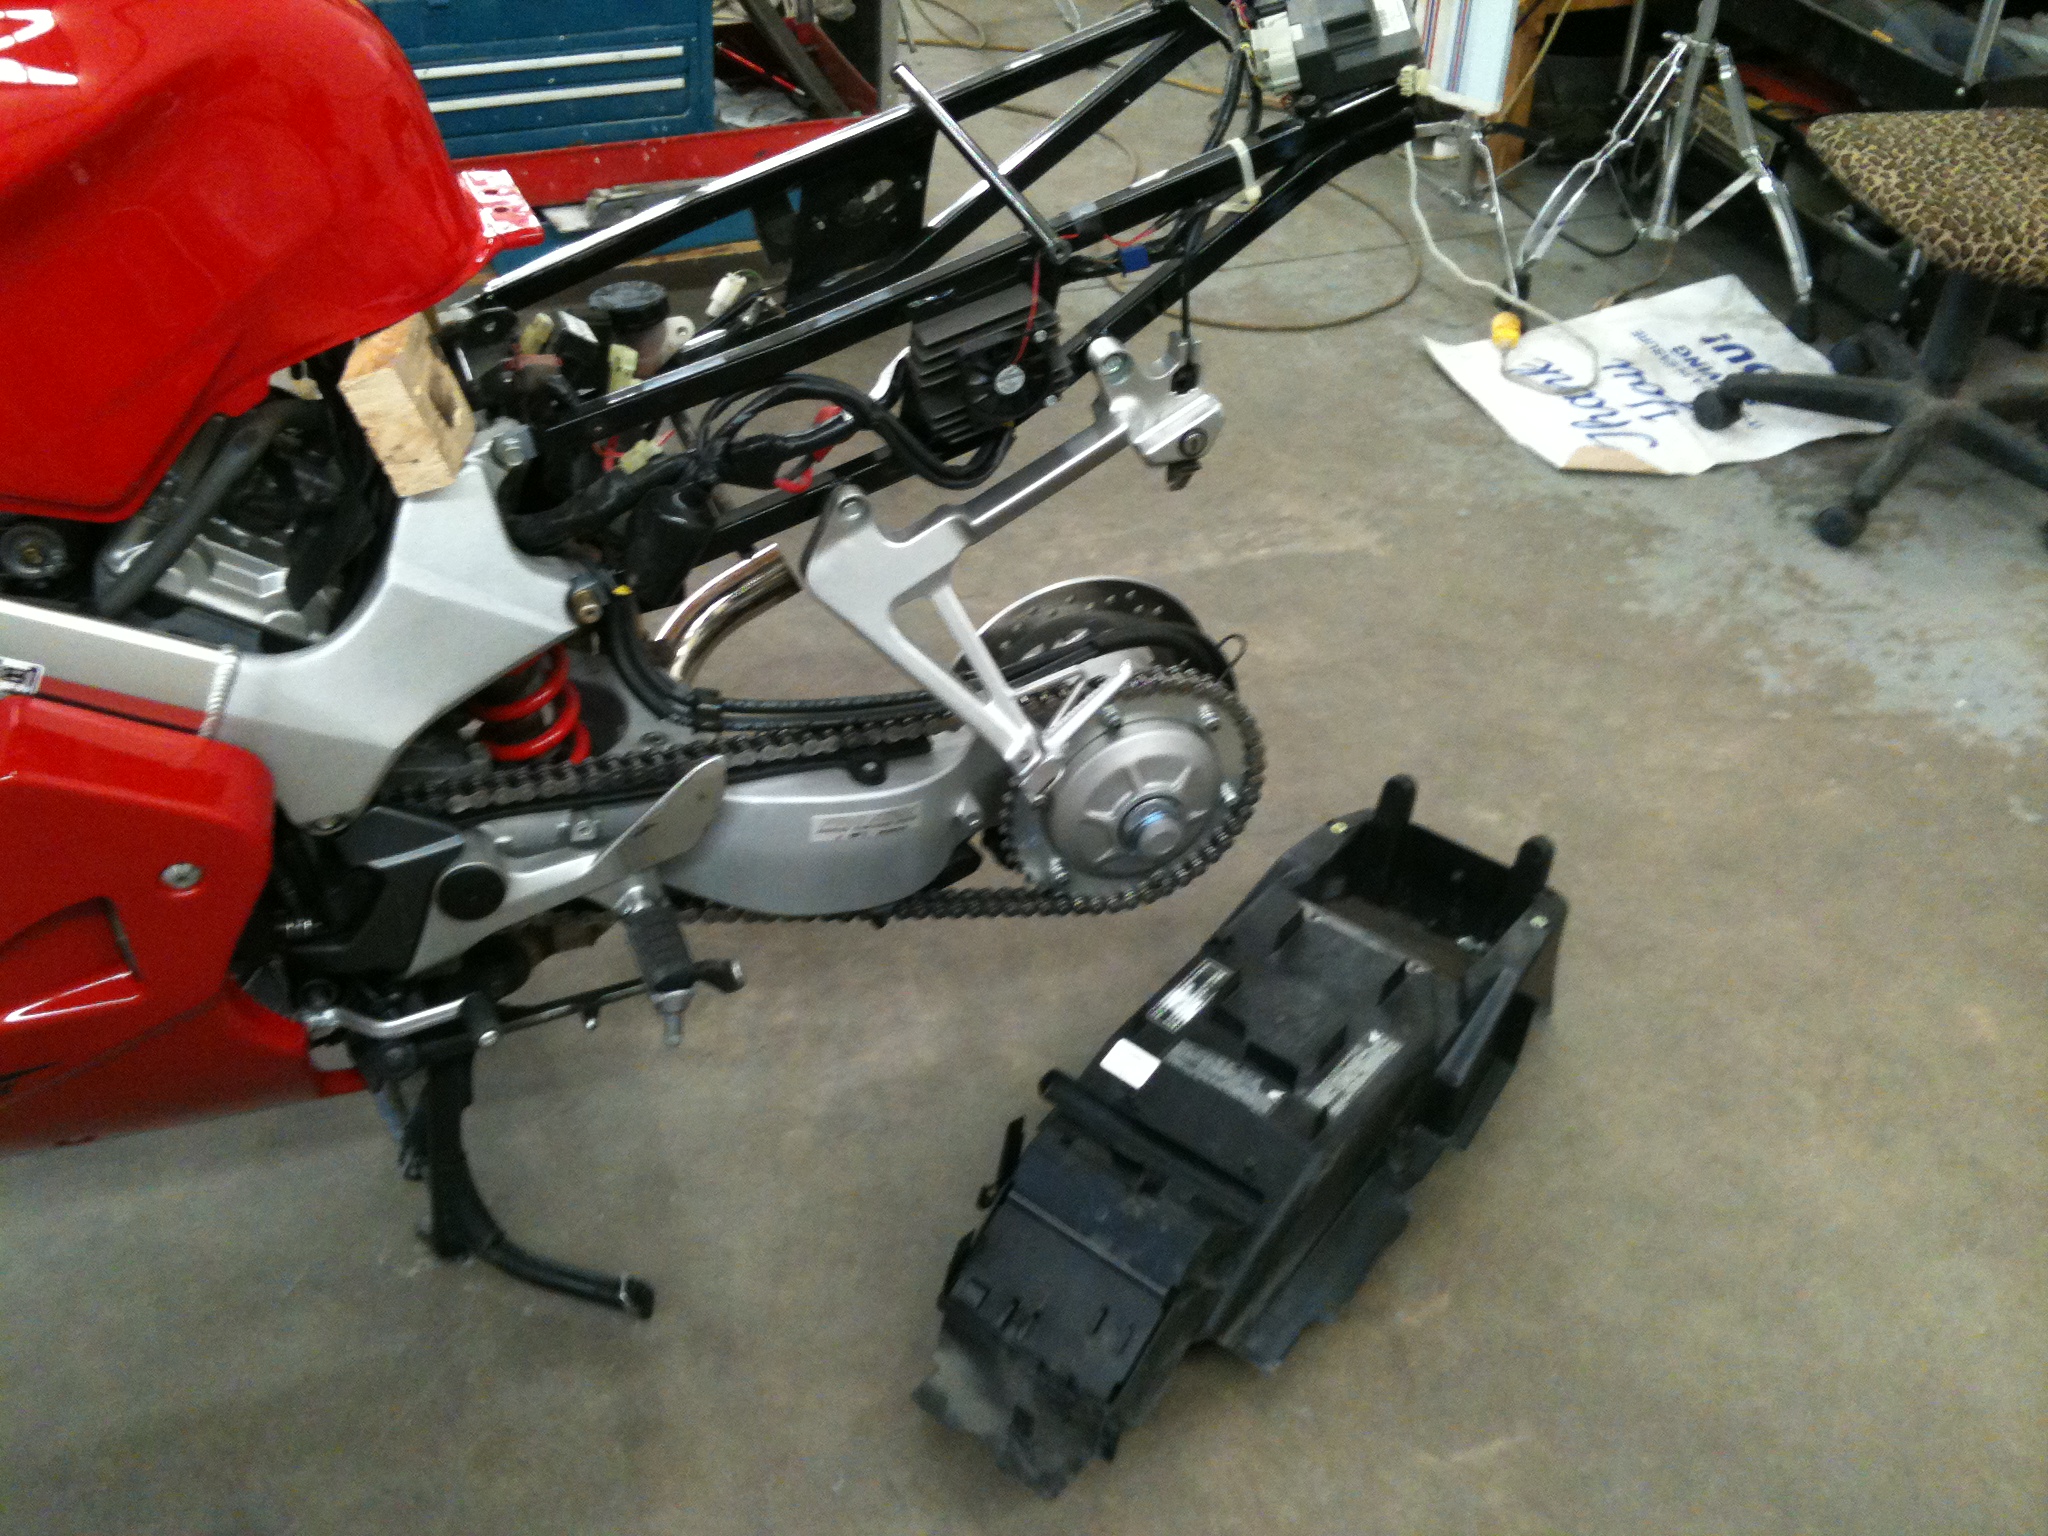
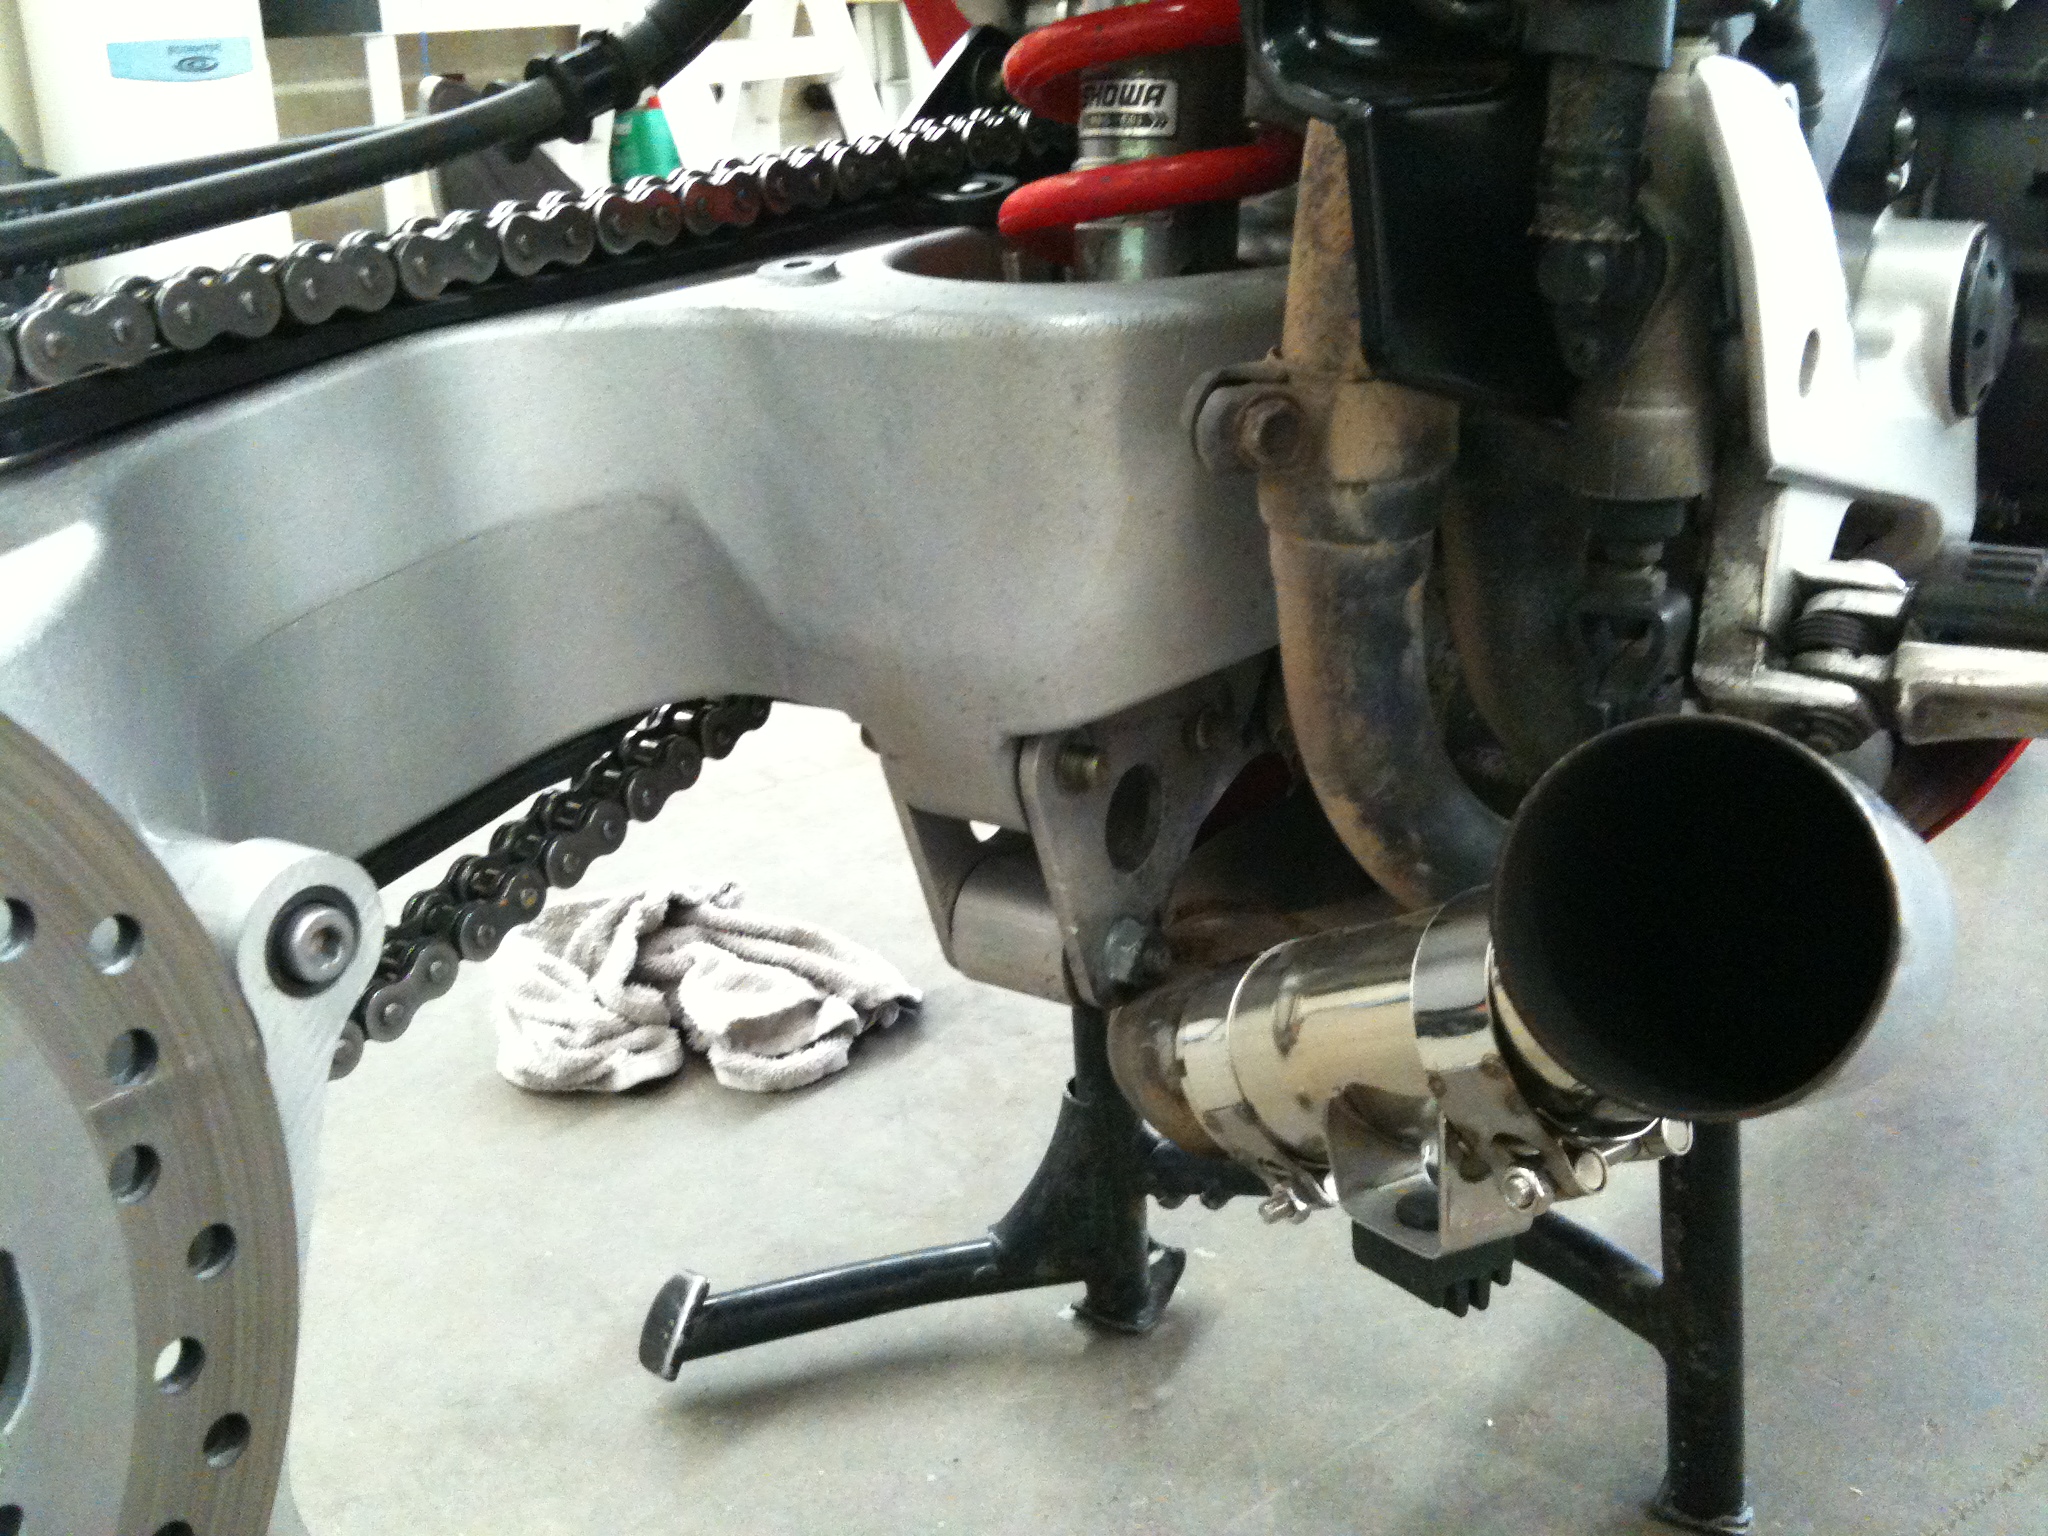
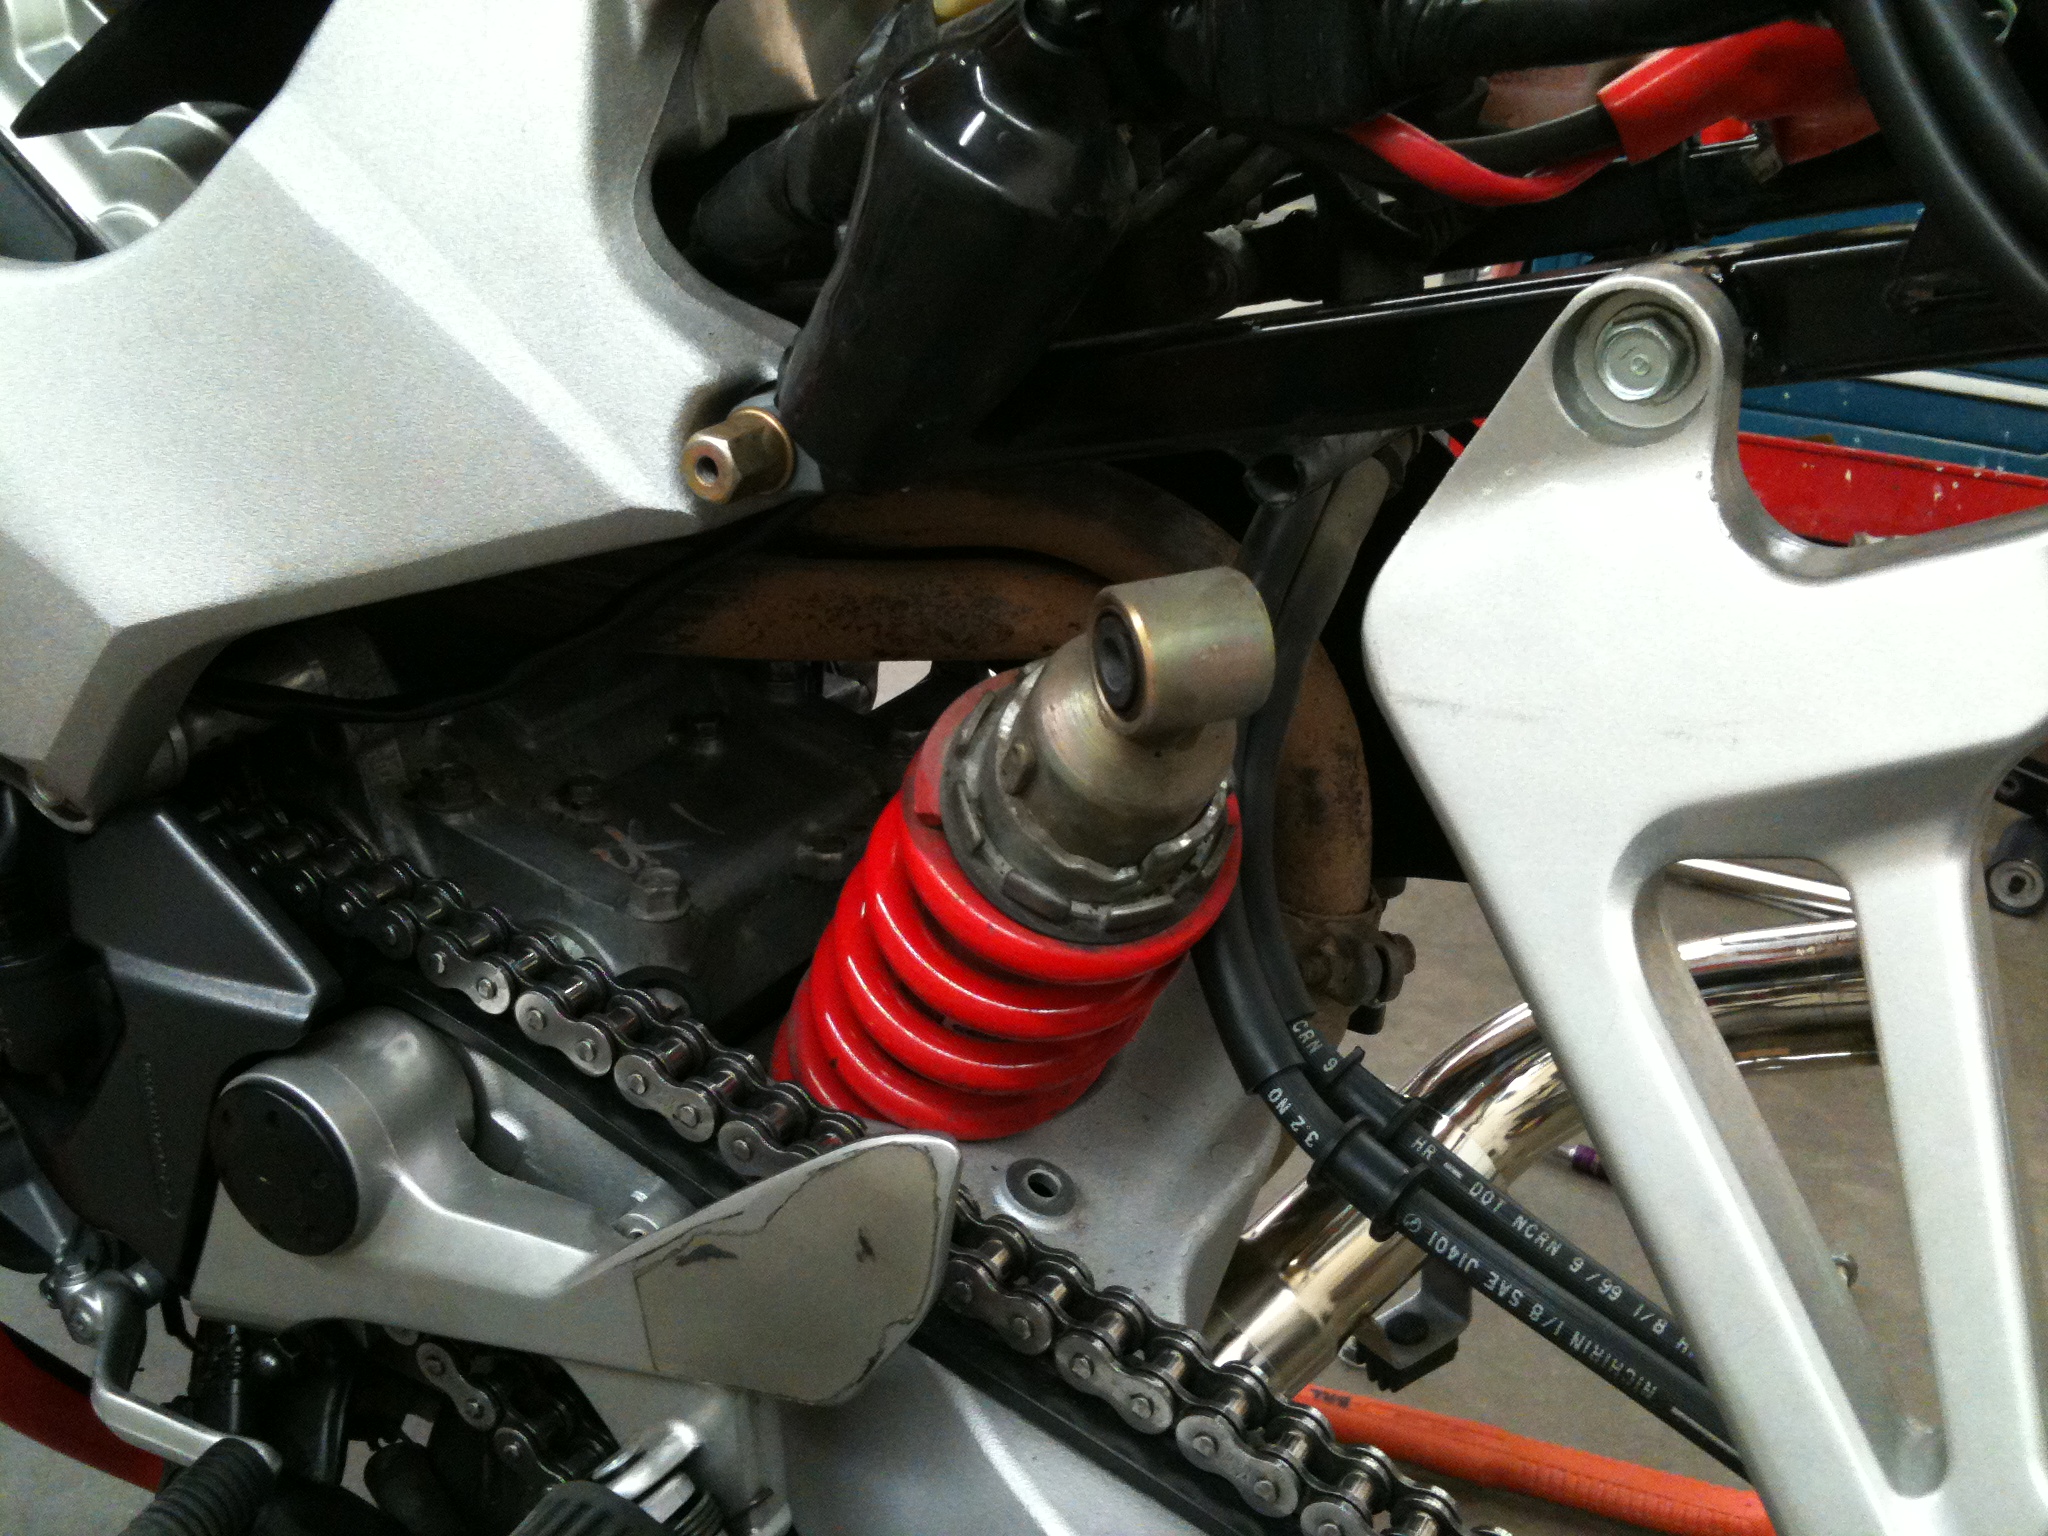
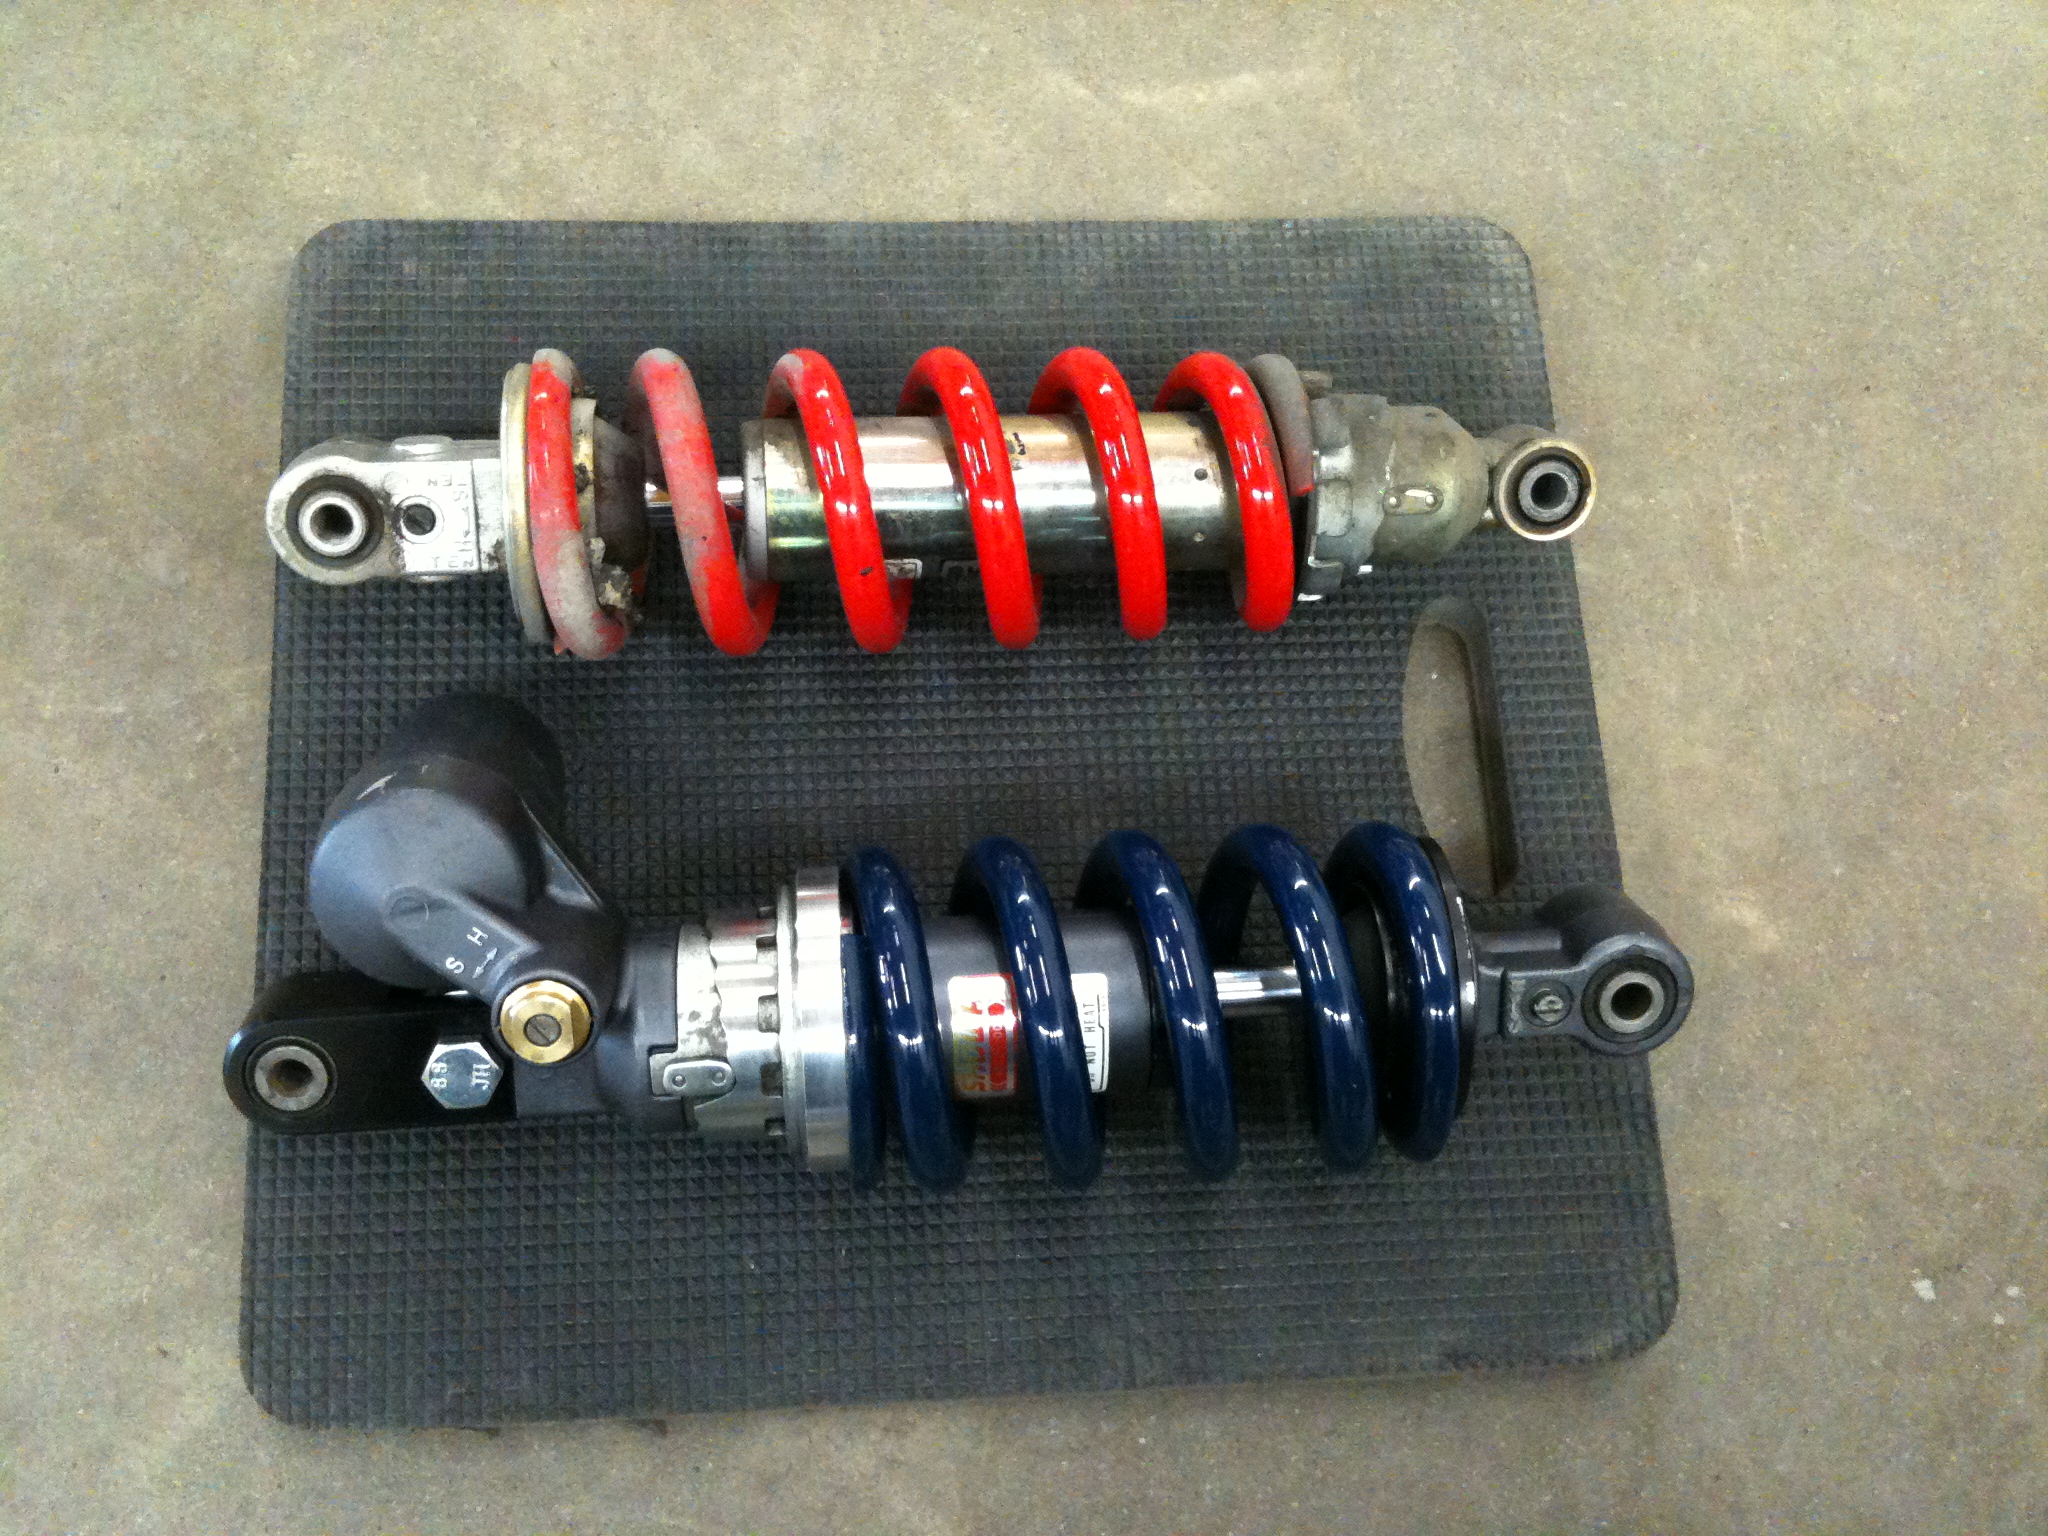
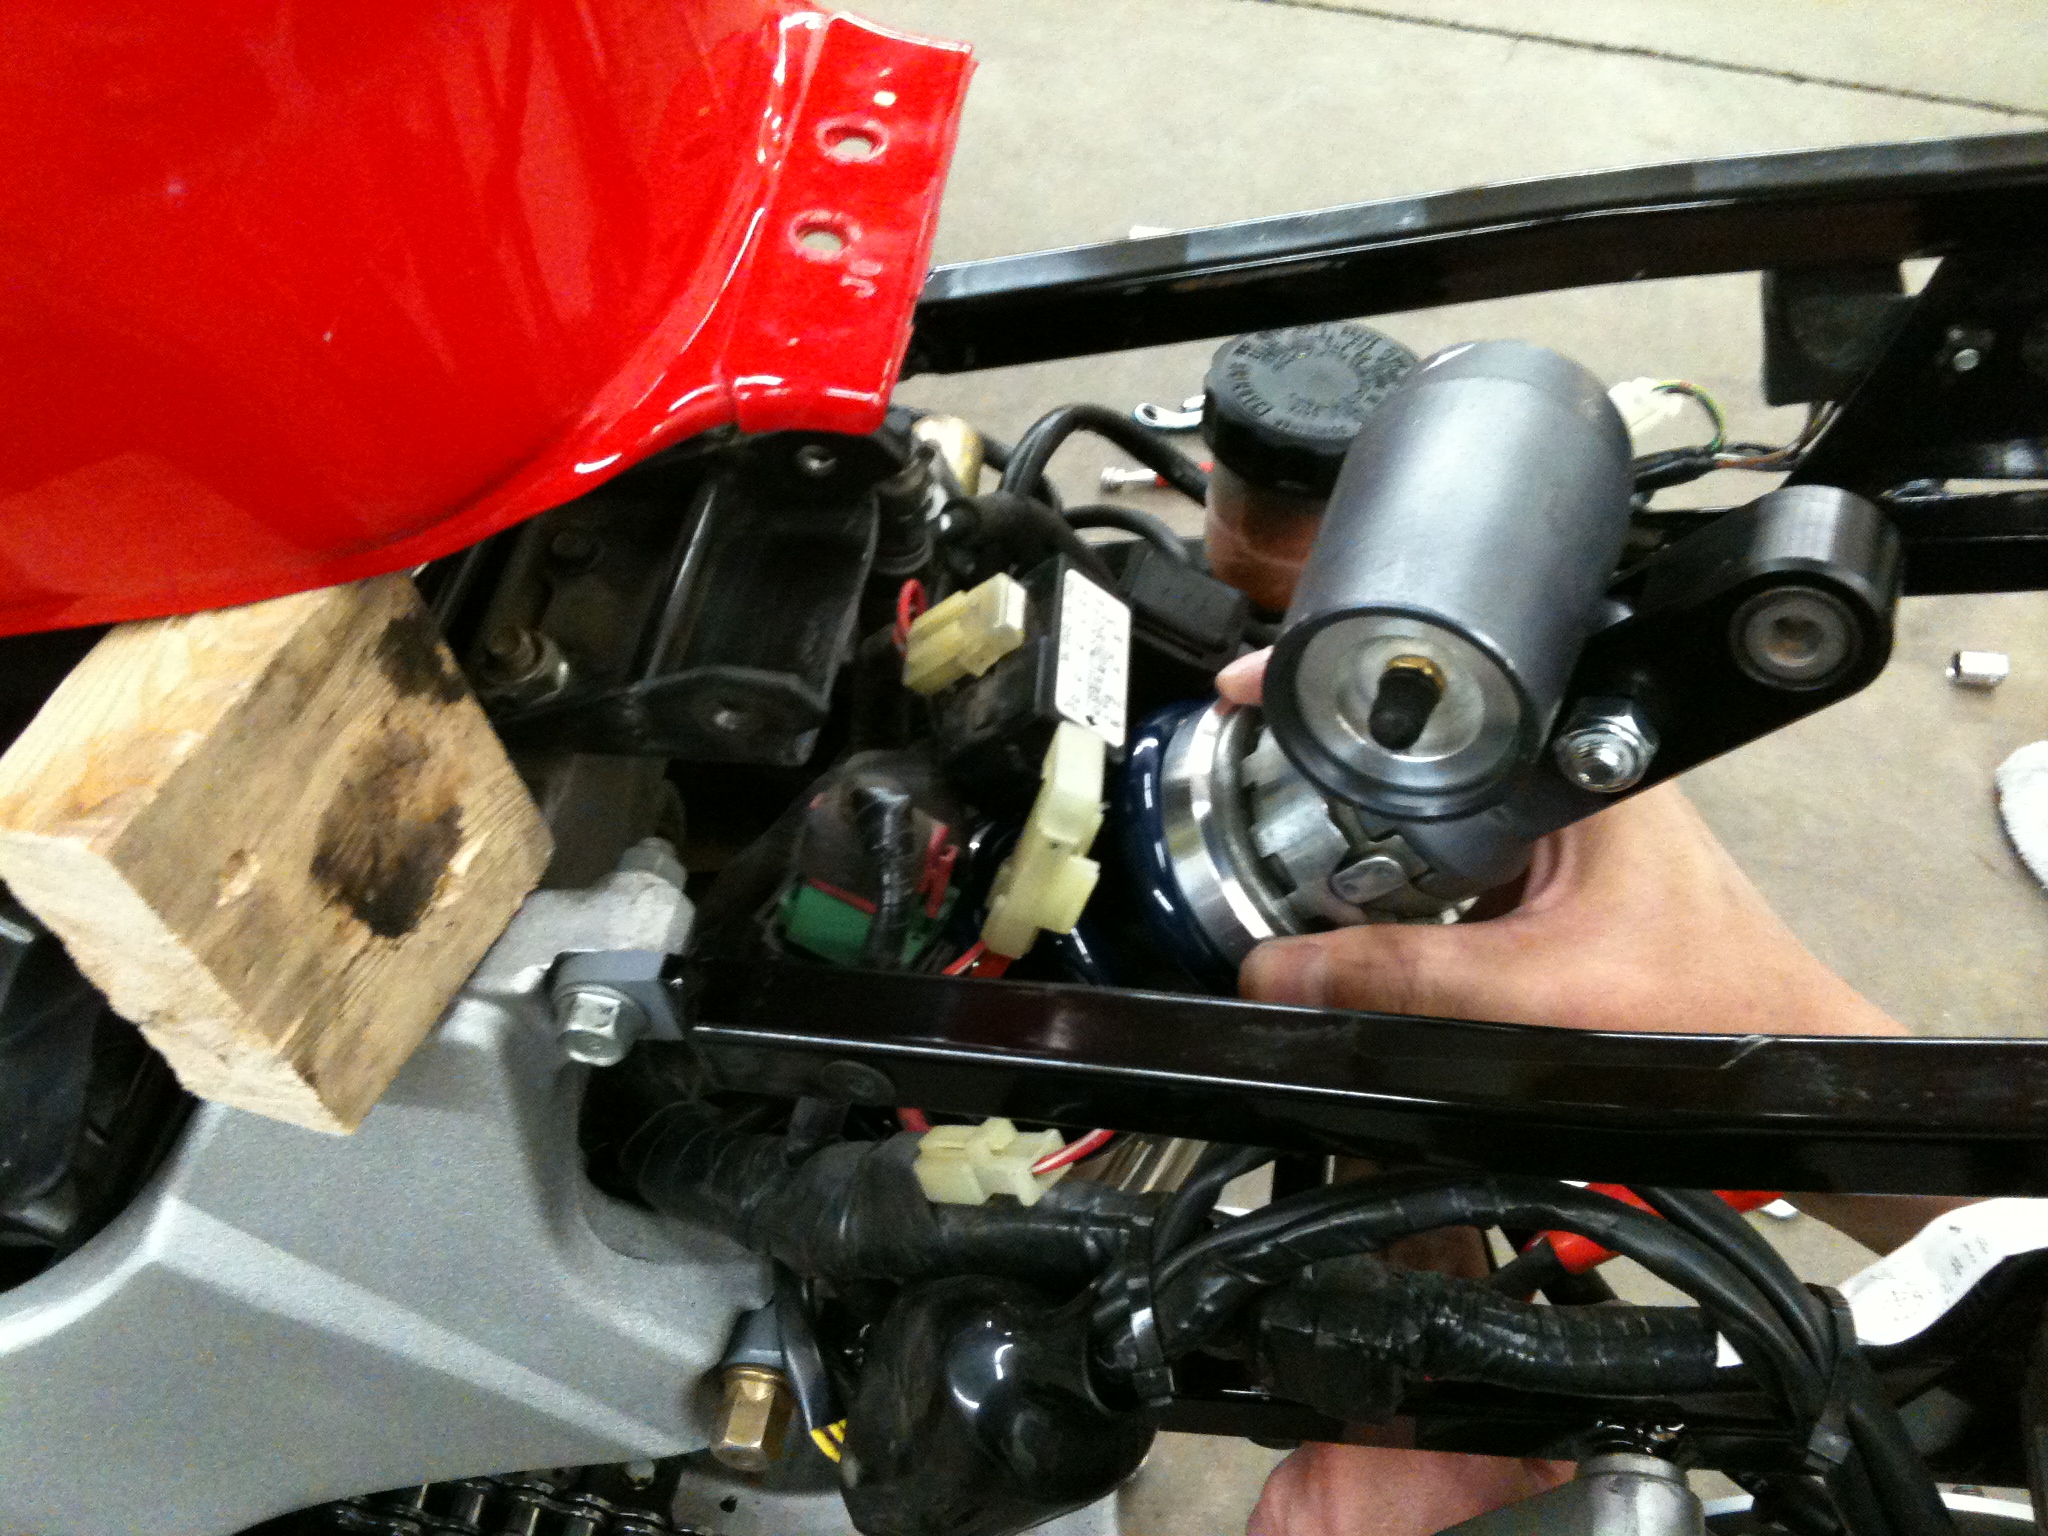
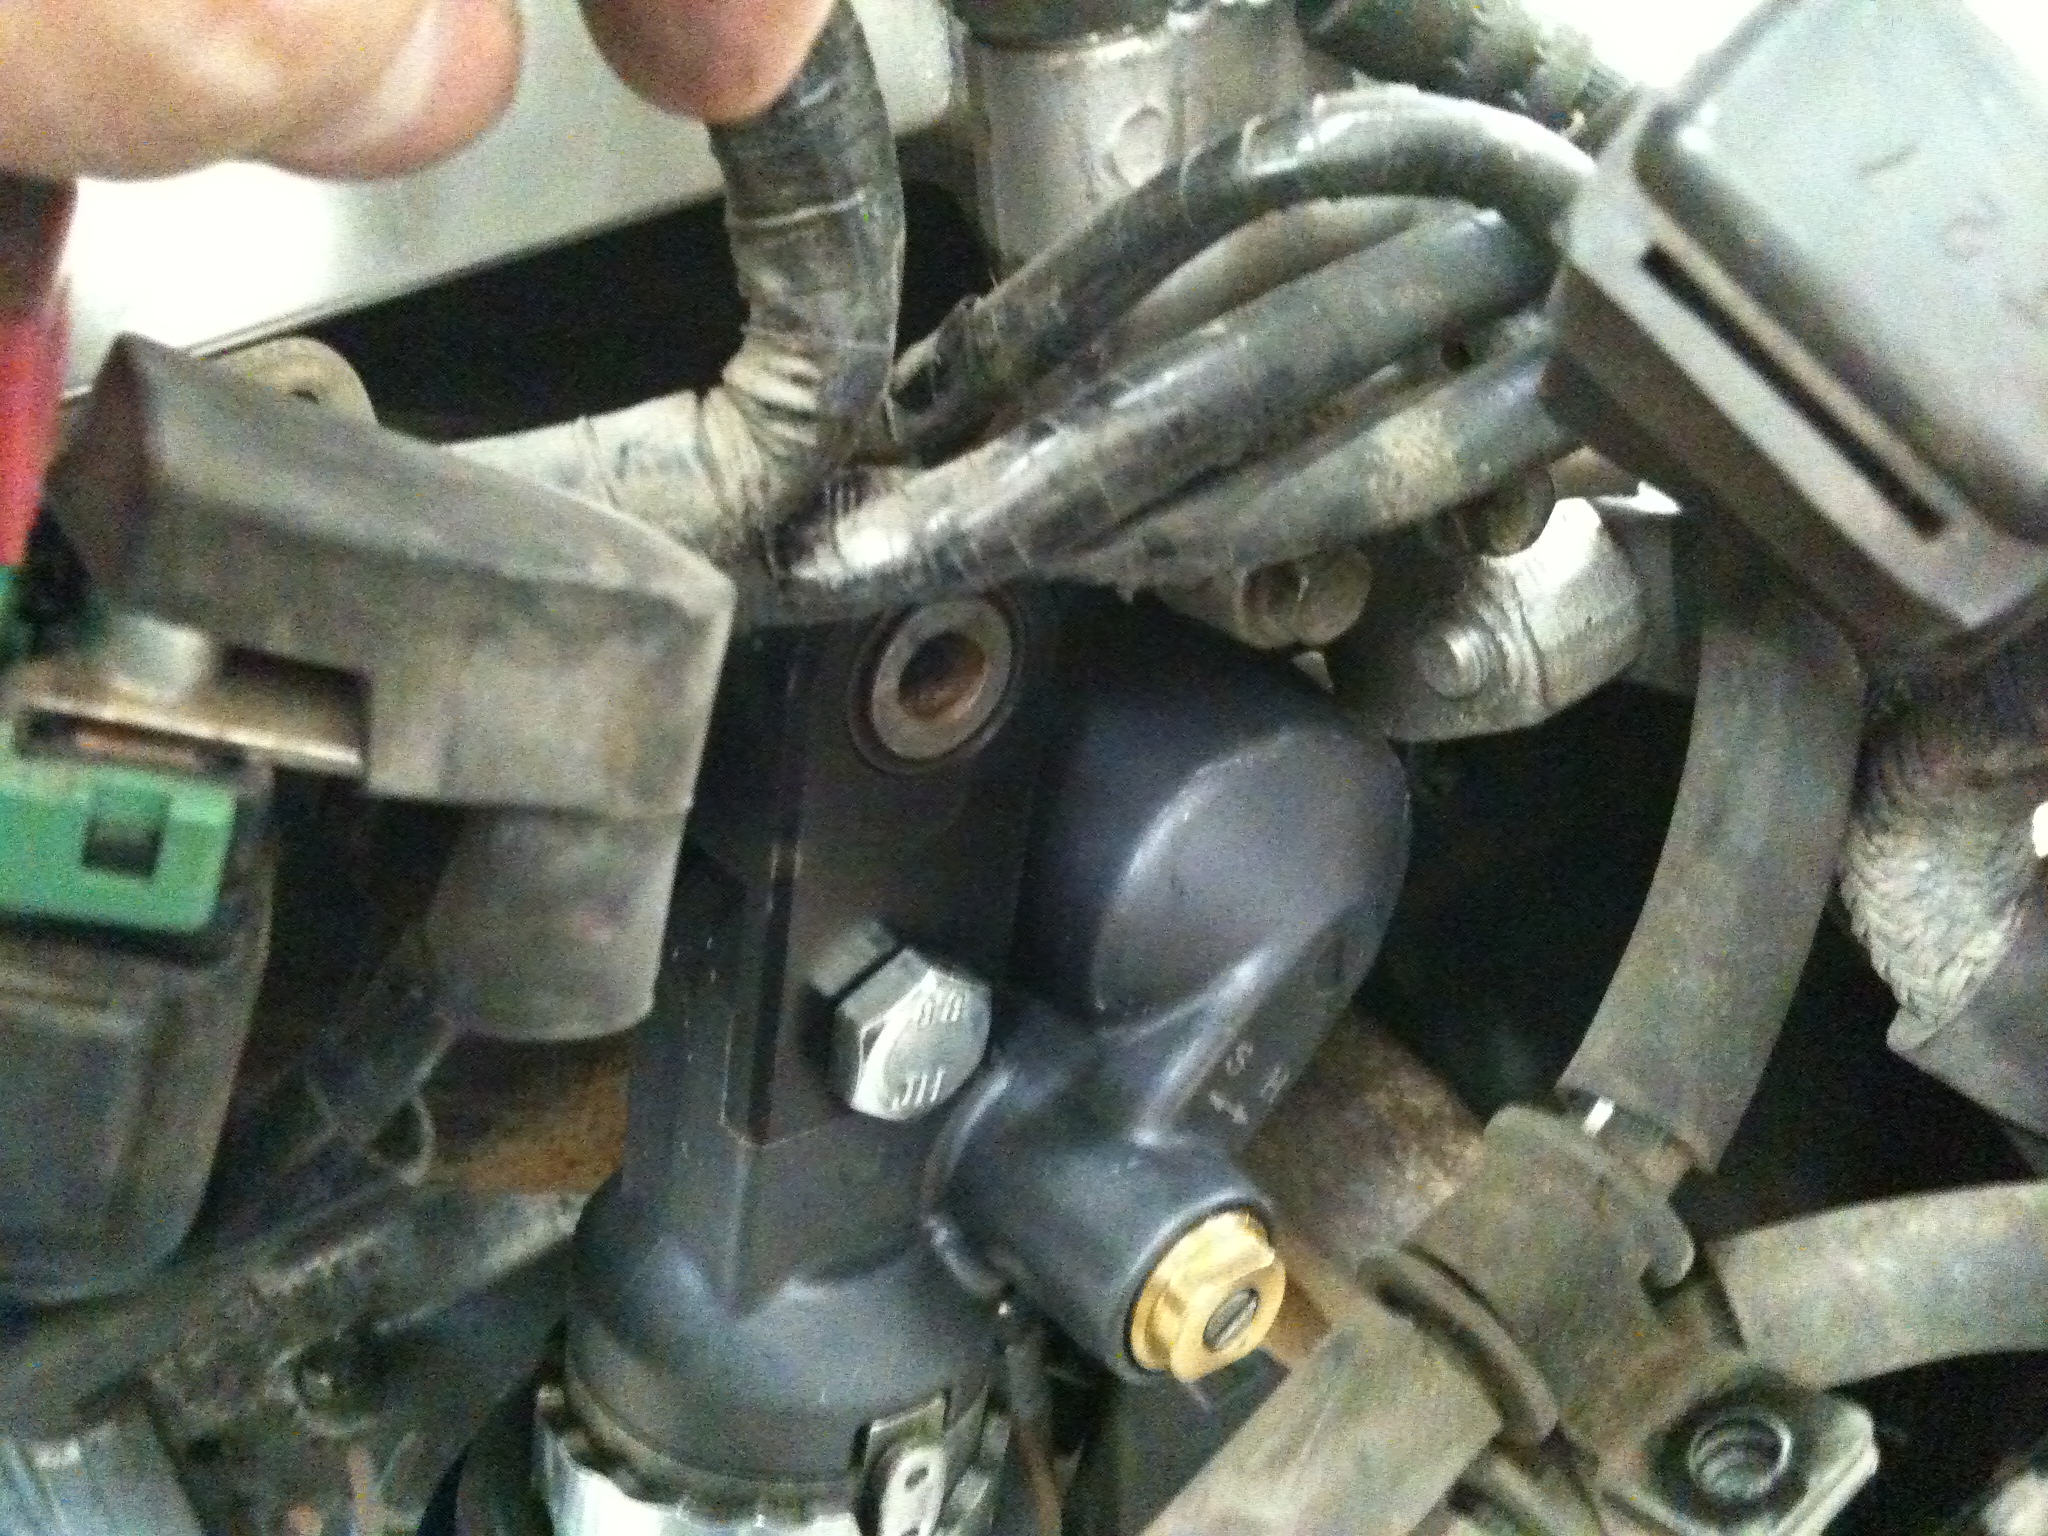
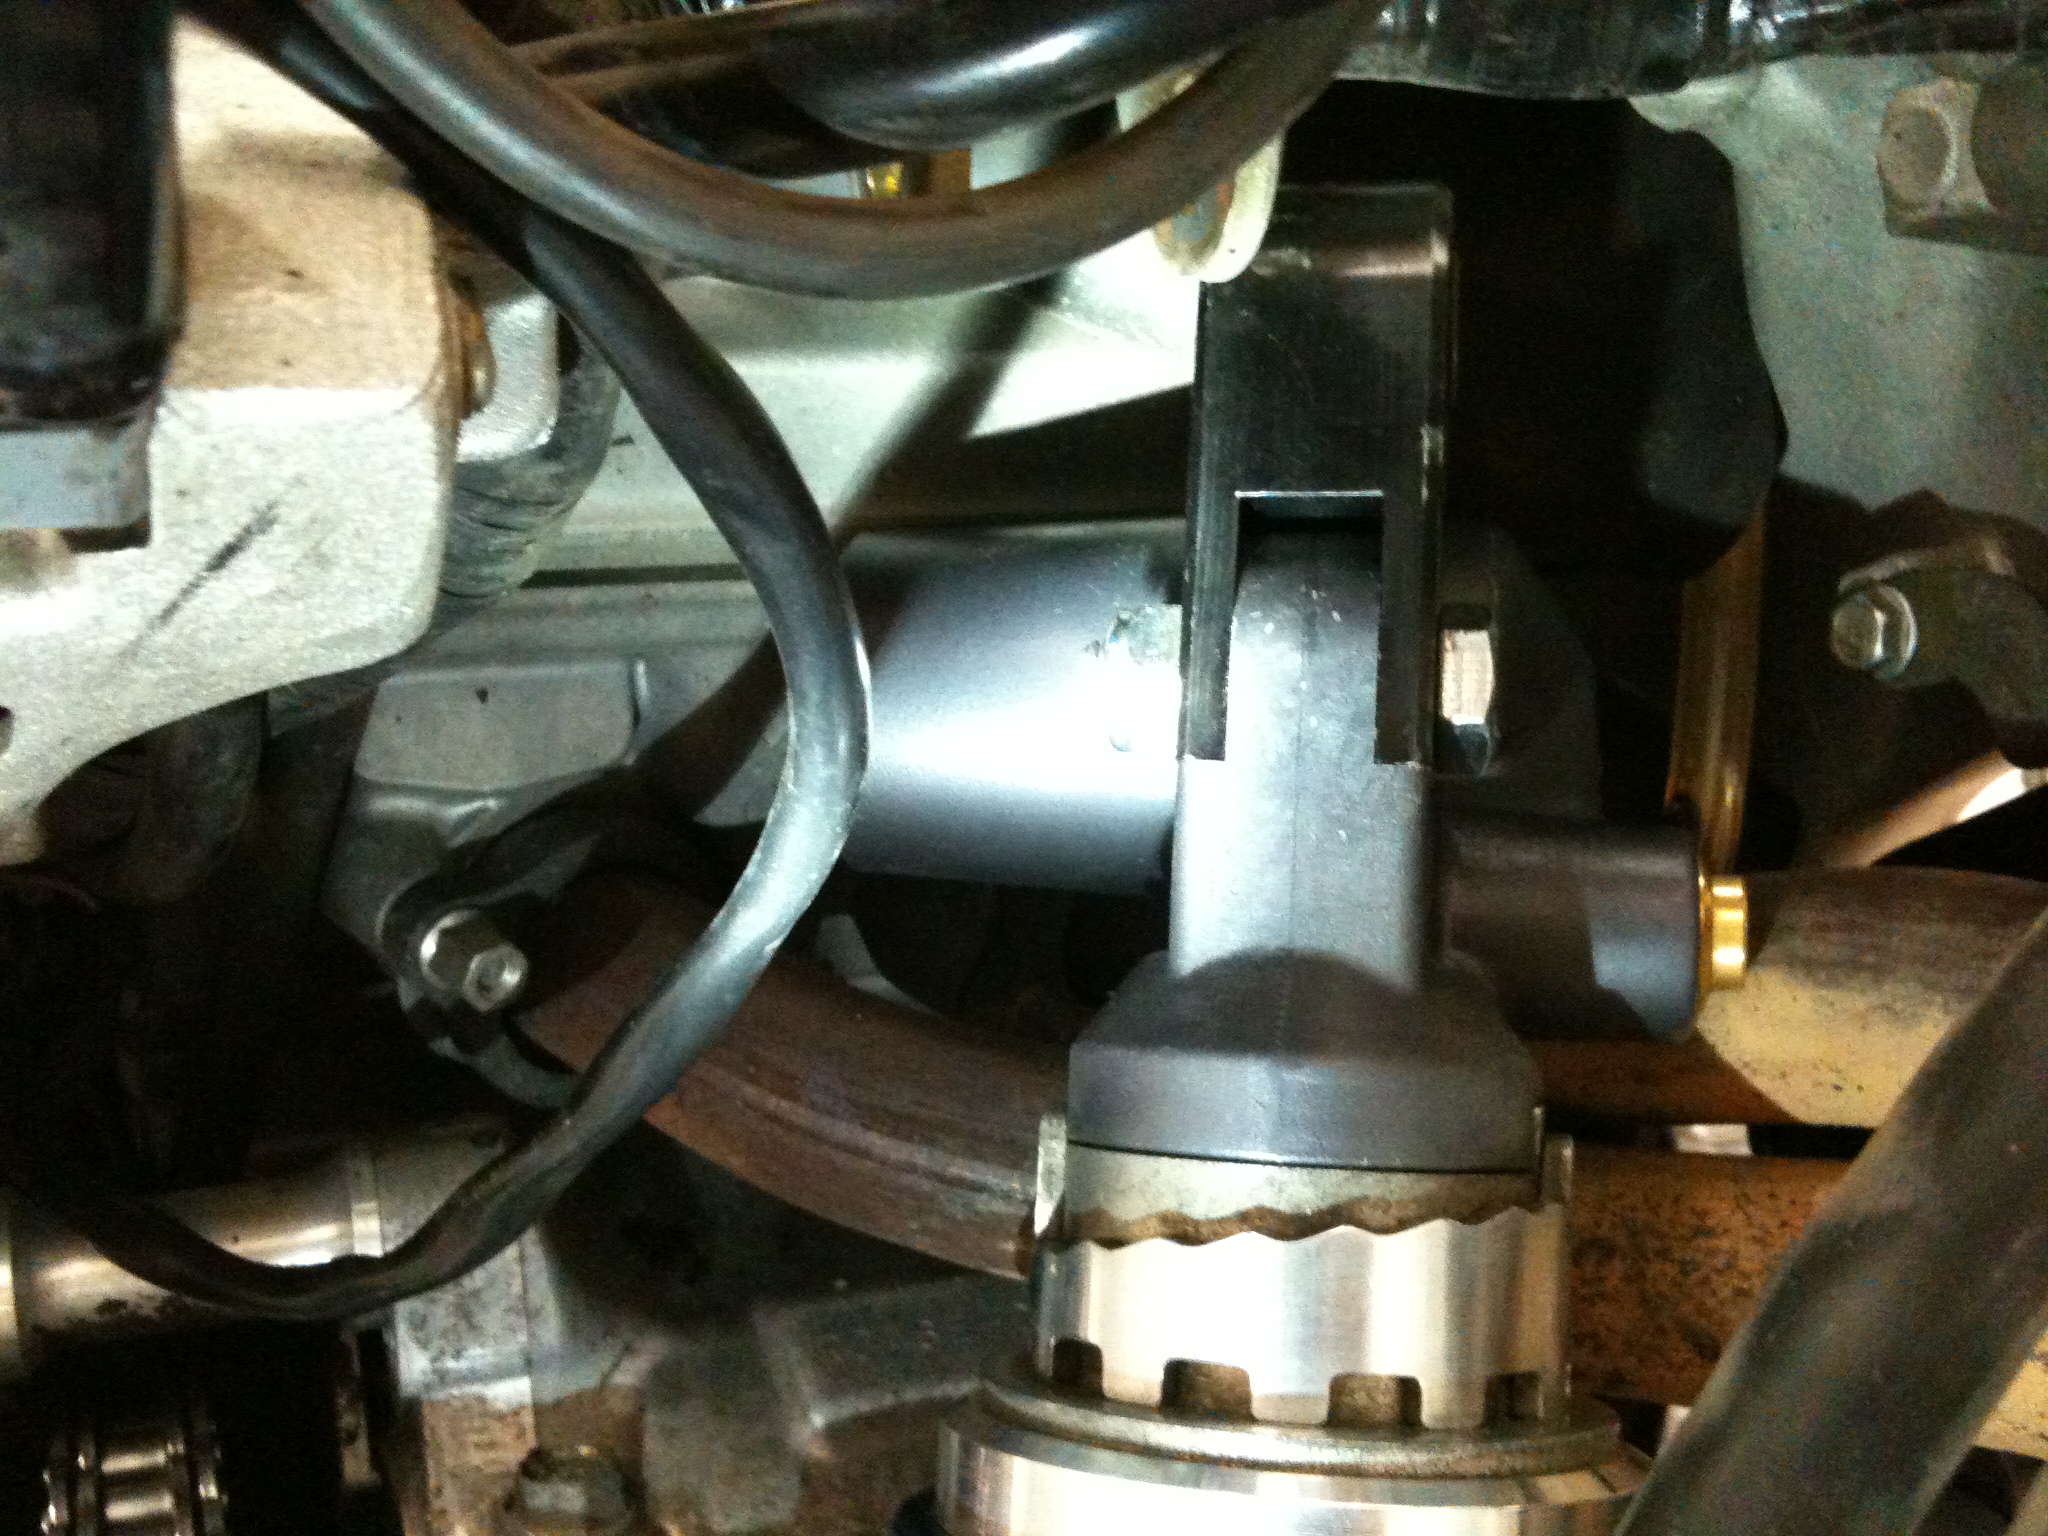
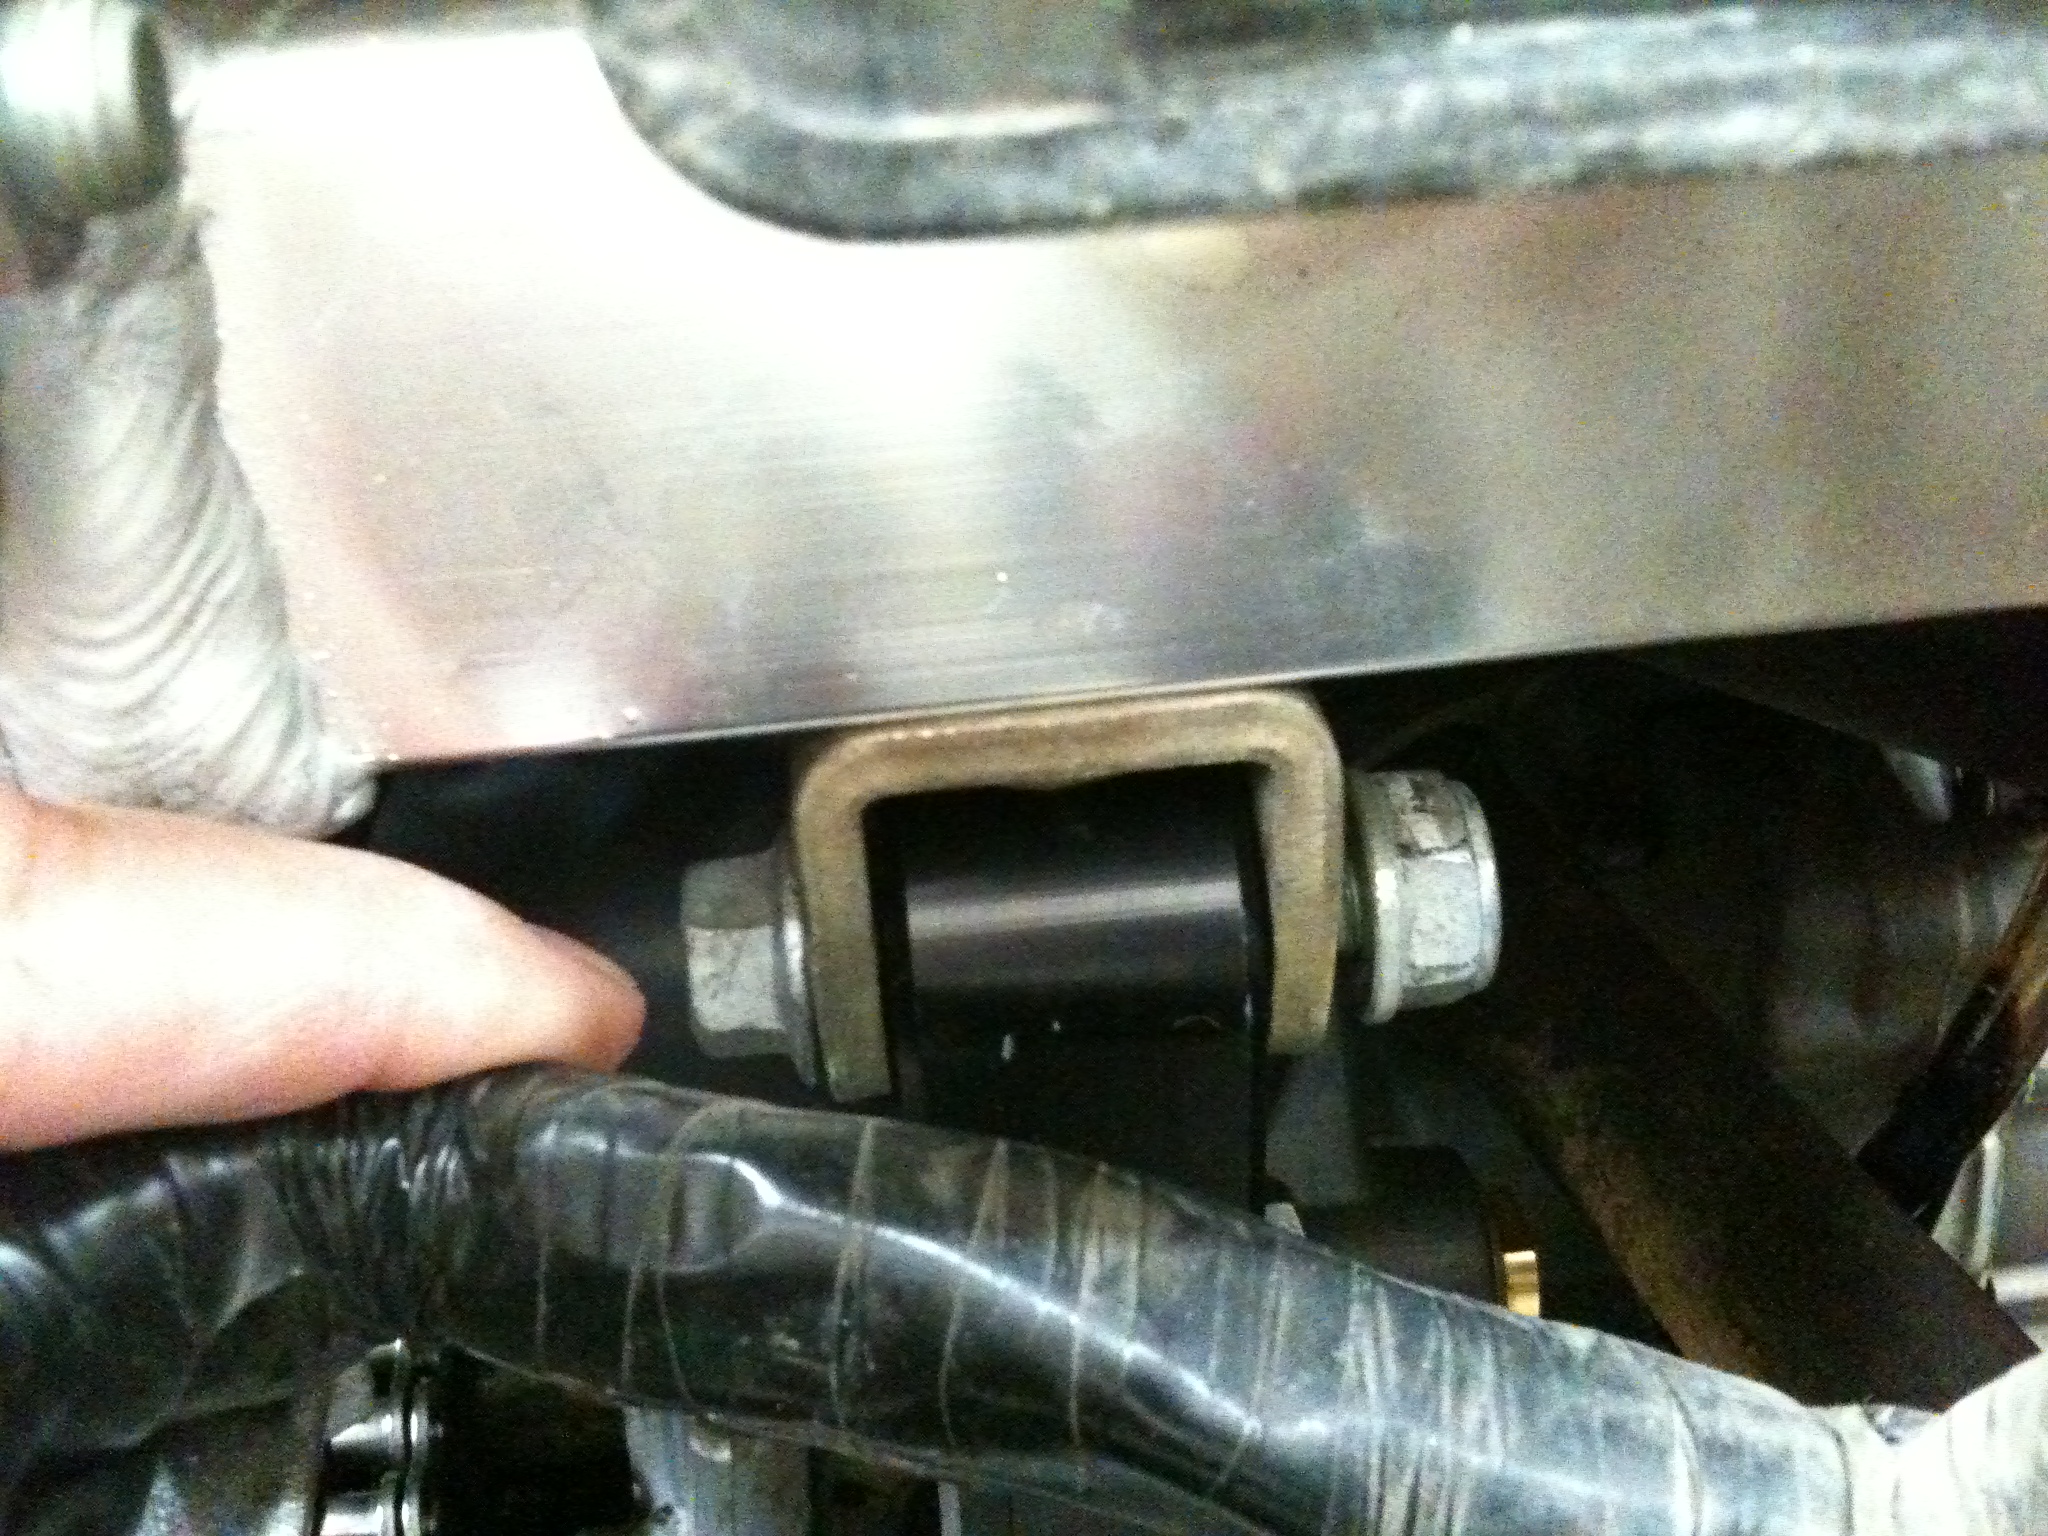
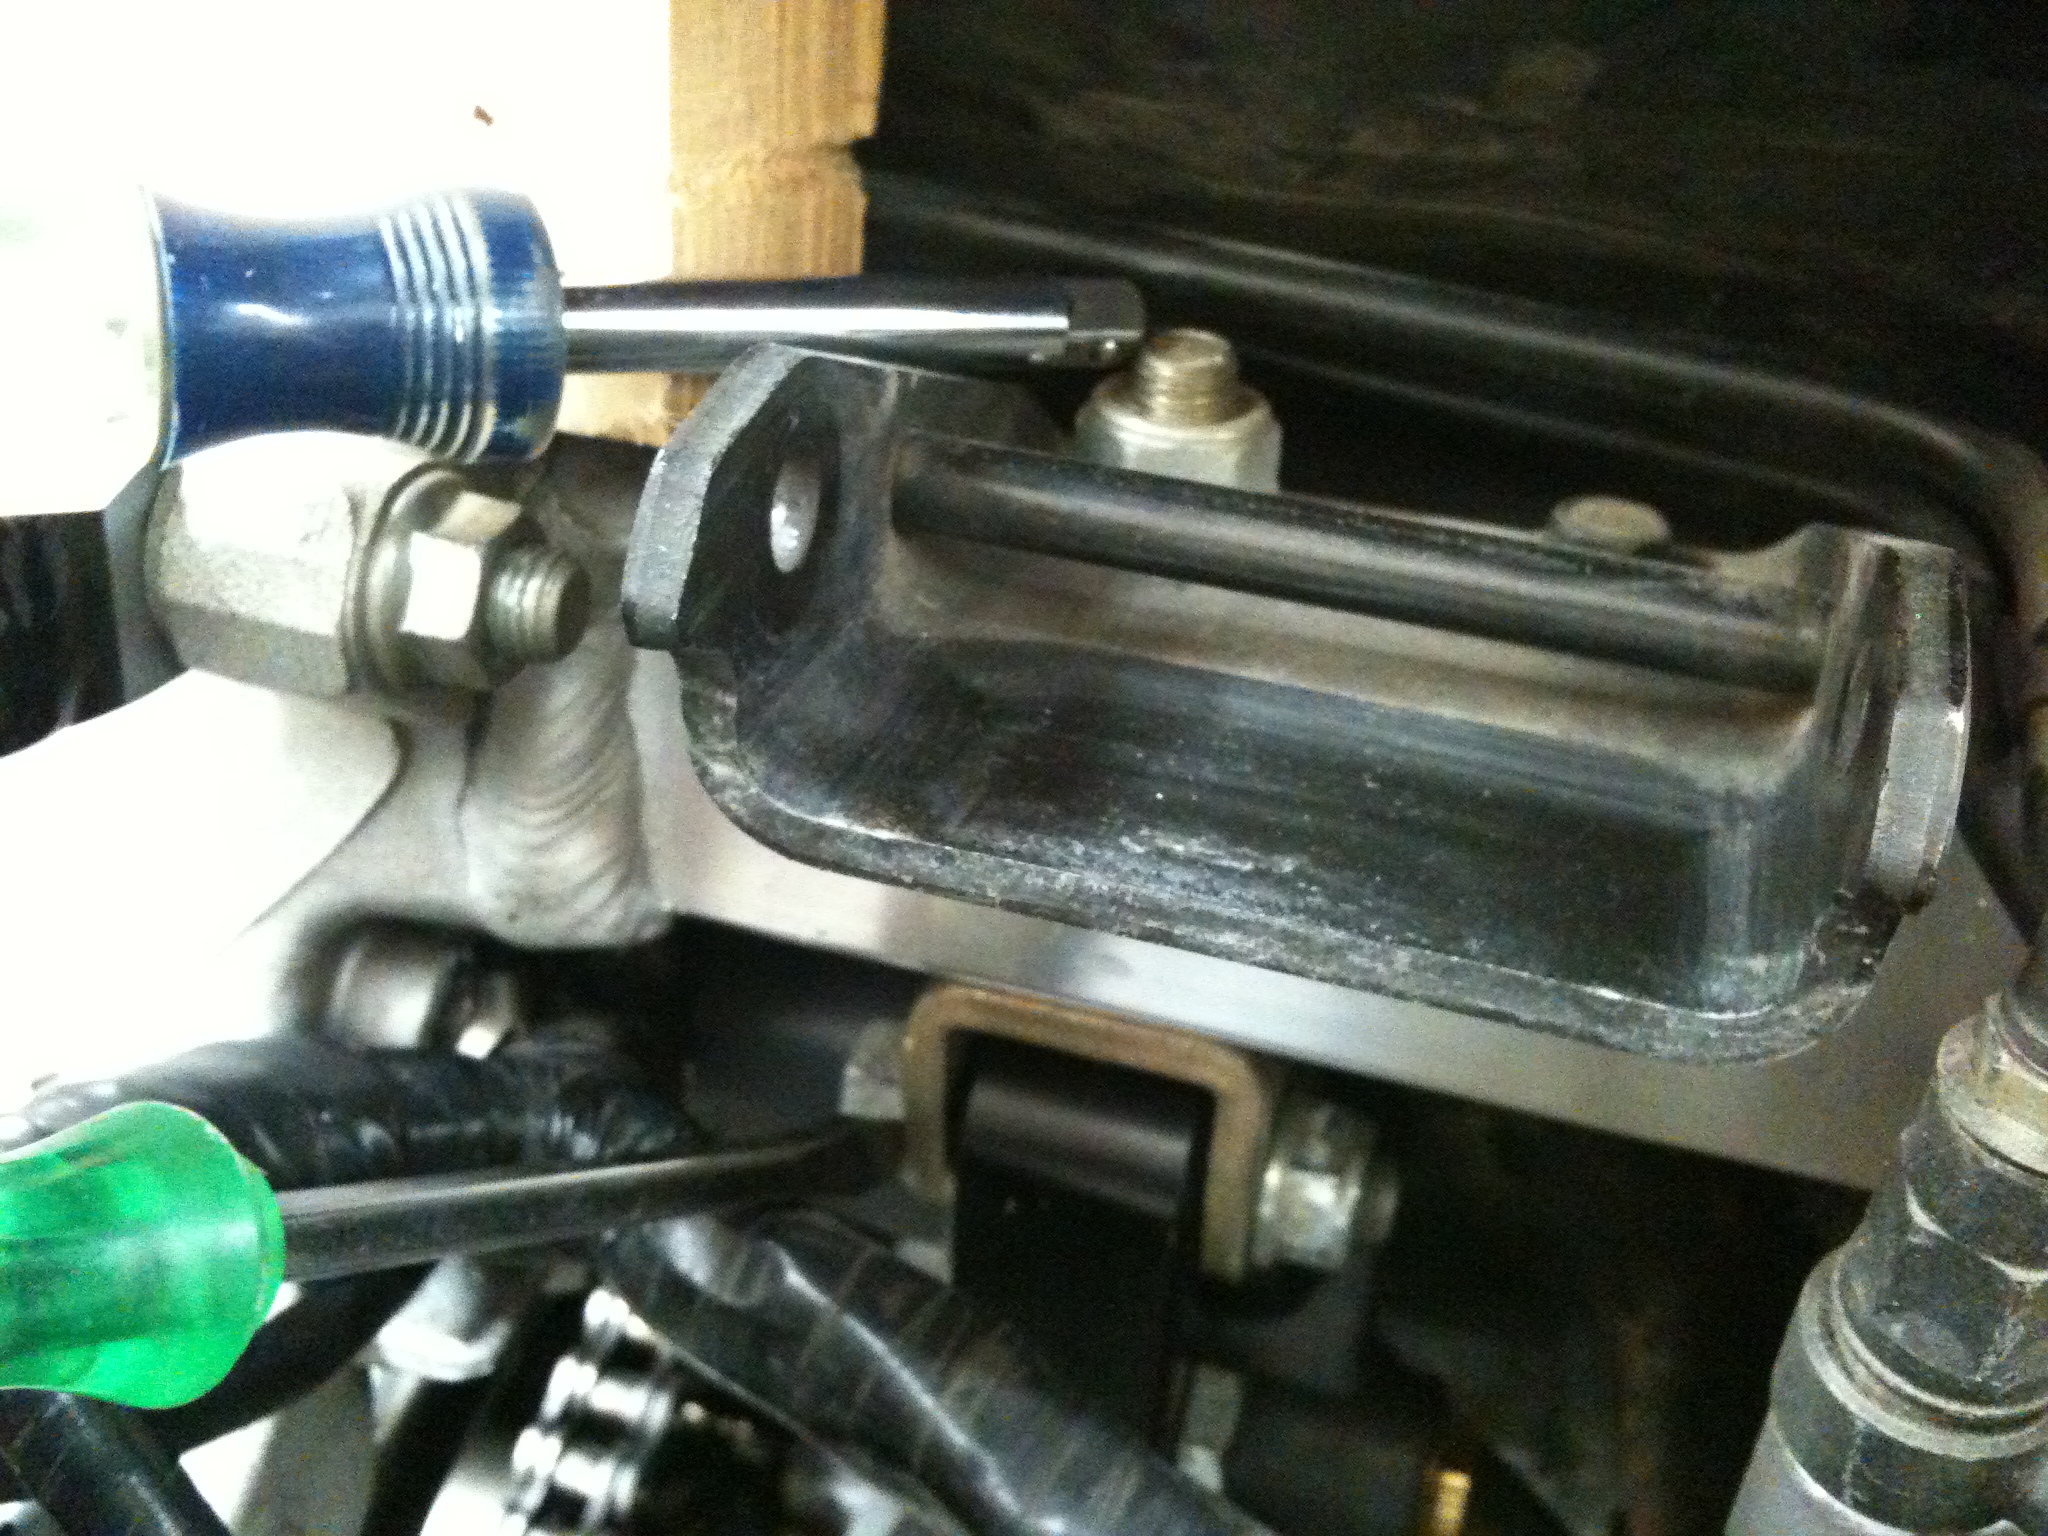
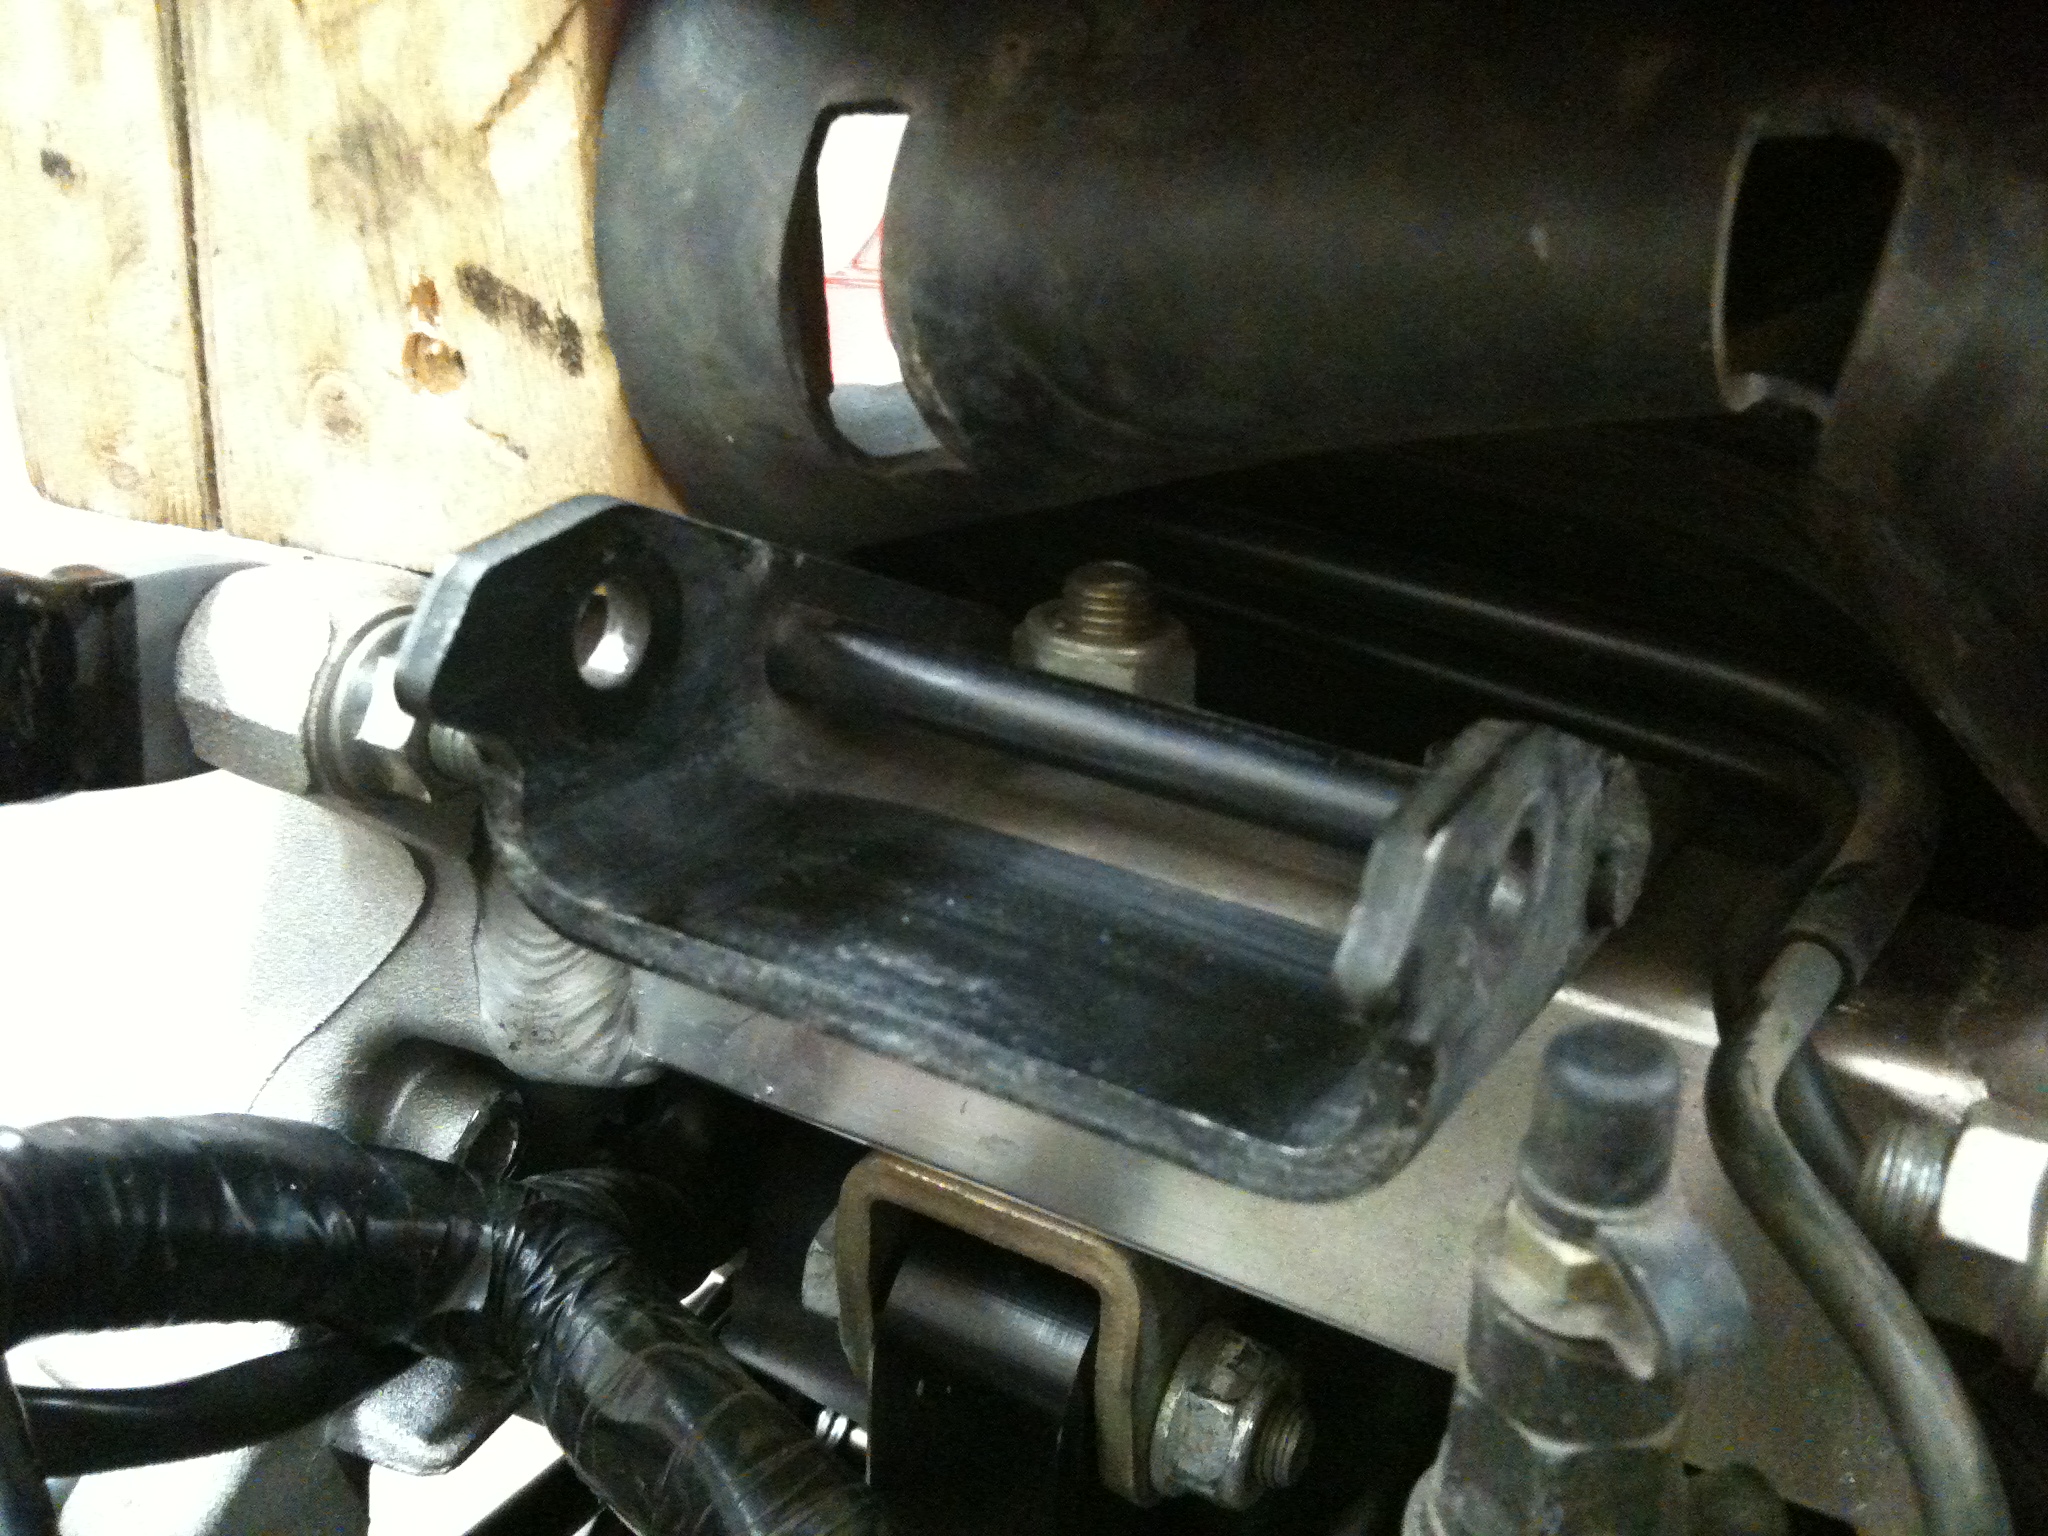
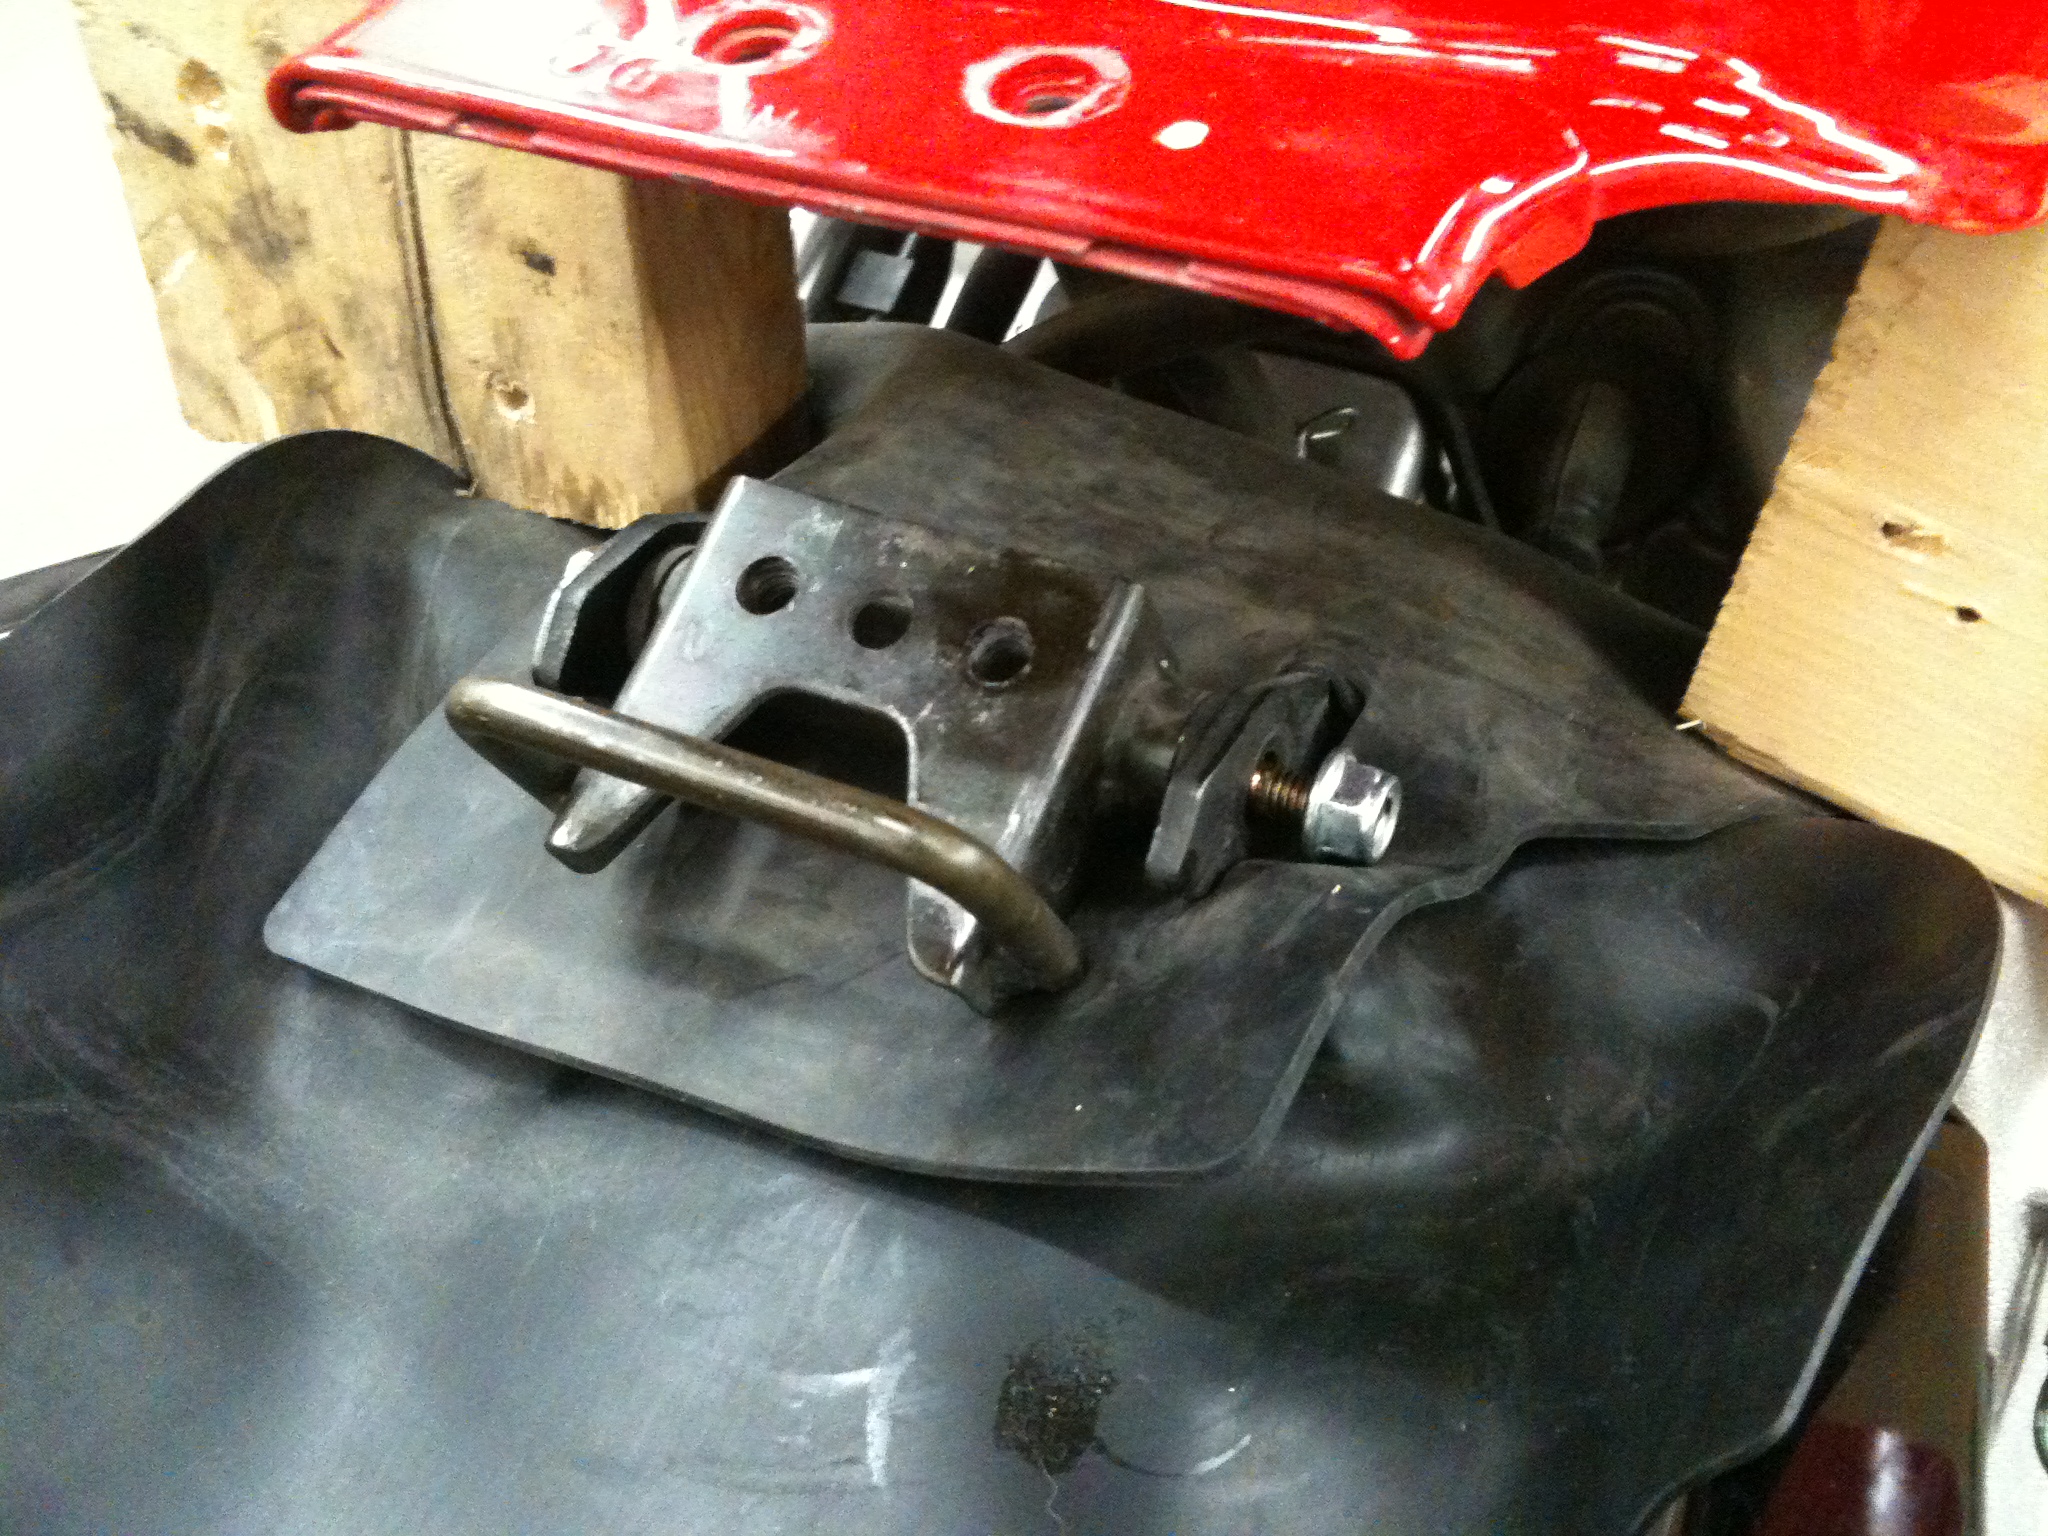
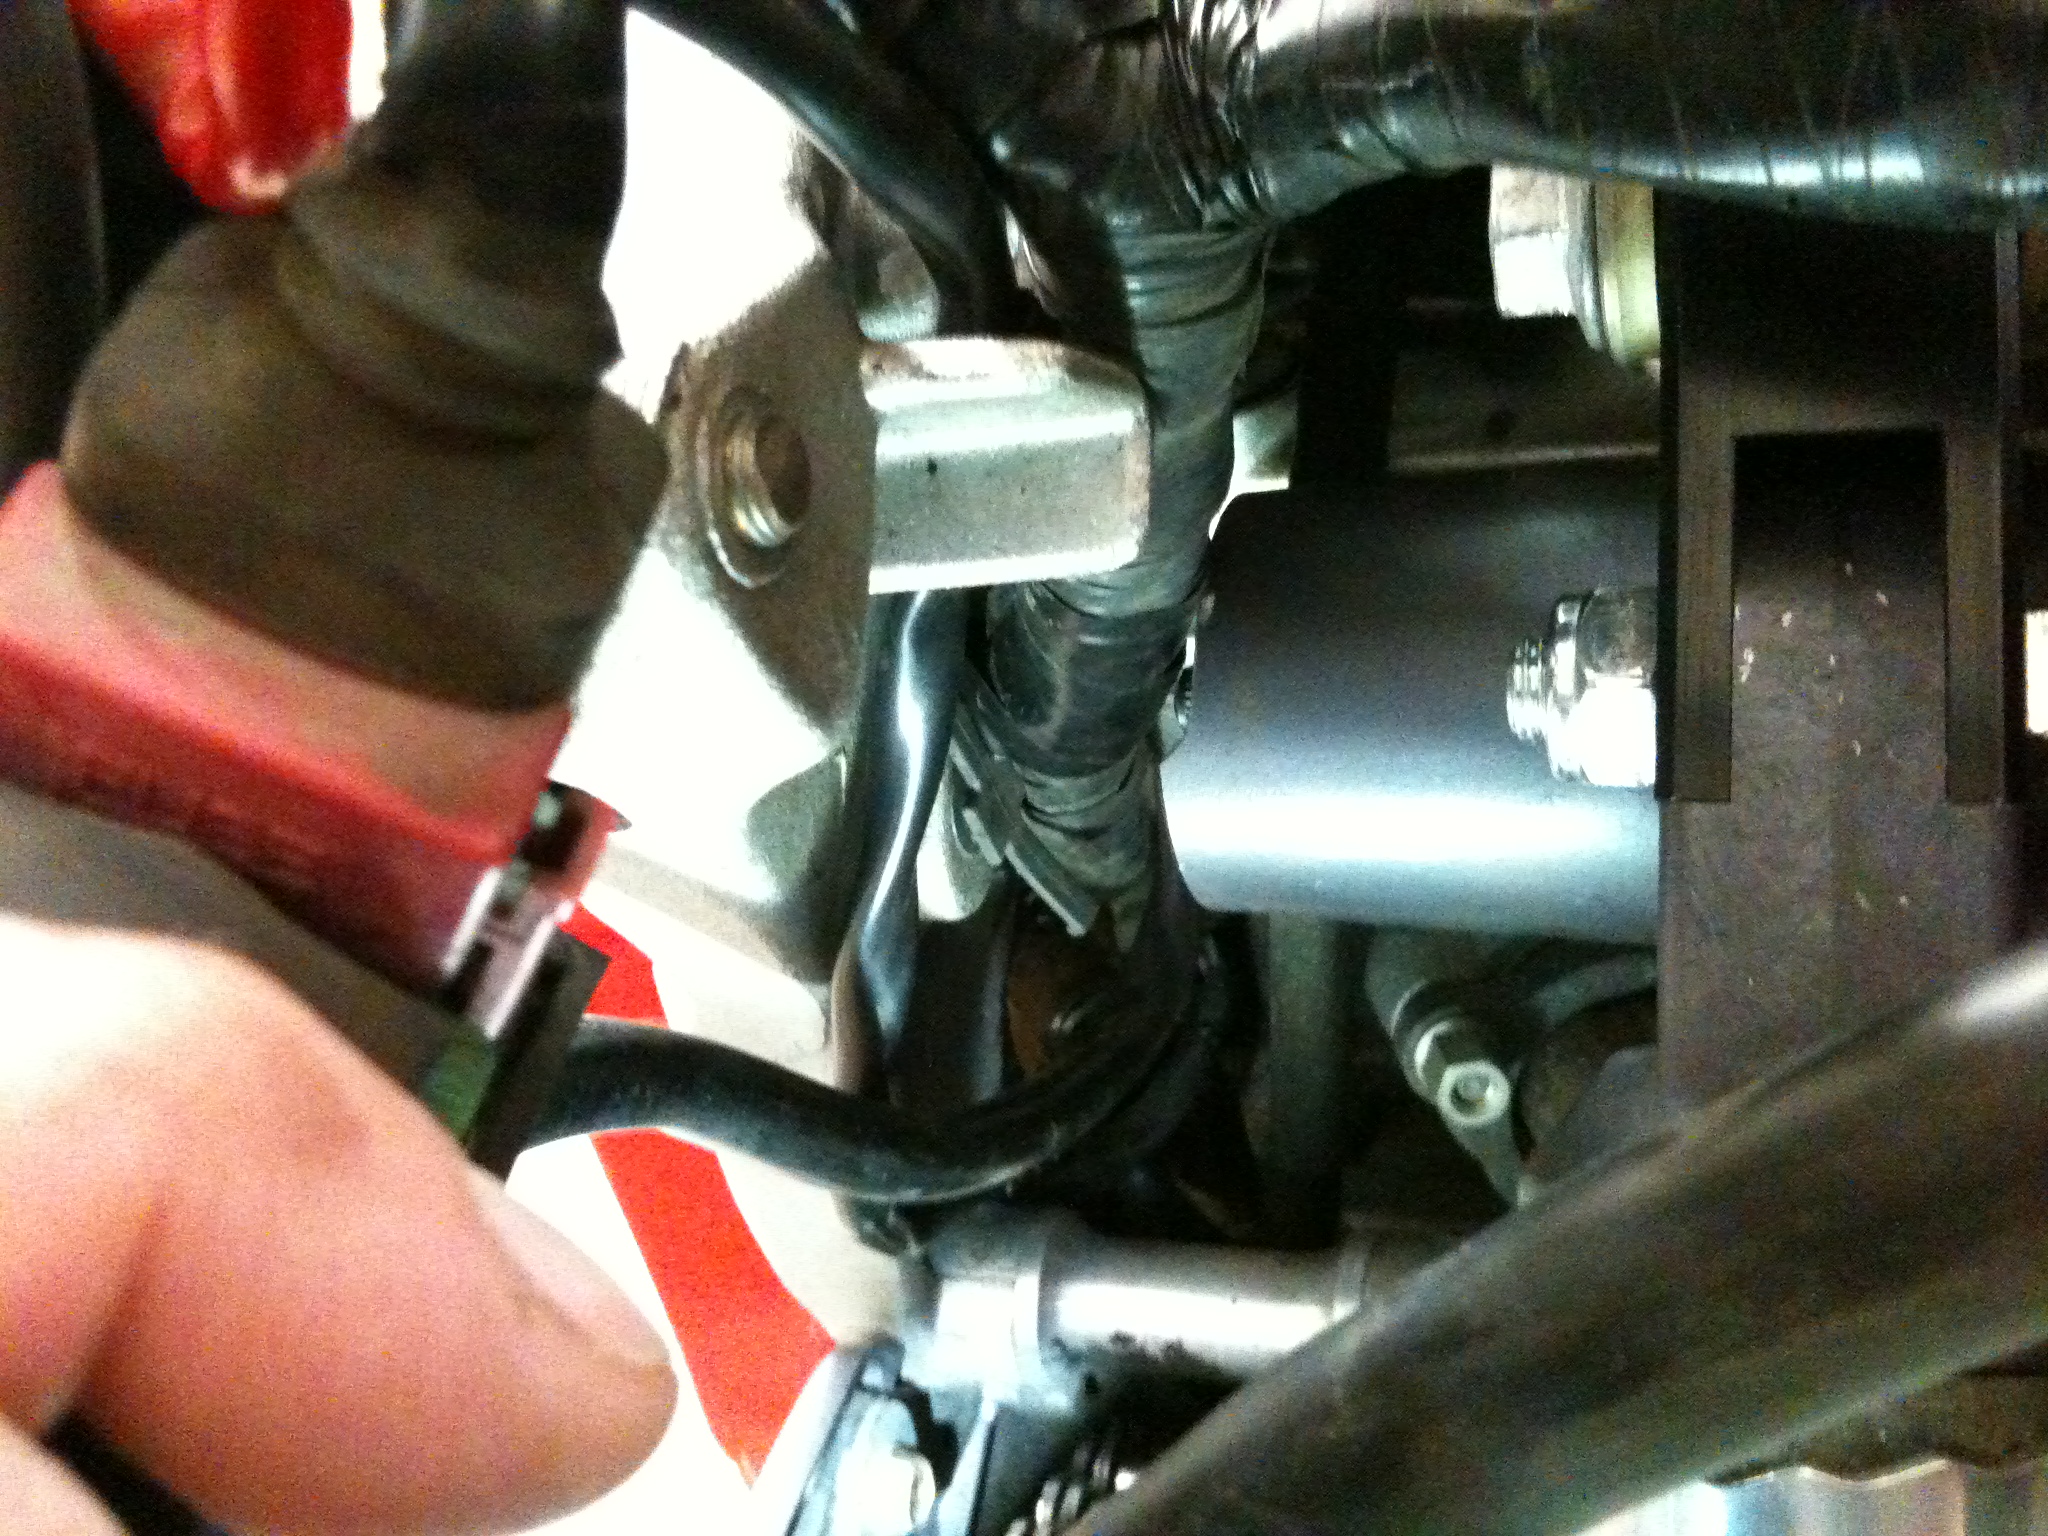
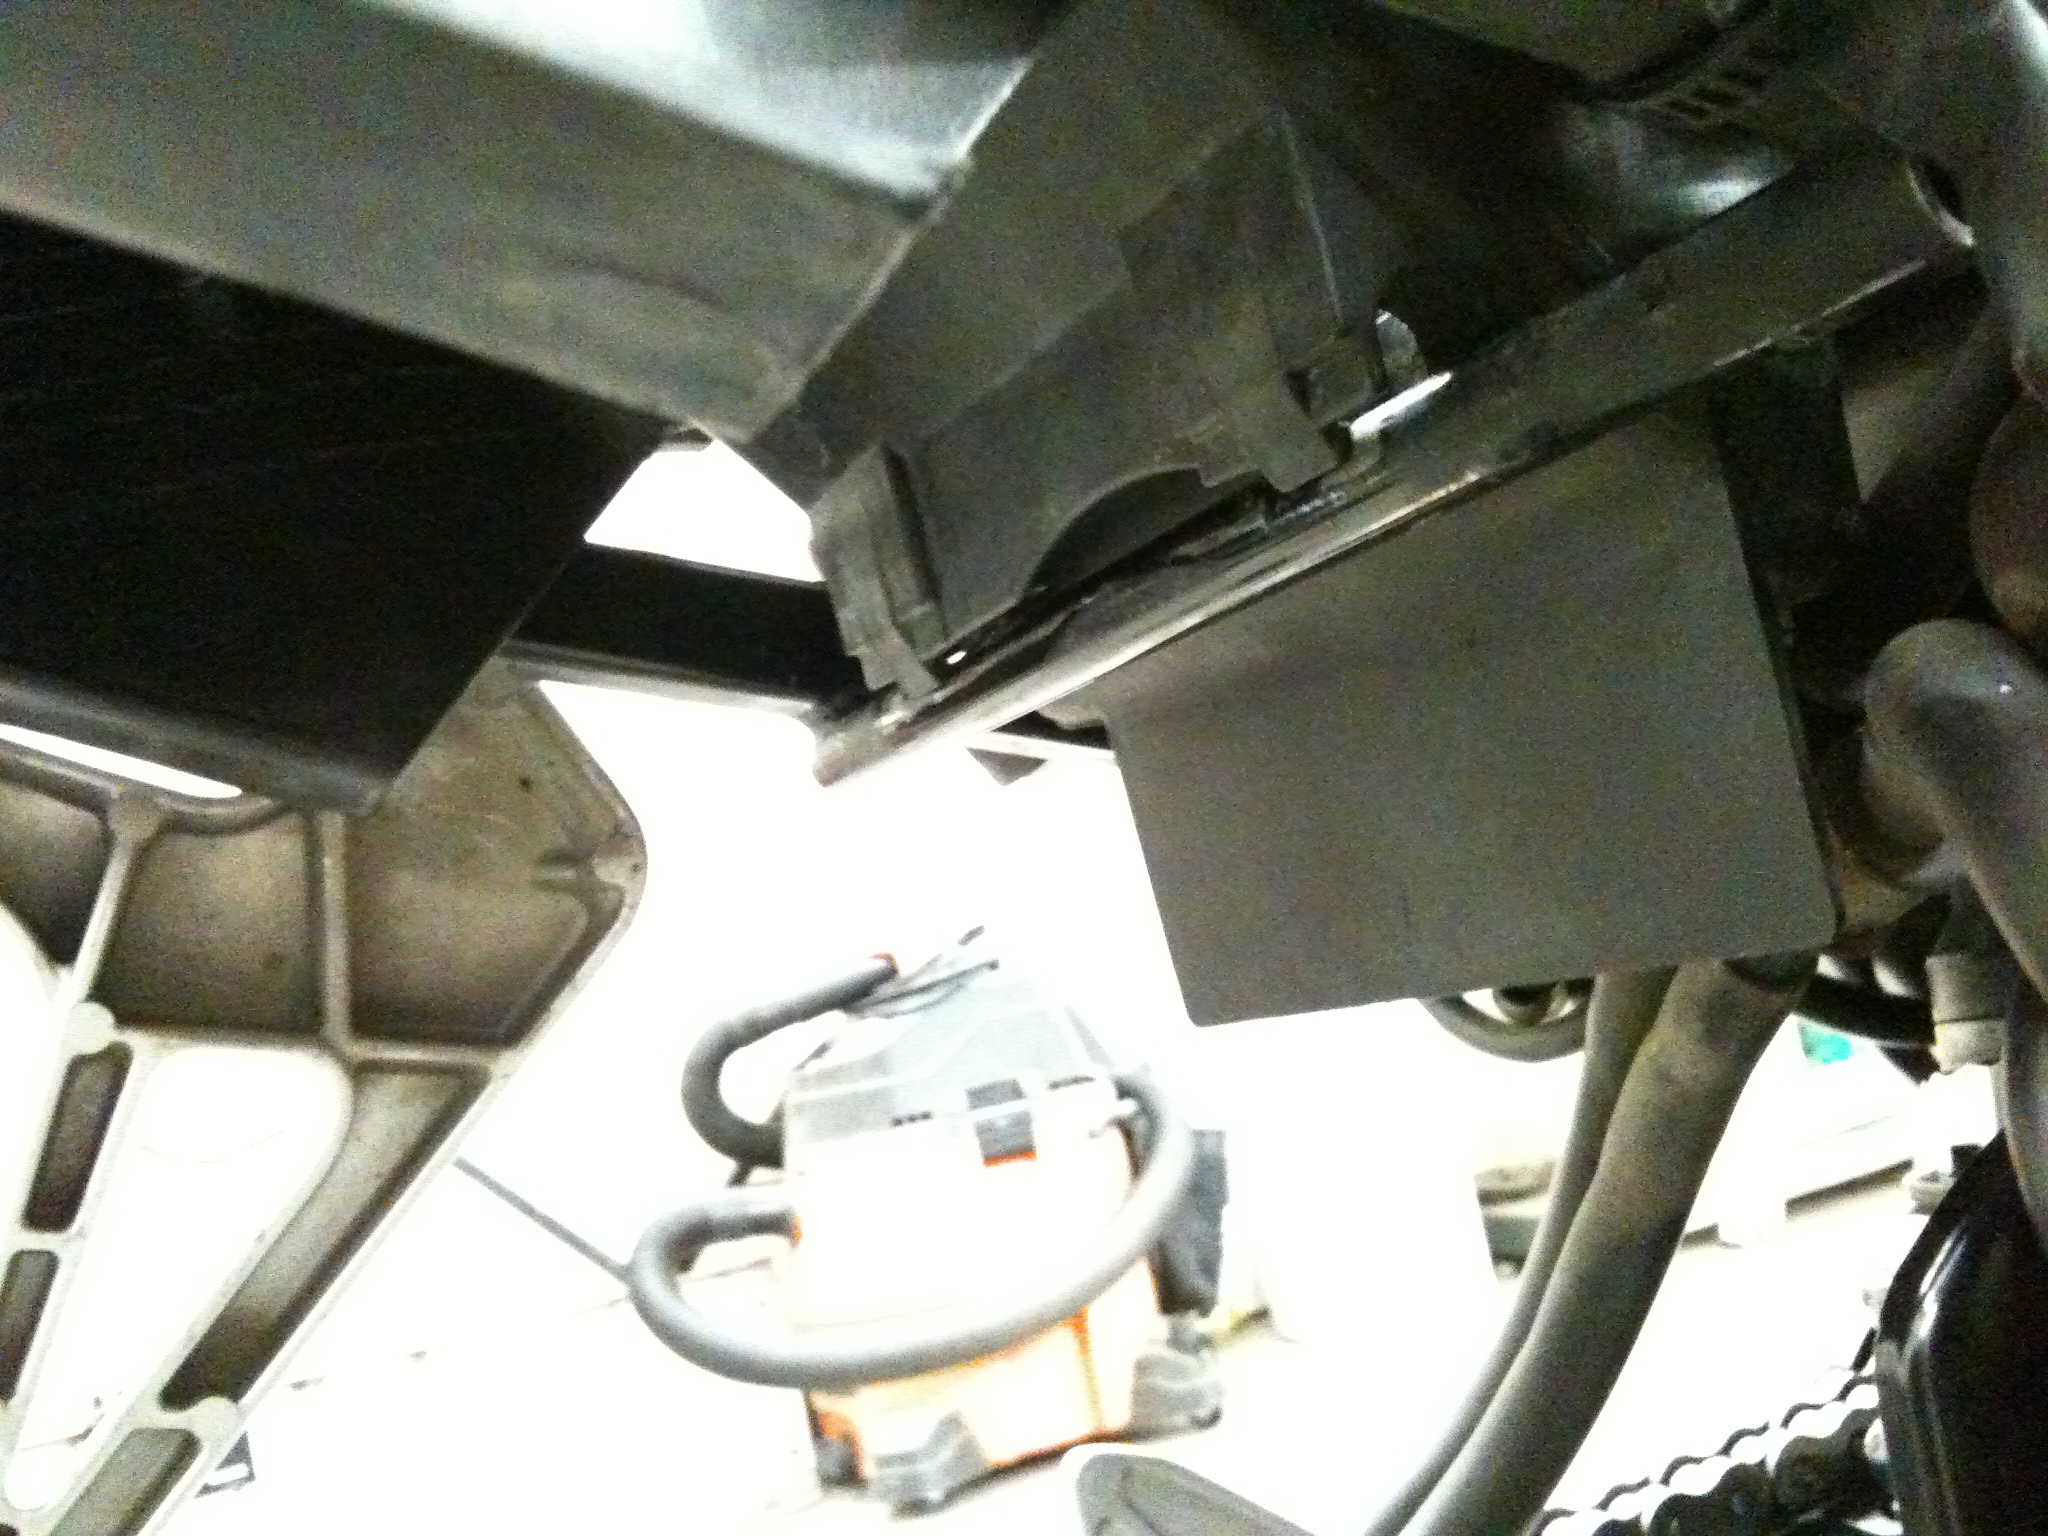
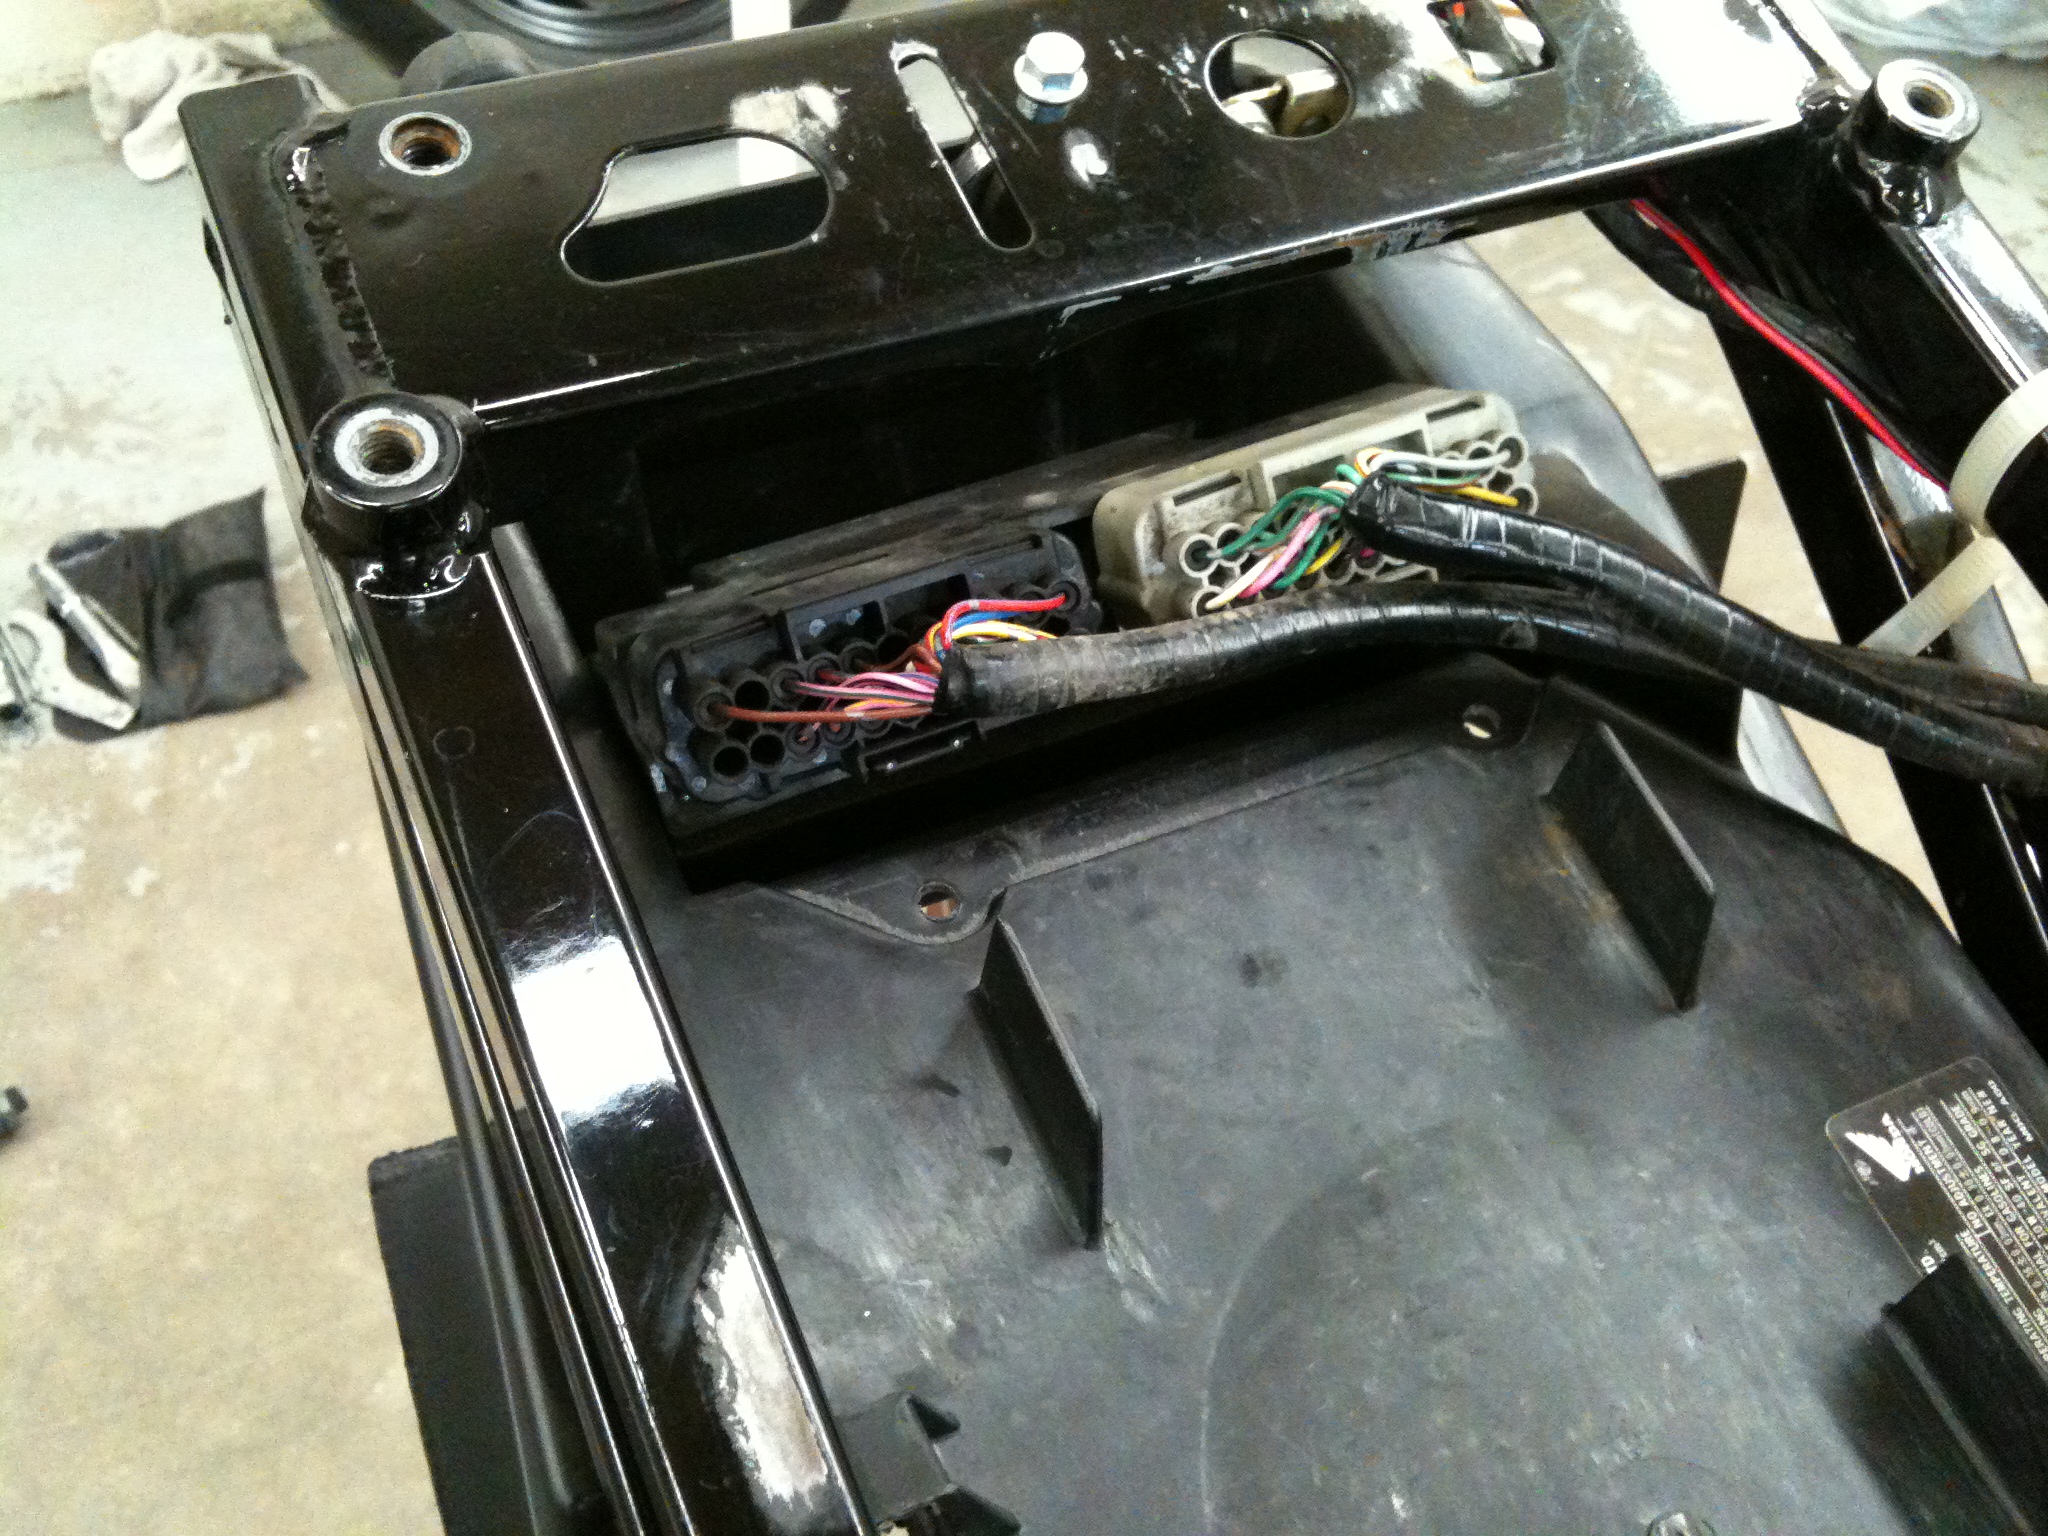
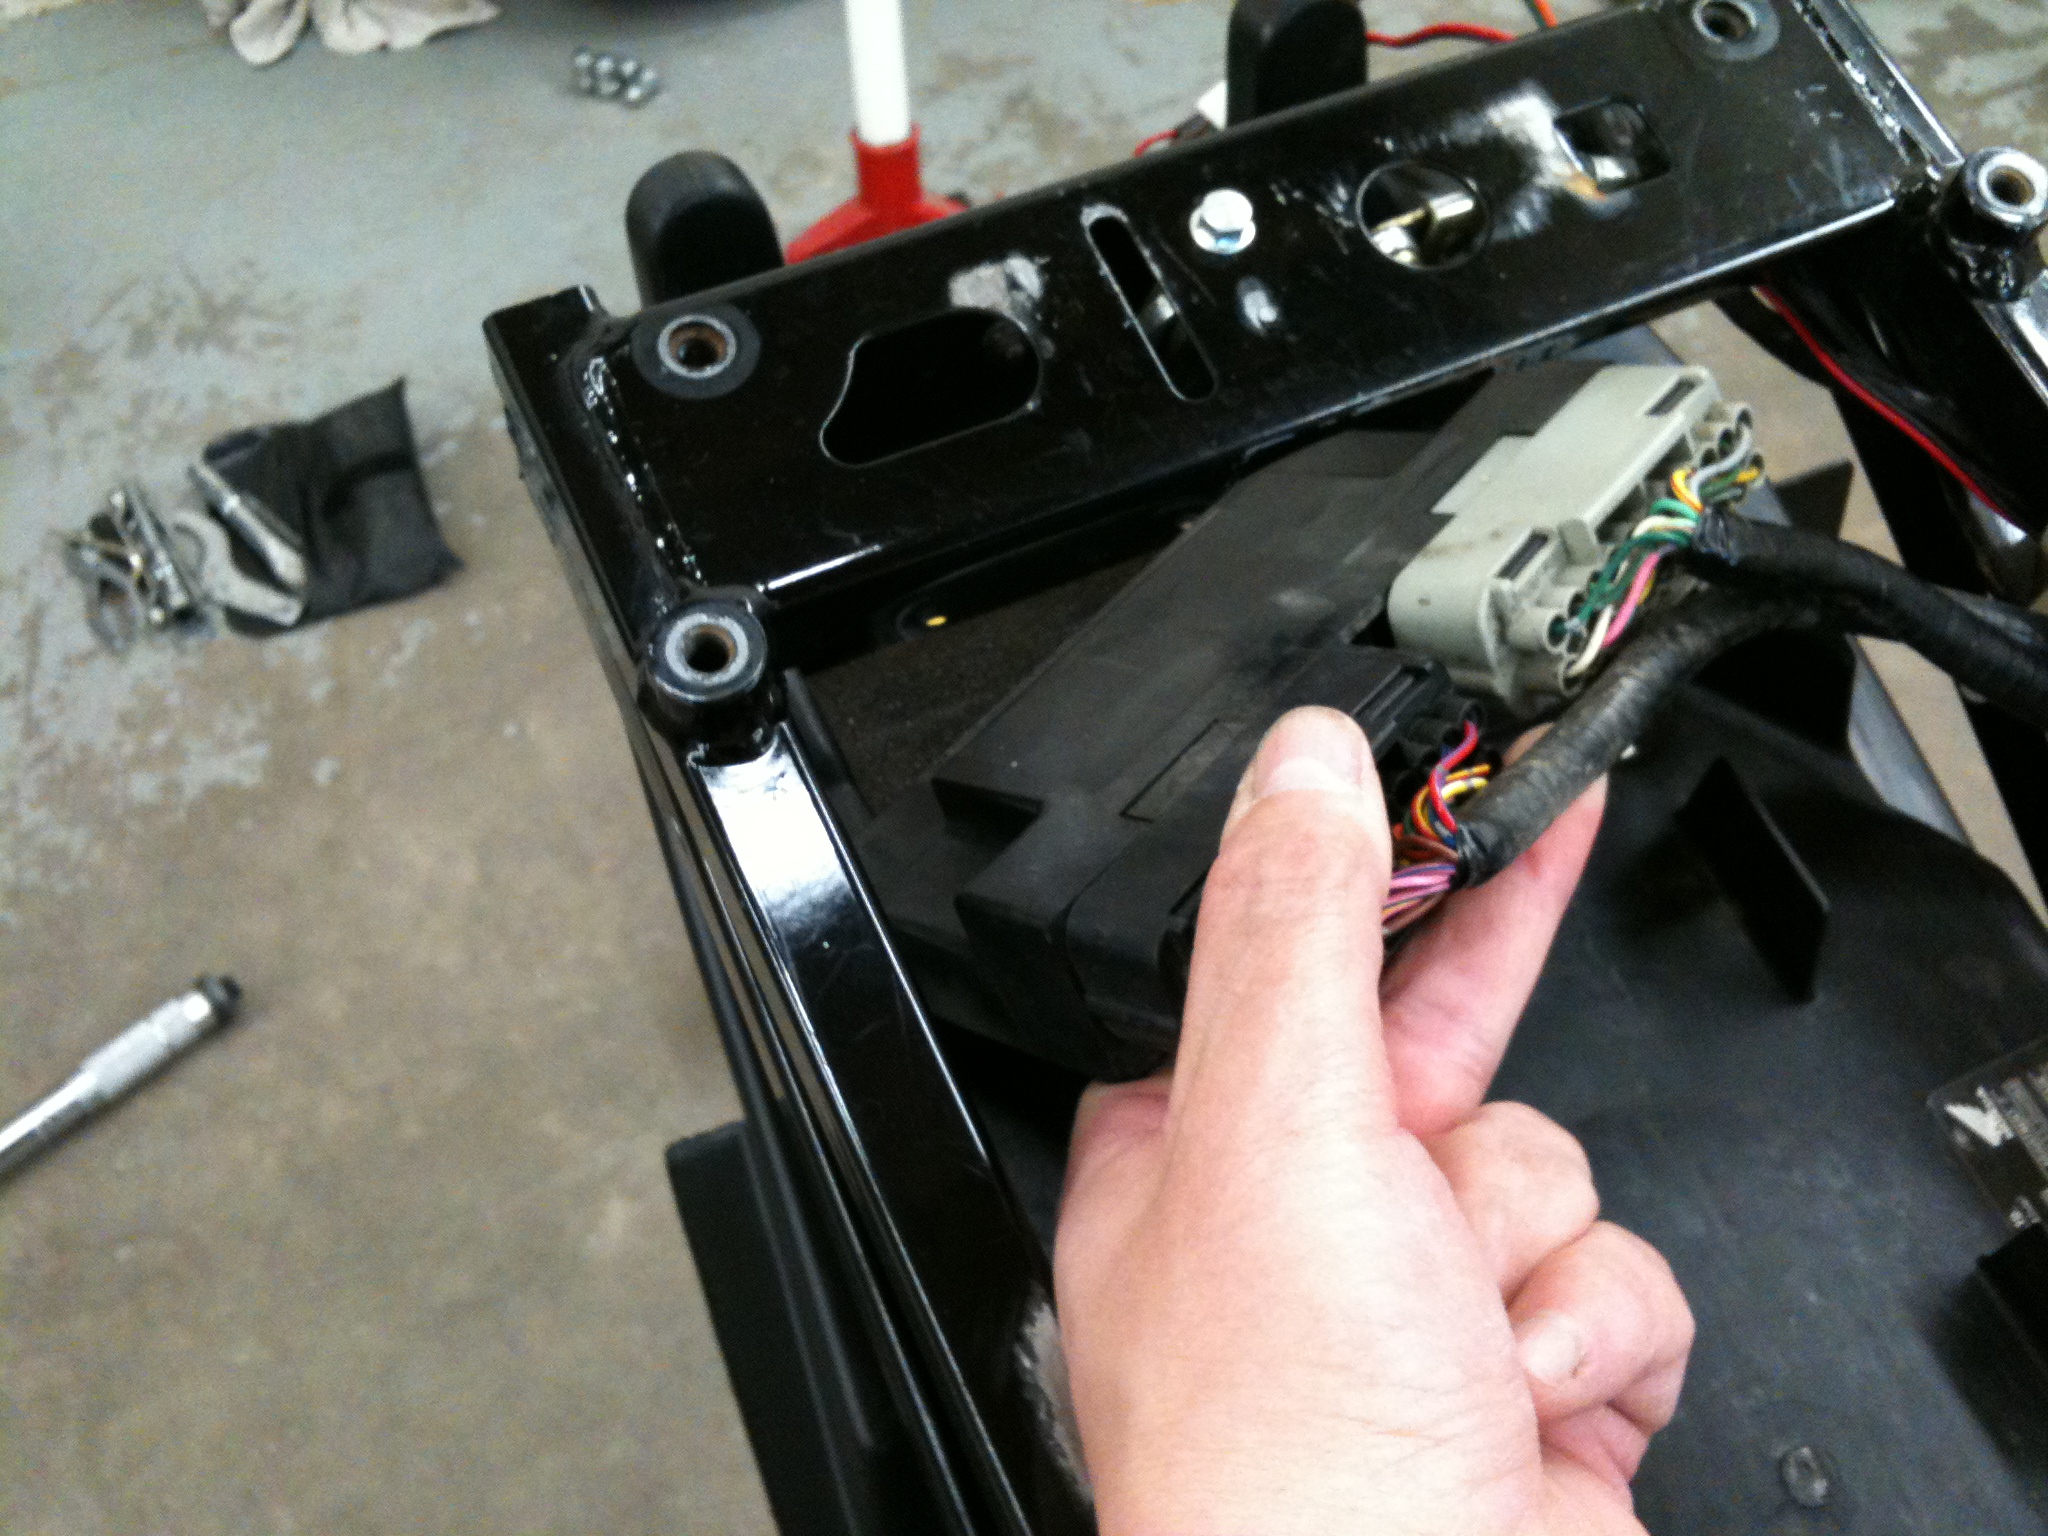
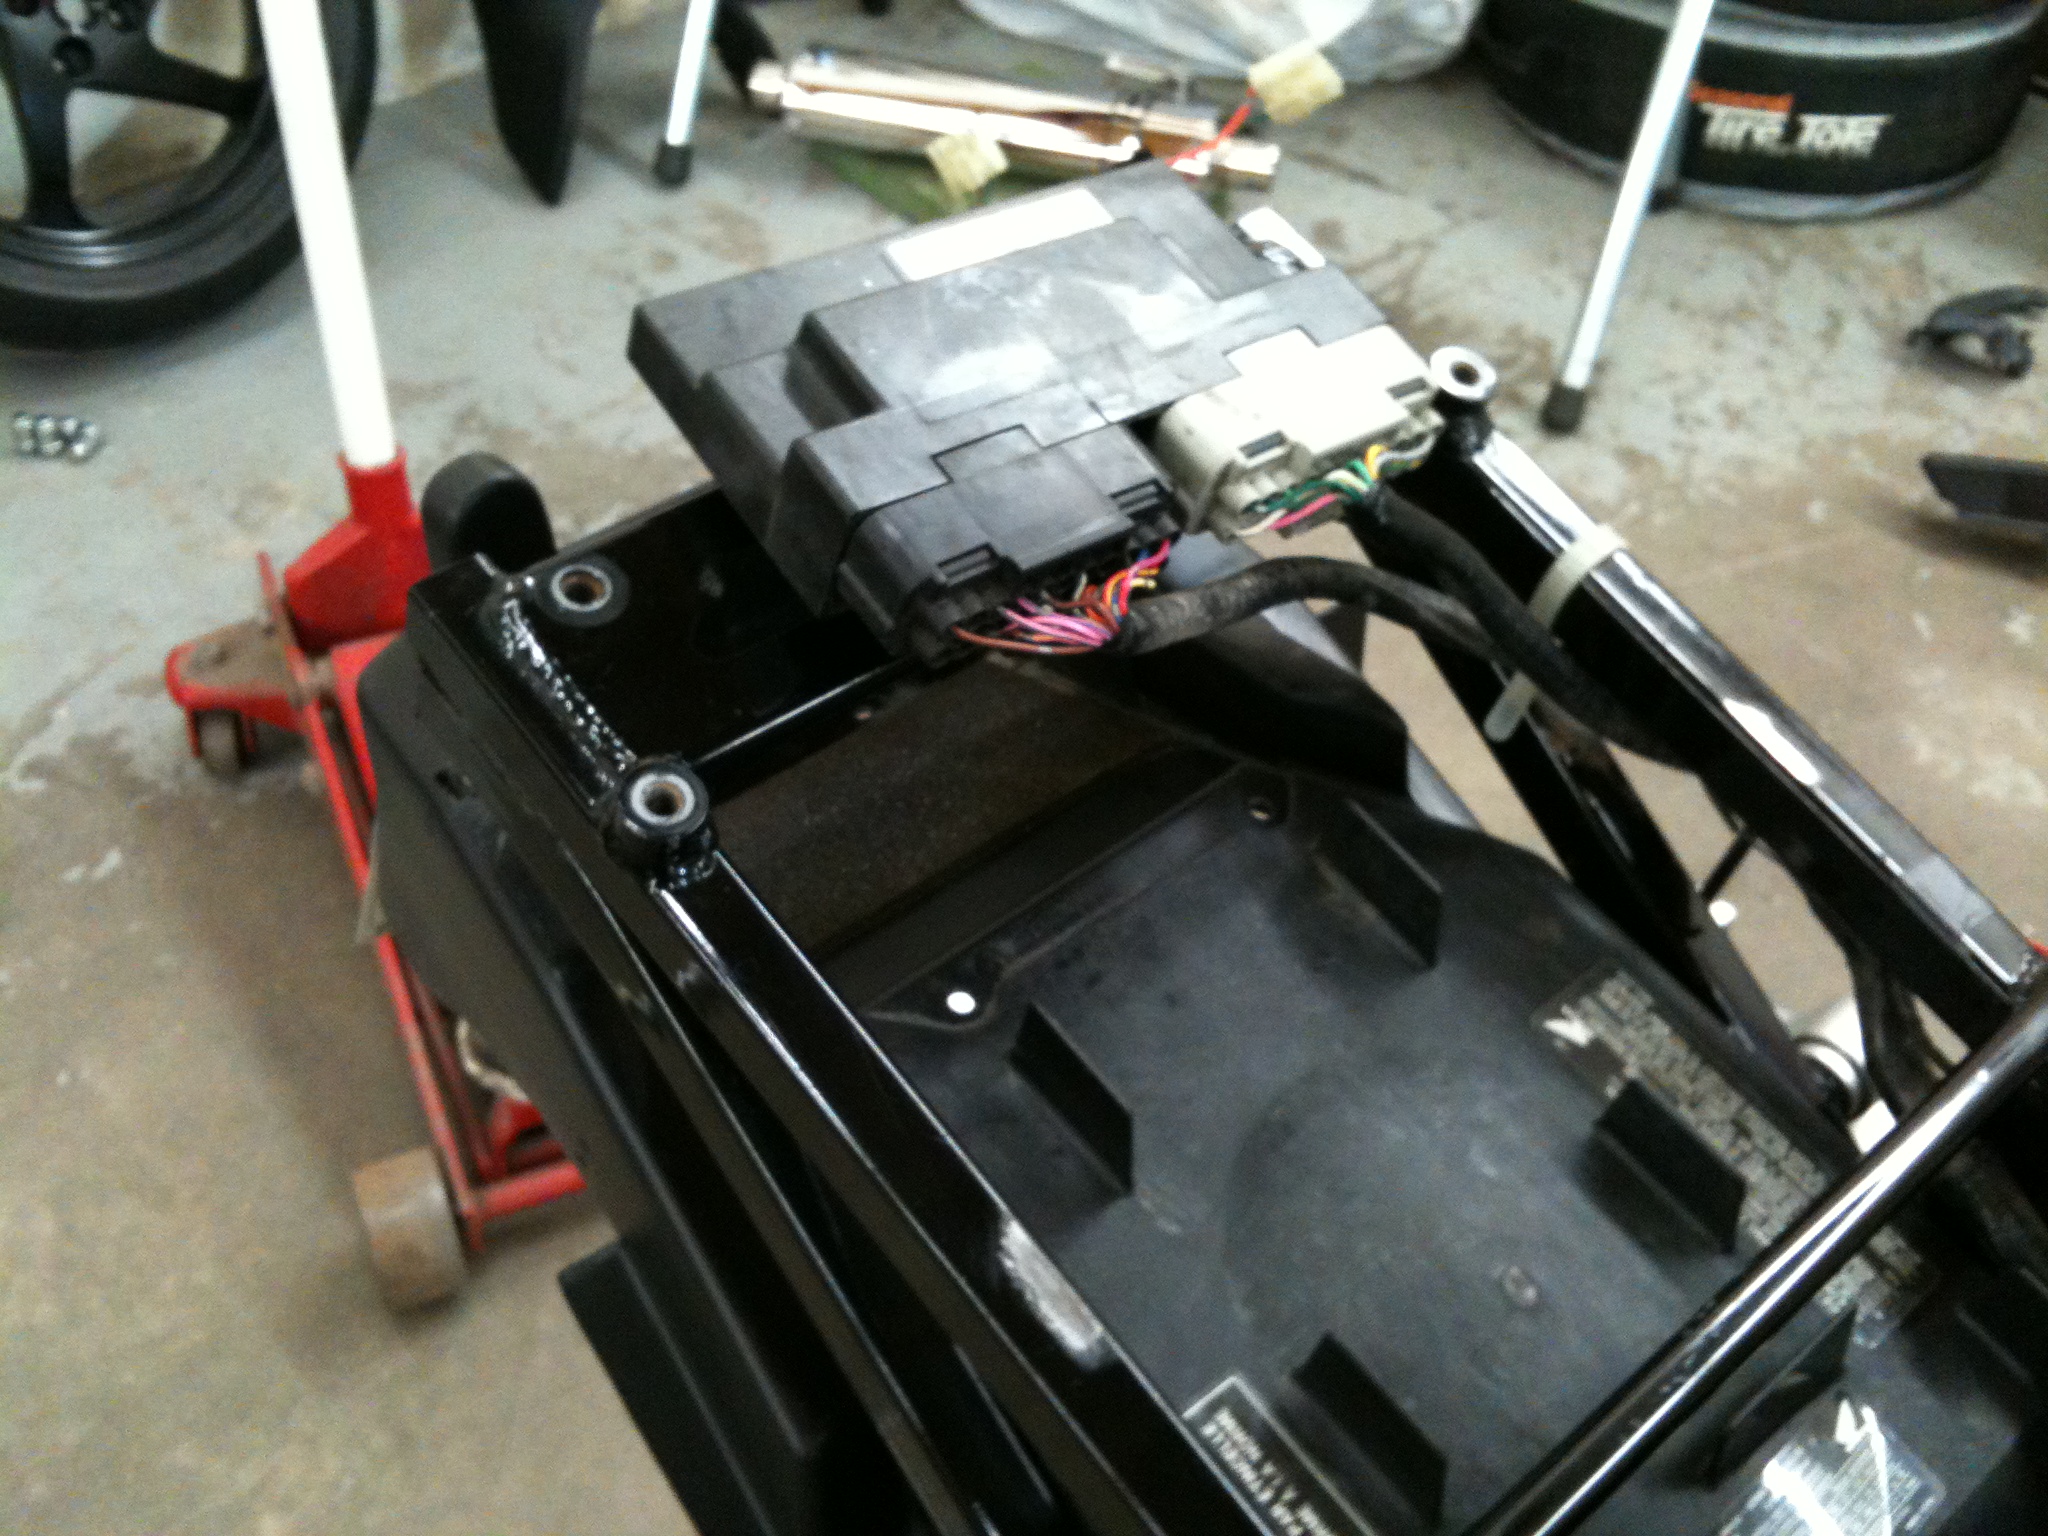
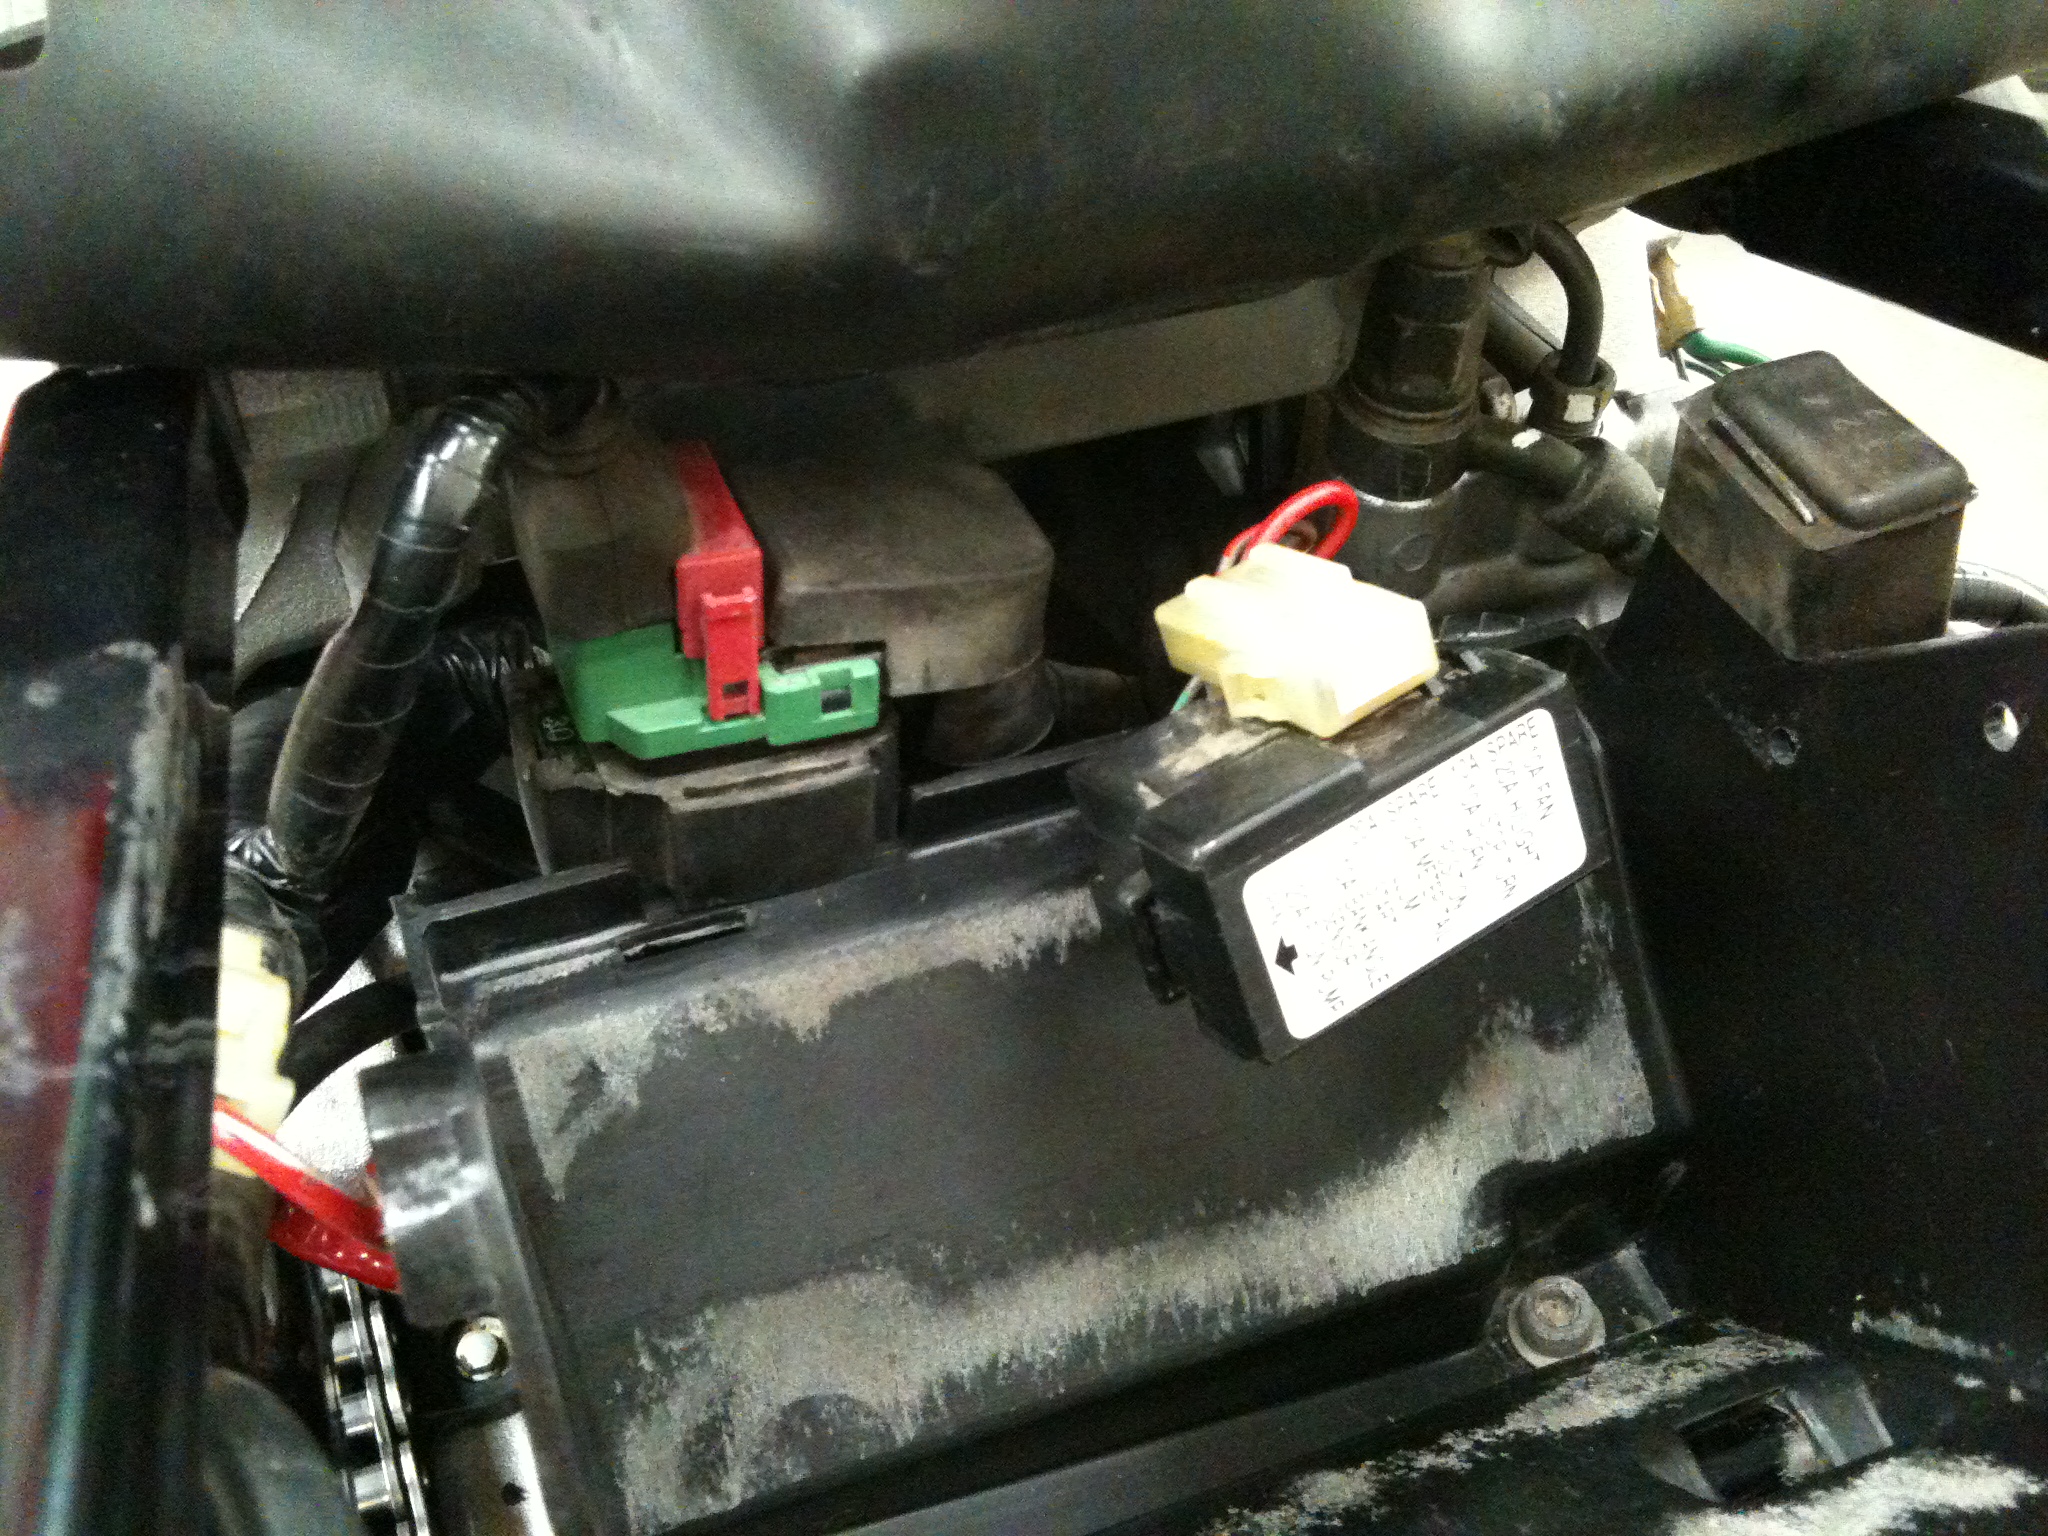
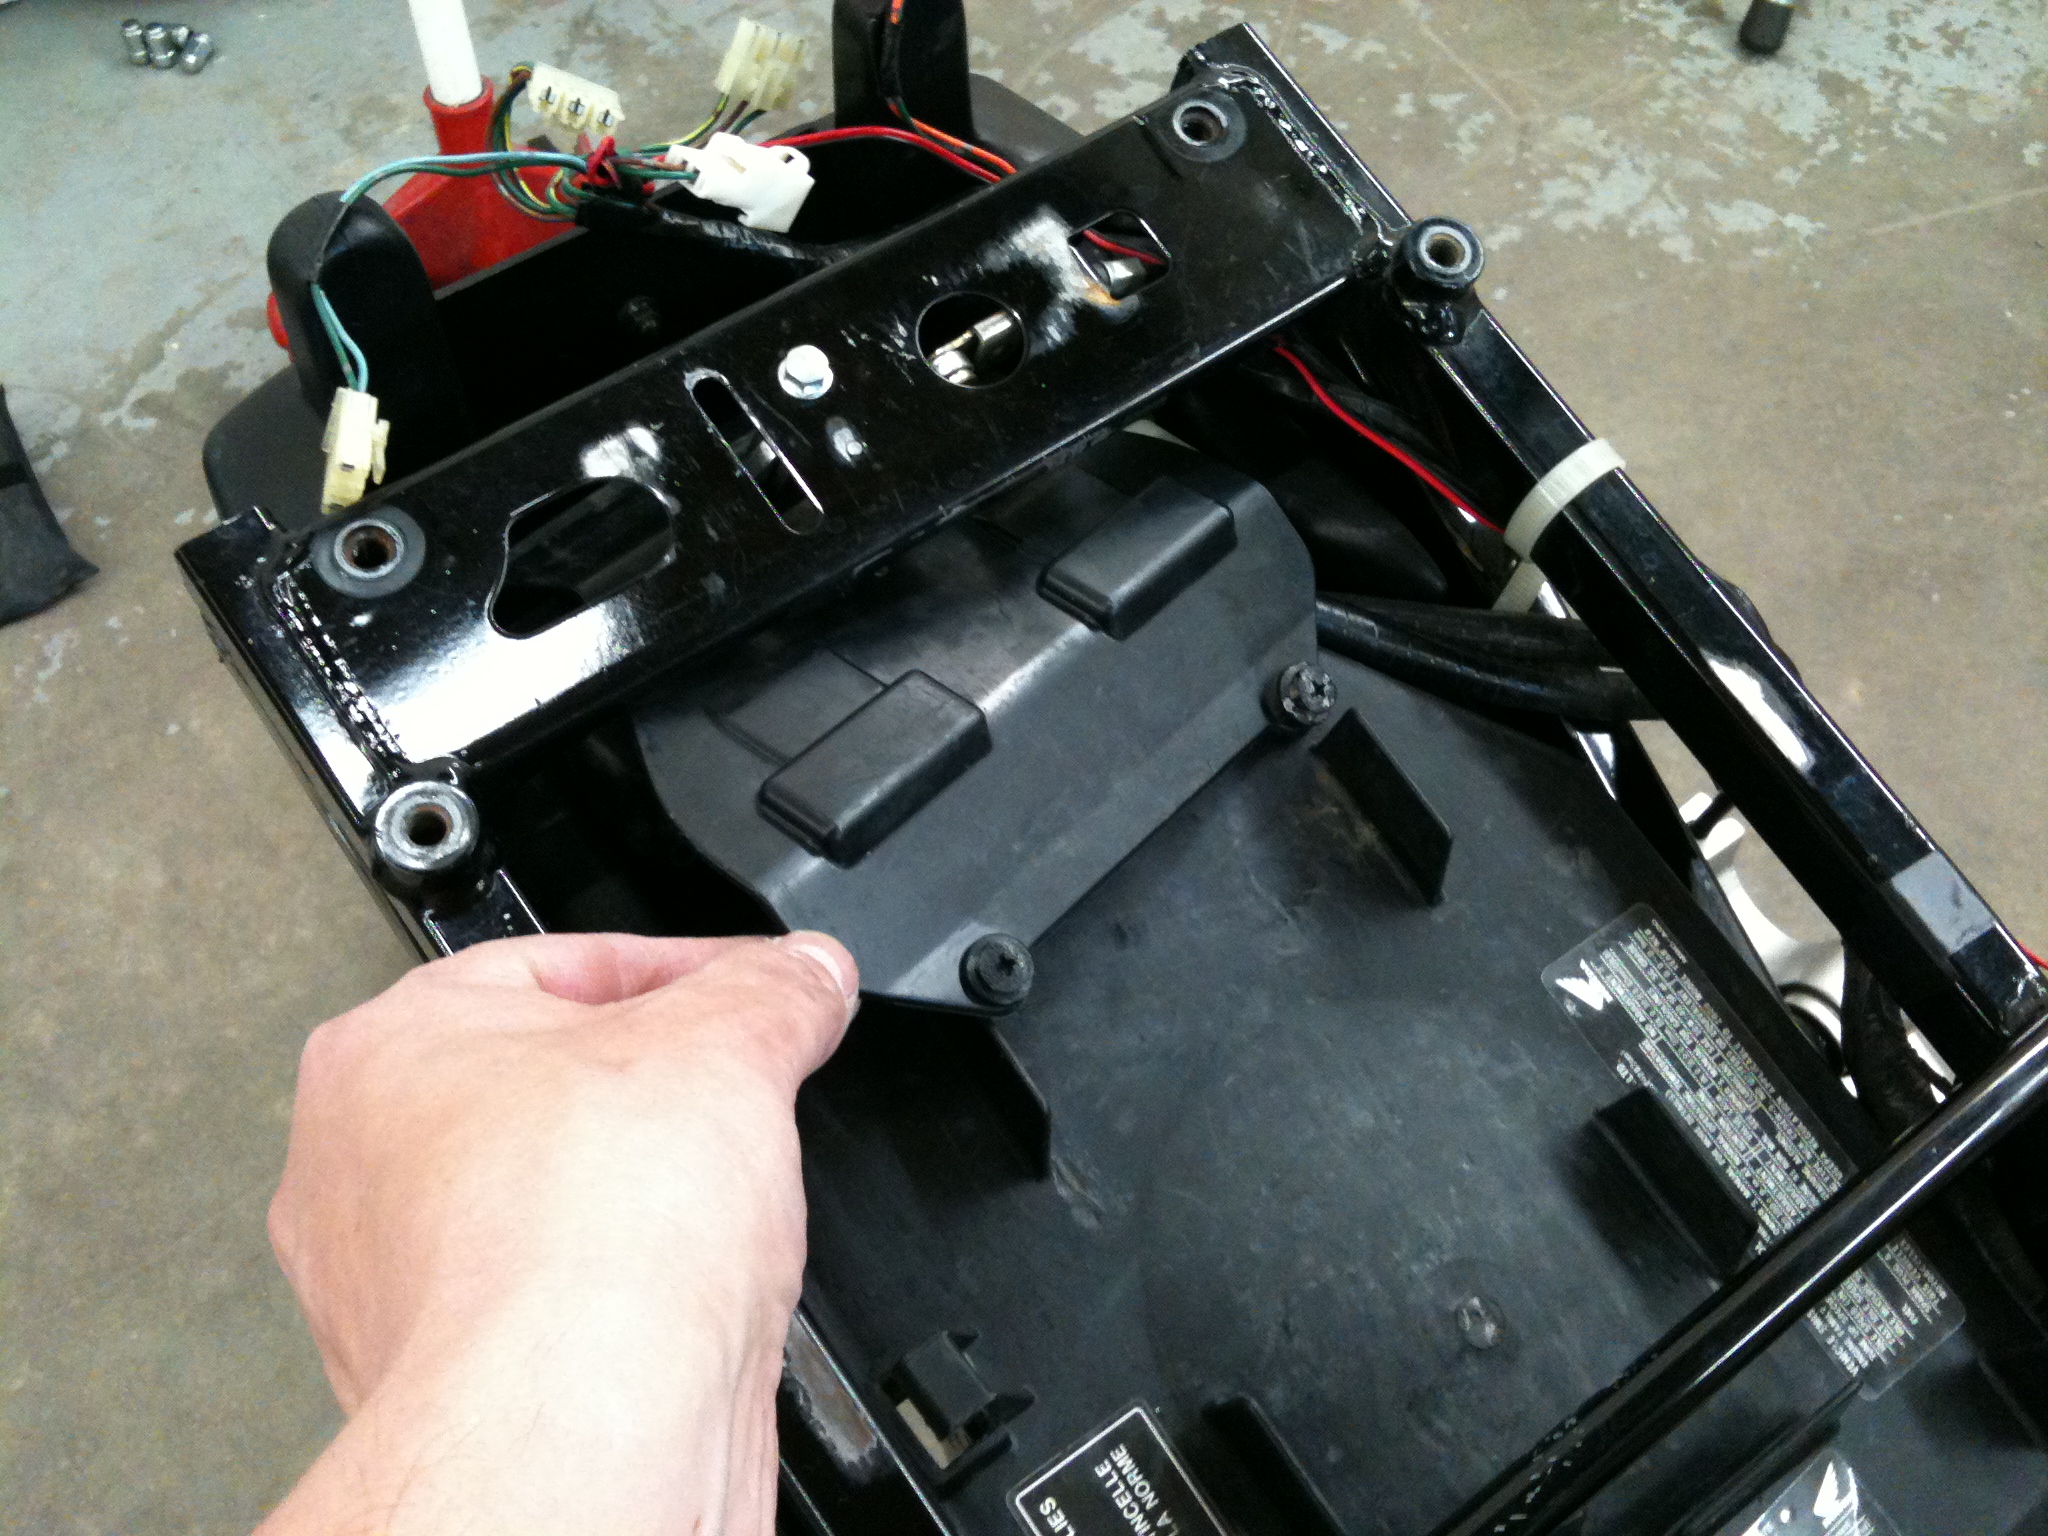
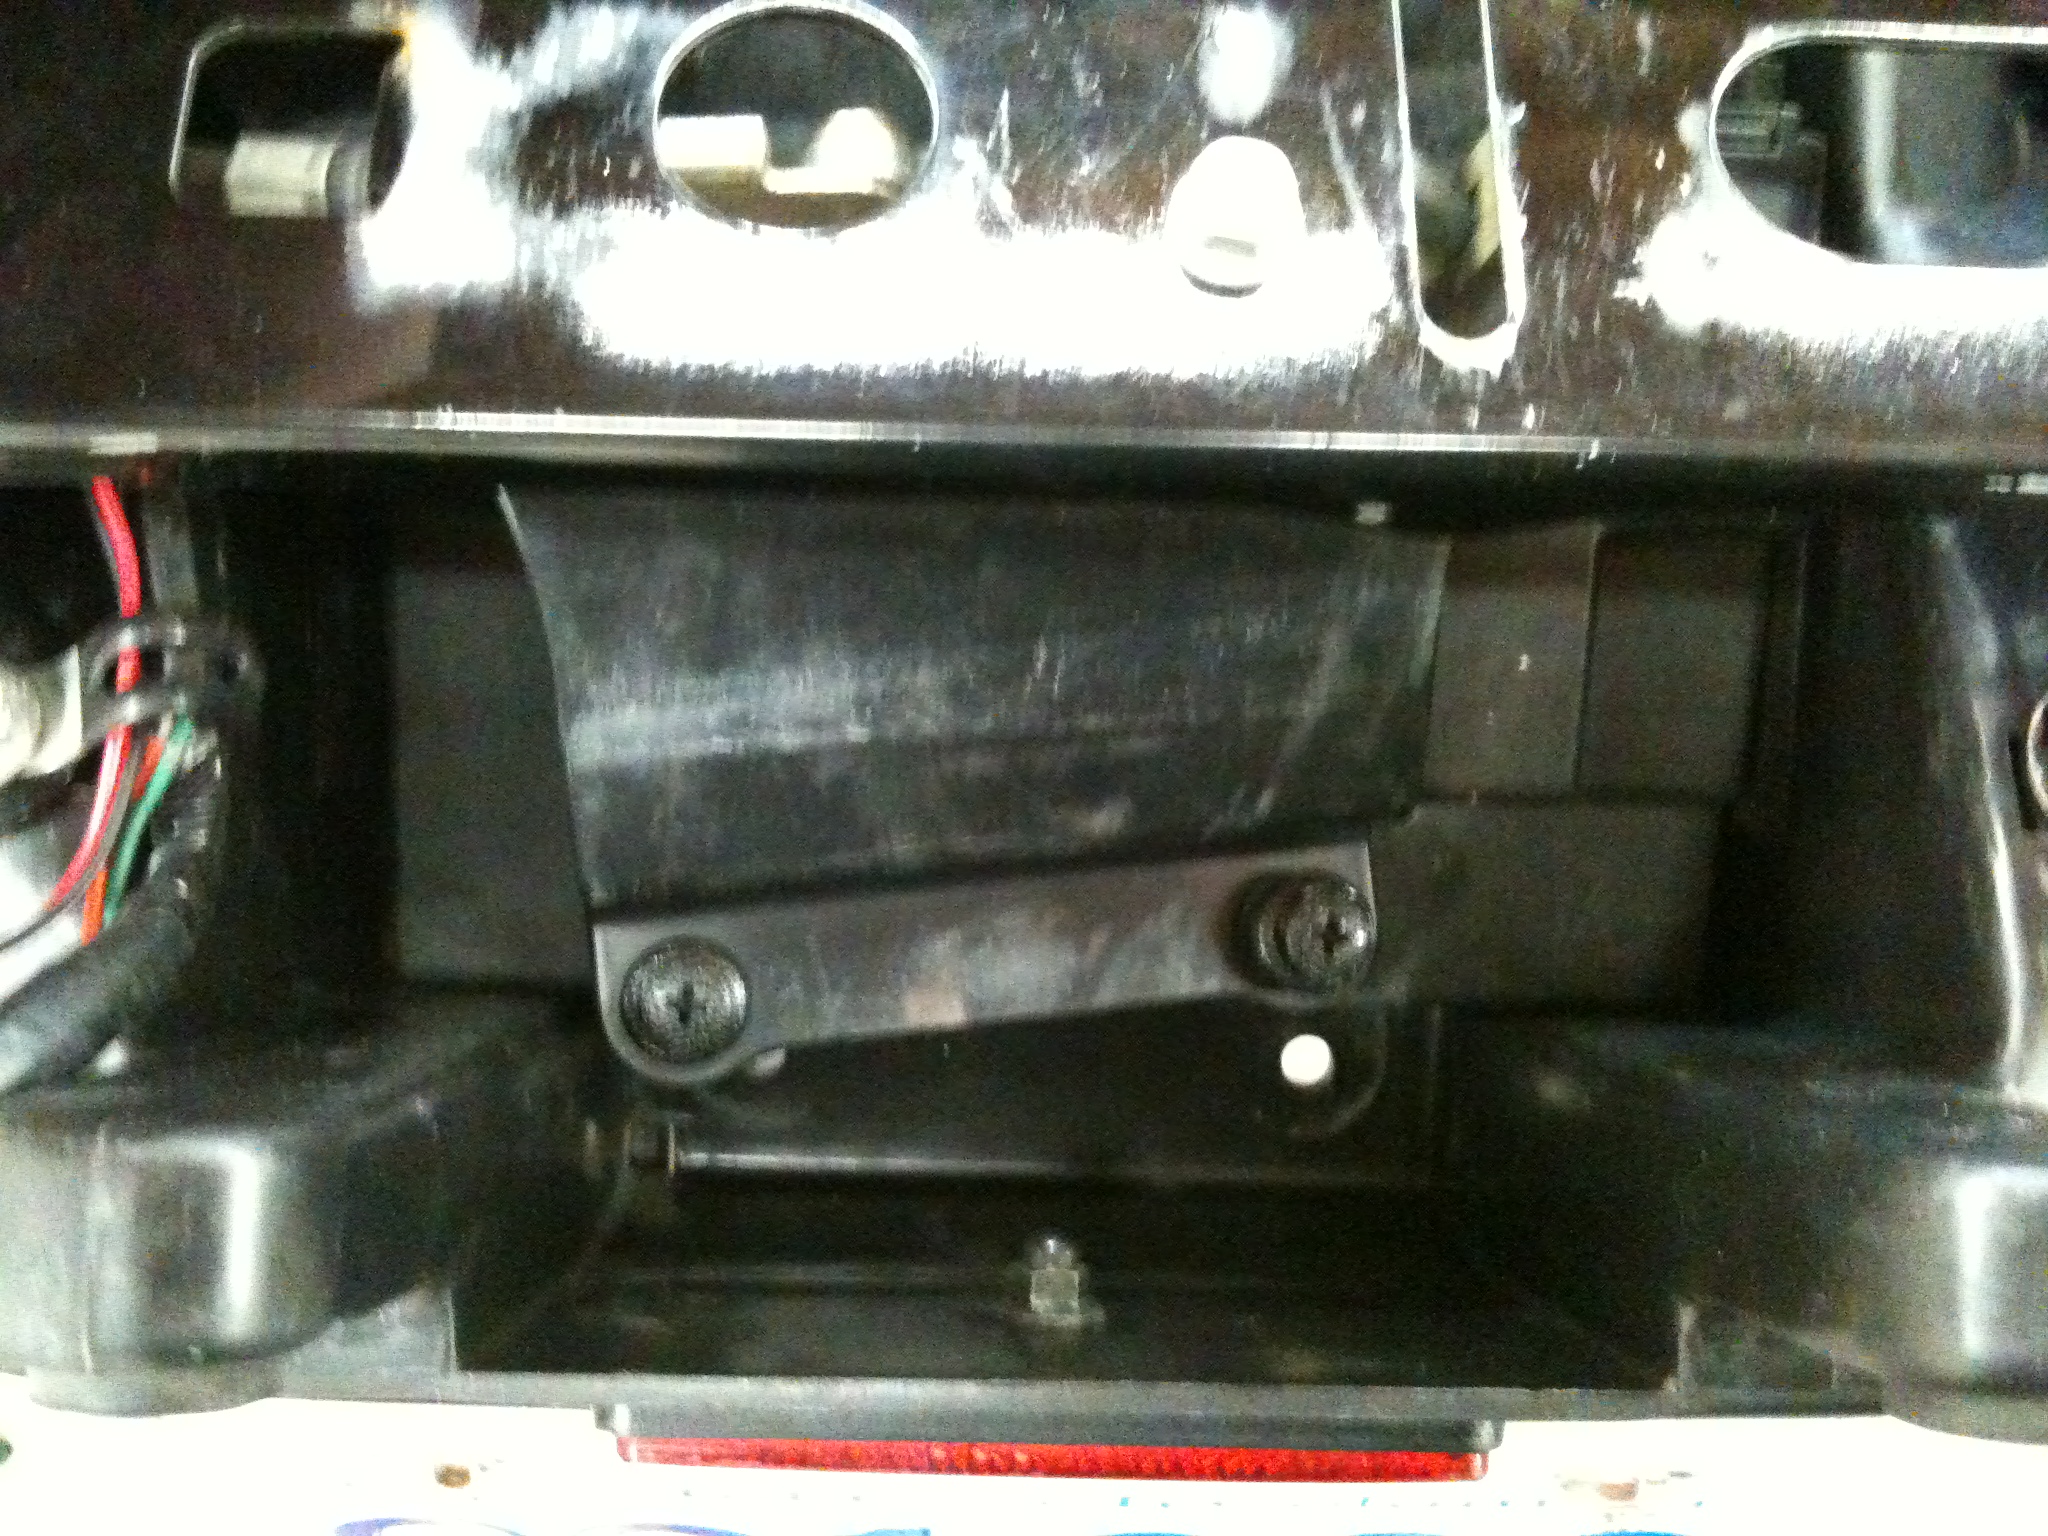
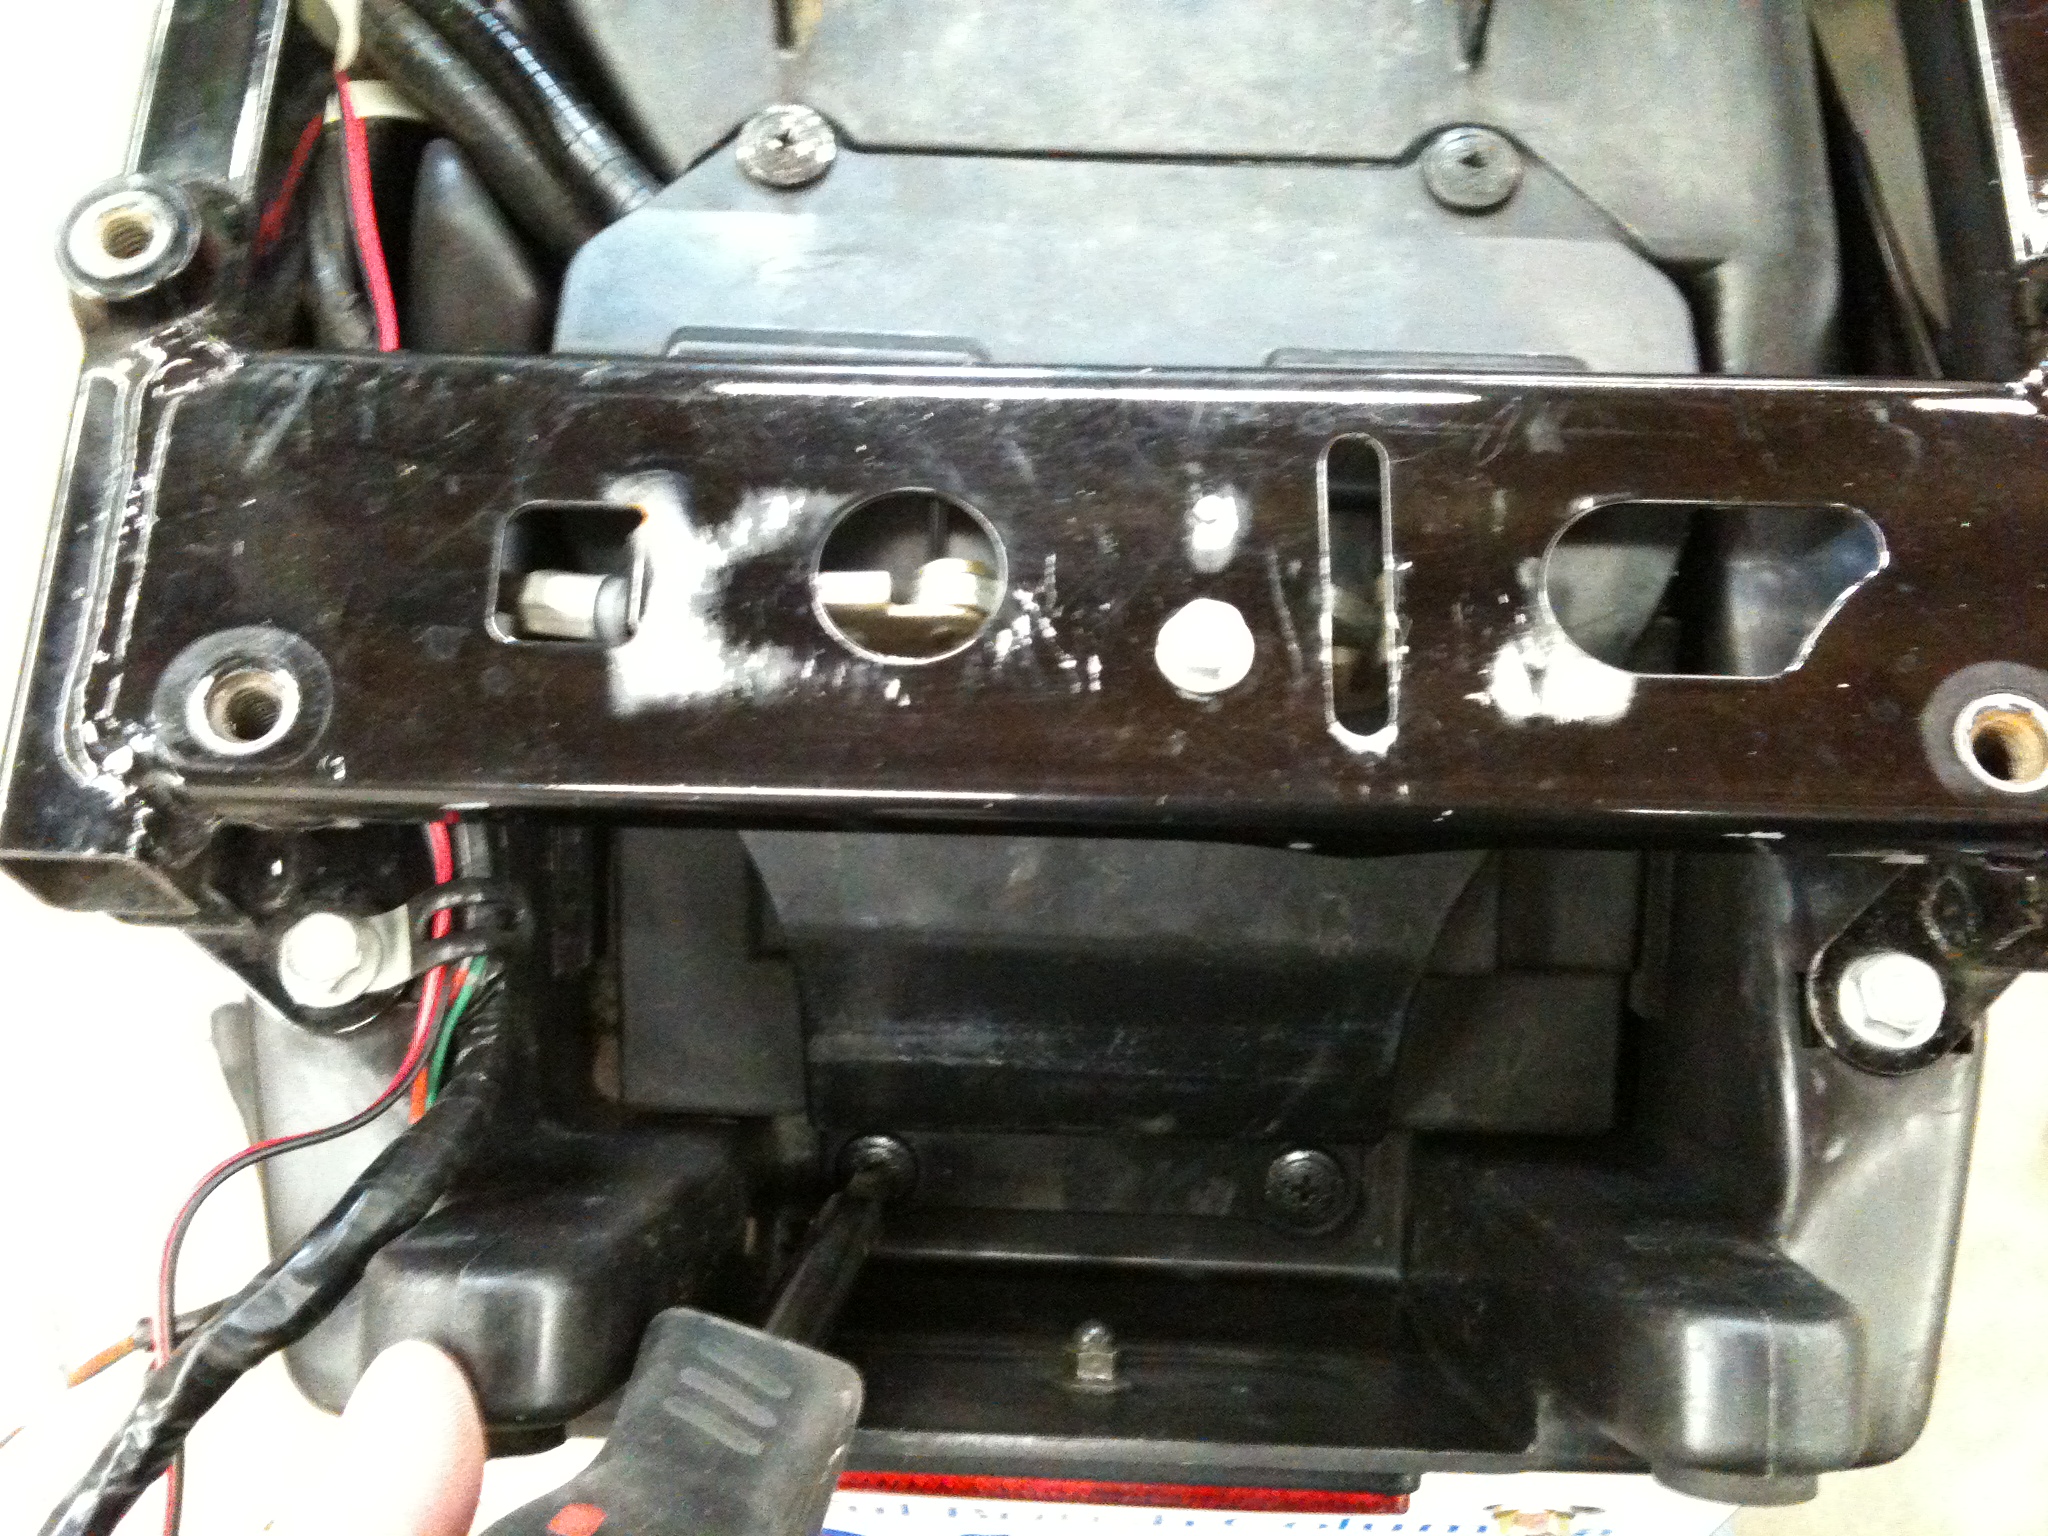
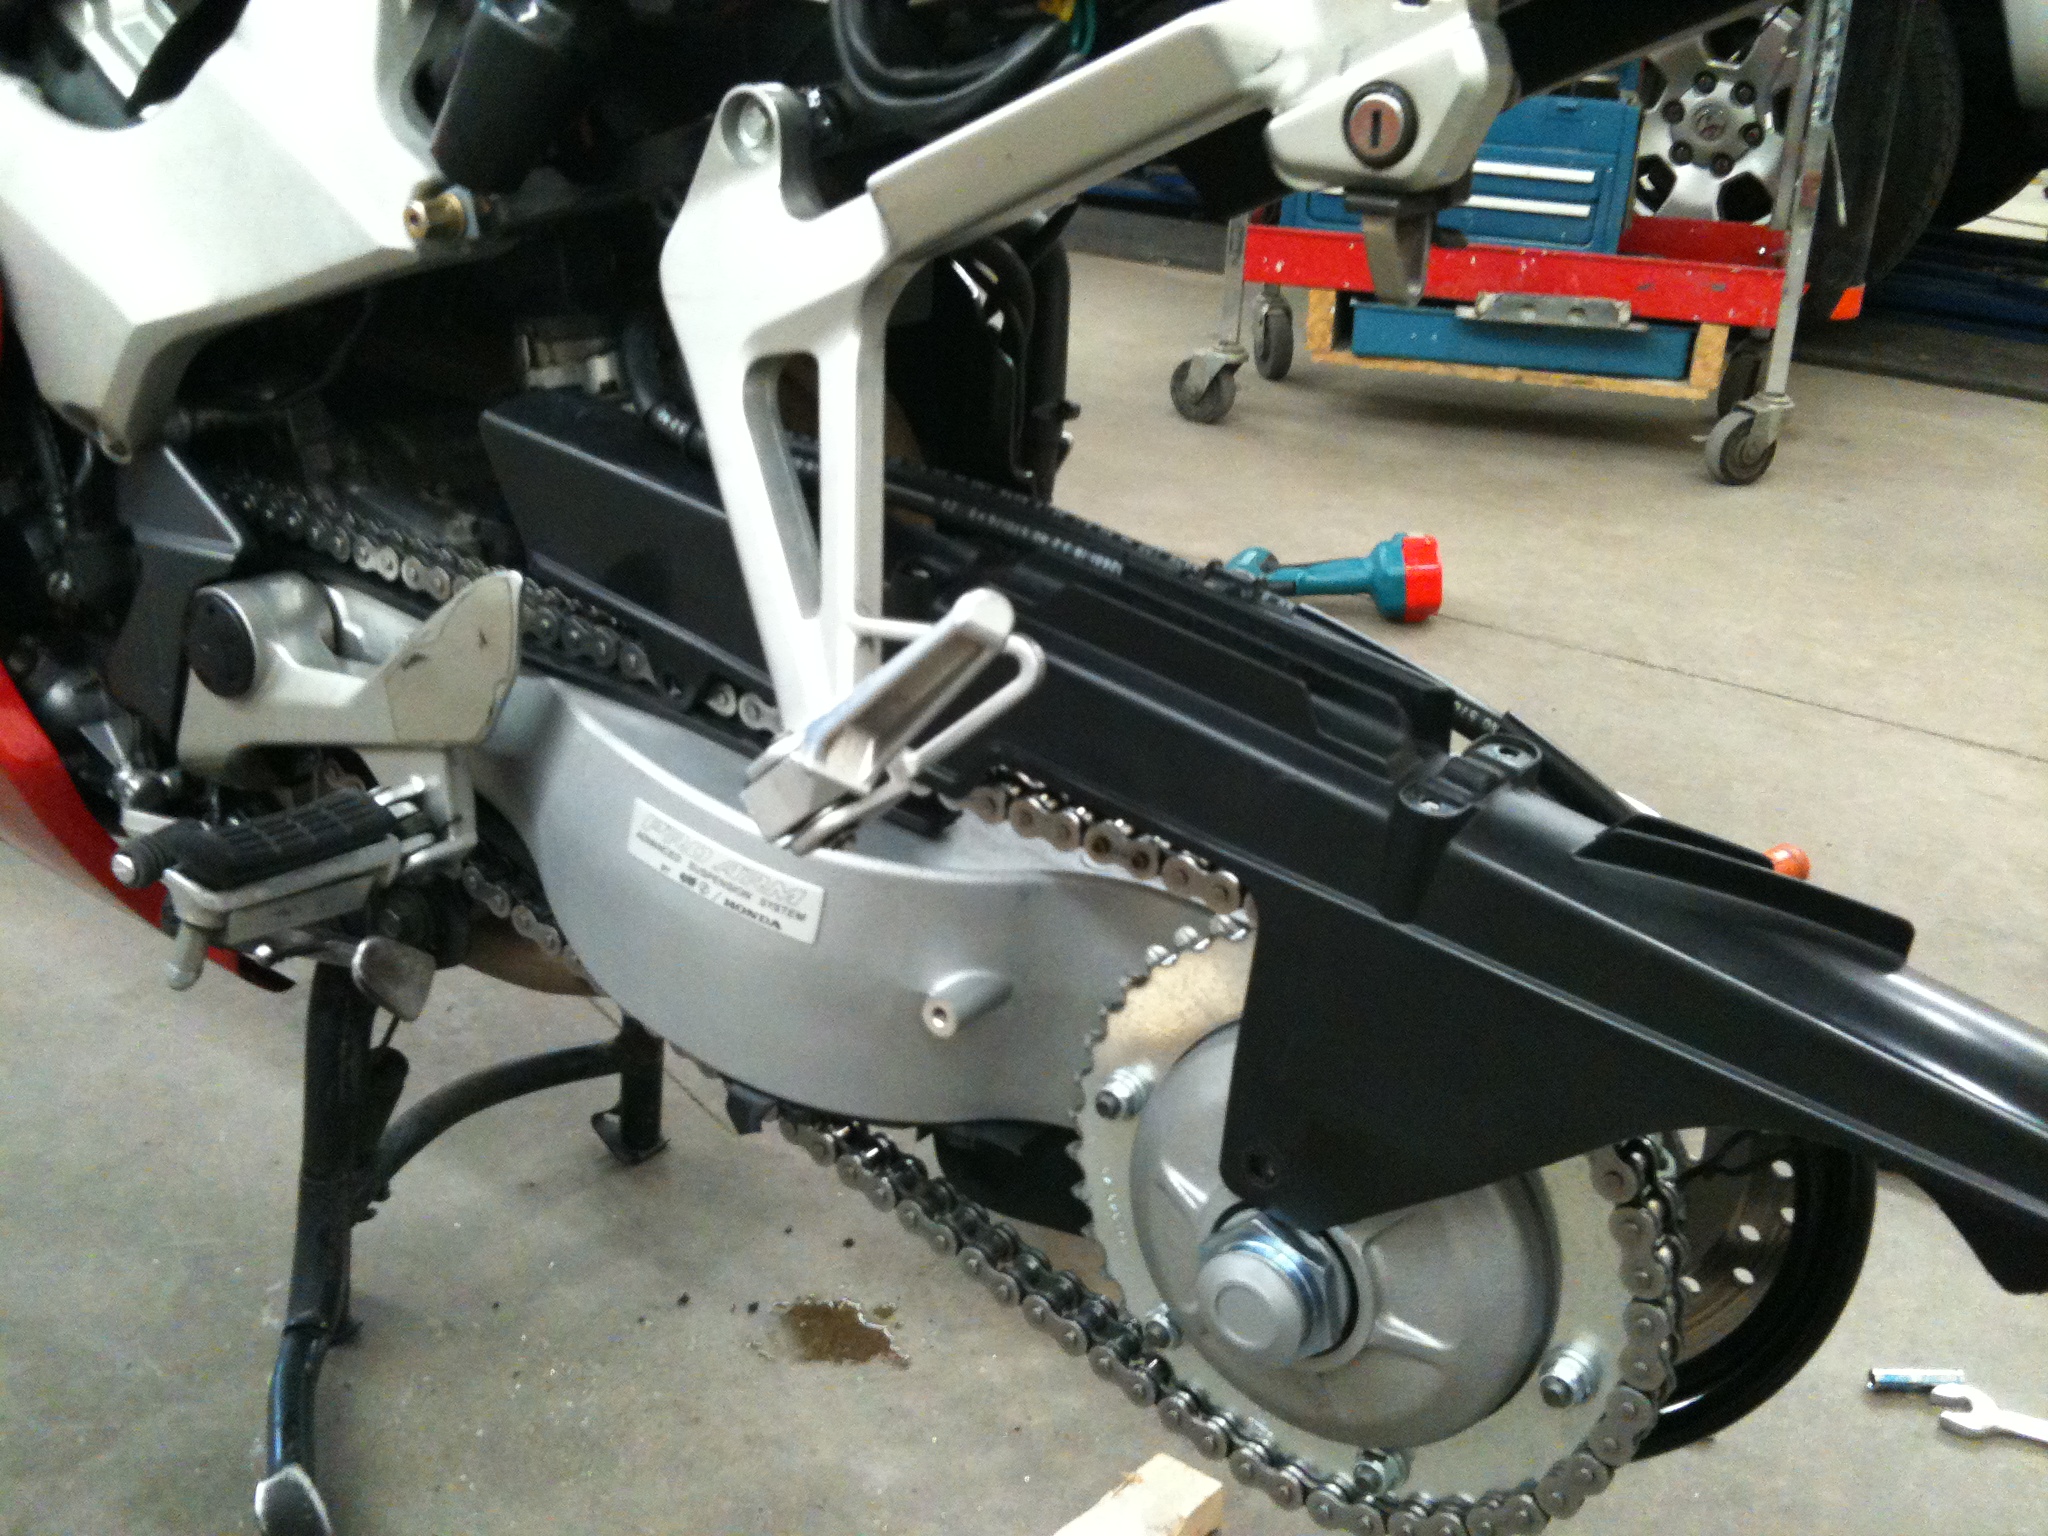
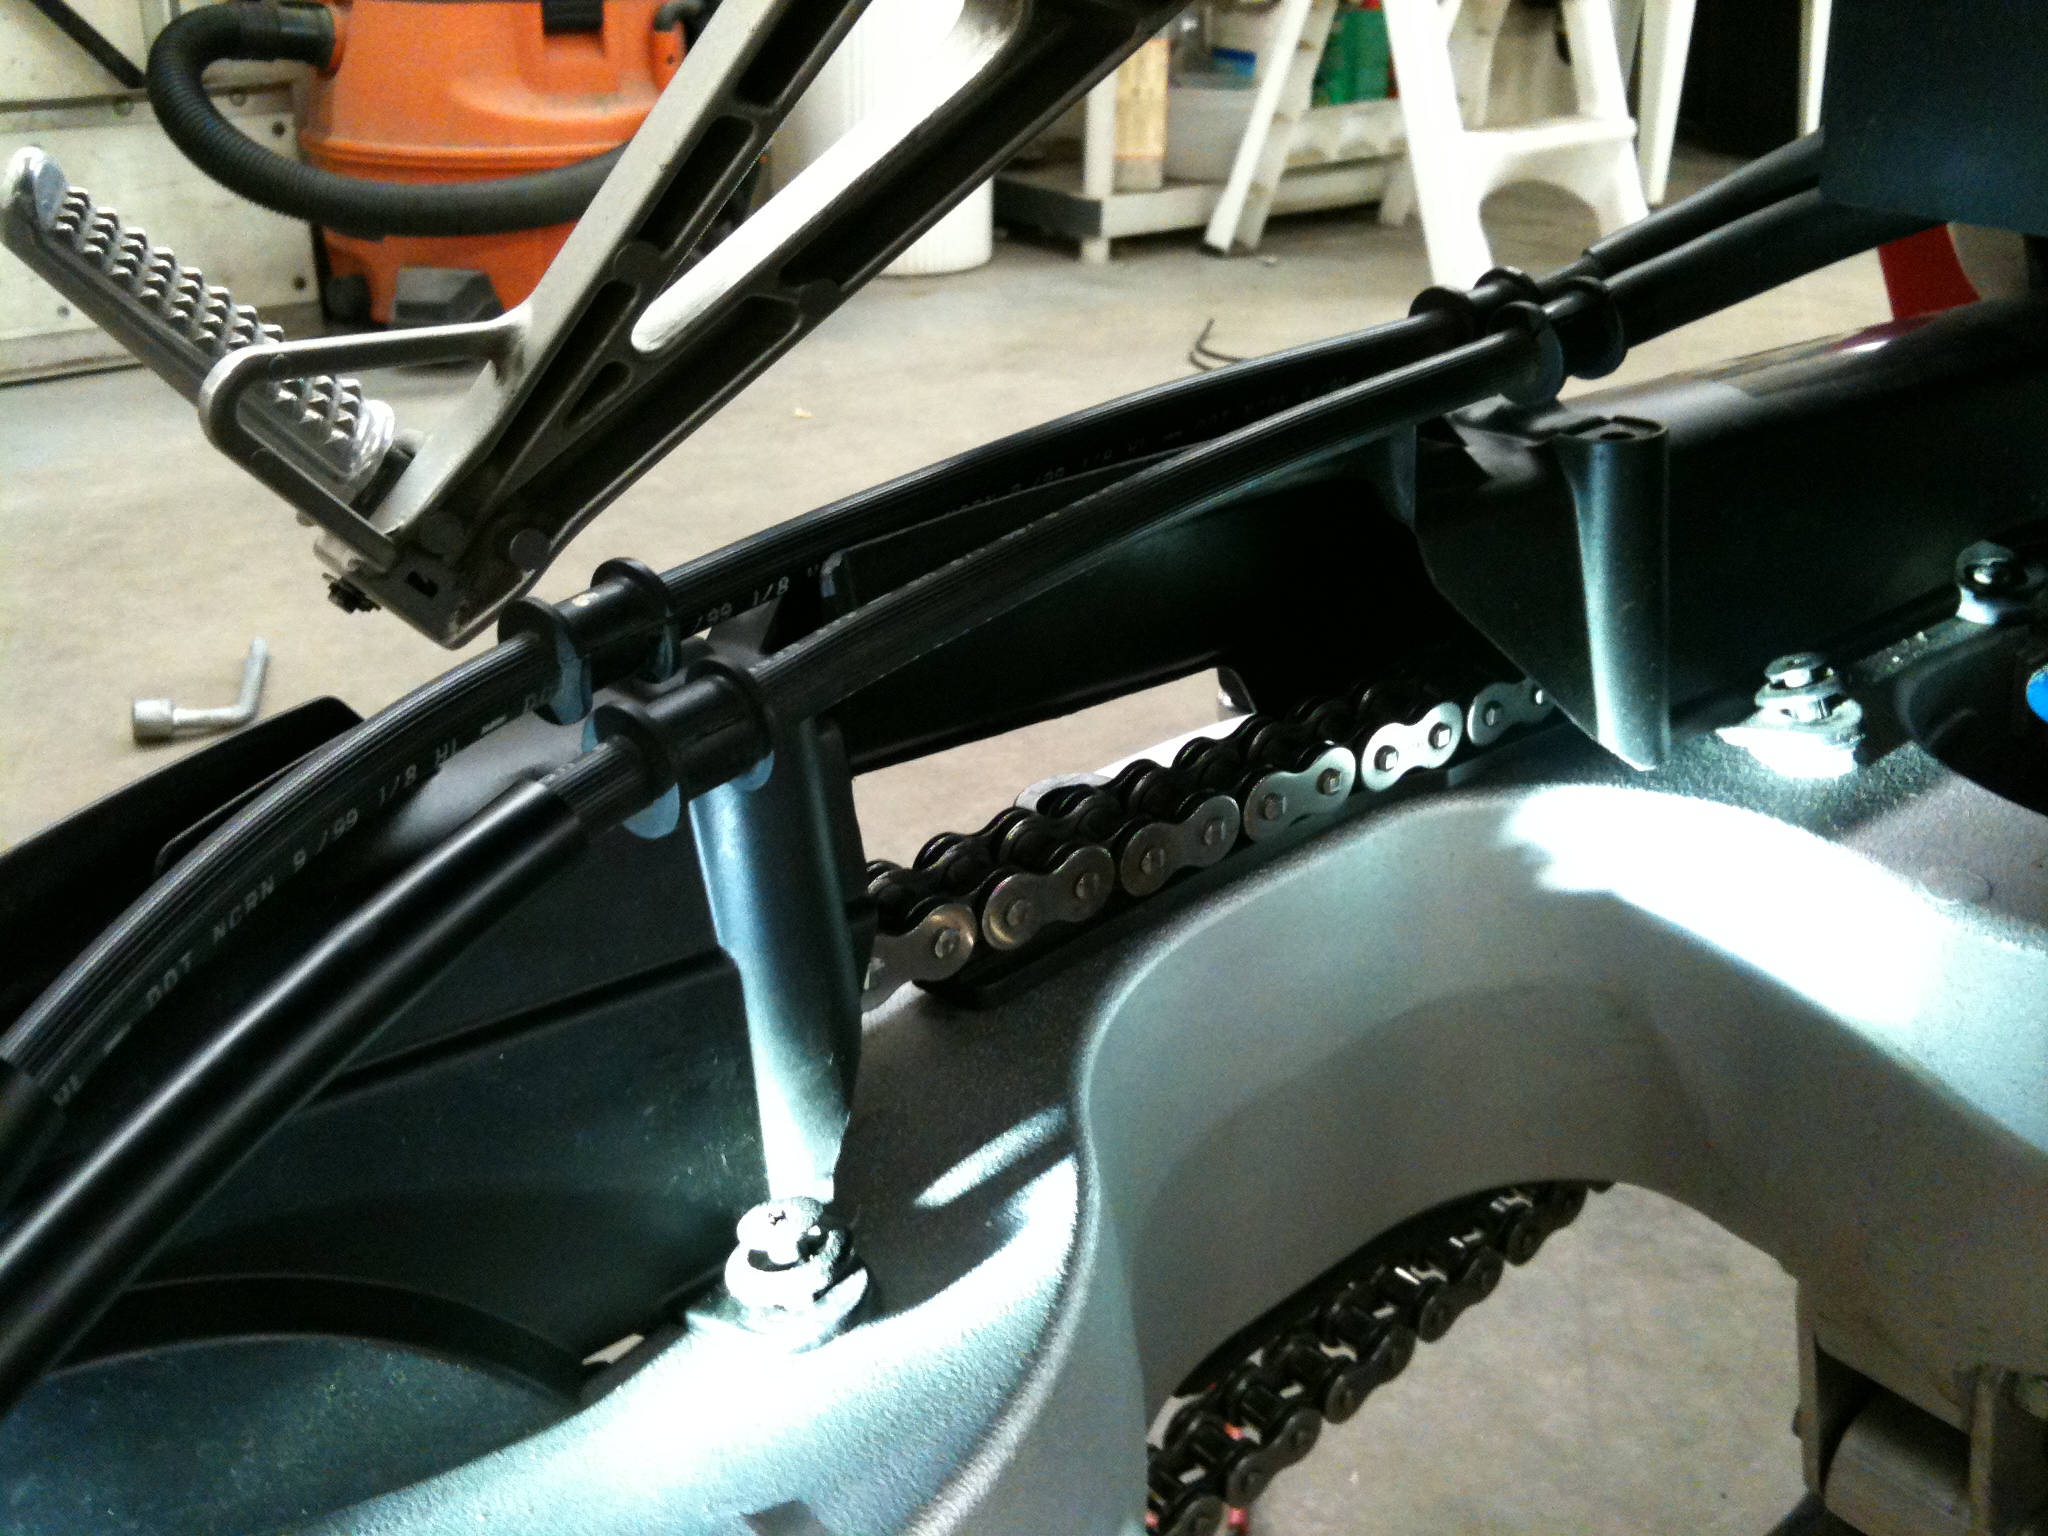
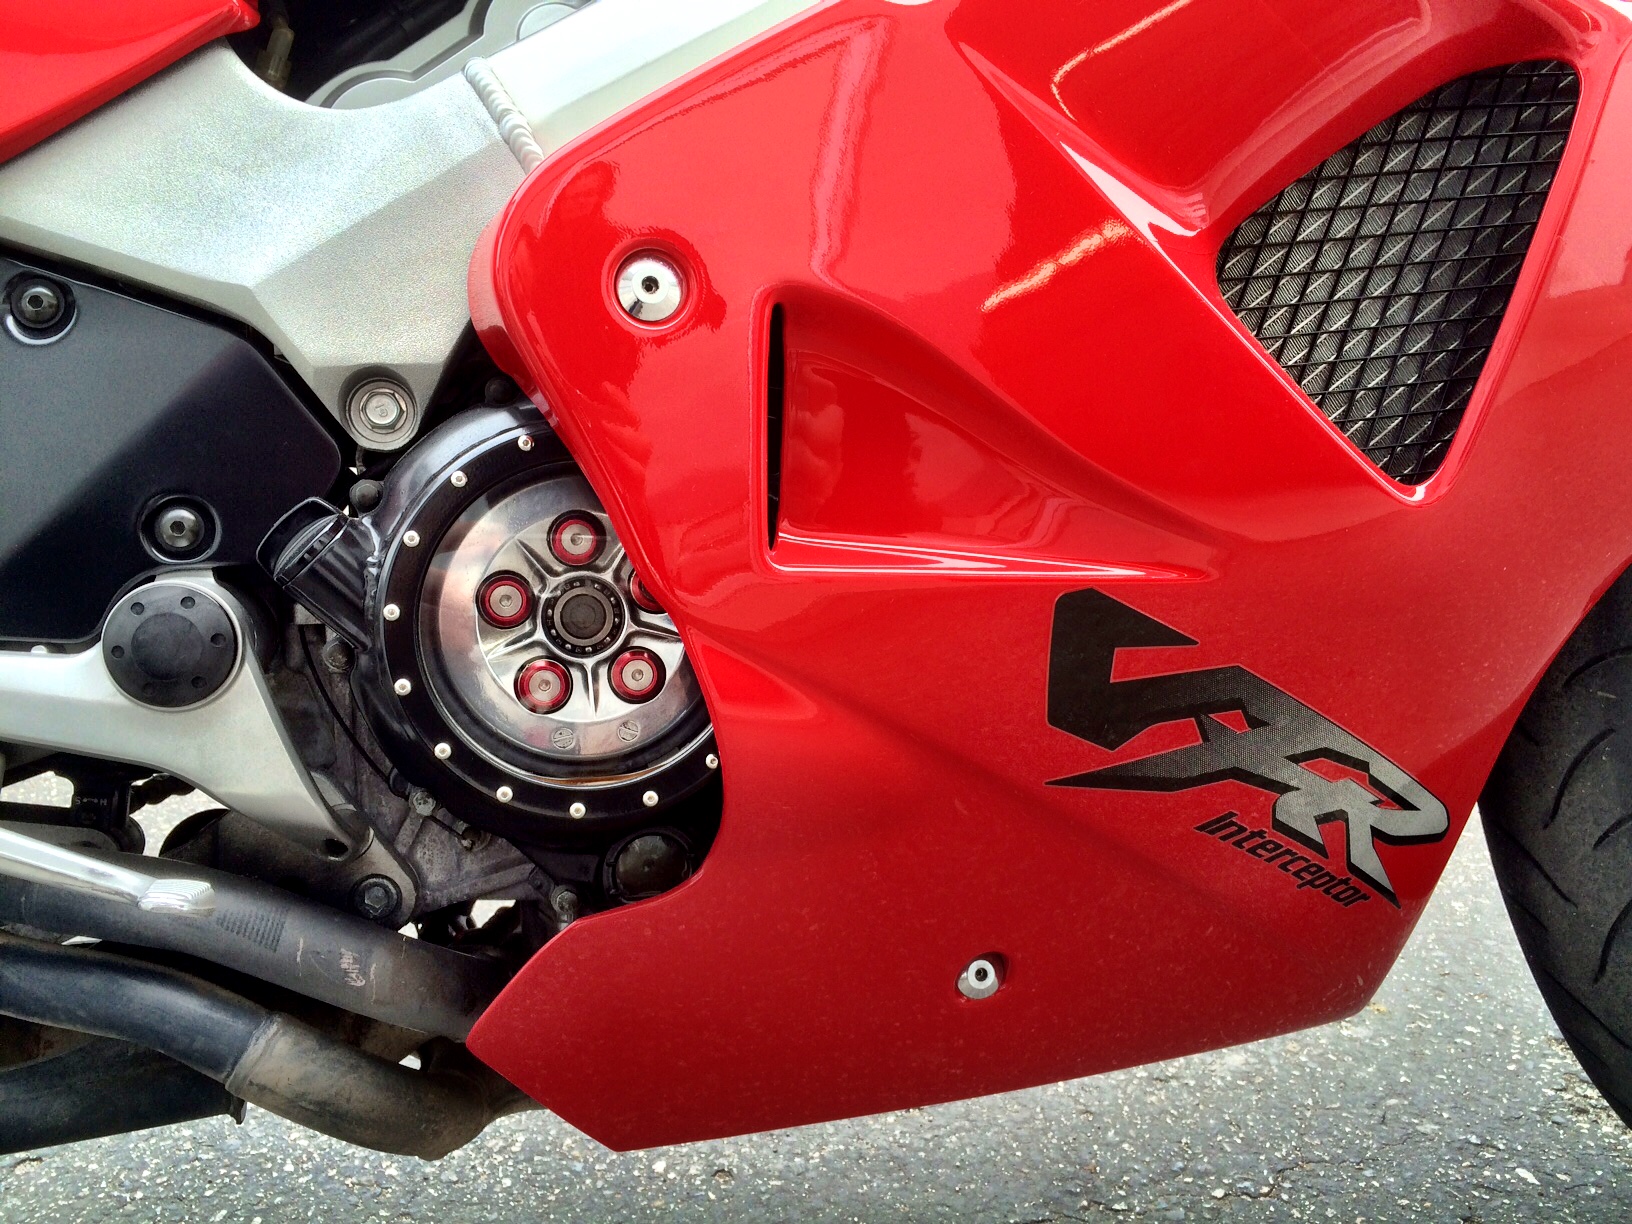
Quite a number of years ago, I wrote up an install thread for a shock I purchased from Jamie at Daugherty Motorsports. Unfortunately, when the site went down and was subsequently rebuilt, this thread had disappeared. I know a few people have asked me in the past if I could re-enter the thread and re-post the photos. Since I had suffered a computer crash of my own and upgraded to a new machine, I had to first locate the photos and then copy them to my new machine, but as usual, LIFE got in the way. For those who have asked me to re-post the thread, "Here ya GO." I know it took a while and I apologize. When I originally posted this thread I did so as a "GUIDE" to those, like me, who had never done anything like this before and as a result, I HAVE done a few things that were likely NOT required during the install procedure, but I did so to make MY life easier. I've had numerous people in the past say things like, "You didn't have to remove _________", or "Do not remove this part as its totally not required". I was also attempting to chase down an electrical gremlin when I performed this install so as an example I was looking for any tell tale signs of harness tampering and also wanted to check the condition of said harness, connections, and I was thoroughly cleaning the entire area as best as possible. Hence I removed the fender tray and this seems to have been the largest point of contention. I'm sure not everyone will agree with the way I did the install, and I'm sure there are other ways, but at the time, there were no other install threads for me to follow and the photos and instructions on the Factory Service manual were helpful, but mentioned nothing about the fact that, lets face it, you're not putting a stock shock back in and it was physically a different size and shape. Hence I documented the install, and took some photos along the way, and MOST IMPORTANTLY I had the time spent with my son, which above all else, was the best THING about the whole procedure. The absolute best part of this whole process was to spend some quality time with my son, and that, to me was worth taking the WHOLE back of the bike apart if necessary. Though there were a LOT of questions and the time spent doing this job was far greater than if I had done it on my own, I would NEVER, EVER have considered not letting him watch and ask as many questions as necessary to satiate his curiosity. HERE WE GO First, a bit of background might be in order. Having sold my beloved 97 VFR750 about 5 years ago, just before my son was born, I had wanted to some day replace the bike when he got older. I knew with a new baby in the house that the poor old girl would spend many a lonely day covered up in the garage unable to see the sun. No way to treat a motorcycle in my opinion. Since one of the guys that I worked with wanted to purchase the bike, I signed the papers and let her go to a new owner. Thankfully I got to see the old bike regularly, and the itch to get a new one was always lurking. About three years ago, I found a 2000 VFR800 sitting in the showroom of one of the car dealerships I do work for (I do Paintless Dent Repair for a living) and my wife said I should buy the bike. The paint was pitted, the wheels had numerous scratches from a disc lock, the fairings were scratched from a couple of garage mishaps (vertical scratches in the lower cowls which indicated to me that the bike had tipped over on both sides at some point) but the price was too high for the condition of the motorcycle. The general manager of the dealership had seen my 97 VFR and had said that I would regret giving her up (he was a fellow biker) and knowing I would lust after the 2000 VFR he started asking me when I would take it home. Every time I walked in to the dealer he would ask if I wanted the VFR and with a price near $6000 at first the cost was too rich for my blood. Finally, after sitting in the showroom for a little more than a year the manager said, “Bill, make me an offer on the bike, I gotta get her out of here.” Over time the price had dropped to $3950 and not even thinking he would say yes, I looked at the manager and said “All I can afford to give you is $2000.” To my amazement, he told me to get her out his showroom and that he was glad the VFR had found a good home. I signed the papers, handed over the cash, donned my helmet and rode the bike two blocks to my shop. Since it was in November and likely to snow any day, the first ride would have to wait. For what seemed like an eternity of cleaning, I spent the winter taking care of the cosmetic issues. I had the wheels stripped and powder coated, painted the lower cowls to get rid of the scratches and spent about 8 hours wet sanding and polishing the rest of the paint to get rid of what was years of neglect. The previous owner had left a copy of all the maintenance receipts for the bike with the dealer and after looking through them all, I found that the bike had been very well maintained and all the suggested services had been completed by various Honda Motorcycle dealers, including the valve adjusts. When the previous owner had traded the bike on a car, he had told the dealer that even though he had kept up on the mechanical work, he was not one to clean the bike. He neither had the time or inclination to keep her spotless (he did spray her off once in a while he admitted) and nor did he have the skills. After 61,000 km’s (35,000 miles) of use the bike was showing its age, but it ran like brand new. When spring finally dawned and the street sweepers had been out I decided to take the old girl (now gleaming like a new motorcycle) for a ride. With some new rubber, some cosmetic work and a lot of blood, sweat and wax, she was ready for the road. At least that is what I thought. To my dismay, I discovered that the back end was sadly in need of some attention. My first season with the 2000 VFR was good but the riding was rare because of family and the new toddler in the house, and the revelation that I was going to be a dad once again. I spent a lot of time the next winter trying to decide what to do about the rear shock. The rear shock on my 97 had been re-built but it never really felt that much better in my opinion and I was not sure if I wanted to go through that process again. After spending about three months unable to ride my 97 while the shock was missing, and then not noticing a huge difference once I got it back, well, I was not impressed. A friend told me check out VFR World and I came across the name Jamie Daugherty. After reading several posts and articles about his suspension tuning abilities, I decided that I would again try getting a shock rebuilt. The difference was, this time, Jamie, unlike the last guy I used, was going to build me a donor shock from a CBR929 so that I could ride my bike until the new one showed up. I was so amazed with the difference the shock made to the rideability of the bike that I wanted to do a “HOW TO” write up on the installation. I know a number of people on this site are aware of Jamie Daugherty and probably equally aware of how to take their bikes completely apart and put them back together. This article is for the average person like me, who has never attempted a project of this kind and therefore I have included a lot of pictures and a lot of, shall we say, instructions. My hope is that it will prove useful to at least one other person. The overall process is not that hard, but it does take some time. I think the whole process for me took about six hours from start to finish, over a span of two days. I am quite used to taking things apart when doing my day job, but that is usually limited to door panels and other parts of car interiors. Having owned about 10 different motorcycles (including an 85 VF1000F, a 97 VFR750F and my current 2000 VFR800) I am also no stranger to regular maintenance like oil and coolant changes. Generally I leave major mechanical work up to the pros, but I decided to tackle this project on my own since, heh, let’s face it, there are only four bolts to undo RIGHT???? WELL YOU HAVE KEPT WITH ME THIS LONG SO HERE WE GO, BACK TO THE TOPIC OF THE CBR929 SHOCK UPGRADE. First, I have to say thanks to Joey_Dude for his write up on how to do this upgrade, since it was after reading his HOW To that I decided to give this whole project a try. Not wanting to disconnect the fuel injection hoses from the tank, I decided to see if it could be done without removing the tank. After clearing some space around the bike and putting the bike on the center stand, the first things to come off are the seat, passenger grab handles, and the rear cowl. Next off is the muffler and the right side foot peg bracket. I chose to remove the muffler and foot peg bracket at one time in order to make it easier to re-assemble later. Loosen the muffler strap connector, undo the bolts on the foot peg bracket and twist the whole assembly out and back to remove. You could probably do it the same way with the stock exhaust but it might be easier to do each separately if you have the stock exhaust. Now it is time to remove the rear tire and the chain guard. Don't forget the two plastic screw clips on the back side of the chain guard The top bolt for the rear shock assembly is under the two rubber flaps at the rear of the fuel tank. I removed the two bolts at the front of the tank and the two bolts that secure the tank to the pivot clamp at the rear of the tank. I then placed a couple of 2x4 pieces on edge under the rear of the tank to support it while I removed the pivot clamp. This allows you to move the two rubber flaps. The top one you can push forward and tuck it under the tank edge, and the big lower one that stretches over the battery box area can be removed and set aside. You should now be able to see the nut that secures the top of the shock bracket to the frame spar, and the bolt that goes through the bracket and the top of the shock assembly. Since the CBR929 shock has a larger spring and a remote reservoir I thought that removing the fender tray would make the installation of the new shock a lot easier because it gives you a LOT more room to work with and it also allows a better view of the whole swing arm area. Removing the fender tray was certainly a bit of a pain to manoeuvre out of the frame but the ease with which the new rear shock went in certainly made it worth the extra effort. It also gave me the chance to take a closer look at the wiring harness, connectors, fuse blocks, and other areas around the rear suspension that were hard to see before. To remove the rear fender tray, disconnect and remove the battery. Next, to remove the battery box cover lid there are a couple of fuse blocks attached to the lid. They are easily removed by inserting a flat head screwdriver underneath and gently twisting to release the push clip underneath. With the clip released, slide the fuse blocks up toward the top of the lid. By gently squeezing the sides of the lid you can release the plastic pins that hold the lid in place and you can remove it. Once the lid is removed you can also undo the 5mm allen head screw that secures the rear brake lines to the under side of the fender tray. Moving to the rear of the fender tray, remove the lid covering the CDI box. This should give you enough room to gently remove the CDI box and manoeuvre it out and then place it on top of the seat frame latch. This is where I left the box until I was finished and it rested there quite securely. Remove the two bolts at the rear of the fender tray that attach it to the seat frame and allow it to drop down a bit. The fender will probably move down about an inch or so but not much. You will also need to remove the bolt that secures the rear brake fluid reservoir to the fender tray as well. The reservoir will just sit there and not move, so not to worry. The front of the fender tray has a couple of tabs on it that the main fuse block (left side) and another fuse block on the right side slide on. By pulling them up they should both come off. Once all the bolts and screws are removed, gently push up on the front of the fender under the battery box to release the plastic clips that go around the round metal frame tube. Now gently squeeze the middle of the fender tray at the bottom and lower it down out of the seat frame. You will have to pivot the back down a bit while pushing the front up to clear the frame spar under the battery box. Having an extra pair of hands to help you manoeuvre wires, connectors, and the fender tray out would be a definite asset. Pay close attention to where and how the wiring harness and connectors are routed around the clips and on the front of the fender tray. It helps to have a camera for this since a picture will help you get everything back together the right way later. Getting the fender over the spar at the front of the battery will require a little bit of bending of tabs and some work to get the harness out but with a little perseverance (and possibly some colourful language) the fender tray will come out. BE CAREFUL OF YOUR LANGUAGE DURING THIS STAGE AS IF YOU'RE LIKE ME, THE SWEAR JAR WAS ENSURING MY SON'S FUTURE EDUCATION WOULD BE FULLY FUNDED BY HIS NEXT BIRTHDAY. NOW to remove the old rear shock. Remove the bolt that goes through the top of the shock assembly. You may have to push down a bit on the wiring harness in order to pull the bolt out all the way since it is a pretty tight fit. Time for the lower shock mount. Remove the bolts from the lower shock arm plates. Note the orientation of the plates when you remove them so that they go back on the same way. With the shock assembly now completely loose, you should be able to pull the top of the shock back toward the rear of the bike, to the side, and out of the swingarm over the chain. You can see the difference in the size and shape of the old shock (red) and the CBR929 (blue) upgrade shock from Jamie Daugherty. This is where removing the fender tray becomes perfectly clear. Drop the CBR929 shock down in to the hole in the swing arm. Rotate the shock assembly clockwise about 90 degrees and push the top of the shock forward, behind and in front of the upper shock mounting bracket. The shock should now be sitting with the reservoir on the front side of the shock toward the front of the bike. Now pull the shock back and in to the upper shock mount bracket and re-insert the bolt through the bracket and the upper shock mounting hole. Another good reason to remove the fender tray is so that you can see if you have any clearance issues with the new shock assembly. When I went to install the shock in the upper shock bracket I discovered that my wiring harness on the left side of the bike was being pinched by the edge of the reservoir on the new shock. If I had not removed the fender tray I would not have been able to see how badly the harness was being pinched. A friend of mine who works at a local auto body shop looked at the shock for me and suggested that I cut a notch in the lip of the reservoir so that it would not interfere with the wiring harness. I also wrapped a couple extra layers around the harness where it passes the shock reservoir lip, just to be sure. I was also careful to make sure that the edge of the lip where I cut the notch was filed smooth with no sharp edges. Though this may not be a problem with every bike (my bike is a 2000 VFR by the way), but I thought that the clearance issue I discovered was worth mentioning, just in case someone else runs in to the same problem. My friend at the body shop used to race motorcycles professionally and I wanted to check with him first before we notched the lip on the reservoir and he assured me that the notch would not affect the shock reservoir. Now just reverse the whole procedure and put the bike back together and go for a ride. And Don't forget to check the factory torque specs in the manual when you put the whole thing back together. THERE ARE A FEW THINGS I LEARNED ALONG THE WAY DURING THIS PARTICULAR BIKE MODIFICATION. 1. When performing ANY task with your 5 year old watching, BE PREPARED for a HUGE barage of questions that request you to explain absolutely EVERYTHING you are doing, WHY, and HOW it will effect the ENTIRE process. 2. When performing ANY task with your 5 year old watching, BE PREPARED to spend a LOT more time completing said task. 3, When performing ANY task with your 5 year old watching, ENJOY the time spent as it may be your last, as these times will never come again, and you owe it to yourself to spend that quality time with them. 4. In the grand scheme of things, I did not NEED to remove the fender tray but IMHO it provided extra room for my hands, increased the ability to see what I was doing, and it generally made my life EASIER. Also, I didn't have to notch the edge of the remote reservoir on the CBR929 shock, but the amount of clearance I had between the two made me nervous about possible chafing so I notched it to make ME feel better. Did it NEED to be done, "No", but did it put my mind at ease, "YES". Hence the notch. FIRST IMPRESSIONS OF THE NEW SHOCK My initial impression of the shock upgrade was that it made a world of difference. I took the bike for about a 50 mile ride after I out the bike back together and could not believe how much better the bike felt. The handling is now much more precise and the bike feels far more stable. Even just sitting on the bike feels better since the bike does not sag as much under my weight. I would highly recommend this upgrade and certainly recommend Jamie Daugherty’s services to anyone that would like a suspension upgrade for their VFR. You can get in touch with Jamie on this site by sending him a Private Message or you can email him at jamie@daughertymotorsports.com

-
Hmmmmmm, THIS looks darned familiar to another VFR of which I am Aware. LOL.
-
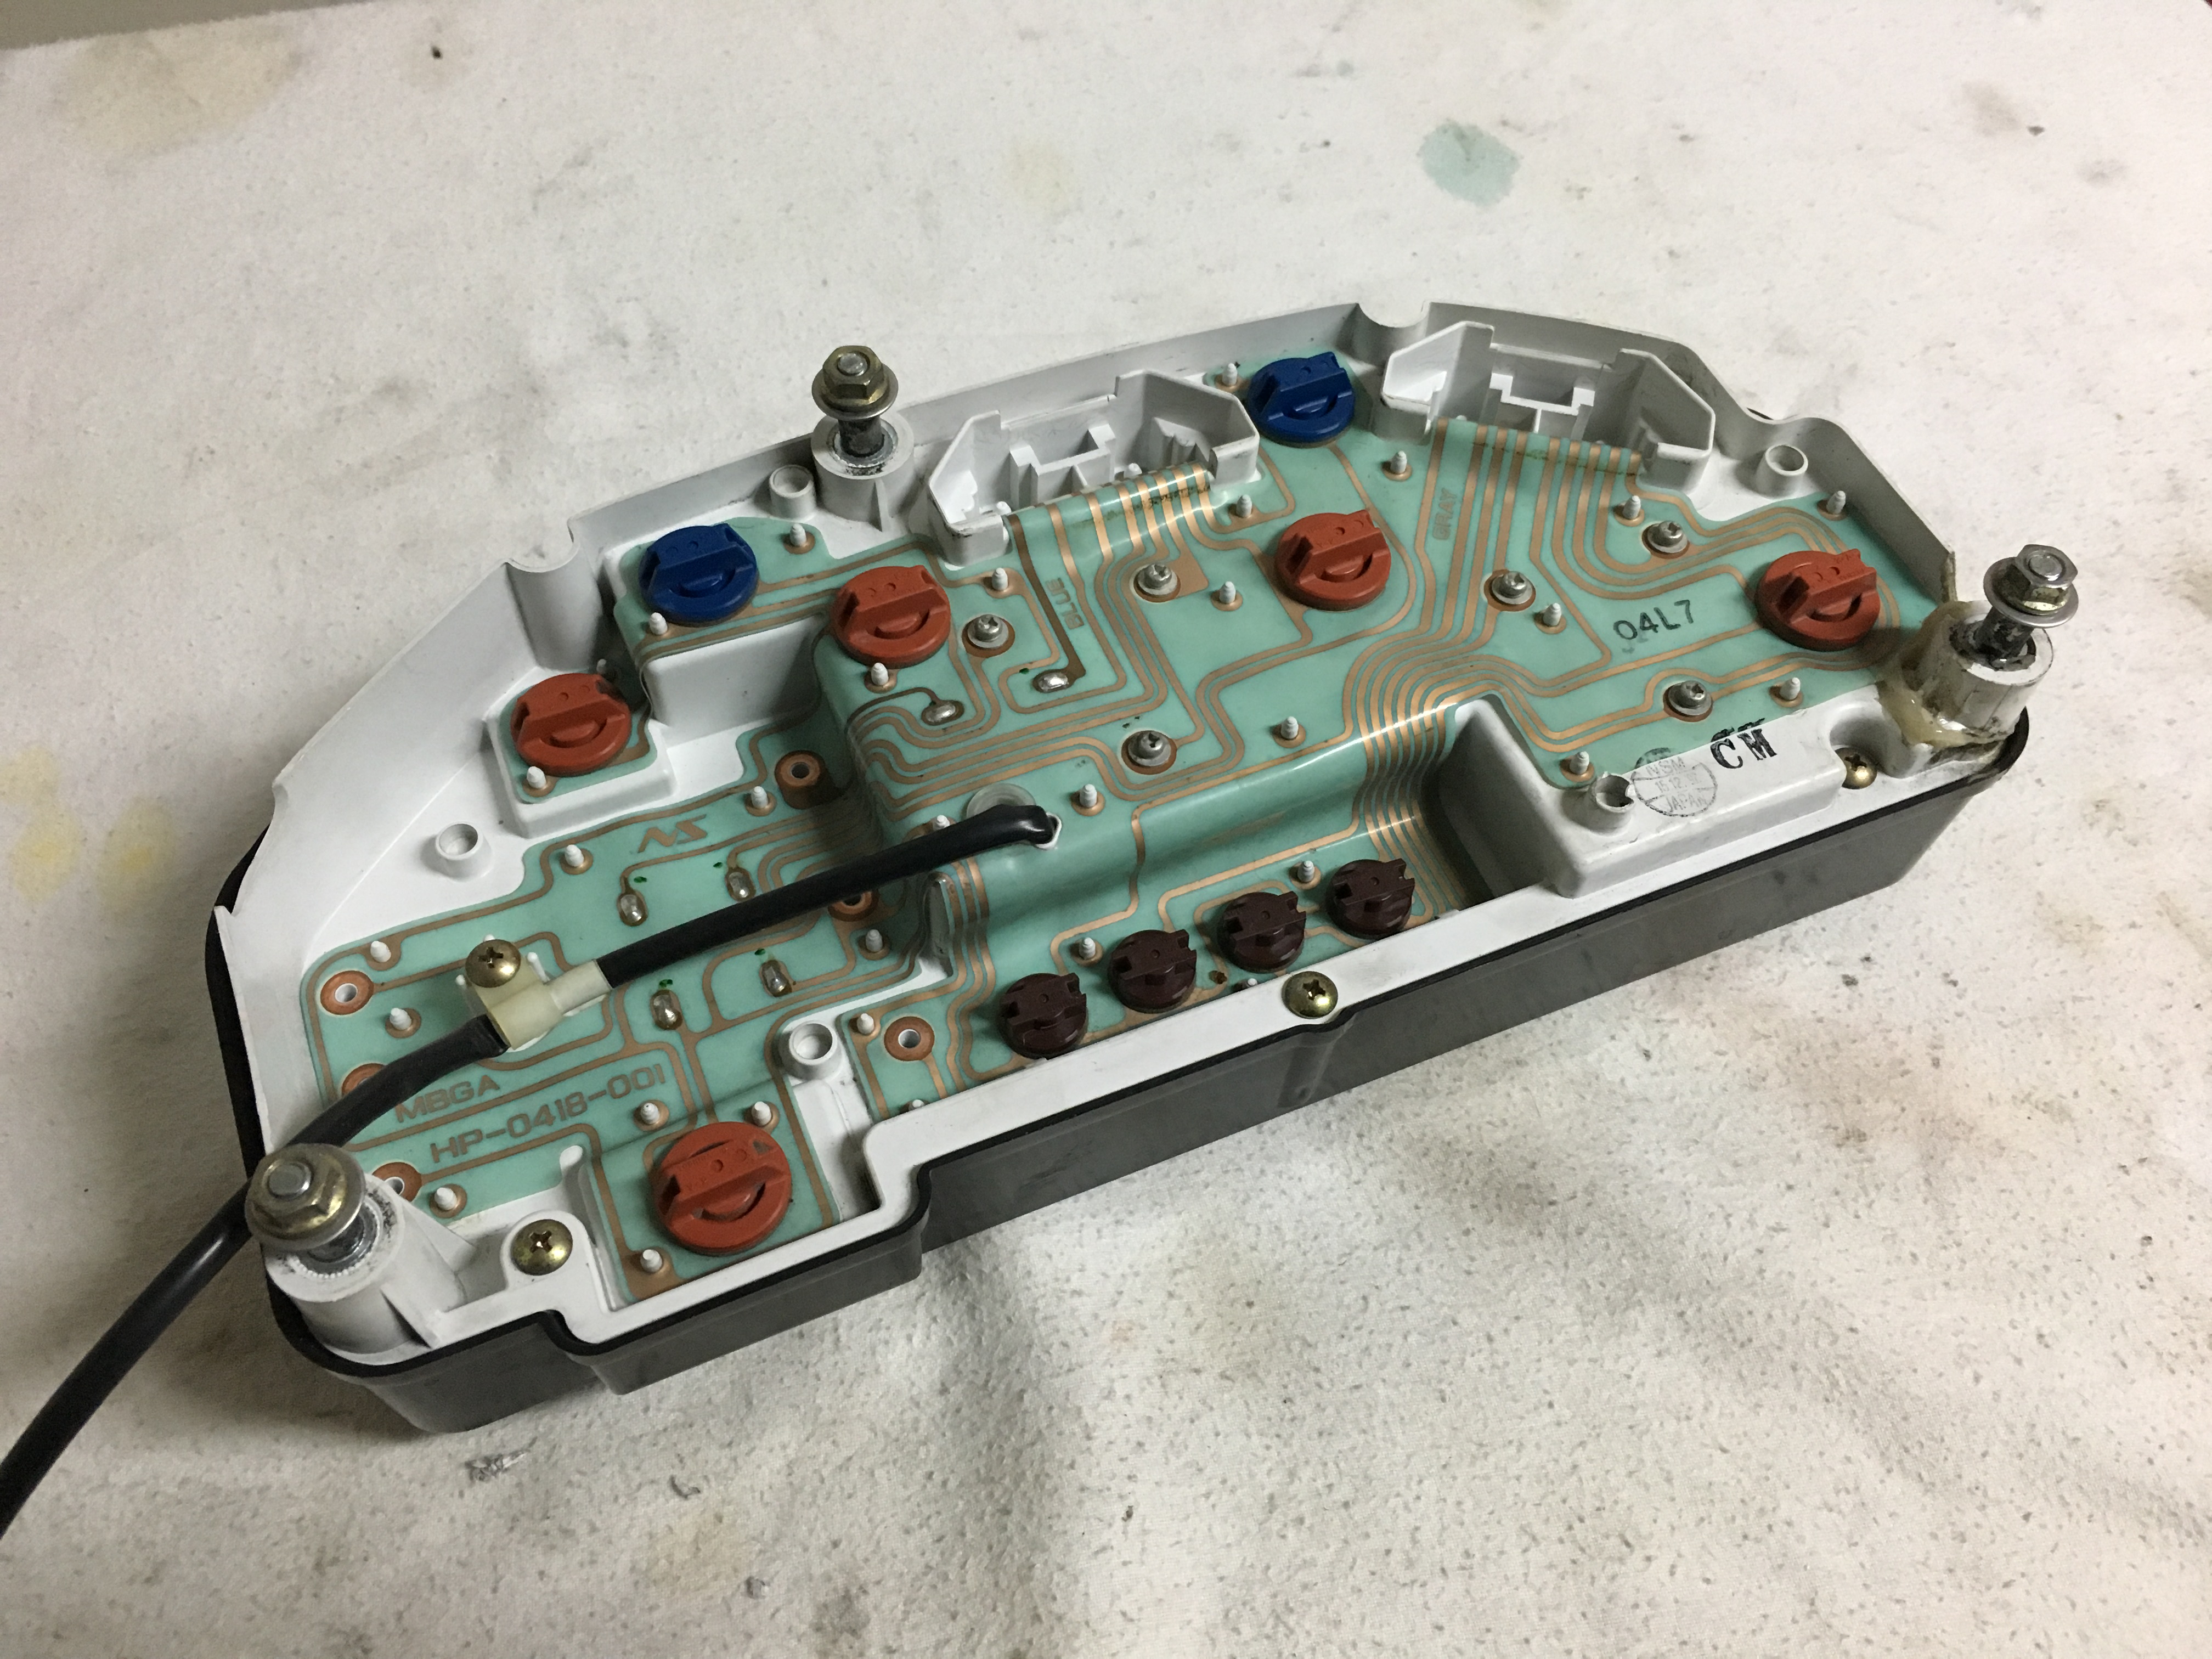
Hey Lint. Just a question but are you talking about needing the white plastic or the gauge housing that all the instruments and everything attach to?
-
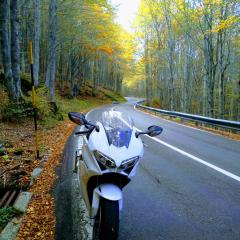
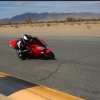
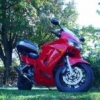
I'm kind of with Greg on this one. I like both photos but when spending a bit of time really looking at both photos I found something interesting. If I spend time staring at both photos, I noted that in the top photo my eyes spent time focusing from the background to the bike and back as the black background is quite over powering IMHO. In the second photo the only thing really in the picture is the real "Subject" of the photo, THE BIKE AND RIDER. I think the second one would look better framed as it would go anywhere and do well against any color background wall.