Grum
-
Posts
3,819 -
Joined
-
Last visited
-
Days Won
119
Content Type
Forums
Profiles
Gallery
Blogs
Downloads
Events
Everything posted by Grum
-
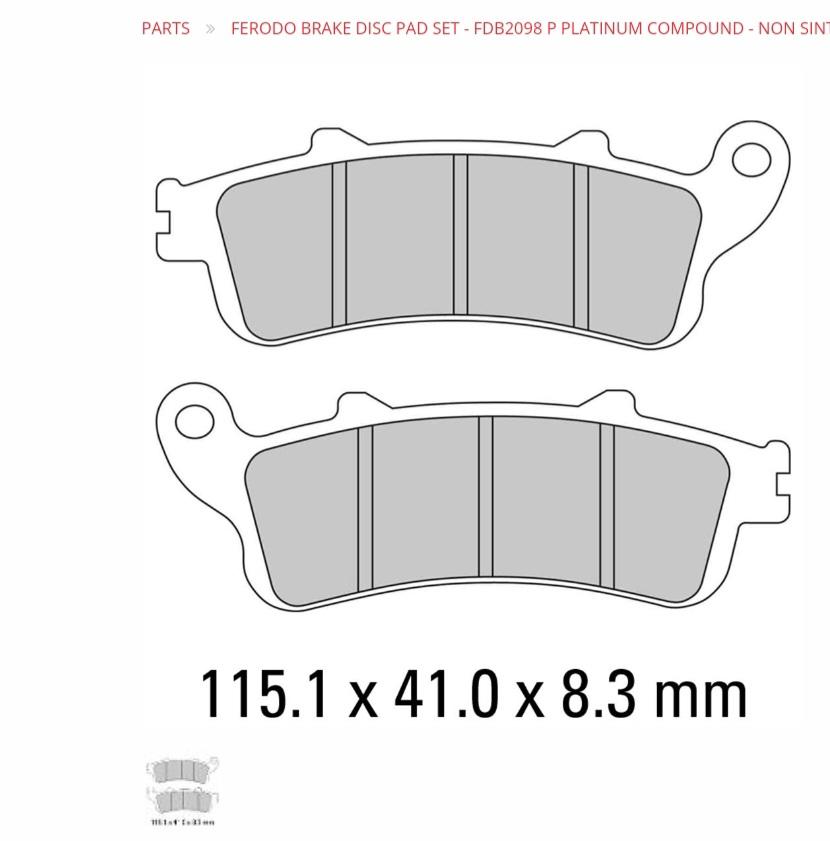
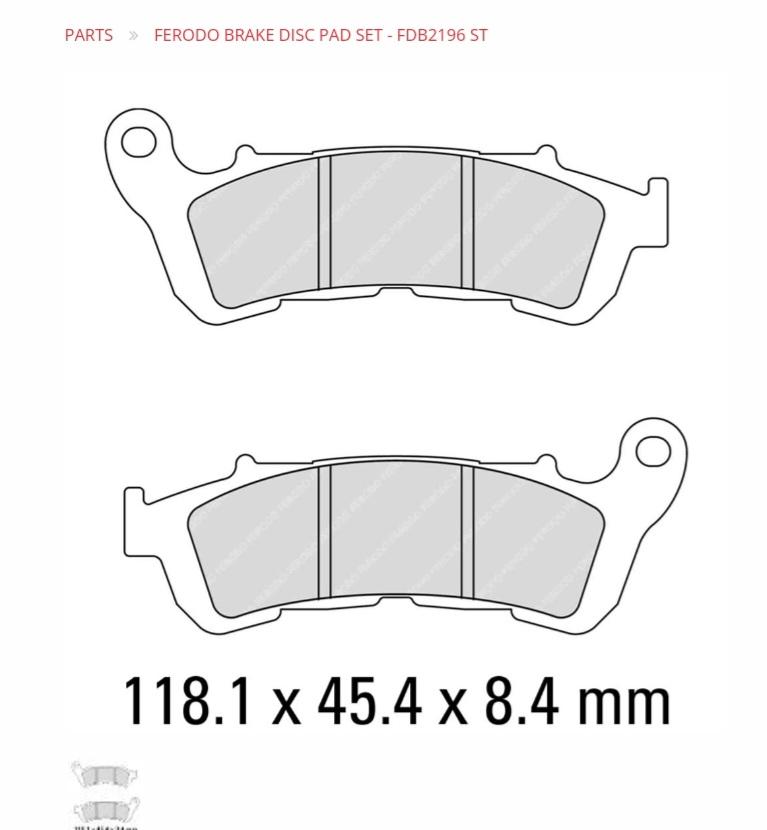
The other thing worth considering is that there is a 40mm difference between the front and rear disc diameters. Front and rear pads would surely have slightly different arc angles you'd think!
-
Here's the drawings and dimensions for the Front and Rear Ferodo pads I replaced on my 2009 6gen years ago. Fronts sure don't look compatible to the Rears! Fronts = FDB2196ST Rears = FDB2098P

-
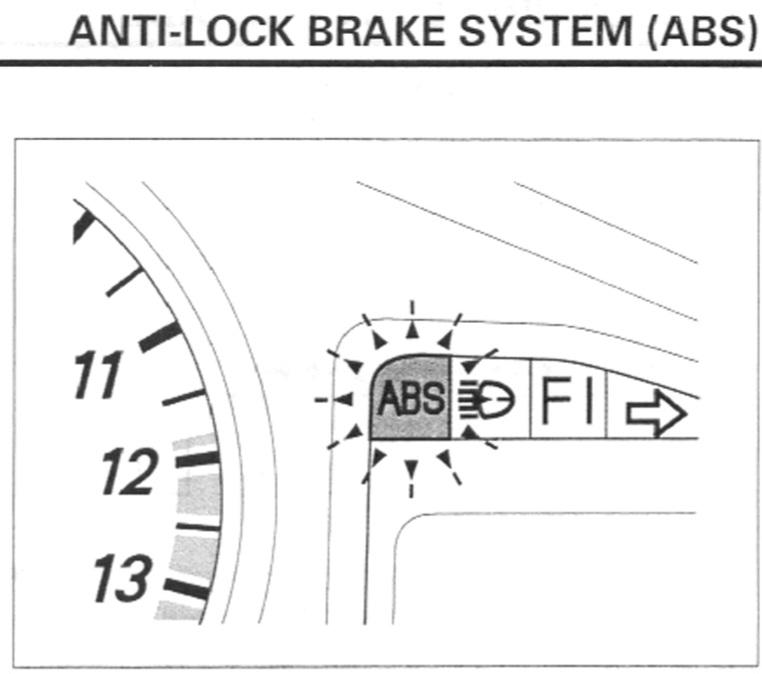
Also, on your Instrument Panel, you should see an ABS warning light at switch On. The light should go out when your speed exceeds 6mph.
-
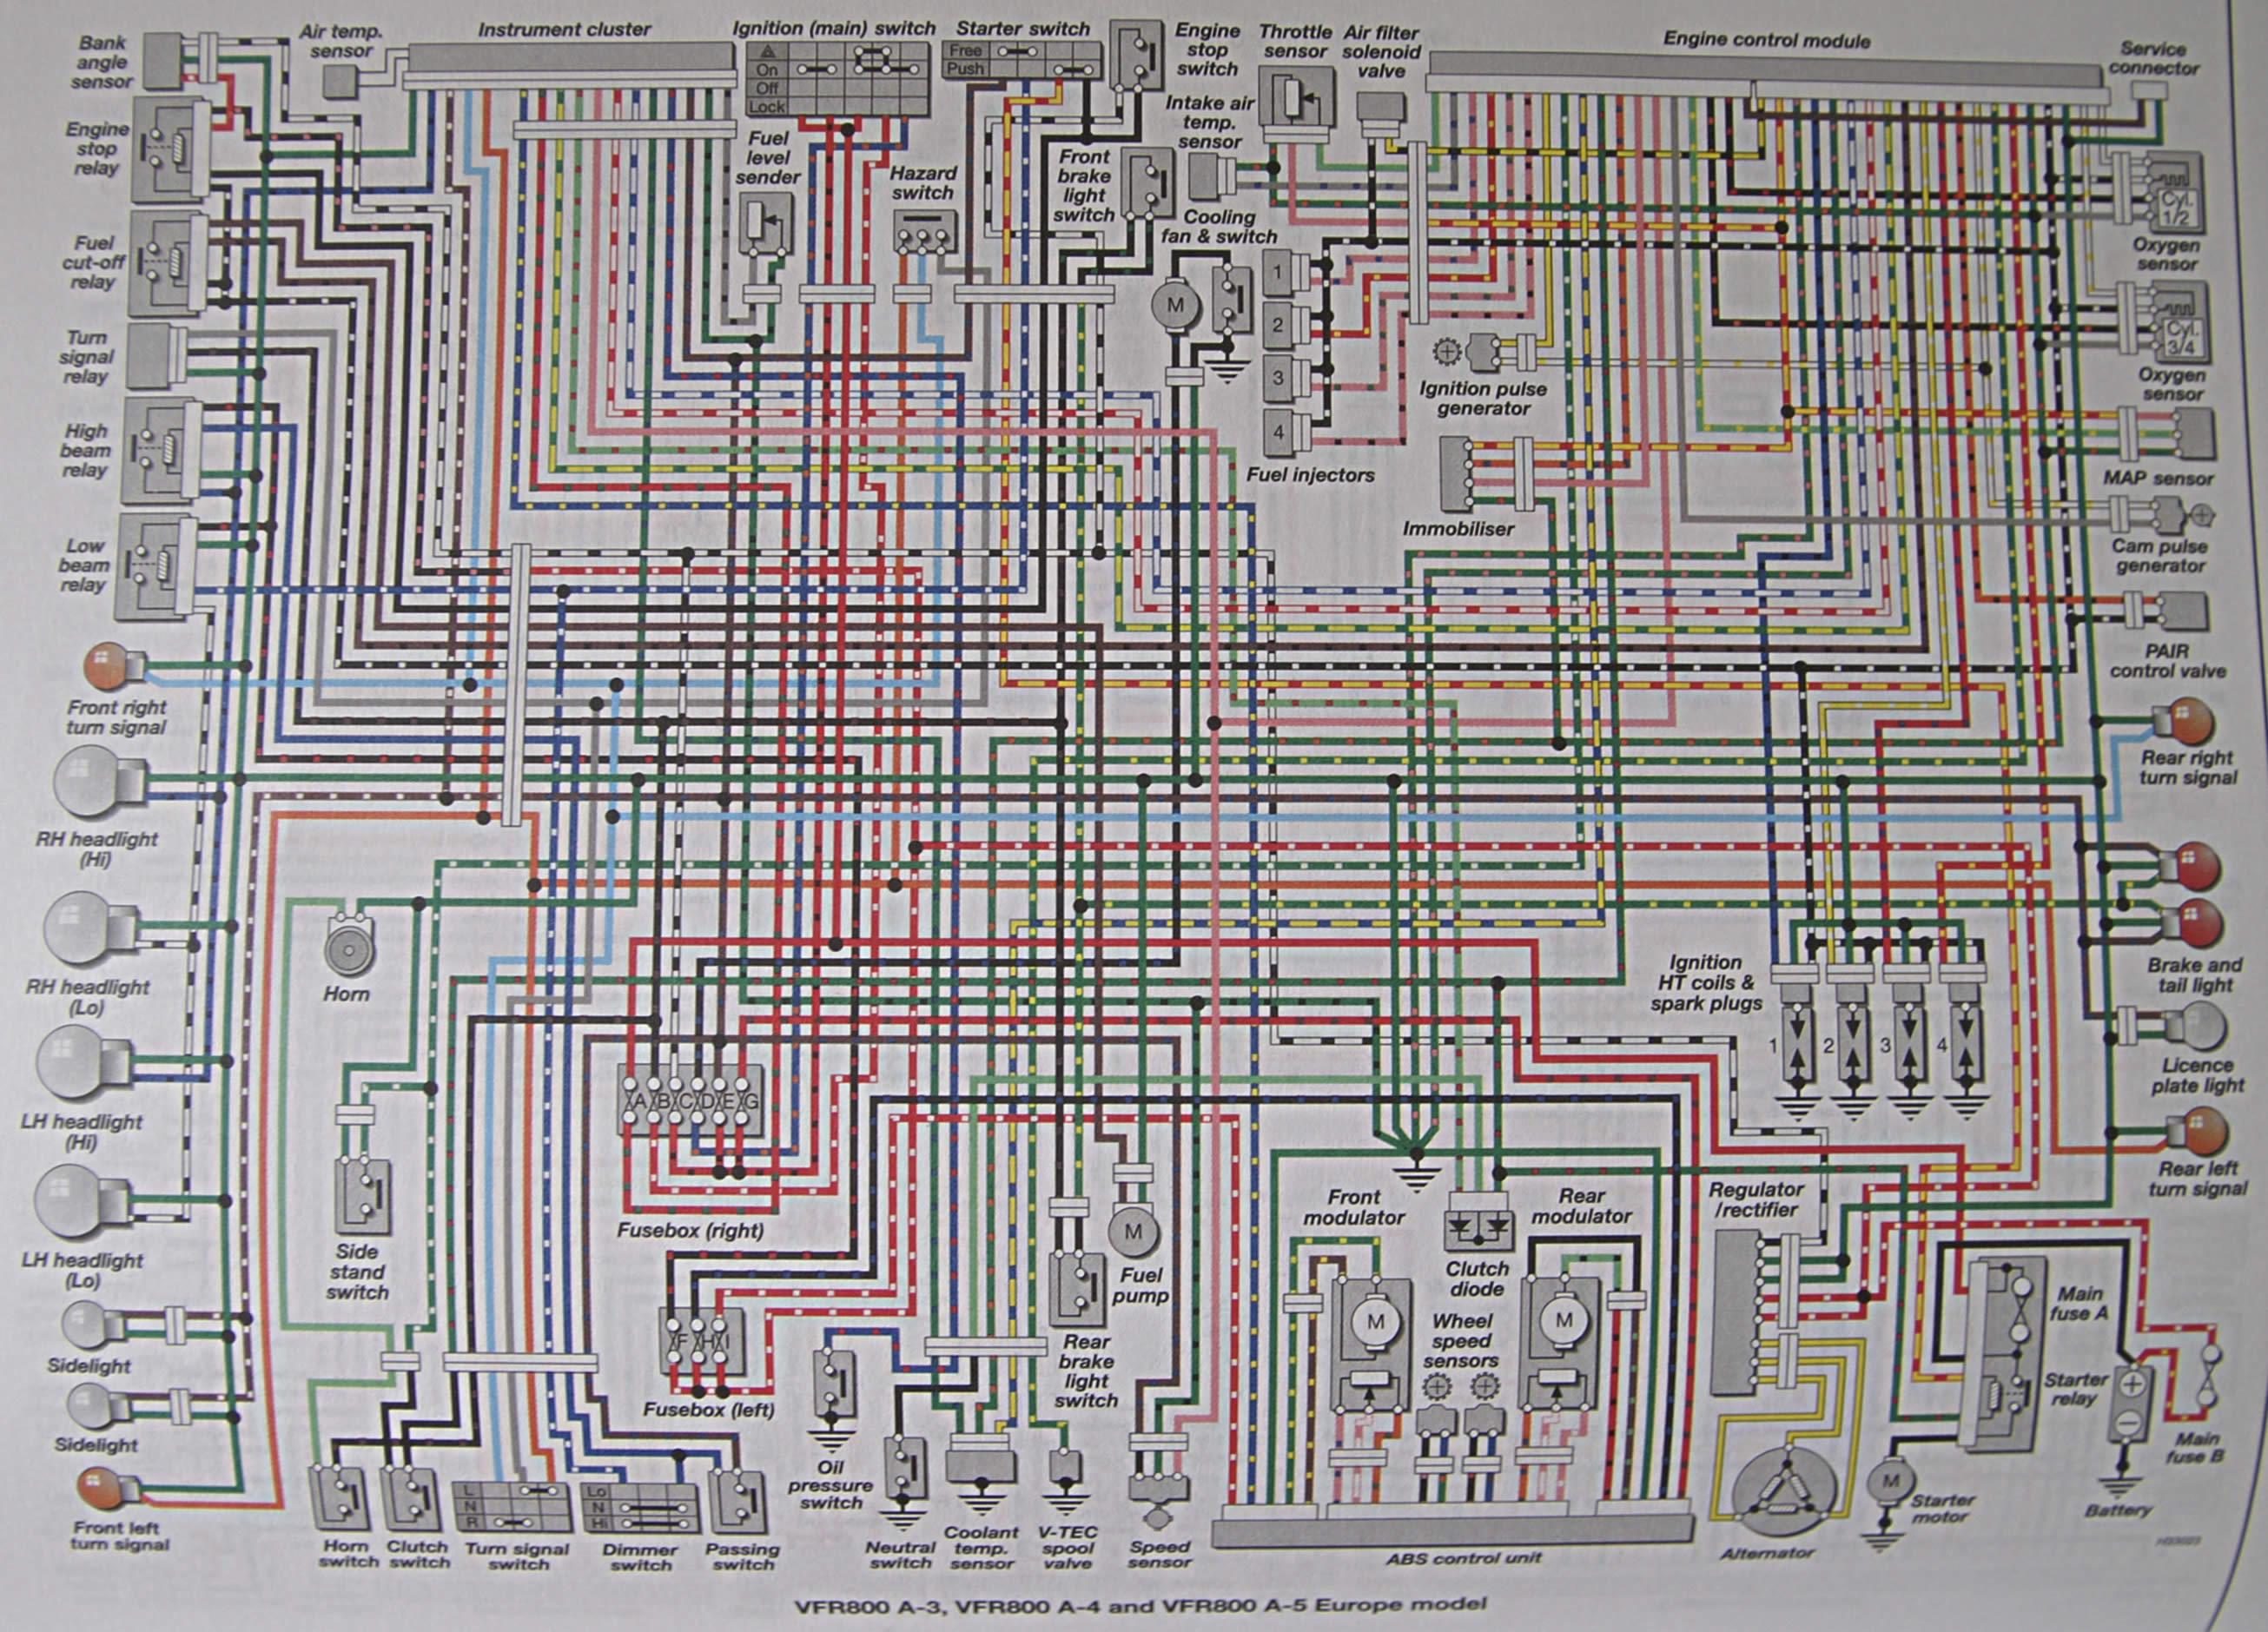
The only thing I can help you with is the attached drawing, ABS 6gens never made it to Australia. Depending on how badly damaged the wire harness is you might still be able to repair things with replacing certain wires with a new wire run. Work out what systems are not working then look at the wiring diagram they may share a common power source or ground, follow up on what fuses (if any) are blowing, try and isolate a shorted component or wire short. Unless the wiring has been greatly modified, virtually all short circuit situations should blow a fuse first, that's what fuses are there for. For example the melted Ground wire could be joined somewhere with a new wire, then terminated at the Battery or common Frame Ground point. Perhaps a good local motorcycle mechanic/electrician might be able to help you out? Whether the Service Manual section 16 for ABS is completely relevent to your model I don't know, however there wouldn't be too much difference surely?
-
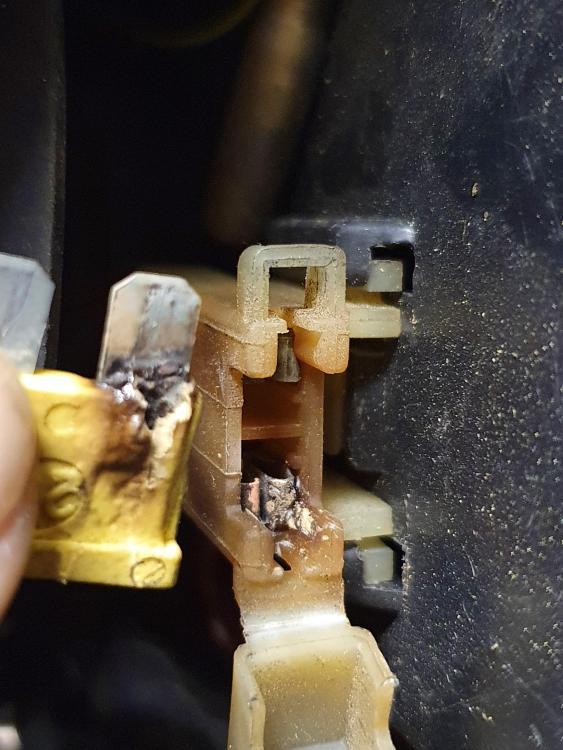
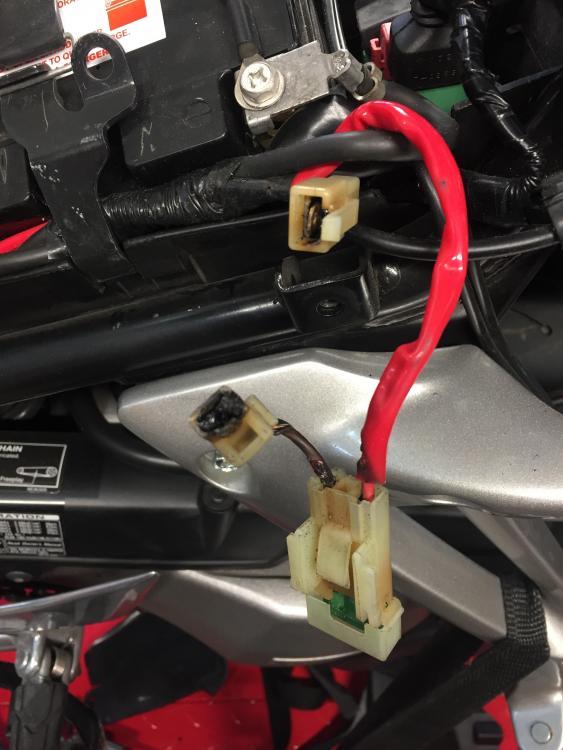
Good find, but a little strange. Overheated bad connections at this fuse would normally mean no Fuel Pump ops, no injectors, no spark, also the MIL light would be fully illuminated, not flashing. Also on a 5th Gen, your headlights would either be dead or barely turning on.! Bit of a shame the Voltage on the critical Black/White wire powering all the EFI equipment wasn't measured, I'm sure that would have told a story, poor/low voltage on this wire generally (not always) goes back to issues with Main Fuse B. The wire joint you discovered and the whole Fuse assembly needs to be replaced, otherwise it WILL come back to haunt you! P.s. Buggar!.........I've just realised, rick is not the Original Poster! Oh well, the above still applies!
-
Good news, by the way and just for info, your Clutch wasn't Dis-Engaging. Clutch is Engaged whenever the lever is not pulled in.
-
Another thing to try is to remove your Oil Filler Cap. Shine a torch into the hole to view the clutch, now operate the clutch lever, Do you see the clutch move outwards as you pull the lever in? If not then best to first try a good bleed of the system.
-
No. But you may need to try higher gears to help break the stiction. Remember keep the clutch pulled in while pushing the bike forwards or backwards. See how you go.
-
You may have a bit of clutch plate stiction from the lack of use over time. Sit on your bike in gear and clutch pulled in, rock the bike forwards and backwards, see if that breaks the stiction. You may also have air in the system, perhaps a good system bleed might help.
-
Hi Andy. Just incase you haven't found it, here's a link to the VFR800F and VFR800X Service Manual - This is Gold! 2014 VFR800F/2015 VFR800X Service Manual https://www.vfrdiscussion.com/index.php?/files/file/271-2014-vfr800f2015-vfr800x-service-manual/
-
Hi Dj. Just thinking, wouldn't it be far easier to repair the wiring for the TPS on the original Throttle Body. Your symptoms and 8 flash diagnostic code back up what you've found as far as a TPS wiring issue. Are you absolutely sure you can't solder and sleeve the wire even with the crimp joint so close to the TPS? Sorry, I can't offer any assistance regarding the cable choke to wax unit conversion, I'm sure some of the 5gen owners will be able to advise on that one. For Info - With the 5th Gen Starter Valve Synch, the Service Manual (Japanese to English) is not correct, they need to be set as per below....... Cylinder 1 is the non adjustable Master. Cylinder 2 is matched to No.1. Cylinder 3 is 20mmHg MORE than No.1. Cylinder 4 is 10mmHg MORE than No.1. Good Luck hope you get it all sorted.
-
Many Thanks Seb. That's Great. Cheers.
-
That's a beautiful looking 2010 1200, hope it lives up to expectations and serves you well. Does it come with all the service history?
-
Reaching out to the moderators/admin crew. Is there any possibility of removing all the frustrating airline ticket scam/spam bullshit that is in the 8gen forum? It starts on Page 2 and goes through to Page 8. Many Thanks Gents. Regards Grum
-
Clever stuff Lorne, enjoyed the journey. Thanks for posting it.
-
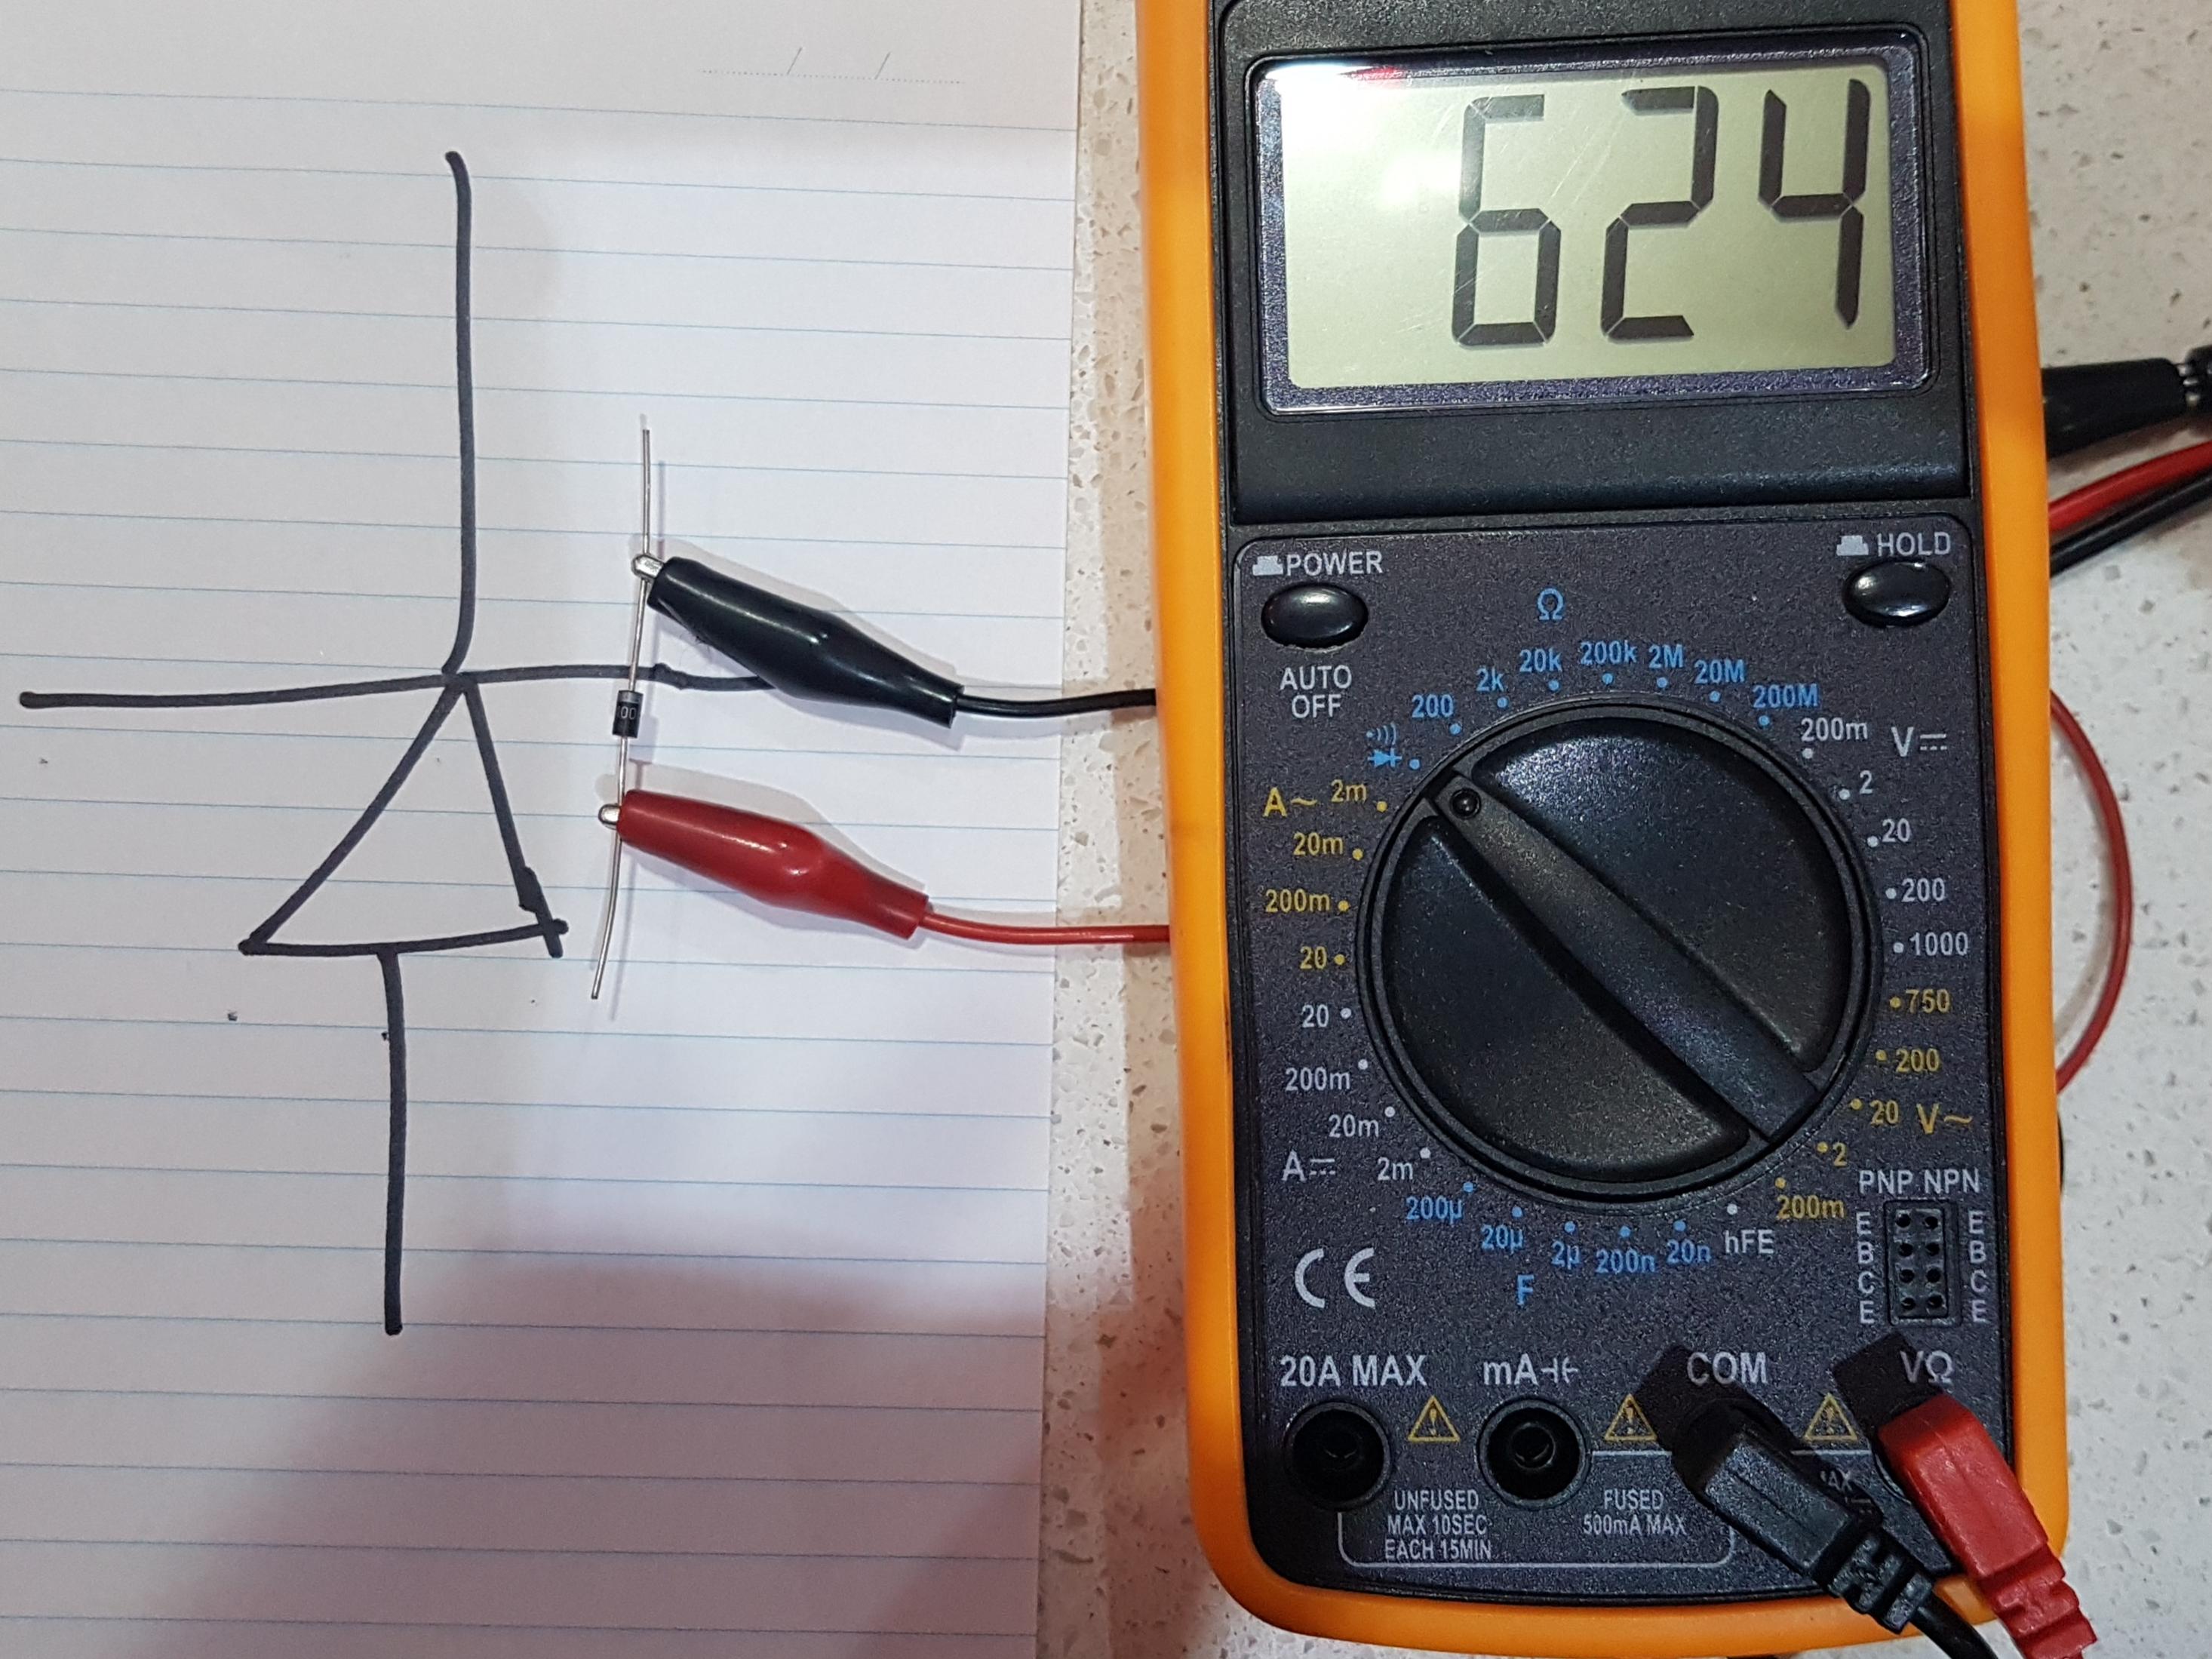
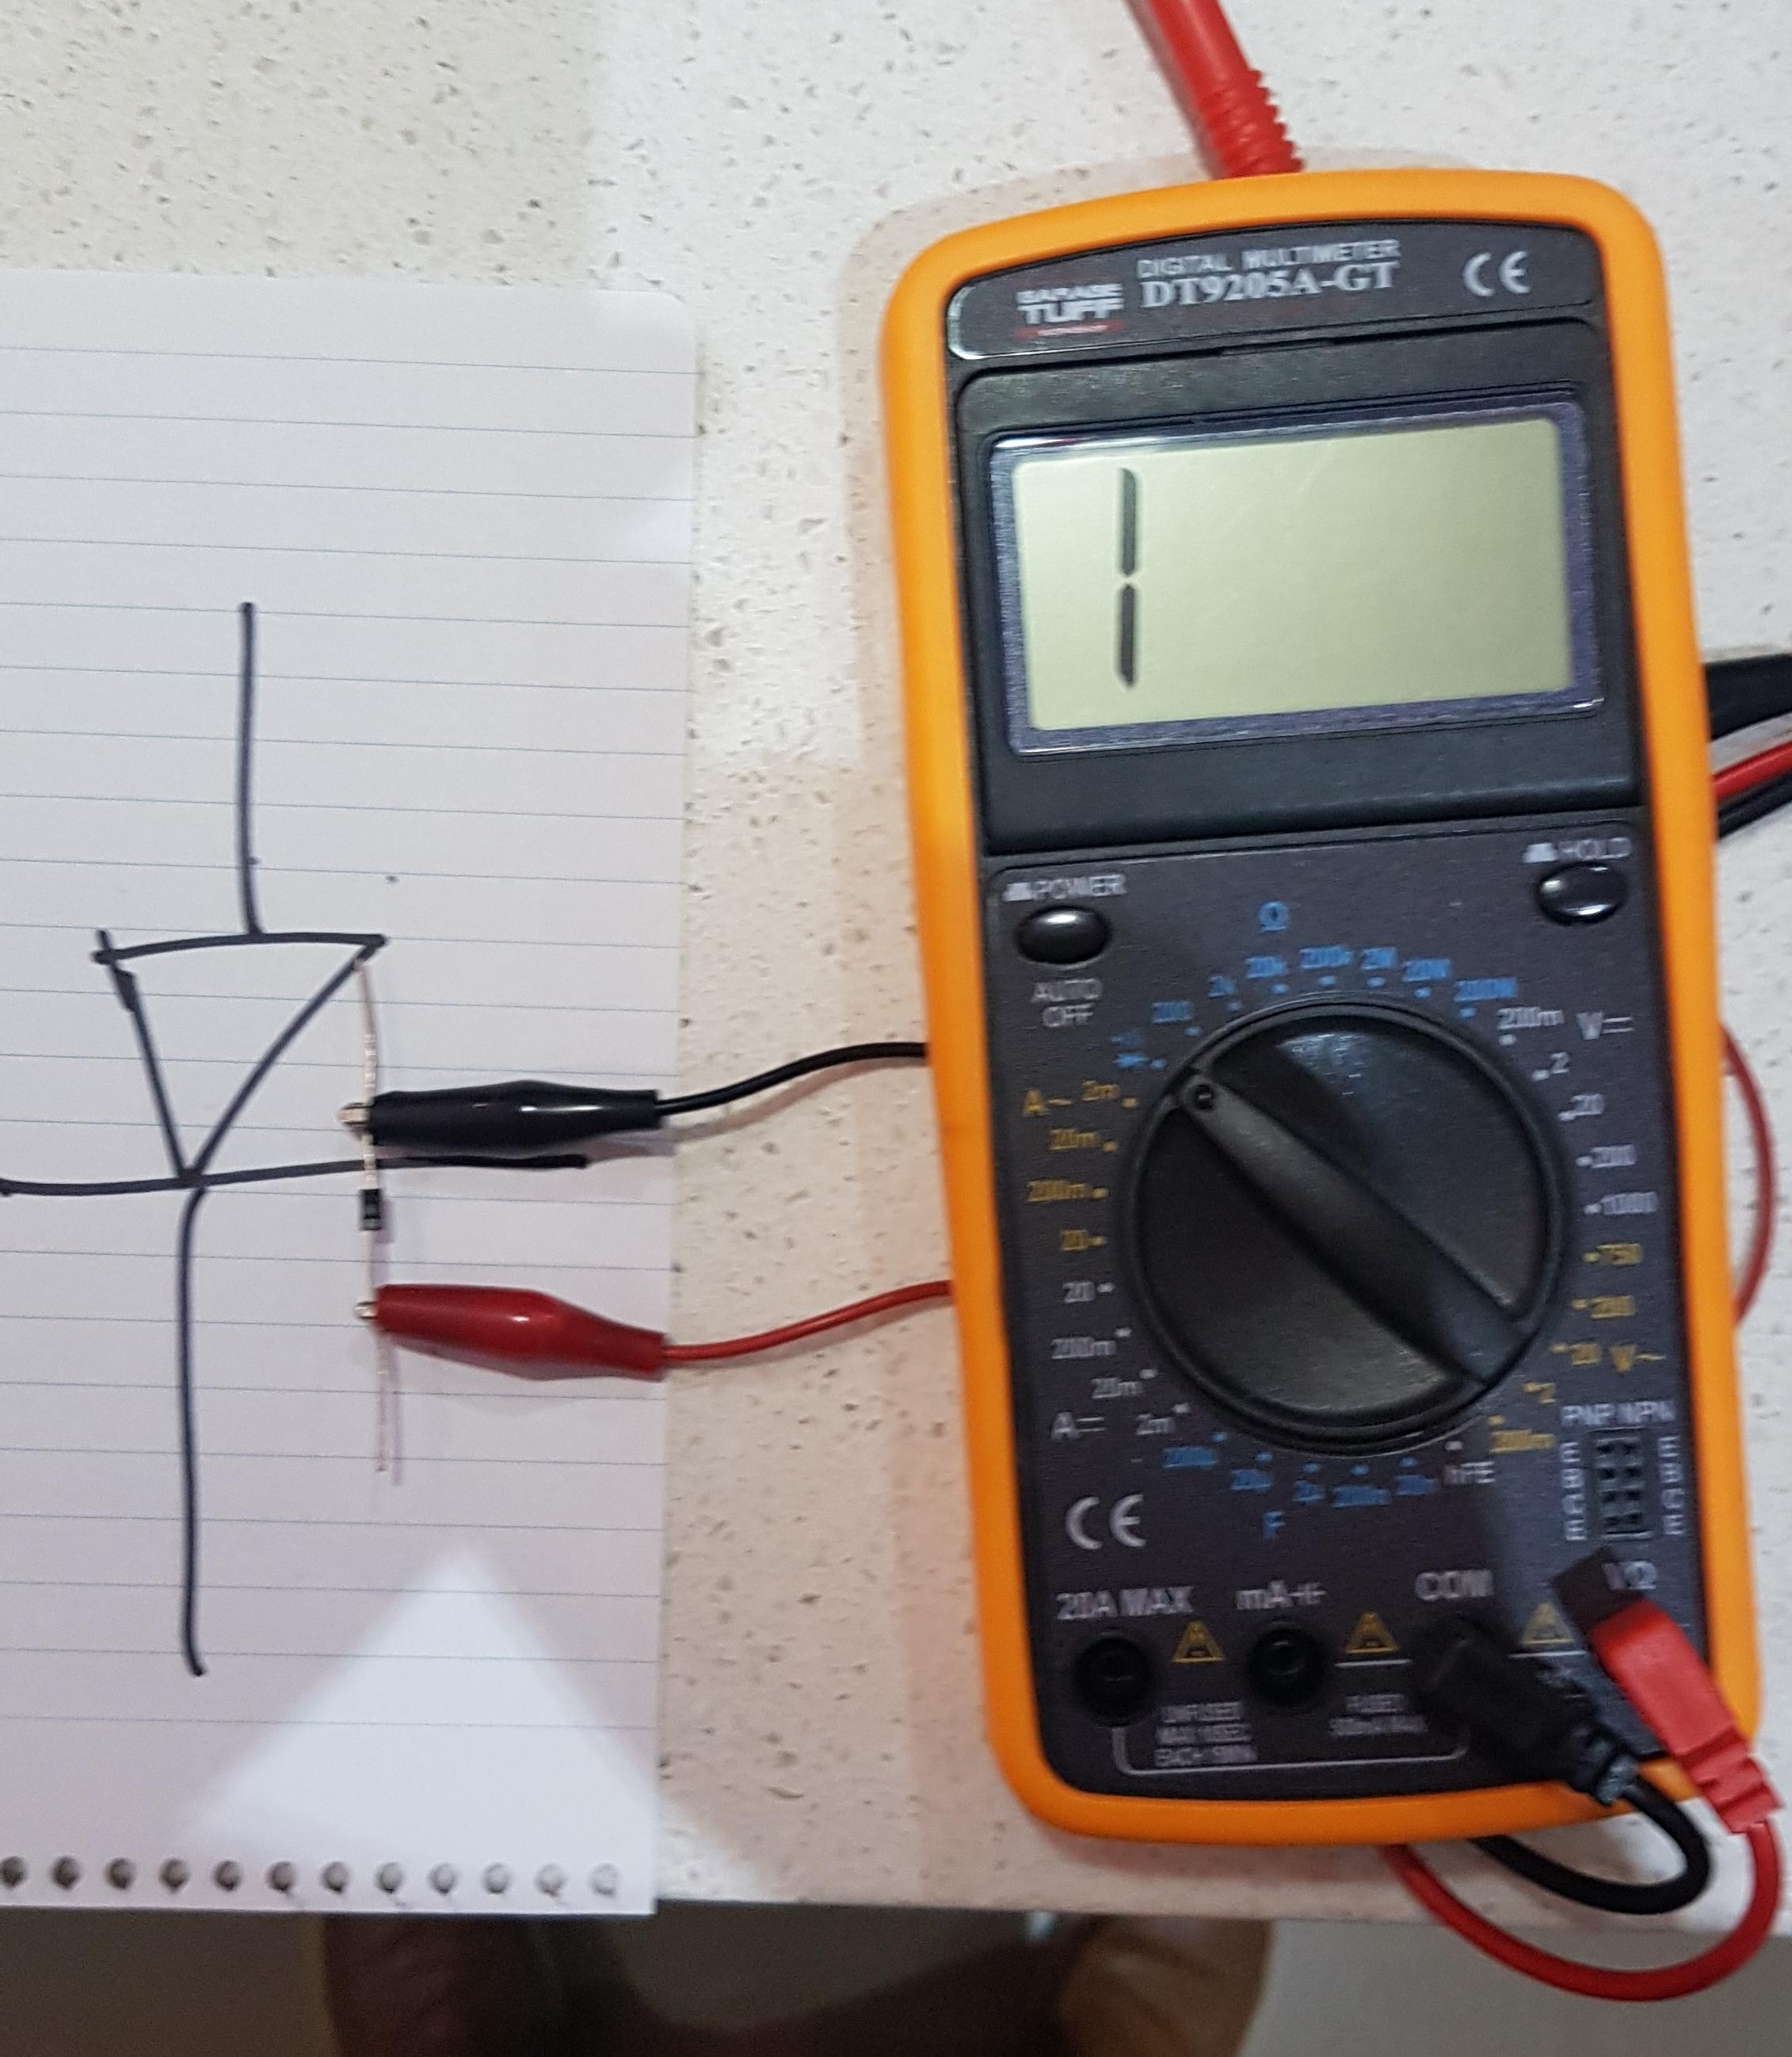
Your meter is showing good forward bias to both Diodes Now do the same thing with the meter leads reversed, ie Red lead at the centre terminal, you should have a reading as per my reverse biased photo. And if that's the case then both Neutral Diode and Clutch Diode are Good. As mentioned you have a Neutral Diode and a Clutch Switch Diode, commonly called the Clutch Diode. Not a "Clutch Diode Switch". The globe earth wire goes to the Neutral Diode. Again....The wire from the Globe is a Light green/ Red wire. (Look at the Drawing), it goes to the Neutral Diode. So you Must have zero ohms/continuity from the globe to one of the Diode terminals, if Not then you have either a poor connection or damaged wire, this will be why the Neutral light is not working. Go through the checks mentioned on my previous post. You're making a lot of hard work out of this!
-
Roger that Captain, Red Courtesy Phone in hand! 1. Oh dear! Ah No, you are not doing it correctly and your results are not making sense, why ACV AC volts?. Have your meter set to DC Volts and if it's not auto ranging set it to the 20v DC range. You should see 12v on the Yellow/Red only when the Starter Button is pressed. Clip your Black meter lead to the Battery Negative terminal. You also need to confirm that the Green/Red wire from the Starter Relay has continuity back to the other Diode terminal AND that the Green/Red wire has continuity to Ground when both Sidestand is Up and Clutch pulled IN. refer the drawing the Captain supplied. 3. If you have NO Continuity on the Light Green/Red wire from the Globe to one of the Diode conections then you have found your Neutral Light issue. 4. The Diode is not a switch! As mentioned it acts like a one way valve, allowing current to flow in One direction but not the other. Are you absolutely sure your meter doesn't show a Diode symbol on the Resistance range of your meter? This is most unusual not having a Diode mode on your multimeter! You need to confirm that both diodes show a reading only in one direction, it would be highly unlikely that Both Diodes could be open circuit. Again, check your meter and compare one diode to the other. Diode Testing - Have a close look at the two photos attached. Note the Diode symbol on the meter dial selection. Good Luck. Diode Test forward bias = Current Flow Diode Test reversed bias = No Current Flow.
-
Instead of guessing!! (Extremely poor fault finding, adding potential delays and wasting money) at least do some checks. You haven't bothered to do a thorough check of Main Fuse B as suggested! This fuse feeds all your EFI stuff and it is a common failure point, suffering from overheated connections and burnt wiring. (Refer to the above pictures attached). -Why not check the wiring and power to the Fuel Pump. Verify the Fuel Pump Ground is good back to the battery Negative. Is the pump electrical connector clean and making good electrical contact, any corrosion evident? - Remove the connector and power the Fuel Pump with some test leads connected to your battery, does the Fuel Pump run continuously while power is connected, does it's sound fluctuate while running? - You could also do the Pump flow and pressure tests in the Service Manual. Service Manual can be downloaded from this forum if you don't already have one. - When your engine dies is it virtually instant, meaning an electrical issue. OR does it cough and splutter as though it's starving for fuel? What is the quality of your fuel, could you have excessive water condensation in your tank, is it Ethanol blended? Have you tried draining the tank and adding fresh fuel? What is the state of your Battery? Is it healthy, how old? Are your terminals clean and tight???? Check the connections for your charging system, check the 3 wire connector from the Stator to your R/R and the output connector from the R/R, both of these can suffer badly from high resistance connections and burn ups. - Check the 4p Red plug to your Starter Relay, this is another week spot for poor, overheated connections to Main Fuse A, see attached picture. If you get the engine going immediately check your charging voltage at the battery both at idle and 5000 rpm should be anywhere from 13.5 to 14.5v. If you are not sure or competent in doing any of these checks, take your bike to a reputable Motorcycle electrician or mechanic.
-
Check Main Fuse B 30amp and its wiring. Located next to your Starter Relay. Are you hearing the Fuel Pump prime at every switch On?
-
Hi Billy. - Make sure the rear seat cowl comes with it. - Check the tool kit is under the seat. Make sure the chain adjusting C spanner and handle are in the kit. - Should have two Ignition keys. - Pillion grab handle blanking plates, and the original grab handles. - If the rider seat is currently in the lowest position, make sure the two seat raising collars come with the bike. - Should also have the owners manual. - Confirm the servicing has been done. It should have had a few Oil and Filter changes and at least one Brake and Clutch Fluid flush, Good Luck. A well cared for 8gen is a great bike and extremely reliable.
-

He was a valued member, a great friend and I will miss him!
Grum replied to Duc2V4's topic in OTHER Motorcycle Talk (non vfr)
To all, and especially Duc2V4. I hope you don't mind me respectfully posting this excellent photo of Lance I happened to find on the web. I think it's a wonderful photo of the man and a special way for people like me who have not met Lance aka sfdownhill to remember him. I was so impressed by his and Duc2V4's tireless efforts in organizing the multiple runs of exhaust manufacturing to help out so many VFRD members, a truly great effort. A highly valued and respected VFRD member. R.I.P Lance.
- 41 replies
-
- 11
-

-

-
Don't get me wrong, I wasn't trying to turn you off the 1200, was just offering a suggestion based on what your're looking for in a bike. IMHO the VFR1200 build quality is second to none and the engine character is fantastic. I've ridden both the dual clutch auto and the standard manual shift, personally I enjoyed the standard shift far more, as well as not having the added complexity of the auto dual clutch technology. If you find a well cared for, more recent model, with low mileage you'll be kicking goals. Good Luck.
-
Hard for me to say the word Yamaha BUT, have you looked at the FJR1300, still in production, superb long distance sport tourer, shaft drive, heaps of power, great for any two up riding and bullet proof reliability, has a great look with panniers on or off. I know a few FJR owners and there's never a bad word spoken about them, sadly, not a Vee 4!
-
Mileage Let's Rock'em 'til the wheels fall off...
Grum replied to RC79NC001's topic in Eighth Generation VFR's
End of the road!! Nah, sell it as a new bike! It'll happily go round the clock another time, fingers crossed. Proof of what a well cared for VFR can do - Great achievement. Crack open a beer and celebrate -
Yep, make sure that the brake switch wires/contacts are in no way touching anything metal, eg brake master cylinder or handle bar. This will blow that Fuse! Carefully check this. And, because its happening without touching the brake lever it would have to be the Black/Red wire of the Brake Switch that was shorting to frame. Failing a brake switch wire short, you will need to measure the short to frame with an ohmeter at the Fuse Load Side terminal, then start removing items hanging off the fuse until the short indication hopefully disappears. Good Luck.

.JPG.bb5cfec25fae9c21c31f8e65852e0b23.JPG)