Grum
-
Posts
3,850 -
Joined
-
Last visited
-
Days Won
119
Content Type
Forums
Profiles
Gallery
Blogs
Downloads
Events
Everything posted by Grum
-
Hard for me to say the word Yamaha BUT, have you looked at the FJR1300, still in production, superb long distance sport tourer, shaft drive, heaps of power, great for any two up riding and bullet proof reliability, has a great look with panniers on or off. I know a few FJR owners and there's never a bad word spoken about them, sadly, not a Vee 4!
-

Mileage Let's Rock'em 'til the wheels fall off...
Grum replied to RC79NC001's topic in Eighth Generation VFR's
End of the road!! Nah, sell it as a new bike! It'll happily go round the clock another time, fingers crossed. Proof of what a well cared for VFR can do - Great achievement. Crack open a beer and celebrate -
Yep, make sure that the brake switch wires/contacts are in no way touching anything metal, eg brake master cylinder or handle bar. This will blow that Fuse! Carefully check this. And, because its happening without touching the brake lever it would have to be the Black/Red wire of the Brake Switch that was shorting to frame. Failing a brake switch wire short, you will need to measure the short to frame with an ohmeter at the Fuse Load Side terminal, then start removing items hanging off the fuse until the short indication hopefully disappears. Good Luck.
-
Absolutely.......... Loss of this Fuse means No Kill Switch Power = A dead Engine Stop Relay and No power for the Starter Relay and all the EFI stuff. It also messes with Starter Inhibitor Relays 1 and 2 screwing your Neutral Light. And because your ECM is now unpowered there can be No Gear Selection readout, equals just a dash just as you have. And no Fuel Pump prime. Have You in any way altered the angle of the Front Brake Switch assy OR fitted after market Brake levers?
-
Ok you have at least found the problem, a short somewhere. Give me some time to have a good look at the diagram. Do you have a multimeter, or a few spare 10amp fuses?
-
Ok lets hope it was just a random fuse fail. See what happens with a replacement. Good Luck.
-
Ok, now Check the Start/Horn/Stop 10amp Fuse in the Left side Fuse Box, is it Blown?
-
OK. Have you confirmed BOTH Fuses in the Sarter Relay are definetly good, Main Fuse A 30amp and Fi Fuse 20amp.?
-
Again IS the Kill Switch set To RUN, its easily overlooked? And can you physically confim you are in Neutral gear?
-
He was a valued member, a great friend and I will miss him!
Grum replied to Duc2V4's topic in OTHER Motorcycle Talk (non vfr)
Really horrible, so sad to hear this. My heart goes out to all of you who knew Lance, family and friends. Obviously an extremely well liked and respected gentleman. Certainly drives home the reality of our own fragility, ride safe everyone. Sincere Condolences to all. R.I.P Lance. -
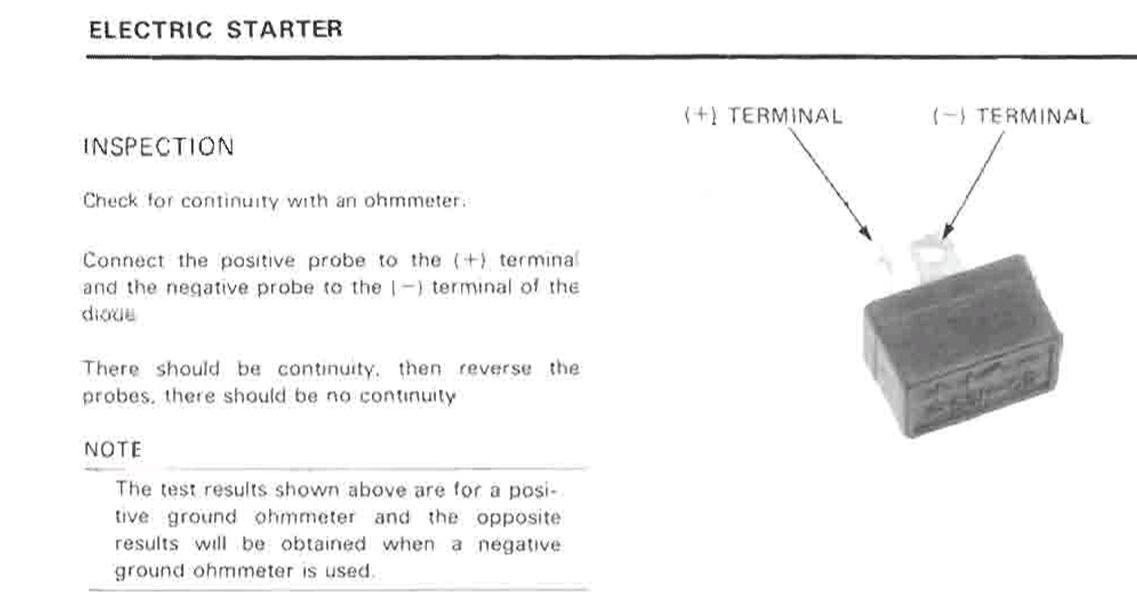
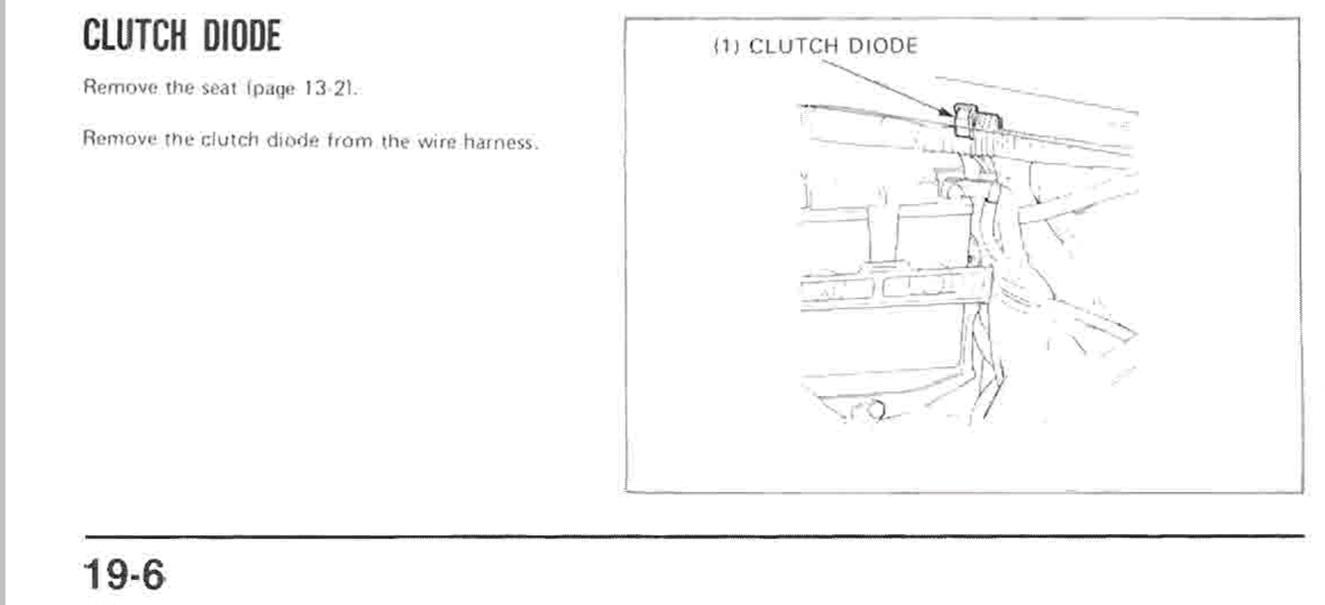
Hi Paco. Further to the good advice from the Captain. Absolutley make sure you are working with a healthy Battery and your battery terminals are clean and tight. Assume you are NOT hearing the Starter Relay clicking when you Press the Starter Switch? You should measure 12v on the Yellow/Red wire at the Starter Relay every time you press the Starter Switch with Ignition to On, measure this, what do you read? If this is good then you need to verify the Ground path being the Green/Red wire, through the Clutch Diode then through the Neutral Switch to Ground. refer above Starting Circuit Diagram. Concentrate on getting your Neutral Light and a Neutral start working. Refer to the Starting Circuit Diagram the Captain supplied above. 1. Verify the Neutral Switch operation - Are you able to unplug the wiring directly at the Switch? If so put your meter into Buzzer or lowest Ohms range. Preferably place the Black meter lead on the battery Negative and the other lead on the Neutral Switch terminal. Go from In Gear to Neutral many times - make sure you have Continuity/Zero Ohms whenever you are In Neutral and NO Continuity when In Gear. 2. Using the diagram the Captain supplied, reconnect the Neutral Switch wiring and locate the Light/Green wire at the Clutch Diodes (see attached picture for Diode location). While in Neutral probe this wire again making sure you have Continuity to Ground on the wire. 3. Measure both Clutch Diode these work like One Way Valves, allowing current flow in One direction only. Select Diode mode on your meter, place the Black lead on the Light/Green wire junction then place the other lead probing the other two ends of the diodes you should measure current flow, reversing the leads should show NO current flow. Given the problem you're having you'd be looking for an Open Circuit Diode = No current flow in either direction. See how you go with these tests to start with.

-
How old is your battery? First and foremost make sure your Battery is fully charged and healthy, any doubts, charge it and have it load checked, any good Automotive parts store will load check it for free. Battery terminal voltage is NOT a true indication of battery Capacity - it's ability to deliver plenty of cranking amps when starting. Also make sure the battery terminals are Clean and Tight. Just curious, is your Neutral Light working? And, does the engine crank over with the SideStand UP and Clutch Pulled In? And.........is the Kill Switch set to RUN? Let's know how you get on.
-
The ECM has no feedback of Fuel Pump ops, flow or pressure. Provided the ECM sees the appropriate cranking pulses, and the enable logic as previously mentioned, as well as no active fault codes, power and grounds all good, then it should be firing the injectors you would think....!
-
For the injectors and most likley the Ignition coils to be enabled the ECM MUST see a Ground at either B10 for a Neutral gear start (from the Neutral Switch) OR a Ground at B21 from the Sidestand UP while riding. If neither Ground is detected = Dead Engine. So, while in Neutral, make sure you measure a Ground at B10 of the ECM. Note - the Neutral Ground goes through one of the Clutch Diodes before reaching the ECM. Verify that you measure a Ground at B21 a Green/White wire, with the Sidestand UP. Might be worth giving both ECM plugs a good spray of electrical contact cleaner something like CRC 2-26. Assume you have fresh fuel, a healthy charged battery and both battery terminals are clean and tight! Ignition Switch to On. Make sure you are measuring battery voltage, a solid 12v, at the Black/White wire of the Injectors and Ignition Coils as well as B8 of the ECM. Try starting the bike with Sidestand UP does this make any difference? Remove the Spark Plugs. What state are they in? If they are wet, then you may have an over rich flooded no start situation. Check that you are getting a good Spark. If you're intending on replacing the plugs (worth doing), try the NGK Iridium CR9EHIX-9 type. Another thing worth checking is the FPR Fuel Pressure Regulator. Check it's vacuum hose, make sure it's dry and no fuel dripping from the FPR, any sign of fuel will mean a ruptured diaphragm in the FPR, dumping excessive fuel via the vacuum hose into cylinders 3 and 4. Have you downloaded the Service Manual?
-
???!!! Are you working with a wiring diagram of your bike???? You've stated twice your Starter Motor is working fine. Now you're saying all four Starter Relay contacts are shorted. If that was the case you'd Blow the Main Fuse instantly or destroy your Clutch Diode, and your Starter would never work? Doesn't make sense to me! Very easy to test the Starter Switch. With Ignition to On you should measure 12v at the Yellow/Red wire of the Starter Relay Every time you press the Start Switch.
-
Doesn't make sense that your Starter Switch is "moody" when you say "pressing the switch causes normal Starter Motor operation".
-
"Still have high temps" ? While the bike sits stationary idling? In stop/start traffic? All Normal. These bikes rely heavily on good coolish airflow through the radiators to maintain a constant temp of around 76 to 80 degC with an ambient temp of around 25degC or lower, on hotter days engine temperature will also rise. With a cold engine feel the upper radiator return hose at the neck. Start the engine, at around 76 to 80 deg you should notice the hose temperature rapidly rise. This will indicate both thermostat and water pump operation. Not sure if there is any way of checking it but perhaps fitting a new Radiator Cap might be worth doing, and I wouldn't trust that damaged hose you have!
-
Once burped. Top up the Reserve Tank, don't worry about overfillig it, the system will either draw back what it needs or any excess will be simply dumped overboard via the reserve tank overflow hose. just keep an eye on the Reserve Tank level, top up if needed, but the level should settle down after a ride or two. I'd be a little concerned about the hose burnt by the header pipe, needs sorting out! As Terry mentioned make sure your cooling fan is kicking in when it should. Download the Service Manual from this site if you don't already have one, link attached. Service Manual, 6th Gen 2002+ VTEC, with bookmarks, new cover & OCR https://www.vfrdiscussion.com/index.php?/files/file/150-service-manual-6th-gen-2002-vtec-with-bookmarks-new-cover-ocr/
-
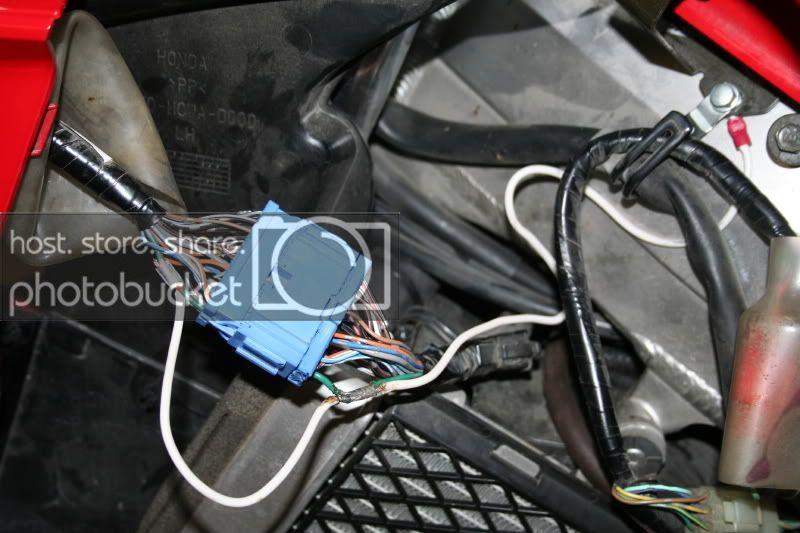
With all those various items not working, it sounds like you have a Ground issue. Check the yellow ground block (if it has one!) taped into the wire harness, located front left side of the bike. Make sure all pins and sockets are clean, no sign of oxidization or burnt connection. May require cutting the block out and soldering all of the wires together. Also check the Green ground wire going through the 18P Blue connector, located just above the left side radiator. See attached pictures. Make sure that any Ground wire has solid continuity, (virtually zero ohms) back to the battery Negative. Make sure that with power on, Ground wires have ZERO Voltage on them with respect to the battery Negative, voltage detected on a Ground wire means it's not properly Grounded. Good Luck.
-
Hi Joe. Beautiful VFR400R You Have. You might have an issue with Voltage drop somewhere for a Normal Neutral Start, could be a poor/high resistance connection. - Measure the 12v at the Ignitor Unit. - What does this voltage drop to as you crank the engine over? - Compare the voltage reading to the voltage measured at the Battery while cranking the engine over. How different are the measurements? Note - Keep the Black voltmeter lead on the battery Negative terminal.
-
Nice bike Keny. Do some good ohm measurements on both the Pulse Generator coils and the Cam Pulsar (if it has the Cam Pulsar) especially if you can get the engine hot. These coils can become flaky/intermittent with heat, make sure they have good continuity in wiring back to the Spark Unit. Also make sure 12v Power (Black/White wire) to the Spark Unit and the Ignition Coils, and the Ground (Green wire) to the Spark Unit is good. And.......It goes without saying! Make sure battery terminals are clean and tight.! Good luck with the bike.
-
Good on you buddy. Great story on beating the big C. Without the need for surgery. Glad you've got the brakes just as you like them, and remember do a brake and clutch flush every 12 months or so, it's a piece of cake on an 8gen. Enjoy the bike, the 8gen is a ripper. Good health to you and safe riding.
-
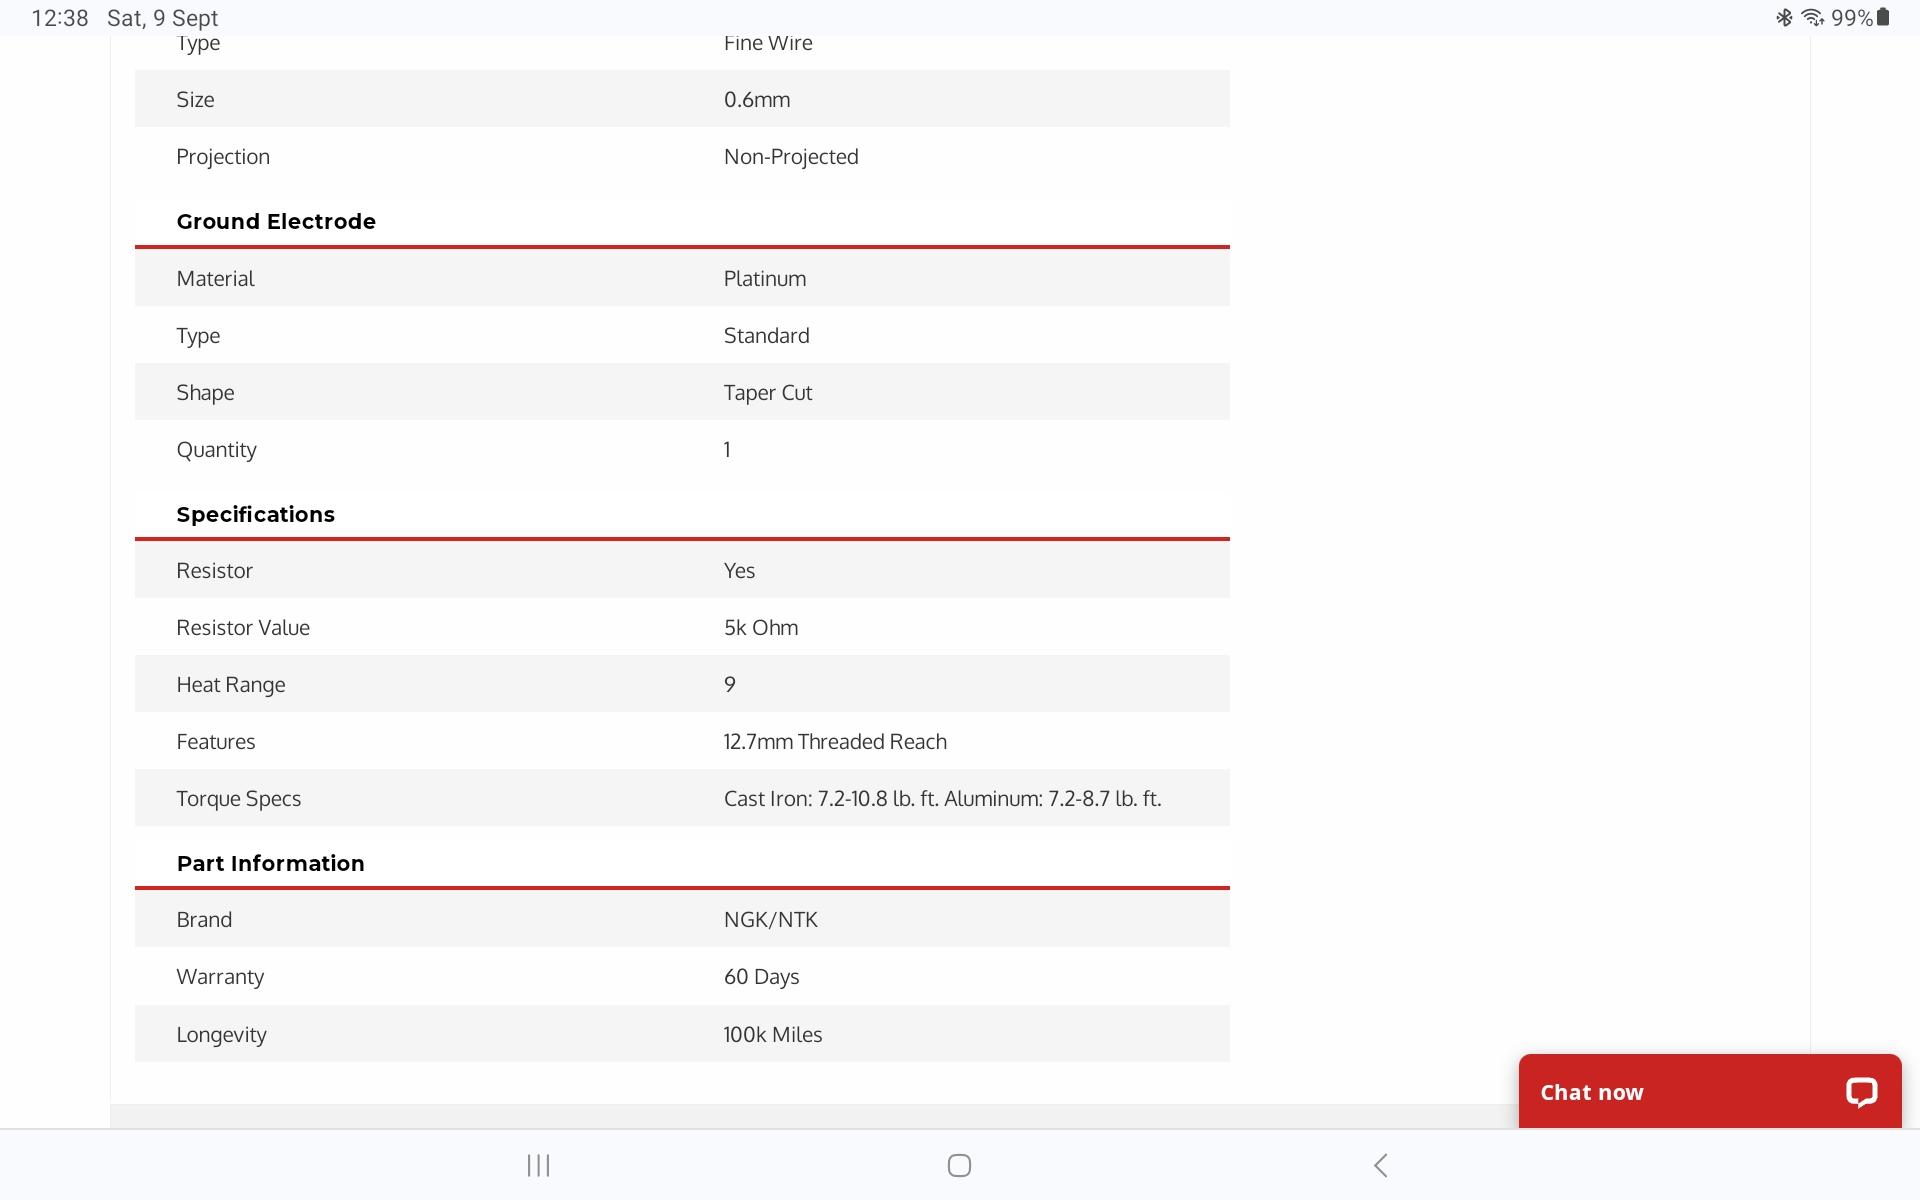
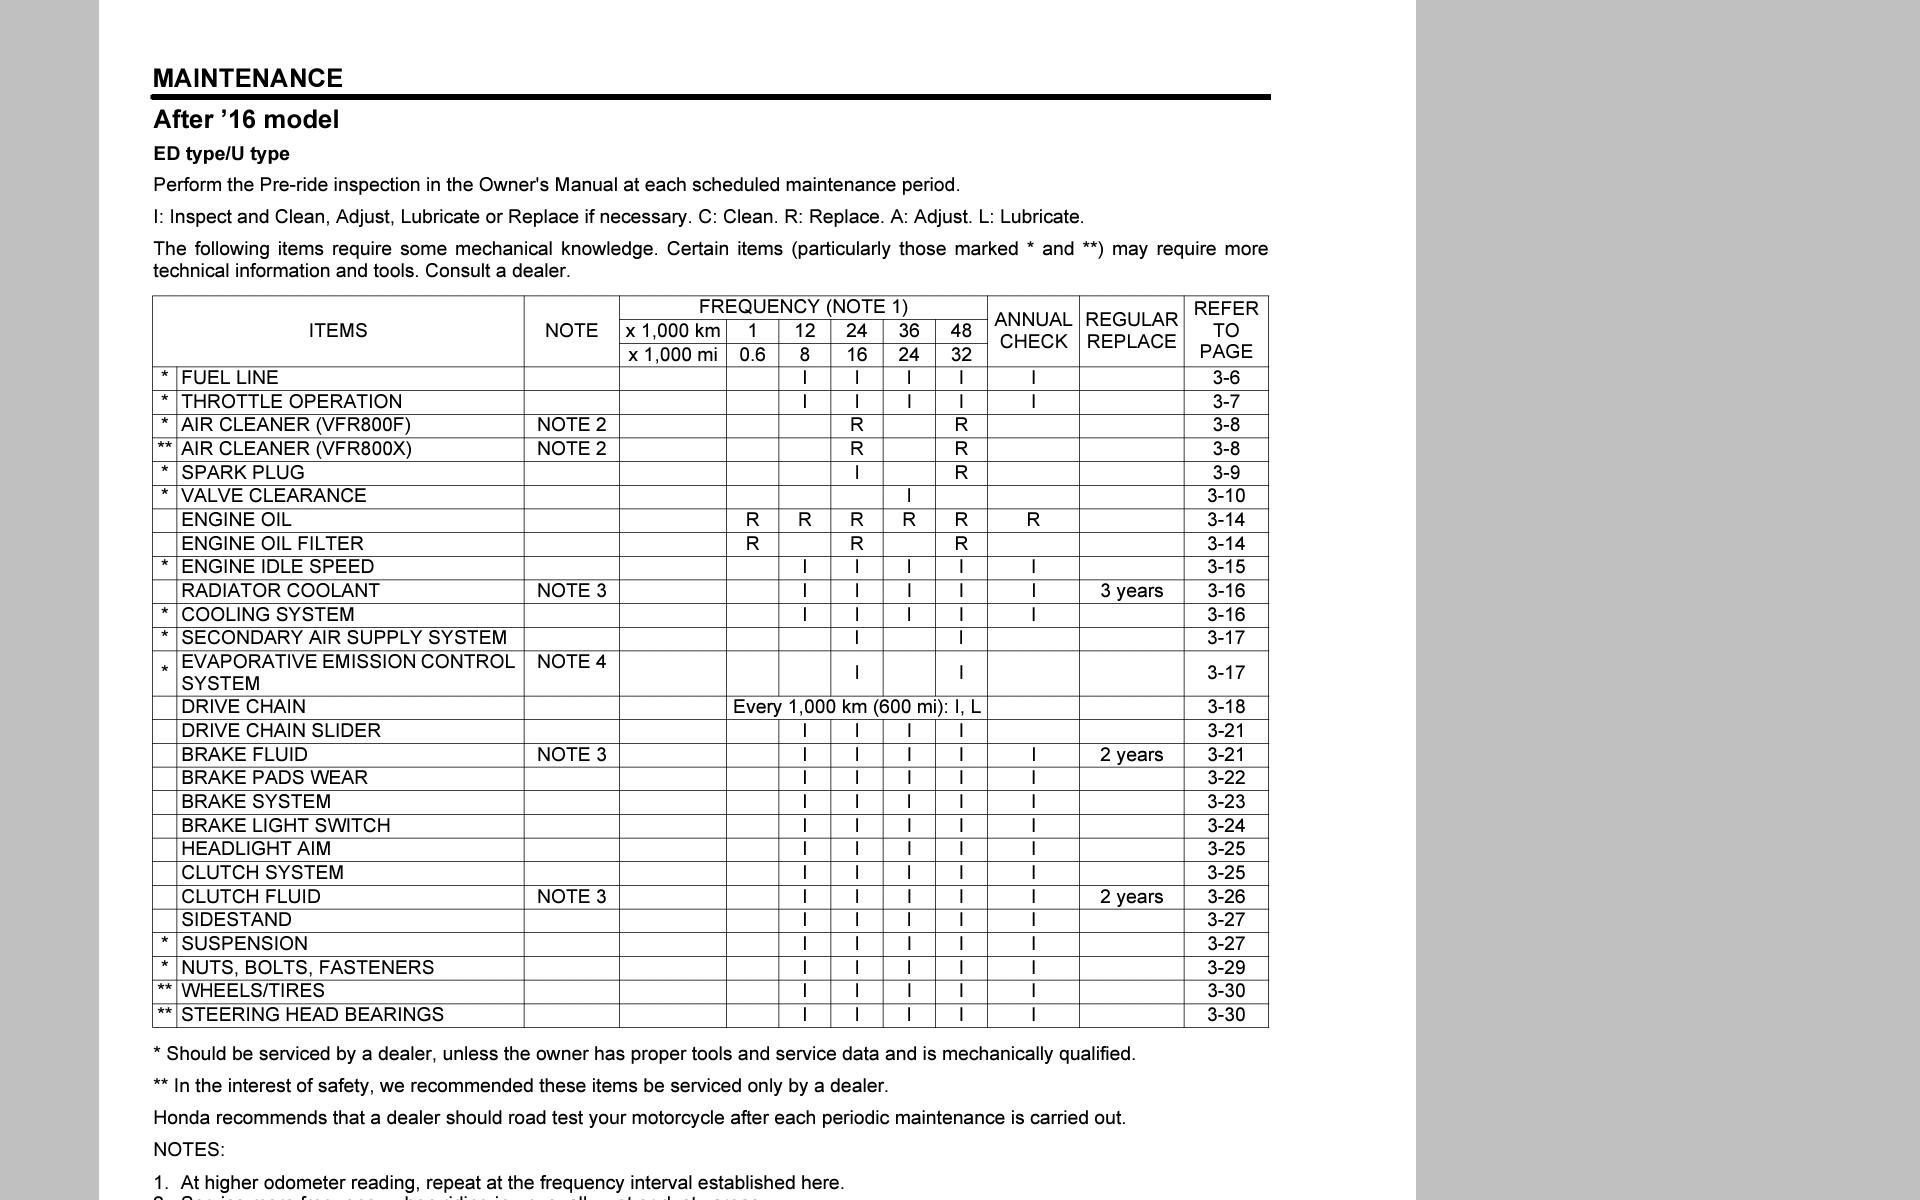
Hi B. See attached spec for NGK IMR9D-9H's. While NGK specify a design life of 100,000m Honda no doubt will apply a fair reliability safety margin specifying 48,000kms. These Plugs are nothing like the old car plugs you refer to! Even my 2013 Mazda 3 has a plug change interval of 120,000kms again being Platinum, Iridium type. I replaced my 8gen originals at 60,000kms. colour, wear and electrode gap were all good bike had no performance issues. Some years back I replaced the plugs on a mates 6gen NGK9B-9H after 70,000kms, same situation, no performance issues plugs looked good and gaps were all in spec. Yep, from the day I picked up my 8gen I've serviced it myself. I think I'm lucky where I live, roads are never salt treated in winter, this must help bearings, chains and sprockets. I never use a pressure washer anywhere near bearings. Note - From 2016 8gen, the valve clearance check has been increased to 36,000kms. See attached. Guess this should just apply to the 8gen in general.
-
Hi Bluehawk. Don't understand why they would replace the plugs,16,000 mile is way too early for Platinum Iridium plugs, the NGK versions are designed for 100,000mile! Agree with you regards the front wheel bearings that perhaps a pressure washer has prematurely made them fail. I'm up to 94,000k's with no wheel bearing problems. Actually, after 94,000k's the bike is running great, no issues at all. The bike has never been in a workshop since the day I bought it new in 2014. As for the chain, always err on the slightly loose side of the tolerance, never tight. Enjoy your 8gen, its a great bike.
-
Seriously, all these LED stripe light things look tacky and degrade the look of a quality machine like the 8gen or any VFR for that matter! Where are ya gonna stick these things, and could they simply fall off at some stage? Anywhere on the fairings will probably need some form of quick electrical release for fairing removal, why go messing with the bikes electrics for no gain and the potential for introducing problems. Sorry, but Only in my irrelevant view, it will look like shit! But of course YMMV. Enjoy your wonderful 8gen.