Marsman99
-
Posts
404 -
Joined
-
Last visited


Marsman99's Achievements
")


-
Does anybody know how to contact Prez aka Satariel who made the ECC unit for the 1200’s? His real name is Przemyslaw Jaworski. His ECC unit has been great but recently lost a rubber cover on one of the switches. I need his help on a replacement.
-

1200 Engine blown at 32000 miles???
Marsman99 replied to 1996 Beeper's topic in Seventh Generation VFR's
FWIW, I had about 96K on my 1200 DCT when I gifted it to my son. Not a single issue that wasn’t self inflicted. I think your sitch is very unusual, I would think the VFR community would be very interested in knowing what you find is the root cause. -
Maybe it’s just my suspicious nature, but it seems unusual that a 1200DCT with <5K miles is selling for a mere $3K…and the seller lost both OEM keys? I’d start by running the VIN before I put a dime into it. https://www.nicb.org/vincheck If it checks out, it’s a steal.
-
Moving onto different motorcycles
Marsman99 replied to Bananaorama's topic in OTHER Motorcycle Talk (non vfr)
Sadly, I too have decided to depart with my beloved 1200. I signed over the title this weekend to my son (he’s ecstatic). After enjoying it for 11 years, I just couldn’t take the literal pain in my neck anymore...from just a few hours in the saddle now. From the outset, I added all the parts to raise the bars, deflect wind, etc. Worked great for a decade, but the last year was a tipping point as age finally took its toll. I’m moving on to an ADV bike for an upright seating position and level reach to the bars. The big VFR has helped establish some requirements though. First, gotta be a shafty - no chain maintenance is a gift from the gods. Second, gotta have clutchless shifting. After the DCT, I’m spoiled. Not the same I know, but close. Third, gotta have the power/handling to run with all my buddies who have switched to Multistradas. Which is a requirement on its own sort of…I don’t want to be another Multi rider in the group…though it is a great bike. That leaves the big GS or Tiger 1200, though for some reason the Pan American intrigues me - but it's shaftless. I have actually thought about going the route Skids went - getting a 1200X (with DCT). They can be had for about $5K US and meet the above requirements. True, they lack the electronic gadgets and active suspension, but I don’t really need that stuff. This would leave a lot of $ for upgrades to suspension, fueling, exhaust etc. and it comes with the monster motor and DCT! -
Damn, I just got the letter too. My bike is in Phoenix for a few months. Anybody know a reputable Honda dealer there?
-
Strange the recall is listed on the NHTSA recall site, but not on Honda’s recall site. Maybe this is Honda's way of saying they’re not fixing it.
-
Might want to consider a fuse block that that includes switched and direct fused connections. If you plan to add accessories, this is the cat’s meow. One example: https://twistedthrottle.com/shop/electronics/fuse-blocks/denali-powerhub2-power-distribution-module/ BTW, Heated grips - meh. Heated gloves - yeah! I rarely, use my OEM heated grips as I haven’t found a pair of gloves I like that have minimal insulation on the palm and the needed insulation on top. With all around insulated gloves my palm cooks, my fingers stay cold. On the other hand, heated gloves are lighter weight and evenly distribute the heat. Yeah, the connection is a bit of a hassle, but they work well. Nice looking Gen7. Who makes the top case you have on there?
-
Hi Marsman99, Thank you for your donation of --. We look forward to improving the forums with your donation. Thanks VFRDiscussion
-
Convertibars for 7th gen... or any better risers?
Marsman99 replied to Yahya's question in Modification Questions
On my 1200 the limit on bar height and angle are the cables and the front fairing at full lock. I have Helibars and they are a definite improvement, but it took every bit of the available envelope to get it. Could use another inch in height...story of my life. -
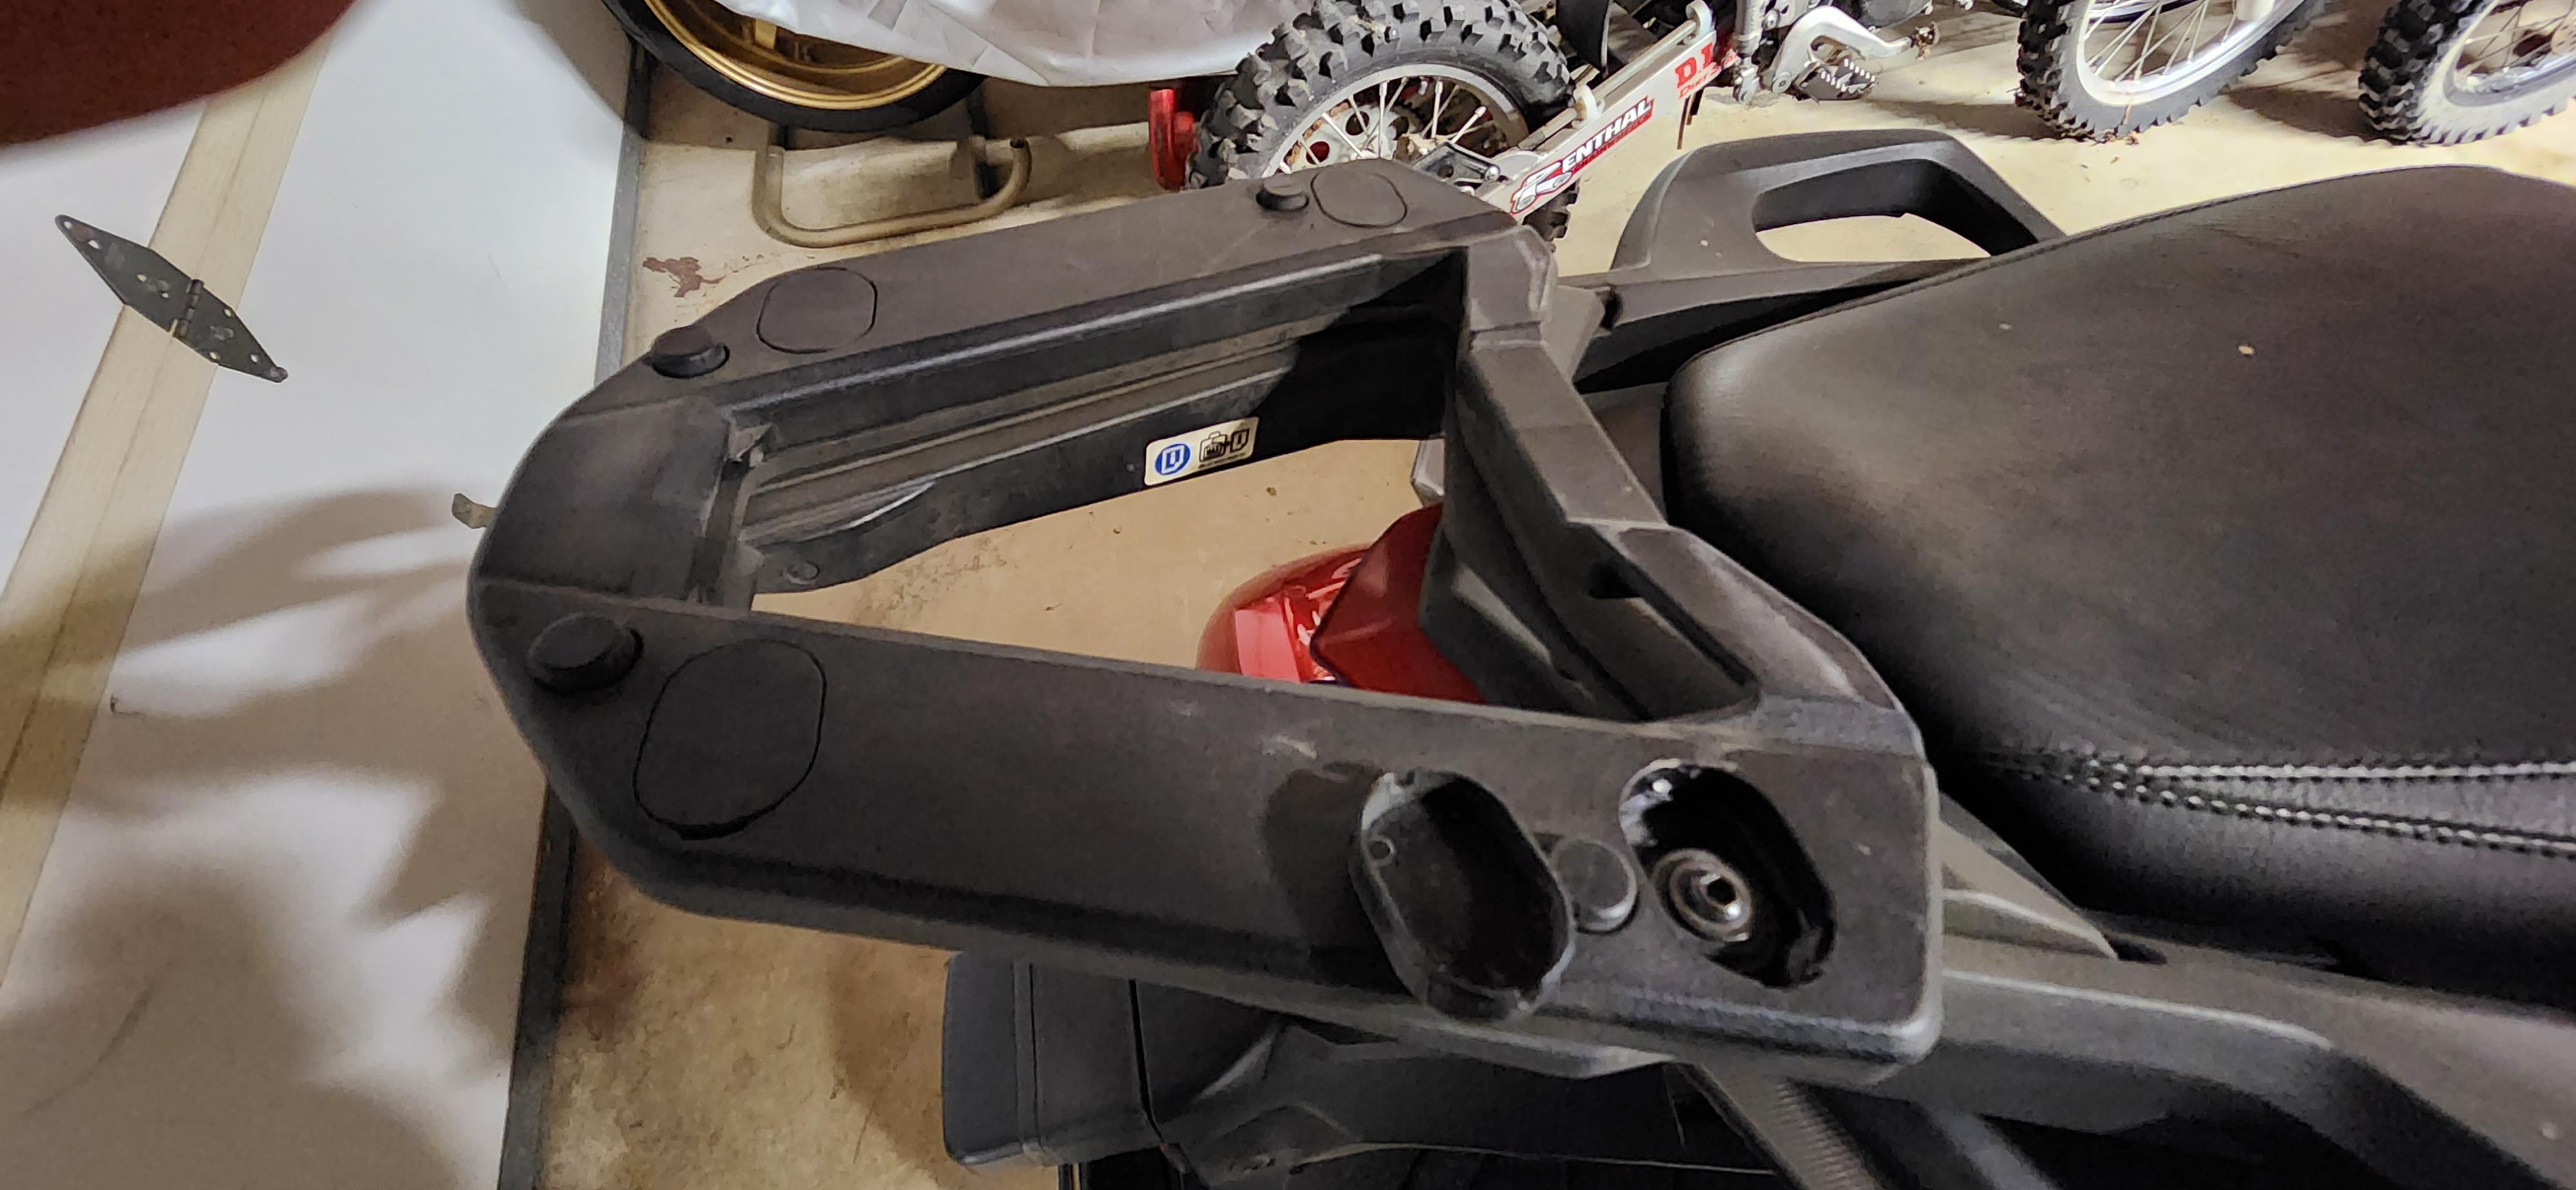
7th Gen cover for cargo box harness
Marsman99 replied to AZ7Gener's question in Modification Questions
AZ7Gener - See attached. Pulled out one of the covers. Dutchy - Would need a pretty large baby-blue to cover that far back. 🤢
-
7th Gen cover for cargo box harness
Marsman99 replied to AZ7Gener's question in Modification Questions
I haven't seen anything to cover up the mount when the box is off, but it would be a nice option now that you mention it. I see that you don't have any of the four hole covers on your mount. I had to silicone mine on since the fit of the covers was so loose. -
ThatGuy, The following might help in your eval: I just rolled 100K miles on my 2010, which I bought new in 2014. My mileage has been roughly 70% commute and 30% sport. The commute has been all freeway between 70-80 mph, while the sport riding has been long road trips (>2K miles) through the western US, all windy country, canyon and mountain roads. The bike has been flawless, not a single issue other than an oil leak that was self-inflicted. Other than standard maintenance it is true to the VFR line in terms of fit, finish and reliability. I bought the DCT and have to say it is awesome. Obviously for the commute, but even better in the corners. Once you get the hang of paddle shifting, banging a shift mid corner under power or de-accel without chassis upset feels, well, like cheating. The DCT is a polarizing option, but most that don't like it probably haven't spent much time on it. As Skids says, it is a heavy bike but for me only noticeable in parking lots and in the tightest of successive corners. Anything else and this thing is a rock, a powerful rock. I've copied most of the mods detailed by the pioneer 1200 owners on this very site (I think the archives still exist). The stock suspension sucks and there are plenty of good options for upgrade. I went with DMr front and back and they have been a great option considering price/performance. That would be the first fix I'd recommend.
-
Buying a 1994 Vfr750 with issues?
Marsman99 replied to JJMaine's topic in Third and Fourth Generation VFR's
37K on the odo means the bike is just getting broken in. I've got nearly 130K miles on mine and it is running great, no drips, leaks or mechanical issues. Seems obvious, but be sure to check the oil level with the bike straight upright (on center stand). On the side stand it'll show overfilled. OEM shock is probably toast. DMr Performance is the only shop I know that can rebuild the OEM. I know, Jamie has done mine twice. Or, you can opt for one of the DMr line of shocks. Fully adjustable, work great and very affordable. Have one on my Gen 7 and love it. If you go this route, PM me as I have some useful info you could use. Probably need a refresh of the forks too, they weren't great in OEM form. Corroded fork lowers can be easily powder coated. Be sure the engine runs smoothly beyond idle, i.e. drive it around. I say this because in the US we use ethanol diluted fuel. I let mine sit for a year and the carbs got gummed up from the goo this asinine concoction creates. No fuel cleaner worked. Had to remove and rebuild all four, followed by the always fun effort to balance carbs. Trust me, you don't want to waste precious life on this path. Gen4's are infamous for extensive stress cracks in the rear cowls. No OEM replacements are available. If yours are in good shape that is a good sign. I'd hold off putting a lot of miles on the bike until these are reinforced. There are some good threads on the subject on this site. Of course, there are the well established electrical issues, notably the regulator/rectifier. Also some good threads on this subject on VFRD. After two rectifiers, I solved mine by a better cable/connector set and an R1 regulator/rectifier. That was 75K miles ago. Good luck. Hope you're able to get this VFR back on the road! -
Anybody running a lithium battery, AntiGravity?
Marsman99 replied to VFR80025th's topic in Eighth Generation VFR's
I have Li batteries in all my bikes that use batteries, street and dirt. All are at least 3 years old and not a single issue so far. For me, lead based batteries are a thing of the past. -
On the bright side, I can get you half way there. I have a BNIB OEM throttle side heated grip, but no left side..don't ask why. You find the left side somewhere and I'll make you a great deal on the right side.