

KanadianKen
-
Posts
1,159 -
Joined
-
Last visited
-
Days Won
12
Content Type
Forums
Profiles
Gallery
Blogs
Downloads
Events
Everything posted by KanadianKen
-
 Greg - I got your message about the tools/connectors you need. Give me a call when you get done drinking chips and eating beer!!
 -
Yes you do - when we hit the local tavern for a pint - and you see me talking to the owner and look over at you - YOU raise your hand and nod. THen the owner will bring you your very special prize. It'll be awesome!! Bailey what are we at for registered attendees?
-
Get packing Timmy !!
-
i must be drunk already...... things are all blurry........
-
Reserve A 5Th Gen Solo Rack From Kanadianken
KanadianKen replied to MotoSensation's topic in Luggage
Actually - I'm a little surprised by how many have already signed up. Give it a week or two, the list may continue to grow. I'll have to dig back into my PM's from members asking for a 5th gen rack - that I couldn't help. 5TH Gen Solo Rack - LIST (copy - paste - and add your name to new post please.) 1 Motosensation 2 ruberducky 3 Higgin 4 Munky 5 Primo 6 Ab-Oz ? 7 SinNh ? -
Reserve A 5Th Gen Solo Rack From Kanadianken
KanadianKen replied to MotoSensation's topic in Luggage
I've shipped several to OZ. I recall $45-50 Canadian to get it there - but it takes several months by Canada Post. Good idea Ken. Make sure they're committed. Lee - I've never asked for $ up front before - but I can't afford to be holding that much tied up DEBT. Its the only way I'll do it again for the 5th gen bike - last time was a nightmare. -
Reserve A 5Th Gen Solo Rack From Kanadianken
KanadianKen replied to MotoSensation's topic in Luggage
Yes - that thread shows the rack in place on Lobsters 5th Gen. However - that version of the rack used steel that would support a Volkswagen..... I had a look to see if I had any recent photos of the "Current" rendition of the rack, I'll have to take a couple tonight and will then post up. -
Spoke with Timmy last night - I believe the issue is that if the bike were to get impunded in NC for no title, the ONLY solution would be for the previously titled owner to show up in NC to gather the bike up. That wouldn't happen - so Timmy would be out a bike (long term) and depending on when the impound happened during the week that we are there - he may be riding a lawnchair at the motel for a few days while the rest of us are riding. The Yellow Peril is the better choice given the circumstances. I'm meeting Timmy about an hour south of Pittsburgh in Morgantown WV, and then we're loading his bike up from there. Couldn't really get 3 bikes on my trailer - it would be close to overload with that weight - and for a long trip - not gonna do that.
-
Can you root canal the VFR700 motor.Nice gesture, funny you should mention root canal I was told Friday number 4 abscessed. Bring a dreaml and some novocaine. I would just as soon pay you. I've witnessed a carb sync by flashlight at TMAC but never root canal. Do it! ;)
-
Looking good Silver Fox! You've been holding out on us I think........ I'm predicting 85-90 for the final tally. 100 members would be awesome!
-
Pads picked up today from Riders Choice in Mississauga for $39 a pair. For any GTA (Southern Ontario riders) don't bother going to Ready Honda Powersports - they are charging $57 a pair, and they don't stock them.... This will be my project later tonight.
-
More info required..... The Masses want to know..........
-
Fully disconnect the power commander or at the least check its electrical connections are perfect. I'm betting on the PC connections.
-

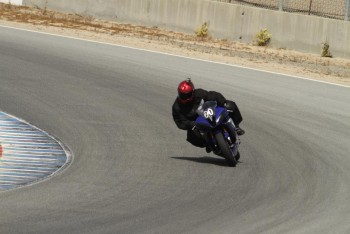
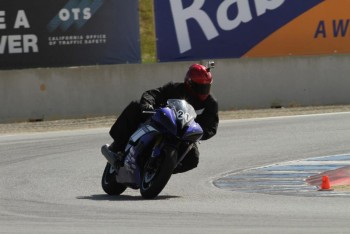
From the album: YCRS - LAGUNA SECA March 2013
-
YCRS - LAGUNA SECA March 2013
Images added to a gallery album owned by KanadianKen in Member's Gallery
Pics and Vid from Laguna Seca Yamaha Champions Riding School - March 2013. -
-
From the album: YCRS - LAGUNA SECA March 2013
-
From the album: YCRS - LAGUNA SECA March 2013
-
I'm not being a smart ass but is the red rocker switch in the correct position? It's happened to a lot of folks.
-
Looooking goooood!
-
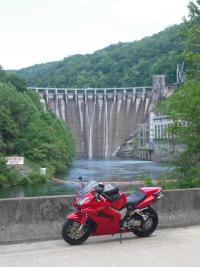
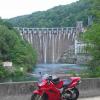
GLad the Solo Rack is working out! Looks like you mounted it a little differently - no grab handles? More info! Looks great. Is that a Canadian bike - or did you get some graphics sent south? Nice set of vehicles !
-
Sweet download! thanks - thats the right set for my year. WOnder why the 6th gens have different part numbers between the years? No - I was sippin whiskey at the time...... But its all coming back to me now!
-
THank you! I see that ABS pads may be a different number - any verdict on that? Mines non abs.
-
I"m online searching for the proper part number for EBC HH pads for the front end of my 02 VFR. I guess i'm doing the dumb - I can't seem to nail down what freakin part number it is I need to order...... ANyone know off hand? I found this: EBC Double H Brake Pads - FA388HHAnd I think its the right one - but i'm guessing. Next question - when I order the part number - do I need to order two sets or just the one part number to get two pairs of pads? thanks.........
-
Ken Shipping is stupid fast with Pete's. Tires were ordered Friday, and today (Tuesday) - they arrived around 1:00pm via FEDEX. Correct tires, perfect!
-
The video editor screwed up. Must be the "why" this chain showed up. The "masses" wouldn't catch the glitch is my assumption.