Terry
-
Posts
2,143 -
Joined
-
Last visited
-
Days Won
88
Content Type
Forums
Profiles
Gallery
Blogs
Downloads
Events
Everything posted by Terry
-
That is the non-adjustable throttle stop. If the throttle drum is hitting that screw firmly with a click then it seems you don't have anything caught up. I was wondering if during the process of checking the vacuum hoses for leaks, one had been mis-routed and was fouling a linkage. That would explain "when I roll the throttle back the other way the idle goes down but the idle is still sporadic but not as bad". Unless the throttle was being hung-up on something a bit squishy, you would not be able to do that. I also assume all the hoses have been plugged back in correctly e.g. the synchronising hoses and seeing you are in the US, you should have the hoses leading to the carbon cannister as well. Any decent leak in those will increase the idle speed and prevent the starter valves having any effect. You did say that you replaced the inlet rubbers, are they all well seated/sealed? I had to swap out my thermostat and re-used the old rubbers and it took a bit to get them to reseal but a few heat cycles settled them down. You have replaced lots of bits trying to improve the idle but in reality the only thing to track down is an air leak, and that is only from the butterflies downwards; anything above those e.g. air filter, PAIR solenoids etc won't affect the intake vacuum. The one-way valve for the flapper, the purge valve for the cannister and the fuel pressure regulator are definitely important as is any hose that joins to them as they can all leak air below the butterflies.
-
I pay extra to have them removed when the tyres are mounted.
-
The idle speed is controlled by airflow into the engine and with the throttle closed, should rely completely on the starter valves. I know on my 6th gen the starter valves have two ports, one is full open and the other has the plunger mechanism that varies the airflow, so you can't completely stop airflow entering the engine. Given the symptoms described your issue is either a leaky vacuum fitting (which I think you have eliminated) or the throttle itself. I had an issue where I managed to trap a vacuum hose on the throttle mechanism and that stopped the throttle closing fully, and your description of pushing the right grip closed and dropping the idle sounds consistent with that. My suggestion is to take the airbox off (again, we've all been there) and visibly check the butterflies, and look closely at the linkage between the butterflies and at the throttle drums for anything getting trapped. IIRC there is a throttle stop screw (which the manual states must not be adjusted) on the side opposite the cable drum, that is where I pinched a vacuum hose. The butterflies should be sealed up tight and should "snap" shut when you release the throttle. You should not be able to feel any vacuum with your hand sealing the intake port with throttle closed.
-
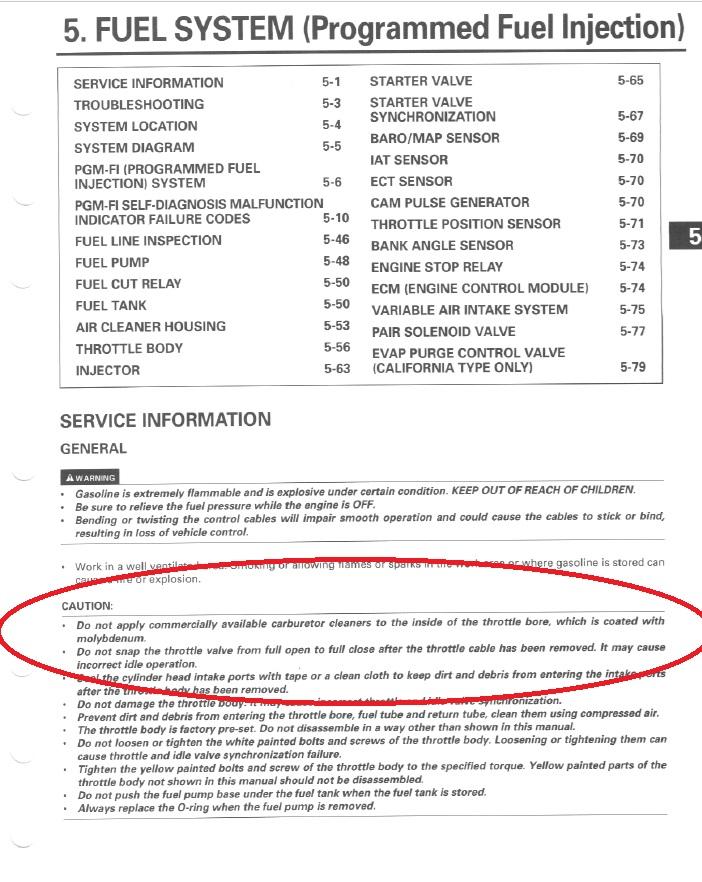
Not to rain on your parade needlesssly, but the photo of the cleaning of the throttle body plates and bores had me wondering. Mr Honda specifically cautions against doing that...

-
My 5th gen manual certainly suggests installing things cleaned but unlubed.
-
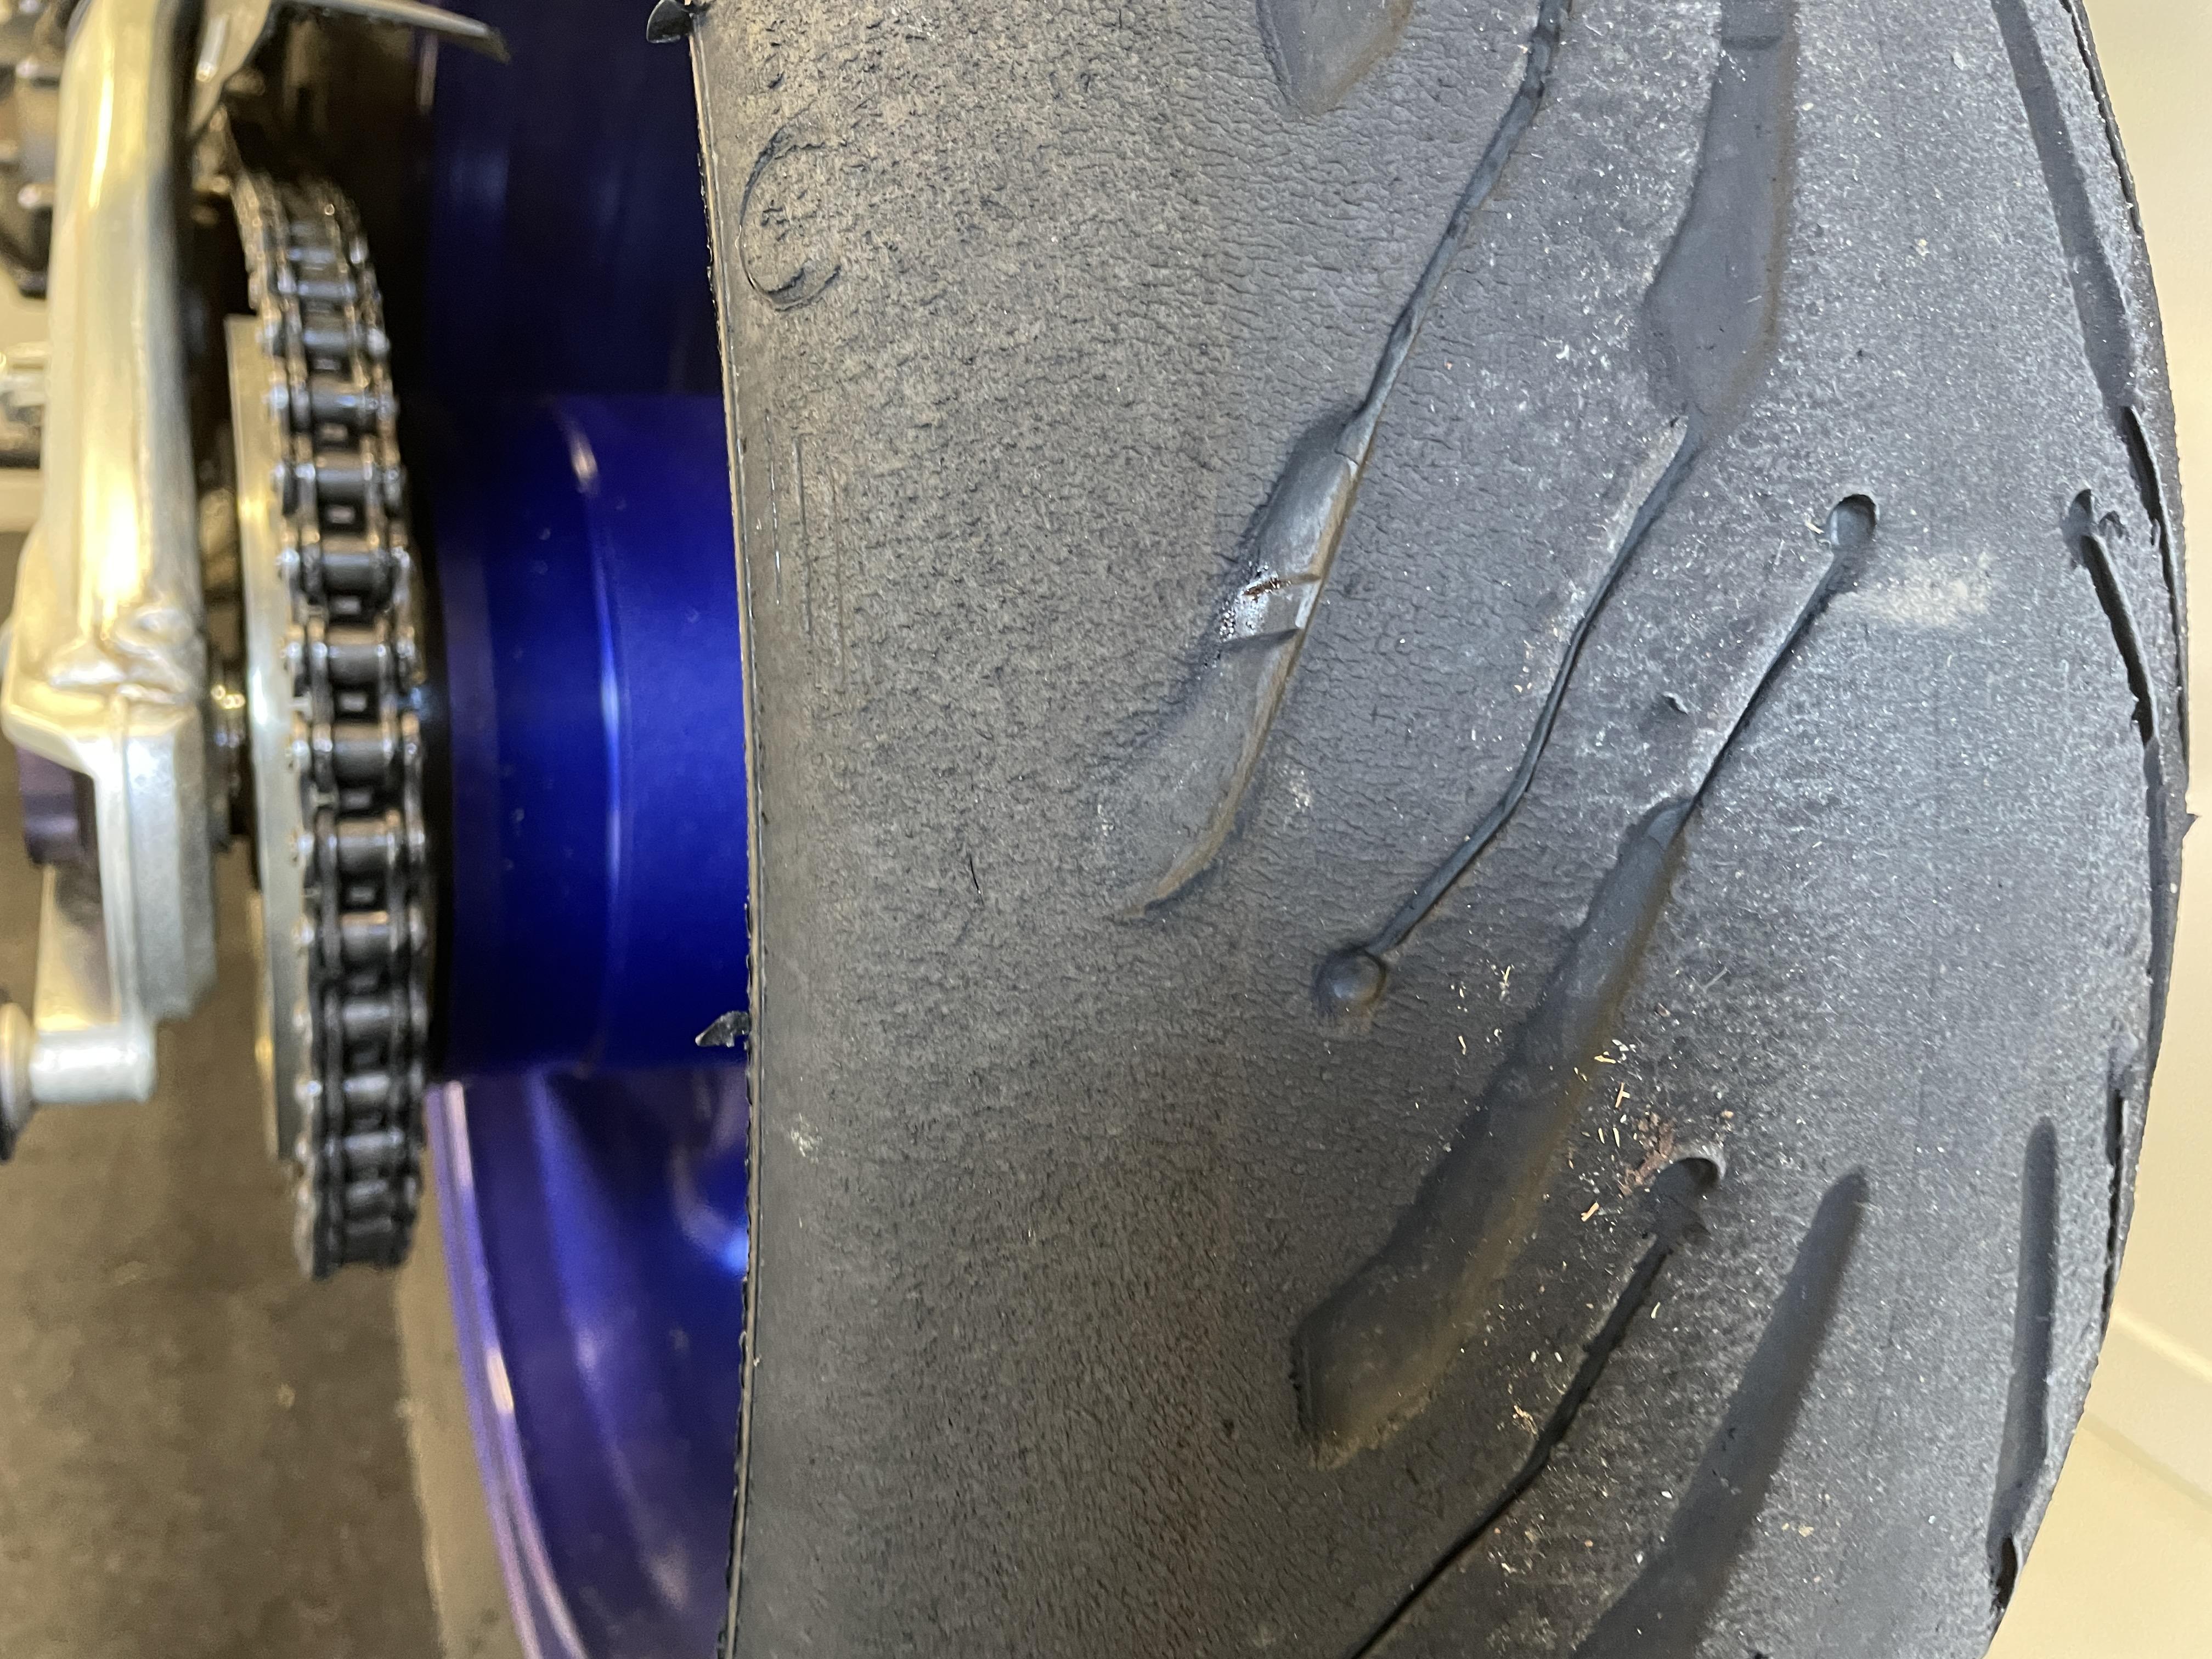
Absolutely that is where the soft compound meets the hard compound. Here's a similar photo off the back of my MT-10.
-
Suddenly side-mounted radiators don't seem such a bad idea. The salted roads of the UK certainly take their toll.
-
I think you will find they are called "fins".
-
 In my experience the clutch is the hardest thing to bleed. My advice is to use thread tape on the bleed nipple threads to make it seal well, and then use a cheap vacuum bleeder to get the fluid to swoosh down the pipe. Once there is some fluid there I switch to regular bleeding as it pumps fluid through the back of the slave and helps to push out air. Regarding your high idle my guess is being a 2000 you have a wax unit for fast idle and the coolant lines to it have become blocked, so the wax unit never sees the hot coolant and keeps the starter valves open even when hot. That will certainly give a high idle but I am surprised it would hit 7k. I would also check you don't have a vacuum hose trapped in the throttle drum or stopper that is holding the throttle open (ask me how I know about that). If you remove the air filter you can at least eyeball the throttle plates and make sure they are closing nicely.
 -
Probably a brand of cigarettes from the 60's, you know, when doctors said that smoking was good for you. "Nothing makes me feel more relaxed than a good drag on my Kooler Thins".
-
That is probably down to the way the wax unit and starter valve synch has been done. The wax unit pulls open the starter valves together, and the 3 starter valves should all be synchronised to the fixed SV. If the fixed SV is closed more and the others are synched to it, the cold idle speed is lower. You can get the same effect if the wax unit nut is loosened off a touch. Because the hot position of the SVs rests on the idle adjuster screw, you can still get a normal hot idle speed with the above adjustments. I know all this because I had to deal with a seized SV on my 09 and had to re-adjust the fixed SV, and it took me three tries to get the cold idle speed back to something sensible. My 09 now starts at around 2000 rpm from cold. I also start my 99 with full "choke" and then ease it back to a steady 2k once it is running, for the warm-up.
-
Clattering at idle that disappears with more revs does sound like a camchain tensioner but I have not listened to your video. AFAIK it is less common for the rear CCT to fail than the front one. You can remove the cap of the CCT (a little oil will ooze out) and insert a flatblade screwdriver and "unscrew" the tensioner (i.e. counter clockwise) which will atempt to extend the plunger and put more tension on the chain. I would not run the engine with the cap removed as there is oil under pressure in the tensioner.
-
The only suspension difference is the VTR has an externally adjustable rebound damping needle, but the rest of the components are visually identical to VFR parts.
-
That was a great explanation. The short version that I took out of this was that the limiting factor of the strength of the bolted joint is the weakest part i.e. the aluminium, therefore there is no benefit using higher strength bolts. I do love a good technical discussion.
-
I get to wait for 40 years before vehicles are classed as classics here. Another two years and a 1986 VFR750 will qualify. My 1999 VFR will qualify in 2039 at which point I doubt I will care much.
-
I bought camchain tensioners off Webike two months ago. The freight was pricey but overall the cost was much less than I could manage locally, and the shipping was quick.
-
Hi all, cheers from Quebec in Canada
Terry replied to Stoichiometry's topic in Official Welcome Forum
OK you win this round. I have been known to polish the damper rod in the forks to reduce stiction, and also to polish the clutch push-rod. -
Default suspension settings mistery
Terry replied to Stoichiometry's topic in Sixth Generation VFR's
It is not unusual for the preload adjuster to lose some fluid over many years, which will give you a "dead" zone where there is no change occurring at the spring. I agree, wind the adjuster out until there is no resistance and go in 7 clicks from there. It is possible to disassemble the adjuster and add oil to replace any losses, I had to do this on my 2004 ST1300. In general I agree with Wald, set the preload to give the required sag and don't pay too much attention to "factory" settings. Sag sets the attitude of the bike front to back, and that affects things like the stability/turn-in rate of steering e.g. low in the back rakes out the forks and slows things, low in the front speeds up steering. The preload applied to the spring moves the resting position of the suspension and can leave more available travel to deal with larger bumps without bottoming. Beyond preload/sag, you can also make some direct geometry changes e.g. by slipping the forks up in the clamps to lower the front, or by adding a shim over the top shock mount to lift the rear. There is also much to be gained getting fork and shock springs which suit your weight; counter-intuitively, a stiffer spring needs less preload and often gives a more comfortable ride. -
Default suspension settings mistery
Terry replied to Stoichiometry's topic in Sixth Generation VFR's
My expectation is that the preload adjuster should be first wound out to lightest position, then turned in 7 clicks. As a general rule the rear preload for a solo rider should be at the lower end of preload leaving the upper end for the added weight of a passenger. With the rebound adjuster I would follow the instruction to bottom out the screw lightly by winding it in (clockwise) until it stops, then backing out 1 1/4 turns, but would not place much importance on any punch marks. -
Hi all, cheers from Quebec in Canada
Terry replied to Stoichiometry's topic in Official Welcome Forum
I thought I was the only OCD fool that removed the filler cap ring to clean beneath. Bikes always run better when they are clean! What bar risers did you remove? I have been thinking about adding some. We have a local engineering company that makes some custom-fit bars which I have on my other VFR and make for a decent reduction in wrist weight. The VFR riding position was never a problem in my youth and at open road speeds is pretty good, but I do find it uncomfortable at low speed.
-
IIRC Shinko purchased the Yokohama tyre brand from Japan and moved it to Korea. Yokohama made some very hot sport tyres in the 80's.
-
One should not forget that the basic design was introduced in the VF750F with a major aim of winning Superbike races. Which they did.
-
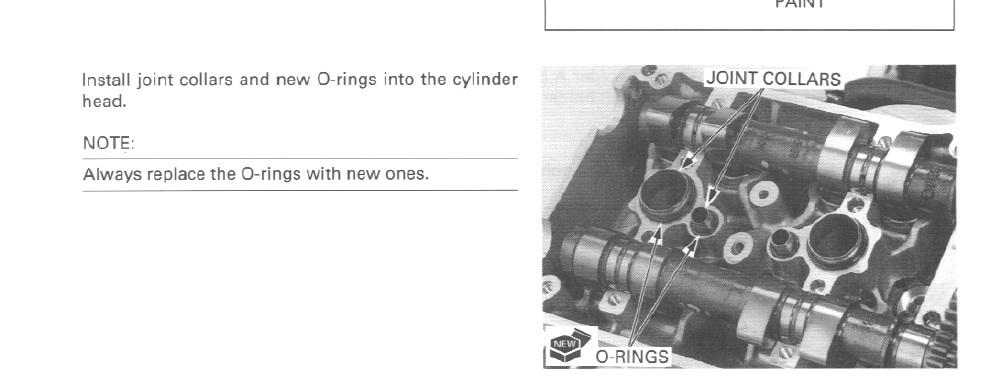
Hopefully that will solve your smoke problem. The o-ring part number is HONDA OEM O RING | 91317-P4V-004 and description is O-RING (9.8X1.9) (ARAI). https://www.partzilla.com/catalog/honda/motorcycle/1999/vfr800fi-a-interceptor/cylinder-head-rear There should be no need for all the gasket cement, originally they just have small spots just to hold the gasket in the groove while fitting the camcover, plus a full thin smear on the half moon sections. The gasket is compressed in place by the 4 cam cover bolts and these actually bottom out in the cylinder head when tightened, and the only clamping force is applied through the rubber washers on those bolts (HONDA OEM MOUNTING RUBBER | 90543-MV9-670). With age those rubber washers compress and don't apply as much force to the gasket to seal. Whatever you do, do NOT overtighten the bolts to improve the seal as the threaded part of the cylinder head can snap fairly easily. Use a torque wrench. While you are that far in, why not check the valve clearances? The rear head on the VFR makes it very easy to replace any shims if needed, thr front head is the same but access is much worse. Good luck
-
The temperature sounds quite normal; unless you moving there is little airflow through the radiators. You should hear the fan running around 102C. 122C is considered overheating. Getting the cam cover off the back cylinder takes 4 bolts, and then you can see if the collar or o-rings are missing. As there was no oil in the front PAIR valves I would not bother looking there. All you need aside from tools is a little gasket sealer for the half-moon section of the cam cover gasket. And DON’T overtighten the cam cover bolts when refitting them.
-
Thanks for that information. Another way that oil can enter the PAIR system is if the o-rings under the cam covers are leaking. There are collars with o-rings that seal the cam space from the PAIR system, if these were mssing maybe you can draw oil direct from the cam space (which will have a lot of whirling oil).