

.JPG.2a770a136838c8e36b0df2f3f67da10e.JPG)
ShipFixer
-
Posts
659 -
Joined
-
Last visited
-
Days Won
42
Content Type
Forums
Profiles
Gallery
Blogs
Downloads
Events
Posts posted by ShipFixer
-
-
On a non-linked brake 8th gen, there's only a small number of places it could be leaking. Brake fluid doesn't readily evaporate so it is very likely you will see a leak if one exists.
Check entire rear master cylinder, banjo bolts at both ends of hose, and pistons behind the brake pads for fluid.
I would suspect the master cylinder is leaking, and needs a piston seal kit. If your brakes work, this would explain why/where its leaking. The fluid comes out behind the piston and doesn't affect the volume of fluid it pushes to the caliper, or the pressure it can generate.
The alternative is whoever serviced your brakes last time wasn't good at their job. But my money is on a leaky master cylinder piston seal.
-
Don't know if there is a valve in the pump or not. But fuel shouldn't flow past an injector "into the engine" unless it is seriously dirty and not closing, which would incur other problems.
Pump on, the fuel injector rail is pressurized and the injectors open and close in milliseconds to allow some fuel to escape. Bike off pump off...should still be fuel in the rail. First thing that happens when bike is on...fuel pump primes and pressurizes the rail so fuel will come out.
-
I'd be in. Turns out the rubber caps I zip tied on way back when will dry rot and crack after a while. Might as well get something nicer right?
-
...or skip getting a tune with real time closed loop control in a Rapid Bike instead... 😜
-
-
LOL...
The 1998-2001 5th gen came with 17T/43T stock final drive. The 6th and 8th gen came with 16T/43T stock. That's a far bigger difference "by the numbers" than anything inside the engine.
Change the sprockets on your 6th or 8th gen and poof...sure feels like a 5th gen. But with stiffer forks, useable luggage, etc.
🙃
-
 1
1
-
-
Will say - stainless braided lines plus serviced calipers are worth all the effort though!
-
22 hours ago, VFR78 said:
I have just purchased (received in 8 days Naples/Sydney) a full set of Fren Tubo Type 2 braided brake lines and front Brembo pads, for the Viffer. After 8 plus years, and over 90,000 kms, I figured a refresh of the old lines could not hurt. The cost was about 20% cheaper than buying OEM in OZ.
The brake lines include replacements for the rubber lines to the rear caliper and in the ABS circuit, so the whole replacement process going to be a bit of a faff.
Any advice regarding possible “bear” traps would be most appreciated. My biggest concern is with the ABS modulator circuit and whether it will end up with air in it and get out of sorts or should a simple bleed fix that.
Don't know which version you have? I posted my full misadventure here. The tricky parts are accessing the rear flare nuts under the seat for removal, and breaking the flare nuts in the front since they are looking up at the sky and possibly corroded. Use good flare wrenches and go slow, that seems to be the biggest key.
For the rear junction block, I drilled out the rivets holding the rear mud flap, cut an access into the plastic normally covered by the mud flap, then re-riveted rhe flap back into place. Not as bad as it sounds but there was no "clean" way to access that rear flare nut otherwise and I would have rounded it badly.
-
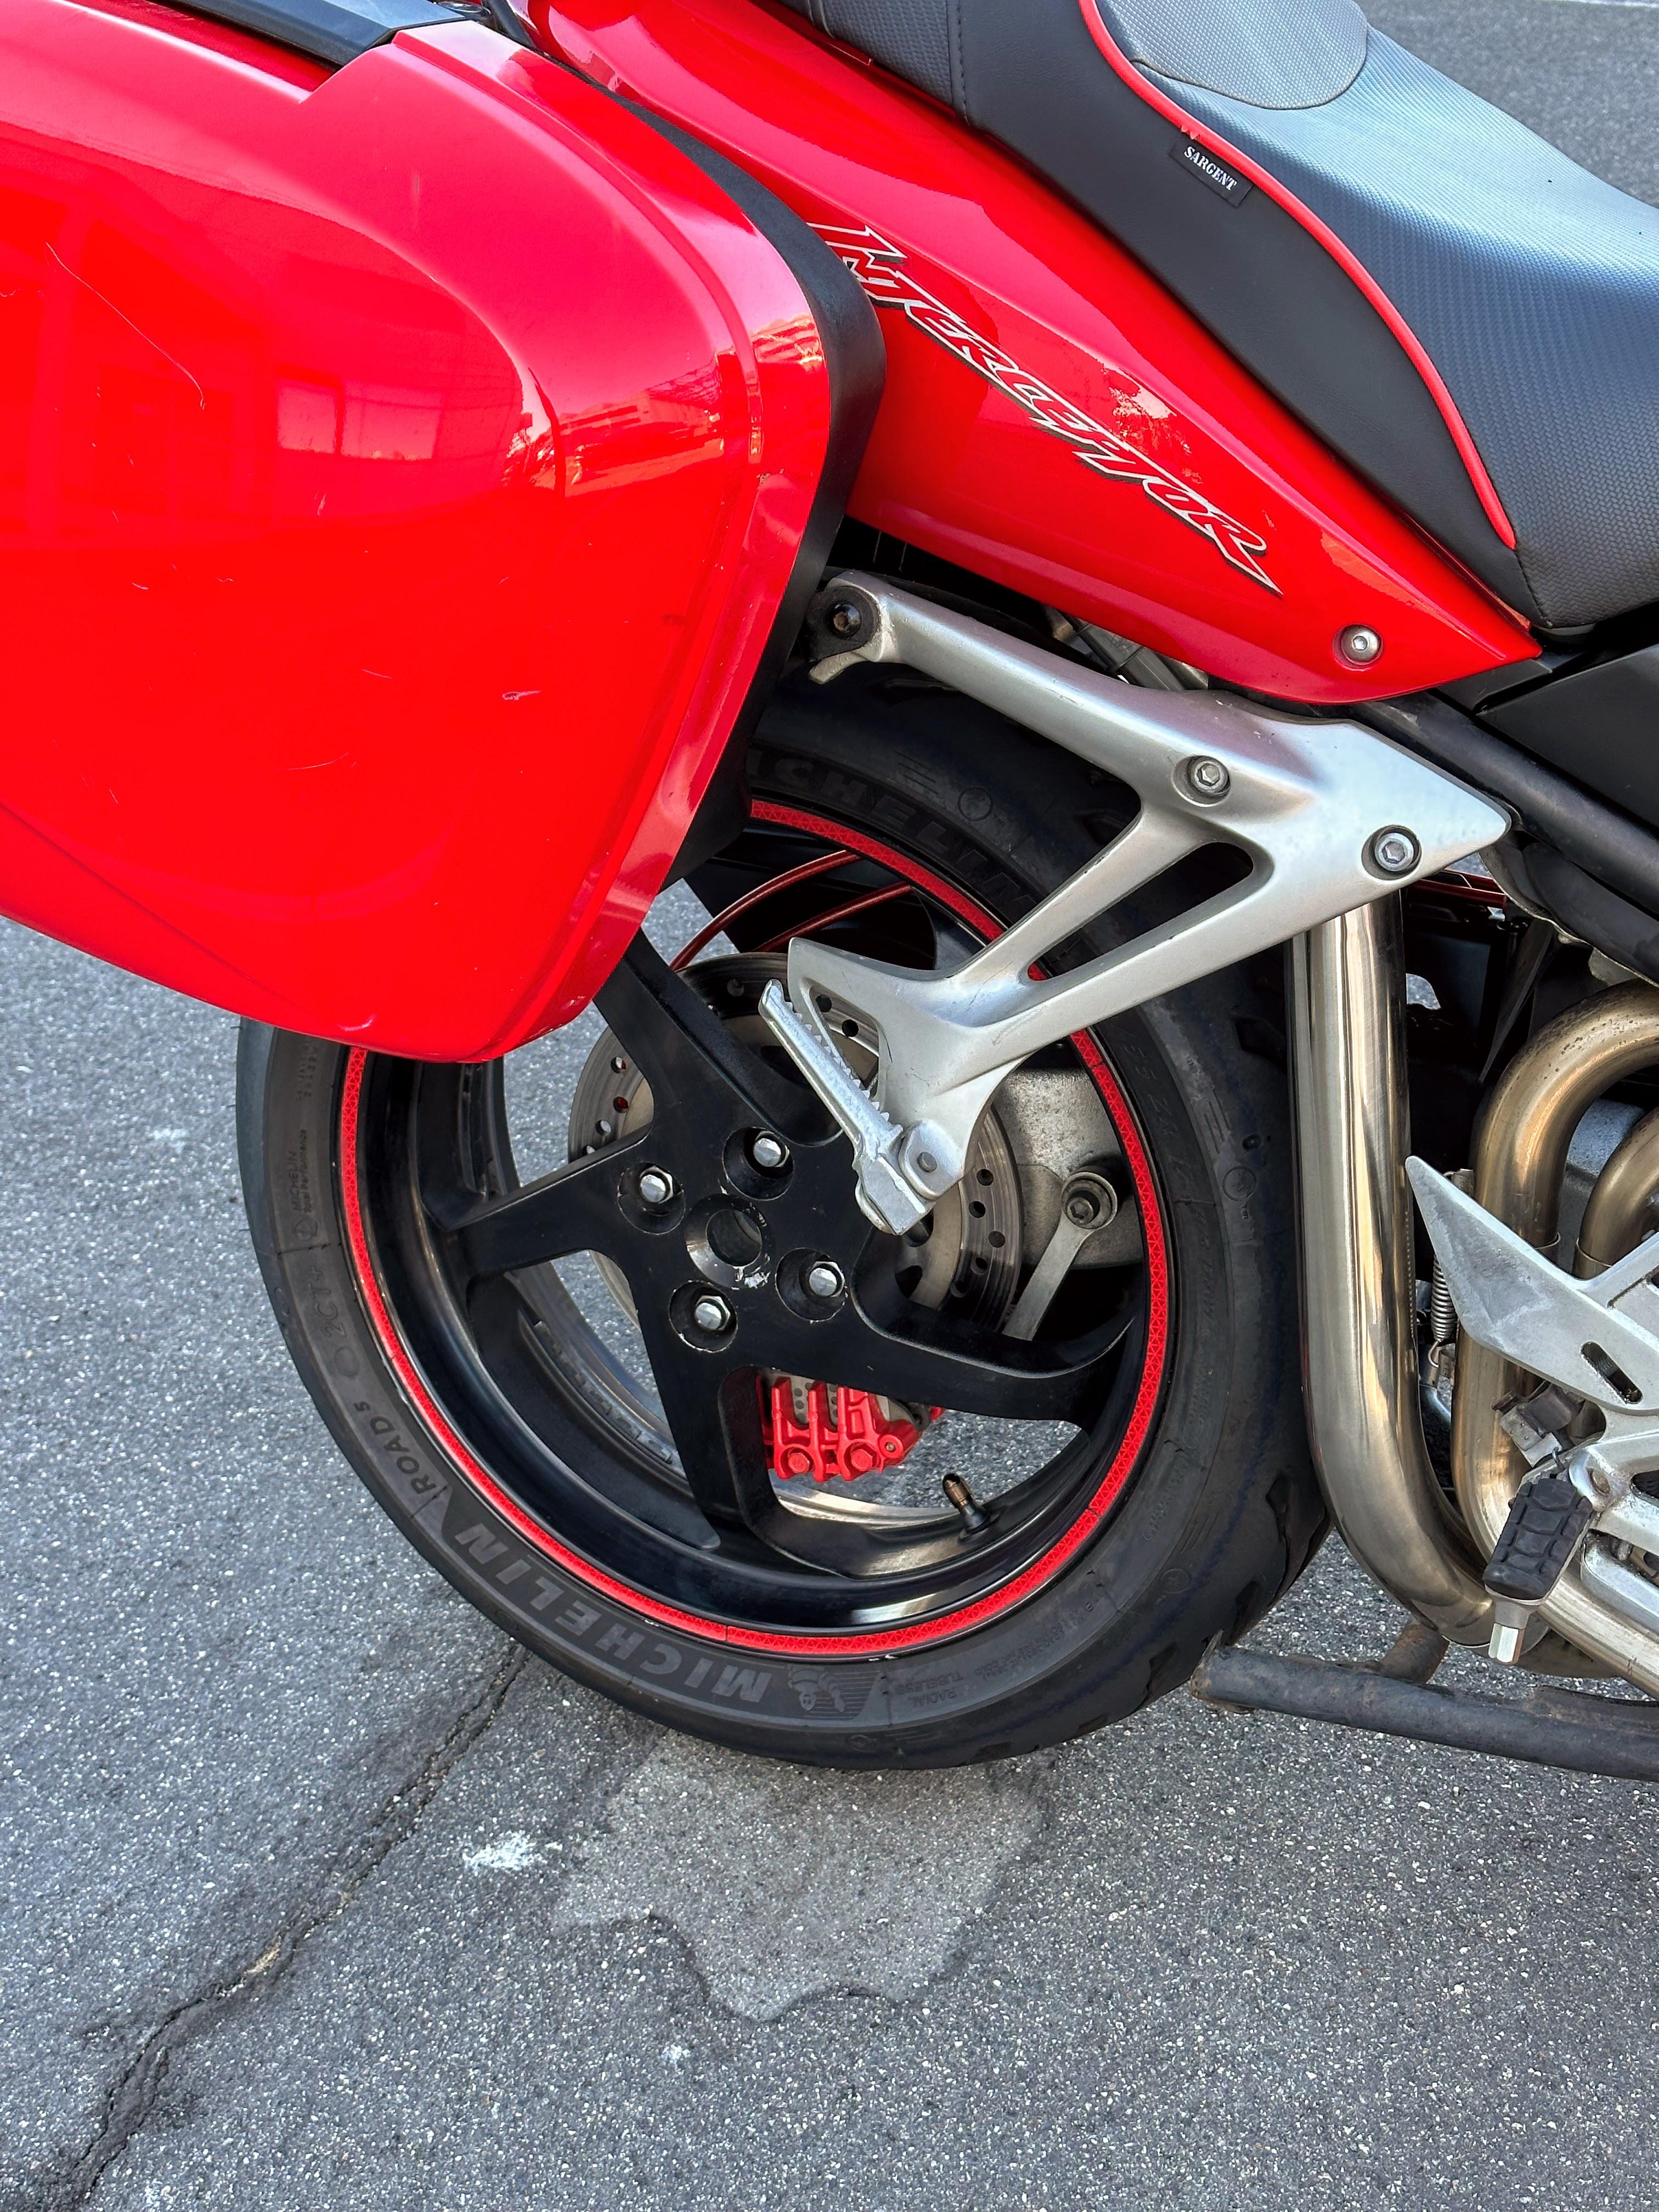
The front calipers have three pistons each. When you "delinked," you hydraulically linked the one of three formerly linked to the rear master cylinder to the other two pistons. So now it's just a three piston caliper. But...
Look at that photo, and where the center nipple that would have bled the LBS circuit to the Secondary Master Cylinder is. Good odds there is air in there. So bleed it the same way you did the main nipple (top of the caliper, or right hand side of the photo), by pushing fluid from the front master cylinder. You should get the remaining air out and lever feel should get solid.
If you are having trouble after bleeding all four nipples, then you might be getting air in through the threads. Try teflon thread tape on the nipples, and/or speed bleeder nipples, which only let fluid go one way...out.
-
 1
1
-
-
If your brakes are truly delinked and the center pistons are linked to the outers, then it shouldn't matter left or right first. You probably do need to bleed the center nipples just because all the air probably doesnt have a clean path back to the primary nipple. Unless it looks different to you. Would not hurt to pump fluid through it regardless especially if these are older calipers that haven't been stripped and cleaned.
-
1
-
-
1 hour ago, Captain 80s said:
How did you determine the fork oil quantity? Ideally, it should be a oil height measurement in completely compressed forks without springs, AND cycled a few times to ensure the damping circuits are filled. If you are just filling to the listed "capacity", put your caps on and button her up. But again, not the ideal way.
^This. Part of the process is cycling the forks up and down. Once the air bubble squish noises are gone, the circuits are full and the air is at the top.
Can't just go by the volume you put in, either. Have to check oil height below the top cap one way or another. MotionPro makes a spiffy tool just for this purpose:
-
2
-
-
Since its a 2002..stator if not upgraded is under powered.
When it dies, do the lights and dash stay "on?" Or is it dead off? If completely off, verify start circuit continuity through the kill and key switch. Mine were dirty and caused some shut-offs when the circuit randomly broke.
-
On 2/24/2023 at 4:45 PM, vic28222 said:
The main message I was trying to send is "IF" your 5th gen VFR seems slow to turn in there is a very inexpensive and easy way to help it some. I never purported to be a suspension guru but what I did use as my knowledge baseline was what RaceTech and Cycle Gear had to say and that was good enough for me. Sure there are other opinions out there and those other opinions may in fact be better if you are tuning your bike for a big race at Barber or Laguna Seca but that is not what I am trying to do. My bike felt a little slow to turn in and I wanted it to turn more willingly on the street. That's all.
39mm is 35% sag. What @bmart is nicely saying in a round about way is that by using spring sag to slightly steepen head angle to "sharpen steering" you are paradoxically adding squishiness in hard corners and turning with a softer spring rate. While it will sharpen handling when the fork is relatively static, it's going to reduce handling at the performance end where it really matters.
I know from his other threads that since he roads races a lot, he likes the knife edge feel of a hard linear spring - cause he actually corners and needs a quick handling bike. As we get faster on bicycles or motorcycles, we like more of that precision up front that comes with a stiffer rate. So he like most knows what happens you do what you are suggesting. I use progressives from Hyperpro so I have a bit of the best of both worlds but my static sag is ~30mm and the bike stays up in the travel over real world (not track) roads. Importantly, my fork does not dive and lose handling precision at speed. Any speed, for that matter. I have had RaceTech linears in there and I know what the knife edge feels like for initial turn in, but on progressives I have nearly the same amount of precision, the same once in the turn, but no amount of ruts or potholes in the middle of a turn will matter.
The right way to do what you are trying to get to is to separate the two variables. Keep the right spring rate for your preferences and experience level, and drop or raise the fork tubes in the triple clamp to get the right rake or head tube angle you want.
I realize from your first post this is exactly what you are trying "not" to do. However, a 5mm drop in fork tube length is going to be something like 2-3mm drop in chassis height above ground, etc. I have never, ever noticed a difference in center standing my bike regardless of where the fork tubes are.
-
2
-
1
-
-
I highly recommend ordering studs and flange nuts in advance and not counting on some or all of your existing ones to work out. None of mine were even close to seized in the block, but most of them were seized to the flange nuts.
May be better post pandemic, but I ended up ordering from three places and waiting to see what arrived first and sort of quickly.-
1
-
1
-
-
For awareness...a lot of the stuff around the bottom of the pump is the metal mesh filter and a rubber bladder thingy that sort of prevents starvation at low levels. So there is a lot of "give" in these two things as you try to wiggle the pump out.
Good news is goes-in is easier than goes-out!
-
1
-
-
I think in @Duc2V4's explanation you see the real answer, which is this is a whole lot of work for two engines that aren't really that far apart, unless you have a real reason to do it. If my engine was leaking coolant then I also might try a 2000-2001 engine, but I would not shy away from a 6th gen engine. There's some things that can make the VTEC transition noticeable (my bike was rich for a little bit, etc.) and the ECU has some bad habits for emissions control and mpg. The RBR covers up both of those where a PC has no way to do it AFAIK.
My 2002 has always been very well behaved except the lean/surge behavior, which was the #1 thing that separated it from the just-expired carbureted generation, especially in long sweeping corners with constant throttle or long straight stretches on the highway. Riding it back to back with some 2001's in excellent condition even way back in the day before I put 02 eliminators in, the difference in linked brakes and even the tiny bit of fork difference (no joke) was more noticeable to me than any difference in throttle manageability - except for lean/surge. When I was playing around with all the theories we explored on VFRD on starter sync and runner length back in the day, I "could" make it all slightly bad, but mine has always been good when in baseline.
Also worth mentioning when talking about motorcycles with less sophisticated engine sensors and controls than cars of the same vintage, and highly variable material condition status over two decades, putting one 6th gen next to any other 5th gen in 2023 is going to have a wild number of results when it comes to injecting half the amount of gas in cylinders half as big, at twice the Hz compared to cars. And...notice how many people who are probably very, very good riders here who also do or do not notice the things the ECU is built to do in closed loop mode, which goes to the proprioception part of "does this all work how I think it should work?" That's wild too, but I have friends who surf waaaay better than me who can't tell the difference between wildly different fin sets. Anyway, I would go after the other stuff in the two decade old sixth gen motor I have like injector cleaning (observable difference, both in riding and what my RBR thinks in auto tune), starter valve sync, the RBR unit I wish I had two decades ago, etc.
-
Oh boy, here it comes... 👀
-
Just to check - do you have stock mirrors? They're plenty wide enough for me. Most of the mods are for shorter stem mirrors for looks over safety. Or no mirrors. 🤦♂️
-
@VifferJ you're in luck, yes the sixth gen and eighth gen shocks are interchangeable. And more importantly, yes, aftermarket options will work for both.
I have a Hyperpro three way reservoir shock and like it a lot. They sell it in their catalog for the 8th gen on the same part number.
-
1
-
-
Yup. What it specifically eliminates is the steady throttle leaning and surging at cruise RPMs, so if this isn't what you are noticing it might not be what you are looking for.
Another thing that goes wrong - fuel injectors. Had mine cleaned (well, eBay used ones to reduce down time), and that plus sync is a tremendous difference too.
-
I have had a stuck starter solenoid - twice. It's nothing like a subtle power draw. As @DannoXYZ says, the starter stays on. And on. And on. I was lucky the first time, the bike was on the center stand. The second time, on the side stand in gear and it kicked itself over.
The only way to stop the pain is to disconnect the battery. So, no...you do not likely have a stuck solenoid 😄
-
@Dorian the 6th gen has aggressive emissions controls built into the ECU. It will dial back mixture in steady cruise even with O2 eliminators installed. So even though it has closed loop control, it exhibits the same behavior without feedback. A PC won't fix it because its not closed loop real time correction of ECU outputs to sensor inputs either; its a map on top of whatever comes out, so unless it is rich enough mid band you still get the same behavior.
Short version / try this: turn the key on, kill switch on. Now turn off at key. Key on...and hit the starter BEFORE the pump whine and dash sequence finishes. For one reason or another this bypasses or faults out the "closed loop" mode and eliminates the shitty behavior.
Ride and see if that's better, especially at steady throttle.
Long version: Rapid Bike is a fast processing unit between the ECU and the sensors, with real closed loop control. I no longer have to do the key switch sequence thing, and my throttle is as smooth as the 00-01s I've ridden. My bike irritated the hell out of me for years. If you Google the older threads here on VFRD, you will see this topic dominated most of the 6th gen discussions. We all tried all the things. But the key switch thing wasn't discovered until sometime in the middle of the 2010's.
-
4
-
-
On 1/16/2023 at 8:23 PM, Ughandi said:
Can anyone smarter than me chime in on conductivity of dissimilar metals for the purpose of grounding the electrical circuit?Aluminum to aluminum is no problem. Its a dissimilar metal "today," so it would reduce the odds of some kind of corrosion due to galvanic potential between the frame and subframe.
Vehicles are typically slapped together with little between them other than maybe paint or grease (only maybe) and it works out over the life of the vehicle. In aircraft and MILSPEC land there are requirements for dielectric materials between even sort of related alloys. Could do that here but probably not required.
-
1
-
-
Do you have speed bleeders? Non-ABS here, but the SMC was kind of tricky to get refilled. If I remember correctly what I did, I used a clamp to hold the SMC activated (squeezing the caliper up to the fork leg), pushed down on the brake pedal, then released the clamp to let the SMC take in fluid from the rear circuit. I want to say doing that a few times got fluid moving through it and working once I got it down. If I did not have speed bleeders installed, I think it would be a lot tougher to do the SMC from dry by myself.
I tried a vacuum bleeder on the SMC, but it really doesn't do anything. You have to do some variation of the bleed procedure in the FAQs here, or fake it like I did with trigger clamps and speed bleeders 🙃
.jpg.9c0eacbfdad53dcd990fab755d66e97c.jpg)
.jpg.4a058cfb43e20347d1f888b80a601528.jpg)
Rear brake fluid is empty
in Eighth Generation VFR's
Posted
The volume behind the pads, even worn thin, isn't enough to deplete the reservoir.
Check the bottom of the master cylinder, where the rod from the lever pushes up into it. Bet you will discover its wet there unless the system is completely dry. The top of the cylinder (banjo bolt) looks dry in your photo.