Fastdruid
-
Posts
171 -
Joined
-
Last visited
-
Days Won
7
Content Type
Forums
Profiles
Gallery
Blogs
Downloads
Events
Everything posted by Fastdruid
-
Bit odd to break there. Normally it breaks on the bottom. I'd say maybe is rack related. I ended up bonding my tail light to the plastic so it became one item. I'm going to have a bit of a reinforcement session when I get a chance, fix the mounts (front ones are both cracked, rear where the grab rail fixed as well)) and bond some metal around so it won't break again (short of destroying the entire thing).
-
It’s 2024 - is a VFR750F G (1986 model) a good daily ride
Fastdruid replied to bob38's topic in Earlier VFRs
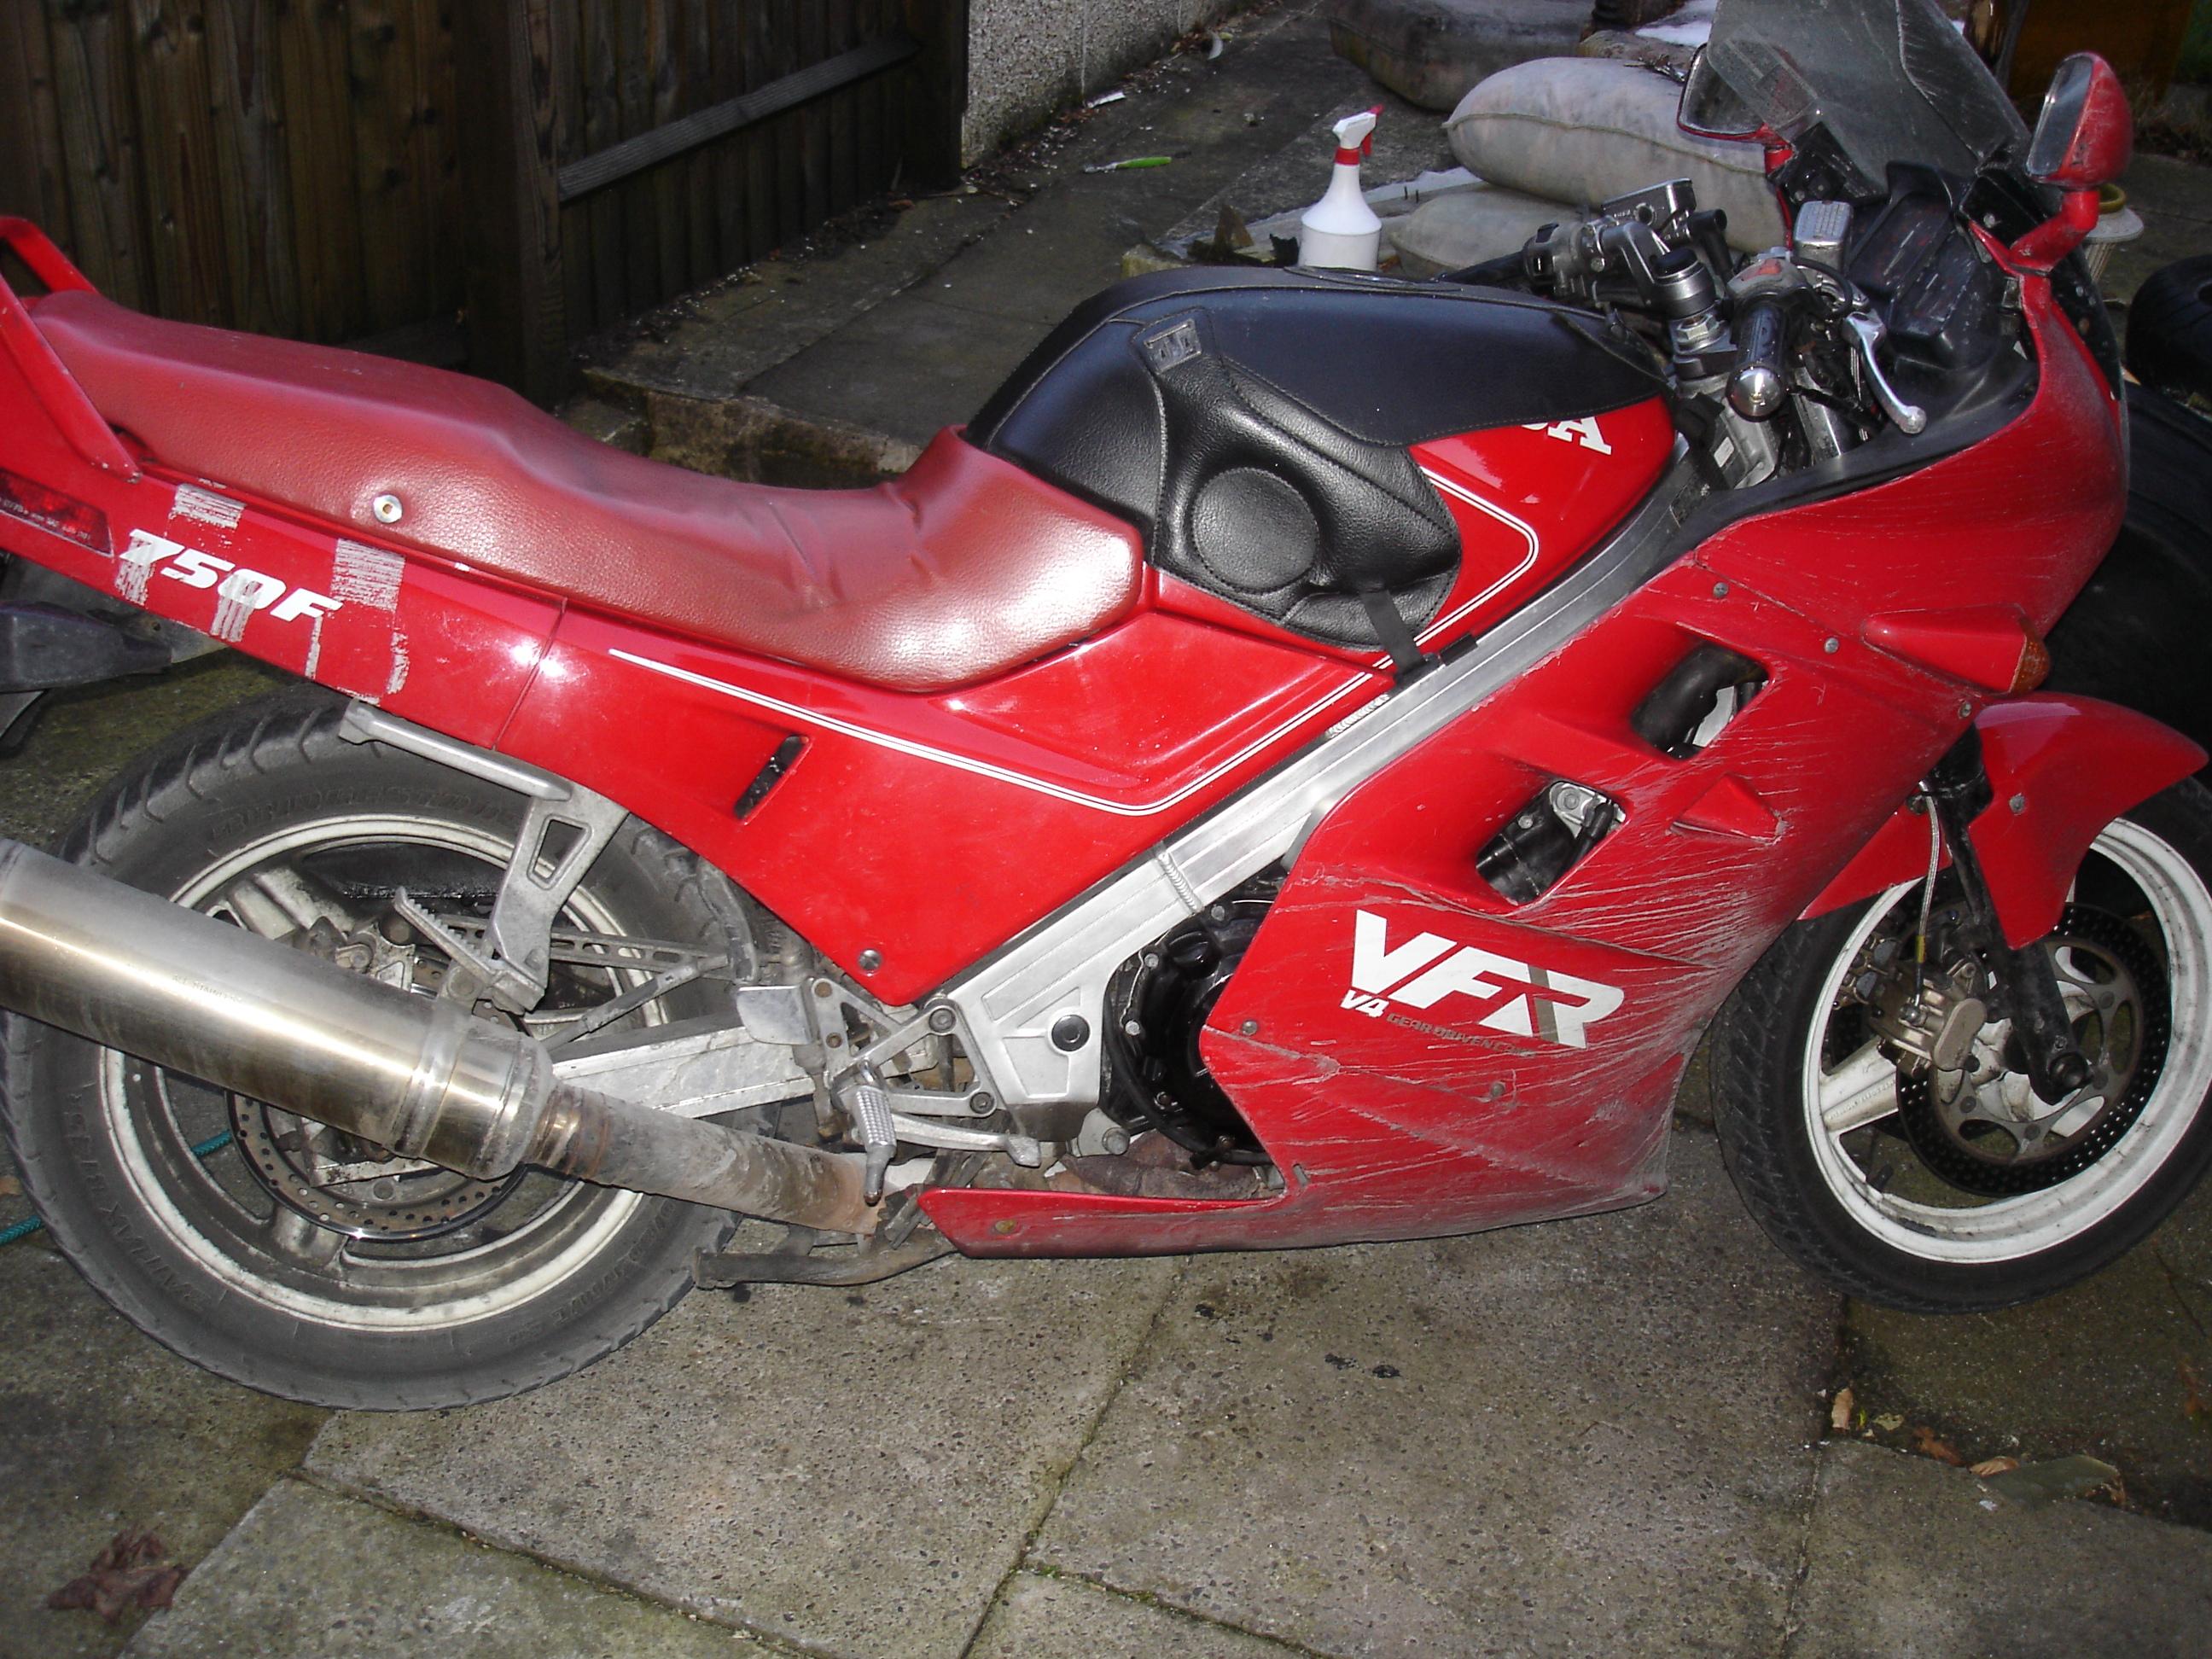
Sort the suspension out and 100% yes. So, I used to commute all year round on my 88 (between15-20 years ago now) and I'm going to say I wouldn't do the same again now. I'd take it occasionally when its nice but not day in, day out. Yes they are lighter and quicker than the later 750 models, I've been on a trackday with a number of other VFRs and my 88 breezed past the RC36's on the straight. No difference with the 800 VTEC though, absolutely level pegging, maybe he had a tiny bit more right at the top but it was negligible. It is however *still* heavy. 229Kg fully wet. I really feel it manoeuvring round the garage etc vs the other bikes. Onto why not, firstly tyres. The older bikes have a 16/18 front in narrow sizes, while this makes them more nimble than the later bikes it means limited availability of decent tyres and they wear more rapidly. If you're commuting expect to get through a *LOT* of tyres. Secondly, maintenance. They're meant to be serviced every ~3750miles. Earlier bikes need every 7.5k the following: Valve clearances Carb balancing Spark plugs Oil/Filter Thirdly, spares. Routine parts are getting scarcer, when I ran mine you could still get pretty much everything from Honda but now you can't. While you can get parts it means many are aftermarket, no guarantee they're any good and for OEM parts no longer here in a day or two, you could potentially be off the road for some time while waiting for a mundane part. Fourthly, fuel consumption. IMO they're pretty poor! I got roughly 34mpg at best and low 20's at worst. Other newer bikes I've ridden have been substantially better (I ran a TDM850 for a while to commute on, that got 45mpg! While nailing it everywhere...it was slow though) Finally, corrosion. If it's a nice bike it's going to be scabby in no time if you're riding it through winter. Here was mine mid winter!
-
Bitubo do at least a 88-89 specific shock as well as at least one other (maybe two) for the 86/87. I had one i bought for mine and I was very much not impressed but I'm not sure if it was just duff. It was very very cheap (old stock sell off on Ebay, iirc was about £10 from M&P as no one else bid) and by the time I fitted it was way too late to return it.
-
I was very happy with the BT45's on mine so doubtless the BT46 would be a good choice if you're sticking with std wheels. Although I've now gone with wider wheels and radials. When I was contemplating them they didn't have the correct speed ratings available so I think *all* BT46's are likely to be pretty new.
-
I've PM'd you where you can get the Honda service manual from!
-
When I revived mine the fuel pump leaked...I bought a new Chinese one...which immediately blew the fuse on trying it. Turned out to be wired backwards. I ended up taking the points out of the leaking one and fitting them to the original pump (that I'd replaced with the current one but kept because of learning you could replace the points on them). Anyway, its worth keeping the old pumps for that reason (unless leaking) or the diaphragm itself has split (ie it's still ticking but not actually pumping). You can get aftermarket replacement points or buy cheap "identical but for the ends" pumps and swap out the internals.
-
Generally it's never a good idea to split the carbs from the base plate...unless you have that very issue! What I've done whenever I've taken a look at carbs is set float heights etc is to rig up a small fuel pot and put a reasonable amount of head of fuel onto it to ensure they're not leaking anywhere. Then again if my current one starts to leak I've got a good set I rebuilt from two bad sets (coincidently one where someone had split them off the base and not put them back correctly!)
-
Looks like http://www.hondavfr.org is dead and intermittently links to malware. Please could you remove from the list @crepitus and your post @SEBSPEED Motad also unfortunately dead @rctwentyfour Some other ones to add. General info on Honda Part numbers - I use this list reasonably regularly to work out what fits what and where parts come from! https://www.vsource.org/VFR-RVF_files/BHondaPCNs.htm More online 'fiches https://www.bike-parts-honda.com/honda-motorcycle Web!ke - Often cheaper to buy OEM parts from Japan *INCLUDING SHIPPING* than it is here in the UK https://japan.webike.net/HONDA/VFR750F+Interceptor/OEM+Parts For suspension PDQ - UK distributors for Racetech (use the calculators on the racetech site to work out what you need). https://pdq1.com/
-
I was re-reading this and realised I'm not 100% clear on if the float needles were leaking or the bowl gaskets were leaking. Both are common issues (particularly with ethanol in modern fuel). Anyway, this place hasn't got the bowl gaskets listed...but the do have replacement float valve needles for the 700 if you haven't found any already. https://nrp-carbs.co.uk/shop/index.php?route=common/productsearch&brand=VFR700F I should also mention that generally (and on the assumption they're not worn) you're better off keeping the stock needles/jets etc and just replace any perished rubber bits. Many aftermarket kits are junk. I would favour buying Honda OEM parts for the needles etc where I could (even if s/h).
-
Very much a "bitsa" and not IMO in a good way! My opinion is that if it's had an impact big enough to need replacing that much it's not worth it unless *really* cheap! Also on the subject of working out early or late even if bits have been changed note the gear lever. The shaft comes out in different places so the early one is straight while the later one is cranked up and then across.
-
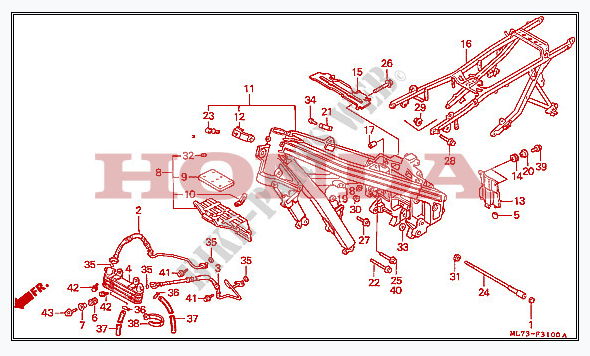
Different heat shield. That's the shock heat shield (#13 on the diagram below). I'm referring to #15 (50177-ML7-920 "GUARD, RR. HEAD HEAT") Shown on the '86 diagram because they update the diagrams for the older models based off the newer ones... but not listed in the parts list. And to make it clearer, here is my photo again with it highlighted.
-
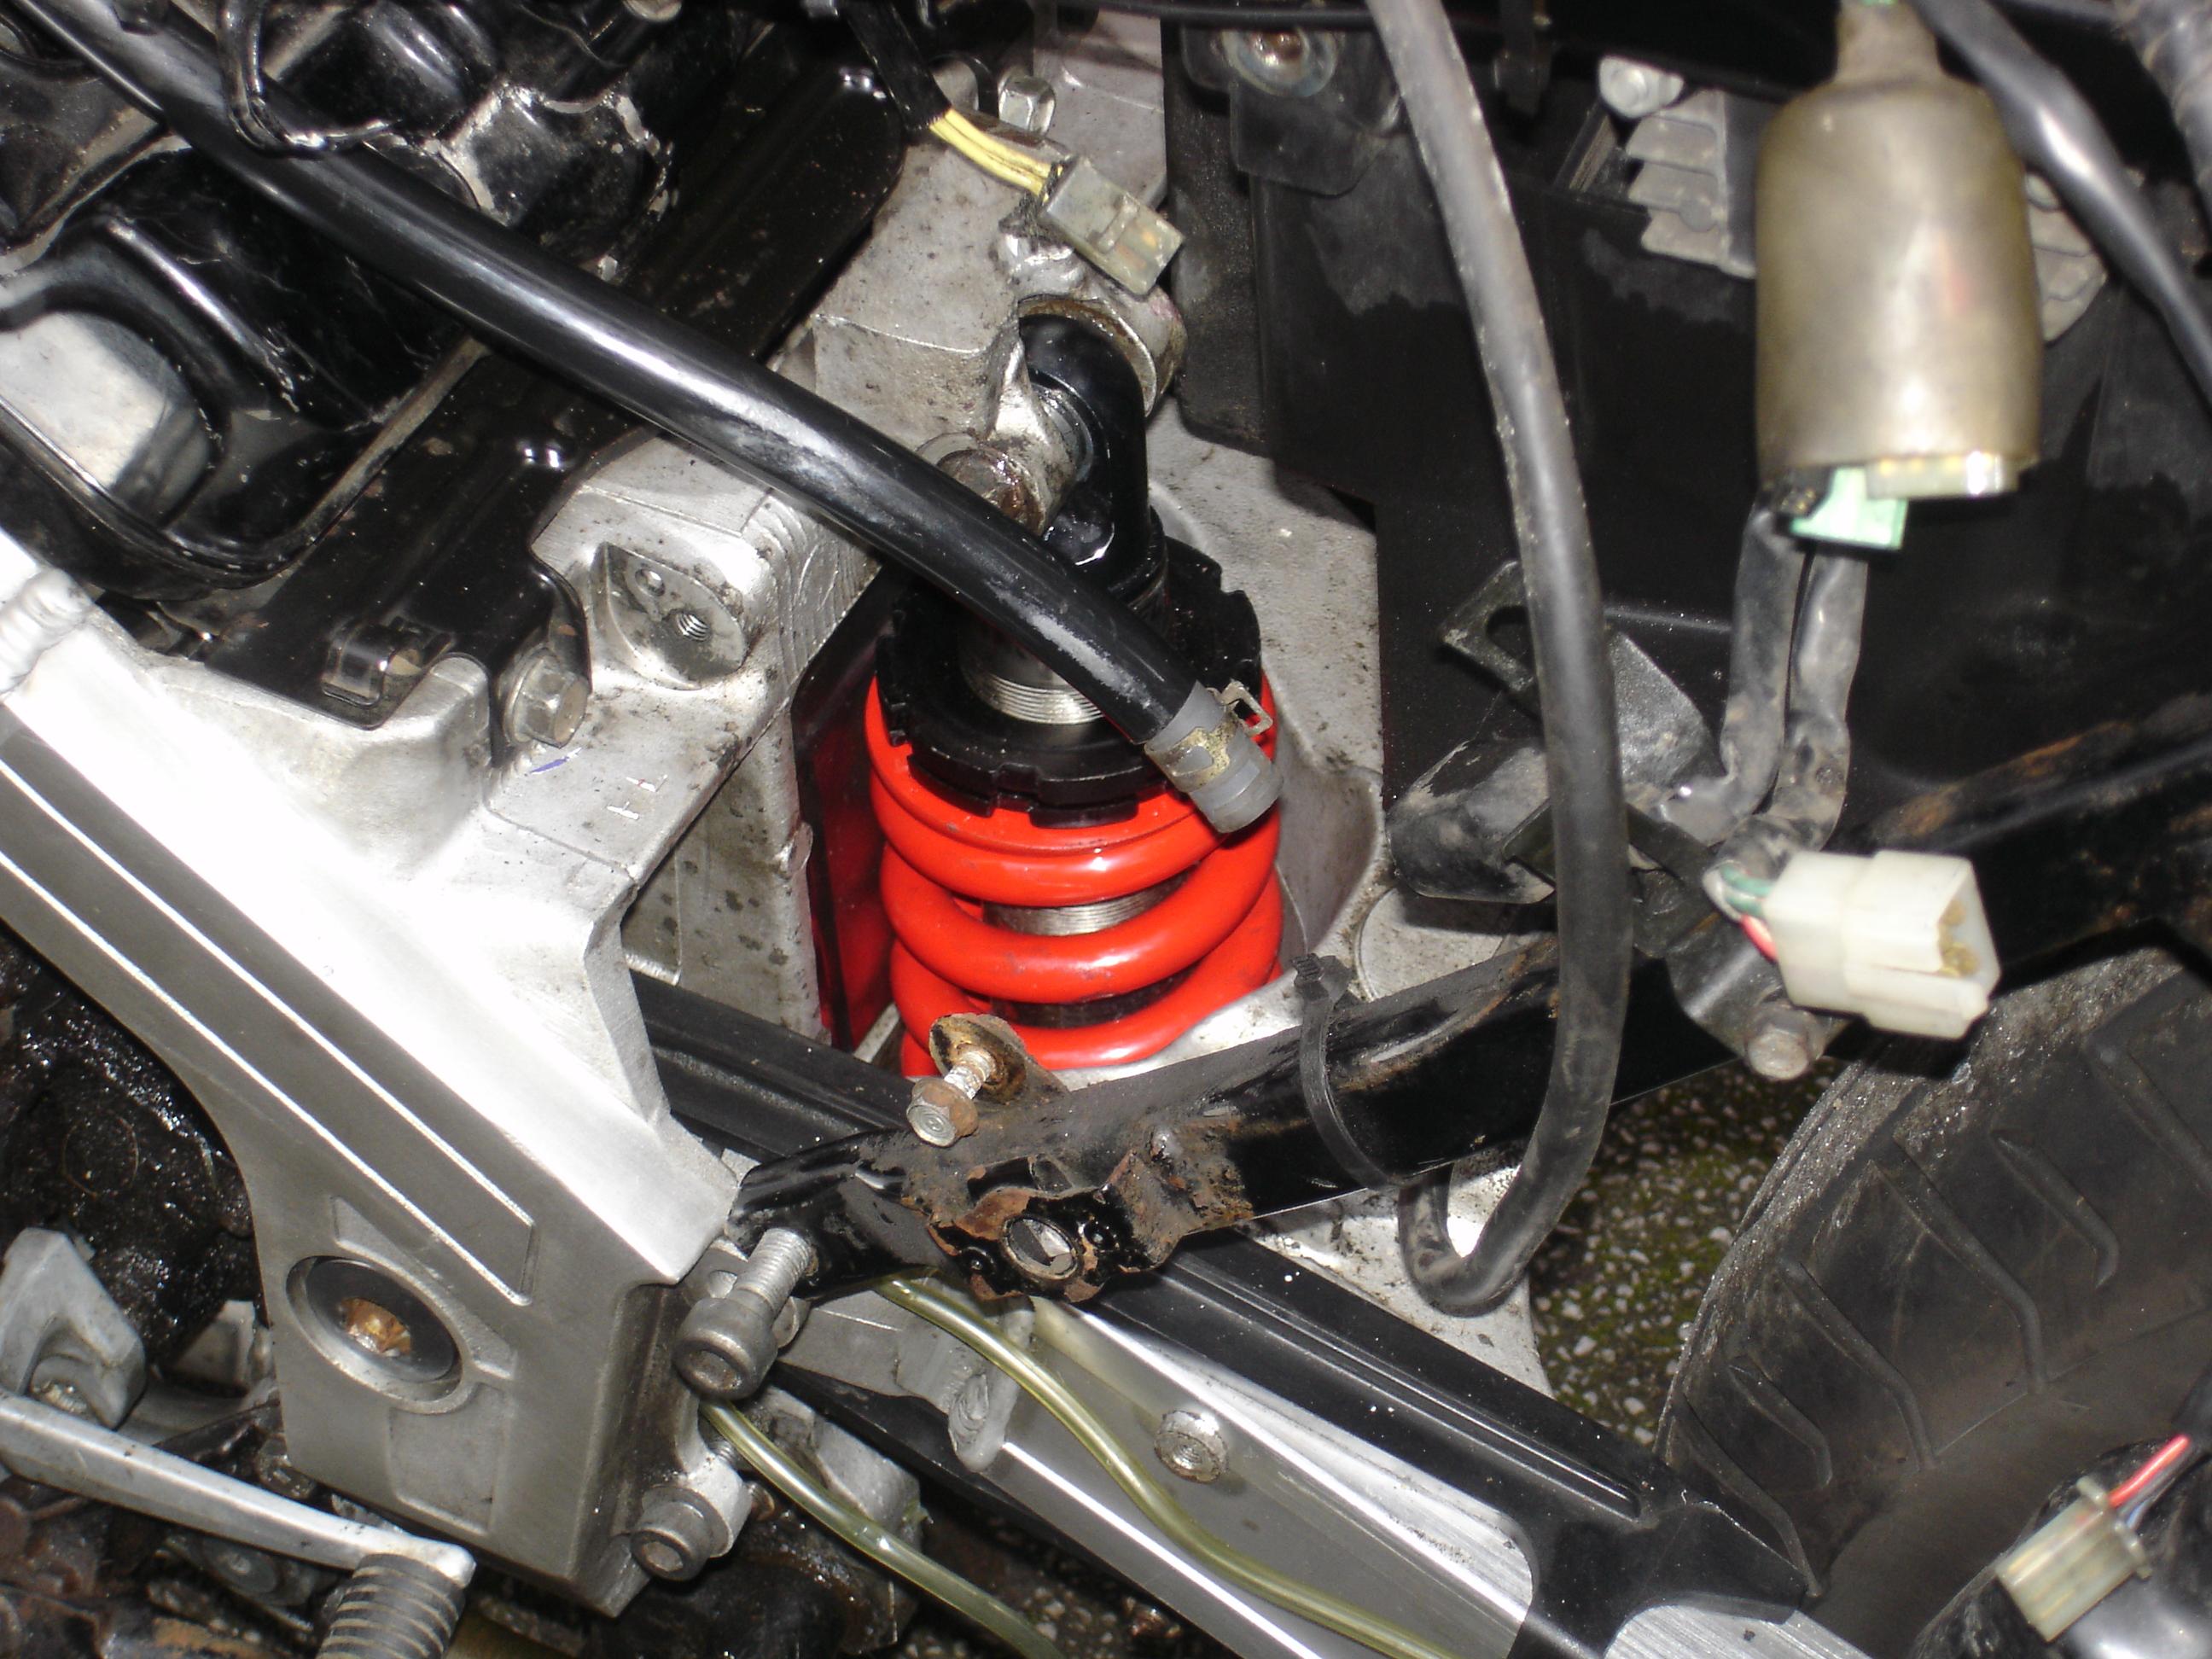
Hmmm, no heatshield on the back of the engine between the frame and head (I initially thought it was "missing" but looking at the fiche and appears the 86 didn't have one, or at least isn't listed). I wonder if there was an excess of heat there and that was an attempt to fix it, ultimately if the heat is coming from the exhaust there it's going to be pretty pointless though. Mine here for context.
-
Very bizarre. It looks like it's kind of trying to keep the fuel line off the head but why I don't know. I can only assume it was an attempt to fix a perceived problem.
-
Well, thing is that they hydraulic system is the only thing in common between the original and replacement engine *AND* the only thing I've changed in the re-commissioning (where the slip became worse).
-
Thanks for the offer but the EBC ones made no bloody difference.
-
What do you use?
-
Oh, one other thing I did see was someone (who had clutch slip after changing to Putoline Ester-Tech) was to clean all the friction plates in petrol and lightly sand the steels with scotchbrite and swap back to Sport4R. I guess I can try that too (apart from the swap to Sport4R as I'm already running that!) 🤣
-
Backstory: Way back in the dim and distant past I used to use my 1988 VFR for commuting. When it was cold the clutch would slip when given full throttle...but only until it warmed up properly. Swapped the engine out (for an FK) for reasons I won't go into now, the only things remaining original was the hydraulic system and the (bike specific) oil (Motul 5100). It still slipped. I'd bought a brand new clutch set (OEM Honda) for the original engine so figured I'd swap them in even though when I checked the old plates they were all in spec. Still did it. Gave up and figured as it only did it while cold I could live with it. Mostly for child and job reasons (I'm now 99.9% WFH) it got parked up for ~11 years. Got it back on the road last year (thread here) ... but now the clutch is slipping on full throttle in the lower gears *all* the time. I'd already replaced the clutch master cylinder (because it was corroded internally). Although the lever isn't original now I've confirmed it's not jamming on slightly. It was a rebuilt M/C and so aftermarket parts. I went through it, checked the heights and conditions of all the plates. Picked the thickest of the friction ones and steels. Replaced the OEM springs (which were still within spec but only just) with new EBC ones (so in theory stiffer too). I swapped oil brand too (to Putoline Sport 4R). I realised I'd missed out the gasket from between the sprocket cover and engine. Replaced that. Double checked fluid was returning in the M/C and the little hole wasn't blocked. Still did it. So now we're left with the only original parts in the entire system being the following. 1) Clutch line - HEL aftermarket. Should be good but I guess there is a chance it's broken down internally. 2) Clutch slave cylinder. Beyond that less likely but could be the "same" issue on the replacement engine which means the following parts. 1) Baskets, pressure plate and release bearing. 2) Pushrod and/or seal. Finally I guess the aftermarket M/C seal/piston kit may not be 100% and a chance isn't letting fluid return quickly enough (which may be why it's now doing it all the time rather than just when cold). Equally while I don't think it's the case I guess the lever may be impinging very slightly. Sticking an original lever isn't too big a deal to do a back to back test with. My initial thoughts are to replace the clutch slave as right now that's one of the two parts that is original to the start of the issue, relatively high mileage (77k) and rebuild the M/C again with an OEM kit. Web!ke had a brand new OEM slave (delivered) for half the UK price so I ordered one of those. If that doesn't solve it I'll replace swap the original clutch line back in to test as well. Any other thoughts before I start swapping more parts?
-
The picture was of an A2-70. That's stainless not zinc!
-
No affiliation and I've never used them but I have this in my saved links which may be of use with the RC26 https://v4dreams.com/products.html
-
I'm not a fan of using A2 stainless bolts for anything other than "cosmetic" purposes, ie never in critical places. They're straight up not as "strong" as a 8.8 (roughly 2/3rd of the yield strength) and more worryingly you can't be sure what grade the originals are either, they may not "merely" be an 8.8. When I run into this situation I use OEM bolts or properly suitable replacements. It's not exactly clear which bolt it is but as far as I can tell all of the bolts are still available new from Honda and for the sake of a few £/$ personally I'd be buying new ones.
-
I'm sure you know this @Captain 80s but for others sake. The middle part of the part number is the PCN or "Product Code Number". This is the unique code that refers to the bike the part was originally designed for. In the case of the lowers, the right one is 51421-MM5-003 so as you correctly deduced that part carries the PCN "MM5" which refers to the "CBR1000FH-J (Hurricane) 1000" (SC21). The stanchions carry a ML7 PCN which means they originated with the VFR750F. There is a good list of PCNs here https://www.vsource.org/VFR-RVF_files/BHondaPCNs.htm Also if anyone is really curious, the initial part of the part number refers to the type of part, the last part refers to the revision. Finally, you will often see parts superseded for improved versions in new models, looking for example at the 88 fork 'fiche the upper guide bush originally was a "MB4" ( VF1100 / V65 Magna) part but has been updated and replaced by the later "KCR" (VT250CR) part.
-
^This. That design of tube is 100% the way the clamp bolts are arranged on the later bikes. I've lost count of how many breakers treat list their parts as fitting 86-89. They're so different and while some parts fit they're not the same. Even when they've specifically listed it as my year of bike I've ended up with the wrong part (last one was a set of bars).
-
My suspicion would be it's similar to the NC30/35 which are as follows. NC30 18° BTDC @ idle -> 36-37° BTDC @ 12k NC35 15° BTDC @ idle -> 36° BTDC @ 7.4k-7.6k In comparison RC24 86-88 15° BTDC @ idle -> 37° BTDC @ 3.3k RC24 89 12° BTDC @ idle -> 35° BTDC @ 4k
-
The biggest thing IMO is the downpipes. It's a royal pain to replace and Motad (which made replacements) long since gone under. If they're not really good then I'd walk away and find one where they've either already been replaced or are good and solid. Other thing is brakes, you can still get Honda parts for the later 88/89 bikes (pads, compatible if not identical discs etc) but not for the 86/87. Aftermarket pads are available but quite limited, unsure on discs. So check the state of the discs on them. With the 86/87 though is tyre choice is quite limited. For that reason the tyres may be quite old, check the date codes carefully if only to bargain them down! You don't really want 10+ year old tyres for example. Beyond that just the common items applicable to all bikes of that age, check tank condition (not easy to seal the tank if it's leaking), check for rust on the subframe etc etc.