


Tightwad
-
Posts
1,689 -
Joined
-
Last visited
-
Days Won
1
Content Type
Forums
Profiles
Gallery
Blogs
Downloads
Events
Everything posted by Tightwad
-
I would suggest combining the two bike wires into one end of a Crimp butt connector, and the Yamaha end into the other. Use 12 gauge wire for the Yamaha side. I personally like a 16-14 gauge seamless butt connector, and use solder after crimping it and cover in shrink tubing. If you need a few, and will cover shipping, i can send them to you...I have lots.
-
The Group Buy is on! We have until 4/18/09 to solidfy the order count. See this thread for more details http://www.vfrdiscussion.com/forum/index.php?showtopic=50205 Discount depends on order quantity, so if you are thinking of a Pro Oiler for your VFR or another bike, or have a friend who is, jump on in!
-
Fair enough, I have no need for one (at this time) so I was just commenting. I will say the quality looks up to the high standards I saw in my Bug Buster
-
Can it be angled down a bit more? It looks like it points straight out, and doesn't flow "Naturally"
-
Using the relay would mean that 6th gen's could use this mod too, as the relay would switch the high current? The 98 and the 02 models use the same thermo switch. The Relay is really not needed, but it reduces the switch count to 1. Both bikes work by grounding the fan using the Thermo switch, this just allows you to do it earlier, or not at all.
-
I'll bet Tightwad could find one and put a kit together for us. Tightwad? Other than possible changing a connector, this would be a simple modification. It would help if someone who worked for a dealer could investigate, as the only way most of us could do it would be by trial and error. I know when I sold autoparts we had specs for all the sensors etc. Back then I could have found one that worked, but I no longer have access to all those books etc.
-
I put my drawing skills to work today, after figuring out how to incorporate both the "Manual off" and "Forced on" options into one DPDT switch. The switch is the lines at the top left, switch up would turn the fan on, switch down the fan would never come on. I pictured a "normal" 5 wire relay, because they are cheaper than a 4 wire NC relay.
-
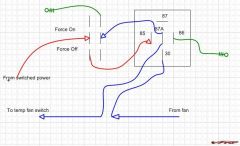
From the album: Other Pics
Fan Switch override...uses a DPDT switch and a 5 wire relay© ©vfdiscussion.com
-
:laugh: Indeed this is a nice option. I have been playing with more high tech options that would allow a temporary override, but I think this would be better in most cases...just not as fun. I have the fairings off my bike (again) doing a headlight mod, so If I remember I will take pictures of the wires needed, so they are easier to find. Should be easy to mod!
-
There's no way it would work with that style of frame slider as that sits right where the belt runs. If you want to run frame sliders, they would have to mount further outboard or more towards the rear of the bike, where the frame bolts to the engine. Never mind that the frame sliders pictures are basically useless, and guaranteed to crush your radiators on any impact....not where i would want a slider!
-
I got to see the results of this mod, very well done and clean as well!
-
Another option for your connectors would be to use a DB9 or DB15 or DB25 from a computer cable. Since the gauges are mostly low power the small wiring should be ok. You might even be able to use a Disk Drive cable that is flat...plenty of those connections to be had.
-
with ABS the only thing I put on that side is a Powerlet for charging the battery, or running roadside gear...non switched of course.
-
6th Gen - Blue Connector Ground Fix - How To.
Tightwad replied to KanadianKen's topic in Sixth Generation VFR's
No harm getting the Recall harness put in. I should have mine done sometime.... -
having not eliminated mine....why are you reliminating it?
-
I did a similar install, but the button went under the windshield pillar....most people don't even see it. I don't worry about having my garage door opener on there because if they are in the garage with my bike, they can already get the door open. If they steal my bike, they have to bring it home to open the door.
-
B E A U tiful Dang I am in love...and I am not usually a Supercharged person. What a nice kit, very well done! Now to talk the wife into a 5th gen with a supercharger....
-
Thats awesome
-
I chose Huggers on purpose, because the CF serves an eye-candy purpose, not a structural integrity purpose....if that chain were to whip loose, wrap around the sprocket and turn into a weedwhacker of sorts, the Hugger would be ripped off the mounts pretty quick...no matter the construction. I am of course NOT saying they shouldn't be made of them, just pointing out that CF pretty parts (bar ends, whatever) serve only a visual purpose...much the way this fabric (CF real or fake who knows) does. Still tempted to drop #35 on a yard of this, and see what it can do. I have a rashed body panel I was planning to practice my body work on...might be fun. I would think a resin layer over the top of some sort would be ideal, although that is beyond any knowledge I can pretend to have.
-
The people complaining about the silicone implants are not the people enjoying them....right? If you like the look, does it matter if it is true Carbon Fiber? Obviously Carbon Fiber for a dash panel is form over function, as it would be way overkill to truly make a dash piece of carbon fiber (or a wheel hugger....whatever). I generally dislike Carbon Fiber, but as a way to cover Road Rash in an inexpensive manner the Tightwad in me approves, if it can be done in a lasting way.
-
Hmmm, rashed fairing + a couple yards of fabric could = an interesting project! Now this isn't actually Carbon Fiber right? Just a "look-a-like"? I am also thinking those little panels people mount meters in would be a nice accent spot.....dang I have too many projects and this isn't even along my normal line of thought!
-
Cam Chain Tensioner, Without Throttle Body Removal
Tightwad replied to Tightwad's topic in Maintenance Guides
At what point, extended or compressed? The shaft extends quite far. I am betting the different part number has to do with a different manufacturing area or something. They appears identical to me. -
Cam Chain Tensioner, Without Throttle Body Removal
Tightwad replied to Tightwad's topic in Maintenance Guides
I agree, there is no sense removing a TB, and potentially disturbing another setting such a cable tension, Starter Valve, etc just because the "book" says to go that route. Now if they are not changing gaskets or replacing wearable parts that should be changed, and saying they are, that is a different story. -
Cam Chain Tensioner, Without Throttle Body Removal
Tightwad replied to Tightwad's topic in Maintenance Guides
Flat Stanley was there in spirit. It would have been funny to include him in the job, maybe next time. Let me know if Honda Spain is insane on the CCT prices and if so I can ship you the second one I bought if you want a new one. Cost here wasn't too bad...$115 or so for both of them and all the parts needed. -
Cam Chain Tensioner, Without Throttle Body Removal
Tightwad replied to Tightwad's topic in Maintenance Guides
Removing that hose (if equipped with a drain hose in hand) takes about 1 minute, and saves a ton of headaches...I would suggest removing them both, but natually there is more than one way to skin a cat (I prefer Duct Tape and Gasoline....) I bought both, but the rear is quiet so I saved that one for future install...although next time I am going to try increasing the tension by 1-2 turns to see what it does. Now that I know the process is a 1 hour job at best, it isn't so daunting to put the old part back in.