Member Contributer grandall1972 Posted April 13, 2012 Author Member Contributer Share Posted April 13, 2012 Look great now. So how much did you spend to fix that? So far, I have spent $347.51 on parts and shipping. It was really easy to replace the pieces and only took about 20-30 minutes. I was really amazed at how well everything comes apart and clips back together. Really nice job by honda. Next I am going to first attempt to sand and paint the bags myself, and if that doesn't turn out the way I want, I'll just have a shop fix the bags for me. I figure its worth a $15 dollar shot. I know what I want to do, and I've done a little painting before. I've just never really painted on a bike that looks as nice as the VFR1200, and I don't want to mess it up. I'll give painting the bags a try though. Thanks Link to comment Share on other sites More sharing options...
VietHorse Posted April 13, 2012 Share Posted April 13, 2012 Really wish you could have the stuff here to repair. I have my whole bike painted (two saddle bags included) by a professional paint shop for just a bit more than $200 Link to comment Share on other sites More sharing options...
Member Contributer RED RUNNER Posted April 14, 2012 Member Contributer Share Posted April 14, 2012 I think the grey I know I can get a lot of it to buff out, but I am really just tempted to go with a different color. I fell in love with that titanium color the first time I saw it online. To me, the titanium blade really just makes the bike shine to me. This is the color I was looking for. Like it alot. In keeping with the quality build of the bike. What about a bluish grey? BMW offers a platinum grey color option for its SUVs; its a real sharp color and I always thought it might look good on a bike. Sort of has a similar vibe to the colors you've selected. Link to comment Share on other sites More sharing options...
Member Contributer grandall1972 Posted April 14, 2012 Author Member Contributer Share Posted April 14, 2012 Really wish you could have the stuff here to repair. I have my whole bike painted (two saddle bags included) by a professional paint shop for just a bit more than $200 Man that would be nice. I will let it go right now with just replacing the parts and painting the front of the bags. I would have gone for the full paint job, but after doing my taxes, it was just easier to buy the replacement parts. I am in the middle of doing the bags right now. After I get them finished, I will do a post on what all I did, and have plenty of pictures. Link to comment Share on other sites More sharing options...
Monk Posted April 14, 2012 Share Posted April 14, 2012 Looks like I am going to be waiting another week for the ride side middle cowl. Yesterday they said it would be shipped out today, and today it says it will be shipped out the 10th. Gives me more time to decide what I want to do with the rear bags. I'm leaning to either picture 1 or picture 3. I like #3 the best as well.......... Semantics....... useless info used to inform, or show off, start arguments, etc. Anyway, good to know the colloquial view of what's in when referring to the area by parts. Even if the road itself would seem more like a tail than a dragon. Link to comment Share on other sites More sharing options...
Member Contributer grandall1972 Posted April 14, 2012 Author Member Contributer Share Posted April 14, 2012 Setting up the bags. Both bags side by side before I started. Both bags side by side after being taped up. Very hard to get them right. Left bag after a little sanding to scuff it up. Link to comment Share on other sites More sharing options...
Member Contributer grandall1972 Posted April 14, 2012 Author Member Contributer Share Posted April 14, 2012 Pictures of the bags while I was painting them. First bag after 2 coats. Second bag after 3 coats. Link to comment Share on other sites More sharing options...
VietHorse Posted April 14, 2012 Share Posted April 14, 2012 Great start.... Hope to see the finished product soon. Link to comment Share on other sites More sharing options...
Member Contributer grandall1972 Posted April 14, 2012 Author Member Contributer Share Posted April 14, 2012 Pictures of the Final product. - They look pretty good, and I'll keep them this way for a while, but they are not perfect. I will bide my time until I can't wait anymore. Then I will either find a way to get replacement covers or get the bags professionally painted. - I like the over all look of the paint, just didn't get it perfect and that bothers me. Can't tell right away but the lines are just very slightly off from one side to the other. It was my main concern when starting, and I did my best to get them right. No one will ever really notice unless you are really looking for it, but I know. From what I have seen, the paint should dull some and match the plastics pretty well. I'll get a few pick of the bike out in the sun tomorrow. Should be able to tell how it looks better then. Bag on the bike #1. Both Bags kind of together. Picture of bike with right side bag. Link to comment Share on other sites More sharing options...
VietHorse Posted April 14, 2012 Share Posted April 14, 2012 Looks good and very creative in general. Don't know how is the intersection area, and how sharp the border. (sorry, I don't know how to explain in English)... Link to comment Share on other sites More sharing options...
TiN Posted April 14, 2012 Share Posted April 14, 2012 Though I cant see it up close in person, that looks really really good. The coating should lighten up over a week or so. It takes a long time for that stuff to get perfectly dry. If its still too dark and glossy you can go with a really really light spray of satin black duplicolor bumper coat over the top. Not a complete one piece coat but more like an overspray looking coat where you spray from farther away than normal and it is just a billion little tiny dots. It breaks it right up and lightens it. though its a softer coat it still will wear good since the surface is broken up. I cant stress the word "light" enough though on that application. And don't do it in one application. Just take it little bits at a time and keep lightening/dulling it up till you get the exact color you want while taking breaks to let it dry in between steps. Also keep the spray nozzle as clean as possible so it keeps the overspray super fine. If done right it should match the plastic of the bags exactly. Just my .02 from my own experiences but even right now it looks really good in the pics. JMHO but it breaks up the lines of the bags and makes them look visually smaller than they actually are. I would have originally went with a different design but I like yours better. It mimics the design of the middle silver fairing but isn't redundant. Kind of confirmed an idea that I had to reduce the visual size of the red real estate on the red middle fairing to make the bike look less bulky. Guess I have a project for summer. P.S.: If you really mess up on the taping job you can take the whole spray off with mineral spirits without damaging the original paint. I had to do it on one of my fairings that I painted with this method. But you need a whole lot of mineral spirits. I just ended up buying a 5gal bucket of the stuff for the job. Link to comment Share on other sites More sharing options...
TiN Posted April 14, 2012 Share Posted April 14, 2012 Btw to get paint dimensions exact with mirror image pieces, I find that a Tailor's fabric type tape measure and a sharpie works out well for getting them to match. Those paint guys on those chopper shows just eyeball it but I for one dont have any artistic ability so I just have to use math and bisect the lines against the dimensions of the bag. Just something that helps me since you mentioned you were having a hard time matching the paint areas. Link to comment Share on other sites More sharing options...
Member Contributer grandall1972 Posted April 14, 2012 Author Member Contributer Share Posted April 14, 2012 Btw to get paint dimensions exact with mirror image pieces, I find that a Tailor's fabric type tape measure and a sharpie works out well for getting them to match. Those paint guys on those chopper shows just eyeball it but I for one dont have any artistic ability so I just have to use math and bisect the lines against the dimensions of the bag. Just something that helps me since you mentioned you were having a hard time matching the paint areas. Thanks Tin for all the information. Road the vfr to work today, and over all i really like the way the bags turned out. The top pf the line on the left bag starts about 2-3mm back of where the right bag starts, but over all the colors are looking better. Also I like how the lines flow with the bike a little. Hopefully in a week or so, they will fade just a hair more, and the colors will match perfect. If not I'll try your mist method. I did make a template to get the lines and angles right. I ended up just slightly off on the top starting point. Lile I said not perfect, buy good enough for me now. I wish i could post picks from my phone, so you could see the bike in the sun. Thanks again Link to comment Share on other sites More sharing options...
Member Contributer grandall1972 Posted April 14, 2012 Author Member Contributer Share Posted April 14, 2012 A few close ups on the bags in the sun. Pictures look better in full form on my cpu, Over all the lines are pretty crisp, very slightly ruff on the edges from where the tape came off. Can only see the ruff edges from about 1 foot away. Link to comment Share on other sites More sharing options...
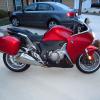
Member Contributer grandall1972 Posted April 14, 2012 Author Member Contributer Share Posted April 14, 2012 Pictures of the bike itself. I like the way the bags look on the bike now. Actually a little better than the stock look. Like I said just not quite perfect, but I do like the look, and they will stay this way for a while. Link to comment Share on other sites More sharing options...
Hvrnaut Posted April 15, 2012 Share Posted April 15, 2012 You've done a great job. Bike looks good with the bags painted, and is certainly unique. You mention that you're looking to replace the right side crankcase cover. I've a few scrapes there, as well. I can't seem to find the paint (or OEM paint code) anywhere. I'm in need of small touch up stuff, a touch up pen would do. Like you, it just bothers me to not look it's best. Anyone help out on the paint? Link to comment Share on other sites More sharing options...
vfrflanders Posted April 15, 2012 Share Posted April 15, 2012 You've done a great job. Bike looks good with the bags painted, and is certainly unique. You mention that you're looking to replace the right side crankcase cover. I've a few scrapes there, as well. I can't seem to find the paint (or OEM paint code) anywhere. I'm in need of small touch up stuff, a touch up pen would do. Like you, it just bothers me to not look it's best. Anyone help out on the paint? Spend hours looking for the paint code for the crankcase cover. Can't find it. However I found this company who makes (hopefully) the correct paint. You'll find the VFR 1200 before the VFR 400. www.rsbikepaint.com The company is from the UK. Prices between £8 (touch up paint - 25ml) and £60 (1000ml) + the same prices for the lacquer. These prices are without European VAT + transport. Maybe sending this overseas might give problem - dangerous goods... Also, some paintshops have equipment to "analyse" the paint in order to make the same paint. But this might be more expensive than ordering from rsbikepaint... I hope this helps Link to comment Share on other sites More sharing options...
TiN Posted April 15, 2012 Share Posted April 15, 2012 Very surprised that nobody wants to paint those engine covers to black. That grey just seems to be an oddball color on the bike to me since the only place you see that color is on the engine. I can see if someone wants to keep the bike original looking though. Cant wait to get a scratch on mine so I have a reason to repaint them. No dice so far though. Link to comment Share on other sites More sharing options...
vfrflanders Posted April 15, 2012 Share Posted April 15, 2012 Very surprised that nobody wants to paint those engine covers to black. That grey just seems to be an oddball color on the bike to me since the only place you see that color is on the engine. I can see if someone wants to keep the bike original looking though. Cant wait to get a scratch on mine so I have a reason to repaint them. No dice so far though. Take a look at the VFR's 1200 sold for the local market in Japan. The engine in black!!! Link to comment Share on other sites More sharing options...
MadPuppy Posted April 15, 2012 Share Posted April 15, 2012 I know I can get a lot of it to buff out, but I am really just tempted to go with a different color. I fell in love with that titanium color the first time I saw it online. To me, the titanium blade really just makes the bike shine to me. This is the color I was looking for. That actually looks pretty good! sorry to hear about the scratches tho... Link to comment Share on other sites More sharing options...
Member Contributer grandall1972 Posted April 16, 2012 Author Member Contributer Share Posted April 16, 2012 Does anyone know how much the seal/gasket for the right side crank case cover cost? Also where can I order it? Link to comment Share on other sites More sharing options...
TiN Posted April 17, 2012 Share Posted April 17, 2012 I would assume it would use high temp rtv. At least that was what it used on my old kawasakis when they didn't specify a gasket in the parts breakdown pic. edit: this is nothing more than an assumption though. i have never broken them open to actually see for myself. Link to comment Share on other sites More sharing options...
Member Contributer grandall1972 Posted April 18, 2012 Author Member Contributer Share Posted April 18, 2012 I would assume it would use high temp rtv. At least that was what it used on my old kawasakis when they didn't specify a gasket in the parts breakdown pic. edit: this is nothing more than an assumption though. i have never broken them open to actually see for myself. You're probably right, either way we'll find out the next time the bike is ready for an oil change. Thanks Link to comment Share on other sites More sharing options...
Hvrnaut Posted April 20, 2012 Share Posted April 20, 2012 Does anyone know how much the seal/gasket for the right side crank case cover cost? Also where can I order it? grandall, Are you replacing the (scuffed) right side crankcase cover? If so, is this requiring a new gasket seal? Just trying to figure out to do with mine... Is this a project you're taking on yourself? If so, how much is involved? Sorry for the 20 questions! Trying to get my bike back to "new" again. Pissed about the slight scuff marks. Thanks Link to comment Share on other sites More sharing options...
Member Contributer grandall1972 Posted April 25, 2012 Author Member Contributer Share Posted April 25, 2012 Does anyone know how much the seal/gasket for the right side crank case cover cost? Also where can I order it? grandall, Are you replacing the (scuffed) right side crankcase cover? If so, is this requiring a new gasket seal? Just trying to figure out to do with mine... Is this a project you're taking on yourself? If so, how much is involved? Sorry for the 20 questions! Trying to get my bike back to "new" again. Pissed about the slight scuff marks. Thanks Yes, I will be replacing the scuffed right side crankcase cover and the two lower cowls that got slightly scratched. I will be doing this in about another 1000 miles, or the next time I do my oil change. Not sure on whether or not it needs a seal. I've been looking and have not been able to find a part number for one, and if anyone else knows for sure let me know. Once this is done, my vfr will be back to better than new. I will be taking on the replacing of parts myself, and not sure what all will be involved. Though, from the looks of it, it should not take too much effort or work to take everything off and put new pieces back on. The middle cowls and upper cowl, , were very easy to replace. So far the paint on the bags looks great and is holding up well. Thanks, Link to comment Share on other sites More sharing options...

Recommended Posts
Archived
This topic is now archived and is closed to further replies.