Cogswell
-
Posts
4,443 -
Joined
-
Days Won
120
Content Type
Forums
Profiles
Gallery
Blogs
Downloads
Events
Everything posted by Cogswell
-
 Love that color combination on a 5th gen - the luggage is a perfect match for the bike - looks great.
 -
Ordered my Bazzaz Z-Bomb today!
Cogswell replied to interceptorrider's topic in Seventh Generation VFR's
If he's not reflashing anything with a VIN, his business must be off like 90% . . . If all he's doing is race and hand built offroad vehicles, that's a tiny percentage of the on-road ones. I wonder if it's some some sort of gov't agency like CARB or EPA that assessed fines or similar and he stopped due to that. The heavy hand of gov't . . . Maybe tell him that the engine was swapped in to a go-kart used for racing - no VIN available! -
Grum, Thanks for the suggestions. The c/b wiring has ring terminals to / from the breaker. As a test, thinking I'll temporarily move the hot wire directly to the battery to bypass the breaker to remove that from the equation - see what happens. Maybe it's just time for a stator rewind. Darn these M/C charging systems - they should be more robust - they're barely adequate when they work properly. Seems like they could have designed a shaft driven alternator with an internal regulator that's air cooled - like all cars have, and spared us all the headaches. edit: So removing the c/b from the circuit does seem to help - although this experiment was done at a cold start. I could keep it around 1,500 to 1,750 rpm and get 14v with the fan going. It's tough to isolate each variable - maybe heat soak is factoring in to this for the 847, thermo-regulating itself, or maybe it's just the c/b does not have sufficient capacity. At any rate, I have a midi-fuse holder and some 30A fuses on the way - will try that and see if anything changes.
-
Grum, Further update. I successfully backprobed the stator wires at the R/R while connected to the R/R. I have some alligator clips with solid core wire that make that easy. Across all 3 pairs voltages were as follows: 1,200 rpm 14 to 15v 2,000 rpm 20v 5,000 rpm 44v Those readings are 20% to 25% less than when I test them with the connector removed from the R/R (and the latter was done at the R/R connector, so the only variable is being attached to the R/R vs not). Now the question is "would that be expected?". Even if yes, it still doesn't explain the behavior of running up to high rpm and not having the voltage move with the fan running. But, it could be a piece of the puzzle. I am at a loss as how the series regulators work vs the shunt type. Many thanks Cogs
-
Grum, thanks for the suggestion - I'll give the volts AC a check while connected and see what it says. Regarding the heat sink, there is some limitation to that with this swap. The mounting plate adapter stands off slightly from the frame so there's no direct contact with the mounting plate to the frame. Regarding thermal protection, it seems to have the fan on / low voltage idle issue after a cold start (I checked since I have the fan switch), so while a possibility, it seems unlikely. As I mentioned, maybe I'm making too much of it. What I may do is ship it back to the vendor and ask him to re-test it - he claims to test them all prior to shipping. He seems like a stand up guy, we'll see. I really want to like this unit - and when going down the road, I do! But sitting in traffic, no so much. I'll report back what the AC reading is.
-
So now with some miles on the 847, an update. Even tho this forum is 8th gen, maybe it still applies to someone that might want to go this direction. Going down the road the '47 regulates to 14.5v very consistently, no complaints. It also cleans up the wiring around the frame and is a clean installation, another plus. OTOH, this unit displays some strange behavior at lower revs and at idle. For context, I've checked out my (10,000 mile) stator for both resistance and voltage, at the 847 connector (to account for any drops across the connection to the stator). It ohm's out perfectly, and voltages at 1,200, 3,000, 4,000 and 5,000 rpm's are 20v, 30v, 40v, and 55v. As far as I can tell those numbers are within specification of a properly functioning stator. I took those readings on a 90 degree day after a long ride and the engine was well heat soaked. While I replaced my OEM R/R due to increased fluctuation to the high side (sometimes seeing 14.8v vs previously a very steady 14.6v), I never had any trouble with it at idle with either high beams on or the fan running. I would get in the range of 13.3 to 13.5 volts with either going. Not great, but not a concern, either as at least I know the battery is not being discharged. Enter the 847. At 1,200 idle, I get battery voltage (12.8v) or less - 12.7v. Here's the strange part. Sometimes if I bring the revs up I get low 13's with it, sometimes not. On one occasion while stopped I decided to continue increasing revs to see if I could get it in to the 13's - I finally gave up at 8,000. At that point the stator is putting out what, 70 to 80 volts? And the 847 can't regulate enough power for the voltage to be any better than the battery? My lowly OEM R/R could do that . . . Now maybe this isn't a big deal. This could be going on for a lot of riders and they never know it b/c they don't have a volt meter (mine is a Datel with a 1 significant digit display). Still stranger, other times it will bring up the voltage at low revs - after one stop light patiently watching the meter at 12.7v, traffic began moving and at under 3,000 rpm in 1st gear it was showing 14.0v with the fan still running. ??? I don't know if this somehow has something to do with 847's "switching the stator off and on" and it has trouble doing that under certain load conditions, or what. I emailed Jack at Roadster Cycle (where I bought it) and he attributed it to low stator output. Hmmm . . . sorry Jack, I don't think so. A healthy stator at 8,000 rpm should provide enough amps at the voltage it's supplying to give the fan the watts it consumes - if the regulator can control it. There's more to this story that I don't know. Maybe this is how series regulators behave, not sure. I cannot find anything about it in my research on it. The main worry about the low voltage with the fan going is because of the situation where this is likely to happen - idling in a traffic jam. I can't let the engine overheat, and I don't want the battery going flat running the fan whilst the R/R is unable to regulate to sufficient voltage to at least prevent the battery from discharging. If this happened with a heated vest, well, just turn the dumb thing off. The added factor in all this is that I have HID headlights, and those consume significantly less power than the stock H4's, so there should be extra available to run the fan, but apparently not. If H4's consume 55watts each, at 20v supplied that would be about 5 to 6 amps (someone please correct me if needed). If the HID's are 70% of that, then call it 70 watts then call it 4 amps needed if the fan draws 30 watts for a total of 100w, plus what's needed to run the balance of the electrics (ECU, etc), then maybe the total consumption is 125 watts (just guessing). At 20v , the stator would need to produce what, 6 to 7 amps, and Jack's telling me my low mile, verified stator can't produce 7 amps??? Well, maybe not . . . Something isn't right with this. I get it that voltage will drop as the draw increases - but I had a better time of it with the OEM R/R. I've been over the wiring carefully, checked each connection, ohm'd them out - everything looks and tests out correct. I don't have an ammeter - wish I did - that would tell me what I'm probably looking for - is it stator output, or is it the 847?? The silver lining in this is that if it does indeed run the stator cooler, then hopefully it will never end up BBQ'd as it did in the past. And hopefully the 847's internals are more robust and likely to last longer than a typical shunt R/R. Sorry for my long rant - but now looking at it, would I make this swap again? Right now I'm not sure - leaning toward "probably not". It may have its advantages, but consistency of regulation, particularly at low rpm's is not one of them. Hopefully it won't leave me stranded if I get caught in a long backup in hot weather.

-
New 5th/6th/8th gen performance header now in production in USA
Cogswell replied to sfdownhill's topic in Exhaust Systems
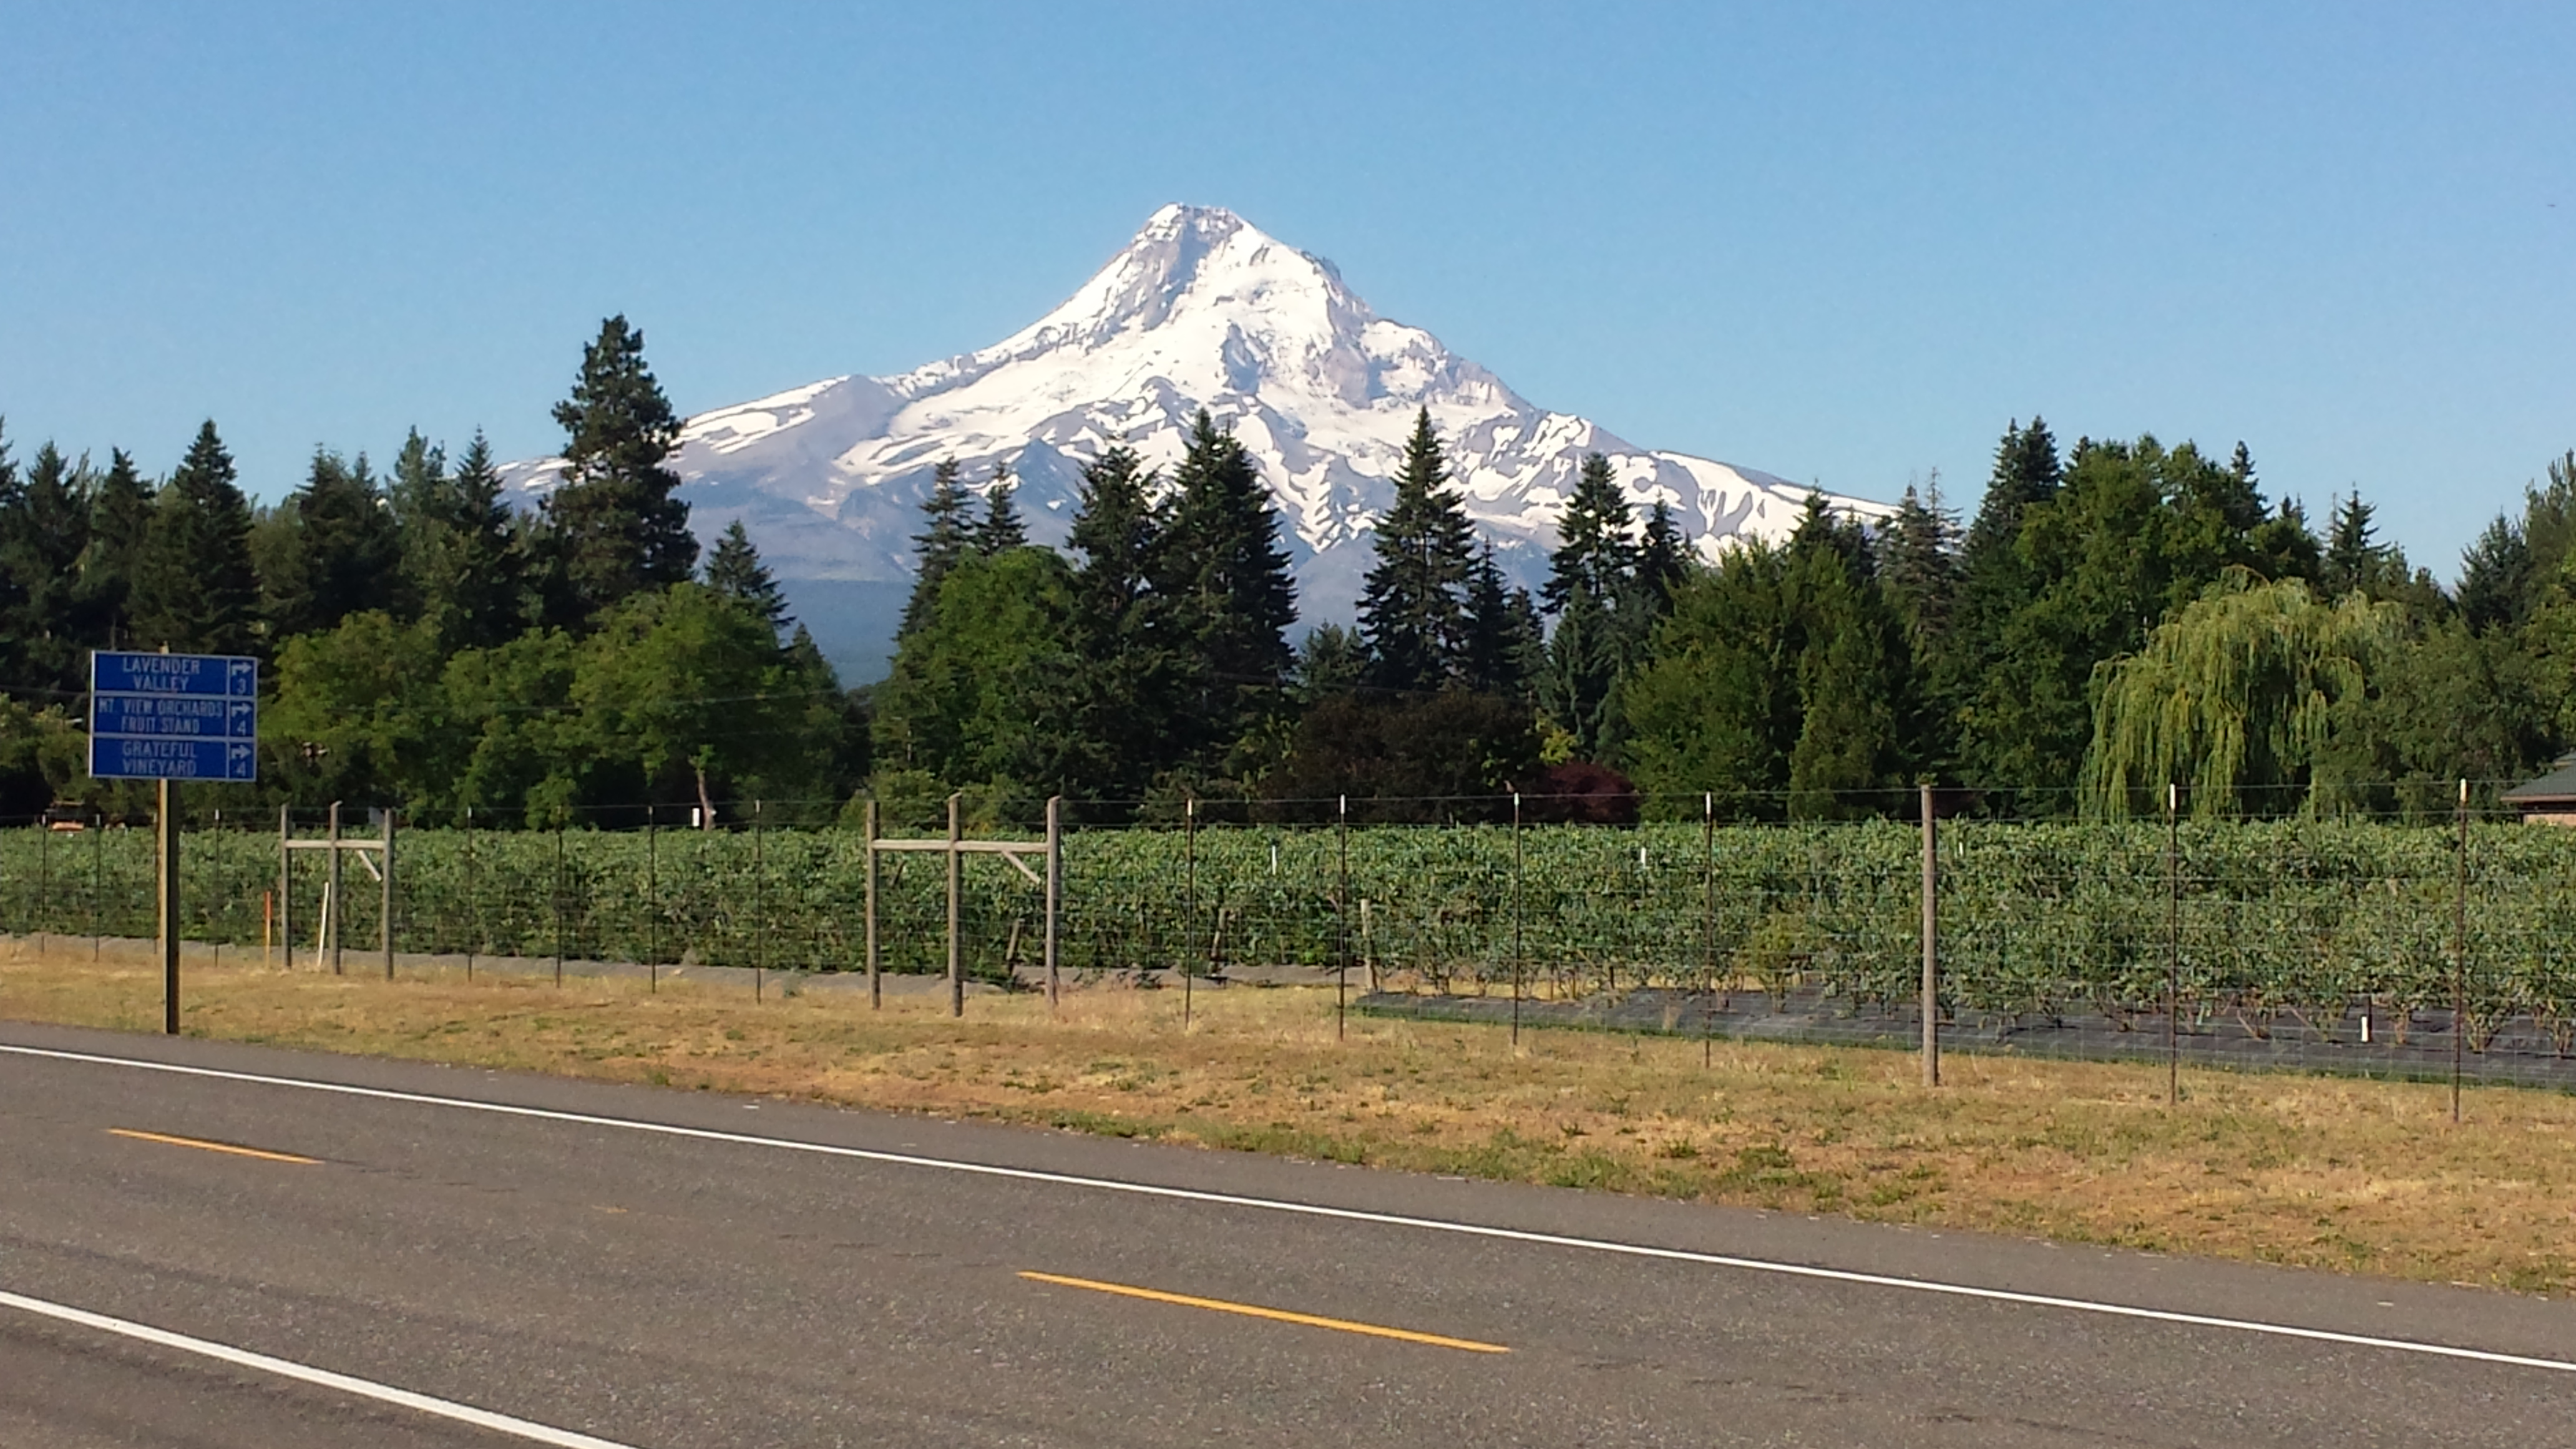
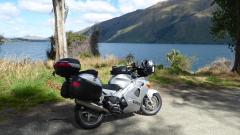
So, an update on the MTB. Set out at 7:00 for a 200 mile loop around Mt Hood. It's going to be 100 today so an early start when it was 65 felt great. With the RB Racing, the tune is very smooth, almost as buttery as my 4th gen was. I had picked up a mpg or 2, I had consistently gotten 40 with the Power Commander and with RB Racing it was maybe 42. Now with MTB and tuned to a cruise AFR of 13.5, at 5,000 to 6,500 rpm I could sense just a very tiny bit of hesitancy when rolling in to the throttle. I'm picking nits - it's subtle. No annoying bucking or jerking, but I could tell is was just a bit different - just a very slight hesitation. Roll in to it assertively though, and there's plenty of smooth mid range mojo. I'm a perfectionist, so if things are the slightest off, it gets to me. Anyway it's nothing I would fret over. Here's the other side of the coin. As I climbed the pass up to 5,000 feet at Govt Camp, i was about 65 miles from my fill up and still showing 7 bars on the gas gauge. I recall thinking that was odd, by 65 miles I'd normally have no more than 6 and maybe even 5 bars. I continued over the summit and then down Hwy 35 to Hood River (what a beautiful run - just the fresh smell of the forest is itself worth the trip). Got gas at H.R. and continued home where I filled again. Total mileage was 199, on 4.326 gal - 46 mpg. Ive never gotten that with this bike. So range is the benefit to me - 15% over the PC tune. I'd guess that riding the PC tune back to back vs this one would not reveal a noticeable difference, so I think a win. Next iteration may be to nudge the cruise AFR down to 13.4, assess and repeat to find the best blend of smoothness vs mileage. The 12 AFR for higher throttle settings seems just fine - she likes to run when you put the whip to it. And the O2 pigtail is still good - after 300 miles I'm going to close the case on that item. The photo of Mt Hood was taken about 9:30 this a.m., maybe 6 miles south of Hood River, OR, on Hwy 35, looking southwest.
-
New 5th/6th/8th gen performance header now in production in USA
Cogswell replied to sfdownhill's topic in Exhaust Systems
Before talking with Yaman, you'll need to get the MTB installed. If you don't have switched power available for it, you'll need to rig that up - fortunately I already had it. Also, the O2 sensor lead met up with the MTB lead right at the tank hinge. That might work in other instances, but the plugs are large and I have wiring for HID headlights, a power outlet and 847 wiring through there, so I got an extension cable to move the plug away from that area. Then you'll need to get the MTB plugged in to the RB module. Before calling Yaman you'll need to download software called "Team Viewer" to your laptop and have that ready in addition to the RB software. You'll get a code from Team Viewer and give that to him allowing him to remote in to your laptop and view your software and map. You'll need the USB cable from the RB module (not MTB) to plug in to your laptop. Be in the garage with all that ready when you call him. I was not ready and he wasn't all that happy with me. At any rate, I caught him on a Saturday morning right at his opening time and he was available. What he'll do is run through the setup routine that's found in MTB documentation. You could do that yourself, but he's so adept at it - it could save a lot of time and frustration. He'll make all the adjustments to the map, then have you start the bike and watch what it's doing to verify the install. It might be good to read through the MTB software to see what he's going to do when he remotes in to your bike - have some idea of what he's doing. Before ordering on line, you might call him to see if he has a MTB available. He's gone through a lot of them and the 2 times prior that I called he was sold out. It will not tell you that on the website. On this last attempt he had one - I told him my name and he said it was mine - I had the payment through in under 10 minutes - he shipped it the same day. -
New 5th/6th/8th gen performance header now in production in USA
Cogswell replied to sfdownhill's topic in Exhaust Systems
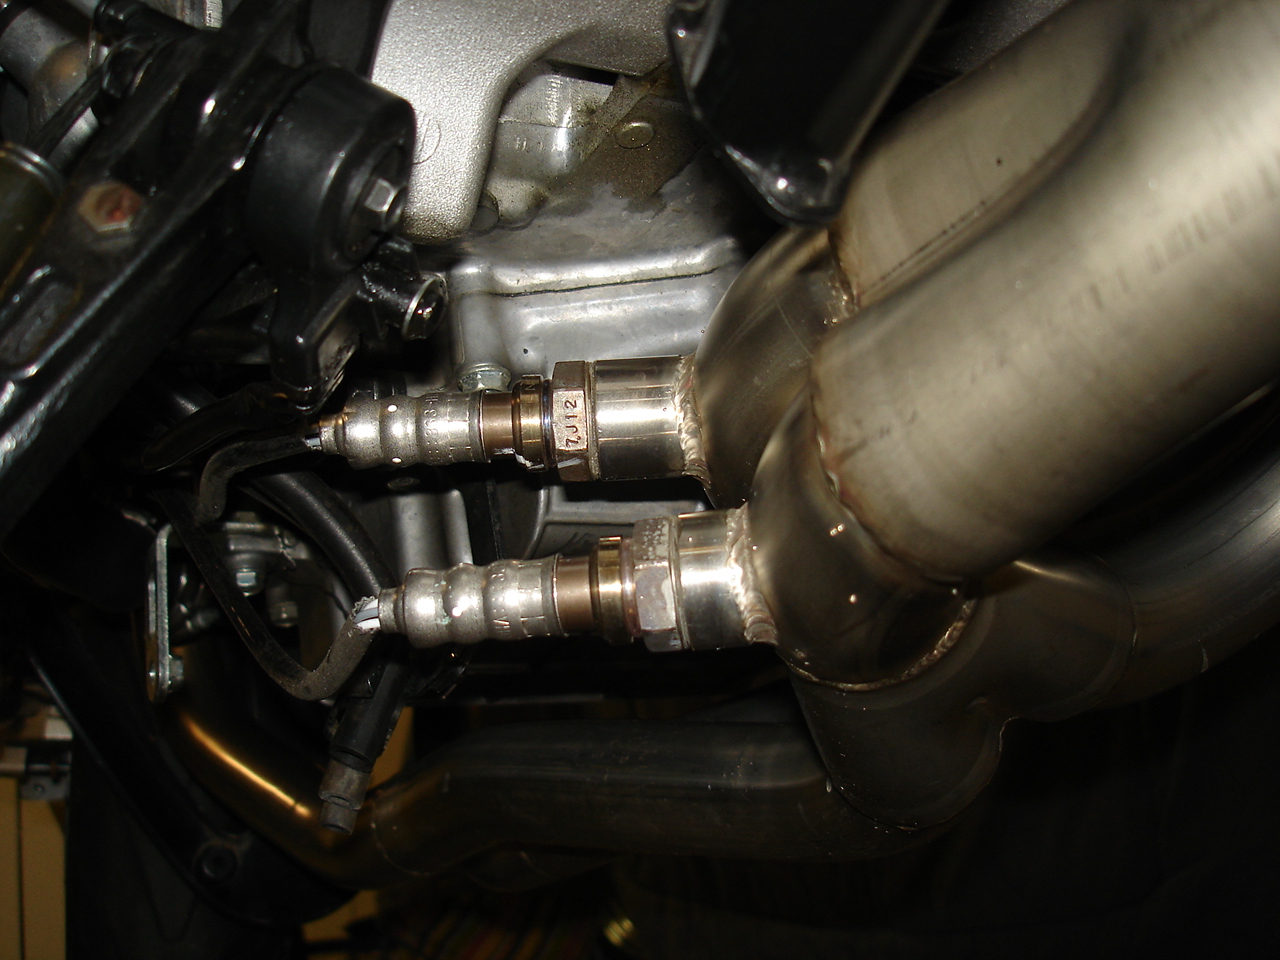
Mr ShipFixer, I think this might be what you were waiting for. My delay in putting any miles on this with the wideband O2 has been a function of other work I was doing on it that had its own set of problems. But, finally got that resolved and now going down the road with about 100 miles on it. The first pic is of how the O2 sensor wire has survived so far. Seems fine. I think the pigtail on it would be sufficient to clear the chain, tho if I pushed it hard that way, it would just barely brush it. So, in the pic I took a piece of scrap solid core copper wire to create a stay, bolting it to Seb's center stand stop. That kept it far enough from the chain that I was not able to push to the chain over against it. For the time being it's experimental - maybe not necessary, will see. If it helps, this is not a new chain - has about 13,000 miles on it, but is well maintained. I suppose as they near end of life they could get more side to side play and potentially rub the wire - time will tell. In the other photo, I had some clearance issues with the lower OEM O2 sensor. There may be some variance from unit to unit - but in my case the O2 sensor fouled the fairing. It was significant enough that the fairing could only just barely be attached to the center stand bolt even if bent around it. (It would have eventually cracked, so that was quickly ruled out). The apparent choices were to trim the faring, find a shorter O2 sensor or trim the O2 bung. I didn't want to alter the fairing and AFAIK there are no "short" O2 sensors available, so I went the route of trimming the bung. You can see in the photo that the lower one is about 1/2 the length of the other. It took about 1/2 hour with a Dremel cutoff wheel and then a file to clean up the face of it and make sure it was square with the centerline of the bung. It seems to work fine. Others may not have this issue - YMMV. Anyway - with the MTB now the AFR target can be controlled and the module will adjust fueling to it on the fly. There's no way of separating the effects of the headers from the RB/MTB module, but my seat of the pants dyno tells me that the mid range of about 5,500 to 9,000 revs is more responsive and fun to ride. IIRC when Yaman remoted in and looked over the tune, I could see that there was some ignition advance dialed in through that range (I need to go back in and spend more time looking it over, but at this point I just want to ride and enjoy it) so that could be another piece of the puzzle. Past about 10,000 it looked like a degree of timing was backed out. At low throttle settings it was set to a target 13.5 AFR for fuel economy and higher throttle settings to 12. That intuitively seems like a good compromise. Regardless, it runs great - very happy with it. Anyway, it's been a long journey time will tell how durable it all is as some miles add up on it. Cheers
-
New 5th/6th/8th gen performance header now in production in USA
Cogswell replied to sfdownhill's topic in Exhaust Systems
I would say the same for my Remus cans - a bit louder with the cat gone, but not harsh. -
New 5th/6th/8th gen performance header now in production in USA
Cogswell replied to sfdownhill's topic in Exhaust Systems
I had to do the same with wood for spacers. Just the nature of going the custom route - some fitting and adjusting is to be expected. -
From the members I've seen here that needed new front wheel bearings they had seen more than occasional rain. Washing a bike with profuse amounts of water the way one would bathe a car is probably also not good for bearing's longevity and by no means ever pressure wash a bike. As Grum said, they should go a good long way and will give some signs of feeling rough before catastrophic failure. When the wheel is off, use an index finger to press in firmly and turn the races slowly. If there's no roughness and they're silent you should be good to go.
-
New 5th/6th/8th gen performance header now in production in USA
Cogswell replied to sfdownhill's topic in Exhaust Systems
We love to help you spend money! LOL. At least you have your priorities right . . . Groceries, clothes for the kids, night out with the wife, motorcycle accessories, taxes, insurance . . . Yup, looks about right - the rest is just sissy stuff. -
New 5th/6th/8th gen performance header now in production in USA
Cogswell replied to sfdownhill's topic in Exhaust Systems
Here's a the lower rev portion of the map showing fuel trims. There are also ignition timing changes made on the Ignition tab. Note the largest fuel changes are made right around 6,700 rpm between 20% and 80% throttle - where riders have issues with the 'transition'. The ignition function Power Commander cannot do. PC does not tap in to the ignition pulse generator as RB does and thus there's no way for it to adjust what's happening. This is much closer to what a dyno tuner would do on a car, adjust both timing and fuel delivery vs. only the latter. Should be interesting to see how this thing evolves as it's ridden.
-
New 5th/6th/8th gen performance header now in production in USA
Cogswell replied to sfdownhill's topic in Exhaust Systems
First ride with it coming up later in the week. Will let you know. Just got the MTB synched up with Racing module. Got on the phone with Yaman this a.m. who remoted in to the sytem for an initial checkup and to make base settings - got a clean bill of health. He sets it up with a leaner AFR target below about 8,000 rpm for mileage - IIRC 13.5. For rpm beyond that the target goes to a richer mixture to optimize power. The MTB will hit those targets even at higher elevations and then readjust back at sea level. Try that with a P.C. . . . Now just other reassembly from other maintenance and she'll be good to go. -
New 5th/6th/8th gen performance header now in production in USA
Cogswell replied to sfdownhill's topic in Exhaust Systems
It looks like a zip tie around it to hold it is about the best that can be done. I also have Sebastisn's center stand stop, so that provides an added structure to retain the wire. How is it holding up for you? -
New 5th/6th/8th gen performance header now in production in USA
Cogswell replied to sfdownhill's topic in Exhaust Systems
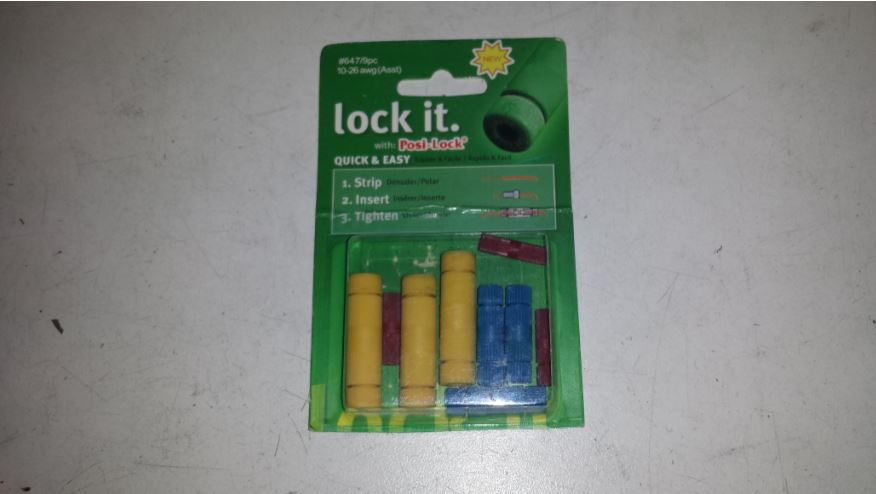
Wire length is a challenge. There are a couple of ways to extend the wiring, have been looking at those. There are pre made wires with connectors on ebay. The other is to follow Bosch's recommendation and use Posi-Locks. Bosch says specifically not to solder wires. -
New 5th/6th/8th gen performance header now in production in USA
Cogswell replied to sfdownhill's topic in Exhaust Systems
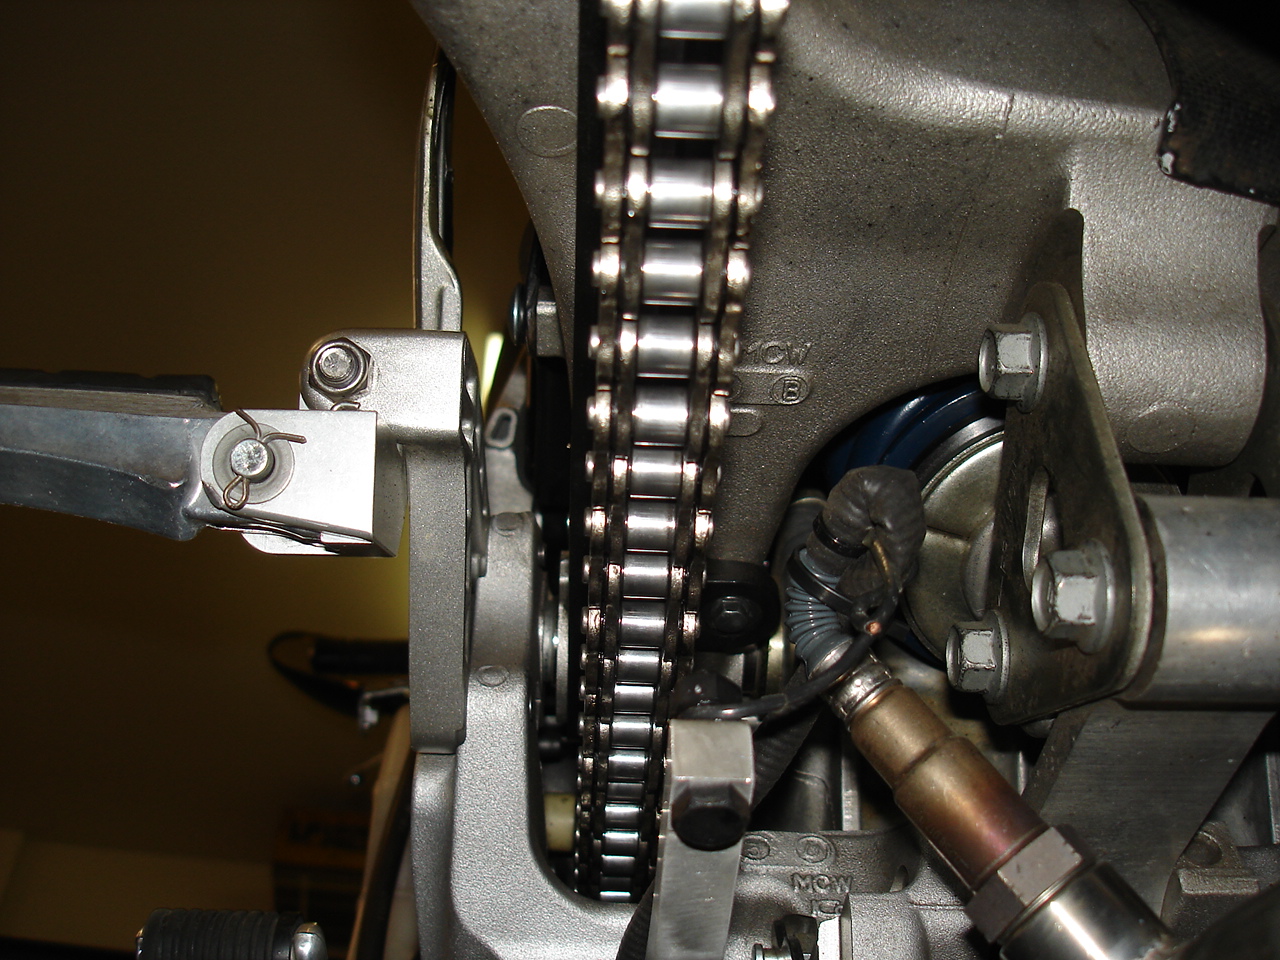
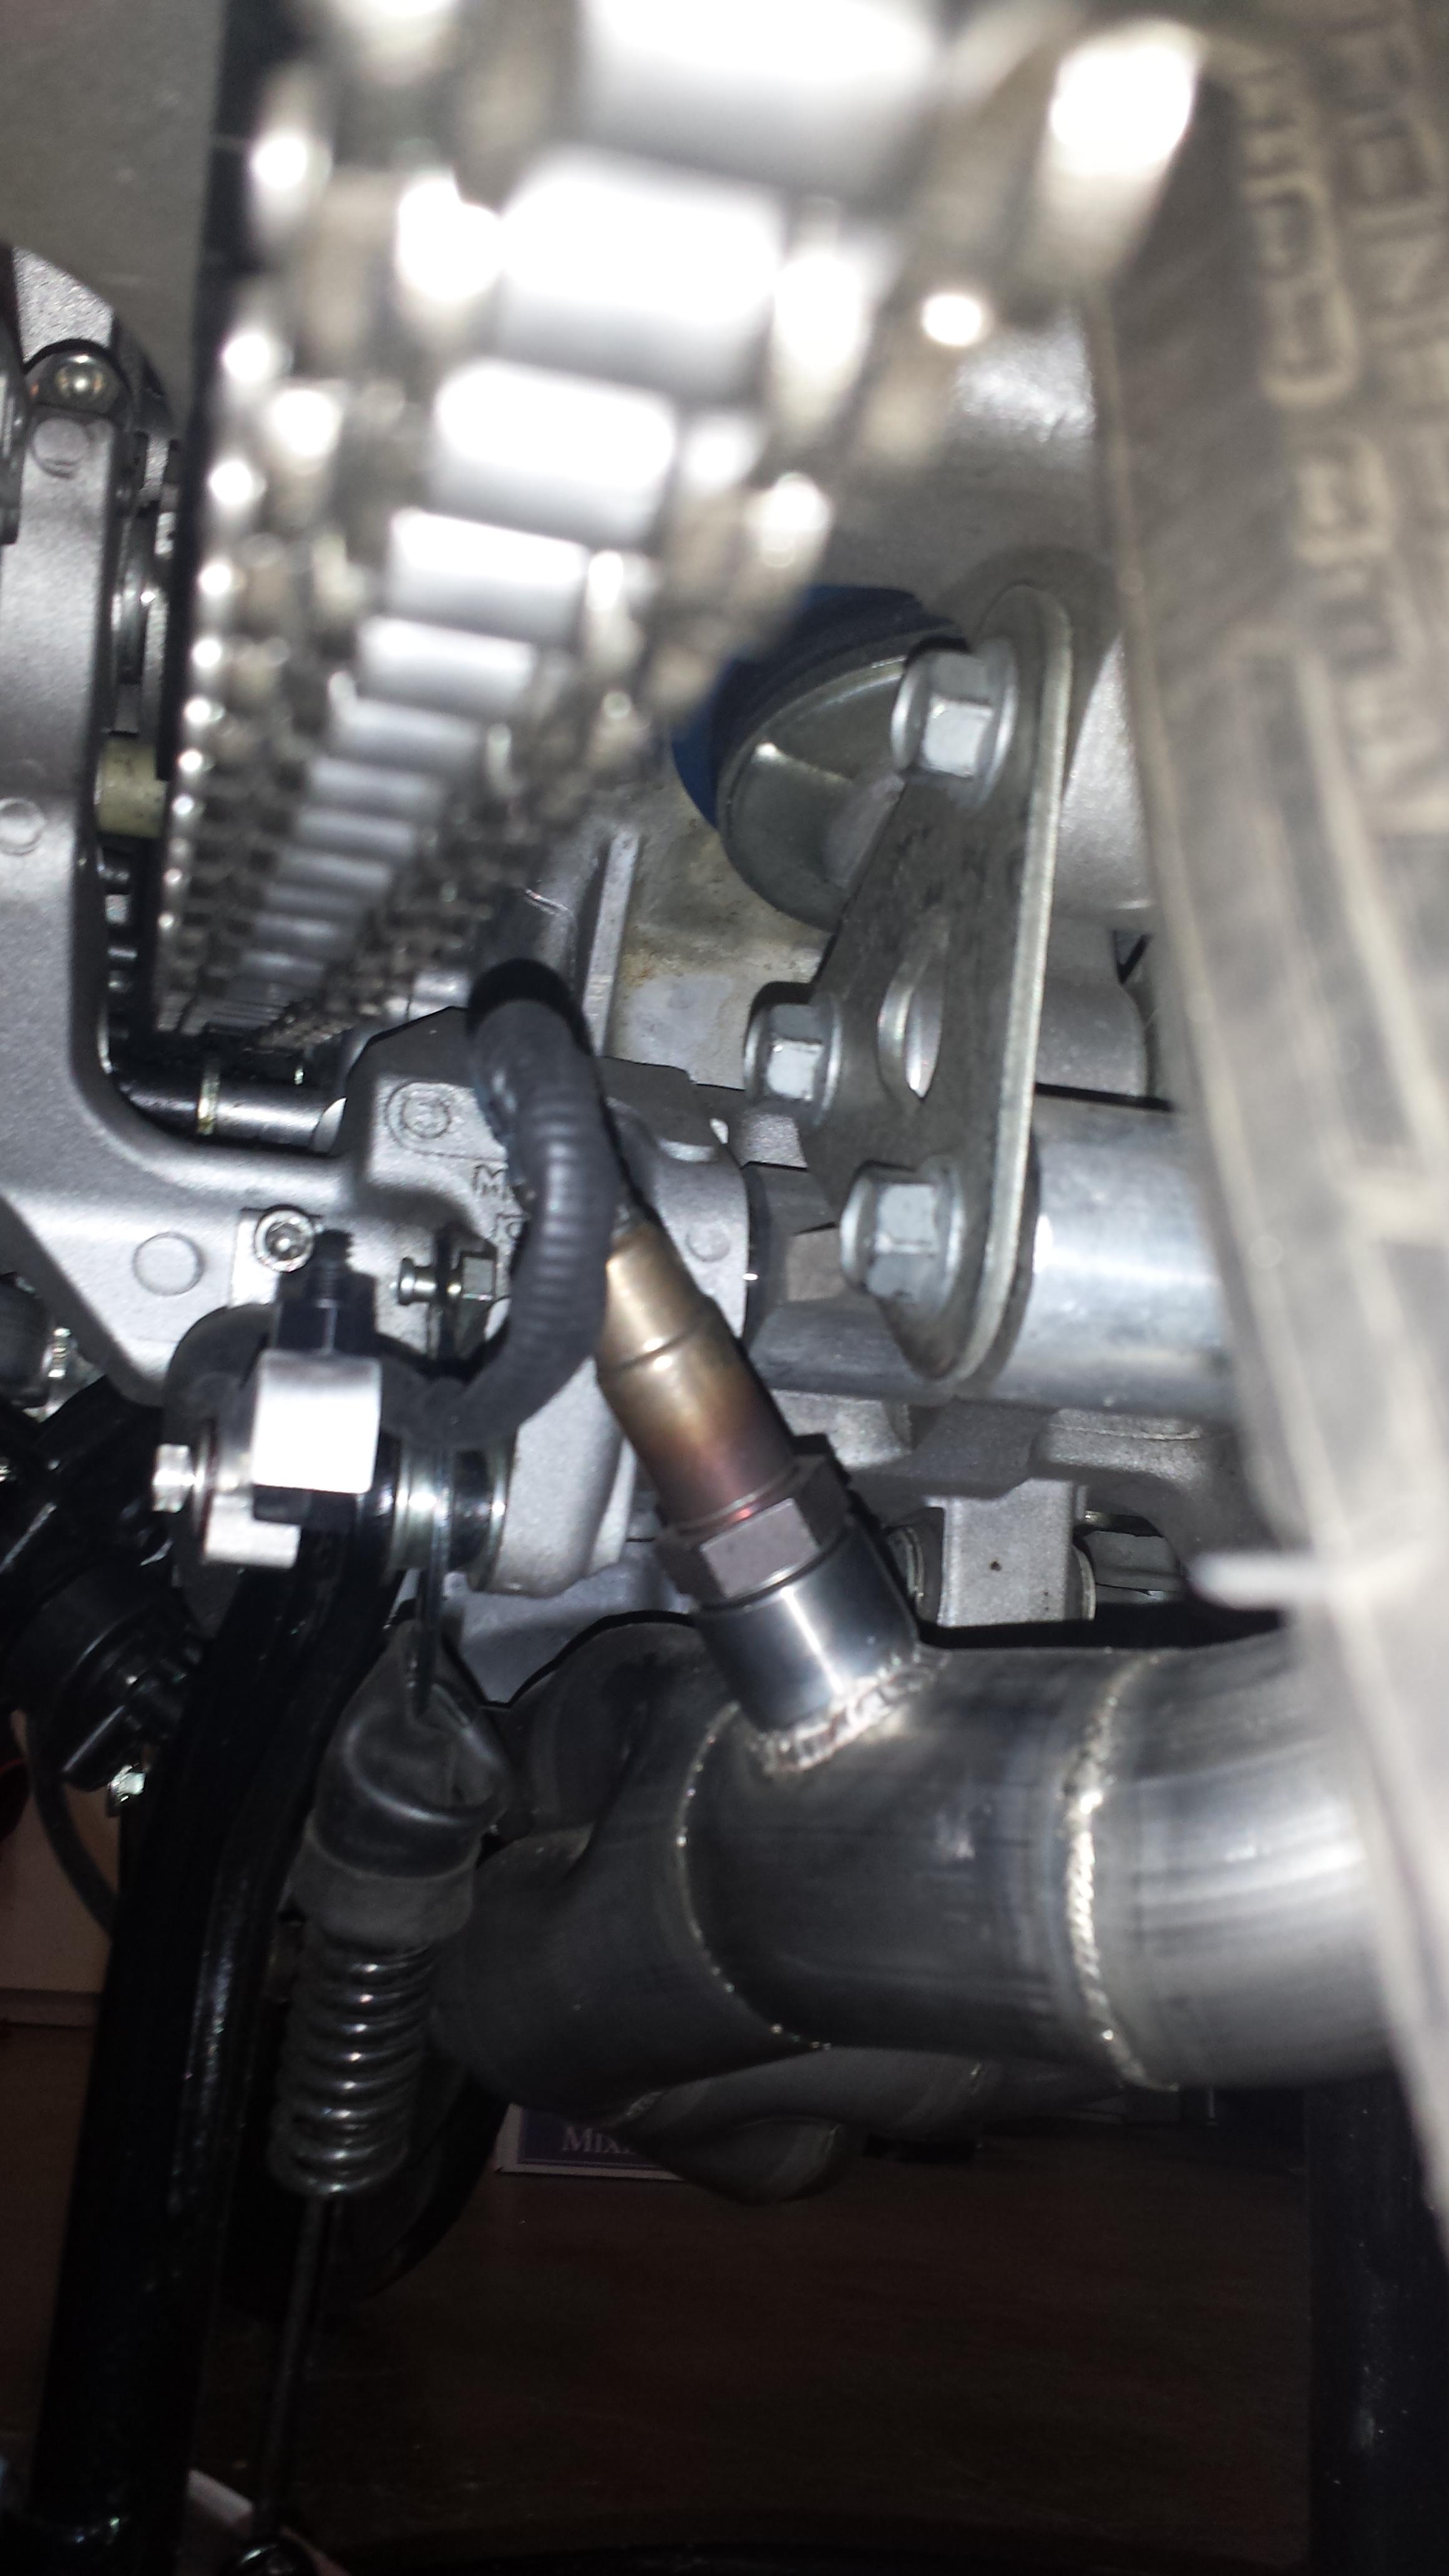
Has anyone with a 6th gen mounted an O2 sensor in the aft bung on one of these headers? With the Bosch sensor I have on the My Tuning Bike module, the wire is coming up right between the chain and the triangle plate for the shock, both moving parts. The particular concern is contact with the chain though obviously both matter. If you have done this, how have you routed / secured the wire? Thanks for any ideas.
-
New 5th/6th/8th gen performance header now in production in USA
Cogswell replied to sfdownhill's topic in Exhaust Systems
-
New 5th/6th/8th gen performance header now in production in USA
Cogswell replied to sfdownhill's topic in Exhaust Systems
I had to spread mine apart. Rather than fight it in place, I removed them and held one pipe while using my leg to ease the other out. It took a few tries, but it got them to where they fit right in. In this case the strap looks like a good option. Looks like it needs to come forward a bit. Some muscle moght get it - it's not far off. -
New 5th/6th/8th gen performance header now in production in USA
Cogswell replied to sfdownhill's topic in Exhaust Systems
On my 6th gen the nut was loose and fell out once threaded off. I just used an end wrench and socket. If not rusted, it should be very easy. -
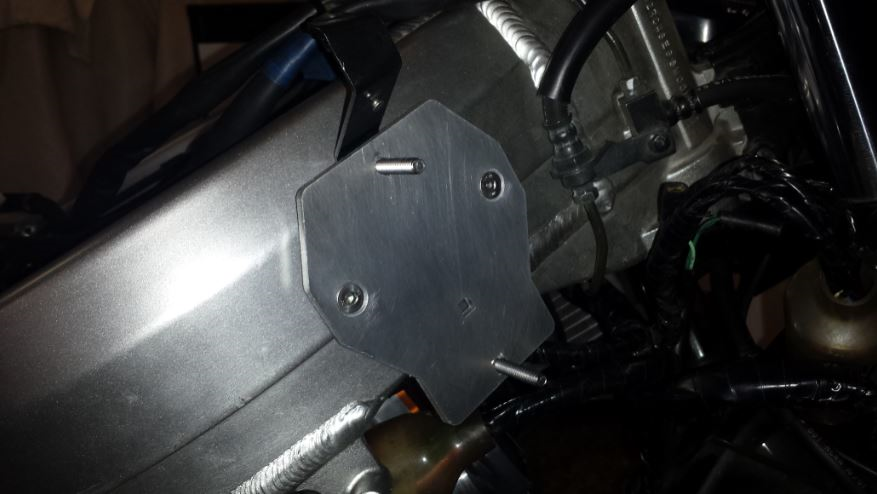
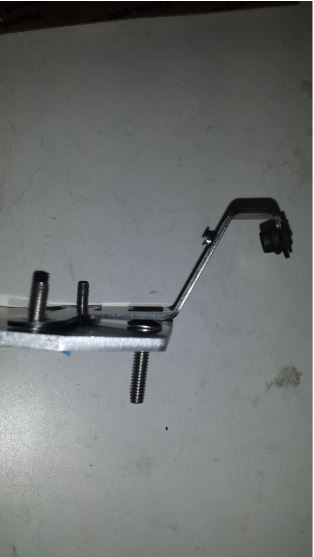
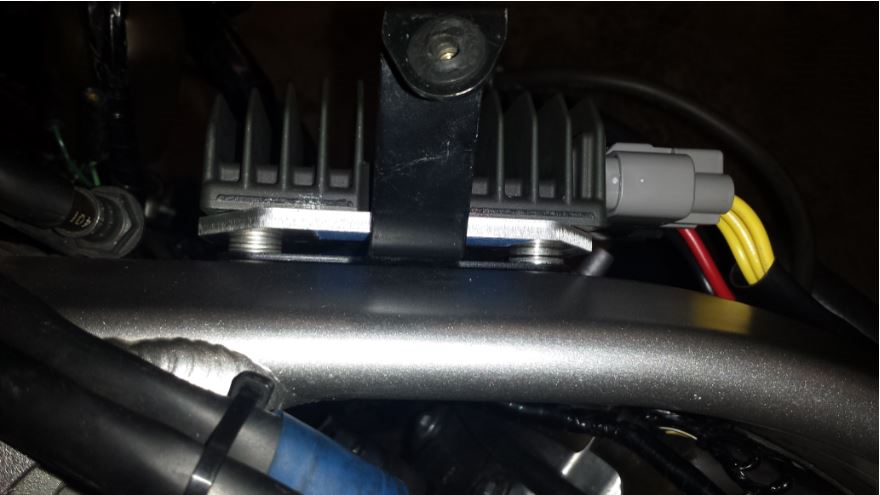
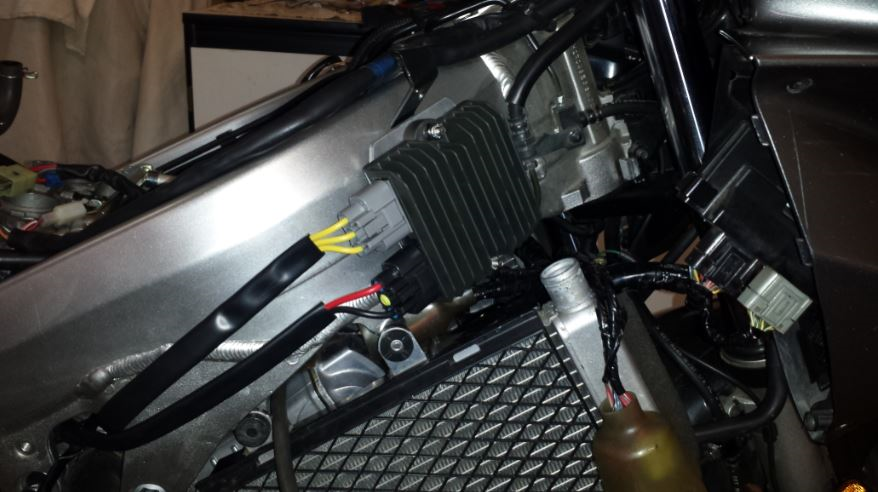
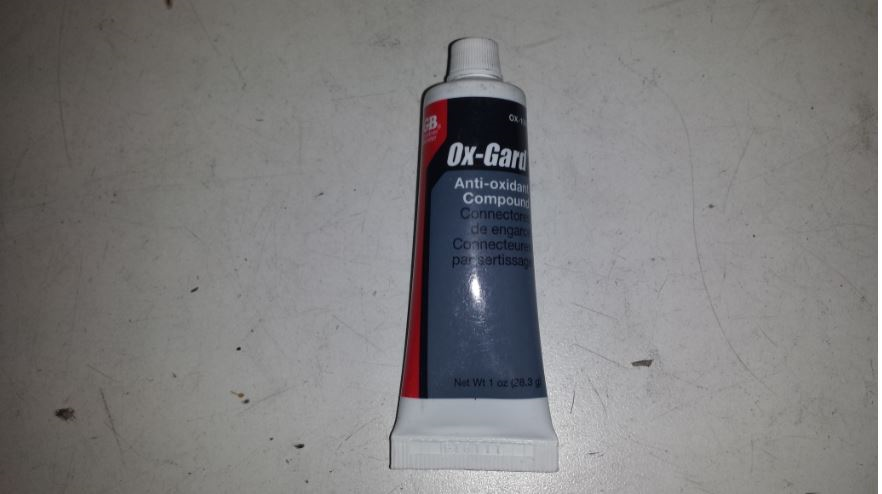
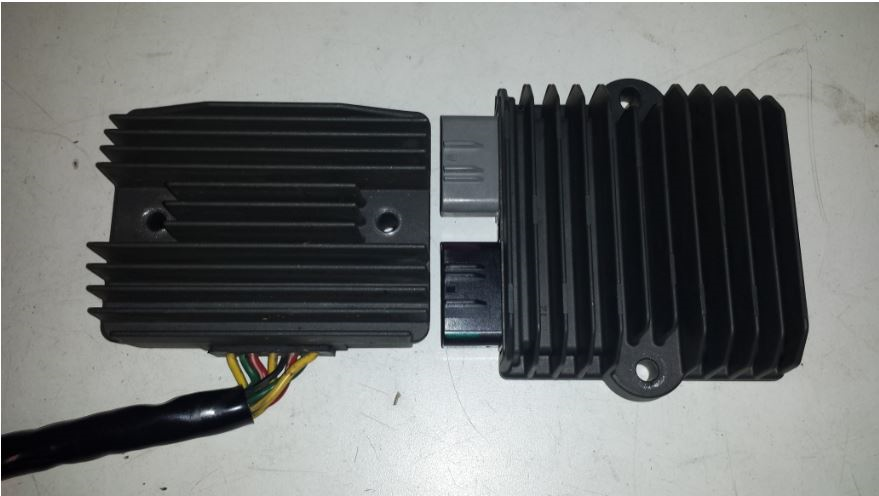
Finally got around to fitting an 847 today. I've had no problems with the 6th gen OEM R/R but after 32,000 miles its output had become less stable. I have a Datel voltmeter and where it used to run at a steady 14.6v, it was moving around more between about 14.5v and 14.8v. The latter was making me uneasy b/c if it begins to fail and spikes too high it can possibly affect the ECU. This is an easier swap than I think widely believed and a great upgrade for the stator's life. Got it from Jack at Roadstercycle. The kit is really clean and very robust. If you're not familiar, the 847 is a series regulator that only turns the stator on as needed vs OEM which runs the stator flat out at all times and shunts excess current off as heat. There are more details on that topic on the Roadster website. This is Mello Dude's flip plate. The 2 protruding bolts are carriage bolts that secure in square holes in the plate and mount the 847. The 2 chamfered holes with the flathead screws mount to the stock 6th gen R/R mounting holes. A minor issue on a 6th gen is the fairing stay (below). If installed over the carriage bolt head, the stay will be pushed slightly out of position. To keep the stay in the correct place a stack of 3 washers was added to clearance the plate so it doesn't interfere with it. View of washer insert. Final install, below. Once the 847 is bolted to the plate it covers the 2 chamfered mounting bolts preventing them from backing out, so no need for Loctite or similar. For the 847 mounting bolts I had 2 nuts with nylon locking collars laying around. Once snug, this install is rock solid. Note the wiring - very robust. The connectors come crimped and sealed so very clean. Note that now the stator connector will be on the stator side of the bike. I ordered the 847 with 4 feet of battery wire and 3 feet of stator wire and sheathing for the stator wires. The sheathing is not necessary, but does keep the wires bundled when threading them beneath the throttle body. I trimmed the stator wires but left enough for a short loop inside the frame so that in the event of any damage to the wires or connectors I can pull a bit more through and re-connect. The battery wire turned out to be too long, so rather than cut and re-connect, etc, I created a loop of wire behind the rear cam cover and zip tied it. The stock R/R connector can just be seen under the black 847 connector tucked behind the radiator mount post. Just tape it off and leave it. This is a comparison of the stock R/R with the 847. The stock R/R initially confused me and I'm sure others with its multiple wires. The two pair of red/white and green are duplicate wires as the gauge of the wires is less than desireable. The 847 uses much heavier wires allowing for a single strand run of wire. Part of my electrical system maintenance routine is to treat connectors with Oxgard and these were no exception. My stator connectors are done with Posi-locks. The nice thing about them is that their locking collars screw in to the connector barrel, making them field serviceable without tools and makes stator removal a snap. I've run these on my stator for years with no issue. This is a spare set of various sizes I carry. Co-incidentally the yellow ones are the gauge needed for the stator wires. The 847 kit wiring has thicker insulation than typical, so I had to use a drill to open the collar diameter slightly - makes for a very rugged and tight fit. The 847 is an easy bolt-on upgrade and IMHO would probably solve many owners' electrical gremlins.
-
Just about everything on that bike was custom - the paint was probably no exception! Those were the days - when those kits were in development.
-
New 5th/6th/8th gen performance header now in production in USA
Cogswell replied to sfdownhill's topic in Exhaust Systems
Do you feel much heat from the rear headers without the heat shield? Sure looks better without it. -
New 5th/6th/8th gen performance header now in production in USA
Cogswell replied to sfdownhill's topic in Exhaust Systems
You just need a USB to micro-USB cable cable to connect. I had one left over from a camera or some other gadget. If you don't have or want to buy the 9V plug in adapter to power it up (I got one for about $10 on ebay), just plug the harness in to the bike and turn the key on. Then connect the USB cable. The bike's power will wake the PC up for it to accept the map. But, you'll have to have your laptop right there to do so. The adapter lets you load it while on a table or desk. There's nothing to lose by downloading the map presently installed with it. Not that you'd use it, but it might be interesting to see it.