magpie114
-
Posts
26 -
Joined
-
Last visited
About magpie114

Recent Profile Visitors
5,530 profile views


magpie114's Achievements
")


-
 magpie114 changed their profile photo
 -
It’s the only place I can think of - it’s shown below in place on the idle control cable (9) Sent from my iPhone using Tapatalk
-
But it goes over the thread at the other end Sent from my iPhone using Tapatalk
-
Is it off the idle control cable? Sent from my iPhone using Tapatalk
-
4th gen Carb Vacuum Pistons Group Buy
magpie114 replied to YoshiHNS's topic in Third and Fourth Generation VFR's
Can you add me for a set too please? Thanks Sent from my iPhone using Tapatalk -
This is reassuring - I thought there was something wrong with mine. I haven’t finished my build yet but when I first fitted the empty tank I’m sure the warning light was on. Later I added a very small amount of fuel and still expected to see the warning light when I switched the ignition on. However the light comes on initially at bulb test but then goes out. I can’t say how much is in the tank other than its very, very low and I wouldn’t expect to go very far.
-
My 4Th Gen Project From Parts
magpie114 replied to magpie114's topic in Third and Fourth Generation VFR's
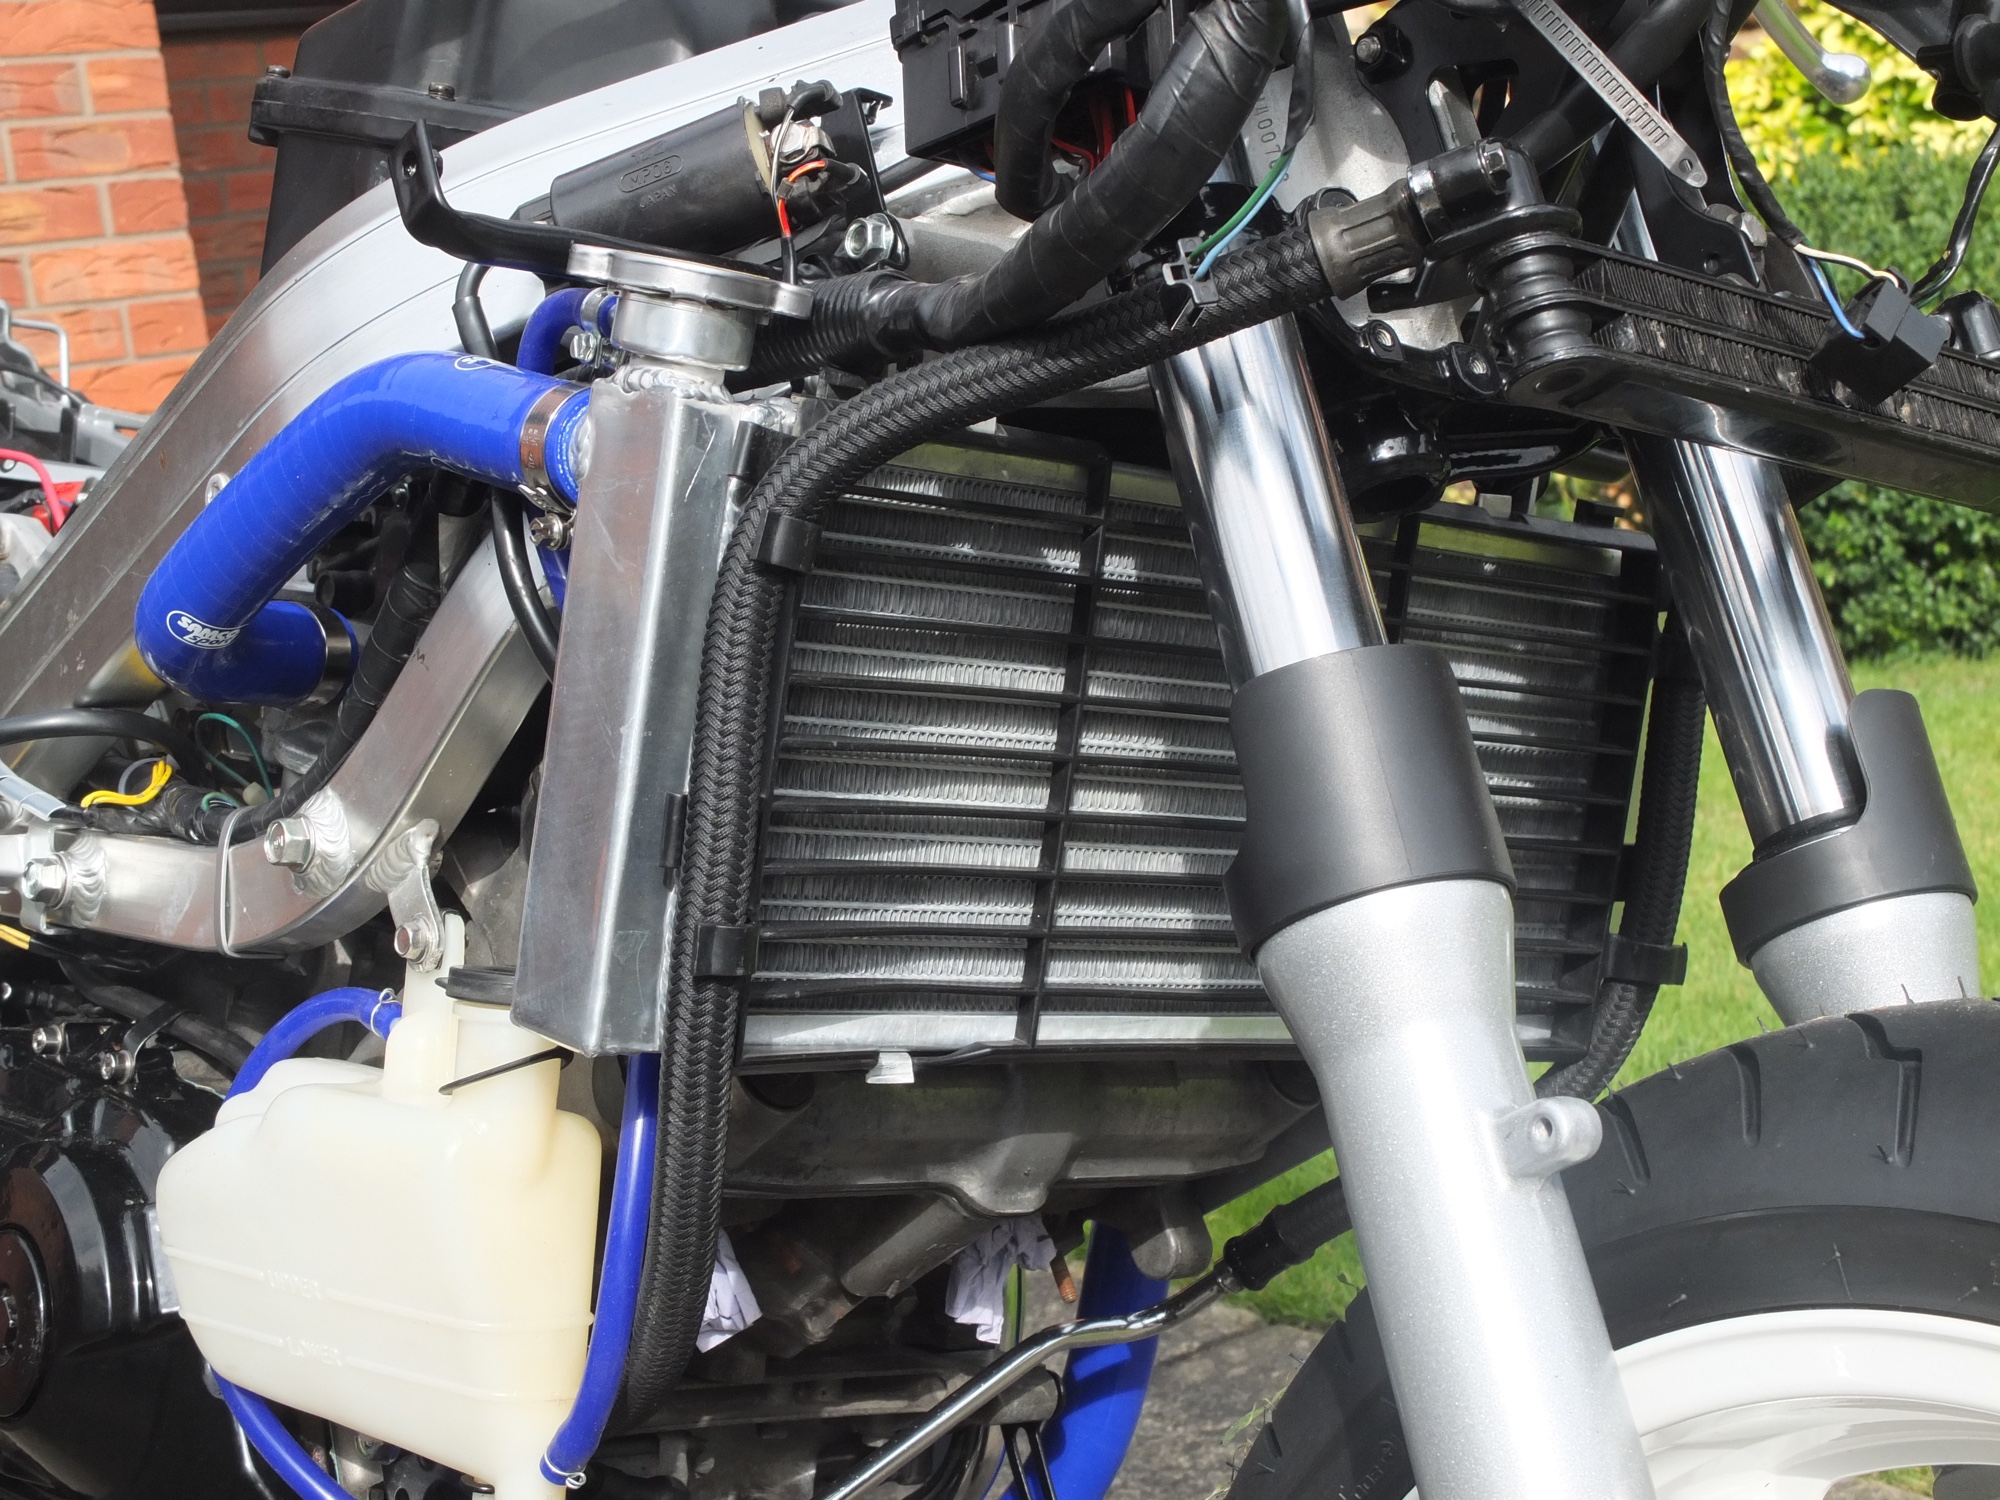
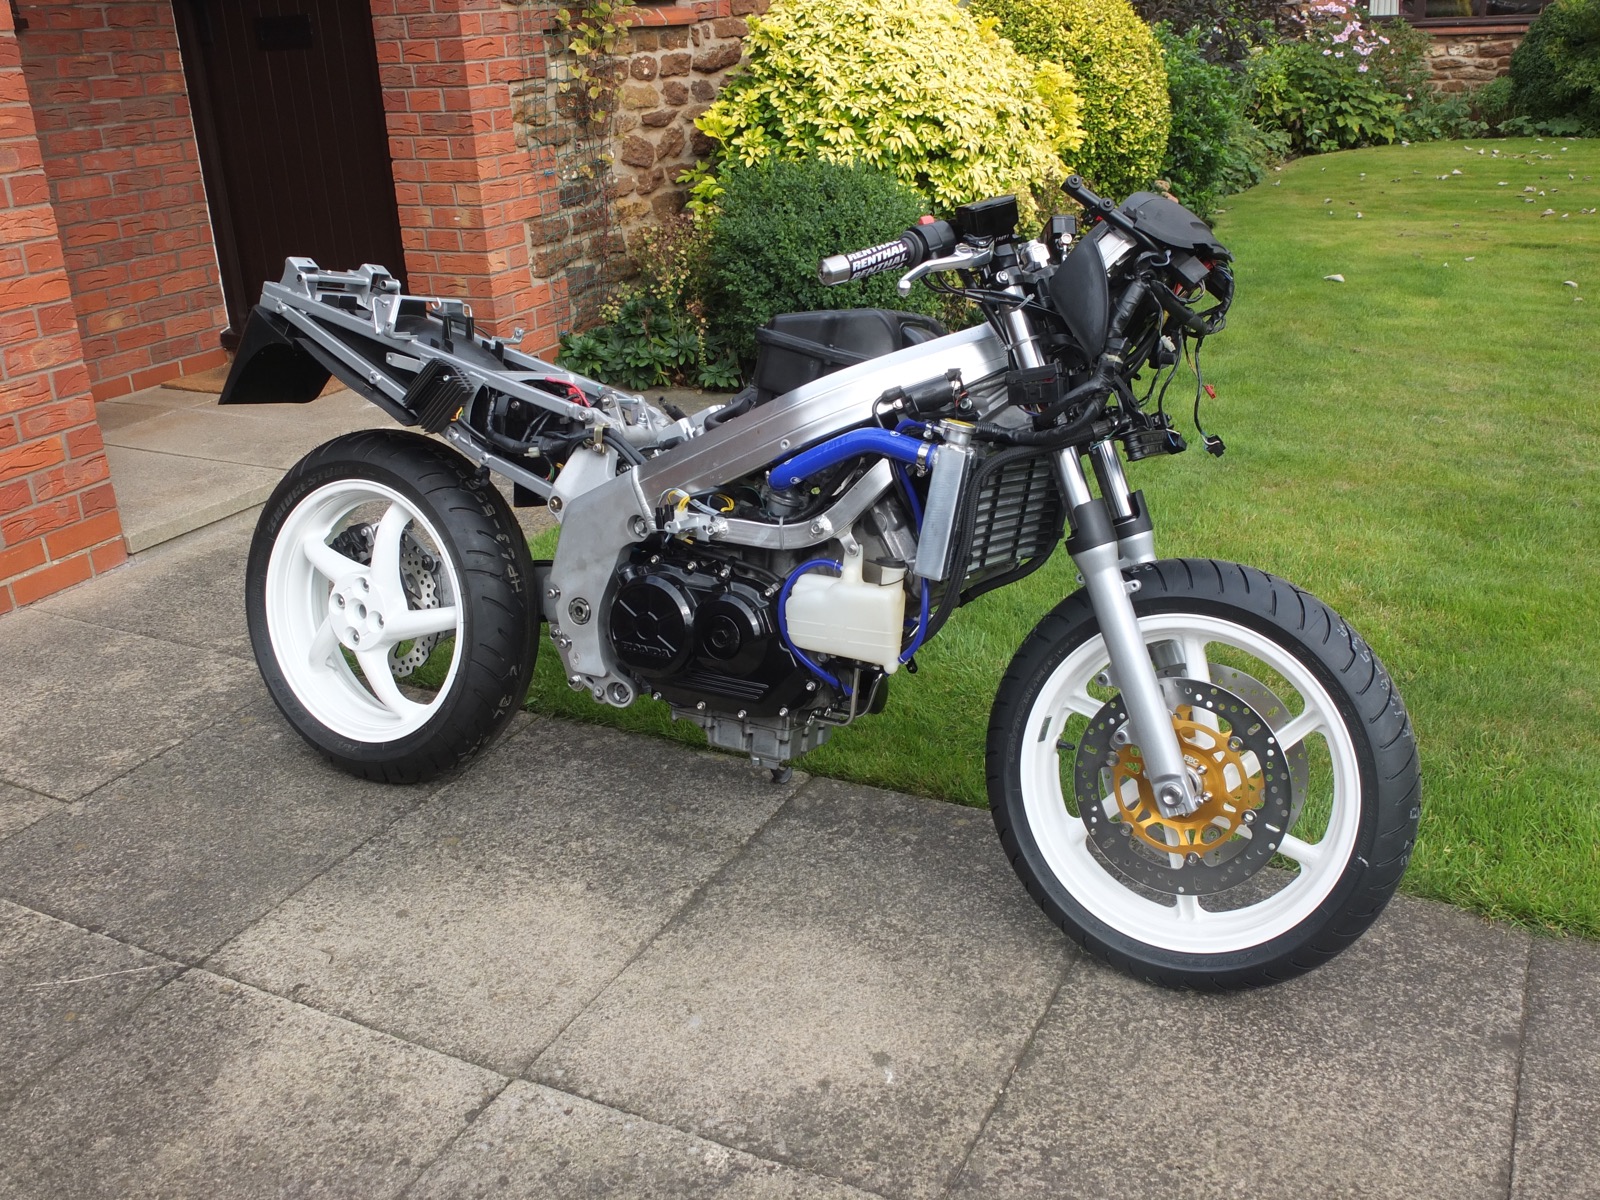
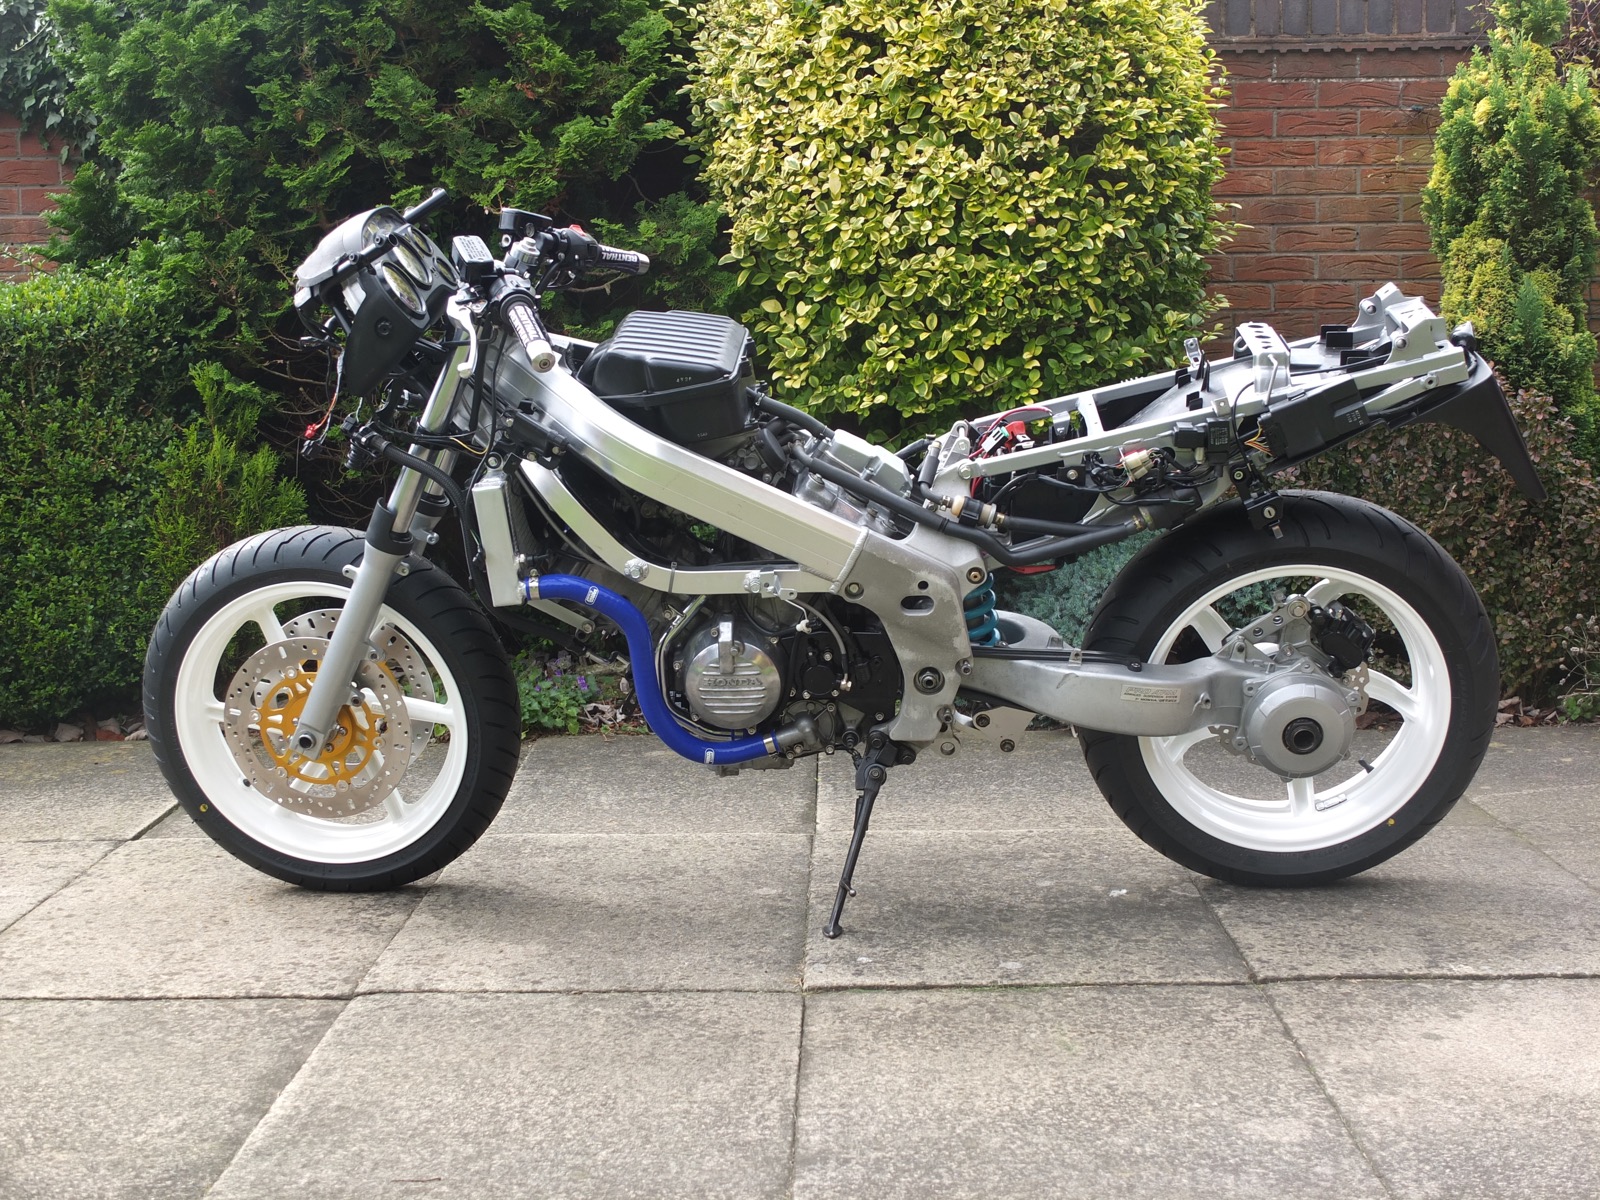
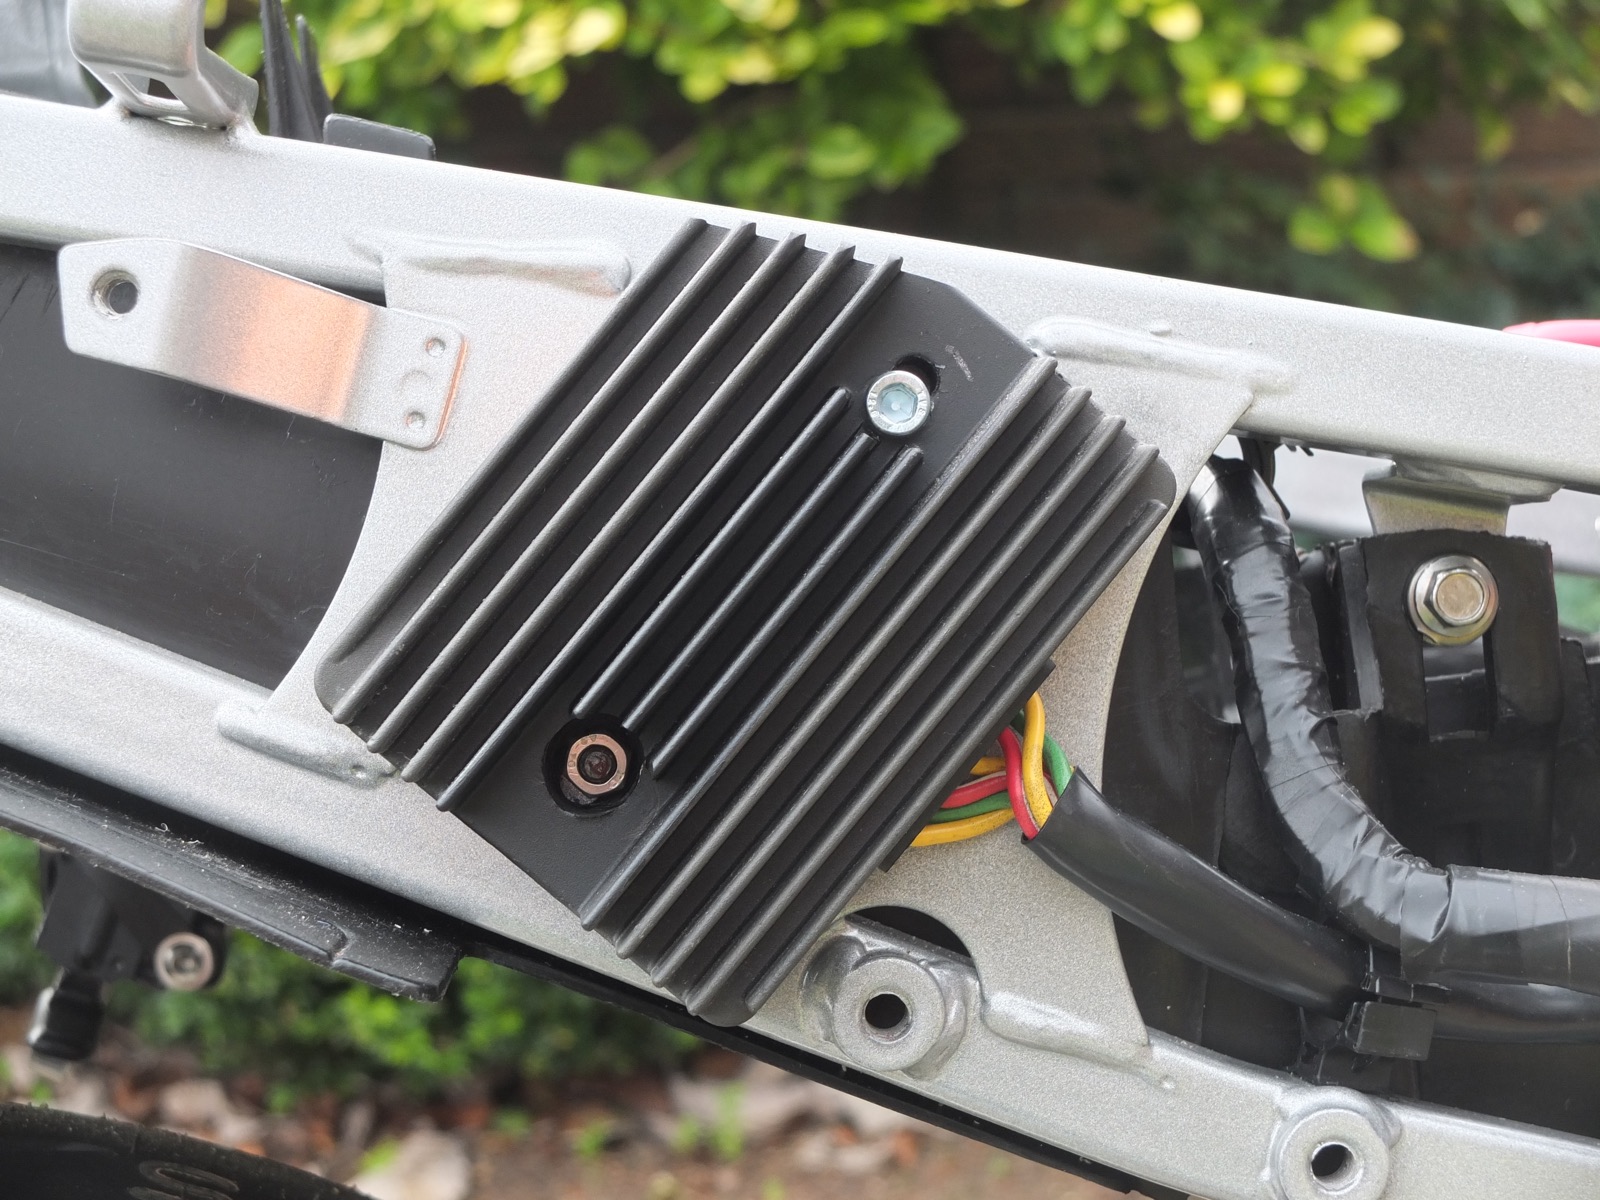
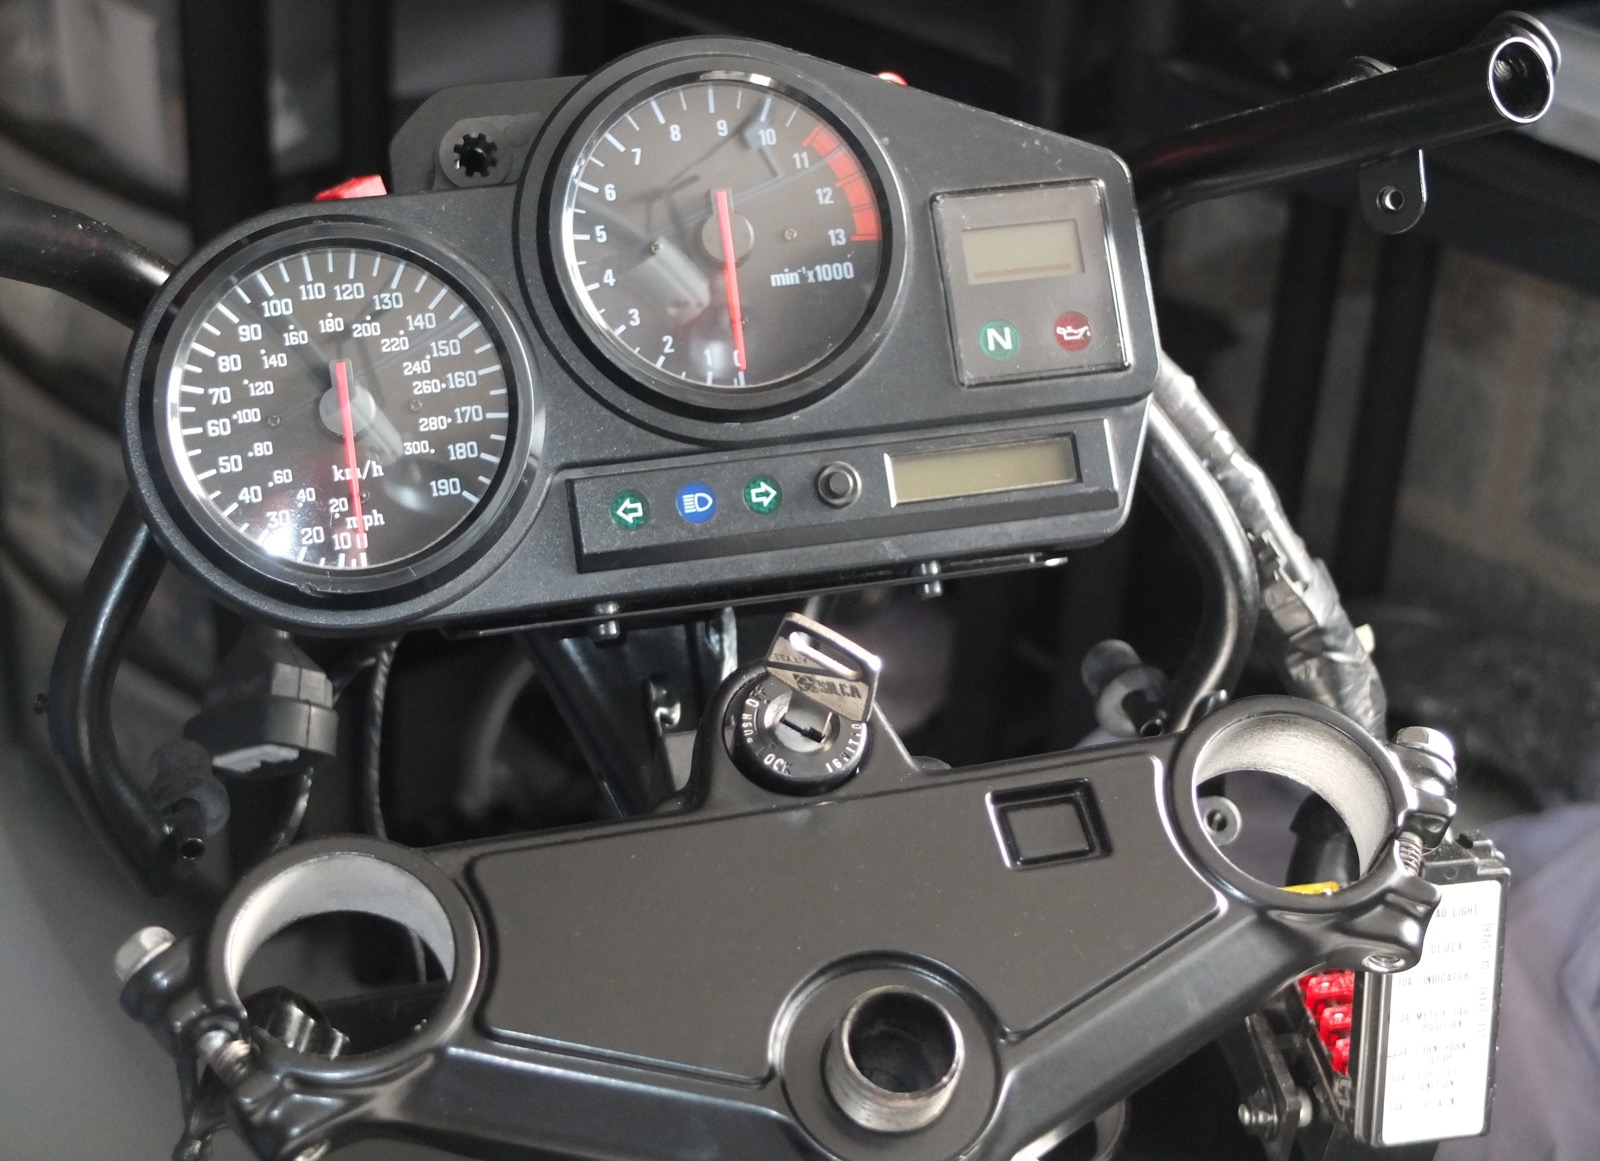
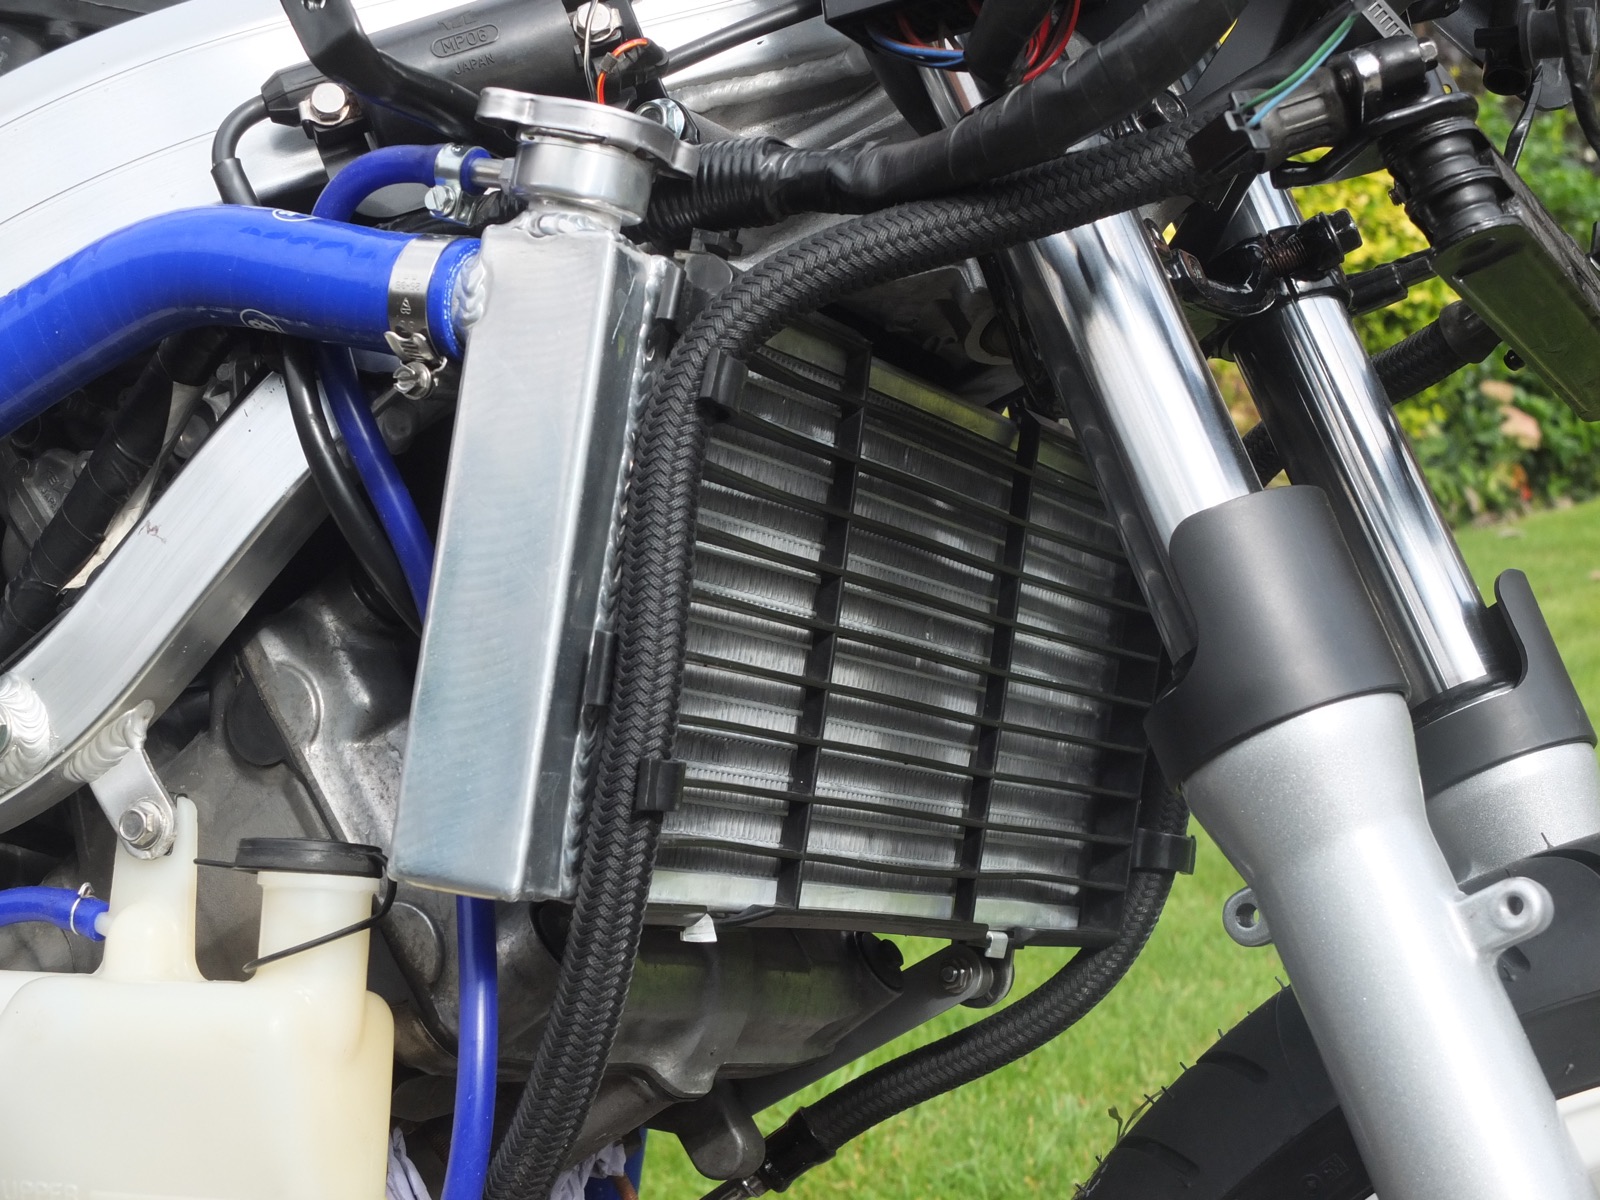
Its been a while since I posted about my project but I’ve been slowly working on it and its now taking shape. A final push into the winter and it should be ready for spring/summer. I’m fortunate having a powder coating company in my area who are used to coating motorcycle components. Wheels have been finished in White Gloss (hard to keep clean but I like them), fork sliders, subframe in metallic silver and fork yokes, bars and brackets mostly satin black. I’ve decided on Lapis Blue for the fairing and I’ve picked up a tank and centre fairing cowl. The engine has done 33000miles and came with a full service history. I got it together with a front wheel and loads of bits from forum member richierex who has been very helpful with parts and advice.There was little to do with the motor other than a final cleanup and to spray the covers with engine paint. Its only when you lift the engine out of the car boot that you realise how heavy it is! With all the problems reported about the stock r/r it made sense to fit a VFRness. I was unsure which r/r to fit and went with Joshuas personal preference for the VFR800 1998/99 unit. The quality of the VFRness is impressive and fitting was easy. I elongated the holes in the r/r, opened out and countersunk the lower hole to accept a nut. Then with a little trimming of the fins it fitted onto the subframe as per the original, although P know it will need a little more trimming to fit the panels. I originally bought CBR900 gauges taking inspiration from mrmatts ’95 VFR750 conversion topic. Mounting was straight forward using a simple L shaped bracket. Armed with circuit diagrams and mrmatts wiring details I grafted the CBR900 plug into the harness. Unfortunately I couldn’t get all warning lights to work and the fuse blew whenever I switched the headlight on. I kept checking the connections and diagrams but couldn’t see anything wrong. Eventually I found that the wiring harness had been badly bodged and hidden by tape. It was so bad I decided to replace it but even this one had been modified - extra connections had been soldered in and then clipped off leaving sharp, poorly insulated stubs of wire. Fortunately this was easy to put right. Its worth mentioning that the stator plugs on both harnesses had overheated badly. At this point, fed up and questioning why I was fitting this gauge anyway I decided on the standard dash. I got hold of a radiator and fan with the intention of cleaning it up but like most its seen better days. I’d seen new Chinese radiators on eBay for £110 from a seller with good feedback and decided to give it a go. It arrived nicely packaged which was just as well because it had been bashed around in shipping and the outer cardboard skin was perforated. Thankfully the radiator was intact. The appearance is good and the welds reasonably neat and tidy. However the mounting lugs are out of line and the fan did not fit, I needed to make a spacer for the bottom securing bolt and the fan ended up being slightly higher than intended. I suspect that that each radiator will have different bracket alignment issues. I also had to make a new slightly longer bottom radiator stay. Ready to fit this weekend are tank, new Motad stainless steel down pipes and collector units (which was a bargain) and a Delkavic silencer and link pipe. I’m then at a point where it will hopefully fire fire it up.
-
Any other rads fit the 4th Gen?
magpie114 replied to Ghostrider's topic in Third and Fourth Generation VFR's
Its still ongoing - I'm aiming to finish it for next spring. I'm learning a lot (number 1 - triple check used wiring harnesses!) and its satisfying seeing it take shape. I'll be updating the thread in the next few days. -
Any other rads fit the 4th Gen?
magpie114 replied to Ghostrider's topic in Third and Fourth Generation VFR's
Its my current build project I started to give me something to do on my retirement. I started a thread on it some time ago and will have to update it. I originally intended to take it fairly slowly but as it starts to resemble a motorcycle I'm getting more impatient! -
New donation from 2k1GoneWild
magpie114 replied to HispanicSlammer's topic in Site Comments, Help, & Support
Hi magpie114, Thank you for your donation of $10.00. We look forward to improving the forums with your donation. Thanks VFRDiscussion -
Any other rads fit the 4th Gen?
magpie114 replied to Ghostrider's topic in Third and Fourth Generation VFR's
Theres 2 identical radiators on eBay from the same seller at different prices! - this is the cheapest http://www.ebay.co.uk/itm/Aluminum-radiator-for-HONDA-VFR750F-1994-1995-1996-1997-/111947314087 -
Any other rads fit the 4th Gen?
magpie114 replied to Ghostrider's topic in Third and Fourth Generation VFR's
I took the plunge and bought a new Chinese radiator on eBay for £110. It looks reasonably well made but the brackets for the fan were a slightly out and it took a little work to make it fit. Also the vent on the filler neck is facing the rear.
-
For my part I'm really happy with this mobile site. I like its clean uncluttered look.
-
My 4Th Gen Project From Parts
magpie114 replied to magpie114's topic in Third and Fourth Generation VFR's
Thanks all for the encouragement, won't be doing too much now until after Christmas - too much going on! No I'm at Normanby, Scunthorpe but I'll be in contact soon about parts. Yes I'm tempted - I had thought about a half fairing too but the more I think about it .... -
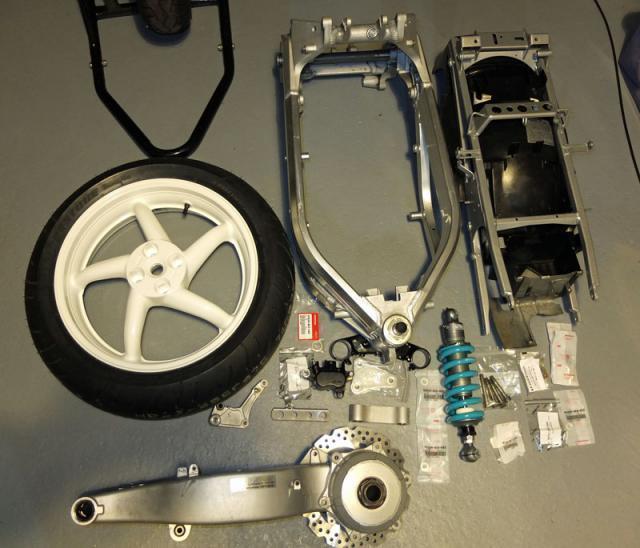
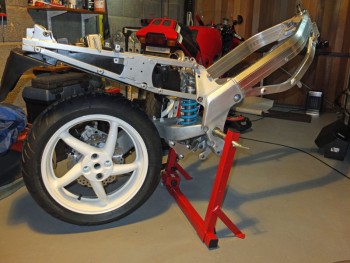
I retire in April next year and although I’ll have plenty to do I thought it was a good excuse for a project - something to keep me occupied in the bad weather and the odd evening. After lurking around the forum for some time I’ve decided on building a VFR750 4th gen from scratch. I’ve been looking out for parts and have already got a small collection including frame, subframe, swing arm, rear brake caliper, loom and rear wheel. My plan was to get the original shock that came with the swing arm serviced but decided to get a new Nitron shock instead. I want to complete the rolling chassis while looking for an insurance write off or similar as a donor bike with the intention of building something near standard but to lose some weight if possible along the way. I would also like to fit a Koso gauge, left sided exit exhaust and an alternative fairing. The wiring loom has a burnt R/R connector which needs replacing and I’m well aware of the problems with the Honda R/R from the forum. I already have a R6 unit on my VFR400 and I’ll probably get another unless theres a preferred alternative. The swing arm took me a week to dismantle, the hub assembly had seized badly and I had to soak it daily with penetrating oil, patiently dismantling it part by part. Anyway here are the initial collection of parts after cleaning, fitting new bearings, polishing and powder coating. And after assembly Now I've got something thats starting to look like a bike its hard not to dive in - afterall it's something to do when I finish work. For now I need to lookout for parts and gather as much information as possible particularly instrumentation set up, alternative exhaust systems and fairings.
-
-
.jpg.19cf04fa8df6d02b410962d8fc4be1c1.jpg)
.jpg.888c7e59b31db2fc750bfea229415749.jpg)