Tightwad
-
Posts
1,689 -
Joined
-
Last visited
-
Days Won
1
Content Type
Forums
Profiles
Gallery
Blogs
Downloads
Events
Everything posted by Tightwad
-
Yeah, my first attempt was a Cmoy version. This is similar (can't be too different) and has a built in charging circuit. I have seen the ones on Ebay, but I like to build the stuff so that was 1/2 the fun for me. This is definantly a step up from a Cmoy, the parts alone cost twice what a Cmoy would to build. Interesting idea with the Line Driver, RCA out isn't a bad thing, but I can see how the cabling could get messy. I would love to find a kit for a "MIt-It2" type of part, as multiple inputs would be cool, but I was a priority assignment, so I hear GPS over MP3, and Radar(if I get it) over GPS or MP3
-
I sent this review to Steve at BikeBolts. He was very welcoming of the feedback, and is going to make some of the changes I suggested! His desire is a kit that is 100% perfect. He even said he would send me the changed parts, which I will install and then update this review for. Bravo to people who really want to make customers happy!
-
From their website FAQ's
-
I am not sure if this belongs in Mods (since it is one I guess) or in some Aftermarket Review section as yet not created... About 6 months ago when looking for replacement fairing clips, I came across www.bikebolts.com. They make colored hardware to replace the fairing fasteners on many bikes, including the VFR. I figured I would try them out, and add them to my site if I thought they were any good...I won't put anything on there I wouldn't personally use (thus no LED kits as yet...). I finally got around to ordering the kit (I used the "Color match my bike" option)a few weeks ago, and installing it this week as I had my forks off so I was in a good position to tinker. I will break this review down into the Bad, the Good and the Pictures. Hopefully I can offer enough detail for any questions. THE BAD I hate reading gushing reviews where the downside is hidden within the text...give it to me straight please! Being as I feel that way, I like to write reviews that way...my wife says I am pessimistic, I say I am a realist. I am probably pessimistic. Issue #1. The replacement hardware is not an exact replica of the existing hardware. The Allen Head bolts have a smaller diameter head, and employ a plastic washer to make up the difference. I realize the over-sized head Honda uses would be much more expensive, but I prefer it. In addition instead of a 6mm bolt with a should to hold the fairing to the frame, they have a special washer with a shoulder in it. They work, but the plastic washer diameter is a bit smaller and I would prefer it be the same size. Also the tool to remove the bolts now goes from a 5mm allen wrench to some 3mm and some 4mm....more tools to have with you, and not the same tools other VFR riders might have! Issue #2. They didn't include enough plastic fairing rivet thingies to replace all of them....short 7 that I can tell(I counted 15 total, they include 8!). This isn't a terrible thing as some you can't see without standing on your head, so you might not notice the inconsistency anyway. Issue #3. They sent a part that was supposed to replace the Fender/Brake line bolts. They were not even close to what comes on the bike, which is a special 6mm nut attached to a square washer piece and a 30mm length bolt. They sent an over-sized plastic bushing, a 6mm nylon locknut, and a 20mm length bolt. This was especially too bad because my bolts have been missing since i bought the bike, and I keep forgetting to replace them. Issue #4. They specify 16mm length bolts for the top of the fairing where the cowl and the uppers connect. This should be a 20mm bolt, and even the 20mm bolt they send for use in another spot isn't quite long enough with the plastic washer on if the Well Nut is new....but this can be overcome by installing the original bolt for a few days until the rubber well nut doesn't return to original length when the bolt is removed. Issue #5. The left and right fairing connect at the bottom with two of those nifty Honda plastic rivets. The front one passes through a thicker boss, and I couldn't get their replacement rivet to secure, it just wasn't long enough. Issue #6. They send a replacement bolt for the Plastic Windshield bolt cover thing....not sure the name but it is a triangle wedge shaped piece that normally holds on with a Phillips head bolt. Having this color matched is a bit odd since the part is black...it sticks out PLUS the bolt is 3mm too long anyway...I didn't install those. Issue #7. Not sure if this qualifies as an "Issue", but they send a replacement 20mm length bolt for the windshield mount. The windshield mount bolt is under that Triangle Wedge shaped piece and isn't visible. I used the bolts for my Top Cowl/Fairing connector bolts since the length would work. Issue #8. The plastic rivet replacements heads are a bit wider than the stock ones, so they look odd where the dash connects to the funky shaped cowl piece. My son said no way so I didn't install them there. Issue #9. This is pickier than I would normally be, and is probably being over pedantic, but the paint color wasn't an exact match...it was a bit oranger, or lighter colored. Now the difference (to me) is not great, but others may see a greater difference. Ok, that wraps up the Negatives. I tried like crazy to list them all, and hope I explained well enough the differences. I prefer to talk about the positive points, so I will do that, even though they aren't as numerous, I still feel they outweigh the Negative by a huge margin! THE Good Positive #1. This is a total body hardware replacement kit (or designed to be, issues noted above). To buy the same parts from Service Honda would be $81.32, with a list price of $106.99...+ shipping...estimated to be $12?. Compared to the $39.12 (shipped) price from www.bikebolts.com (10% less from me, when I get them listed or by contacting directly to order) and you have a heck of a deal if all you need is replacement bolts. You can save $10 by not having the color matched if you prefer. Positive #2. Stainless Steel. Each of the bolts is stainless steel, which offers superior corrosion resistance and are also lighter weight. They go to much effort to point out the weight savings is NOT great enough to matter of course. Positive #3. Fairing clips! Instead of the Honda clips made of black gold or whatever, these replacement clips are a screw type clip. They are also not the 6.3mm (1/4") clips many try to pass off as a replacement...these work exactly as needed, but use a screwdriver (#2 Phillips is ideal) to remove and replace. As noted I didn't put them everywhere as I like the OEM look in some places, but it sure saved some cash!. Positive #4. Well Nuts. They send new Well Nuts...8 of them. This is great for those who have some wear out or tear. I don't suggest changing your good ones, rather keep these as spares....much cheaper than the exact same Honda part. Positive #5. Installation. They include with the bolts a microfiche shot showing where each bolt goes, by number. They also include a list of how many of each you have. Positive #6. Packaging. I hate putting together furniture and trying to match the intended hardware when some is 16mm and some is 20mm and so forth. They included 4 different bags, separating the bolts so that you only had 1 length of each kind of bolt per bag. The bags are labeled with the hardware # and quantity for easy reference. Positive #7. Selection. They offer a good selection of vehicles and colors....all the colors you could ever want (Yes Timmy, they have Flat Black), as well as OEM color matching. Like I said, not as many Positive points, but definantly a deal! I am going to send them this same review, and see if they will modify their kit. I can't speak to other model years of course, but from what I understand they have replacements for the DZUS fasteners for the older models. THE Pictures Here are some shots from my install. I have a somewhat crappy camera, and did not take "while I was working" shots. The only picture I don't have is of the front black part, which now has red bolts and an interesting look...I couldn't put it in Bad or Good...The contrast is cool but I think I would prefer black there. The Front Fender: Front Cowl mounting spot: Front cowl multiple bolts...sorry it's kinda oranged out: Replacement Fairing Clip: I hope you guys liked the review...if you have any questions let me know! Joshua
-
A bit over a year ago, I decided that with ear plugs my in helmet speaks just weren't up to snuff...especially when i needed them most....that being in long boring rides at Freeway speeds (note that I didn't say ON FREEWAYS)....Anywho, I digress. I started investigating my options. Naturally I could upgrade from my Elcheapo MP3 Player/FM Tuner....but then that would defeat the purpose of having an MPS player I don't particularily mind being dropped, dragged, stolen, stepped on, run over or otherwise abused.: This has actually been a great MP3 player, it has multiple pre-sets for my intown commuting....Lex and Terry in the AM, Soft Rock or Country headed home (calm down music). I can load 1GB worth of anything else I like, and it would play that as well. I have 3 of these MP3 players, I keep one in each jacket. Option #2 would be to upgrade my headphones. I originally used a pair that I got in a random box of stuff....brand new, but not expensive. They look something like this...prior to my modifying them of course: The nice thing about these is they have a REALLY long cord...long enough to reach to wherever my Audio Source ends up located....which is sometimes dangling by the cord and nearly getting sucked into the back tire... Upgrading would mean finding a better headphone, then making it nearly worthless by cutting it up and putting it in my helmet...I want to avoid that. Option #3 was an Amp...something to boost the little noise my MP3 player makes to a level I can hear it at. Now I could buy one online or at Radioshack for $30 or so....but what would be the fun in that??? Being a bit of a Mad Inventor, I knew I had to build my own. I check out www.instructables.com, and found some promising plans. Attempt #1, which occured in April of 08 was not very good. Actually I take that back...it sucked. I tried to stay cheap on components, and I don't know enough about Audio Electronics to know what the problem was, but it was clearly too much modification to a proven idea. I shelved the Amp, and put all the extra bits away for future use in who knows what project. Attempt #2 was MUCH better. After going to RadioShack to buy the "Boostaroo" only to discover they had stopped carrying it (wow, what a surprise....) I started checking out some of the Audiophile sites. I am NOT an Audiophile. I have tin ears, can't carry a tune in a bucket, and don't particularily care for "normal" music....it's all noise to me. I can't watch American Idle, or Britain's Got Talentor anything because they all sound just fine to me. My research confirmed that many people spend WAY too much on music stuff. WAY too much. A "good" headphone amp starts at about $125 and goes up from there. No granted these are designed for good headphones, and good music sources, and ideal listening environments....but still way more than I could justify (as an upfront cost of course). I found in my search for a DIY kit (to avoid my compulsion to buy extra parts or cheaper parts) I came across www.amb.org, specifically their "Mini3" amp. They don't sell a kit, they sell just the circuit board and a couple key components. This kit got rave reviews, and those who build them sell them for $125 to $175. Here are a couple pics from their site: and the guts(mine has a bettery battery, but otherwise looks the same): I liked the very compact nature...perfect for a jacket pocket or mounted forward near the controls...TBD on that part. They make the kit 2 ways...Extended Runtime, or High Performance. Which to decide.....both. Yeah, my compulsion kicked in and i bought the boards and bits for two of them. I rationalize that i will sell the one I don't want to keep, but that may or may not ever happen. I ordered the remainder of the parts from www.mouser.com, using the exact part numbers provided. I was determined to not shortcut anything.....that is until i got the 7812 and LM317 regulators...I had at least 10 of each of those...no need to order them. Batteries came from another source....never knew a 9V rechargeable could be so expensive....like $13 each! I ordered exactly what they specified however...I wasn't going to let that be the fail point. The packages started trickling in, but i was determined to wait for every piece before starting...I have a habit of getting 80% completed then getting sidetracked....Mad Inventor with ADD...great. Eventually all the pieces I ordered arrived, and I got a reprieve from the VFRness orders long enough to begin my build. I had never solder Surface mount chips before, so that was a good learning. Luckily I had invested earlier in a Digital Soldering Station, so I had the fine tipped soldering iron needed. I printed out the instructions, which are not very well organized, and began. All was going well until i got to the Voltage Regulators....I hadn't noticed the LM317 was actually an LM317LZ...the difference? I had this: I needed this: I also realized I hadn't purchased the T-1 LED specified, although I had a couple that would "work"...specifically I had regular power red, yellow or green, where I needed high power Blue and Red. The unfortunante thing about where I live is that hardly anyone is willing to build or fix anything for themselves. Even the Lowes here has changed their slogan from "Let's build something together" to "Let's hire someone to build something for you". The part I needed wasn't available at Radio Shack, which is the only parts option I knew of. I got online....$8 to ship a $0.31 part. Noooooo. Even with the LEDs I was looking at way more in shipping than the cost of the parts, plus it would be like 5 days. I checked on some forums and another Dallas resident pointed me to Tanner Electronics http://www.tannerelectronics.com/. I called and they not only had what I needed, the guy who answered the phone new what it was by part number. Of course this was still a drive, being 16 miles from my work, but it was lunch-hour(and a bit) doable. Tanner Electronics is AWESOME. I was like a kid in a Candy store...they have everything (within reason). I was able to get the part I needed, the LEDs(great price on them) and a volume knob...not the one i wanted but it will work for now. When I got home I finished the amp, performed the tests they specified, and I was rocking. This little amp is pretty hefty in weight, although it is the size of a credit card and < 1" thick. I can see why they are so expensive....by the time I was done I spent 4 hours assembling it, and parts were about $70. I didn't spring for the custome engraved end panels, as they were an additional $40 per kit. I will get a picture of my build up later, but it turned out just like the ones pictured above, but with a different knob(not as purdy of a knob). Best part is, i can hear my tunes! Now I need to figure out where to mount my Amp and MP3 player...and i need a shorter cable to connect them to avoid too many wires everywhere.
-
Is this the pain you feel: Cause I do!!! Softball sized bruise on my leg, now a nice black color.
-
I had great aspirations for this weekend. Lots of time in the garage, time to catch up on all the mods and fixes and such that have been stacking up. The list I had compiled mid week was this: Mow the jungle...errr...lawn Finish catching up on VFRness and Speed Bleeder orders, since the Speed Bleeder bags had finally arrived Remove forks and replace oil and seals and bushings....27K miles on the oil, and the left side is leaking pretty bad. Install my Bike Bolts colored hardware, and write an evaluation for VFRD Install my Pro-Oiler Replace left headlight Upgrade headlights to run off the battery, not through the single 12 gauge wire that powers everything....I have nearly 2 volts lost by the time the the tail-lights get power remove the resistors in my JC Whitney Trunk lights (custom LED lights, 18 lights for left, right and brake....the voltage drop doesn't allow enough power for them to light correctly) weld/fix trunk rack where the platfrom broke....it wasn't originally built for the JCWhitney trunk assemble my Mini^3 headphone amp (one of the top rated amps there is) Now I know this was a big list, but it just keeps getting bigger and the long weekend was going to be the perfect chance to do at least 50% of it. Instead Friday morning my wife informs me "The AC is making a weird noise".....great. I had just changed the filter the day before (Getting that Honey-Do list out of the way for the weekend). I check and confirm....yup, blower making weird noise, not getting cooler in our house. All day friday was spent wishing I was home figuring out what was wrong with the AC, and hoping it was simple(and CHEAP) to fix. Got out of work a bit early and headed home. First thing to do was check if the outside unit was working....AC had just kicked on (such as it would) when I got home, so I was able to check right away. It was running, which was a good sign, but it was also iced up from the house to the thingie in the middle. I immediately went in and shut the AC off, then jumped on Google to see what could be wrong. Google was full of what it could be, and my wife reminded me of a friend of her's who blogged about AC problems she fixed herself. I read her blog, where the problem was the Run Capacitor not working. Cheap fix...wonder if I could have the same problem.....I could hope, right? I went into the attic (gotta be 140 degrees up there I SWEAR). I took the side cover off the Blower unit, and looked inside like I would be able to just see the problem....wouldn't that have been nice. I did locate the blower motor (behind a plate containing sixty-eleven wires and a circuit board). I turned the power back on to the unit (light switch installed in attic for just this purpose...nice). I saw the fan start moving, but it didn't seem to be moving very fast....definantly a fan problem. Good to know the rest of the AC system SHOULD be in good shape. I also located the Run Capacitor, and called my wife via cell phone to have her write down all the different numbers on it, as well as the model number from the AC unit. My wife and I had somewhere to be at 7:00, so we dropped the 4 kids at a friends house and headed out. On the way home I heard a noise from our rear tire...congrats, we were the proud owners of a nail! Luckily I have replacement and flat protection, so that would just mean a trip to Discount Tire in the morning. We didn't get back until after 10:00, and by the time we got the kids in bed etc it was well after 11:00....no work was going to get done that night. Saturday I woke up thinking "Maybe I can get a new Run Capacitor, it will fix the problem, and I will be back on track". I started calling around, trying to find one. Every HVAC place I called told me they were not allowed by law to sell parts to the public..... :blink: I didn't feel like arguing about how even if that WAS a law, it certainly wouldn't cover an electrical motor part. I did find that Grainger carried the part I needed.....Awesome!!! Too bad Grainger is closed on Saturdays, and the Monday is a Holiday. 4 days of having my wife and kids living in a sauna wasn't going to be pleasant. How was now 84 degrees. I placed an order to be shipped for 2 of them ($6.56 each). As I wasn't going to get the AC fixed, I started on my list....Mowed the Lawn. After mowing the lawn I took the car to Discount Tire....wait time would be 1 hour. Darn....oh well..."get er done". Discount Tire is awesome, but their estimates are not always spot on...took closer to 1.5 hours I think. It was now 12:00. I also took the car to Service King to get pictures taken of the rear bumper...at a recent Volley Ball match another driver thought she should park in our space with us. Service King was speedier than usual...I was done in 15 minutes. Got home at about 12:45. Soon after I got a phone call. One of the HVAC places I left a message with actually called me back. Real nice guy who operates out of his house maybe 1 mile from me. I told him my problem, what I was looking for, and he said he thought he might have one on his truck. He promised to call back. I didn't hear from him for 20 minutes, figured he had decided it wasn't worth his time. Finally he called back, he had a used one that he said was good...he was willing to sell it for $10. A bit steep, but beats 4 days of hoping the parts I ordered from Grainger would fix the problem. He was very helpful on the phone explaining the possible testing that could be done....I wasn't too interested, it was worth $10 to try and fix it. I popped over to his place, met his dog and grandson, saw his 15 stitches in his leg, paid my $10 (had to borrow cash from the kids...sad). Got home with the part, and headed to the attic to try it out. I recalled some web sites I read that said the problem could be insufficient air returns, so on the way to the AC unit I decided to open a 2 foot hole in the ceiling to allow more air flow. Luckily I caught myself with my shin, thighs, hip and elbows, so I managed not to fall ALL the way through the ceiling. I did demonstrate a few of my better words, which of course got my wifes attention. After asking if I was ok, and if I could get out, both of which I said "yes" to, I heard her giggling. This of course brought the kids over to see what was going on. I managed to extract myself from the ceiling, but not before I heard the camera going....she got proof of it: I made my way to the AC unit, and plugged in my "new to me" Capacitor. Kicked on switches, and the Blower came on.....Success!! I buttoned up the AC unit as I over heard (through the new hole next to me) my wife explaining to the kids what happened. I managed to get everything back the way it went, and got the heck out of the attic. Unfortunantly, when I got down I discovered that although the blower was working, no air was coming out of the vents. Turns out the coils were totally iced over and nicely blocking all air. I left the AC off and the fan running to hopefully thaw them out. The next 6 hours was spent repairing the ceiling in the hall. Of my long list of To-Do's, I managed to get the Lawn mowed. Every time I walked past my VFR it was pouting at me. I know the poor thing feels ignored and used...I really need to devote some time to it!
-
Service Honda's shipping is a killer! 22% they want for my $90 front seal/bushing order. I hate paying so much when i know what shipping will cost on those items. I am going to give Keith a call at Mason City and see what it comes to. *edit* I ordered my parts...saved $15 over the Service Honda price, and only paid $7 shipping instead of $20. Total savings was close to $28 that way, plus I was able to order a couple pints of fork oil and thus save a trip to the dealer (20 miles)....very nice, Keith was good to work with.
-
Initial measurements sent to Randy as requested. For those that installed the Ulysses pegs..do they angle farther forward or is it just me? Does it seem to be an issue?
-
I just saw this...and have been considering a lowered peg as I have knee problems...I am not sure if I really can use them, as I don't have long legs, but I would be willing to take measurements, fit them, and give feedback. I sent Randy an email.
-
inquiring minds also wish the video was on VFRD not youTube or whatever...I don't get to see it at work:(
-
I have decided to not Maintenance updates to my "blog" since I haven't done any 2-up riding since the latest child was a fairly big bump. 26,500 miles (Approx) Replace Chain and Sprockets with DID ZVM2 chain and steel sprockets (stock ratio) Apparantly the original chain on the bike, owned since just under 14K miles. Chain showed significant streching, but no link issues. The link I cut to get the chain off showed surface rust on the inner roller, but the z-rings were intact. Maintenance on the chain was limited to 2 cleanings by me, and 4 lubrications in 12K miles. 26.500 miles (approx) Changed headlights to use all 4 high beam filaments when the high beam selection is made. Developed a "Plug and Play" modifcation harness at the request of other VFR owners. 27,000 miles Installed Speed Bleeder valve for bleeding the clutch. Worked well...precursor to installing Speed Bleeders for the brakes. Brake Pads have arrived, just need installed. 27,300 miles Replaced Rear Tire with Bridgestone BT021. Previous Pirelli Diablo got poor mileage...approx 2500 miles maybe, Dallas sucks as it contains no curves. Old tire was showing cords all the way around, and wasn't far from blowing out. 27,500 miles Installed LEDs in my JCWhitney trunk, under the "Reflector"...discovered my tail-lights have a LOT of voltage drop...I only get 9.5 volts at the brakelight...more tests needed to see if this is voltage drop across the bulb, or if there is a problem. LEDs come on for Brake Light, and each side for Turn Signals.....cheap LEDs were used as a test, and they are not very bright...doesn't help that they have to be installed sideways...LEDs are designed to be view straight on.
-
Found an interesting article/feedback on the Galfer Wave Rotors, and how they are better. They did say that they chew through pads faster, but braking is much improved at the rotor bleeds heat better, and presents a new surface to the pad as the wave goes around.(but the pad gets chewed by the new surface....I guess it is a tradeoff) http://www.webbikeworld.com/carym/wave/
-
I have never bought the Wave Design either...especially with more surface area empty than filled in. I would thing less metal means more heat/cool cycles = more warping and less effective braking....let alone the cheese grater concept, which large holes would seem to encourage. Slotted rotors run cooler, but 1/2 the surface area would seem to just heat right up.
-
Still looking for your pin location! Straight or off-set? thax I took INLINE to mean straight, not offset??
-
Pictures of other Motorcycle stuff
-
-
From the album: Other Pics
© ©vfdiscussion.com
-
How To Upgrade (change?) Your 2002+ Vfr Headlight Settingsq
Tightwad replied to Tightwad's topic in Modifications
Yeah that short range light is what I want back. I don't feel the light I gain in distance was worth the cost of my short range light. Before I did the mod I had upgraded all four bulbs to Piaa bulbs. Not cheap but HUGE difference in light. Long and short distance light. Im going to go back to stock wiring for now.. Why not use all 6 filaments? Get the best of all worlds! -
How To Upgrade (change?) Your 2002+ Vfr Headlight Settingsq
Tightwad replied to Tightwad's topic in Modifications
I finally rode in the dark....light was just fine, and definantly brighter and in different areas, but I didn't feel I lost a ton of short range, no dark spots. -
How To Upgrade (change?) Your 2002+ Vfr Headlight Settingsq
Tightwad replied to Tightwad's topic in Modifications
Discharging at a low idle (under 1300) isn't uncommon or even wrong. I figured out how to make a 3rd part that would allow me to chose(on install) or change later from option to option. (move red wire from HB to LB onto the HB input, as it is OEM, using a short pigtal cable, leaving that pin empty) -
How To Upgrade (change?) Your 2002+ Vfr Headlight Settingsq
Tightwad replied to Tightwad's topic in Modifications
I wondered about the focus, and honestly haven't ridden at night yet to check. I think you will find the HID mod doesn't help either, as the reflector is definitely not designed for HID and you get holes in the vision. Undoing the MOD wouldn't be that hard really, although it would require terminal end changing. -
How To Upgrade (change?) Your 2002+ Vfr Headlight Settingsq
Tightwad replied to Tightwad's topic in Modifications
Just looking for clearification, is that schematic from Darth's thread? Which mod does it represent?(EDIT: It is the LB-HB/HB) Why do you need a DPDT relay when the schematic shows a SPDT? Neat mod though, if I ever take the front end of my bike apart, I might just do this. Good catch, I meant SPDT, and that is what I used. That is the Schematic from Darths Thread, as mentioned. It is the LB-HB/HB as the 6 filament mod doesn't require a change in relay. -
How To Upgrade (change?) Your 2002+ Vfr Headlight Settingsq
Tightwad posted a topic in Modifications
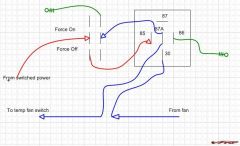
After reading all the various headlight mod threads, most particularly Fixers(may he be banned for all time as needed) version, I decided to make the jump and upgrade my headlight...utilizing the unused High Beam filament in the 2002+ assembly. As with all mods I do, I like to stay 100% plug and play, and if possible make it easy to replicate (or for sale....). I won't bore you with pictures of the Nose Fairing removal....just a warning that this mod took 3 weeks and isn't done....my side fairings have been off so long I am getting tickets for indecent exposure. Not all pictures will be used, but you can check them out here Wiremybike Headlight Mod Slideshow HL = HeadLight LB = Low Beam HB = High Beam LB-LB/HB = Low Beam or Low Beam AND High Beam First thing to do is decide...do you want to go from LB-LB/HB to LB-HB/HB or LB-LB/HB/HB (6 filaments).....Having 6 filaments going in high beam can be a bit of a stress, about 8 more amps worth. As this would only be when you are using High Beams it should not be an issue....but it is YOUR choice. I chose to go for the LB-HB/HB option...which you would think would be easier/cheaper than the 6 filament option, but it isn't. It requires a different HB relay. Not a problem, I have dozens of them from the VFRness/Auxiliary Fuse Panel kit building. My Garage is NOT neat/clean/eat off the floor worthy(not that I haven't at times), but I like it....I call it my Mad Scientist shop: On to the actual modding....First thing I did was blatently take the work of others and apply it to my situation. In this case banned! created a mod, it was lost some time ago, and Darth Bling recreated it here: Original Head Light Mod Thead I liked his Schematic...which I am terribly at drawing: From this I determined I needed: SPDT headlight capable relay...check Wire...Check Connectors...Check....errr...not all of them I had to special order from overseas the HL Terminals. I bought enough for 15 HL upgrade harnesses...I will get more when/if needed. Working backwards the finished result is this: Headlight Mod, 2002+ allowing High Beam in all 4 bulbs on high: This same kit, minus the Red wire and Relay bits allows 6 filaments on High Beam....LOTS of light: To install is just a matter of undoing and redoing the wiring loom. First locate the HB and LB relays....they are here (far right is LB, far left is HB..this is post install so the HB relay is different): Remove the tape from the LB and HB relays, and from the HL connectors(Low Beam only) We start with the HB relay...remove it and it's rubber overcoat from the bike, and disconnect it: next remove the wires from the connector...sounds simple doesn't it??? well first I made this little shim, from a piece of a computer power supply casing. You could probably use something else....jewelers screwdriver perhaps: Simply slide it down the back side of the terminal, where the catch is, and pull the wire out. Don't force it, things don't go well when you do that. Trust me: http://wiremybike.com/Slideshows/VFR%20200...g_terminals.jpg After all are removed, toss the relay and connector aside....you can keep them for spare somethings later...now you have wires like this: See that Red w/black wire? That connectors your LB and HB relays. We don't want it to do that, so we clip off the LB side of the wire (double check, then check again) Next disconnect the LB relay, and remove the other end of that Red w/black wire. Discard it as well, we won't be needing it anymore. From here on my pictures, and my kit are not 100% the same, as I was not afraid to solder connectors right on my bike, especially as I had to be at work and needed lights.....but you get the same place either way.... Now we need to start connecting stuff back together. First we install the OEM wires into the included relay connector: Red w/black(that we cut the one wire off) goes to pin #30 (power in) OEM blue wire goes to pin 86 (this is from the HB switch) Green goes to pin 85 (ground) Red wire from kit goes to pin 87A (Low Beam on standard) Blue wire with pigtail goes to in 87 (high beam) The original Blue w/Black wire then plugs into the pigtail. Red wire from kit(other end) plugs into the LB relay, and plug it back in. Using double sided tape already on Relay, mount it where the OEM HB relay was located. Route the new Blue wire along the LB harnesses, shorter side is for the LH side of the bike(if sitting on it, not when looking at the relays) Re-tape the harness to make it pretty, using Electrical tape (not Duct/Galfers tape, not matter how much you love it). Unwrapped left side: Next open the little tabs on the LB headlight connectors...see the empty spot?: Thats where our new Blue wire goes: I had to use pliars to adjust the terminal just a bit so it would fit in, then to seat it as well: Once finished, repeat with the other side, finished result should look like this: From here on its a cake walk....just button everything back up, and enjoy your now Modded lights. This MOD is NOT reversible without some electrical knowledge, but has no reason to BE reversed either. I have not yet worked out how to make the LB-LB/HB/HB or LB-HB/HB option user selectable with a switch, but it could be done to invoke the extra 2 filaments only when desired. Wouldn't be hard, just not done yet. This mod is for sale, if you don't wish to repeat the build process. $20 for the LB-HB/HB mod, $15 for the 6 filament mod, plus shipping of course. Click here to buy -
Producing A Fix For The Regulator/rectifier Wiring Issue
Tightwad replied to Tightwad's topic in Modifications
Thanks all for the kind words! For those who are interested, based on user feedback I have shortened the 12 gauge wires another 2 inches to try to save space. -
Fishing pole support?