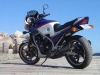
Guest Posted September 15, 2012 Share Posted September 15, 2012 yo, as you can see, the headlights are recesed within the front of the fairing. The fairing looks very stock, with the exception of the twins....the side veiw of the bike is with the twin, with a contrast of the stock item...in touring trim...do you like my lowers? Link to comment Share on other sites More sharing options...
Guest Posted September 15, 2012 Share Posted September 15, 2012 Oh im liking that headlight faring! Very nice choice. I wonder if something like this is still available. Link to comment Share on other sites More sharing options...
greatwhite Posted September 15, 2012 Author Share Posted September 15, 2012 Ah, i see. They more-or-less did what I'm planning for the RC15 dual lights. I'm going to craft the new fairing on top of the old (without messing up the original plastic), pull a mold off it and lay up my new one to create the dual opening. Mine is going to be a bit more stock looking though. Essentially, it will just lok as if the light opening is wider. Your upper fairing I like because it's different. IE; not the same old cokkie cuter stocker. I don't think I would go with the round lights, but that's just a "beauty in the eye of the beholder" thing.... Your lowers look very functional for weather protection, just not my personal preference asthetically. I would think they made your long trip to the salt much more comfortable. More pictures of the upper installed on the bike if you have them please. ;) Link to comment Share on other sites More sharing options...
Guest Posted September 17, 2012 Share Posted September 17, 2012 ..ya, the lowers....new bug deflector to fit a 1975 chevy pickup... works very, very well! the top bit is from the same bug deflector...I was in a hurry, and could not find suitable lowers to do the trick, so this was easy and cheap Rat-O-Ceptor- Interstrada! I purchased the Corbin seat at the World Superbike race in Brainard Mn in 1990 and it has deteriorated very well.....(name dropping warning) I met Yvon and Miguel Duhamel there....Gods-Both! Geez I like motorbikes... When the weather changes to very cold, I will park the bike and put the twin on for photo-op, sorry, but I have no past pics of the twin on the bike. Say, did you keep close notes on your wheels install? I think they look fab. I think you mentioned you made the spacers...do you have the spacer dimensions? all the best Kevin Link to comment Share on other sites More sharing options...
greatwhite Posted September 18, 2012 Author Share Posted September 18, 2012 Say, did you keep close notes on your wheels install? I think they look fab. I think you mentioned you made the spacers...do you have the spacer dimensions? all the best Kevin Oh lord no. I've been chopping bikes for a long time. The one before the VF is an 82 cb650sc thats more RZ500/EX500 than CB these days ( sitting behind the garage in is a sad state these days) That was................*thinking*...........*thinking*..........about 7/8/9 years ago. I was in the first batch to swap over to the F2 wheels once upon a time and did a "roll my own" deal in conjunction with some words of advice from a gent named Jamon out in Alberta at the time. I centered the rims and then started shaving up spacers until I got everything right. Front was a piece of cake. Only thing that was a pain was machining a spacer to fit the bearing seal. The speedo drive went in unaltered. rotors were VF750f stockers and eventually swapped to F2 rotors (which are for the most part identical) The rear wheel went in with a vf500f drive section, CBR600 brake caliper bracket and some spun up spacers. The rest was just spinning wrenches. Thats all from memory ( which seems to be less and less reliable these days!) so i may have missed a detail bit or two... Link to comment Share on other sites More sharing options...
greatwhite Posted September 24, 2012 Author Share Posted September 24, 2012 Picked up the linkage for the swingarm the other day and a bunch of bolts, axle adjusters, brackets, bits, etc. I've just been watching eBay mostly. There's no bike wreckers handy for hundreds of miles (more like around a thousand miles and a 6 hour ferry ride) so everything here has to be shipped in anyways.. The military has me in a "north-ish" semi isolated posting for the next couple years so that's just the way it has to be...... But, good news is I'm pretty well set for parts to start fabbing, altering and fitting this long, dark, cold winter when the snow is halfway up the door. I've also gotten tired of "long handing" out spacers and other roundy type bits. Old age might be getting to me because I just don't seem to have the patience or desire for the tediousness of it anymore. I still don't have the coin for a "proper" mill or lathe, so I bought a 6 inch independent 4 jaw lathe chuck today. With that and an old wood lathe that's been handed down through the ages I'll fab up a simple turning lathe that will let me at least spin out my own spacers at home. Nothing super elaborate and it will most likely only spin aluminum for me. Most of those who can afford their own metal lathe are thinking "troouuuuble" but I've got it covered. I hand fabricate many of my own tools now (yes, you can get into .001 accuracy by hand, it just takes forever to get it) so this will at least spin true and will have a nice tooling bed to speed fabricating up just a touch. Ever try to hand tool a perfectly round wheel spacer? I'll tell you this much; it's not fast or much fun. And man am I tapped out for cash now. They may all be "recycled" parts, but it all adds up after you buy a truckload of 'em. Gotta wait for next month just to buy some raw aluminum stock. Now that's tapped out brother....spare a guy a dime for a hot cup o' joe mister? I promise i won't go spend it on bike parts.......... Link to comment Share on other sites More sharing options...
greatwhite Posted September 29, 2012 Author Share Posted September 29, 2012 So, i arrived in merry ol' England this morning. Bag drive of a flight. 17 hours after it was all said and done. But a nice little present was waiting for me at the front desk: My cbx750 dual headlight for the vf conversion. Its in great shape. Even has smaller bulbs for drl's should i want to go that way. I suppose a feller could put colored bulbs in there id they wanted red or blue for show or something. The other seller shipped out the nc24 rotors friday and they show up monday. Good trip so far! ;) Sent from my iPhone using Tapatalk Link to comment Share on other sites More sharing options...
greatwhite Posted October 5, 2012 Author Share Posted October 5, 2012 Rotors are in my luggage and will be winging their way to Canada tomorrow. :) Sent from my iPhone using Tapatalk Link to comment Share on other sites More sharing options...
greatwhite Posted October 7, 2012 Author Share Posted October 7, 2012 Safe and sound at home, waiting for installation: Also had a nice surprise waiting for my arrival: I'm all set up for a long winter of fabricating! Link to comment Share on other sites More sharing options...
Member Contributer Kel Posted October 7, 2012 Member Contributer Share Posted October 7, 2012 How wide is the new arm at the pivot. If much more than 9" you might be in trouble. The right side pivot arm looks wide. Will it fit in the frames pivot "cage"? What are you doing for pivot bolts, You can't use 1 long one because of the rear pipes. You may have to make a custom header. Love the rotors. Link to comment Share on other sites More sharing options...
greatwhite Posted October 7, 2012 Author Share Posted October 7, 2012 How wide is the new arm at the pivot. If much more than 9" you might be in trouble. The right side pivot arm looks wide. Will it fit in the frames pivot "cage"? What are you doing for pivot bolts, You can't use 1 long one because of the rear pipes. You may have to make a custom header. Hi Kel. No worries, it'll fit. I'm not breaking any new ground here as it's been done before: Uses the VF pivot bolts and a bit of swingarm "shaving". It's not a walk in the park but after reading the thread from the Netherland VF1000F pictured here it's not quite as involved as some other "swaps". I plan to eventually use a CBR1000rr rear shock to move the reservoir to the over tire configuration. This should do away with any frame clearance problems (the above pic doesn't look like the most ideal solution) and I won't have to get the drive sprocket centerline and rear wheel centerline so out of alignment like the above pics. Chain clearance will also be improved at the swingarm pivot if I lower it from what the gent has done with the VF1000F pictured above. He built it as a "streetfighter" which seems to sacrfice some basic geometry for looks. I'm building it as practical everyday streetbike, so I'm less willing to sacrifice geometry for looks. It still won't be ideal, but much closer than a steetfightered bike. The CBR1000RR shock is also a slightly better fit for the weight of the VF as opposed to the 600RR unit. Still not a match as the VF has somewhere around 100lbs on the 1000rr (not to mention having to carry my fat butt), but should be a little shorter path to the final product. Link to comment Share on other sites More sharing options...
Member Contributer Kel Posted October 7, 2012 Member Contributer Share Posted October 7, 2012 Awesome. Can't wait to see it! Link to comment Share on other sites More sharing options...
greatwhite Posted October 7, 2012 Author Share Posted October 7, 2012 Experimenting with initial mock up. Observations: 1. rear wheel. I've already got cbr/f2 wheels on the bike. The wheel fits the newer CBR/RR arm fine. The problem is in the axle diameter and length. The RR axle is too large to fit the F2 bearings and the F2 axle is a touch too short to fit the swingarm width with the standard adjustment blocks. The F2 axle would also require some bushings to properly fit the swingarm openings, spacers and brake caliper bracket. The easiest way out will be to fit the later RR bearings into the F2 wheel, assuming they have the same outer race diameter. Or perhaps just order a new set of bearing that are the proper specs for my needs. I need to check with some suppliers after I look up some specs. Next way out would be to use the F2 axle and chain adjusters on the RR arm. My arm is a 2006 so it uses the bolts in the arm adjuster style rather than the older "metal loop" axle adjusters. A 2004 RR arm would have had the hoop style adjusters and may have worked "as is" with the F2 axle (well, with new bushings for the proper DIA). If I use the F2 axle, I'll also have to make up some bushings for the various bits that are larger diameters (IE: built for the larger RR axle). The preference will be to simply swap in new bearing and shave/build the proper spacers for rear wheel alignment. 2. Swingarm axle bolts/pivot point. a. The RH bolt from the VF frame slips right in like it was made to fit. Got off lucky there. b. The LH side is a different matter. The bolt diameter is waaayyy smaller than the swingarm bushing. So, I'll either need to; i. make a sleeve for the bolt or ii. spin up a whole new bushing with a smaller ID. I would prefer to make a new bushing (option ii) but we'll have to see how it goes as I continue fitting the assembly. The swingarm width is quite close to final dimensions also: A couple MM's here and there will get it right in. Looks like I might need to mill 5-10 mm off on either side to fit 'er up. It also looks as if the exhaust clearance is not going to be an issue at all. 4. Wheel alignment Pretty good from eye balling it. Chain looks really close, tire looks centered: Obviously, measurements and refining are required. 5.Wheelbase Looks like it's going to be a touch longer than the stock VF arm: That picture is a little deceiving since it has to move forward about 3 1/2 inches before it's even close to the pivot point (it looks like a drag bike or one of those extended swingarm jobbies in that pic!). I'm going to guestimate it will add another 5-15 MM to the wheel base, which can have a fairly large effect. So the longer wheel base will alter handling a bit. But it's a street bike and I've got a couple other ideas on how to deal with the wheelbase change.. 6. Linkages/shock mount. The shock and linkage is all integral to the swingarm so no worries there. The only thing is the one link to the lower frame. Looks like I'm going to luck out here also - the RR link lines up pretty much spot on with the VF linkage frame point. Some shaving and cutting on the RR link should slip it right in. I'll most likely make up my own link/dogbone with heim joints so I can fine tune the ride height and suspension action (ie: progressive rate). On a personal note that has nothing to do with how it functions; I think that arm looks really good on the bike! I need to drop it on a scale to see how much more of less it is compared to the stock arm and shock/linkage. The really nice thing about the whole deal is it's going to be stiffer but also lower the center of gravity a bit since everything is in the swingarm and carried very low. Should be interesting to see how it all effects the bike once it's done. Link to comment Share on other sites More sharing options...
greatwhite Posted October 7, 2012 Author Share Posted October 7, 2012 Also considering cutting down the GSXR can now and routing the pipe through the swingarm cutout similar to this: Once I've got the swingarm installed, I can't see me not making use of the stock CBR pipe routing indent...... Link to comment Share on other sites More sharing options...
greatwhite Posted October 7, 2012 Author Share Posted October 7, 2012 Whelp, there it is. I need an offset sprocket for the chain to clear the swing arm. Two options: 1. Buy one. I like that for bolt on easiness. 2. Build one. I need to replace the sprocket anyways (getting the shark fin look). I can buy a new one, chuck the old on up in the lathe, turn it down to a spacer and weld 'em together. I like option 2 because it's just the price of a normal front sprocket. Its not all bad either. With an offset sprocket i have the option of running a 5.5 wheel in the future if i want or need to. Sent from my iPhone using Tapatalk Link to comment Share on other sites More sharing options...
greatwhite Posted October 7, 2012 Author Share Posted October 7, 2012 SP2 throttle is installed. Easy as pie. Bolted right up. The stock VF cables work fine. Perhaps this means the RC51 cables will work with the VF carbs? It sure would be nice to find another workable solution to replacing the throttle cables than prowling ebay for NOS pieces to pop up. The SP2 throttle is also 1/4 turn, or at least the one I have is.... I also popped on the RC51 start/run housing but haven't had time to work out the electrical parts yet. The bike isn't going anywhere for several months so no biggie there. The LH bar is probably going to stay VF stuff (clutch master, switchgear, etc) for the immediate future. Link to comment Share on other sites More sharing options...
greatwhite Posted October 7, 2012 Author Share Posted October 7, 2012 The next thing I'm going to have a try at is casting my own aluminum pieces (IE; brake brackets, rear set brackets, etc). I've got a couple cracked Al heads that can be melted down after I build a furnace. The sand casting process itself is pretty easy...... Link to comment Share on other sites More sharing options...
greatwhite Posted October 8, 2012 Author Share Posted October 8, 2012 After a couple hours work shaving and fitting I'm getting closer: It still has to go forward about another 2 inches to be at the pivot points. So even though it's inside the frame rails it's not quite clearanced enough to make it up between the swingarm mounts: I still have a fair bit of material to remove. The swingarm bearings are ruined and will require replacement. I've been pressing and pounding on them to establish the final position so thier sacrifice has not been in vain. Looks like I'll also have to shift some of the bits around like the fuel pump. Tiny bit of possible interference with the top of the shock. Sent from my iPhone using Tapatalk Link to comment Share on other sites More sharing options...
greatwhite Posted October 8, 2012 Author Share Posted October 8, 2012 Figured I'd take a break from metal working the swingarm and bolt on the nc24 rotors: Fit like a glove (or is that gloves?). Now she's ready for me to build the brackets for the SP2 Nissin 4 pot calipers. Yeesh, back to metal work.....it's like it never ends..... Sent from my iPhone using Tapatalk Link to comment Share on other sites More sharing options...
greatwhite Posted October 10, 2012 Author Share Posted October 10, 2012 So after another day of fittingand refinement, it looks like the clearance on the 600RR shock reservoir to frail rail is going to be pretty minimal. The 1000F above gets away with it because the rear is jacked up to high heaven. Mine is a bit more conventional. So, off to ebay and grab a cbr1000RR shock for 19 bucks. The reservoir points rear and up on the 1000RR so it should be in clear air once installed. As a side bonus, it carries a 670Lb spring so it may be capable or carrying the VF750f weight and my ample poterior without respringing. Time will tell.... Link to comment Share on other sites More sharing options...
greatwhite Posted October 11, 2012 Author Share Posted October 11, 2012 More shaving on the swingarm pivot points. Getting closer. Pulled the cbr bearings out of the pivots. Looks like they might be too long to fit in swingarm between the vf frame mounts. I'll have see how it foes once the swingarm fits between the frame rails. Shaving is going slowly ok purpose. Its a lot more difficult to put material back on than take it off...... Sent from my iPhone using Tapatalk Link to comment Share on other sites More sharing options...
Member Contributer Kel Posted October 11, 2012 Member Contributer Share Posted October 11, 2012 Let me just say, the way I got a modern arm in is to lose the right side pivot cage on the frame and grind down the left side pivot boss on the frame. Unfortunately, it means using a long through bolt for the pivot bolt and that might mean a custom exhaust in the rear. This will allow the arm to fit without hacking too much aluminum off of it and maintain stock bearings. You may not have to lose the left side boss but with the VFR arm, moving the whole thing to the left is the only way to line up the wheel. With a conventional arm, you can line the wheel up with spacers. My 2 cents. Love the rotors. Link to comment Share on other sites More sharing options...
greatwhite Posted October 11, 2012 Author Share Posted October 11, 2012 Oh so close: But now i'm running into exactly what Kel mentioned: the rh side boxed cage. The swingarm flares up and down as it moves back from the pivot point it won't go all the way into the cage. Out comes the grinder again. I was trying to mot alter the frame from stock but theres no other way at this point. I'll shave a little off the swingarm and shave a little off the cage. I'll keep going back and forth between the two until i get a good march.... Sent from my iPhone using Tapatalk Link to comment Share on other sites More sharing options...
greatwhite Posted October 11, 2012 Author Share Posted October 11, 2012 Well, there we go. Its in. At least physically it's in place, no bearings yet: I shaved a little off the swingarm where it contacted the rh cage. I will shave an 1/8 or so off the cage and see if i get enough clearance for suspension travel. Little nervous While i was clearancing the arm, not certain if the part was hollow or solid and how thick it was if hollow. But my reasoning in doing more with the swingarm instead of the frame is if i mess up the arm i just throw the stock arm back on and I've only wasted some cash. Altering the frame is a little bit harder to recover from if it gets messed up... Sent from my iPhone using Tapatalk Link to comment Share on other sites More sharing options...
Member Contributer Kel Posted October 11, 2012 Member Contributer Share Posted October 11, 2012 Altering the frame is a little bit harder to recover from if it gets messed up... That is true. Some times you have to just go all in if you want it custom. I carefully removed the cage whole so I can re-weld it in the future when she goes back to stock. I can't believe Honda thought that was a stout mounting point for the rt side swingarm pivot. It's laughable. I can't tell how much you removed but that cage is under designed IMO as is the bolt that attaches to it. I'd risk my gradmothers life on the leftside bolt but the right one is wimpy if you ask me. I think it JUST does it's job in stock form and probably even flexes some but I wouldn't get TOO happy with the grinder there. The problem with mods like this is, one road block leads to another mod and so on and so on. The 1000F rear looks high, probably to avoid contact with the rear frame member heading up to the tail? If you go too high, the chain will rub on the bottom of the frame on the other side. It never ends. Good luck and stay with it! Link to comment Share on other sites More sharing options...

Recommended Posts
Archived
This topic is now archived and is closed to further replies.