Member Contributer redmarque Posted March 24, 2008 Author Member Contributer Share Posted March 24, 2008 Now, the weight of the completed bike with a full load of fliuds? What! on the bathroom scales!! :warranty: Quote Link to comment Share on other sites More sharing options...
Member Contributer redmarque Posted March 31, 2008 Author Member Contributer Share Posted March 31, 2008 Forks welded! :unsure: Quote Link to comment Share on other sites More sharing options...
Member Contributer tok tokkie Posted March 31, 2008 Member Contributer Share Posted March 31, 2008 I have the greatest admination for what you are doing. Your forks are true to Norman Hossack in looks. That is the one weak point about the design - they don't look good to me. You had no choice; being constrained by the materials available to you (& Hossack in the original). Britten used carbon fibre & his forks looked great to me whereas the Confederate forks are similar but brutally ugly. The BMW cast aluminum are not pretty either. My favourite are the Vincent Girdraulic forged aluminum blades (not Hossack; a variation on conventional girder forks). I had a Vincent and stripped the stove enammeling off and polished up those aluminum blades - looked terrific. Like the Cyzsk (sp?). All of this is just comment & observation. Yours are going to look like what they are which is fabricated tubes. An honest design. Did you have trouble with distortion of the steering stem bearing seats after the welding? Quote Link to comment Share on other sites More sharing options...
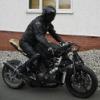
Member Contributer redmarque Posted March 31, 2008 Author Member Contributer Share Posted March 31, 2008 I have the greatest admination for what you are doing. Your forks are true to Norman Hossack in looks. That is the one weak point about the design - they don't look good to me. You had no choice; being constrained by the materials available to you (& Hossack in the original). Britten used carbon fibre & his forks looked great to me whereas the Confederate forks are similar but brutally ugly. The BMW cast aluminum are not pretty either. My favourite are the Vincent Girdraulic forged aluminum blades (not Hossack; a variation on conventional girder forks). I had a Vincent and stripped the stove enammeling off and polished up those aluminum blades - looked terrific. Like the Cyzsk (sp?). All of this is just comment & observation. Yours are going to look like what they are which is fabricated tubes. An honest design.Did you have trouble with distortion of the steering step bearing seats after the welding? Thanks Tok! It's in fact a variation on Norman's design, as ball and socket joints are replaced with the head stock ( heavier but smoother stearing) I'm sure I could fabricate a lighter version, but as I've never built anything like this before it's safer this way. maybe i could pretty it up with a bit of fork cowling? The Kawa GT 550 headstock is heavy but functional - saved a massive amount of fabrication. I'm really interested to see what difference this front-end makes to the handling with 15 degrees rake - it will probably be very quick? I have a GSXR stearing damper on hand if it gets out of shape. Bearings went in fine btw - such a big piece of steel didn't suffer from distortion. Here's another pic of the progress... suspension linkage mount on wishbone needs moving forward. 'Fun' With the battery location. You can see why I'd like to remove some of the rear cam cover. Found a good location for the reg/rec Quote Link to comment Share on other sites More sharing options...
Member Contributer tok tokkie Posted April 1, 2008 Member Contributer Share Posted April 1, 2008 Page 8.22 of the workshop manual identifies that as the crankcase breather. A 'breather seperator' is bolted to the inside covered by a 'breather plate' torqued to 12 Nm with blue loctite. The rubber breather tube connects to the nipple on the front of that lump. I assume you have taken off all the PAIR gubbins. Can you swop the front & rear cam covers around? Quote Link to comment Share on other sites More sharing options...
Member Contributer redmarque Posted April 1, 2008 Author Member Contributer Share Posted April 1, 2008 Page 8.22 of the workshop manual identifies that as the crankcase breather. A 'breather seperator' is bolted to the inside covered by a 'breather plate' torqued to 12 Nm with blue loctite. The rubber breather tube connects to the nipple on the front of that lump.I assume you have taken off all the PAIR gubbins. Can you swop the front & rear cam covers around? Fantastic Tok - that gives me an idea... I could re-locate the 'breather seperator' or make it 20mm shorter. I'm leaving the PAIR system on until the bike's been though the UK MSVA testing - they do an emissions test :biggrin: As to changing the cam covers around - there would be frame interference issues with the 'breather seperator' lump. good idea though :biggrin: Quote Link to comment Share on other sites More sharing options...
Member Contributer redmarque Posted April 4, 2008 Author Member Contributer Share Posted April 4, 2008 Scaring after operation on rear cam cover OK I hope this works! plucked up the courage to remove an inch from the crank case breather lump. Hopefully the removal will only cause slight pulses into the airbox? A small expansion tank could be the fix for this. There's now enough room for the battery across the frame, plus clearance for the fuel pump banjo and return pipe. Quote Link to comment Share on other sites More sharing options...
The Phantom Posted April 4, 2008 Share Posted April 4, 2008 maybe i could pretty it up with a bit of fork cowling? This Aprilia concept bike might inspire some ideas... Looking good, RM. The frame is almost too sexy for the swingarm :beer: Quote Link to comment Share on other sites More sharing options...
Member Contributer redmarque Posted April 4, 2008 Author Member Contributer Share Posted April 4, 2008 Love the Aprilia Concept! Fork cowls like this would break the tube lines well, thanks Phantom! :beer: My Radiator and oil cooler location are roughly the same location too. Quote Link to comment Share on other sites More sharing options...
Member Contributer redmarque Posted April 11, 2008 Author Member Contributer Share Posted April 11, 2008 First time sitting on the Hossack Viffer today! Slightly aprehensive about mounting the bike - Wondered whether the handlebar position would be a long stretch? Bars are about 2-3 inches lower than standard and roughly the same distance from the back of the tank Handlebar and front shock mount has now been fully welded (needs support struts like the front base tube) Custom bolt and plugs to locate the stem clamps fabricated. Stainless steel main engine bolt and front wishbone pivot bolts made Still on target for the 1388mm (54.645 inch) wheelbase! Quote Link to comment Share on other sites More sharing options...
Member Contributer redmarque Posted April 14, 2008 Author Member Contributer Share Posted April 14, 2008 Here's the linkage The red dots show where cross bracing needs to be added from one side to the other. in each end there are bearing bronze bushes - a system like this requires zero slack in the linkage 3 Red dots to the left show the scissor pivot points Dot to the right of the picture under the steering yoke marks the location of rose joint linkage to the forward pivot. Now you’re probably wondering why i've included this extra linkage -surely I could attach the yoke directly to the forks? Because the top wishbone pivot is further back than the handlebars - it would need link arms that could change lengths! Plus if I used a scissor linkage from yoke to fork the ratio of bar movement to wheel turn wouldn't be 1 to 1! weird steering! :pissed: Also a rake of 15 Degrees also moves the headstock further forward - making a BIG stretch to the bars Hope i'm making sense? :huh: Quote Link to comment Share on other sites More sharing options...
Member Contributer redmarque Posted April 27, 2008 Author Member Contributer Share Posted April 27, 2008 360lbs + electrics, guages, coolant, etc, (gas = 30lbs/5gal), my guess for final weight with paint ready to ride is 405-410lbs. Very nice, right about what a CBR weighs! :fing02: Cheers Seb! :fing02: Spent the afternoon measuring for all the stainless bolts needed to fix everything correctly, 61 so far. Interesting to note that the VFR engine bolts are M10 fine thread ECU is going to be mounted behind the airbox and stock connectors for speedo/rev counter are redundant as I've bought a Vapor unit! should save a few more grams chopping the loom too. Vapor Spec - Link Quote Link to comment Share on other sites More sharing options...
Member Contributer redmarque Posted June 9, 2008 Author Member Contributer Share Posted June 9, 2008 Sometimes - 'other' things gets in the way of bike building. So I thought it was about time I posted a little update on the bettle VFR. Cooling system is now complete with silky silicon hose, stainless hose clamps and ducati 916 radiator. R1 Caliper mounts added - parts for the earls hoses are waiting to go on. Coils are mounted on a aluminium bracket on the left side of the frame between the engine and frame. Don't worry the frame look squewd as it's unbolted for now. Crankcase breather on the rear rocker cover has been re-welded to miss the frame tube. Airbox has been modifed to fit around the frame tube. Front of the box is going to have 2 entry points for the ram air mod. Finally standing back and admiring....oh yeah :biggrin: Quote Link to comment Share on other sites More sharing options...
Guest vfrrider Posted June 11, 2008 Share Posted June 11, 2008 Red Marque, Nice job so far. Don't know about that radiator location, but like the effort. May I make a suggestion for the rear, though. NR replica It would be killer. Larry VFRrider Quote Link to comment Share on other sites More sharing options...
Member Contributer redmarque Posted June 12, 2008 Author Member Contributer Share Posted June 12, 2008 Unless I get a radiator fabricated to go under the seat this seams to be the only option for now - i'd really like a wedge shaped one from a late GSXR would be slightly narrower and taper towards the base. the 916 one was only $30 Tail fairings are really a matter of taste - i'm into the minimlistic look of the new fireblade and like integrated indicators like a gsxr1000. the NSR tail is very cool especally the fin air intakes very ferrari! :unsure: Quote Link to comment Share on other sites More sharing options...
Member Contributer redmarque Posted June 13, 2008 Author Member Contributer Share Posted June 13, 2008 Plus if I used a scissor linkage from yoke to fork the ratio of bar movement to wheel turn wouldn't be 1 to 1! weird steering! :pissed: Tony Foale experimented with this as well. Apparently not as weird as you might think. Yes that's right - the riders he tried it on got used to the change very quickly. Interestingly the old Ner-A-Car has a 3-1 steering ratio on it's centre hub steering http://thekneeslider.com/archives/2007/10/...r-vintage-fest/ It's seams that most of the 'new' ideas have been done way before! :idea3: Quote Link to comment Share on other sites More sharing options...
Member Contributer redmarque Posted June 13, 2008 Author Member Contributer Share Posted June 13, 2008 Wow, this has been an amazing read! I'm curious what your background is redmarque? Obviously you know what you are doing. And... of course, will there be a kit? Thanks! :idea3: I take it from your username you aren't the 'one' then? Firstly i'm really no engineer! I started life with one of those father's who gave me technical lego and was a member of the Vintage Motorcycle Club! I left school at 16 and went to the local college to do a foundation in art and design - went onto Central Saint Martins College of Art & Design in London to study honors Degree in Product design. Somehow after finishing (spending more and more time with computers) I've ended up as a IT Manager for an investment bank! I had a lot of 'help' on this project but have tried to do as much as I can myself - I guess you could say I had a fair idea what to do, but only after reading Tony Foale's book and working with my now good friend from essex wheels and engineering. As for a kit? who know's? I'm pretty sure that it 'should' handle well, i've even thought about adding a steering damper! :blink: I can't wait to see if it works! :pissed: Quote Link to comment Share on other sites More sharing options...
Member Contributer redmarque Posted June 16, 2008 Author Member Contributer Share Posted June 16, 2008 As requested a 'cockpit' view. My, what a mess! :fing02: I've modified the standard oil cooler take-offs to except earl's hoses Sanded down and painted the throttle body side plates Satin Black, will change out the standard bolts to stainless (shiny) Didn't realy like the huge standard caliper so i'm modifying CBR600RR rear caliper to fit above the swingarm - should keep the dirt off and look trick. I'd like to put the hose though the swingarm aswell Quote Link to comment Share on other sites More sharing options...
Member Contributer tok tokkie Posted June 16, 2008 Member Contributer Share Posted June 16, 2008 What you propose for the rear brake is novel. Like the front end is. What I notice about your workshop is more how small the space you have created this in rather than how cluttered it is. Quote Link to comment Share on other sites More sharing options...
Member Contributer redmarque Posted July 3, 2008 Author Member Contributer Share Posted July 3, 2008 The other side... :biggrin: Exhaust system is coming along, i've modifed the front down pipes to miss the radiator and cooler. Early cbr600 pipes have that same size header tubes Stock pegs are a temporary solution until I finish the bespoke rearset design, also good to take measurements from for the rearset relationship to engine and swingarm mountings. Quote Link to comment Share on other sites More sharing options...
Guest DarkKnight Posted July 3, 2008 Share Posted July 3, 2008 ...Wonderful project. Reminds me of the Britten (in concept). Subscribing. Quote Link to comment Share on other sites More sharing options...
Member Contributer redmarque Posted July 23, 2008 Author Member Contributer Share Posted July 23, 2008 After much adjustment, fabrication and head scratching (standing and looking at the bike) :biggrin: I've finally got around to the rearset design! way way back last year I decided that the stock 5th Gen footpeg hangers look disgusting... The structural elements of standard 5th gen hangers are very good - especially using the swingarm pivot as a mounting point. But as you know there isn't any adjustment! I've tried various designs trying to allow for some forward and aft movement - none of which look any good! Here's attempt number 14 (left side rearset) It has height adjustment only - 3 positions at 36 degree increments. Brake lever in this pic is shown lower than final design so that it can be seen against the hanger Heal plate design is to be finalised afterward as 3mm plate aluminium can be easily fashioned by hand. Would most apreciate you guy's input! :fing02: Quote Link to comment Share on other sites More sharing options...
SEBSPEED Posted July 23, 2008 Share Posted July 23, 2008 What?!? And here I thought you weren't posting because you were busy riding it already... Looks good, do it up! :biggrin: Quote Link to comment Share on other sites More sharing options...
Guest vfrrider Posted July 23, 2008 Share Posted July 23, 2008 I know you love fabricating, but there are some real nice rearsets on Ebay for the NC30-35 or even the NSR series. Larry VFRrider Quote Link to comment Share on other sites More sharing options...
Member Contributer redmarque Posted July 24, 2008 Author Member Contributer Share Posted July 24, 2008 I know you love fabricating, but there are some real nice rearsets on Ebay for the NC30-35 or even the NSR series.Larry VFRrider There very nice rearsets too.. Mounting on the 5th gen engine/swingarm would be interesting? Quote Link to comment Share on other sites More sharing options...

Recommended Posts
Join the conversation
You can post now and register later. If you have an account, sign in now to post with your account.