redmarque
-
Posts
299 -
Joined
-
Last visited
-
Days Won
1
Content Type
Forums
Profiles
Gallery
Blogs
Downloads
Events
Everything posted by redmarque
-
Strange..yawns and blinks.... it's 2015 erk! didn't see the thread bump... New years resolutions include getting this bike on the road for a UK summer! I've been tied up with renovating my old house over winter.. .warmer weather soon please! Something to look at in the way of an update.. Honda RS250RW track fairing... i've added some mounting tabs and started the front subframe... Radiator is really too wide for the upper so now mounted veritcally with new hangers welded on. Happy New Year VFRD!
-
Alodine... had to look that up. Guessing you use it on aircraft parts at work? Gonna be very careful with pressure testing. i've heard of people balloning tanks with only 5 psi.
-
Nope - filler neck and breather still need welding on. Open to ideas on wjhat to do for a leak/pressure test? Anodising sounds like a good idea. Sliding bath? you been playing with rubber duckies and the soap again?
-
Thanks Guys! One day i'll make a sexy hand beaten tank! Will be using a stock fuel pump and this mounting plate.
-
Cheers Mr Canuck! Shame it's going to be hidden with a CBR600RR tank cover. Will source some baffle foam blocks to stop the fuel sloshing about too.
-
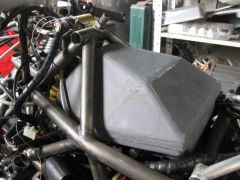
Got the tank welded up.... Filler cap and breather ready to be welded on. Next get it mounted!
-
Something to look at.. started fabing the tank. i've calulated that it will hold about 10 litres.. will do for testing. Underside will fit over the airbox nicely. Anybody recommend some type of isolation mounts?
-
Yes indeed we do Some chamfering on the edges and black anodising and we'll be good to go. Here's the other side and a better shot of a plate. Uses one of gear linkages that comes with the rearsets.
-
i started designing some rearsets a long time ago.... well there's a fair amount of machining and design in a full set.. so I cheated.. Adaptor plates... keep it simple and allow any cbr600rr rearsets to be used. these are from uk gbmoto. I need to machine another set with the mounting holes more upright.
-
Hi Mr Mod!
-
Cheers doug, It's more of where was I going to put the old style coils I have them mounted like this... and they look meh!
-
Hmmm... apologies all - I hadn't seen that anyone had posted to this thread this year till this morning! Some progess.. I've moulded a rudimentry airbox as a standard one wouldn't fit between the frame rails. filtering is going to be minimal... stainless steel mesh maybe a thin layer of foam. All of the electrics are mounted under the seat plate apart from the tilt switch sensor. Fibreglassed a holder for the LiFe Po4 battery. Having read the COP thread yesterday. i've pulled the trigger on some late model GSXR 750/600 coil sticks - getting rid of those traditional coils and leads will be great with such limmited space.
-
Cheers guys! I've seen Rangerscott69's COP setup. - Hoping it's still working OK too.
-
Agghhh! You got me there Seb! Yep there's some progress... slow progress but something to look at! Coils mounted... has anyone worked out if a coil-on-plug setup works yet? airbox plug nearly ready for fibreglass - i've moulded this now but haven't taken any pics of it yet.
-
Second Version of Hossack Forked 5th Gen VFR
-
-
From the album: HossackViffer Mk2
Hossack VFR Mk2 Airbox Pattern for fibreglassing. -
From the album: HossackViffer Mk2
Hossack VFR Mk2 Hossack Fork -
From the album: HossackViffer Mk2
Hossack VFR Mk2 -
Just wondering how your getting on with the motor? :biggrin:
-
Wish I had more funds to indulge my hobby further :blush: Yeah that TL would be a hoot though morning traffic... V-twin booming and hiss of waste gate to intimidate the car drivers! :fing02:
-
Ah, Now I understand what you're getting at! Your reasons for concern are valid and I thank you for pointing out a possible issue. Having re-evaluated the design and discussed with my engineer/welder friend i’ve come to the conclusion that if there were only 2 spreading bars I would agree that more triangulation would need to be added. The design has four connecting struts to front and rear of the fork all of which are angled to transmit the loads. Look at this Vincent girder fork for example; which has only 2 legs. Instead of round tubes it utilises a thick plate to perform a similar function. Also note the material (mild steel) and section/thickness of the fork legs compared to my Hossack design. I will be keeping a close eye on all the frame and forks for any signs of fatigue once testing begins. My sense of life preservation is VERY strong!
-
Hey those tanks are sure pretty and unfortunatly expensive! As this is a prototype that I don't even know if it will work yet; I thought it best to make things functional first and aesthetic second. This mad supercharged TL1000 built for hillclimbing has simular idea to what i'd planned to use. - without the supercharger/plenum :wub: :offtopic: Apparently it makes over 200BHP and looks the business!
-
Thanks Larry :fing02: I'm not really sure what you mean - i don't understand your description of the issue. :blush: i've decided not to spend $$ modifiy the engine until everything else is complete. If the bike handles well then i'll certainly look into more power. Working on the steering/handlebar mounting atm.. wil post pics when more parts are finished.
-
Thanks Canuck! I offen think I must be a bit crazy :goofy: - especially taking on a project like this! :blush: So much still to do!
-
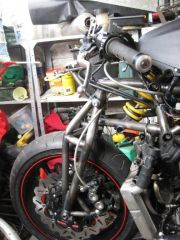
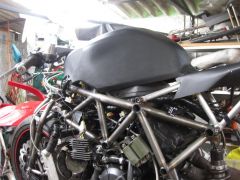
Backup from welders! Test fitted frame on motor with scrap mounting plates. A few modifications to the position will be needed to align rear shock and upper front a-arm. Fork came out rather well :cheerleader: Nice welding - will need some mild heat to get both calipers to line up correctly.