
sfdownhill
-
Posts
662 -
Joined
-
Last visited
-
Days Won
43
Content Type
Forums
Profiles
Gallery
Blogs
Downloads
Events
Everything posted by sfdownhill
-
Hey Sean - I love the Triple Bronze too, and it definitely was a perfect match for MiniCarver's 8 gen components. But I went astray by not getting color swatches from Prismatic or, even better, paying my applicator to buy a small amount and powdercoat a test piece. I had a pair of wheels, 2 valve covers, a clutch cover, and three calipers coated in Prismatic Triple Bronze and they all came out a lovely darker, greener color than the 8 gen wheel/component color. After facing the consequences [cost] of my mistake, I contacted Prismatic and learned that they have a four tier color matching program. You send them a part that is the color you want to match, then they do either a [1] Quick Search - a no-charge search of all their current colors with no minimum purchase. They then send you 2-5 swatches of the colors they've found closest to your color for $6 shipping [2] Archive Search - no charge for the search, but there is a 6 pound minimum purchase [Powdercoat powders run roughly $11-15 per pound]. They search 6500 colors and textures they have on file, then send color/texture swatches [unspecified quantity] closest to the part you sent for $6 shipping. [3] Reformulation - the Prismatic description of this process is not entirely clear, but the service costs $100 to provide swatches, and carries a 10 pound minimum purchase. [4] New Formulation - again the description is not clear, but does involve terms like 'chemistry' and 'complex'. This service costs $400 to produce a sample of the color, requires a 45 pound minimum purchase, and takes 8-12 weeks.
-
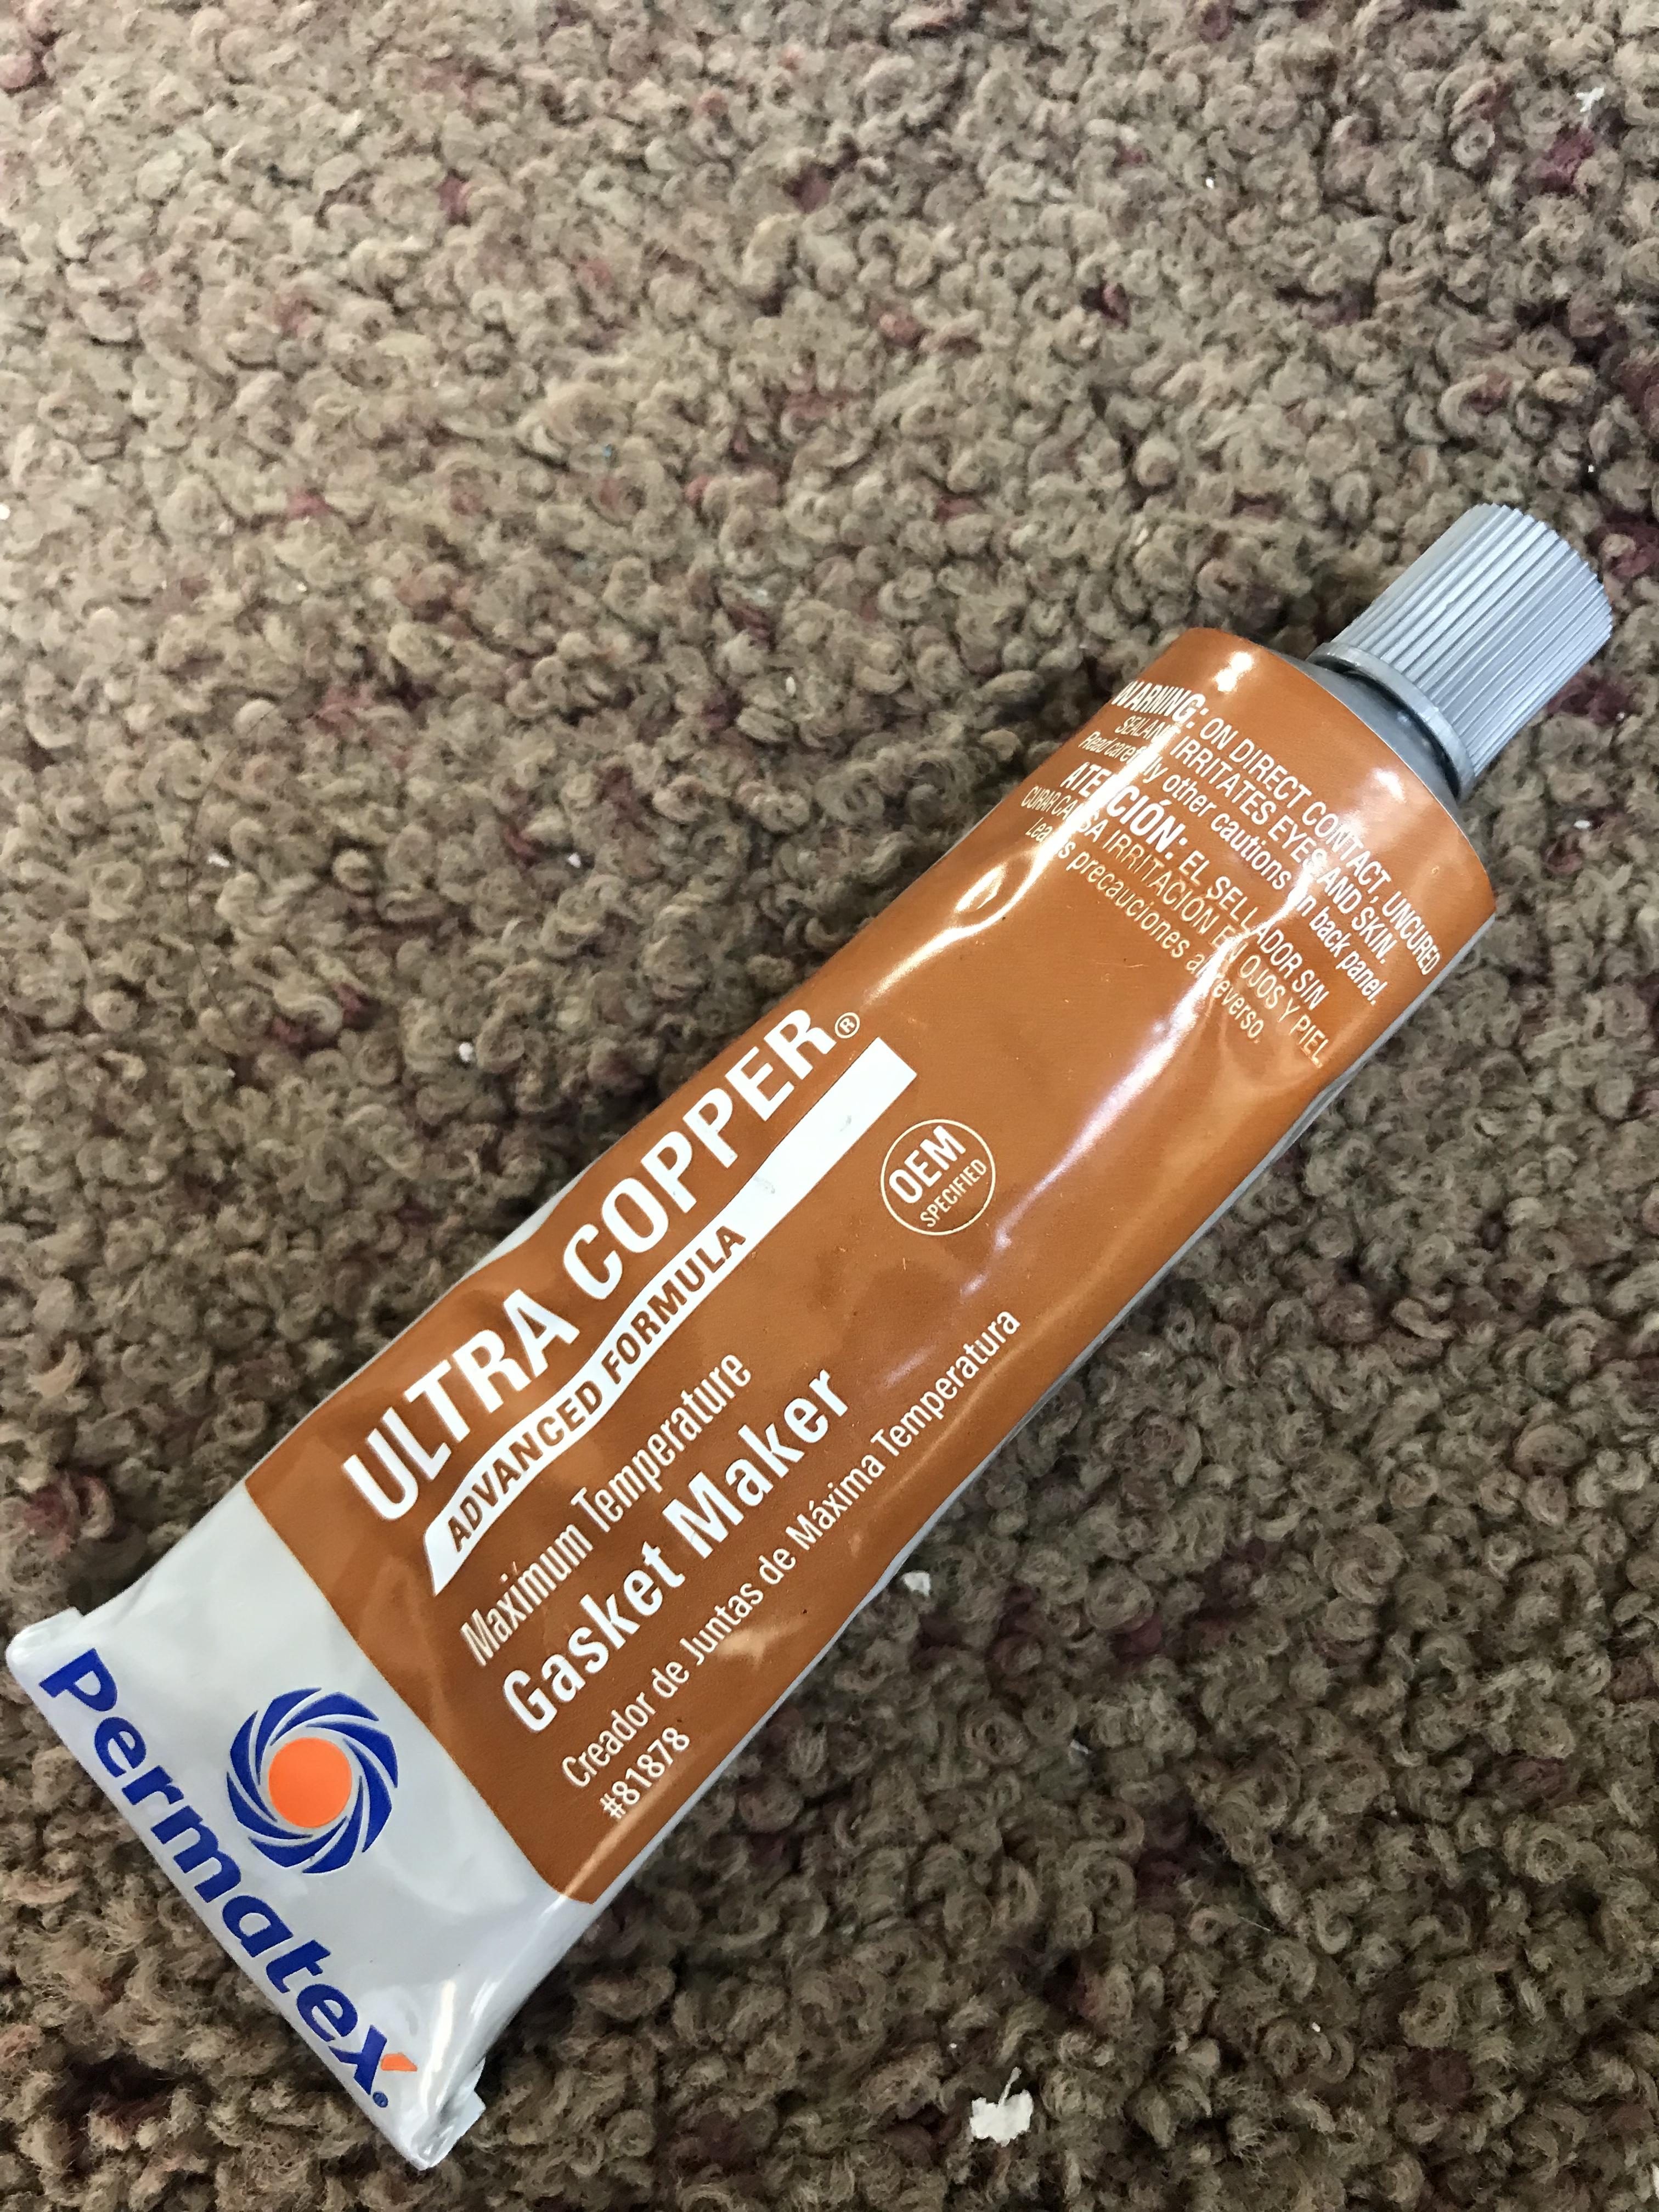
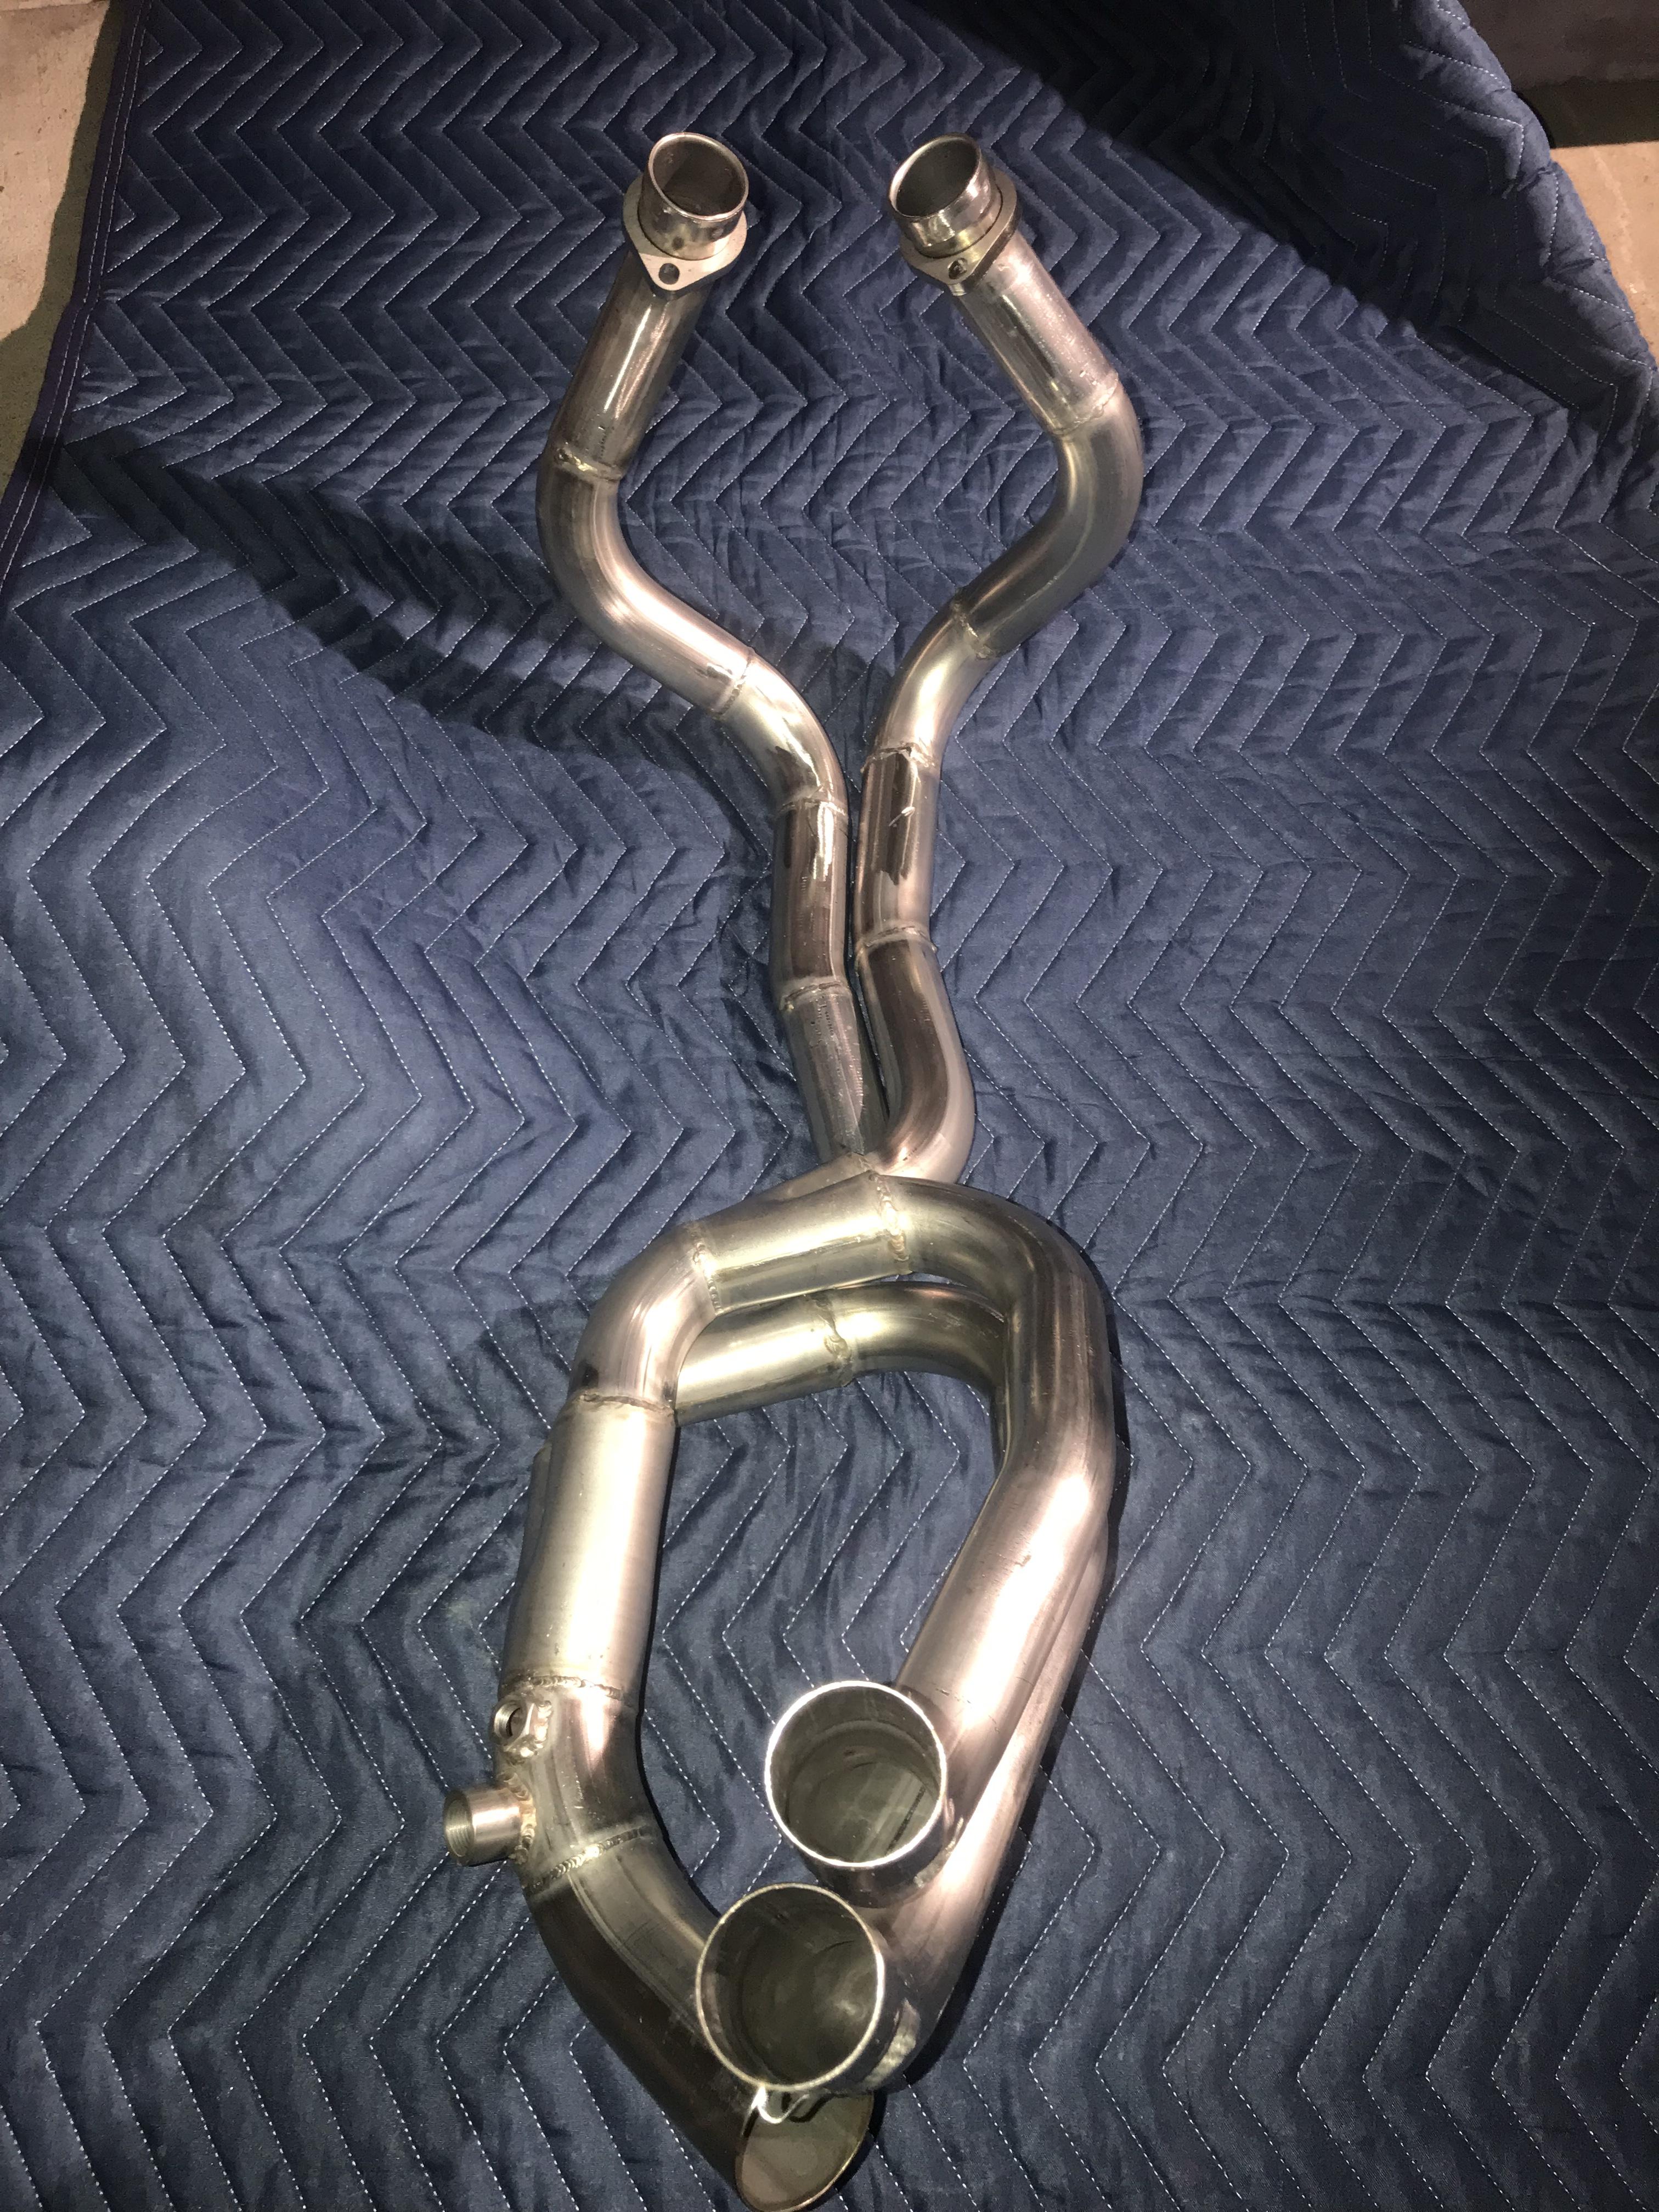
cargustav, great detective work with the pressurizing mechanism and bubble factory. I sincerely apologize that you are having to wrestle with these problems. I’ll ask Wade about the leaking at several places on your headers. A friend of mine is the owner of a local automobile exhaust shop, motorcyclist, and long ago built headers for a VF500. Side note: a year or so ago, I approached him about building our headers, but he declined. He uses the copper silicon in the photo below on all slip joints and potential exhaust leak spots. I’ve got to get my bike back together and check my production headers for leaks.

-
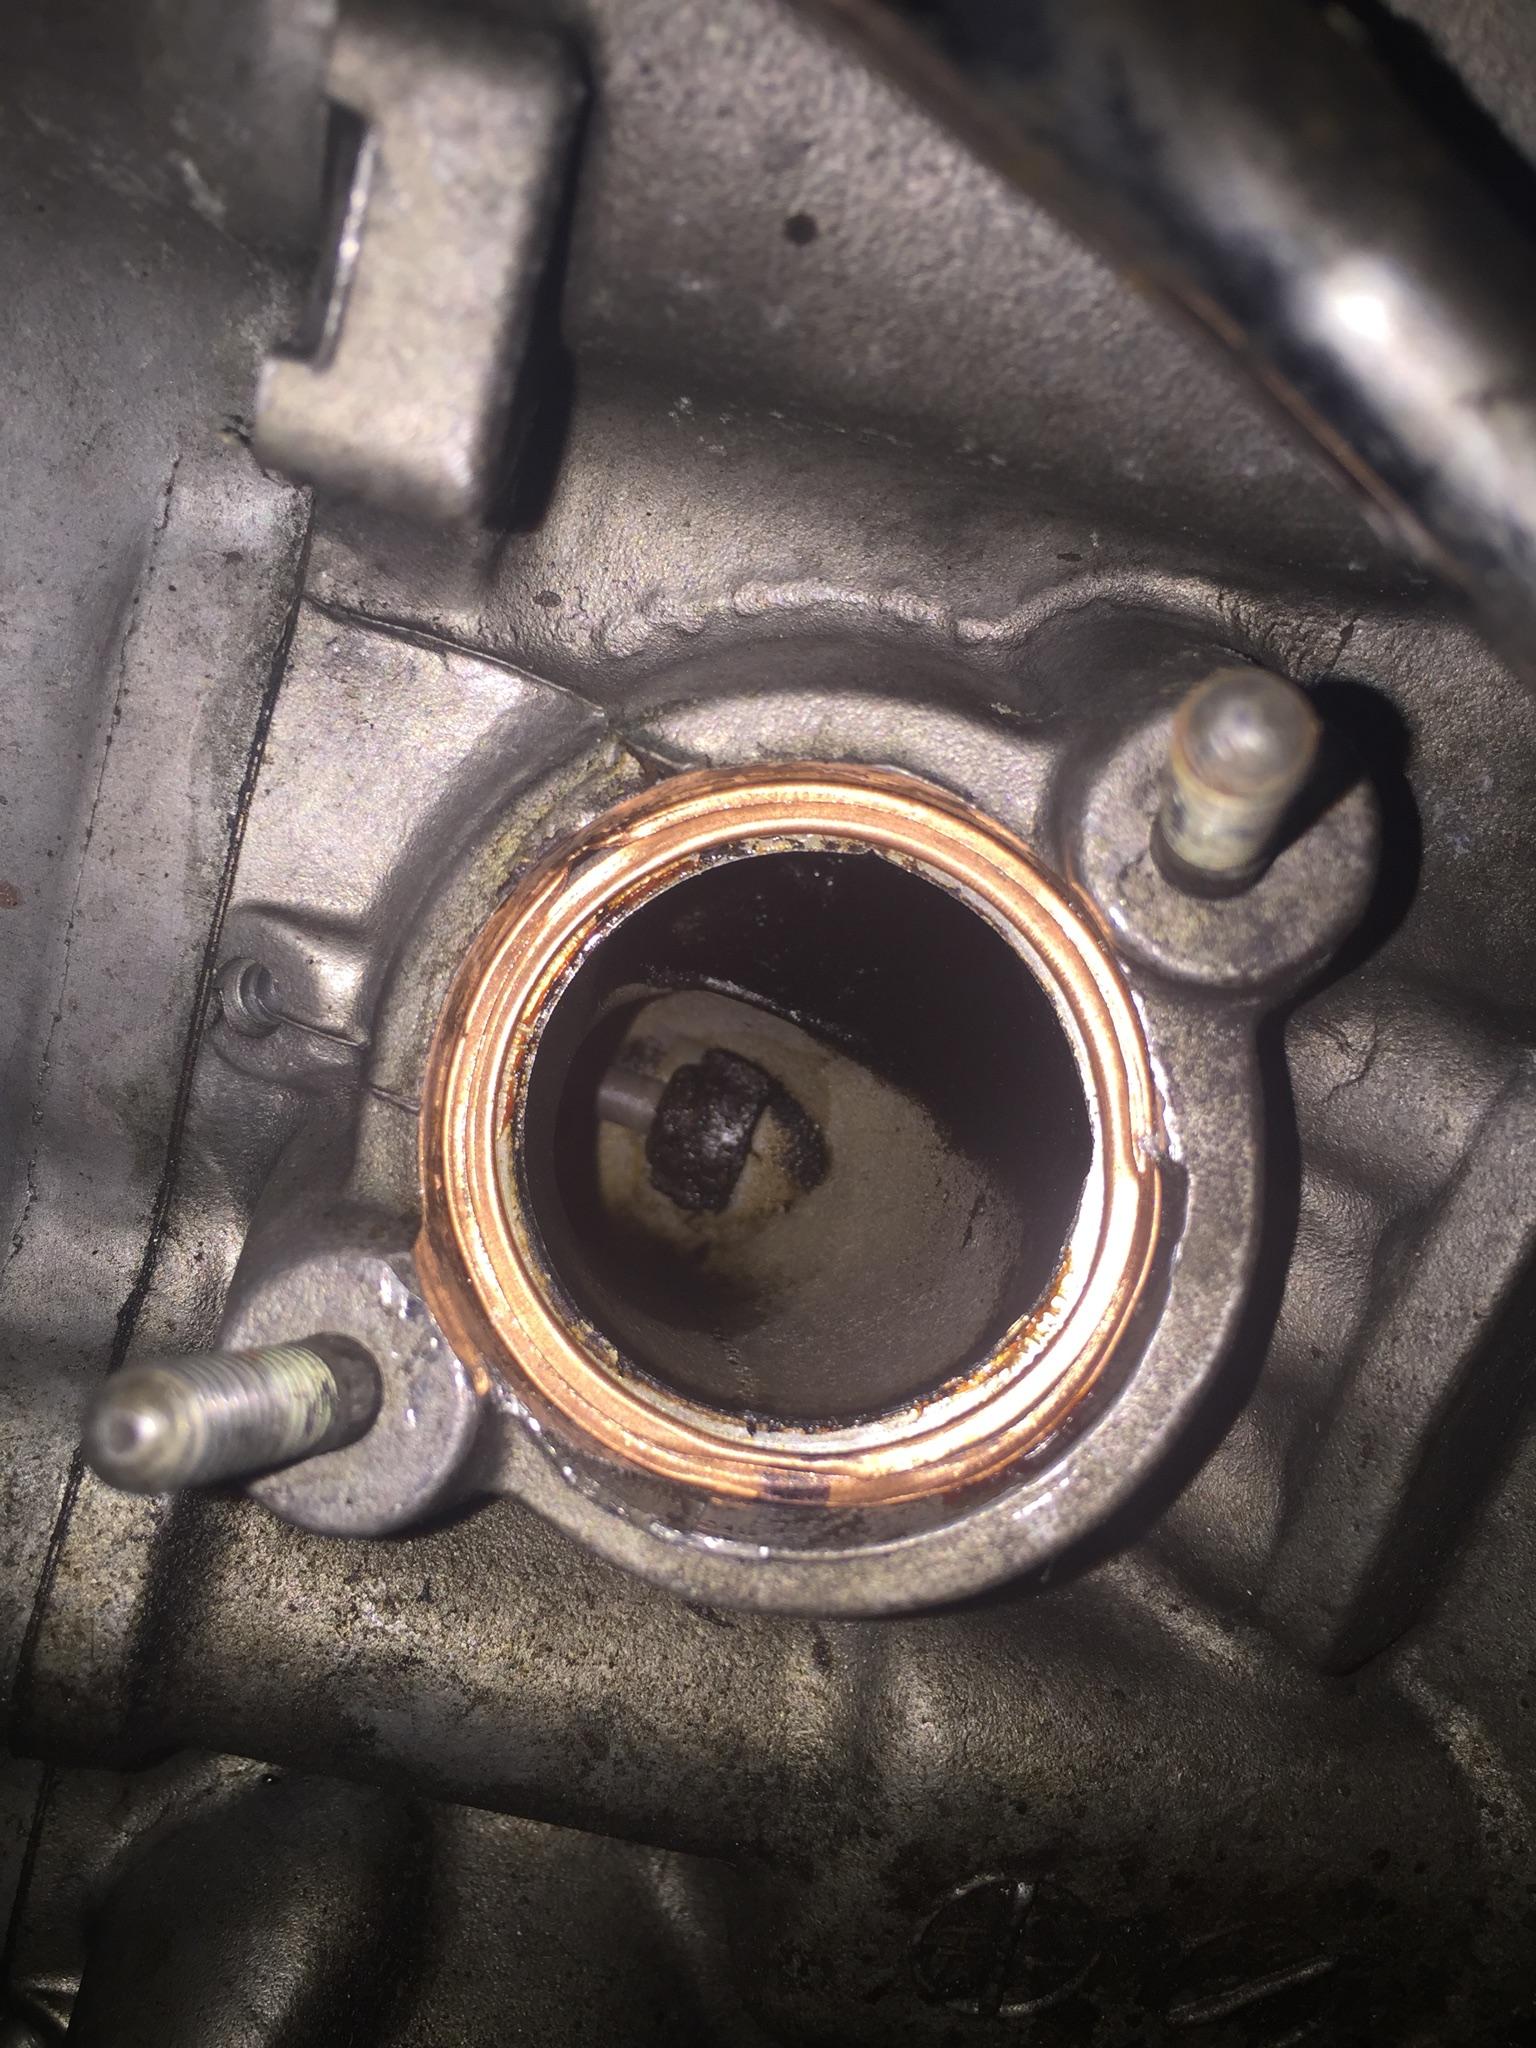
I’m late to the party, but this thread is probably the best example I’ve ever seen of our community in action. It’s like carlgustav has more than 6-7 experienced guys in his garage w him, and they can instantly run out to their own bikes to check stuff, then return to his garage. I don’t have much to add regarding fueling - I take good care of my bike, but still feel luckier every day that my 2001 w 60k miles just runs and runs. I can offer a bit of supporting evidence about possible leaks from Delk 42mm crush gaskets. When I’ve installed the new headers w Delk 42mm gaskets (seam side toward the head), they’ve always resulted in a crush and seal like the one in the photo below (photo is of a 5 gen) so I never kept close track of which gasket did what on which cylinder. It’s visible that the gasket seated further from the port at the lower right of the photo - that’s the part of the gasket that was last to go into place and really really didn’t want to go there without a fight. One thing that was clear was that the Delk 42mm gaskets are a bitch to get started on a 5 gen - on about 30% of 5 gen cylinders I had to let the headers do the final insertion. On the one 6 gen and one 8 gen where I’ve used them, the gaskets went into place with only a little wrestling and fewer curse words.
-

Different clutch slave cylinder sizes?
sfdownhill replied to Stray's question in Modification Questions
Thanks Buzzner. Sounds dodgy - glad you were able to nurse it home. My issue must be something else, probably one last air bubble I don’t know how to find/get rid of. -
Different clutch slave cylinder sizes?
sfdownhill replied to Stray's question in Modification Questions
Buzzner, what behavior does a master cylinder with a plugged return port exhibit? I’ve been chasing a soft-levered 5 gen delinked front brake system for ages, bled the system carefully multiple times, rebuilt master and calipers w OEM Honda parts, but didn’t know about a return port or how to check it. -
Thanks for doing the legwork to find Prismatic's Triple Bronze as a match for 8 gen accent colors. Did you try Triple Bronze out on a test piece before having all those parts coated?
-
New 5th/6th/8th gen performance header now in production in USA
sfdownhill replied to sfdownhill's topic in Exhaust Systems
Hi eyrwbvfr - I've recently changed my subjective preference from new headers with no bungs and PC3 on a 2000-2001 VFR to one bung in the collector exit and PC3. I changed my mind when Jozef - the dyno tech at Attack Performance - was pleased to find an 18mm bung in the collector exit of the 8 gen test headers. He gets more accurate readings from his Bosch wide band sensor inserted into a bung in the collector exit than he does with a 'sniffer' inserted down the tailpipe. A number of VFRD and VFRW members with 2000-2001s are getting good results with PC3, and some are happy with Rapid Bike fuel management systems. You may have read other posts in this thread that document the problems the 2000-2001s have with PCV - stay away from that device. An option would be to plan on headers with one bung for dyno tuning and obtain Dynojet O2 Optimizers to plug into your VFR's wire harness where the O2 sensors used to connect. There is a dyno chart earlier in this thread that has three graphs that pertain to your question: one graph line for baseline stock 5 gen, one with the headers installed but a zero map on the PC3 [zero map means the PC3 makes no changes to OEM fueling], and the third graph on the chart representing the headers with a custom tune done on the PC3. The timing for the next production run of 5/6 gen headers depends on when we gather an order for 15 units or more. A rough estimate for delivery of the next group of 5/6 gen headers is 10 weeks from now. -
New 5th/6th/8th gen performance header now in production in USA
sfdownhill replied to sfdownhill's topic in Exhaust Systems
Thanks for the generous offer, Dennis. We were able to put together a 6 gen slipon muffler assembly and test the headers with it. I bet your pipes sound better, though. -
New 5th/6th/8th gen performance header now in production in USA
sfdownhill replied to sfdownhill's topic in Exhaust Systems
Man, the folks on this forum come up with some of the coolest ideas! carlgustav, that perf metal is brilliant for prototyping - bends as easy as cardboard, but stays bent. -
New 5th/6th/8th gen performance header now in production in USA
sfdownhill replied to sfdownhill's topic in Exhaust Systems
Thanks! It's super cool of you to consider loaning us a set of pipes as nice as your Leos. We did manage to get the 6 gen onto the dyno, and the associated muffler project was a trip which will be detailed in a separate thread soon. -
New 5th/6th/8th gen performance header now in production in USA
sfdownhill replied to sfdownhill's topic in Exhaust Systems
Here are a few notes spawned by MooseMoose's awesome, informative, and more than a little amusing installation thread. If you purchased headers, or think you might, or think you might ever install a set of any headers in your life, you can find MooseMoose's thread here: And this is a bit of extension/extrapolation on his findings: +1, +2, +3 on all the compliments for MooseMoose's detailed documentation of his header install odyssey! Great work, and thanks to him for all the extra time he put into sharing so much pertinent information with the community. Here are a couple observations/additions that occurred while reading his thread: - Header stud nuts, torque, and anti-seize Confirmed: 9ft-lbs is more than enough to hold things together ESPECIALLY if using anti-seize. I bent flanges on the prototype headers when I used anti-seize and torqued the nuts to 9 ft-lbs. I suspect that at 9ft-lbs, the lubrication component of the anti-seize allows greater force to be exerted than 9ft-lbs on 'dry' threads with no anti-seize. I have chosen to wipe the anti-seize from the studs' threads on the 4 VFRs I've been using for the header project. I say 'wipe off' because I just remove what will come off with a rag and do not clean with any cleaner or solvent. Who knows, there might be enough residual a-seize left to do just enough good. CAUTION 6 GEN OWNERS: in the list of torque values on page 2-3 of the 6 gen service manual, Honda states 'exhaust pipe flange nut' 15 ft-lbs. This is NOT the nut NOR the torque value of the header stud nuts we use to hold our headers to our heads. That sounded weird, but this problem with Japanese-to-English translation has caused one owner of new headers to overtorque the header stud nuts. Thankfully, no damage occurred. Honda calls the header stud nuts 'Special Nuts', which sounds like a breakfast cereal one would eat while listening to MooseMoose's fictional band 'Overtorqued Nuts'. [Actually Honda calls them 'exhaust pipe joint special nuts' and specifies their torque value at the aforementioned 9ft-lbs] Later in section 2 of the 6 gen manual the exhaust component torque values shown on the drawings are correct. Be patient with the special nuts. As MooseMoose suggests, make circuits around all the nuts starting when they are all just finger tight. I've had 9-10 shots at removing and installing headers recently, and this procedure works best for me: Once all 8 nuts are finger tight using a socket on extensions but no wrench, go through all 8 nuts in a circuit around the bike, adding 1/2 turn of tension. This takes a fair amount of time, but keeps all the exhaust components gently easing together into their happiest states. As soon as a 1/2 turn begins to require more tension - this will happen on one or two nuts before it happens on the others - switch to the torque wrench and set it at 5 ft-lbs. Go around another circuit of all 8 nuts, adding another 1/2 turn only where necessary until all 8 nuts reach 5 ft-lbs. Change the torque wrench setting to 6 ft-lbs and go around again, taking each nut up to 6 ft-lbs. Change the wrench's setting to 7 ft-lbs, rinse and repeat. On both 5 gen test bikes, going from 7 ft-lbs to 8 ft-lbs required only a tiny bit of wrench rotation, and going from 8 ft-lbs to 9 didn't produce any movement at all - I believe this is because the nuts were tight enough at 8 ft-lbs, and probably would have been safely secure at 7 ft-lbs. On the 8 gen test bike, the nuts stopped moving at 8 ft-lbs instead of 7 ft-lbs. Wade laughs at me when I crawl around the perimeter of a VFR with a torque wrench, carefully setting each nut. He says "Just tighten 'em until they stop crushing the gasket!". I guess with as much experience as he has, he can confidently 'feel' when the gasket stops crushing. I've chosen to stay with the torque wrench...it is my friend. -
New 5th/6th/8th gen performance header now in production in USA
sfdownhill replied to sfdownhill's topic in Exhaust Systems
Yep, that's originally why I wanted to coat them. Vanity. Pure vanity. And that is the rub - a question that was brought up is "How does a professional applicator effectively coat the insides of multiple, connected bendy tubes?" Answer: A coating company Duc2V4 told me about [Thank you Duc2V4] has devised a simple method of coating the inside of headers. This is so simple and of such quality that at first I thought the idea must have come from Mohawk. They plug the ends of the headers and pour the tubes full of the same ceramic coating that they apply to the tops of pistons, then they pour out the excess material before curing the headers. And yes, standard ceramic coating on the outside of headers is thin...so thin that it is described as mechanically delicate [scratches easily]. The coating place also explained that different colors of the same ceramic coating product have different mechanical strengths - silver is toughest and most scratch resistant, black is weakest and scratches easiest, titanium [the color, not the metal] is somewhere in between, but closer to silver in strength. -
New 5th/6th/8th gen performance header now in production in USA
sfdownhill replied to sfdownhill's topic in Exhaust Systems
Hey Nick - sounds good. Sorry to have taken so long to reply - I've been neglectful due to needing to get caught up with the day job and real life. A few guys have placed deposits on 5/6 gen headers for the 3rd production run, so that will be the next undertaking after the 8 gens get finished. -
New 5th/6th/8th gen performance header now in production in USA
sfdownhill replied to sfdownhill's topic in Exhaust Systems
6 gen headers have had 5/8" cut off the collector exit, so it may very well be possible to slip the headers on over an installed center stand. The three-point fastening of the 6 gen muffler system won't fit correctly with the stock 5 gen collector length. If you've ever wrestled a set of 6 gen mufflers onto a set of 98/99 OEM headers, you know exactly what I'm describing. -
Installing the new performance header on 5th gen
sfdownhill replied to MooseMoose's topic in Exhaust Systems
+1, +2, +3 on all the compliments for MooseMoose's detailed documentation of his header install odyssey! Great work, and thanks to him for all the extra time he put into sharing so much pertinent information with the community. Here are a couple observations/additions that occurred while reading this thread: - Header stud nuts, torque, and anti-seize Confirmed - 9ft-lbs is more than enough to hold things together ESPECIALLY if using anti-seize. I bent flanges on the prototype headers when I used anti-seize and torqued the nuts to 9 ft-lbs. I suspect that at 9ft-lbs, the lubrication component of the anti-seize allows greater force to be exerted than 9ft-lbs on 'dry' threads with no anti-seize. I have chosen to wipe the anti-seize from the studs' threads on the 4 VFRs I've been using for the header project. I say 'wipe off' because I just remove what will come off with a rag and do not clean with any cleaner or solvent. CAUTION 6 GEN OWNERS: in the list of torque values on page 2-3 of the 6 gen service manual, Honda states 'exhaust pipe flange nut' 15 ft-lbs. This is NOT the nut NOR the torque value of the header stud nuts we use to hold our headers to our heads. That sounded weird, but this problem with Japanese-to-English translation has caused one owner of new headers to overtorque the header stud nuts. Thankfully, no damage occurred. Honda calls the header stud nuts 'Special Nuts', which sounds like a breakfast cereal one would eat while listening to MooseMoose's fictional band 'Overtorqued Nuts'. [Actually Honda calls them 'exhaust pipe joint special nuts' and specifies their torque value at the aforementioned 9ft-lbs] Later in section 2 of the 6 gen manual the exhaust component torque values shown on the drawings are correct. Be patient with the special nuts. As MooseMoose suggests, make circuits around all the nuts starting when they are all just finger tight. I've had 9-10 shots at removing and installing headers recently, and this procedure works best for me: Once all 8 nuts are finger tight using a socket on extensions but no wrench, go through all 8 nuts in a circuit around the bike, adding 1/2 turn of tension. This takes a fair amount of time, but keeps all the exhaust components gently easing together into their happiest states. As soon as a 1/2 turn begins to require more tension - this will happen on one or two nuts before it happens on the others - switch to the torque wrench and set it at 5 ft-lbs. Go around another circuit of all 8 nuts, adding another 1/2 turn only where necessary until all 8 nuts reach 5 ft-lbs. Change the torque wrench setting to 6 ft-lbs and go around again, taking each nut up to 6 ft-lbs. Change the wrench's setting to 7 ft-lbs, rinse and repeat. On both 5 gen test bikes, going from 7 ft-lbs to 8 ft-lbs required only a tiny bit of wrench rotation, and going from 8 ft-lbs to 9 didn't produce any movement at all - I believe this is because the nuts were tight enough at 8 ft-lbs, and probably would have been safely secure at 7 ft-lbs. On the 8 gen test bike, the nuts stopped moving at 8 ft-lbs instead of 7 ft-lbs. Wade laughs at me when I crawl around the perimeter of a VFR with a torque wrench, carefully setting each nut. He says "Just tighten 'em until they stop crushing the gasket!". I guess with as much experience as he has, he can confidently 'feel' when the gasket stops crushing. I've chosen to stay with the torque wrench...it is my friend. -
New 5th/6th/8th gen performance header now in production in USA
sfdownhill replied to sfdownhill's topic in Exhaust Systems
Best, simplest idea yet. And it wouldn't have to hang a single thing on the 6 gen midpipe. 5 GEN RIGHT SIDE CENTER STAND BOLT IS REGULAR RIGHT HAND THREAD HighSideNZ - you are correct about 6 gen 8 GEN RIGHT SIDE CENTER STAND BOLT IS REVERSE LEFT HAND THREAD [Recent experience with dyno test bike] -
New 5th/6th/8th gen performance header now in production in USA
sfdownhill replied to sfdownhill's topic in Exhaust Systems
I hear you, Marv! All my dreams of modifications/upgrades are temporarily on hold too. What gen VFR do you have? 8 gen headers are gathering orders for the next production run, probably 8 weeks to completion. After that, we’ll start another run of 5/6 gen headers, so somewhere along the line, headers will probably line up for you. -
New 5th/6th/8th gen performance header now in production in USA
sfdownhill replied to sfdownhill's topic in Exhaust Systems
You rock Wacken - thank you! -
New 5th/6th/8th gen performance header now in production in USA
sfdownhill replied to sfdownhill's topic in Exhaust Systems
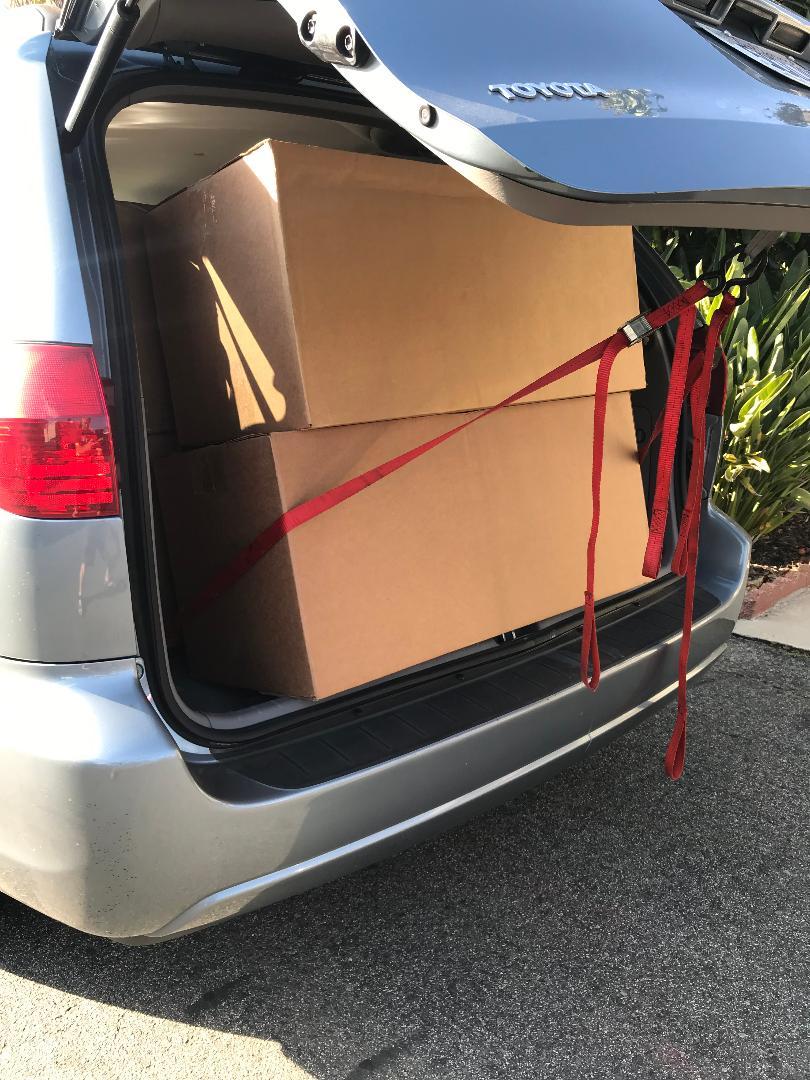
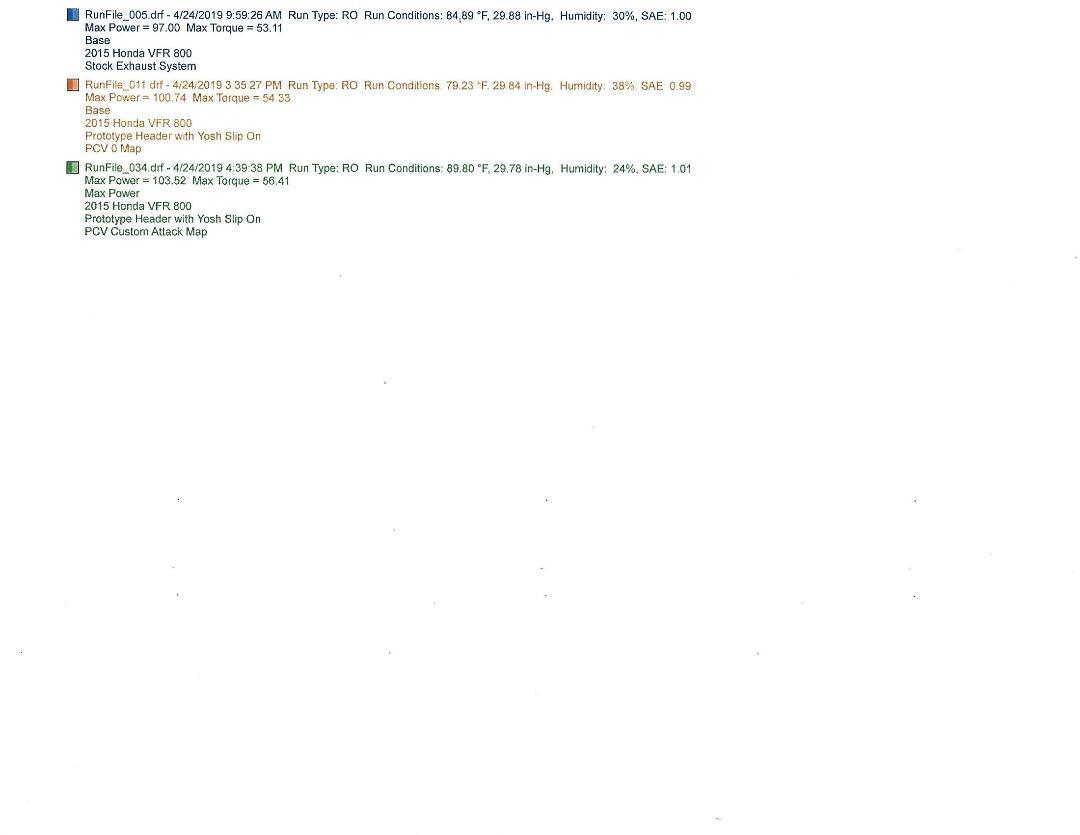
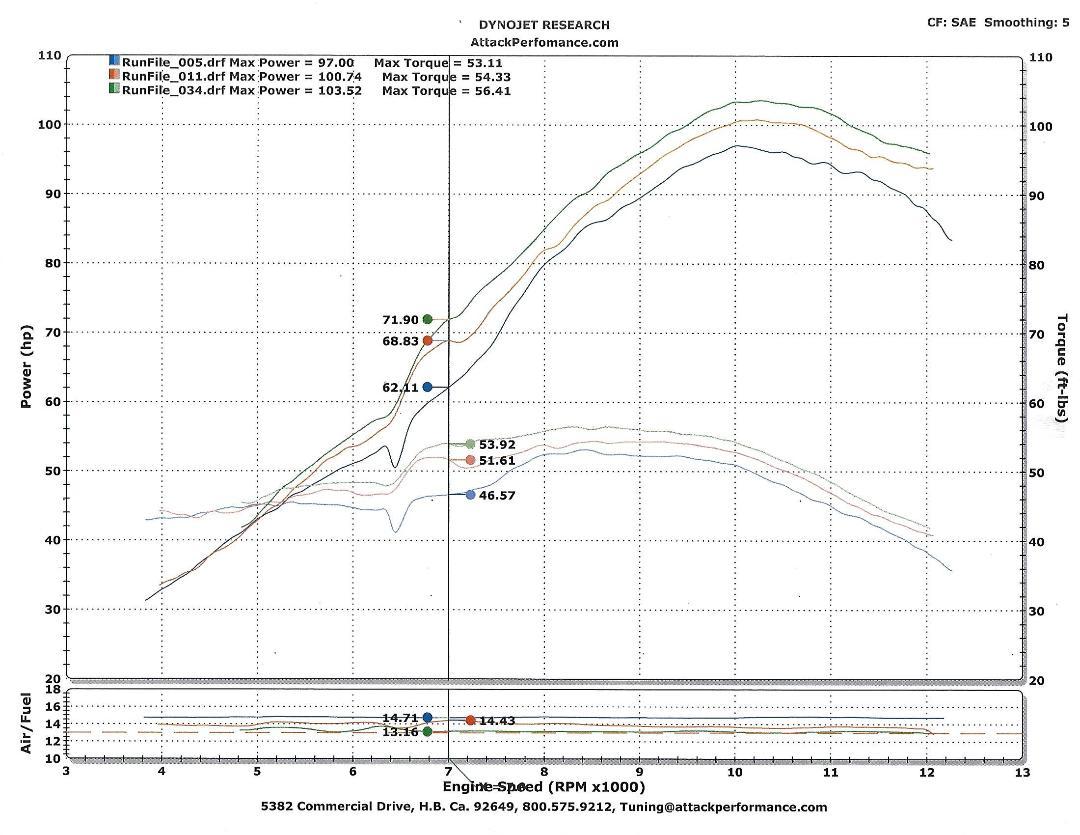
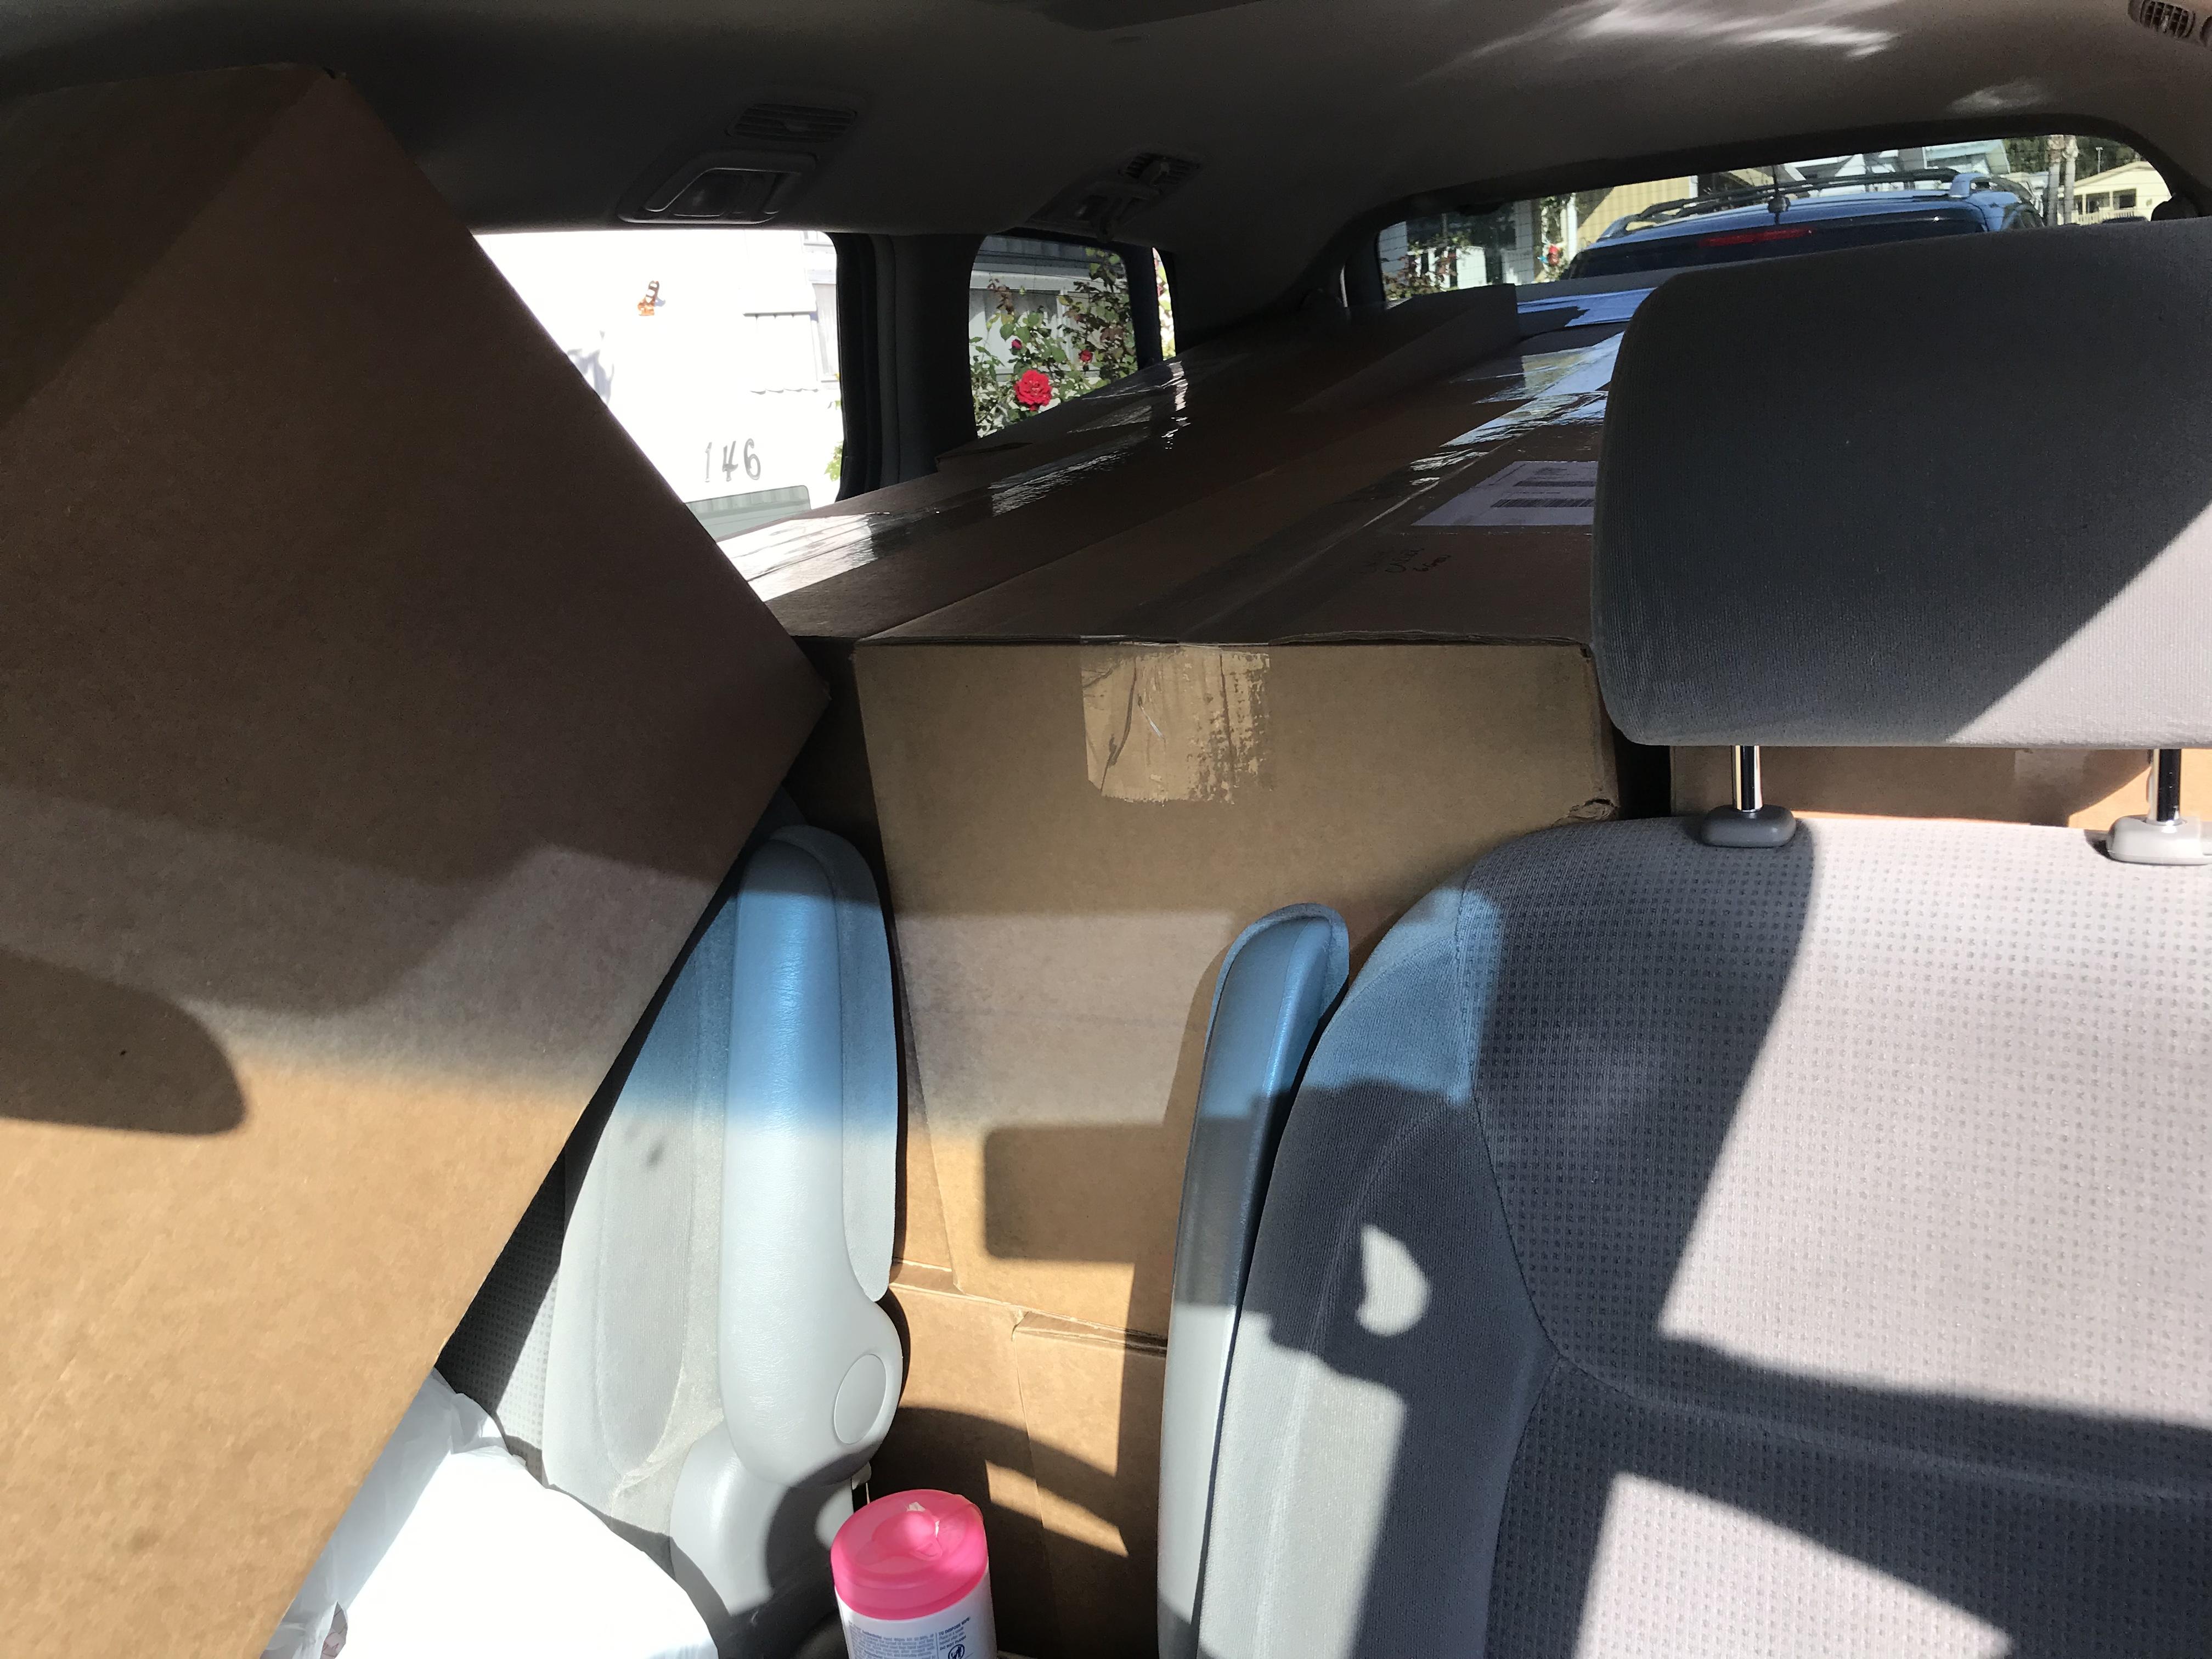
Duc2V4 and I got the first nasty surprise of this project when we went to pay Wade the balance due and pick up the headers VFRD members had ordered and paid for. Our group had ordered a total of 24 sets of 5/6 gen headers, but the amount due was the balance on the cost of 25 headers. The extra cost - $760, equal to the price of one set of headers at the beginning of the project - was Wade's charge for building the fixture/jig from which the headers were built. This blindsided Duc2V4 and I more than a bit, but it became clear that Wade was not pulling a fast one; he simply charges one unit cost to build a jig. We simply had not understood this until the eleventh hour. We were 130 miles from home, and were not going to be able to take delivery of our 24 headers unless the fixture charge was paid along with the cost of the headers. Duc2V4 stepped up big time and personally paid the $760 fixture charge. This was above and beyond the set of headers he was getting for his 5 gen. He saved us all from a minimum two week delay to sort out the additional cost and ask all purchasers for an additional payment. Here is my request: Most of us are going to receive our headers this week, so this is a good time to ask that each of us who ordered headers now send Duc2V4 $32 per set of headers to pay him back. I used my personal paypal to send $32 to Duc2V4 at the vfrheaders@gmail.com paypal account. [$32 is the nearest whole dollar amount to $760 divided by 24 - the number of headers we ordered] Thank you very much, everybody. On to 8 gen headers. The good news is that we now know Wade will charge us the cost of one set of headers for building the 8 gen header fixture/jig. Dividing this $790 cost by an estimated 20 sets of headers means the cost of 8 gen headers has become $830 per set. As Duc2V4 and MooseMoose have described, we got the headers on their way to their happy new homes. I couldn't find any clowns to stuff into my van this past Monday, so instead attempted to find out "what is the maximum number of boxed headers that can fit into a Toyota Sienna?" Thank god motorcycling requires having tiedowns on hand... The answer to the question "how many boxed headers fit into a Toyota Sienna?" is 15 if a human is driving, 16 if one of the boxes drives. On to more important things. One look at the front primaries on these headers and you'll know what this means... That's right - it's 8 gen time, and dyno day is just around the corner [EDIT - 8 gen dyno day was today 4/24/19]. Further updates will be available [posted] the following business day, or soon after that. Moosemoose, carlgustav, Hammerdrill, and Duc2V4 have helped compile a few pointers for installing the new headers and we will get those posted along with photos of 8 gen fitment sessions. So briefly, here is the 8 gen dyno chart with Runfile 005 baseline, Runfile 011 new headers installed with zero map in PCV, and Runfile 034 the final result of tuning the 8 gen with PCV and new headers: But that chart is not the best part of the dyno results, the chart below is the best part. Jozef inserted a reference line at 7000rpm to isolate the improvements in midrange. Horsepower at 7000rpm went from 62.11hp with stock exhaust to 71.90hp tuned with new headers - that's a huge bump right where a great deal of our fun is to be had. Torque at 7000rpm increased from 46.57ft-lbs stock to 53.92ft-lbs tuned. Schweet!
-
New 5th/6th/8th gen performance header now in production in USA
sfdownhill replied to sfdownhill's topic in Exhaust Systems
Hi Viffer - got your PM, response sent. Cheers -
New 5th/6th/8th gen performance header now in production in USA
sfdownhill replied to sfdownhill's topic in Exhaust Systems
Thanks Samuel! I hit Jozef up for motogp paddock passes through Attack, but theirs were already spoken for. It will be a blast any way we slice it - even the rainy free practice tomorrow morning. -
New 5th/6th/8th gen performance header now in production in USA
sfdownhill replied to sfdownhill's topic in Exhaust Systems
This is true, HighSide. and as Wade and I discovered, getting a fat, non-crossover cyl #1 primary tube (left rear) past all the 8 gen hardware that Honda nestled in around the stock headers has proven to be a bit of a rub - solveable, but not solved yet. Also to be noted is the difference in 02 sensor size - 12mm for stock 8 gen and 18mm for 5/6 gen and Bosch wideband sensors. We’ll have to get a plan together for 8 gen bung size. Wade is highly in favor of a single choice for 8 gen headers: get a single bung, single size, single placement or no bung at all. -
New 5th/6th/8th gen performance header now in production in USA
sfdownhill replied to sfdownhill's topic in Exhaust Systems
We barely got the mufflers done in time, but we’d already test fit them two weeks ago after gutting them, before working on their internals. They will be finished in black and have black OEM heatshields trimmed and bead rolled to wrap around the trailing edges of the mufflers. Muffler mod will be covered in a separate thread. B8259217-2C5C-442B-8128-55AEF70AC069.MOV C53ED7DF-A6CE-4028-A6C3-520CA98A26EC.MOV -
New 5th/6th/8th gen performance header now in production in USA
sfdownhill replied to sfdownhill's topic in Exhaust Systems
Yep - Hammerdrill only lives 6 miles from Attack, so he rode his VFR to and from the session. After he got home he texted “Hey! Now I can wheelie on this bike!” And dang! Forgot about ignition mapping and how it helps the 6 gen. Does PCV have ignition mapping onboard, or does it require an add-on module? -
New 5th/6th/8th gen performance header now in production in USA
sfdownhill replied to sfdownhill's topic in Exhaust Systems
You and all the other guys with supercharged 6 gens!