HighSideNZ
-
Posts
612 -
Joined
-
Last visited
-
Days Won
29
Content Type
Forums
Profiles
Gallery
Blogs
Downloads
Events
Everything posted by HighSideNZ
-
Hi wgregt Yep, please confirm my order for a set as long as the price is not excessive. Cheers Phil
-
Hi Count me in on a set as well. What year/model GSXR mirrors do we need? Cheers Phil
-
Those cone washers are called Belleville washers and they are usually stacked so if you have 4 of them the go like this. Bottom one has the high side pointing down. The next one has the high side point up. The next, high side down. Last one, high side up. Each washer deflects to give a combined load.
-
If you are using the 6th Gen ECU and loom you have to go with the 6th Gen 3 wire COPs, unless you can find another more suitable device. I looked but had no luck. Pretty much every other bike uses 2 wire COPs and there would need to be quite a bit of work needed to make them work on a 3 wire system. The 3 wire system has a - feed, a + feed (both constant when the ignition is on) and an exciter feed from the ECU that I believe goes high only for short periods of time. I spoke to an electronics engineer about building devices to drive these but decided that the work and introducing another point of failure was not what I wanted. Hence I stayed with the 6th Gen units. Phil
-
When I did my 5th Gen to 6th Gen conversion I used the 6th Gen COP unit and I did screw them down to the cam covers. You can see what I did in this post. http://www.vfrdiscussion.com/forum/index.php/topic/75067-anyone-ever-reboredoverbored-a-56th-gen/page-14#entry967228 You also do need to keep the solenoid from the VTec valve connected to the loom as the impedance or something similar is needed by the CPU Apart from that the only other small issue is that the standard bottom radiator mounts that bolt to the heads, are positioned a little lower on the Gen 5 engine. No real problem but you do need to tweak them a little. Phil
-
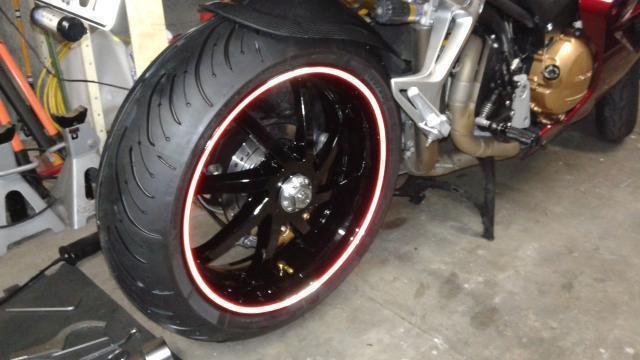
Well ran up 800km on the new wheel/axle assembly over the last 2 days in both peeing rain and fine weather. It went really well seems there are no problems that I can tell. I'll give it a good clean tomorrow and do a full check and make sure that nothing has moved.
-
Keef You are talking about a 5.5" wheel then? Not a 6"?
-
I hear where you are coming from. The chassis and engine design are not really the issues. It's the extraneous crap hanging of each end. The biggest problem with what I've just done is finding a wheel to suit! I was lucky with finding the wheel I did but they are like rocking horse poop.
-
Nah. Too much gold if I went gold wheels I think.
-
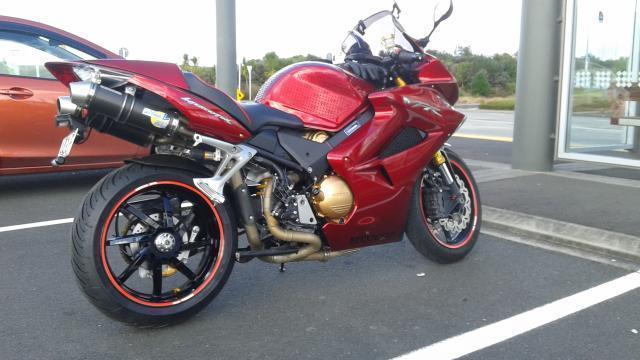
Here are a couple of shots of the complete bike. Left and right.

-
Well went for the first ride today, just to make sure everything held together. No problems at all, it all stayed tight and functioned as expected. Just need to bed the rear brake in and we should be all go. The whole driveline feels more taught with no play in anything as the urethane bobbins are a press fit into the sprocket carrier. Seems to be smooth down to about 3k rpm, then you need to drop a gear to pull away cleanly. I'll post a couple of full bike photos a bit later.
-
Hey thanks again guys. All the qudos for the initial ideas has to go to Mohawk though. Seems that red is the only colour you can get urethane. Even back in the '80s buying urethane bar stock, it was always red. Yep, agree, red and blue not the best combination. I've been toying with the idea of painting my front calipers gold as well since I did the new rear one. Gold, red and black really do go together well. Keef I take it you meant 190/50 is what you ended up with. 190/55 would be too high in the profile I thought. The 190/50 is about the same rolling radius as the original 180/55 that I was running.
-
Here is the link to Mohawks thread on the VFR400 rear axle and the cush drive. Sorry, I should have included this in the original post. http://www.vfrdiscussion.com/forum/index.php/topic/72914-custom-cush-drive-for-vfr800-vfr400-axle/ Cheers Phil
-
Thanks for all the comments. Yes the wheel 6.00x17 so I'm now running a 190/50x17 tyre. If the weather is good over the weekend I'll get it out for a test and take some full bike shots.
-
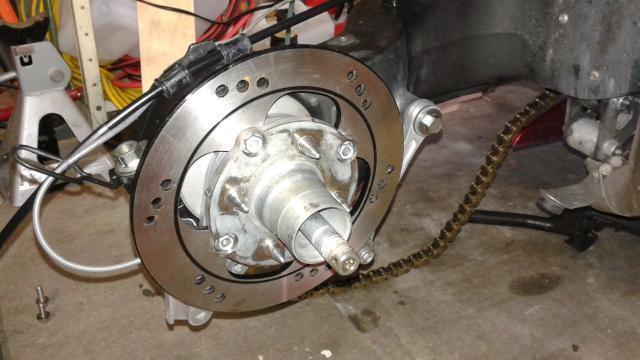
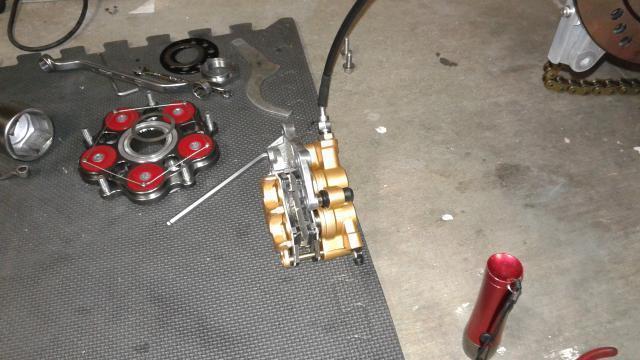
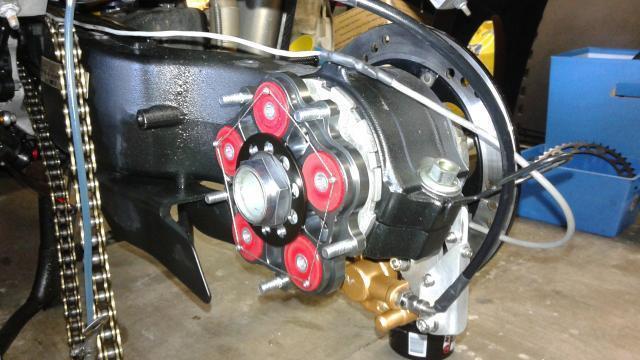
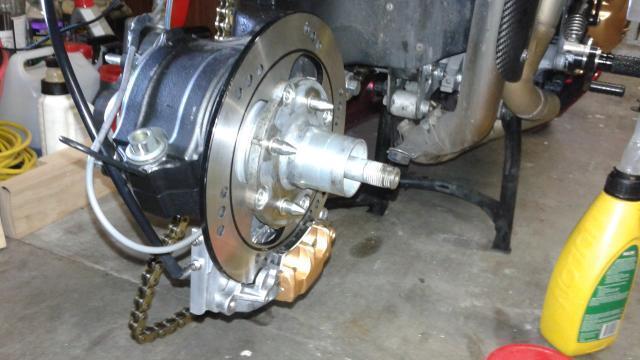
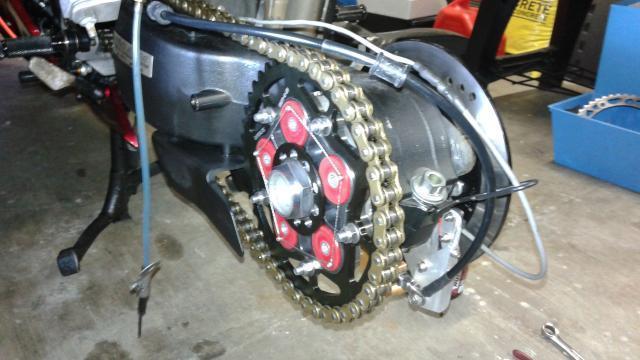
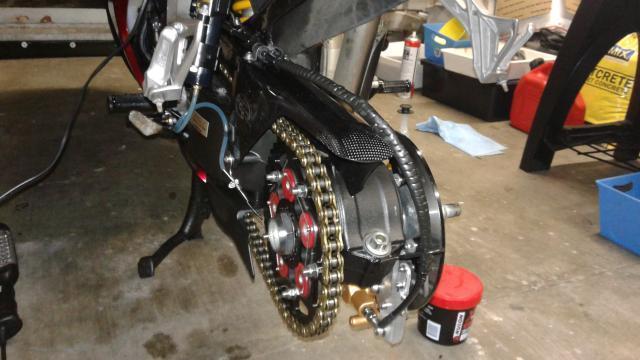
I've embarked on doing a single nut rear axle conversion to my 6th Gen/5th Gen VFR825. Mohawk did it a couple of years ago and I used his ideas but ended up with a brand new RC45 rear wheel instead of the carbon wheel like Mohawk. (Yep, I got hold of a pair of RC45 wheels that a guy has had in a cupboard unused since the mid nineties) The donor axle was a VFR400 and so is the caliper, disk, and caliper carrier. Had to get the taper spacer for the wheel and a new nut and shim, from an RC45 via Partzilla and Tyga Performance. When I started, I could not find a donor VFR400 (NC30) so I used an axle from an MC28 but found that the MC28 axle is made from lower tensile steel and it's internal profile is quite different and I felt weaker than the NC30 axle. I would advise anyone doing this mod to use the NC30 donor parts and not the MC28. The cush drive assembly is based on a Ducati quick change unit from JT and I've used a set of urethane bobbins instead of the genuine Ducati SilentBloc rubber ones. In the end this has shaved 3.0kg off the unsprung weight on the rear. The assembly drawing lists all the parts used including the part numbers and suppliers. If anyone wants to go down the same route, I've made a full set of CAD drawings and these, along with photos, are below. Disk and axle Cush Drive Assembly and Rebuilt/painted NC30 caliper Cush Drive and Axle assembled Caliper fitted All fitted up Chain guard/hugger fitted and brake hose/sensor cable bound RC45 wheel, Tyga spacer and Wheel nut Drawings Cush Drive Assembly.pdf Axle machining dwg 1.pdf Caliper Mounting Plate.pdf Cush Drive Backing Plate.pdf Cush Drive Retainer Washer.pdf Sprocket Carrier.pdf
- 96 replies
-
- 12
-

-
Rapidbike Evo And Racing Related Questions !
HighSideNZ replied to RapidBikeUSA's topic in Modifications
So I take it that you have the stock narrowband O2 sensors still connected to the RB module? I agree the standard map that cam with the module should make a significant difference to stock and that is what I've seen with any of the RB gear. Recheck everything and if you are running the stock O2 sensors make sure that the RBO2 tick box on the map settings page is ticked. Also check if the Average Cells box is ticked. If it is untick it. Make sure that you click the Apply button on any changes that you make. -
Rapidbike Evo And Racing Related Questions !
HighSideNZ replied to RapidBikeUSA's topic in Modifications
Before you pull it all apart just make sure that there are no leaks in the exhaust system. If there are leaks the O2 sensors will be put off and alter the map incorrectly. Also, try fattening up the map manually in the area where you are having the problem. Go quite big on the steps like richen it by +10 in the corresponding cells of the map. then give it another try. -
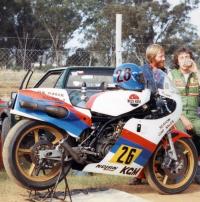
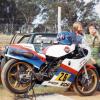
Just stumbled on this thread today. That bike has a lot of history on OZ. As far as I can remember it was one of two that were ridden by Anthony Goberts and Mal Campbell, both riders for Team Honda Australia. A rare and very interesting find.
-
Rapidbike Evo And Racing Related Questions !
HighSideNZ replied to RapidBikeUSA's topic in Modifications
Hi Mohawk Once I finish the pipes I'm heading that way. I've been talking to a guy here in Auckland that is just finishing off a dyno room with a brake dyno so I'm really interested in getting on to that instead of some DynoJet unit. The 825 is going really well now. I'll keep you posted. That is a pretty good looking graph. Was that a full brake dyno, or a DynoJet? Phil -
Rapidbike Evo And Racing Related Questions !
HighSideNZ replied to RapidBikeUSA's topic in Modifications
Well the unit arrived and I've fitted it and carried out a full test over the same route as before. Problem solved. Yippee! A big thank you to Yaman and Daniele at Dimport IT. I cannot fault their customer service. We tried everything possible to find the cause but in the end it looks like I got a faulty unit. Phil -
Rapidbike Evo And Racing Related Questions !
HighSideNZ replied to RapidBikeUSA's topic in Modifications
Well you wouldn't read about it but USPS's tracking site has my replacement bits from Yaman sitting in Santiago Chile. Mmmm. Not sure how they got there seeing my address is Auckland New Zealand. Bugger! -
Rapidbike Evo And Racing Related Questions !
HighSideNZ replied to RapidBikeUSA's topic in Modifications
I'll chime in on the customer service side of things here. As some will know, I've been having an issue with a surge in the 3500 to 5000 RPM range that I've not been able to fix. Came on after a biggg over rev where I thought I'd clipped some valves. I've been working with Dimsport in Italy on this and we pretty much exhausted all possible avenues bar replacing the RB Racing unit. To cut a long story short, Yaman has arranged a warranty replacement of the RB Racing and My Tuning Bike units. FOC. All I've had to do is get my units to him, and he is sending the replacements tonight NZ time. His service is second to none. A great guy. Just my 2 cents worth. Phil -
Rapidbike Evo And Racing Related Questions !
HighSideNZ replied to RapidBikeUSA's topic in Modifications
Yes, I was in the same boat as CandyRed and bought my original RB2 from Lenny. Took a while to get the goods and I had the same great experience with the RB2 compared to the PCV I ran previously. I then bought a second had RB3 from an R6 Yam and reprogrammed it for the VFR. That gave me twin maps and lots of other features. No where near as good as the RB Racing though. -
Rapidbike Evo And Racing Related Questions !
HighSideNZ replied to RapidBikeUSA's topic in Modifications
Hi Guys There is an update to the Rapidbike software (Version 2.6.9 or something like that) that gives new mappings and a change to the number of maps that you can run on the 6th Gen VFRs. They have changed the cyl numbering so as the correct cyl and pipes are mapped so as if you run 2 maps the OEM O2 sensors are correctly read. Phil -
Rapidbike Evo And Racing Related Questions !
HighSideNZ replied to RapidBikeUSA's topic in Modifications
Just an update on the My Tuning Bike and RB Racing. Yaman got back to me and advised that I should zero out the map and do about 100 miles and see how it goes from there so I did the following this morning. I went back to the factory supplied map and zeroed out all the low end cells, up to about 6000 rpm Went for a 200km ride and at about 100km checked the correction map. It was pretty big in some places and there were lots of corrections as you would expect. Saved the corrections in and kept riding. At another 60km I did the same thing. Then at the 200km point did a final check and added the corrections. At this point I turned off MTB with the map switch and rode home thru traffic and all the normal situations where surging is a problem if it occurs. It was great. No problems at all. Overall it is just sooo smooth. Give it a good run up to red line a very times and the corrections up top were not all that great but the bike pulls so well. One happy camper! So my thinking on using the map I made for the RB3 was a pretty stupid idea in hindsight. Just let the MTB build the map for you. I think the key is a good long ride and let it sort itself out early on. Make sure you have a very varied ride pattern so as it "sees" all of the variables involved with your road riding style. Phil