vfrqqq
-
Posts
167 -
Joined
-
Last visited
About vfrqqq

- Birthday 11/17/1979
vfrqqq's Achievements
")


-
:+1: :+1: and I don't think they've changed the price for the last four plus years or so.
-
 The only reason I recognize this road is because of Top Gear episode 1, season 10. Amazing road.
 -
What? No Torocharger option? :warranty:
-

Cam Chain Tensioner, Without Throttle Body Removal
vfrqqq replied to Tightwad's topic in Maintenance Guides
Of course, there are two CCTs and I haven't messed with the other one. I'll have to update once I do that. -
Cam Chain Tensioner, Without Throttle Body Removal
vfrqqq replied to Tightwad's topic in Maintenance Guides
Yes, quite true. Of course if I hadn't been so cavalier about taking about my new CCT I could have figured it out. D'oh! There has to be a way to find out what that tension should be right? I mean a dealership would need to know that if they were trying to repair a CCT. Then again maybe they would just replace it and stick you with the bill. Well, if anyone knows then it's the perfect way to fix a noisy CCT with $0 spent! -
Cam Chain Tensioner, Without Throttle Body Removal
vfrqqq replied to Tightwad's topic in Maintenance Guides
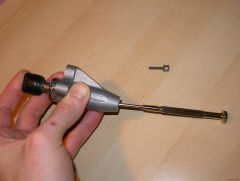
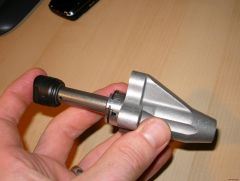
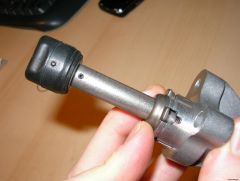
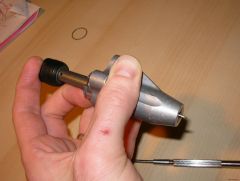
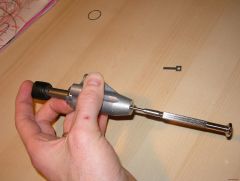
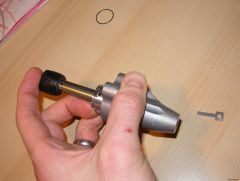
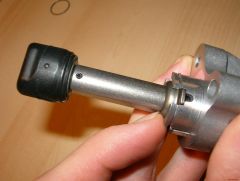
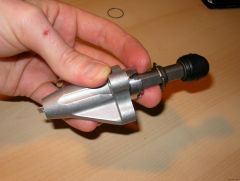
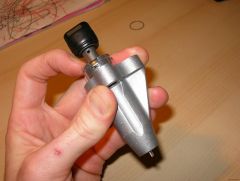
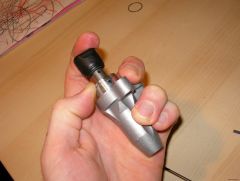
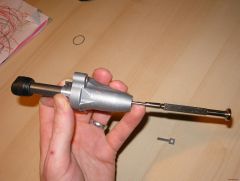
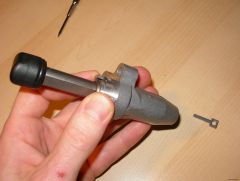
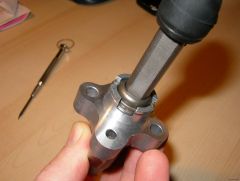
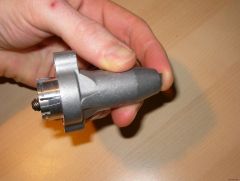
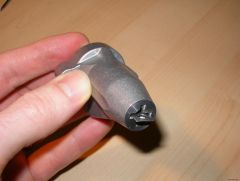
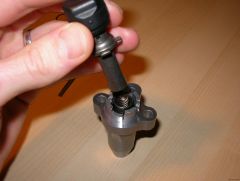
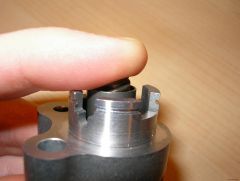
So after sitting down and figuring out how the CCT works I am a bit sad that I ended up spending the ~$100 on a new CCT to have at the ready for a replacement. I am sternly in the camp that CCTs DON'T "go bad" but rather only require adjustment. Ultimately, as Tightwad mentioned, all you really end up doing is increasing the tension on the spring that extends the tensioner shaft. This write up details how to adjust the tension on the CCT thereby preventing the need for a replacement. I took pictures of the new CCT that I purchased, however the procedure is no different with a CCT that has been removed by the correct procedure as detailed above. After you follow the directions for removing the CCT you may attempt to adjust the tension by this procedure instead of replacing. In the end I do not know how much tension is the right amount and basically just adjusted mine until I didn't have a noisy CCT anymore. 1. After your CCT is removed the tensioner shaft should be completely retracted and the stopper key in the end of the CCT body as shown below. SANY0014.JPG 2. Now you need to remove the circle clip that holds the locking tab in place (ignore the fact that the tensioner shaft is extended in this picture). I show here pushing it down toward the CCT body so that at the end you only just need to slide it back up into place. SANY0043.JPG 3. With the key still in place, slide the locking tab up the tensioner shaft and unscrew the shaft until it is almost fully extended and then lower the locking tab back into place. SANY0036.JPG With the locking tab in place and the shaft fully extended, the spring is effectively locked in place. SANY0037.JPG If the locking tab doesn't slide all the way into the slots then screw the shaft down until the locking tab fits all the way down into the four slots. Hold the locking tab down with a finger and remove the key from the back of the CCT. Shaft may move a bit, but should be at the end of its travel which thereby prevents the spring from unwinding. At this point the spring has about the same amount of tension on it as before it was removed, however the shaft is extended now and the tension on the spring can be increased. 4. To increase the tension on the spring insert a screw driver and turn it clockwise. As you do this the tensioner shaft will withdraw into the CCT body. SANY0039.JPG Now, how much tension you add to the spring is up to you. I do not know how much is the right amount. When I was messing with it I ended up releasing all the tension on the spring. From this point I chose 5 full revolutions on the spring for the tension I wanted (NOTE: you can really only get 4 revolutions at the most before you will need to reinsert the locking key, unscrew the shaft so that you can get the fifth full turn). I do not know how much tension this is relative to a normally, non-noisy CCT, however I do know that it no longer makes the knocking noise. This is due to the fact that there is now sufficient tension on the spring so that it is now able to keep the tensioner shaft forced up against the cam chain guide. If you do not end up releasing all the tension on the spring as I did then you may only want to add one or two full turns of tension to the spring and then return the shaft back to its original position. Is it pushing too hard? I don't know and you will have to use your own judgment on this. 5. After you have adjusted the tension to your liking keep pressure on the tensioner shaft stopper and insert the locking key into the CCT. SANY0040.JPG 6. repeat step 3. You have now added tension to the spring and have the shaft extended all the way out. 7. Remove the key and insert the screwdriver. Withdraw the tensioner shaft all the way, put pressure on the shaft and insert the key back into the CCT. SANY0045.JPG SANY0046.JPG 8. You are now ready to reinstall the CCT back into the motor. From my understanding of the mechanics of the CCT I believe that using a lighter oil may keep a noisy CCT from being noisy. The spring in the CCT is quite has many windings and using a heavier oil will increase the amount of friction between the windings in the spring. If the spring has already lost a bit of its tension then the additional friction will prevent it from extending the tensioner shaft that much more. A lighter oil will reduce the friction, however, in the end, the spring has still lost some tension and likely needs to be wound up a bit. If this doesn't clear it up I would recommend either purchasing a new CCT and fiddling around with it or pulling an existing CCT from your motor (make sure you count the number of turn before all tension is released from the spring!!) and figure it out. It is a neat little piece of engineering to figure out if you don't already know how it works. -
Wire harness recall pictures
-
-
:biggrin:
-
Wow. Gotta say that its rather expensive just for the coating. I mean I'm sure there was some R&D involved, or perhaps not, but their price point is way above my level of curiousity. I'm content with a plug kit.
-
Shouldn't the paint shop be paying for the replacement?
-
If You'd Like A Project, Just Break Your Bike
vfrqqq replied to vfrqqq's topic in Motorcycle Maintenance
So I just repaired the main wire harness that would've otherwise set me back $270. The ground wire that was damaged completely melted off it's insulation all the way up to the point shown in the image by the red circle. Wire harness goof up The picture is deceiving since splitting the harness up that far requires you to move the air intake box entirely. This was truly seemed very epic, but in the end it was just a matter of removing the connectors on the burnt wire and splicing in a new section of wire where needed. I am very interested to know exactly what the rectangular connector is on the main harness where the damage stopped. When I opened it up it seems like it is probably just a heat sink to prevent further damage if you are dumb enough to dump a whole bunch of current the wrong direction on your battery terminals :blush: . All the wires going into it were green so I'm guessing it was a massive tie-in point for all ground wires. Anyway, all is well. Thank God. -
With regard to how you would try to convice non-ATGATT riders to ride ATGATT I was trying to think of a good analogy and I felt that riding non-ATGATT is a very similar hazard/risk as if you were having promiscuous sex with multiple partners and didn't use prophylactics. This is really just to illuminate the absurdity of the "It's most likely not going to happen to me" mind set, which is easy to convince yourself of until, of course, it does happen to you. I know that if I didn't ride ATGATT I would feel quite naked, even with wearing everything else except for jeans instead of armored pants. I plan on commuting to work this summer on my VFR quite a bit and dress code at work is business/business casual. What do I plan on doing? Bringing my work clothes in one of my bags and then changing at work. I love riding, but I value my safety far more than convenience, slight improvements in comfort, etc. If it's too much of a hassle then I won't be riding to work.
-
If You'd Like A Project, Just Break Your Bike
vfrqqq replied to vfrqqq's topic in Motorcycle Maintenance
So after soldering the broken wire I found that my fuel pump is still working, :biggrin: Looks like I just gotta replace the harness. -
If You'd Like A Project, Just Break Your Bike
vfrqqq replied to vfrqqq's topic in Motorcycle Maintenance
Okay, so I guess I need to order the Canadian (CM) part 32102-MCW-A00? D00 and U00 are either england, europe, or france specific. -
If You'd Like A Project, Just Break Your Bike
vfrqqq replied to vfrqqq's topic in Motorcycle Maintenance
So I'm replacing the harness, however when ordering the part I see on the microfiche there are three part numbers 32102-MCW-A00 32102-MCW-D00 32102-MCW-U00 It seems that only 32102-MCW-A00 is called the Sub harness, fr., but do I also need D00 and U00?