
slowbird
-
Posts
368 -
Joined
-
Last visited
-
Days Won
9
Content Type
Forums
Profiles
Gallery
Blogs
Downloads
Events
Everything posted by slowbird
-

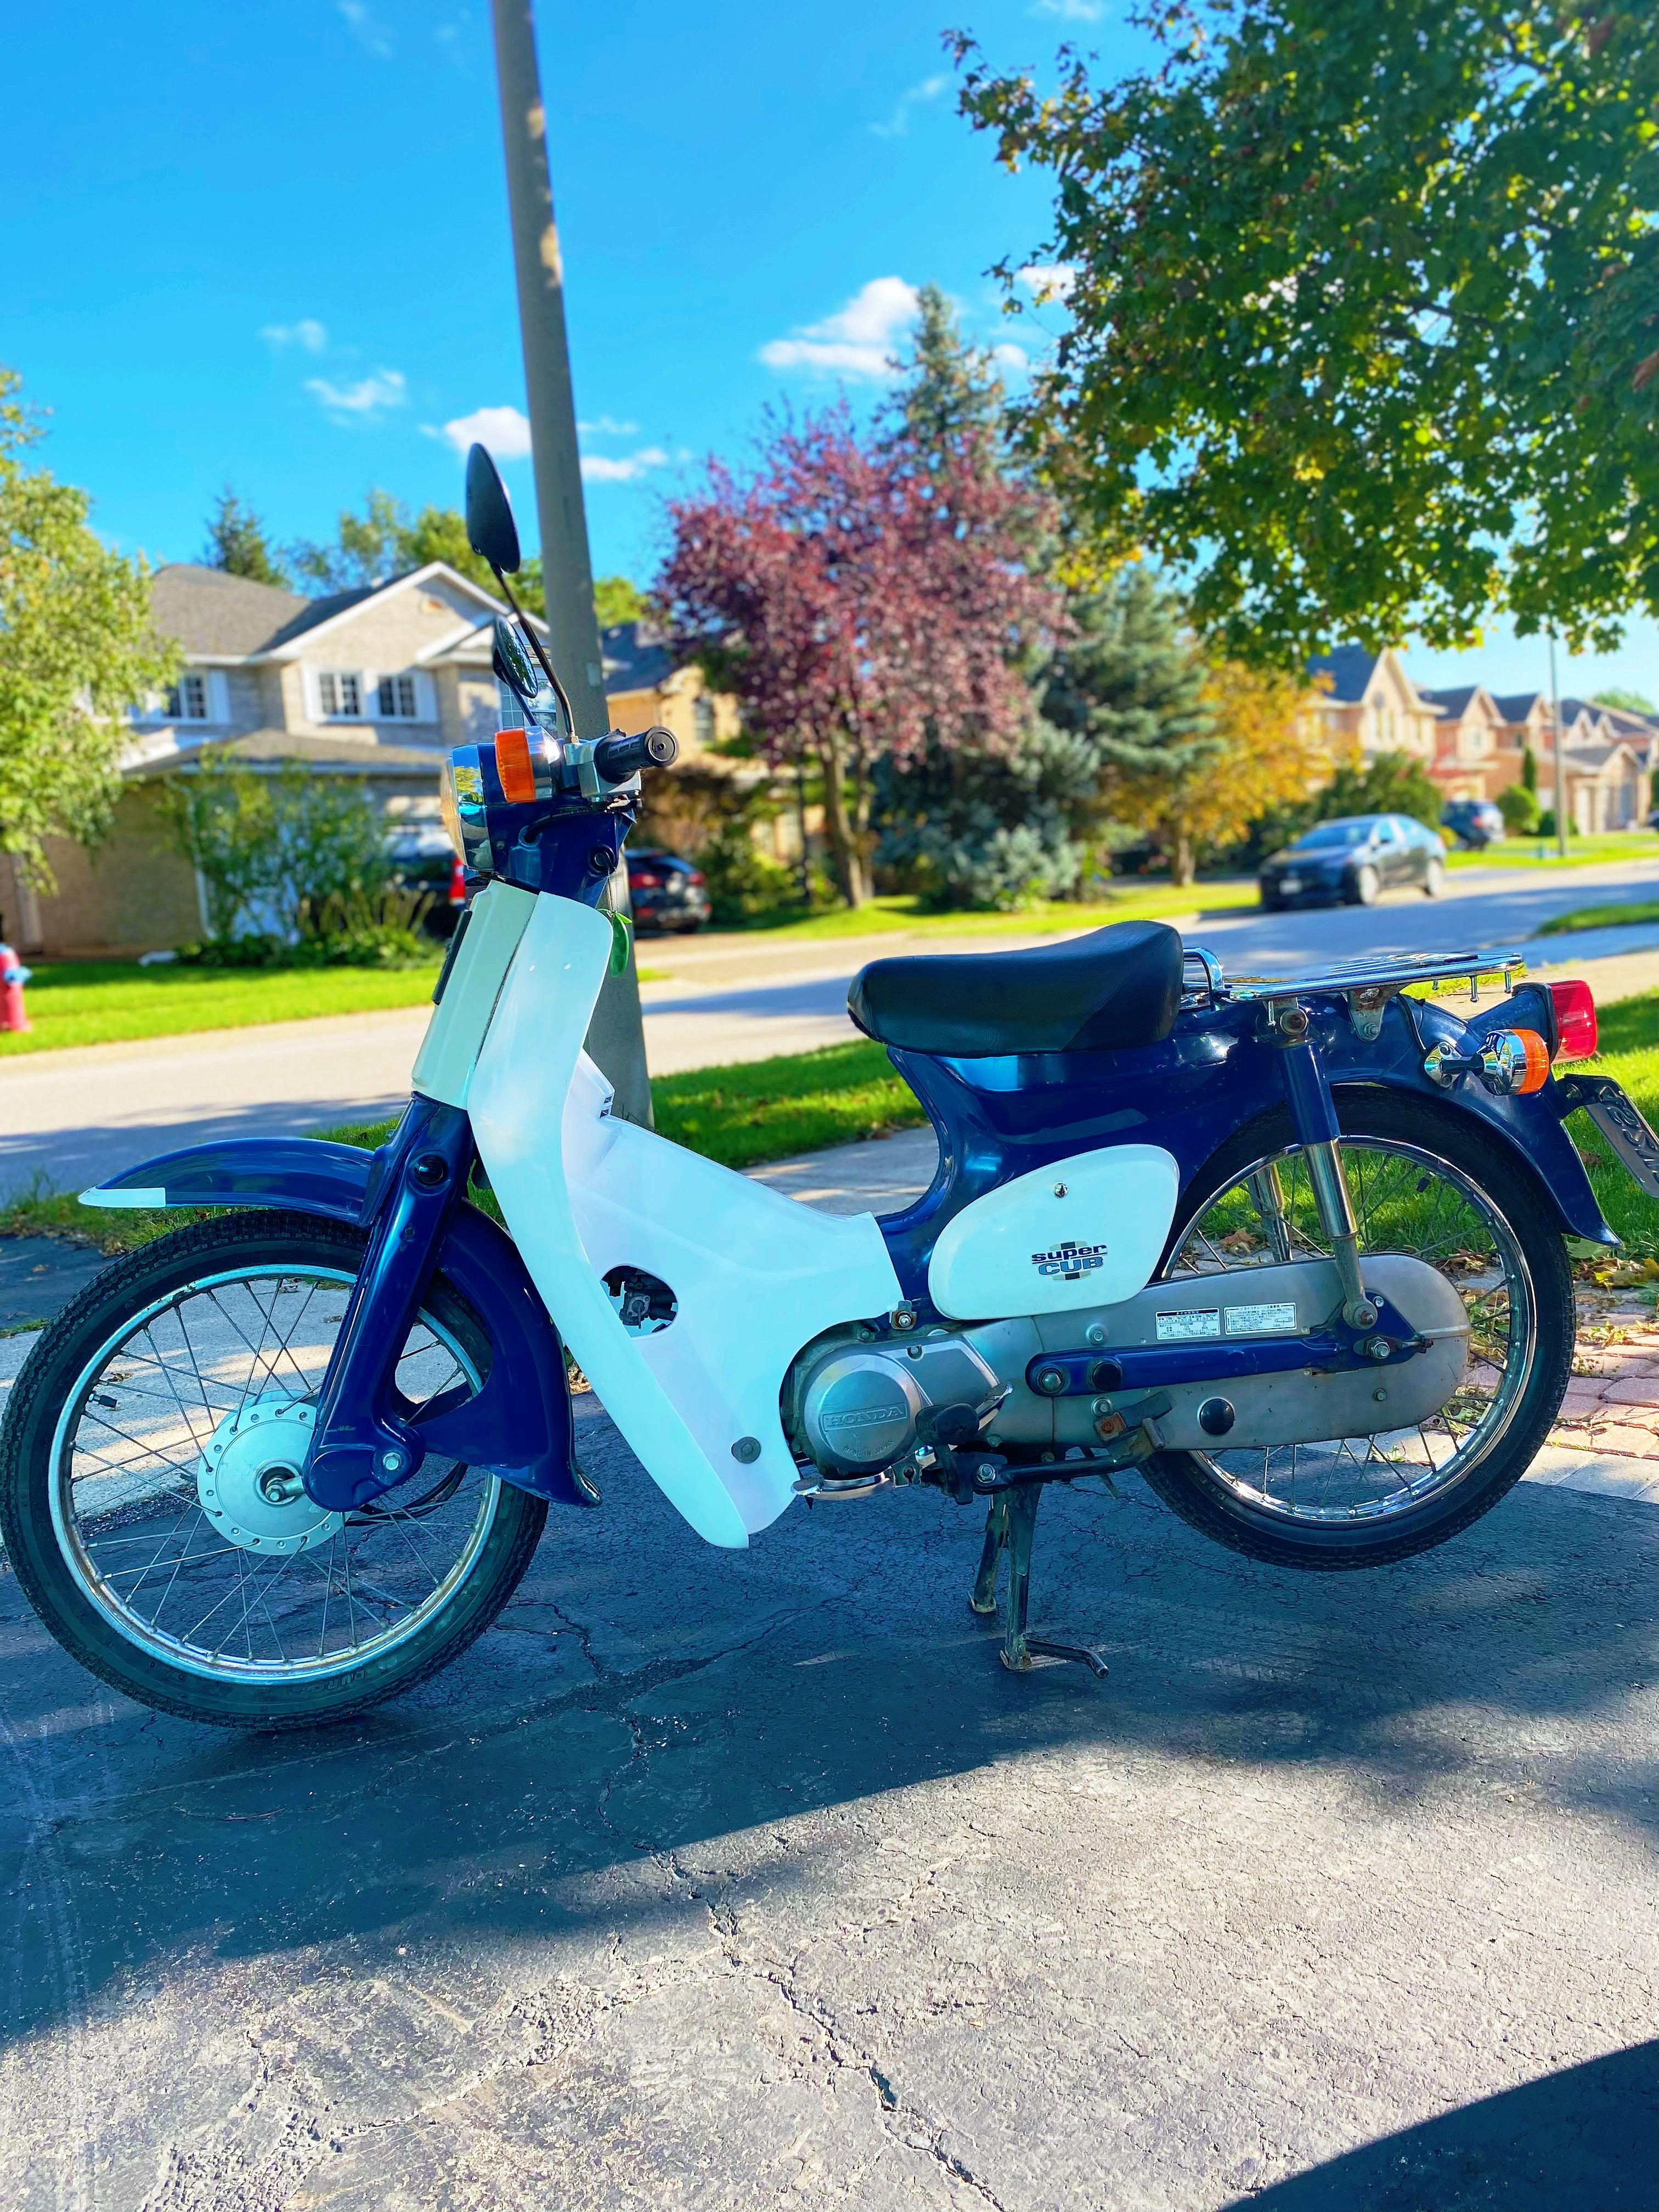
Bought an old Honda "super" bike
slowbird replied to slowbird's topic in OTHER Motorcycle Talk (non vfr)
So I've been riding the Super Cub a bunch. Haven't gone through a Full tank of gas yet. In the meantime I did some cosmetic stuff. I had already replaced the horribly scratched and scored turn signal: BEFORE: I don't know how that happened. AFTER: Much better 😎 Next was the headlight. It wasn't very clear and it had seen better days: The murkiness was on the inside of the headlight. I tried going in through the headlight bulb opening to clean it but didn't make much of a difference. Thankfully wife brought a spare from Japan. After some buffing I swapped the headlight out with a fresh bulb. Much better! But that front cover under the headlight with the yellowed white plastic and worn Super Cub Emblem is really bothering me. Researching how to restore faded white plastic apparently soaking in a solution of Comet powder helps. I tried that for a bit and it seemed to help a little. Another method was to rub a lemon all over the white plastic and leave it in the sun. That really seemed to do the trick. I also added a new emblem I found quite cheaply from Amazon.jp: BEFORE: Comparison: AFTER: Not too shabby if I do say so myself. The white isn't a perfect match to the Leg shield but it's much better I think. 😎 -
I wonder what it is about these Rotors that make them bend/warp so easily while non-5th/6th gen VFR's aren't as problematic. As I said before, I never had these issues with any of my other gen bikes, and a quick google search shows bikes that use the same Rotors suffering from the same.
-
Weak rotor carriers must be a 5th/6th gen thing. My 1st gen, 2nd Gen, and 4th gen never had these issues. yet my 5th gen and my 6th gen had warped rotors when I purchased them. No amount of Bobbin cleaning helped. I ended up replacing the rotors.
-
Bought an old Honda "super" bike
slowbird replied to slowbird's topic in OTHER Motorcycle Talk (non vfr)
We last left off with the bike running. I had topped off the tank with a Jerrycan to keep the fleshly cleaned tank brimmed with fuel to prevent any rusting and the bike sat for about a week in the garage. When I came back to work on the bike I couldn't get it to run. It would start a little but stumble and die. I pulled the leg shield off to look around and noticed the fuel filters weren't really filling with fuel. I wasn't sure if maybe the fuel lines weren't routed correctly but the tank was the highest point by far so I can't imagine even a slight upwards bend would prevent fuel from flowing. I opened the tank and peered inside. Looked fine. Both pick up tubes in there looked clear and unobstructed. I tried again and the bike fired up. Fuel filters filling nicely. Not sure what was wrong. My only idea is that maybe the tank isn't venting well? With the tank filled to the brim and the bike sitting in a hot garage it built up some kind of pressure and prevented the fuel from flowing freely? 🤷♂️ Maybe? Anyways, bike runs. I took the opportunity to shim that needle in the carb. I moved the clip one position up to its highest/leanest setting. It definitely feels smoother at part throttle now. An improvement for sure. Carb must be running a bit rich. I took it for a cruise around town. Put about 20ks on it. Feels good. One issue I'm having is when the bike is cold it won't start without messing with the throttle a bit. Once it starts I have to hold the throttle open a bit to keep it running until the motor warms up. After that it starts fairly easily. After riding it for some time I hopped off and tried setting the air screw. First I turned the idle way down, and then started turning the air screw. Going too far in would upset the bike but no matter how many turns out it doesn't seem to make a difference. I think for some reason perhaps the slow jet is too large.
-
Bought an old Honda "super" bike
slowbird replied to slowbird's topic in OTHER Motorcycle Talk (non vfr)
I did put the disassembled carb body and all of the jets/nozzles and other misc parts into the ultrasonic cleaner for quite some time. Afterwards I used a can of compressed air and blew air through all of the passages, crevices, and jets to ensure they were clear of any obstructions. -
Bought an old Honda "super" bike
slowbird replied to slowbird's topic in OTHER Motorcycle Talk (non vfr)
So Bike is back together. Brimmed the tank. Oil is good. Ready to go. Key on. 👍 Petcock to on. 👍 Unfold the kickstarter and start kicking. 🦵 kick. kick. kick. kick. kick. kick. kick. kick. kick. kick.kick.kick.kick.kick.kick.kick.kick.kick.kick.kick.kick.kick.kick.kick.kick.kick.kick.kick.kick.kick.kick.kick.kick.kick.kick.kick.kick.kick.kick.kick.kick.kick. kick.kick.kick.kick.kick.kick.kick.kick.kick.kick.kick.kick.kick.kick.kick.kick.kick.kick.kick.kick.kick.kick Hmmmm. Why won't it start? Also, I miss electric start. 😐 Ok. Time to troubleshoot: Could it be a fuel problem? Fuel Filters have fuel in them. Lets crack the float bowl drain screw....yup fuel is in there. Well maybe it's a Spark issue then? Pull the plug. Still new. Put it back into the boot, hold it to the engine and crank the motor by hand. Hmmmmm no spark. Why is that? Oh wait! I turned the Key off while I was checking for Fuel. 🤦♂️ Turn the key on, crank the Engine. I got Spark. ⚡ Ok, I got Spark and I got Fuel. So WTH. Better get back to Kicking. After A LOT of kicking while trying various throttle positions it stumbled to life, but won't run. It doesn't want to idle. During these brief moments of it running it doesn't sound right. Not like it's broken but sounds like there's an air leak somewhere. I run my hand along the intake and a small leak between the Carb and the Intake manifold. I pull it apart and can't see the issue. Gasket is brand new. After some googling I notice in one of the pictures there should be an O-Ring on the Carb side that presses against the gasket on the intake side. I slap one in there and the leak is gone. Bike starts and runs, and with some minor tweaks runs fine. I reinstall the leg guard and go for a test ride. It feels.......exactly the same as before I rebuilt the carb. lol 🤷♂️ It even has the same problem I had before. A stumble/stutter at part throttle. Runs great at WOT but part throttle makes it stumble. I think I'll pull the needle jet and see if I can move it up a notch.
-
Bought an old Honda "super" bike
slowbird replied to slowbird's topic in OTHER Motorcycle Talk (non vfr)
When the gas cap finally arrived I got working on the tank. Flushed out the Rust Wash and was quite surprised with the results. Unlike the vinegar the tank wouldn't start flash-rusting immediately after being emptied. Pretty good stuff. I made sure to give everything a good wash and scrub before getting the tank bolted back on and filled with fresh ethanol free fuel. New gas cap is really nice. Looks just like stock. A bit too shiny compared to the rest of the bike 😅 One of the new parts the wifu brought with her from Japan was a new fuel gauge. Old one was quite cruddy looking. The bracket was rusty and I couldn't buy a new one so I stripped the paint from the original and gave it a fresh coat. Replaced the bolts with new ones and it turned out quite fresh looking. Cross your fingers that it will start. (and run) -
Bought an old Honda "super" bike
slowbird replied to slowbird's topic in OTHER Motorcycle Talk (non vfr)
Next on the list of things to do is clean the tank. It isn't the worst tank I have ever seen, but it can be better. Researching all of the ways to DIY clean the tank I decided to go with plain old White vinegar. Inexpensive, non-toxic, easy to dispose etc etc. I watched some online vids and got to work. Tank is only 4 Liters so I didn't have to buy much. I dropped in some bolts to help with the agitation/scrubbing. After a few hours I dumped out the contents: Pretty nasty. Bits of rust and crud. I decided to dispose of this first batch and pour in some fresh vinegar. Next day the contents looked like this: Still gross. However, no matter what I did the contents of the tank always came out like this. Even when the inside looked fine. After a few flushes with the vinegar I came across a problem. When I tried to remove the cap it wouldn't budge. The key would turn but the cap wouldn't loosen from the tank. After some messing about it finally came off and a quick look at the underside of the gas cap showed that the locking mechanism had turned to slag. I know vinegar is acidic but I never imagined it would melt the metal of the gas cap locking mechanism. I even had to fish out a screw from the tank as the threads dissolved in the vinegar and the screw just fell in. Oh well. Time to order another cap and wait patiently for it to arrive. Lesson learned. I washed the tank out with some baking soda to neutralize the Vinegar. I gave the inside a good scrub with a toilet brush and flushed it with water till it seemed completely clear of vinegar, baking soda, or anything else. I know I had to work quick to prevent the tank from flash rusting. Original plan was to install the tank and then fill it with fuel but I don't want it sitting full of fuel without a gas cap. So I decided to fill the tank with the Rust Check Rust Wash and wait till the cap arrives. -
So sad 😢
-
Bought an old Honda "super" bike
slowbird replied to slowbird's topic in OTHER Motorcycle Talk (non vfr)
I did notice that last thing I tried soaking took awhile and the Rust Wash was quite dark so I disposed of it. Good to know for next time. 😎 ...and thanks for the tip re: aluminum. -
Bought an old Honda "super" bike
slowbird replied to slowbird's topic in OTHER Motorcycle Talk (non vfr)
Pulled the side cover off to get at the battery. It's been sitting awhile so I wanted to put it on a tender. Considering how slooooow the bike is I was toying with the idea of getting a lighter anti-grav battery. Especially since there is no starter motor and it only needs to run the lights, I could get the tiniest one. Checking the sizes though even the smallest one wouldn't fit in the existing battery tray. Probably for the best as I don't want to spend $200 on a battery. With the battery out, I removed the tray to expose the innards of the frame. It's real filthy. I took all of the electronic bits off the battery tray and gave it a wash. Inside the frame was super dirty. Very musty and old smelling. I gave it a good clean. Frame is in good shape. No rot that I can see. Just the occasional surface rust. I'm happy with that. Speaking of rust. I came across this stuff while doing some research: Rust Check. Rust Wash They have it at the local "Canadian Tire". It's supposed to be non-toxic and even reusable. Some of the videos I saw of it looks promising. You're just supposed to soak the rusty items. The rustier it is, the longer it needs to soak. The bolts of the side covers were quite rusty, so I gave them a soak: Before: After: You can see the chrome has been damaged by the rust, which I can't do anything about, but the rust itself is gone. Bolt is left nice and shiny, and way easier than trying to scrub with the Autosol. One of the replacement items the wifu brought from Japan are a pair of used shocks. (One of the shocks that came with the bike has a broken plastic cover) But the shocks have some surface rust on the top, so I poured some of the Rust wash into an old thermos and put the shock in there upside down to soak. Before: After: Using the same method I tried the Shifter pedal Before: After: Next I tried this front rack the seller gave me with the bike. It's quite rusty. This needed a bit more soaking as well as the occasional scrub with a bristle brush to help persuade the rust to go away. Not too shabby. I gave everything a wash and some polishing with the Autosol. Hopefully that keeps them looking decent.
-
Bought an old Honda "super" bike
slowbird replied to slowbird's topic in OTHER Motorcycle Talk (non vfr)
Awesome! Much obliged. Posties are cool little bikes. I'd love a CT110 -
Bought an old Honda "super" bike
slowbird replied to slowbird's topic in OTHER Motorcycle Talk (non vfr)
Time to get that carb out and get cleaning. At my request, the wifu brought a suitcase full of Honda parts back with her from Japan 🗾 Some replacement parts, and thankfully a O-ring Kit for the Carb. I really wanted all new seals/o-rings. It was needed as the seller used some gasket goop to seal the float bowl and pieces of sealant made their way inside the carb. It's so small. 😄 Such a difference from when I rebuilt the carbs on my old 2nd gen VFR. Quite a filthy little Carb. Some time in the parts cleaner will fix that. Reassembly was smooth. The parts cleaner made it quite easy to clean everything. I was glad to have all of the proper seals and O-RIngs from Honda. Part of the long list of parts I asked the wife to bring from Japan were the manifold Gaskets. The one between the carb and the manifold was a proper gasket and the one between the manifold and the cylinder head was a thick O-Ring. Bolted it all back on. While I was at it I replace the fuel hoses. One of the originals tore when I tried to pull it off the carb so I had to get new ones. I originally went with the stock i.d. hose size but couldn't find any decent fuel filters so I went a size up. I used the same style fuel filters that I tried on my old VF500 and they worked well. Here's hoping the fresh and clean carb, plus the fuel filters will help keep the jets clean. -
Bought an old Honda "super" bike
slowbird replied to slowbird's topic in OTHER Motorcycle Talk (non vfr)
Nice! I think I've seen that on my YT feed before. been meaning to watch it. There's also the guy with the C90 Super Cub who's ridden through many countries. He went from Malaysia to the UK, and just before COVID he was doing Canada Coast to Coast and then down to South America. Check him out on c90 adventures on You Tube, I highly recommend it. -
Bought an old Honda "super" bike
slowbird replied to slowbird's topic in OTHER Motorcycle Talk (non vfr)
With the Intake hose repaired, time to see what the air filter looks like: I wonder when was the last time this Air Filter was changed. If I remember correctly, when I bought the bike the Ad did say it had a new air filter installed....oh well. Can't dwell on that now. Time for a new one. After some searching online the cheapest and fastest was from Ebay. While I waited for the filter to arrive I slapped on a cone filter I had laying around and tried that in the meantime. The bike didn't like it at all. It would idle, and it would run on part throttle, but anything more and it would stutter or bog down...I should have known it would have been too much air for the stock carb setup. 🤦♂️ So the bike remained parked while I waited. Eventually the new Air Filter arrived: Well now I know that the filter is supposed to be yellow. I thought it was orange lol. Or perhaps they used to be redish/orange color back when this filter was installed. Cleaned up the airbox, polished up the clamp and slapped in the new Air Filter. Quite the difference. Looks night and day 😎
-
Bought an old Honda "super" bike
slowbird replied to slowbird's topic in OTHER Motorcycle Talk (non vfr)
Awesome! Lots of fun memories. Cool Super Cub too. Looks like an old 6volt model maybe -
Bought an old Honda "super" bike
slowbird replied to slowbird's topic in OTHER Motorcycle Talk (non vfr)
oooh. Me too 😊 The new Super Cub and Cross cub haven't made it to Canada yet -
Oberon slave cylinder - is it the real deal?
slowbird replied to cuoccimix's question in Modification Questions
Same. Haven't gotten around to it. -
Bought an old Honda "super" bike
slowbird replied to slowbird's topic in OTHER Motorcycle Talk (non vfr)
Thanks! Yeah some parts are easy to get online and others, not so much. Nice! I imagine riding this in a beautiful country like that would be great. LOL. That is a concern for sure but so far it has not happened. It goes well over 65kph/40mph. How much faster isn't really known as the Speedo doesn't go that far. The needle will easily go past 60kph and I've seen 75kph/47mph on those radar operated "This is your speed" signs. I try and keep off any roads with 80kph speed limits, especially if there is only 1 lane, but again. I haven't had any issues with cars queuing up behind me. -
Bought an old Honda "super" bike
slowbird replied to slowbird's topic in OTHER Motorcycle Talk (non vfr)
So I want to fix this little bike up. It won't be perfect but we can right some wrongs for sure. Let's dig in. Easily enough to pull the leg shield off and expose the....well....everything. Compared to all of the V4's I have owned, this bike is quite simple. But, at the same time compared to all of the V4's I have owned this bike is quite filthy. It's obviously been sitting for some time, and occasionally I am finding a missing fastener here and there. No problem though. That's what I am aiming to fix Airbox is off: Such a weird intake design. 4 little chimney like snorkel tubes. It didn't take too long to find a problem. Well this doesn't look right. Hmmm can't have that. Getting a replacement doesn't look possible so lets see if I can fix it. Removed the intake hose from the airbox: After setting overnight with some adhesive: Finished off with some black silicone: There! Hopefully that holds for some time.
-
Bought an old Honda "super" bike
slowbird replied to slowbird's topic in OTHER Motorcycle Talk (non vfr)
Oh yeah? Not many around here in my part of Canada. Funny for a bike that is so popular it's quite rare here. 😄 -
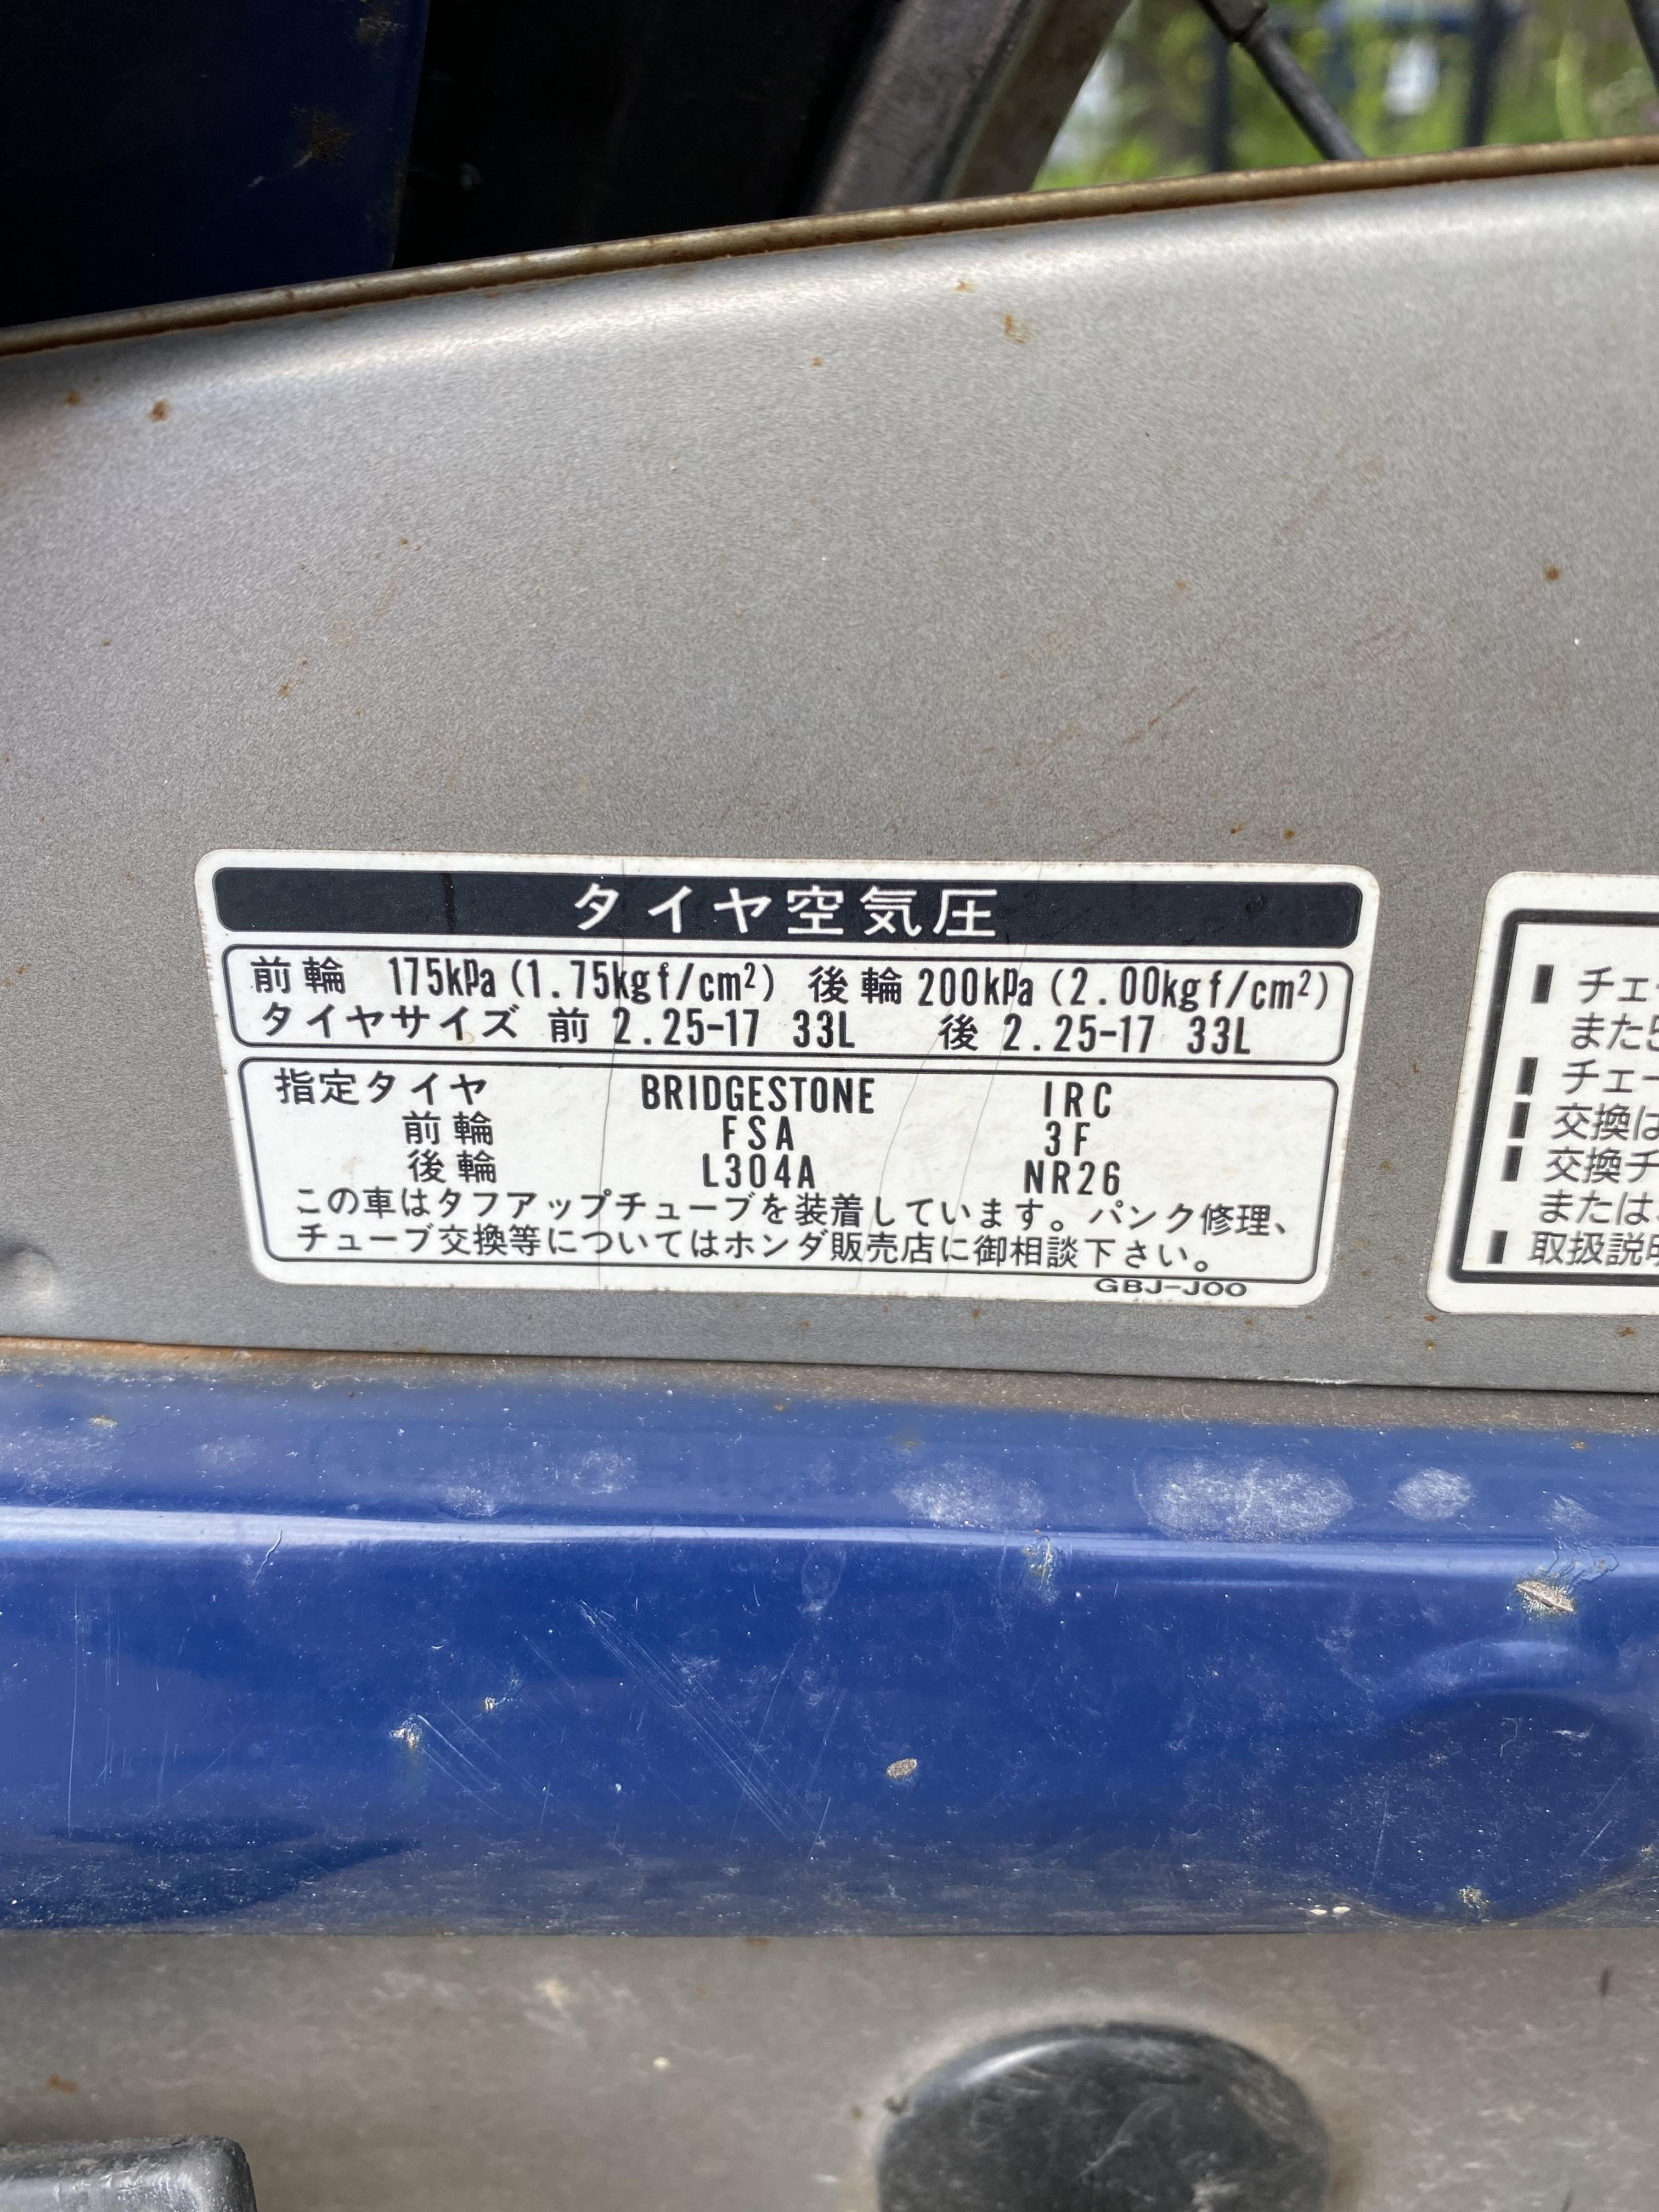
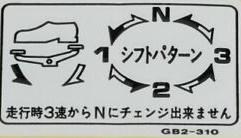
Hello all. Thought I'd share this little gem with those that are interested. It's a 1995 JDM Honda Super Cub. 50cc's of raw, unbridled neck snapping power 😅 I'm sure everyone knows already, but to those that don't...the Honda Super Cub is the most produced motor vehicle in history 🏆. The North American ones are called the Honda Passport. Previous owner shipped a bunch of them over from Japan. This one had just under 11,000kms (6,800miles) on it. Runs pretty good. Plan is to freshen it up, keep it as original as possible, and enjoy buzzing around the area on it. It has a 3-speed rotating drum transmission with a centrifugal clutch. A very interesting shifting pattern indeed. Because it's from Japan there is a lot of Japanese labels and markings. Fuel tank is under the seat with a small floater gas gauge: Tire Label on the chain guard with a very interesting unit of measurement for the tire pressures: First time I have seen kg f/cm2 🥴 Anyways, that's my toy.
-
Who Here Likes Single Cylinder Bikes?
slowbird replied to SingleCylinderLife's topic in Eighth Generation VFR's
Awesome! You have so many! 😍 -
Who Here Likes Single Cylinder Bikes?
slowbird replied to SingleCylinderLife's topic in Eighth Generation VFR's
Can I add my newly acquired JDM Super Cub to this thread? 1995 Honda C50 Super Cub Was imported from Japan to here in Toronto, Canada. Still has all of the Japanese labels and markings, Even the fuel gauge is in Japanese. Has a 3-speed rotating transmission and a centrifugal clutch. Pressing down to change gears Needs some TLC but it's a fun little bike. But very very sloooooowwwwww. lol
-
Nice! They look well made. I have Helibars but recently I'm finding even that position is painful after some time. I'm always looking into raising the riding position more