


Bruckner
-
Posts
86 -
Joined
-
Last visited
Content Type
Forums
Profiles
Gallery
Blogs
Downloads
Events
Everything posted by Bruckner
-

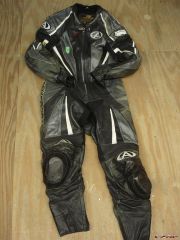
From the album: VFR 03
© ©vfdiscussion.com
-
From the album: VFR 03
© ©vfdiscussion.com
-
Great stuff, I'll be putting this tool together this weekend. Is there a full writeup on the disassembly of airbox, or is the service manual good enough? Should the tank be taken off entierly? Regards, Bruckner
-
For the members who understand Spanish, there is a discussion by Honda race engineers of the NSR500 and the Big Bang effect here: http://www.youtube.com/watch?v=aGSxjM6pfXE I wish the original English version was available.. fascinating stuff! Regards, Bruckner
-
From the album: Fender eliminator
© ©vfdiscussion.com
-

From the album: Fender eliminator
© ©vfdiscussion.com
-
From the album: Fender eliminator
© ©vfdiscussion.com
-

From the album: Fender eliminator
© ©vfdiscussion.com
-
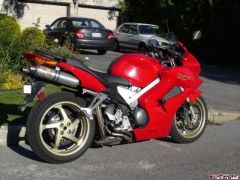
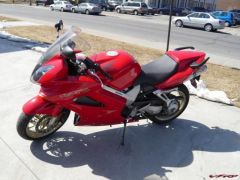
 Great looking bike! Couple of questions: who makes this fender eliminator? How much lower is your bike and how did you achieve it? Have you thought of gold/anodized wheels on your bike? I have them on my italian red 2003 and they look good! Regards, Bruckner
 -
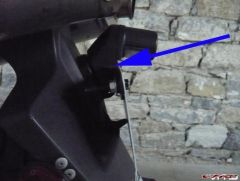
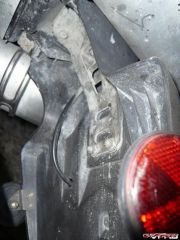
OK guys, something of interest for those who bypassed the ground green wire around the blue connector because the latter can't be opened (fused plastic inner bits), you may be uncomfortable (as I was) knowing that any routine maintenance that requires this blue connector to be opened will require dealing with this stuck connector. The local Honda tech here in Montreal found a clever way to undo the blue box halves: there are 2 clips on the front side of the connection (towards the front of the bike) held in place by flexible plastic bits (in 'S' shape on picture, provided by a member here, thanks!), open these up and the individual connections will be exposed, undo the ground wire connection and a few others, use a flat screwdriver to push the terminal out of the socket (may require a bit of force) and voila. Put in generous amounts of grease, use the bypass and enjoy the peace of mind of knowing all connectors can be opened, as they should be, should need be. pic blue box copy.jpg Interestingly, Honda acknowledges that this connection must be checked during any inspection (tech call) so they are aware of the problem. For any Montreal owners experiencing this problem, see Richard at Excel Honda, he's an ace. Regards, Bruckner
-

From the album: Fender eliminator
© ©vfdiscussion.com
-
From the album: Fender eliminator
© ©vfdiscussion.com
-
From the album: Fender eliminator
© ©vfdiscussion.com
-

From the album: Fender eliminator
© ©vfdiscussion.com
-
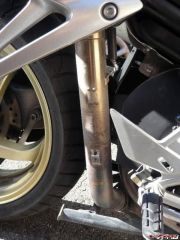
OK job's almost done but ran into a bunch of problems. I lowered the front about 20mm (back was lowered roughly 22mm using a longer 'dog bone'), when all was tightened up to spec (good thing I had a long torque meter handy, access isn't great), I wanted to remove the handles to slide spacers to raise the bars, with the forks now protruding the clutch line prevents me from lifting the handle high enough, I didn't want to risk damaging anything so I undid the triple clam bolts to set the fork at factory height again, then removed the handles and noted that one of the spacers I bought wasn't large enough to fit around the fork tube.. the other spacer fits fine but the difference in diameter is visible so I brought both pieces to a machinist to enlarge the opening of the smallest one hoping it'll work. Unless I'm doing something terribly wrong, the handles and spacers must be installed on the fork at factory height then sliding the fork up, unless there's a way to get enough slack in the lines to lift the handle up an extra 20mm (or whatever extra height is dialed in). Thoughts? Regards, Bruckner
-
DO ONE FORK LEG AT A TIME! I'm not sure that's so obvious.. since fork legs are perfectly parallel, wouldn't pulling on a single unbolted fork while the other is bolted tight risk damaging the whole thing??? Things may look more obvious when I get down to it but seems like sliding the entire assembly up and down is the only way to go; now of course measuring the proper height and tightening clam bolts will be done ONE FORK LEG AT A TIME, I hope that's what you meant??!?! As for the headers, hmmm, is there a better solution? Regards, Bruckner
-
What's the best way to support the front while undoing these triple clamp bolts? I'm thinking the headers aren't an ideal support, I can't find anything else under there.. what if I stack up sand bags on the passenger seat? How much weight is needed? I'm not sure I understand the "tie-strap" technique? Regards, Bruckner
-

Installing Radar's Custom Sliders - Black Bases
Bruckner replied to KanadianKen's topic in Modifications
I'm thinking of going this route, for peace of mind! Has anyone experienced a low speed drop with these protectors on? How well did the sliders perform? Regards, Bruckner -
From the album: VFR 03
© ©vfdiscussion.com
-
To clear things up guys, the triangle linkage has to be rotated COUNTERCLOCKWISE?? Have we achieved a consensus on the height difference this mod does to VTEC models (I assume all models 02-07 have identical rear suspension components)? Also, anyone has the torque specs for the 3 triangle linkage bolts? I'm about to do this to my 03, at 5'7" and 29" inseam, it's a must! By the way, when you guys measure your "inseam", you take your riding boots off??? Seems stupid but this makes a difference equivalent to the lowering mod!! Thanks much! Regards, Bruckner
