
SEBSPEED
-
Posts
22,516 -
Joined
-
Last visited
-
Days Won
103
Content Type
Forums
Profiles
Gallery
Blogs
Downloads
Events
Posts posted by SEBSPEED
-
-
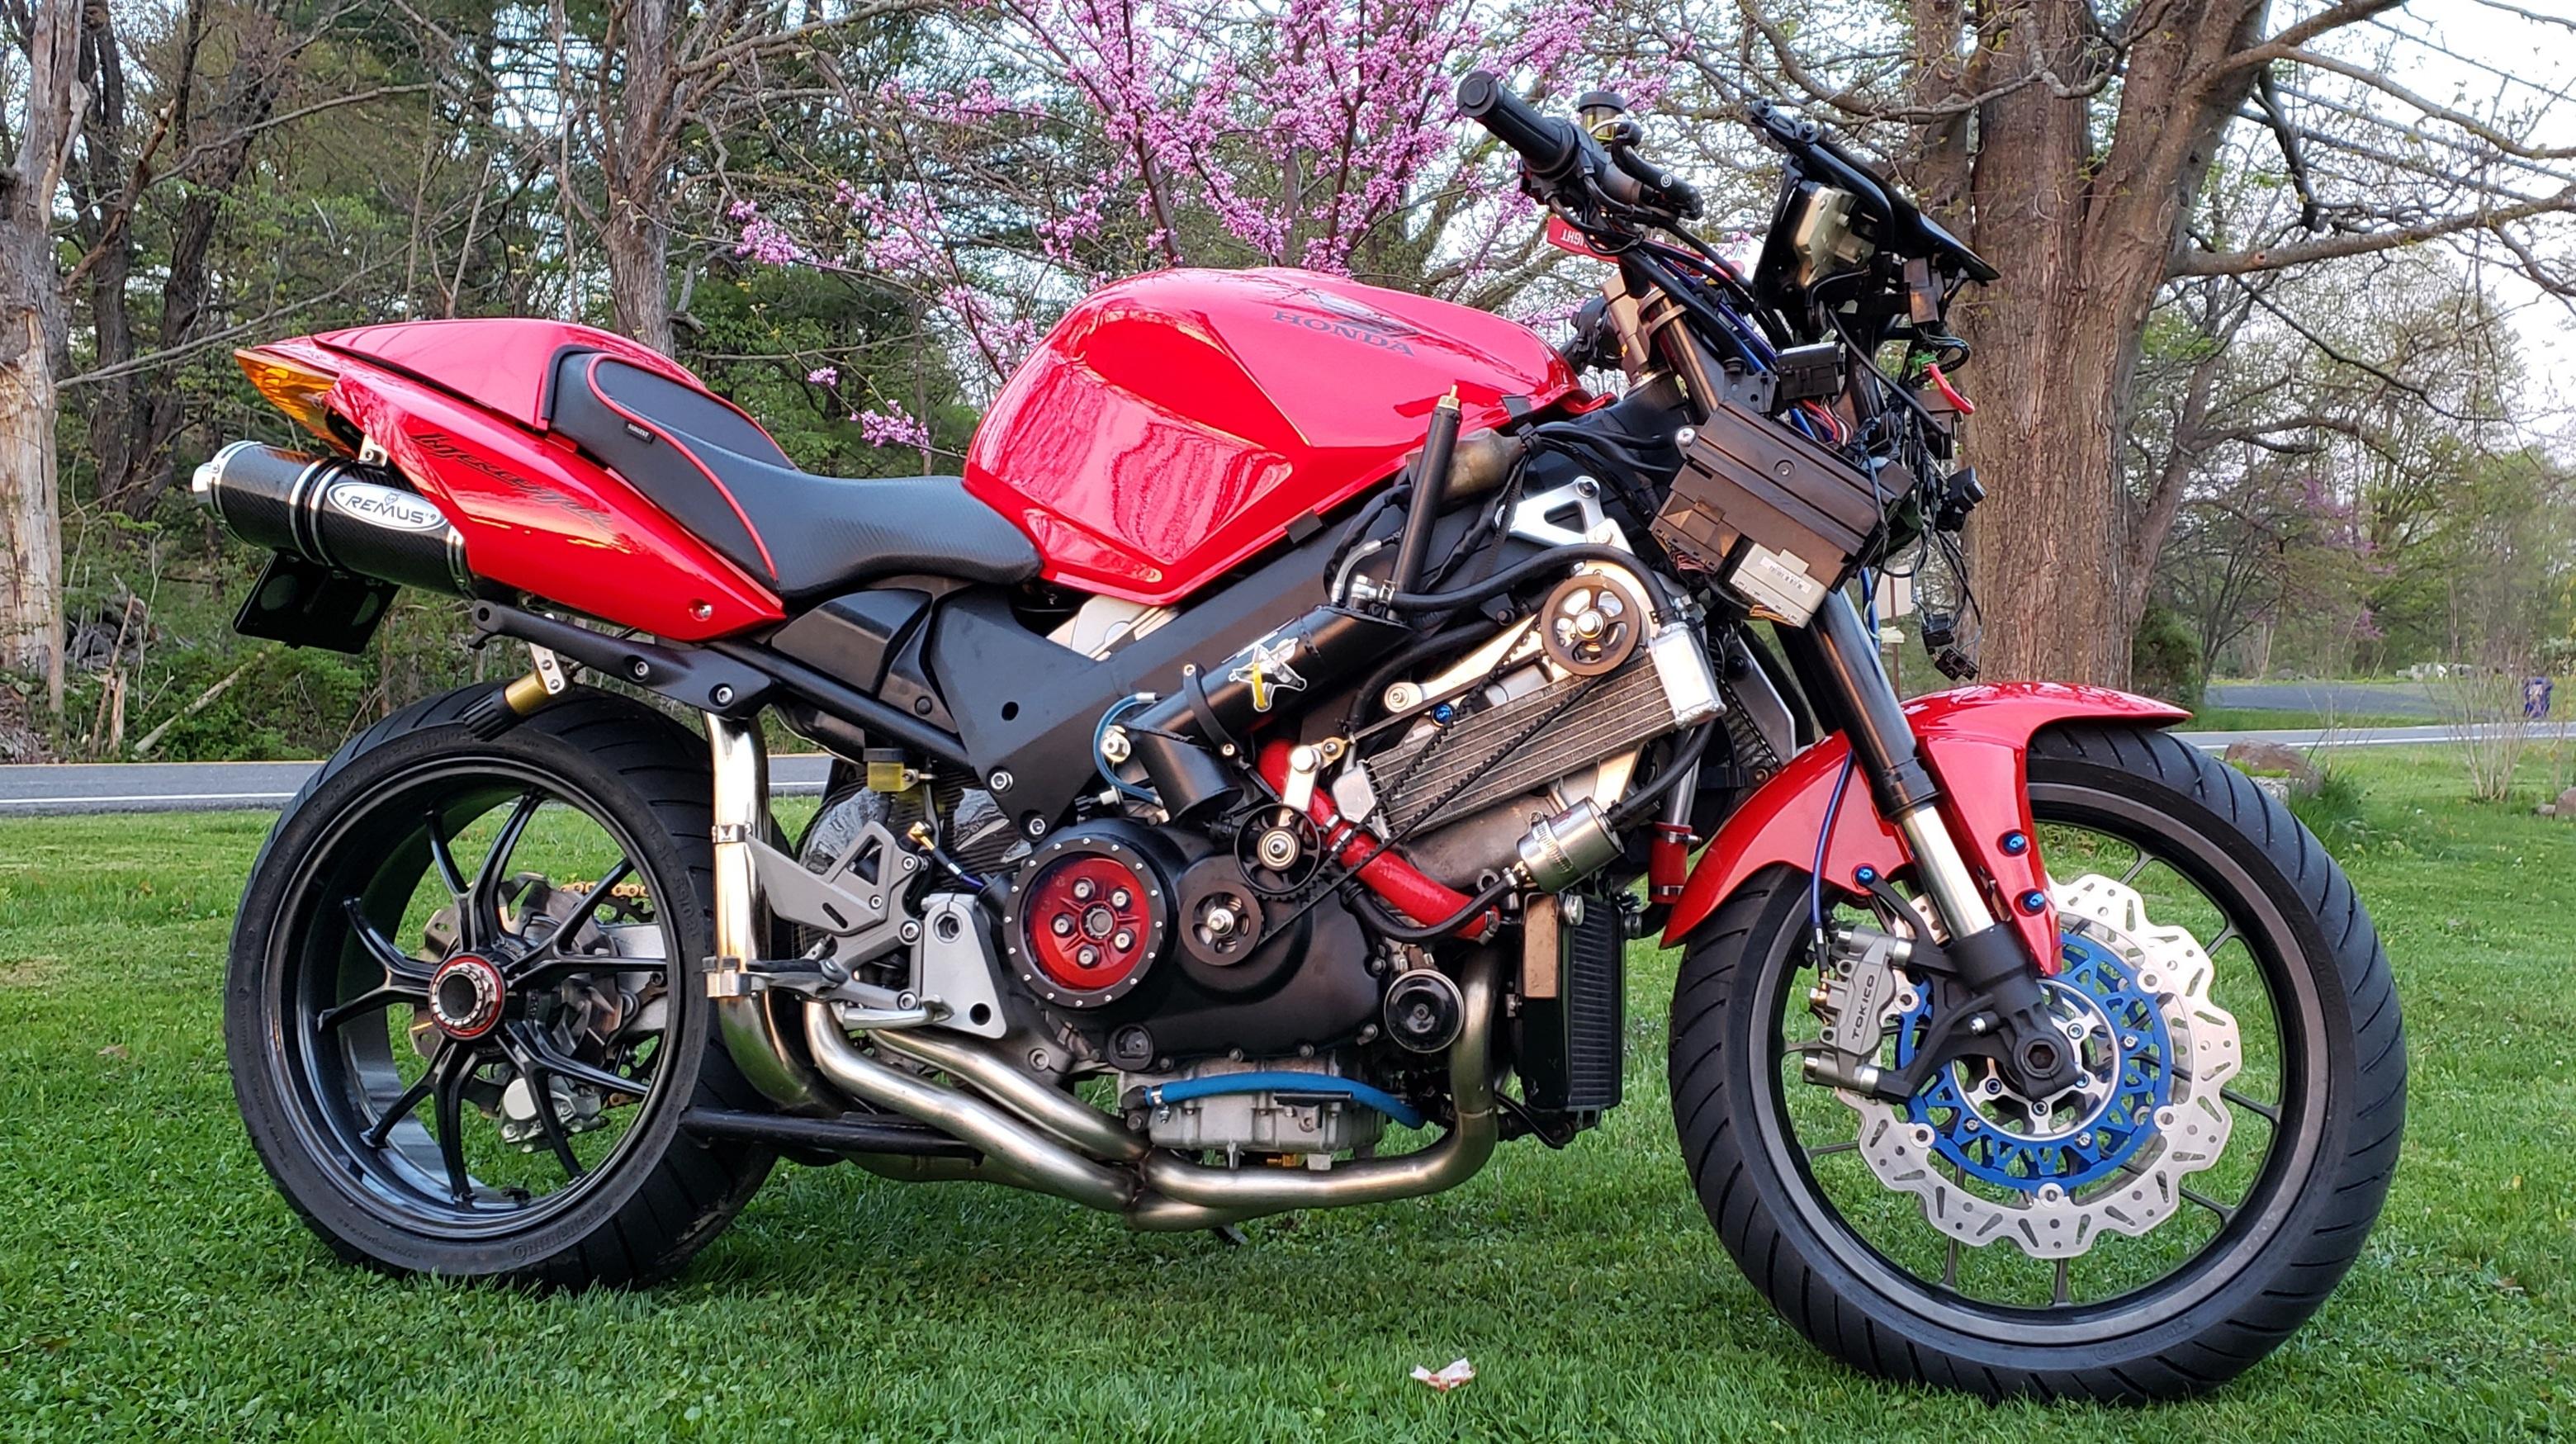
Now, while measuring and fitting the front end conversion was fairly straightforward, these next two sub-projects were neither straightforward or easy.
These two(more like 4, really) projects address two more issues prevalent in the Toro kit:
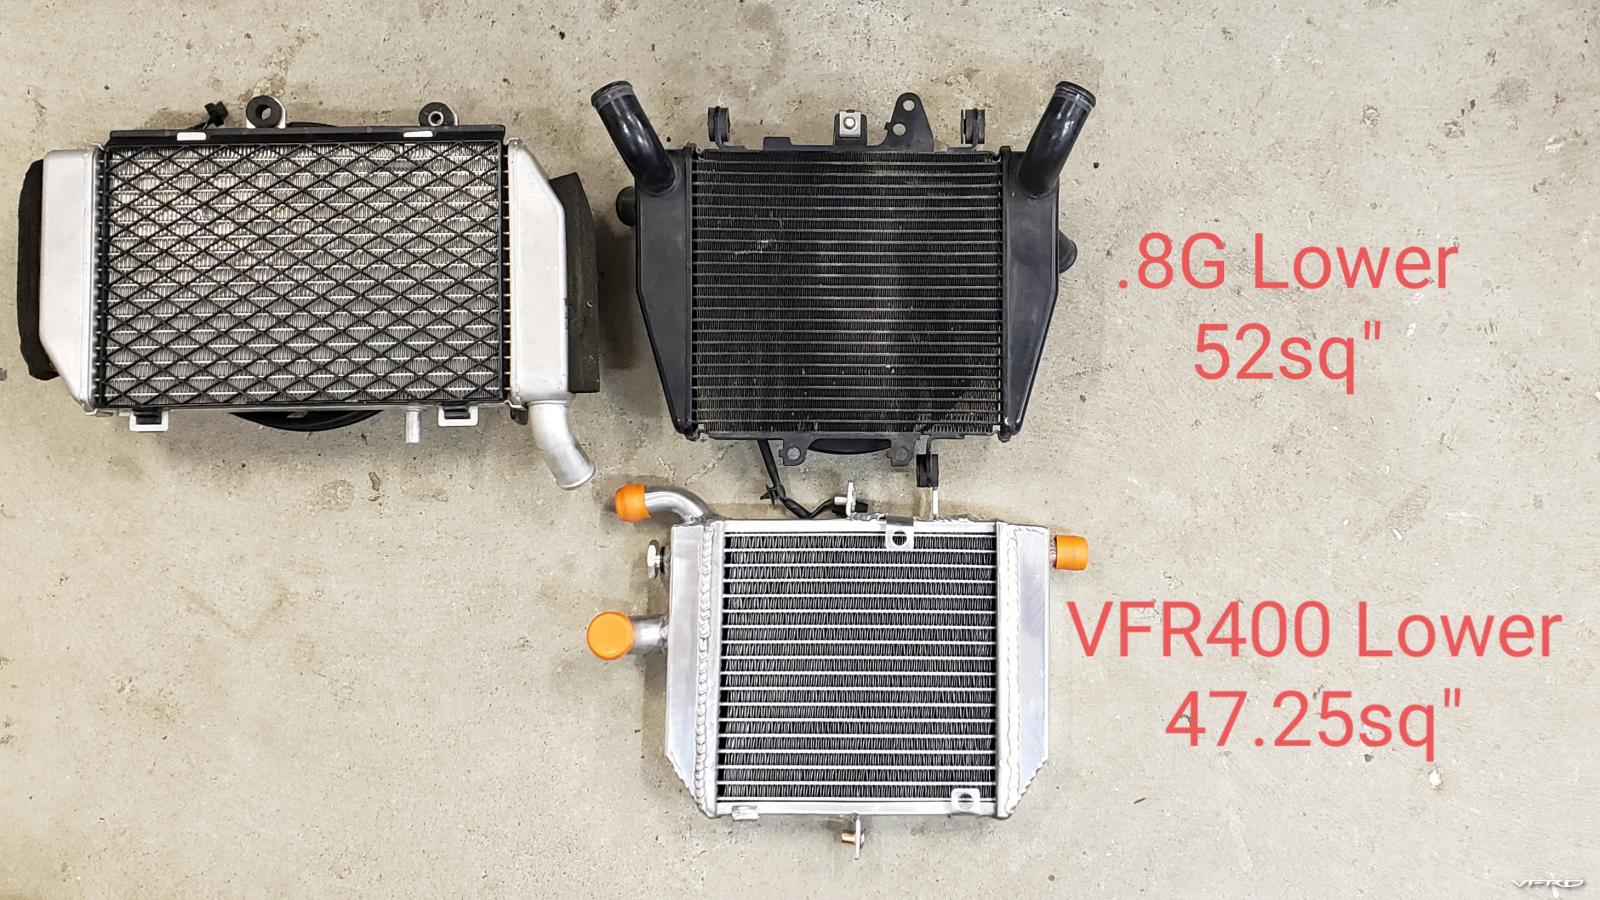
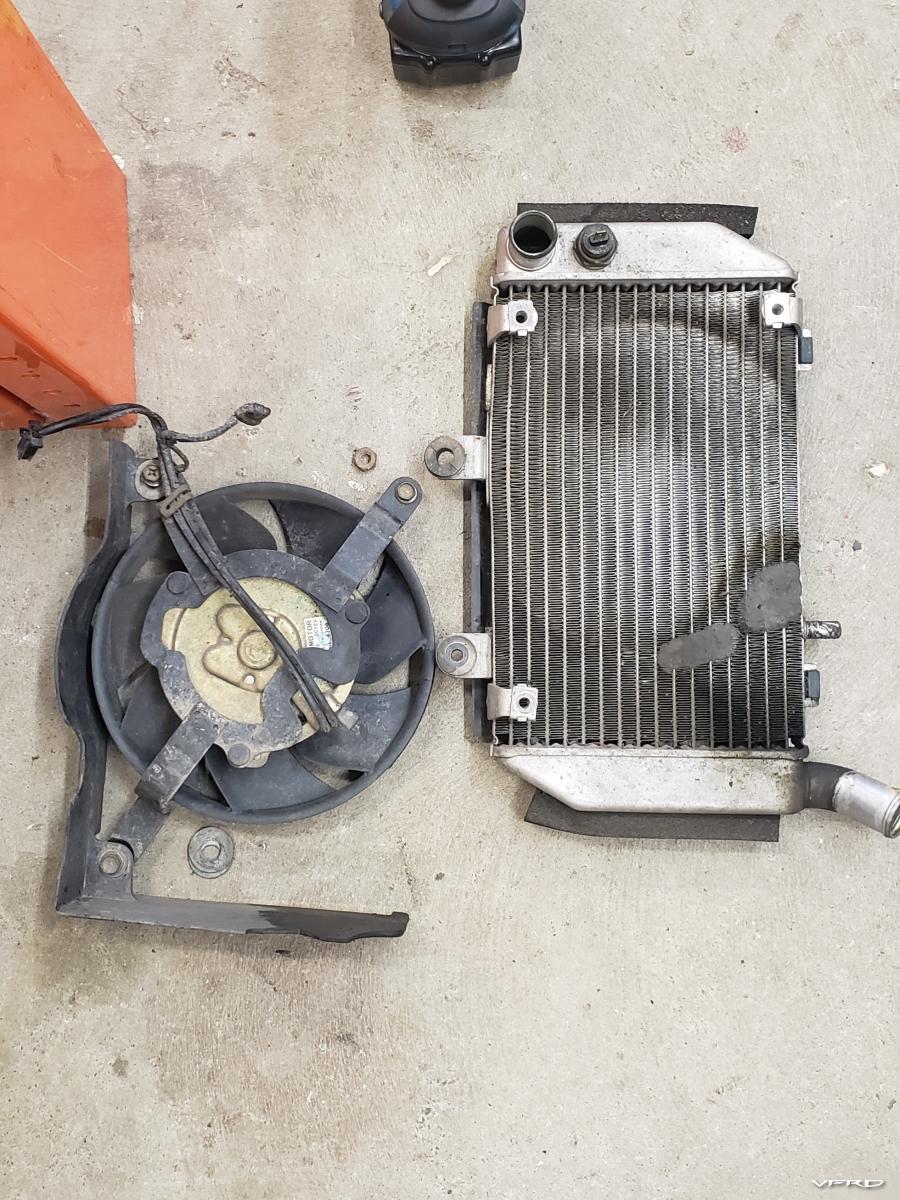
A - the added power creates extra heat, and that heat needs to be dissipated while hampered by the borderline adequate folly that is side mount radiators, compounded by the downsizing(on a 6g) and downward relocation (out of the airflow) of the right side radiator
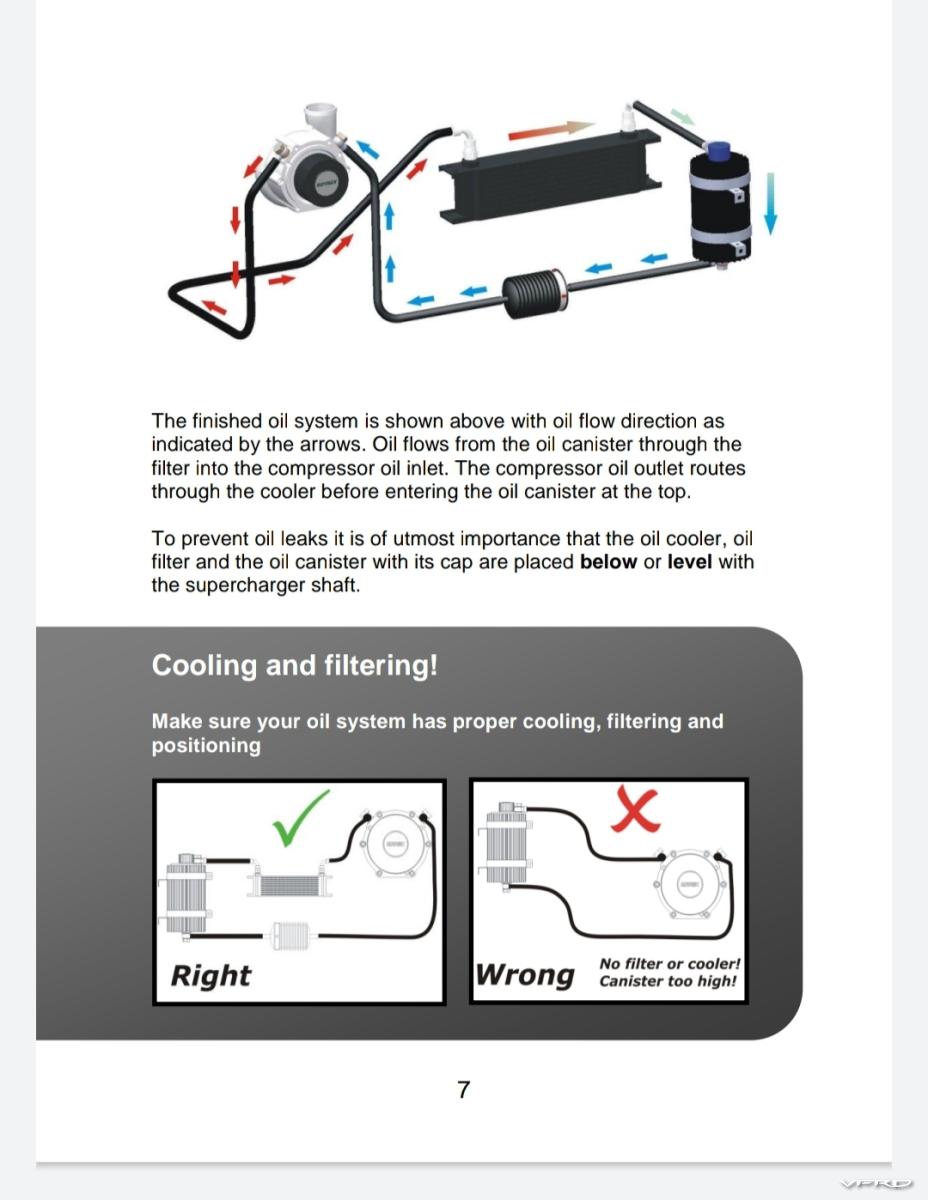
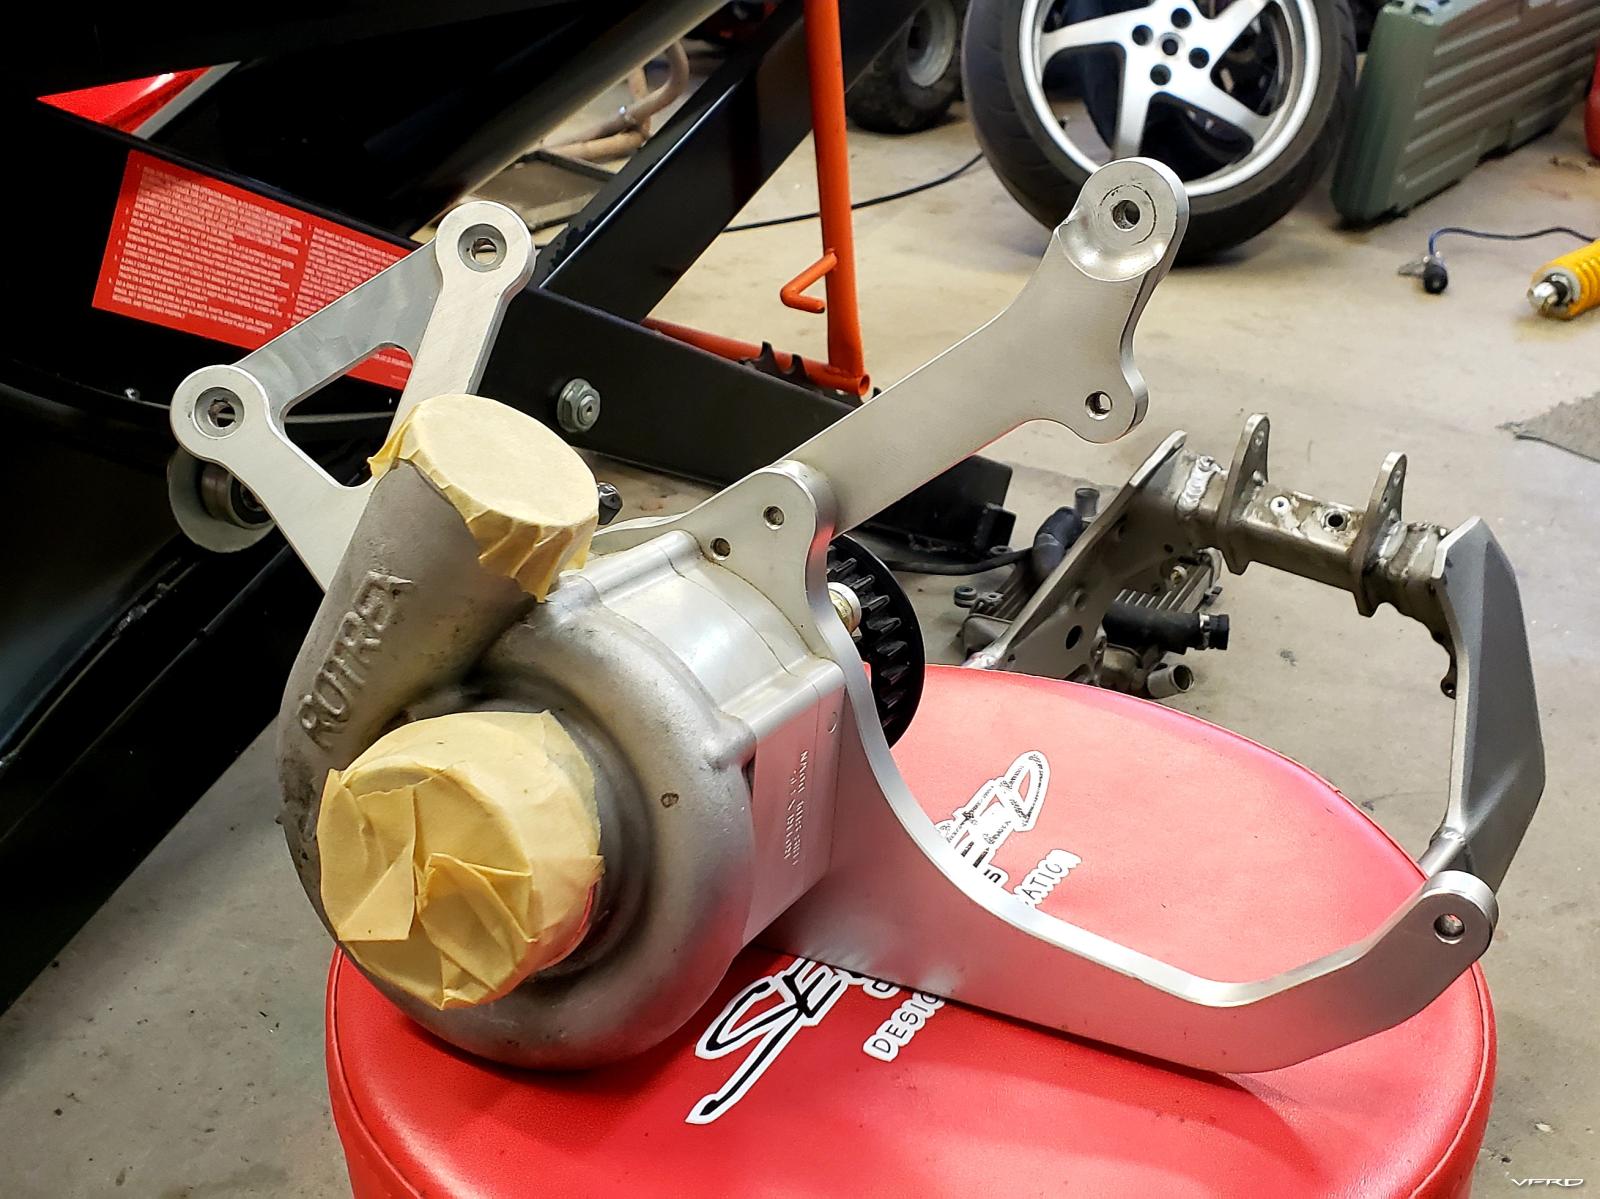
and B - the lack of any cooling for the supercharger oil which Rotrex states is REQUIRED for longevity and warranty
A sub issue is that since Dan developed the kit, Rotrex has updated the Rotrex C15 design to delete a seal on the blower shaft. This means that if I installed the kit as designed, and needed to replace the blower unit in the future, all the oil would leak out of the unit as the oil reservoir was located above the horizontal centerline of the unit(at the front of the airbox, behind the steering neck).

It took days of pondering, staring, test fitting, and calculating to get this sorted out.
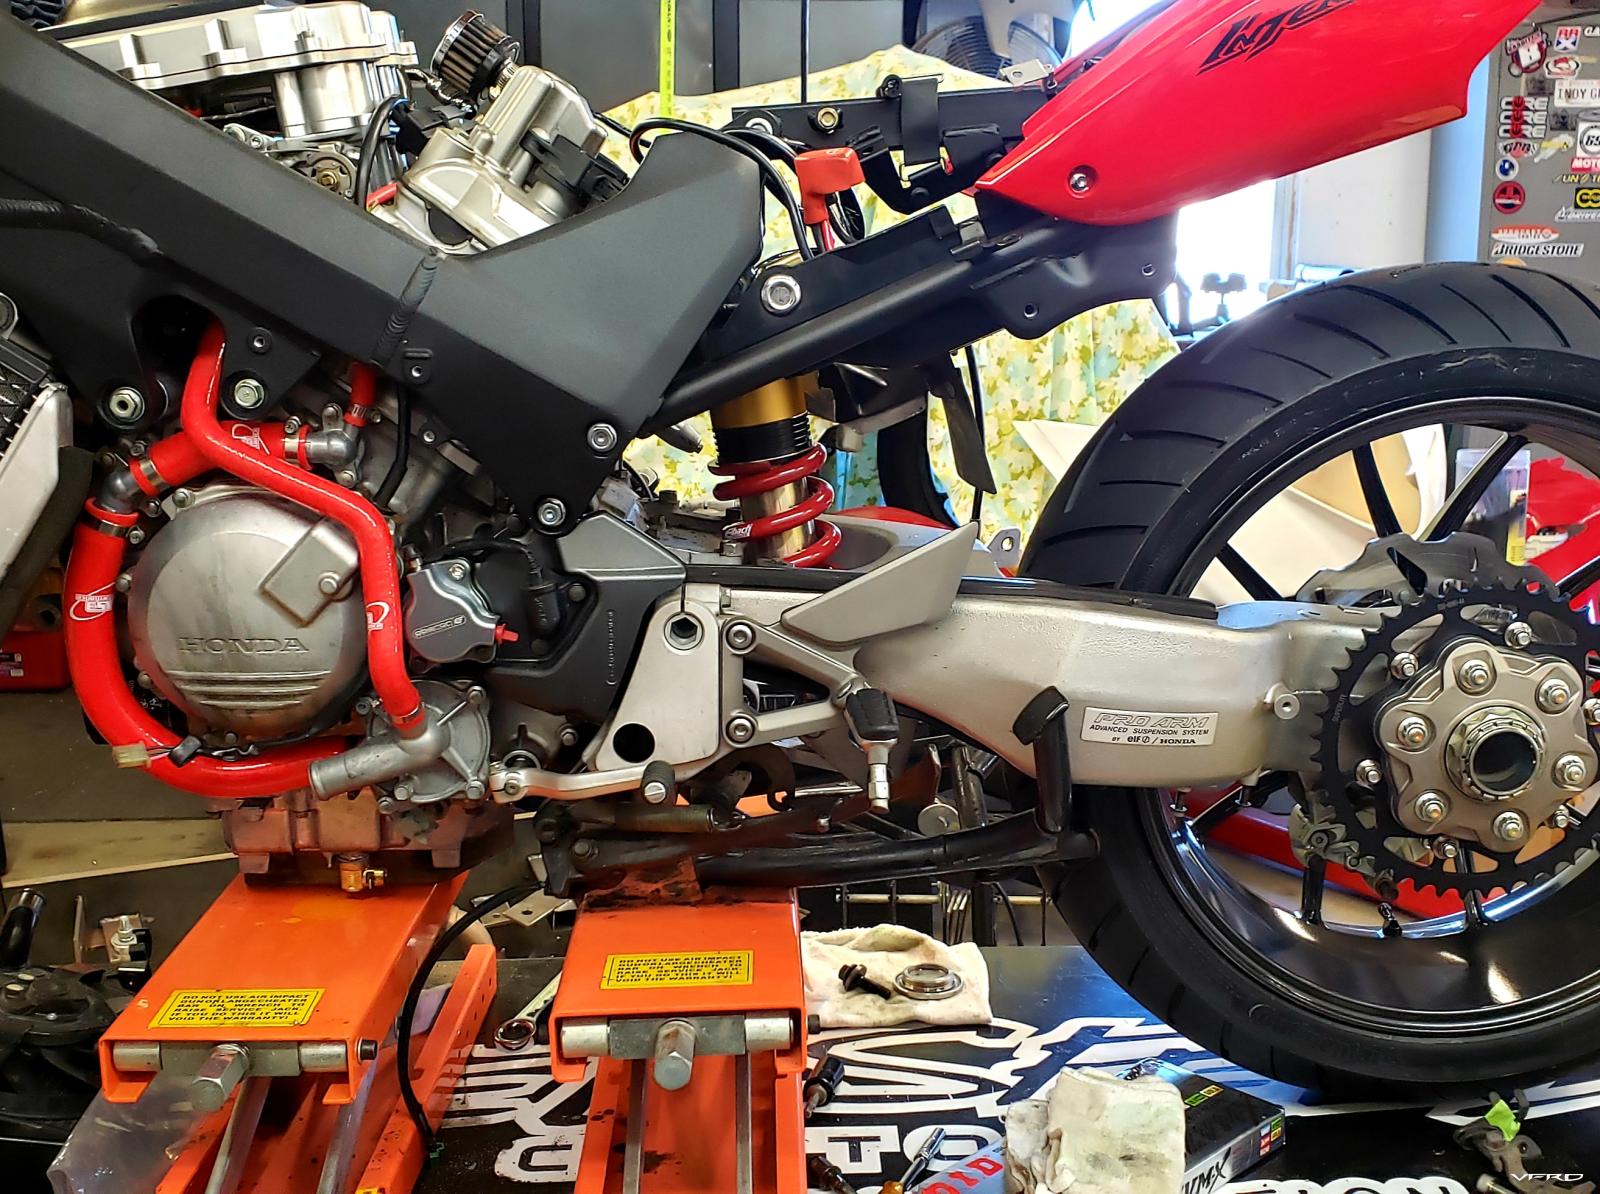
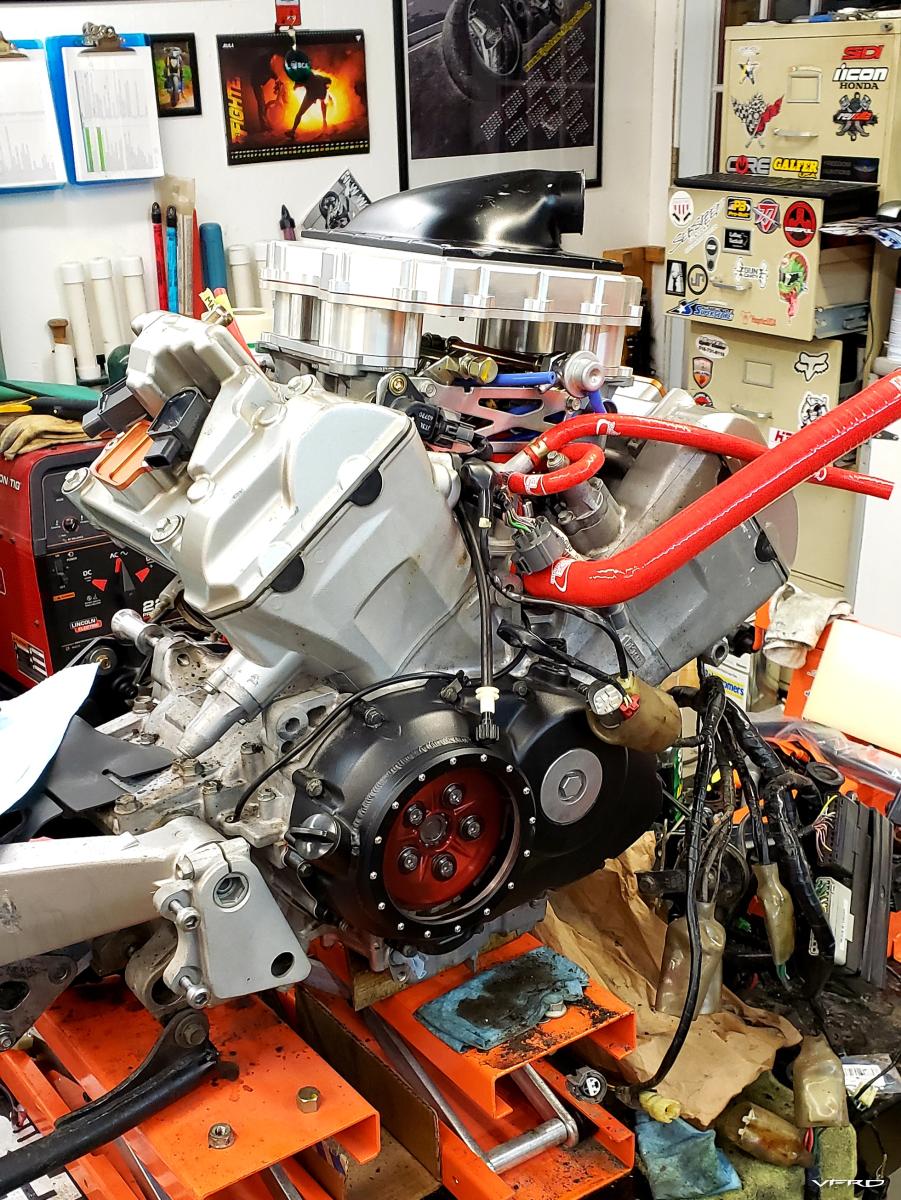
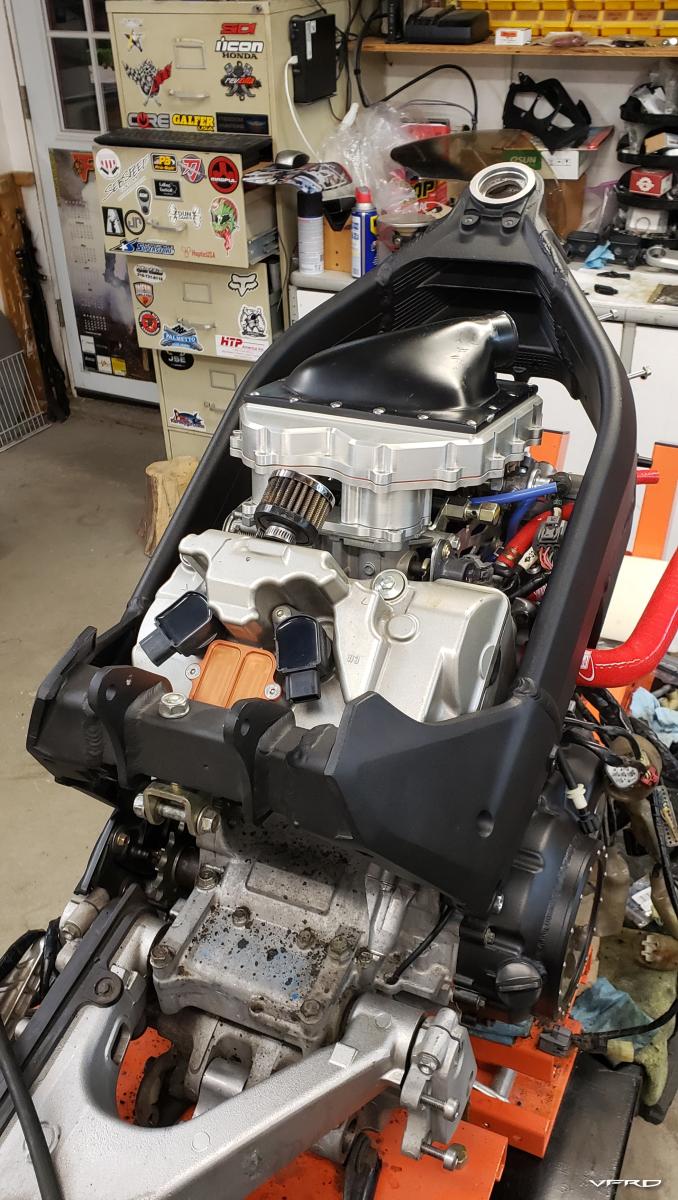
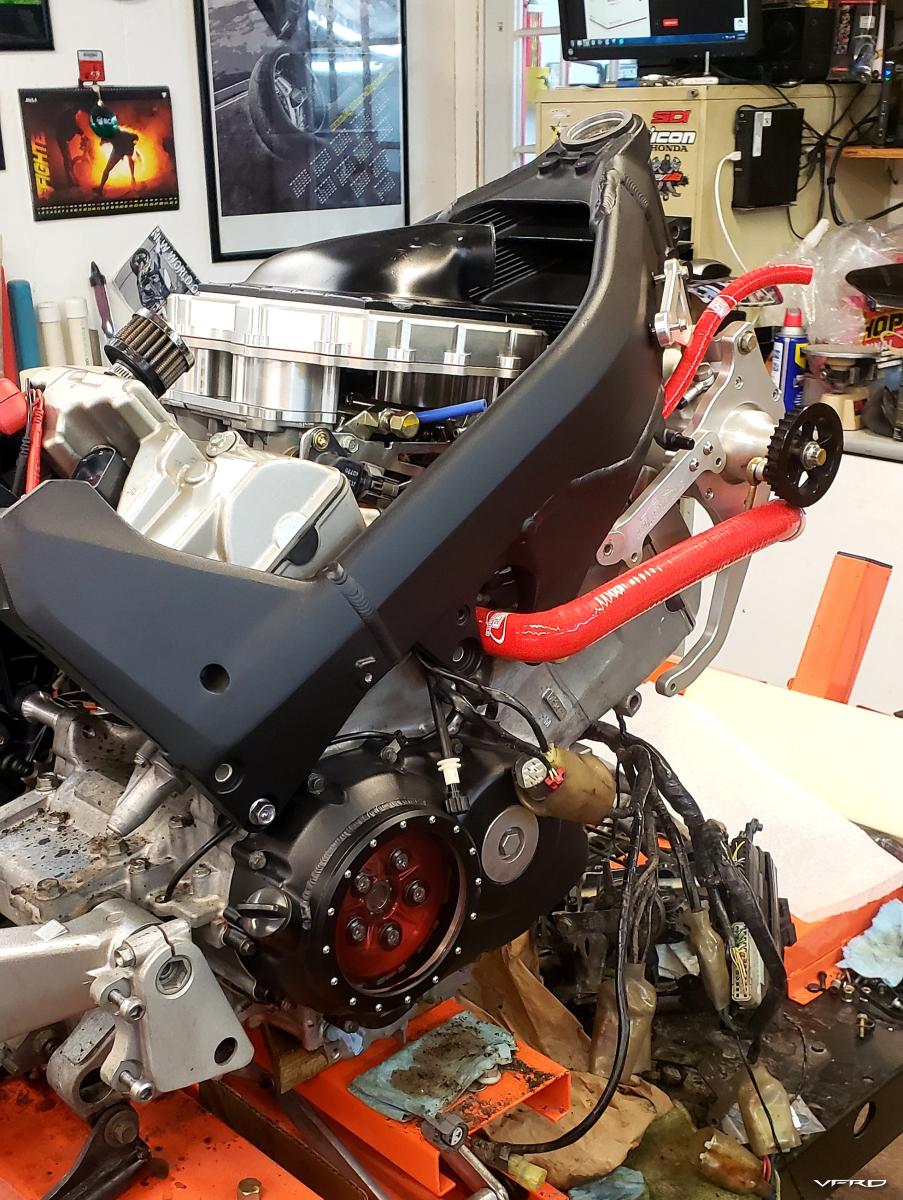
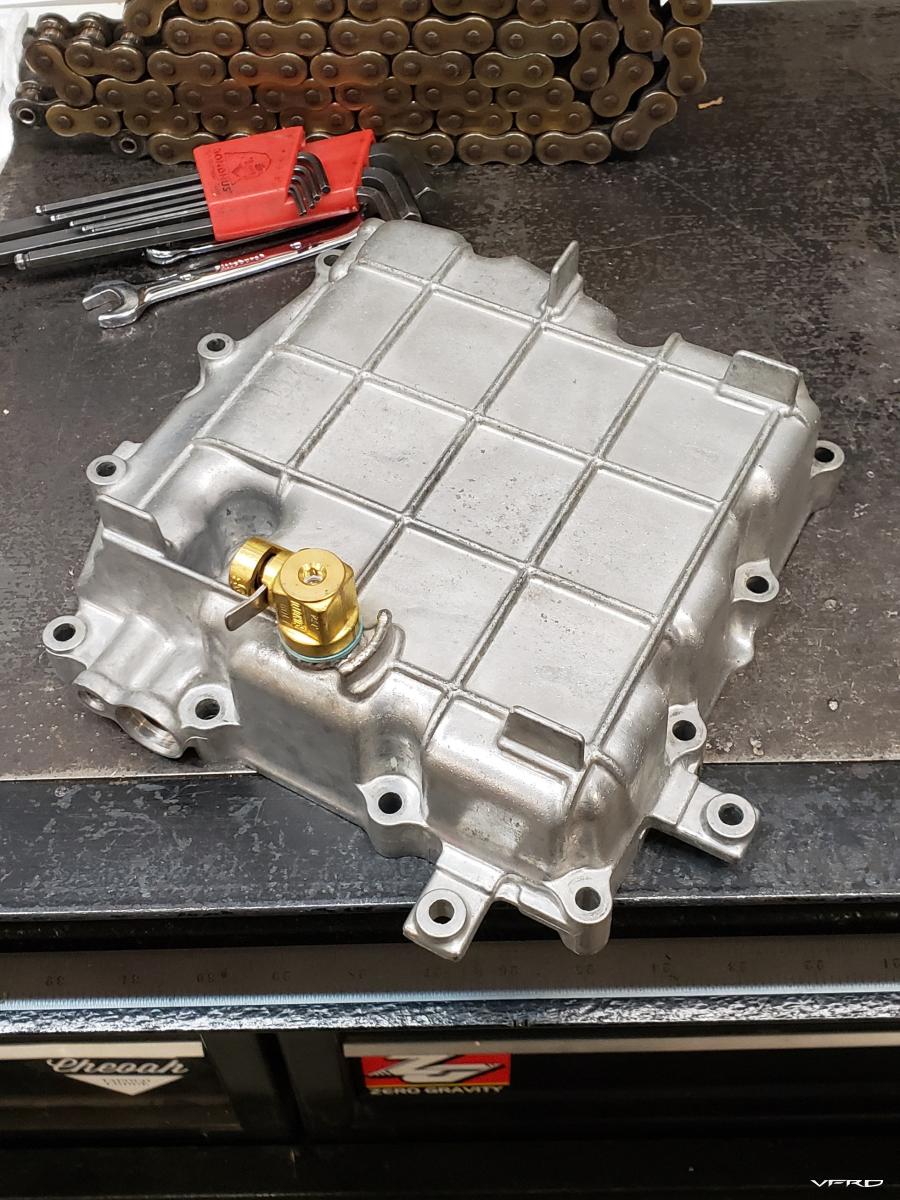
The short story is that I ended up using the left side 6g radiator along with a lower radiator from an 8th gen for the coolant, and converted the right side 6g rad to become a Rotrex oil cooler.
The longer version is that I also ended up redesigning the engine oil cooling system as the new coolant flow conflicted with the oem oil cooler.
Here's the "blank slate"
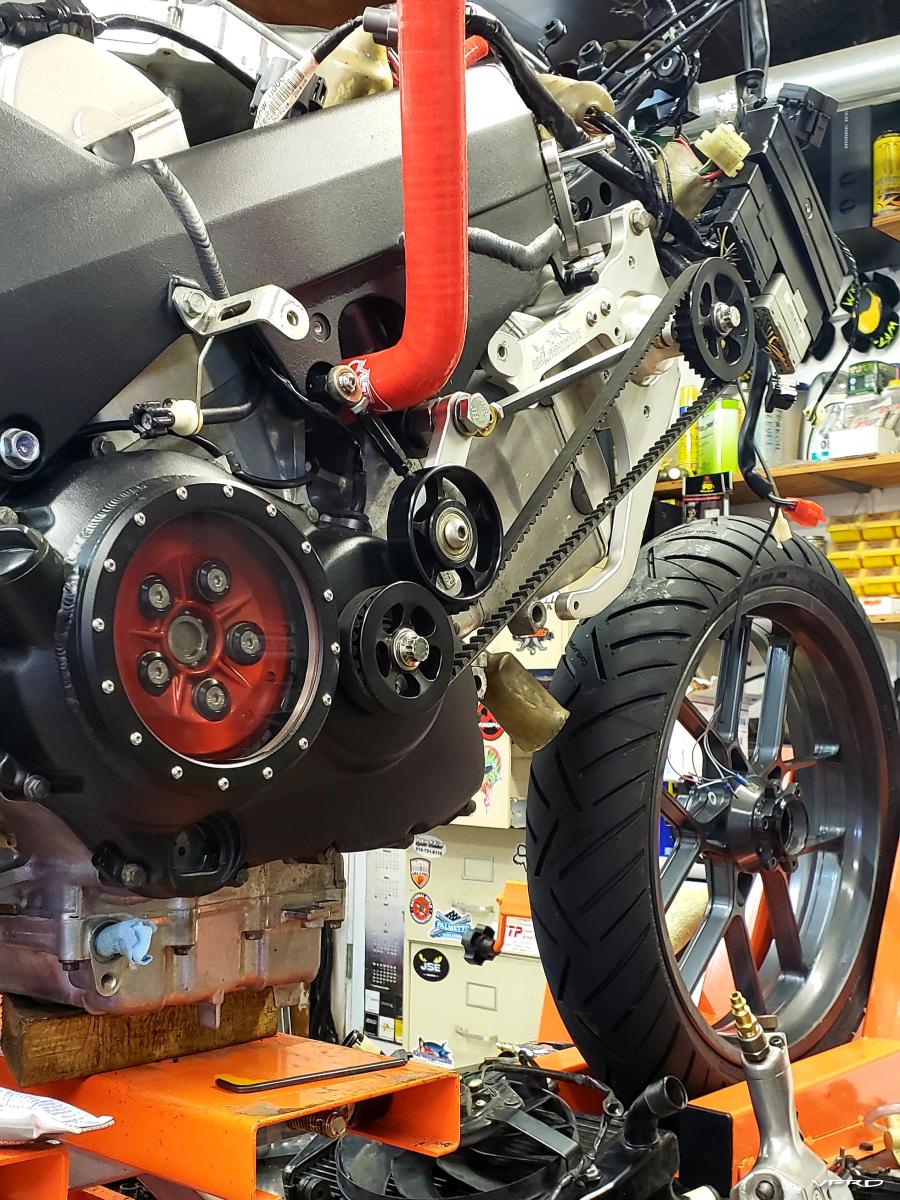
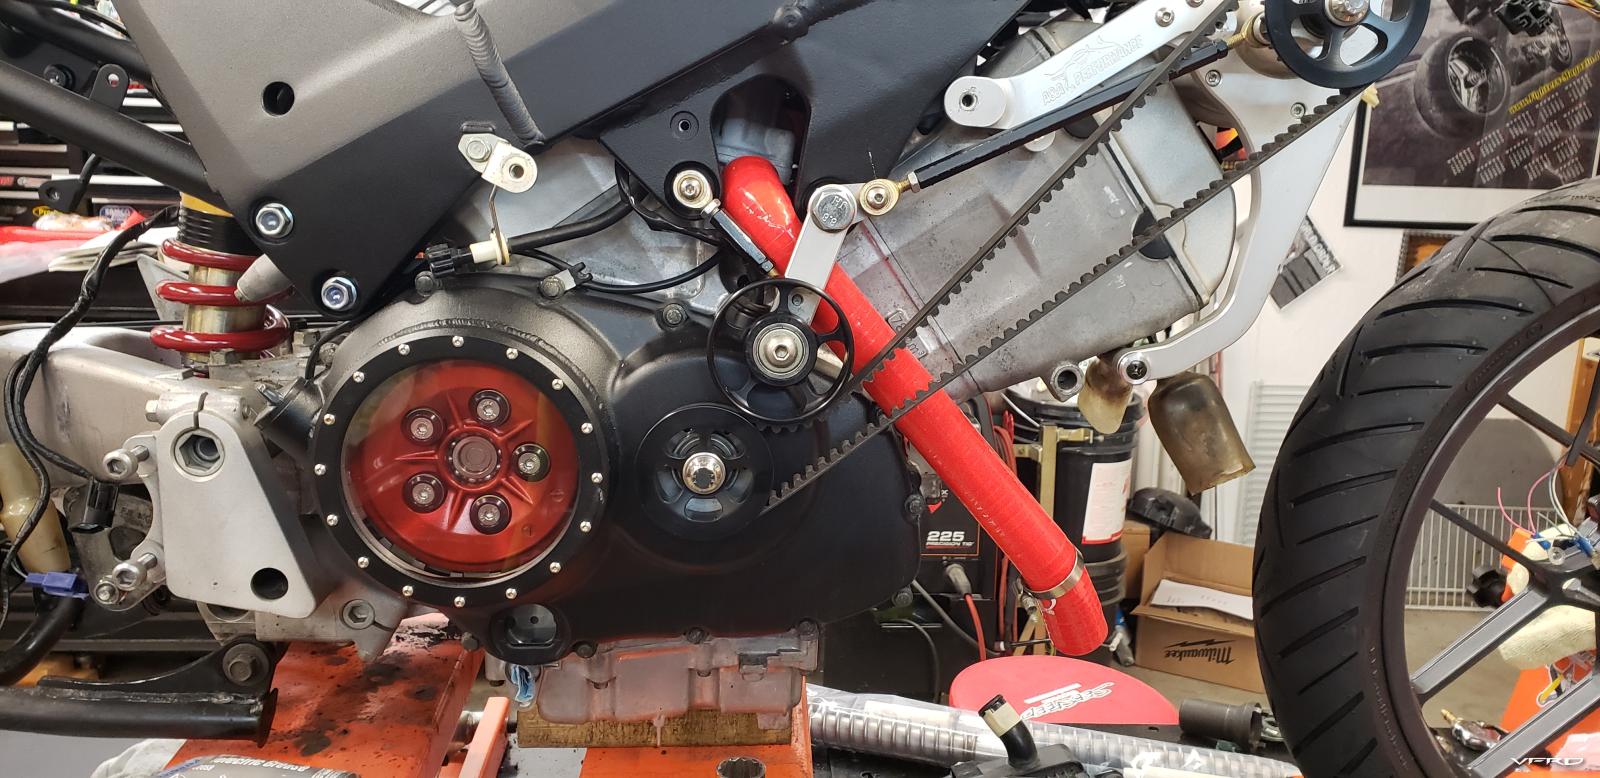
First up, I had to mock fit the blower pulleys and belt to see if there was room to route the hose down to the 8g lower rad instead of up to the 6g oem location
*just*
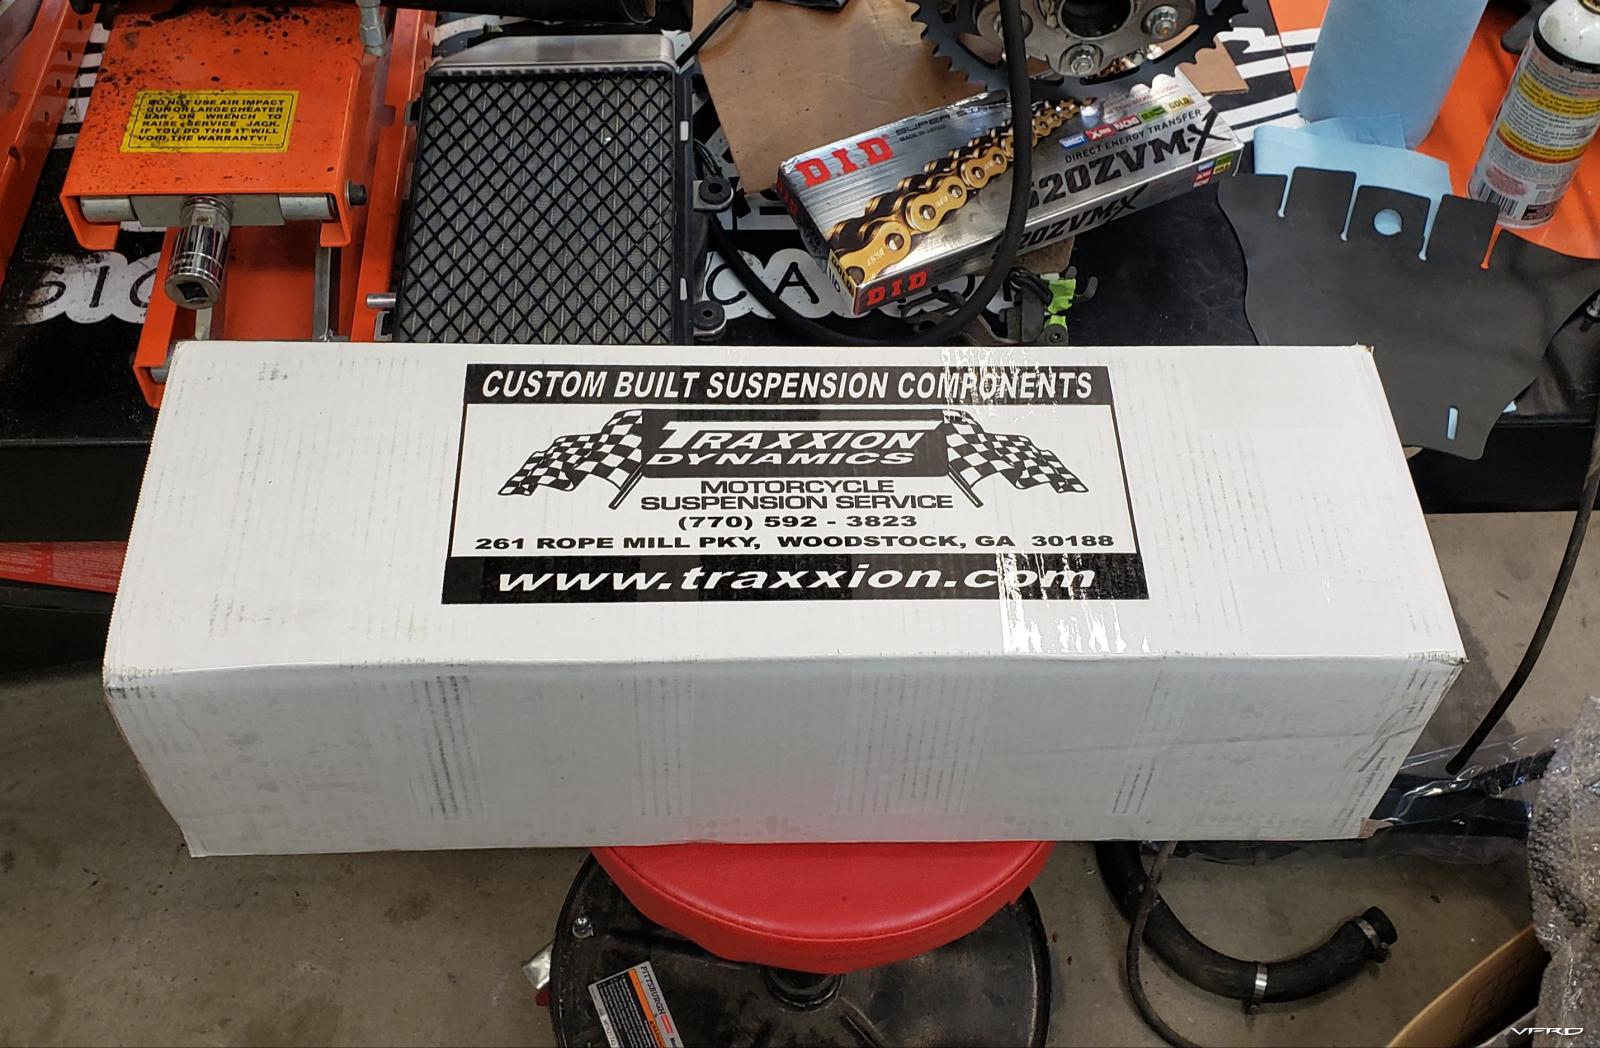
While working on that, Traxxion returned my goodie box
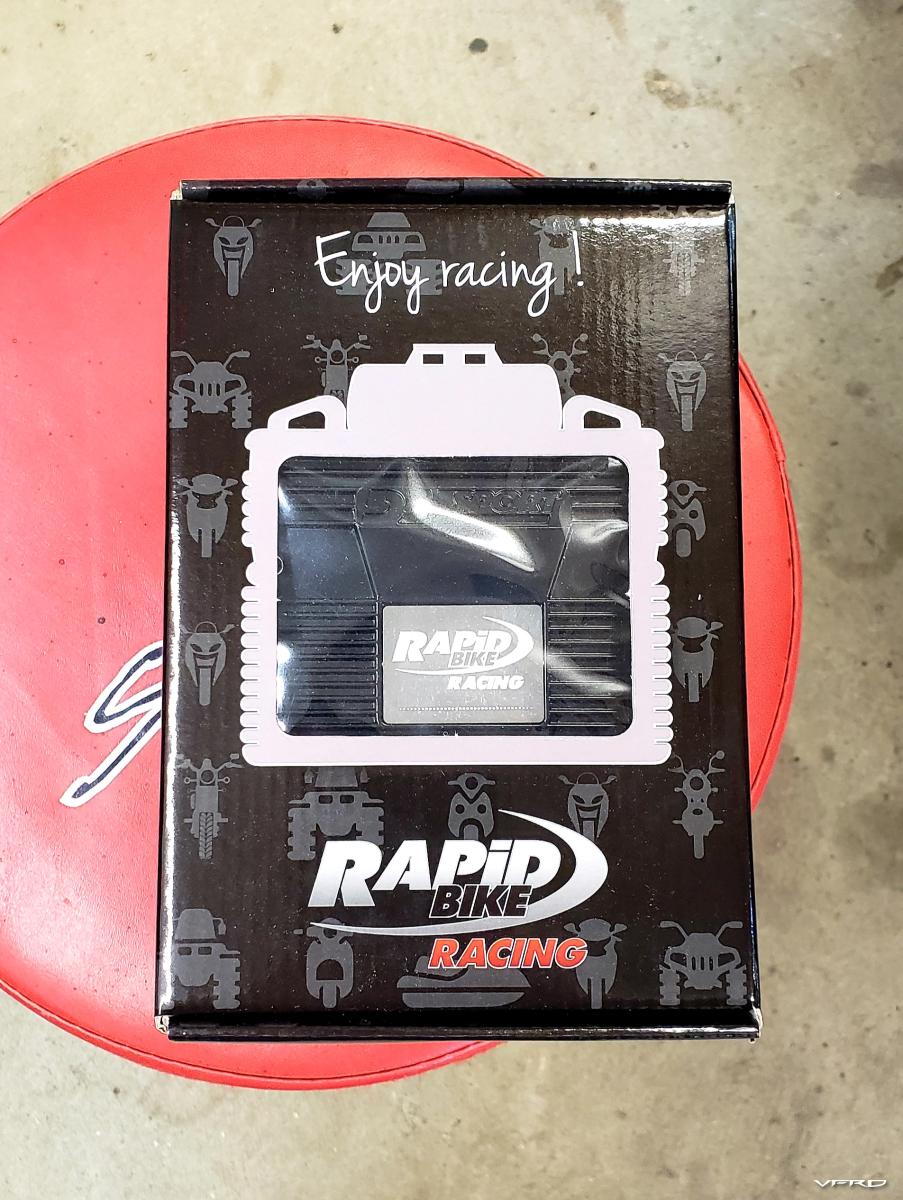
Rapid Bike delivered my Race unit
And I had a steel template cut that would allow me to test handlebar riser positions
More test fitting
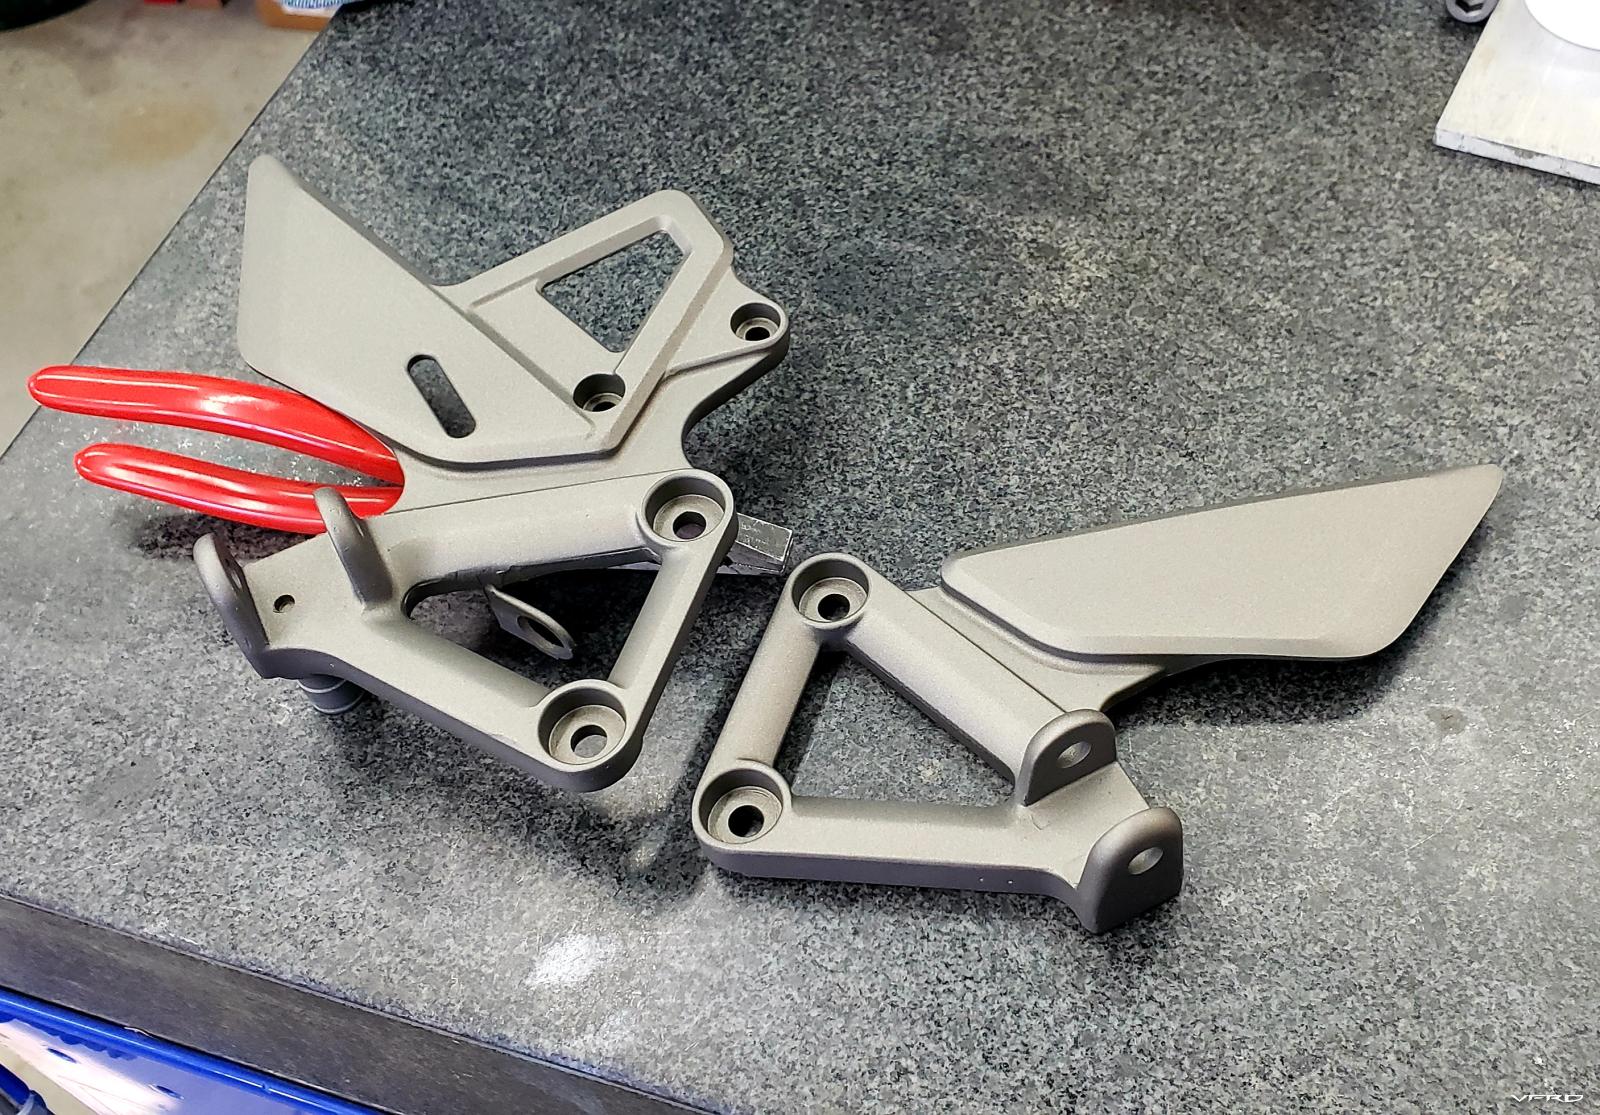
Then I squirrel-brained my way into fitting an R1 rear master to the VFR footrest
And made caliper spacers(ended up redoing these later)
Then I realized the caliper color would look great on the footrests, so...
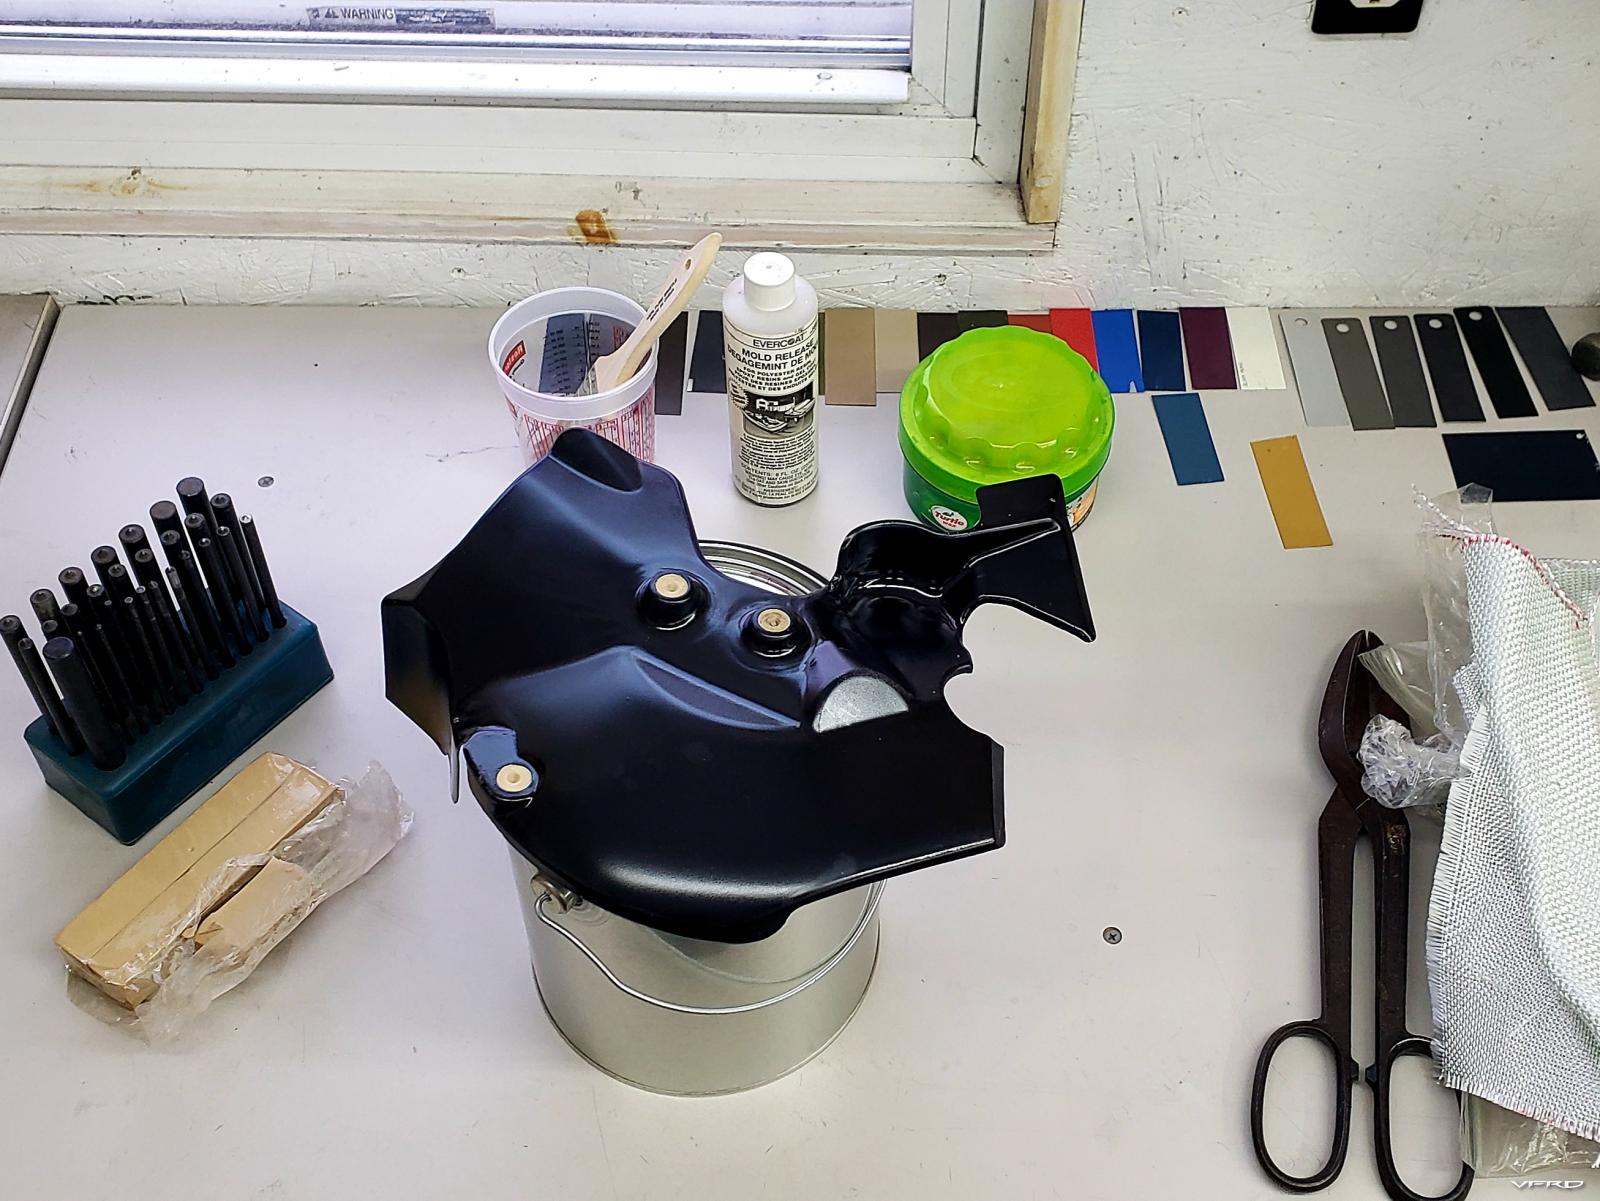
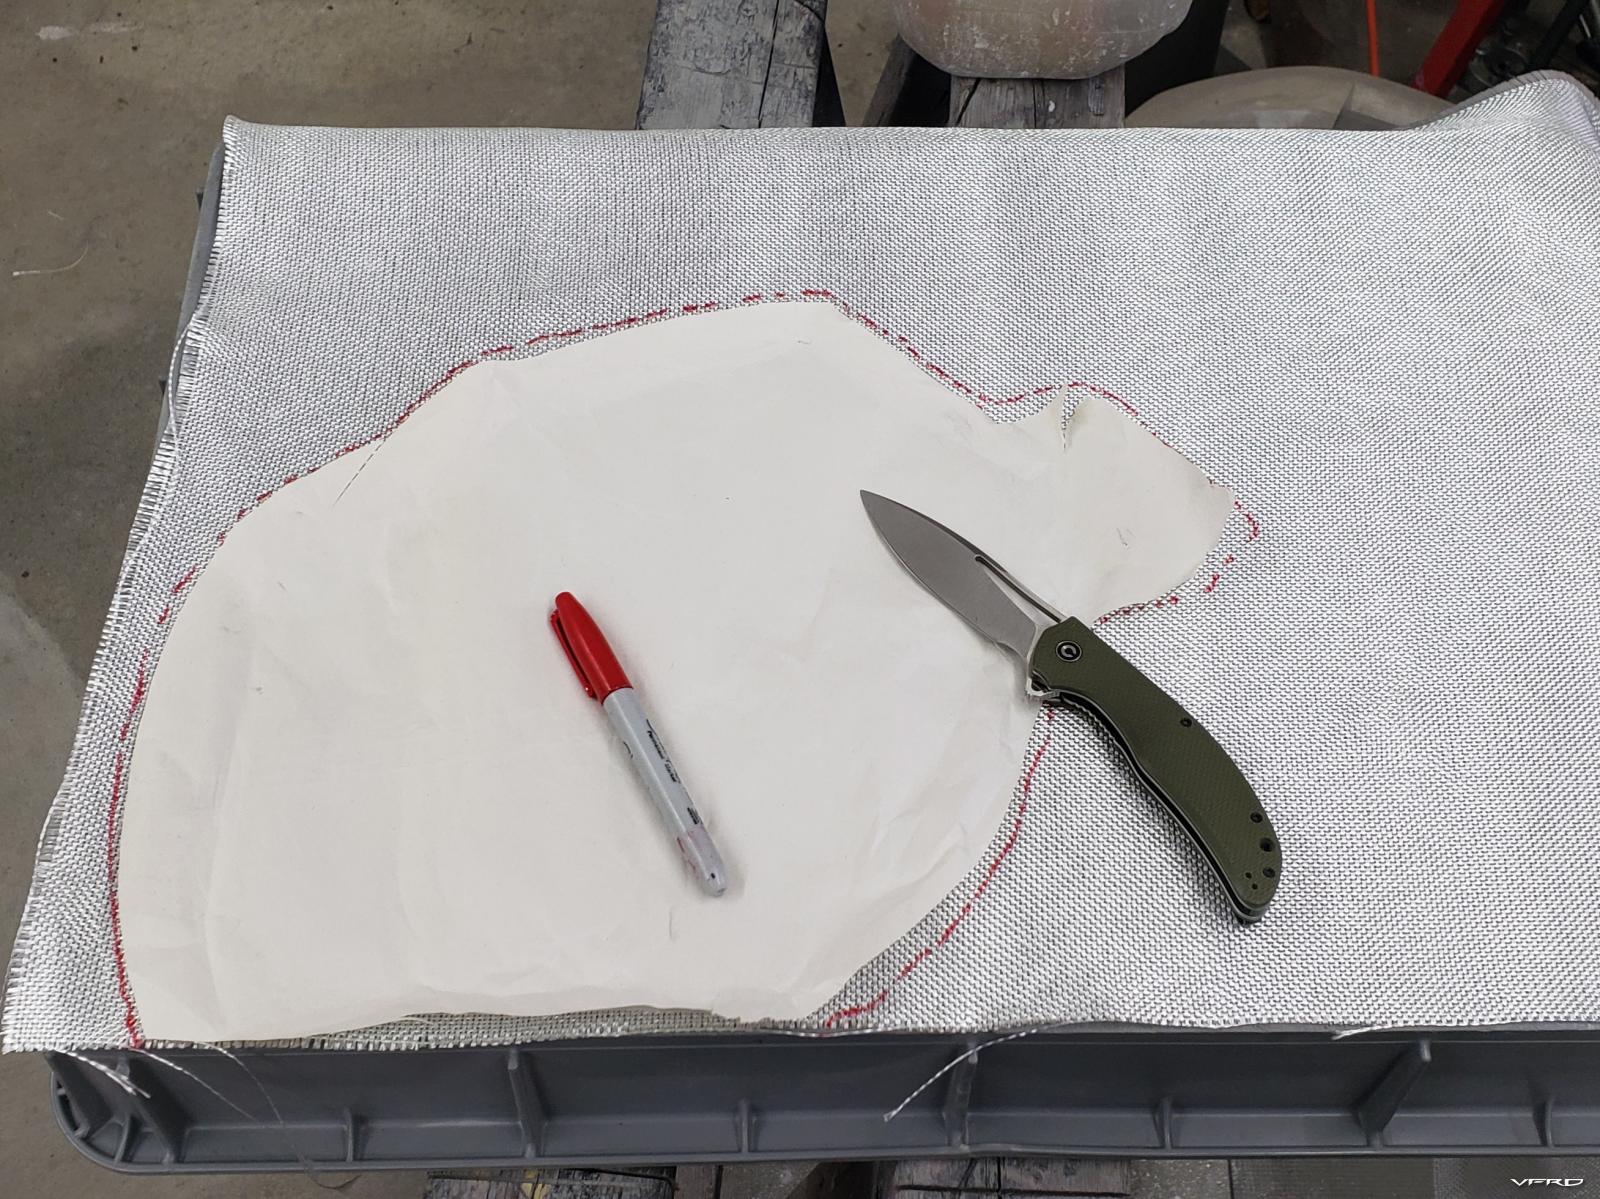
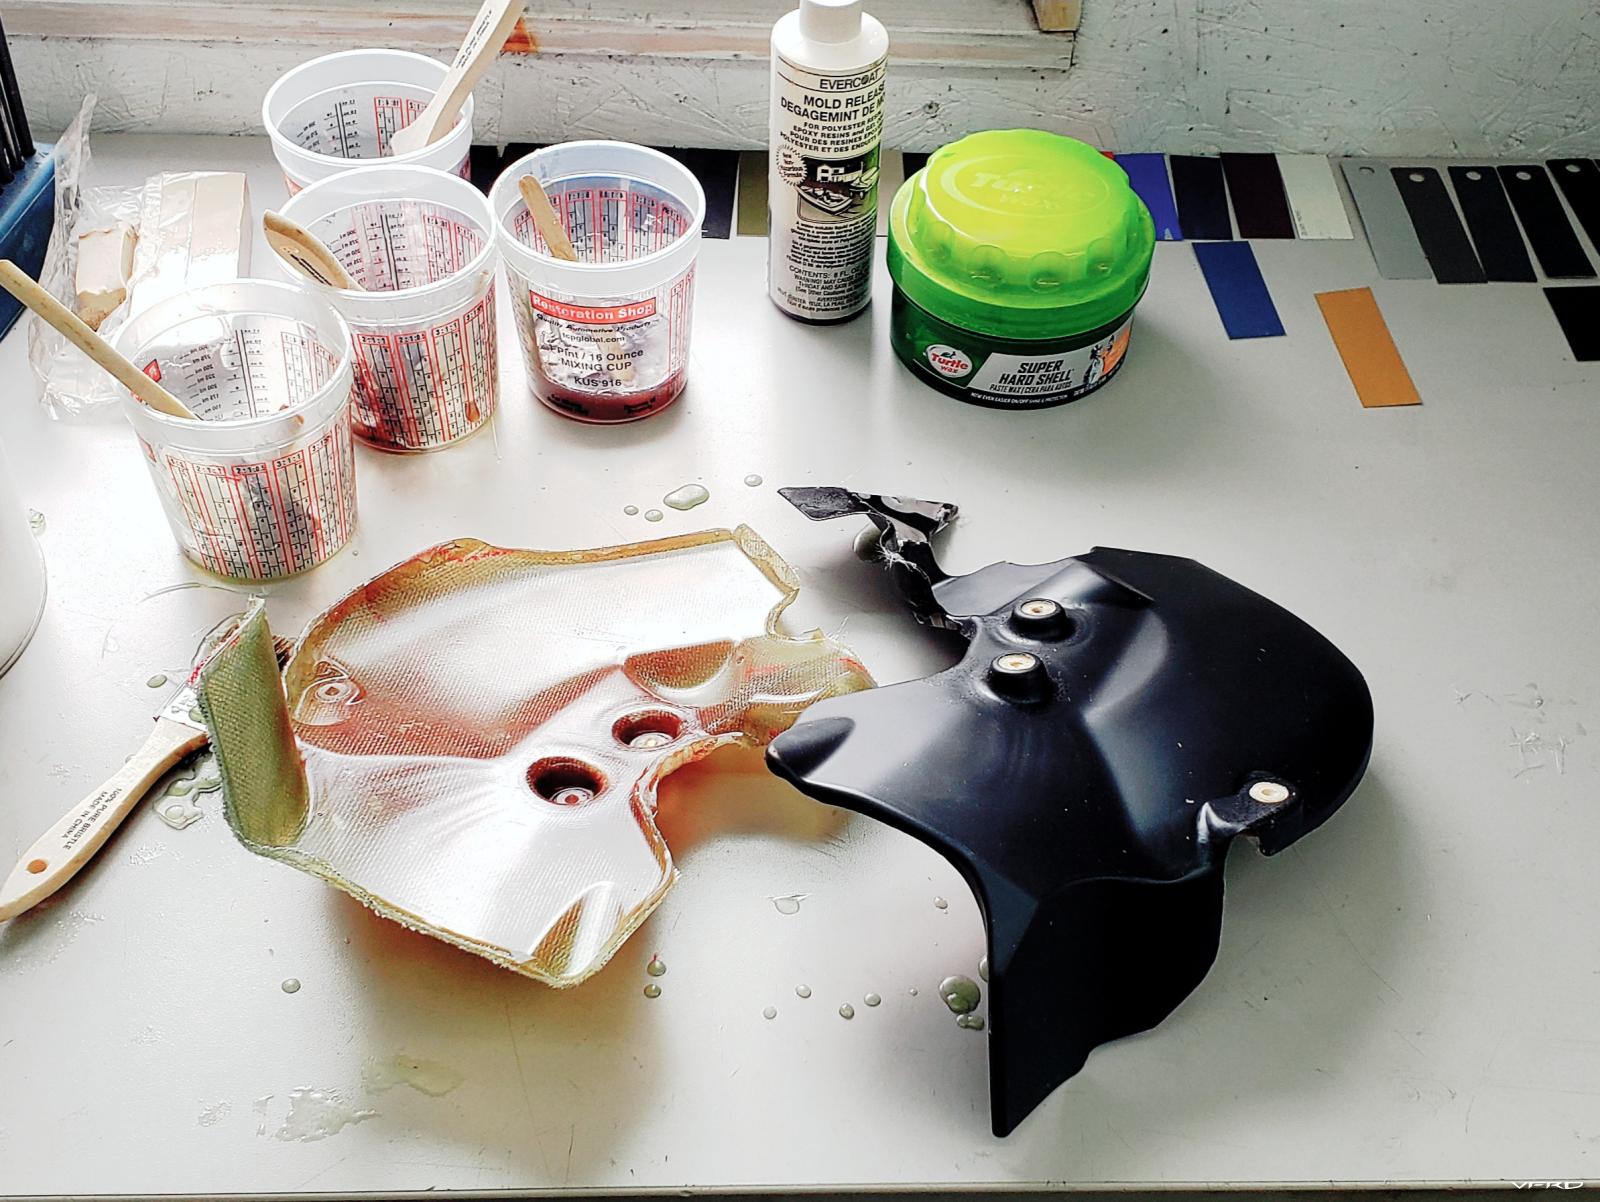
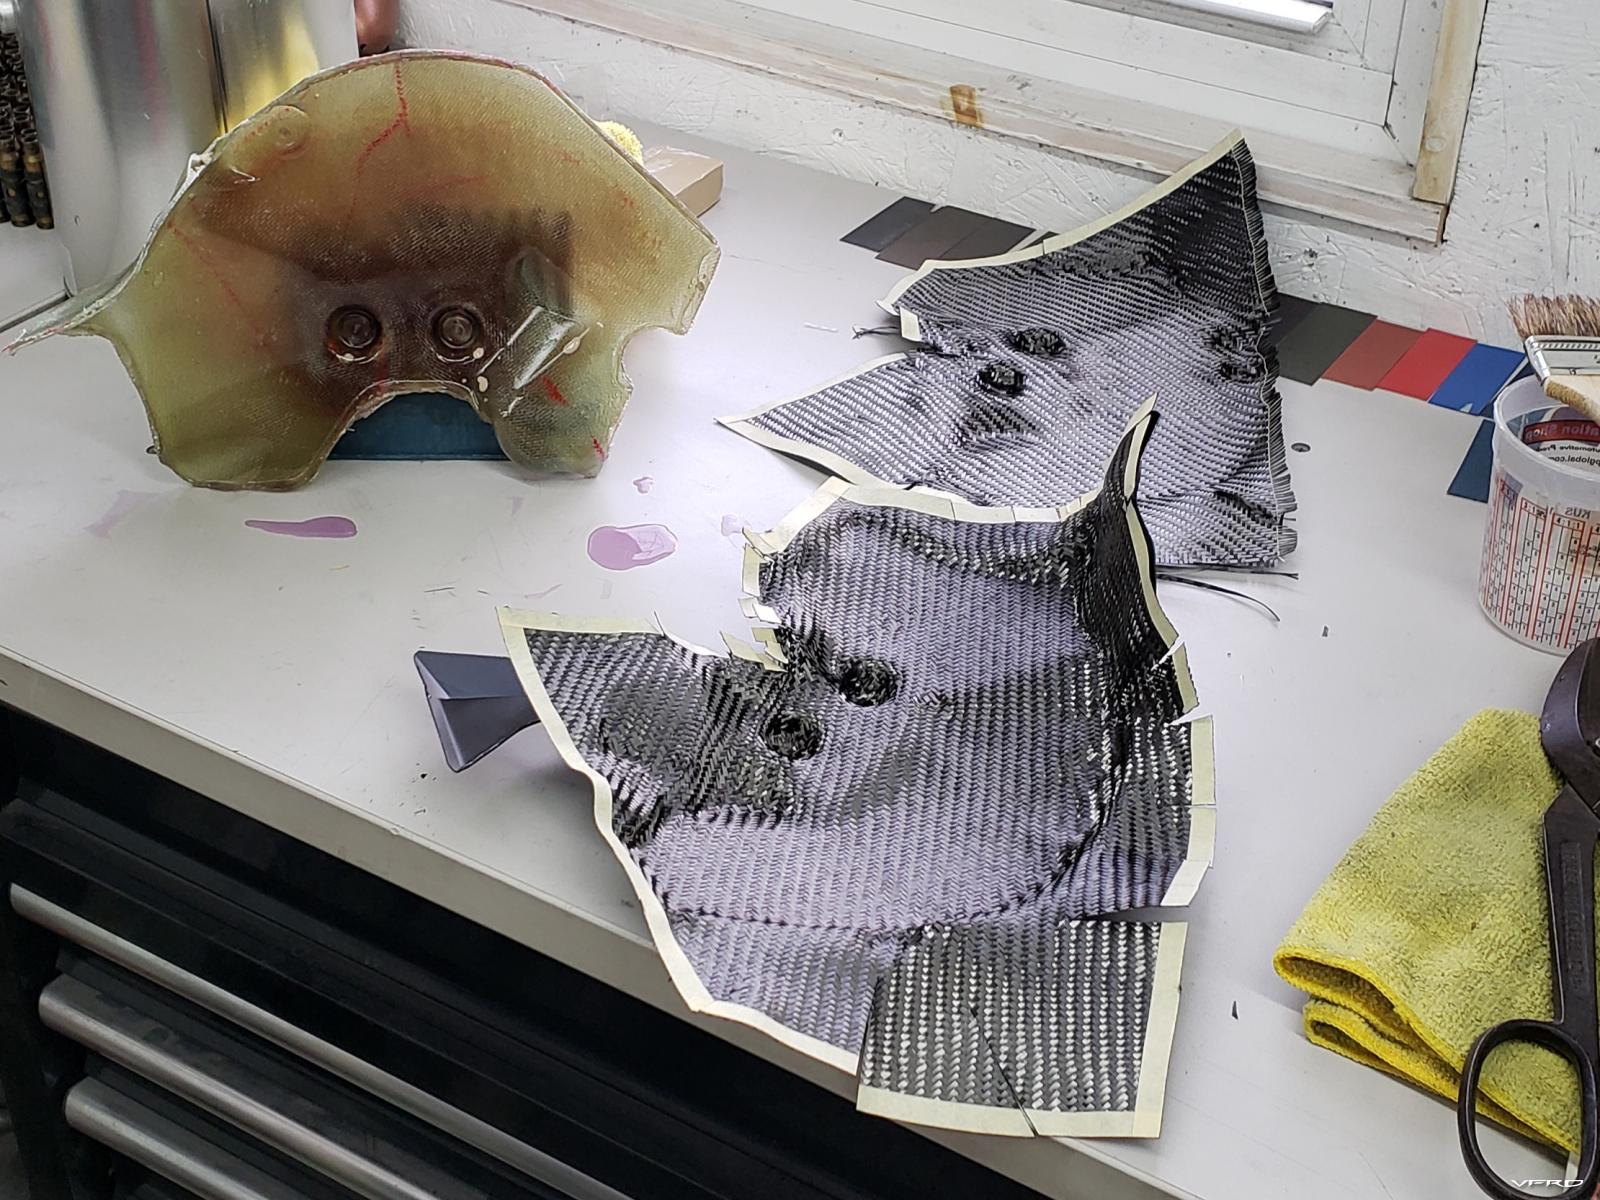
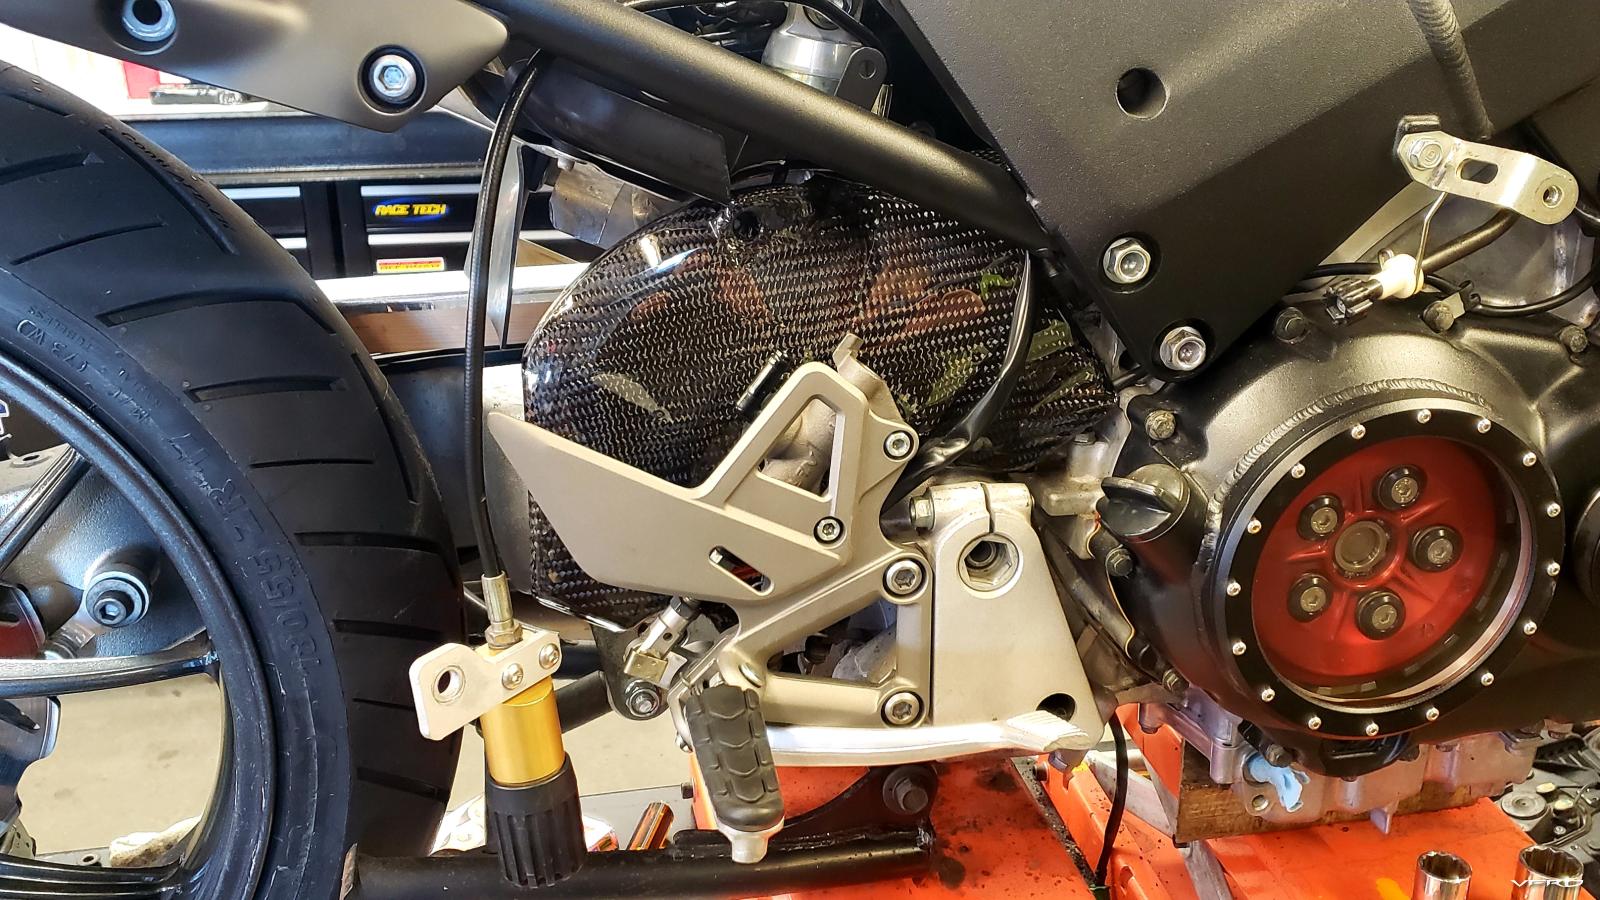
And there's no way I was going to reattach the grungy heat shield to my nice rearset, so I coated it black.
But then I also realized I could do better than that, so...
I managed to do some programming and milling while that was curing
Also made up some stainless steel fluid reservoir brackets, mimic'ing the Japanese "Ladybird" style
Then the redo on those caliper spacers...
And made the captured wheel spacers to locate the wheel perfectly on center in the forks...
-
 5
5
-
-
So yes, I did say supercharger on that list... crazy story in itself... it was purchased new by VFRD member Arrow in Istanbul, Turkey. He installed it and had it tuned in the Netherlands where it pulled 202hp on that particular dyno. He later removed it and sold it to another VFRD member zRoyz in Australia where it sat on a shelf for a few years. Roy listed it for sale in a VFR fb group and somehow it didn't sell for months, even though the price was good. I happened to see the listing months later when someone bumped the topic, and I jumped on it. That was back in 2016 or 17... I was happy to just own the kit and wasn't too fussed about installing it as I considered it an investment at the time.
Crazy story time... I dug the kit out of its hidey hole in my garage to look it over when I got into this rebuild. It was an odd time of the day, I hadn't touched it the kit in literally years and so I was pretty disturbed when I woke up the next morning to see I had received a fb message from Murray(phantom here) informing me that Roy had been in an accident during a group ride and did not survive his injuries. The crazy thing is, after calculating the time difference, I was looking through the kit and reflecting on how it came to my possession at the same time the accident occurred. I got the feeling it was my sign to go all out and throw the kit and the full kitchen sink at the bike, and bring it to the VFRD Spring ride to get it in front of Roy's online friends and do a burnout for him.
Look at these goodies...
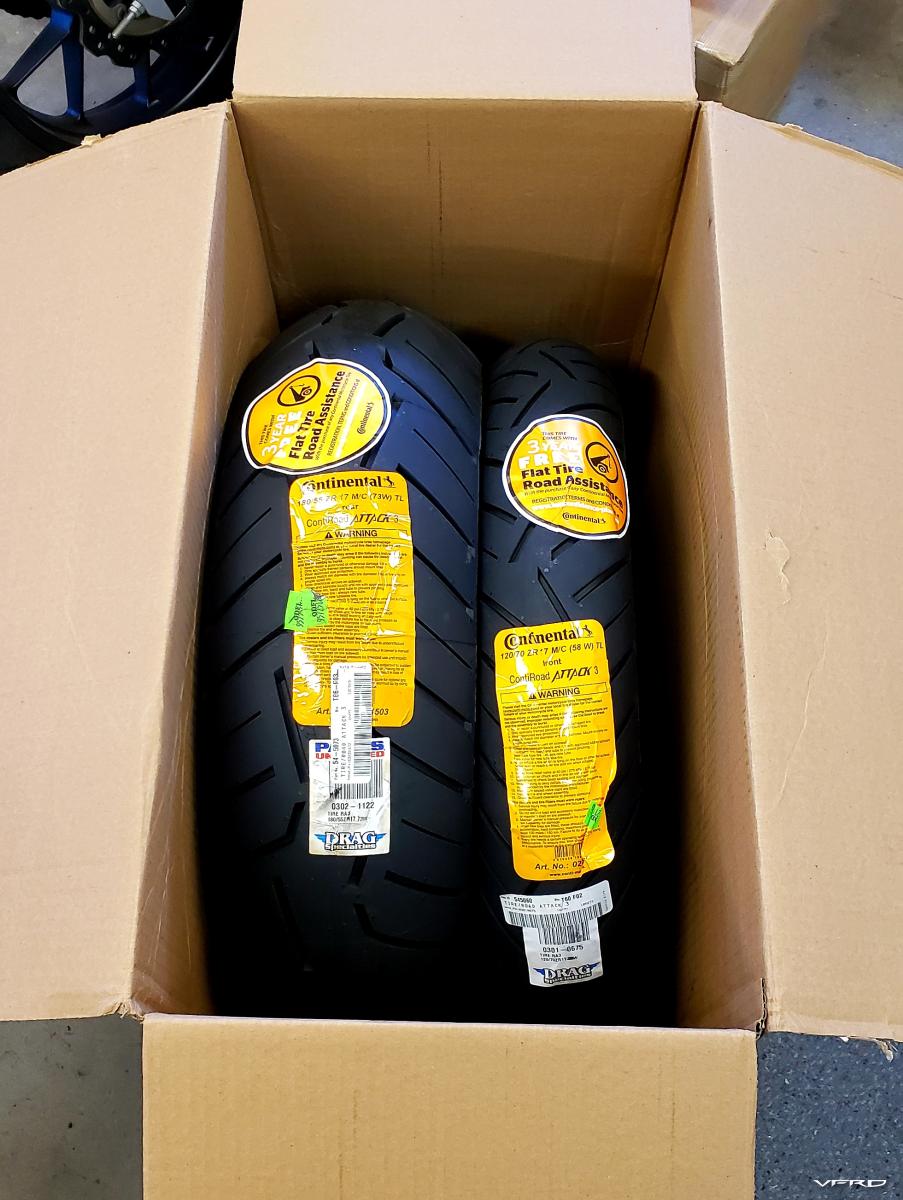
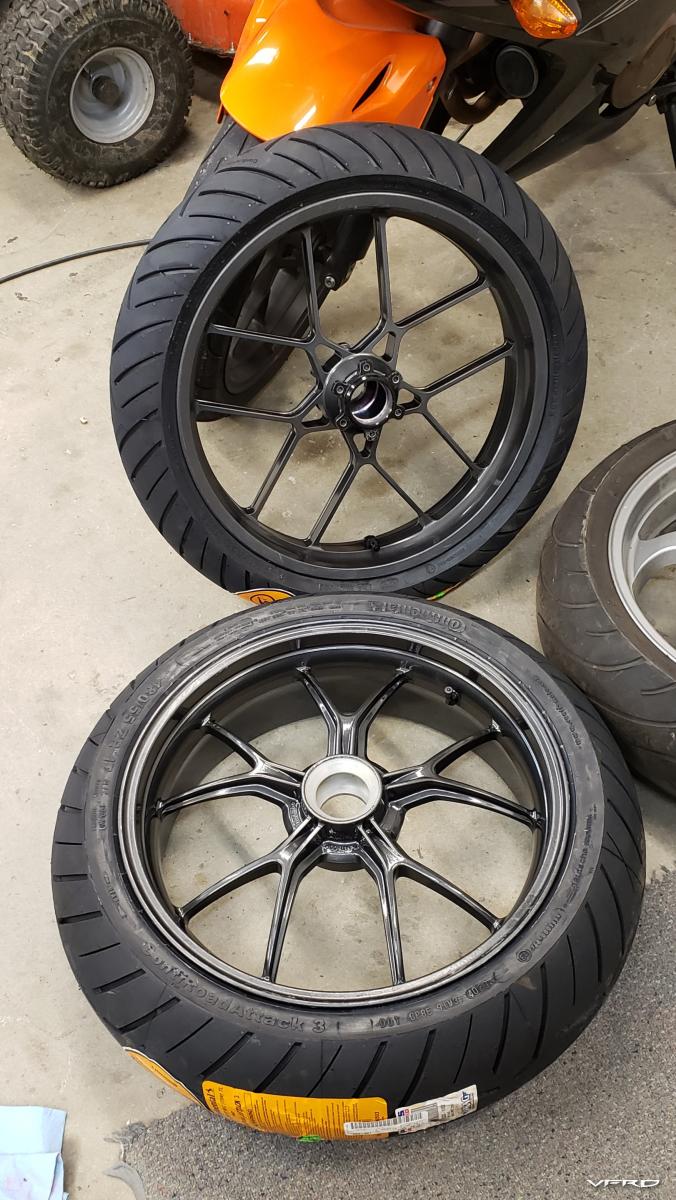
I went with Conti RA3's and very glad I did - although I did quickly regret ordering a 180 to fit on the 6" 1098 wheel. The profile was jacked and I ran off the edge of the tire on the first ride nowhere near the lean limit. I ended up putting about 50 test miles on it and switched out to a 190 in TN right before the spring ride.
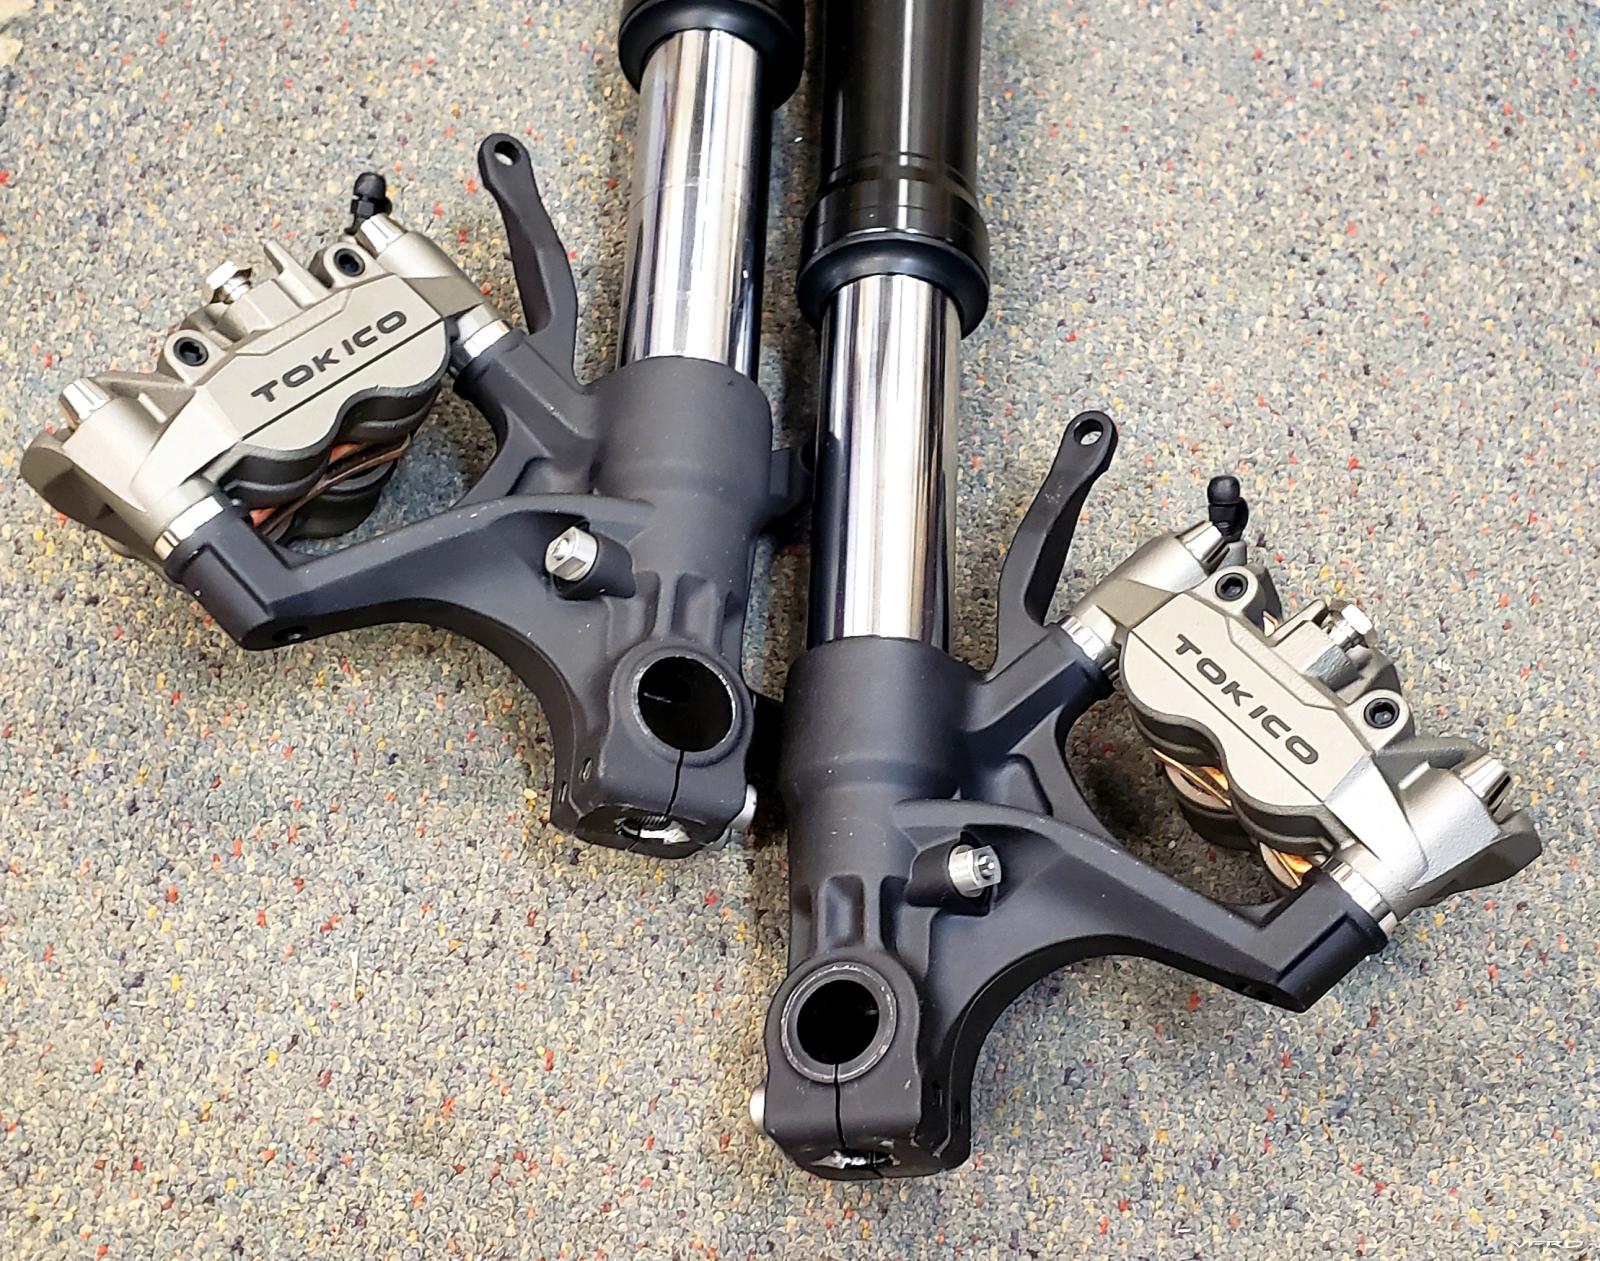
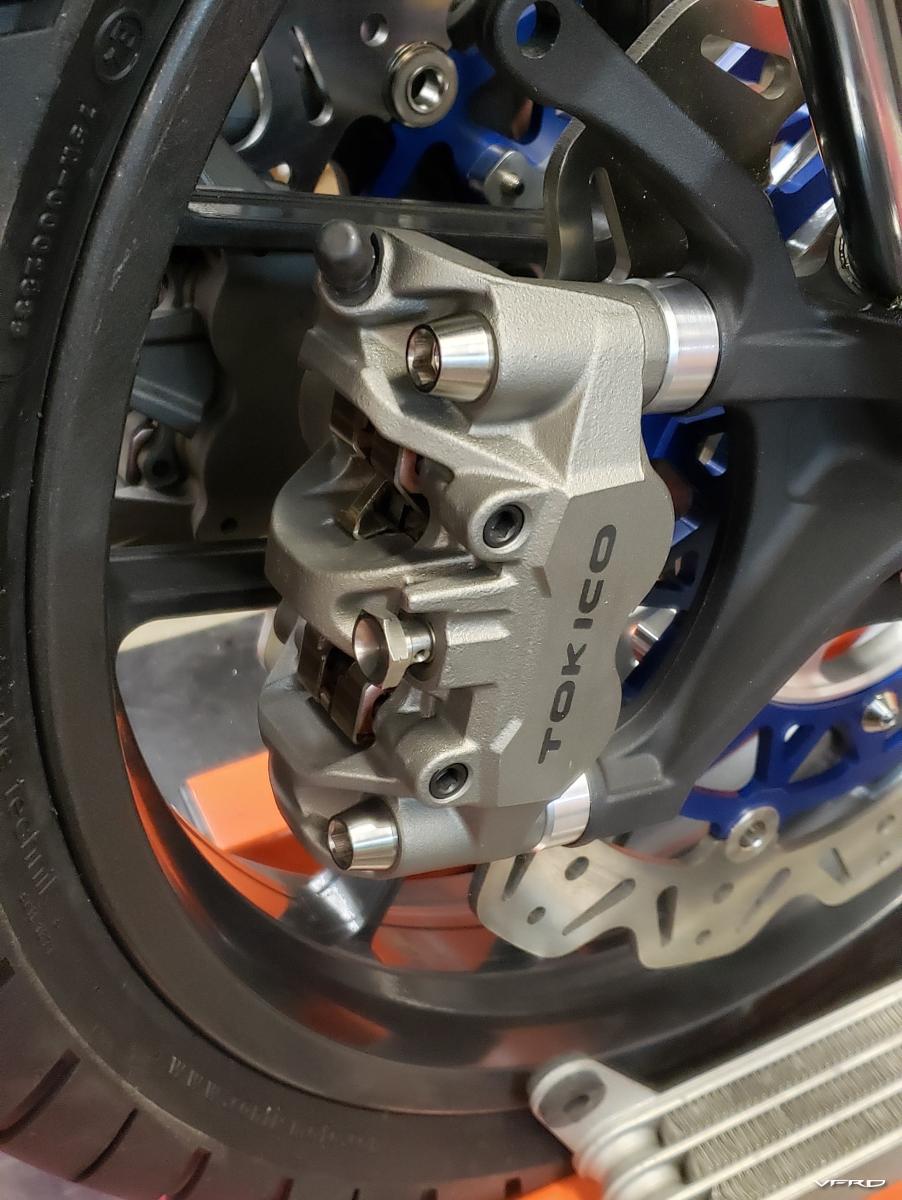
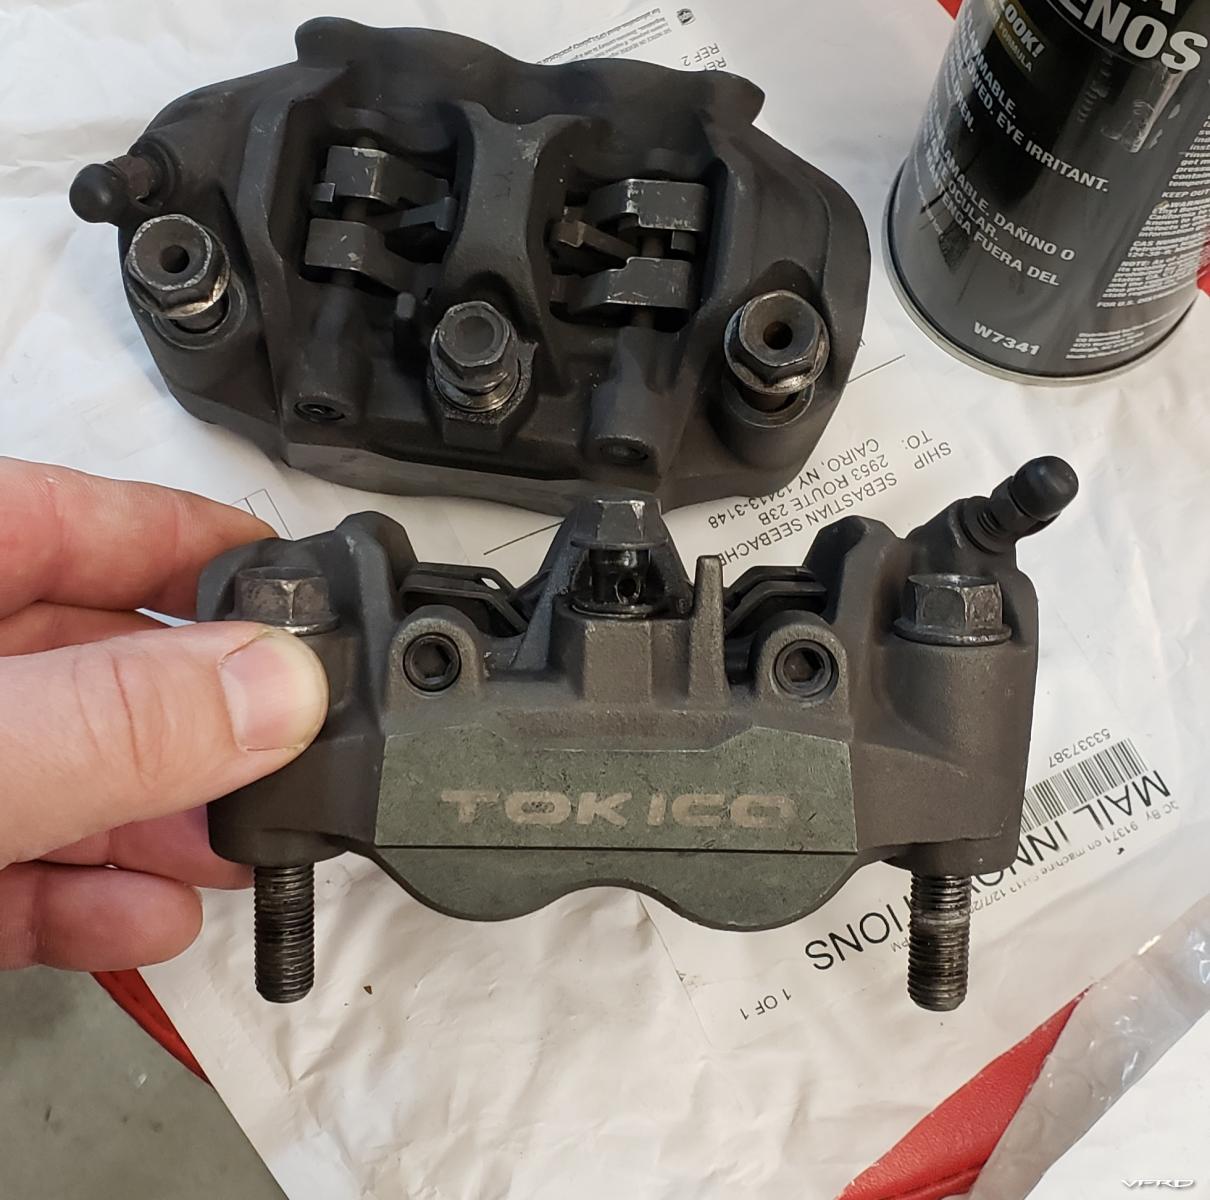
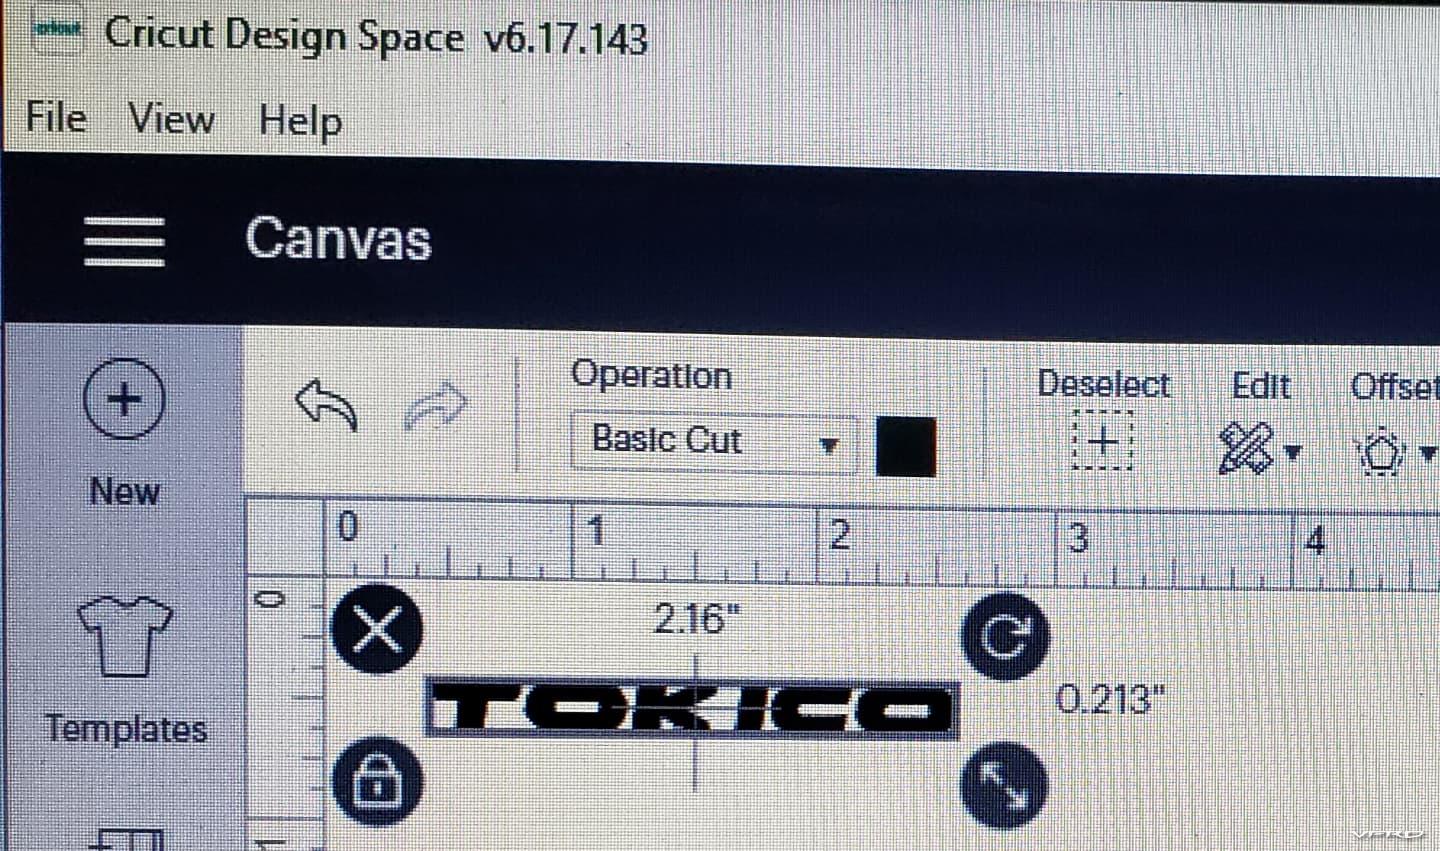
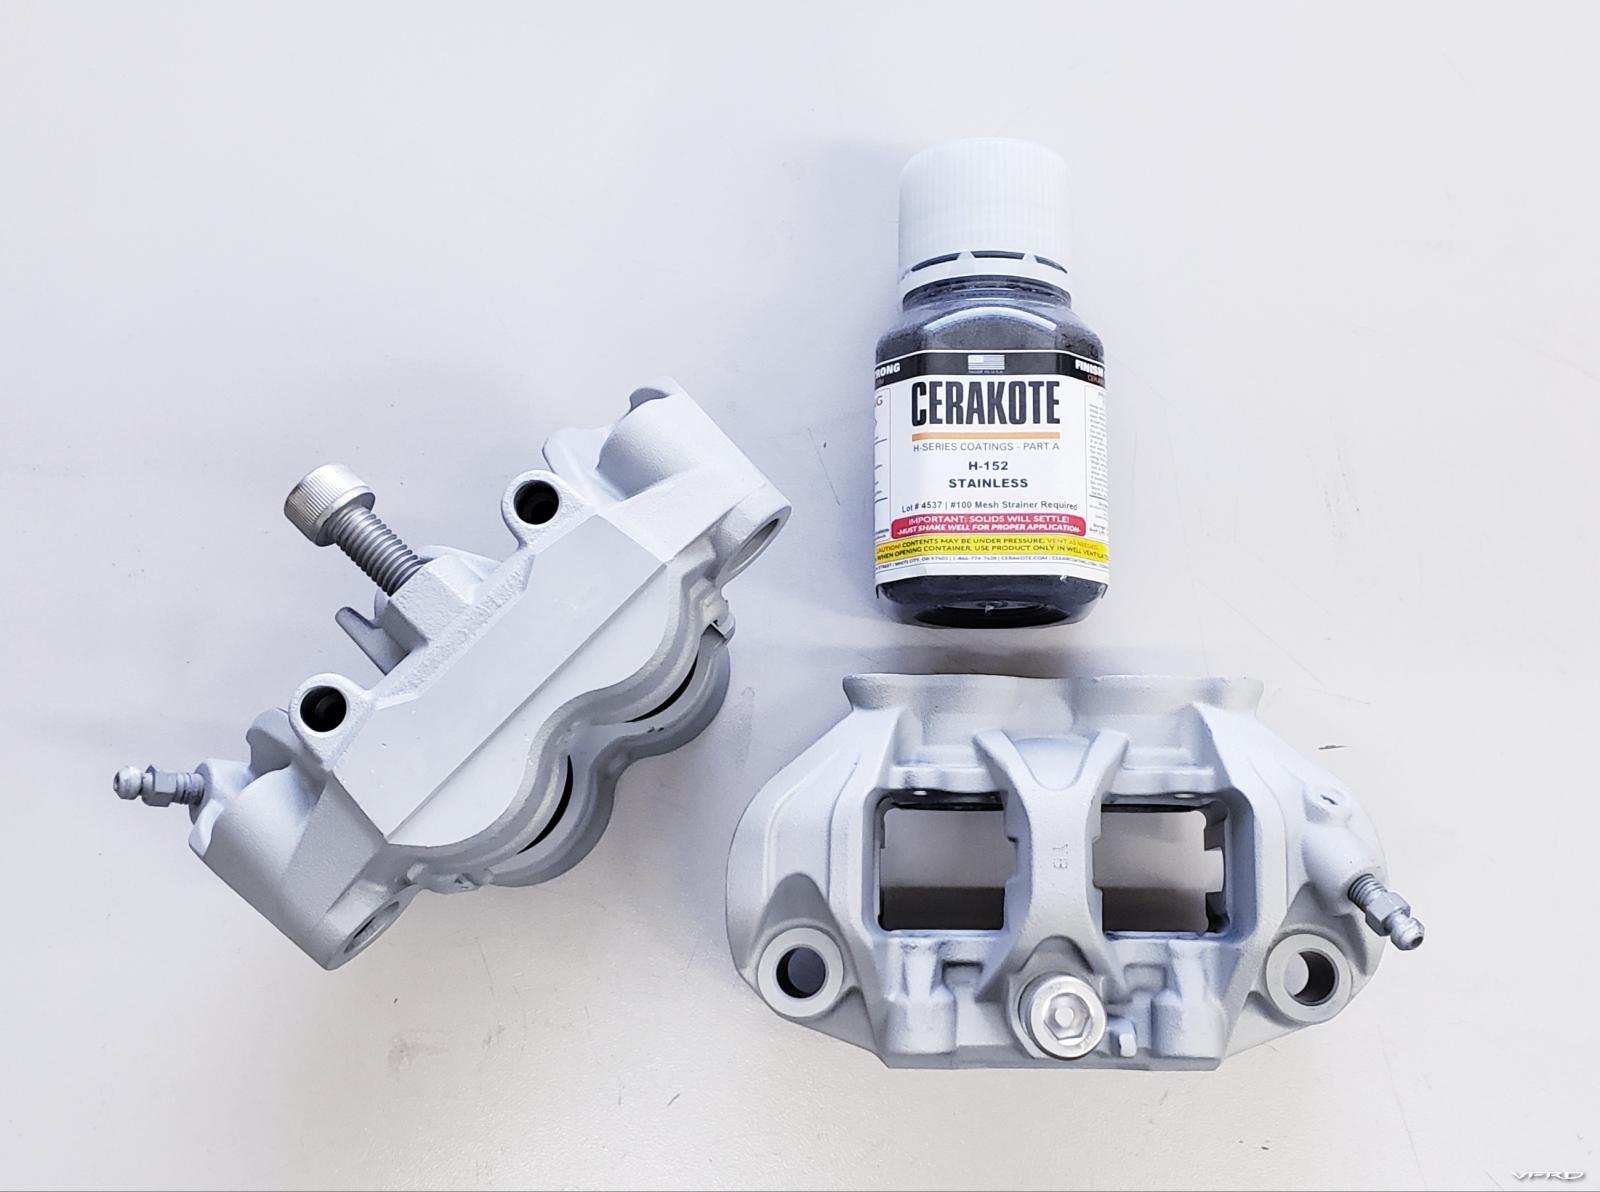
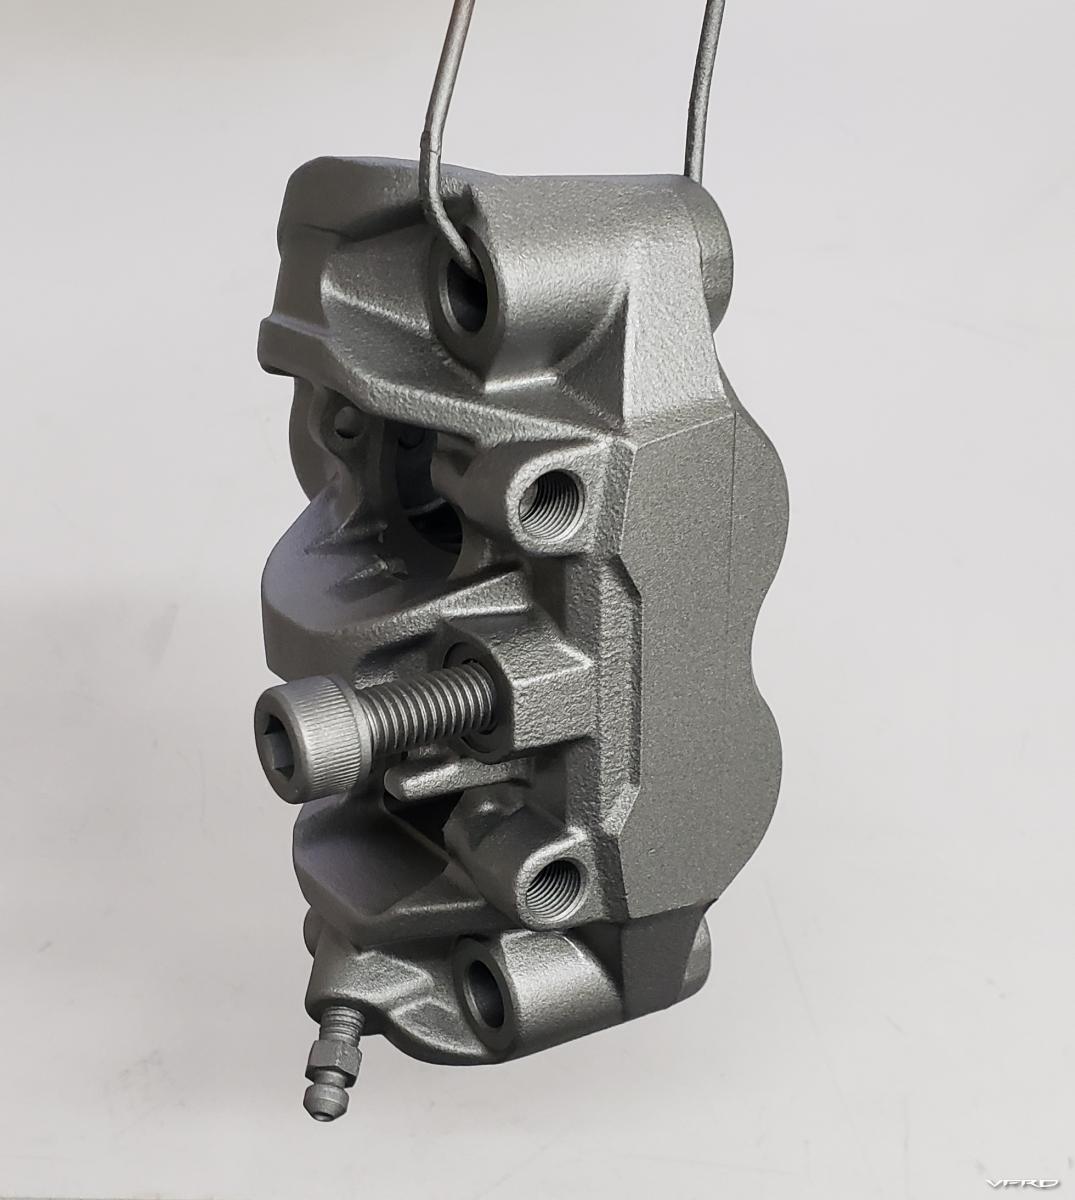
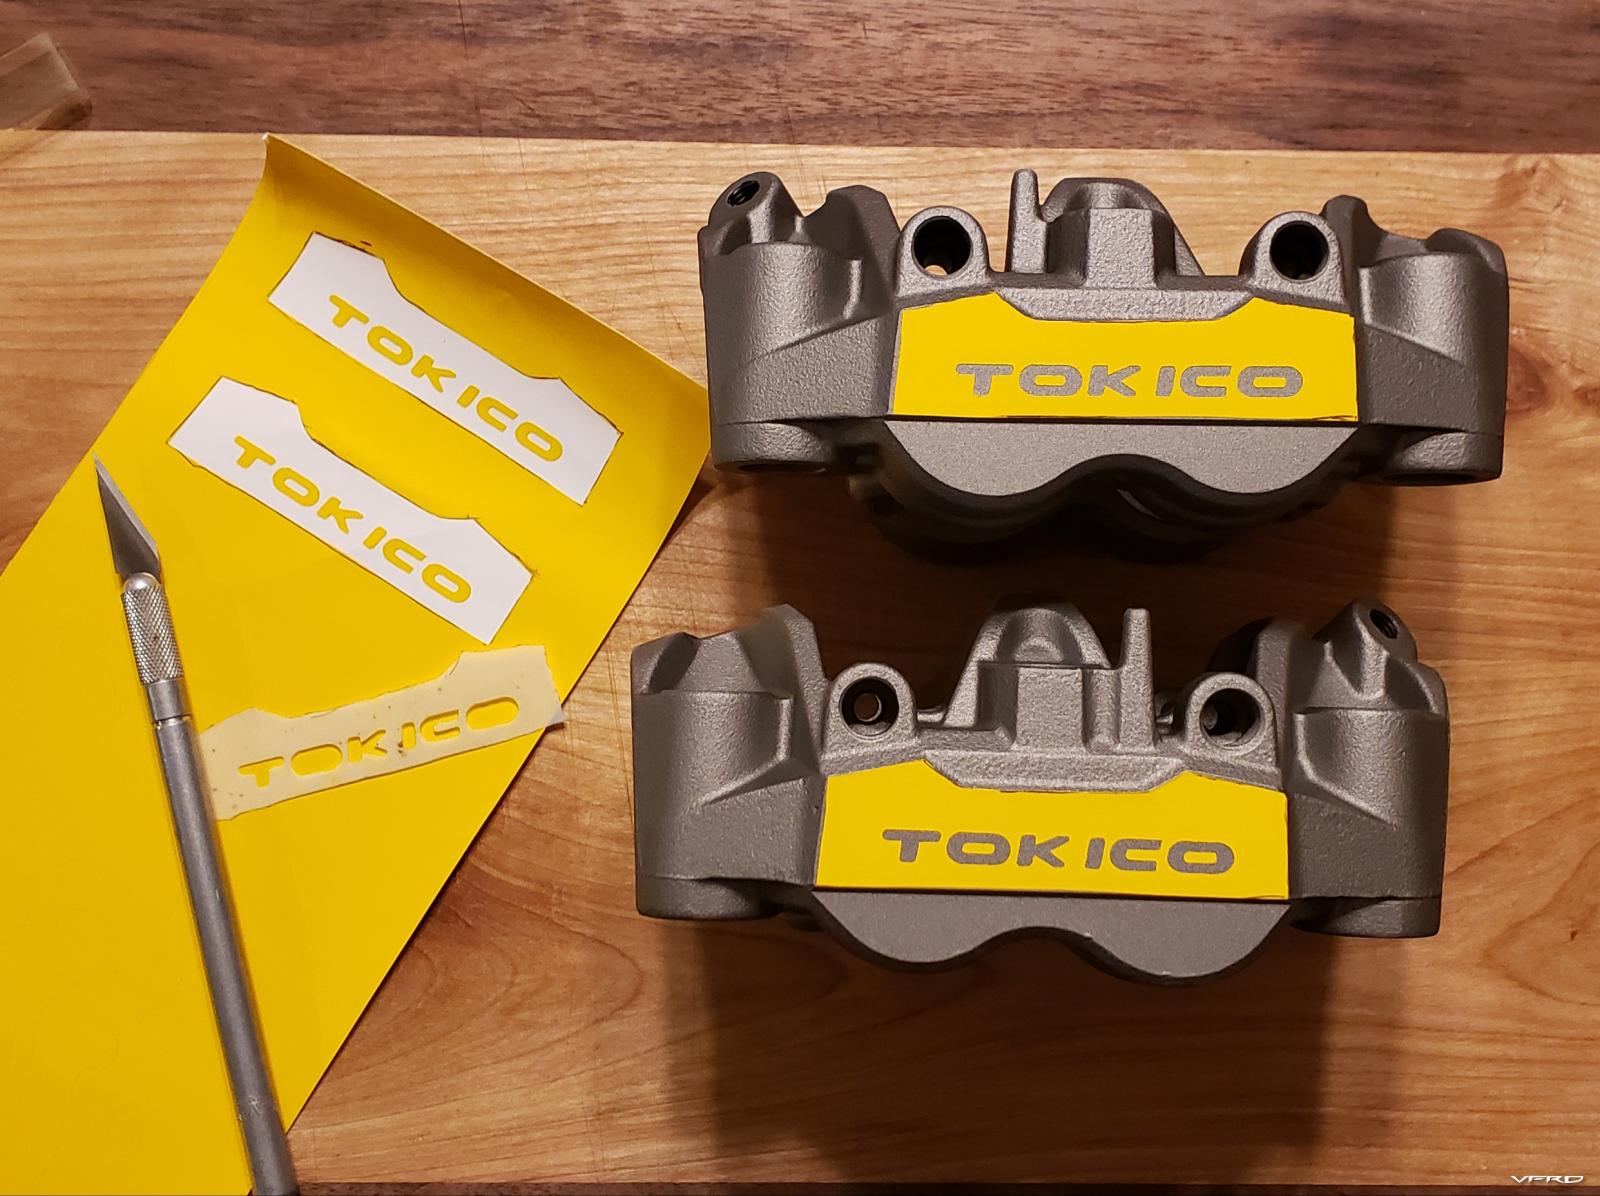
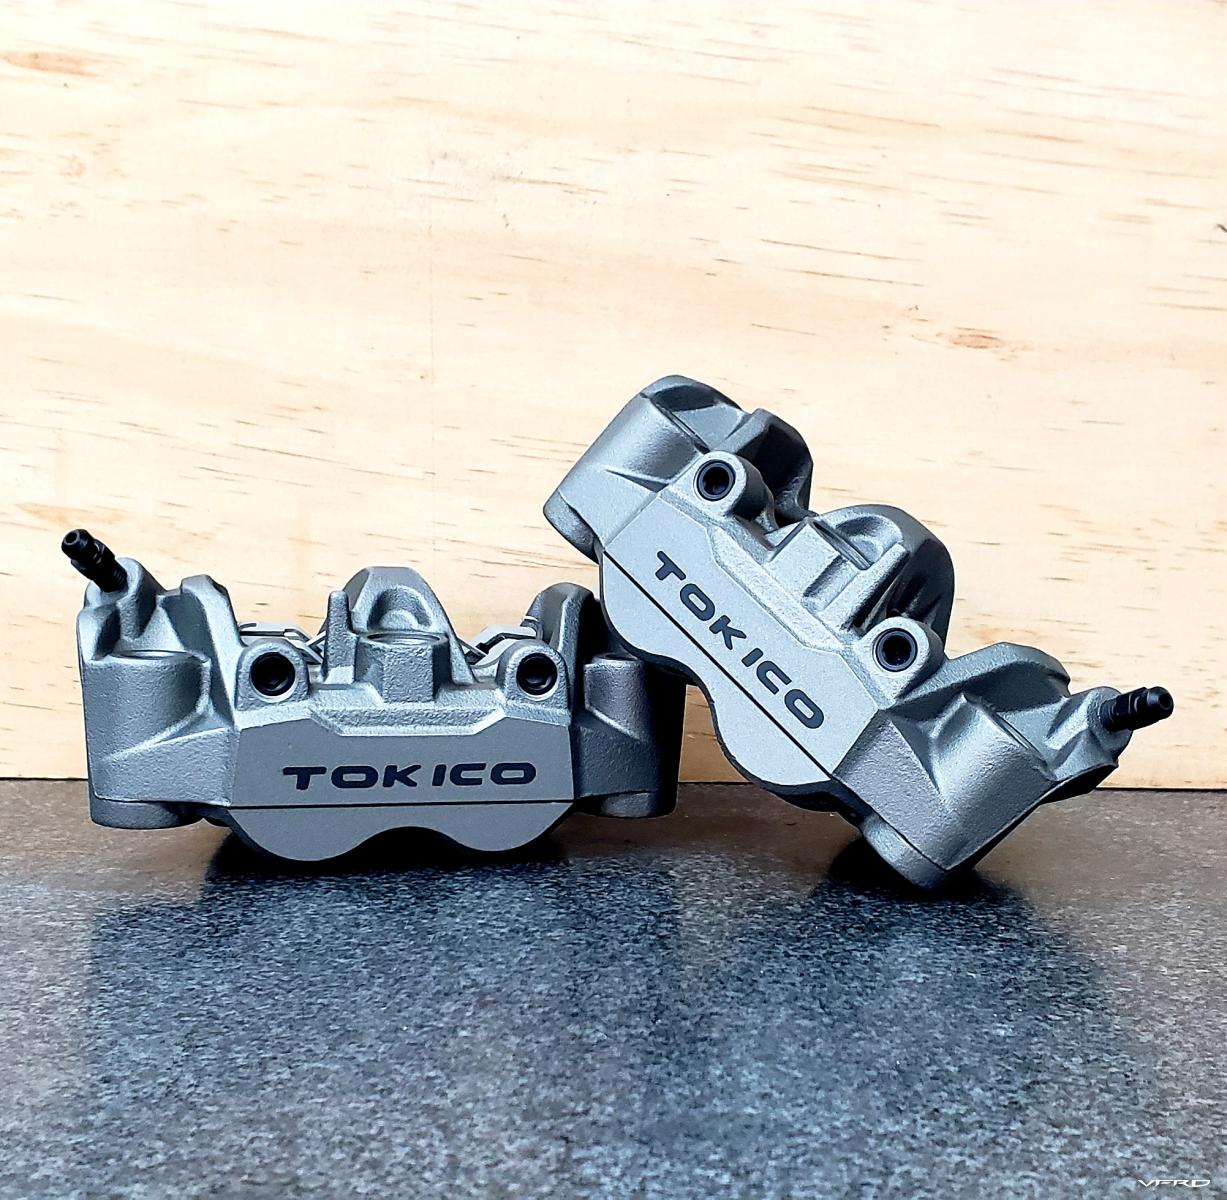
For the front brakes, I went with a set of CBR1000RR monoblock calipers. I bought a used set on ebay and went to town refreshing them. I have set up a Cerakote application process in my shop and I coated these in Stainless and Graphite Black lettering. I used my vinyl cutter's software to create layout templates and stencils for the lettering.
Cerakote is a cool product, it is MILES above and beyond using powdercoat. It's very thin and very tolerant of high heat, abrasion, and solvent. I have submerged test samples in both brake fluid and acetone overnight and the coating was not phased at all.
As received
Prepped
First color
Stenciled
Done
Test fit with fresh titanium bolts
Speaking of titanium, I sprinkled some out back too...
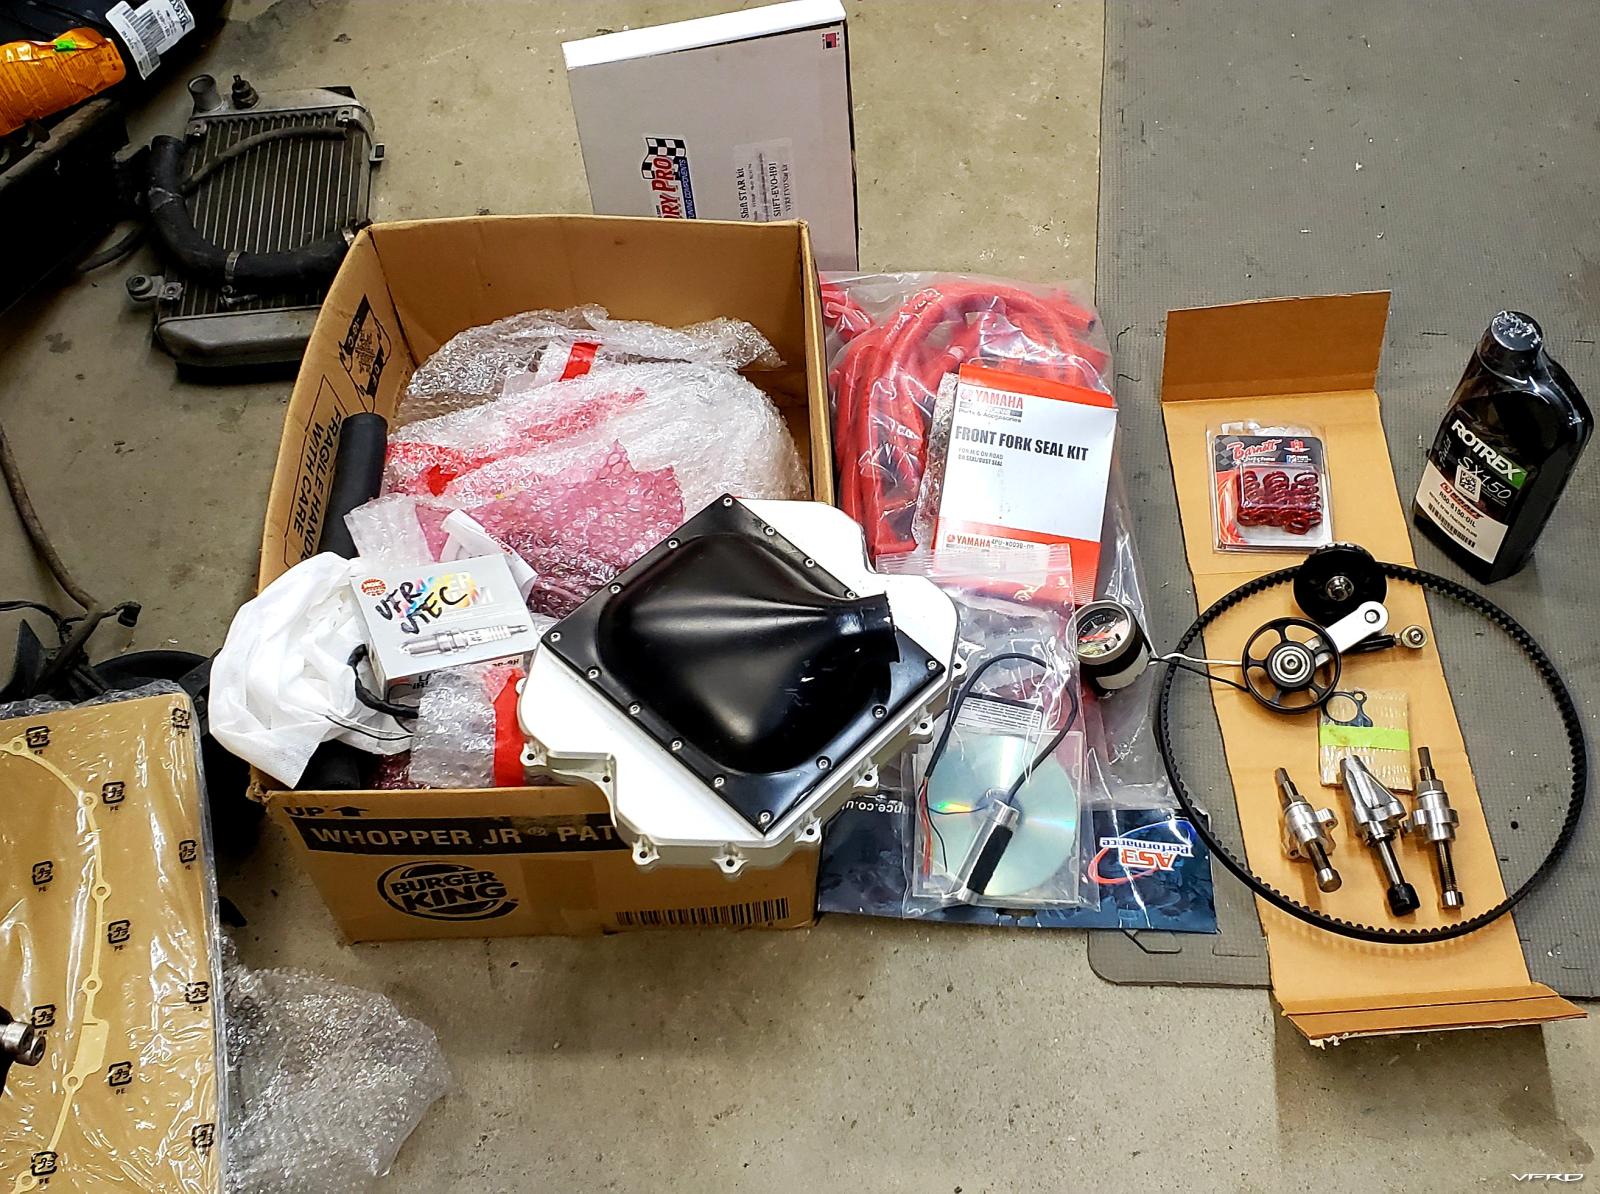
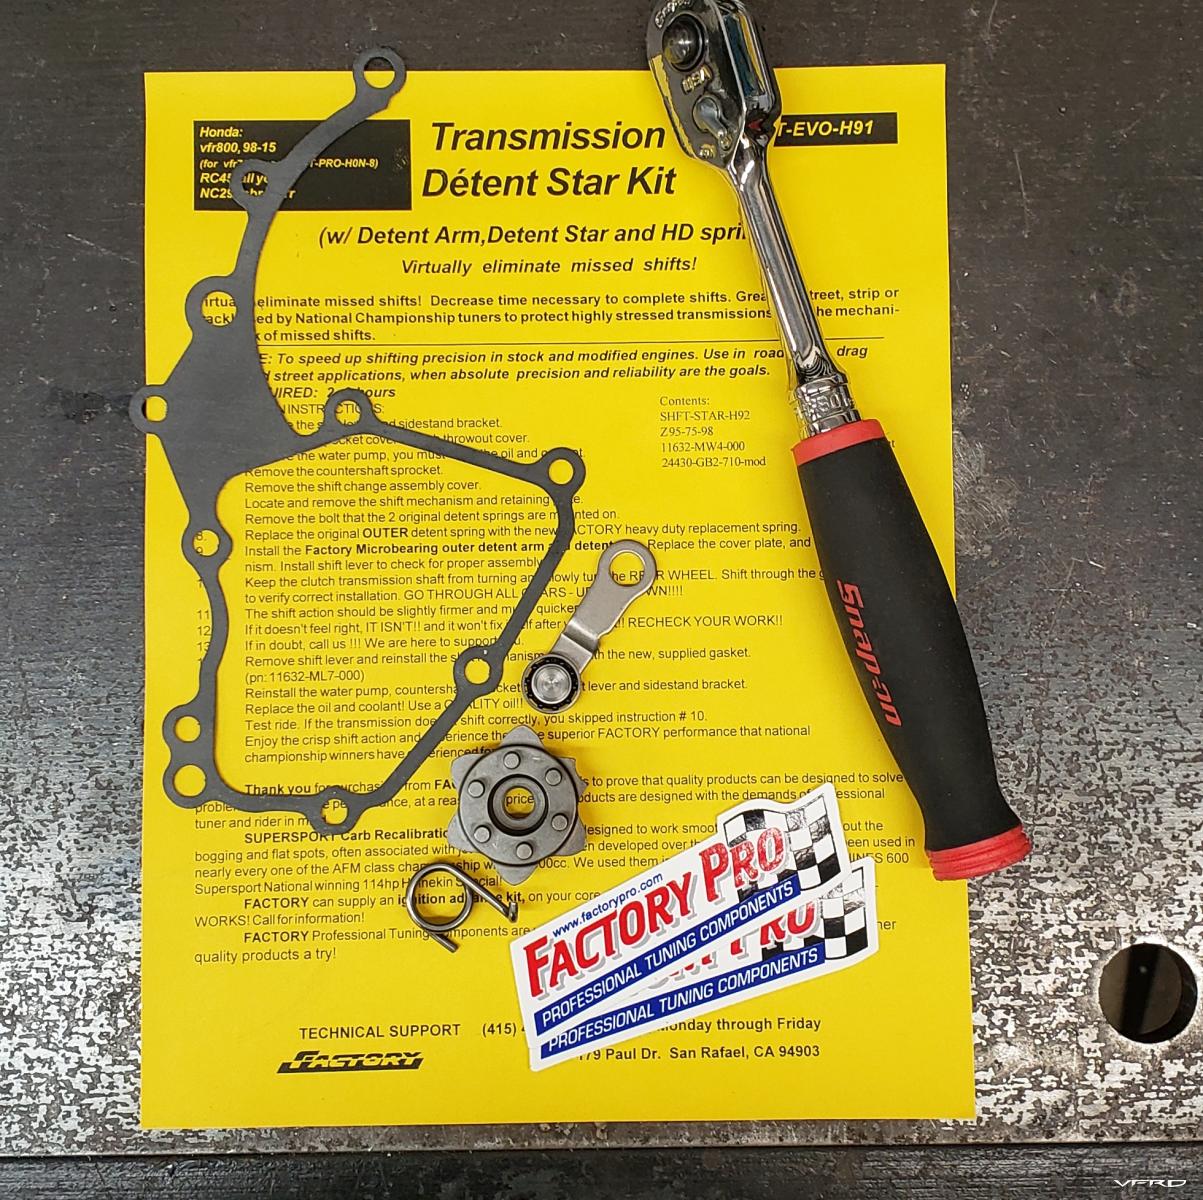
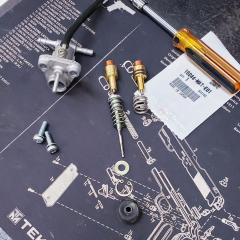
No easier time to install the Factory Pro shift kit, let's have at that
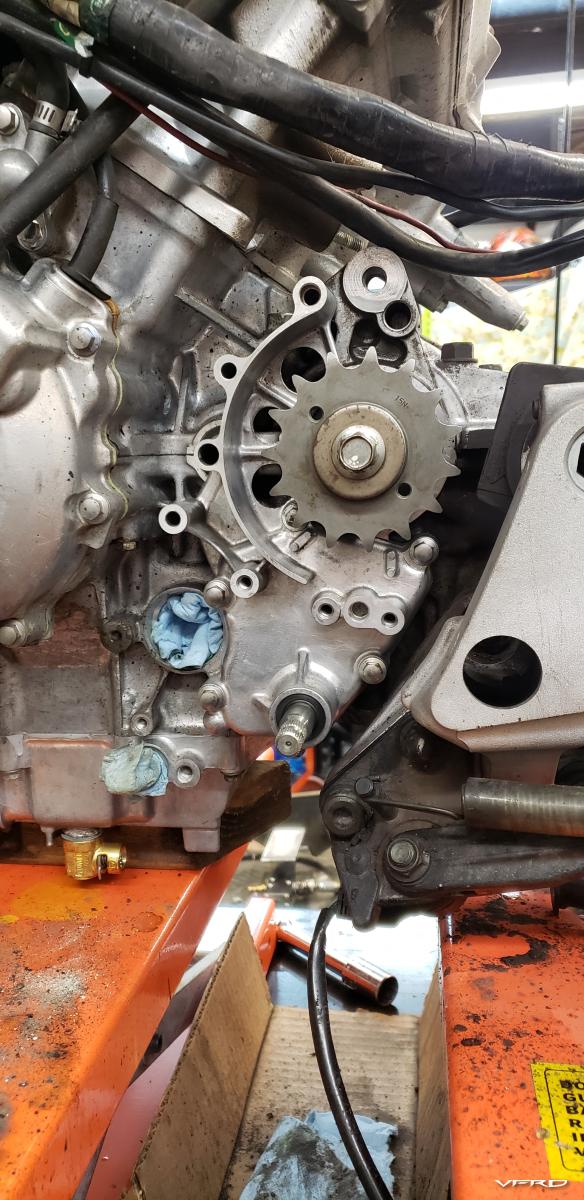
Top it off with a new front sprocket
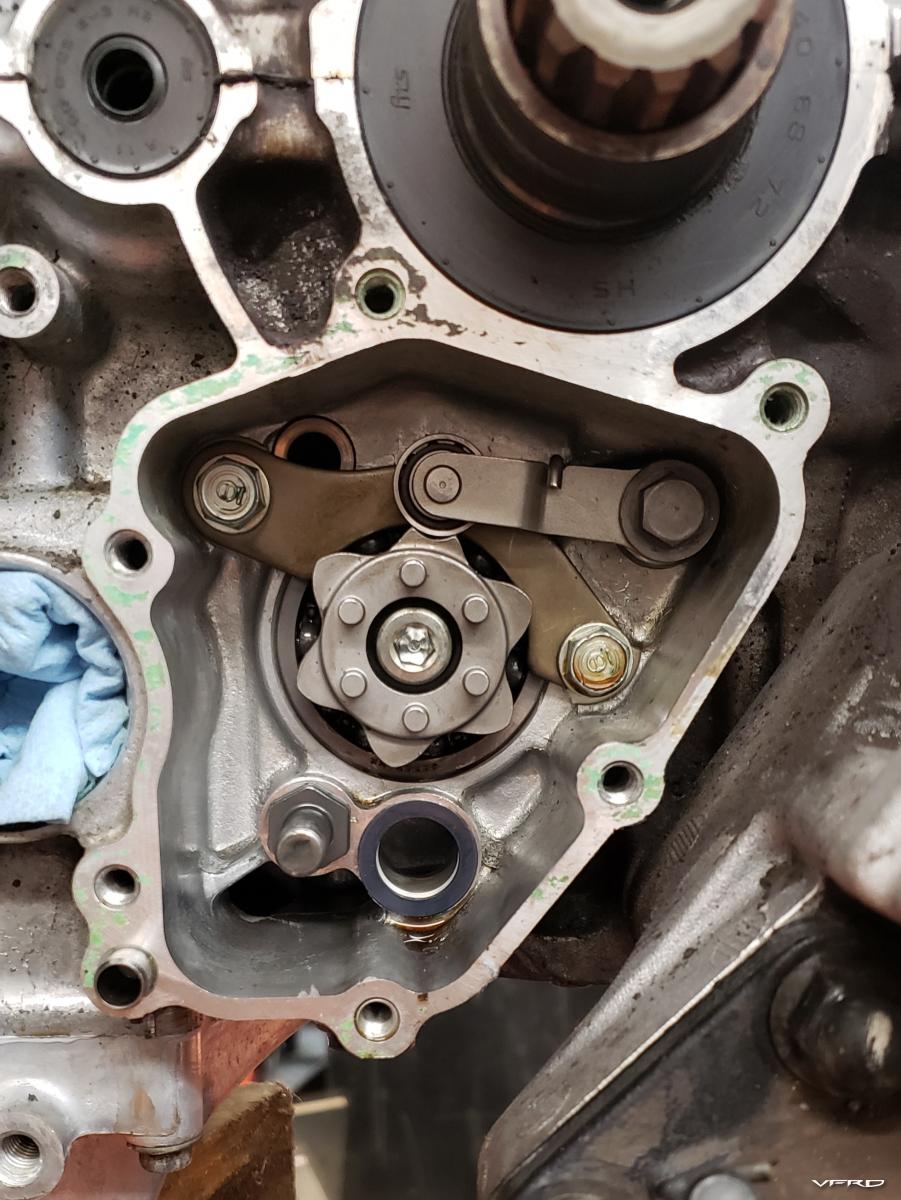
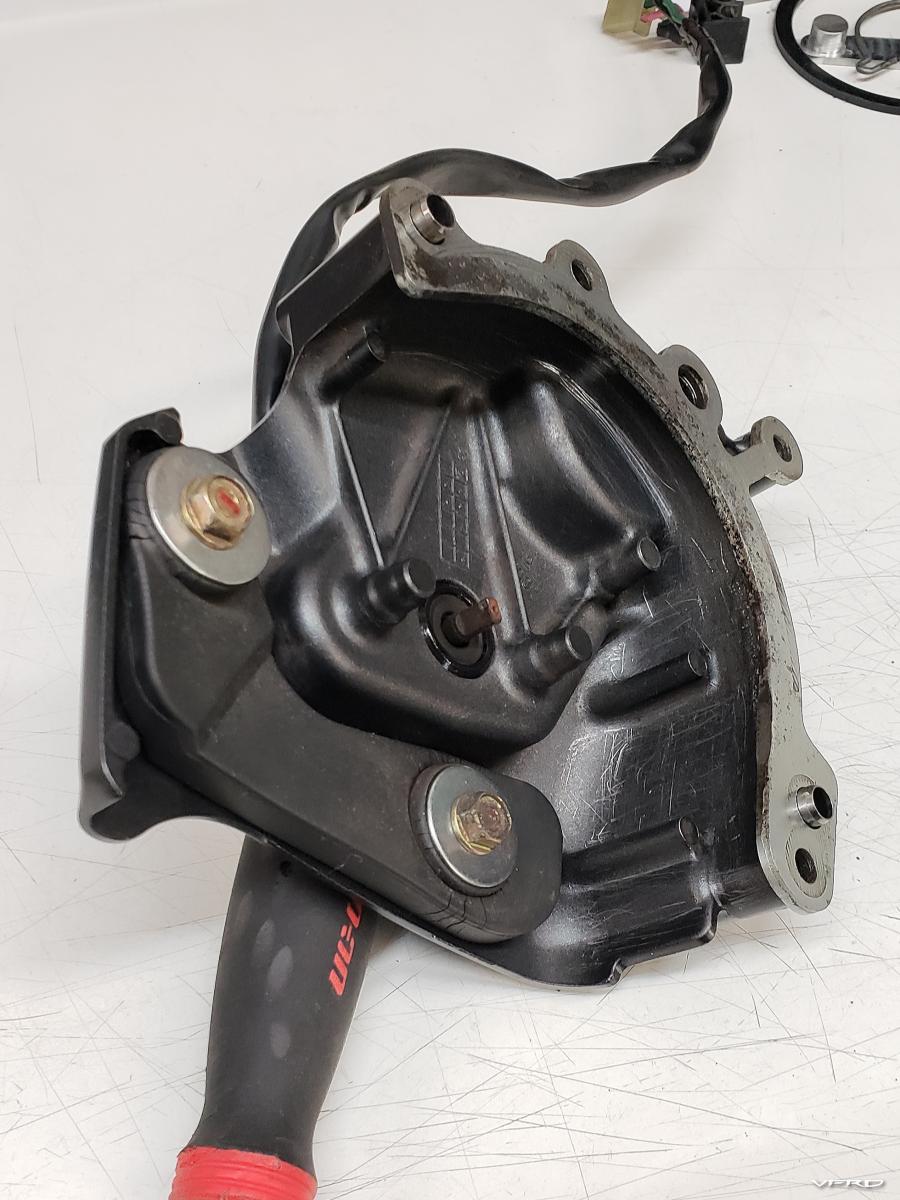
And of course we can't cover that with a grungy cover, so let's clean that too and toss in a new plastic speed sensor adapter and Oberon clutch slave for good measure
First Toro kit part installed
It was at this point things began looking a bit hectic...
So let's keep going...
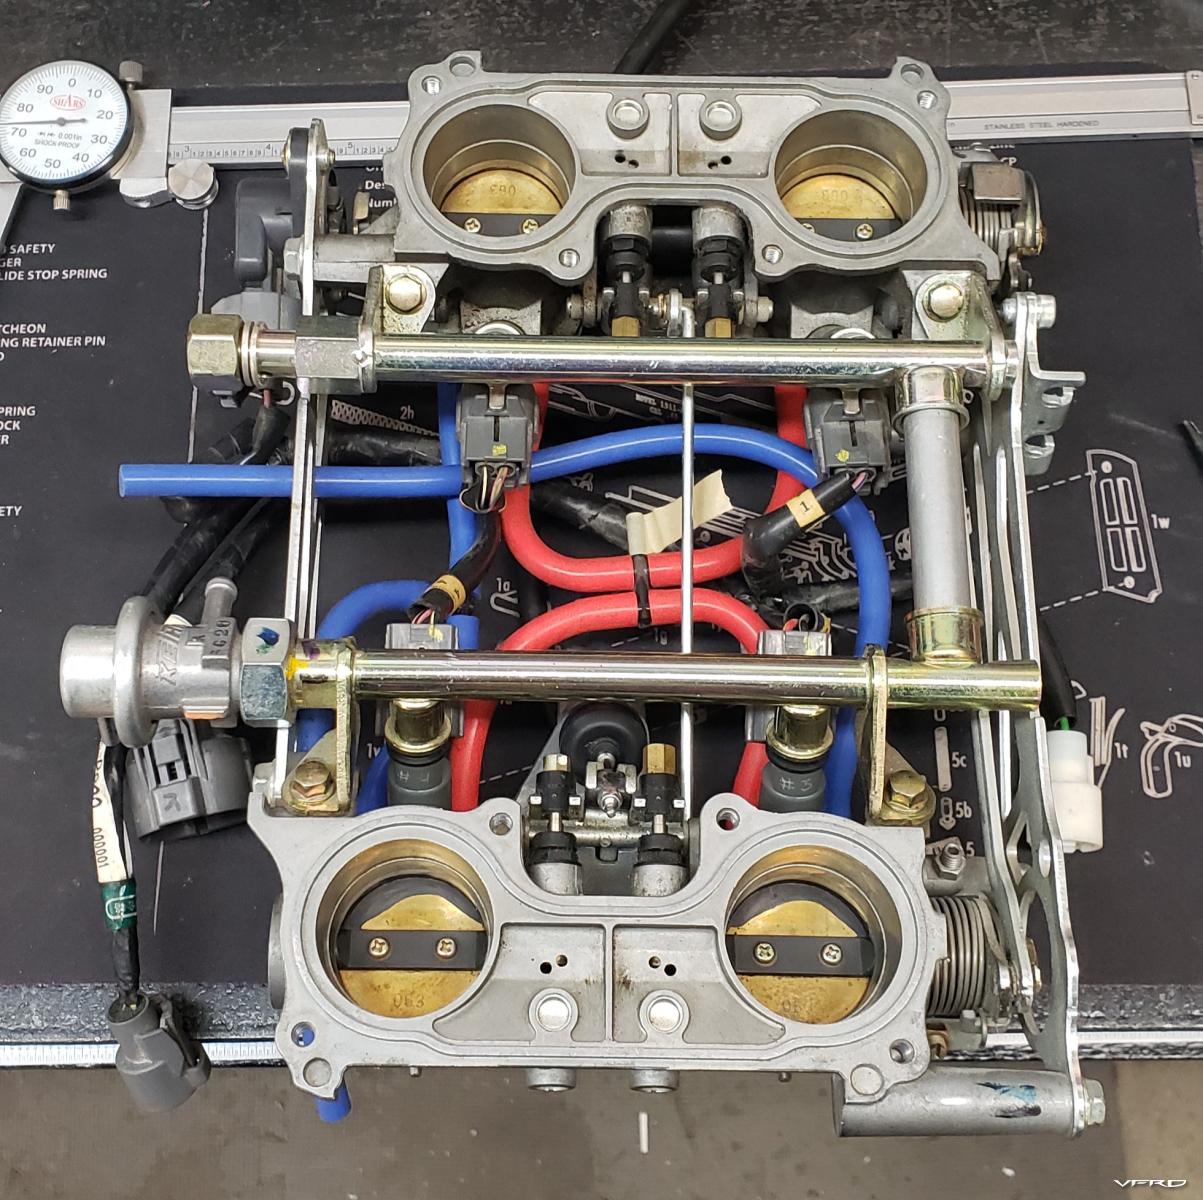
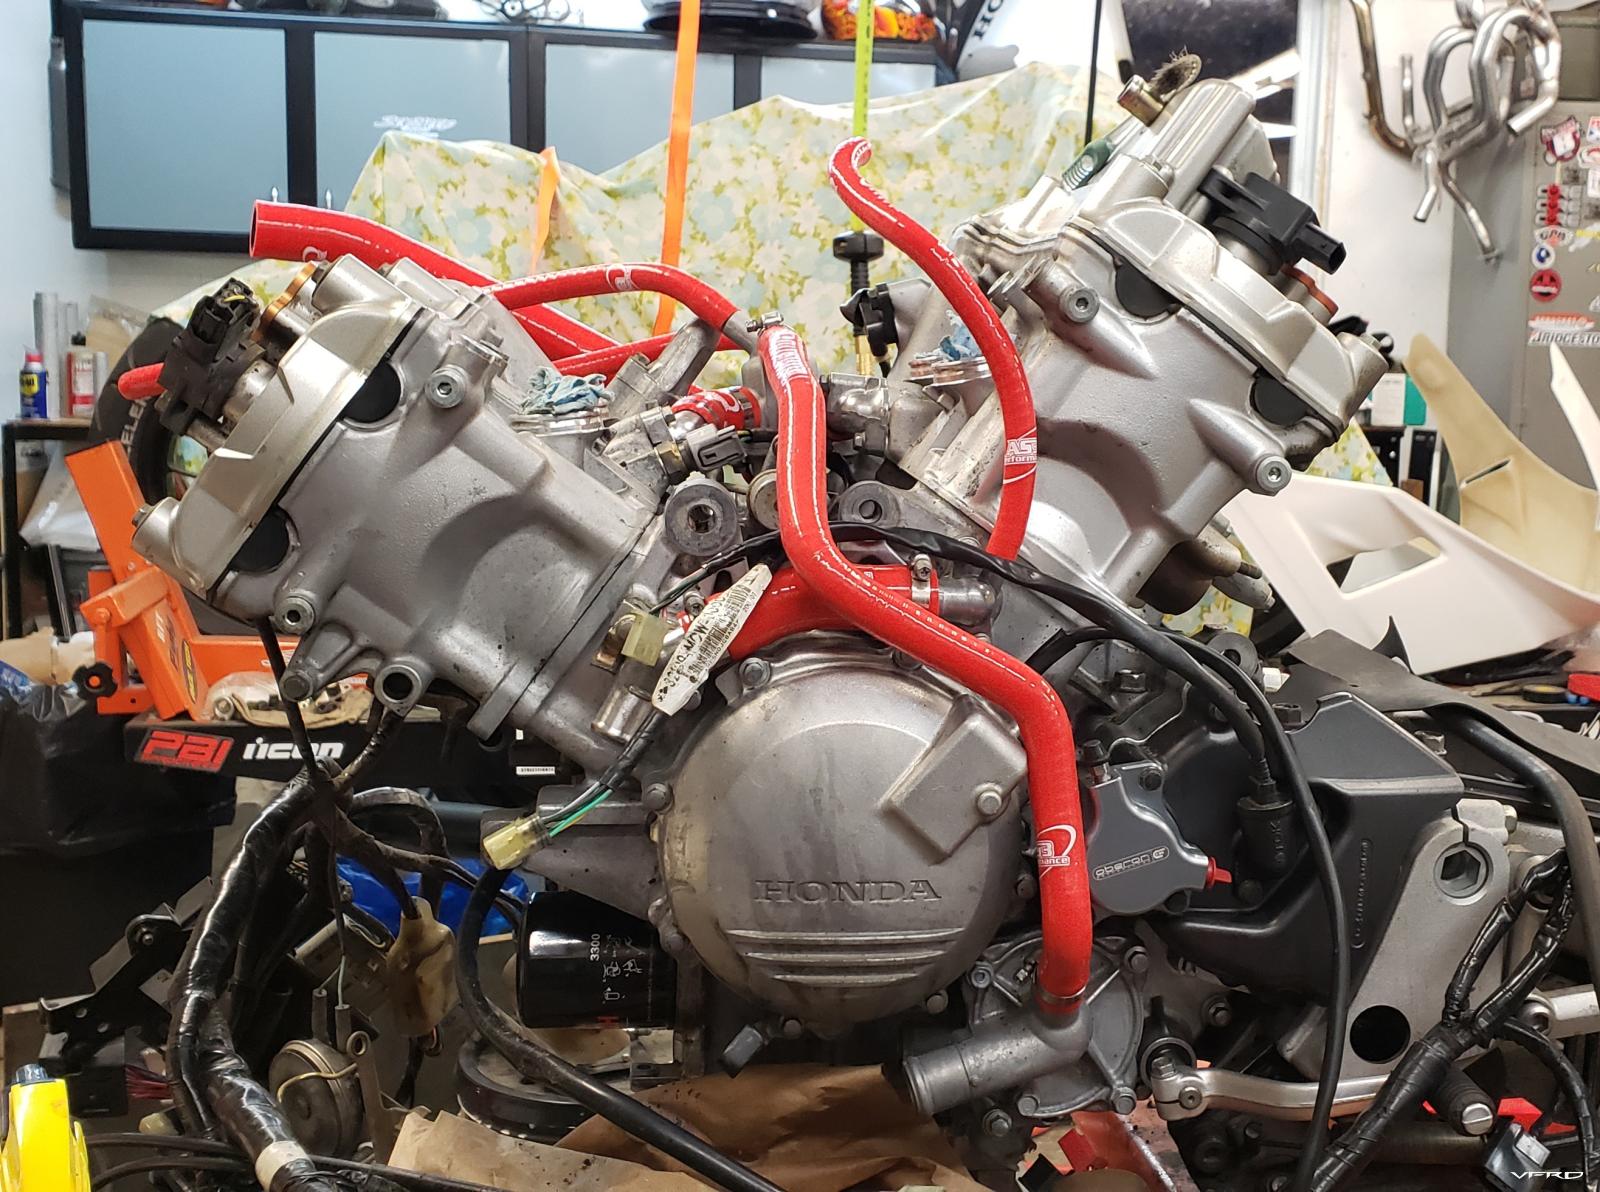
I rebuilt a spare throttle body with cleaned & flow matched injectors, and new silicone hoses
And replaced the wax unit with new, even though the old one with almost 50k was still good. A lot of the small things are easy to replace while everything is apart, well worth the small extra expenses to do them while the bike is apart vs digging back in again later.
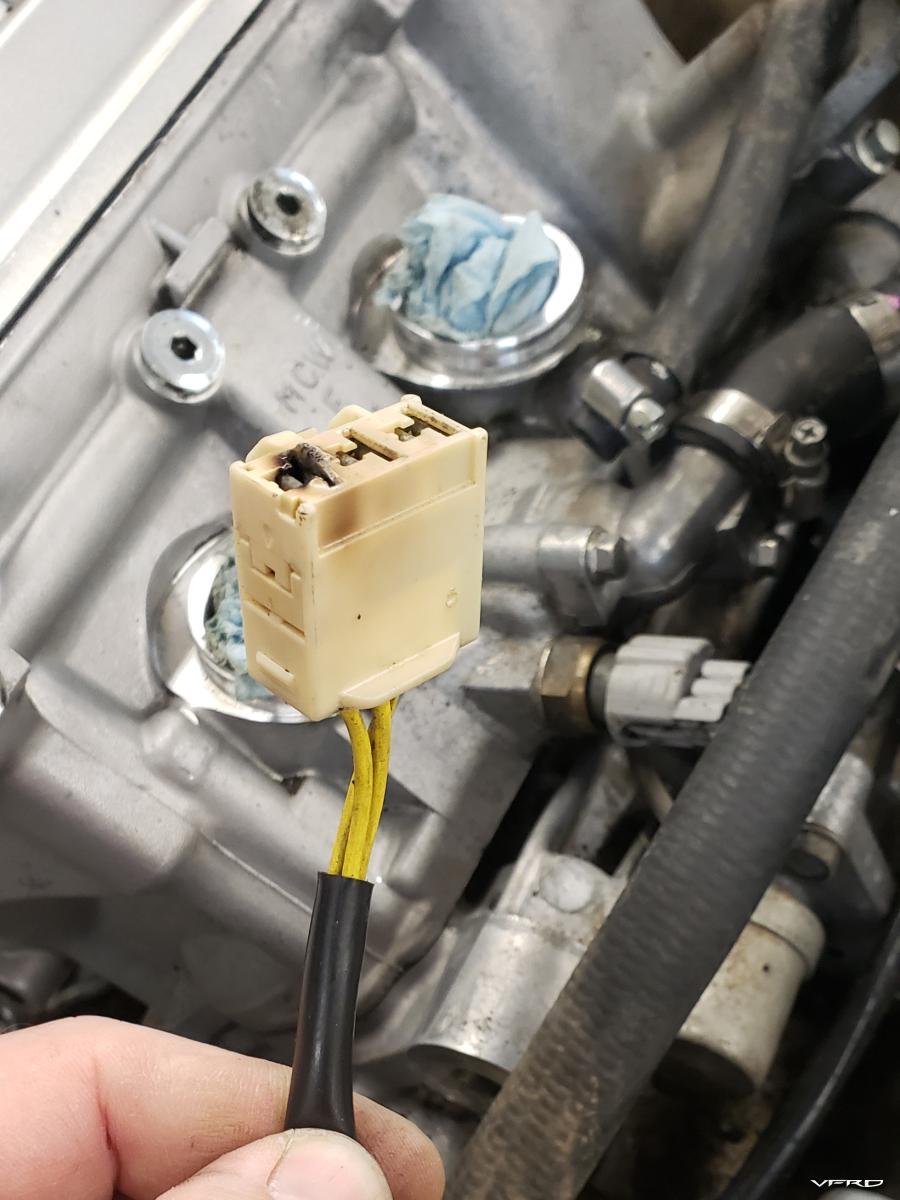
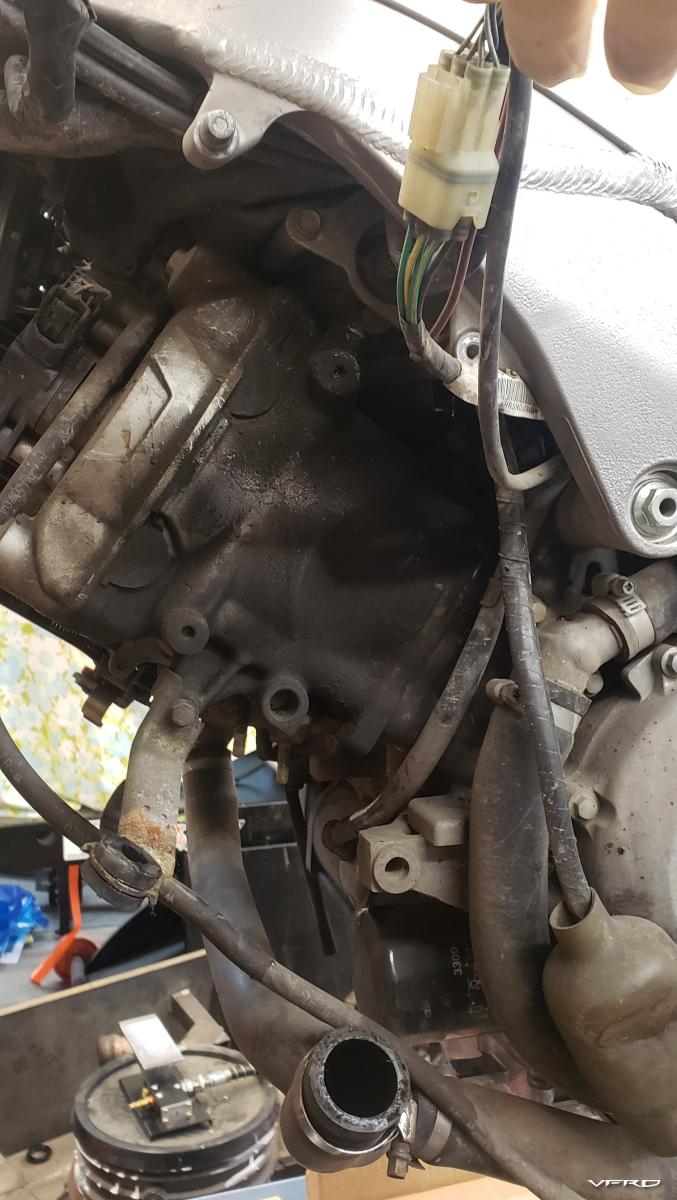
Speaking of things that are worth replacing proactively... I'll get to the details of my stator and charging system upgrade later, but here's what my 47,xxxmi stator plug looked like. Not touched since factory install. Bike was charging properly when I last rode it, looks like it was about the go though.
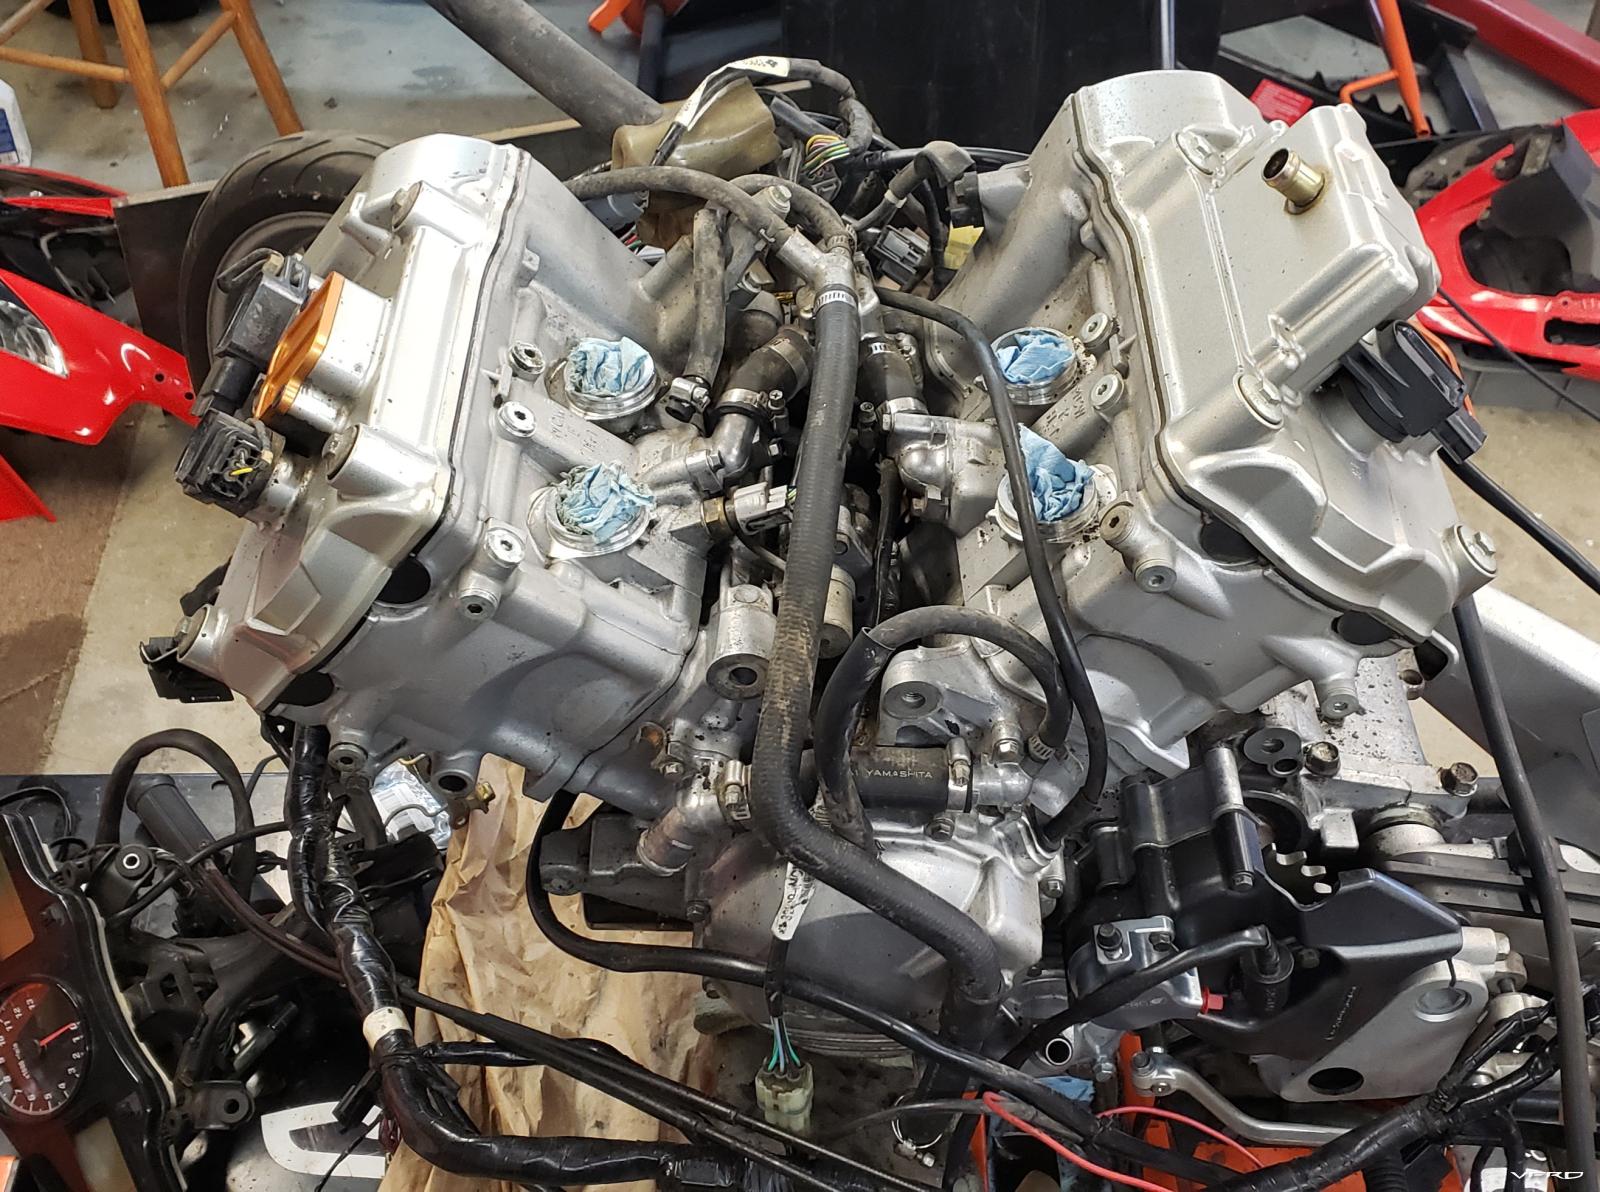
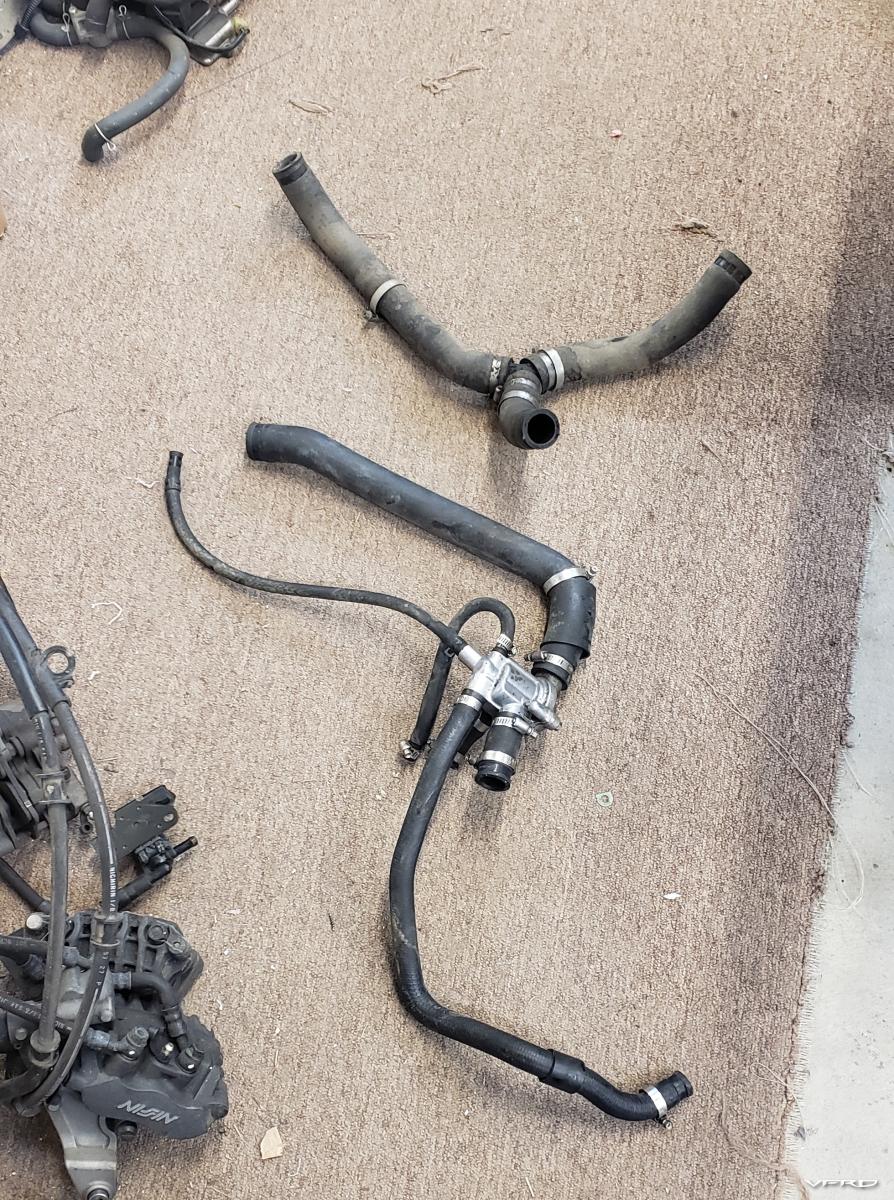
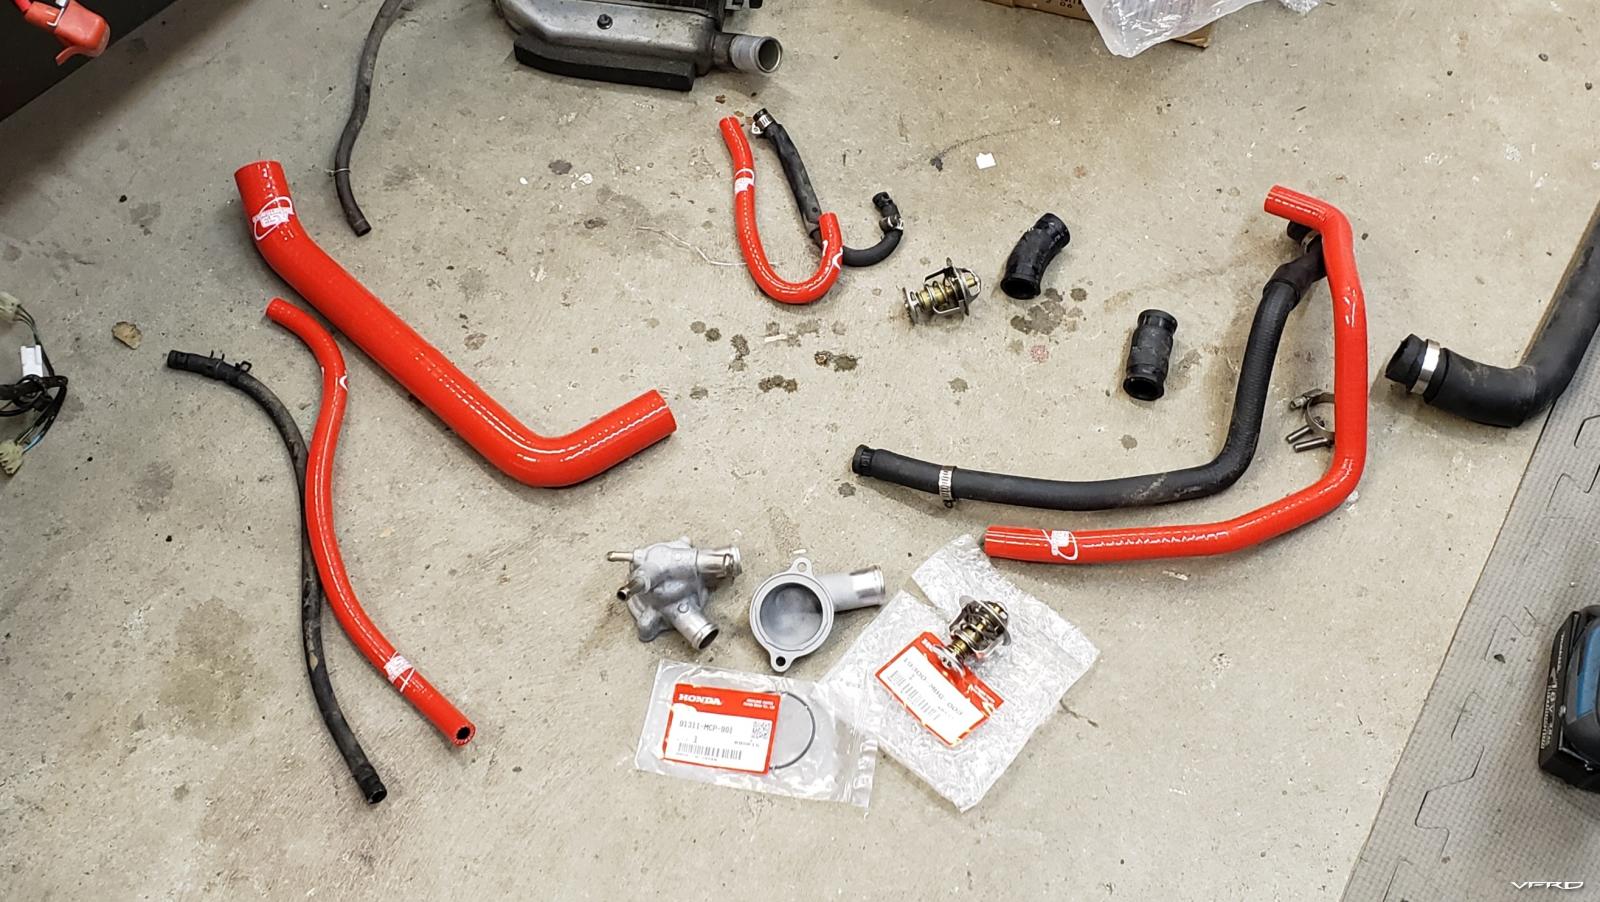
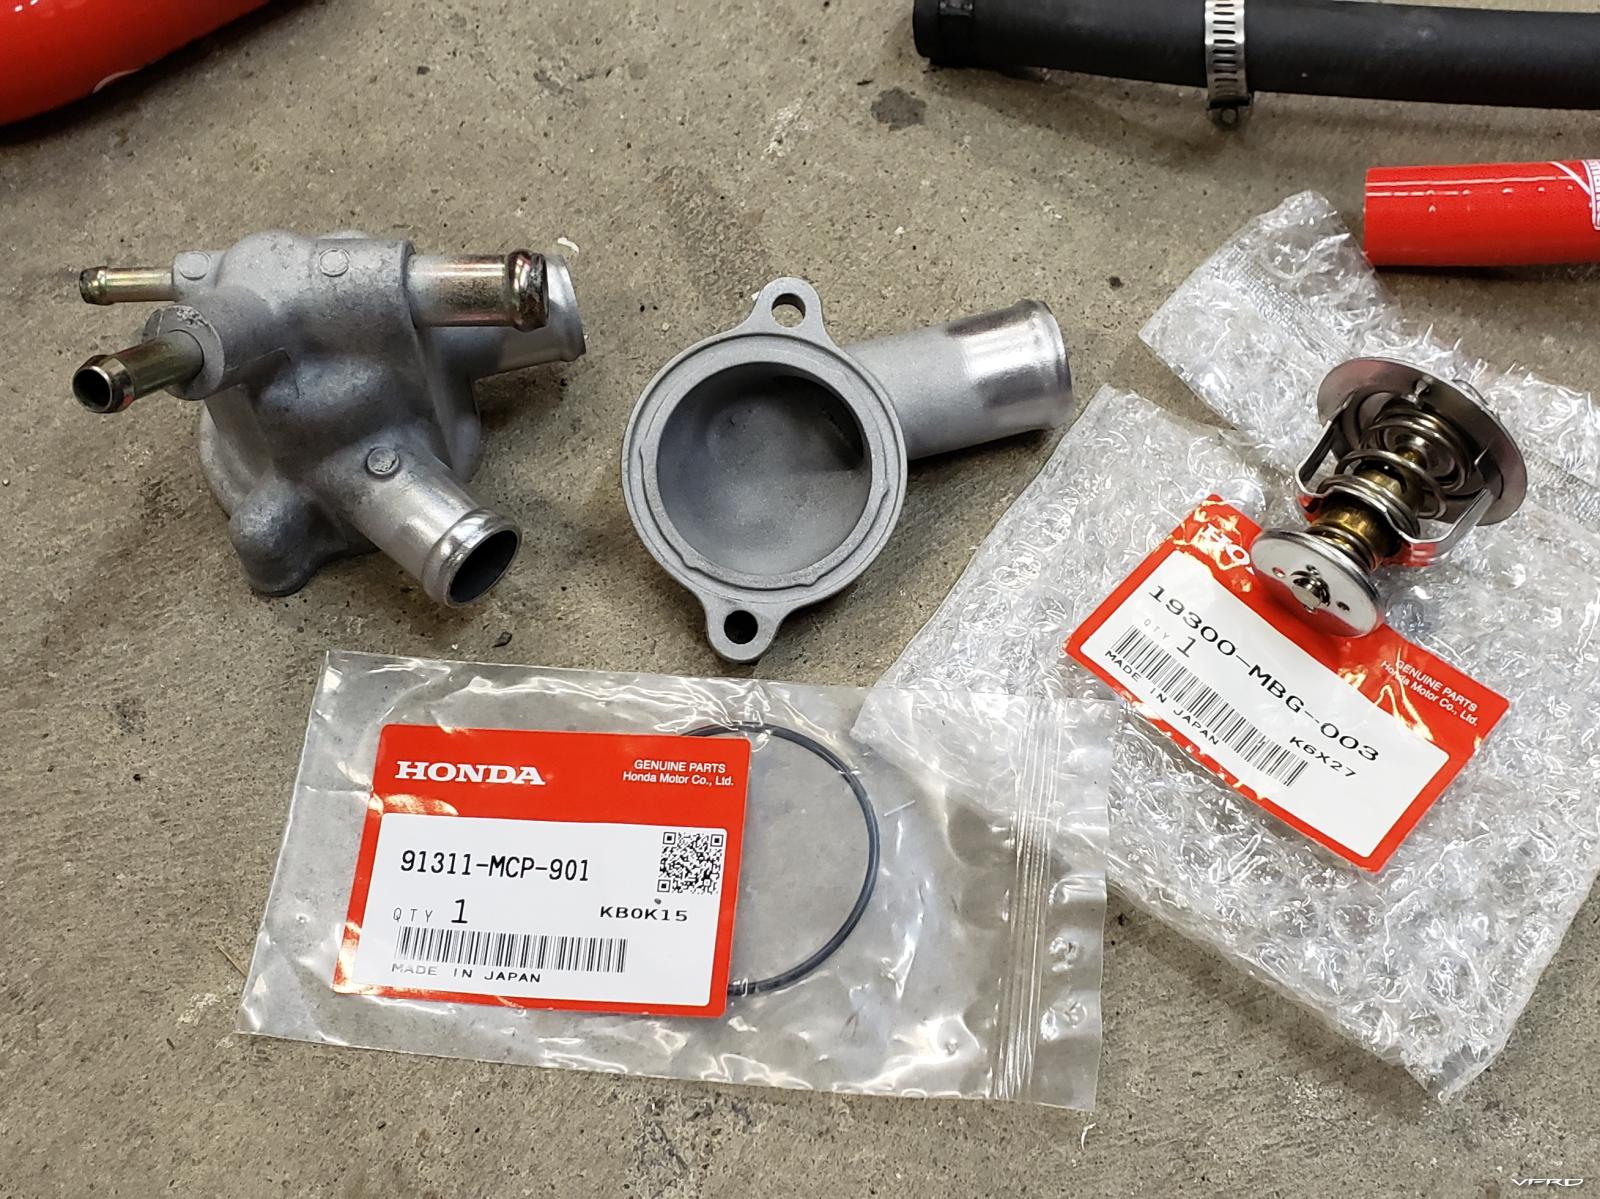
With the motor cleaned up, it was time to start throwing new parts back on it. I replaced every cooling system hose, o rings, and thermostat. All new.
Also media blasted the tstat housing parts to pretty them up and check for pitting corrosion - all good.
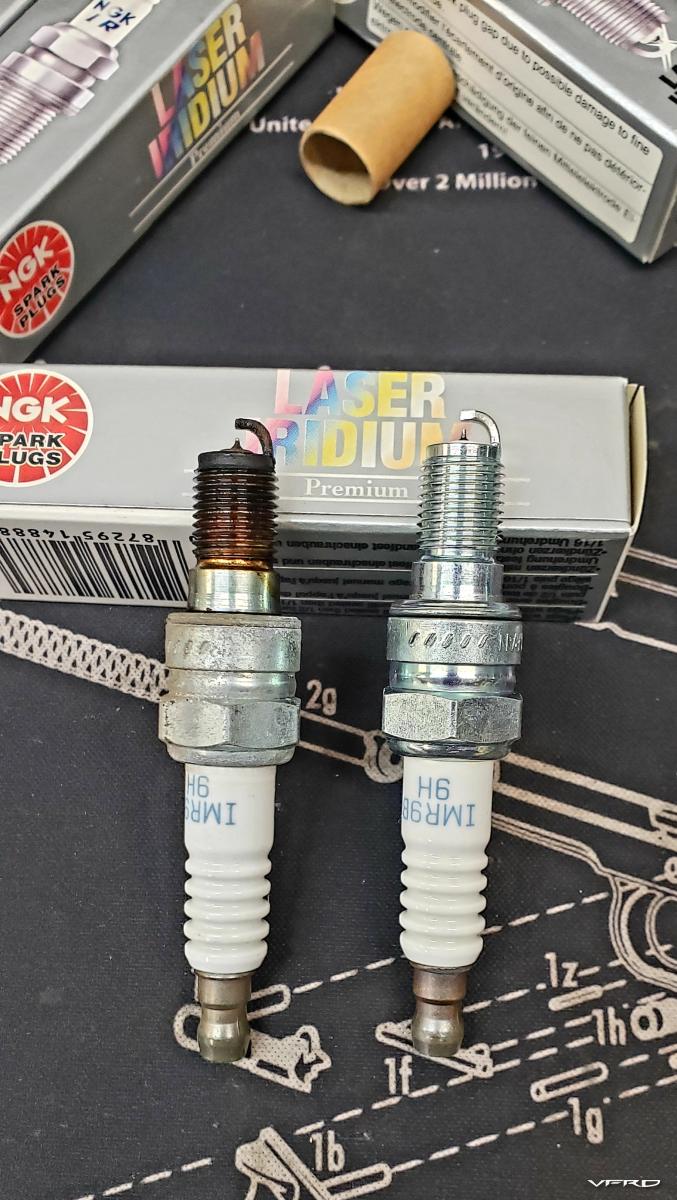
Replaced the spark plugs with oem equivalent
Upon installing the new throttle body and mock up of Toro plenum, I found the first of a few kit-related issues that needed solving.
The fiberglass intake hat had shrunk and deformed over time (as thick fiberglass resin does), causing cracks and deformation. The cracks were just on the outside surface, so I lapped the faying surface to get it flat before installation. I've confirmed that this cracking and deformation is not unique to my kit, so if you're one of the few that have one, check yours if you haven't already!
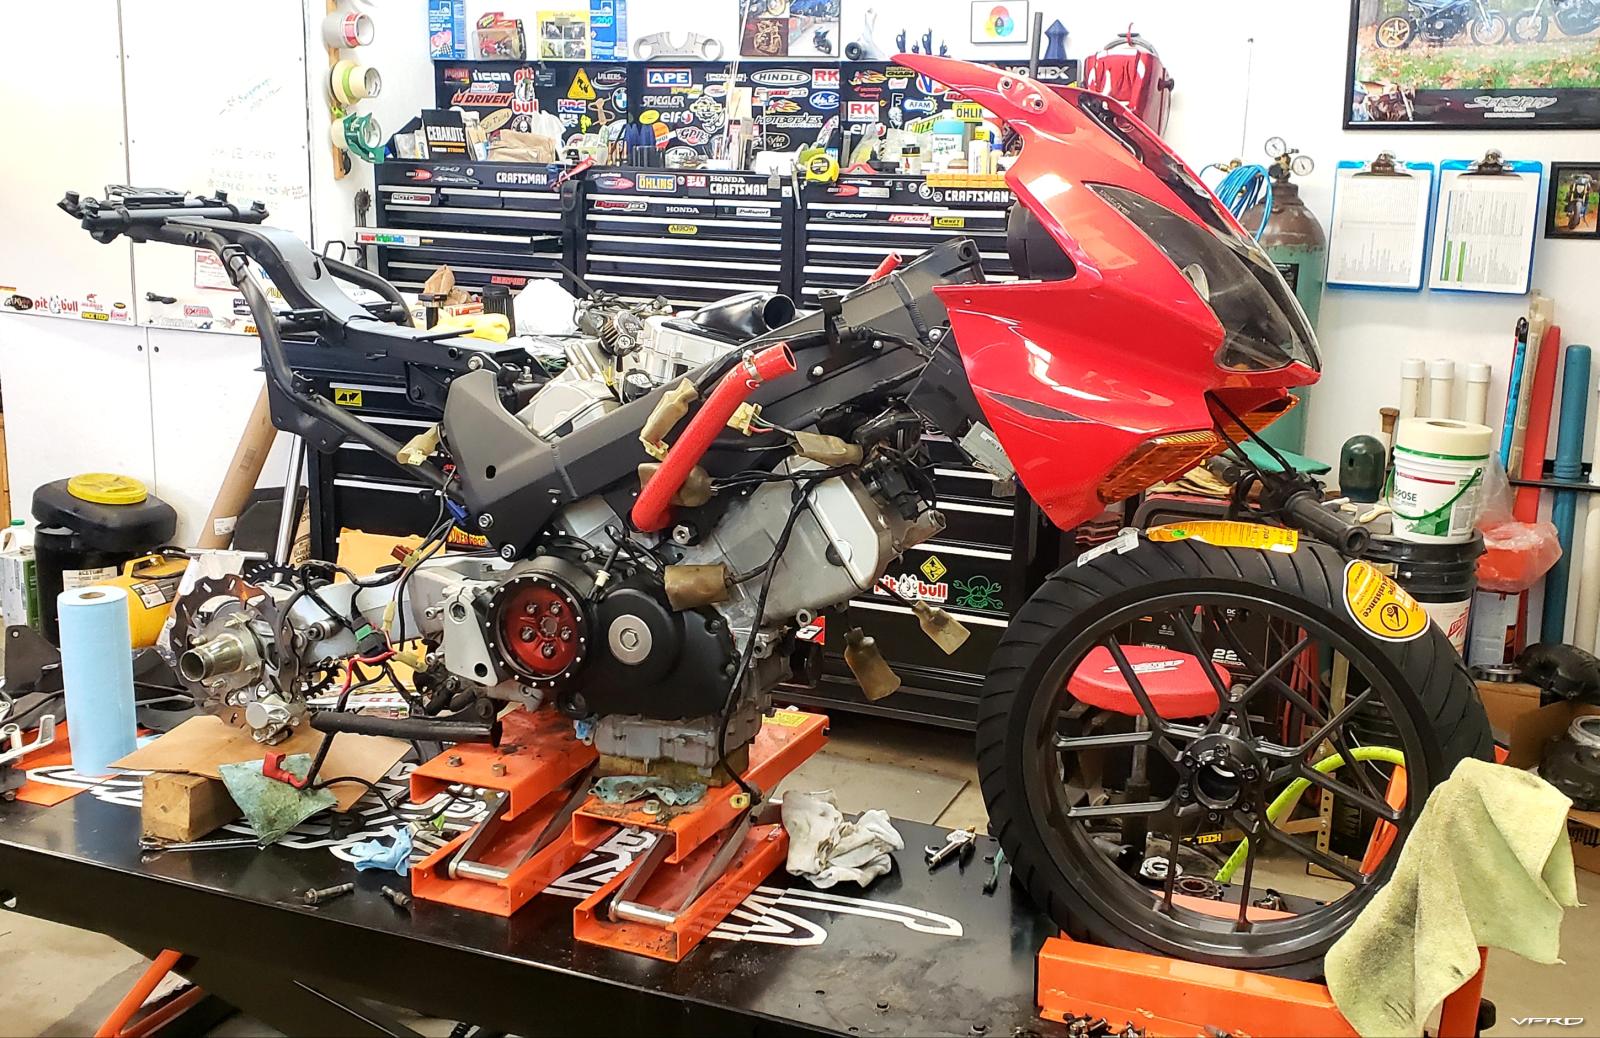
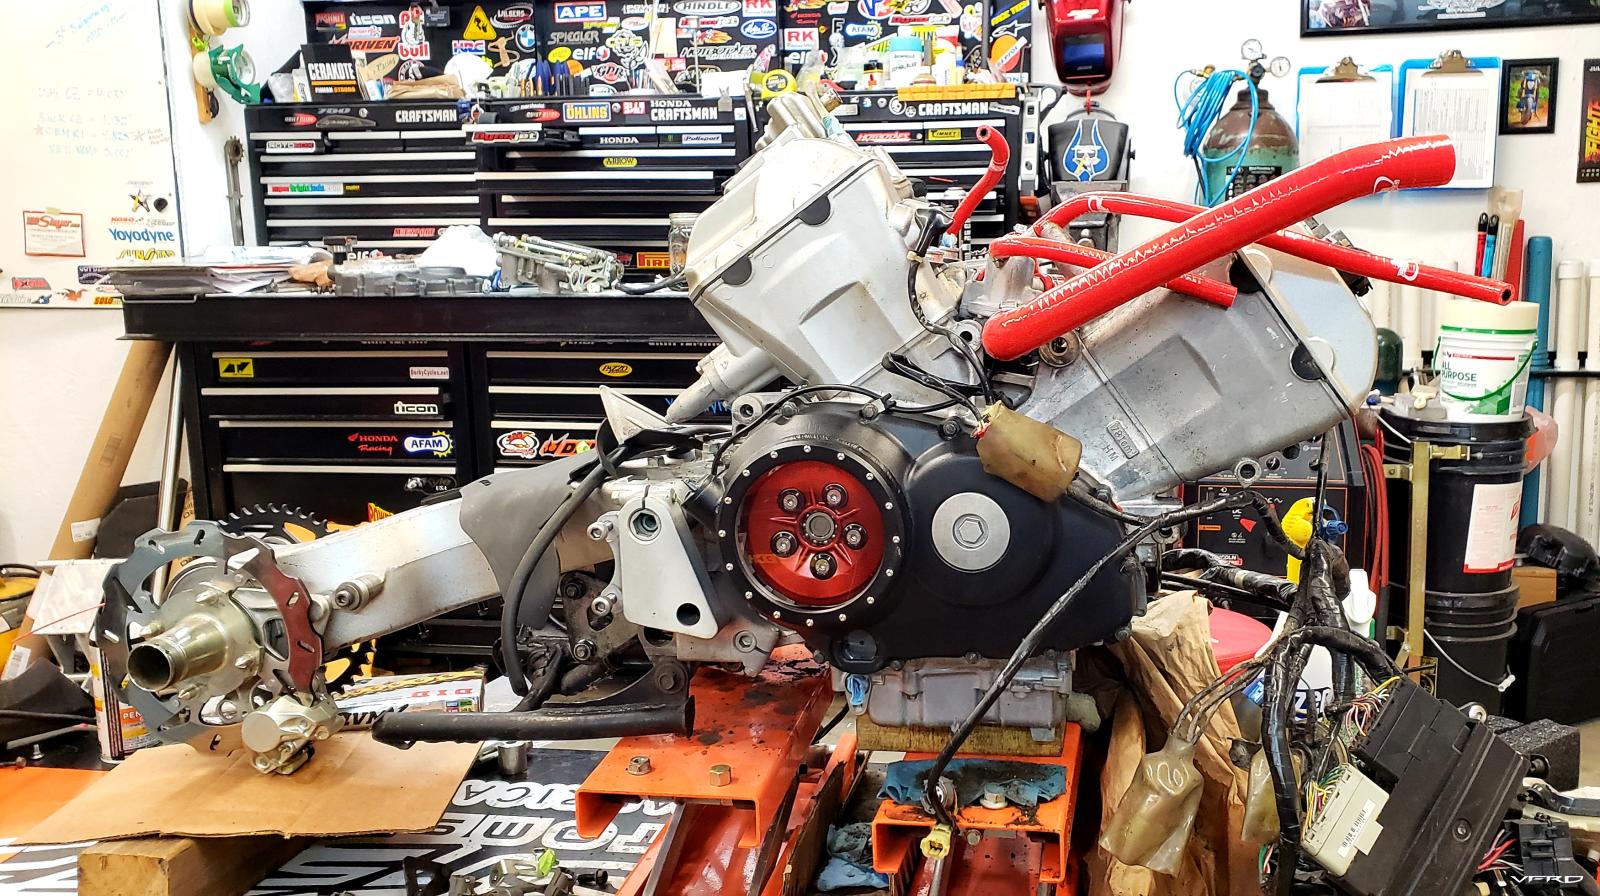
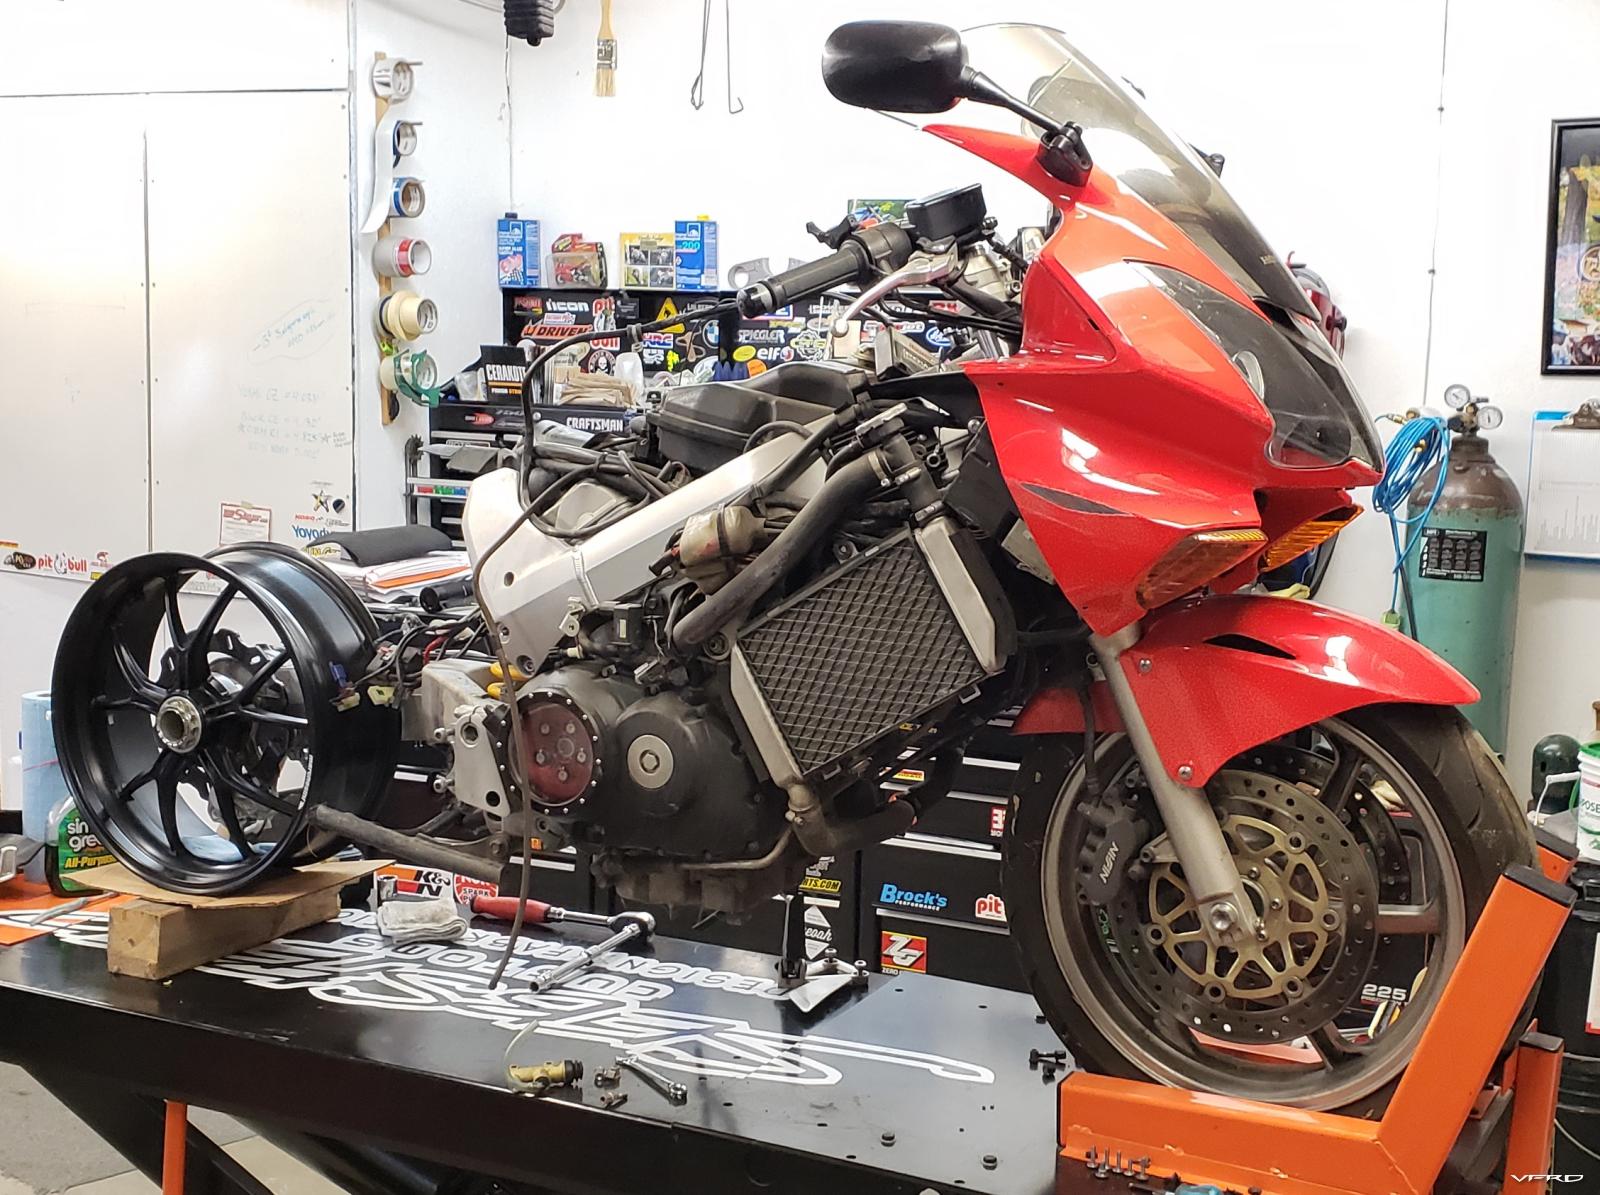
And then the frame went back on, plus a test fit of the Rotrex
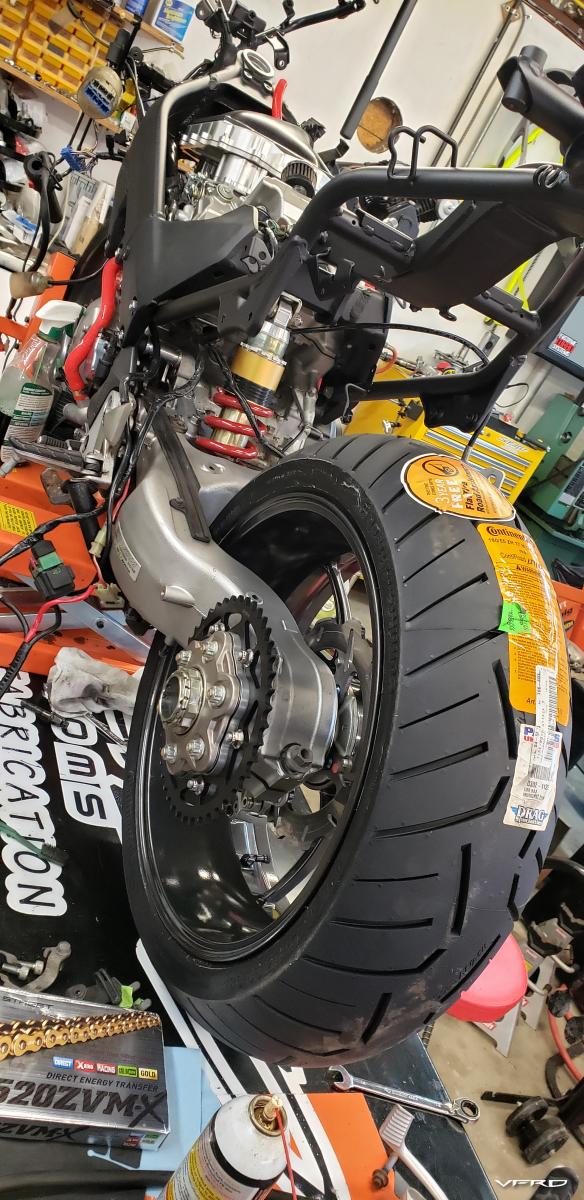
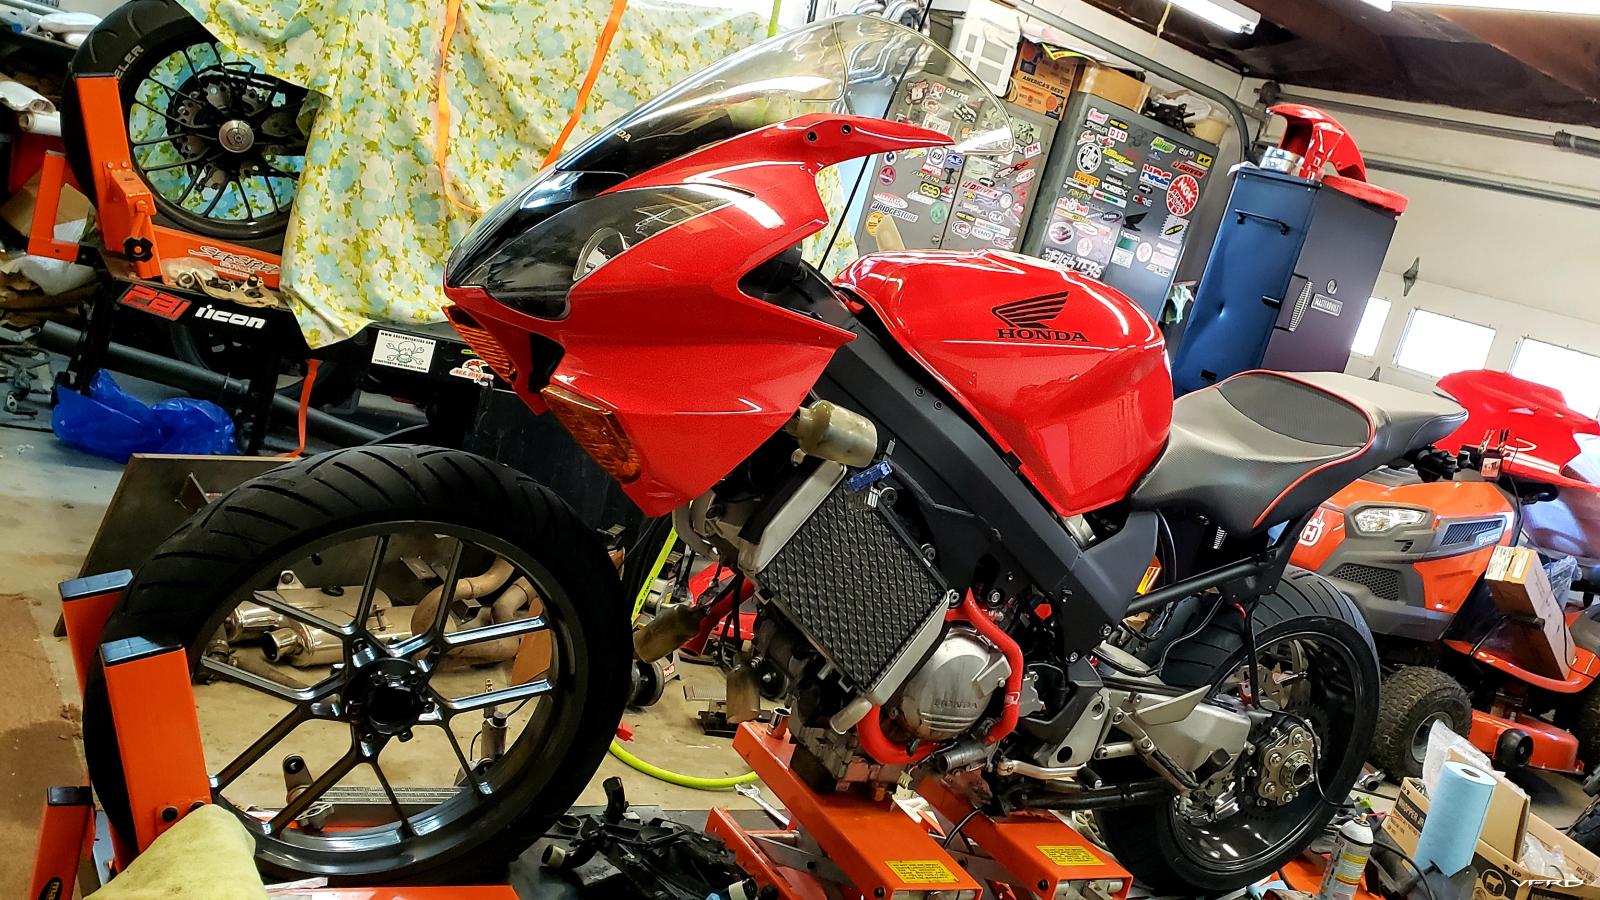
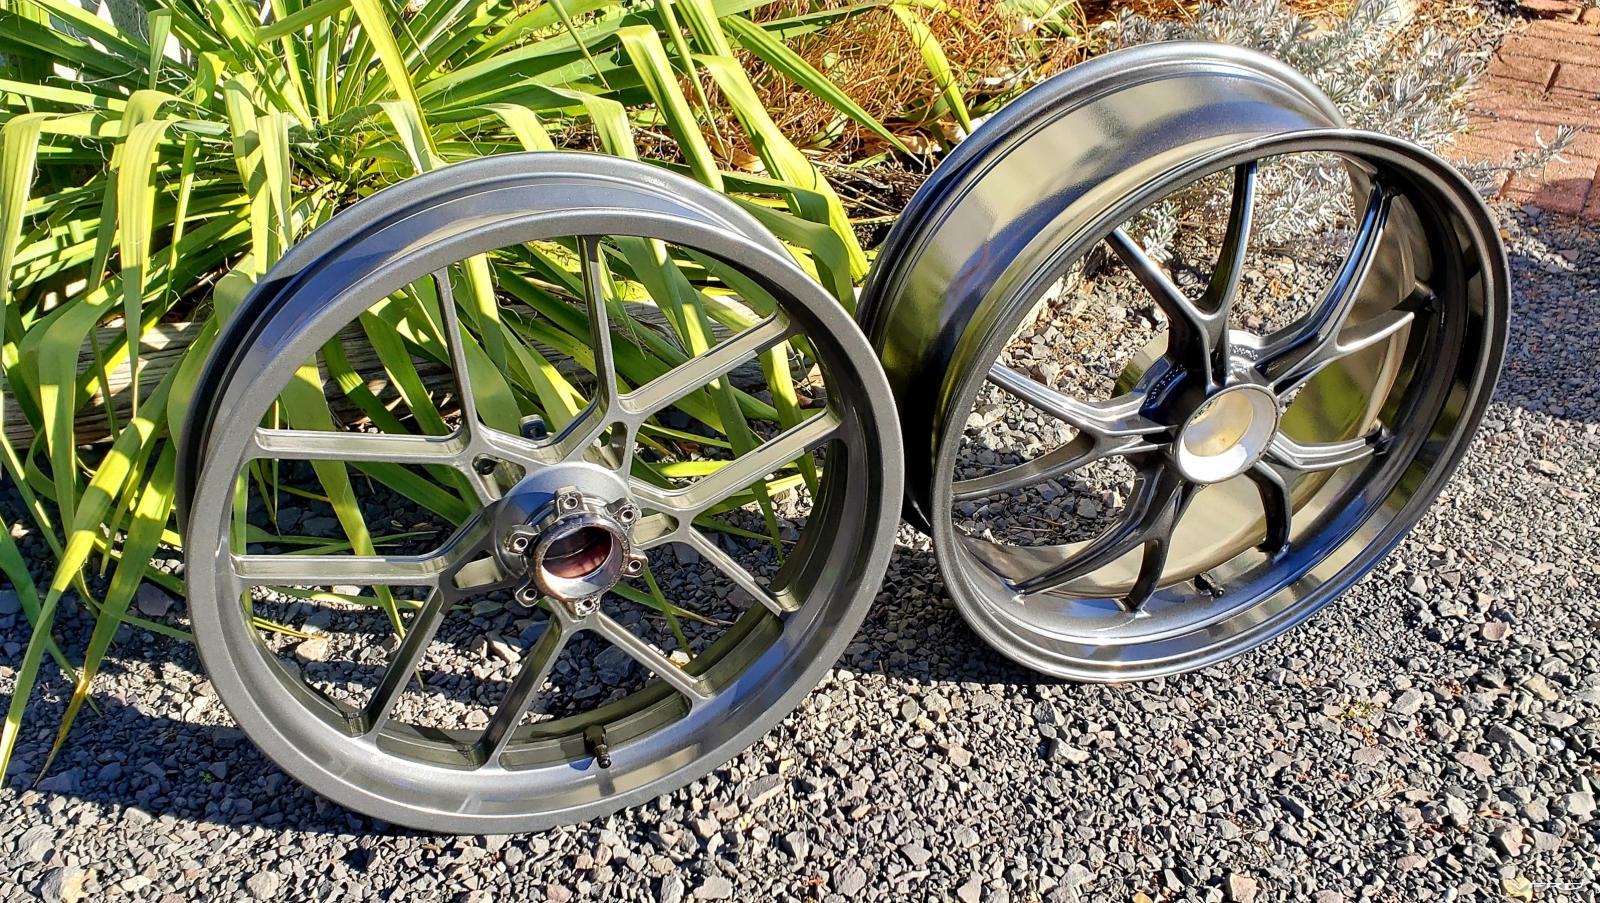
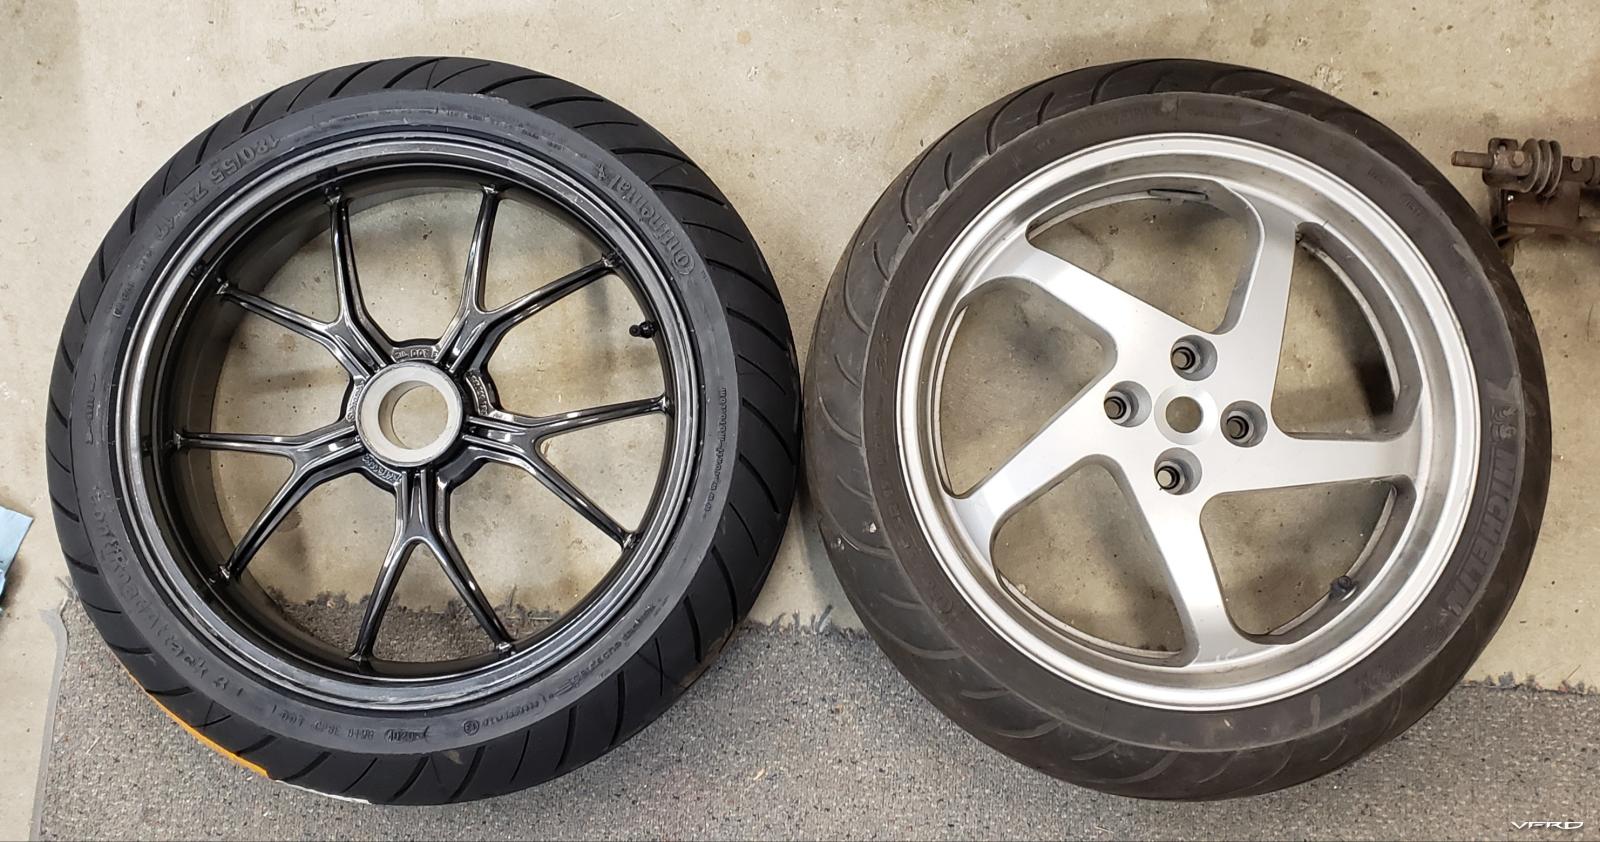
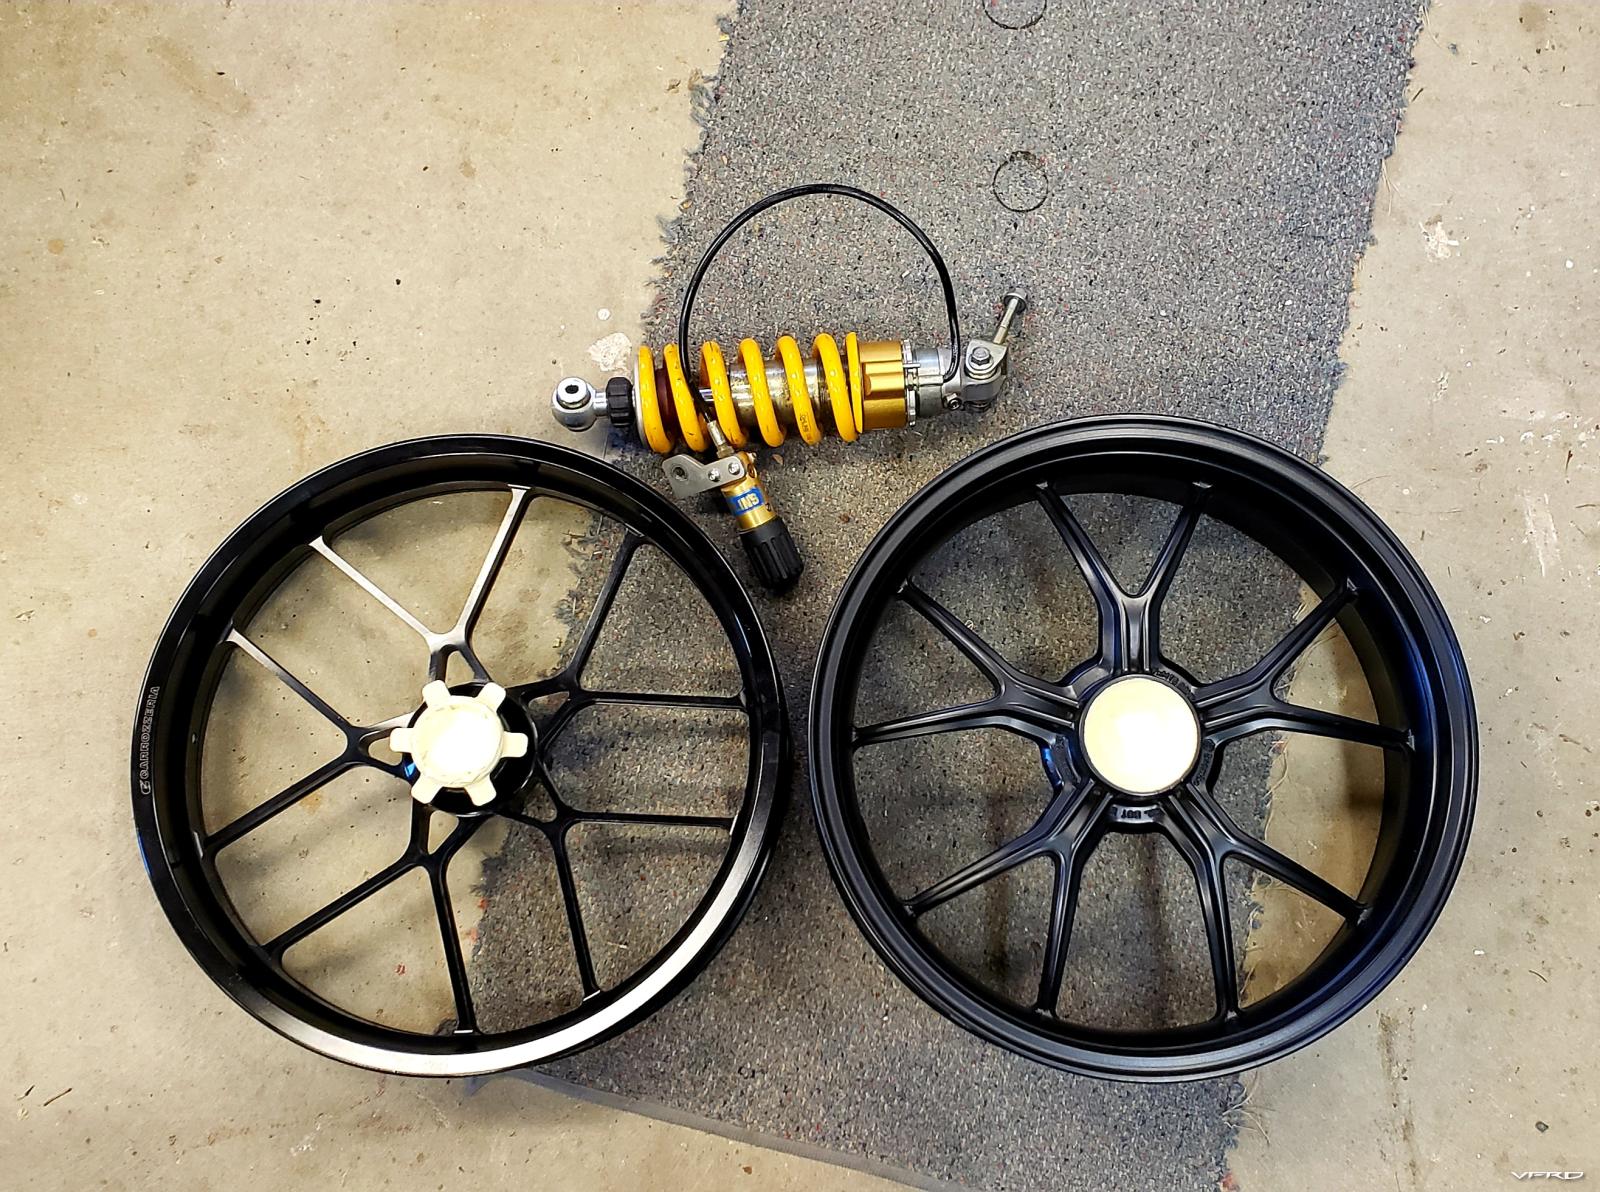
Around this time I got my wheels back. I wanted to stick with an oem grey color, and I'm really happy with how this Prismatic Wet Charcoal turned out.
I fitted angled aluminum valve stems before popping the tires on
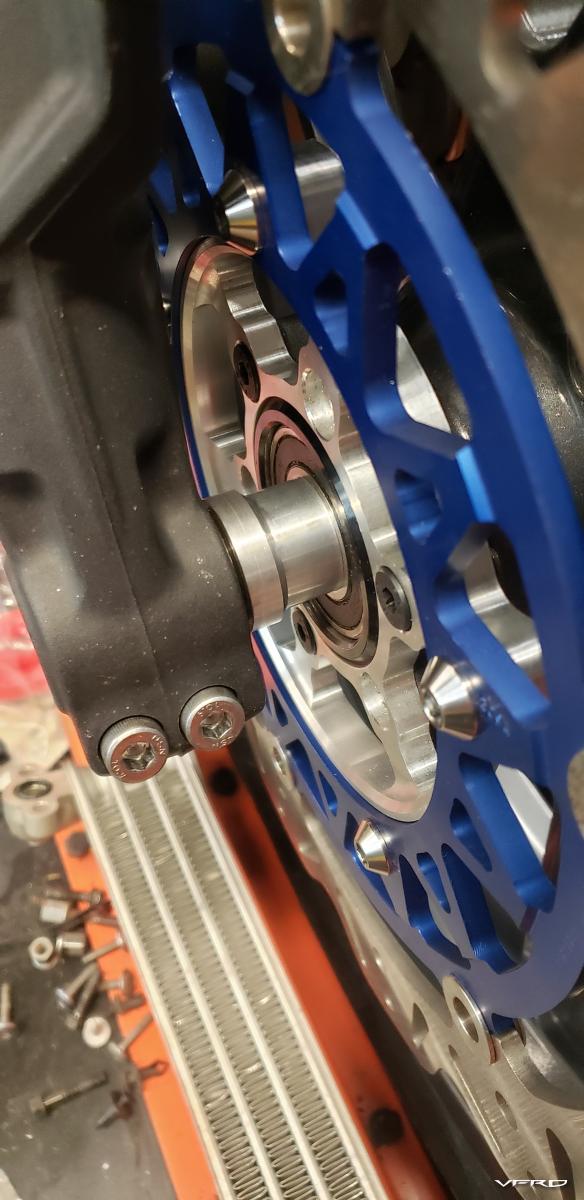
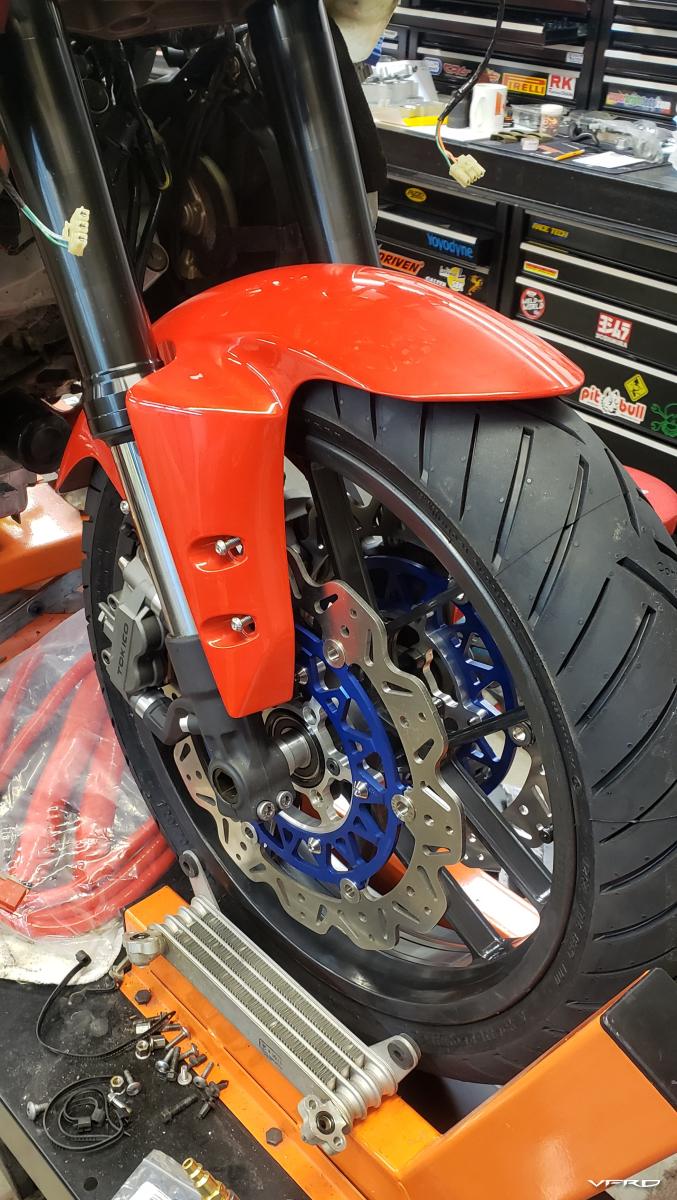
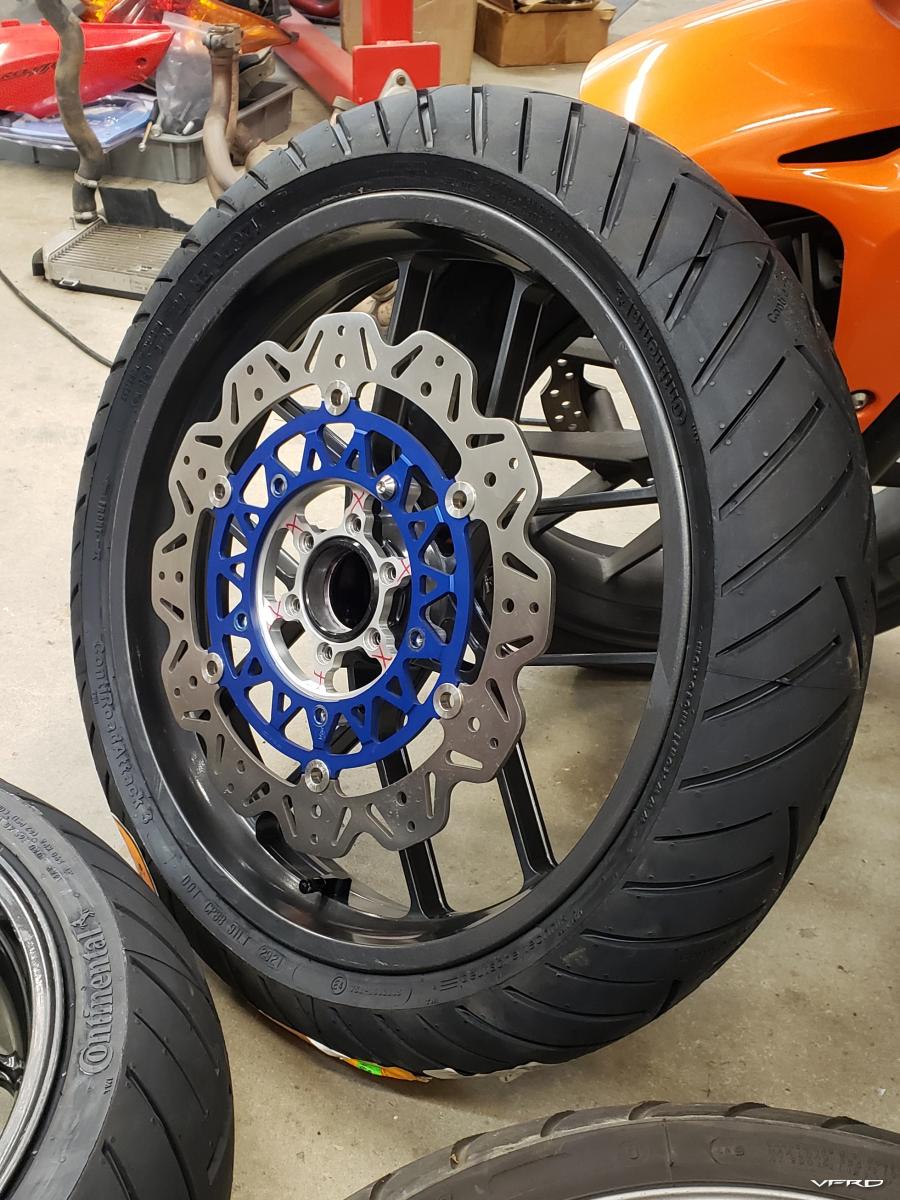
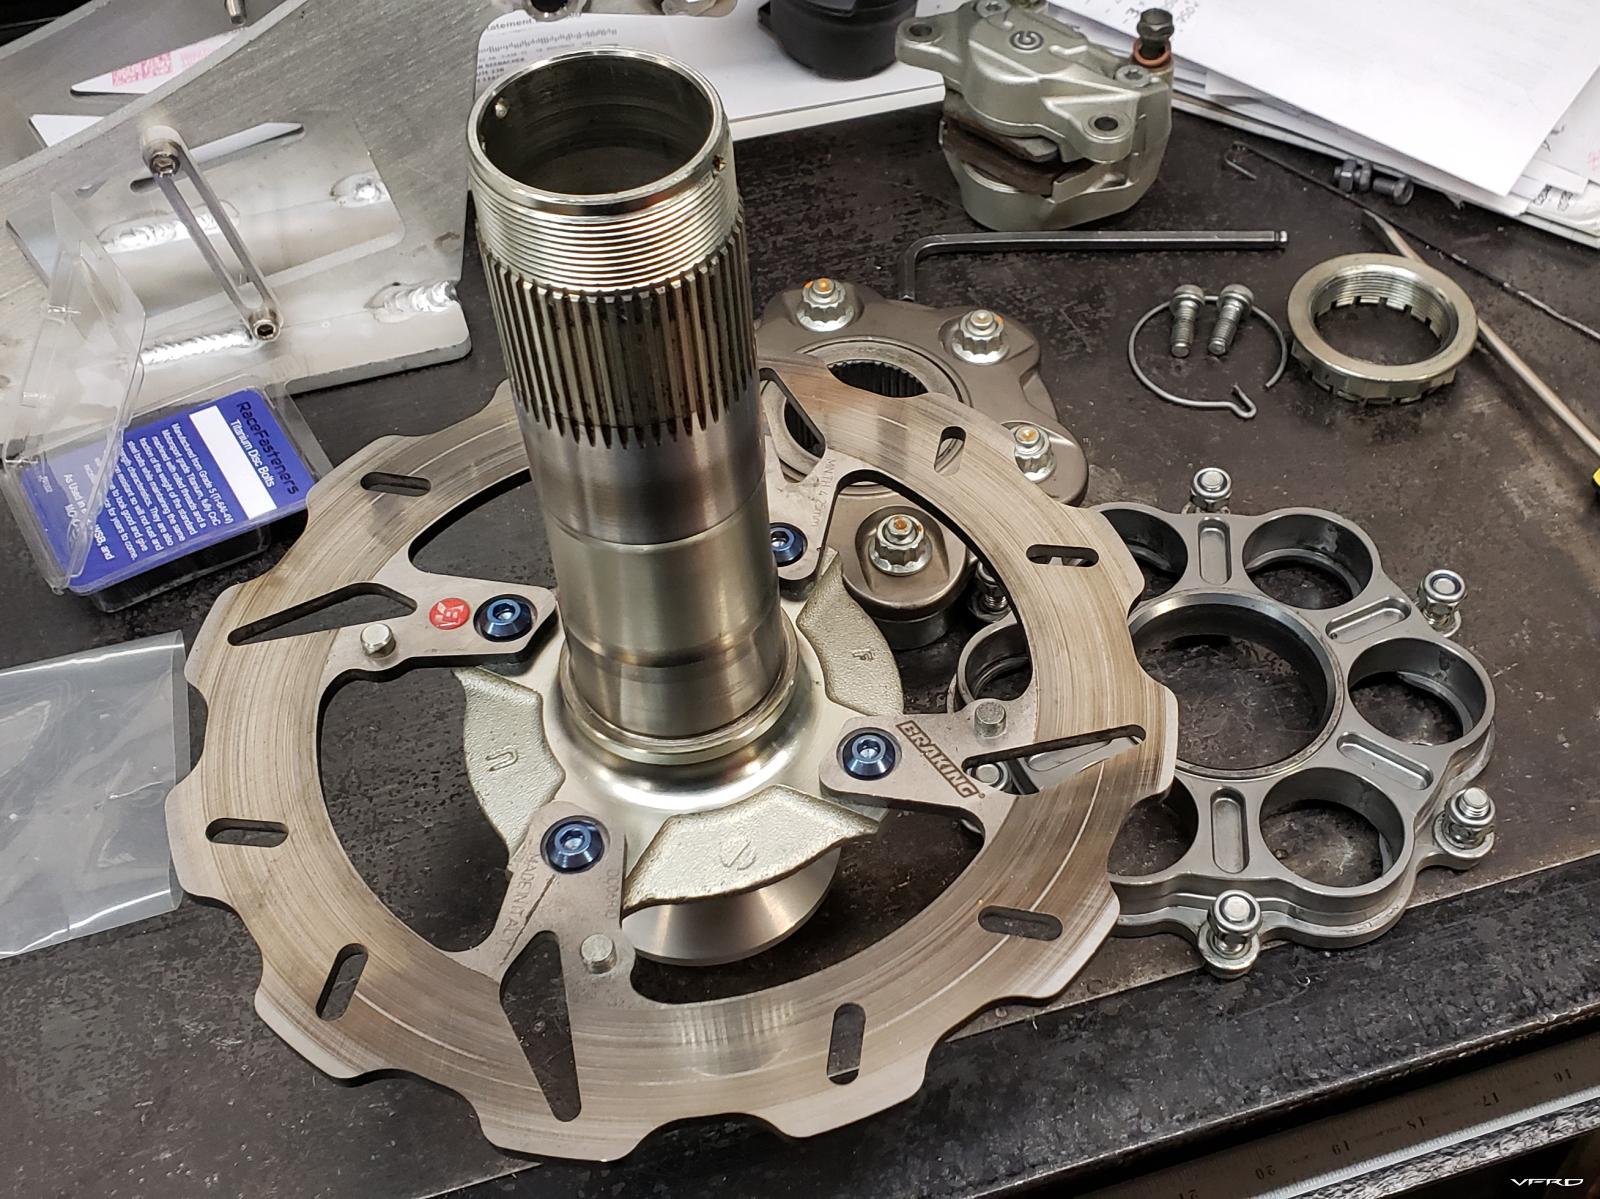
Test fit of my billet R1 rotor adapters with R1 spec 320mm EBC "Vee" rotors.
-
5
-
-
- Popular Post
- Popular Post
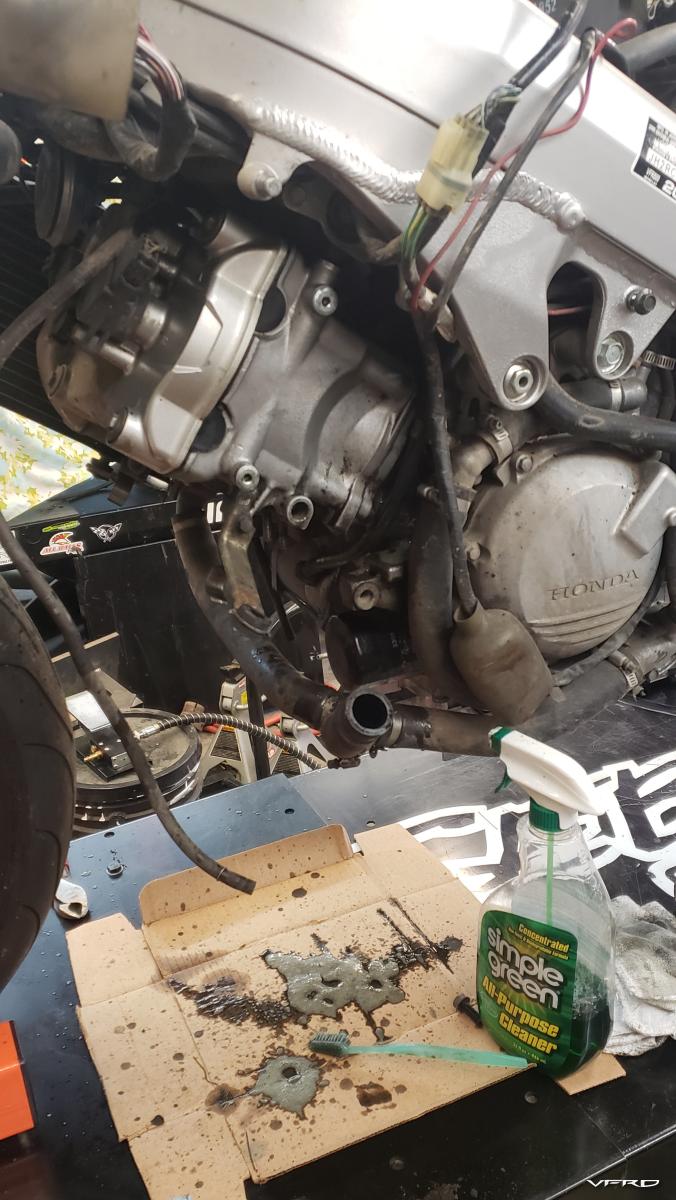
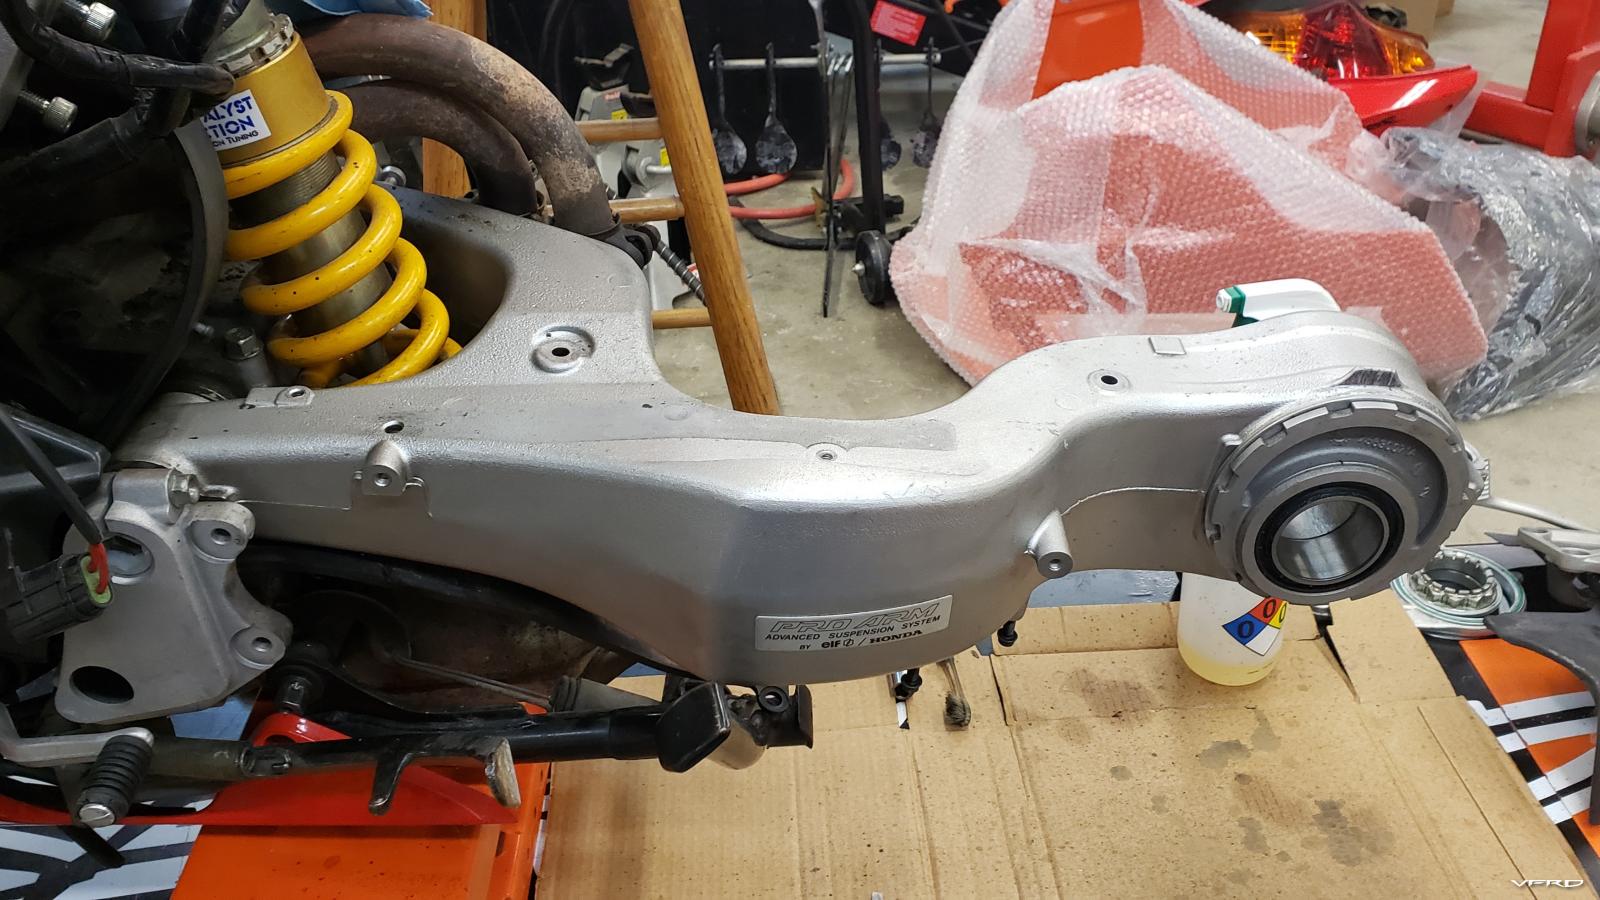
Teardown continued... without a doubt the dirtiest part of the bike was everything in the vicinity of the left radiator... it had sprung a leak in 2008 at the base of Blood Mountain... caused by a bent fan mount which allowed the fan to cut through the cooling fins as it ran. I was able to tear the bike down in a gas station parking lot at the base of the mountain with the oem tool kit. I used some steel epoxy to patch the rad and refilled the system with pure Georgia Mountain Tap Water. Over the years it developed a new leak and ended up making quite the mess.
Elbow grease works wonders at loosening up that old baked on crud
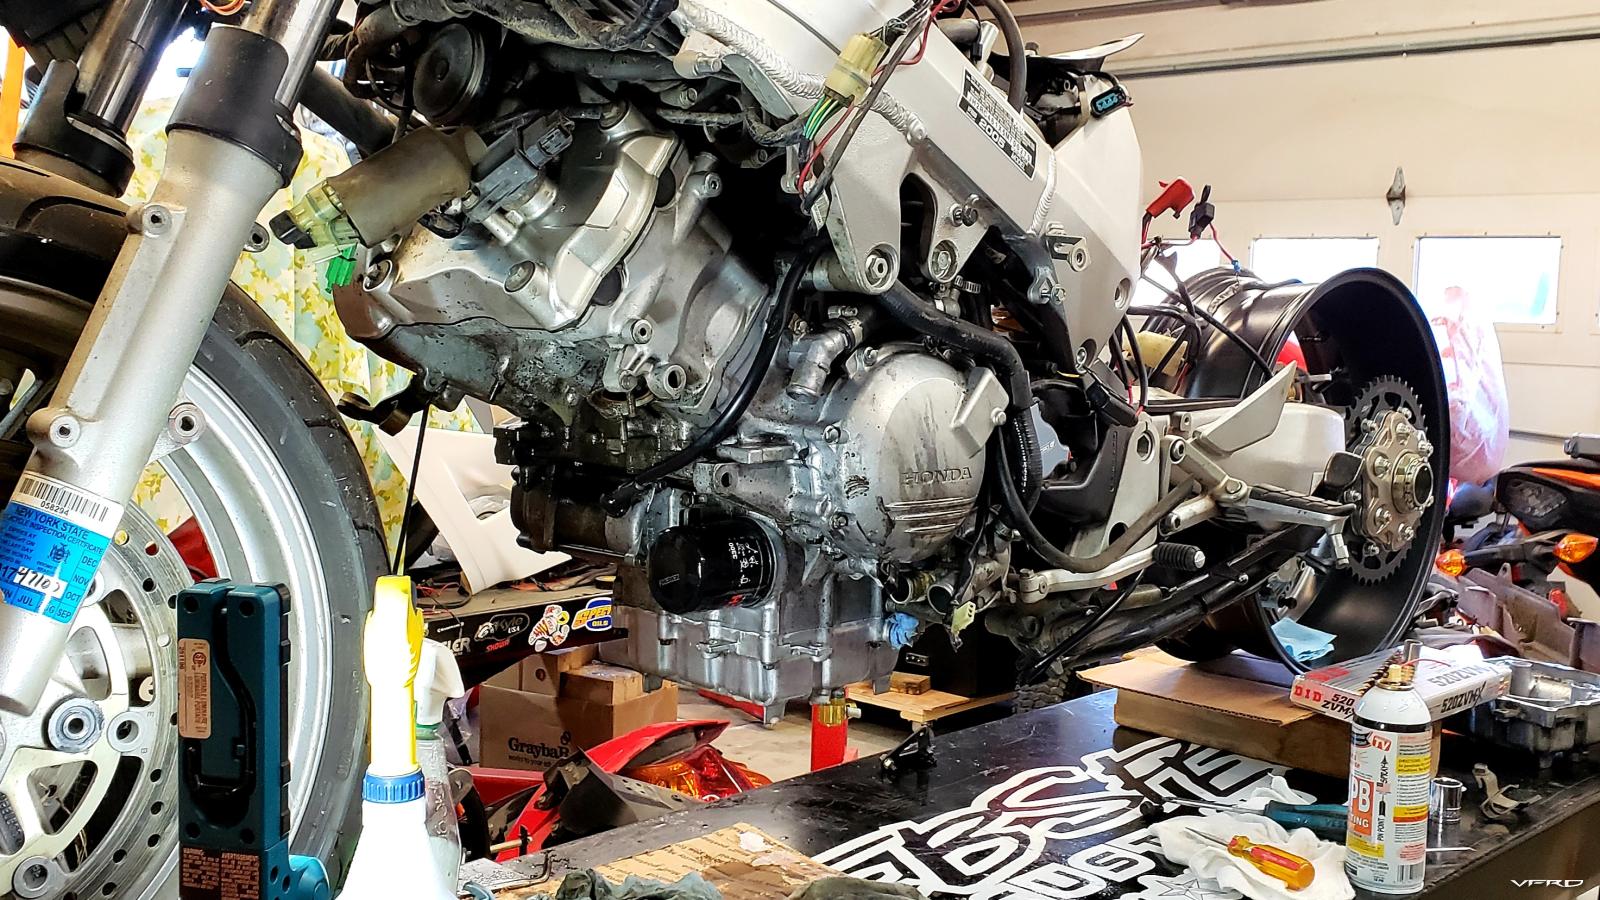
The frame and front end were in my way, so I took them off too
I went back and forth for a bit before committing to powdercoat the frame, but I was already doing the wheels and subframe, and there'd never be a better time, so off it went. I always liked the way the black frames looked on the newer models.
Wheels prepped for powder
The front wheel was made by Carrozzeria and came with spacers to fit a Ducati 748 or 916 I think... it is very light at just 6lbs.
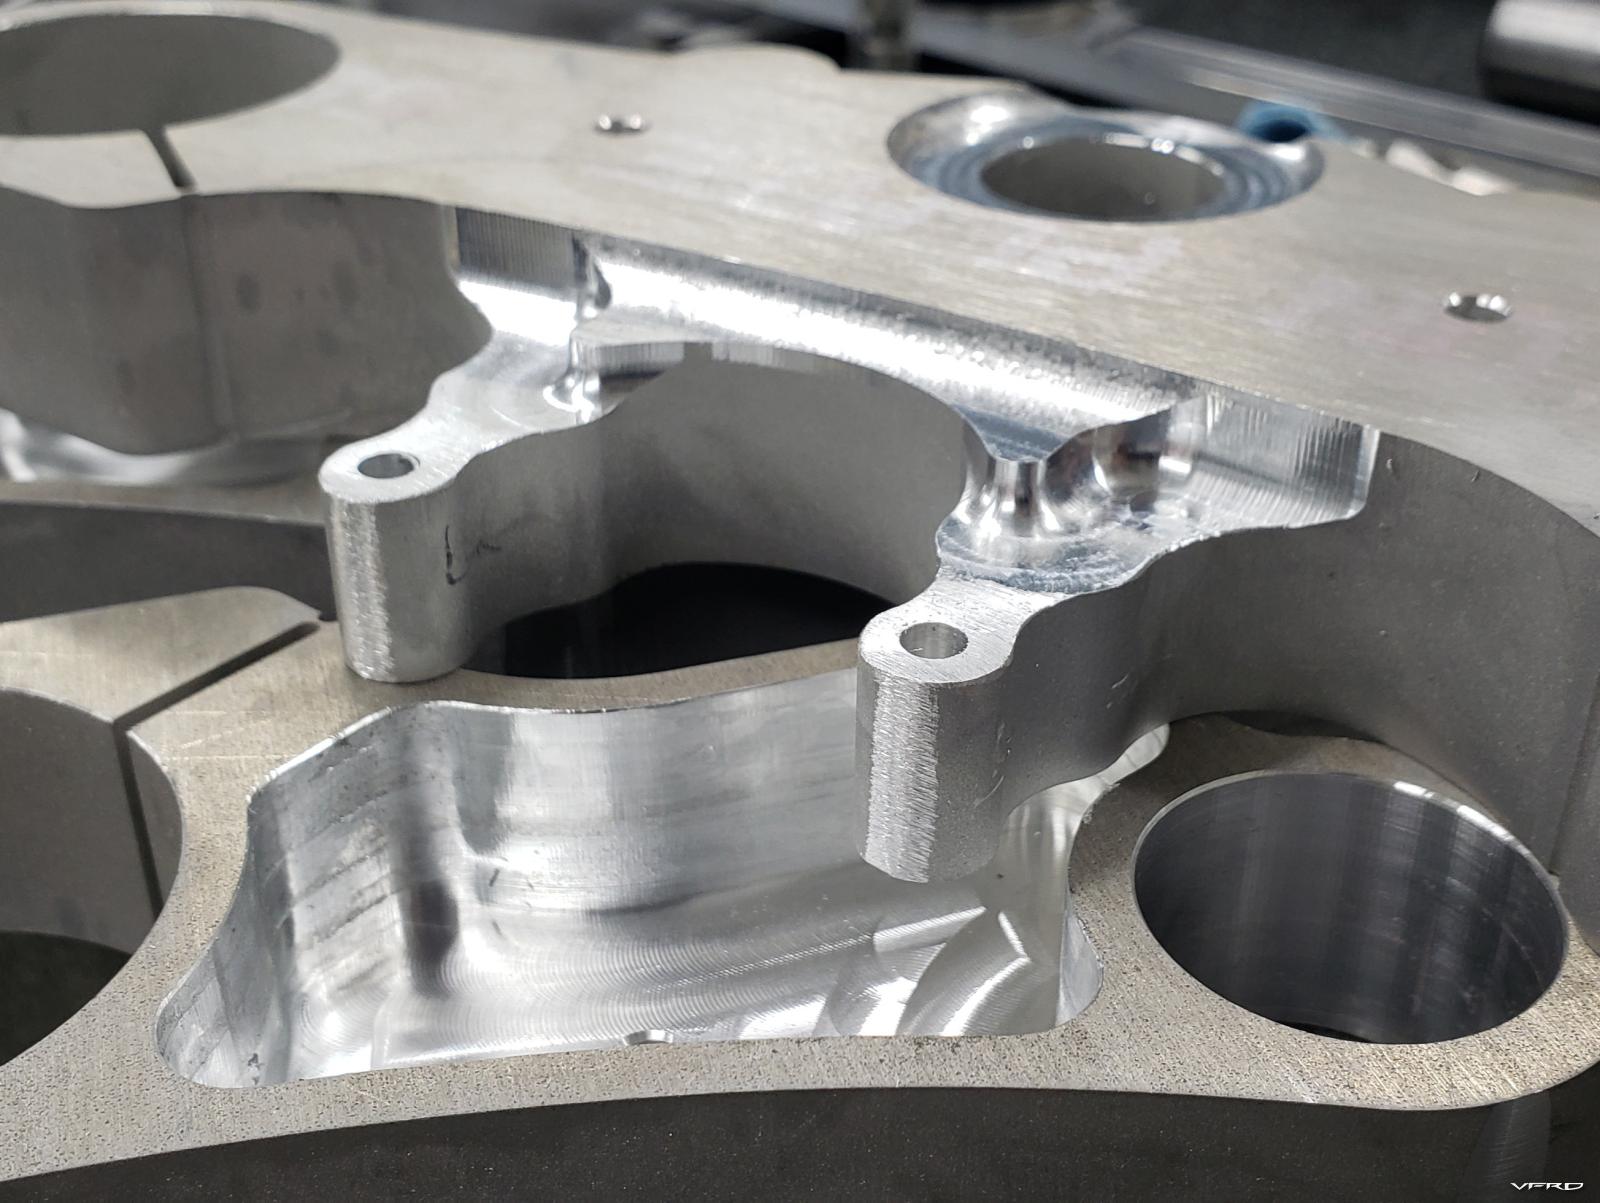
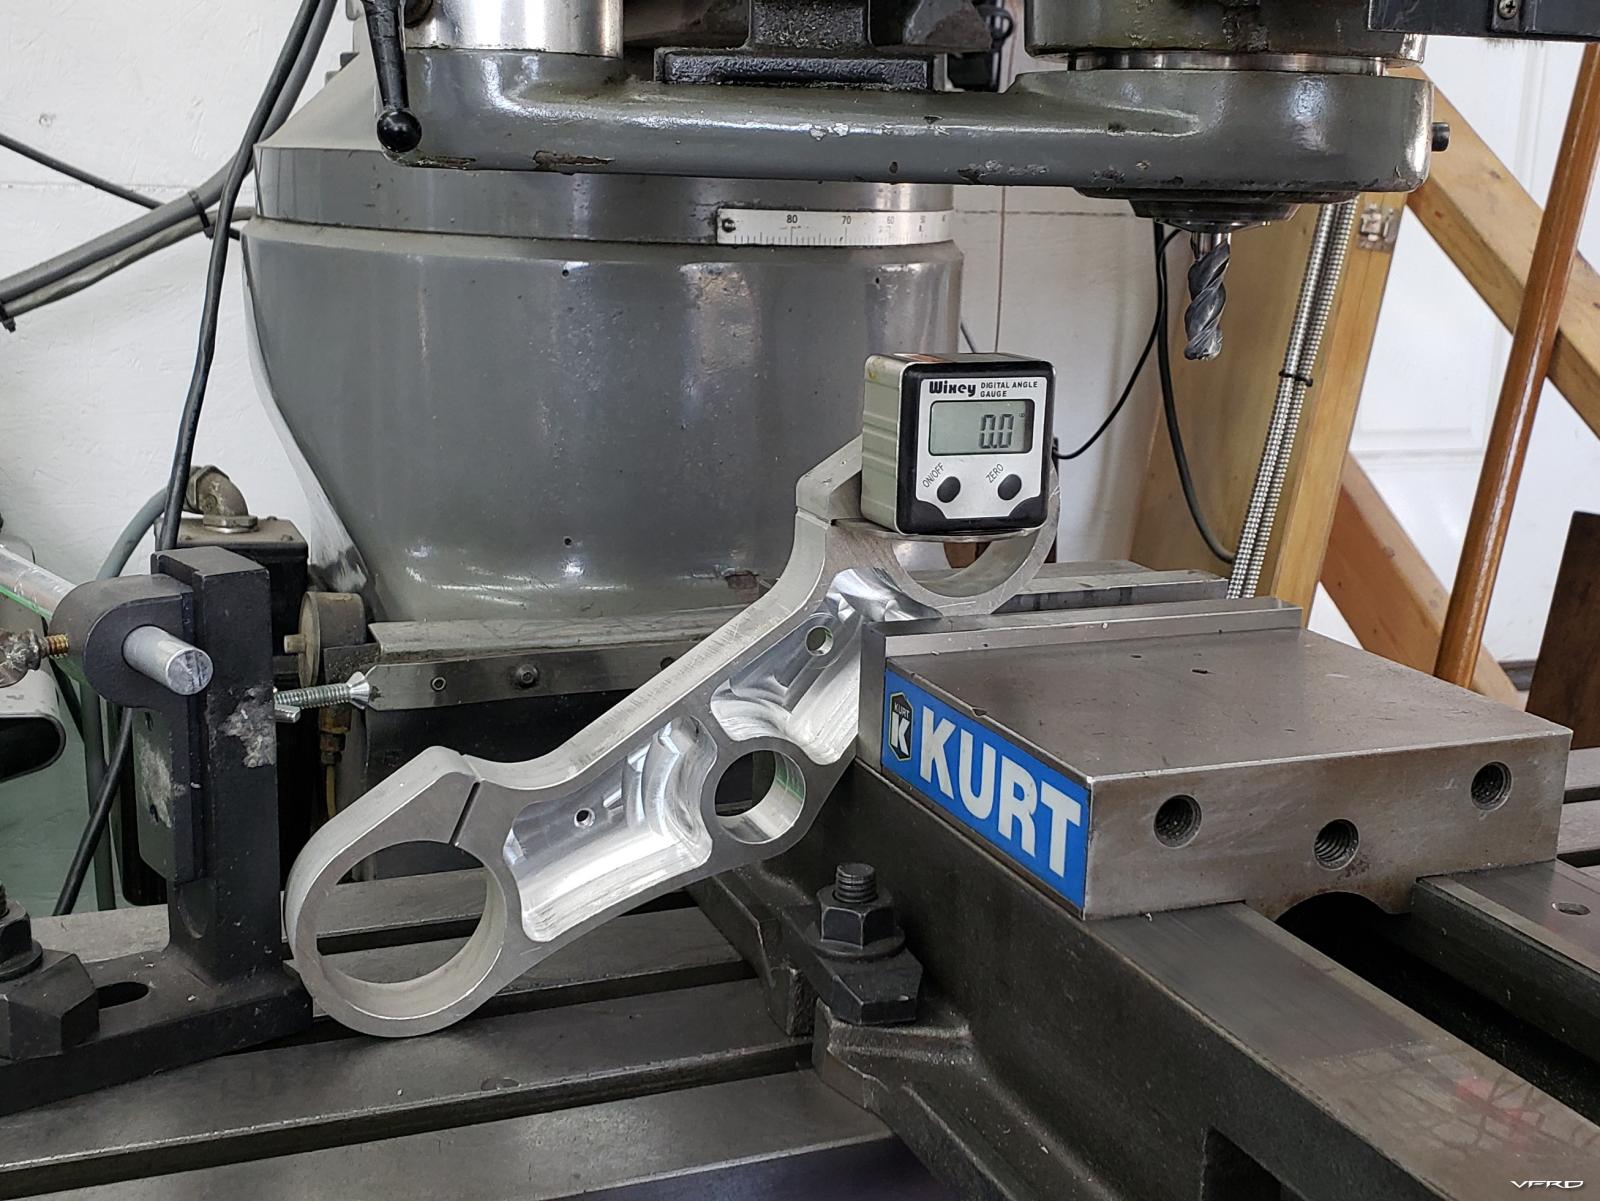
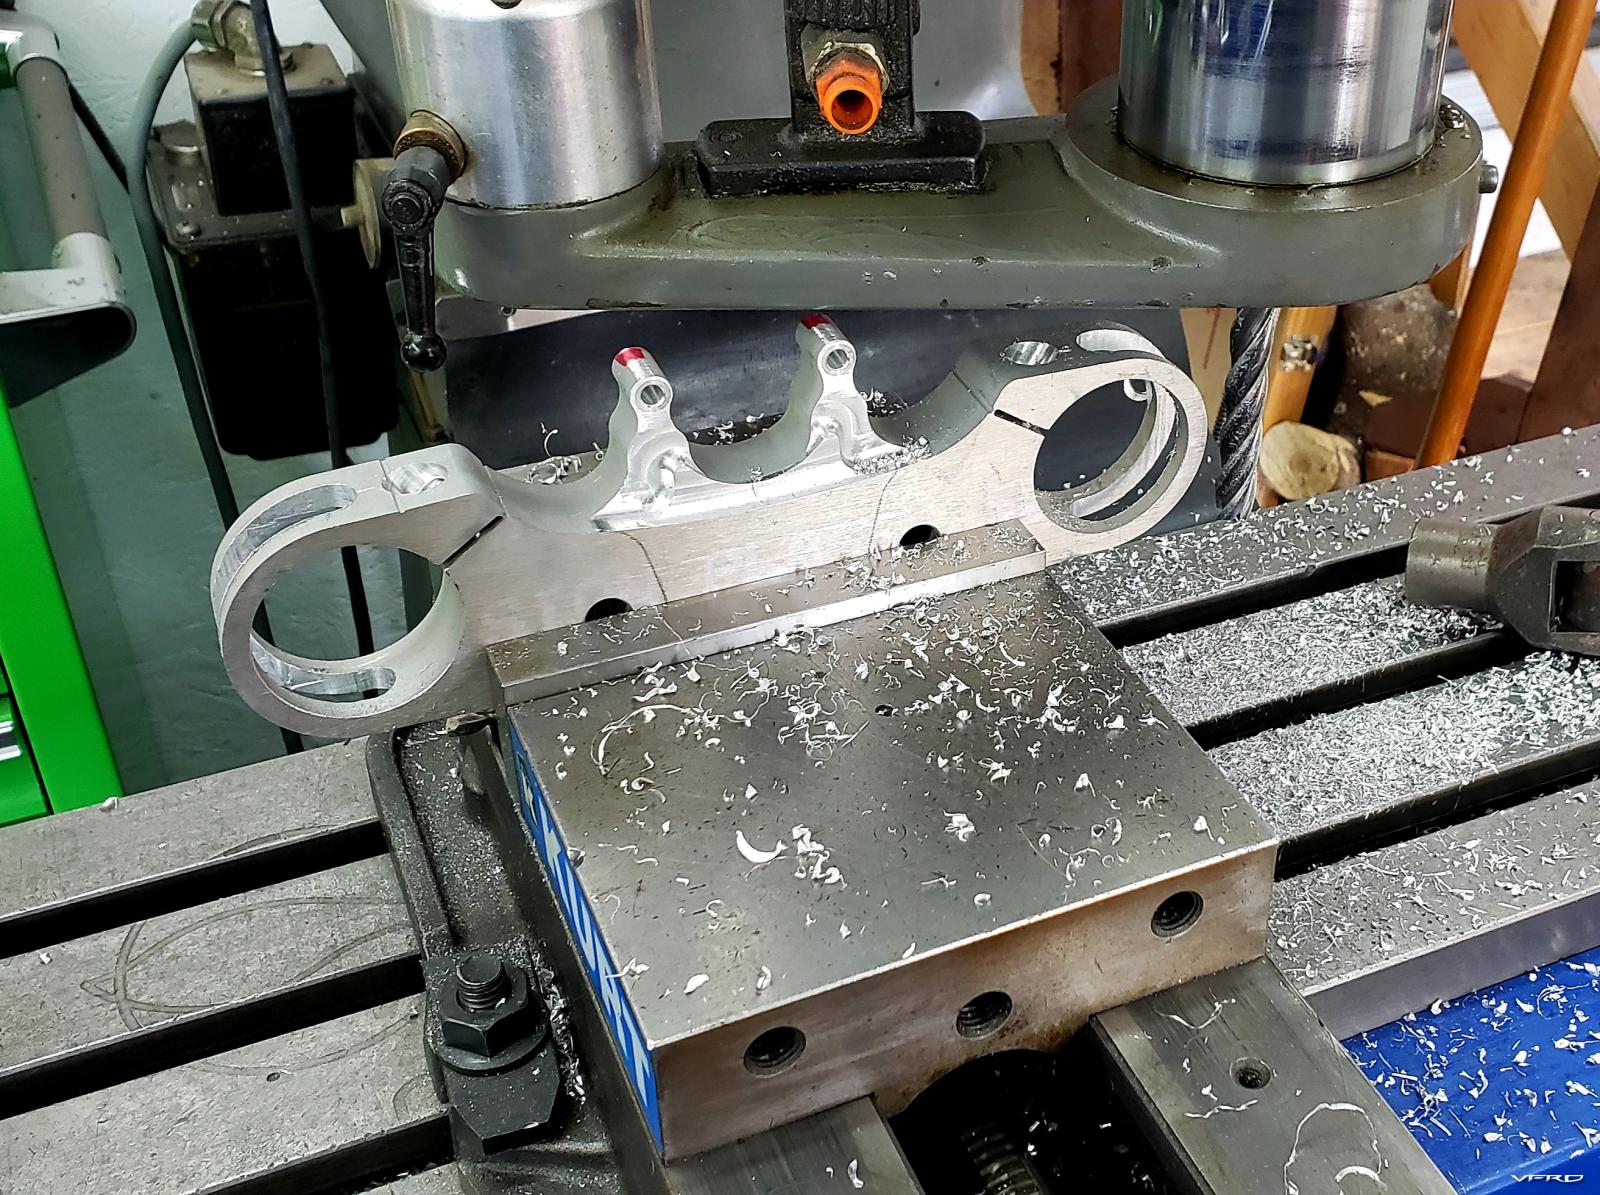
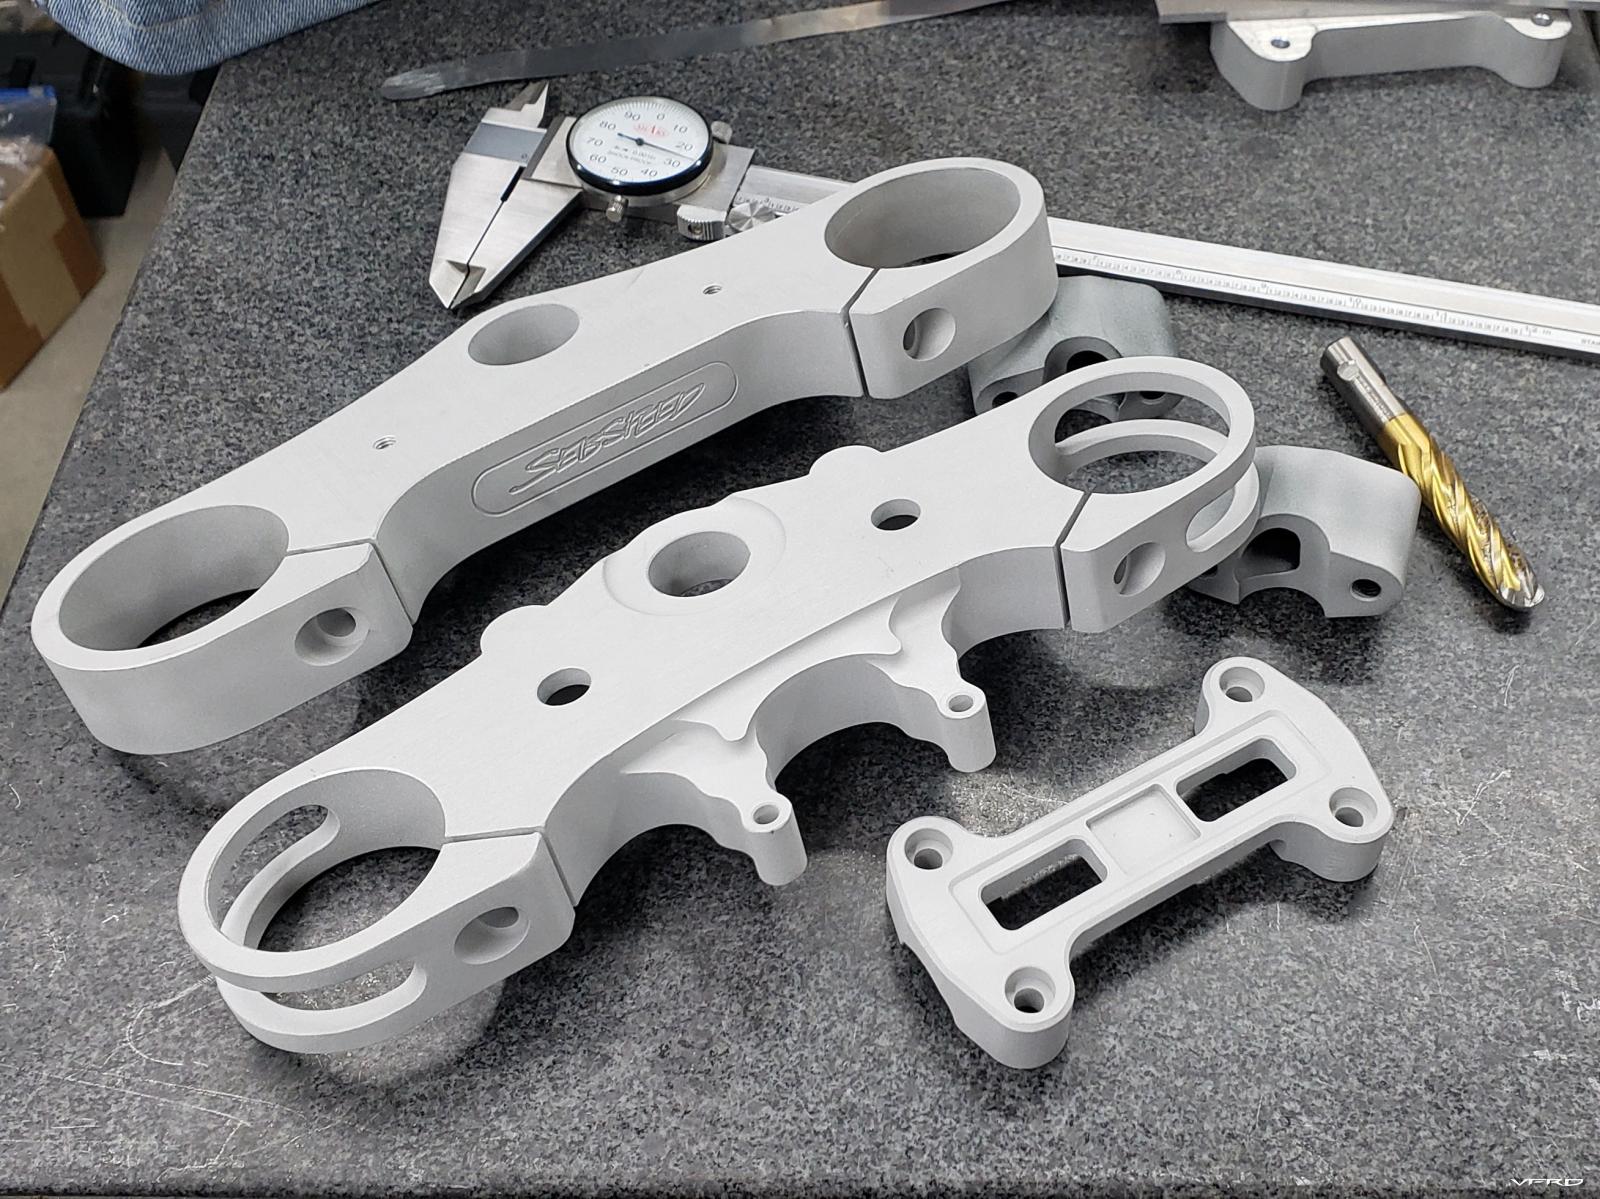
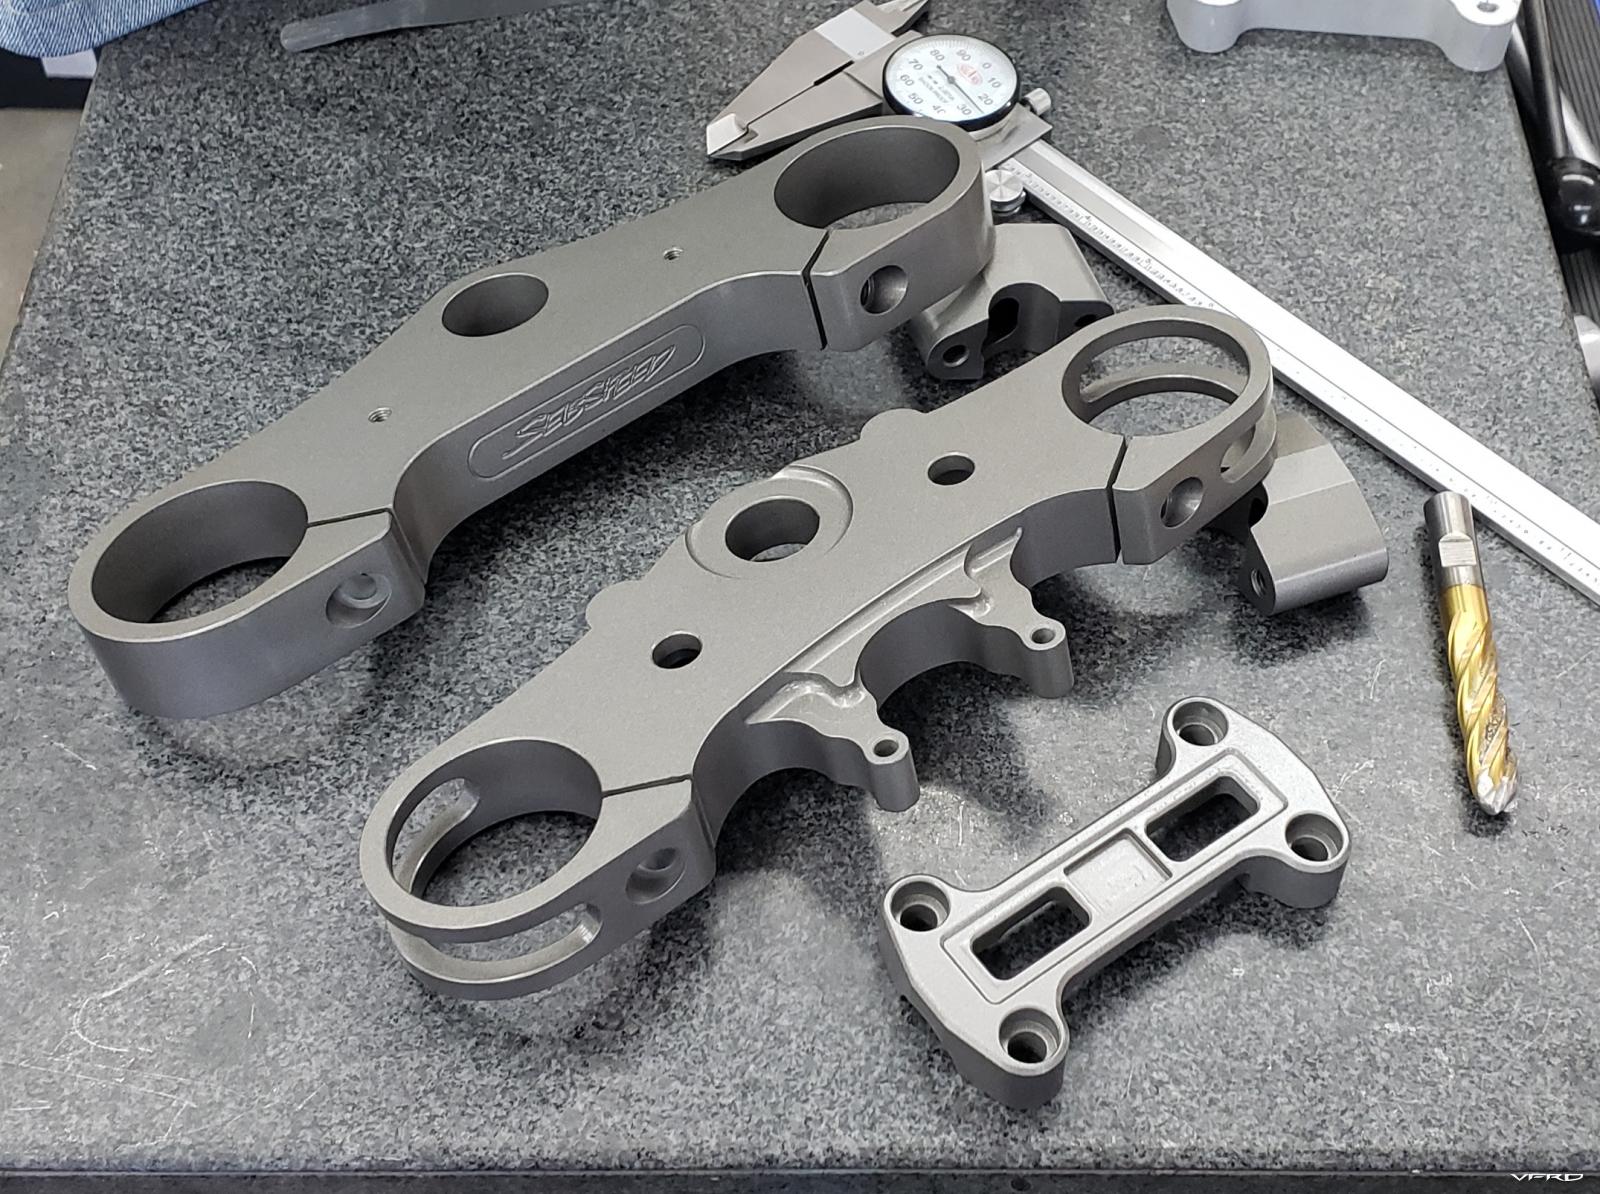
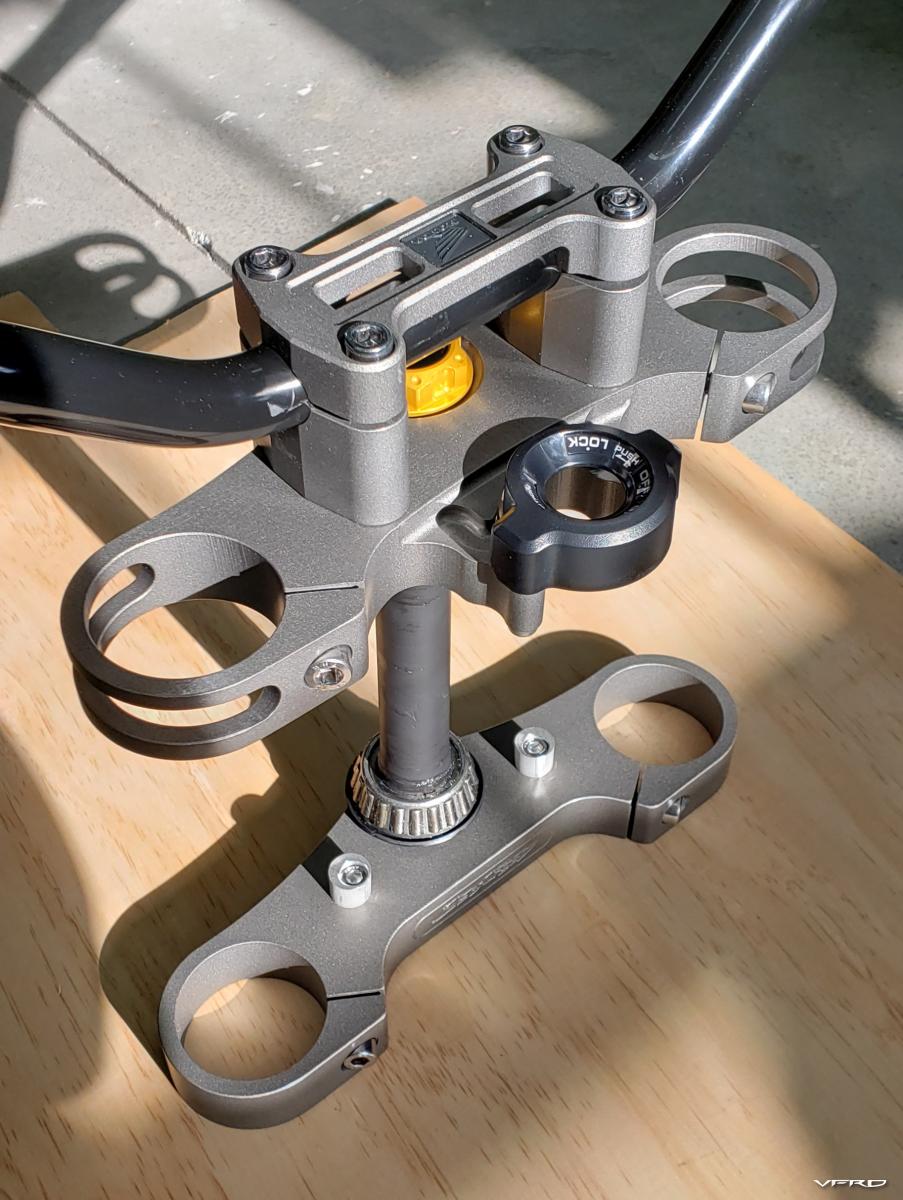
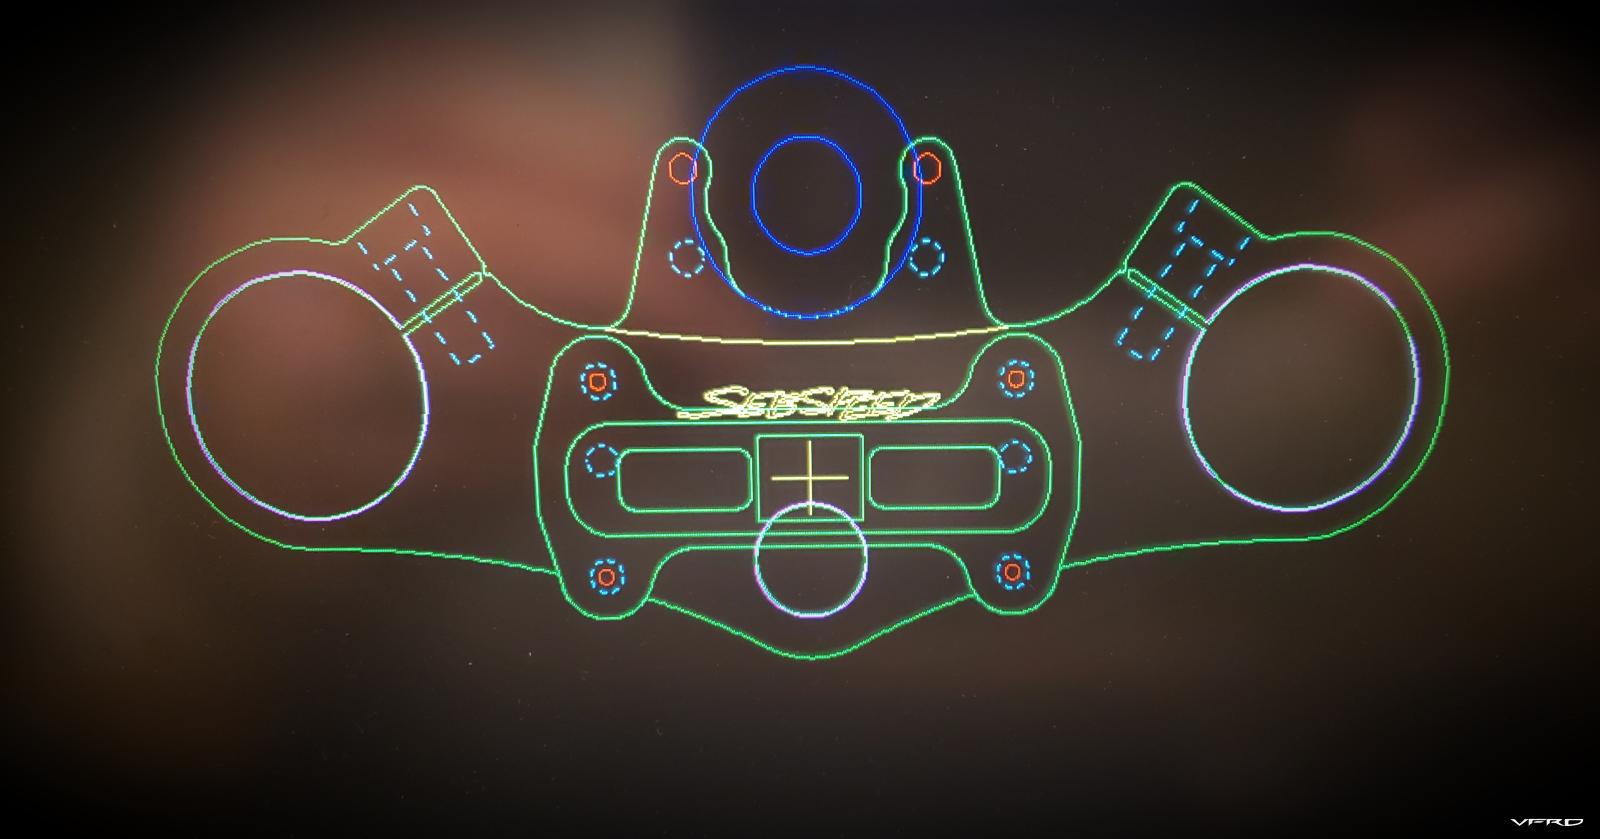
It was an interesting puzzle to make the wheel work and fit properly with the R1 forks, fender and rotors I had collected. I started by measuring everything and making up cad files for the new triples, rotor carriers, and wheel and caliper spacers. This puzzle is always my favorite part of a project - taking a handful of select parts from various sources and creating a homogeneous result.
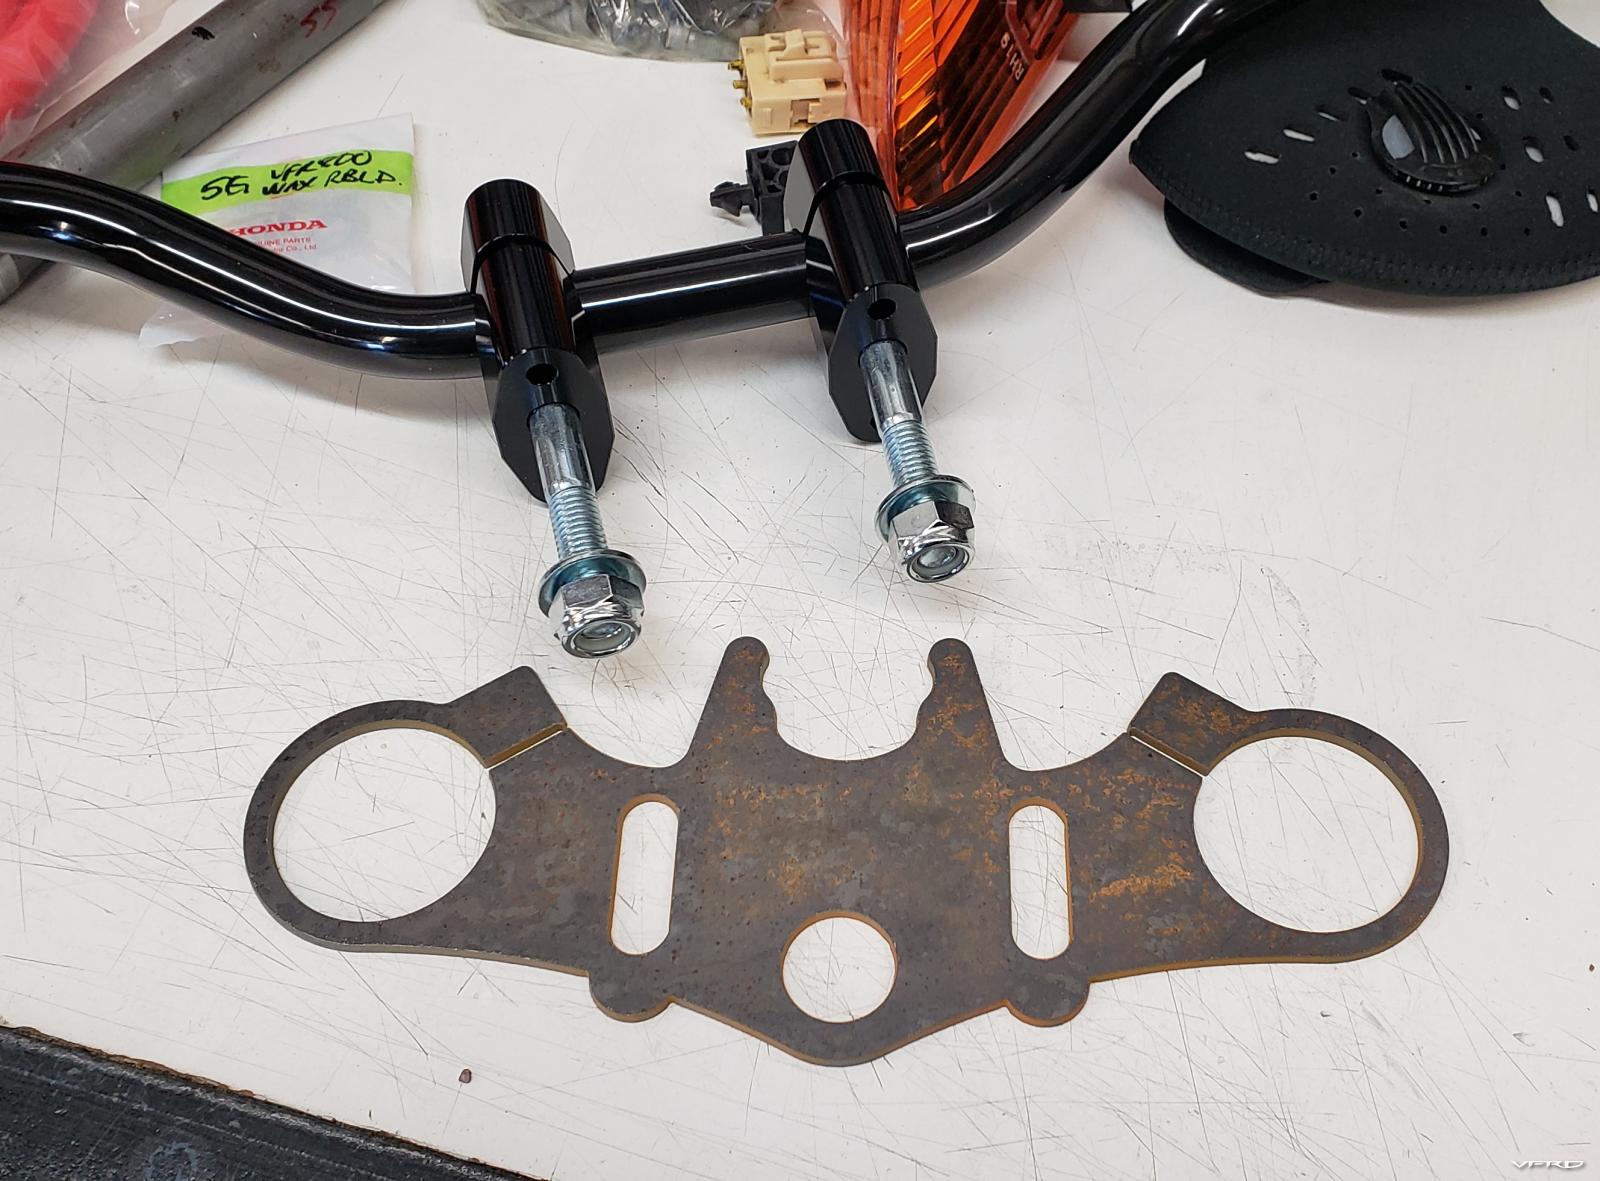
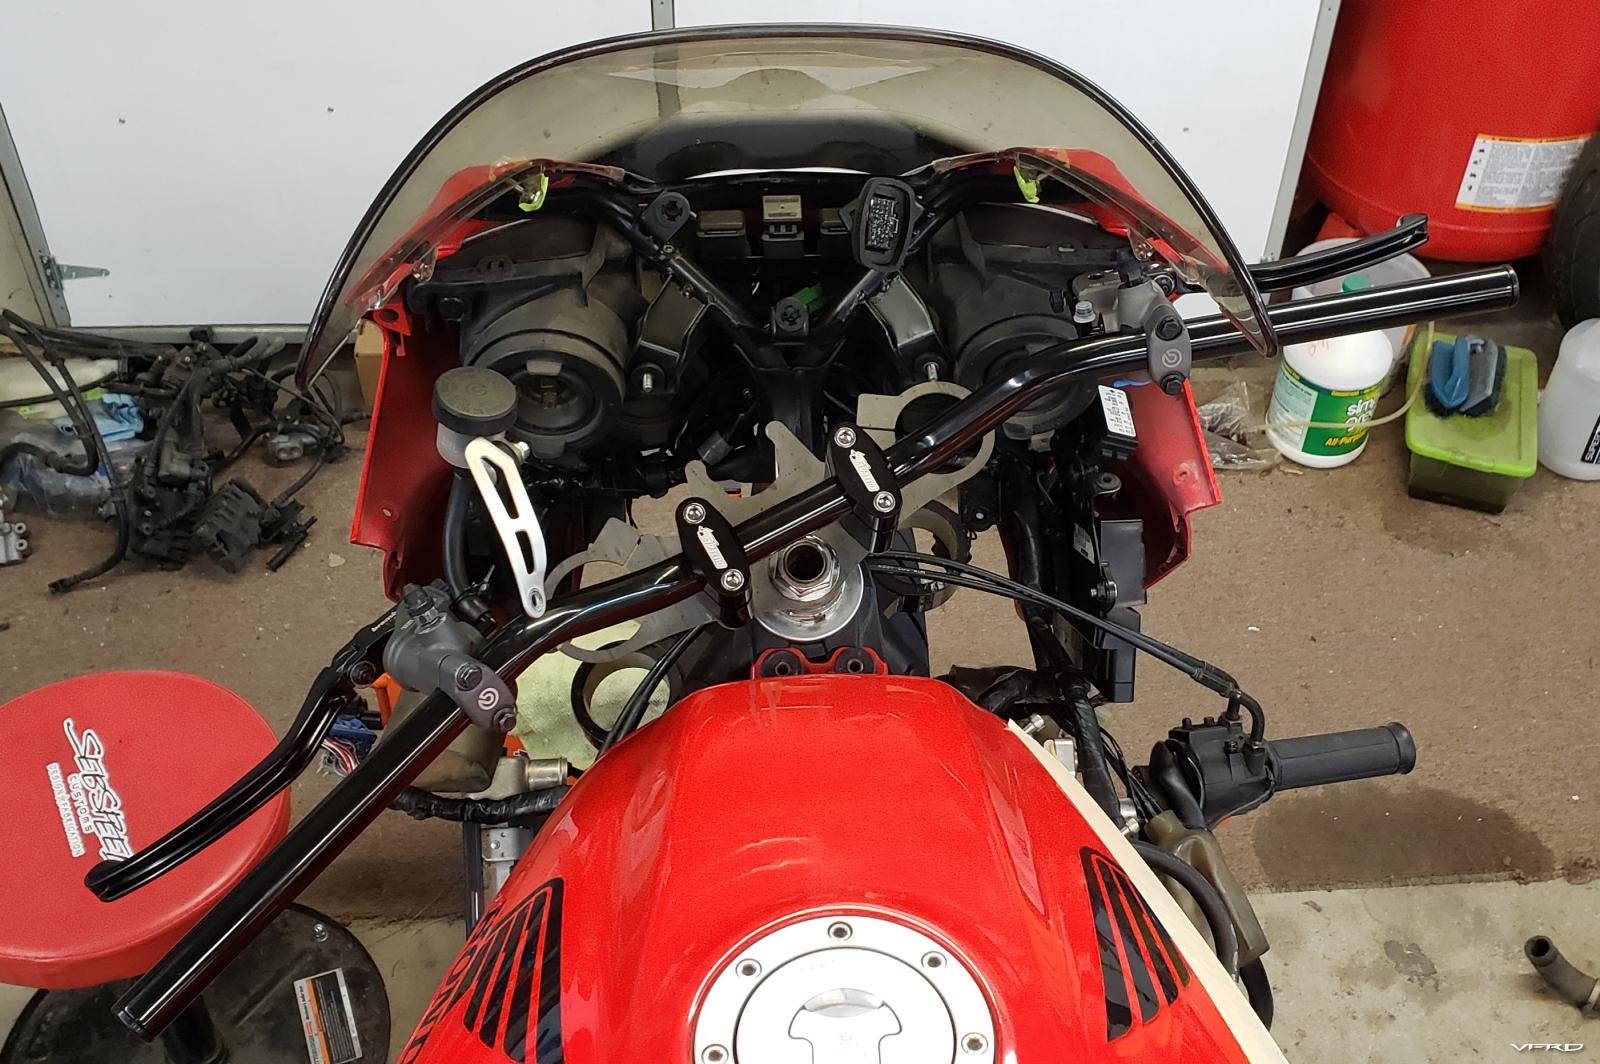
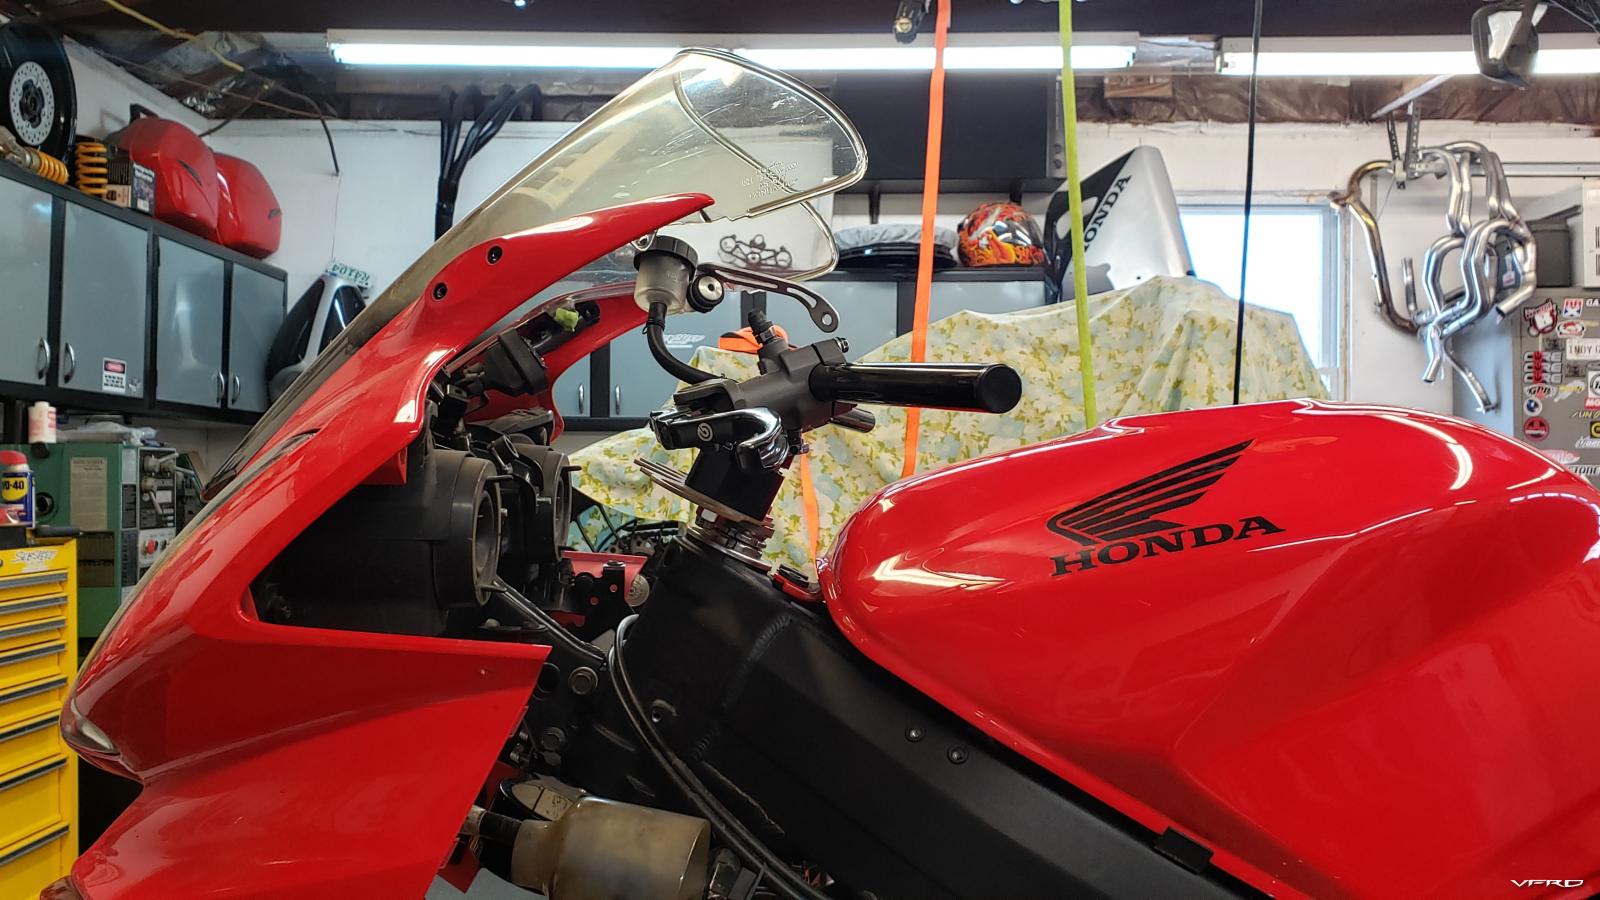
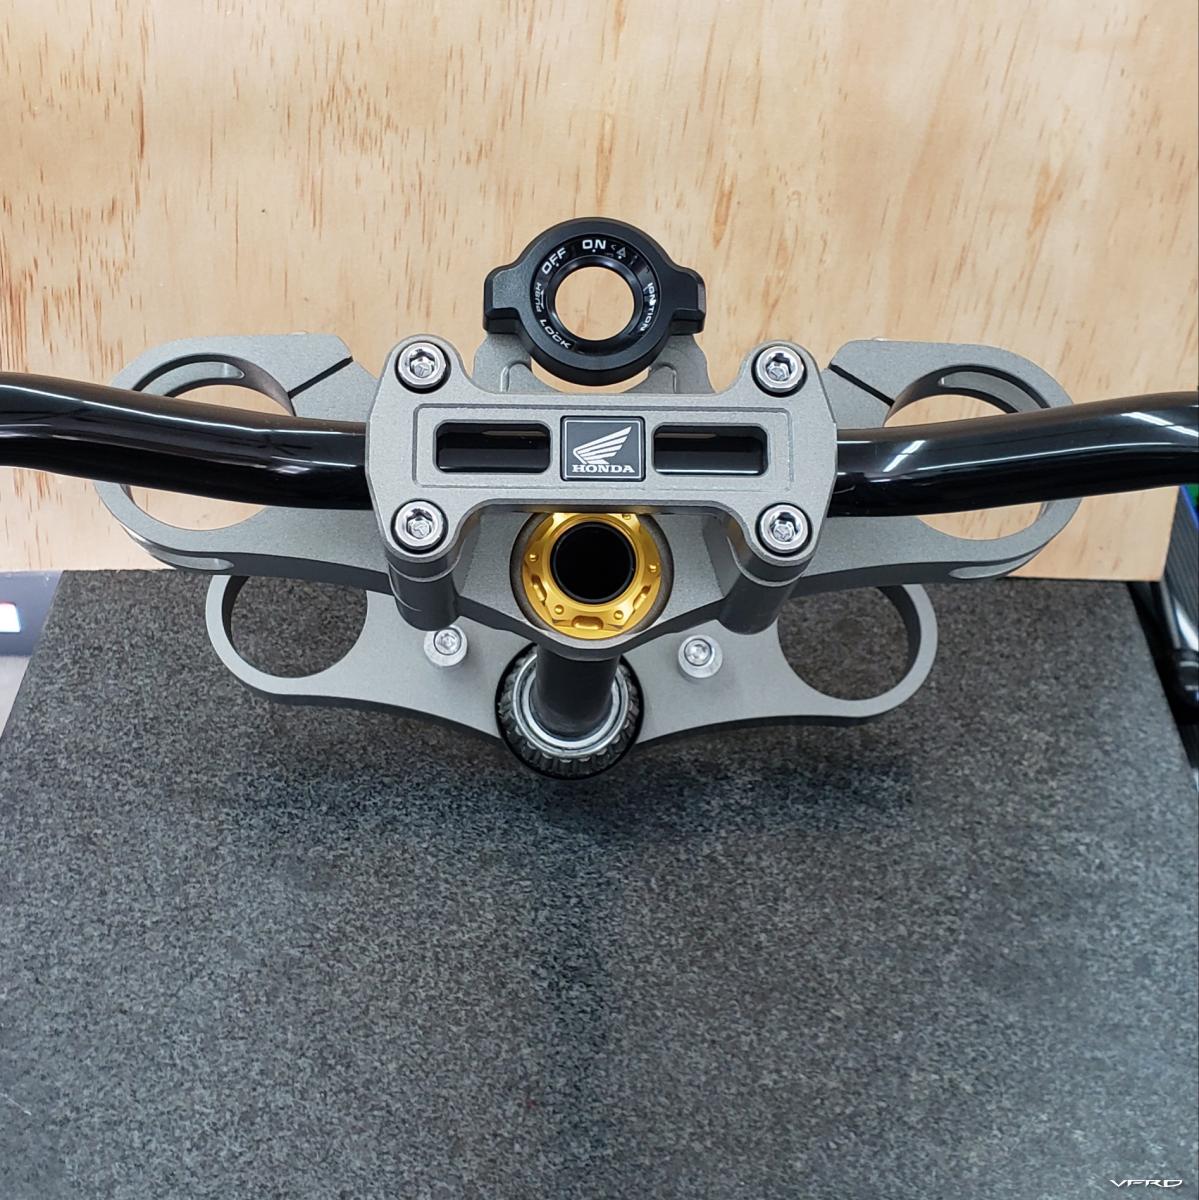
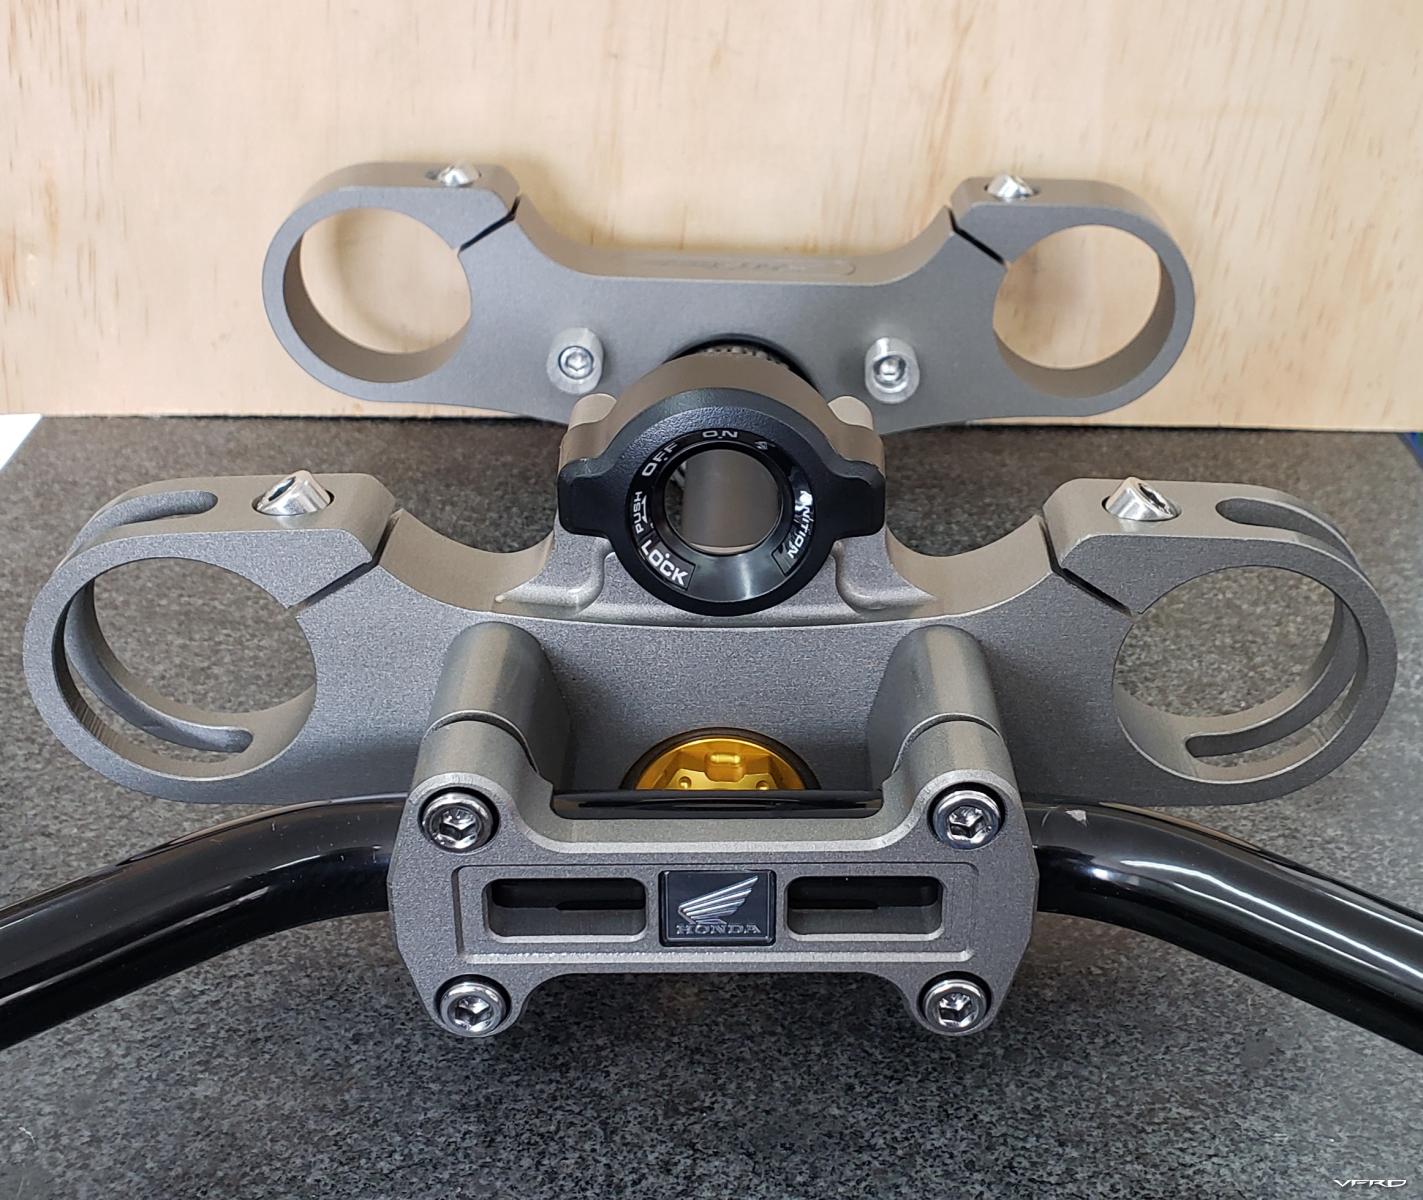
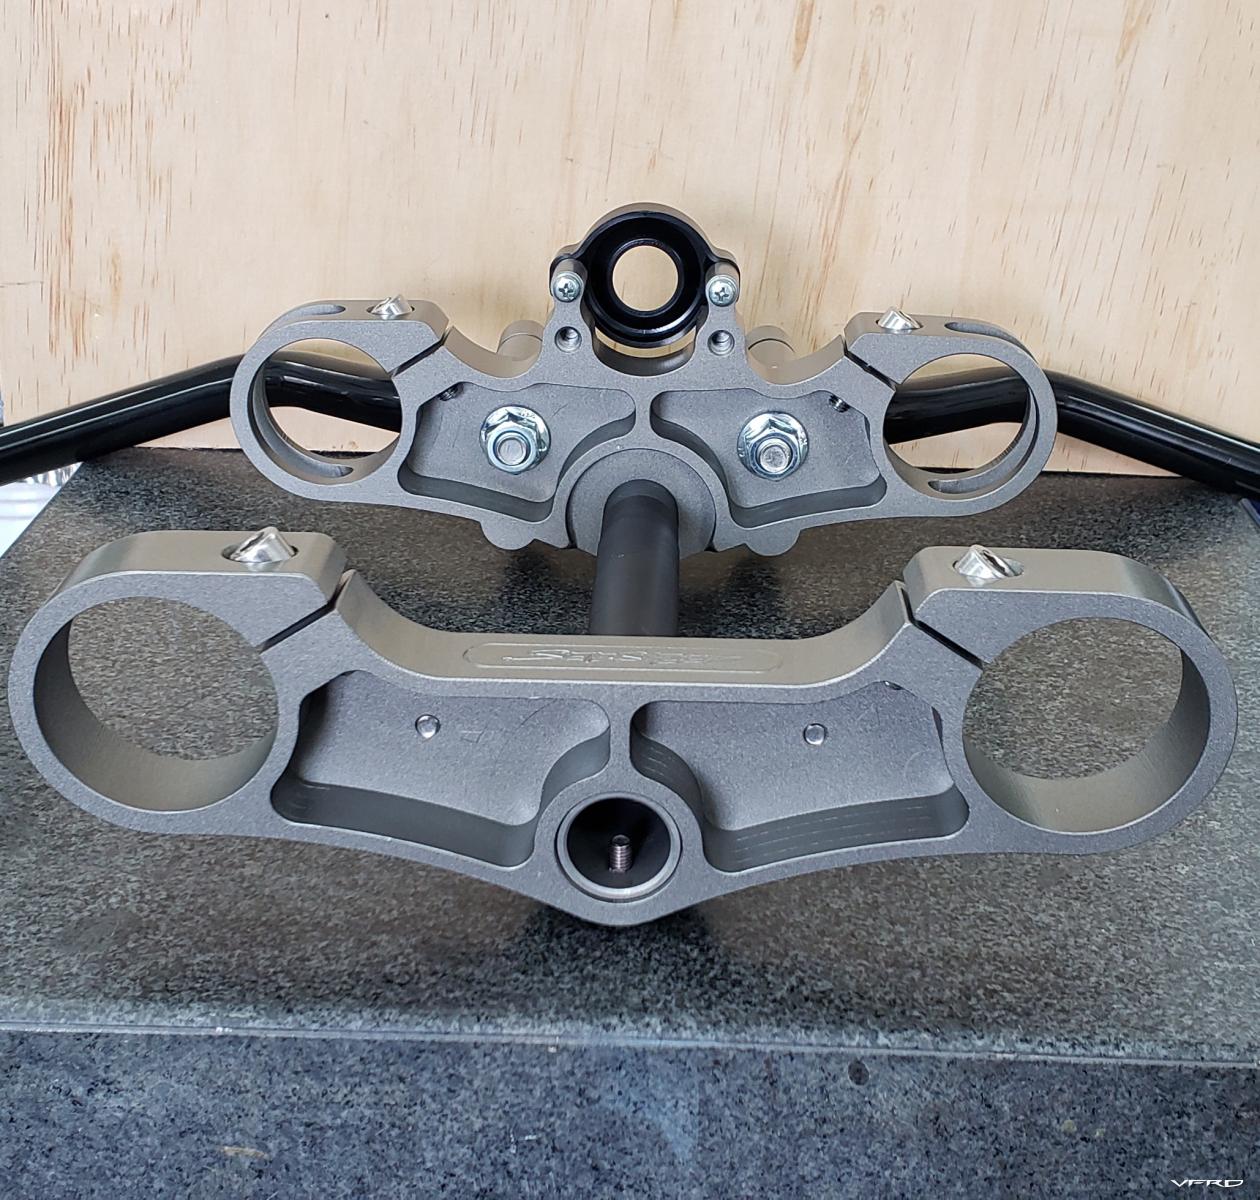
I designed the triples with R1 fork spacing and a custom offset that is less than the stock 40mm. I've retained the ignition mount, ignition shroud, and steering lock in my design. I also added bar risers and a bridge to adapt a Superbike bar.
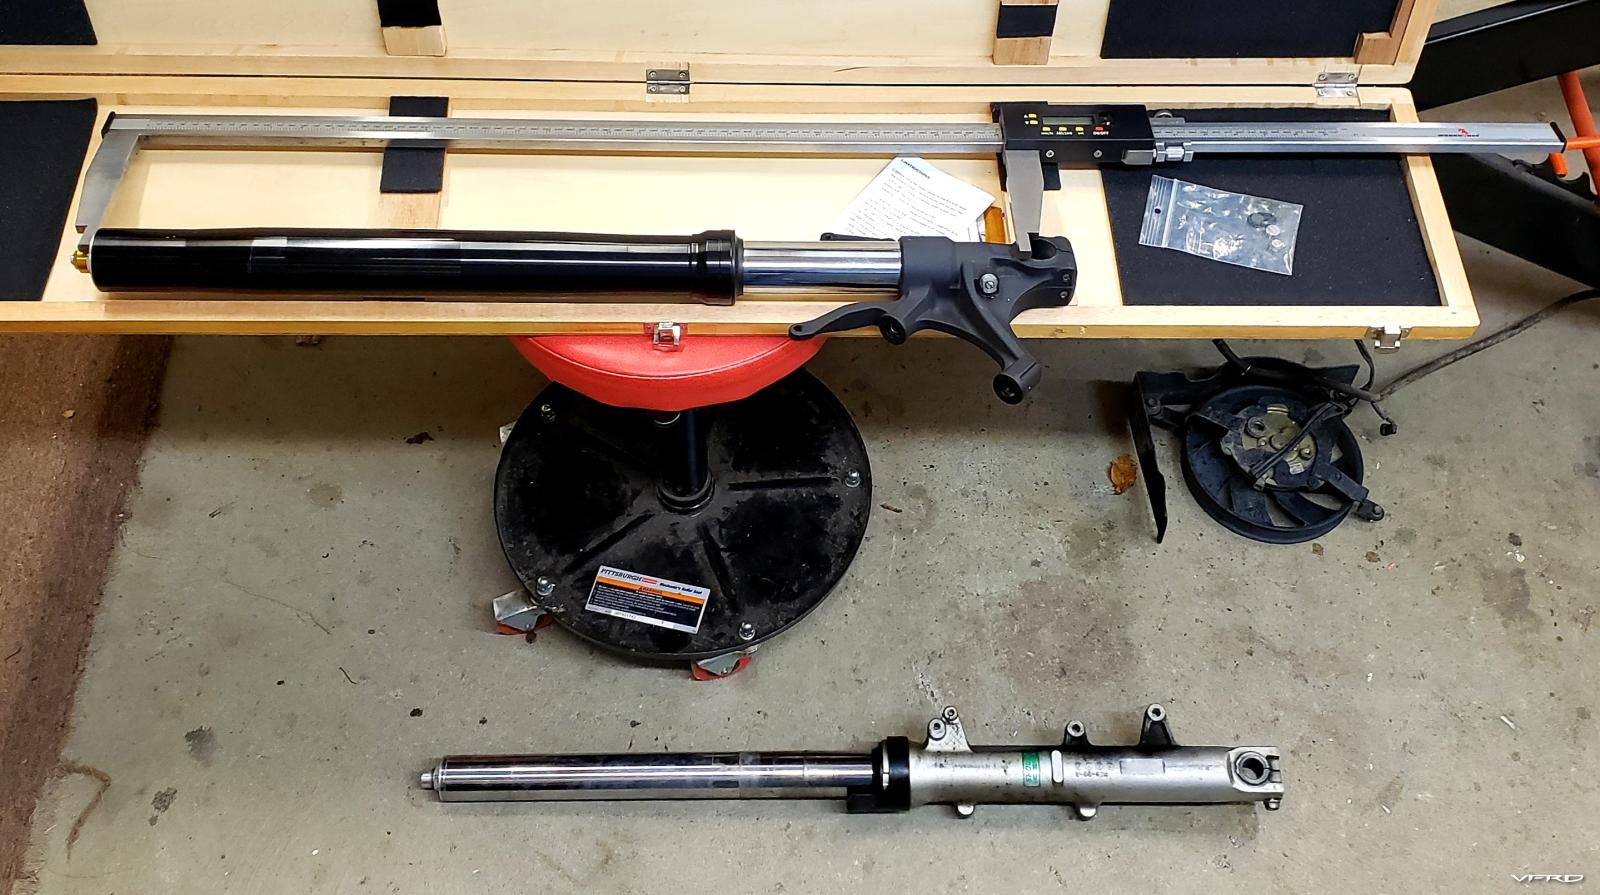
I sent the fork cartridges and the Ohlins off to Traxxion for a full rebuild and revalve. The forks got Racetech G2R compression valves, Traxxion rebound valves, and Racetech springs. The shock was dyno'd and tuned after installing the new Eibach spring.
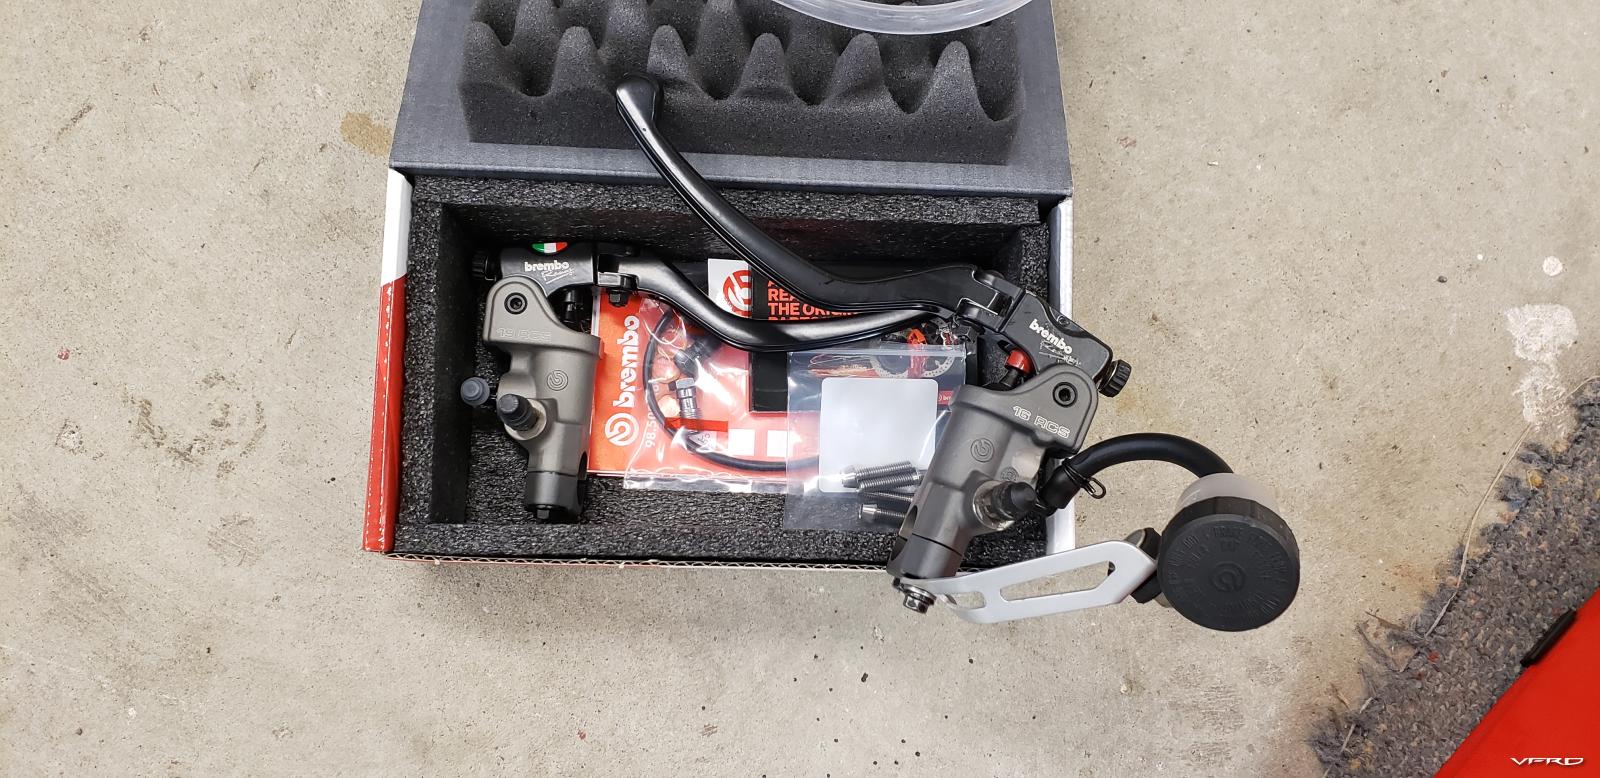
I was really spoiled by the Brembo controls I had installed on my 750 naked build, so I got myself a set of RCS masters for the brake and clutch on this bike as well.
-
11
-
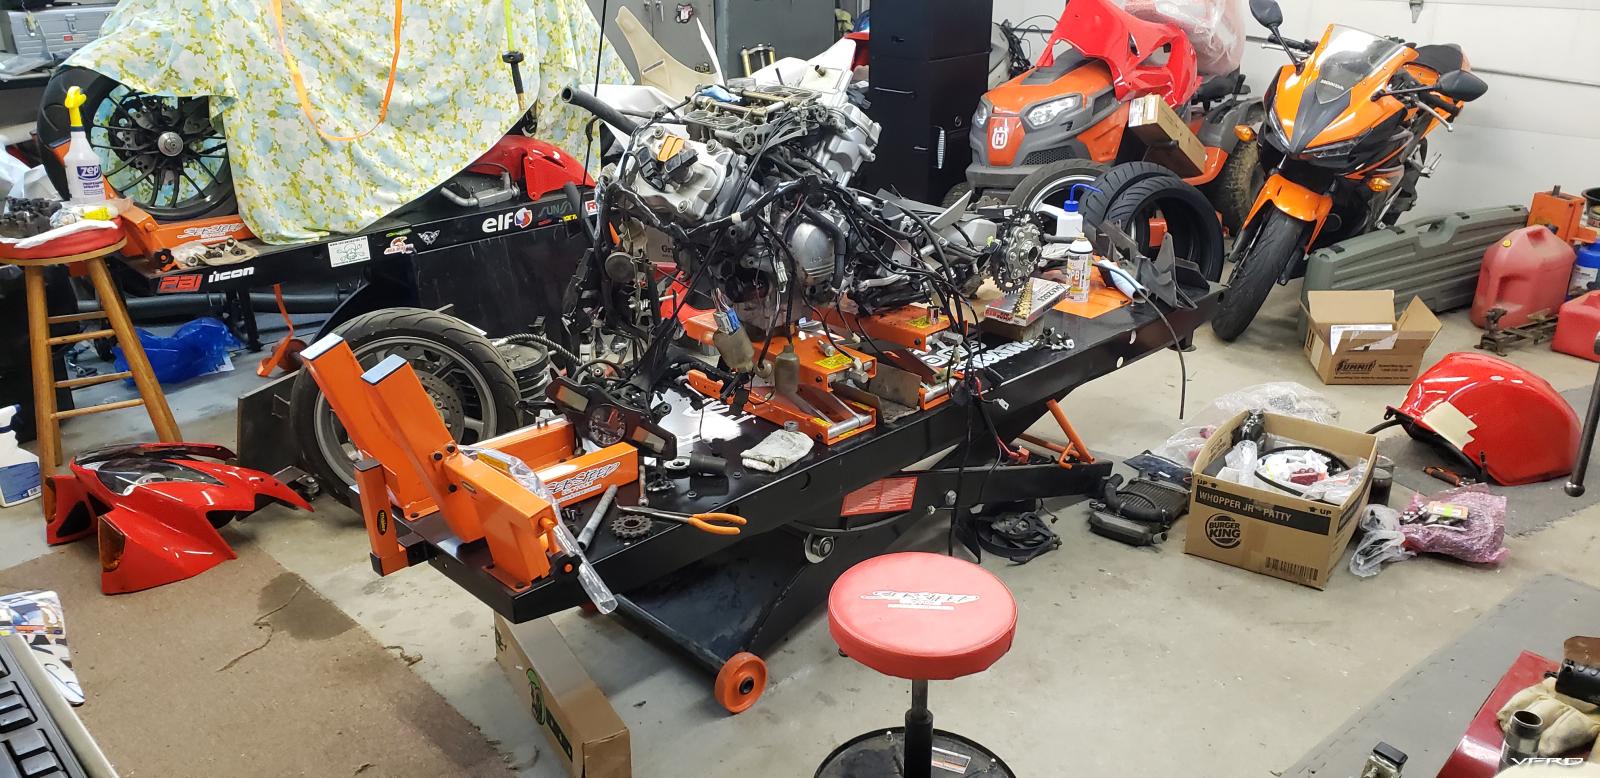
Alright... so the kickoff here was the fact I hadn't ridden my poor bike in years, mostly due to job change. As in, I was restructured out of my day job and I decided to make my side hustle into a self-sustaining endeavor. That meant putting all the frivolous stuff like toys and vacations on hold till I could find my niche/rhythm/whatever. Along the way, that meant taking my VFR apart so I could use it as a development mule for a subframe conversion project:
That left me with my bike on my bench sans rear body... and it just felt like it was time to dive in vs putting it back together as it was.
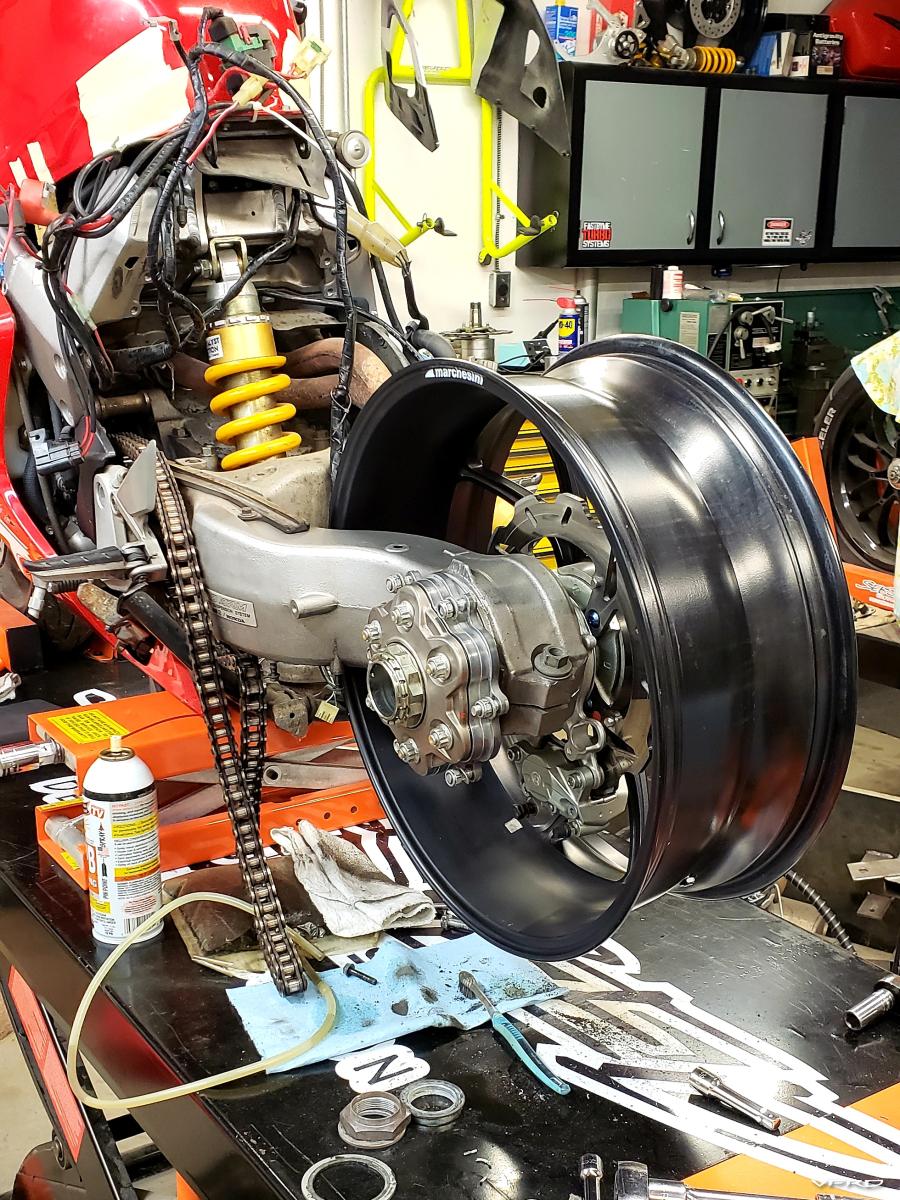
The first thing I really wanted to try was fitting the Ducati rear wheel, as I made a kit for it and wanted to sell the extras to pay bills. So, I dug into cleaning & assembling the Duc axle and cleaning the swingarm.
I used 1098 parts for my bike, and I upgraded from oem Ducati with a better brake rotor, titanium bolts and nuts, quick change sprocket carrier and a few other bits. The Duc brake caliper is stock.
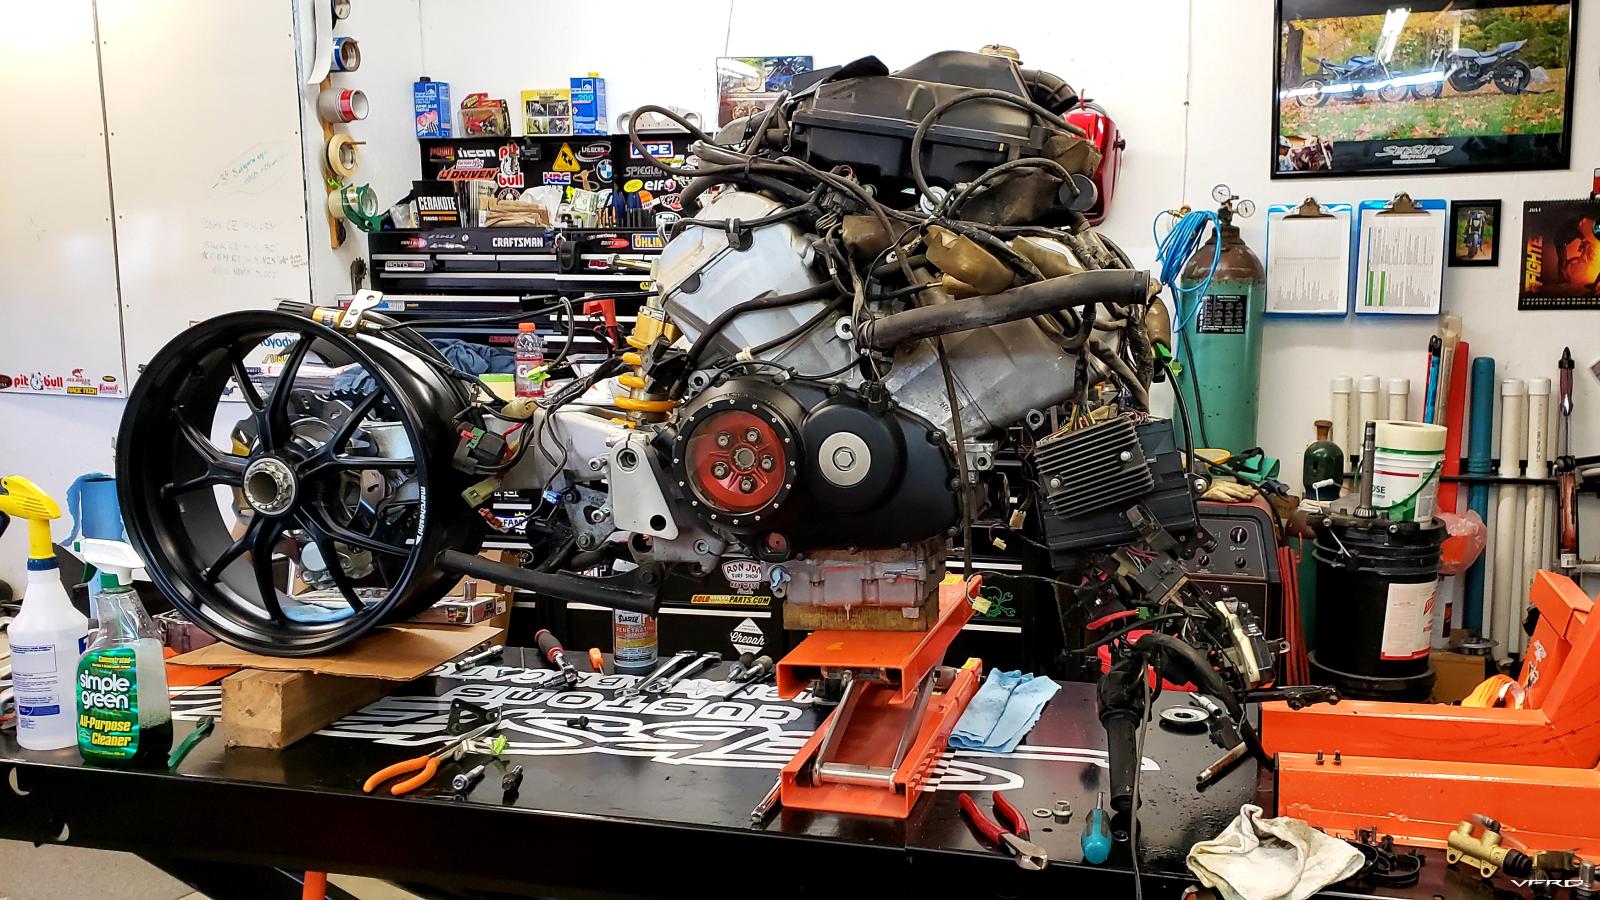
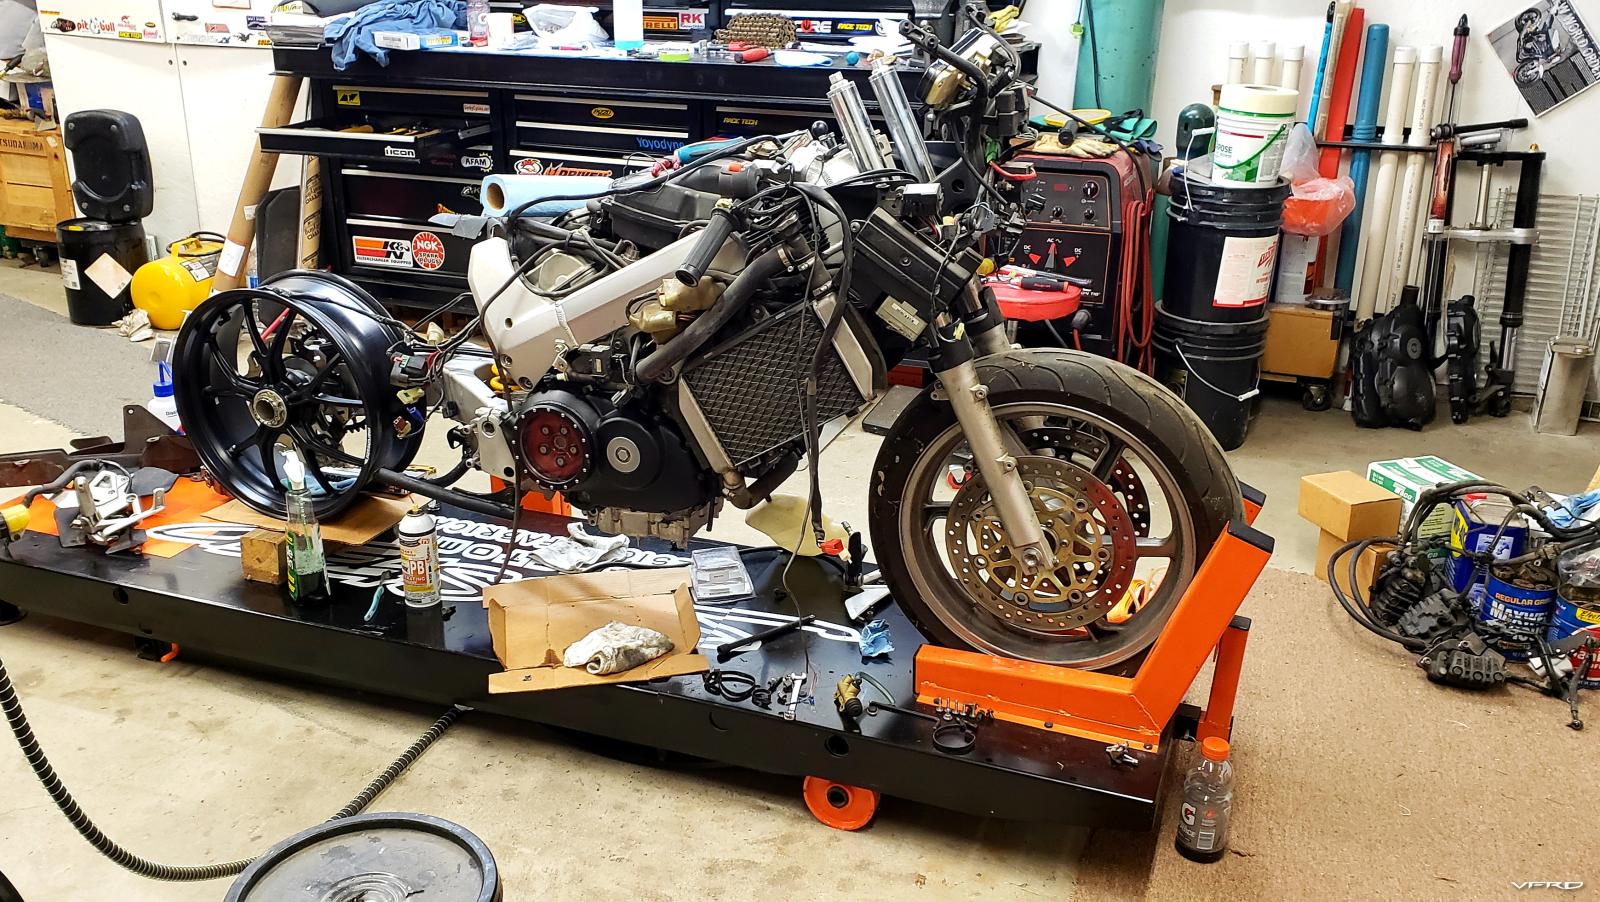
Then things got real... teardown time! Lots of grime but thankfully the bike has always lived indoors when not on road trips.
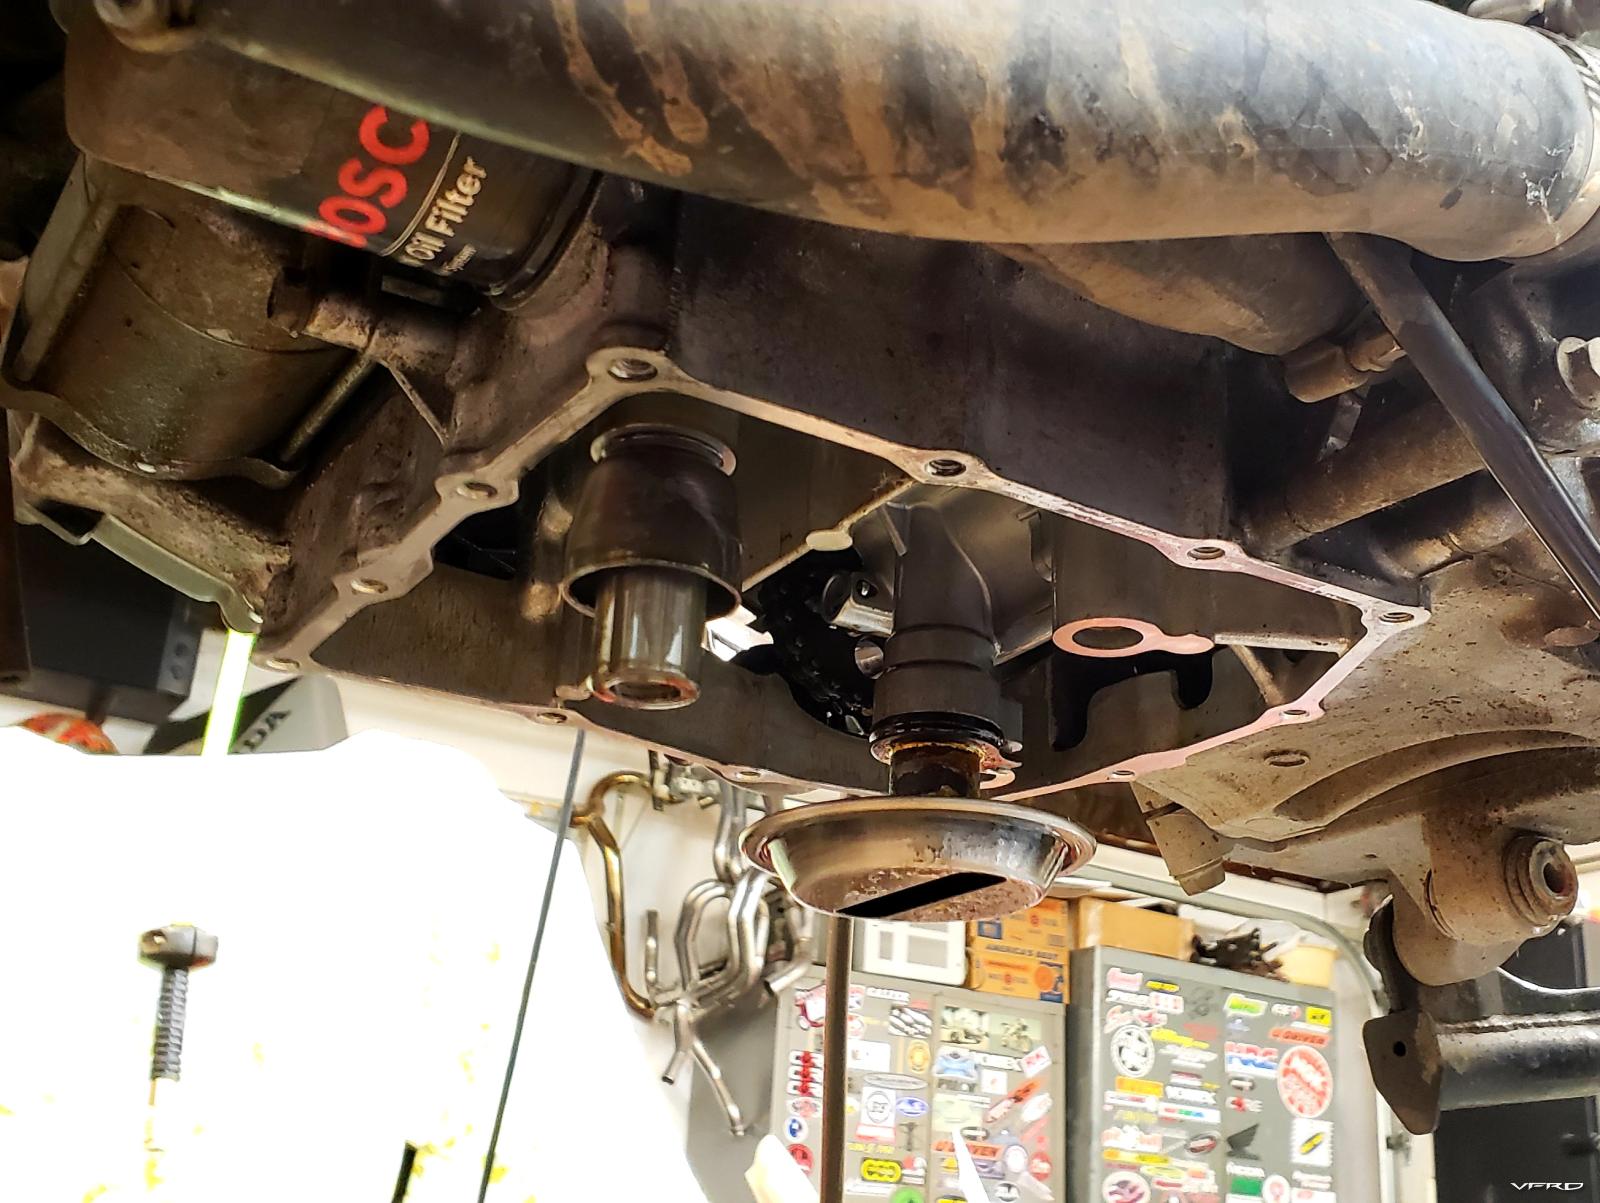
Once the headers were off I could swap out the oil pan for a spare one I modified years ago to accept a Fumoto drain. I'll now regain the fairing tabs I had previously broken off mine.
-
5
-
-
- Popular Post
- Popular Post
Well, my idea of one, anyway.
aka, I collected parts for 10 years and finally installed them all... (a year ago, sorry
 )
)
aka, my bike needed a refresh after almost 50kmi and sitting unused for the last 5 years.
I started this work early December 2021 and finished just shy of 6 months later in May of 2022, so this story has been a long time coming.
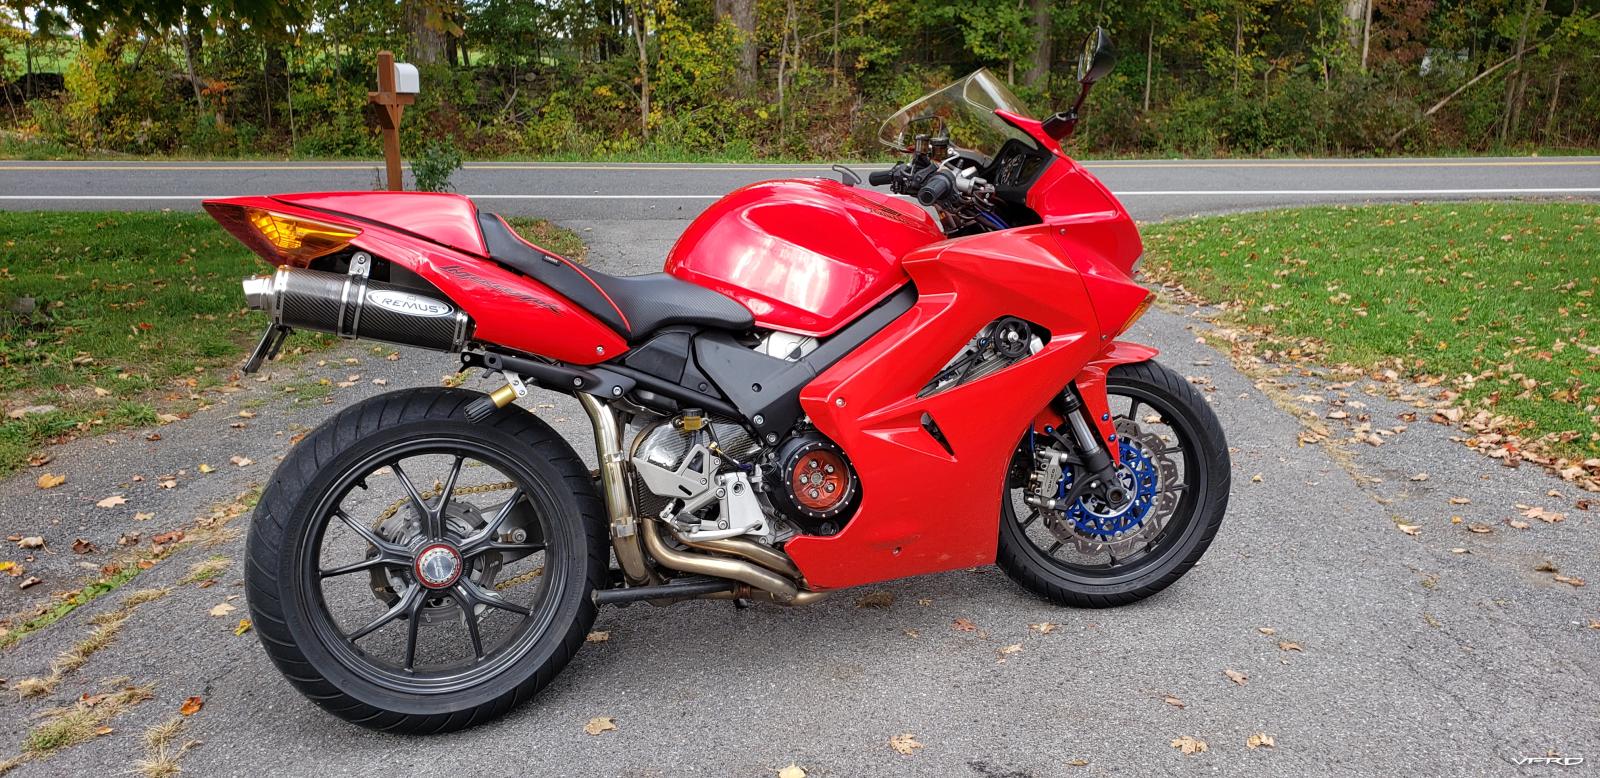
I bought this 2005 VFR800 brand new 17 years ago in February 2006, and I started with some light modifications right off the bat. Mostly good practical ones like a throttle lock, comfy seat, mirror extenders, suspension work, luggage, etc. Being a member here prior to purchase and of course ever since, you get a lot of ideas and sometimes even some good deals on gently used parts and unique parts made by other talented members. Over the next series of posts in this thread I'm going to highlight the bucket list of parts I collected & fabricated, plus the modifications I made to my bike to make it into my dream VFR.
Here's a pretty comprehensive list of what the build is comprised of:
- 2005 VFR800. Bought new, now 48,xxx + mi
- Powdercoated frame and subframe satin black
- Wheels powdercoated "Wet Charcoal", added angled stems
- 2005 Yamaha R1 forks upgraded with:
~Racetech 1.0kg springs
~Racetech G2R comp valves
~Traxxion rebound valves
~cartridges tuned by Traxxion
~Maxima 7wt 125-150 oil @115mm air gap
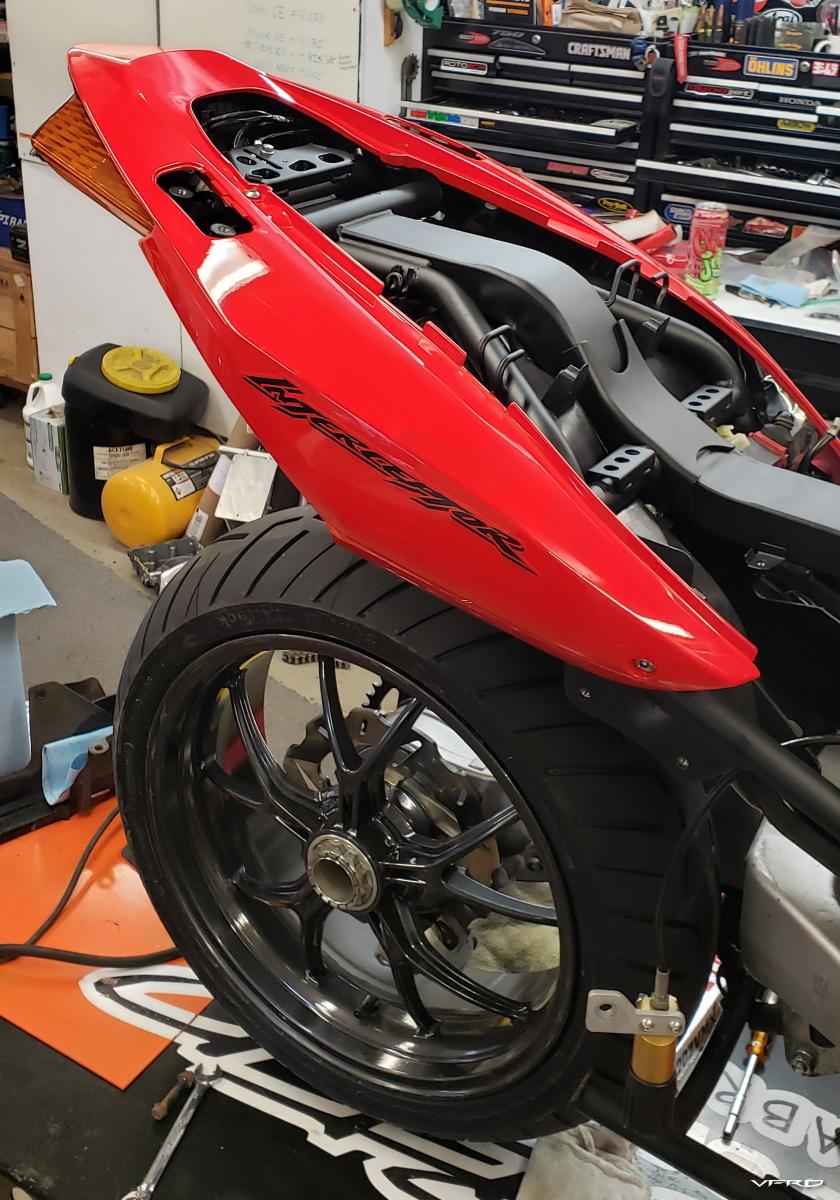
- R1 front fender painted R258 Winning Red
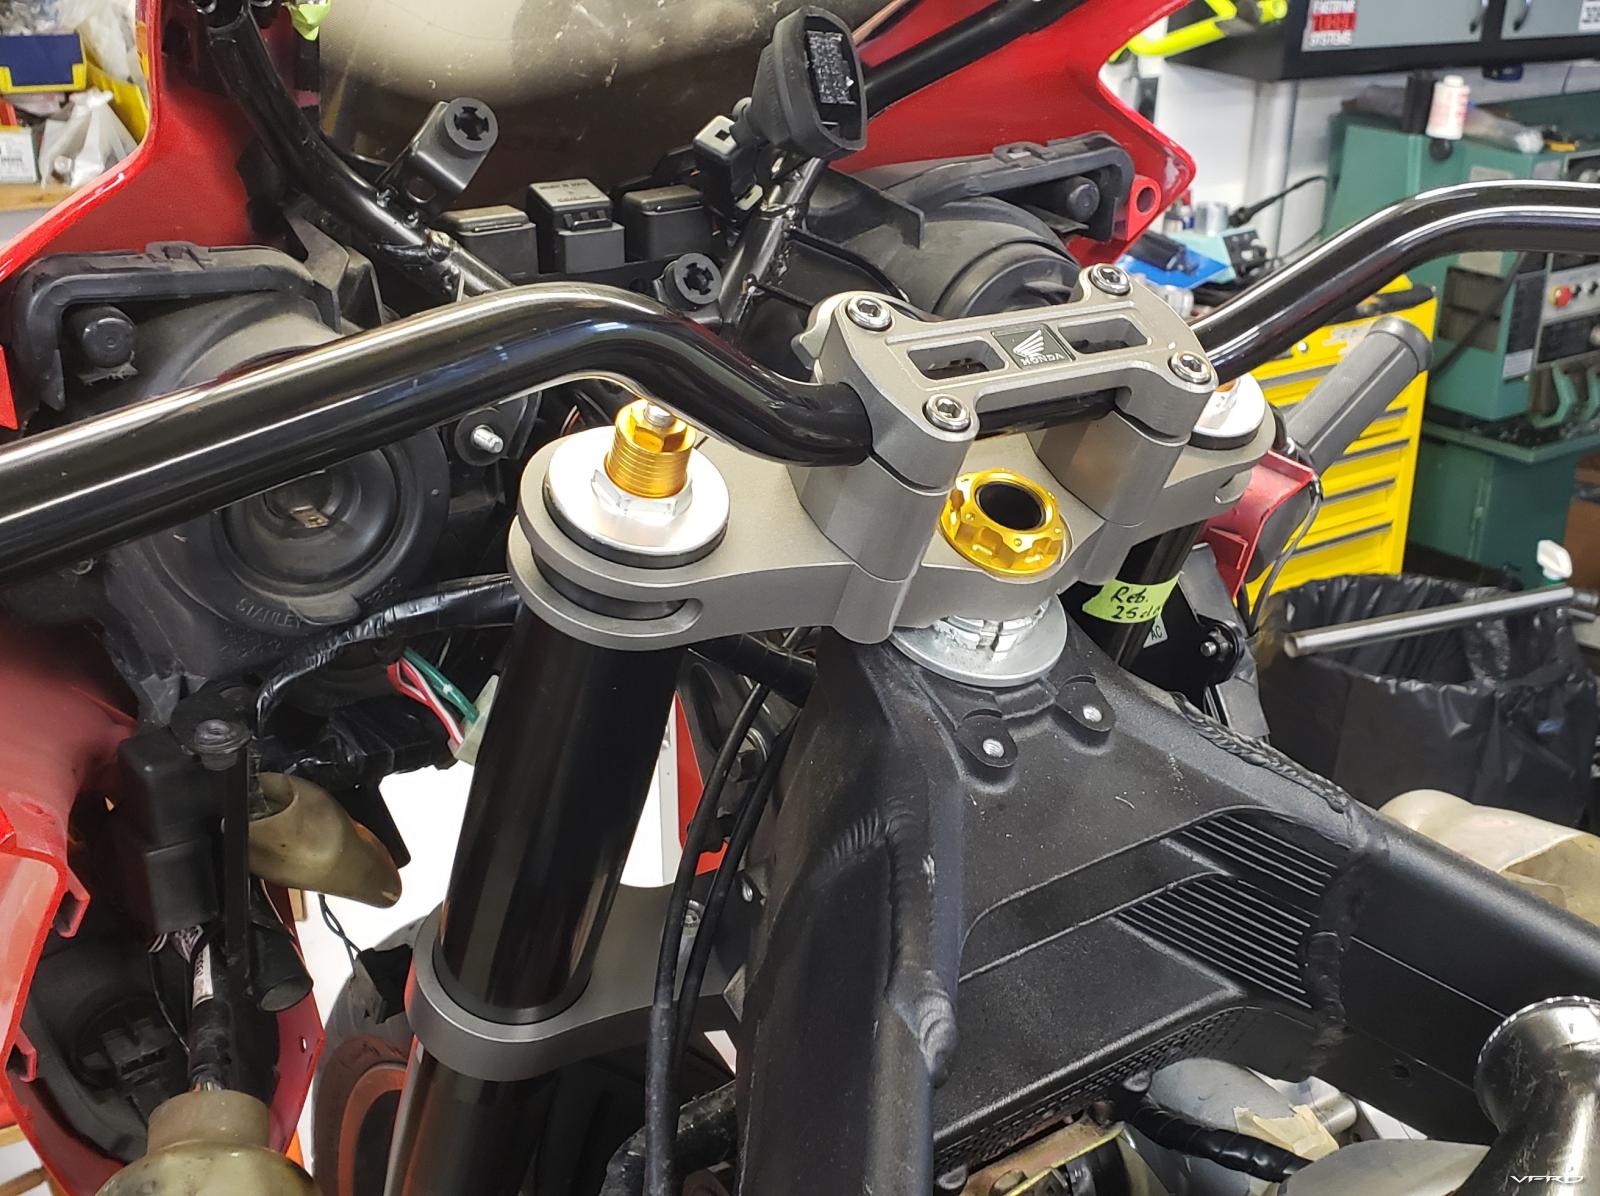
- Sebspeed triple clamp set, 35mm offset, integrated bar risers & custom riser bridge
- Handlebar conversion to Superbike bar
- Brembo 16RCS clutch master
- Oberon billet clutch slave
- Brembo 19RCS brake master
- Tapered head bearings
- Carrozzeria front wheel, 6lb
- Custom billet rotor adapters
- EBC Vee rotors, blue carriers
- Titanium rotor bolts
- 08 CBR1000RR Tokico monoblock calipers, Cerakoted "Stainless" with black lettering and rebuilt with oem seals
- EBC HH pads
- Titanium caliper bolts
- Mirror extenders
- 06 oem windscreen (?)
- Dash lcd update film/led converion
- Heated grips
- NEP throttle lock
- Oem CBR900RR grips
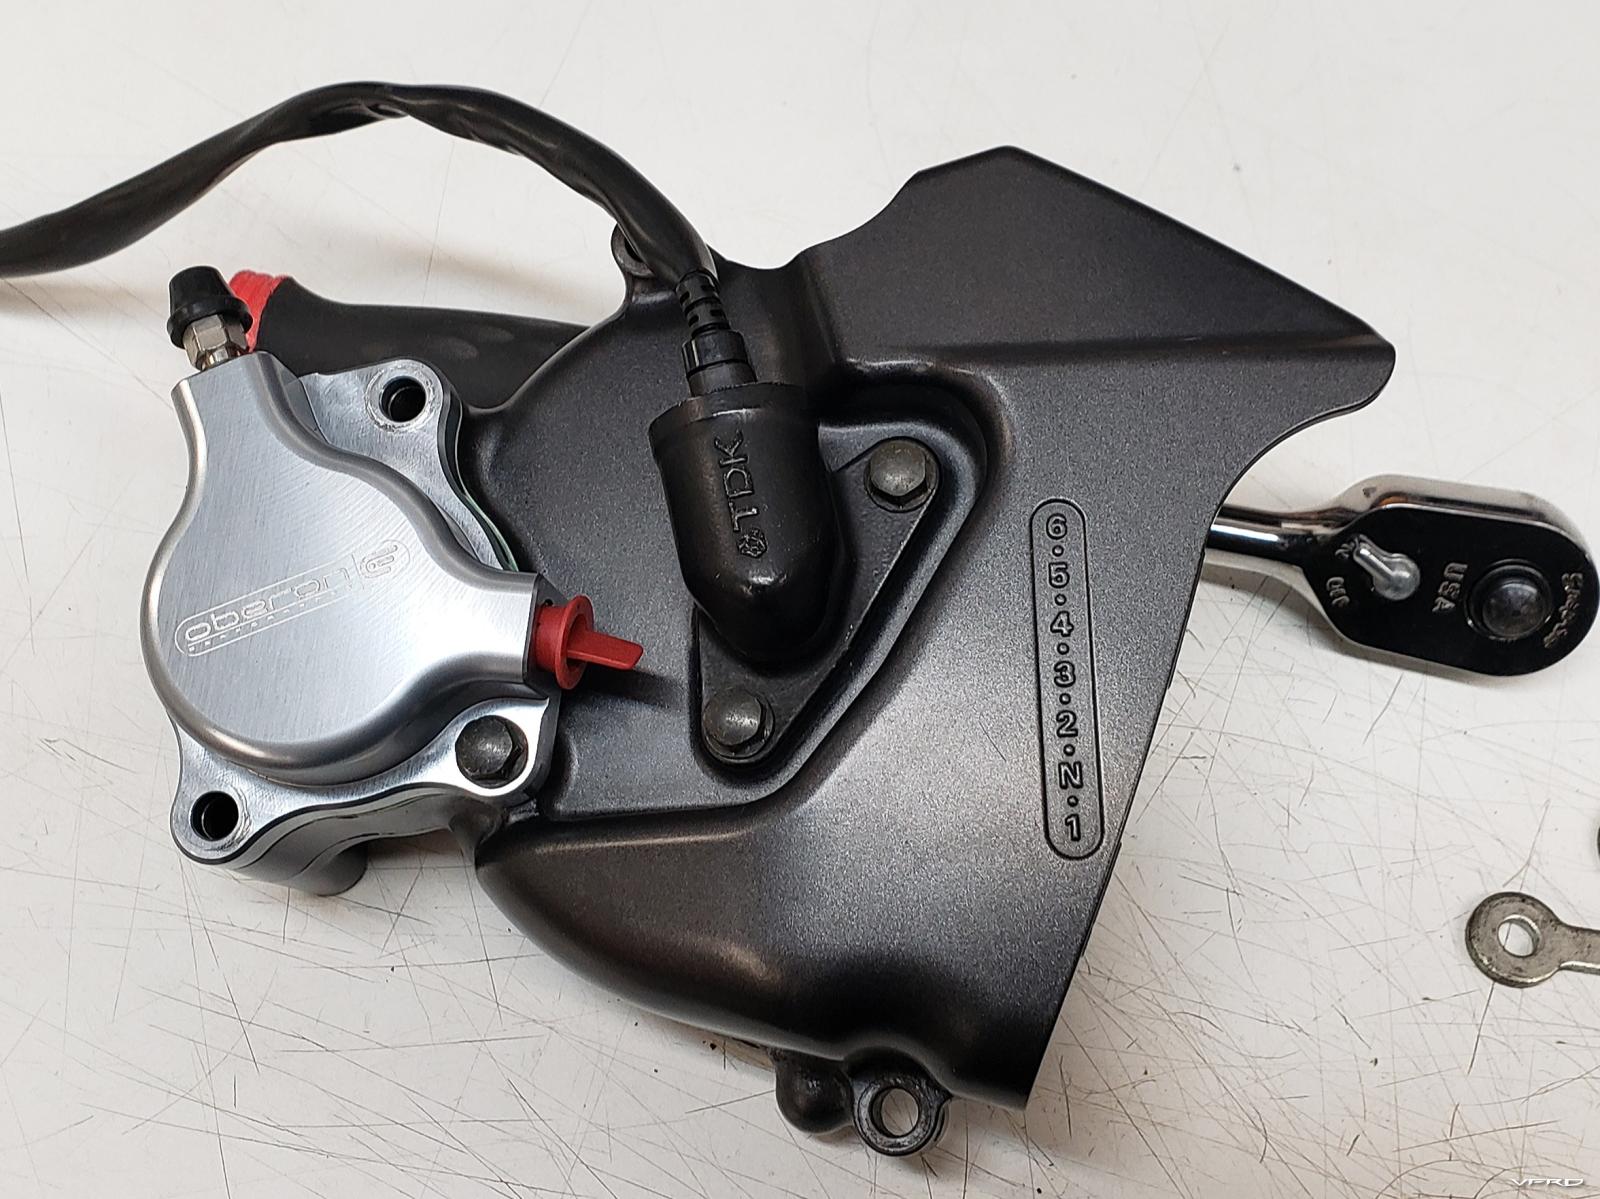
- Sebspeed windowed clutch cover
- Factory Pro shift kit
- Throttle body hoses replaced with silicone
- Fuel injectors cleaned and matched
- A&A Torocharger kit, modified with:
~ added sc oil cooler and custom reservoir
~ modified cooling system to delete right side radiator, added 2014 VFR800 lower radiator with fan
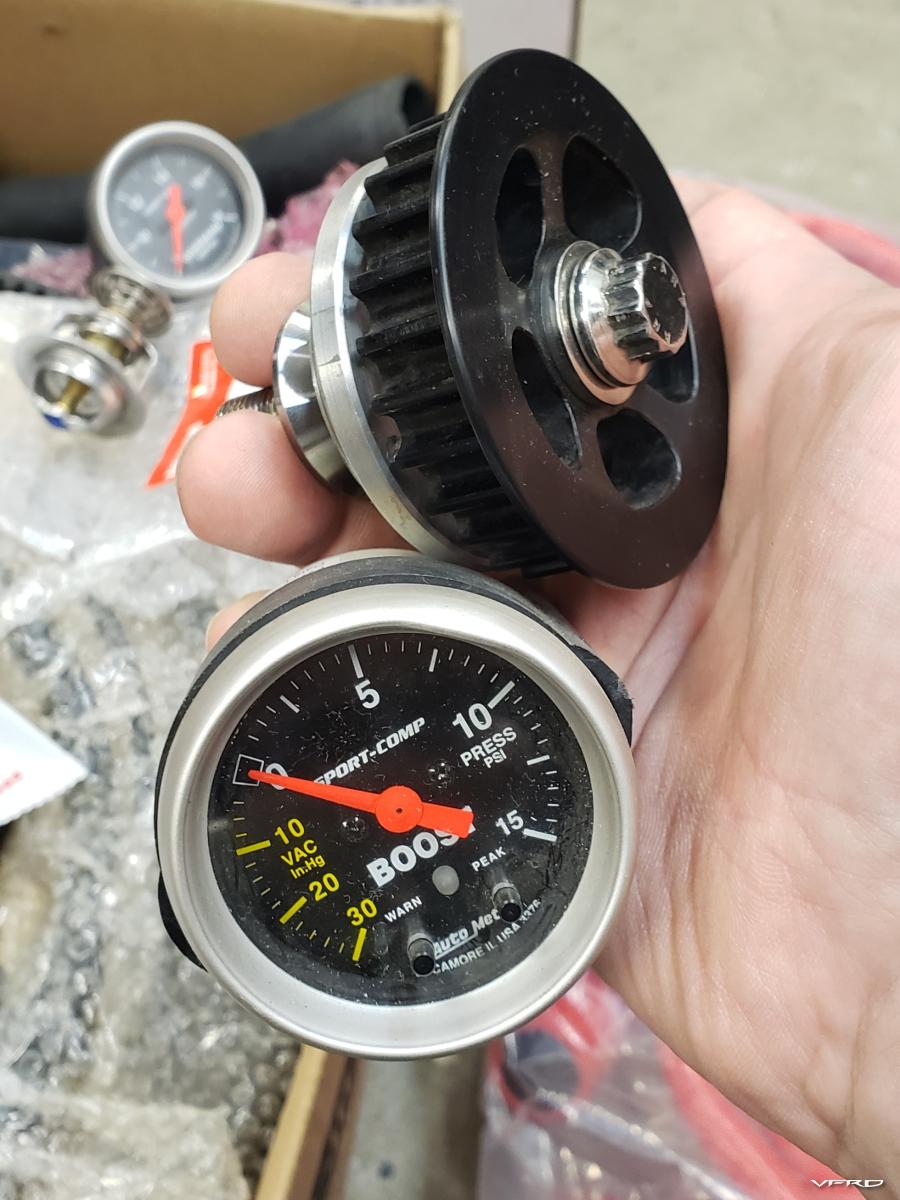
- Boost gauge
- Knock sensor
- Rapid Bike Race fuel & ignition management
- VFRD Two Brothers replica big tube stainless header, RC30/8th gen VFR style to accomodate lower radiator
- Remus carbon fiber slip on pipe set
- Sargent seat
- Oem luggage, full three bag set, side racks powdercoated
- Ohlins shock with:
~1300lb Eibach spring
~Traxxion 1" spacer
~tuned on Traxxion dyno
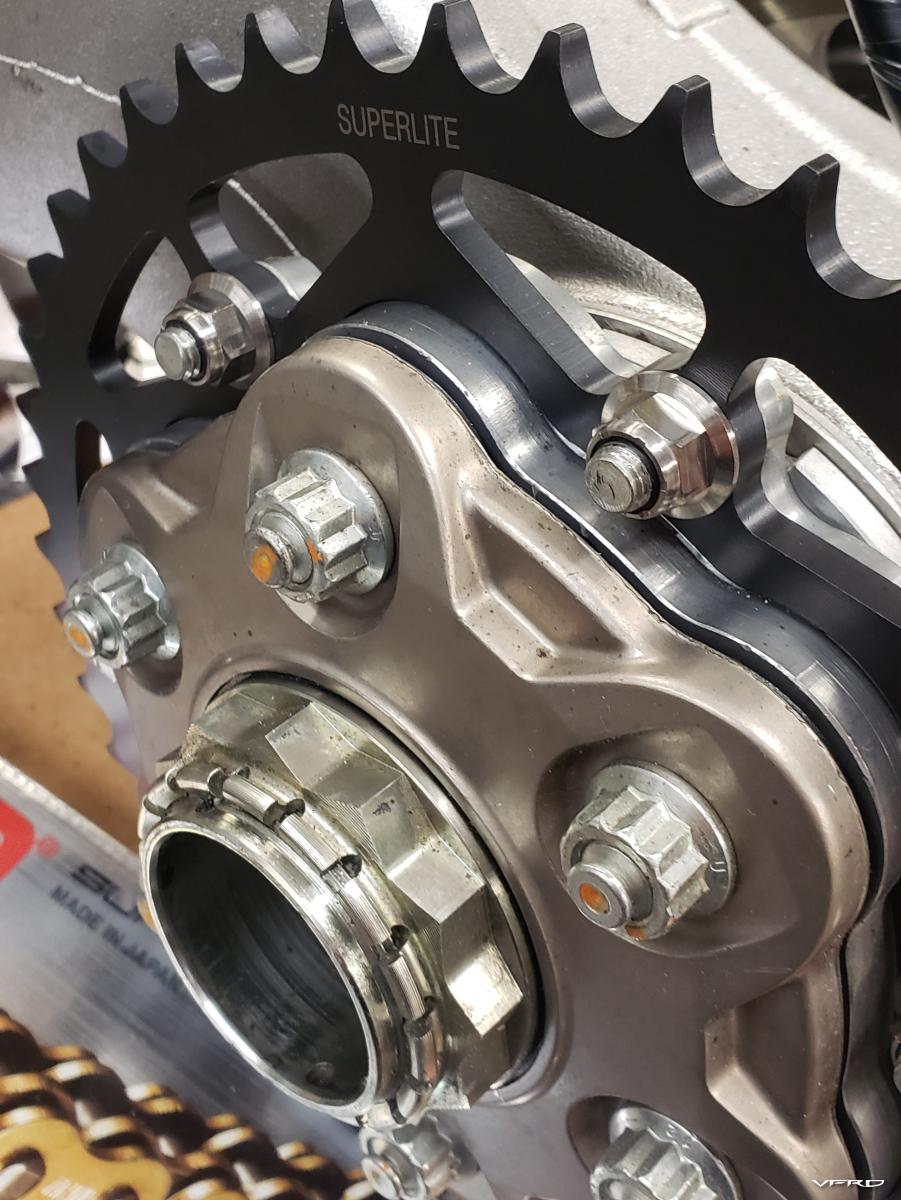
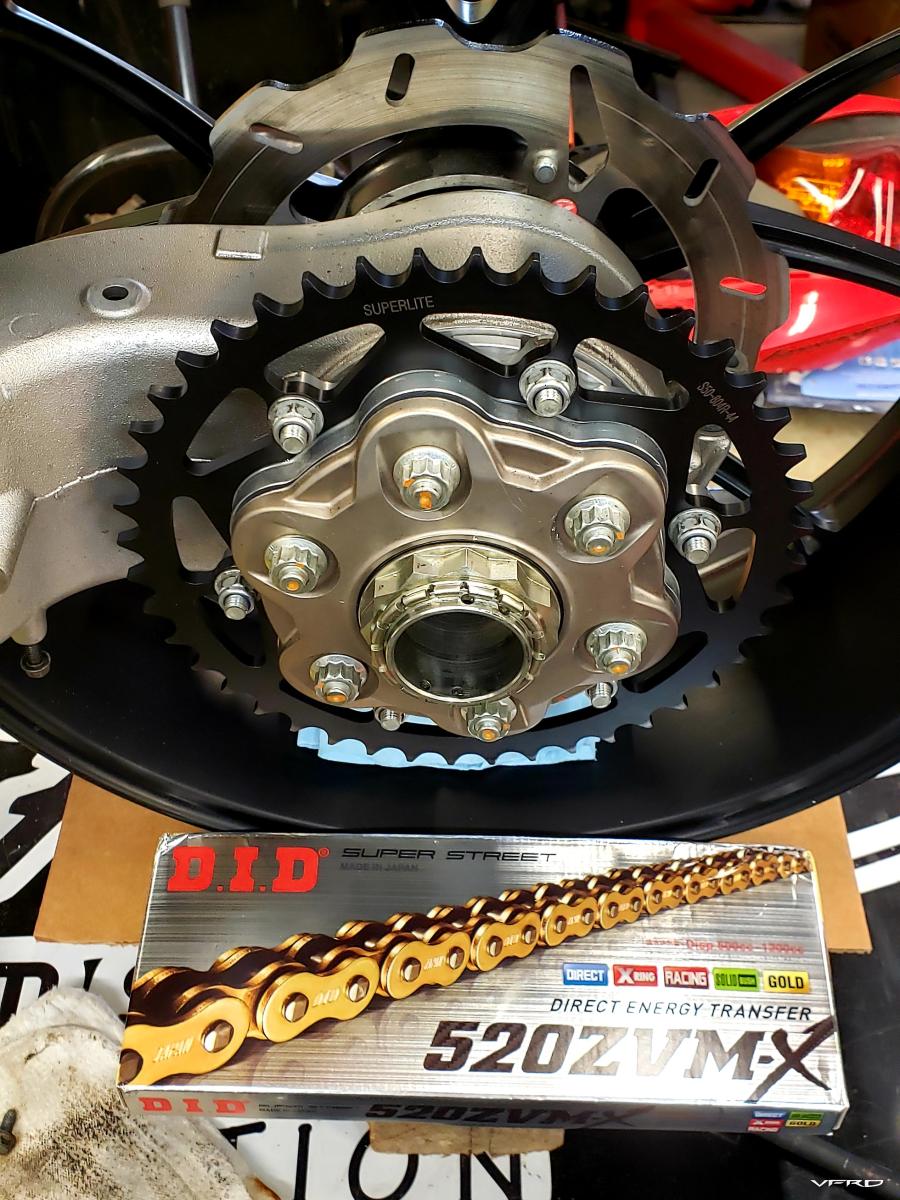
- Ducati 1098 rear wheel swap with:
~Sebspeed adapter kit
~1098 hub/drive parts and brake
~Braking Wave Fix rear rotor
~titanium rotor bolts
~JT quick change carrier
~titanium sprocket nuts
~Marchesini forged 1098 wheel, 9lb
~Superlite sprocket
~DID 520 chain
~geared -1, +1 (15/44)
- Roadstercycle SH847 Super kit
- Oem stator replaced with new
- New battery
- Core Moto custom brake & clutch lines
-
16
-
 1
1
-
I think I need another 8G style header. I'm not in any rush, just voicing interest for future consideration.
-
1
-
-
On 5/15/2022 at 3:23 PM, WackenSS said:
Looking good as usual!
So you will have access to the dipstick through a hole in the right panel right?
You said you have been gathering parts for ages, but you had the complete SC kit minus the cooler or am I wrong?
No outboard support bearing on the rotrex?
Did you fab the toothed pulleys or are they the last revision from Dan?
Where did you put the rectifier?
Could we get a look under the hood Please 🙂😳
No dipstick, I added a clear tube to indicate oil level
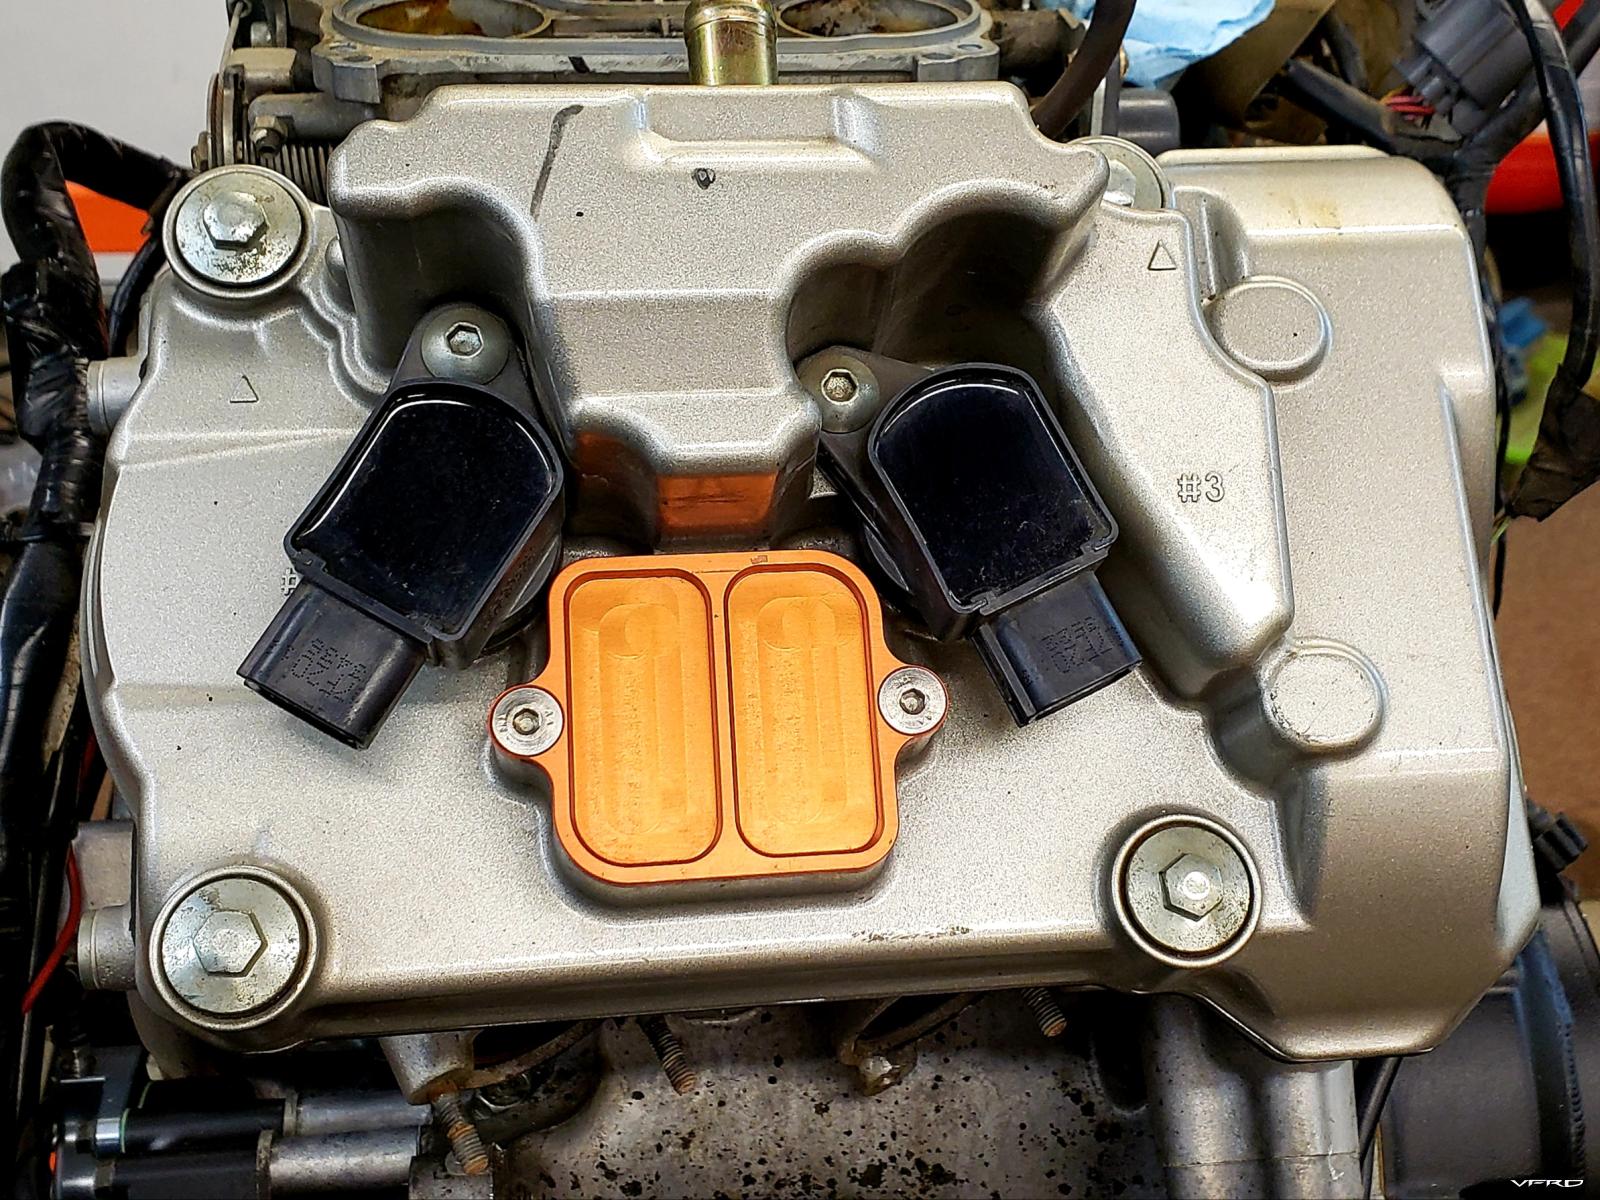
I bought a complete used A&A kit, one of the original 6g kits. I made the oil cooler from a 6g radiator.
New larger SH847 rr is mounted on the left side of the frame now.
I didn't get a chance to make a thread for my rebuild before leaving on a trip, but I plan to make a list of mods with pics when I return.
-
3
-
-
4 hours ago, Cogswell said:
Is the lower chin fairing in the "V" going to fit over the 8th gen rad? Mods for that in store?
Mods in store and done, along with a rock guard.
-
A pic from the other day. I have since installed the upper cowl with lights and am just waiting to get in the paint booth to finish the right side panel, then it will be done.

-
7
-
-
2 hours ago, WackenSS said:
There is no need to balance this assembly. The shaft is supported on 3 large rollers and is machined as a single part so this is naturally balanced. The impeller is cast OEM and balanced 2 ways alone before it is put on the shaft and fixed with a steel nut on the first versions and aluminium nut on the later gen1's
Your setup certainly needs pics 🙂
I guessing this is not the warbird?
Nice that you don't have to balance it.
I am installing on my 2005 VTEC which still has fairings. I had been collecting parts for about 10 years and I got the itch to put them all on it at once

-
1
-
-
4 hours ago, WackenSS said:
I'm pretty sure the oil temps are ok, but that's a guess based on the climate i live in. I'll make a temp sensor thing this year just to confirm.
Do you have the gen2 version?
Pictures should be a must from what I've seen of your fab skills before.
In other news I've decided to do this the hard way.
I'll put everything together, rotrex fixed and unmodified, stock headers, no rapidbike, brakes and suspension and put in on the Dyno for fun and find the weight numbers before i start the diet and all-around upgrades.
This should go rather quickly - then for the upgrades, and it will also include a billet impeller either before or after the headers/rapidbike.
I have an earlier model Rotrex from the original Toro production run. I did the oil relocation to save time in the future in case it's needed, and because I was re-plumbing the system to add the cooler anyway. Rotrex states in their texts that an oil cooler is mandatory on installation, so I figured it can't hurt.
I have been taking pics along the way, I'll post them later when I get the bike done and I can relax a little.
Do you have someone that can balance the rebuilt rotating assembly for you?
-
11 hours ago, WackenSS said:
I'll post my findings when i am sure everything is repairable and quoted.
The "gen2" rotrex C15 explicitly states that oil reservoir can not stay in Dan's location.
The reason for this is that the rotrex is a dry-sump with scavenging pump and it will start sending oil out behind the impeller.
Did you fab something nice already?
I did, I mounted a new tank on the right side behind the fairing. I also reconstructed the cooling system with a different radiator configuration so I could add a cooler for the Rotrex oil.
-
1
-
-
19 hours ago, WackenSS said:
I've made some research and tried to analyze the charger failure.
There might be some very interesting information coming up for us rotrex guys as a result of this blown piece of danish technology.
What do you have cooking? I'm interested to hear your findings.
I am aware that the newer iteration of the C15 does not use a shaft oil seal, and so all the oil needs to be located below the centerline of the shaft. I've taken that into account with my current installation. I've also added an oil cooler for the Rotrex oil.
-
19 hours ago, SEBSPEED said:
Sorry for the necro-post... Looking for any insight on Rapid Bike 3 maps vs Rapid Bike Race maps. How compatible are they, if at all?
I spoke to Yaman at RBUSA this morning. He was not able to answer my question directly but passed it on to hq in Italy and they responded to say the RB3 files ARE compatible with RB Evo and Race. It's as simple as opening the file and sending to the connected unit. That made my day today!
-
1
-
-
Found what I needed thank to @Cogswell
-
Sorry for the necro-post... Looking for any insight on Rapid Bike 3 maps vs Rapid Bike Race maps. How compatible are they, if at all?
-
On 7/3/2020 at 2:08 PM, WackenSS said:
Det høres kjent ut
Vfr800"fi" is the factory name on the European version, of course the fi was short for forced induction...
Its been absolutely trouble free after the initial bugs mentioned earlier where worked out.
I've worn out 2 belts, and both bearings in the PTO. Still have that same sprocket and chain as pre charger actually.
My goal is putting the 200ish crank hp directly on the wheel.
@WackenSS do you have a part number handy for the belt? I'd like to order a spare
-
On 12/13/2021 at 12:50 AM, sfdownhill said:
Hip hip hooray for hoarded parts! Let us pay tribute to our racks and stacks of parts...they'll all be put to porper use in good time.
Seb, yes there are maps for 5 gen [PC3, can be converted to PCV], 6 gen [PCV], and 8 gen [PCV]. Paypal $50 to vfrheaders@gmail.com and let us know which map you'd like.
I have a PC3 on my 6th gen now, and I'm installing an 8th gen header.
I am more recently considering going the Rapid Bike Racing route as it will be of more benefit if/when I strap the Torocharger on... will be in touch if I need a map, thank you.
-
1
-
-
I forget if there is mapping available from the development phase? I may soon be in need of a PC3 map for this header/Remus slip on/air filter. Currently running the old CozyE map, but at long last getting into installing some of my hoarded parts.
-
It's House of Kolor PBC32 Tangelo Orange.
-
On 4/17/2020 at 2:54 PM, BuzznerSuntrusts said:
So, what's the verdict on these?
I was just thinking about seeing if @SEBSPEED would be able to machine some, but at $16.79 (2020 price) shipped from Hong Kong I'm wondering what kind of volume it would take to compete.
I couldn't find it anywhere in the parts fiche, but the part# (44808-MR&-013) still calls up the correct plastic part for under $6 (US).
No self-respecting "first world" job shop can compete with China. I'd make more money working a minimum wage job for a day than trying to make a handful of those for $17, and that's the sad truth.
IF someone had an automated cnc and better programming software than I do (ie, someone who has invested $50k+), AND they got an order for hundreds of these, then it might be worthwhile.
My plastic part is fine at almost 50k with aftermarket sprockets for most of its life, I wouldnt hesitate to buy another for 50k of use.
-
On 3/10/2020 at 1:11 PM, NarrowRider said:
Put me down for one for 6th gen header please
On 3/20/2020 at 12:48 PM, Flabashaba said:New member here that has read lots and is excited by the idea of getting a set of these headers for my 2007 6th gen. I'd like to keep my centerstand and upgrade from a stock ECU to a Power Commander, probably just downloading a map. I'm running gutted stock pipes and have done the pair/flapper mods. I'd love to here from whomever is taking orders, woo-hoo Trump bucks
Anyone else need a centerstand stop? I've got 3 total interested so far, unless I missed someone. I can do them for $50 each shipped in the lower 48, or $42 plus actual cost to points globally.
I'll try to make a couple extra anyway, but times are tight so I can't sit on a bunch of inventory.
-
2
-
1
-
-
7 hours ago, CornerCarver said:
Tried to help you out with some fab info but the 5th gen bikes we can access right now have 6th gen cushions on them for updated rear sets....still looking.
Ok, thx
-
I'll see about getting another batch going. Looking into 5th gen fitment.
-
1
-


The Ultimate VFR800...
in Sixth Generation VFR's
Posted
"Being surrounded isn't a problem, it's a fortuitous opportunity to attack in any direction"...
Minor issue in the grand scheme, but it sure would be nice if the VFRD headers didn't require every aftermarket exhaust be expanded to fit the end pipe. The exhaust shop I used in the past for projects had a changing of the guard, new rules dictated I couldn't be in the work area while they expanded my pipe for me - until after they effed it up, and asked me if it was ok... Thankfully I am handy and was able to fix this. Kind of.
There're
23 problems with expanding the mid pipe:1, it can get torn like this.
2, whether it tears or not, the pipe can expand in a non-concentric way (least resistant section of material expands first), which will shift the tube off center and cause the rest of the system to become permanently misaligned.
3, depending on how far off the VFRD header exit is, it could result in a non-compatible fit of the exhaust.
I was able to make my Remus cans fit, but they are visually off.
They look great though...
Better shot of triples installed
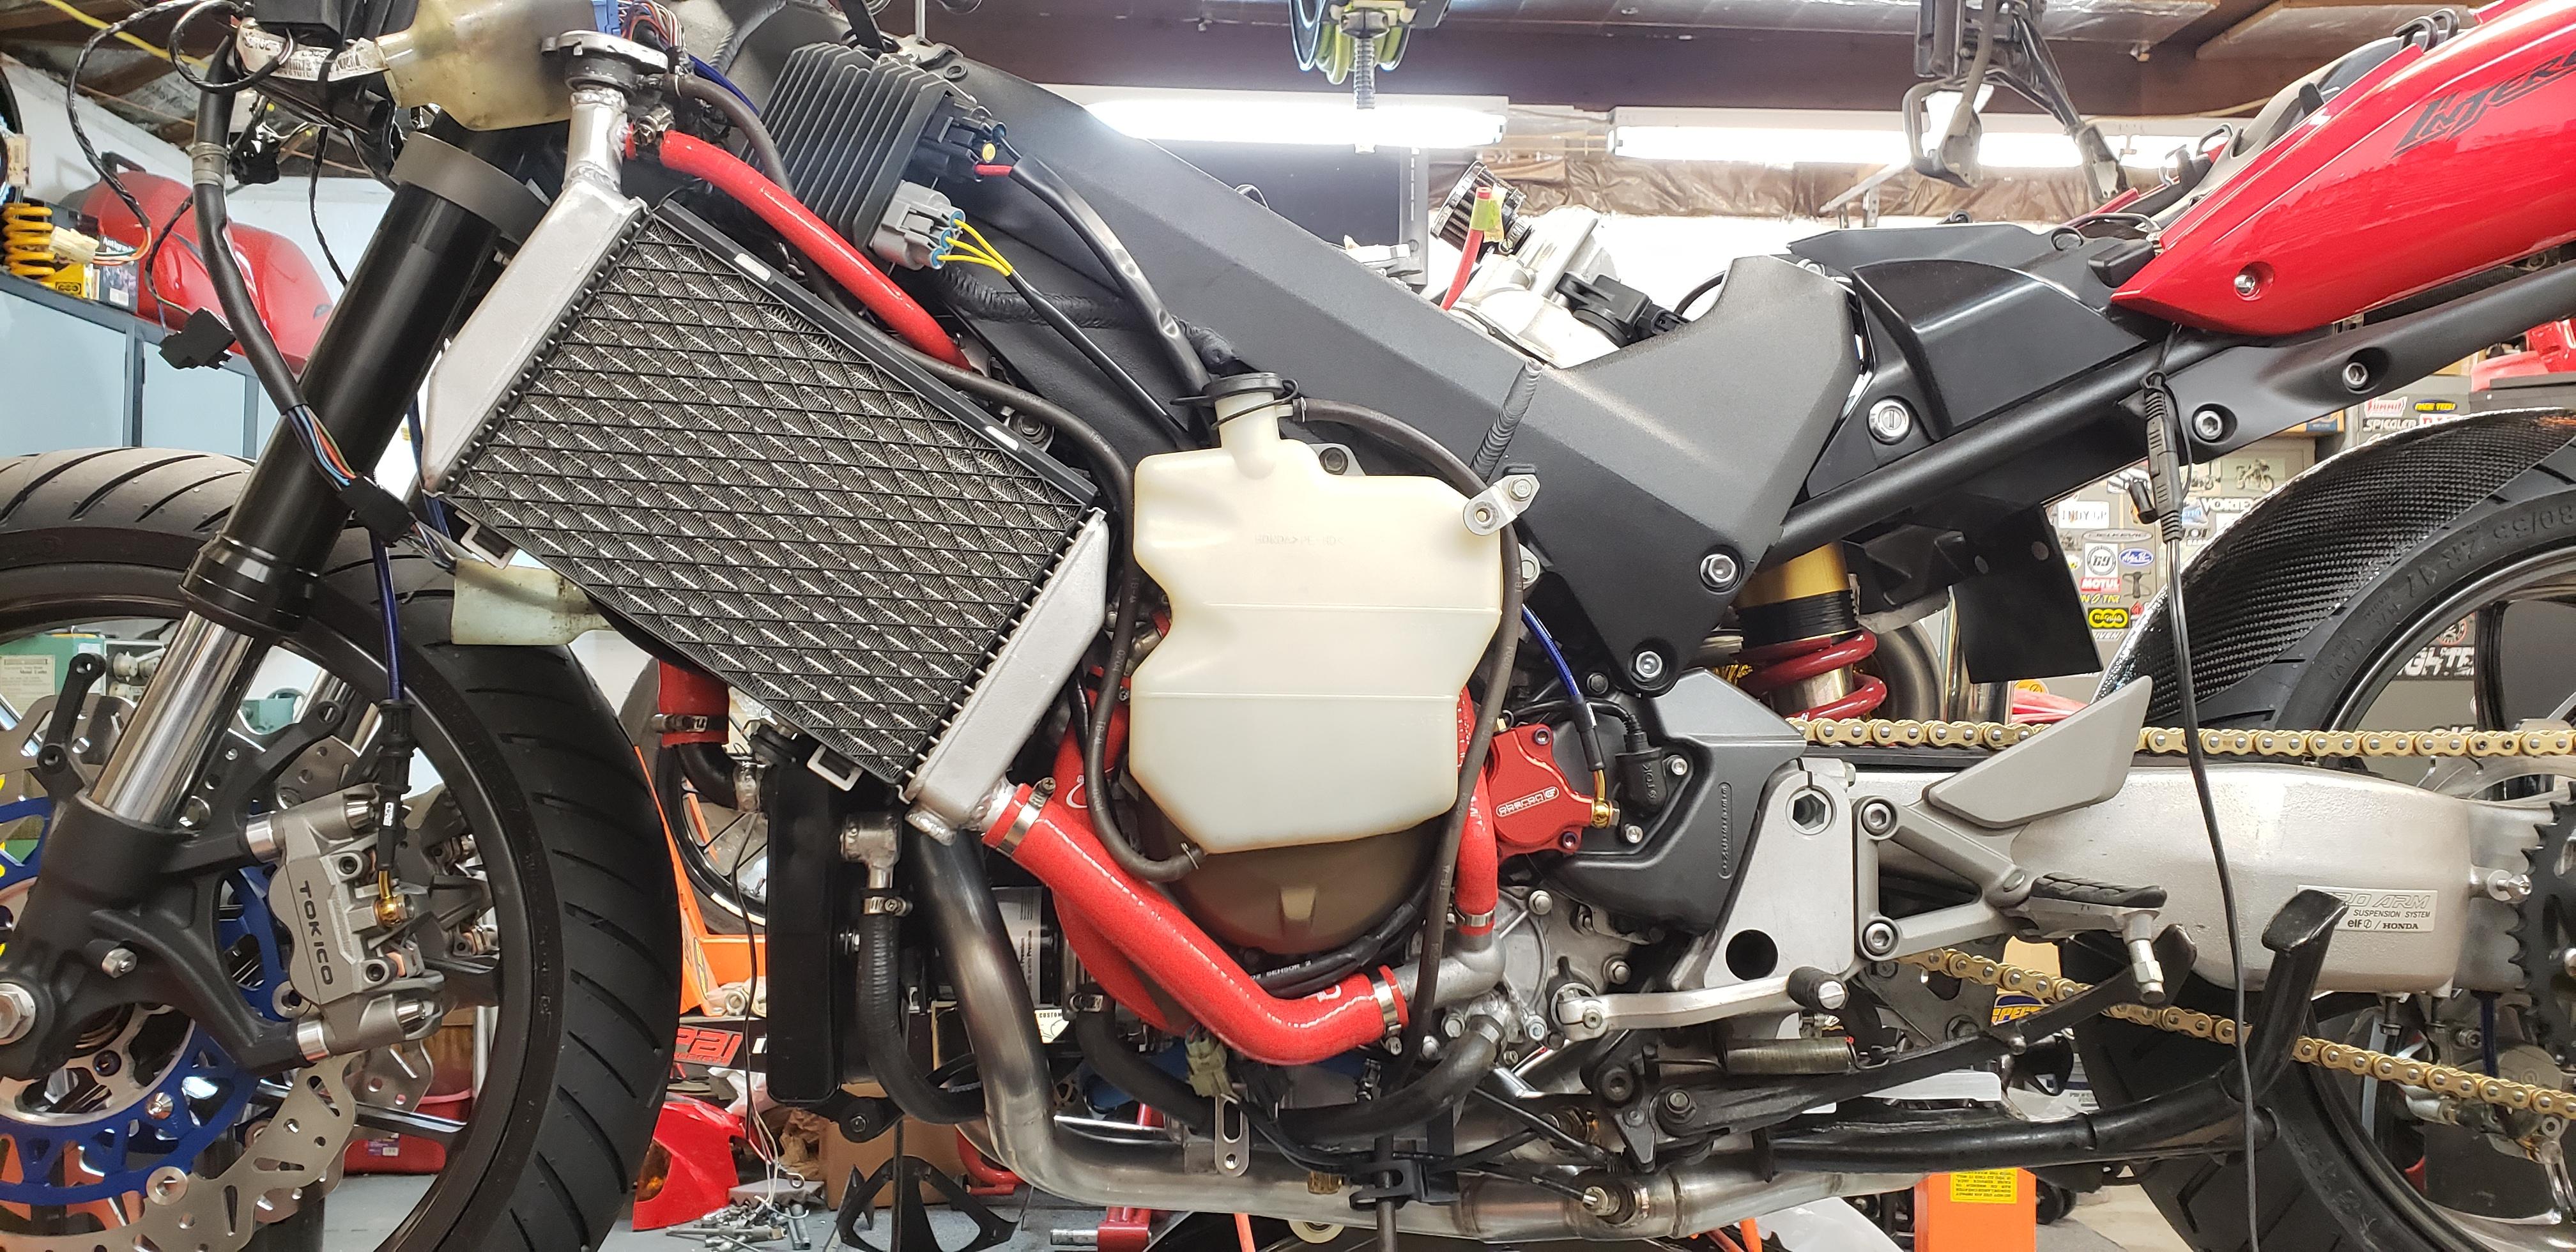
With the front end on, time to do some more radiator fitting. The 8g mounts bolt right on to the 6g block, but there are some mods required.
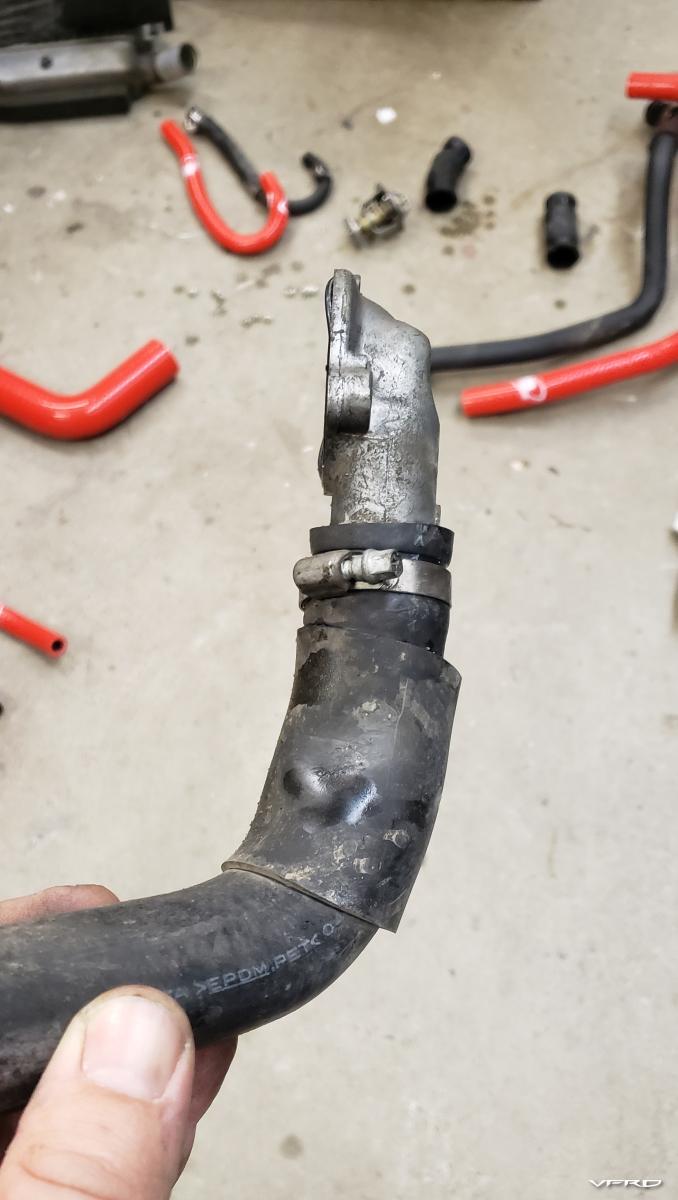
I was able to repurpose the entire 6g hose kit I bought, plus 2 pieces I bought separately to link the 8g lower to the 6g left side.
The plumbing on the right side was pretty simple - rotate the hose down, shorten it, and use a straight nipple to rejoin the 2 hose sections.
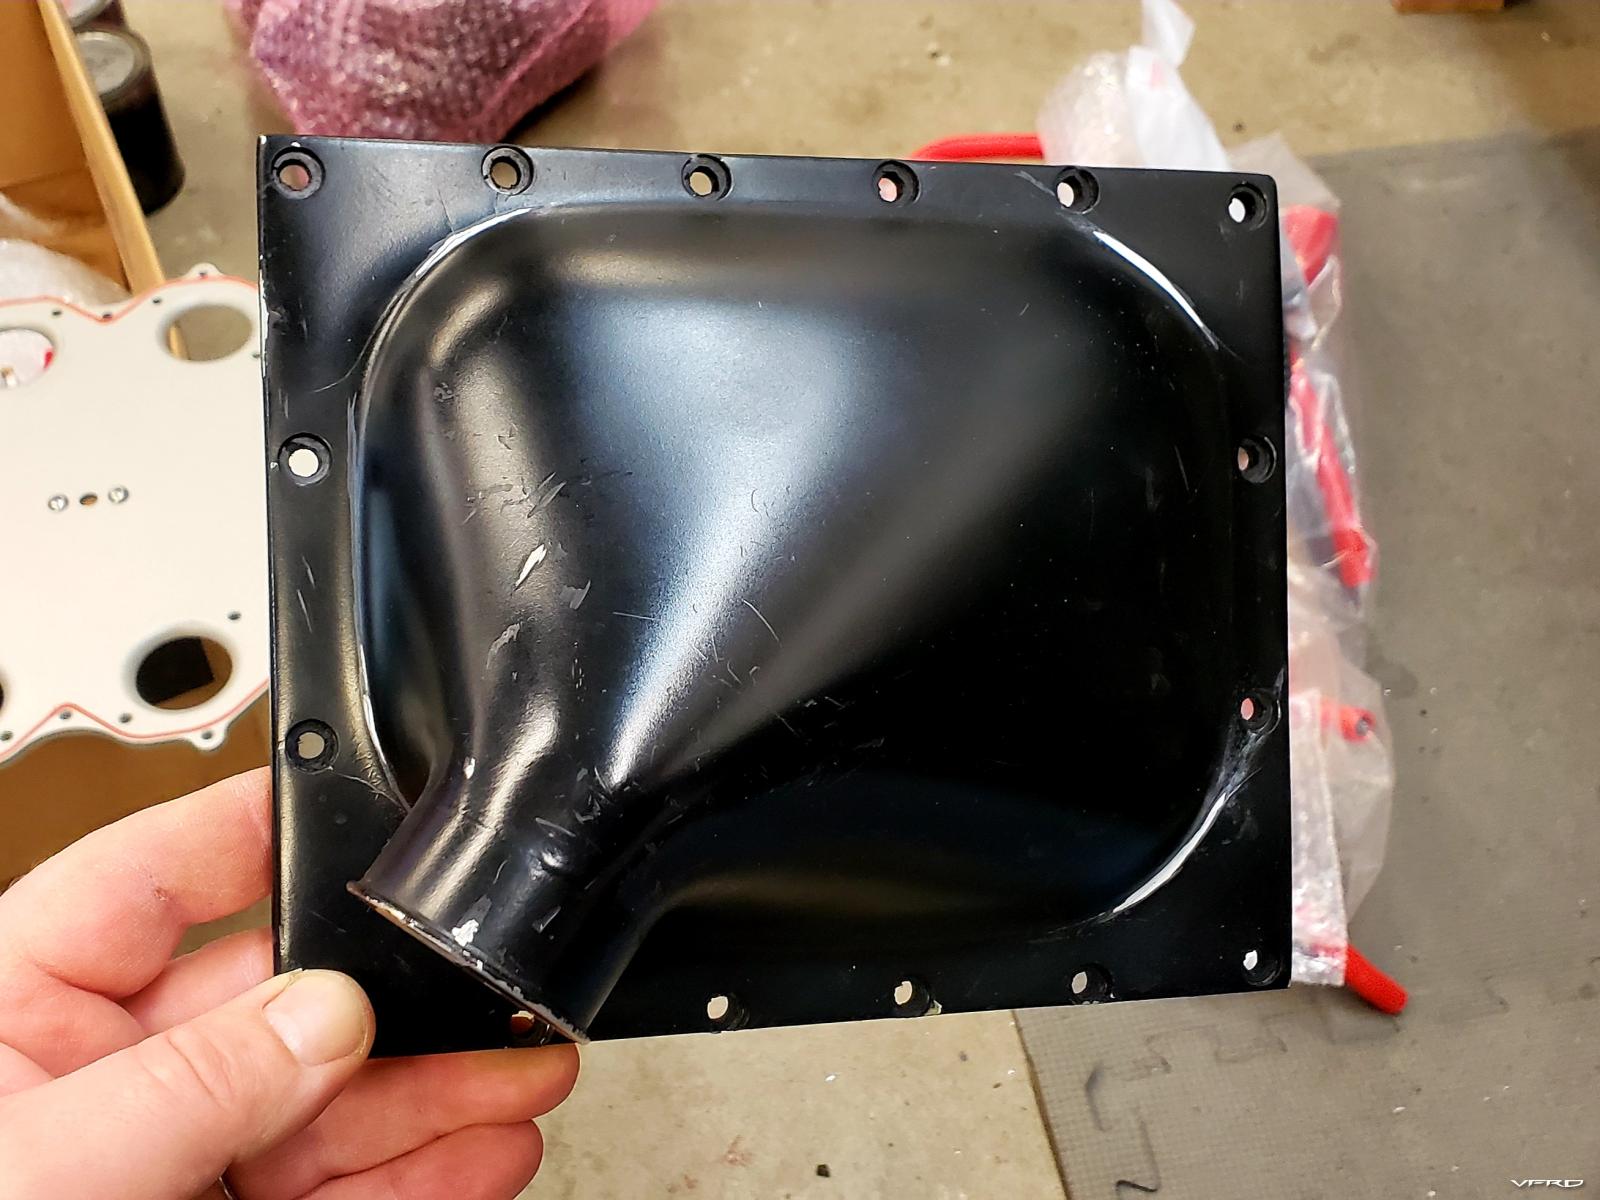
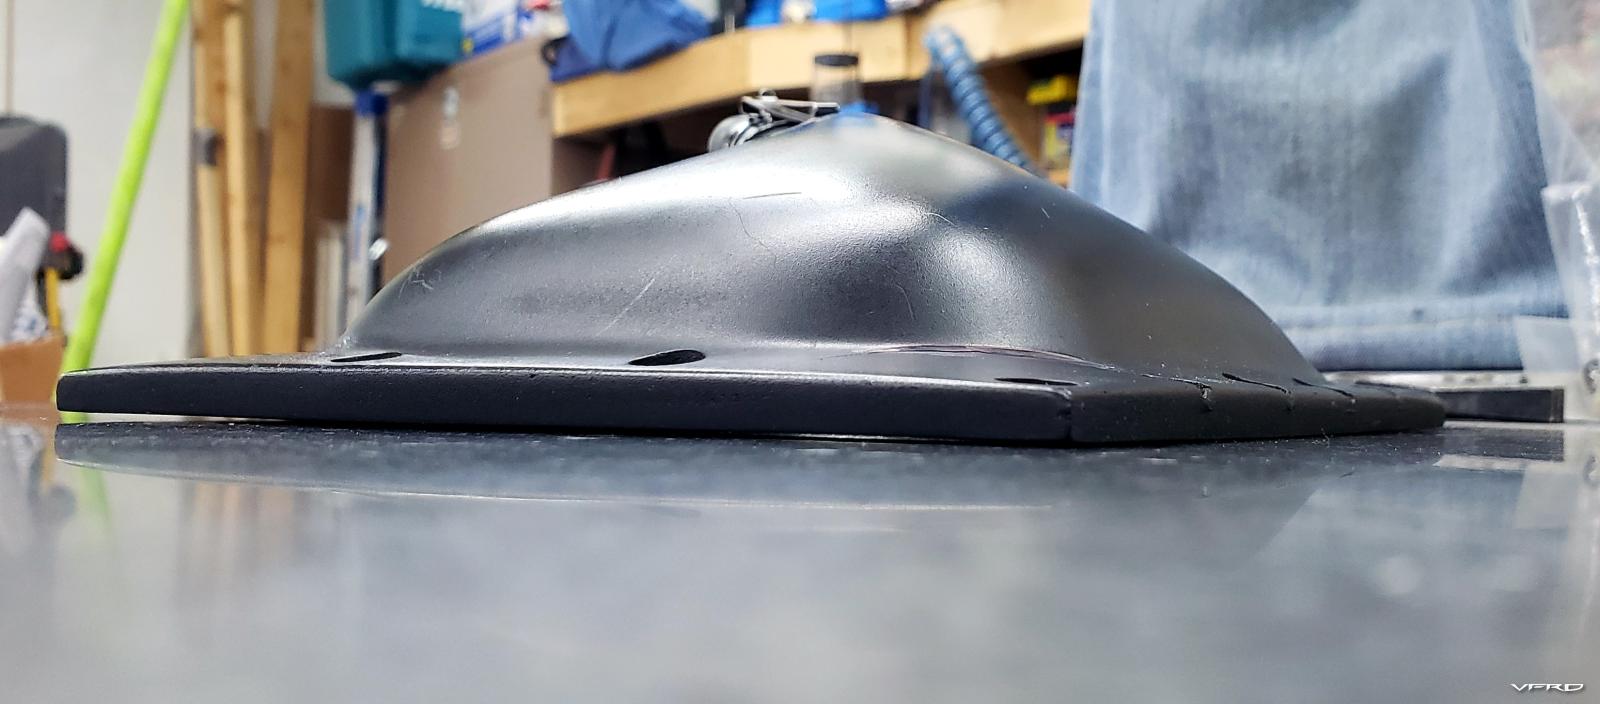
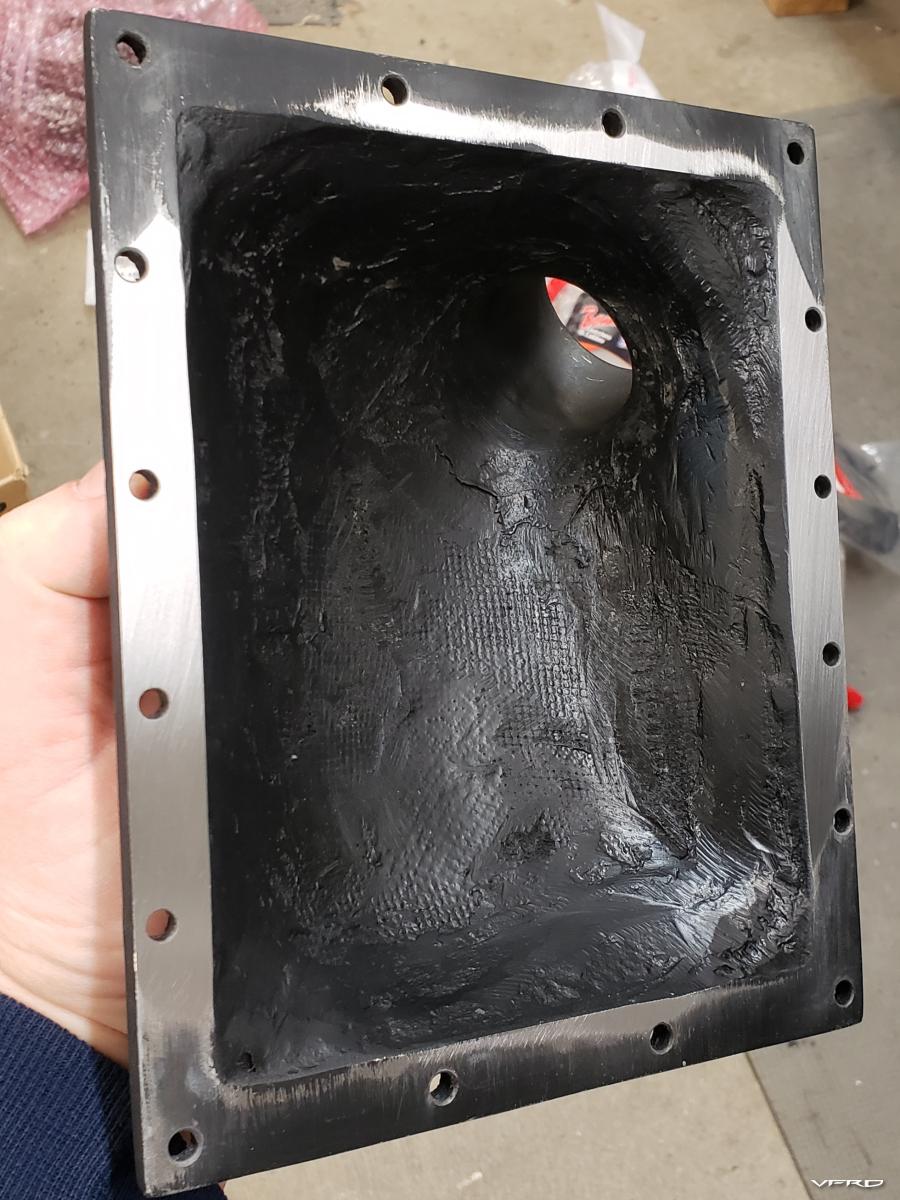
On the left is where things got interesting, for a few reasons. The existing hose fittings didn't align for simple hookup. The 8g lower needed to feed into the top of the left side rad due to space restrictions, the fittings were pointing the wrong way, the new hose had to fit around the fan, and oh by the way I lost my filler cap and overflow/return hose when I deleted the right side radiator.
Aaaaand, just to make things more interesting, I decided it would be a good idea to integrate a laminova style oil cooler from a CBR929/954, which also needed a feed & return hose for coolant, linked to the rad and water pump...
So about that oil cooler... the fittings on that needed to be repositioned but other than that, it was a simple parts swap as far as fitting it to the VFR motor.
Good amount of clearance to the header. This same setup is used on NC/RC30's and 45. Just borrowing from HRC's playbook here. The VFR1200 uses a similar oil cooler as well. I bypassed the original cooler feed and return with a section of hose, there is still opportunity to add another remote cooler later. Maybe.
I was actually able to re-use the CBR hoses to some extent to make this work. I added a feed nipple to the water pump cover for the cool side supply,
Hose routing kinda looks like this
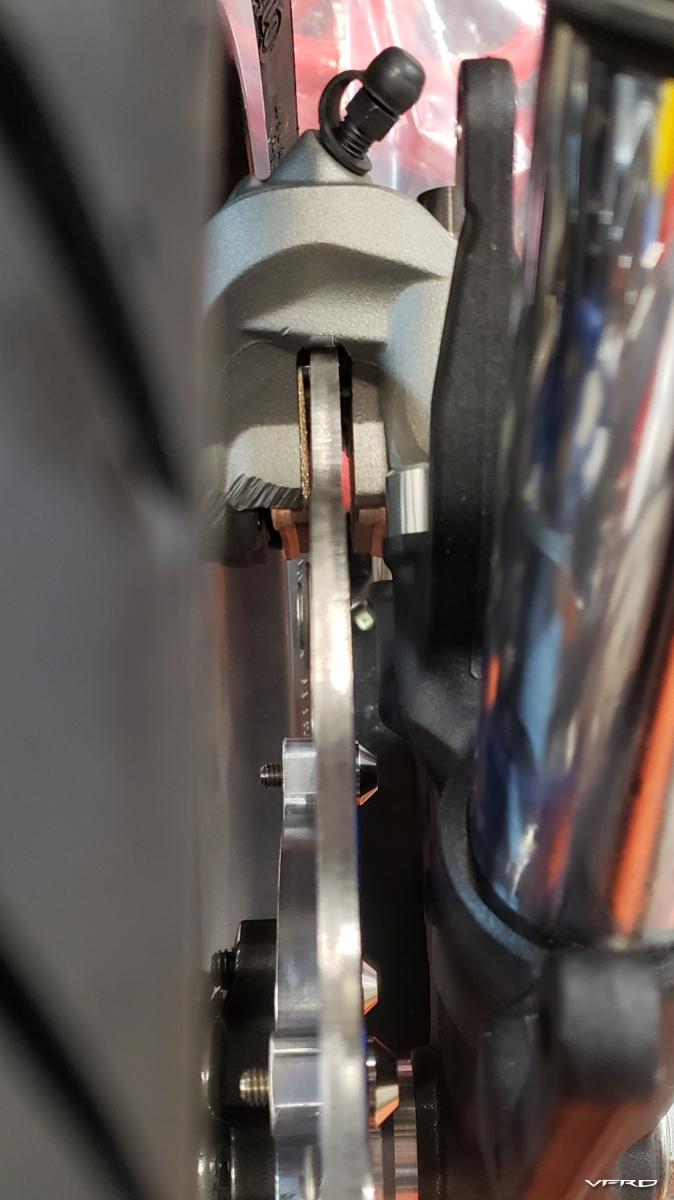
Nothing like new parts to distract... after installing the forks and brakes I was able to measure and order my custom stainless brake and clutch hoses from Core Moto. As soon as they came in, I installed the rear through the swingarm
Clutch line too... along with stainless hardware dressed up in the lathe
While working on the rear brake, I updated my prototype aluminum brake carrier stay (which I had cut from the oem torque arm) to a more durable steel part that I machined and Cerakoted.
While I was back there I installed the new 520 chain and speed sensor nut
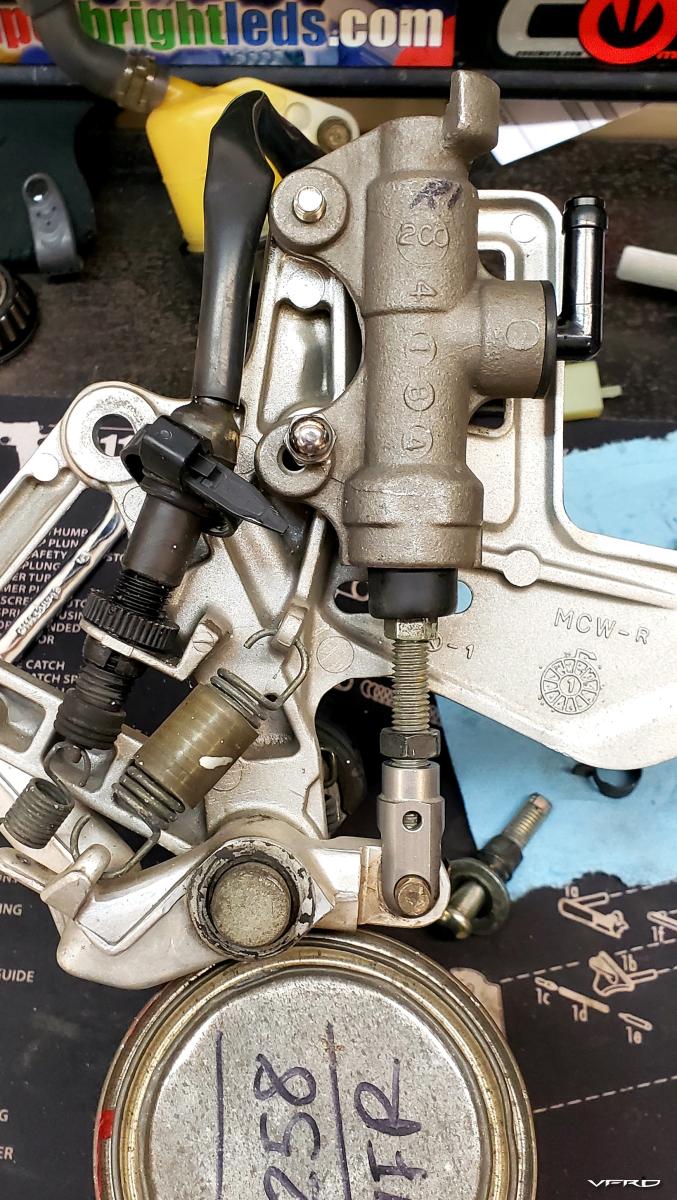
Oh and also decided to swap out the R1 rear master for a new Brembo unit because it was a better match for the rear brake piston size. But it didn't fit... so I made it fit. I had to modify the master body and mill an adapter to maintain the bolt spacing required for attaching the heat shield, and also create a new plunger, and modify the brake lever with a travel stop pin.
I needed another easy job to build myself up for tackling the radiators, so I knocked out a couple dress up parts for the rear axle
I went back and forth on a color, but in the end did a simple clear Cerakote to show off the machined goodness