


HispanicSlammer
-
Posts
6,954 -
Joined
-
Last visited
-
Days Won
61
Content Type
Forums
Profiles
Gallery
Blogs
Downloads
Events
Everything posted by HispanicSlammer
-
 So is that one
 -
 OK thats on my fav list
 -
 Is that the Ocean in the distance?
 -
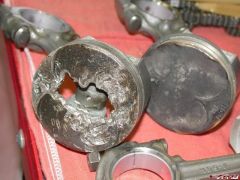 OWCH!!!
 -
 Mad Max would be proud
 -

From the album: Help Gallery
Clicking on the photo in you album you can edit the captions, delete it, rate it, or pin it if thats availible. -

From the album: Help Gallery
use the dropdown menu choose Upload Image -

From the album: Help Gallery
you can go to your album by clicking "View" -

From the album: Help Gallery
You can see buttons to upload more pictures, bulk upload (Gzipped files), or edit your album. click on an individual photo for the next screen. -

From the album: Help Gallery
a screen will appear to confirm you image was uploaded -

Use the upload manager to upload your file
HispanicSlammer posted a gallery image in Member's Gallery

From the album: Help Gallery
Use this tool to find the photo on your computer and upload it. -

From the album: Help Gallery
This is your upload tool, use it to name your photo, and put a caption on the photo. -

From the album: Help Gallery
confirm your photo was uploaded -

From the album: Help Gallery
Fill in the form and check the box -

From the album: Help Gallery
Click the link "create your first album" -

From the album: Help Gallery
After Clicking "My Controls" Click "Your Albums" -

From the album: Help Gallery
First please before using the gallery please read both the Board Rules then use the help file for more info on uploading photos. -
 I especially like the turn signal lol
 -
 OHH sweet hulky
 -
 Where is this? Salt Flats?
 -
 Laguna Seca, looks a bit dirty too
 -
VTEC Starter Valve Synchronization K&N filter Install Airbox snorkel modification Preparation Remove the tank screws and prop up the tank. Unscrew the 7 screws on the top of the airbox, remove the tube to the flapper. Remove the airfilter and unscrew the 8 screws on the velocity stacks, lift the airbox out of the way. I had to remove the wire to the flapper solenoid to accomplish this but I did not have to remove any other tubes or wires to lift the airbox up out of the way. Remove the velocity stacks notice that the stacks are different sizes, they are offset so that the short ones are on the inside and the tall ones are outside. Front tall on the left short on right, back short on the left tall on the right. Disconnect the hoses to the PAIR Valves front and back Back If you have a rubber cap plug up the open ends of the PAIR valve tubes, we did not so we stuffed in a plastic bag. There are 4 starter valves connected to a 5 way tube connector, they take air from the airbox and bypass it into the intake manifold in place of a choke. They must be balanced by equalizing the vacuum pressure so they run evenly and run smoothly. Here is a clear view of the 5 way connector another view Remove the 4 tubes from the 5 way connector and connect them to your a 4 way vacuum tester, I use a motion pro mercury tool They are difficult to reach and if you lose them you have to fish them out make note of the tubes in relation to the starter valve location as they are related. connect the tubes to the number on the vacuum tool Here they all are connected Connect an electronic Tachometer I have a multi use tool that has a built in tachometer The ECM computer has a tach lead wire that gives off pulses that an electronic tachometer can read, I just shoved the lead in behind the connector, it is the yellow and green wire on the gray connector, and set the tool to 4 cyclinder. Ground the tool anywhere on the frame Start up the bike and warm it it up to operating temp. Then set the idle speed to 1200 rpm, Craig's bike was only at 1050 when first measured. The idle adjustment is on the right side Begin balancing the valves, They are numbered #1 left rear, #2 left front, #3 right rear, and a non adjustable #4 valve at the right front side. turn the valves one at a time to get them all even with #4 and adjust the idle to 1200 until they are all even, clockwise to lower and counter to increase the vacuum pressure. Remove the tools and reconnect the 5 way connector, replace the airbox and reinstall the velocity stacks. K&N filter install Remove the rubber gaskets in the groves of the top and bottom of the airfilter The K&N has a built in gasket just set it into the groove. Snorkel Modification I also have a K&N on my VFR, I was cleaning it last month and found that the filter was dirty only on one side so I cut away a portion of the snorkel to get a more even distribution of air and still get the laminar flow. I cut the rubber at the first ridge and left the top of the snorkel material, cutting at an angle. The modification increased my normal tank mileage by 20 miles to a tank of gas extra. But I did not notice a loss of torque at low rpm and a slight increase in power.
-
Land Between The Lakes Bison Herd
HispanicSlammer commented on tbzep's gallery image in Member's Gallery
 That photo reminds me of the story Robert Duval told Sean Penn in the movie Colors.
 -
 What a cute little puppy!
 -
 Hmm I am getting hungry
