Trace
-
Posts
545 -
Joined
-
Last visited
-
Days Won
4
Content Type
Forums
Profiles
Gallery
Blogs
Downloads
Events
Everything posted by Trace
-
It's going to be 72 here in Ponte Vedra Beach on Tuesday. No ice. No snow. :fing02:
-
And as for that picture of me on the grass at the Speedway? I was DYING to get a running start and dive onto the big, white DAYTONA and go sliding and spinning across it like the 500 winner gets to do! :squid: However......as they let us onto the track and infield from the grandstands (via a retracting stairway at the start/finish line that you can see in the picture behind Coastie) we had already been warned to not even THINK about walking on it. :ohmy: The new paving is sweeeeet, btw. And there was no snow on it at all! :biggrin:
-
Yes, that RC sounds pretty amazing. When we were slowly chugging down Main Street in Daytona (where the madness of Bike Week takes place but is now silent and empty) on our way to the Speedway, Coastie told me that two old bearded Harley guys were nodding their heads and digging the booming noises coming from those Jardines. In fact, even the OEM pipes sound pretty good on that thing! And yeah, that's my Y2K. Come to think of it, my RC is "Y2K", too. :idea3: Wow...Albany. Brrrrr..... But it's beautiful there in June! :fing02: Hahaha.....that's a hilarious picture. I feel for ya.
-
Yaknow....we were on our bikes and at Daytona Speedway for hours and hours....and we looked everywhere for snow. I'm SO sorry to report that we didn't see a single flake. Not one damn flake. That is SO disappointing....winter seems to be passing us by. :pissed: But we had a great time watching one of the supporting race events for the wonderful Rolex Daytona 24. In fact, we almost got run over by a golf car that was hauling NASCAR champ Jimmie Johnson back to his semi. (he's driving a Gainsco car in the 24hr race) We heard some little kid yelling "Jimmie, Jimmie, Jimmie, Jimmie", so we turned and there he was, jumping off the cart and signing this kid's hat or whatever. DAYTONA BEACH Today's Rolex 24 at Daytona will be Jimmie Johnson's seventh attempt at winning sports car racing's crown jewel. Based on Friday's final practice session, it might be his best. The Chevrolet-powered Riley sports car for Johnson, Alex Gurney and Jon Fogarty was the fastest in the 49-car field. It posted a quick lap of 127.044 mph on the 3.56-mile Daytona International Speedway road course, perhaps signaling the GAINSCO/Bob Stallings Racing team finally found a solution to some mechanical problems on Thursday. But even better was the time we spent in the garages and pits, loving all the fantastic racecars that will be doing battle on Saturday and Sunday. Oh...and Coastie ran into a group of his fellow Coast Guard guys who will be doing the flyover at the start of the race, 3:30 pm Eastern Standard Time, USA. One of them was his previous CO, so they had a great time catching up and talking cars and motorcycles....and helicopters. And chicks. Florida has chicks. :fing02: And surprisingly, there was not much snow at all. Minor accumulations in Turns 1 and 4, and very little on the twisty infield sections. It should be all melted in time for the start of the Rolex 24 on Saturday afternoon! :pinocchio: Yeah, it was a good day, in spite of the fact that here was no snow or freezing temps or salt & sand on our straight Florida roads. Another normal day in Paradise....
-
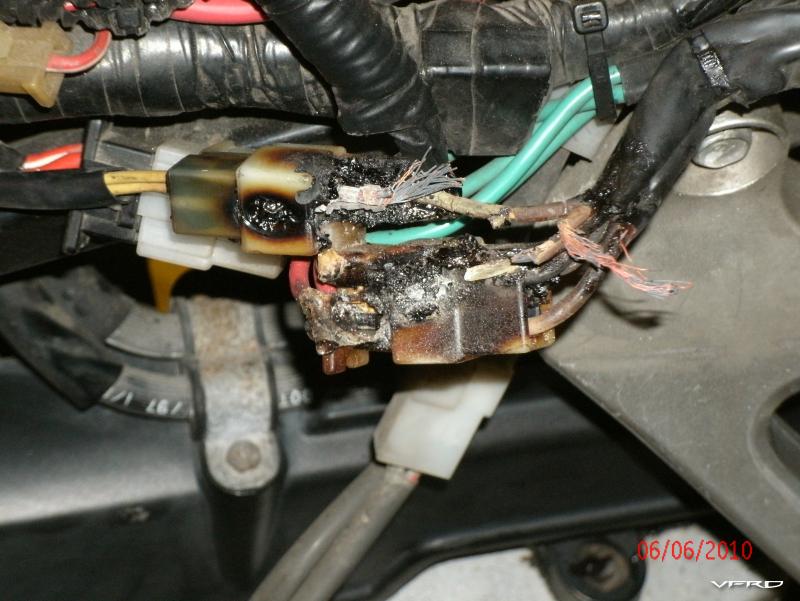
Damn! HS wins again! :fing02: But it never hurts to :beatdeadhorse: about VFR electrical problems! In a week or two somebody will be posting up about their melted RR connector again....and again....and again.....
-
That is simply not true, as was mentioned by others here. A poor connection is a poor MECHANICAL connection, which is the big problem with the 3-wire stator/RR connector as I discussed in this post:. http://www.vfrdiscussion.com/forum/index.php?app=forums&module=forums§ion=findpost&pid=750761 The terminals inside the white plastic " terminal holder" don't make good contact....which means high resistance, which means heat and meltdown. The 6th Gen 30-amp fuse holder problem is similar in that the terminal's crimp connection to the wire is probably gimpy from the date it was manufactured, and maybe the wire isn't robust enough for high amp situations....and eventually this causes high heat. I believe that dieletric grease will not prevent this meltdown, because I "greased" a friend's 6th Gen only to have that fuse do a meltdown a month later. Grease certainly can't fix poor connections, but if a set of terminals has good mechanical contact (as they should!), dielectric grease is scraped away from the metal-to-metal connection at the contact points, and then is simply an anti-corrosion coating for the rest of the terminal's metal areas. It DOES NOT adversely affect a good, tight-fitting terminal, nor will it prevent problems in a loose, crappy OEM terminal. Grease is neither the problem or the solution, but it IS good to have on good connections. I suggest replacement of these well-known weak spots in the VFR system using either Tightwad's products, OR good, new crimp connectors, wiring, and solder joints for those of us who are comfortable with our simple 12V electrics. It really is simple....just fix the poor connection problems before meltdown and the bike will last forever.
-
Take H4 bulb (from any auto parts store). Do a SEARCH here on VFR so you know why and where you're bending or cutting tabs or buying a cheap adapter thingy off the Interweb. Go riding. :fing02: :blush:
-

O.K. Let's see what the reaction is from an owner's club....(High Mods inside)
Trace replied to a topic in Modifications
An overall suggestion: Unless you're already a Honda or VFR guy and are aware of Honda's assorted chronic electrical ( or other) gremlins, you might want to carefully review some of the threads in the electrical (or other) sections and eliminate those problems while the bike is in a zilion pieces. That subframe weldment photo of yours that shows the big white 3-wire stator/RR connector got me to thinking about this. You DO know about the big white 3-wire connector meltdown problems, don't you? :pissed: Maybe some folks will chime in with other common problems for this generation VFR. Anyway, good luck with your clever project. :cool: -
O.K. Let's see what the reaction is from an owner's club....(High Mods inside)
Trace replied to a topic in Modifications
That's a good enough reason for me! Onwards! :fing02: -
Wait a golllddamnededed minute! You can't claim this issue back to 1986! The engines were friggin' air-cooled back then!! No fair! Find your own chronic Honda problem to solve! :goofy: But he makes a good point...this harness problem is nothing new, and there is no mystery. Fix those terminals now!
-
Oh...yeah. That. The electrical engineer throwdown challenge. That got rather pissy, didn't it? But the great thing about this forum is that most of us are not shy about saying something like "I know nothing about electrical/mechanical/tire stuff, please explain." And once that is said, we all are happy to give good basic advice. :fing02:
-
Hahaa, that was dang funny. But sorry......you gotta step up and make the proclaimation to get that credit!! :cheerleader: After all, IntAceptor figured it out for himself, too, and eliminated the cursed connector. Exactly. As per what Misspent says below.... Yes, that's why I made my Connector Proclaimation. The connector is the connector's fault, period. All the other RR-stator-burnt wiring threads that **I** ever saw treated the melted connector as something of a mystery, vaguely related to RRs, stators, inadequate wiring size, grounding issues, too much stator output, too little RR control of the current, etc. and so on. It's no longer a mystery....the friggin' terminals are loose inside that big white (soon to be melted brown) connector! Fix that, and the meltdown problem goes away. Just like when you guys discovered the proactive approach for the 30 amp fuse wire/terminal/fuseblock problem on 6th Gens. It was no electronical mystery...it was poor quality connections. Gravity sucks! Of course, Tightwad knows all this anyhoo! :fing02:
-
Modulator Failures? You mean like BaileyRock? :laughing6-hehe: :491:
-
Not necessary...already gots me one of them engyneeeeren degrees, thanks. :biggrin:
-
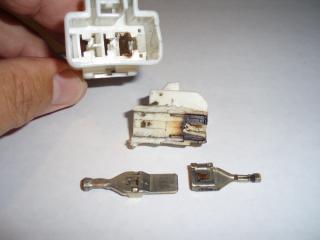
And when I proclaim that I've "found the root cause" like I'm some big research scientist or something, I'm making the assumption that in the 5 years I've been here where I've heard a dozen reasons for RR/Stator problems....I personally have never heard anyone zero-in on this loose connector issue. It's always been "my connector burned up, damn junk Honda RR, etc.". But maybe I missed a discussion about the looseness of these terminals, or maybe the reason that Tightwad made his 6-post connector available in the first place is because HE discovered the crappy-ness of the terminals, so perhaps I'm only confirming (with visual proof!) that the terminals themselves can be loose-as-a-goose inside those plastic connectors. I'm sure I'm not the first member to figure this out....but I thought that showing that gravity wins might convince everyone to fix the problem pronto! Also---I think bikes that use synthetic oil instead of dino oil are more susceptible to this problem. :laughing6-hehe:
-
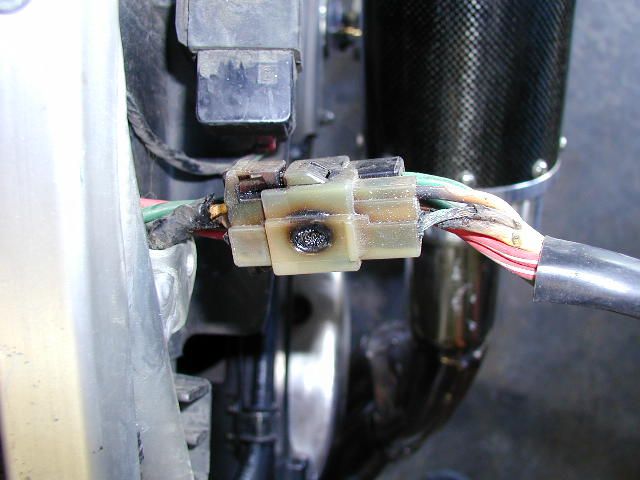
There have been numerous threads here about stator and RR and wiring harness problems. Without a doubt the 5th and 6th Gen bikes have their issues in that regard, and Tightwad has done some great work to fix those problems. And yet we still have posts about this connector melting down. This was all discussed in great detail in this post by Soichiro: http://www.vfrdiscussion.com/forum/index.php/topic/62912-stator-rr-wires-connector-fried/page__pid__749019#entry749019 In that post were lots of pictures like this: And recently we saw something about an RC45 almost burning to the ground, and BusyLittle was surprised to see his charging connector (not the RR one) getting all "melty". In that post, I stated that the reason the connector melts is the damn connector's fault, not the RR or the stator. And here's the proof: Look at this pic. A nice clean normal-looking terminal from my 5th Gen's removed RR conncector--- Now I'll pick it up and tilt it just a bit--- And lookee what happens. It falls apart from gravity only. What a GREAT electrical connection, huh? The male blade of the terminal is totally loose in the female socket. So, picture that poor metal-to-metal connection wobbling around inside the white connector that you THINK is good and tight because you heard the connector snap together with a click. Nope....that loose terminal is arcing away with all that stator current going through it all the time. And the arcing causes more oxidation, which raises the resistance....which causes critical heat and the damn thing melts. So.....as was discussed in that Soichiro thread, it's a real smart move to eliminate these connectors with the crappy terminals and either make your own insulated terminal splices (and toss that white connector); hardwire, solder, and heatshrink 'em; or use one of Tightwad's products. DO IT NOW!! :fing02:

-
Okay, okay, okay JES.... how about a truce? If you and your loyal supporters leave behind the leftist, apocolyptic, conspiracy-piracy-theory-MIB-Matrix spoutings of this TECHNICAL DISCUSSION about the merits or lack thereof of HHO, I'll butt-out with my criticism and chain-yanking from the sidelines. It is because of my pro-capitalist, anti-global warming, anti-New World Order, anti-Michael Moore, anti-Al Gore stance that I simply can't let unfounded opinions about the future of oil and energy policy go unchallenged on this forum. When myths go unchallenged for too long, they begin to eclipse the truth. Thus I had to go on the offensive to put some records straight or at least question the liberal politics that have invaded your "Cooking With Hydrogen" thread. So.....why don't we ALL leave politics out of this, as it serves no purpose. We can agree to disagree about the future of the planet and where HHO fits into it. Hell, I'll even stop picking on HHO as being junk science and sit back to see your eventual results! Let us allow the technical chips to fall where they may. Sound reasonable? As for the future of electrical power generation for the Rest Of All Time Of Earth....learn what you can about Traveling Wave Reactors. http://en.wikipedia.org/wiki/Traveling_wave_reactor Lots and lots of science involved there!
-
That is absolute bullshit statement and you should be ashamed of yourself. THAT is why I resurrected this thread....to expose this crazy political nonsense that blindly supports "capitalist oil conspiracy theory"....yet attacks anyone who points out the decades of scientific work that has totally debunked the Brown's Gas Conspiracy is infuriating and baffling. Slavery? Oil addiction? Those are big words and have no place here, especially after I [me, Trace] got pounded for bringing this nutbag topic back for inspection by the membership and wondering about your (lack of) progress. I asked for an update, and we got more political spin instead of results. How DARE you shill for your own Pepsi project, asking your fellow VFRD members to vote for you regardless of the merits of your project. Ahhhh...I see. If MONEY goes toward your cause it's okay. If it goes to Exxon....it's evil. Slave oil? No. HHO snake oil? Yes. Welcome to the Matrix, but I'll stick to the Blue Pill, thanks. :lurk:
-
JES, Thanks for the update, and appreciate your willingness to step back into this controversial subject. Just an FYI, my 2000 gets a consistent and carefully calculated 44 mpg with a 45 tooth sprocket. By "carefully calculated", I mean that my speedo is exactly correct using a speedohealer, and that my odo is exactly 11 percent low as a result of that correction. Thus, I crank 11% into my odo miles when gassing up. Plus, I use traveling mate's mileage at gas stops as a comparision/validation of miles traveled. Anyway, it always comes out to 44 mpg over the last 5 years during fairly hard highway running. And my gas-pig RC51 gets 31 mpg doing the very same runs from Florida to Franklin NC and back! :pissed:
-
Hahaha! Yeah, or dare ask about "oil" or "tires" or "helmets" or "which color is best", etc. :laughing6-hehe:
-
You are completely off base with your take on this discussion. Let me boil it down for you for your re-consideration: 1. A good and respected member (JES) posted about his HHO project, which I think we ALL applauded as admirable for giving it a shot. 2. But many of us with technical backgrounds found it to be extremely questionable, because we know you don't get something for nothing. 3, This skepticism was bolstered by the long, long history of "Brown's Gas" hokum. Us doubters didn't invent the skepticism...it's well documented by most of the scientific community. 3. The greenie folks here accepted the premise that HHO is viable, and then attacked us skeptics as "capitalistic tools". 4. We all retreated to our respective corners for the past six months. Waiting. 5. And now....me....who is the proud owner of a long memory.....have asked the original poster of the status of his HHO project. So I ask you.....if a member had converted his chain-drive to a belt-drive six months ago and then became a fanatic proponent of his own self-generated controversy, would it not be proper to ask that member how that belt system is doing after half a year of use? After all, on this excellent forum we are always sharing info, helping each other, challenging assorted ideas, and letting the marketplace decide. Did you want us all to accept HHO as the Next Great Thing without question? I'm questioning. And as of yet, I have no answers.
-
Totally true, but it's about the only weight you can get out of our heavy pigs for free, so I wanted to "enjoy" that massive improvement, too! :biggrin:
-
Yeah, that 6thGen HowTo is good 'nuff for 5thGen work. Once you start "following hoses", you'll see how simple the PAIR removal actually is. As for the flapper valve stuff that was also mentioned in that post, most of us have disconnected the hose that goes to the diaphram and plugged it. But last weekend I had the airbox off and removed EVERYTHING that has to do with that useless system (Bypass Solenoid Valve, One Way Valve, small Vacuum Canister, associated small vacuum hoses, etc), and plugged the single small vacuum hose from the intake manifold that makes it all work. I DID keep the Bypass Solenoid Valve in place on the airbox and kept the electrical connection to it (which just gives the valve 12V on/off to open or close the flapper) to prevent any codes due to being disconnected, but that solenoid valve now does NOTHING except sit there. Obviously, since it's not hooked to anything there is no reason whatsoever to plug the various nipples coming off of it. So, while you're doing the PAIR thing you might as well do the total flapper crap removal, too. With all of this work you'll be removing a whopping 10-12 ounces of useless do-dads! :biggrin:
-
Echoing what Mad said, you can toss everything in that picture with no ill-effects. Get rid of that crap! I didn't use block-off plates....I simply cut and plugged hoses coming off the cylinder heads with short 3/8s inch bolts. Blocking the airbox hole is really simple....pretty much anything that you can put over the airbox fitting or jam securly in it (which is what I did, but I forgot what it was...a small rubber cork perhaps?) It's not a critical pressure or vacuum situation there. What you DON'T want to do is jam something into the hole from the inside of the airbox. If were to ever pop out (inwards!), it would definitely end up down the intake stacks and jam your throttle blades open. Oooops! Removing the airbox to do this makes it easy and foolproof. Isn't there a How To on this? I thought HS did one years ago.
-
True, if you remember to do it with constant vigilance. Who thinks to check that often? When one tail/brake light burns out, the other often soon follows. Then you're dark back there. Not good. Best solution indeed is additional LEDs like Hyperlites. Also--I bought as set of LED replacement "bulbs" off the Interweb, but they weren't for shit. Not nearly as bright as normal incandescent 7443 OEM bulbs. I tossed 'em!