omgvfr
-
Posts
17 -
Joined
-
Last visited
-
Days Won
1
Content Type
Forums
Profiles
Gallery
Blogs
Downloads
Events
Everything posted by omgvfr
-
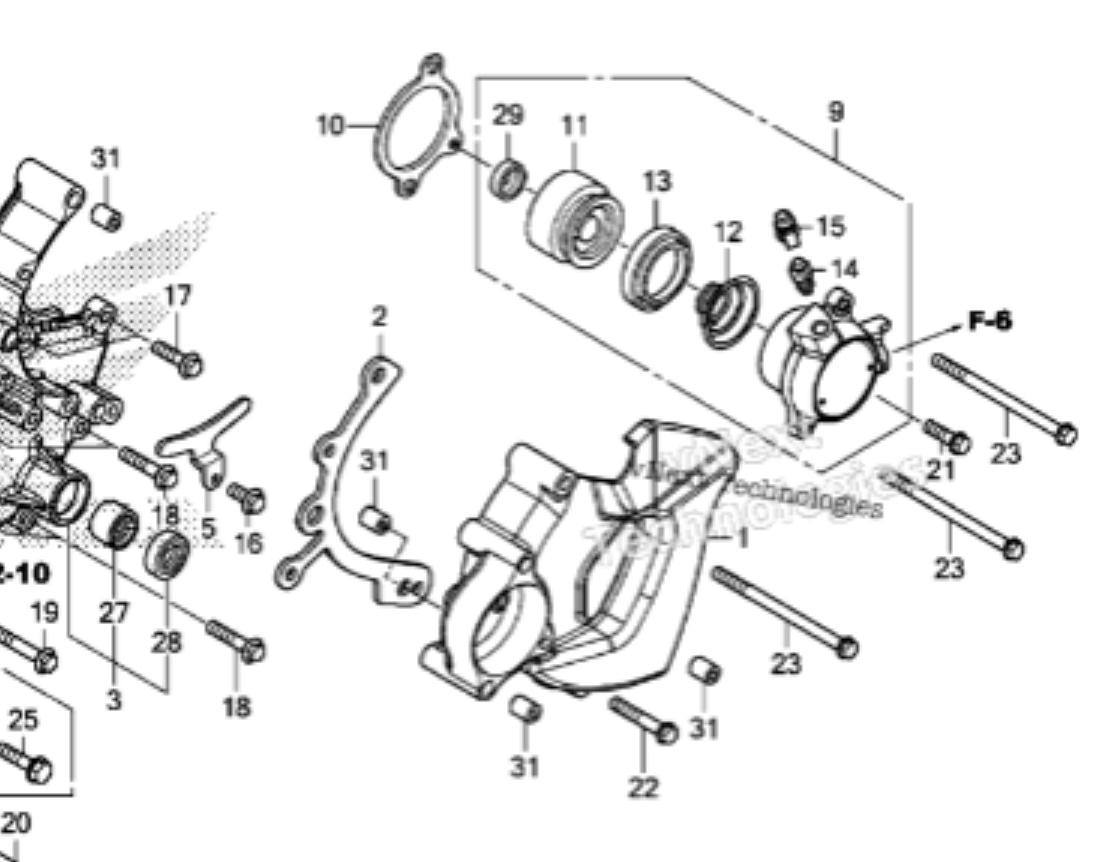
Hey Sgt, Here is a parts diagram for reference. #11 is the slave piston. It is the part that does the pushing when the clutch lever is pulled. It’s inside the cover. When assembled, this ends up pushing on the rod you see on the engine. You’ll want to push #11 back inside the slave cylinder until it’s flat. Then try putting the cover back on. Firm force here with your thumbs and it should slowly ease all the way in. You’re pushing the fluid back up the hose towards the clutch lever when you do this.

-
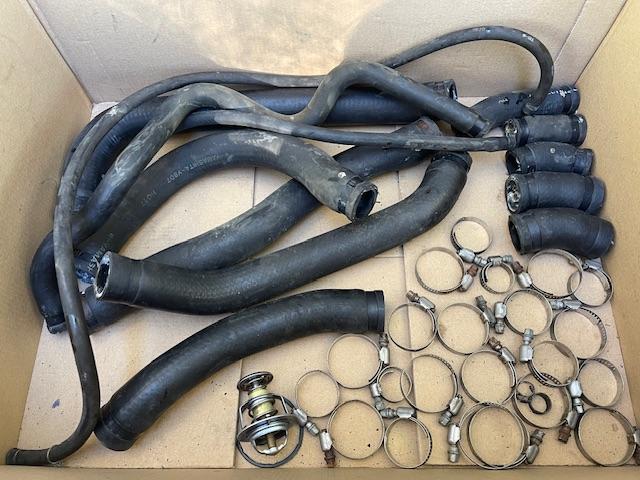
I recently replaced the coolant hoses on my 5th gen VFR. Previous owner replaced these a little over 10 years ago. I’d recommend you do the same as I did and get all new ones if you’re doing the job. If you only need one to get by these make more sense. Offering to anyone before they get tossed out. All hoses and clamps are present. Also, the thermostat works fine, but was replaced as a preventative. Free for pickup in SoCal 91304, and I can ship if necessary. Will leave this up for a bit and pull the post when it’s time to ditch them.
-
I’ve read about the possibilities. Lots to read about timing overlap and its effects. Seems more applicable in situations where boost is involved, with increased scavenging etc. I just wanted to report that I ended up doing it, even if unintentionally, and it ran fine. It’s been reverted to stock settings and all is well. I’ll report that the idle speed has dropped about 50-100 rpm from before. A little bit smoother too, due to the front and rear cylinders now being in sync with each other. This will likely be left alone now. I’ll have time to go for a ride next week and really get a feel of things. The AS3 silicone hoses kit is nice. Everything is very clean, all parts are present and installed properly. Most difficult aspect was fitting the airbox with the flapper valve hoses and getting everything to seat nicely. Just finished up that project today. It’s been up to temp, no leaks whatsoever, air is bled from coolant system and oil + filter change done too. Ready for a new year.
-
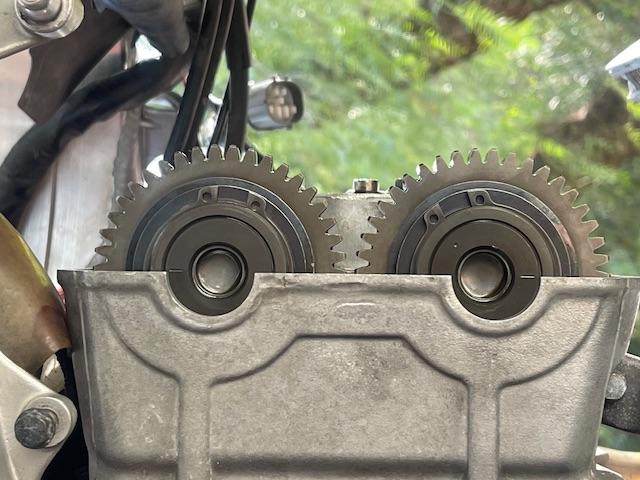
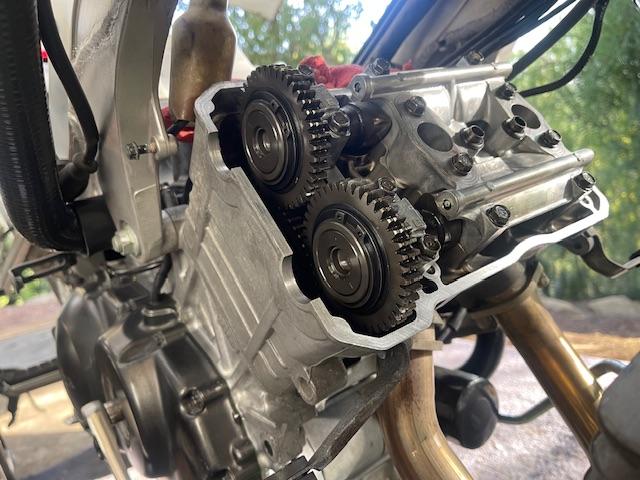
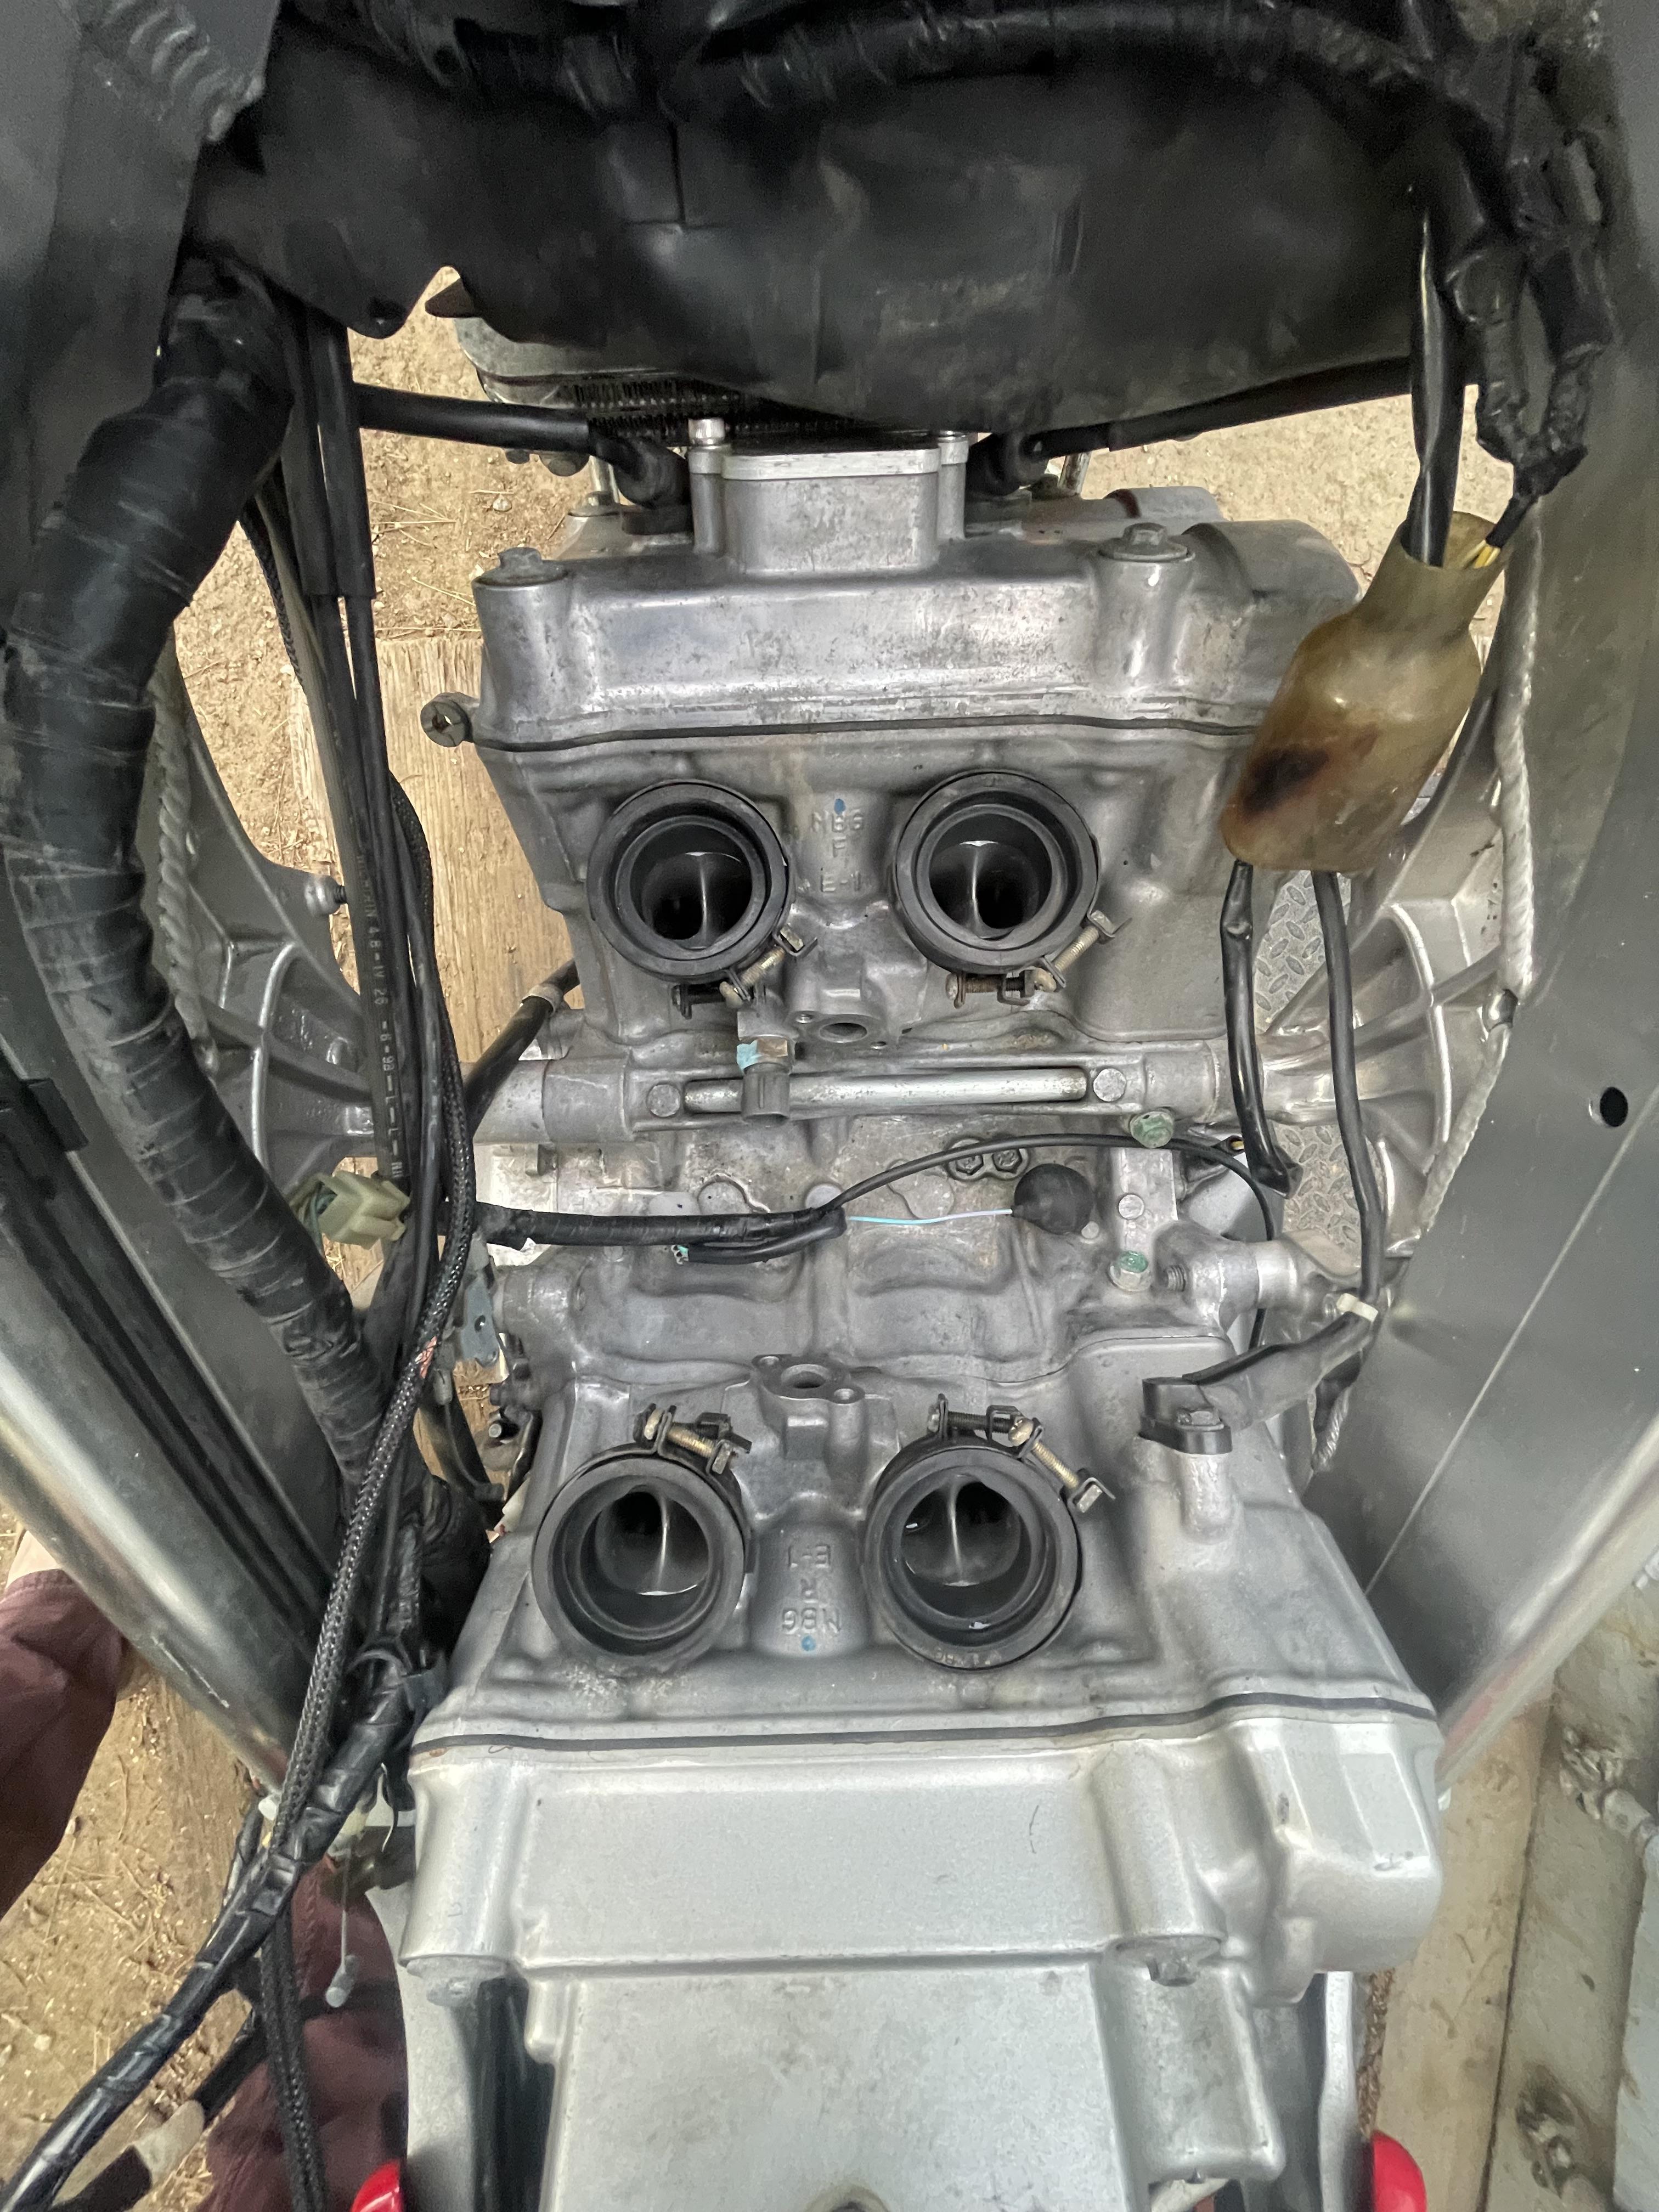
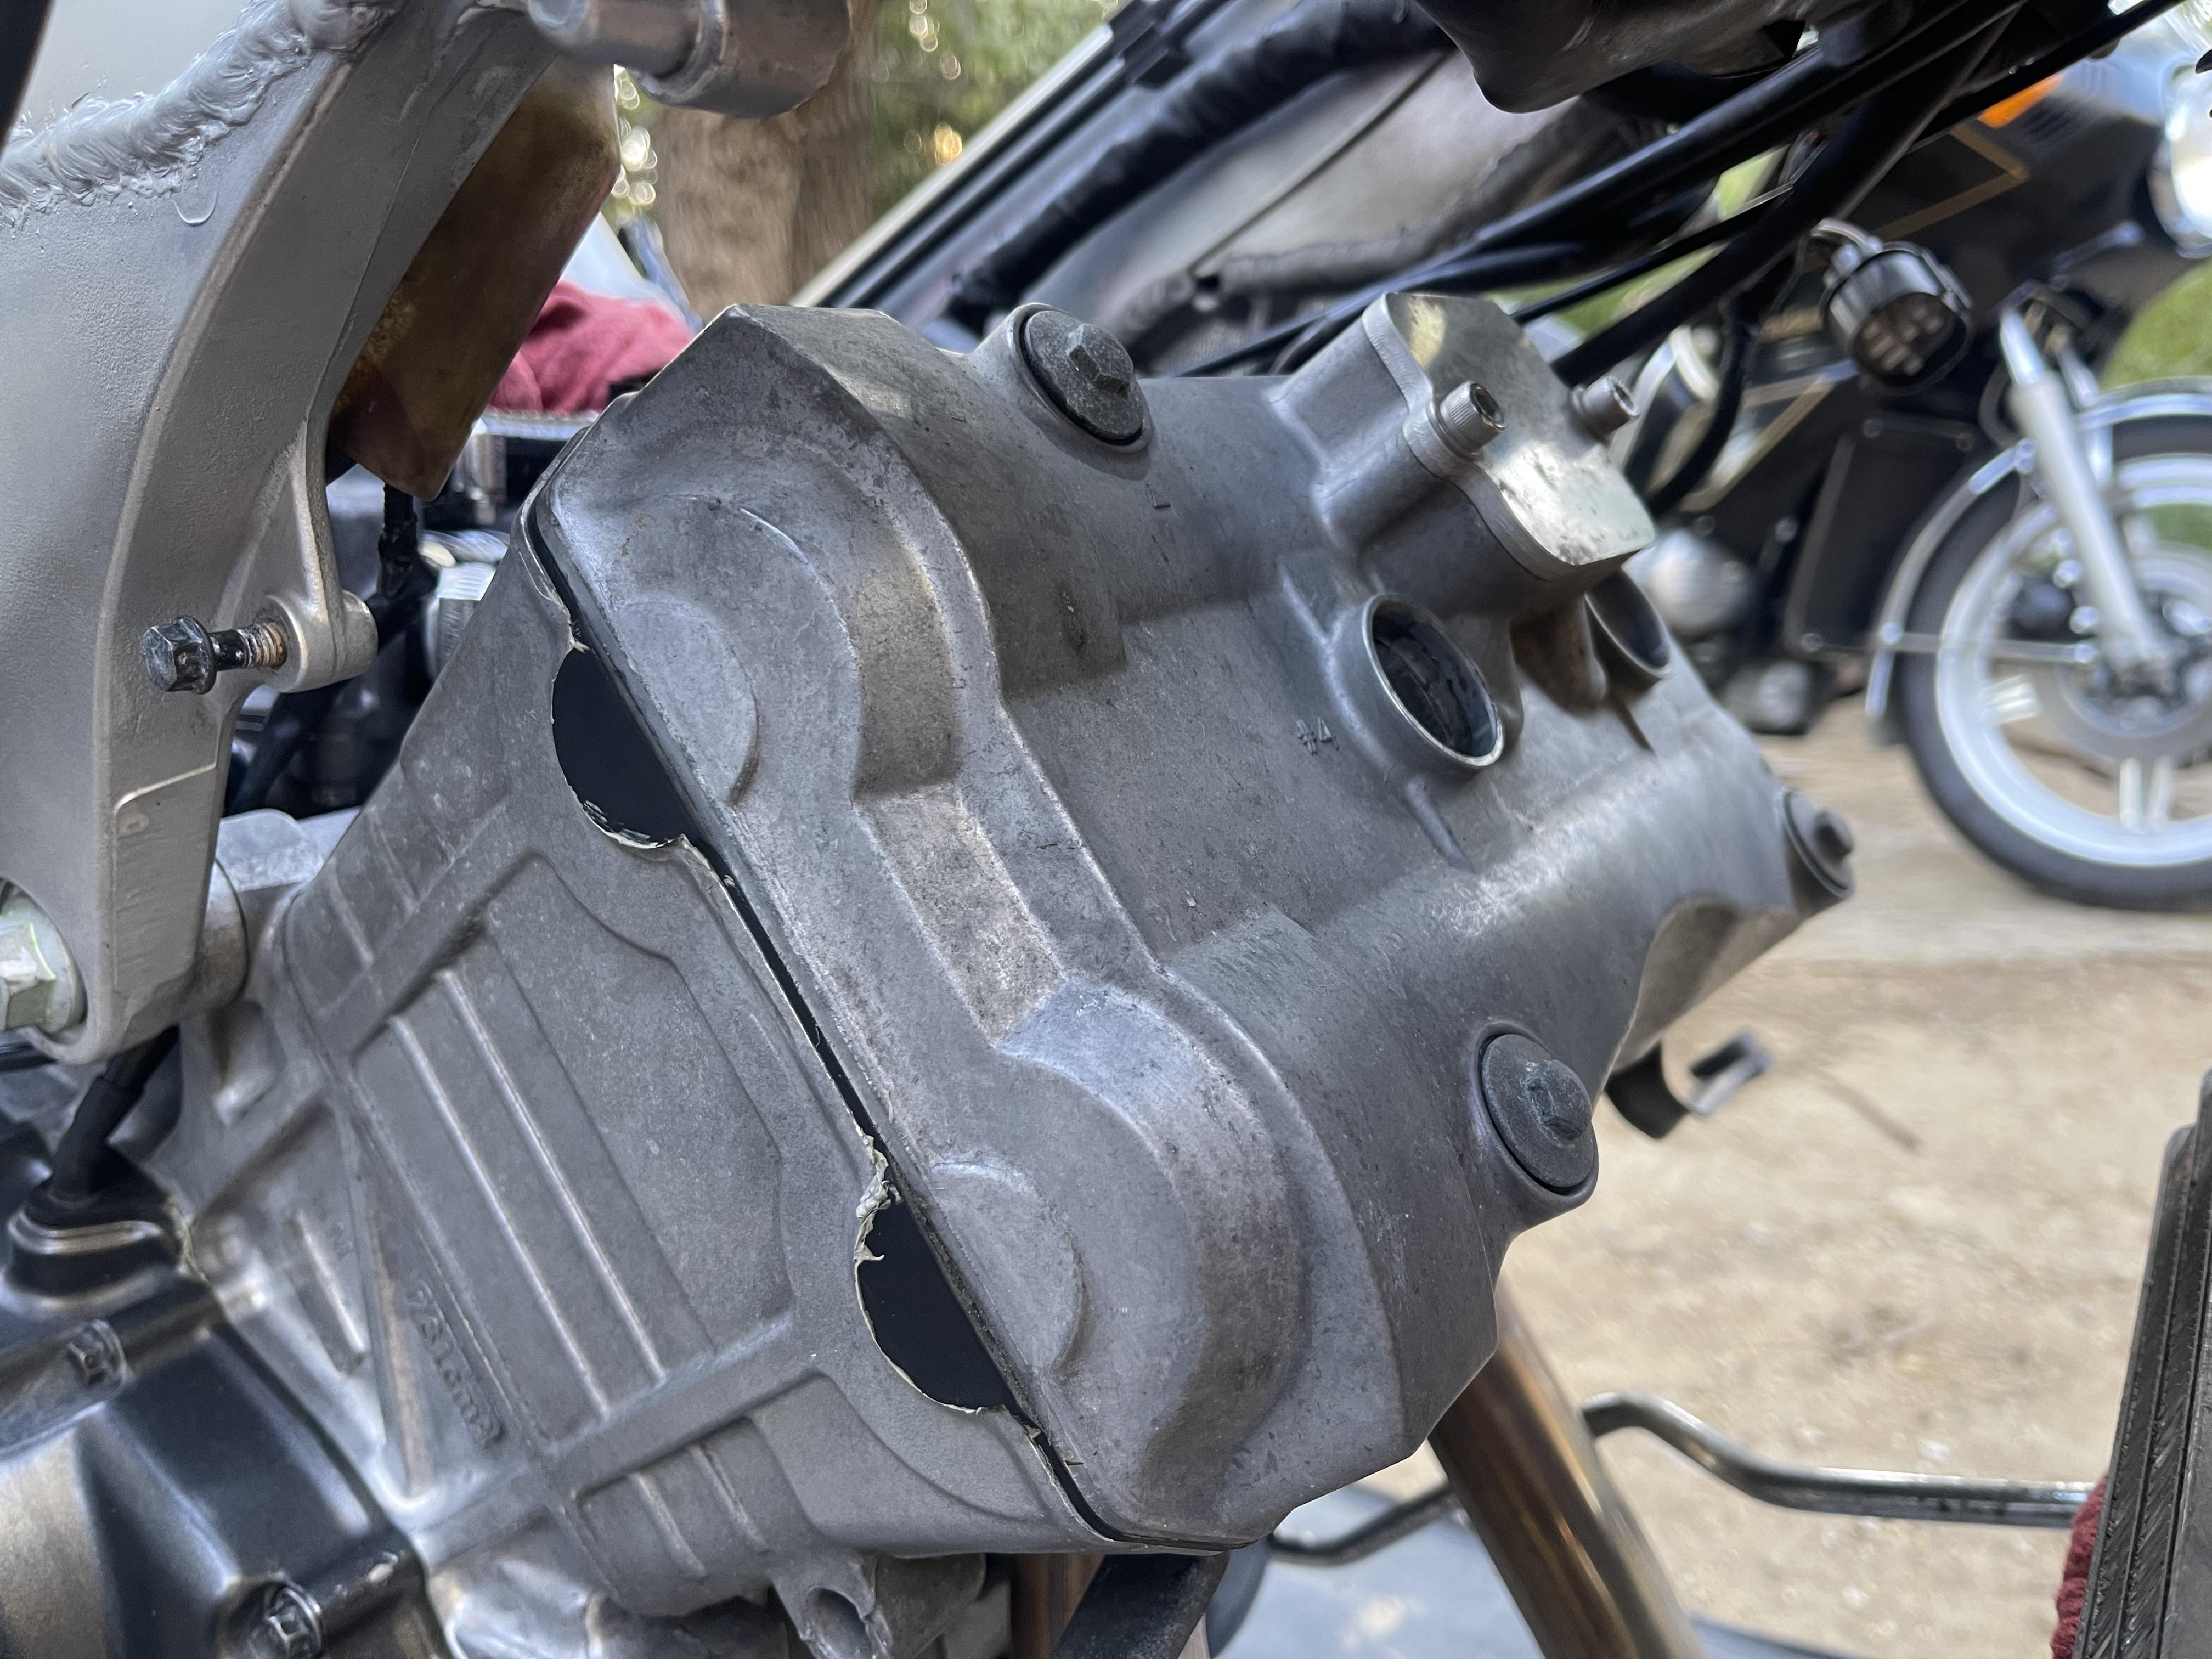
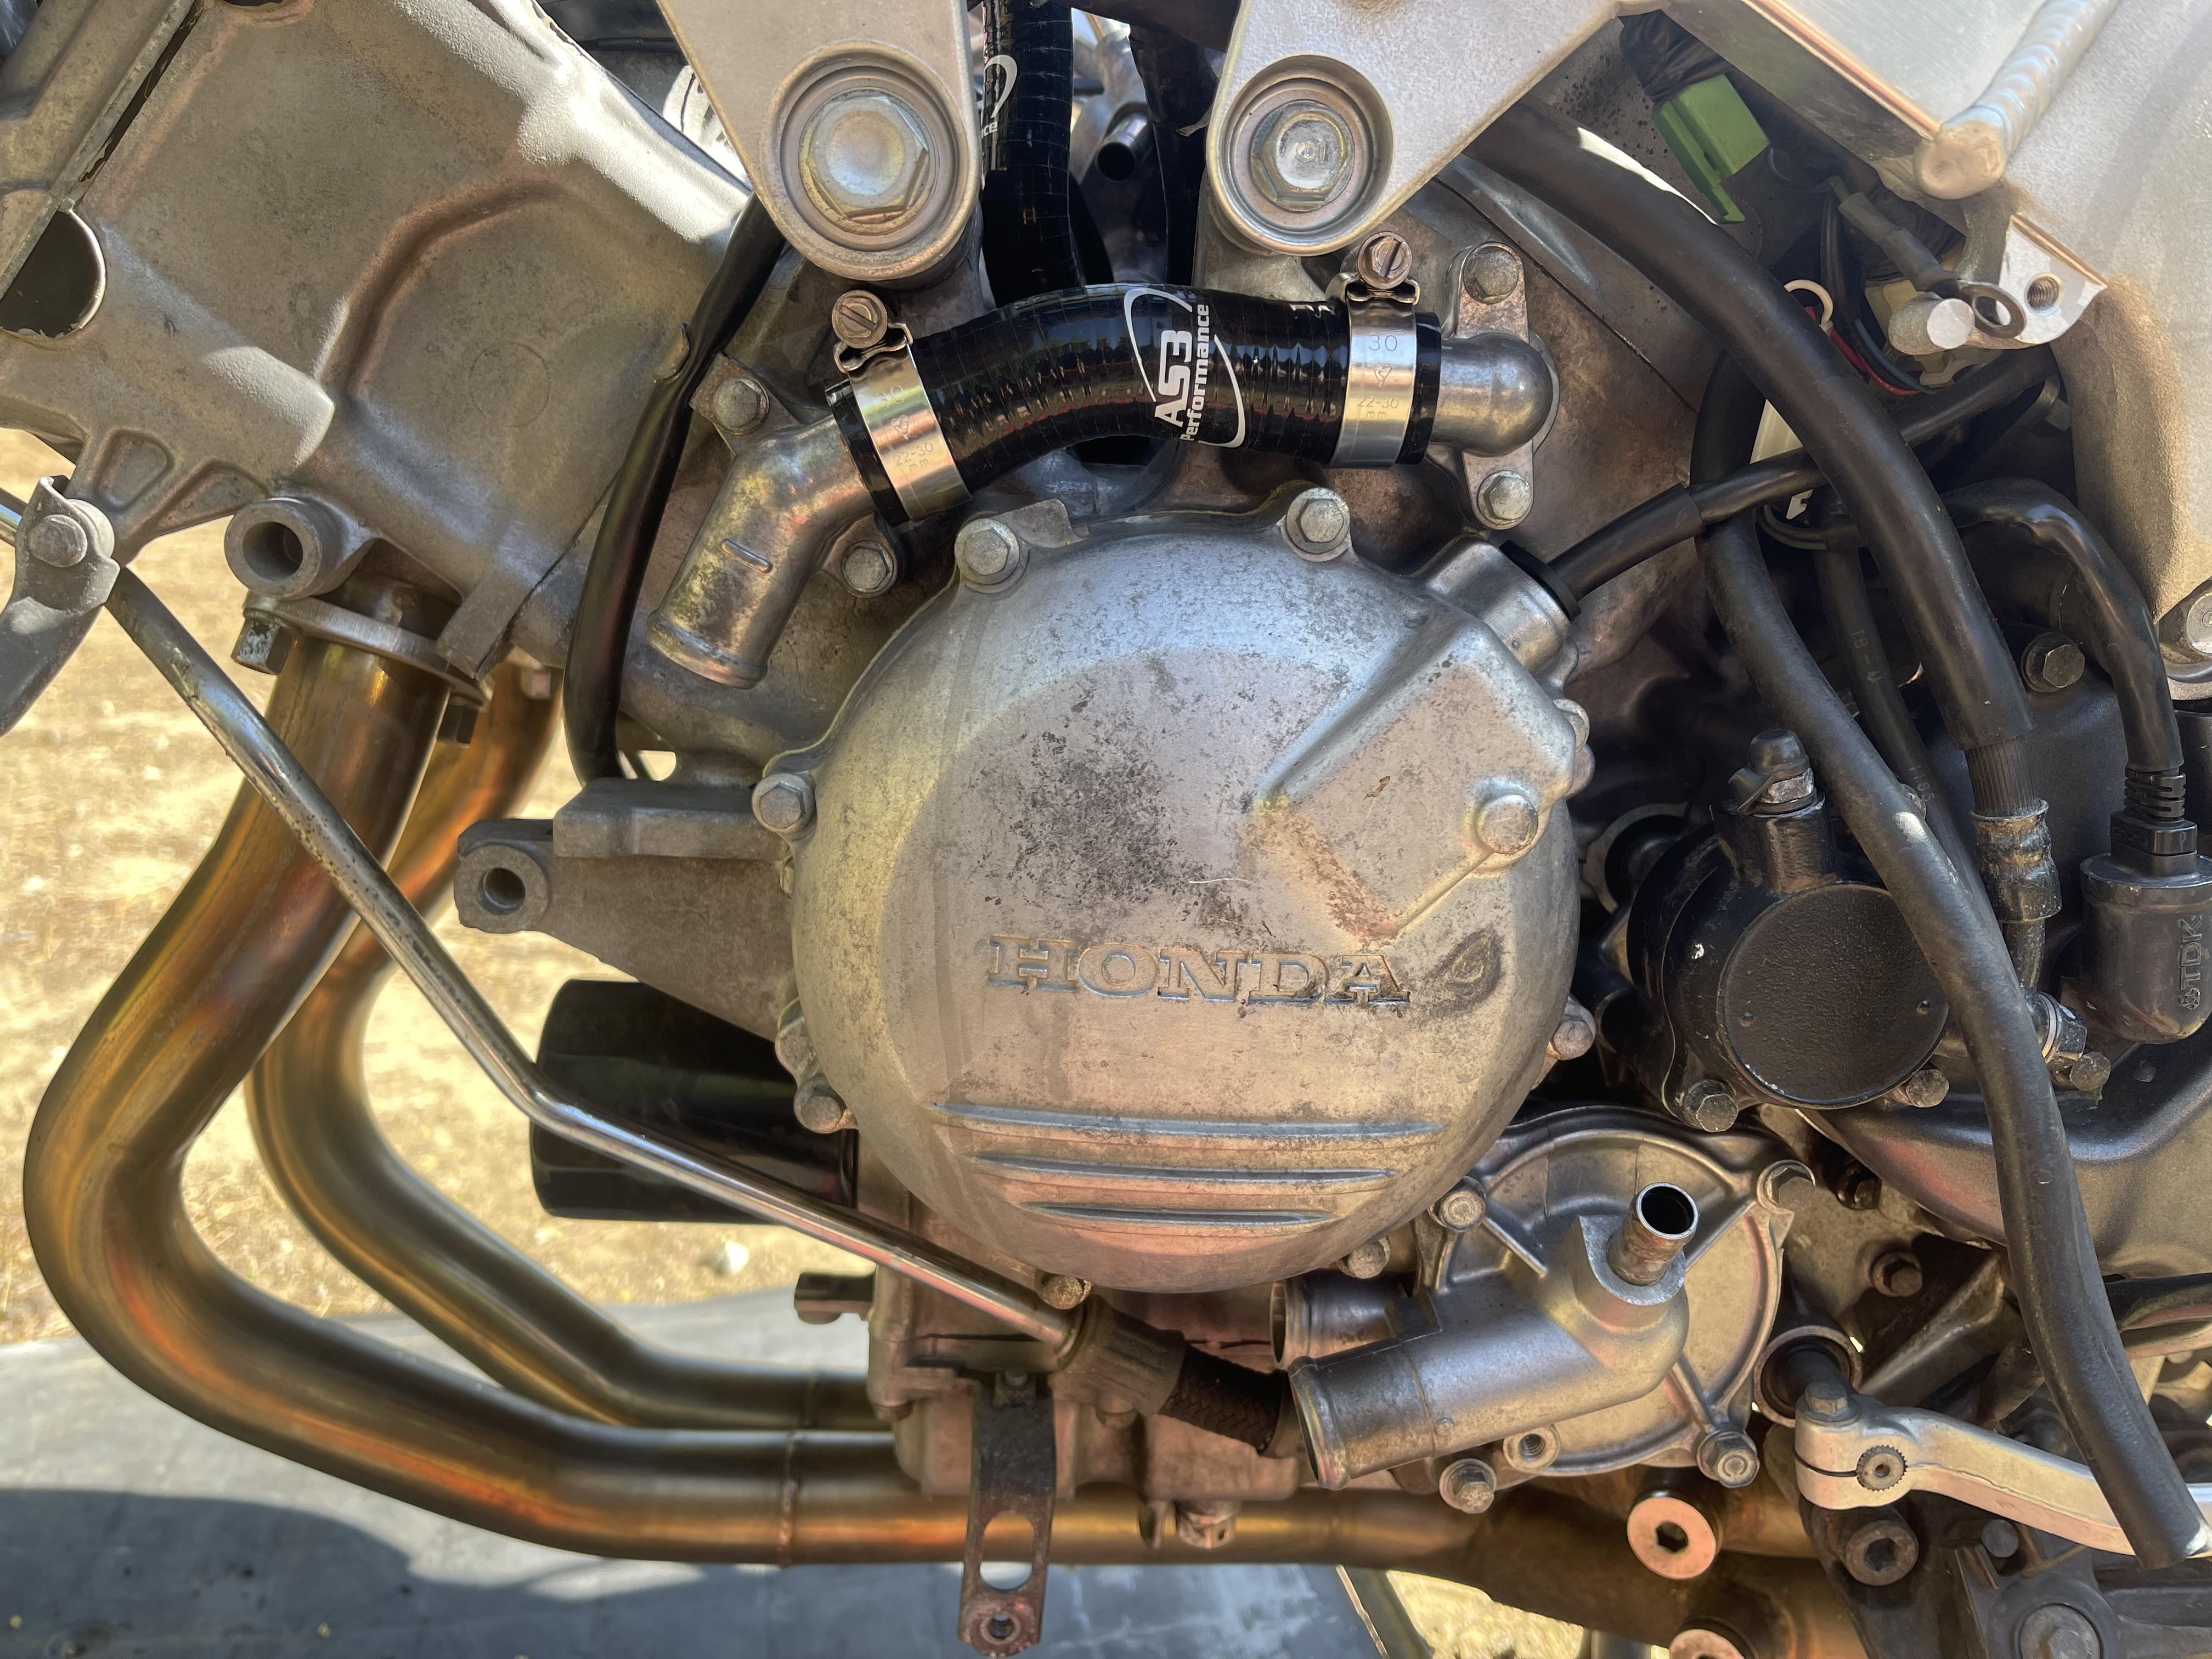
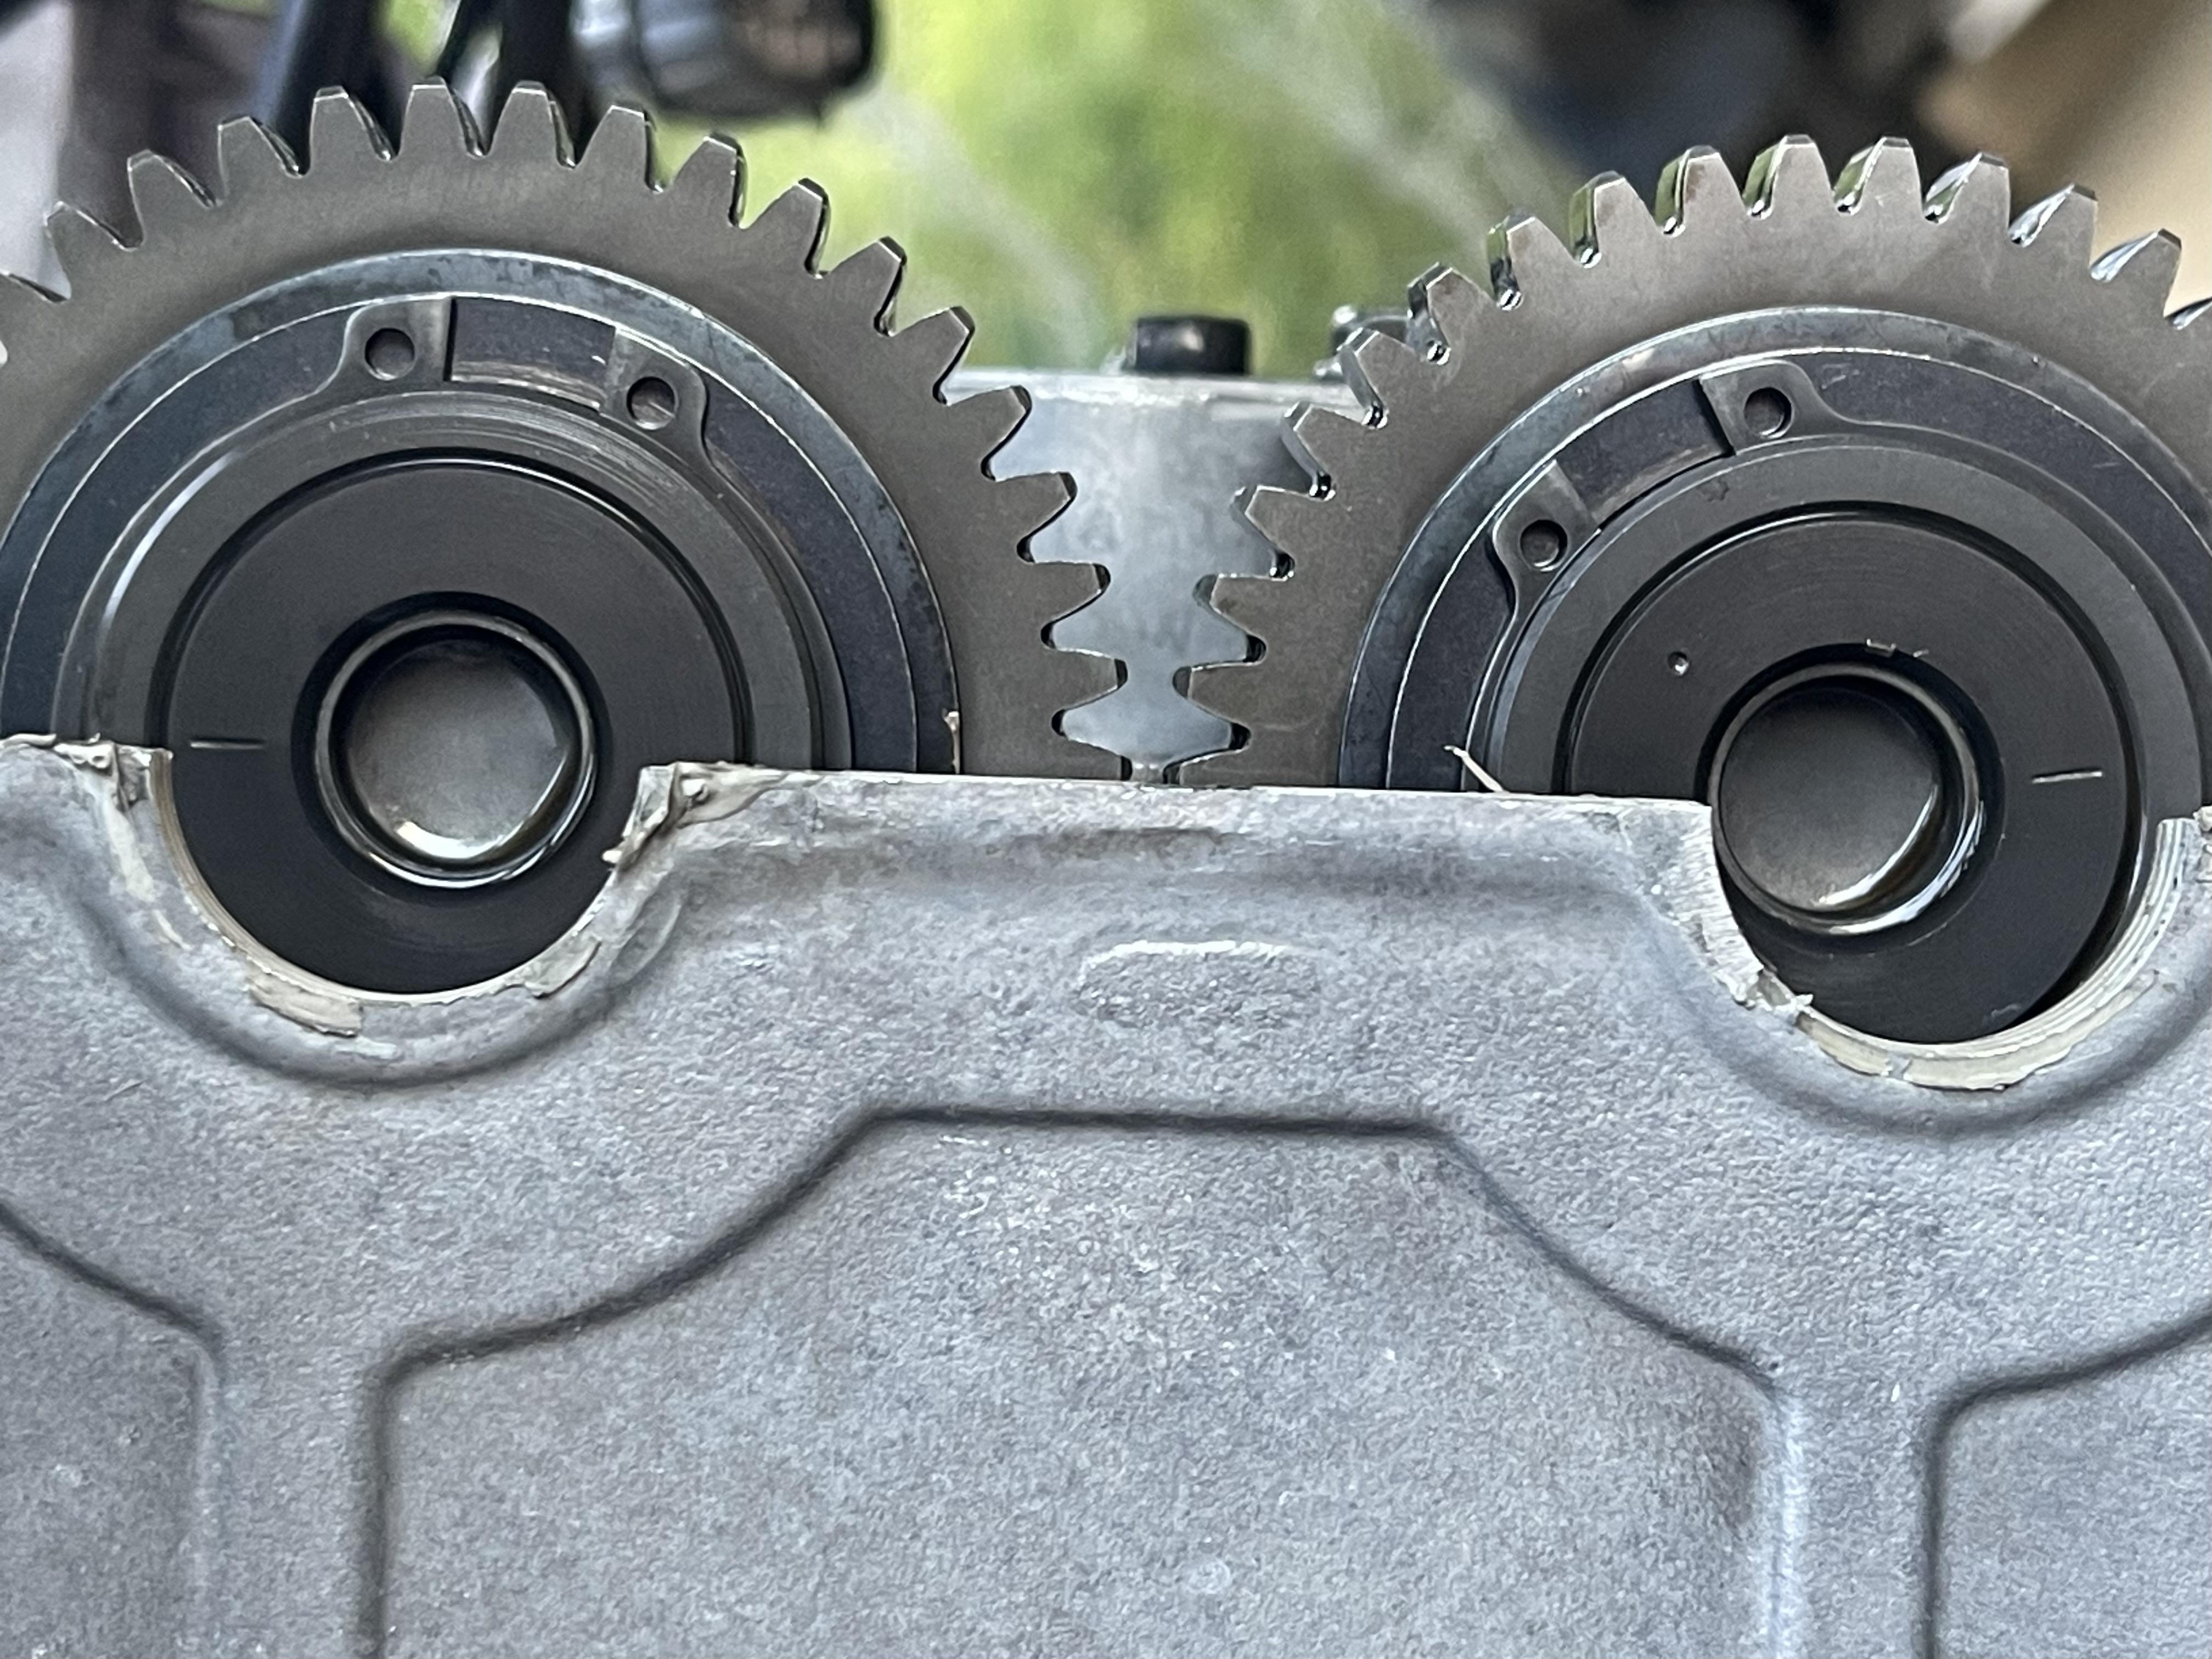
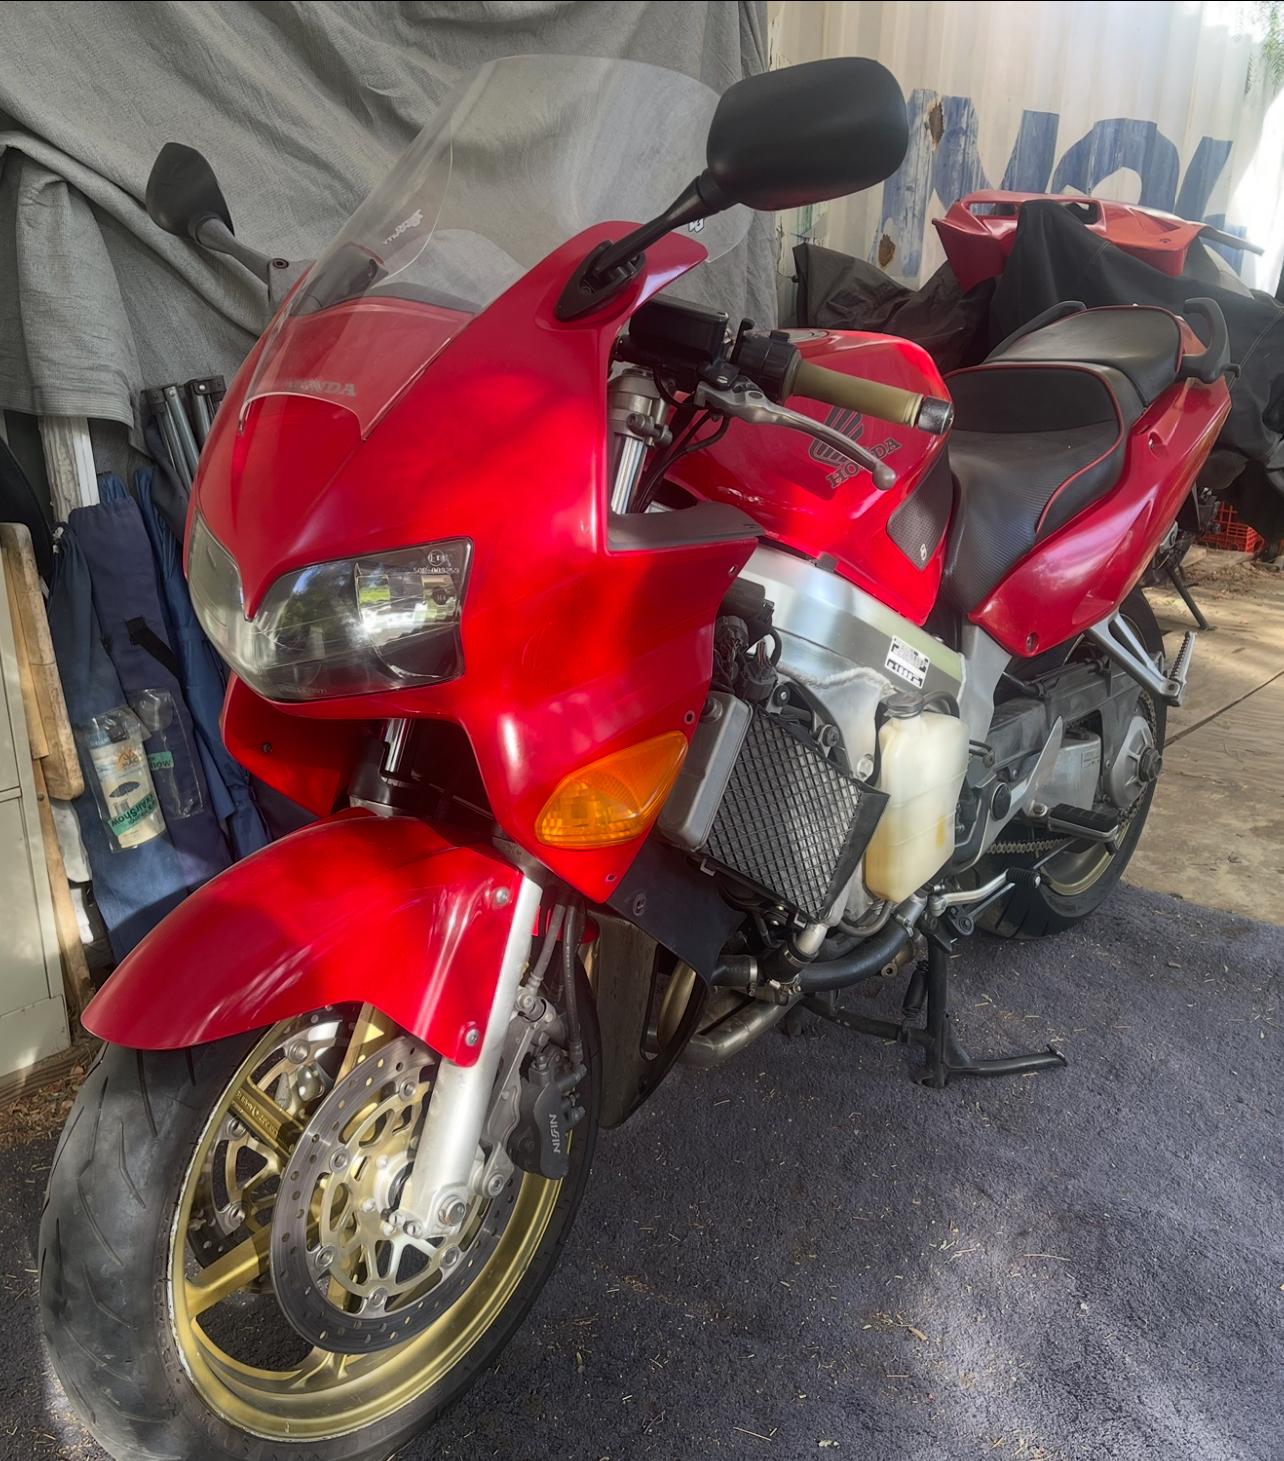
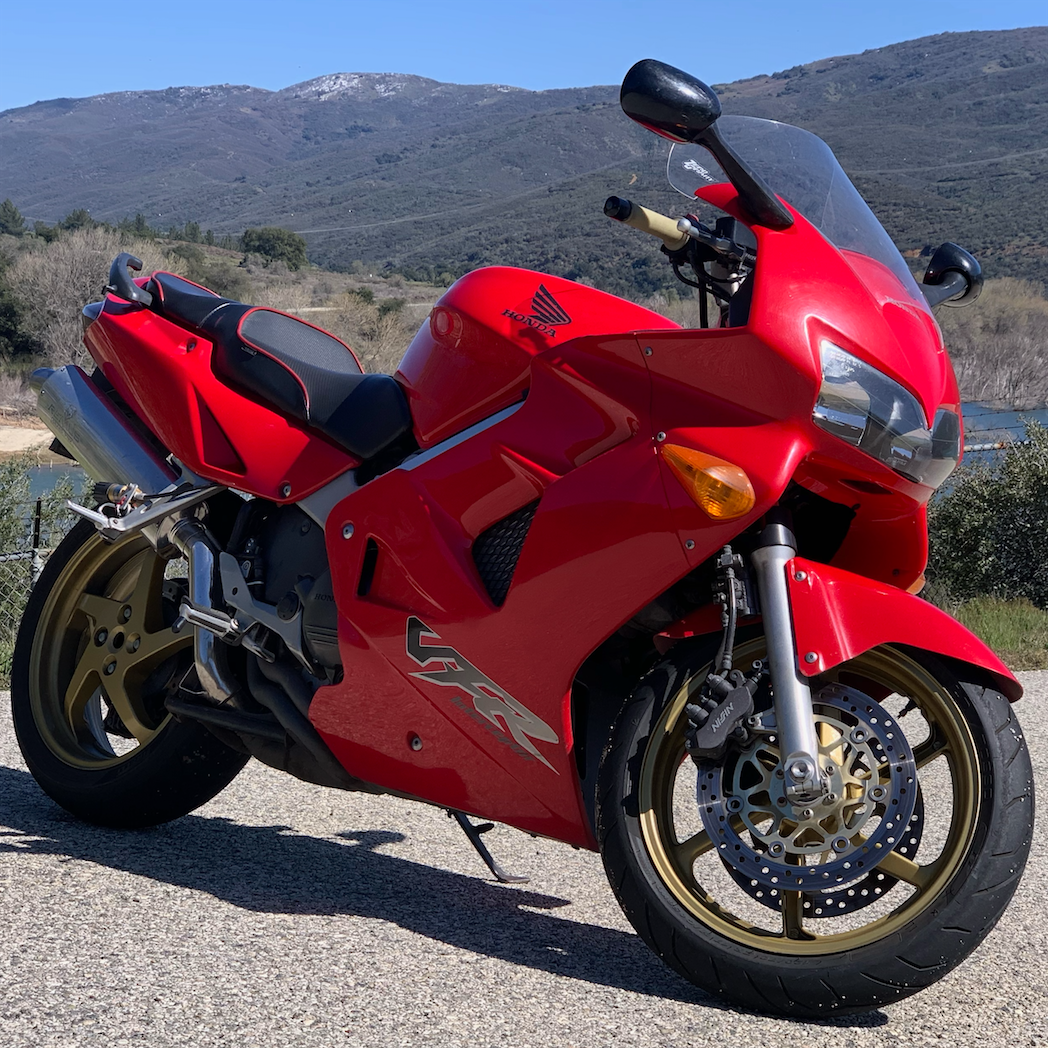
Project time with the 5th gen VFR. Focus: cooling system. Farings off, and it begins. I recently acquired a set of AS3 coolant hoses. Ordered the usual o rings for water pump, thermostat, water jacket inlets. Thermostat has been replaced before and is working fine, but I am replacing it again just to be thorough with the project. First new hose installed. Last week, I began the process of replacing the coolant system. Over the past year there has been a tiny coolant weep from somewhere in the V. Never enough to make a drip on the ground, but just enough that the overflow reservoir level would slowly go down over time. I ride it pretty often and it’s never been a problem, but it’s time to address it. All clean now. I have the radiators removed, throttle body out of the way, good access everywhere. And I’m looking at those heads. I have a 1999 CA model. Two years ago, I sourced a set of 49 state cams to get the full lift as Honda intended. That valve adjustment was tiring, in and out with the old then new cams to get the correct lash all around. Lots of measuring and adjusting. That all went okay. I’m looking at all of the access I have in front of me, and with a sigh, it’s time to open up the valve covers again to check the lash. The access is there, time to break the seal. The good news is after two years of running with the new cams, all but one intake valve is still in spec. But to my surprise, I’ve found the timing on the front cylinder head is wrong. I had spent plenty of time going back and forth when switching to the new set of cams, and know how I got it wrong. It didn’t jump a tooth, I just wasn’t thorough enough with final assembly and sealed it up anyway. Interesting to note and the reason I’m sharing: the bike runs just fine. Cam timing off. This is the front cylinder head. The exhaust cam is advanced by one tooth. Those index marks should both be flat. I’ve ran many miles like this with no ill effect. Confirming the crank position. I did note more exhaust smell with cold starts after swapping the cams. I was surprised that removing the PAIR system would have such a dramatic effect. I realize now that’s likely not the case. Instead incorrect cam timing overlap is what’s caused this condition. You can be one tooth off and wouldn’t notice it. The bike starts and idles fine. Because I swapped to cams with a different profile, there was a small change in character of engine performance. I’ll be correcting this error and will know the real difference between the CA / 49 state cams when timing is correct. If I was just doing a simple valve adjustment and had noticed this change, I would have gone back to check my work. Replacing the cams had covered it up. I’ll be finishing up my cooling system project throughout the week. Good news is the shims I need to address are only in the front head, so these cams needed to come out anyway. I might make another thread for the cleanup and restoration work I’m currently doing. Normal stuff like old deteriorated o rings in the usual places. There’s more in store for this VFR, getting it right has been a lot of fun!
-
If this happens to be your first run in with this stuff. We could make a whole thread of these. Good to know what details to look for. There will be more in the future. 😂 Taking requests! What do you want to see? 😅
-
Dished center 8 spoke VFR wheels?
omgvfr replied to omgvfr's topic in Third and Fourth Generation VFR's
Ah, thanks Captain, it seems that’s it. I need the 5.5” width for the 5th gen. That’s what I have already acquired. Nothing to do here, mystery solved. -
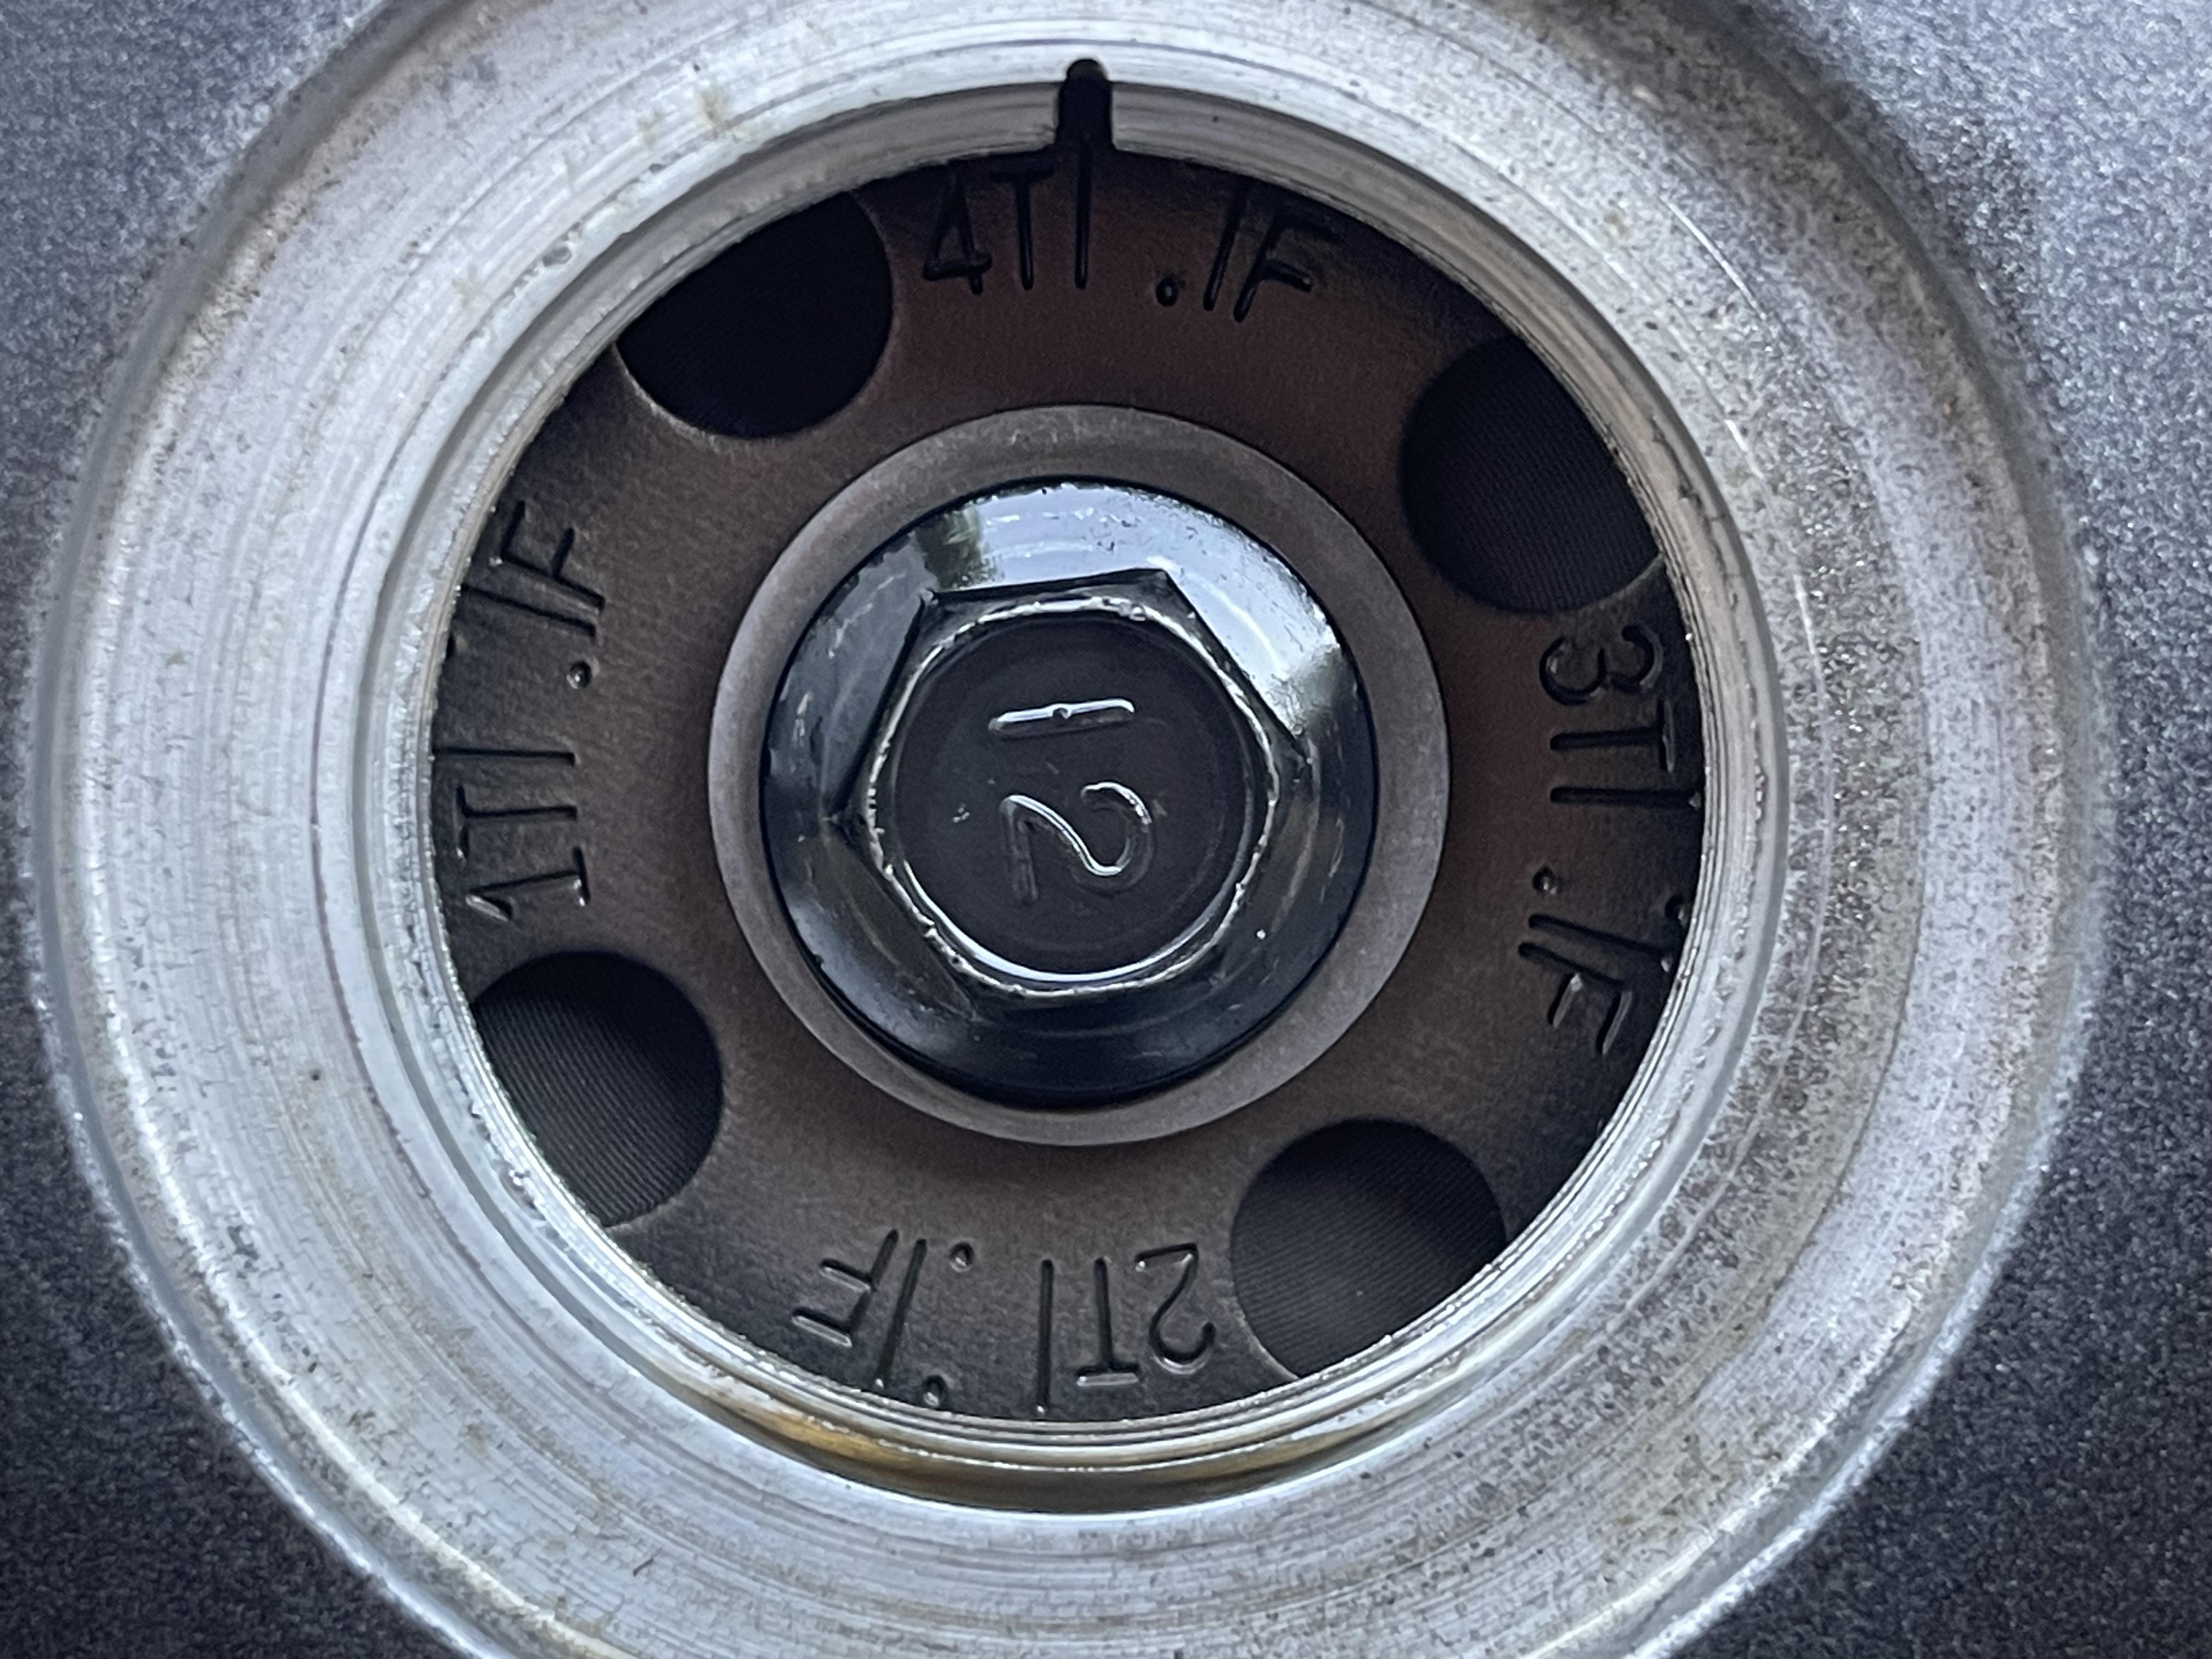
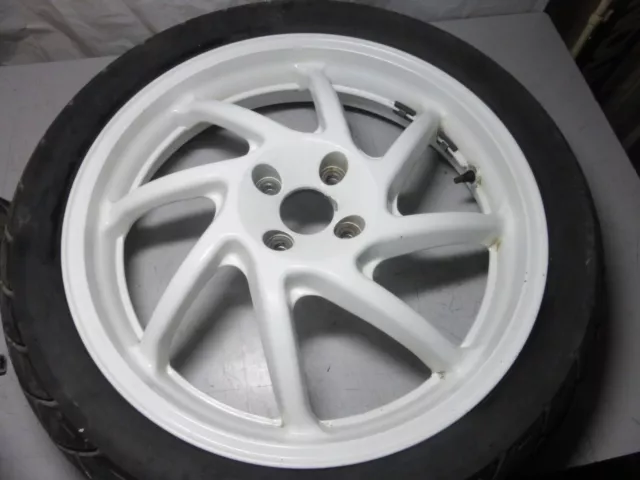
Hey everyone, I have been doing my research on 8 spoke rear rims, intending to mount one on my 5th gen VFR. I’ve finally sourced a wheel from an RC36. I have a lot of prep work to do now. I my research I came across an interesting photo. It’s an 8 spoke rear rim, with 4 lug bolts. It doesn’t have a flat face in the center where the directional arrows usually are. It’s not a VFR400 or RC30 rim which uses the single nut mounting. I don’t have any extra info from the websites, it was a related image. Does anyone know about how this came to be? It seems like there is more than one out there like this. Looks pretty good. I think if the stock wheel was mounted to a lathe it could be duplicated. Sharing with the forum to see if it’s known about!
-
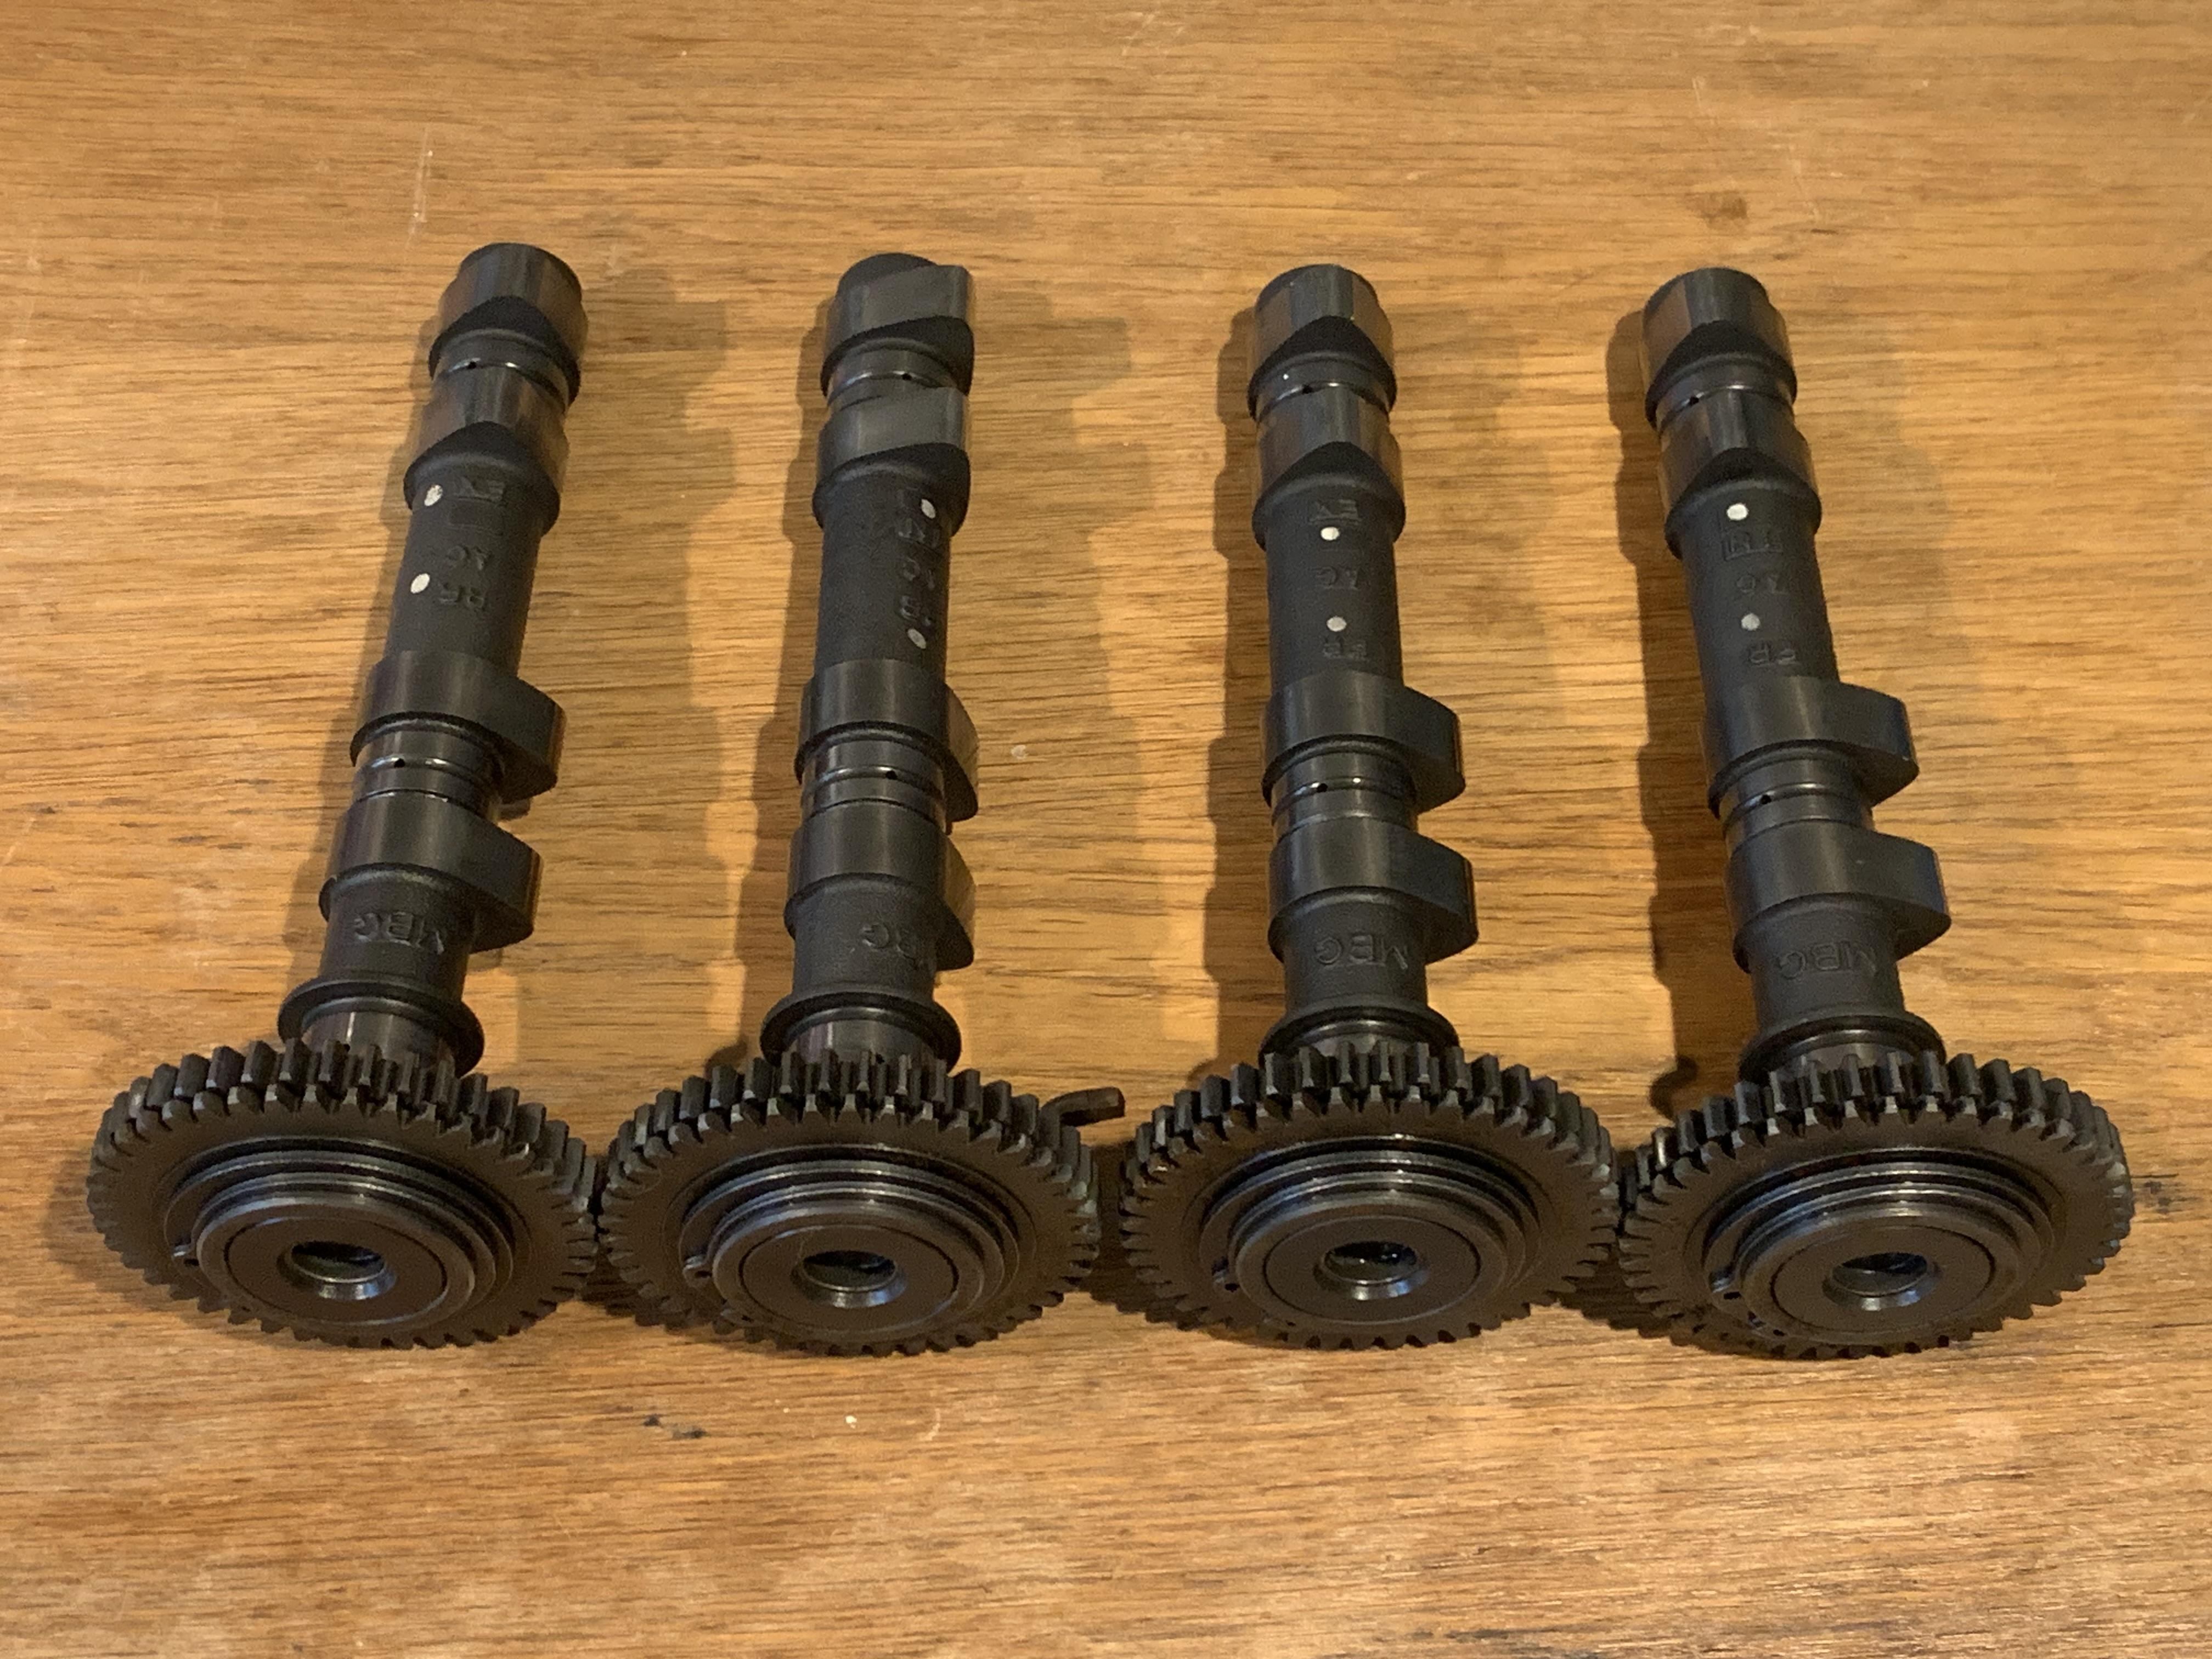
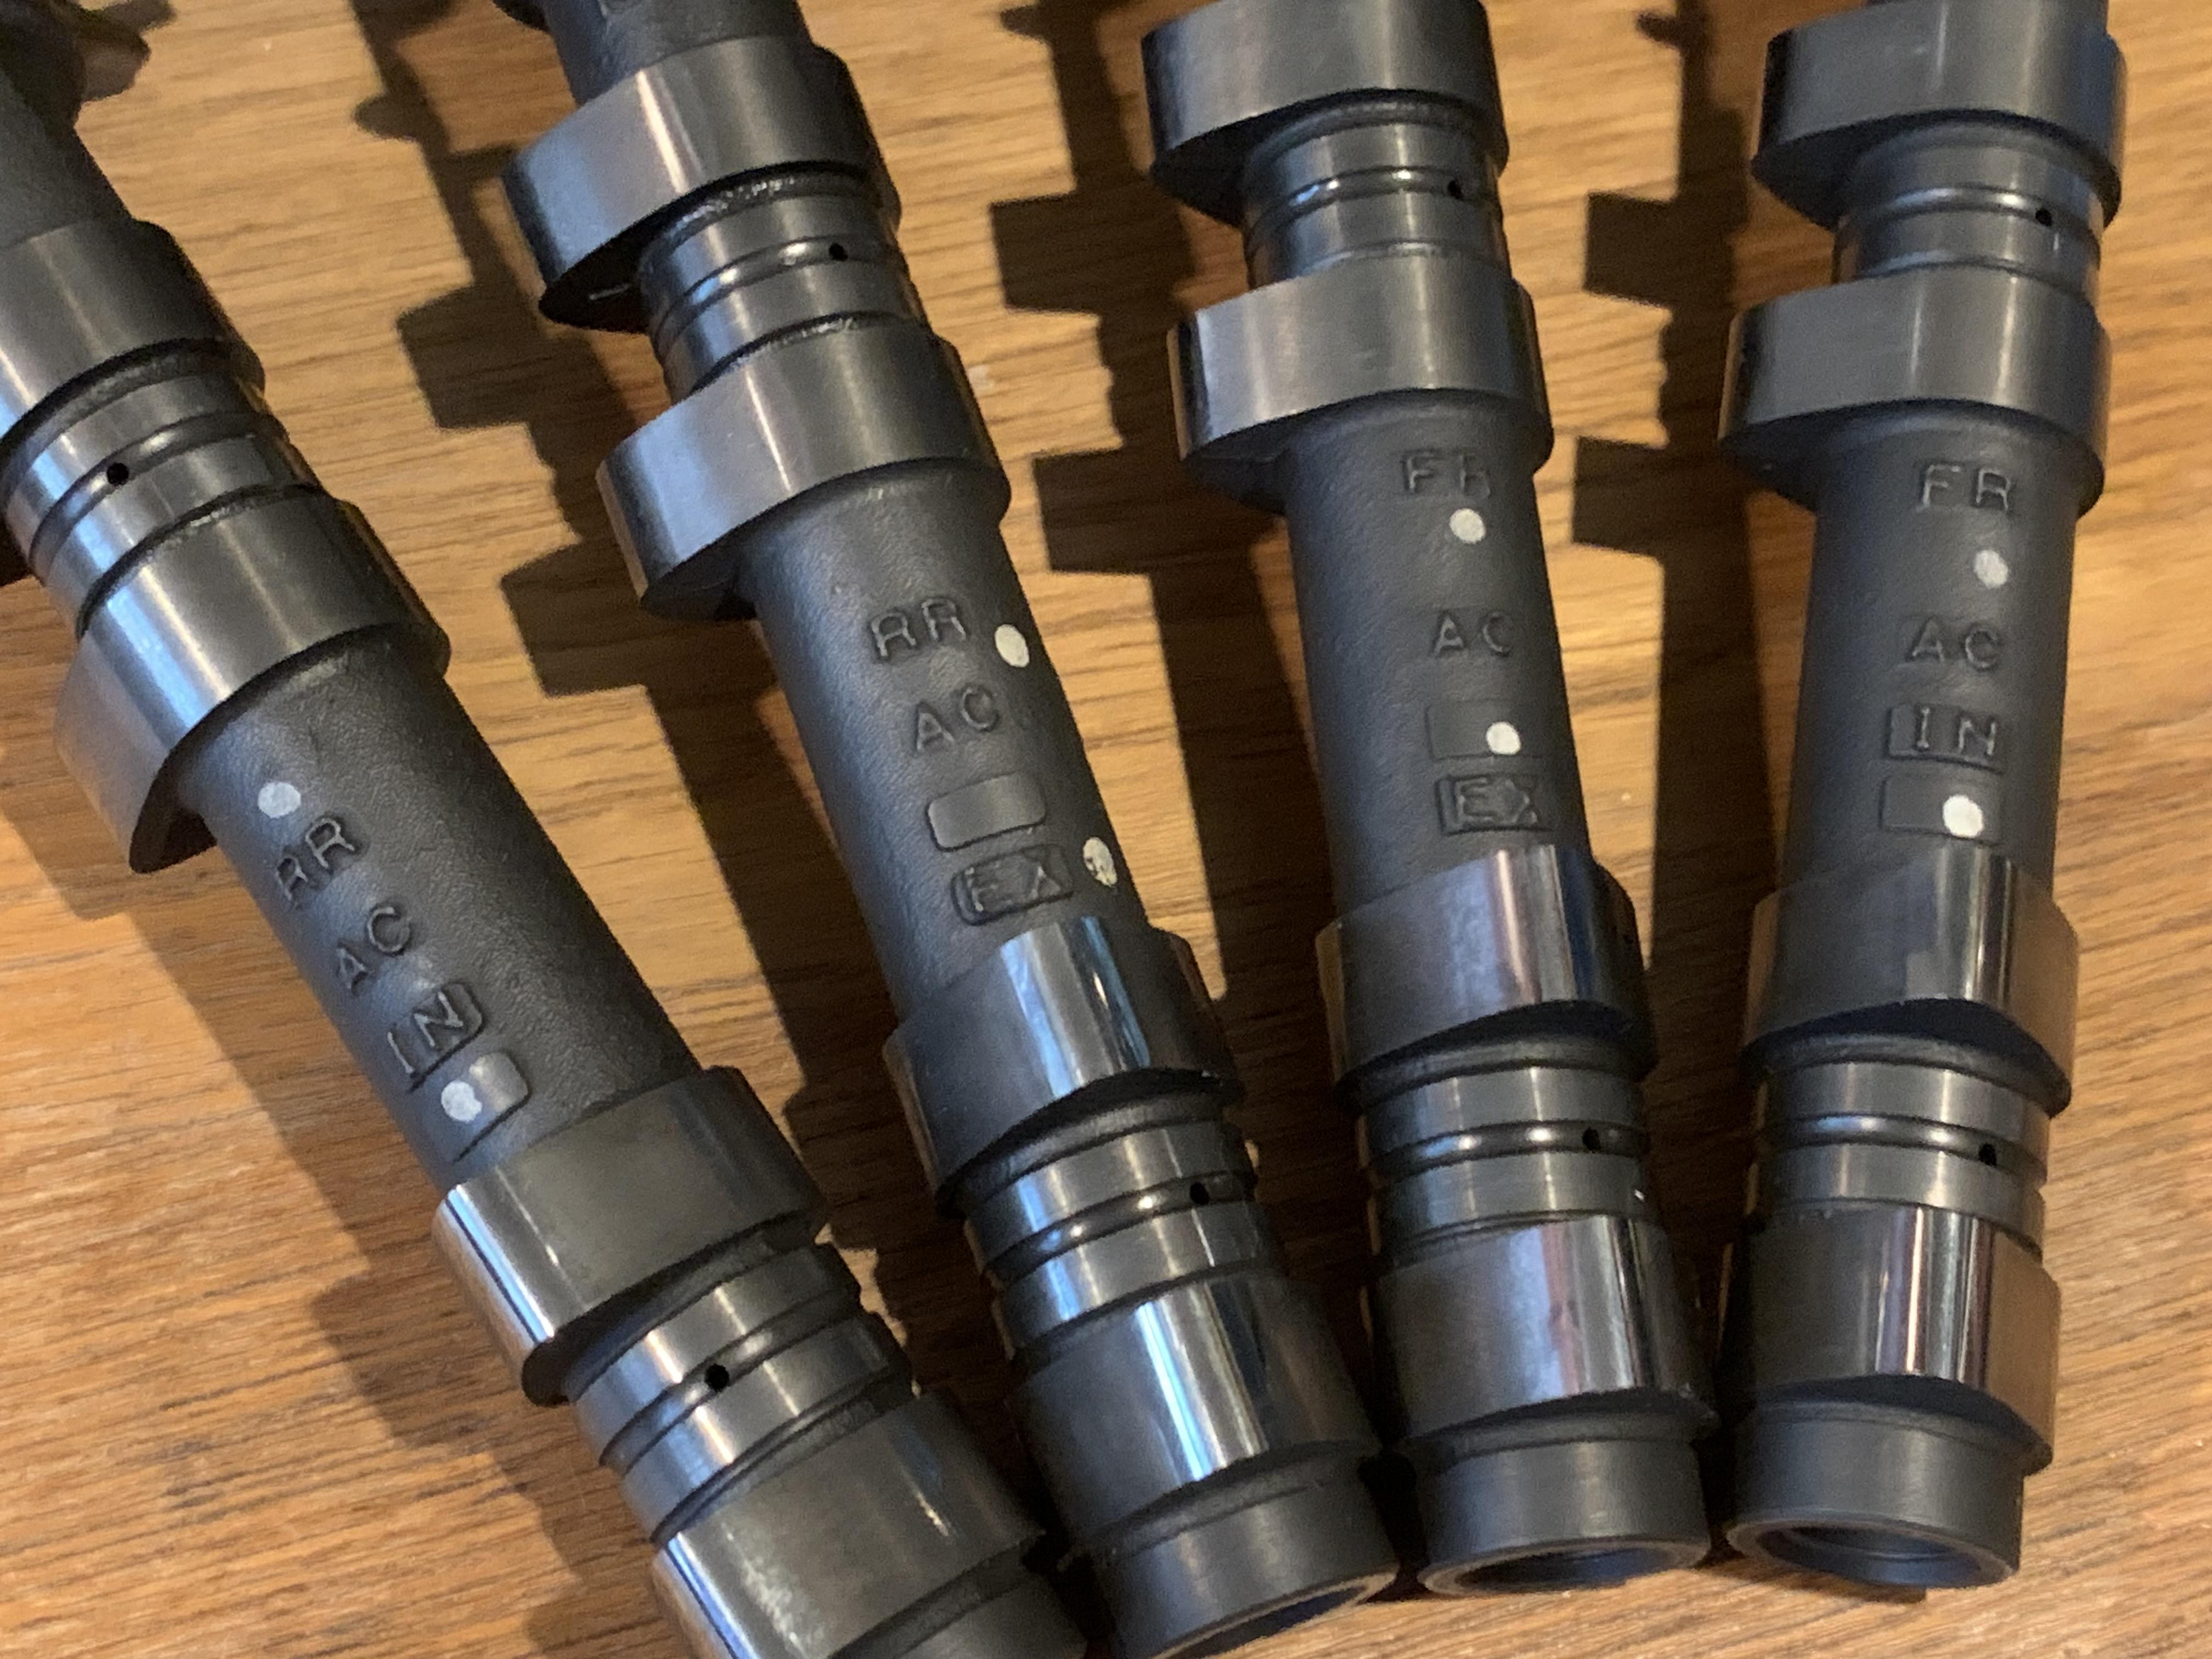
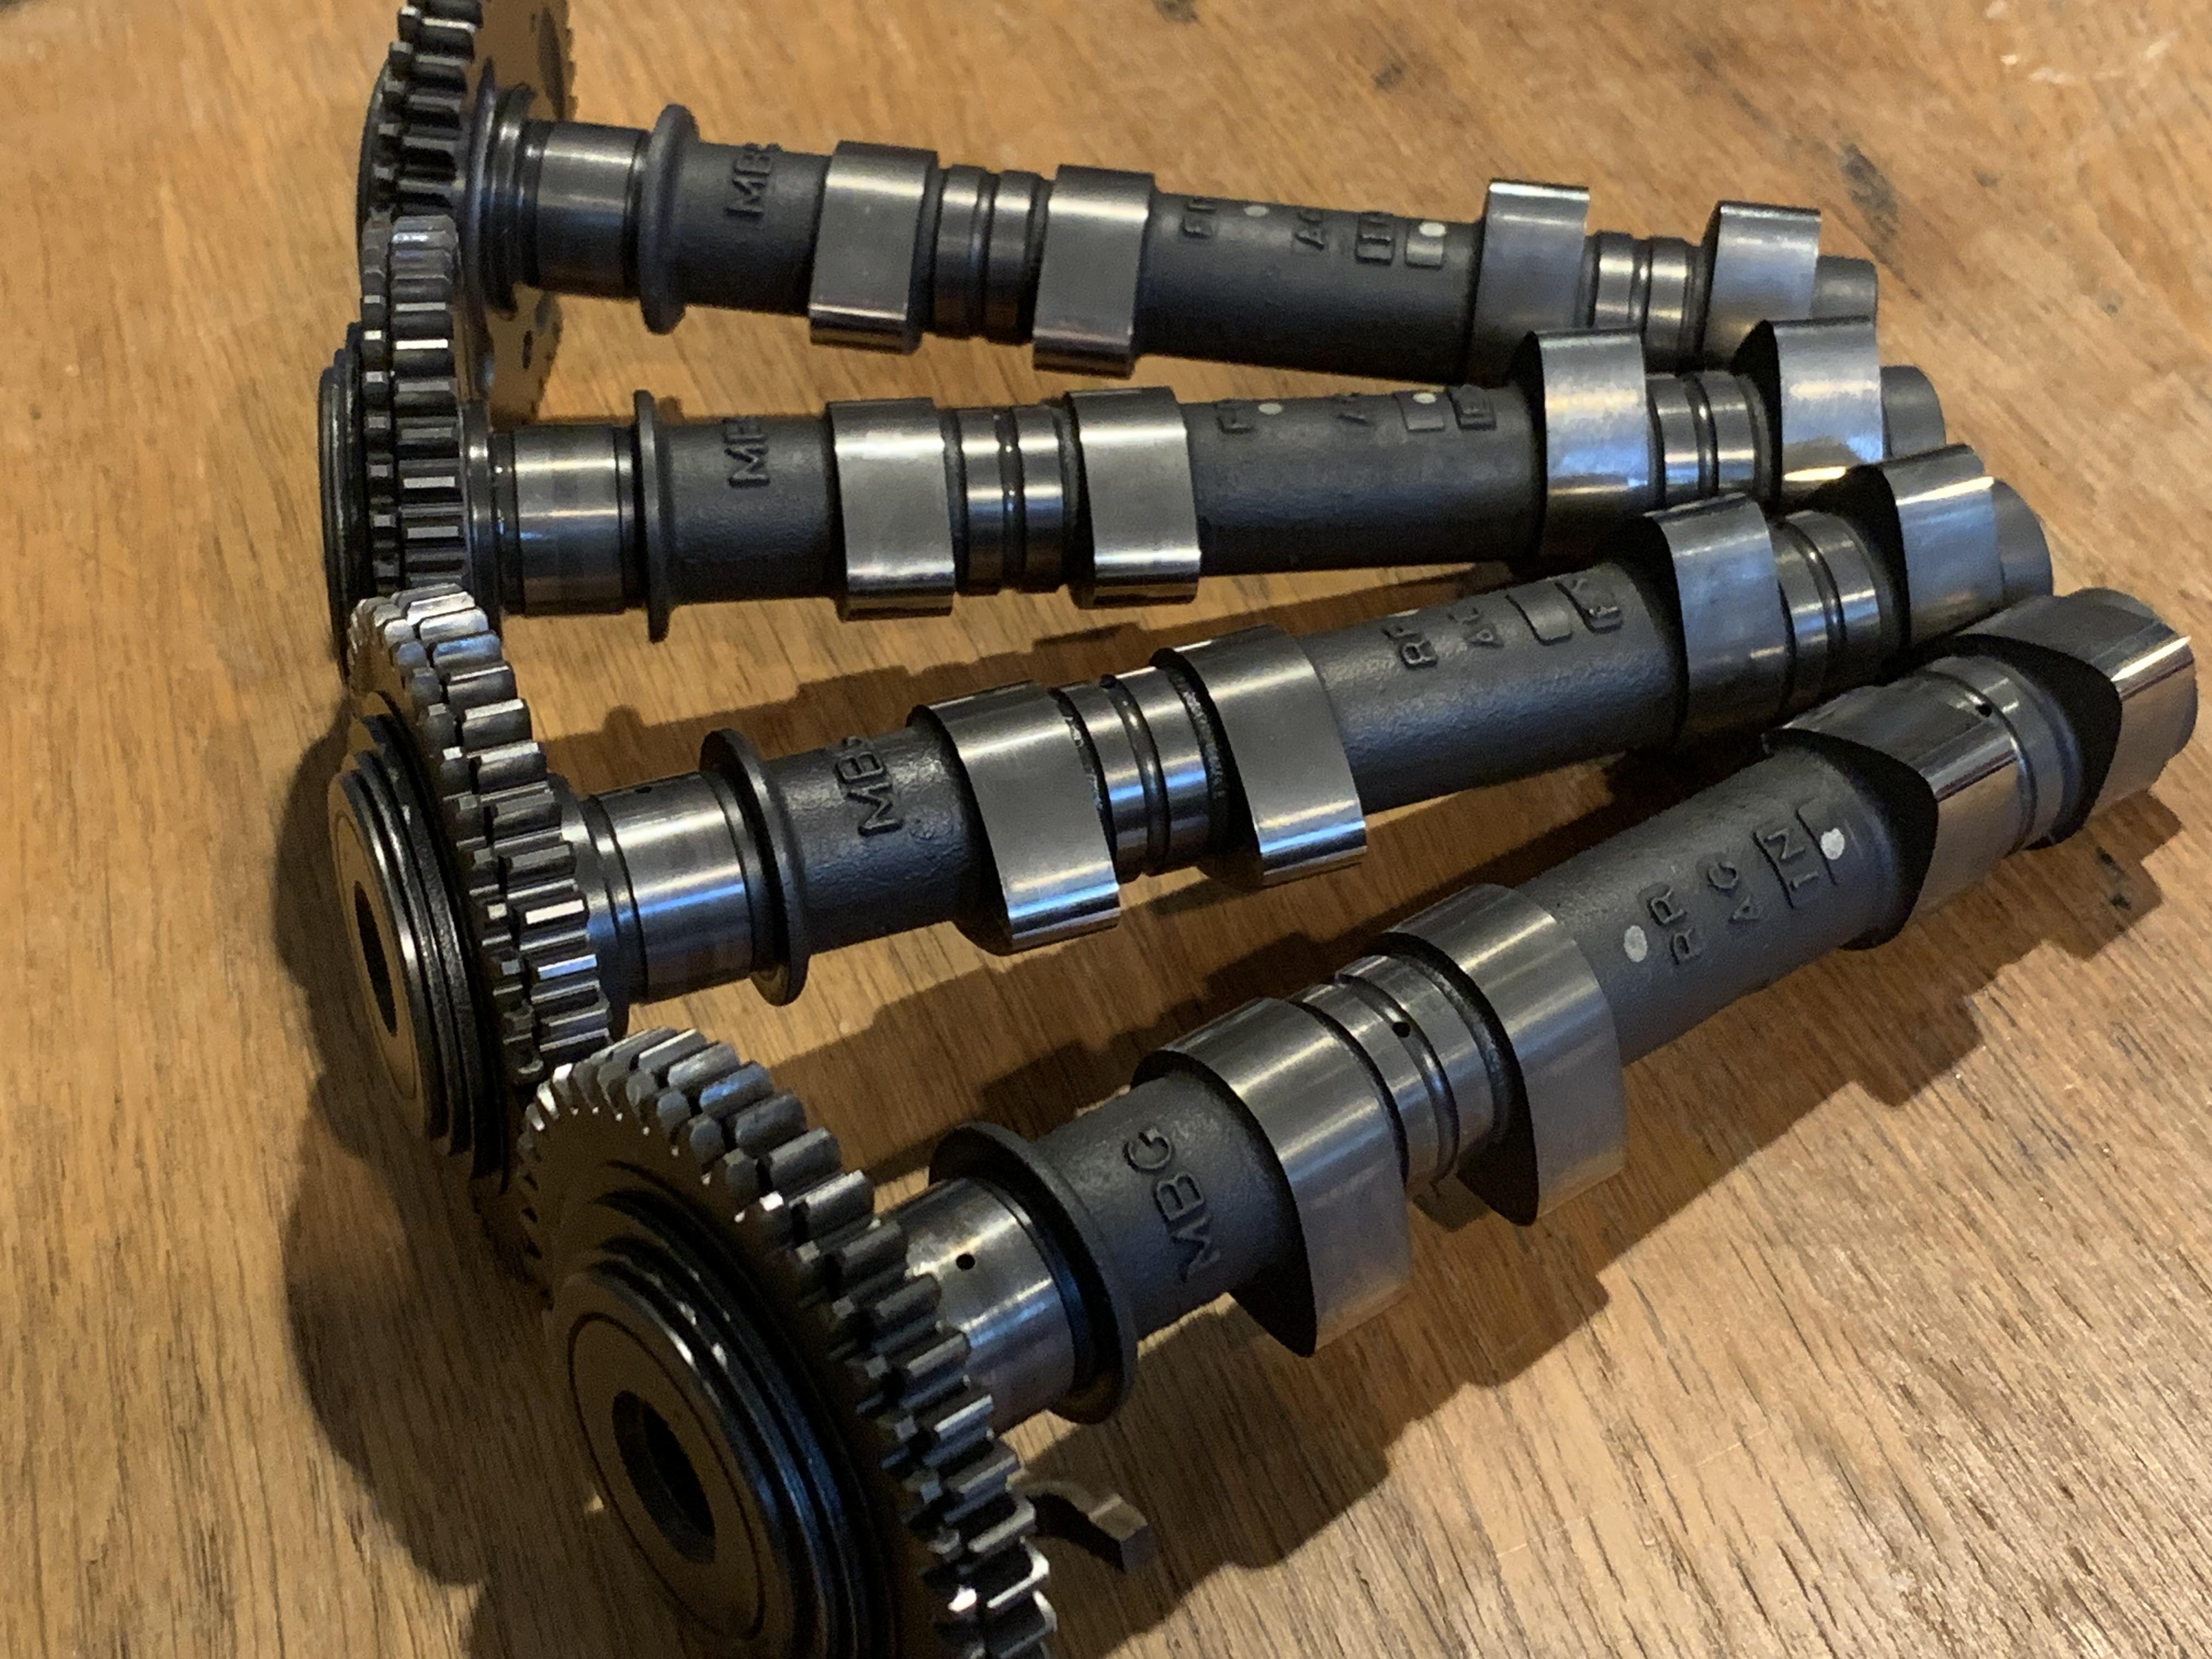
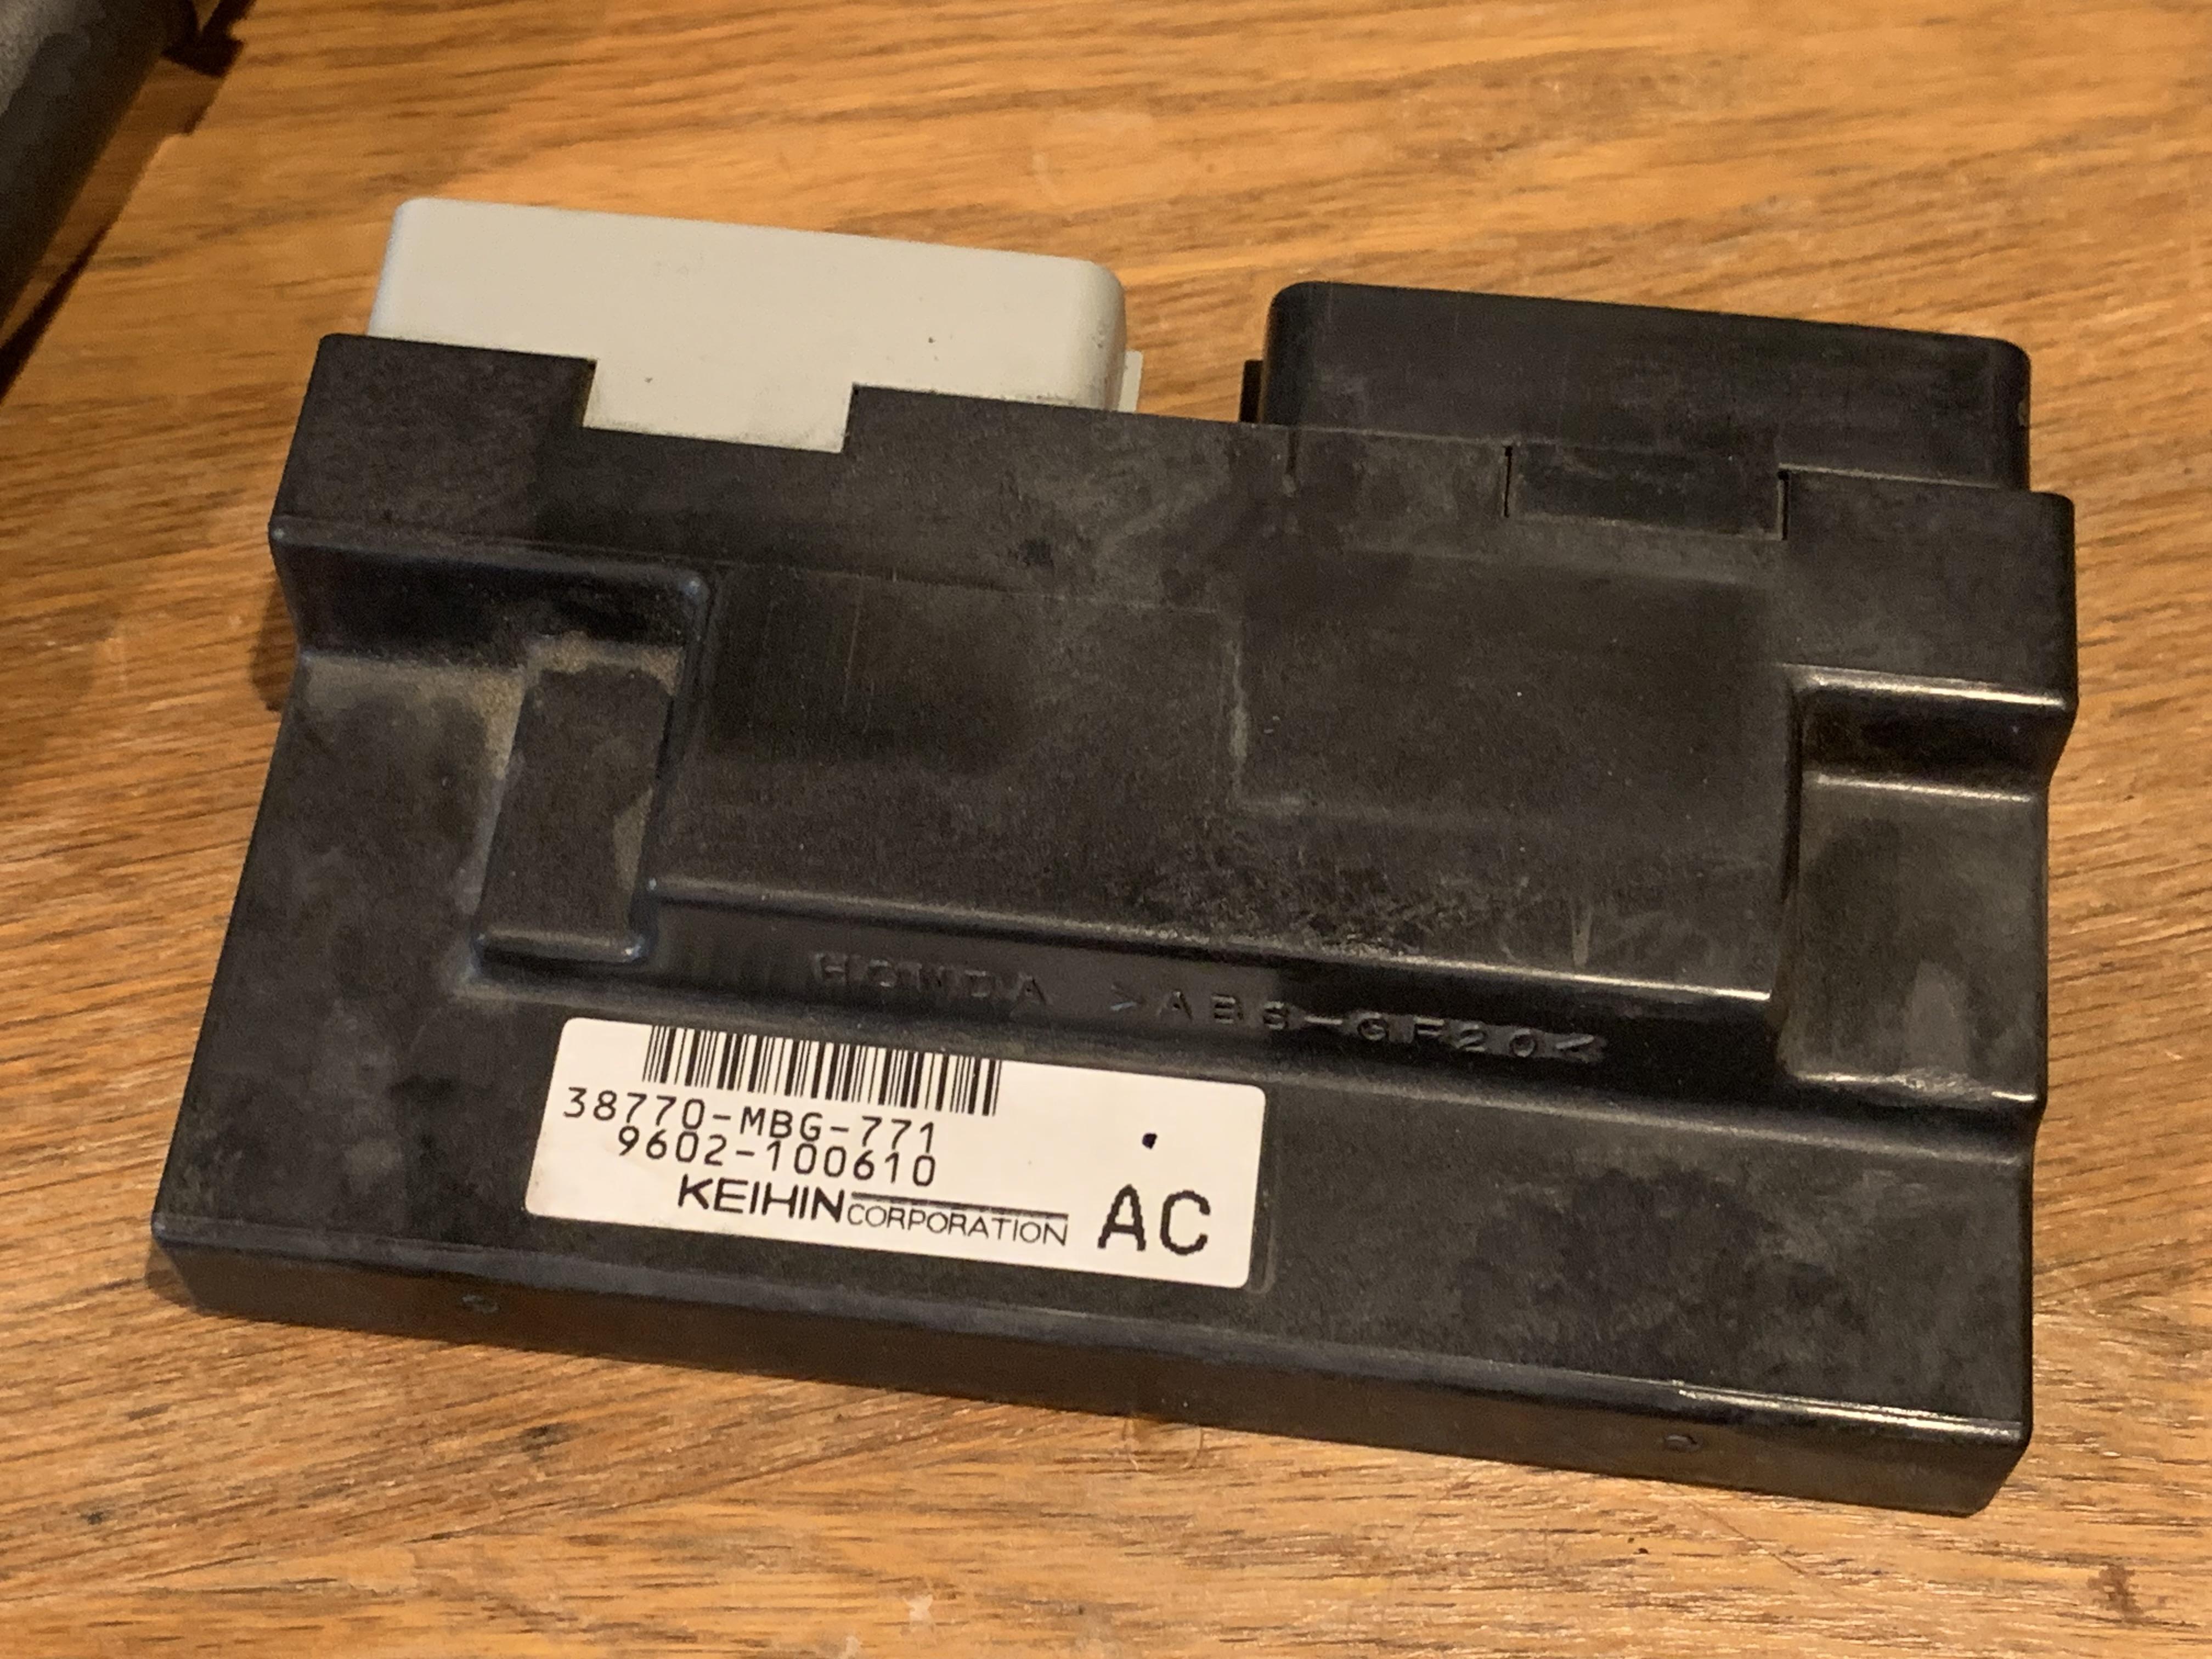
Hello, Last year I converted my 1999 VFR800 AC model to an A. AC is the California only model, and A is the 49 state model. This change only applies to the 1998-1999 bikes. In 2000 and on they were all the same. The timing in the ECU is different, as is the overall lift from the cams. I have the cams I removed and they are in very good condition. They are better than the A model cams I installed in their place. They had a bit of scoring on the lobes present which these do not. The bike had 50,000 miles on it when they were removed, proper maintenance is what has preserved them so well. There are a number of discussions regarding the differences, here is an example: The AC parts are softer, and may improve fuel economy. If these can be useful to anyone here, that’s great. I’ll ask for $100 for the cams, or make an offer. I’m located in Southern California 91304. I’ve had good luck shipping other parts to other forum members, so that can be arranged. In addition to the cams I have the ECU. I’ll ask $150 for it, and again, make an offer. Hopefully these can be useful to someone!
-
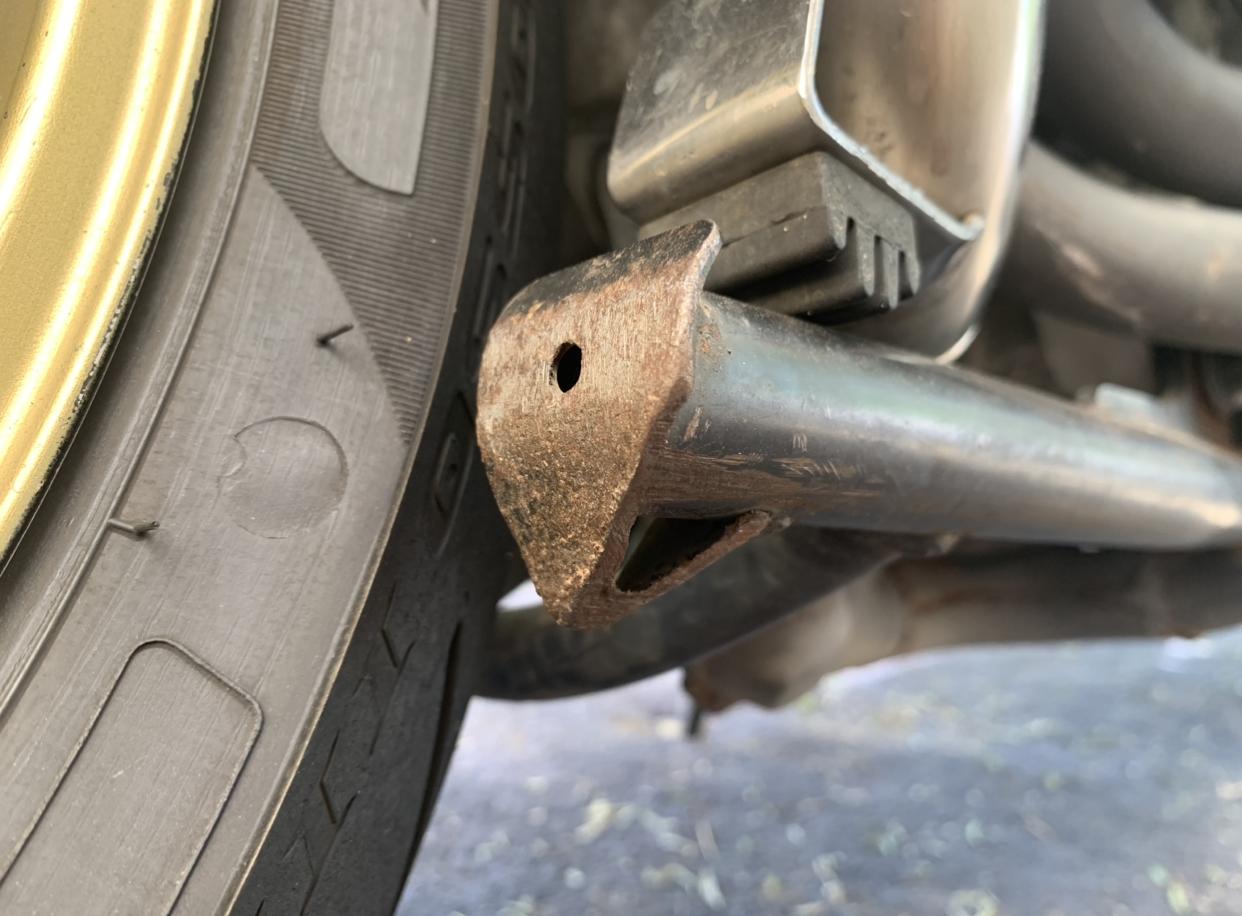
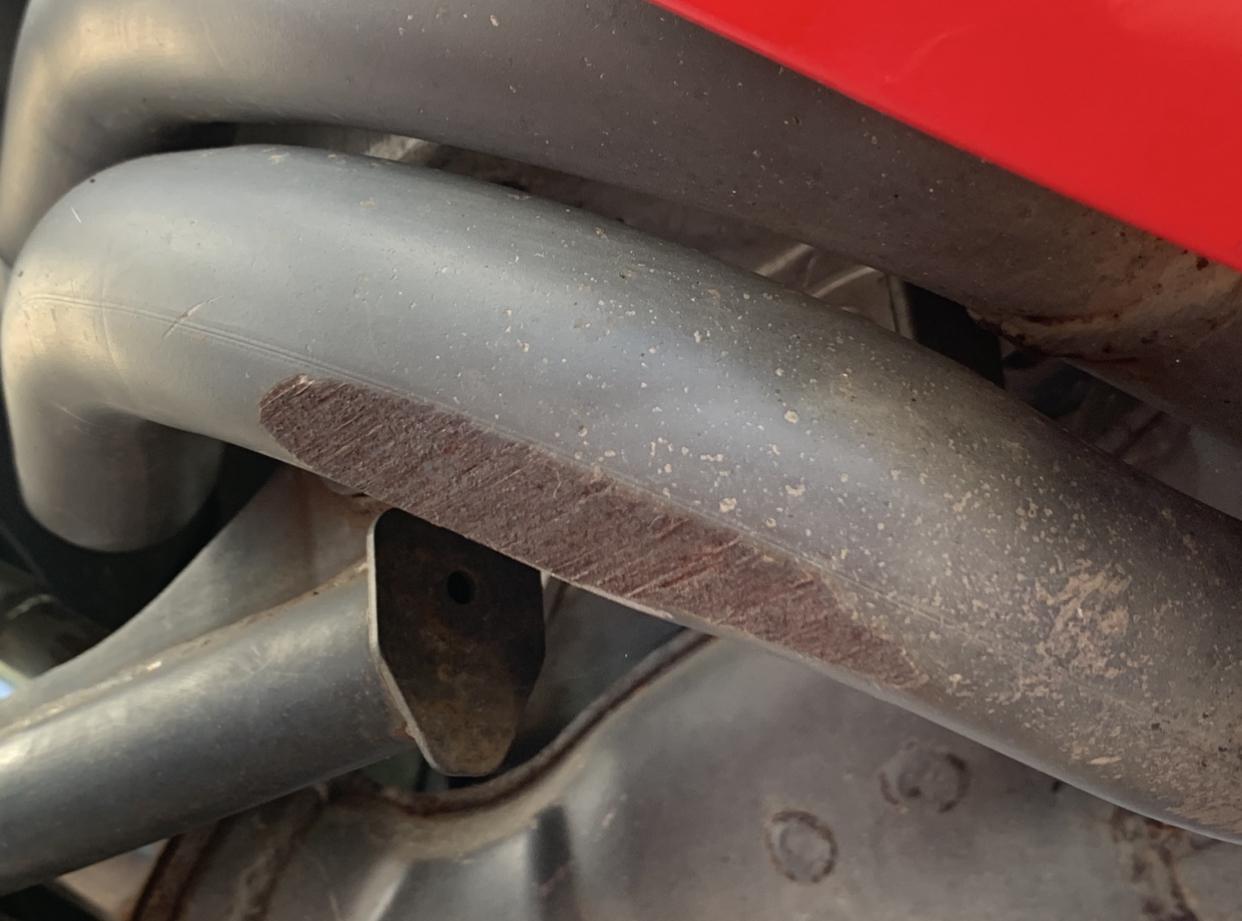
That piece looks like a sheared off drive dog. From the main or countershaft gears in your transmission. I’m used to seeing surface wear on these and issues with shifting into certain gears and getting good engagement. Having a broken off piece is something else. Do let us know…
-
If other replies come in I’m certainly curious to the answer. From what I understand, the stators in our VFR’s all have single windings. That’s the 3 yellow wires that put out high voltage AC. The rectifier portion of the R/R takes this AC and converts to DC, and the regulator keeps the voltage where it should be (around 12-14 volts) to prevent overcharging… I have a Honda dirt bike with a dual wound stator. The windings are on each half of the stator. There are two separate AC leads that could connect to separate R/R’s come out of that stator. However, running two R/R’s, the wattage wouldn’t increase. Each stator would only have half the power available - the number of windings on the stator determine this. Benefits are: if one side of the stator’s windings go bad while riding, one could switch to the other set of AC wires and continue riding without lights, as that bike has separate circuits with ignition separated from it’s headlight. I am running two R/R’s in this case, but they are small, it’s a dirt bike. It could get you home if you were stuck. Not as useful on a VFR. Plan for a tow if/when your charging system fails, and resolve it for good. To make the VFR’s charging system work well: Having a good stator with no shorts or opens and good uniform AC voltage across the 3 leads. A direct link with those yellow wires - no connectors, or a robust one if necessary. Corroded anything here won’t work - resistance means heat and that means parts failure. Get a good modern R/R. (Shindengen 847). Direct link from R/R to battery, fused, circumventing the wire harness. You’ll have a VFR that works well. Still curious if the single AC leads were to be connected to two R/R’s, and what would happen there. It certainly isn’t optimal but is a good question.
-
New 5th/6th/8th gen performance header now in production in USA
omgvfr replied to sfdownhill's topic in Exhaust Systems
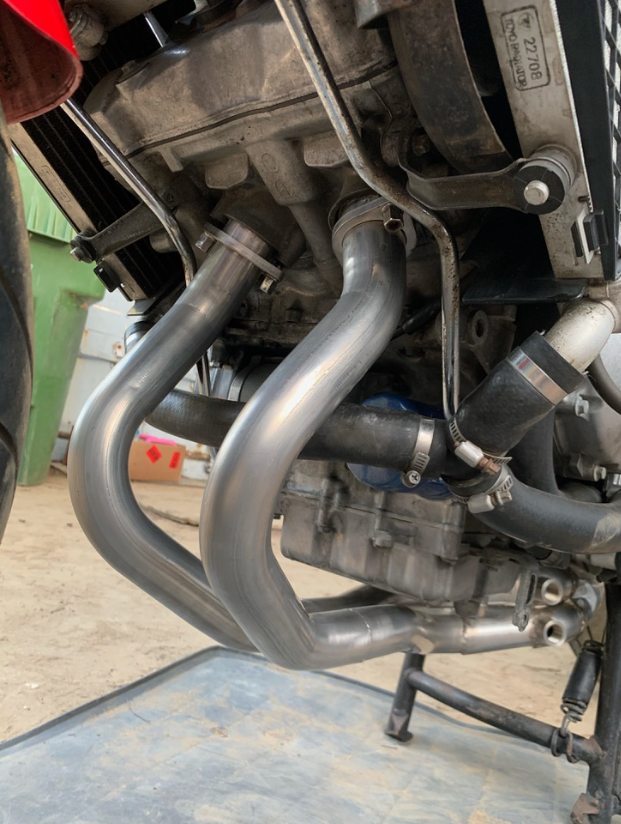
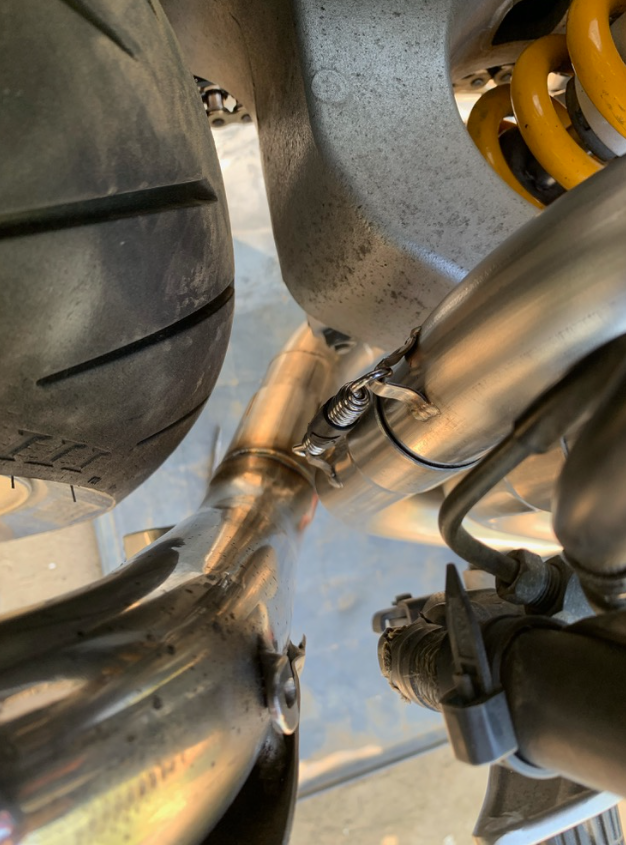
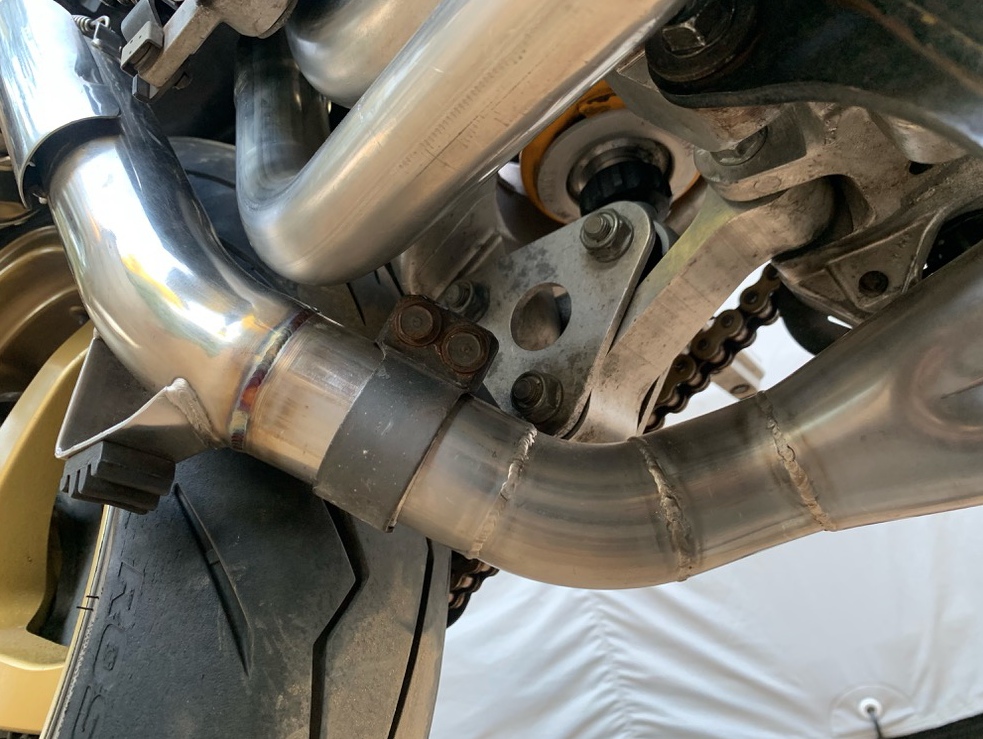
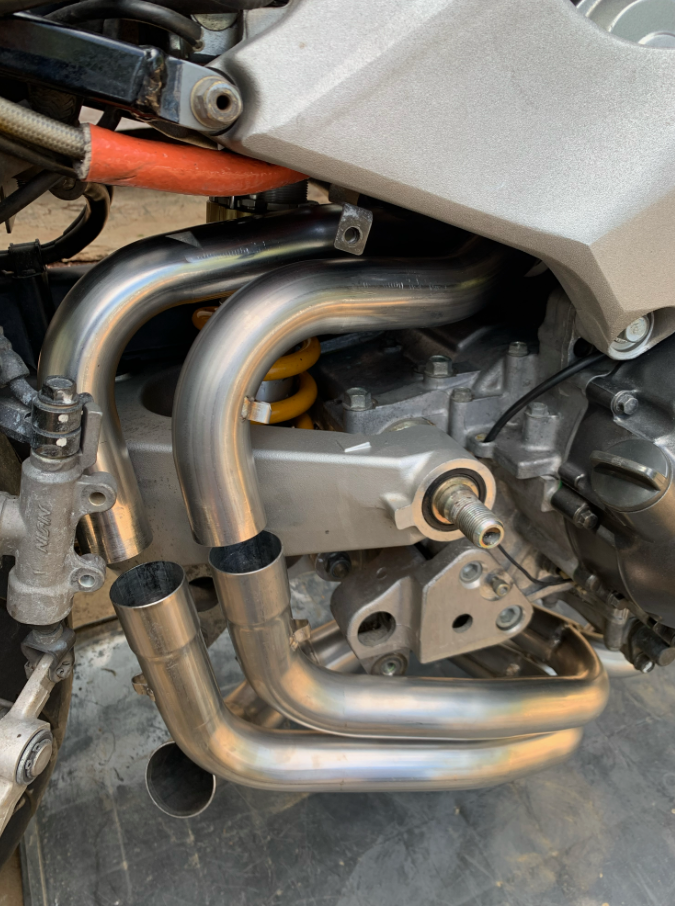
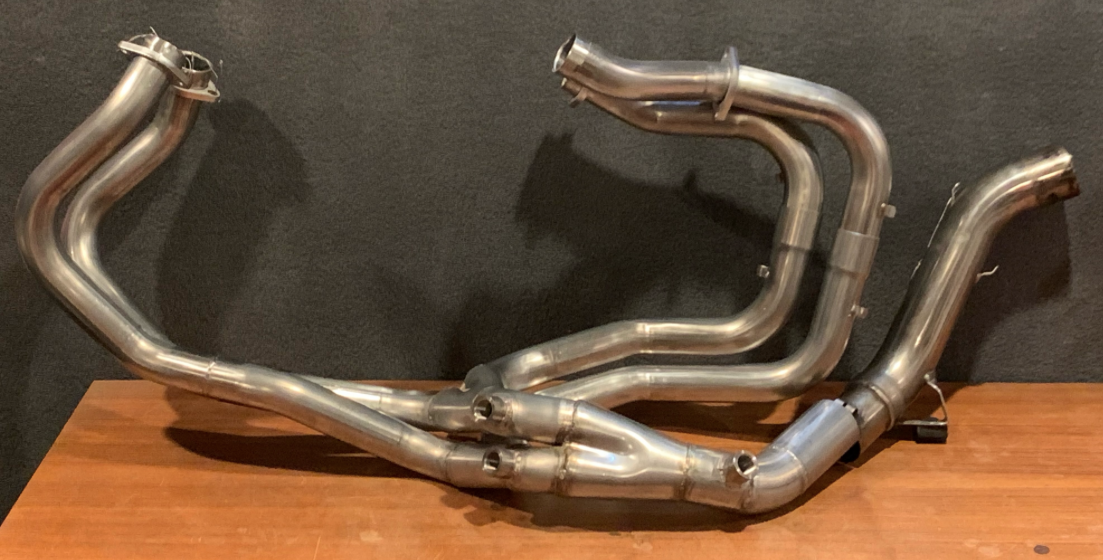
Fitting the front primaries. Fitting the midpipe. This lines up well after the welding work. Stock exhaust clamp now in use. A big plus: The midpipe can now be removed without first removing the rear wheel. Taking a look at how it all comes together. This is really nice. I've ordered three M18x1.5 o2 plugs. Everything else goes back together as normal. Note: Even if the rear primaries are slip fitted together and the header is in one piece. If you need to install or remove the centerstand it can be done by removing the header bolts at the engine. There is then enough flex to access the top right bolt for the centerstand. A parts diagram shows the assembly order of the spacers, flat and spring washers.
-
New 5th/6th/8th gen performance header now in production in USA
omgvfr replied to sfdownhill's topic in Exhaust Systems
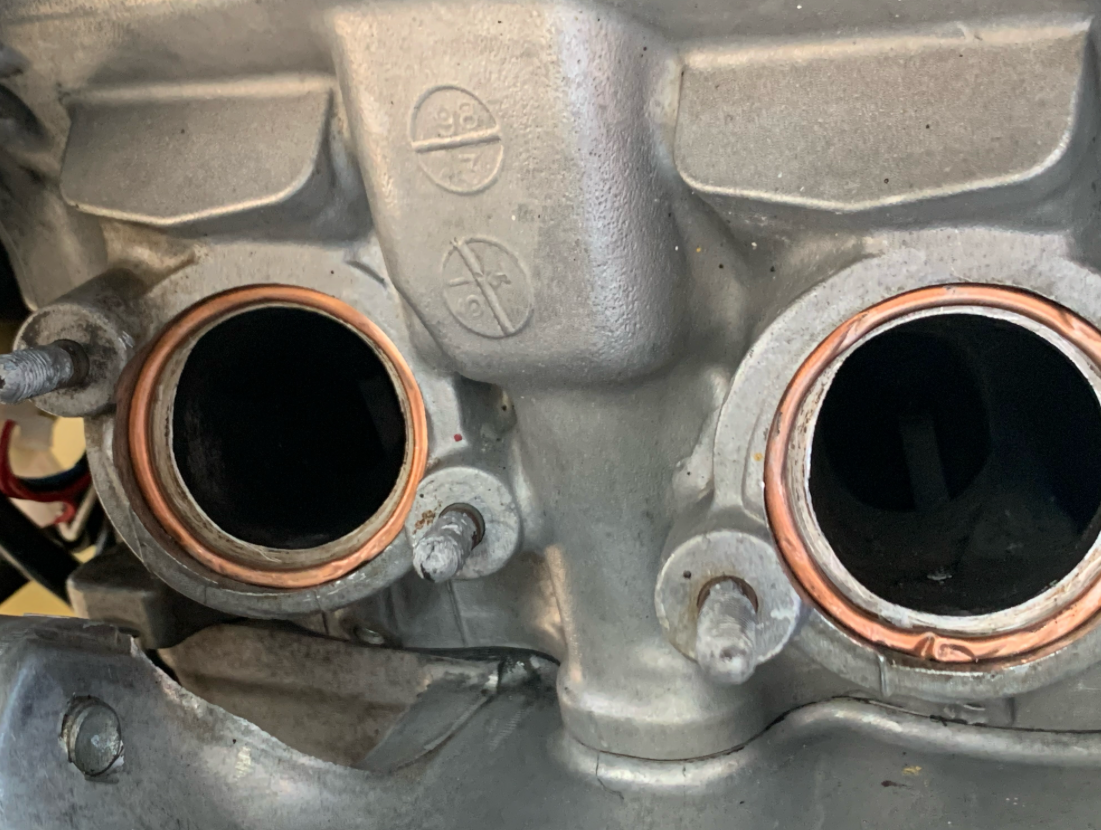
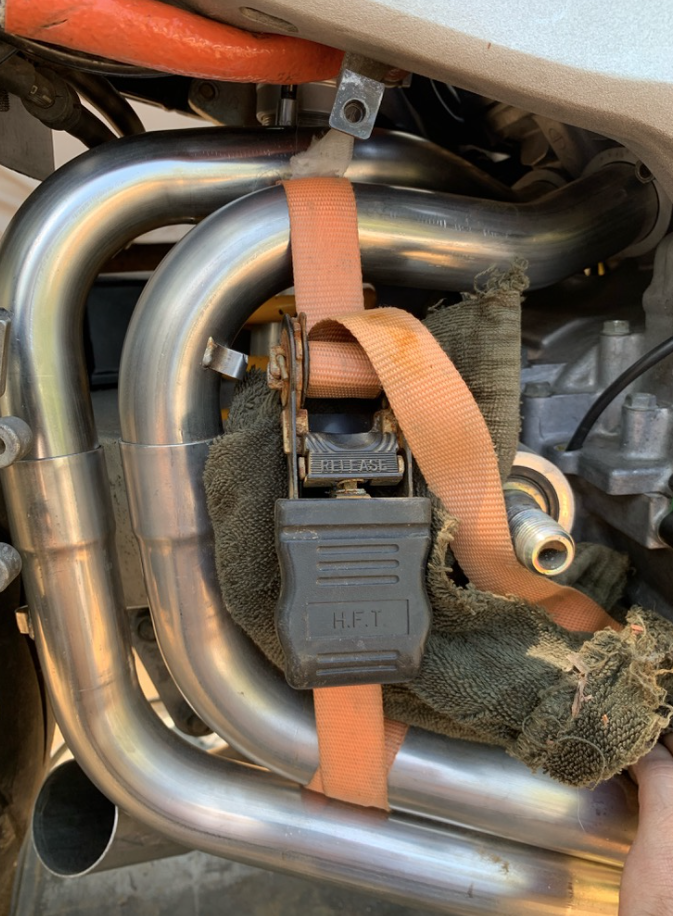
Removing the stock system is pretty straightforward. Remove tail plastic, remove rear wheel, remove Remus can and link pipe. Remove front fairings, loosen right foot stay, remove heat shield. Header bolts all loose, rear primaries disconnected, and the stock system shifts out just fine. Once the bike is back on the sidestand the centerstand can be removed. The bike certainly looks good with all of this stuff out of the way. I also cleaned up surfaces while the access was there. With everything ready, the first step was fitting the Delkevic copper gaskets. They're just a little big - but this is a good thing once all is assembled. You can see that the ring wouldn't just fit but needed a little manipulation to sit centered. My initial reaction was - oh no! Spend the time to make the entire gasket centered in the exhaust port. I noticed on the front ports there is some chipping of the external casting. Once fitted they stay in on their own and don't fall out unless disturbed. Looking at the rear ports, here are the gaskets fitted. I was told that the left rear primary slip joint was a tight fit. This is true - I had test fitted these before they went on the bike. The right slips on easily enough, while the left was quite tight. Wiggling and slightly twisting, it does slip on all the way though. Same thing removing the slip fitting. I put a marker dot on the slip fittings as an index, so I could tell when it was fitted all the way when on the bike. With the rear primaries loosely fitted and the same in the front. Here is the view before joining the slip fittings. A bit of strength to align these while lifting the header up, both began their slip fit. A moment of manipulating by hand and they fit as much as they would go. Out comes the ratchet strap with a piece of cloth to protect the surfaces. I squeezed the left joint first and then the right. Once the strap was pulling, light taps on the slip joint pulled them right into place. This was surprisingly easy considering how tight this appeared while test fitting. After these joints were fitted, the remaining 4 points attaching to the bike all lined up where they should. Very nice!
-
New 5th/6th/8th gen performance header now in production in USA
omgvfr replied to sfdownhill's topic in Exhaust Systems
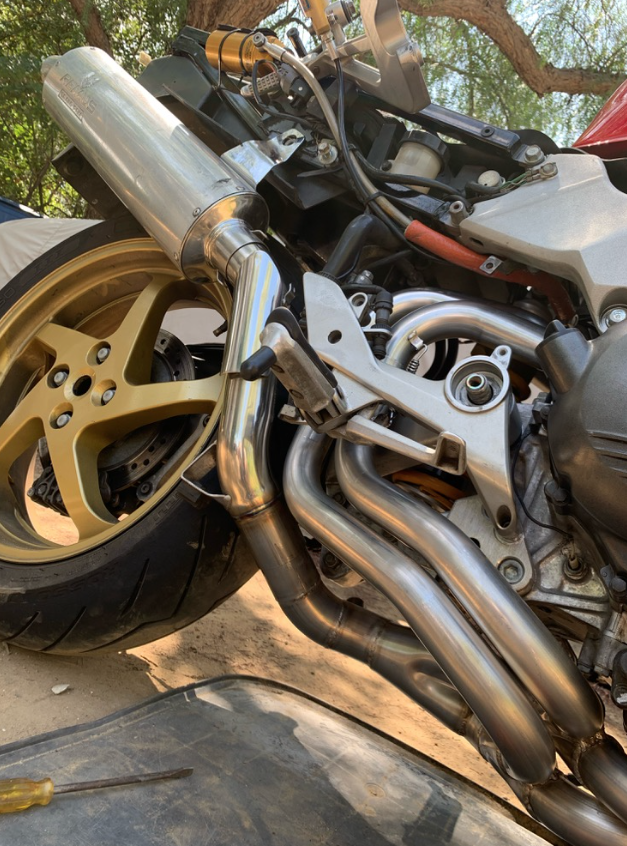
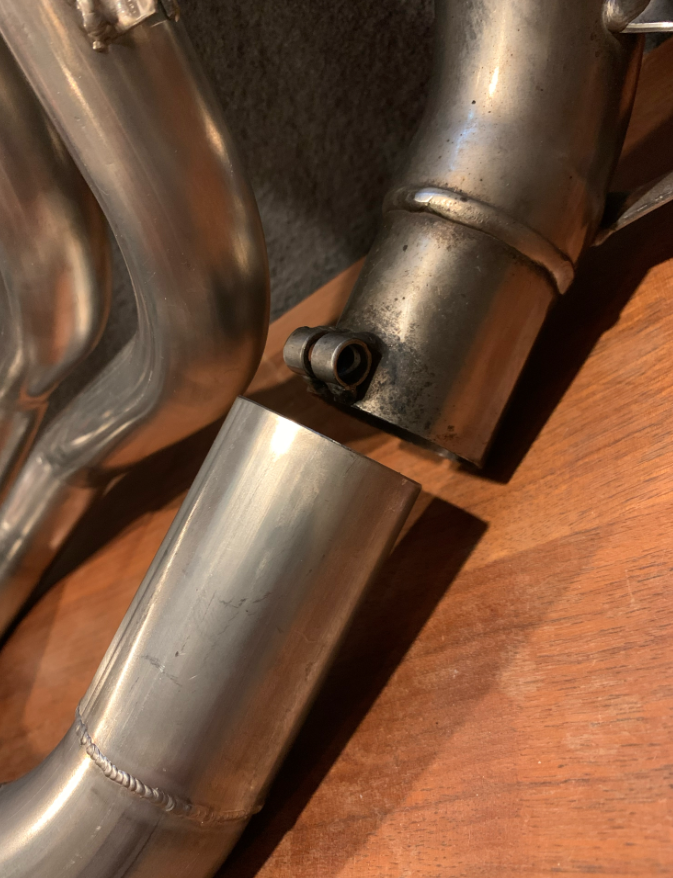
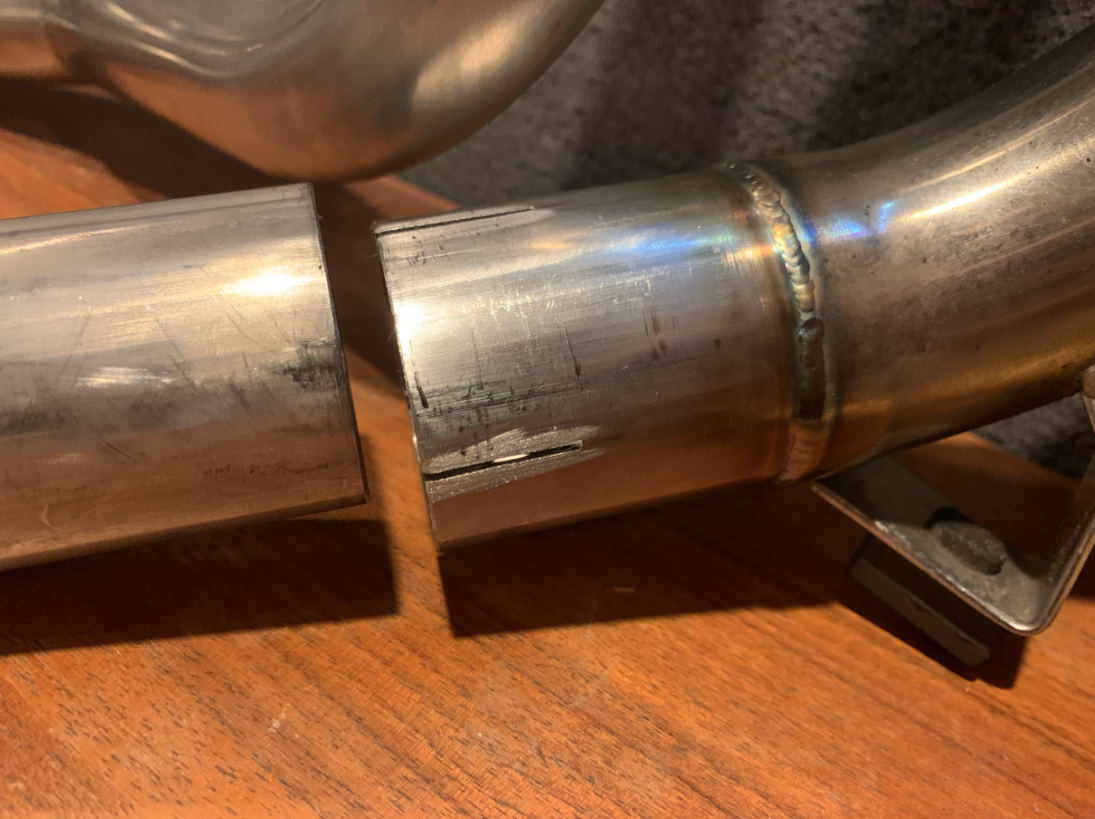
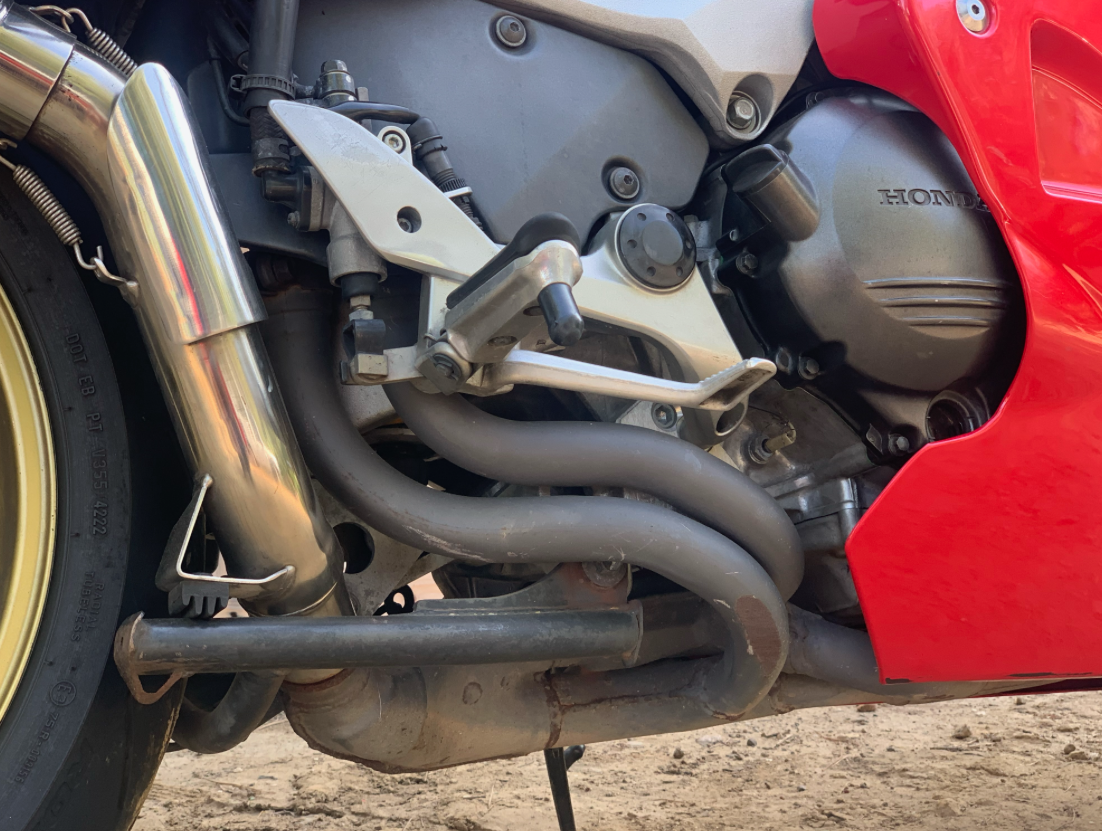
All right, it's that time! I recently acquired my set from the latest run. The very good news is everything is working as it should! I've just finished with the install and I have some photos to share. 😁 Here is my pair. Right now the rear primaries are just balanced in the slip fittings. I have a Remus high mount can - the link pipe is balanced where it should be. The Remus link pipe does not utilize the stock exhaust gasket. It has a built-in clamp. This is actually a very tight fit on the stock exhaust outlet. The diameter of these pipes are about the same. The muffler end of the remus link pipe would slip on as it should here. I knew this part would need to be addressed before the install. The first welding shop I went by was a fabrication specialist, I showed them what I was working with. They didn't have expanders or tubing material there and I was referred to another local shop. The second shop has cars parked inside and custom turbo header projects everywhere. This was the right place. The first attempt was to just expand it as is - the metal promptly cracked and tore open. He confirmed I do have a clamp that would work. A moment later, the end is cut off and there is a new piece of pipe that slip fits being welded on. These now fit properly and everything is clean inside and out. This aspect of the project could have gone many ways. I am very glad it worked as well as it did. It's a pretty weld and is the most visible one so good there too. Here is the starting point. The bike is a 1999 model. It hasn't been down before - the scrape on the stock header is from lean angle.
-
Center stand and mid pipe hitting ground
omgvfr replied to Clintonjl's topic in Fifth Generation VFR's
I also have a 5th gen, and drag both of those areas in the same conditions you’ve described. I have the Ohlins shock installed out back which is lifted an additional .75” at the top shock mount. I pay attention to chain length and rear hub positioning as it affects rear ride height, although this changes with wear. The Ohlins has a preload adjuster and I do max this out for passenger riding. I ended up using a file and softened the edges on the lowest part of the center stand where it drags. The right side is definitely more worn than the left. I don’t know when I’ll wear a hole though the stock 5th gen headers… I am in the group buy for the VFRD headers and hoping I won’t be touching down in the same spot. I am riding very quick to make this touchdown happen… To me it’s a cue to start hanging off a bit more to decrease the lean angle… add a bit more throttle and the bike really seems to like it. Decrease the pace and that solves it too. I’ve considered removing the centerstand but I’ve also had a flat with this bike where it would not stand on the side stand. The centerstand was the only way to keep bike upright waiting for a tow. Anyway, just sharing that it isn’t just you.
-
New 5th/6th/8th gen performance header now in production in USA
omgvfr replied to sfdownhill's topic in Exhaust Systems
Post questions here. There also is a PM that goes out with info on deposit and payment info. -
New 5th/6th/8th gen performance header now in production in USA
omgvfr replied to sfdownhill's topic in Exhaust Systems
I sent an inquiry and heard back. The good news is the group buy is still going through and we are close to our 15. Also, the 42mm gaskets are back in stock. $32 shipped for the order. I'm picking up in preparation. https://delkevic.com/copper-gasket-42-mm/ -
New 5th/6th/8th gen performance header now in production in USA
omgvfr replied to sfdownhill's topic in Exhaust Systems
This group buy is still in progress… I am one of those who has a deposit down. Any ideas going forward? I’d really like to make this still happen. -
I had this problem recently with my 99 model. Rocking the red kill switch back and forth did not make the fuel pump prime. This was after a break from an afternoon of riding and was time to go home. The FI light remained solid. I got a tow home that day. The next day I followed the service manual’s troubleshooting flow. The relevant fuses were OK and relays were OK. The final step was “replace ECM”. I unplugged and replugged the ECM. Immediately the fuel pump started working and has been working since that point. This won’t solve your problem if the fuses & relays need attention. For me, the signal to tell the fuel pump relays to prime just wasn’t there, and reseating the connection fixed it.
- 3 replies
-
- 1
-

-
- starting problem
- ignition
- (and 1 more)
-
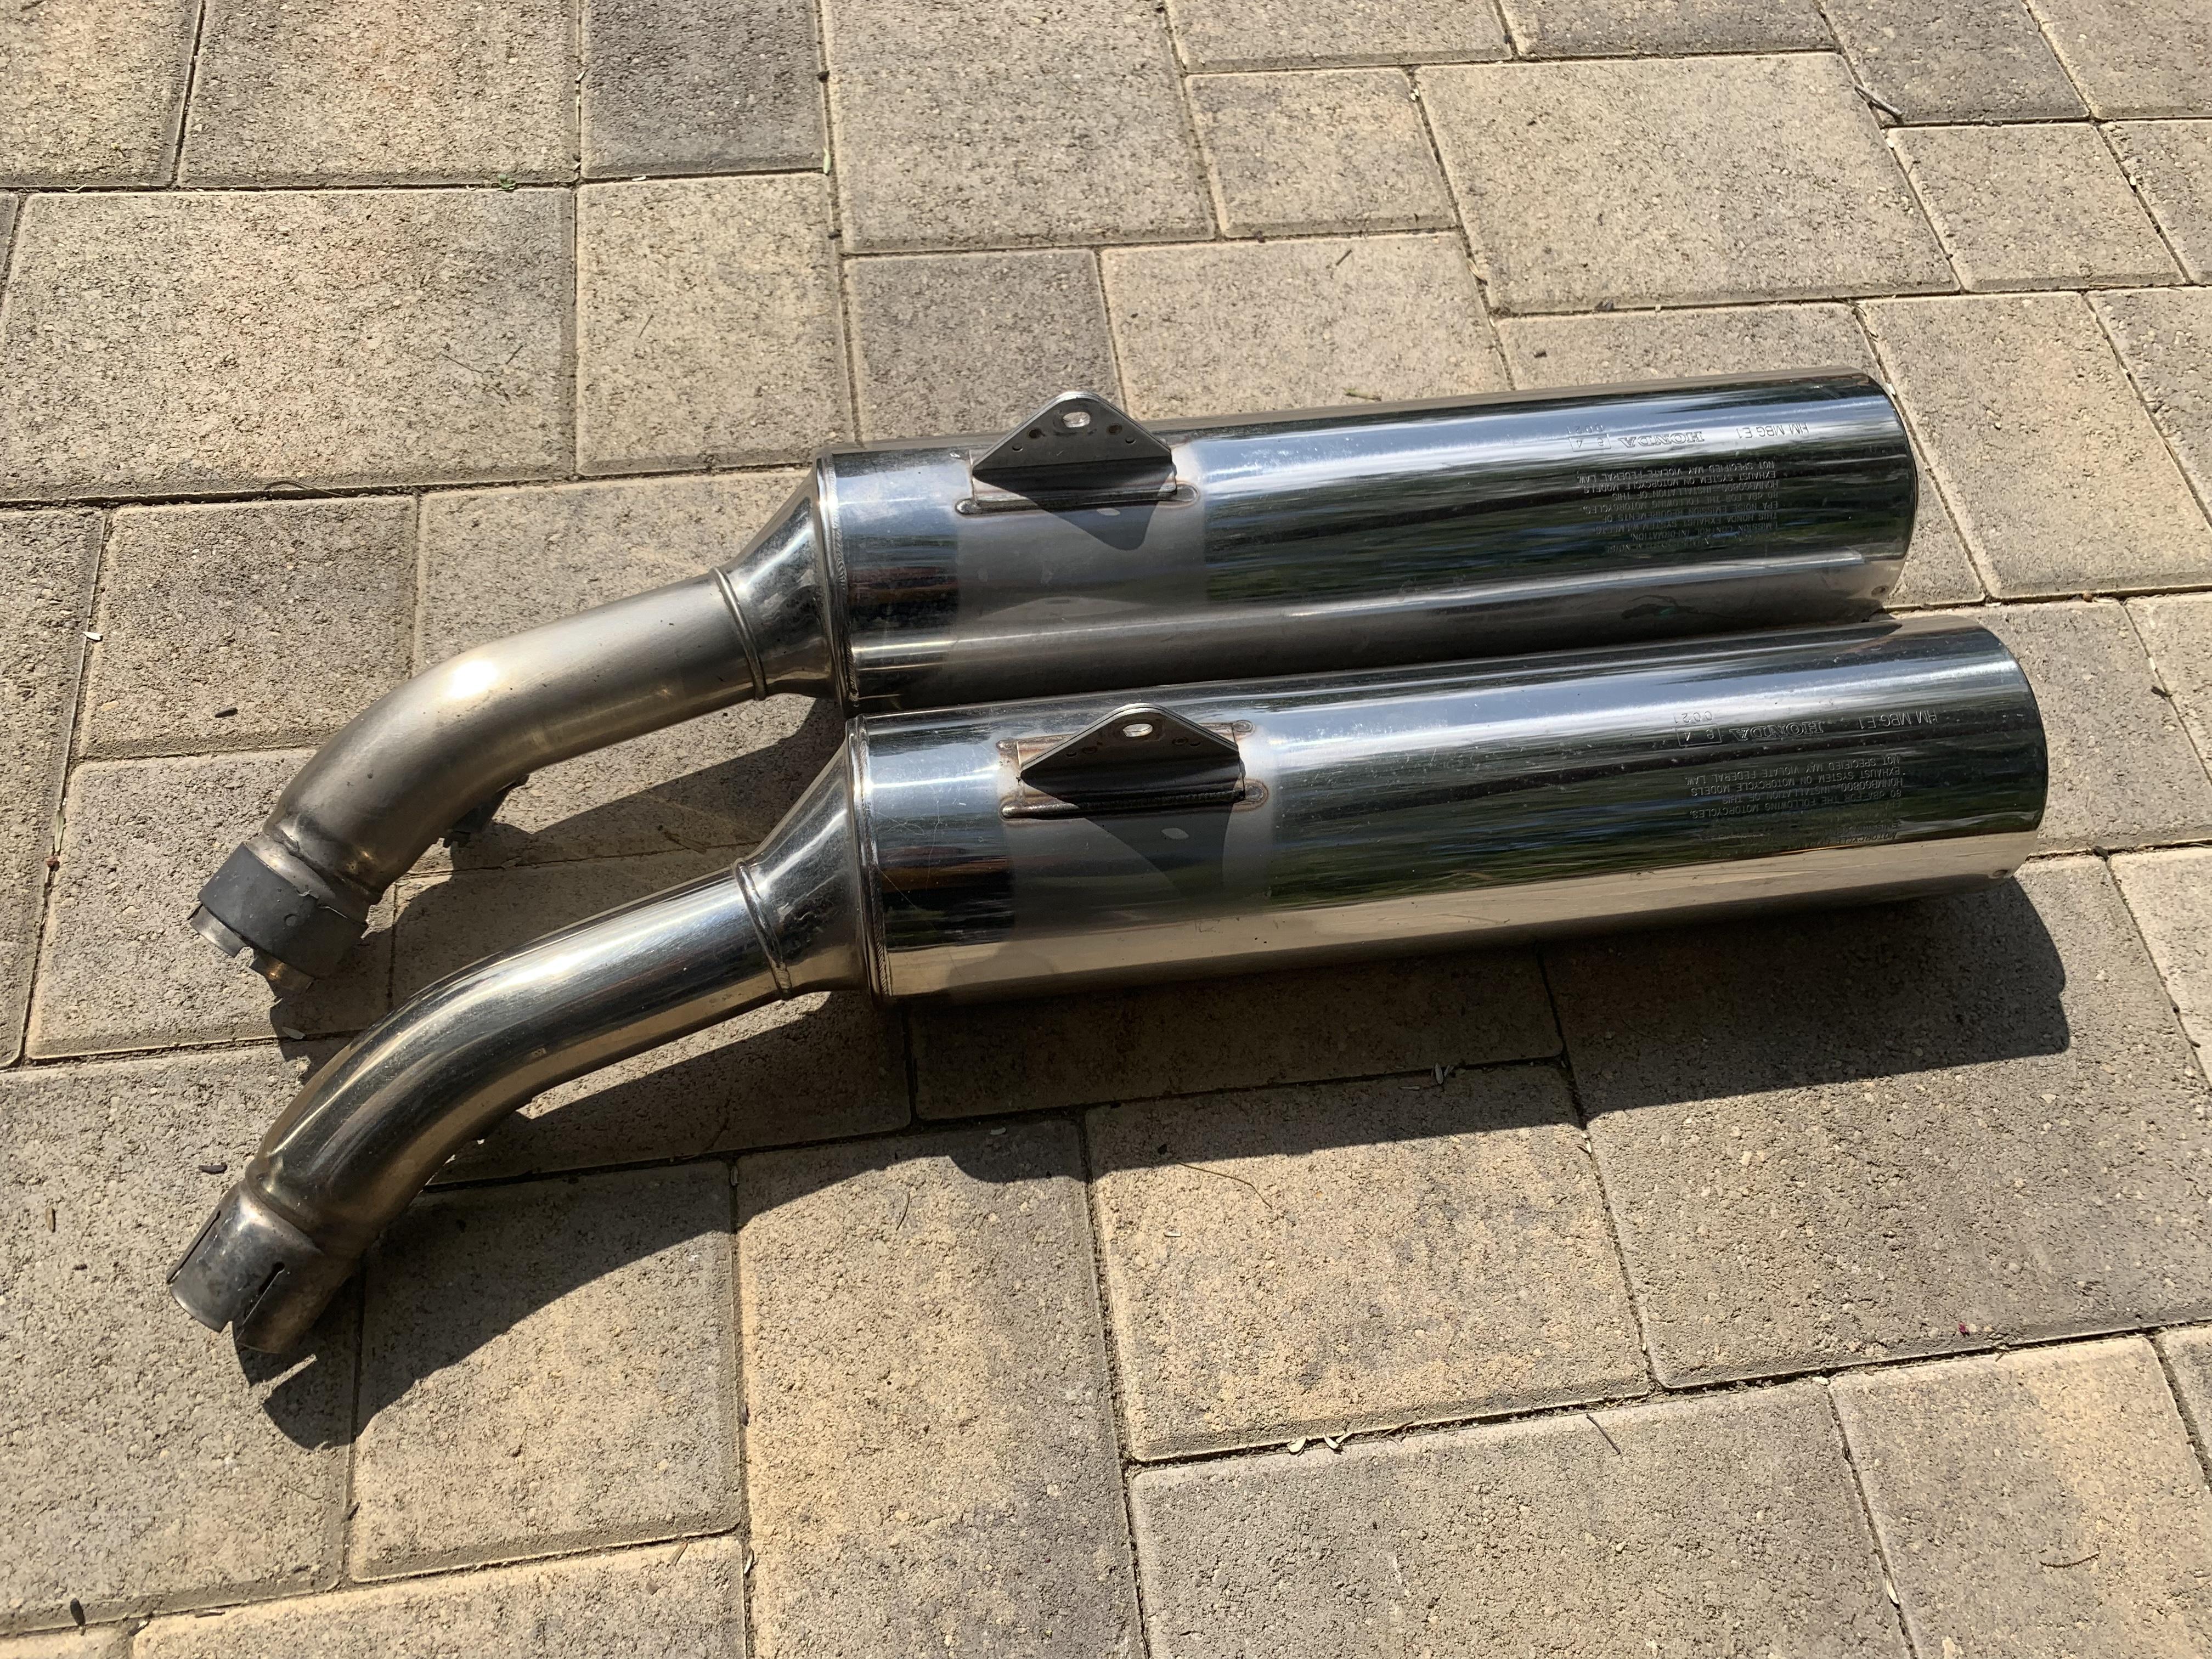
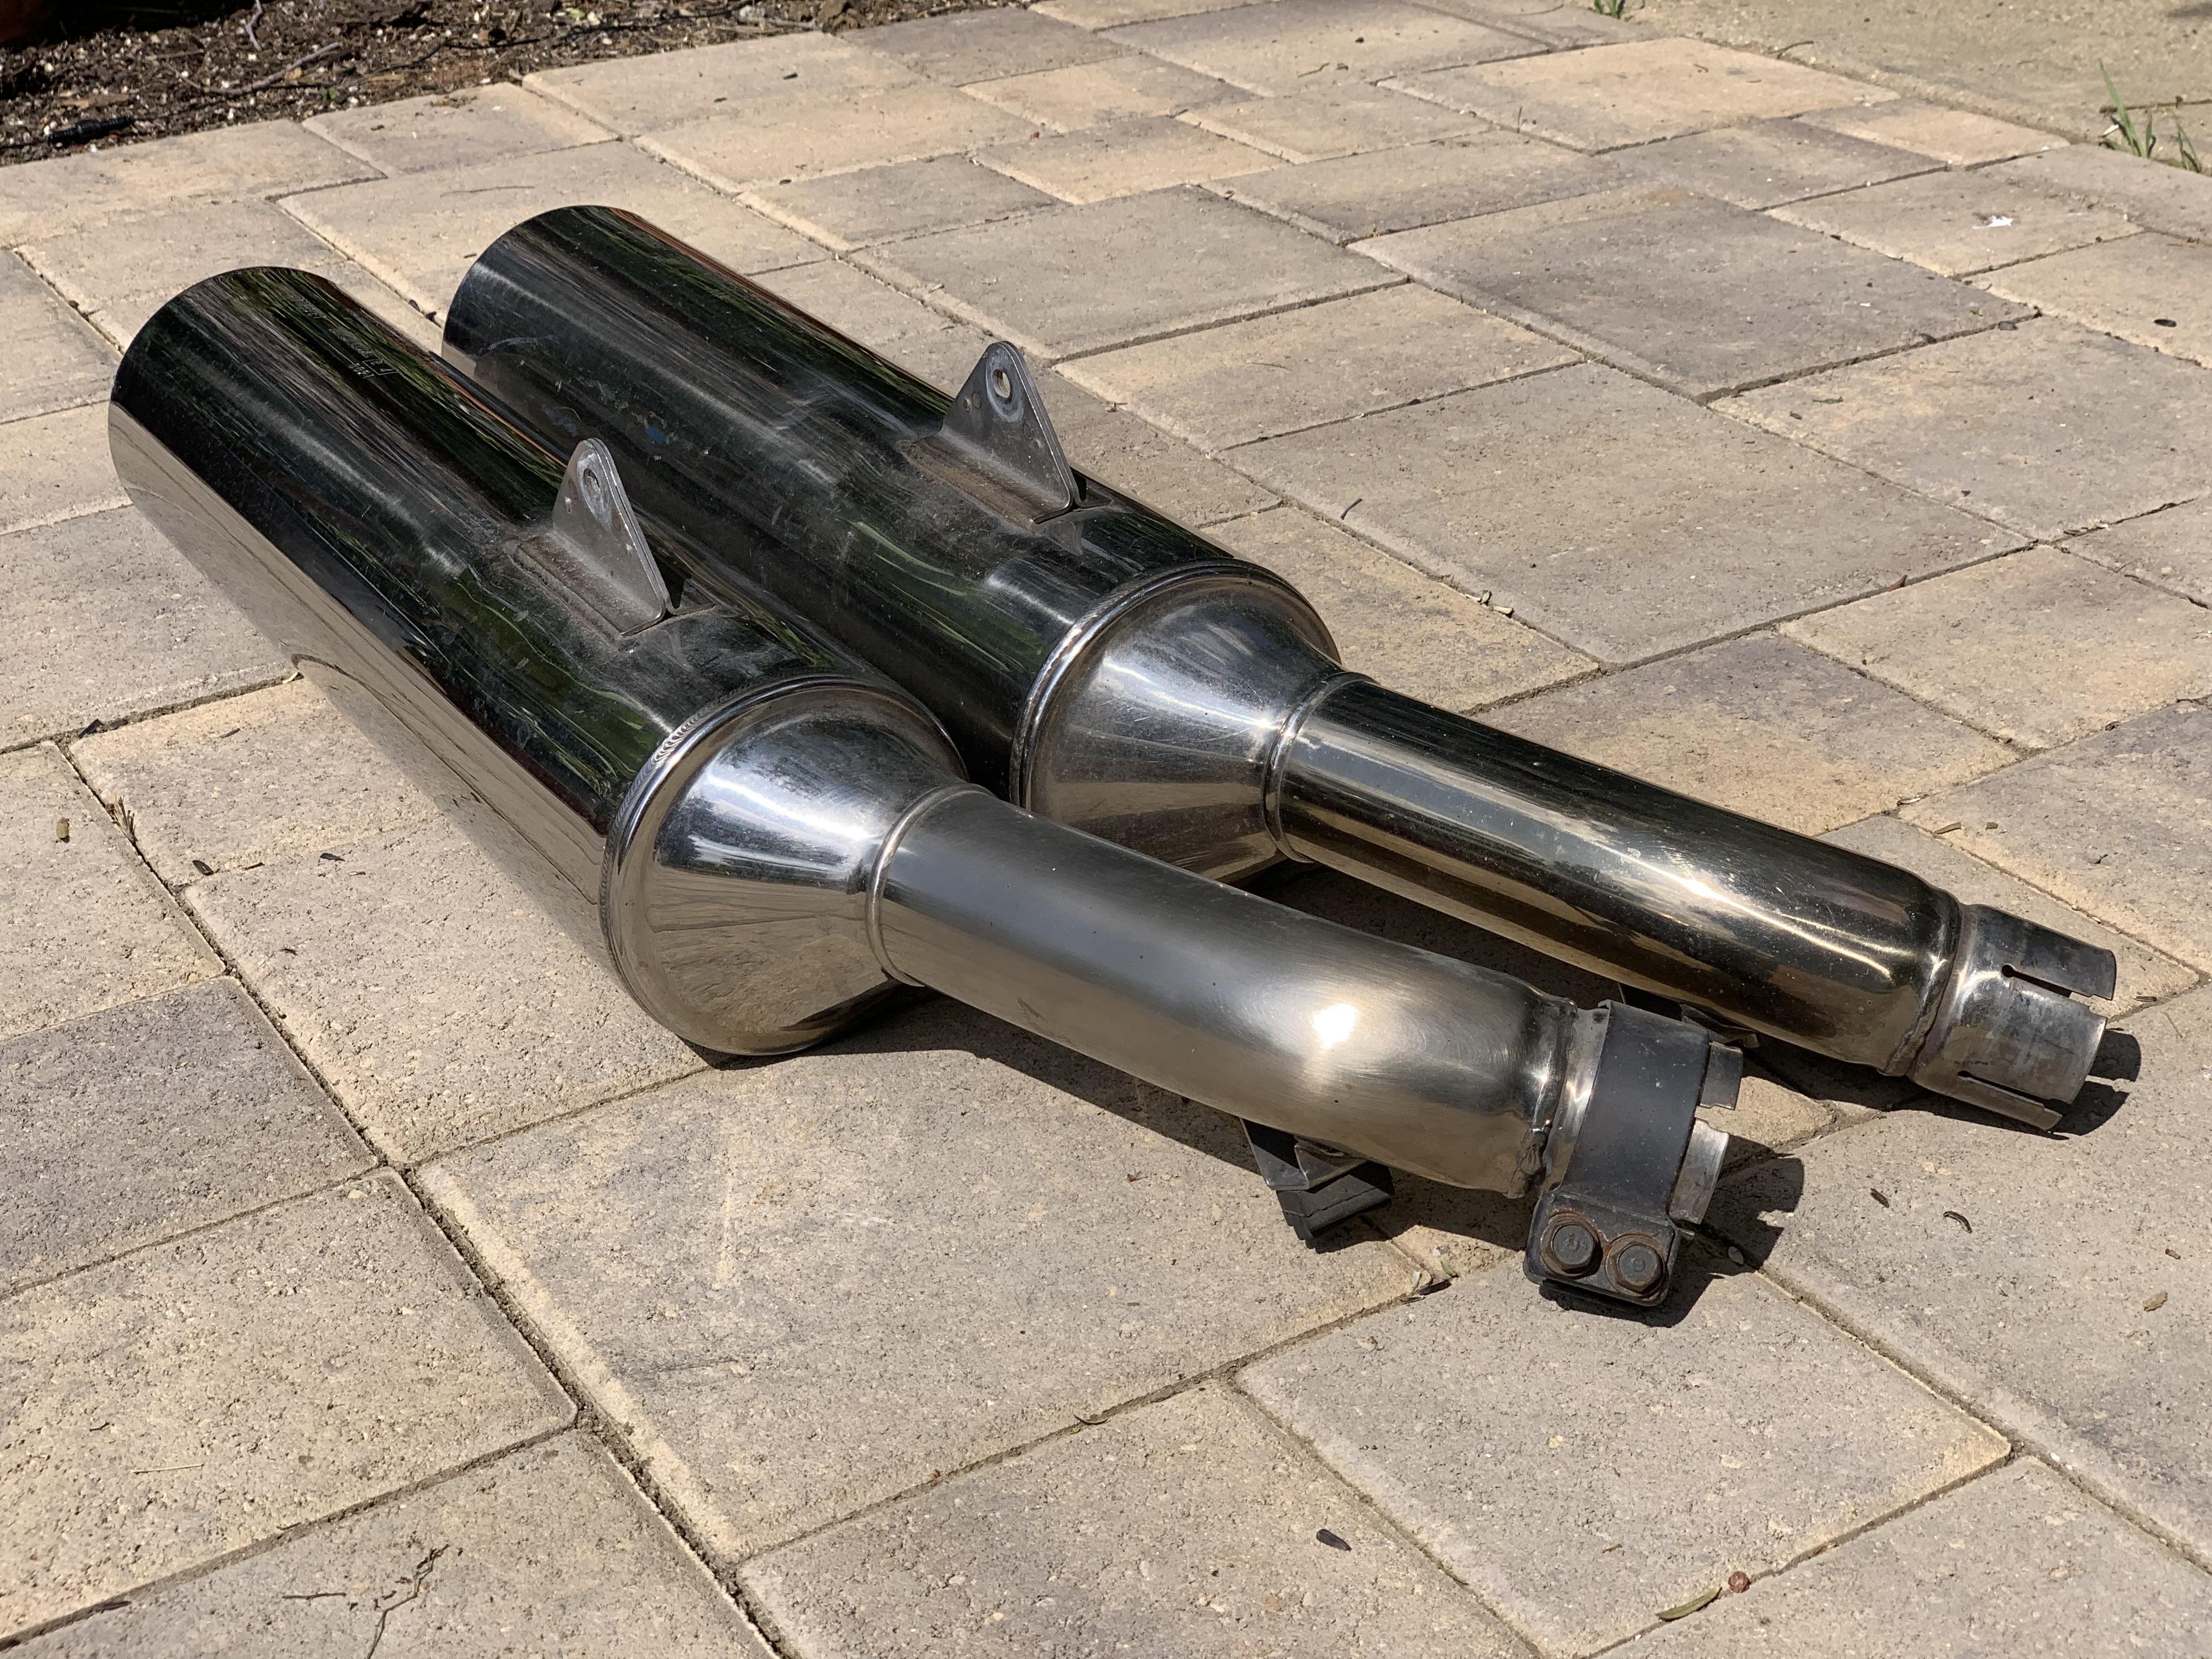
Hello! I have (two…) stock exhaust cans from a 1998 and 1999 VFR800. If anyone out there could use one, I have these available. Located 91304 Southern California. I can keep one as a spare - it’s the second one I am sure I won’t be needing.
-
New 5th/6th/8th gen performance header now in production in USA
omgvfr replied to sfdownhill's topic in Exhaust Systems
Speaking up, for a 99 model. A high mount link pipe is all thats left to find... Edit: found a Remus Grand Prix high mount that fits. 🙂