kaldek
-
Posts
1,317 -
Joined
-
Last visited
-
Days Won
11
Content Type
Forums
Profiles
Gallery
Blogs
Downloads
Events
Everything posted by kaldek
-
 Functional, yet extremely ugly!
 -
You mean my problem? All fixed - new injectors and a dyno tune did the trick.
-
Sorry mate, but the PGM-FI control unit on the VFR just isn't that smart. Only vehicles with the newer OBD-II (Onboard Vehicle Diagnostics) can guarantee such levels of diagnostic capability. Even then, if the problem is not considered an error it won't show up. Having said that, a modern car ECU such as the Blackwood unit used on most Fords has very strong diagnostic capability, mainly due to the O2 sensor. They know what an engine which has no problems should show with regards to the O2 readings and such. In addition, nearly all car ECU systems use a mass air flow sensor for measuring air and therefore appropriate fuelling. Nearly all bikes - with possibly the exception of Ducati - use Manifold Absolute Pressure (MAP) sensors and are essentially an open-loop system (that is, they can't learn or adjust to circumstances outside of their preprogrammed maps). A car with a mass airflow sensor can be practically blueprinted or fitted with hot cams without a re-tune, because these systems measure the airflow and apply the right amount of fuel in accordance, and then take readings from the O2 sensor to make sure they're getting it right. To put it mildly, the VFR O2 sensors are next to useless. They only monitor fuel mixture at a very small window of operation (cruising rpms, less than 25% throttle) and as far as I know, they forget the data as soon as you turn the bike off. It's just not a true closed-loop system, unlike a modern car. The best way to make a 6th-generation VFR run well is to bung on some O2 sensor eliminators, a Powercommander (III or V - either will work), and a custom tune. I just had mine tuned and I told them I didn't give a toss about power, I just wanted smooth throttle response at cruise. And that's what they focused on - the results are pretty darned good too.
-

From the album: Tech Bits
© ©vfdiscussion.com
-
From the album: Tech Bits
© ©vfdiscussion.com
-
Disconnecting the PAIR solenoid does not cause generation of any FI error codes. For reference, neither does disconnecting your flapper valve solenoid; both of these can be disconnected without concern.
-
From the album: Tech Bits
© ©vfdiscussion.com
-
OK I have a ride report for y'all. It's definitely better. Each rider will probably find something different in their mind which makes it better, but for me it's the ability to short-shift easily. I do a lot of short-shifting on my ride to work (take off in first, drop it straight to sixth) and this mod makes it MUCH easier to short shift with smaller lever movements. Previously I used to find that if I didn't mash the gear pedal hard each shift, I'd end up dropping back to the previous gear. You can imagine how annoying that would be when you're trying to short-shift rapidly! With the new softer "cam" profile on the Factory Pro star, once you get past the peak it wants to happily roll into the next gear for you. Lovely! In addition to that, the actual gear change experience is definitely smoother. It "feels" quicker and appears to require less effort to shift. The only question for potential buyers is whether this change is worth the $200USD price tag. For me, it has fixed a long-term annoyance which I probably should have fixed years ago!
-
Job done. See my install guide (on a very dirty bike!) here for double reference!
-
As soon as the weather is dry tomorrow I'll be out there and will update the original post for sure!
-
Yeah, total nonsense. They were trying to say "spin the rear wheel a little bit so you can change gears, because you can't normally change gear when the engine isn't turning the gearbox."
-
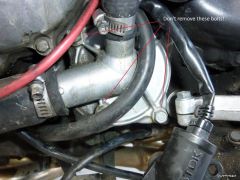
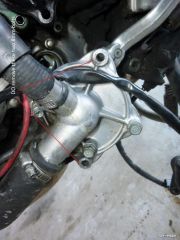
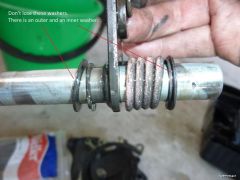
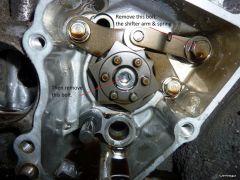
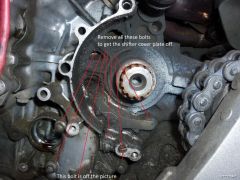
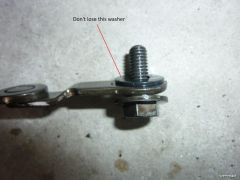
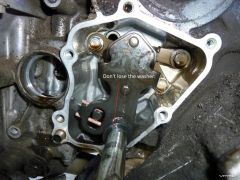
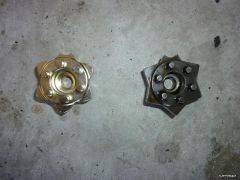
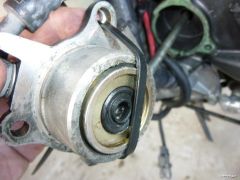
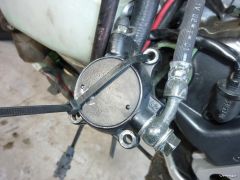
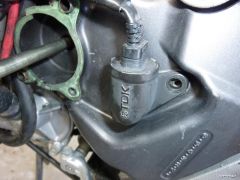
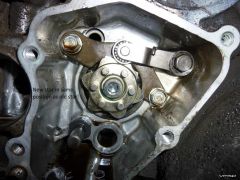
This is a short instructional post on how to install the Factory Pro EVO Shift Star Kit, including the shifter arm and spring and also the shifter Star. The star makes the biggest difference to the shifting experience. :) For any missing pictures from this guide, see the other install guide (only for the shifter arm, not the star) and note that their bike is a lot cleaner than mine!! The kit comes with four pieces: Shifter star Shifter arm Shifter Spring Replacement gasket The kit is designed to provide more positive shifting, reduced dropping from 2nd back to neutral (i.e. missed shifts) and a general more snicky-snicky feel to the gear change. And so without further ado, let's get into it. First up, remove your fairings and drain your oil. No pics for that! After that's done, you need to remove the water pump. You are ONLY removing the two 8mm bolts to do this - don't remove the 10mm bolts because they bolt the pump together! Don't touch these! DO remove these! The water pump simply pulls out away from the bike. You don't need to drain the coolant or anything funky. Just remove it and push it to one side a bit, because all it is attached to now is flexible water hoses. They can take the slight bend no dramas. The ONLY reason we're removing the water pump is to get to a couple more 8mm bolts that hold the shifter mechanism cover in place. Geez!! Once the water pump is off, remove the clutch slave cylinder assembly. After removing the three 8mm bolts, it's a good idea to wrap a zip-tie around the cylinder so you don't accidentally hit the clutch lever and pop the cylinder out! You may want to also use some string or another zip-tie to lift the clutch cylinder out of the way, because it tends to dangle in front of where you will be working. Now we remove the speedo sensor. Two short 8mm bolts, nice and easy. Let the sensor just dangle from its cable. The sprocket cover is next - but I was too stupid to take a picture of that. It's only a few more 8mm bolts though. Once off, you want to put the bike into 1st gear and loosen the sprocket bolt with a 14mm socket. Once that's done, loosen the pinch bolt on the rear axle - you know, the one you use to adjust the chain. Slacken the chain as much as you can, and then remove the front sprocket. Once that's all done, you need to remove the shifter cover plate. It's a lot of bolts! We can now see the shifter mechanism. At this point you need to just gently tug on this until it pops free. Don't lose the two (outer and inner) washers on the shifter though! Note these two washers and don't lose 'em! We now need to remove the bolt that holds on the shifter arm (10mm) and then the 6mm hex bolt which holds the star in place. This bolt is loctited in place so you will feel it "crack" when you loosen it off. Don't worry, the gear drum will only turn a little to the left and then stop securely while you are loosening this bolt NOTE THE CURRENT POSITION OF THE STAR AND DON'T FORGET IT. THE NEW STAR GOES BACK THE SAME WAY. This picture shows FIRST gear, just so you know! Don't lose the washer from the back of the shifter arm - we need to use it on the new one. Here are our new and old shifter stars. Quite a different profile, aren't they! Note that the Factory Pro star only fits one way, using the locating pin which is in the engine already, so it's impossible to get it wrong. Last, we need to install the shifter star and shifter arm. You can do this in either order, but it's probably easier to install the arm first, and then use something strong to push it up and out of the way against spring pressure so you can get the star in place. When installing the star bolt, clean the threads and loctite them first, then torque to spec (24Nm). Make sure the shifter arm is resting on the star in the same position as the original was. It's time now to install the shifter mechanism back into place and temporarily put the gear lever back on. MAKE SURE THE GEAR LEVER FACES rearward, otherwise you will think you have just created a race pattern gearbox and spend twenty minutes wondering how that is even possible... Don't ask how I know this! Temporarily put the front sprocket back on, and tighten up the chain enough to spin the rear wheel and turn the gearbox over. Test going through all the gears - one down, five up. Do it a couple of times until you're confident that neutral is in the right place and the gears are engaging properly. When that's done, install everything in the reverse of disassembly, PUT SOME OIL IN THE ENGINE, and go for a ride! If your water pump doesn't want to fit back easily, it's because the engine has turned over a bit since you remove the pump. You'll need to shine a torch into the hole to see which way the pump driver output shaft is aligned, and then manually turn the water pump's drive shaft to the same alignment. You also may or may not need to replace the shifter cover gasket - certainly mine was in good condition so I just left the original in place.
-
Install pictures for the Factory Pro shifter kit (shifter arm and shifter star/wheel).
-
-

From the album: Factory Pro Shifter Kit
-
From the album: Factory Pro Shifter Kit
-
From the album: Factory Pro Shifter Kit
-
From the album: Factory Pro Shifter Kit
-
From the album: Factory Pro Shifter Kit
-
From the album: Factory Pro Shifter Kit
-
From the album: Factory Pro Shifter Kit
-
From the album: Factory Pro Shifter Kit
-
From the album: Factory Pro Shifter Kit
-
From the album: Factory Pro Shifter Kit
-
From the album: Factory Pro Shifter Kit
-
From the album: Factory Pro Shifter Kit