01VFR
-
Posts
70 -
Joined
-
Last visited
About 01VFR

- Birthday 11/09/1972
01VFR's Achievements
")


-
sample pic
-
-
New 2008 FJR
-
-
I just checked and saw that it is already close....I am going to be in Fl anyways that weekend. I will have to "book" it for next year though! Corey
-
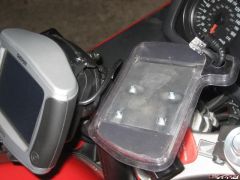
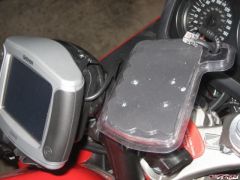
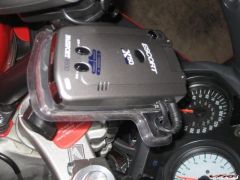
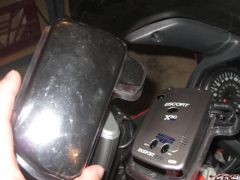
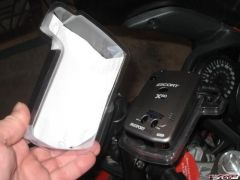
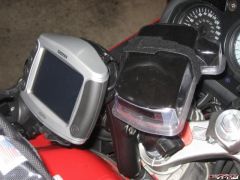
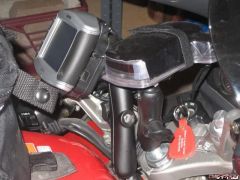
Ram mounts / LegalSpeeding Radar cover
Images added to a gallery album owned by 01VFR in Member's Gallery
Ram mounts / LegalSpeeding Radar cover -
-
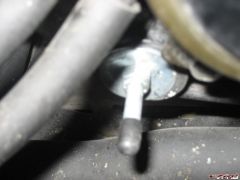
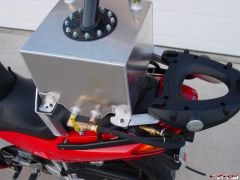
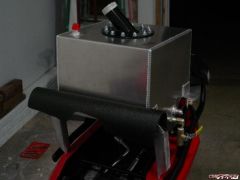
I only put 4 gal in the tank as it is usually on the side stand and there is foam in the tank to avoid sloshing. My bike is bone stock and I could easily go 400 miles on 9 gallons, so I should be able to go 425 or so. I was averaging 44 mpg at interstate + speeds. I need to clarify...It is gravity fed so when the fuel light starts to blink, I pulled the valve and it transfers the fuel from the aux to the main in about 20 min. I never wanted to try to transfer too much otherwise it could ooze out the top of the main tank. Once the fuel light blinks I have plenty of room for 4.5 gal based on history. Also, since I had my tank absolutely dry, I checked to see exactly how much it holds. I always suspected it was more than published...5.8 gal is flush with the metal plate inside the tank with the bike upright. I guess they are dead on... Corey
-
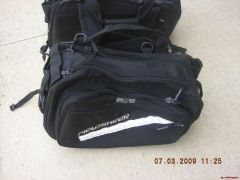
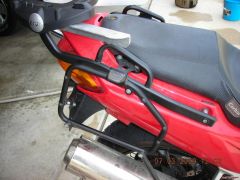
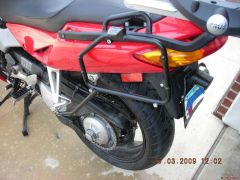
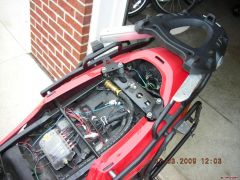
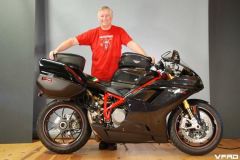
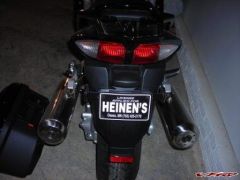
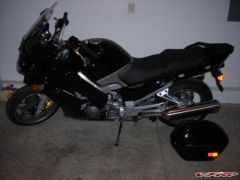
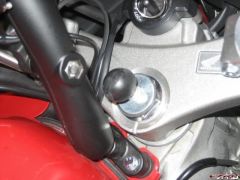
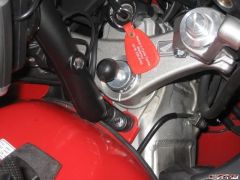
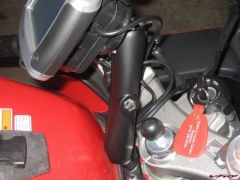
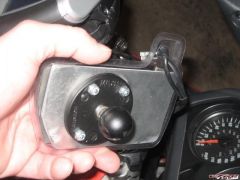
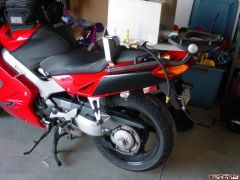
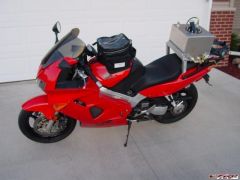
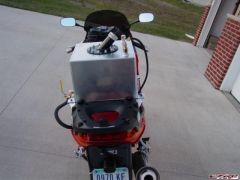
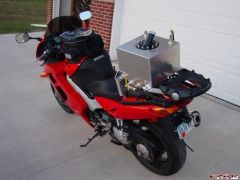
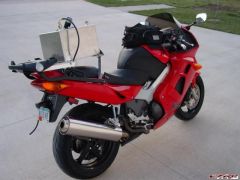
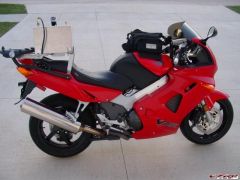
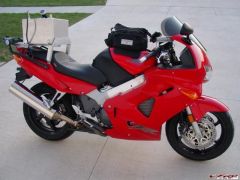
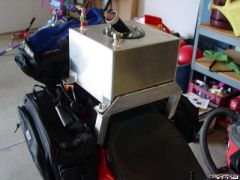
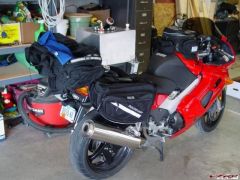
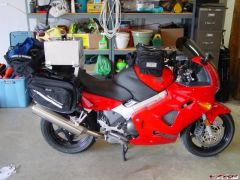
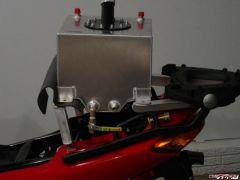
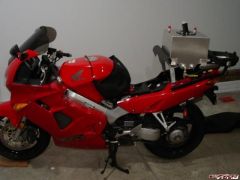
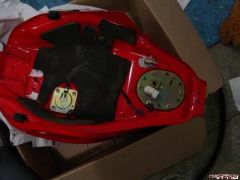
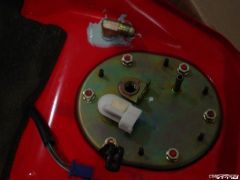
I thought I'd post a brief summary of my installation of an aux fuel cell on my 2001 VFR. But first, I need to thank all the members that have posted here at VFRD as I wouldn't have done this and my other mods without all the how to's and discussions on products. Here goes: It all started in Feb 2006 when I signed up to do the CapeFear1000. It is a 24 hour road rally where you ride within a time period to get photos or receipts of some nature to obtain bonus points (scavanger hunt) and the one with the most points gets braging rights for a year. Well, I thought how tought can it be? 2006's ride was during the aftermath of the hurricanes and there was constant rain for the entire ride. Needless to say, I finished a dismal 44th out of 52 that finished. But I learned a lot and realized that I was the only one on a unmodified bike. Ok, I had throttlemeisters and a corbin, but that was it. Since I was hooked on this type of competition, I knew I needed to step up and start improving my bike. The 2 biggest problems with doing a road rally is finding your location efficently and minimizing your stopped time. I knew that I would need to have GPS if I were to be efficient at locating the bonus locations (especially in the dark). But how would I improve on minimizing my stopped time? It seemed that I had to get fuel quite often since I could go only 200-210 miles on one tank. Most IBA riders have aux fuel cells to go at least the 350 miles without refueling. I really only needed an additional 4 gal to get to the 350 mark. So off to Ebay I go...I watched forever and finally saw a 5 gal RCI tank available for a steal at $100 delivered. Bought it. Then how to mount it? I heard that Mark Kiecker had an aux fuel cell on his 2000 and he sent me some pictures of his mount. He integrated the rear mount to attach to his Givi topcase mount. I thought this was a good idea as I wanted to minimize the cutting of my bike. Again Ebay was the answer and $90 later I have a Givi topcase mount. I then picked up some 1 1/2" angled alum that was 3/16" thick. 2 short pieces where sandwiched between the Givi mount and the Givi top plate. These would serve as the back supports for the tank. Then I decided a larger piece of angle alum would serve as the front support of the tank and I would use square tubing to support the frame via the slots for the solo seat cover and frankenbolts. Once the fitment was tested, I sent it to a buddy who did custom welding and presto - a beautiful front support to my RCI tank. It cost about $20 for the alum and $30 for the welding. Finally I put a thin layer of tool drawer liner between the tank and the mount to reduce vibration. Four bolts later, the tank was mounted securely to the bike. Now I needed to run the fuel line to the main tank. Mark had indicated in his email to "bung" the tank and you'll be set. I was originally hoping to go thru the fuel pump cover and avoid drilling thru the tank itself as it would be cheaper to replace that plate than the whole tank...after draining the fuel tank, I took out the fuel pump and notice that there was absolutely no space available to go thru the fuel pump cover. By now I was heavily invested in the project, both financially and mentally and decided to bung the tank. I set the tank back on the bike and determined that the best place to have a bulkhead come out was on the left side about the same location as the fuel pump. It seemed there was a level spot on the tank to put it there. The necessities were a uni-bit and a lot of patience. I had already obtained a 90 degree bulkhead fitting from the custom hose shop I was working with. I first drilled a pilot hole with a standard drill bit. I took a styrofoam coffee cup and cut the top 2 inches off and held inside the tank where I drilled to catch the metal flakes. I would recommend having an assistant as this became very tedious work for one. Then I drilled the hole using the uni-bit. It was a very slow process. Going too fast could tear the metal tank and then you would be SOL. I put a piece of tape around the layer of the uni-bit to make sure I did not go too big. I checked the fitment several times until it I drilled enought to be snug. There was a small lip that needed to be filed off of the inside. Then I gooped up the hole with a product called Gasolina. It is a gas safe sealant that we use on generator fuel tanks at work. I put on a wide brass washer and loctite'd the nut on the bulkhead fitting. Once dry, it was good to go. I added a new seal and re-inserted the fuel pump assembly and tightened down per specs. I added the fuel line and routed along the left side of the frame under the seat and came out with the fuel line where the grab rails should be. Then I added a quick disconnect and ran the fuel line to the valve that I had already fitted to the tank. The fuel line and fittings totalled $65. The only things left were a vent line and a ground for the tank. Rules stated that you needed to have a vent line that would not all fuel to potential get on the exhaust or rear tire. I chose to route mine on the opposite side at the grab rail, under the seat and down towards the license plate. The hose I had, had a natural curve to it so I pointed the curve away from the license plate and used some twist ties to hold in place. The ground was simply a wire that I bolted to the tank and had a quick disconnect on that ran under the seat and to my BlueSea Fuse box. I started this project around Christmas with limited time to work on it. I finished 2 days before the 2007 CapeFear 1000 and hadn't even tested it tank. It was either going to work or not. As I hoped, it worked flawlessly. Due to this and other great web pages, I was able to add a aux fuel cell, blue sea fuse box, garmin zumo 550, passport 8500 x50, starcom1 advance and 2 ram mounts all without any real testing. All worked perfectly and as a result I finished 25th out of 80 riders in this years Capefear1000. I have plenty of other mods to come thanks to this great website (dual star grip warmers-Thanks Trace, peg lowering from LBS, and genmars.) My goal for next year will be Top 10. Here are some pictures of my mods. You can see more pictures at my album. I will also send more info or pictures if anyone else is interested in something specific. Thanks, Corey
-
Mods
-