Grum
-
Posts
3,820 -
Joined
-
Last visited
-
Days Won
119
Content Type
Forums
Profiles
Gallery
Blogs
Downloads
Events
Everything posted by Grum
-
Yep, make sure that the brake switch wires/contacts are in no way touching anything metal, eg brake master cylinder or handle bar. This will blow that Fuse! Carefully check this. And, because its happening without touching the brake lever it would have to be the Black/Red wire of the Brake Switch that was shorting to frame. Failing a brake switch wire short, you will need to measure the short to frame with an ohmeter at the Fuse Load Side terminal, then start removing items hanging off the fuse until the short indication hopefully disappears. Good Luck.
-
Absolutely.......... Loss of this Fuse means No Kill Switch Power = A dead Engine Stop Relay and No power for the Starter Relay and all the EFI stuff. It also messes with Starter Inhibitor Relays 1 and 2 screwing your Neutral Light. And because your ECM is now unpowered there can be No Gear Selection readout, equals just a dash just as you have. And no Fuel Pump prime. Have You in any way altered the angle of the Front Brake Switch assy OR fitted after market Brake levers?
-
Ok you have at least found the problem, a short somewhere. Give me some time to have a good look at the diagram. Do you have a multimeter, or a few spare 10amp fuses?
-
Ok lets hope it was just a random fuse fail. See what happens with a replacement. Good Luck.
-
Ok, now Check the Start/Horn/Stop 10amp Fuse in the Left side Fuse Box, is it Blown?
-
OK. Have you confirmed BOTH Fuses in the Sarter Relay are definetly good, Main Fuse A 30amp and Fi Fuse 20amp.?
-
Again IS the Kill Switch set To RUN, its easily overlooked? And can you physically confim you are in Neutral gear?
-

He was a valued member, a great friend and I will miss him!
Grum replied to Duc2V4's topic in OTHER Motorcycle Talk (non vfr)
Really horrible, so sad to hear this. My heart goes out to all of you who knew Lance, family and friends. Obviously an extremely well liked and respected gentleman. Certainly drives home the reality of our own fragility, ride safe everyone. Sincere Condolences to all. R.I.P Lance. -
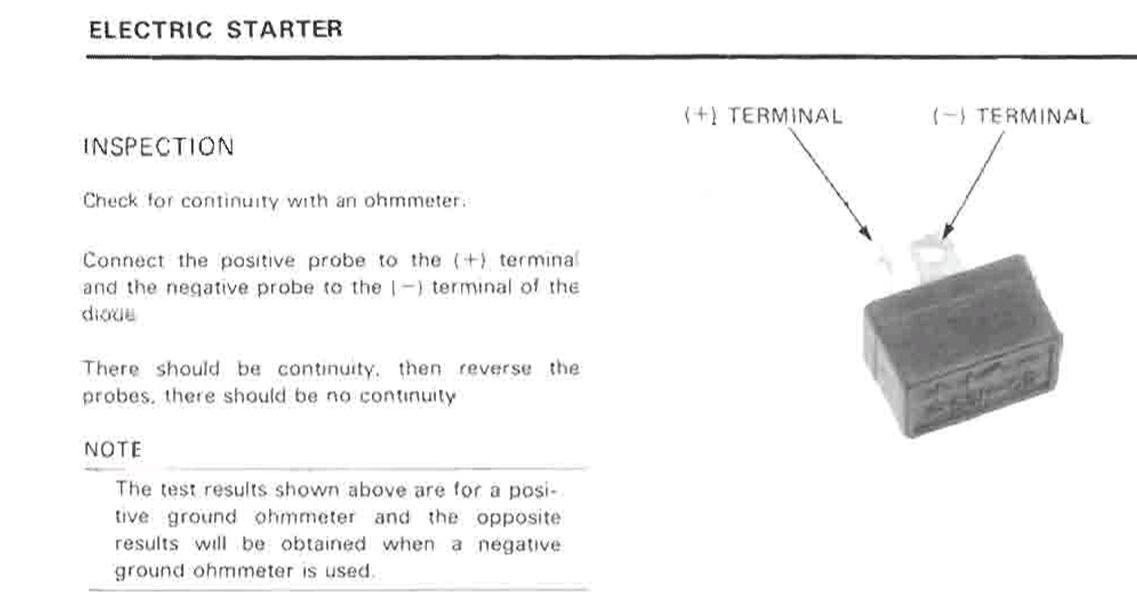
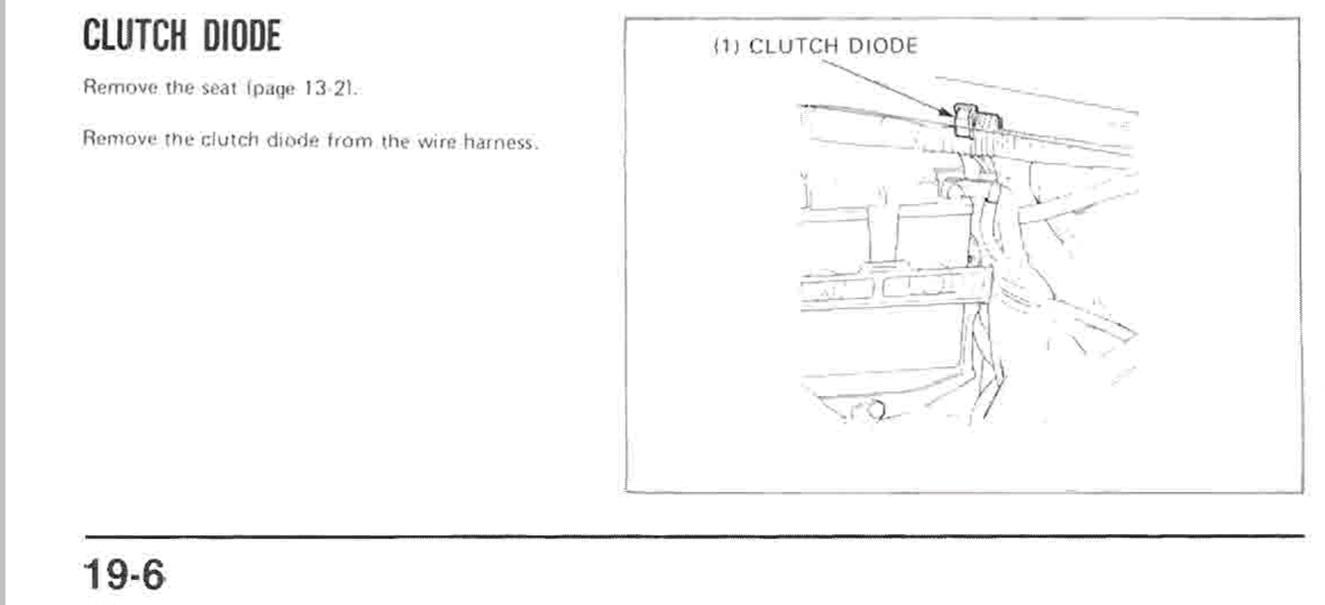
Hi Paco. Further to the good advice from the Captain. Absolutley make sure you are working with a healthy Battery and your battery terminals are clean and tight. Assume you are NOT hearing the Starter Relay clicking when you Press the Starter Switch? You should measure 12v on the Yellow/Red wire at the Starter Relay every time you press the Starter Switch with Ignition to On, measure this, what do you read? If this is good then you need to verify the Ground path being the Green/Red wire, through the Clutch Diode then through the Neutral Switch to Ground. refer above Starting Circuit Diagram. Concentrate on getting your Neutral Light and a Neutral start working. Refer to the Starting Circuit Diagram the Captain supplied above. 1. Verify the Neutral Switch operation - Are you able to unplug the wiring directly at the Switch? If so put your meter into Buzzer or lowest Ohms range. Preferably place the Black meter lead on the battery Negative and the other lead on the Neutral Switch terminal. Go from In Gear to Neutral many times - make sure you have Continuity/Zero Ohms whenever you are In Neutral and NO Continuity when In Gear. 2. Using the diagram the Captain supplied, reconnect the Neutral Switch wiring and locate the Light/Green wire at the Clutch Diodes (see attached picture for Diode location). While in Neutral probe this wire again making sure you have Continuity to Ground on the wire. 3. Measure both Clutch Diode these work like One Way Valves, allowing current flow in One direction only. Select Diode mode on your meter, place the Black lead on the Light/Green wire junction then place the other lead probing the other two ends of the diodes you should measure current flow, reversing the leads should show NO current flow. Given the problem you're having you'd be looking for an Open Circuit Diode = No current flow in either direction. See how you go with these tests to start with.

-
How old is your battery? First and foremost make sure your Battery is fully charged and healthy, any doubts, charge it and have it load checked, any good Automotive parts store will load check it for free. Battery terminal voltage is NOT a true indication of battery Capacity - it's ability to deliver plenty of cranking amps when starting. Also make sure the battery terminals are Clean and Tight. Just curious, is your Neutral Light working? And, does the engine crank over with the SideStand UP and Clutch Pulled In? And.........is the Kill Switch set to RUN? Let's know how you get on.
-
The ECM has no feedback of Fuel Pump ops, flow or pressure. Provided the ECM sees the appropriate cranking pulses, and the enable logic as previously mentioned, as well as no active fault codes, power and grounds all good, then it should be firing the injectors you would think....!
-
For the injectors and most likley the Ignition coils to be enabled the ECM MUST see a Ground at either B10 for a Neutral gear start (from the Neutral Switch) OR a Ground at B21 from the Sidestand UP while riding. If neither Ground is detected = Dead Engine. So, while in Neutral, make sure you measure a Ground at B10 of the ECM. Note - the Neutral Ground goes through one of the Clutch Diodes before reaching the ECM. Verify that you measure a Ground at B21 a Green/White wire, with the Sidestand UP. Might be worth giving both ECM plugs a good spray of electrical contact cleaner something like CRC 2-26. Assume you have fresh fuel, a healthy charged battery and both battery terminals are clean and tight! Ignition Switch to On. Make sure you are measuring battery voltage, a solid 12v, at the Black/White wire of the Injectors and Ignition Coils as well as B8 of the ECM. Try starting the bike with Sidestand UP does this make any difference? Remove the Spark Plugs. What state are they in? If they are wet, then you may have an over rich flooded no start situation. Check that you are getting a good Spark. If you're intending on replacing the plugs (worth doing), try the NGK Iridium CR9EHIX-9 type. Another thing worth checking is the FPR Fuel Pressure Regulator. Check it's vacuum hose, make sure it's dry and no fuel dripping from the FPR, any sign of fuel will mean a ruptured diaphragm in the FPR, dumping excessive fuel via the vacuum hose into cylinders 3 and 4. Have you downloaded the Service Manual?
-
???!!! Are you working with a wiring diagram of your bike???? You've stated twice your Starter Motor is working fine. Now you're saying all four Starter Relay contacts are shorted. If that was the case you'd Blow the Main Fuse instantly or destroy your Clutch Diode, and your Starter would never work? Doesn't make sense to me! Very easy to test the Starter Switch. With Ignition to On you should measure 12v at the Yellow/Red wire of the Starter Relay Every time you press the Start Switch.
-
Doesn't make sense that your Starter Switch is "moody" when you say "pressing the switch causes normal Starter Motor operation".
-
"Still have high temps" ? While the bike sits stationary idling? In stop/start traffic? All Normal. These bikes rely heavily on good coolish airflow through the radiators to maintain a constant temp of around 76 to 80 degC with an ambient temp of around 25degC or lower, on hotter days engine temperature will also rise. With a cold engine feel the upper radiator return hose at the neck. Start the engine, at around 76 to 80 deg you should notice the hose temperature rapidly rise. This will indicate both thermostat and water pump operation. Not sure if there is any way of checking it but perhaps fitting a new Radiator Cap might be worth doing, and I wouldn't trust that damaged hose you have!
-
Once burped. Top up the Reserve Tank, don't worry about overfillig it, the system will either draw back what it needs or any excess will be simply dumped overboard via the reserve tank overflow hose. just keep an eye on the Reserve Tank level, top up if needed, but the level should settle down after a ride or two. I'd be a little concerned about the hose burnt by the header pipe, needs sorting out! As Terry mentioned make sure your cooling fan is kicking in when it should. Download the Service Manual from this site if you don't already have one, link attached. Service Manual, 6th Gen 2002+ VTEC, with bookmarks, new cover & OCR https://www.vfrdiscussion.com/index.php?/files/file/150-service-manual-6th-gen-2002-vtec-with-bookmarks-new-cover-ocr/
-
8th gen speed indication fault and ABS not working.
Grum replied to Theunis's topic in Eighth Generation VFR's
Interesting Partzilla (Honda Parts website), are specifying the -306 as a replacement for the ABS model. However, in 2016 my Instrument Panel was replaced under Warranty due to condensation forming under the faceplate. I have found the documents for the replacement panel and the Part Number fitted was a 37100-MJM-D11. So definitely go with that one. Note - All Australian 8gens have ABS and Traction control. -
8th gen speed indication fault and ABS not working.
Grum replied to Theunis's topic in Eighth Generation VFR's
The answer is above! You need to fit the correct Instrument Panel Part No. 37100-MJM-306. -
Not much detail in your fault description! - Are your tire pressures correct? - ABS is sensitive to battery status, is your battery and charging system good? - Are you saying that the ABS light remains On once bike speed is above 6mph? - Any physical damage to either of the Pulser Rings? - Are all four ABS fuses good? - Have you gone through the Service Manual for fault code checking? - Could the "work done" have effected ABS wiring and connections? - Was the issue there prior to work done? - What new sensor? Front or Rear? Did it have a fault code for the sensor? - Are the Sensor to Pulser Ring air gaps correct? - Have you checked all the ABS connections and connectors are clean and making good contact?
-
Hi Rick. I have a Red 2014 and have confirmed the Part No. Stamped on the actual cowl is 77281-MJM-D000. However its replacement Part No. is the 77283-MJM-D00ZC and the Pearl White being the D00ZA. While Partzilla are stating the starting numbers of 77283............ for both White or Red for the 2014 8gen. I can only suggest that as long as its the Pearl White that either a starting number of 77281 Or 77283 won't matter, no guarantee!
-
And if all of the above doesn't work check the dreaded Orange Ground block, its the main cause of many strange Ground faults.
-
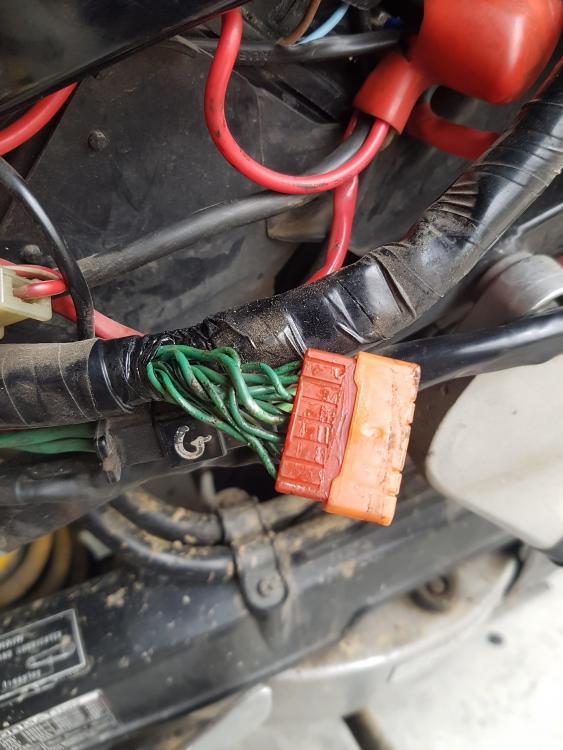
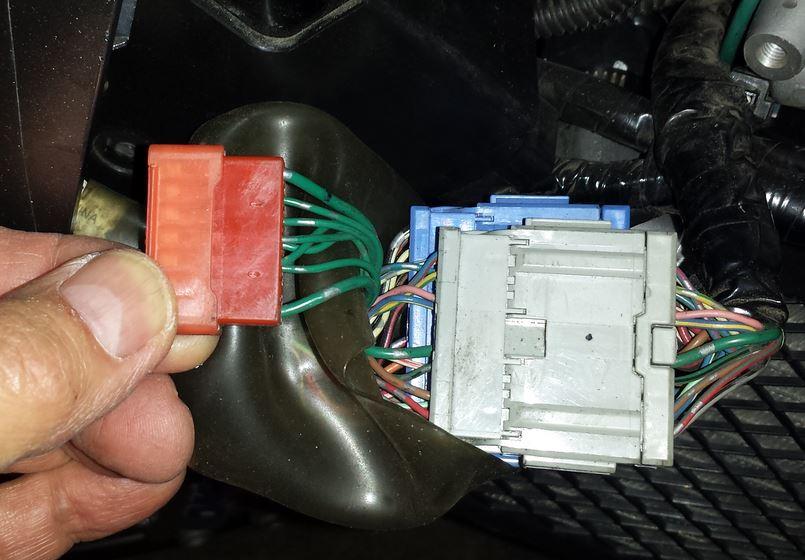
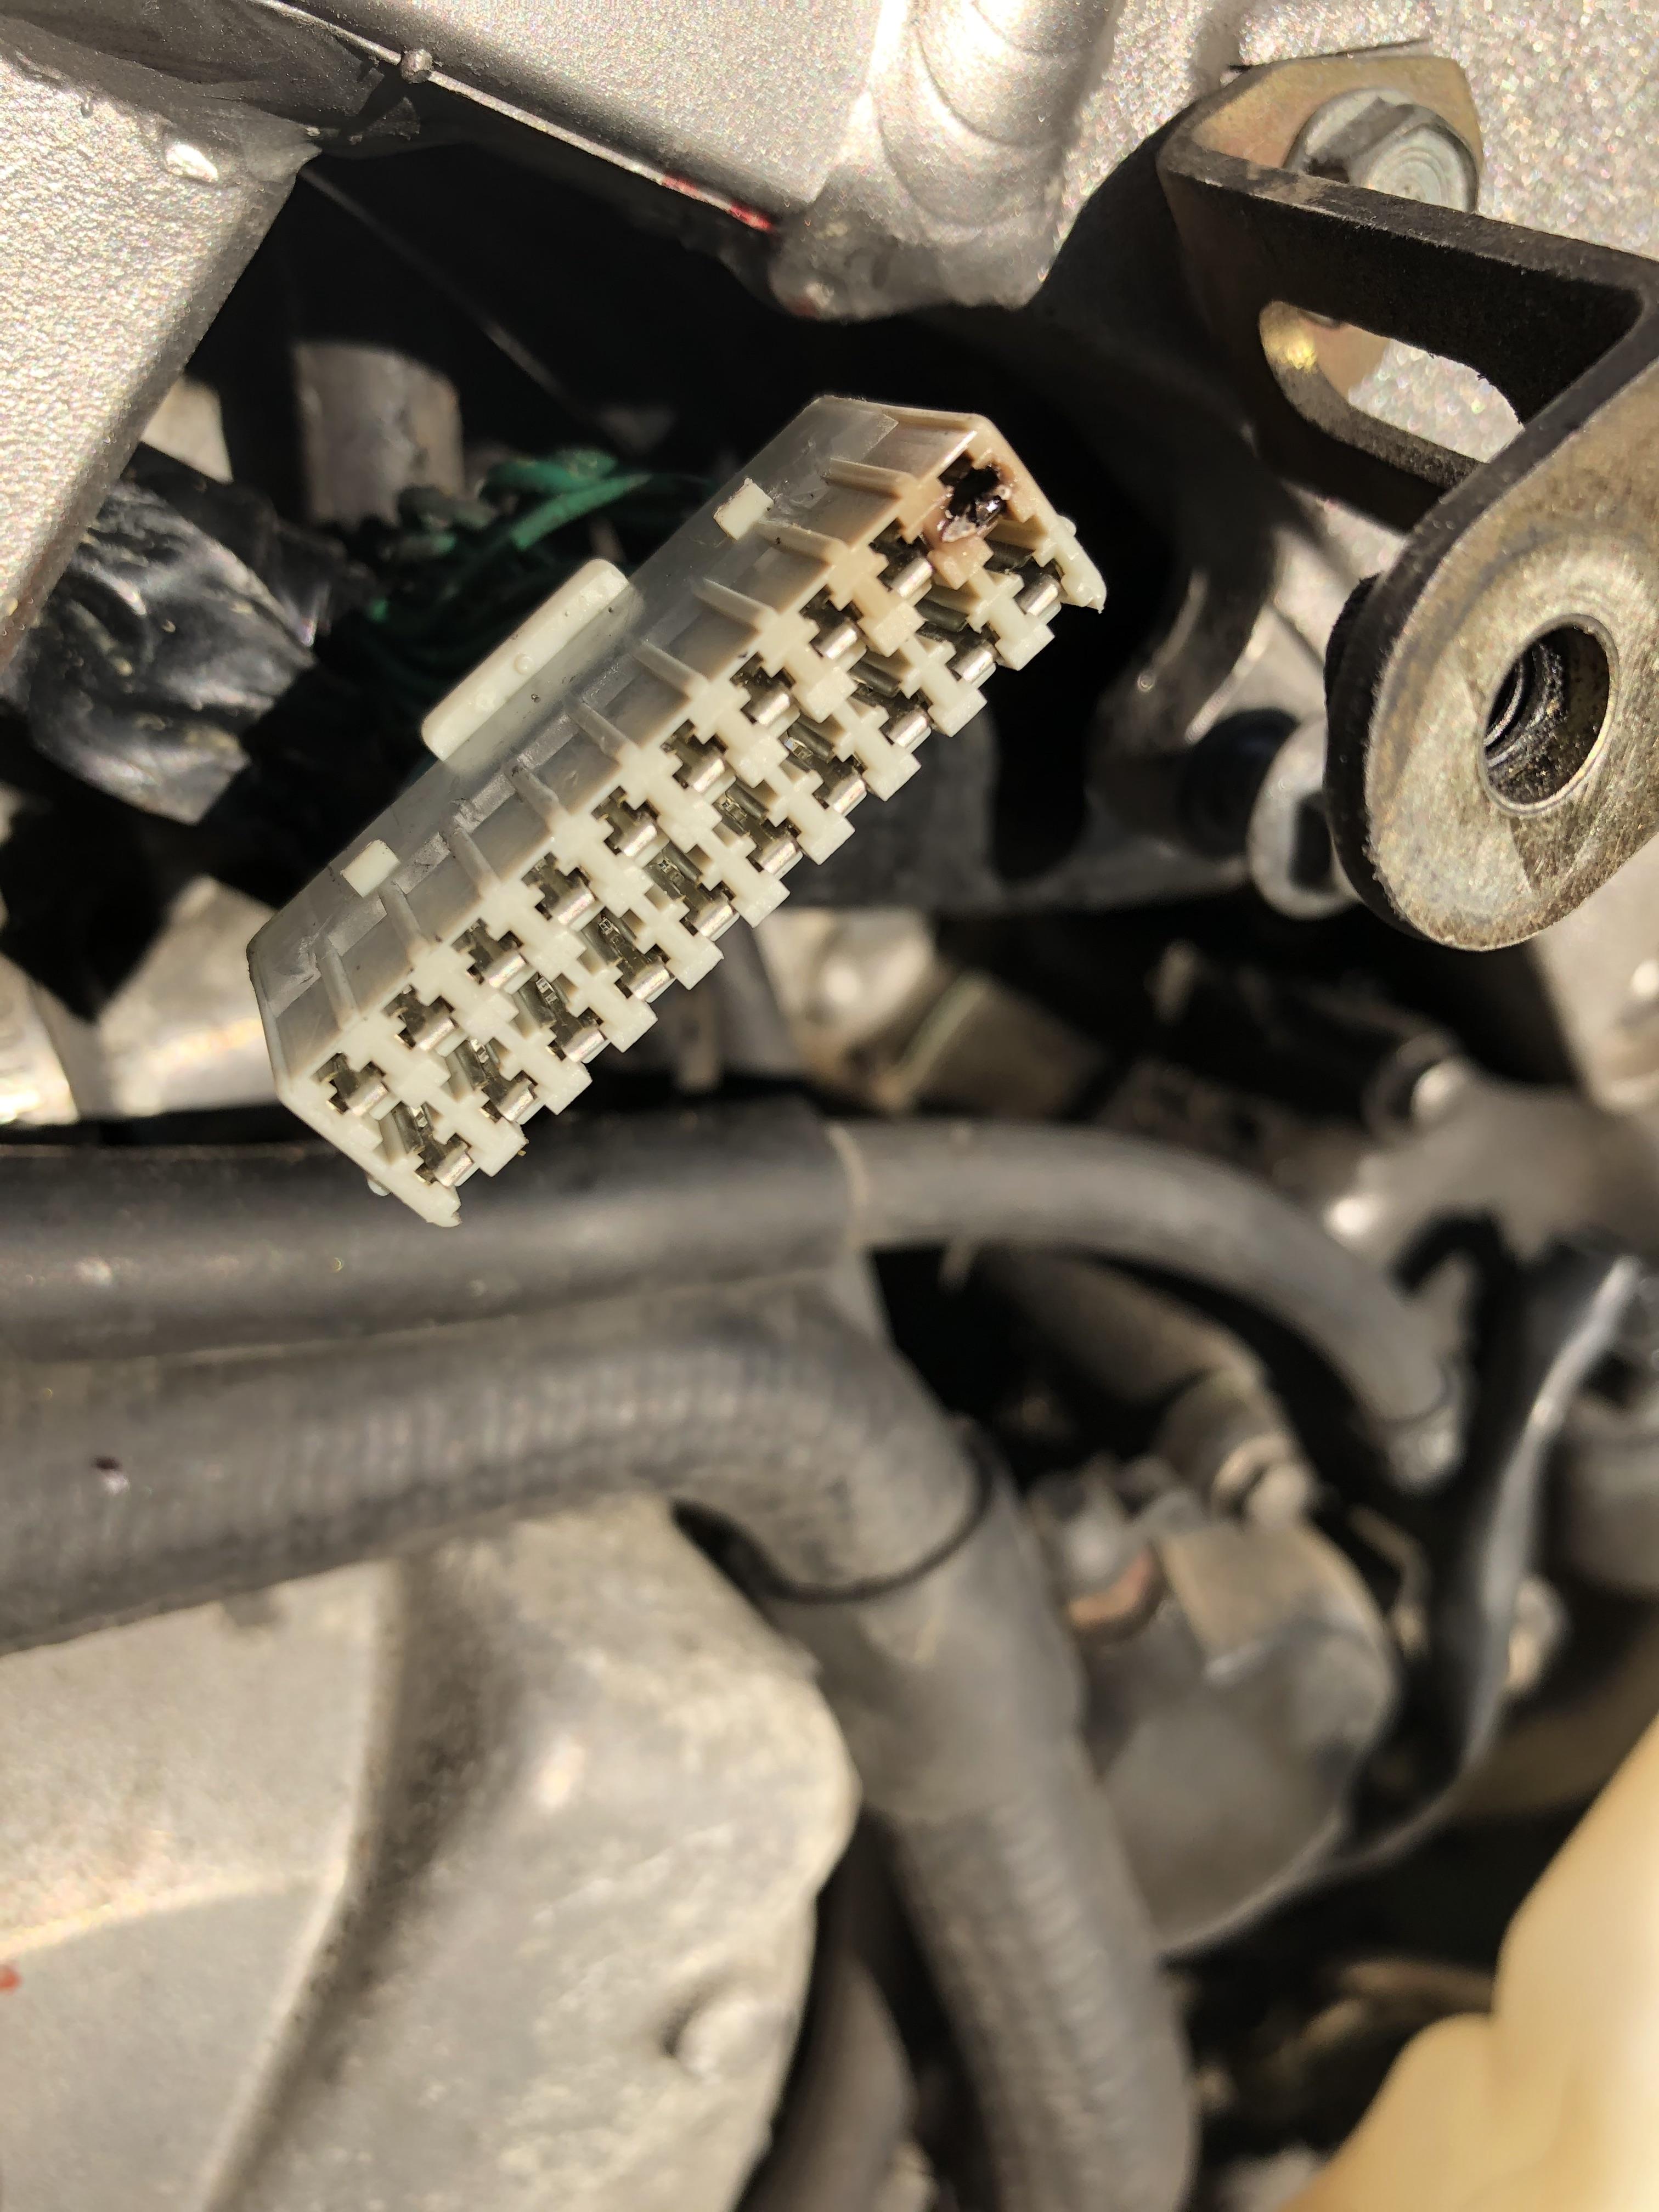
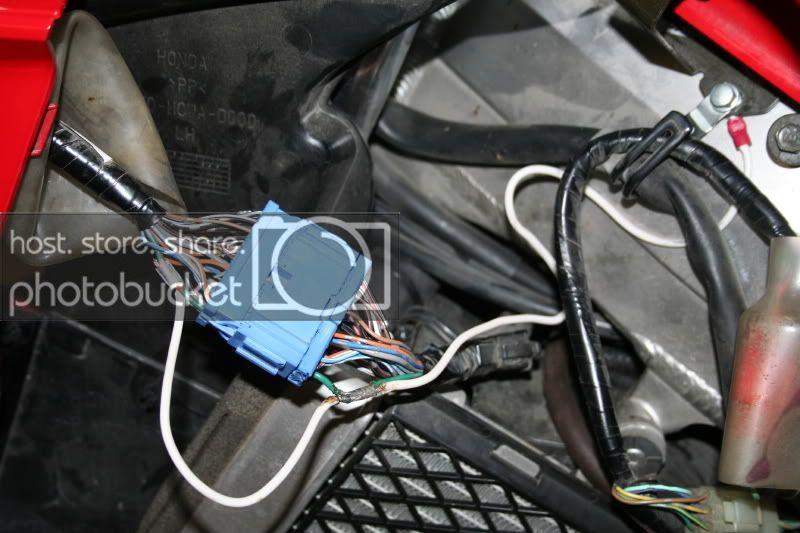
Sounds like you may have already found the cause! A poor/high resistance joint, or damage to the Ground wire. Try clipping your voltmeter Black lead to the battery Negative, switch On your Ignition and measure the Ground you say you are loosing, if you're measuring a voltage then you've confirmed a bad Ground, definitely causing Ignitors 3 and 4 to fail. Perhaps as bmart mentioned a rodent has had a wire nibble, worth checking for any damaged wires. Without any visable damage, the difficulty is locating just where the Ground issue might be. It might require running a new Ground wire for the two Igniters. Or similar to the 5th gen Orange ground block the 6gen will have them as well. Here's where three different Ground blocks exist on various 6gen versions. See what you can locate on yours! These blocks are multiple Ground junctions and can develop burnt joints and poor connections causing various systems to become intermittent or complete failures. - Yellow one located behind the front cowl in the harness left side of the bike. - Orange one located behind the 18P Blue connector just above the left radiator - Gray one located in the harness just behind the Coolant Reserve Tank. Good Luck let's know how you get on.
-
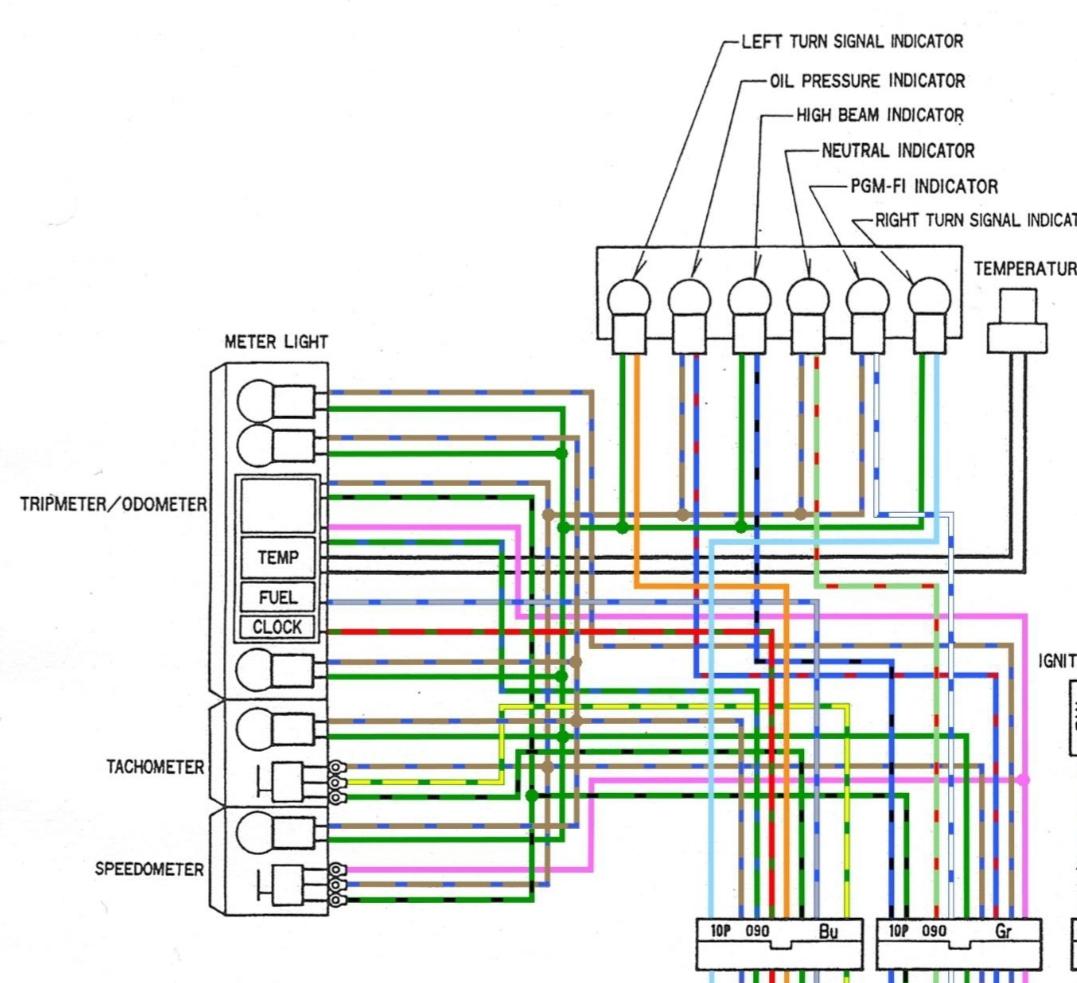
And while you're doing as vfrgiving suggested. Both Tacho and Speedo share the same power source and ground source. So make sure at the mounting screws for both instruments you measure a good ground which goes back to the Green/Black wire, and 12v that goes back to the Brown/Blue wire and to Fuse G 10amp. Check for any corrosion on the PCB copper tracks. Refer partial drawing attached.
-
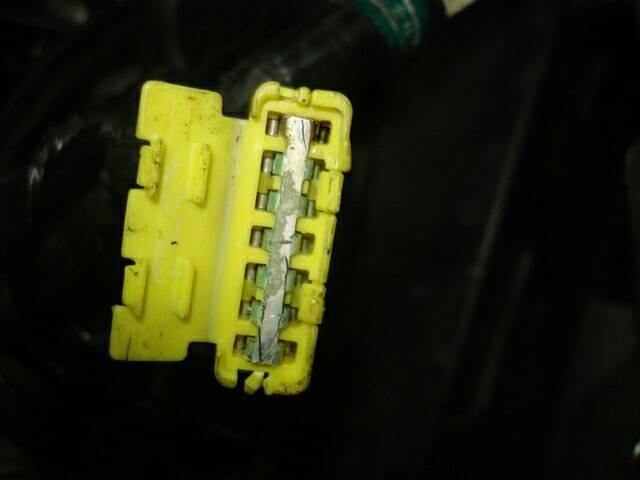
With all those various items not working, it sounds like you have a Ground issue. Check the yellow ground block (if it has one!) taped into the wire harness, located front left side of the bike. Make sure all pins and sockets are clean, no sign of oxidization or burnt connection. May require cutting the block out and soldering all of the wires together. Also check the Green ground wire going through the 18P Blue connector, located just above the left side radiator. See attached pictures. Make sure that any Ground wire has solid continuity, (virtually zero ohms) back to the battery Negative. Make sure that with power on, Ground wires have ZERO Voltage on them with respect to the battery Negative, voltage detected on a Ground wire means it's not properly Grounded. Good Luck.
-
CRY FOR HELP! Bike only sparking on cylinder #2. Electrical?
Grum replied to TdotVFR800's topic in Sixth Generation VFR's
How about a CRY FOR ANSWERS!....... Have you had any luck fixing your bike. Some follow up on the cause would be extremely beneficial to ALL of us.